

Page 1

Can Opener
Model No. CO2061-V
'!
Care & Instruction Manual
For household and indoor use only
Please read these instructions before use and retain for
ISSUE 1 29/6/2017
future reference
1
Page 2

Electrical safety
You should only plug the appliance into a 220V‐240V AC, 50Hz
Switch off and unplug when not in use and before assembling,
Keep the appliance and its cord out of reach of children less than
Do not allow children to use the appliance without supervision.
This appliance can be used by children aged from 8 years and
Keep motor housing, cable and plug and appliance dry and away
Do not pull on the cable to disconnect from mains supply.
Do not operate the appliance if damaged or after it malfunctions.
This appliance must be positioned so that the plug is accessible
This appliance is intended exclusively for use in domestic
Do not leave unattended during use.
The cutting blade is sharp, take care when handling or removing
Cut edges of the can and lid will be sharp. Take care when
Never try to open cans that are under pressure (e.g. aerosol cans)
This appliance can cause personal injury if misused.
supply. Connecting it to other power sources may damage the
appliance and will invalidate the guarantee.
cleaning or dismantling the appliance.
8 years.
above and persons with reduced physical, sensory or mental
capabilities or lack of experience and knowledge if they have
been given supervision or instruction concerning use of the
appliance in a safe way and understand the hazards involved.
Children shall not play with the appliance. Cleaning and user
maintenance shall not be made by children unless they are older
than 8 and supervised.
from areas where it is likely to get splashed. Never immerse in
water.
In the event the supply cord is damaged, in order to avoid a
hazard it must only be replaced by a qualified service engineer,
with a suitably approved part.
and the plug socket is within easy reach of the power cord.
Warning!
households. It is not suitable for commercial use.
from the opener for cleaning.
handling.
with this opener.
ISSUE 1 29/6/2017
2
Page 3
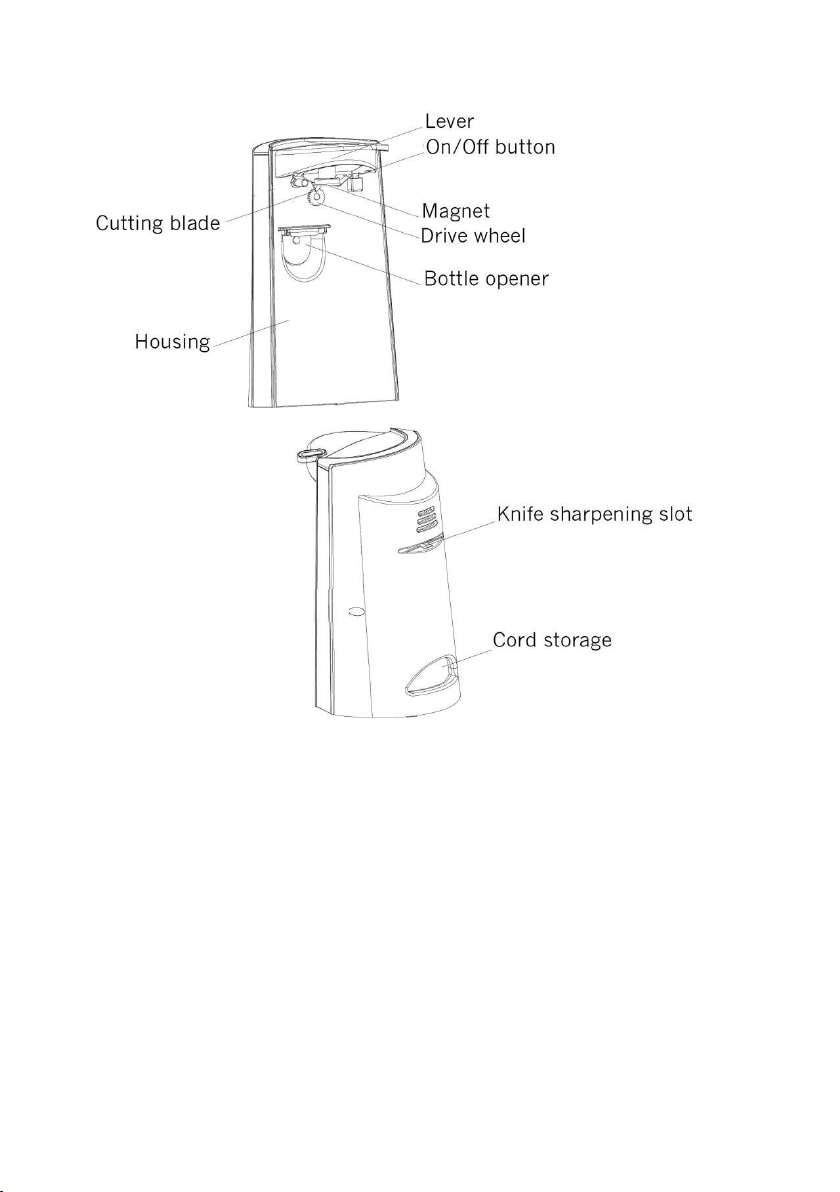
Parts
1. Fit the lever onto the body of the can opener (fig.1)
2. Place the can opener on a stable, flat surface and clean
3. Lift the lever (fig. 2) and position the can so that the lower edge
To use– opening cans
thoroughly before use. Plug in and switch the power on at the
mains.
of the can lip rests on top of the drive wheel and the cutting
blade is on the inside of the can lip as shown in fig. 3.
ISSUE 1 29/6/2017
3
Page 4

4. Lower the lever firmly so that the cutting blade pierces the lid
this will start the can opener working automatically and the can
5. When the can is fully open the can opener will stop.
6. Open cans for a maximum of 1 minute of continuous use.
7. The cut edge of the can and the lid will be sharp. Take care not to
8. The can opener can be stopped at any time by lifting the lever,
This can opener is suitable for opening round rimmed cans with
The can opener is not suitable for opening rimless, aluminum,
Badly dented cans may cause the opener to stall. If this happens
To open a can that has become jammed, hold the can, lift the
will rotate. It is not necessary to hold the lever or the can during
operation.
touch either when removing the can and the lid from the opener.
Hold the can, lift the lever and remove the can from the opener.
The lid of the can will be retained by the magnet.
removing the plug or switching off at the mains.
Notes:
maximum dimensions - height 175mm, diameter 50 - 100mm,
weight 0.6kg. For cans above 0.5kg, the top of the opener will
need to be stabilized with one hand.
pressurized cans, cans with angled corners, or cans that are
designed to be opened by another method (e.g. pull tab, peel off,
rolling key etc.).
grasp the can and manually guide it through the cutter until the
damaged area has been passed.
lever and release the can. Restart the cutting procedure again on
a new place on the can.
ISSUE 1 29/6/2017
4
Page 5

To use – opening bottles
1. Place the can opener on a stable,
2. Hold the body of the bottle and
3. Push the lower part of the bottle in
Not suitable for removing screw
1. Place the can opener on a stable,
2. Hold the top of the can opener
3. Insert the heel of the clean knife to
Keep hands away from the sharp edge of knife at all times.
Not suitable for sharpening serrated, hollow ground or ceramic
Fig. 5
Fig. 4
flat surface near to the edge of a
work surface.
position with the cap underneath
the top edge of the bottle opener
(fig. 4). With your spare hand
steady the top of the can opener.
a downwards direction to lever the
metal cap off the bottle.
Notes:
caps.
To use – knife sharpener
flat surface with the can opener
sideways to your body.
with one hand.
be sharpened into the groove (fig.
5) at the rear of the opener and
with a light pressure, pull the
handle of the knife so that the
length of the blade passes through
the sharpener. Repeat a further
four to five times on each side of
the knife.
Notes:
knives or scissors.
ISSUE 1 29/6/2017
5
Page 6

Cleaning
1. Switch off and unplug the can opener from the mains.
2. Lift the lever and gently pull the assembly away from the opener.
3. The blade assembly can be washed in hot water with a little
4. Wipe the drive wheel and the outside of the can opener body
5. Allow all surfaces to fully dry before using the can opener again.
6. To refit the blade assembly, reverse the above procedure.
Fig. 7
Fig. 8
Clean the blade assembly after each use.
washing up liquid. NOT SUITABLE FOR DISHWASHERS. Dry
immediately to prevent rusting.
with a damp (not wet) dishcloth soaked in washing up water. Do
not use detergents or abrasives as these may scratch the surface
and never immerse in water.
Technical specification
Rated voltage 220-240V AC 50Hz
Power consumption 60W
Class rating 2 (double insulated)
BS 1362 fuse 3A
ISSUE 1 29/6/2017
6
Page 7

Plug / Wiring advice
The BLUE wire must be connected to
the terminal marked with the letter N
The BROWN wire must be connected to
the terminal marked with the letter L
If you encounter any problems
with this product please call our
customer care team on
0345 640 30 30
Produced in China for
Argos Limited,
489 – 499 Avebury Boulevard
Central Milton Keynes
MK9 2NW. UK.
The wires in this mains lead are coloured in accordance with the
following UK electrical code: BLUE = NEUTRAL
BROWN = LIVE
Non-rewireable plug
This appliance may be fitted with a “non‐rewireable” plug. If you
need to change the fuse in a “non‐rewireable” plug, the fuse cover
must be refitted. If the fuse cover is lost or damaged, the appliance
must not be used.
Rewireable plug
The colours of the wires in the mains lead of this appliance may not
correspond with the coloured markings identifying the terminals in a
rewireable plug. Rewireable plugs should only be replaced by a
suitably competent person. If in doubt, consult a qualified
electrician.
Recycling electrical products
This marking indicates that this product should not be
disposed with other household wastes throughout the EU. To
prevent possible harm to the environment or human health
from uncontrolled waste disposal, recycle it responsibly to
promote the sustainable reuse of material resources. To return
your used device, please use the return and collection systems
or contact the retailer where the product was purchased. They
can take this product for environmental safe recycling.
ISSUE 1 29/6/2017
7
Page 8

ISSUE 1 29/6/2017
8
 Loading...