

Page 1
Mini Chopper
Model No. CH1115A
Care & Instruction Manual
For household and indoor use only
Please read these instructions before use and retain for
future reference
ISSUE-1 8/8/2017 1
Page 2

Electrical safety
You should only plug the appliance into a 220V‐240V AC, 50Hz
supply. Connecting it to other power sources may damage the
appliance and will invalidate the guarantee.
Switch off and unplug when not in use and before cleaning the
appliance.
This appliance shall not be used by children. Keep the appliance
and its cord out of reach of children.
This appliance can be used by persons with reduced physical,
sensory or mental capabilities or lack of experience and
knowledge if they have been given supervision or instruction
concerning use of the appliance in a safe way and understand
the hazards involved.
Children shall not play with the appliance.
Keep motor housing, cable, and plug dry and away from areas
where it is likely to get splashed. Never immerse in water.
Do not pull on the cable to disconnect from the mains supply.
Do not operate the appliance if damaged or after it malfunctions.
In the event the supply cord is damaged, in order to avoid a
hazard it must only be replaced by a qualified service engineer,
with a suitably approved part.
This appliance must be positioned so that the plug is accessible
and the plug socket is within easy reach of the power cord.
Do not cover or block the ventilation holes.
ISSUE-1 8/8/2017 2
Page 3
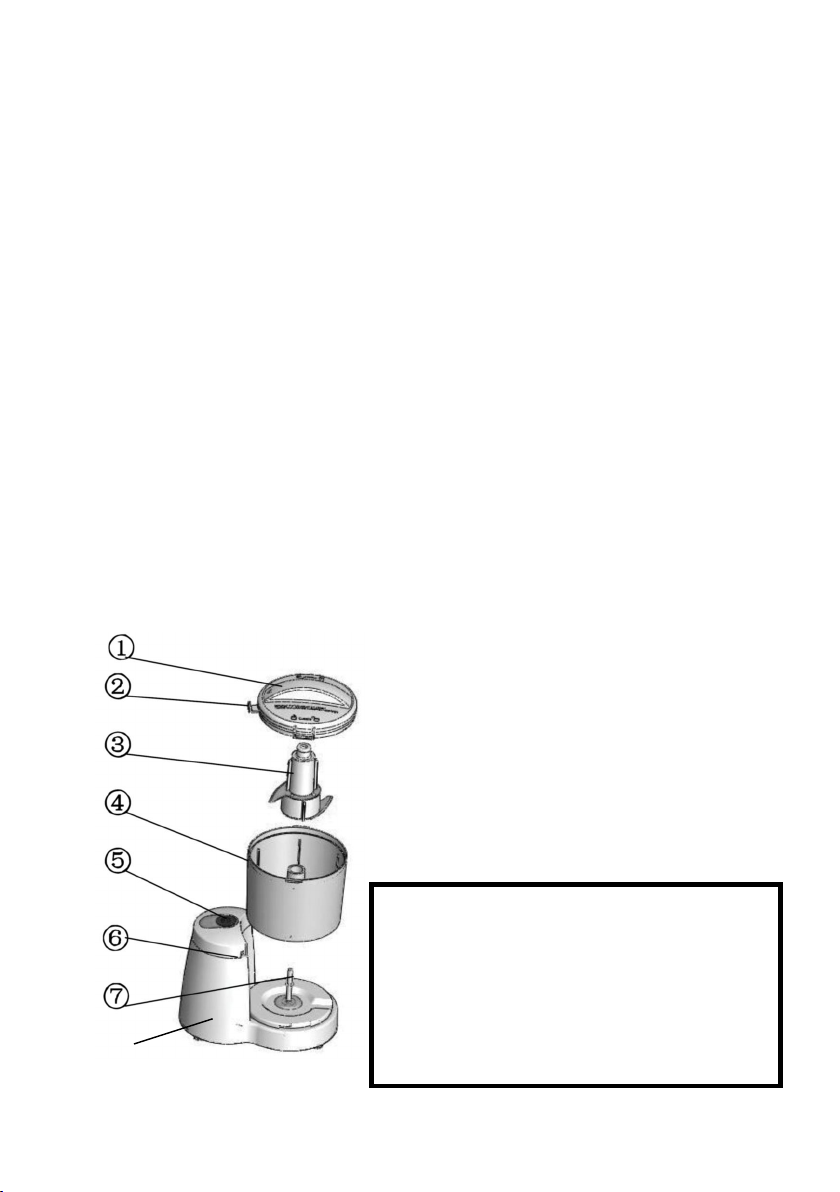
1. Lid
Warning!
This appliance is intended exclusively for use in domestic
households. It is not suitable for commercial use.
Always unplug the motor housing of the mini chopper if
unattended and before assembling, disassembling or cleaning.
Only use with the parts supplied and fully assembled.
The mini chopper blades are sharp, take care when emptying the
bowl and cleaning.
Never use hot liquids in the mini chopper, always allow liquids to
cool to room temperature before blending.
Do not leave unattended during use.
Do not exceed the quantities shown in the guideline table.
Never place hands or utensils inside the bowl whilst the chopper
is in use. Only use a scraper / spatula when the mini chopper is
not in operation.
Do not attempt to operate the mini chopper without the
protective cover and bowl in place.
Do not cover the mini chopper and allow the motor housing to
cool fully before storing.
This appliance can cause personal injury if misused.
Parts
ISSUE-1 8/8/2017 3
2. Lid locking tab
3. Blade assembly
4. Bowl
5. On/Off button
6. Lid locking slot
7. Drive shaft
8. Motor housing
IMPORTANT:
Your mini chopper is equipped
with a safety feature, where the
blades will not operate unless
the chopper lid and chopper
bowl are both correctly engaged.
Page 4

To use
1. Dismantle and clean thoroughly before first use – see cleaning
section.
2. Place the motor housing on a stable, flat surface.
3. Fit the bowl over the draft shaft and onto the motor housing
stand. Twist the bowl clockwise until the lugs on the base are
engaged with the grooves in the stand.
4. Carefully remove the plastic blade guard and place the blade
assembly onto the drive shaft.
5. Prepare the food to be chopped (see maximum quantities and
size of pieces in table below) and place into the bowl on top of
the blades. Do not exceed the maximum quantity shown.
6. Position the lid locking tab next to the locking slot and fit the lid
onto the bowl. Twist the lid clockwise until the locking tab is fully
engaged. If the bowl is not correctly locked the mini chopper will
not work.
7. Do not use without the lid in place.
8. Fully unwind the mini chopper cable and plug in.
9. Press down on the ON / OFF button to start the chopper. Chop
for a maximum of 60 seconds. If further chopping is required,
wait a few seconds before restarting.
10. To switch off, release the button and allow the blade to come to a
complete stop before checking the fineness of the chop. If
satisfactory, unlock the lid and remove the bowl from the motor
housing.
11. After using the chopper for 3 x 60 second cycles, a short rest
interval (e.g. 2 minutes) is required before using the chopper
again.
12. After a total of 3 x 60 second cycles, the chopper should be
rested for 20 minutes.
13. To stop or interrupt the chopping process, release the button or
turn off at the mains.
Note:
Do not run the chopper empty (without the blade covered by
food).
If using to chop fruit and vegetables, remove the skins, peel or
stones and cut into small pieces before chopping. It may be
necessary to add some water when chopping vegetables or fruit.
ISSUE-1 8/8/2017 4
Page 5

Food
Max quantity
Approx size
Nuts
100g
Fresh herbs
30g
Hard cheese
80g
15 x 15
Garlic cloves
150g
Onion
150g
15 x 15
Meat
150g
15 x 15
Hard vegetables (e.g.
100g
15 x 15
Guideline quantity
The table below is a guide to the maximum quantity of these items
that should be chopped at any one time. Do not overfill the mini
chopper. Most foods will only require 15 seconds to chop.
(mm)
carrots)
Cleaning
Clean the mini chopper after each use.
1. Switch off and unplug.
2. Twist the lid anti clockwise and remove from the bowl. Carefully
lift out the blade assembly and then twist the bowl anticlockwise
to remove it from the stand.
3. Wipe the outside of the motor housing with a damp cloth; do not
use detergent or abrasives as these may scratch the surface.
Never immerse the motor housing, cable or plug in water.
4. Wash the blade assembly and other loose parts in hot water with
a little washing up liquid. Rinse and wipe dry. Not suitable for
dishwashers.
Technical specification
Rated voltage 220-240V AC 50/60Hz
Power consumption 120W
Class rating 2 (double insulated)
BS 1362 fuse 3A
ISSUE-1 8/8/2017 5
Page 6

Plug / Wiring advice
The wires in this mains lead are coloured in accordance with the
following UK electrical code: BLUE = NEUTRAL
BROWN = LIVE
Non-rewireable plug
This appliance may be fitted with a “non‐rewireable” plug. If you
need to change the fuse in a “non‐rewireable” plug, the fuse cover
must be refitted. If the fuse cover is lost or damaged, the appliance
must not be used.
Rewireable plug
The colours of the wires in the mains lead of this appliance may not
correspond with the coloured markings identifying the terminals in a
rewireable plug. Rewireable plugs should only be replaced by a
suitably competent person. If in doubt, consult a qualified
electrician.
The BLUE wire must be connected to
the terminal marked with the letter N
The BROWN wire must be connected to
the terminal marked with the letter L
Recycling electrical products
This marking indicates that this product should not be
disposed with other household wastes throughout the EU. To
prevent possible harm to the environment or human health
from uncontrolled waste disposal, recycle it responsibly to
promote the sustainable reuse of material resources. To return
your used device, please use the return and collection systems
or contact the retailer where the product was purchased. They
can take this product for environmental safe recycling.
Produced in China for Argos Limited,
489 – 499 Avebury Boulevard
Central Milton Keynes
MK9 2NW, UK
ISSUE-1 8/8/2017 6
Page 7
ISSUE-1 8/8/2017 7
 Loading...