

Page 1
2 SLICE T O ASTER
INSTRUCTION MANUAL
Page 2

IMPORTANT SAFETY WARNINGS
Read all the instructions carefully before using.
To protect against electric shock, do not immerse the toaster in
water or any other liquid.
Never leave the toaster unattended while in use.
Never insert metal objects into toasting slots to avoid hazard.
Never attempt to remove bread that has become jammed in the
toasting slots without fi rst removing plug from socket.
Extra care and supervision must be taken when using the
appliance near children or when being used by children.
Keep the power cord away from hot surface.
Bread may burn. Therefore toaster must not be used near or
below curtains and other combustible materials. They must be
watched.
Never attempt to touch the internal parts with knife or sharp tool
as it may cause damage to heating elemen ts.
If your toaster is dropped, it should not be used until examined by
an authorized service center.
If the supply cord is damaged, it must be replaced by the
manufacturer, its service agent or similarly qualified persons in
order to avoid a hazard.
The toaster is intended for household use only.
This appliance is not intended for use by persons (including
children) with reduced physical, sensory or mental capabilities, or
lack of experience and knowledge, unless they have been given
supervision or instruction concerning use of the appliances by a
person responsible for their safety.
Children should be supervised to ensure that they do not play with
the appliance.
Please retain this instruction manual for further reference.
1
Page 3
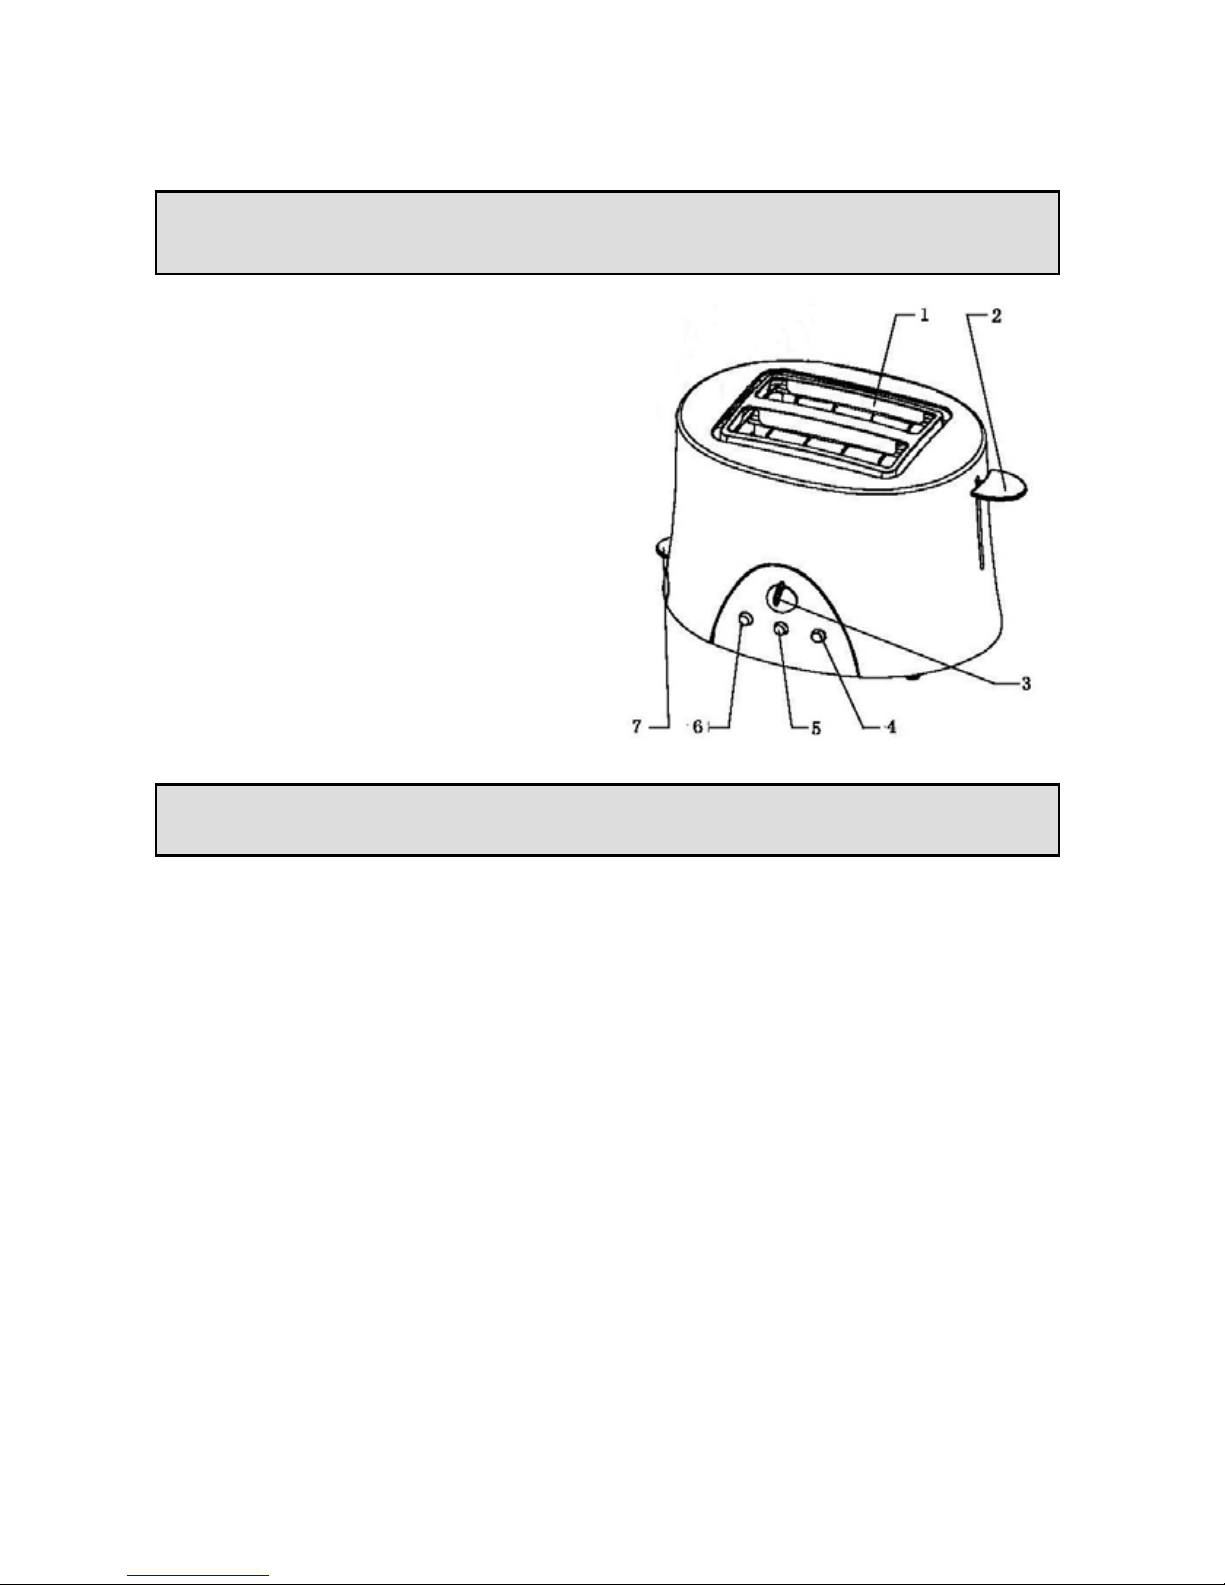
PRODUCT DESCRIPTION
1. Toasting slots
2. Loading lever
3. Browning control
4. Reheat button
5. Cancel button
6. Defrost button
7. Removable crumb tray
Always operate this product on a flat horizontal su rface.
LOCATION
Do not operate under or near curtains or other combustible
materials. Do not place under cupboards or close to a wall as
scorching of wall or cupboard may occur.
After selecting appropriate location, carefully lay toaster down on
protected flat surface to avoid scratching.
Lay out power cord to desired length and secure excess power cord
on underside of toaster.
2
Page 4

BEFORE USING YOUR TOASTER
Before using your toaster for the first time, set the browning knob at
maximum setting and activate the toaster without bread for two times.
This will prevent the unpleasant smells when toasting bread.
USING YOUR TOASTER
Select the desired browning setting, from No.1 to No.7 on the
browning control knob. (No.1-lightest, No.7-darkest).
When using the toaster for the first ti
me we suggest you toast on
number 3. Varying types of bread and personal preference may
require different browning setting.
Press the loading lever down until it clicks into place. Toasting
cycle will automatically commence.
Please note: if the toaster is not plugged in and swit
ched on at the
power point the loading lever will not click into place.
The toaster turns off when the desired toast color is achieved and
automatically raises the toast. The toasting process can be stopped
at any time by pressing the cancel button.
In the unlikely even t that the bread or crumpet beco mes jammed,
switch the toaster off at the power outlet, remove the plug from
the supply socket and carefully ease the bread out of the toaster,
ensuring that you do not damage the element.
TOASTING FROZEN BREAD
To toast frozen bread, place the bread into the bread slots and
select the desired browning setting. Press the loading lever down
until it clicks into place then press the Frozen Button.
3
Page 5

REHEATING TOAST
The toaster allows yo u to reheat toast with out additional toas ting.
To reheat, place toast into bread slots, lower the loading lever
until it clicks into place and press the Reheat Button.
HINTS
If the toast is too dark, use a lower toast setting.
Dry bread will require a lower setting than normal.
Thick bread, fresh or whole wheat bread will require a higher
setting than normal.
Remove any loose fruit before toasting to prevent pieces falling
into the toaster or sticking to the heating element and cause
damage.
Never force bread into the toasting slot. Bread should fit freely
between the bread guards.
Uneven toasting is usually due to bread slices of uneven
thickness.
CLEANING
Before cleaning ensure power is switched off at mains and plug
has been removed.
Wait until your toaster has cooled down completely before
cleaning.
Clean the outer surface with a soft damp cloth only.
It is important that crumbs are not allowed to build up inside the
base of the toaster.
Crumbs can be removed by simply sliding out the crumb tray at
the bottom of the toaster. You can then tip the crumbs out.
4
Page 6

CONNECTION TO POWER
Before connecting, check that the voltage indicated on the
appliance (bottom of the appliance) corresponds with the main
voltage in your home. If this is not the case, consult your dealer
and do not use.
This appliance may be fitted with a non-rewirable plug. If you
need to change the fuse in a non-rewirable plug, the fuse cover
must be refitted. If the fuse cover is lost or damaged, the plug
must not be used until a replacement is obtained (available from
the appliance manufacturer).
If the plug has to be changed because it is not suitable for your
socket, or becomes damaged, it should be cut off and appropriate
plug fitted following the wiring instructions. The plug removed
must be disposed of safely as insertion into a mains socket is
likely to cause an electrical hazard.
This unit must be earthed. This equipment must be disconnected
from the mains when not in use. Do not allow this unit to be
exposed to rain or moist ure.
For your own safety read the following instructions
carefully before attempting to connect this unit to the
mains.
You should only plug the appliance into a 230V-240V AC, 50Hz
supply. Connecting it to other power sources may damage the
appliance.
5
Page 7

The wires in this mains lead are colored
in accordance with the following code:
BLUE = NEUTRAL
BROWN = LIVE
GREEN + YELLOW = EARTH
IMPORTANT
The colors of the wires in the mains lead of this appliance
may not correspond with the colored markings identifying the
terminals in your plug, proceed as follows:
Caution
To prevent electric shock disconnect from the
mains before removing the cover
The blue wire must be connected to the terminal marked with the
letter N or colored black.
The brown wire must be connected to the terminal marked with
the letter L or col ored red.
The green and yellow wire must be connecting to the terminal
marked with the lett er E or the earth symbol. (
).
If a 13 Amp (BS1363) fused plug is used it must be fitted with a 13A
fuse conforming to BS1362 and be ASTA appr ove d.
If in doubt contact a qualified electrician
6
Page 8

DISPOSAL INFORMATION
Waste electrical products should not be disposed
of with household waste. Please recycle where
facilities exist. Check with your local authority for
recycling advice.
GUARANTEE
This product is guaranteed against manufacturing defects for a period
of
1 year
This does not cover the product where the fault is due to misuse, abuse,
use in
contravention of the instructions, or where the product has been
the subject of unauthorised modifications or alterations, or has been the
subject of commercial use
In the event of a problem with the product within the guarantee period
ple
a
se return it to your nearest Argos store
If the item is shown to have had an inherent defect present at the time
of sale, t
he store will provide you with a replacement
Your statutory rights remain unaffected
Guarantor; Argos Ltd
489 – 499 Avebury Boulevard
Central Milton Keynes
MK9 2NW
7
 Loading...