

Page 1
Owner’s Manual
™
: ,
*
CAUTION: Read the instructions before using the equipment.
©2016 TurboChef Technologies, Inc.
*Delivery bags and natural convection trays sold separately.
Page 2

For further information, call
800.90
TURBO
or
+1 214.379.6000
Page 3

Original Instructions
The information contained in this manual is important for the proper installation, use, maintenance,
and repair of this equipment. Follow these procedures and instructions to help ensure satisfactory results
and years of trouble-free service.
Errors – descriptive, typographic, or pictorial – are subject to correction. Specifications are subject to
change without notice.
Please carefully read this manual and retain it for future reference.
Page 4

Table of Contents
Safety Instructions
Important Safety Instructions i
General Safety Information i
Grounding Instructions ii
Power Cord Replacement ii
Specifications and Installation
Theory of Operation 1
ThermaCube Charger 1
ThermaCube Natural Convection Tray 2
ThermaCube Delivery Bags 3
Certifications 4
Electrical Specifications 4
Installation 4
Unpacking Instructions 4
Installing the ThermaCube Charger 4
Assembling the Delivery Bag 4
Maintenance 5
Controls
ThermaCube Charger Controls 6
Operating the ThermaCube Delivery System 7
Troubleshooting 8
Warranty 10
Page 5
IMPORTANT SAFETY INSTRUCTIONS
WARNING: When operating this appliance, strictly adhere to the following safety precautions
to reduce the risk of burns, electric shock, fire, injury, damage to appliance or property near
appliance.
GENERAL SAFETY INFORMATION
• Read all instructions before using this appliance.
• This appliance must be grounded. Connect only to a properly grounded outlet. See “Grounding
Instructions” on page ii and “Electrical Specifications” on page 4 of this manual. DO NOT use an
extension cord.
• Install or locate this appliance only in accordance with the provided installation instructions on page 4
of this manual.
• Keep appliance away from person(s) with reduced physical, sensory, or mental capabilities unless
supervised/instructed on how to properly use the appliance.
• Keep children 8 years and younger away from the appliance when in operation. Children 8 years
and above may use the appliance with proper adult supervision. DO NOT allow children to clean or
perform maintenance on this appliance without adult supervision. DO NOT allow children to play
with this appliance.
• This product may only be serviced by an authorized service agent or by CookTek personnel.
DO NOT attempt to open the unit or perform service of any kind. For service information, contact
CookTek at +1 (214) 379-6000.
• DO NOT use the CookTek ThermaCube Food Delivery System for anything other than its intended
use as described in this manual. This unit is designed to heat food and is not intended for laboratory
or industrial use.
• DO NOT use the ThermaCube’s charger surface for storage purposes.
• Always unplug the appliance immediately after use and allow for cooling time if handling,
transporting, or storing.
• DO NOT use any appliance that has a damaged cord or plug, or one that has malfunctioned or been
damaged. Consult the warranty on page 10 and follow instructions for service.
• Use only CookTek-approved delivery bags and natural convection trays.
• DO NOT use any accessories or attachments that are not recommended by the manufacturer. Use of
unapproved accessories may cause injuries and void the warranty.
• The ThermaCube charger top may get hot to the touch after hours of continuous use. Use caution
when loading and unloading delivery bags.
• DO NOT place a delivery bag on the charger with food inside the delivery bag. Charging the delivery
bag with food inside will prevent proper ventilation and will cause damage to the natural convection
tray and the delivery bag.
• DO NOT let the power cord touch hot surfaces or hang over the edge of the counter. DO NOT
move the ThermaCube charger when electric power is connected.
• Never immerse cords, plugs, or the appliance in water.
• To disconnect the appliance, press the POWER button and wait for the LED to no longer be
illuminated. You may then remove the plug from the outlet.
• DO NOT place foreign objects on the charger, between the delivery bag and charger, or inside the
delivery bag. Doing so may overheat and cause damage to the charger and/or delivery bag.
• DO NOT leave the appliance unattended while in use.
i
SAFETY INSTRUCTIONS
SAVE THESE INSTRUCTIONS
Page 6

ii SAFETY INSTRUCTIONS 1
• Users wearing a pacemaker should consult their doctor or the pacemaker manufacturer prior to operating
CookTek induction equipment. The electromagnetic field may interfere with the proper function of the
pacemaker.
• The ThermaCube chargers and natural convection trays are intended for use with CookTek-designed
and approved delivery bags only. DO NOT attempt to use unapproved or damaged delivery bags or
natural convection trays.
• Turn off the ThermaCube charger after use.
• Keep the ThermaCube Food Delivery System away from metallic surfaces, gas and electric ranges, and
open flames. DO NOT place in the oven. If the ambient air temperature is above 110°F (43.3°C), the
unit may not function properly.
• Metallic objects such as kitchen utensils, knives, spoons, etc. should not be placed on top of the charger
or in the delivery bag. Use caution when wearing rings, watches, and other metallic objects as they may
get hot if placed near the charger’s surface.
• DO NOT place aluminum foil or plastic objects on top of the ThermaCube charger.
• DO NOT use the ThermaCube Food Delivery System near a faucet, swimming pool, sink, or other
areas where water can be found. Never store the unit upside down or in a non-climate controlled
environment.
• DO NOT strike or damage the ThermaCube Food Delivery System. DO NOT put the unit in your
luggage. Throwing or dropping the unit can damage the internal components or crack it, voiding your
warranty. If the ThermaCube charger and/or natural convection tray becomes cracked, unplug the unit
immediately and do not use it.
• DO NOT obstruct, block, or alter openings or holes in the ThermaCube charger housing. DO NOT
stick foreign objects into these openings.
• DO NOT use a water jet to clean the appliance. See page 5 in this manual for proper cleaning
procedures.
GROUNDING INSTRUCTIONS
The ThermaCube charger must be properly grounded. In the event of an electrical short circuit, grounding
reduces the risk of electric shock by providing a safe path for the electric current. The ThermaCube charger
has a power cord with a 3-prong grounding plug, which must be used in a compatible and properly
grounded outlet. It is the owner’s responsibility to replace any 2-prong wall outlet with a properly grounded
3-prong wall receptacle.
For your safety, never cut, remove, or disable the electrical (ground) connection from the plug. Never use an
adapter plug or an extension cord with the ThermaCube charger.
WARNING: Electric shock can result from an improperly grounded plug. Please consult a
qualified electrician if you have any questions about these grounding instructions.
POWER CORD REPLACEMENT
If the power cord is damaged, it must be replaced by the manufacturer, its service agent, or a similarly
qualified person.
Please make sure that the power cord is firmly attached to your CookTek unit BEFORE plugging the unit
into the power receptacle and attempting operation.
SAVE THESE INSTRUCTIONS
Page 7

13.63” (346 mm)
14” (356 mm)
16.75” (425 mm)
Figure 1: ThermaCube Charger Dimensions (Top and Side Views)
16.93”
(430 mm)
1” (25 mm)
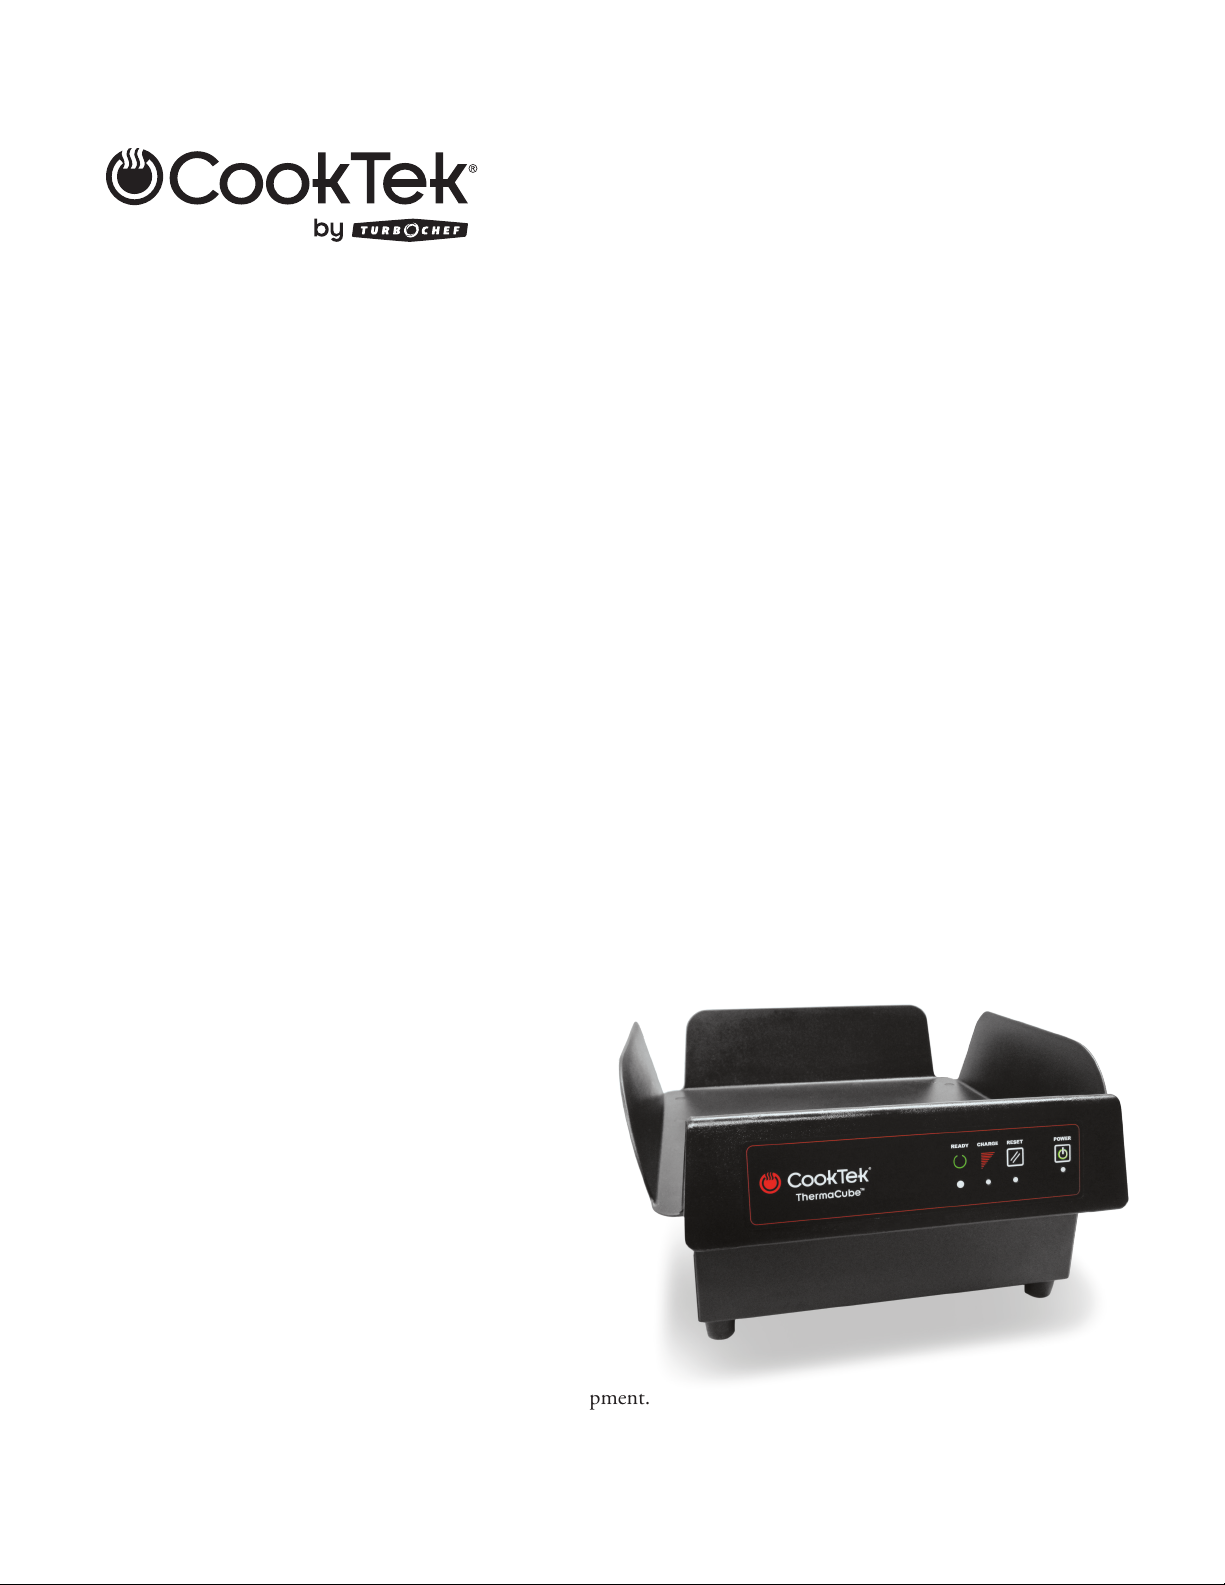
Theory of Operation
The ThermaCube Food Delivery System uses
precise induction technology to warm food
without cooking or overheating. The speciallydesigned natural convection tray creates a
blanket of warm air that surrounds the food,
keeping it at a consistent, hot temperature
for up to 45 minutes. The delivery bags are
equipped with VaporVent™ lids to effectively
control moisture.
8.25”
(209 mm)
3.5” (89 mm)
13.88” (353 mm)
ThermaCube Charger
Exterior Dimensions
Height: 8.25” (209 mm)
Width: 16.75” (425 mm)
Depth: 16.93” (430 mm)
Weight: 14.5 lb. (6.6 kg)
Interior Surface Dimensions
Width: 14” (356 mm)
Depth: 13.63” (346 mm)
The ThermaCube Food Delivery System is
comprised of a specially-designed lightweight
natural convection tray, a system-specific
delivery bag, and an induction charger base.
The natural convection tray resides hidden
inside the delivery bag. Once a delivery bag
containing a natural convection tray is placed
on the induction charger base, it automatically
heats up. The Charge LED light turns red to
show that charging is taking place. The Ready
LED light turns green when the delivery bag is
hot and ready for use.
Clearances
Front: 2” (51 mm)
Back: 2” (51 mm)
Sides: 2” (51 mm)
Bottom:
On-the-Counter: None
Recessed: 6” (152 mm)
SPECIFICATIONS AND INSTALLATION
Page 8

2 SPECIFICATIONS AND INSTALLATION 3
Figure 2: ThermaCube Natural Convection Tray Dimensions
ThermaCube Natural Convection Tray
The ThermaCube natural convection tray
is removable and designed to optimize food
temperatures inside the delivery bag. The natural
convection tray should be placed at the bottom of the
delivery bag, directly under the food being held.
Featuring a polycarbonate outer casing, the natural
convection tray is submersible for cleaning but not
dishwasher safe. Depending on the type of food and
mass to be heated in the delivery bag, the natural
convection tray is available in four percentages – 0%,
+10%, +25%, and +35%. The difference between the
pellet/cage assemblies is the amount of joules of heat
stored in each. For example, the +10% has 10% more
energy stored in it for larger volumes. Additionally,
the +10% natural convection tray takes 10% longer to
charge.
ThermaCube Natural Convection Tray
Dimensions (all models)
Height: 1.85” (47 mm)
Width: 13.50” (343 mm)
Depth: 12.50” (318 mm)
Weight: 3.5 lb. (4.6 kg)
Page 9

12.75”
(324 mm)
10.25”
(260 mm)
15.13” (384 mm)
Front FrontSide Side
Figure 3: ThermaCube Large Delivery Bag
13.38” (340 mm)
ThermaCube Delivery Bags
Available in two sizes, the ThermaCube delivery
bags are equipped with the VaporVent™ system
to effectively control moisture while keeping food
warm. The cordless delivery bags have adjustable
carrying straps, removable velcro interior dividers,
and are machine washable (natural convection tray
and dividers must be removed first).
ThermaCube Large Delivery Bag
Exterior
Height (closed top): 12.75” (324 mm)
Width: 15.13” (384 mm)
Depth: 13.38” (340 mm)
Weight:
With Natural Convection Tray: 3.2 lb. (1.5 kg)
Without Natural Convection Tray: 1.6 lb. (0.73 kg)
13.38” (340 mm)
Figure 4: ThermaCube Small Delivery Bag
13.38” (340 mm)
ThermaCube Small Delivery Bag
Exterior
Height (closed top): 10.25” (260 mm)
Width: 13.38” (340 mm)
Depth: 13.38” (340 mm)
Weight:
With Natural Convection Tray: 2.8 lb. (1.3 kg)
Without Natural Convection Tray: 1.0 lb. (0.45 kg)
Usable Interior Dimensions
Height: 8” (203 mm)
Width: 13.13” (334 mm)
Depth: 13.13” (334 mm)
SPECIFICATIONS AND INSTALLATION
Usable Interior Dimensions
Height: 10.63” (270 mm)
Width: 13.75” (349 mm)
Depth: 13.13” (334 mm)
Page 10

4 SPECIFICATIONS AND INSTALLATION 5
Certifications
The CookTek ThermaCube Food Delivery System
has been tested and is in conformance with ANSI/
UL-197 and CSA C22.2 No. 109 standards and bear
the commercially-rated approvals.
Electrical Specifications
The ThermaCube charger should be plugged into
a grounded, single-phase receptacle. Check the
rating plate on the unit to verify correct voltage and
wattage. Voltages below 120 VAC or 240 VAC can
result in less-than-rated power and slower heating
times. This appliance is designed for holding food
products only.
NOTE: Each ThermaCube charger should be
connected to its own dedicated circuit. They should
not be connected to circuits sharing compressors or
other heavy current draw devices.
Single Phase (1800 watts)
100-120 VAC, 50/60 Hz, 15A
200-140 VAC, 50/60 Hz, 8A
Installing the ThermaCube Charger
Follow these guidelines to ensure product reliability:
• e ThermaCube charger can be installed on
top of or recessed into a flat, level countertop
or shelving unit. All installations require a
minimum clearance of 2” (51 mm) between all
sides of the charger and any surface or obstacle.
Recessed (or dropped-in) installations require an
additional 6” (152 mm) between the bottom of
the charger and any surface or obstacle.
• If the ThermaCube charger is recessed (or
dropped-in) into an enclosed countertop, there
should be an opening near the charger for fresh
air to circulate underneath.
Assembling the Delivery Bag
Use only CookTek-approved delivery bags.
Other CookTek delivery systems are NOT
COMPATIBLE.
• Each side of the delivery bag contains a stiener
to help the delivery bag maintain its shape.
ese stieners should be placed in each side
pocket, and each side pocket should then be
closed with the velcro strips.
Installation
Install or locate this appliance only in accordance
with the instructions below.
Unpacking Instructions
1. Remove the ThermaCube charger, natural
convection tray, and/or delivery bag from
its packaging.
2. Before throwing the packaging away, check it
thoroughly for accessories and literature.
NOTE: Keeping the packaging is recommended
in case the equipment and/or accessories may be
shipped to another location.
• e delivery bags contain a large arrow marked
on the inside. When inserting the natural
convection tray, make sure that the arrow on
the natural convection tray is lined up with the
arrow located on the inside of the delivery bag.
• ere is an optional velcro divider which can be
used to create two or four compartments inside
the delivery bag. Simply unfold the divider, and
attach the velcro strips to the velcro strips inside
of the delivery bag.
Page 11

Maintenance
Follow the steps below when cleaning your ThermaCube charger, natural convection tray, and delivery bag.
Failure to adhere to these procedures may damage components, resulting in a non-warranty service call.
Step 1: Turn the Charger O and Allow to Cool
• Turn the unit OFF by pressing the power button.
• Remove the plug from any power outlets.
DO NOT proceed to Step 2 until the charger surface is cool to the touch.
Step 2: Clean the Charger
• With a clean, damp cloth wipe the top and all sides of the charger.
DO NOT immerse the charger in water or place it in the dishwasher.
DO NOT use steel wool or abrasive cleaners on the housing or on the top surface.
CAUTION: DO NOT splash or pour water onto the charger’s control panel or into the
intake/outlet vents. Possible shock hazard may result and the unit may be damaged.
• Carefully turn the unit on its side.
• With a clean, damp towel wipe off any accumulated dust and dirt from the cooling vent located on
the bottom of the charger.
Step 3: Clean the Filter
The filter must be cleaned regularly or replaced if damaged.
• Slide the filter out of the track on the bottom of the charger.
• Rinse the filter with hot water to remove dirt and grease.
• Allow the filter to dry completely.
• Reinstall the filter. The arrow on the edge of the filter should be pointing into the unit.
CAUTION: DO NOT operate the unit without the filter installed. If the filter becomes
clogged, the unit may overheat and will report the overheat error code of “E4”. Follow the
filter cleaning procedure above and let the unit cool down before resuming operation (turn off for
approximately 5 minutes).
Step 4: Clean the Natural Convection Tray
• Remove the natural convection tray from the delivery bag.
• Wipe the natural convection tray with a clean, damp towel.
• Remove any foreign objects on or in the natural convection tray.
Step 4: Clean the Delivery Bag
• Check for foreign objects in the delivery bag. These objects should be removed immediately.
• Ensure all velcro seams and pockets are clean and properly closed.
DO NOT use delivery bags that appear ripped or damaged in any way.
• The delivery bags can be laundered. If washing the delivery bag, remove all stiffeners.
DO NOT wash delivery bags with the natural convection tray or stiffeners. Remove these items prior
to washing. After washing, make sure the delivery bag is reassembled correctly as described on page 4.
• Periodically check the condition of the stieners. If they are cracked or damaged, they should be
replaced immediately.
MAINTENANCE
Page 12

6 CONTROLS 7
4
3
Figure 5: ThermaCube Charger Controls
1
2
ThermaCube Charger Controls
1. Ready LED
is green LED will illuminate to indicate that the delivery bag is fully charged and ready for use.
2. Charge LED
is red LED will illuminate to indicate that the delivery bag is charging.
3. Reset Button/LED
Use this button to reset the ermaCube charger in case an error occurs. is button can also be pressed
to exit Sleep Mode (see page 7).
4. Power Button/LED
Press to turn the charger on or o. An LED will illuminate to indicate when the unit is on.
Page 13

Operating the ThermaCube Food Delivery System
1. Make sure that your ThermaCube charger is plugged in to a dedicated circuit. See page 4 for electrical
specifications.
2. Press the Power button to turn the unit on. An LED will illuminate to indicate that the charger is on
and ready for use (see page 6).
NOTE: If the ThermaCube charger has not been used for an extended period of time, it will
automatically enter Sleep Mode. Sleep Mode is indicated by two beeps and flashing Power LEDs.
To exit Sleep Mode, press the Reset button.
3. Place the assembled delivery bag on the charger. Delivery bags should be empty with the top closed
when charging. e charger will automatically detect the delivery bag and the red Charge LED will
illuminate to indicate the delivery bag is charging.
4. Once charging is complete, the green Ready LED will illuminate to indicate that the delivery bag is
ready for use.
5. Remove the charged delivery bag from the charger and place food inside the delivery bag.
6. At the end of each day, turn the charger off by pressing the Power button. All LEDs should turn off.
NOTE: The charger’s cooling fan will continue to run and will turn off approximately 20 seconds after
the power is turned off.
DO NOT place more than one delivery bag at a time on the charger.
DO NOT place any items on top of the charger or under the delivery bag while charging.
NOTE: If the red Charge LED or green Ready LED do not illuminate when a delivery bag is placed on
the charger, remove the delivery bag and reposition it on the charger.
NOTE: Removing the delivery bag from the charger while the red Charge LED is illuminated will
result in the delivery bag not being fully charged, which may result in a lower delivery temperature.
e charger will beep three times if the delivery bag is removed before it is fully charged.
NOTE: If a charged delivery bag is not removed within approximately 12 minutes after charging
nishes, and 20% of the energy in the natural convection tray is lost, the green Ready LED will turn o.
Lift the delivery bag o of the charger and set it back down on the charger to charge the bag back up
to 100%.
CONTROLS
Page 14

8 TROUBLESHOOTING 9
Troubleshooting
e following is a list of error codes, along with the possible problem(s) that the appliance may experience.
Please attempt the recommended action before calling CookTek Tech Support (800.90TURBO,
+1 214.379.6000) or your Authorized Distributor.
Error Codes
Error codes will be indicated by a number of beeps and the flashing Reset LED. Count the number of
beeps in a row – this will be the error number. If there is more than one error condition, there will be a
pause and then the charger will beep the next error number. Once the problem has been resolved, press the
Reset button to reset the charger. If the unit does not reset, turn the unit off, unplug the power cord, wait
10 seconds, and then plug the charger back in.
Code Error Description Possible Cause(s) Resolution
2 Time out. Low line voltage. Check circuit breakers. Try
a different outlet. Have an
electrician monitor the line
voltage. If the problem persists,
call CookTek Tech Support.
3 Current draw is too high. A metallic object may be
present on the charger or there
may be mechanical damage to
the coil.
4 Electronics are overheating. Fan broken, air path blocked,
or intake air is too hot.
6 Over voltage. Voltage exceeds 264 on
240 VAC model or 132
on 120 VAC model.
7 Hardware failure. Board component failure. Turn unit off, then on. Unplug
8 Zero cross error. Bad AC source, board
component failure.
9 RFID time failure. Date and time corrupted. Call CookTek Tech Support.
15 Communication error. RFID and CPU boards not
communicating.
16 Critical system failure. Critical hardware/software
problem.
Remove delivery bag and check
for foreign objects between the
box and charger. Retry. If the
problem persists, call CookTek
Tech Support.
Check airflow. Clear air vents.
Verify proper clearance and
ambient temperature is less
than 110°F (43.3°C). Relocate
charging station, if necessary,
to cooler area. Listen for fan
operation. Clean filter (see page
5). If the problem persists, call
CookTek Tech Support.
Have an electrician verify/adjust
the main voltage. If the problem
persists, call CookTek Tech
Support.
and wait 10 seconds. Retry.
If the problem persists, call
CookTek Tech Support.
Call CookTek Tech Support.
Call CookTek Tech Support.
Unplug charger and wait 10
seconds. Retry. If the problem
persists, call CookTek Tech
Support.
Page 15

Issue Possible Cause(s) Resolution
No power
(lights or fan noise).
Red Charge LED
does not turn on
when delivery bag is
placed on charger.
Delivery bag is not
heating properly.
• Unit unplugged.
• No power to receptacle.
• No natural convection tray in
delivery bag.
• Delivery bag is not positioned
correctly.
• Foreign or metallic objects on top
of the charger, between the charger
and delivery bag, or inside of the
delivery bag.
• Charger unplugged.
• No power to receptacle.
• Delivery bag is assembled
incorrectly.
• Delivery bag is not positioned
correctly.
• Plug unit in.
• Check wall switches/circuit breaker.
• Place the natural convection tray in
approved delivery bag.
• Make sure the delivery bag is assembled
correctly and positioned properly on
the charger. The triangle on the natural
convection tray should face the triangle
image located on the inside of the
delivery bag.
• Make sure that there are no foreign or
metallic objects on top of the charger,
between the charger and delivery bag,
or inside the delivery bag.
• Plug unit in.
• Check wall switches/circuit breaker.
• Make sure that the delivery bag is
assembled correctly. The triangle on
the natural convection tray should face
the triangle image located on the inside
of the delivery bag.
• Make sure the delivery bag is
positioned properly on the charger.
You may have to press the delivery bag
down lightly to properly position a new
or stiff delivery bag.
TROUBLESHOOTING
Page 16

10 WARRANTY 11
THIS WARRANTY REPLACES AND SUPERCEDES ANY AND ALL PREVIOUS
WARRANTIES OFFERED BY COOKTEK AND/OR ANY WARRANTIES
PROVIDED IN THE ACCOMPANYING PRODUCT MANUAL
Two (2) Year North America Limited Warranty for “Portable” CookTek Products
CookTek Product Models Covered Under this Limited Warranty
“Portable” CookTek products shall mean all Single and Double Burner Cooktops (countertop or
built-in), Woks (countertop or built-in), FaHeaters, Soup Warmers, ThermaCube Delivery Systems, and
Pizza Delivery Systems.
Limited Warranty
CookTek warrants to you, the purchaser, that under normal use the CookTek Induction System you
have purchased (the “Equipment”) will be free from defects in material and workmanship during the
Warranty Period, subject to the terms and conditions set forth herein. The “Warranty Period” is twentyseven (27) months from the date the Equipment is shipped from CookTek’s U.S. factory or distribution
center in Carrollton, Texas. This warranty is conditioned upon you promptly notifying CookTek of any
claims, as provided in the paragraph entitled “Warranty Claims” below, and providing CookTek with
all data and information requested by CookTek in connection with such claims. This warranty is made
only to the initial purchaser of the Equipment from CookTek or its authorized dealer; it is not assignable
to subsequent purchasers unless CookTek consents to such assignment in writing. THIS WARRANTY
DOES NOT INCLUDE ANY THIRD-PARTY INSTALLATION, REMOVAL, OR DAMAGE COST
INCLUDING (BUT NOT LIMITED TO) LABOR, MATERIALS, AND TRAVEL FOR CAULKING
IN DROP-IN (BUILT-IN) UNITS, OR REPAIRS/REPLACEMENTS OF FUSES, BREAKERS,
MILLWORK AND/OR COUNTERTOPS.
Disclaimer of Warranties
Except as provided in the Limited Warranty above, the Equipment is provided “as-is”. CookTek disclaims
all other warranties, express, statutory or implied, including without limitation, the implied warranties
of title, non-infringement, merchant- ability and fitness for a particular purpose. CookTek does not
warrant that the Equipment will meet your specifications or needs. You acknowledge that you are solely
responsible for the selection of the Equipment and determining the suitability of the Equipment for your
needs.
Warranty Exclusions and Limitations
Improper Installation, Operation or Maintenance: Equipment that is not installed, operated and
maintained in accordance with CookTek’s manual (as may be updated by CookTek from time to time,
the “Manual”), a copy of which is provided to you with the Equipment or otherwise will be furnished
to you upon request, is excluded from this warranty. This warranty does not apply to damage or failure
which results, in CookTek’s sole opinion, from failure to provide a suitable installation and operating
environment (including power and HVAC) and facilities as prescribed by the Manual, misuse, abuse,
accident, neglect, power failure or power surges (over or under voltage), or to damage or failure from
flood, fire, lightning or other natural or man-made disasters, or other Acts of God, or to Equipment that
has missing or altered serial numbers.
Page 17

Modifications and Repair: Equipment that has been modified or altered by persons other than CookTek
or its service agents, or Equipment that has had non-approved devices or connection items attached
thereto, is excluded from coverage under this warranty. Repair of the Equipment by anyone other than
CookTek or its authorized service agents will void all warranties on the Equipment.
Accessories: All accessories and parts (collectively “Accessories”) such as pans, bags, ceramic cooking
platters, paddles, approved cleaning chemicals, and other non-electrical devices are warranted against
defects in materials and workmanship for a period of 90 days from the date of shipment from CookTek’s
factory. Failure of or damage to Equipment or components from the use of non-approved cleaning
chemicals, devices or processes is excluded from this warranty.
Outstanding Invoices: If the full invoiced amount for the original Equipment purchased or for a
non-returned Advance Replacement Unit has not been paid within forty-five (45) days from the invoice
date, then CookTek will have no obligation to honor this or any other warranty on the Equipment until
payment is received in full, including any accrued interest or other charges, has been satisfied, at which
time warranty coverage will be reinstated, but the Warranty Period will not be extended.
Advance Replacement Warranty Service, Exclusive Remedy
CookTek will be solely responsible for determining whether or not the Equipment or any component
thereof is Defective. Defective Equipment will be repaired exclusively under CookTek’s Advance
Replacement Warranty Service. Upon notification of a repair issue, CookTek will send an Advance
Replacement Unit to the address provided at its expense. The Advance Replacement unit may be new or
refurbished at CookTek’s sole discretion. Upon receipt, you must remove and/or uninstall the defective
equipment and place the defective equipment in the packaging provided with the Advance Replacement
Unit. It is your sole responsibility to pack and return the defective equipment to CookTek using the
packaging and shipping label provided. Units that are not returned after 30 days or units that are
improperly packaged and damaged shall be charged to the customer at current list price. The Advance
Replacement Unit’s warranty will continue through the end of your original warranty period. In no
case will an Advance Replacement Unit extend the duration of the warranty period. This paragraph
states CookTek’s sole and exclusive obligation and liability and your sole and exclusive remedy under
this warranty. CookTek shall not be responsible for a failure to provide warranty services due to a user’s
non-compliance with this clause.
Warranty Claims
Claims under this warranty must be reported to CookTek during our normal working hours at
800.90TURBO, or such other reporting service as CookTek may designate. Upon receipt of the claim and
related information and preliminary verification that the claim is valid, CookTek will promptly send an
Advance Replacement Unit to the requested location within North America.
Disclaimer of Damages
CookTek disclaims all incidental, special and consequential damages, including but not limited to loss
of use, lost revenue or profits, or substitute use, suffered by you or any third party, whether arising in
contract, tort (including negligence), or otherwise, resulting from any breach by CookTek or its service
agents of this warranty, or resulting from the manufacture, use, or defects, of or in the Equipment, even if
CookTek was apprised of the possibility of such damages.
WARRANTY
Page 18

12 WARRANTY 13
Customer Indemnity
You agree to indemnify, defend and hold CookTek harmless from all third party claims, demands,
judgments, fees and costs directly or indirectly arising out of or related to your use of the Equipment.
You further agree to indemnify and hold CookTek harmless from any incidental, consequential or special
damages suffered by you, including lost revenue or profits, loss of use, or substitute use, during periods of
Equipment failure or loss of use.
Territory
This warranty is valid in the United States of America, Canada and Puerto Rico.
Governing Law, Entire Warranty
This warranty shall be governed and construed in accordance with the laws of the State of Texas, USA
(except with respect to its provisions regarding conflicts of laws). The warranty described herein is the
complete and only warranty for Equipment and supersedes all prior oral or written agreements and
understandings that may have existed between us relating to Equipment warranties. The terms of this
warranty may not be altered, amended or modified except by a signed writing from CookTek. Any
purported alteration, amendment or modification by a service agent or anyone else will not be enforceable
against CookTek.
Page 19

This page intentionally left blank.
WARRANTY
Page 20

For service or information:
Customer Support at 800.90TURBO
+1 214.379.6000 or Your Authorized Distributor
Part Number: CT-103930 / Revision A / October 2016
Country Code: NA/EU
Global Operations
2801 Trade Center Drive
Carrollton, Texas 75007
+1 214.379.6000
+1 214.379.6073
Customer Support
TURBO
800.90
+1 214.379.6000
turbochef.com
 Loading...