

Cookson MGRL Series, MGHL Series Installation Instructions And Operation Manual

INSTALLATION INSTRUCTIONS
AND
OPERATION MANUAL
Cookson MG Operator
MGRL / MGHL Series
(with internal lock sensor feature)
04/08

IMPORTANT INSTALLATION INSTRUCTIONS
WARNING - To reduce the risk of severe injury or death:
1. READ AND FOLLOW ALL INSTALLATION INSTRUCTIONS.
2. Install only on a properly operating and balanced door. A door that is operating improperly
could cause severe injury. Have qualified service personnel make repairs to cables, spring
assemblies, and other hardware before installing the operator.
3. Remove all pull ropes and remove, or make inoperative, all locks (unless mechanically and/or
electrically interlocked to the power unit) that are connected to the door before installing the
operator.
4. Install the door operator at least 8 feet or more above the floor if the operator has exposed
moving parts.
5. Do not connect the door operator to the source of power until instructed to do so.
6. Locate the control station: (a) within sight of the door, (b) at a minimum height of 5 feet so
small children cannot reach it, and (c) away from all moving parts of the door.
7. Install the Entrapment Warning Placard next to the control station in a prominent location.
8. For products having a manual release, instruct the end user on the operation of the manual
release.
9. The door is under extreme spring tension. Have qualified door mechanics make all necessary
adjustments and repairs to the door.
10. Make sure the available power supply to be connected to the operator is of the same voltage,
frequency, phase and wattage as indicated on the nameplate of the operator.
11. Read and understand the wiring diagram of the operator and the control station
(open-close-stop push button), and any other equipment to be connected to the operator.
12. To avoid damage to the door and operator, make all door locks inoperative. Secure locks in the
unlocked position, or install external electrical interlocks to prevent operation with the locks
engaged.
13. Always disconnect power whenever installing or servicing the door operator or door.
14. All wiring is to comply with National Electrical Code (NEC) and local code requirements.
15. Any change in mounting position may result in change of operator rotation and consequently
in change of control functions. Consult factory for any changes.
16. Hand Chain must be kept inside plastic bag when operating electrically.
1
MGRL/MGHL SERIES
04/08

SPECIFICATIONS
MOTOR
Type: ……………………… Restricted cycle duty
(25 cycles per day)
Horsepower: ……………… 1/3hp, 1/2 hp
Speed: …………………….. 1700 RPM
Voltage: …………………… 115, 230 – 1 phase
208/230, 460 – 3 phase
230 volt 3 phase motor is suitable for use with 208 volts
Current: ………………….. See motor nameplate
ELECTRICAL
Transformer: …………….. 24VAC
Wiring Type: …………….. Momentary pressure open, stop, constant pressure close
(provided standard), with provision for momentary
pressure close*
Limit Adjustment: ………. Linear driven, fully adjustable screw type cams.
MECHANICAL
Drive reduction: …………. 43:1
Output shaft speed: ……... 40 RPM
Door Speed: ………………. 6 - 9” per sec. average (typical)
Brake: …………………….. Solenoid actuated brake
Release Mechanism: ……... Floor level pull-cable release standard
Emergency Chain Hoist: .... Optional (Standard on MGHL)
ENTRAPMENT PROTECTION
Sensing Edge*: …………… (Optional) Sensing device attached to the bottom edge of
the door.
* Per the requirements of UL Standard 325, the door operator must be provided with an
actuating device requiring constant pressure to close the door. As an alternative, the door
may be provided with a device that will reverse the door upon contact with an obstruction
during closing.
2
MGRL/MGHL SERIES
04/08
INSTALLATION INSTRUCTIONS
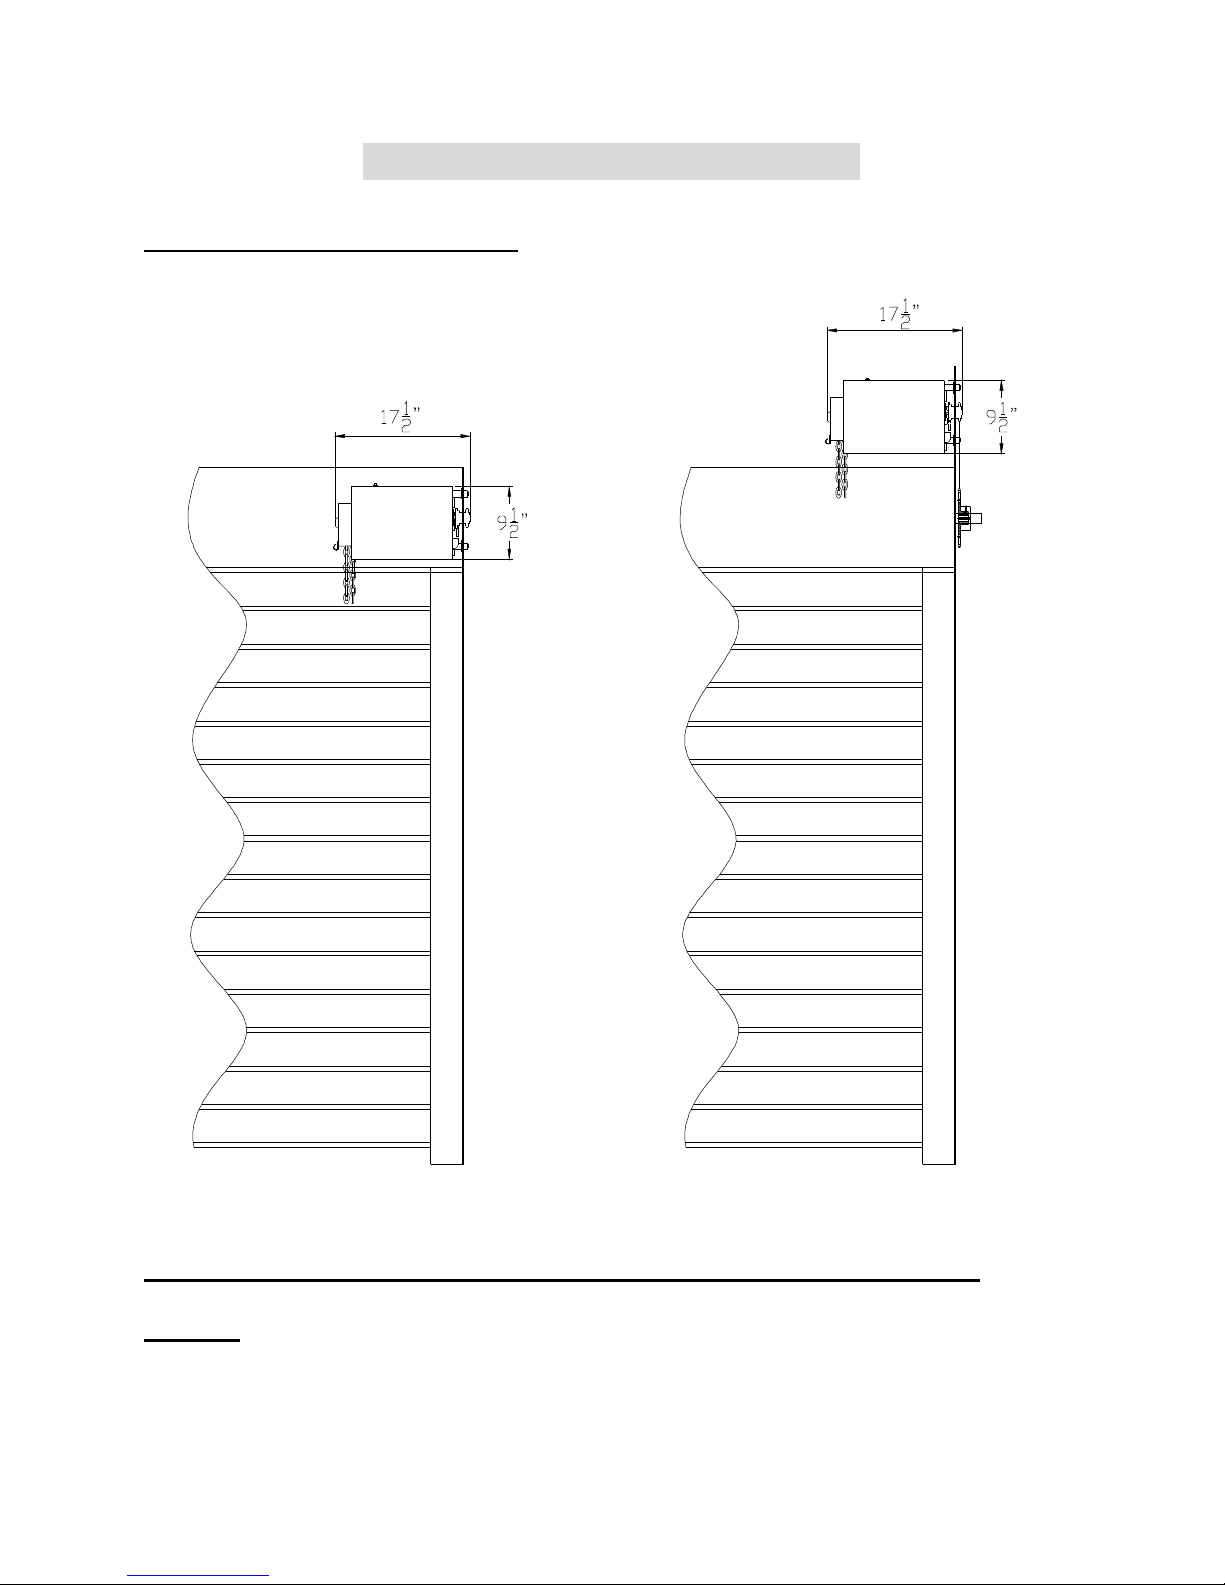
INSTALLATION POSITIONS
Illustration only. Consult factory for changes in installation positions.
NOTE: Any change in mounting position may result in change of operator rotation and
consequently in change of control functions (i.e. lock sensor). Consult factory for any
changes.
3
MGRL/MGHL SERIES
04/08

OPERATOR MOUNTING
1. Before the operator is installed, verify that the door is properly operating and balanced.
2. Make sure the dimensions of mounting holes on the bracket are correct.
3. Attach and tighten the three legs (2) to the mounting plate.
4. Bolt the operator mounting plate (1) to the door bracket plate.
5. Finally, mount the operator (3) to the three legs (2) and tighten.
4
MGRL/MGHL SERIES
04/08
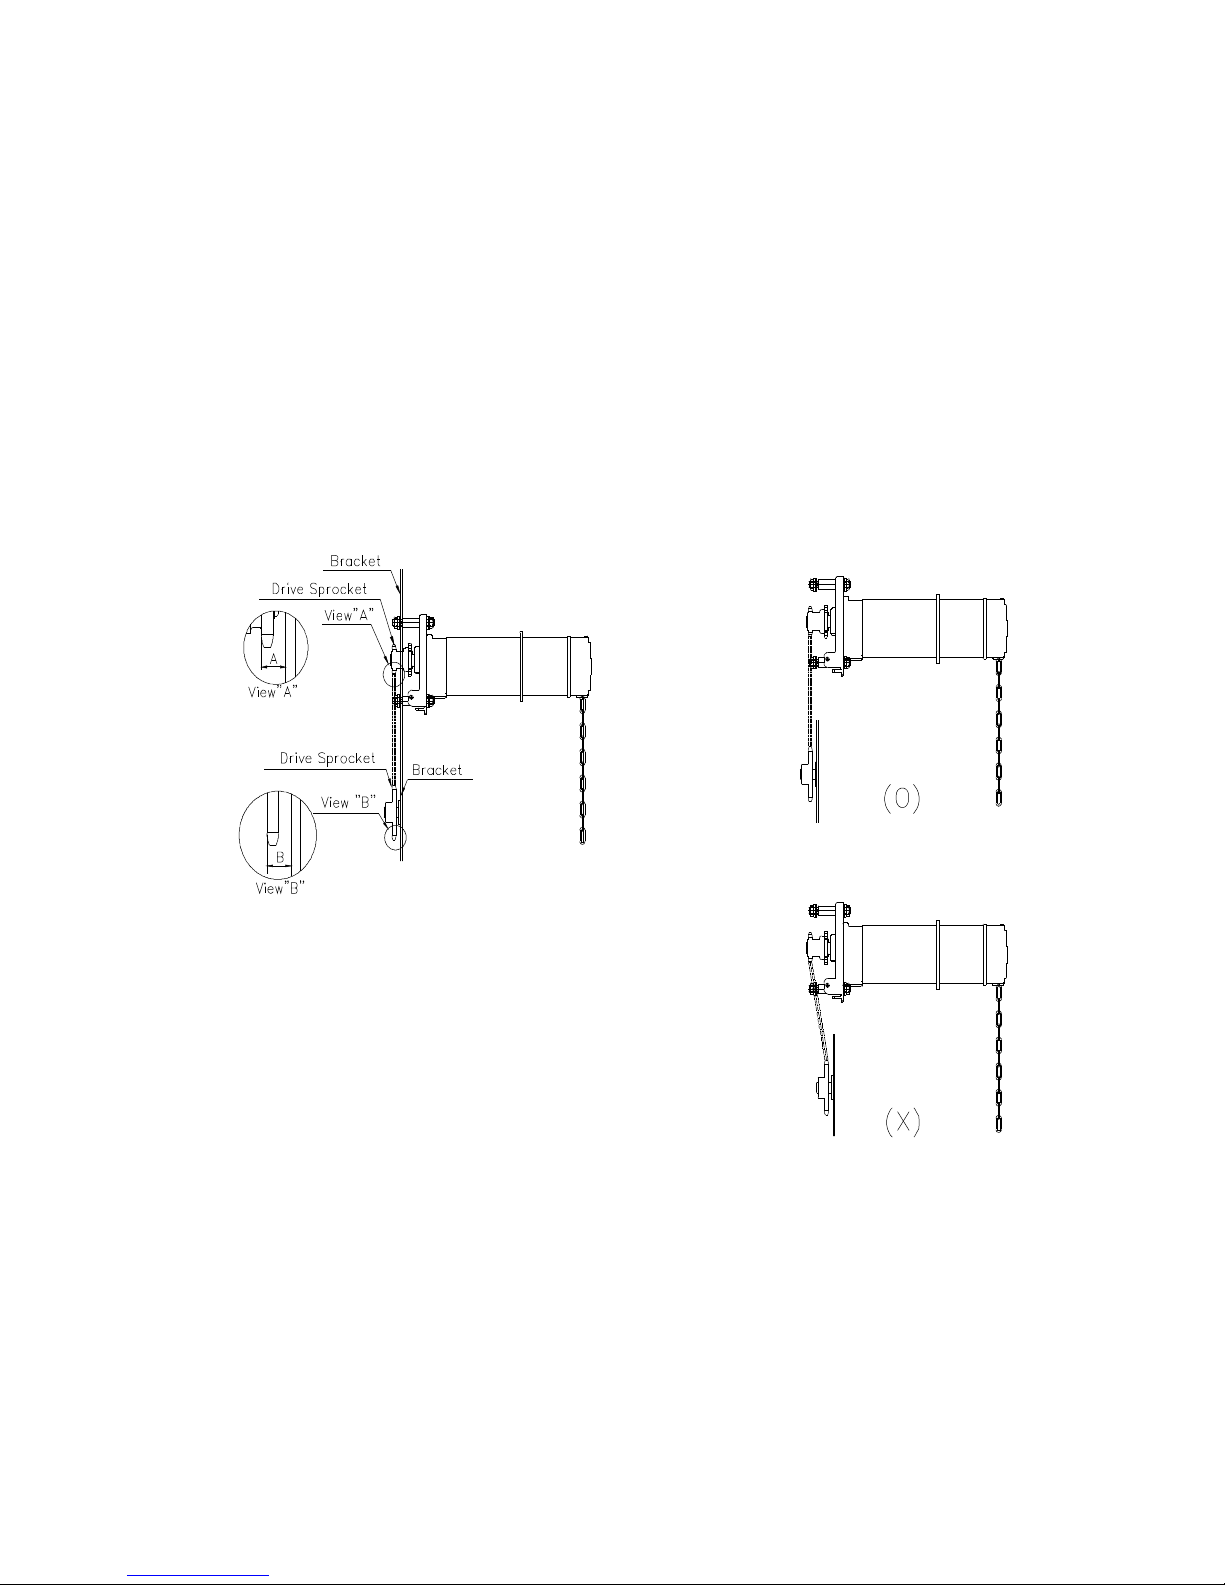
6. When the operator is mounted on the bracket, be sure the door driven sprocket is properly
aligned with the operator drive sprocket before securing to the shaft. The clearance (B) must be
the same as the height (A).
7. The shelf or bracket must provide adequate support for the operator. Prevent play between
operator and door shaft. Permit operator to be fastened securely and with the drive shaft
parallel to the door shaft. It may be necessary to field brace the operator/bracket.
5
MGRL/MGHL SERIES
04/08
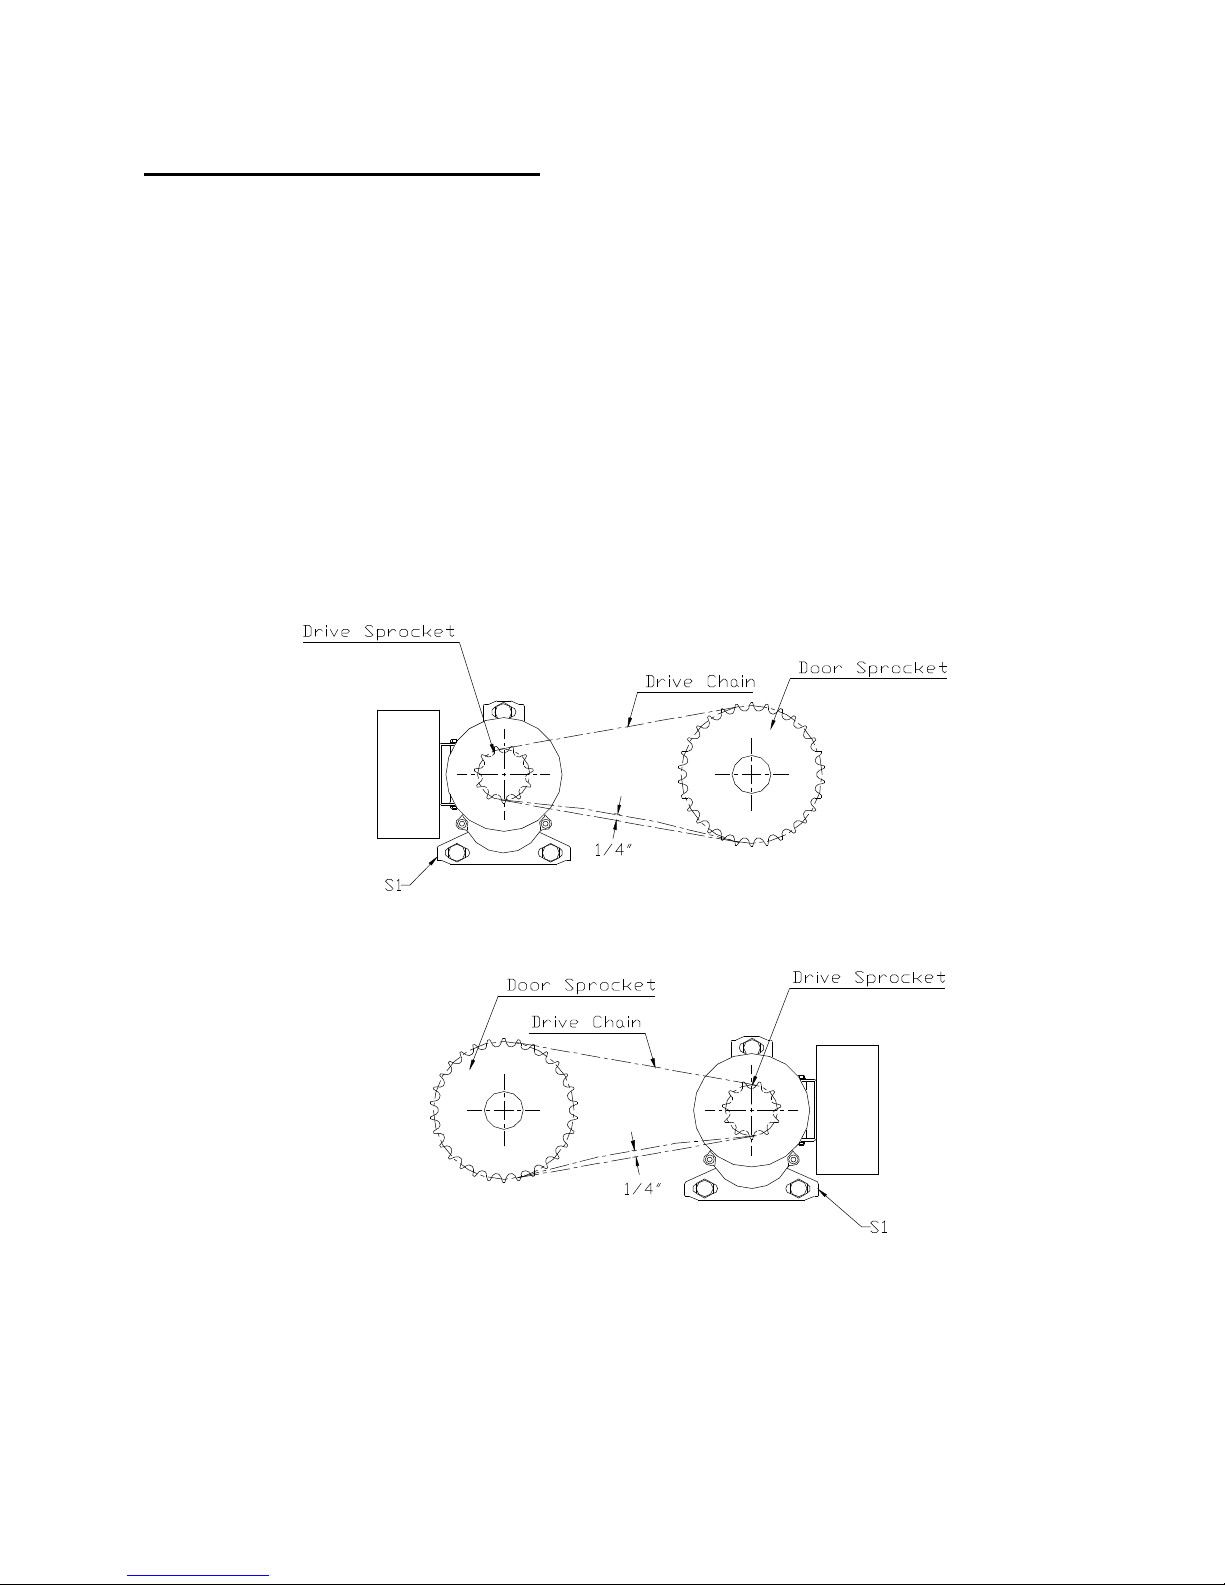
DRIVE CHAIN ADJUSTMENT
NOTE: Use correct type, size and proper length of roller chain.
1. Adjust the drive chain by tilting the operator so that there is about 1/4” of slack when the chain
is depressed.
Note: The set screw included in the operator may be used for adjustment (S1 location).
2. Once the drive chain has been tightened and the base leg screws have been set, and then tighten
the operator screws.
6
MGRL/MGHL SERIES
04/08

MANUAL RELEASE
Cut and adjust cable length.
EMERGENCY HAND CHAIN ADJUSTMENT (OPTIONAL on MGRL Series)
Cut and reconnect chain with different color link provided.
WARNING: When using hand chain, a dis/engagement cable is not required and should not be
used. Use cable only on operators without an auxiliary hand chain (MGRL) or when a pull handle
egress device is used in conjunction with an auxiliary hand chain on the MGHL.
Note: Chain hoist can be added in the field. Consult factory for details.
7
MGRL/MGHL SERIES
04/08
 Loading...