

Page 1
Full Color Reverse
Owner’s Manual
G FOR HOUSEHOLD USE ONLY
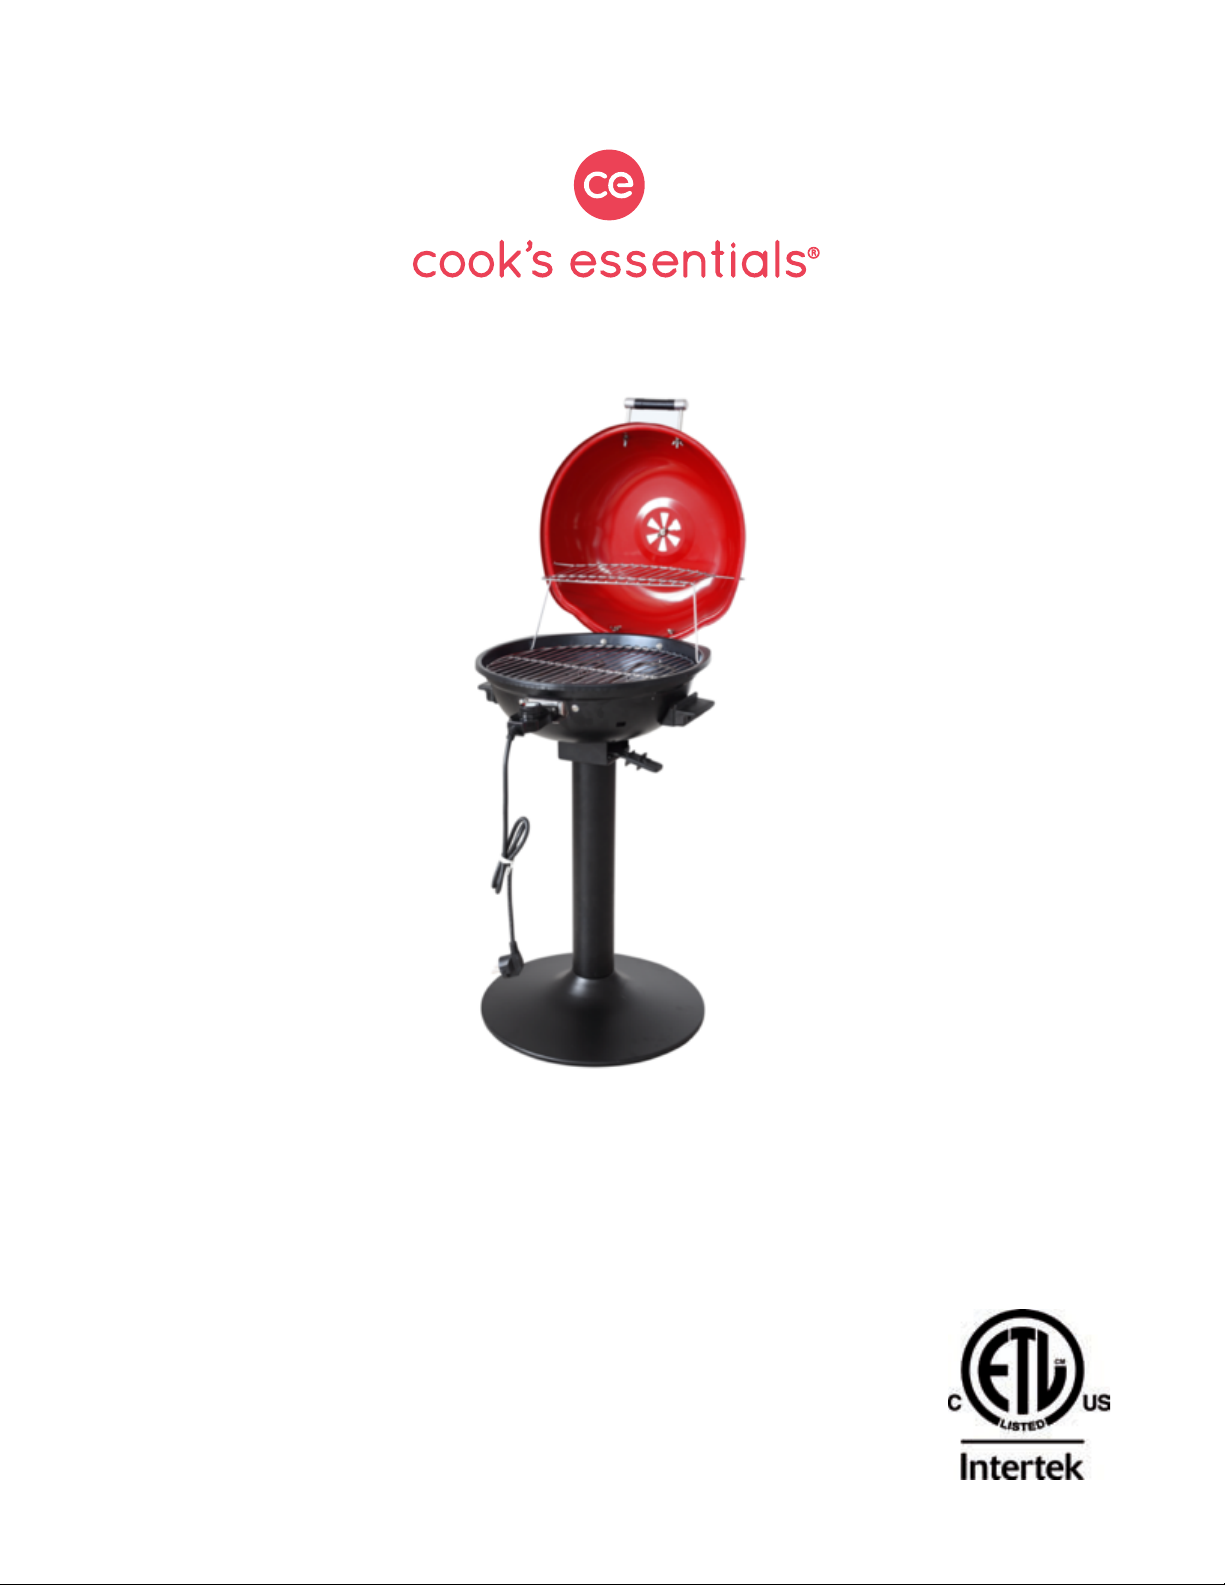
Electric BBQ Grill Model: CM-GR103SA
Page 2

Index
Topic Page
Important Safeguards ................................................................................................................... 1 - 3
Parts & Accessories ........................................................................................................................ 4 - 5
Assembly Instructions ................................................................................................................... 6 - 11
Using the Temperature Control ...................................................................................................... 12
General Operating Instructions ....................................................................................................... 13
Cleaning & Storage ...................................................................................................................... 13 - 14
Troubleshooting .............................................................................................................................. 15
For California Residents
WARNING: This product can expose you to chemicals including Bisphenol A which are
known to the State of California to cause reproductive harm, birth defects or cancer.
For more information go to www.P65Warnings.ca.gov
Before you begin… It is very important that you read this entire manual making certain that you are
totally familiar with its operation and precautions.
Page 3

Important Safeguards
1
When using electrical appliances, basic safety precautions should always be followed, including the following:
• READ AND FOLLOW all instructions carefully and
thoroughly, before assembly, installation, use or
service.
• DO NOT TOUCH HOT SURFACES such as the Lid,
Bowl and Cooking Grill. Use handles or knobs
…wear oven mitts when handling hot components
or touching hot surfaces.
• TO PROTECT AGAINST fire, electric shock or
personal injury, do not immerse unit, cord, plug,
heating element or temperature control in water or
any other liquids. Do not rinse under tap.
• CLOSE SUPERVISION is necessary when any
appliance is used by or near children.
• THIS APPLIANCE IS NOT INTENDED for use by
persons with reduced physical, sensory, or mental
capabilities, or lack of experience and knowledge,
unless they are under the supervision of a
responsible person or have been given proper
instruction in using the appliance. This appliance is
not intended for use by children.
• ALWAYS UNPLUG FROM OUTLET when not in use
and before cleaning. Allow to cool completely
before putting on or taking off parts.
• DO NOT operate any appliance with a damaged
cord or plug, or after the appliance malfunctions or
has been damaged in any manner. Return
appliance to the nearest authorized service facility
for examination, repair or adjustment.
• THE USE OF ACCESSORY ATTACHMENTS not
recommended by the appliance manufacturer may
cause injuries.
• EXTREME CAUTION must be used when moving
an appliance, hot racks, pans and other cooking
vessels containing hot oil or other hot liquids.
• ALWAYS ATTACH the Temperature Control to the
appliance first, then plug cord into the wall outlet.
To disconnect, turn any control to “off”, then
remove plug from wall outlet.
• DO NOT use appliance for other than its intended
use.
• SAVE THESE INSTRUCTIONS.
• USE ONLY manufacturer designation
temperature-controlling probe or plug set supplied
with the product. Use only DCT-001C Dachang
Hardware and Electronics Technology Co. Ltd.
temperature controlling plug.
• RISK OF ELECTRIC SHOCK. Cook only when unit
completely assembled, and all parts are securely
fastened and tightened.
• KEEP THE barbecue and electric controller dry at
all times. Keep electric plugs off the ground and dry
at all times.
• DO NOT use in humid or wet conditions.
• ONLY USE A PROPERLY-GROUNDED power
source; use with a properly-grounded Ground-fault
circuit-interrupter (GFCI) household circuit.
• NEVER alter or remove grounding plugs on the
power cord or replacement information.
• IN CASE OF FIRE, turn the controller to “off”,
unplug the barbecue from the power source and
allow the fire to burn out on its own. Do not use
water to try to extinguish a fire.
• DO NOT use any replacement parts not provided
by the appliance manufacturer. Use only identical
replacement parts.
• THIS PRODUCT is intended for household use
only, and is suitable for outdoor use.
• DO NOT let power cord hang over edge of table or
counter, or touch hot surfaces.
• DO NOT place on or near a hot gas or electric
burner, or in a heated oven.
• KEEP THE APPLIANCE and its power cord out of
the reach of children when it is in operation or in
the “cooling down” process. Do not place cord
where it may become a tripping hazard.
• DO NOT plug in the power cord or operate the
Unit controls with wet hands.
• NEVER CONNECT THIS APPLIANCE to an external
timer switch or separate remote-control system.
Page 4

Important Safeguards…
2
• DO NOT USE fuel, such as charcoal or lava rocks
with this appliance. Do not use barbecue lighter
fluid, gasoline, kerosene or alcohol with this
barbecue.
• DO NOT OPERATE THE APPLIANCE on or near
combustible materials such as tablecloths and
curtains. Do not use in the presence of explosive or
flammable gases, vapors or other substances.
• KEEP ANY COMBUSTIBLE materials at least 3 feet
away from the grill at all times. Do not use this
barbecue under any overhang or near combustible
structures.
• WHEN COOKING, do not place the appliance
against a wall or against other appliances. Leave at
least 6” free space on the back and sides and above
the appliance. Do not place anything on top of the
appliance.
W A R N I N G
• Do not store or use gasoline or any other
flammable vapors or liquids in the vicinity of this
appliance.
• When cooking with oil or grease, do not allow
the oil or grease to exceed 480!F/250!C on the
grill. Do not store extra cooking oils in the vicinity
of this appliance.
• A short power-supply cord (or detachable powersupply cord) should be used to reduce the
risk resulting from becoming entangled in or
tripping over a longer cord.
• Longer detachable power-supply cords or
extension cords are available and may be used if
care is exercised in their use.
• If a longer detachable power-supply cord or
extension cord is used:
1) The marked electrical rating of the cord set or
extension cord should be at least as great as
the electrical rating of the appliance; and
• THIS APPLIANCE IS NOT DESIGNED for tabletop
use. Do not set this appliance on a table.
• DO NOT USE this appliance for any purpose other
than described in this manual.
• NEVER operate the appliance unattended.
• IMPROPER USE, assembly, installation,
adjustment, service or maintenance can cause
serious injury and property damage.
• FAILURE to follow instructions could result in
electric shock, fire or explosion.
• AFTER A PERIOD OF STORAGE, inspect the
barbecue for abrasion, wear, cuts, or damage to the
controller and power cord.
• ALWAYS OPEN the barbecue lid carefully. Heat
and steam trapped inside the lid can cause injuries.
• ALWAYS USE a meat thermometer to ensure food
is cooked to a safe temperature.
2) The cord should be arranged so that it will not
drape over the countertop or tabletop where
it can be pulled on by children or tripped over
unintentionally.
3) If the appliance is of the grounded type, the
extension cord should be a grounding-type 3wire cord.
CAUTION: To reduce the risk of electric shock,
keep the extension cord dry and off the ground.
• The temperature control, thermostat prong side
is protected with a detachable silicone jacket for
outdoor moisture resistance. DO NOT remove this
jacket during normal operation, and if found to be
broken, replace before use.
• While it is still hot or still connected to the
temperature control plug and energized, do not
place the heating element on flammable materials
such as wood tables.
Page 5

Important Safeguards…
3
C A U T I O N
• Always operate the appliance on a horizontal
surface that is level, stable and noncombustible.
Use caution when operating on wood decks. Do
not use in or on boats or recreation vehicles.
• Do not use appliance on floor surfaces where
heat or hot grease may cause damage.
• This appliance is intended for normal household
use only. It is not intended for use in commercial
or retail environments. Suitable for use outdoors.
• If the appliance is used improperly or for
professional or semi-professional purposes or if it
is not used according to the instructions in the
user manual, the warranty becomes invalid and we
will not be held liable for damages.
• Always unplug the appliance after use.
• Let the appliance cool completely before
handling, removing parts, cleaning or storing
indoors.
E L E C T R I C P O W E R
If the electrical circuit is overloaded with other
appliances, your new Unit may not operate
properly. It should be operated on a dedicated,
separate electrical circuit.
ELECTROMAGNETIC FIELDS (EMF)
This appliance complies with all standards
regarding electromagnetic fields (EMF). If handled
properly and according to the instructions in this
user manual, the appliance is safe to use based on
scientific evidence available today.
SAVE THESE INSTRUCTIONS. FOR HOUSEHOLD USE ONLY.
Page 6
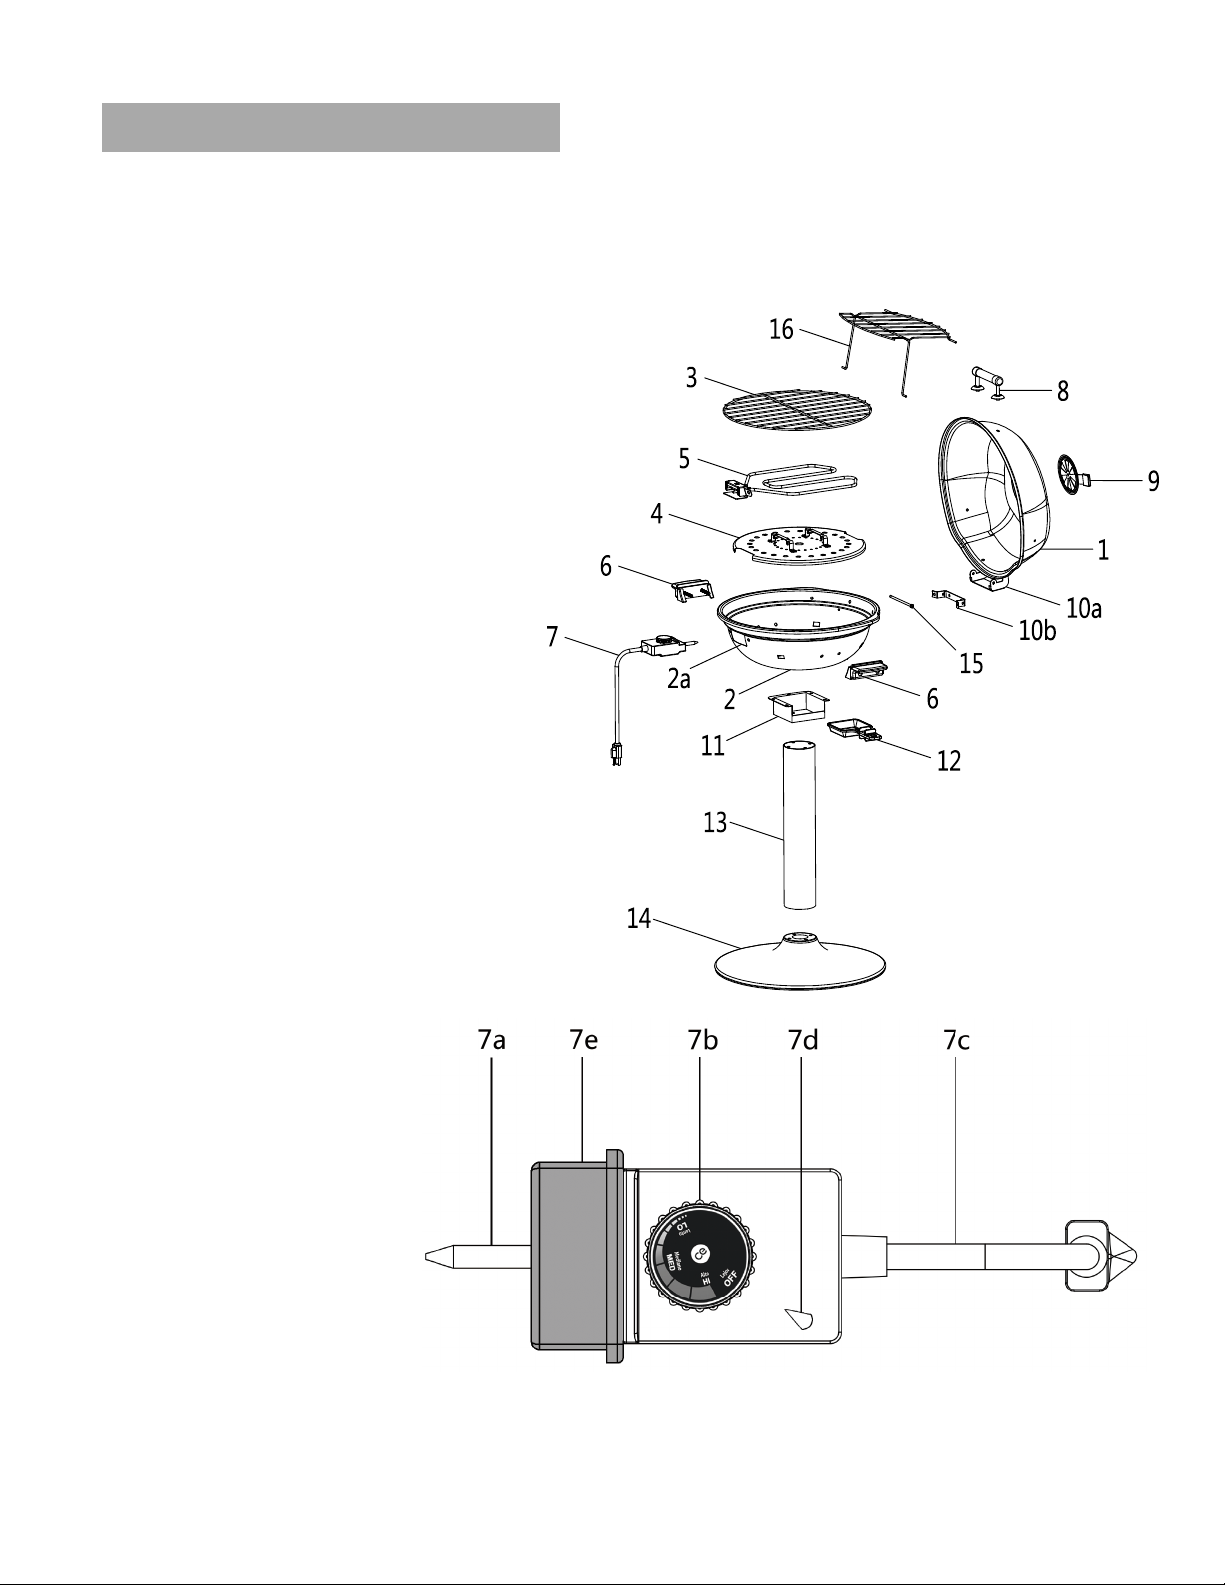
Electric Barbecue Grill Parts
4
IMPORTANT: Your Electric Barbecue Grill has been shipped with the components shown below. Check
everything carefully before assembly or use. If any part is missing or damaged do not use this product
and contact shipper using the customer service number located in the back of this owner’s manual.
PRODUCT DIAGRAM
1. Lid
2. Bowl
a. Opening for the Temperature Control
3. Cooking Grill
4. Heat Reflector Plate
5. Heating Element
6. Bowl Handle (x2)
7. Temperature Control
a. Thermostat Prong
b. Dial
c. Wall Plug
d. Off and Temperature Level Light Indicator
e. Silicone Jacket for Moisture Resistance
8. Lid Handle
9. Air Vent
10. Hinge Bracket
a. Upper
b. Lower
11. Connection Part
12. Drip Tray
13. Pillar
14. Base
15. Locking Pin M5*123
16. Foldable Warming Rack
See Hardware Components and Assembly Instructions below.
Page 7

Electric Barbecue Grill Parts…
5
!
HARDWARE COMPONENTS (Screws, Nuts, Washers)
17. Small Screw M5*12 (7 pcs)
18. Medium Screw M6*20 (13 pcs)
19. Long Screw M6*45 (4 pcs)
(Affixed to Bowl Handles)
20. Small Wing Nut M5 (6 pcs)
21. Large Wing Nut M6 (11 pcs)
22. Lock Washer (27 pcs)
23. Flat Washer (27 pcs)
24. Flat Nut M5 (2 pcs)!
Note: Hand tools such as a cross-head screw driver, pliers, and/or a small spanner may be required for
assembly. Wear protective gloves during assembly.
Page 8

Assembly Instructions
6
NOTE: In each step described below, tighten all connections by hand first. Once assembly is complete,
tighten all connections fully.
Step 1 – Attach Pillar (part #13) to Base (part #14)
Hardware: M6*20 medium screws (part #18) – 4 pcs
flat washers (part #23) – 4 pcs
lock washers (part #22) – 4 pcs
Locate the Pillar and the Base. Set aside four (4) M6*20 medium screws, four (4) lock washers and four
(4) flat washers. Place a lock washer and then a flat washer on each screw. Put the Pillar on the Base as
shown below, and align the holes. From the underside of the Base, screw the Base to the Pillar using
the lock washers, flat washers and medium screws.
Step 2 - Connection Part (part #11)
Hardware: M6*20 medium screws (part #18) – 4 pcs
flat washers (part #23) – 4 pcs
lock washers (part #22) – 4 pcs
Place the Base on flat ground. Locate the Connection Part. Set aside
four (4) M6*20 medium screws, four (4) lock washers and four (4) flat
washers. Place a lock washer and then a flat washer on each screw.
Put the Connection Part on the Pillar as shown here, and align the
holes. Screw the Connection Part to the Pillar using the lock washers,
flat washers and medium screws.
Page 9

Assembly Instructions…
7
!
!
Step 3 – Attach the Bowl (part #2)
Hardware: M6 large wing nuts (part #21) – 5 pcs
M6*20 medium screws (part #18) – 5 pcs
flat washers (part #23) – 5 pcs
lock washers (part #22) – 5 pcs
Ensure the assembled Base is on flat ground. Locate the Bowl. Set
aside five (5) M6 large wing nuts, five (5) M6*20 medium screws, five
(5) lock washers and five (5) flat washers. Place the Bowl on top of
the Connection Part as shown below, and align the five (5) holes.
Insert a medium screw up from the underside of the Connection Part
through the Bowl. From inside the Bowl, place a flat washer then lock
washer on each screw and affix using the medium wing nut.
Step 4 - Bowl Handles (part #6) with M6*45 long screws (part #19)
Hardware: M6 large wing nuts (part #21) – 4 pcs
flat washers (part #23) – 4 pcs
lock washers (part #22) – 4 pcs
Locate the two (2) Bowl Handles. For each Bowl Handle with M6*45 long screws, set aside two (2) flat
washers, two (2) lock washers, and two (2) M6 large wing nuts. Place the screw ends of each Bowl
Handle through the holes on the sides of the Bowl, as shown below. From inside the Bowl, place a flat
washer, then lock washer on each screw and affix using the large wing nuts.
Page 10

Assembly Instructions…
8
Step 5 – Lower Hinge Bracket (part #10b)
Hardware: M5*12 small screws (part #17) – 2 pcs
flat washers (part #23) – 2 pcs
lock washers (part #22) – 2 pcs
flat nuts (part #24) – 2 pcs
Locate the Lower Hinge Bracket. Set aside two
(2) M5*12 small screws, two (2) flat washers,
two (2) lock washers and two (2) flat nuts. Place
the Lower Hinge Bracket on the Bowl as shown
here, and align the holes. Note the ‘Up’ marking
on the Lower Hinge Bracket. Through each hole,
insert a small screw from the outside of the
Lower Hinge Bracket through the Bowl. From
inside the Bowl, place a flat washer, then lock
washer on each screw and affix using the flat nuts.
Step 6 – Attach Upper Hinge Bracket (part #10a) to the Lid (part #1)
Hardware: M5 small wing nuts (part #20) – 2 pcs
M5*12 small screws (part #17) – 2 pcs
flat washers (part #23) – 2 pcs
lock washers (part #22) – 2 pcs
Locate the Lid and the Upper Hinge Bracket. Set aside two (2) M5*12 small screws, two (2) flat washers,
two (2) lock washers and the two (2) small wing nuts. Place the Upper Hinge Bracket on the Lid as
shown below (on the side opposite the Cook’s Essentials logo), and align the holes. Through each hole,
insert a small screw from the outside of the Upper Hinge Bracket through the Lid. From inside the Lid,
place a flat washer, then lock washer on each screw and affix using the small wing nuts.
Page 11

Assembly Instructions…
9
Step 7 – M5*123 Locking Pin (part #15)
Hardware: M5 small wing nut (part #20) – 1 pc
flat washer (part #23) – 1 pc
lock washer (part #22) – 1 pc
Locate the M5*123 Locking Pin, and set aside one (1)
flat washer, one (1) lock washer, and one (1) M5 small
wing nut. Place the Lid on the Bowl as shown here, so
the Lower Hinge Bracket sits inside the Upper Hinge
Bracket, and align the holes. Screw the Locking Pin
through all four (4) holes of the Hinge Brackets. From
the other end, place a flat washer, then lock washer on
the Locking Pin and affix using the small wing nut.
Step 8 – Air Vent (part #9)
Hardware: M5*12 small screw (part #17) – 1 pc
M5 small wing nut (part #20) – 1 pc
flat washer (part #23) – 1 pc
lock washer (part #22) – 1 pc
Locate the Air Vent, and set aside one (1) M5*12
small screw, one (1) flat washer, one (1) lock washer,
and one (1) M5 small wing nut. Place the Air Vent on
the outer middle of the Lid as shown here, and align
the holes. Put the small screw from the outside
through the center of the Lid. From inside the Lid,
place a flat washer then lock washer on the screw
and affix using the small wing nut.
Page 12

Assembly Instructions…
10
Step 9 – Lid Handle (part #8)
Hardware: M6 large wing nuts (part #21) – 2 pcs
flat washers (part #23) – 2 pcs
lock washers (part #22) – 2 pcs
Locate the Lid Handle and remove the cardboard from the
Handle screws, careful not to let the short tube and washer
come off, Set aside two (2) M6 large wing nuts, two (2) flat
washers, and two (2) lock washers. With the Lid open, place
the screw ends of the Lid Handle (with short tube and washer)
through the holes on the outside of the Lid as shown here.
From inside the Lid, place a flat washer and lock washer on
each screw and affix using the large wing nuts.
Step 10 – Heat Reflector Plate (part #4) and Heating Element (part #5)
Hardware: M5*12 small screws (part #17) – 2 pcs
M5 small wing nuts (part #20) – 2 pcs
flat washers (part #23) – 2 pcs
lock washers (part #22) - 2 pcs
Locate the Heat Reflector Plate and the Heating Element.
Set aside two (2) M5*12 small screws, two (2) M5 small
wing nuts, two (2) flat washers, and two (2) lock washers.
Place the Heat Reflector Plate into the Bowl with the
metal bands facing up and parallel to the front of the
Grill, as shown below. Then, place the Heating Element
on top of the Heat Reflector Plate. Make sure the ‘Top’
of the Heating Element box is facing up and fits through
the rectangular hole at the front center of the Bowl.
Insert the small screws from outside the Bowl through
the holes on each side of the Heating Element box. From
inside the Bowl, place a flat washer then lock washer on
each screw and affix the Heating Element to the Bowl
using the small wing nuts. See Step 11 for final
placement of Heating components.
Page 13

Assembly Instructions…
11
Step 11 – Cooking Grill (part #3)
Locate the Cooking Grill and place in the Bowl on top of the
Heating Element, as shown here.
Step 12 – Foldable Warming Rack (part #16)
Locate the Foldable Warming Rack and unfold the legs. Insert
the Foldable Warming Rack by placing the four (4) prongs into
the side holes of the Lid and Bowl, as shown here.
Step 13 – Drip Tray (part #12)
Locate the Drip Tray and insert in the Connection
Part, as shown here.
Page 14

Using the Temperature Control
12
Powering Up the Barbecue
1. Make sure the OFF symbol on the Temperature Control
Dial (part #7b) is fully turned to the light Indicator
location. (Fig. 1, page 12). The light should not be
illuminated.
2. Insert the Temperature Control Thermostat Prong (part #7a) with
the Temperature Control Dial facing up, into the Opening for the
Temperature Control (part #2a) at the front of the unit just below the
rim of the Bowl. (Fig. 2, page 12). Push in all the way to be sure it is
making full contact.
Fig. 2
Fig. 1
F
Hint: The tip of the Temperature Control Thermostat Prong should
be above the nearby punch hole on the Heat Reflector Plate when it
is fully inserted. (Fig. 3, page 12).
Fig. 3
3. Plug the Temperature Control Wall Plug (part #7c) into a dry ground-fault circuit-interrupter (GFCI)
power outlet.
WARNING: Using an extension cord is NOT recommended. If an extension cord is absolutely
necessary, carefully follow the instructions in the Important Safeguards on page 2.
4. Adjust the setting on the Temperature Control Dial to desired temperature level. (Fig. 1, page 12).
Settings on the Temperature Control are indicated by temperature marks on the circular dial,
including the ‘OFF’ position marking. The light indicator will illuminate while the unit is heating, and
will switch on and off during the cooking cycle. The unit is usually packed with the Temperature Dial
set to the “OFF’ position.
Turning Off the Barbecue
1. Turn the Temperature Control Dial to the ‘OFF’ position.
2. Unplug the power cord from the wall outlet.
3. Once the Barbecue has cooled down, unplug the Temperature Control from the Barbecue.
Page 15

General Operating Instructions
13
Before using the Electric Barbecue Grill for the first time...
Remove all packaging materials from the exterior and interior of the Barbecue Grill.
Follow all assembly instructions.
Before cooking any food on this appliance, operate the grill for about 15 minutes with the lid closed and
the power turned to “HIGH”. This will ‘heat clean’ the internal parts and dissipate odors from the
manufacturing process.
Using Your Electric Barbecue Grill
1. While the Grill is in off, spray with a non-stick cooking spray.
2. Set Temperature Control to the desired level and allow temperature to be reached.
3. Place food on Cooking Grill.
4. With Lid open or closed, cook until desired internal temperature is reached. Use heat-proof, non-
scratch utensils to remove food from Cooking Grill.
CAUTION: Lid is NOT intended to be locked while cooking.
WARNING: Do NOT touch hot surfaces. Use handles or knobs …wear oven mitts when handling hot
components or touching hot surfaces.
Cleaning and Care
CAUTION:
1. After using, turn the Temperature Control Dial to the ‘OFF’ position and unplug the power cord from
the power source. Allow the Barbecue to cool completely, then unplug the Temperature Control
from the Barbecue Grill and remove the Heating Element before cleaning.
2. All cleaning and maintenance should only be performed when the Barbecue Grill is cold to the touch
and only when the power supply is disconnected.
3. Do not use water or any other liquid spray to clean the Barbecue Grill while it is still plugged in.
4. Do not clean any parts in a self-cleaning oven or dishwasher. The extreme heat will damage the
finish.
5. NEVER immerse the Heater Element or Temperature Control Plug, Prong or Cord set in water.
Note: Do NOT use abrasive cleaning agents on this appliance. They will damage the finish. Never use
oven cleaner on this product.
Page 16

Cleaning and Care…
14
Cleaning Outsides of Appliance and Cooking Grill
1. Remove the power cord from the wall socket and be certain the appliance is thoroughly cooled
before cleaning the appliance.
2. Remove the Temperature Control from the appliance before cleaning, and set aside.
3. Remove the Cooking Grill.
4. Remove the Heating Element before cleaning by unscrewing the wing nuts and lifting the element
out, and putting it and the wing nuts aside.
5. Wipe surface grime off the appliance, including the Lid top, Bowl, Cooking Grill and Heat Reflector
Plate with a clean damp cloth, using mild dishwashing detergent or baking soda.
6. For stubborn surface dirt, use a citrus-based degreaser and a nylon scrubbing brush.
7. Rinse clean with a damp cloth.
8. Allow surface to dry fully before use.
Cleaning the Heating Element
1. Once the Heating Element is completely cool and has been removed as outlined above, gently clean
the Heating Element with a damp cloth.
CAUTION: Do not scratch the element’s surface or immerse in water.
Avoid impact to connection pins while cleaning as this may damage the contacts inside.
2. When fully dry, reinstall the Heating Element.
3. Inspect the Temperature Control and Power Cord for any possible damage, and then re-install.
Cleaning the Temperature Control
1. If cleaning is required, once the Temperature Control is completely cool and has been removed from
the appliance, gently wipe with a damp cloth.
2. Dry thoroughly.
CAUTION: Do not immerse in water.
Cleaning the Drip Tray
1. Once the Barbecue Grill is completely cool, remove the Drip Tray and empty the contents.
2. Wash with warm soapy water.
3. Rinse, and dry thoroughly.
Storage
1. Unplug the appliance and let it cool down thoroughly.
2. Make sure all components are clean and dry.
3. Place the appliance in a clean, dry place.
Environment
Dispose of all unwanted appliances according to local environmental regulations. Preserve the planet.
Page 17

Troubleshooting
PROBLEM
POSSIBLE CAUSE
SOLUTION
The Barbecue Grill does
not work.
The appliance is not plugged in.
Plug power cord into wall socket.
The appliance is not turned on.
The Temperature Control Prong is not
inserted properly into the Heating
Element’s Front Bracket.
Re-insert the Temperature Control
Prong into the Heating Element’s
Front Bracket.
Turn the Temperature Dial to the
desired temperature.
Temperature Control Prong failure.
Replace the Temperature Control.
Food is not cooked/
overcooked.
The temperature setting needs
adjusting.
Adjust the Temperature Control
Dial.
Smoke or an unpleasant
smell is coming from the
unit.
The Cooking Grill, Heat Reflector Plate
or Drip Tray may need cleaning.
Clean Cooking Grill, Heat Reflector
Plate or Drip Tray.
15
Is it possible to shut off the Unit at any time?
At any time, the unit can be turned off by turning the Temperature Control Dial to the ‘OFF’ position and
unplugging the power cord from the wall outlet.
Page 18

Full Color Reverse
Electric Barbecue Grill
Should you have any problem, our friendly customer service staff is here to help you.
1-866-533-1184.
!
EG_IB-CE-CM-V1-190114!
 Loading...