

Cook's Companion MULTIFUNCTIONAL AIR FRYER WITH ROTISSERIE Care & Use Manual
MULTIFUNCTIONAL AIR FRYER
WITH ROTISSERIE
Care & Use Manual
with Recipes by Deb Murray

PLEASE READ BEFORE USE AND SAVE THESE INSTRUCTIONS
Thank you for purchasing Cook’s Companion™ Multifunctional Air Fryer with Rotisserie. The
Cook’s Companion™ Multifunctional Air Fryer heats up quickly while the convection fan
circulates hot air internally to cook food uniformly and seals in the natural juices for full avor
and aroma. The look while you cook lid, allows you to clearly see what you are cooking and
easily obtain the optimum cooking level for your meals. In addition to being your primary
cooking vessel, this appliance is so compact, it can be used as an extra warming vessel for
entertaining or in situations where space is limited. This Cook’s Companion™ product will
perform best when used as intended. To ensure the best performance please consistently
follow these instructions. This user’s manual contains information on the use and care of this
product. Please read this manual carefully before operation to ensure proper usage and
maintenance. Carefully following the directions in this booklet will enable you to optimize the
performance and lifespan of the appliance. The product you have purchased adheres to the
latest safety and technology standards; however, as with any electric appliance, there are
some potential risks. Only operate this oven in accordance with the instructions provided and
only for its intended household use.
- 2 -

IMPORTANT SAFEGUARDS
• Read all instructions and save for future reference.
• The Multifunctional Air Fryer is for domestic use only; It is not designed for commercial
operation.
• Do not operate in the presence of explosive and/or ammable fumes.
• This appliance is not intended for use by children. Keep children and pets away from this
product. Close adult supervision is necessary when any appliance is used by or near children.
• Always make sure that children cannot reach the product or any loose cables.
• Use on a secure and stable worktop. Do not place near the edge of the worktop.
• Do not place the product where it can either fall or be submerged into water or any other
liquid.
• Use the product for its intended household use only.
• Always place the pan shell and pan onto the base before plugging the power cord and
switching on. NEVER operate the oven without rst placing it on the supplied base.
• Do not let the cord hang over the edge of the table or worktop, or make contact with hot
surfaces.
• Do not place the Multifunctional Air Fryer on or near a hot gas or electric cook top or in a
heated oven.
• Do not move the oven while in use.
• Surfaces become very hot during operation, and remain hot for some time after the unit is
switched off.
• All metal items in the Fryer, such as the accessory attachments, can get very hot during
cooking. Please be careful when removing these items from the oven. Always wear oven
gloves or use the tongs supplied.
• Never place unprotected hands inside the oven when in use.
• Never leave the product unattended while in use.
• Always open the lid away from you so that escaping steam is channeled away from your face.
• Take care when lifting the lid to avoid contact with hot liquid condensation that may have
collected on the inner surface of the lid.
- 3 -

IMPORTANT SAFEGUARDS (CONT.)
• Be sure to allow the oven body to cool off before cleaning.
• Be sure to unplug the oven when it is not in use, when cleaning the oven or whenever there
is a known power failure. Allow the unit to cool before putting on or taking off parts. Remove
the plug from the socket by pulling on the actual plug. Do not pull the plug out by the cable.
• Use extreme caution when removing any part from the Air Fryer.
• Be careful when disposing of hot liquids, particularly fat or oil.
•To protect against electrical shock, never immerse the cord, plug, lid/control panel or the
whole unit in water or other liquids.
• Regularly check the cable and plug for any signs of damage.
• Do not clean with metal scouring pads: Pieces may break off the pads and make contact with
electrical parts, increasing the risk of electrical shock.
• Never operate the Air Fryer if it has a damaged cord or plug or after the appliance has been
damaged in any manner.
• Do not use any other accessories or attachments not recommended by the manufacturer.
• Never use the cord to carry the product.
• Do not disassemble the product or attempt to modify the plug in any way. This item is not
equipped with any user serviceable parts.
•Extreme caution must be used when moving an appliance containing hot oil or other hot
liquids.
•Always attach plug to appliance rst, then plug cord into the wall outlet. To disconnect, turn
any control to “off”, then remove plug from wall outlet.
NOTICE:
This appliance has a polarized plug (one blade is wider than the other). To reduce the risk of
electric shock, this plug is intended to t into a polarized outlet only one way. If the plug does not
t fully into the outlet, reverse the plug. If it still does not t, contact a qualied electrician. Do not
modify the plug in any way.
- 4 -
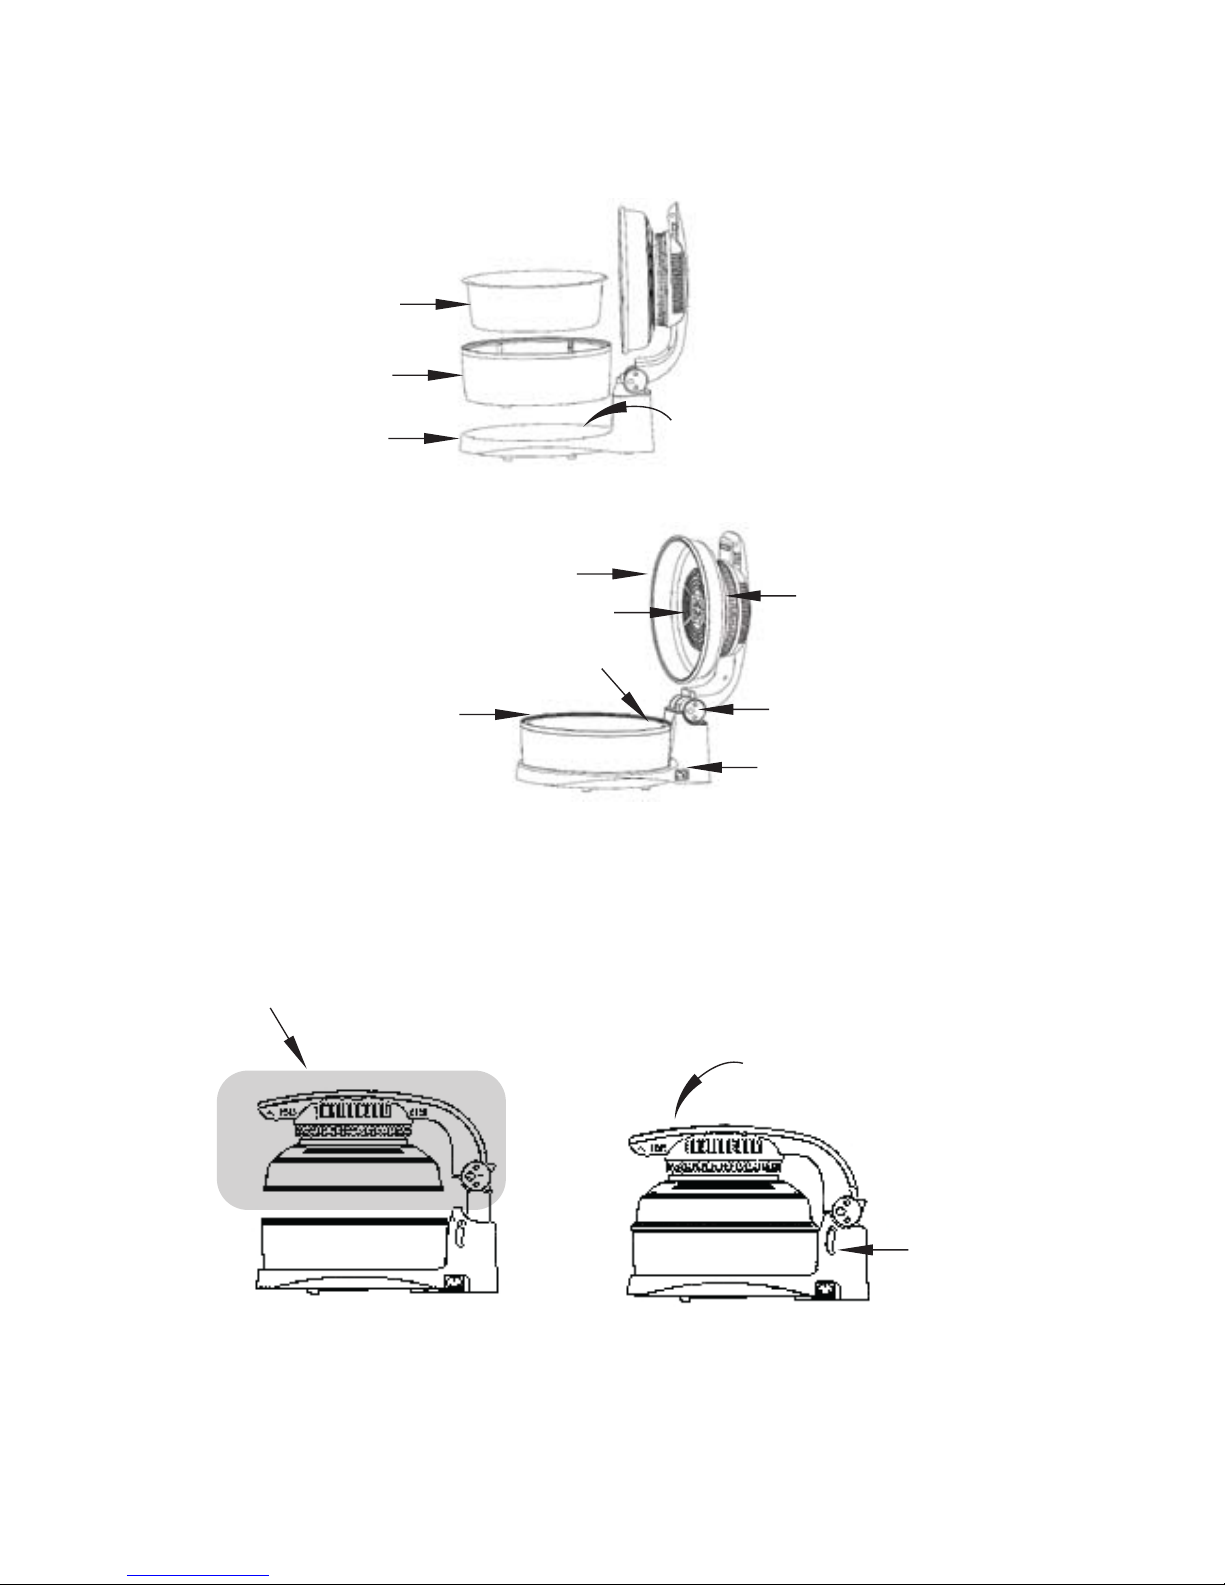
APPLIANCE DIAGRAM
MICROSWITCH (1)
(inside base)
(2) MAIN HOUSING
(3) BOWL HOUSING
(4) INNER BOWL
(5) REMOVABLE TRANSPARENT DOME
(6) HEATING ELEMENT
(7) ROTARY DRIVE
(8) ROTISSERIE
SHAFT HOLDER
AIR FAN (9)
COVER LOCK (10)
CORD RECEIVER (11)
(12) COVER (see control diagram)
CONTROL PANEL (13) (a-j)
EXPANSION
LEVER (14)
- 5 -

CONTROL PANEL DIAGRAM
(a) LED DISPLAY
(b) INCREASE TIME
DECREASE TIME (c)
(d) TEMPERATURE
INDICATOR LIGHTS
(f) ROTATION
INDICATOR LIGHTS
(g) MANUAL
TEMPERATURE
CONTROL
(i) MENU
MENU INDICATOR (e)
LIGHTS
ROTATION (h)
START/STOP
ON/OFF (j)
- 6 -
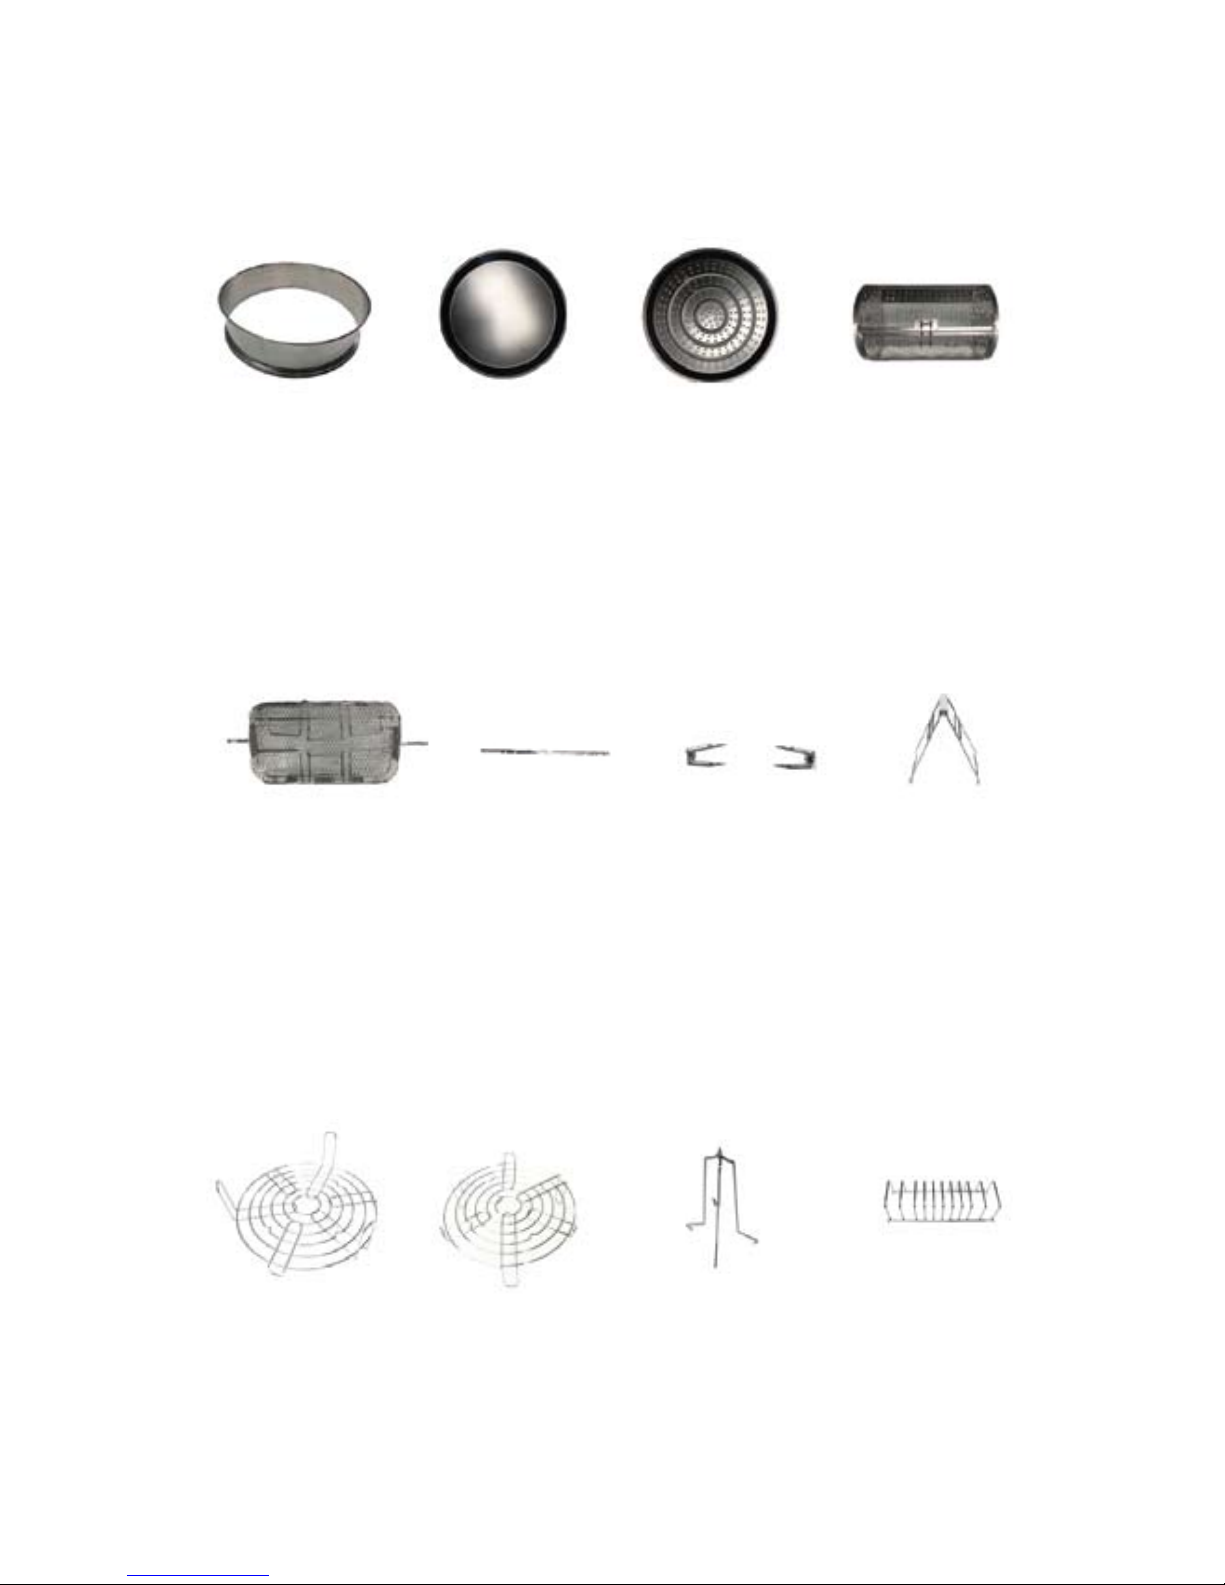
ACCESSORY ITEMS
1. EXPANSION RING
10. POULTRY RACK9(a). DUAL RACK
(low position)
8. LIFTER
7. ROTISSERIE
FORKS
6. ROTISSERIE
SHAFT
5. RECTANGLE ROTARY
BASKET
4. ROTARY BASKET
3. PERFORATED PAN2. UTILITY PAN
9(b). DUAL RACK
(high position)
11. VERTICAL RACK
- 7 -
APPLIANCE DIAGRAM USE & ASSEMBLY
1. MICRO SWITCH: A safety mechanism (located inside the base of the Main Housing) that
must be depressed by the Bowl Housing for the appliance to function. If the appliance
does not turn on check this connection to make sure it is depressed.
2. MAIN HOUSING: Outer support structure. Houses the Micro Switch, Heating Element,
Rotary Drive, Air Fan, Cover Lock, Cord Receiver, Cover, Control Panel and Expansion Lever.
3. BOWL HOUSING: Holds the Inner Bowl in place and surrounds the inner bowl with a
color, heat resistant outer shell. Place the Bowl Housing inside the Main Housing making
sure to insert the rotary drive through the round opening in the Bowl Housing.
4. INNER BOWL: Main cooking area coated with PTFE free nonstick coating. The Inner Bowl
nests inside the Bowl Housing. Align the round opening in the Inner Bowl with the Rotary
Drive and nest into the Bowl Housing.
5. REMOVABLE TRANSPARENT DOME: Look through area of the cover. The Dome is
removable for cleaning. To remove, grasp the dome and turn clockwise. To replace, align
grooves and turn counter clockwise.
6. HEATING ELEMENT: Heat source.
7. ROTARY DRIVE: Rotating connection for all rotisserie parts. This is the chrome circular
shaft that inserts through both the Bowl Housing and Inner Bowl.
8. ROTISSERIE SHAFT HOLDER
9. AIR FAN: Fan that circulates the air in side the appliance creating the convection
process.
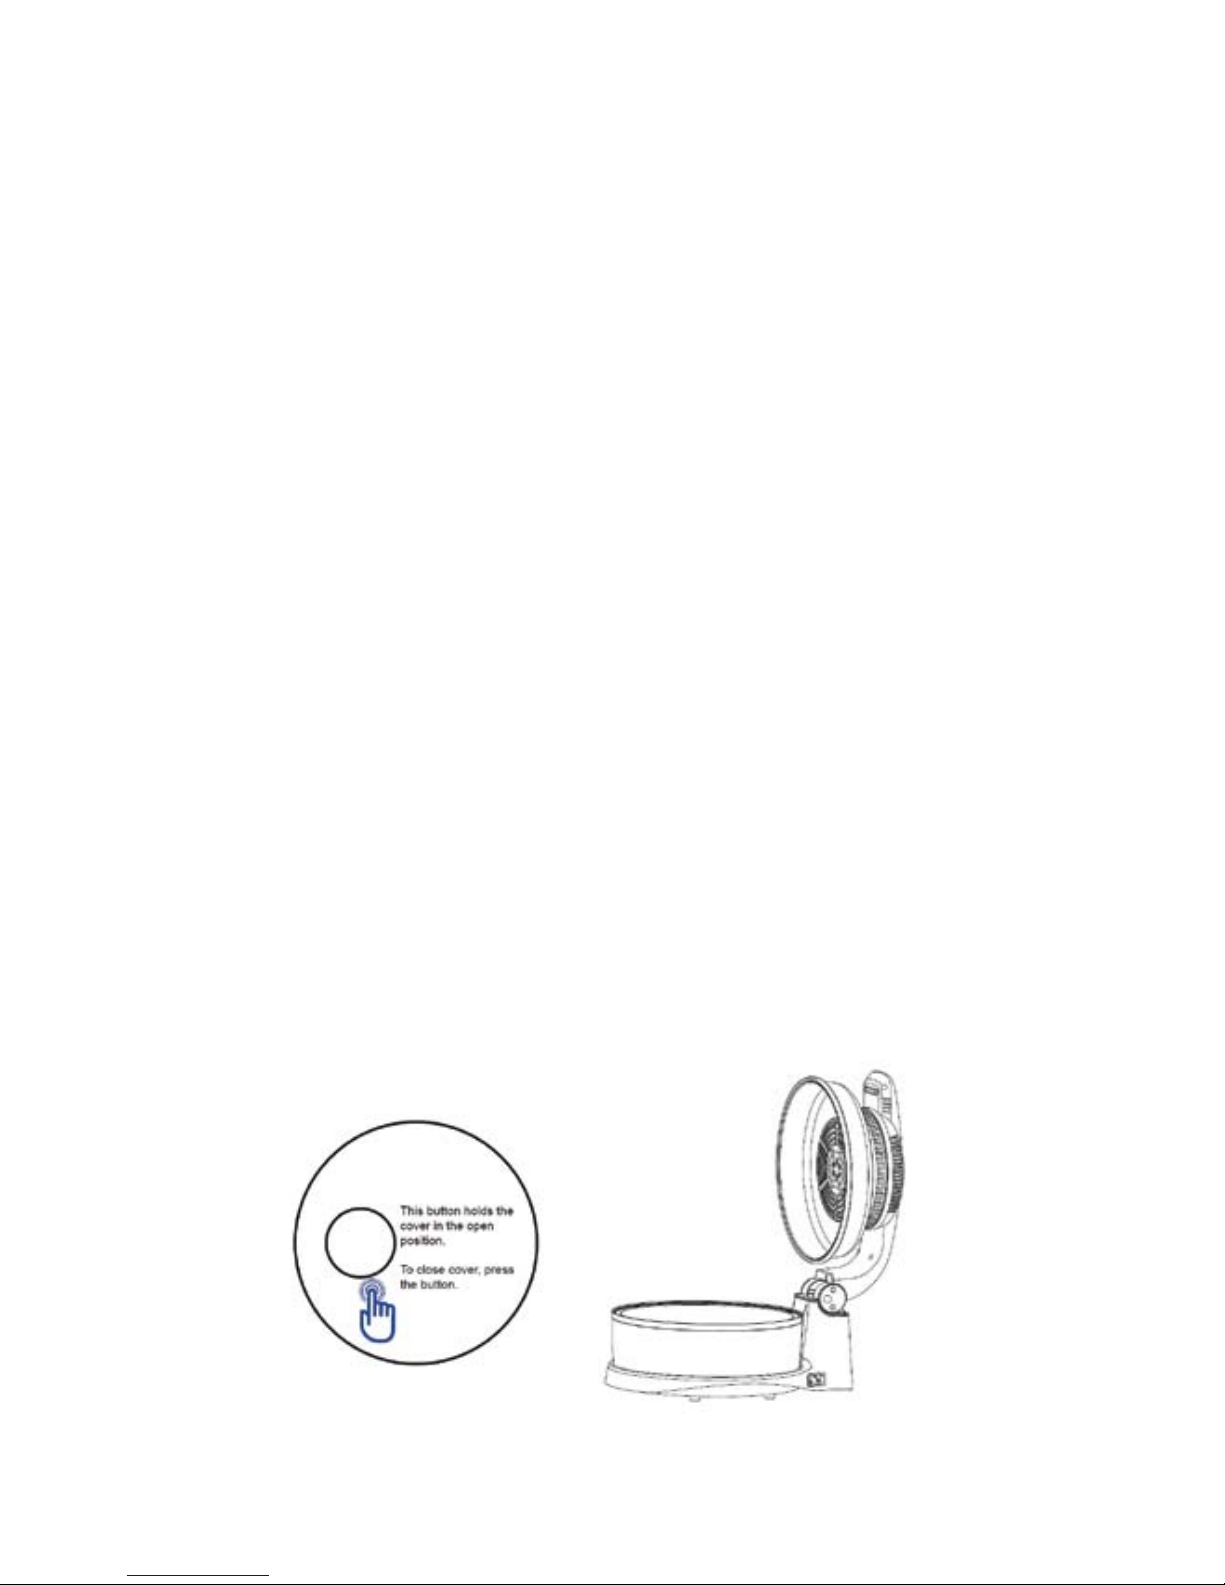
10. COVER LOCK: Holds the cover in the open position at a 90° angle. While the button is in
position, the top lid is locked. To close the cover, press the button.
- 8 -
APPLIANCE DIAGRAM USE & ASSEMBLY (CONT.)
11. CORD RECEIVER: Attachment area for electrical cord to the appliance. Insert the
appliance side of the cord here.
12. COVER: Entire top section of the appliance. Transparent dome removes for cleaning.
13. CONTROL PANEL: Digital function control area. See separate control function
reference (a-j).
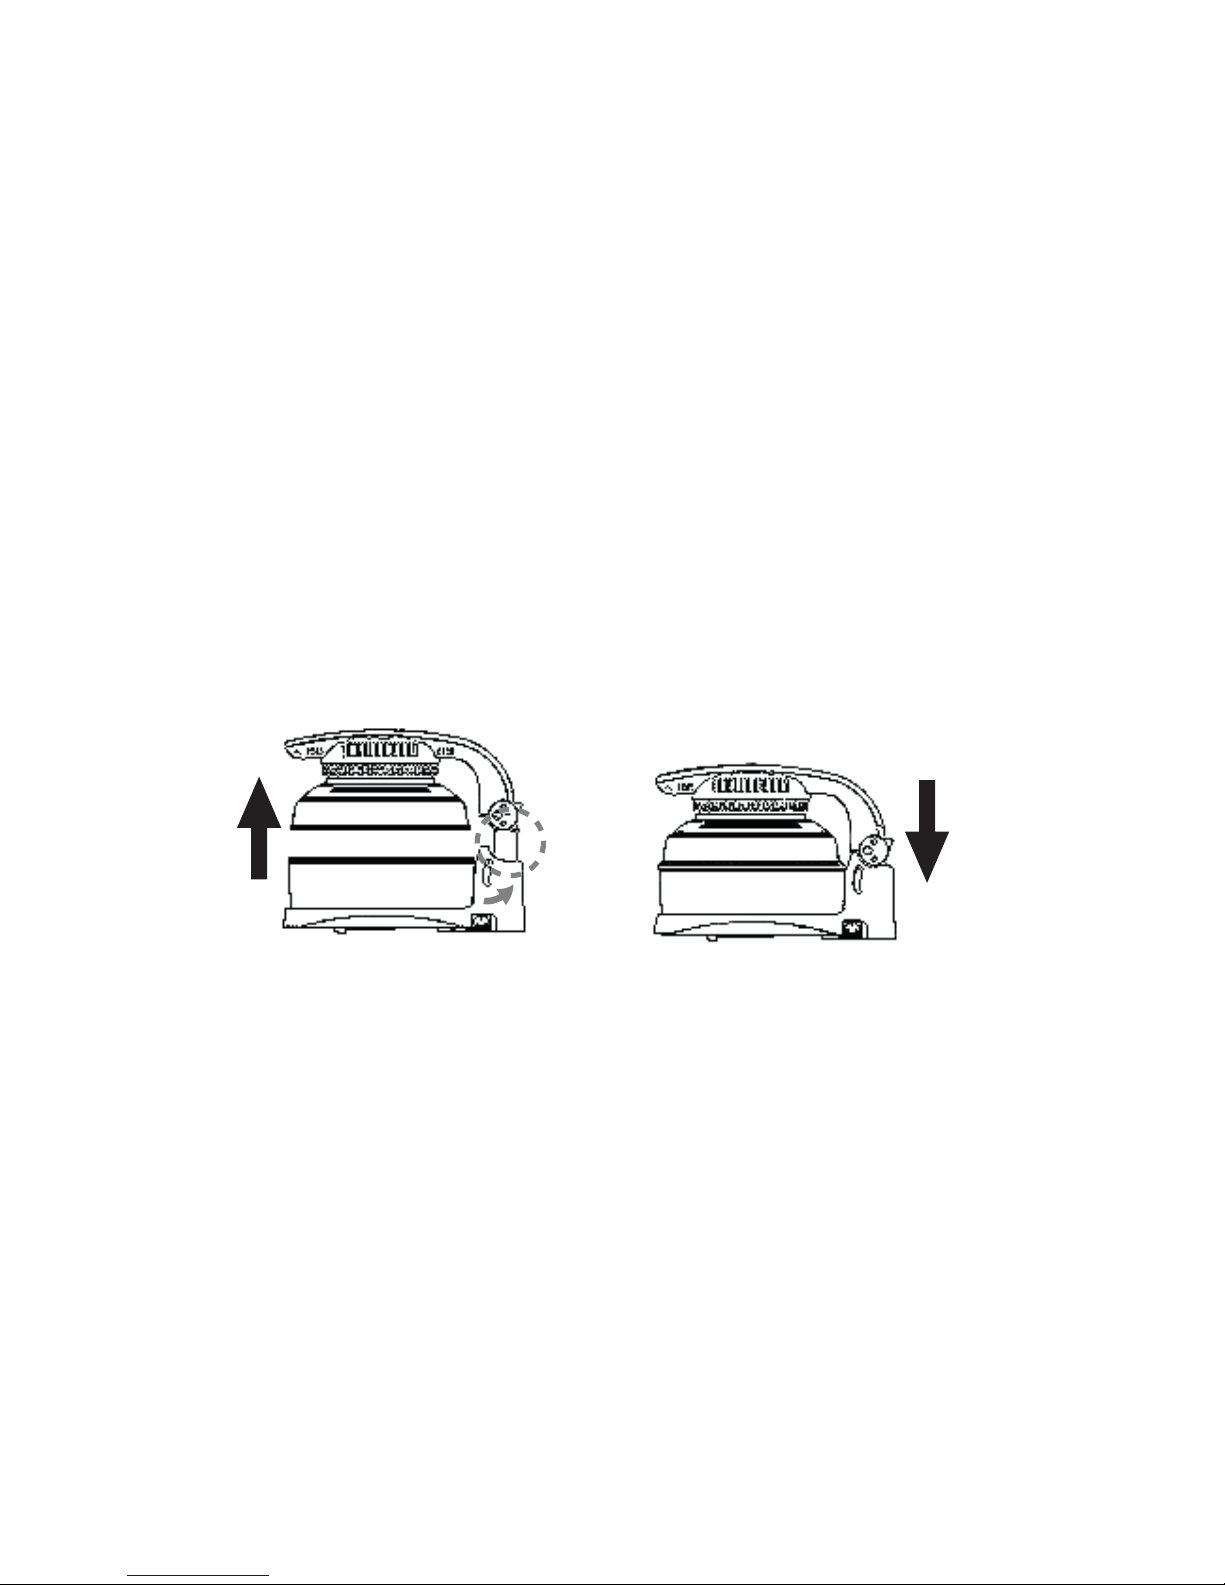
14. EXPANSION LEVER: Your Cook’s Companion™ Multifunctional Air Fryer has a special
design feature (Expansion Device) that allows the appliance to expand to accommodate
the Expander Ring. To expand: Grasp cover arm rmly, and lift up the cover arm until it is
held in the higher position. To lower: Turn the expansion lever counter-clockwise until it
releases and lower the cover arm.
- 9 -

CONTROL PANEL REFERENCE
(a) LED DISPLAY: Digital display.
(b) INCREASE TIME: Press button, at any time, to manually increase cooking time. It
increases by minutes. If pressed continually without release, it will increase up in 5 minute
increments.
(c) DECREASE TIME: Press button, at any time, to manually decrease cooking time. It
decreases by minutes. If pressed continually without release, it will decrease in 5-minute
increments.
(d) TEMPERATURE INCREMENT LIGHTS: Lights up to identify temperature setting.
(e) MENU INDICATOR LIGHTS: Lights up to identify item setting.
(f) ROTATION INDICATOR LIGHTS: Light up to identify if rotation is on/o.
(g) MANUAL TEMPERATURE CONTROL: Press to manually adjust temperature.
(h) ROTATION STOP/START CONTROL: Press to start/stop rotary function.
(i) MENU: Press to select DIY or Pre-settings.
(j) ON/OFF: Starts or stops power.
- 10 -
ACCESSORY USE AND ASSEMBLY
(All ACCESSORIES ARE DESIGNED SPECIFICALLY FOR USE WITH THE COOK’S COMPANION™
MULTIFUNCTIONAL AIR FRYER)
1. EXPANSION RING: Increases Inner Bowl height expanding the appliance capacity by 5
quarts. Allows extra capacity for cooking larger food items such as a whole chicken. Follow the
Expansion Lever instructions (Appliance Use 13). Open cover to 90° and place the Expansion
Ring on top of the Bowl Housing (Appliance Use 3). The Expansion Ring has triangle-shaped
caution symbols. The triangles point up Δ when correctly placed. Press the Cover Lock
(Appliance Use 9) to lower the cover. The Transparent Dome nests inside the rim of the
Expansion Ring.
2. UTILITY PAN: Stick resistant pan mostly used on top of the low rack.
3. PERFORATED PAN: Stick resistant perforated pan mostly used on top of the low rack and
allows more airow than the Utility Pan.
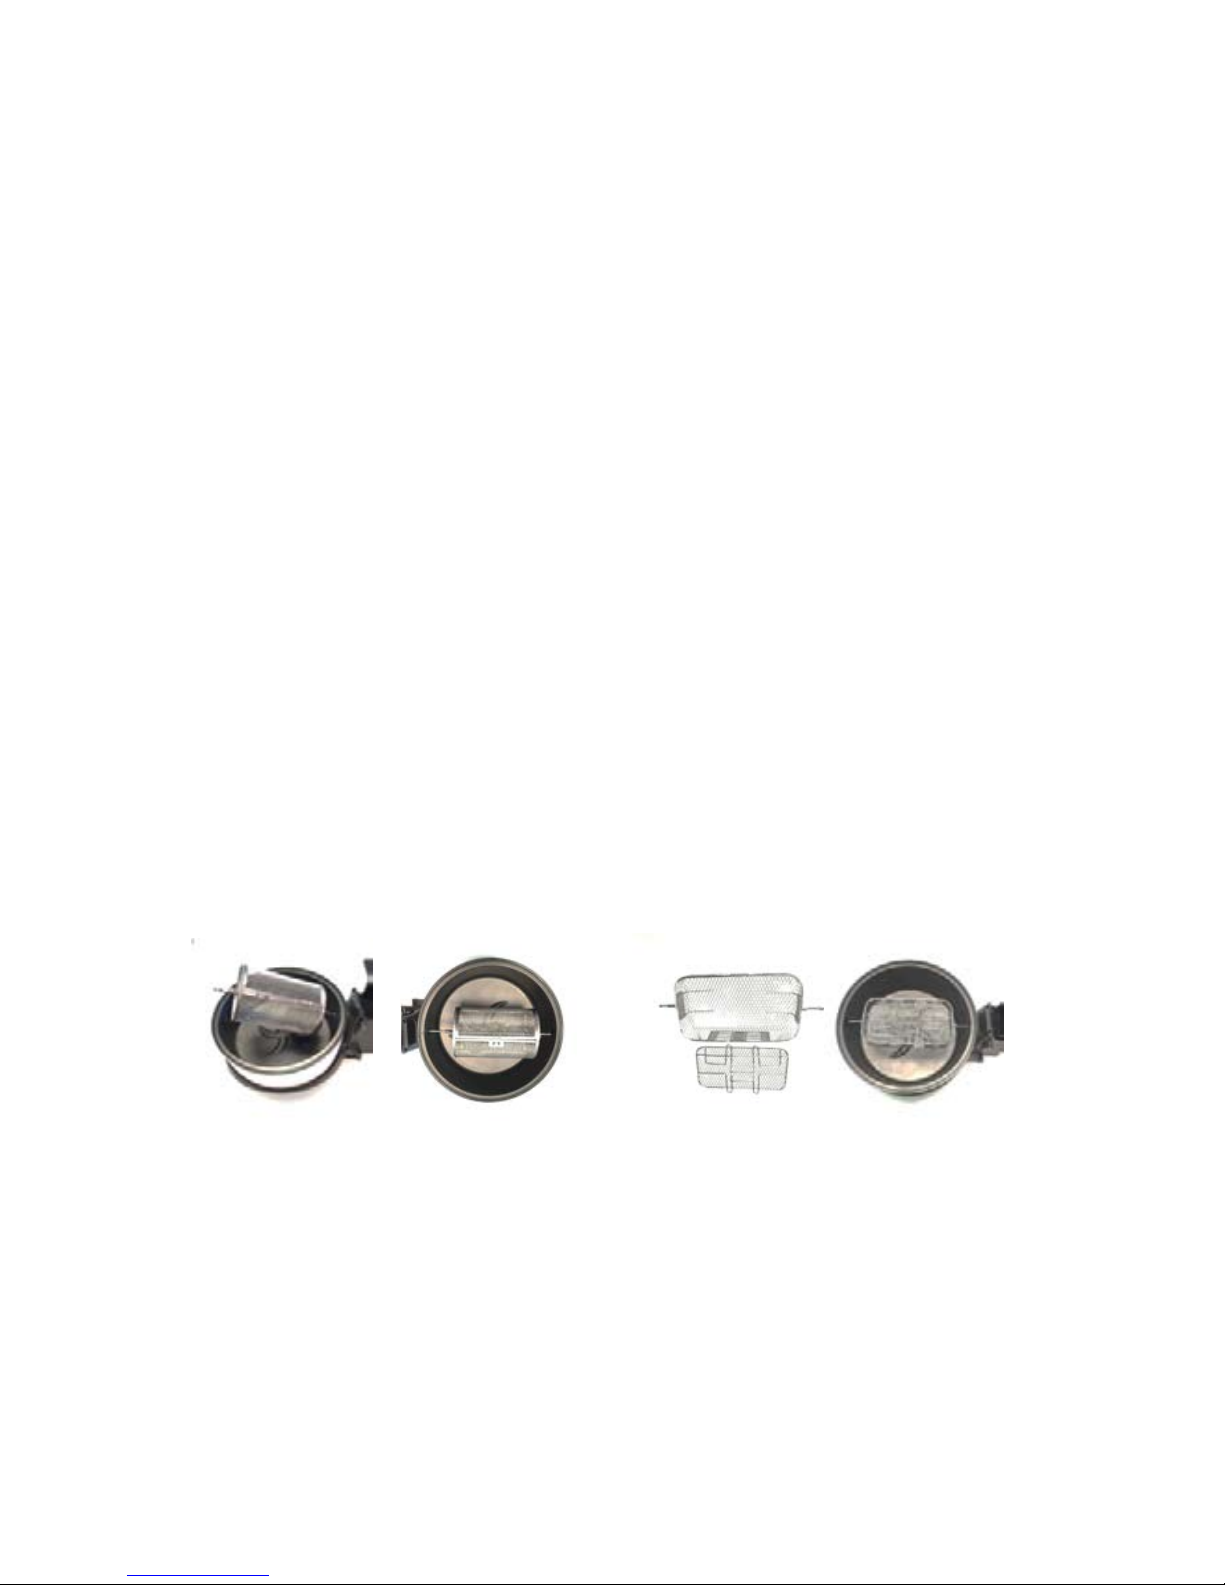
4. ROTARY BASKET: (pictured below left) Cylinder shaped basket mostly used to rotate
smaller food items such as French fries, beans and more. Must be used in conjunction with the
rotisserie shaft. To assemble the Rotary Basket; insert the Rotisserie Shaft (6 Accessary Items)
through the square hole in the center of the Rotary Basket. The Rotisserie Shaft has small
indents on one side that should be facing the screw side of the Rotary Basket. These indents
help center the basket. Align the outer indents with the screws and hand tighten. Open the
basket on the opposites side of the hinges, the basket has a tension clasp that easily opens or
closes with pressure. Fill basket with desired food. Place the assembled Rotary Basket inside
the Inner Bowl (4 Accessory Items) by inserting the pointed end of the Rotisserie Shaft into
the Rotary Drive (7 Appliance). Rest the opposite end of the Rotisserie Shaft into the Rotisserie
Shaft Holder (8 Appliance). Tip: Do not over ll the basket, allowing sucient room for
movement will ensure more even cooking.
5. RECTANGLE ROTARY BASKET: (pictured above right) Rectangle shaped basket most used
to rotate narrower items such as sandwiches or sh. The Rectangle Rotary Basket comes with
a pre-assembled rotisserie shaft. Remove the basket lid by squeezing the top lid handles
together. One side of the handle will bend inward allowing removal. Place food item inside
and replace the lid as close to the food item as possible. Place the basket inside the Inner
Bowl (4 Accessory Items) by inserting the longer shaft end into the Rotary Drive. Take care to
line up the square shaft end with the square area of the Rotary Drive. Rest the opposite end of
the basket shaft into the Rotisserie Shaft Holder (8 Appliance). Tip: The Basket lid can be
placed at dierent levels inside the basket, the closer lid is placed to the food item the better
the item will stay in place during cooking.
ROTARY BASKET
RECTANGLE ROTARY BASKET
- 11 -
ACCESSORY USE AND ASSEMBLY (CONT.)
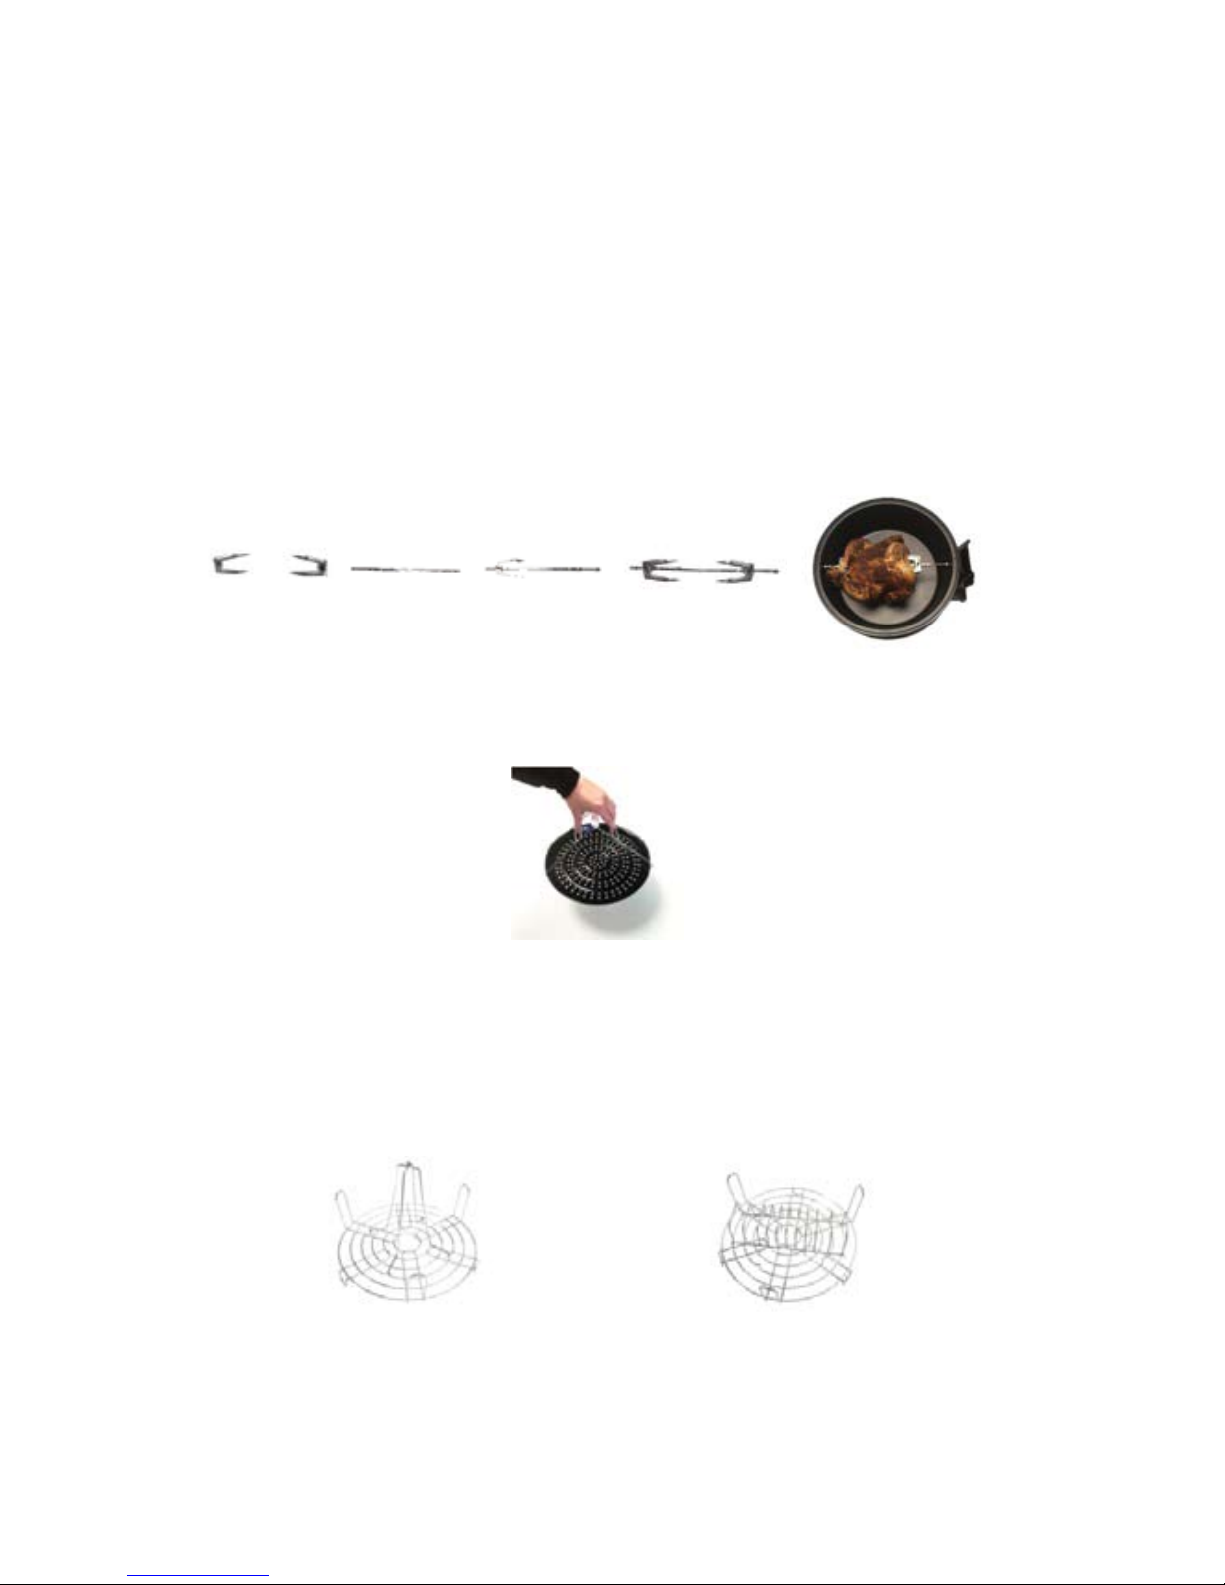
6. ROTISSERIE SHAFT: (pictured below) Used in conjunction with the Rotary basket and
rotisserie forks.
7. ROTISSERIE FORKS: (pictured below) Use for roasting chicken, duck and roasts. Must be
used in conjunction with the rotisserie shaft. The Rotisserie forks need to attach to the
Rotisserie Shaft for use. Attach one fork to one side of the Rotisserie Shaft and tighten.
Skewer the food to be cooked with the Rotisserie Shaft and slide the food until it is
secured by the fork. Attach the other fork and slide until it secures the food and tighten
the screw to secure. Place the assembled Rotary Basket inside the Inner Bowl (4 Accessory
Items) by inserting the solid end of the Rotisserie Shaft into the Rotary Drive
(7 Appliance). Rest the opposite end of the Rotisserie Shaft into the Rotisserie Shaft
Holder (8 Appliance).
8. LIFTER: (pictured below) Use only for lifting the Dual Rack, the Utility Pan, and
Perforated Pan out of the Fryer. Place the Lifter ends around the outside edge of the rack
or pan, squeeze together and lift (as pictured). Note: Please use caution when using lifter,
as all pieces may be hot.
11. VERTICAL RACK: (pictured above right) Use in conjunction with the Dual Rack in the
low position. Separates food and assists vertical cooking items such as garlic toast.
Vertical Rack rests on top of Dual Rack in low position, as pictured.
POULTRY RACK + DUAL RACK VERTICAL RACK + DUAL RACK
- 12 -
9. DUAL RACK: Recommend for maintaining the desired height between food and heat
source. This rack is reversible, with one side high and one side low. Please note there must
be at least ¾” between the heat source and the food.
10. POULTRY RACK: (pictured below left) Use in conjunction with the Dual Rack in the low
position. This rack allows for vertical roasting of poultry. Attach the Poultry Rack to the
Dual Rack, as pictured.

GETTING STARTED
Read the safety instructions found in this manual before operating. Before using this
appliance for the rst time, follow these steps:
1. Remove all packing materials and literature from inside the oven. Make sure the oven is
in good condition and there are no missing parts or damage to any part.
2. Select a at, heat-resistant, non-ammable surface to operate the Multifunctional Air
Fryer on making sure there is enough room to open the cover when cooking is complete.
3. Remove any dust or soil that may have accumulated on the surface of the product. Wipe
thoroughly with a clean damp cloth. Wash each washable part (Inner Bowl, Transparent
Dome, Accessories) in warm soapy water or in the dishwasher. Do not use any abrasive
cleaners or scouring pads. Dry thoroughly before use. NEVER submerge any non-washable
part in water or any other liquid.
4. Select desired parts and accessories to be used for cooking and take care to assemble
each part or accessory per the assembly instructions.
5. Lower the cover to the closed position and plug the appliance into the wall outlet.
6. Make sure the power cord is not touching any surface that is or will be hot.
7. Always have oven mitts or heat resistant glove available.
8. Before rst use, heat up the empty appliance at 410° temperature for ve minutes. This
will eliminate any odors from within the oven. This also will burn o any excess lubricants,
which were used during the manufacturing process. Allow the appliance to cool to room
temperature before rst use. A slight amount of smoke may be produced during the rst
few uses and is not considered a defect.
9. Always use wooden, silicone, heat-proof plastic or nylon utensils while cooking. Metal
utensils may scratch the bowl.
- 13 -

OPERATING INSTRUCTIONS
1. Place the desired accessory inside the Inner Bowl before placing food inside (unless the
accessory is pre-loaded with the food item). You may also cook directly in the bowl but it
is recommended to use at least one of the accessories to obtain better circulation and
distribution of hot air within the unit. For best results, keep food approximately 1” to 1.25”
from the wall and ¾” from the heating element to allow maximum air circulation. FOOD
CANNOT BE CLOSER THAN ¾” FROM THE HEATING ELEMENT. Foods may also be cooked
directly on the racks, on foil or in an oven-safe container.
2. Lower the cover securely on the bowl making sure that the food does not touch the
sides of the lid. If lid is not closed completely, the appliance will not turn on.
3. Press the Menu button for the desired pre-set function or DIY.
4. If using DIY, press the temperature button until the Temperature Indicator light
indicates your desired temperature.
5. If using DIY, press the timer +/- button until the desired time is indicated in the LED
Display.
6. If Rotisserie is desired, press the rotation start/stop button.
7. Press the On/O button. Now you are Cooking!
Note: The interior heating element/light will cycle on and o during cooking. When the selected
temperature is reached, the heat will turn o and when the inner temperature drops below the
selected level, the interior light will turn back on for short periods of time, indicating that the oven
is heating up.
8. When the preset time period is completed, an alarm will sound to alert you that the
cooking time is over.
9. When the cooking time is over, unplug the device from the outlet. Lift the cover away
from you to allow any steam to exit and take out the food.
- 14 -
 Loading...