

Page 1
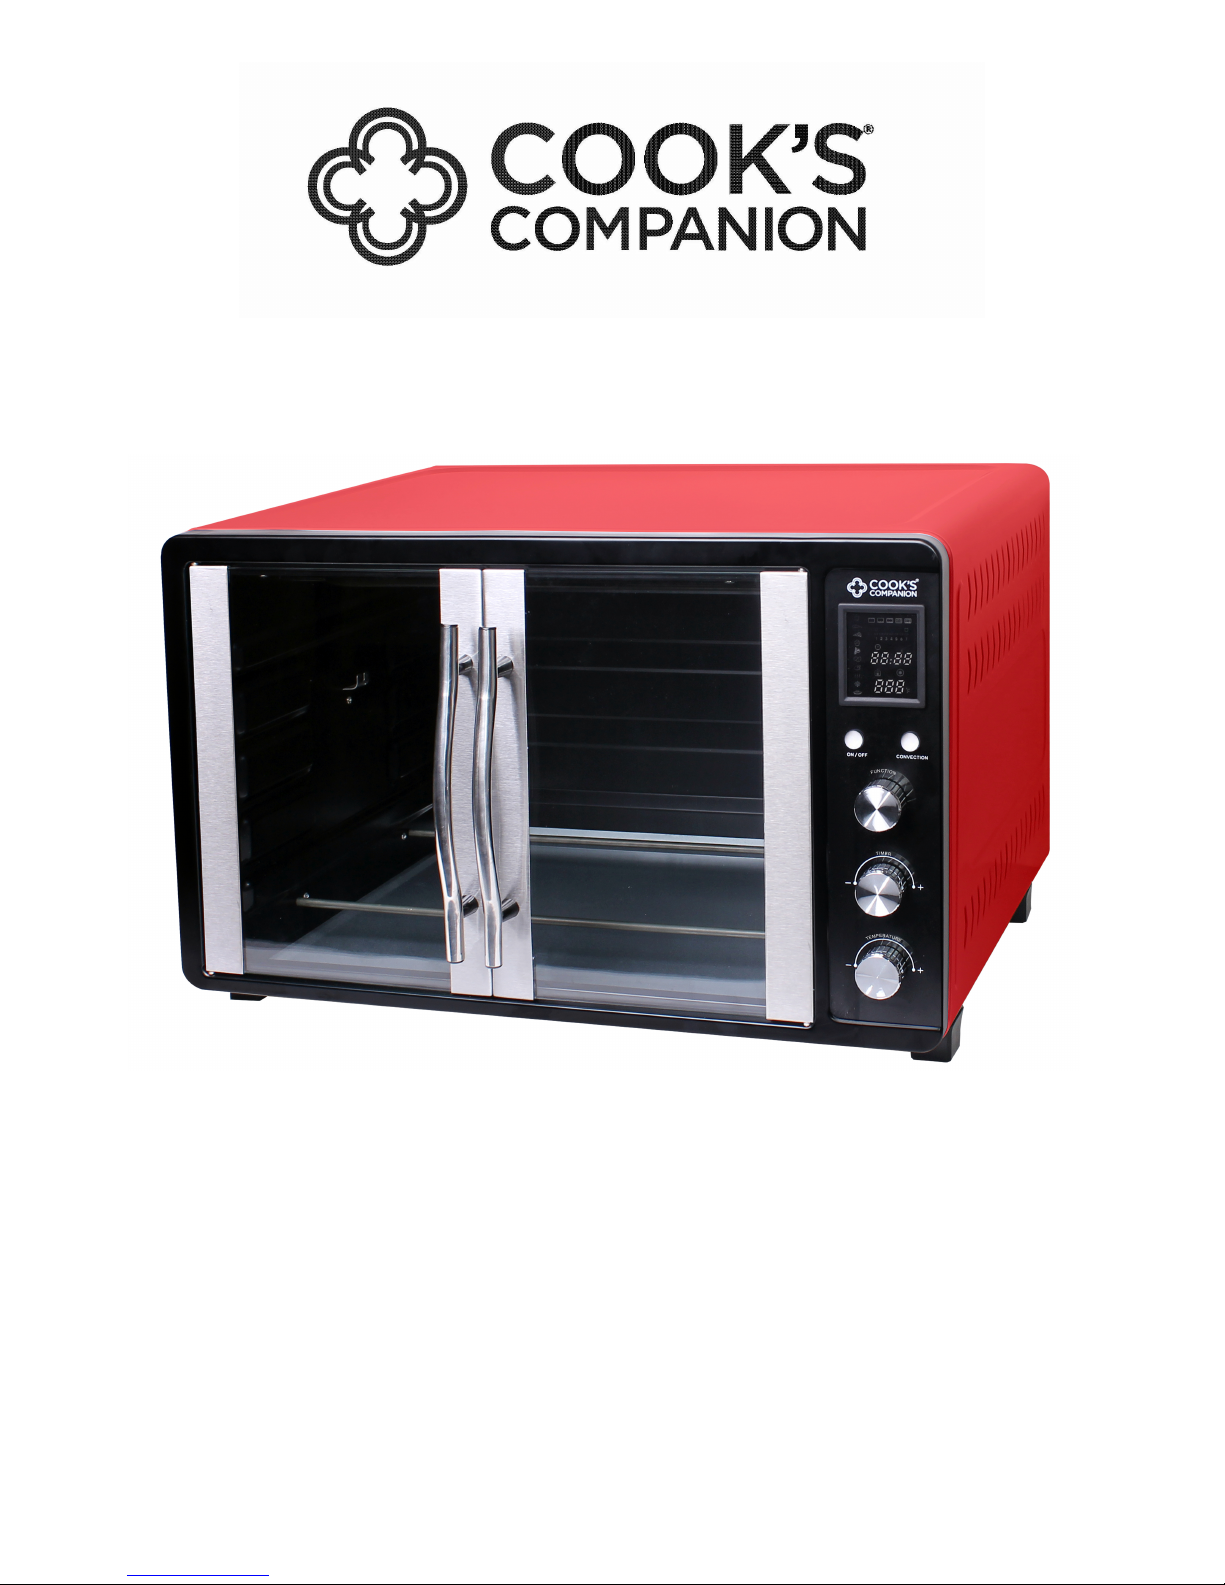
1550W DIGITAL FRENCH DOOR OVEN
Instruction Manual
MODEL CCFD19
1
Page 2
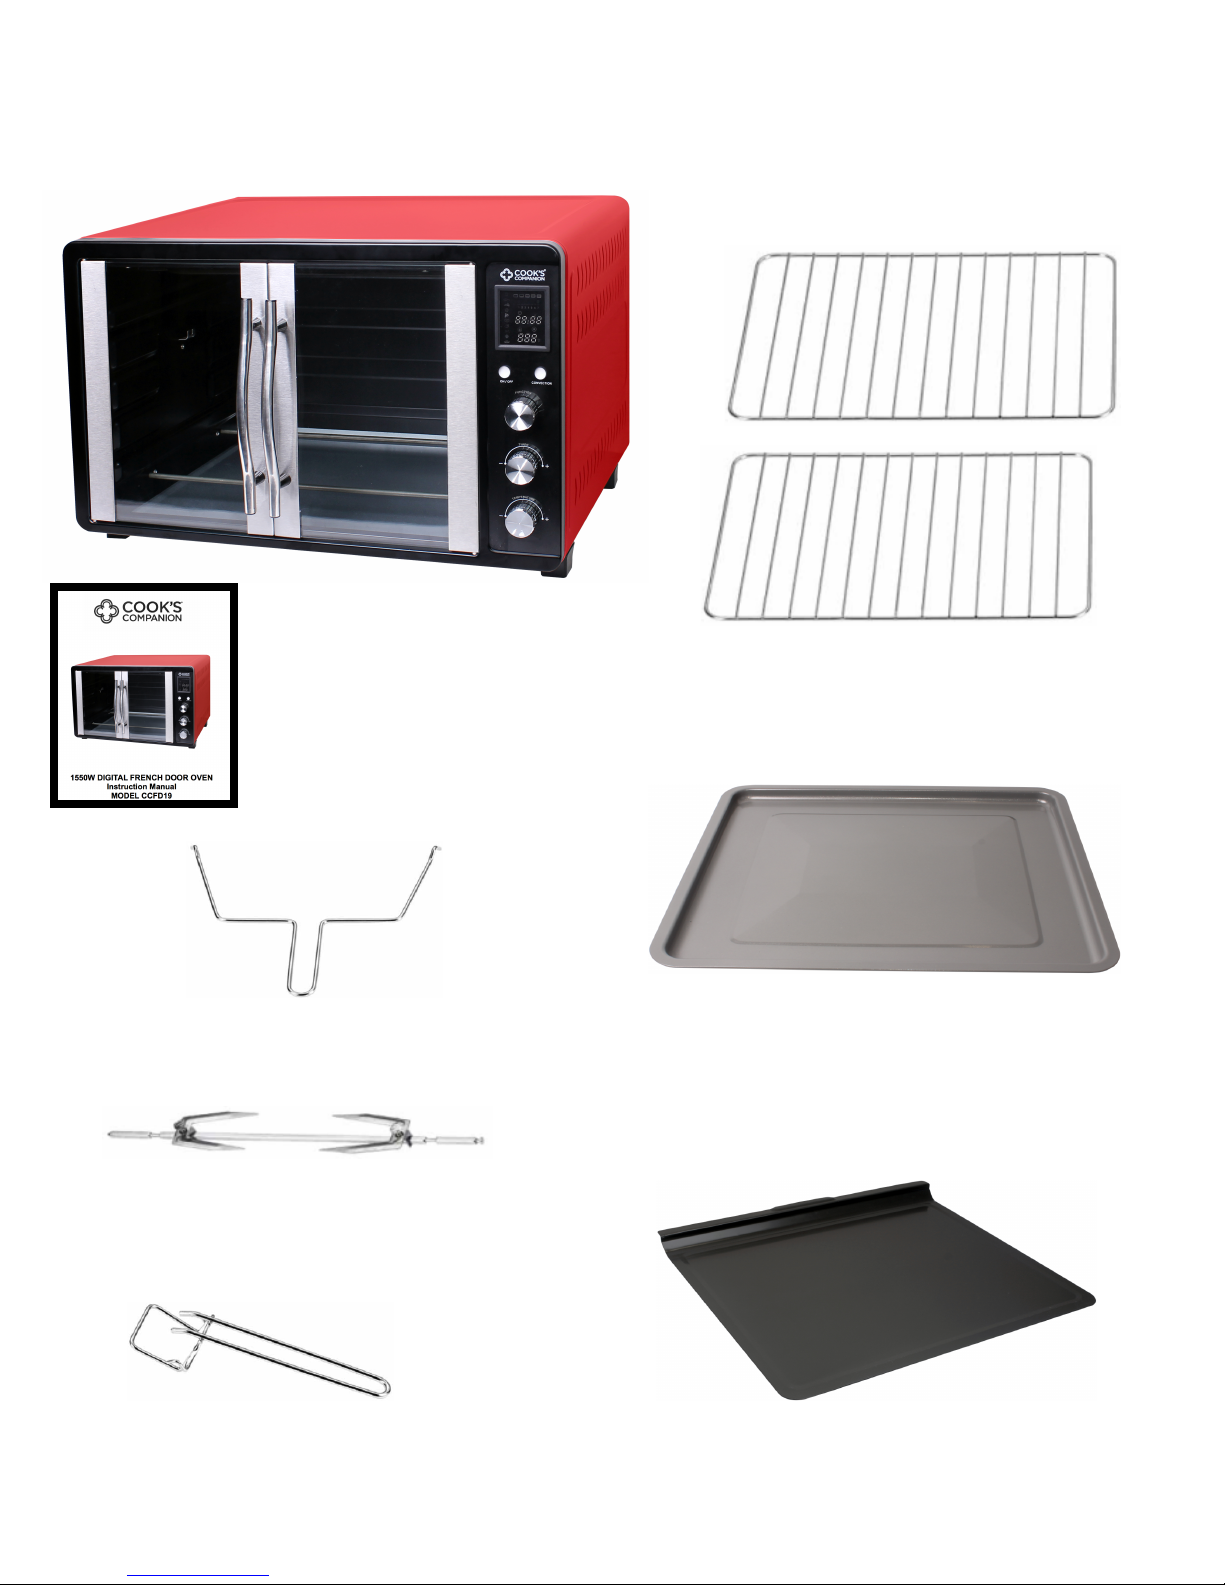
WHAT’S INCLUDED
2
French Door Oven
& Instruction
Manual
Two Wire Racks
Baking Pan
Crumb Tray
Rotisserie Handle
Rotisserie
Tray Handle
Page 3

IMPORTANT SAFEGUARDS
When using electrical appliances, basic safety
precautions should be followed as follows:
• Read all the instructions.
• Not intended for commercial use.
• The exterior of the oven will become very hot during
use. Do not touch hot surfaces. Use handles or
knobs.
• To protect against electric shock, do not immerse
cord, plug, or any parts of the oven in water or other
liquids. For cleaning instructions see page 15.
• If the cord or plug become damaged, do not use
machine.
• Do not place oven near or on gas or electric burners
or in a heated oven.
• Do not place cord or oven by another hot surface as
this may cause damage to the cord and oven. Do not
let the cord hang over the edge of a table or counter.
• When operating the oven, keep at least four inches of
space on all sides of the oven to allow for adequate
air circulation.
• The unit will still operate if the door is opened, be
sure to always cancel the cooking setting before
opening the door.
• Unplug unit from outlet when not in use and before
wiping the unit clean. Allow unit to cool before
cleaning.
• Be extremely careful when handling pans, tray, racks,
or grease from oven as they could be extremely hot.
3
Page 4

• Do not clean with metal scouring pads. Pieces can
break off the pad and touch electrical parts, creating
a risk of electric shock.
• The risk of fire may occur if the oven is covered or
near flammable materials (ex. Curtains, drapes,
walls). Do not store any item on top of the unit when
in operation.
• Make sure that the oven vents and openings are not
obstructed during use.
• Make sure the oven has four inches of space around
to avoid fire.
• Do not place containers constructed of materials
other than metal, glass, or ceramic in the oven.
• Do not put paper, cardboard, or plastic inside the
oven.
• Do not touch the glass window on the oven during
use as this will be extremely hot. Also, do not place
utensils or anything against the glass window.
• Do not leave the oven unattended during use in case
of fire.
• Do not let children operate oven.
• Do not place eyes or face in close proximity with the
tempered safety glass door, in the event that the
safety glass breaks.
• Caution should always be used when opening the
oven due to the steam as this could result in burns.
• Use extreme caution when emptying trays and allow
liquids to cool fully before handling.
• Intended for household use, do not use outside.
4
Page 5

• Always wear protective, insulated oven mitts when
inserting or removing items from the hot oven.
• This appliance has a tempered safety glass door.
The glass is stronger than ordinary glass and more
resistant to breakage. Tempered glass can break, but
the pieces will not have sharp edges. Avoid
scratching door surface or nicking edges.
• Do not use appliance for anything other than its
intended use.
• During the dehydrate function it is suggested to open
the doors every thirty minutes to let out humidity.
• To ensure continued protection against risk of electric
shock connect to properly grounded outlets. Do not
use an extension cord with unit.
• SAVE THESE INSTRUCTIONS.
5
Page 6

CONTROL PANEL
6
Preset functions
Function Dial
Power Button
Temperature Dial
Timer Dial
Preset functions
Toast Functions
-
The toast functions
have preset times
and temperatures
that can not be
adjusted.
-
When using the
function dial, 1 will
be the lightest toast
setting and 7 will be
the darkest toast
setting.
-
See page 12 for
default times on
each toast setting.
Convection Icon
-
Shows when the
convection is in
use.
Convection Function
-
See page 12 for
cooking chart
showing which
functions can and
can not use
convection.
-
If the convection
function is in use, it
can not be
cancelled during
cooking.
Page 7

BEFORE FIRST USE
1. Remove all packaging materials. Place the oven
on a flat surface.
2. Clean pans, racks and accessories with hot
water, dishwashing liquid, and a non-abrasive
sponge.
3. Wipe the inside and outside of the appliance with
a cloth.
USING THE APPLIANCE
1. Plug the unit in. Note: The screen will display “-
- - -” always when the unit is plugged in.
2. Place the crumb tray in the bottom of the oven,
depending on recipe place either the baking
pan or roasting rack in the oven in desired
position. If these items need to be removed
during cooking, use the tray removal tool, this
can also assist with lifting the pan/rack when
they become hot from cooking.
3. To choose a function on the oven, rotate the
dial to the desired function. Note: Default times
and temperatures of each function can be found
in the cooking chart starting on page 12.
4. To adjust the temperature, rotate the
temperature dial to increase or decrease the
temperature.
7
Page 8

5. Then the time can be adjusted on the unit. To
adjust the time, rotate the time dial to increase
or decrease the time.
6. After the time and temperature have been
confirmed, press the power button to start the
oven.
7. Once the cooking time has elapsed, the unit will
beep four times and the screen will display
0:00, press the power button to stop the
beeping.
8. Use the tray handle provided to remove trays
and pans. Note: The oven will be extremely hot,
use caution.
8
Page 9

How to Prepare Your Rotisserie for Chicken
-
Remove chicken from packaging. Make sure if previously
frozen it is completely thawed.
-
Check cavity and remove neck and giblets. Check at the tail
and make sure the kidneys have been removed. The kidneys
are the dark reddish colored objects located on back side of
cavity near the tail. If they have not been removed, use your
thumbs to force them out.
-
The chicken should then be rinsed thoroughly inside and out
with cold water. Pat dry inside and out with paper towels.
-
The chicken needs to be placed on a spit so that it is centered
and evenly balanced. It must also be held in place so it does
not move around as it is cooking.
- Slide the spit rod through the neck opening of the chicken and
out the bottom end. Place the chicken so that it is in the center
of the rod.
-
Keep the rod running through the center of the chicken and
attach the rotisserie spit forks into the breast end. Once in
place secure the forks on the spit by tightening the wing nut.
- Then attach the spit forks at the tail end in the same manner.
When the forks are attached, the rod should be centered
through the chicken so that it is evenly balanced. It is important
for the chicken to be balanced so that it rotates smoothly on the
rotisserie unit.
-
Make sure the forks are pushed in so that they are holding the
chicken securely and that the wing nut on both forks has been
tightened.
- Cut several lengths of kitchen twine. First loop a piece around
the tail, securing it to the rod, unless the tail was secured by
one of the tongs of the spit fork. Then cross the legs and wrap
the twine up around the legs several times.
9
Page 10

- Tie the twine securely, making sure the opening to the cavity is
closed so that the ingredients inside will not drop out as the
chicken rotates on the rotisserie spit.
-
Wrap another piece of twine around the fatty part of the legs a
couple of times and tie securely.
-
Use another piece of twine to wrap around the breast area to
hold the wings in close to the body of the chicken.
-
Insert the pointed end of the spit in to the spit mount hole in the
oven, then rest the back of the spit on the stainless groove
adjacent.
- Close the door, select one of the functions that uses the
rotisserie function (see page 12 for function list). Always make
sure the crumb tray and baking pan are installed in the bottom
of the oven before pressing the start button.
- Once the cook time is complete, remove the rotisserie rod
using the rotisserie handle by placing it under the rotisserie and
lifting up.
10
Page 11

How to Prepare Your Rotisserie for other Fowl and
Roasts
-
The meat needs to be placed on a spit so that it is centered and
evenly balanced. It must also be held in place so it does not move
around as it is cooking.
-
Slide the spit rod through the middle of the protein and out the
bottom end. Place the protein so that it is in the center of the rod.
-
Keep the rod running through the center of the protein and attach
the rotisserie spit forks into the end. Once in place secure the forks
on the spit by tightening the wing nut.
-
Then attach the spit forks at the other end in the same manner.
When the forks are attached, the rod should be centered through
the protein so that it is evenly balanced. It is important for the
protein to be balanced so that it rotates smoothly on the rotisserie
unit.
-
Make sure the forks are pushed in so that they are holding the
protein securely and that the wing nut on both forks has been
tightened.
- Cut several lengths of kitchen twine. First loop a piece around the
end, securing it to the rod, unless the it was secured by one of the
tongs of the spit fork. Then wrap the twine up around the protein
several times.
-
Tie the twine securely, making sure the opening to the cavity is
closed so that the ingredients inside will not drop out as the protein
rotates on the rotisserie spit.
- Insert the pointed end of the spit in to the spit mount hole in the
pressure oven, then rest the back of the spit on the stainless groove
adjacent.
-
Close the door, select a function that uses the rotisserie function
(see page 12 for a list). Set the temperature to desired temperature
and time of protein. Always make sure the crumb tray and baking
pan is in place before pressing start.
- Once the cook time is complete, remove the rotisserie rod using the
rotisserie handle by placing it under the rotisserie and lifting up.
11
Page 12

COOKING CHART
12
Function
Description
Heating
Element
Position
Default
Time
Default
Temp.
(°F)
Time
Range
(Min)
Temp.
Range
Convection
Rotisserie
Toast
Upper
and
Lower
0:02 /
0:04 /
0:05
0:06 /
0:07 /
0:08
0:11
XXXXX
Fish
Upper
and
Lower
0:20
340
0:01 -
3:00
150-450
Optional
X
Pizza
Upper
and
Lower
0:20
400
0:01 -
3:00
150-450
Yes
X
Page 13

13
Bake
Upper
and
Lower
0:30
350
0:01 -
3:00
150-450
Optional
X
Meat
Upper
and
Lower
0:20
440
0:01 -
2:00
150-450
Optional
X
Potato
Lower
0:50
425
0:01 -
2:00
150-450
Yes
X
Chicken
Upper
and
Lower
1:00
380
0:01 -
3:00
150-450
Optional
Yes
Dehydrate
Lower
6:00
130
0:01 24:00
86-130
X
X
Defrost
Upper
and
Lower
0:30
140
0:01 -
3:00
140-185
Optional
X
Page 14

14
Keep
Warm
Upper
and
Lower
0:25
150
0:01 -
12:00
95 - 180
Optional
X
Upper
Heating
Upper
0:30
360
0:01 -
2:00
150-450
Optional
X
Lower
Heating
Lower
0:30
350
0:01 -
2:00
150-450
Optional
X
Upper
and
Lower
Heating
Upper
and
Lower
0:30
400
0:01 -
2:00
150-450
Optional
X
Upper
Heating
and
Rotisserie
Upper
and
Rotisserie
0:40
380
0:01 -
2:00
150-450
Optional
Yes
Upper
and
Lower
Heating
+
Rotisserie
Upper,
Lower,
and
Rotisserie
0:30
420
0:01 -
2:00
150-450
Optional
Yes
Page 15

CLEANING
Clean after every use.
1. Turn the oven off, unplug and allow to cool
completely.
2. Wash pans and tools in hot water with dish
liquid. Rinse and dry thoroughly.
3. Wipe the external surface of the oven with a soft
damp cloth and dry surfaces with soft dry cloth.
Do not use detergent or abrasives as these may
scratch the coating.
Note: Never immerse or place water inside the oven
housing.
STORAGE
1. Unplug the cord.
2. Make sure all parts are clean and dry.
TROUBLESHOOTING
15
CODE
CAUSE
SOLUTION
E1
Open circuit issue.
Unplug unit and call
customer care at
312-526-3760.
E2
Short circuit issue.
Unplug unit and plug
back into the same
plug. If the unit doesn't
work, use a different
plug on a different
circuit.
Page 16

LIMITED ONE YEAR WARRANTY
This warranty covers all defects in workmanship or materials in the mechanical and
electrical parts arising under normal use and care in this product for a period of 12
months from the date of purchase provided you are able to present a valid proof-ofpurchase. A valid proof-of-purchase is a receipt specifying item, date purchased, and
cost of item. A gift receipt showing item and date of purchase is an acceptable proof-ofpurchase. Product is intended for household use only. Any commercial use voids the
warranty.
This warranty covers the original retail purchaser or gift recipient. During the
applicable warranty period within normal household use, we will repair or replace, at our
discretion, any mechanical or electrical part which proves defective, or replace unit with
a comparable model. Shipping and handling costs are not included for warranty
replacements and are the responsibility of the customer.
To obtain service under the terms of this warranty, call our customer care department
at 312-526-3760 (Monday- Friday 10:00AM-6:00PM CST), or send an email to
customercare@alliedrich.net. Please provide the model number listed on the bottom of
this page when contacting us.
THIS LIMITED WARRANTY COVERS UNITS PURCHASED AND USED WITHIN
THE UNITED STATES AND DOES NOT COVER:
• Damages from improper installation.
• Damages in transit.
• Defects other than manufacturing defects.
• Damages from misuse, abuse, accident, alteration, lack of proper care
and maintenance, or incorrect current or voltage.
• Damage from service by other than authorized dealer or service center.
• Shipping and handling costs.
• This warranty gives you special legal rights and you may also have other
rights to which you are entitled which may vary from state to state.
Manufacturer does not assume responsibility for loss or damage for return
shipment. We recommend that you keep your original packaging should you require
repair service. Before returning product please contact our customer care department
for return authorization. When returning product for repair please include your full name,
return address, and daytime phone number. Also include a brief description of the
problem you are experiencing and a copy of your sales receipt or other proof of
purchase in order to validate warranty status.
MODEL CCFD19
16
 Loading...