

COOK Medical Ciaglia Blue Rhino G2 Instructions For Use Manual

EN
Ciaglia Blue Rhino® G2 Advanced Percutaneous Tracheostomy
11
Introducer
Instructions For Use
CS
Perkutánní tracheostomický zavaděč Ciaglia Blue Rhino® G2
15
Advanced
Návod k použití
Ciaglia Blue Rhino® G2 Advanced perkutan tracheostomi-indfører
DA
20
Brugsanvisning
Ciaglia Blue Rhino® G2 Advanced Einführhilfe für die perkutane
DE
25
Tracheostomie
Gebrauchsanweisung
Εισαγωγέας διαδερμικής τραχειοστομίας Ciaglia Blue Rhino® G2
EL
Advanced
30
Οδηγίες χρήσης
Introductor para traqueostomía percutánea Ciaglia Blue Rhino® G2
ES
36
Advanced
Instrucciones de uso
Introducteur pour trachéotomie percutanée Ciaglia Blue Rhino® G2
FR
41
Advanced
Mode d’emploi
Introduttore per tracheostomia percutanea Ciaglia Blue Rhino® G2
IT
46
Advanced
Istruzioni per l’uso
Ciaglia Blue Rhino® G2 Advanced introducer voor percutane
NL
tracheostomie
52
Gebruiksaanwijzing
Introdutor para traqueostomia percutânea Ciaglia Blue Rhino® G2
PT
Advanced
57
Instruções de utilização
Ciaglia Blue Rhino® G2 Advanced perkutan trakeostomiinförare
SV
62
Bruksanvisning
*C_T_PTISG_REV3*
Illustrations • Ilustrace • Illustrationer • Abbildungen • Απεικονίσεις • Ilustraciones • Illustrations • Illustrazioni • Afbeeldingen • Ilustrações • Illustrationer
1
3
2
5
6
4
7
8
9
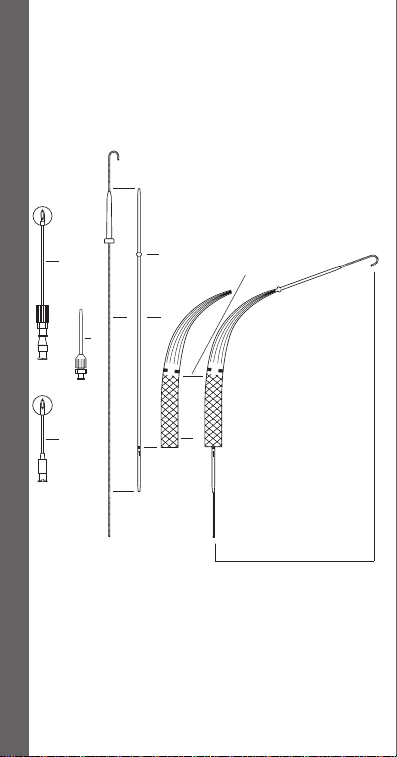
Fig. 1

1. FEP Catheter Introducer Needle
2. I ntroducer Needle
3. I ntroducer Dilator (14 French
Radiopaque Polyethylene)
4. J-tipped Wire Guide
5. S afety Ridge
6. Guiding Catheter
7. Sk in Level Positioning Mark
8. Ciaglia Blue R hino® G2 Advanced
Dilator (Radiopaque)
9. Dilator Assembly
1. FEP katetrová zaváděcí jehla
2. Zaváděcí jehla
3. Zaváděcí dilatátor (14 Fr
rentgenokontrastní polyethylen)
4. Vodicí drát s hrotem J
5. Bezpečnostní hřeben
6. Vodicí katetr
7. Polohovací značka na úrovni kůže
8. Dilatátor Ciaglia Blue Rhino® G2
Advanced (rentgenokontrastní)
9. Sestava dilatátoru
1. FEP-kateterindføringskanyle
2. Indføringskanyle
3. I ndføringsdilatator (14 Fr røntgenfast
polyethylen)
4. J-kateterleder
5. Sikkerhedskant
6. Styrekateter
7. Positioneringsmærke i hudniveau
8. Ciaglia Blue R hino® G2 Advanced
dilatator (røntgenfast)
9. Dilatatorsamling
1. FEP-Einführhilfe für die Kanüle
2. Einführ hilfe für die Kanüle
3. Einführdilatator (14 Fr, Polyethylen,
röntgendicht)
4. Führungsdraht mit J-Spitze
5. Sicherheitsring
6. Führungskatheter
7. Hautniveaumarkierung
8. Ciaglia Blue R hino® G2 Advanced
Dilatator (röntgendicht)
9. Dilatatoreinheit
1. Βε λόνα εισαγωγέα καθετήρα από FEP
2. Βε λόνα εισαγωγής
3. Διασ τολέας εισαγωγής (14 Fr,
ακτινοσκιερό πολυαιθυλένιο)
4. Συρμάτινος οδηγός με άκρο
σχήματοςJ
5. Προε ξοχή ασφαλείας
6. Οδηγός καθετήρας
7. Ένδει ξη τοποθέτησης στο επίπεδο του
δέρματος
8. Διασ τολέας Ciaglia Blue Rhino® G2
Advanced (Ακτινοσκιερός)
9. Διάταξη διασ τολέα
1. Aguja introductora de catéter de FEP
2. Aguja introductora
3. Dilatador introductor (14 Fr,
polietileno radiopaco)
4. Guía de punta en J
5. R eborde de seguridad
6. Catéter guía
7. M arca de posición del nivel de la piel
8. Dilatador Ciaglia Blue R hino® G2
Advanced (radiopaco)
9. Conjunto de dilatador
1.
Aiguille d’introduction du cathéterFEP
2. Aiguille d ’introduction
3. Dilatateur d’introduction (14Fr
polyéthylène radio-opaque)
4. Guide à ex trémité en J
5. S aillie de sécurité
6. Cathéter guide
7. R epère de positionnement cutané
8. Dilatateur Ciaglia Blue Rhino® G2
Advanced (radio-opaque)
9. Assemblage de dilatateur
1. Ago introduttore per catetere in FEP
2. Ago introduttore
3. Dilatatore di introduzione
(polietileneradiopaco da 14 Fr)
4. Guida con punta a J
5. Ner vatura di sicurezza
6. Catetere guida
7. I ndicatore di posizione a livello
cutaneo
8. Dilatatore Ciaglia Blue Rhino® G2
Advanced (radiopaco)
9. Gruppo del dilatatore
1. FEP-katheterintroductienaald
2. Introductienaald
3. I ntroducerdilatator (14 Fr radiopaak
polyethyleen)
4. Voerdraad met J-tip
5. Veiligheidsrand
6. Geleidekatheter
7. Huidniveaumarkering
8. Ciaglia Blue R hino® G2 Advanced
dilatator (radiopaak)
9. Dilatatorsysteem
1. Agulha introdutora de cateter em FEP
2. Agulha introdutora
3. Dilatador introdutor (radiopaco em
polietileno de 14 Fr)
4. Fio guia com ponta em J
5. S aliência de segurança
6. Cateter guia
7. M arca de posicionamento ao nível
dapele
8. Dilatador Ciaglia Blue R hino® G2
Advanced (radiopaco)
9. Conjunto de dilatador
1. FEP-introducernål för katetern
2. Introducernål
3. I nförardilatator (14 French röntgentät
polyetylen)
4. Ledare med J-spets
5. Säkerhetskant
6. Styrkateter
7. Hudnivåpositionsmarkering
8. Ciaglia Blue R hino® G2 Advanceddilatator (röntgentät)
9. Dilatationsenhet
Illustrations • Ilustrace • Illustrationer • Abbildungen • Απεικονίσεις • Ilustraciones • Illustrations • Illustrazioni • Afbeeldingen • Ilustrações • Illustrationer

Illustrations • Ilustrace • Illustrationer • Abbildungen • Απεικονίσεις • Ilustraciones • Illustrations • Illustrazioni • Afbeeldingen • Ilustrações • Illustrationer
1
1. Tracheostomy Tube
2. Loading Dilator
3. D eflated Balloon
1. Tracheostomická trubice
2. Nasazovací dilatátor
3. Vyprázdněný balónek
1. Tracheostomitube
2. Ladedilatator
3. Tømt ballon
1. Trachealkanüle
2. S erieller Dilatator
3. D eflatierte Manschette
1. Σωλήνας τραχειοστομίας
2. Διασ τολέας τοποθέτησης
3. Ξεφου σκωμένο μπαλόνι
1. Tubo de traqueostomía
2. Dilatador de carga
3. Balón deshinchado
1. Canule de trachéotomie
2. Diamètre introducteur de
canule
3. Ballonnet dégonflé
1. Cannula tracheostomica
2. Dilatatore di inserimento
3. Palloncino sgonfio
1. Tracheostomietube
2. Laaddilatator
3. G edeflateerde ballon
1. Tubo de traqueostomia
2. Dilatador de carregamento
3. Balão vazio
1. Trakeostomikanyl
2. Laddningsdilatator
3. Tömd ballong
2
3
2
1
2
3
4
5
6
6
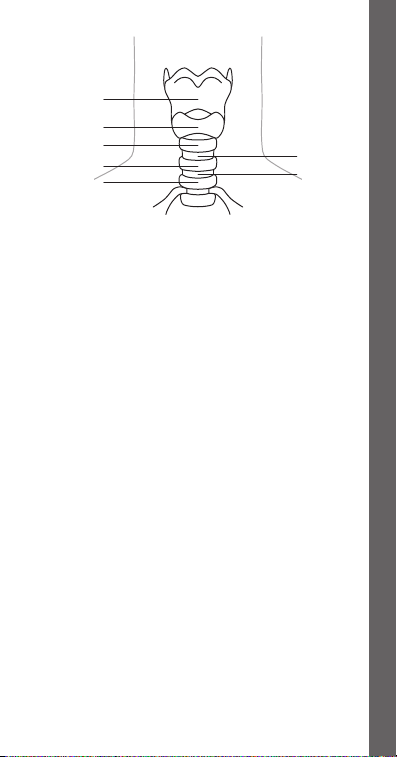
1. Thyroid Cartilage
2. Cricoid Car tilage
3. 1st Tracheal Cartilage
4. 2nd Tracheal Cartilage
5. 3rd Tracheal Cartilage
6. Access Site
1. Štítná chrupavka
2. Prstencová chrupavka
3. 1. průdušnicová chrupavka
4. 2. průdušnicová chrupavka
5. 3. průdušnicová chrupavka
6. Přístupové místo
1. Thyreoideabrusk
2. Cricoideabrusk
3. 1. trachealring
4. 2. trachealring
5. 3. trachealring
6. Indføringssted
1. Car tilago thyreoidea
2. Car tilago cricoidea
3. 1. Trachealspange
4. 2. Trachealspange
5. 3. Trachealspange
6. Zugangsstelle
1. Θυρεοειδής χόνδρος
2. Κρικοειδής χόνδρος
3. 1ος τραχειακός χόνδρος
4. 2ος τραχειακός χόνδρος
5. 3ος τραχειακός χόνδρος
6. Θέσ η προσπέλασης
1. Car tílago tiroides
2. Car tílago cricoides
3. Primer car tílago traqueal
4. S egundo cartílago traqueal
5. Tercer cartílago traqueal
6. Lugar de acceso
1. Car tilage thyroïde
3
2. Car tilage cricoïde
3. 1er car tilage trachéal
4. 2ème car tilage trachéal
5. 3ème car tilage trachéal
6. Site d’accès
1. Car tilagine tiroidea
2. Car tilagine cricoidea
3. 1° anello car tilagineo tracheale
4. 2° anello car tilagineo tracheale
5. 3° anello car tilagineo tracheale
6. Sito di accesso
1. Schildkraakbeen
2. Cricoïd
3. Eerste k raakbeenring
vantrachea
4. Tweede kraakbeenring
vantrachea
5. D erde kraakbeenring
vantrachea
6. Introductieplaats
1. Car tilagem tiróide
2. Car tilagem cricóide
3. 1.ª car tilagem traqueal
4. 2.ª car tilagem traqueal
5. 3.ª car tilagem traqueal
6. Local de acesso
1. Sköldbrosk
2. Ringbrosk
3. Första trakealbrosket
4. Andra trakealbrosket
5. Tredje trakealbrosket
6. Punktionsställe
Illustrations • Ilustrace • Illustrationer • Abbildungen • Απεικονίσεις • Ilustraciones • Illustrations • Illustrazioni • Afbeeldingen • Ilustrações • Illustrationer

Illustrations • Ilustrace • Illustrationer • Abbildungen • Απεικονίσεις • Ilustraciones • Illustrations • Illustrazioni • Afbeeldingen • Ilustrações • Illustrationer
4
5
6
7
8
9
Illustrations • Ilustrace • Illustrationer • Abbildungen • Απεικονίσεις • Ilustraciones • Illustrations • Illustrazioni • Afbeeldingen • Ilustrações • Illustrationer
Illustrations • Ilustrace • Illustrationer • Abbildungen • Απεικονίσεις • Ilustraciones • Illustrations • Illustrazioni • Afbeeldingen • Ilustrações • Illustrationer
10
1. Proximal Wire Guide Solder Mark
2. Dilator Positioning Mark
3. Sk in Positioning Mark
1. Letovaná proximální značka
vodicího drátu
2. Polohovací značka dilatátoru
3. Polohovací značka na kůži
1. Proksimalt loddemærke på
kateterleder
2. Dilatatorpositioneringsmærke
3. Positioneringsmærke i hudniveau
1. Proximale Führungsdraht-
11
Lötmarkierung
2. Dilatatormarkierung
3. Hautniveaumarkierung
1. Εγ γύς ένδειξη συγκόλλησης
συρμάτινου οδηγού
2. Ένδει ξη τοποθέτησης διαστολέα
3. Ένδει ξη τοποθέτησης στο επίπεδο
του δέρματος
1. M arca de soldadura proximal
delaguía
2. M arca de posición del dilatador
3. Marca de posición del nivel delapiel
1. M arque de brasage proximale
duguide
2. R epère de positionnement
dudilatateur
3. R epère de positionnement cutané
1. I ndicatore prossimale di unione della
guida
2. I ndicatore di posizione del dilatatore
3. I ndicatore di posizione a livello
cutaneo
1
1. S oldeermarkering op proximale deel
van voerdraad
2. Dilatatorpositiemarkering
3. Huidniveaumarkering
1. M arca de solda proximal dofioguia
2. M arca de posicionamento
dodilatador
3. M arca de posicionamento ao nível
dapele
1. Proximalt lödmärke på ledaren
2. Dilatatorpositionsmarkering
3. Hudnivåpositionsmarkering
12
1. Loading Dilator
1. Nasazovací dilatátor
1. Ladedilatator
1. S erieller Dilatator
1. Διασ τολέας τοποθέτησης
1. Dilatador de carga
1. Diamètre introducteur
decanule
1. Dilatatore di inserimento
1. Laaddilatator
1. Dilatador de carregamento
1. Laddningsdilatator
Illustrations • Ilustrace • Illustrationer • Abbildungen • Απεικονίσεις • Ilustraciones • Illustrations • Illustrazioni • Afbeeldingen • Ilustrações • Illustrationer
Illustrations • Ilustrace • Illustrationer • Abbildungen • Απεικονίσεις • Ilustraciones • Illustrations • Illustrazioni • Afbeeldingen • Ilustrações • Illustrationer
13

ENGLISH
CIAGLIA BLUE RHINO® G2 ADVANCED
PERCUTANEOUS TRACHEOSTOMY INTRODUCER
CAUTION: U.S. federal law restricts this device to sale by or on the order of
a physician (or properly licensed practitioner).
DEVICE DESCRIPTION
The Ciaglia Blue Rhino G2 Advanced Percutaneous Tracheostomy Introducer
Set/Tray consists of these primary components: an introducer needle, J-tipped
wire guide, introducer dilator, guiding catheter, loading dilators, and singlestaged Ciaglia Blue Rhino G2 Advanced Dilator. Dilation takes place in one
step with the Blue Rhino G2 Advanced dilator using the Seldinger technique.
Proper alignment of the components is illustrated in (Fig. 1).
INTENDED USE
The Ciaglia Blue Rhino G2 Advanced Percutaneous Tracheostomy
Introducer Set/Tray is intended for percutaneous dilational tracheostomy
for management of the airway in adults only. Tube placement, using the
technique described herein, should be performed in a controlled setting
(e.g., ICU or operating room) with the assistance of trained personnel.
CONTRAINDICATIONS
• Emergency tracheostomy tube placement
• Patients with enlarged thyroids
• Nonpalpable cricoid cartilage
• Pediatric applications
• Non-intubated patients
• PEEP (Positive End Expiratory Pressure) value greater than or equal to 20
• Uncorrected coagulopathy
• Pre-existing infection at the tracheostomy site
• Pre-existing malignancy at the tracheostomy site
• Unstable cervical spine fracture
• Previous surgery at the tracheostomy site (e.g., thyroidectomy)
WARNINGS
• Only physicians trained and experienced in percutaneous tracheostomy
techniques should use this device.
• Exercise care to ensure that the components used in each step are properly
positioned within the trachea. Improper placement of the components
may lead to potentially life-threatening injury.
• Improper dilation technique or tracheostomy tube placement can lead to
delayed complications (e.g., Corkscrew stenosis).
• Aseptic technique must be strictly adhered to during placement of this
device.
• Prior to attempting percutaneous tracheostomy, the patient’s airway must
be secured with an endotracheal tube.
11

• Anatomic anomalies may make the procedure difficult to perform. The
presence of anomalous blood vessels may cause excessive bleeding during
the procedure.
• In small or short patients (weighing 40-50 kg or less, and/or 4 ft. or less in
height), care must be taken not to injure the airway at the level of the carina.
PRECAUTIONS
• Bronchoscopic guidance is strongly recommended during placement
of this device to reduce the likelihood of paratracheal insertion and to
determine the intratracheal position of the needle, wire guide, dilators and
tracheostomy tube.
• An ultrasound evaluation of the patient‘s neck prior to the procedure may
aid in identification of anatomical variances.
• This product is intended for use by physicians trained and experienced
in percutaneous tracheostomy techniques. Standard techniques for
percutaneous placement of tracheostomy tubes should be employed.
• Do not resterilize dilators.
• Always confirm needle access into the trachea by air bubble aspiration or
visualization.
• Maintain safety positioning marks of the wire guide, guiding catheter and
dilator during dilating procedure to prevent trauma to posterior wall of the
trachea.
• The tracheostomy tube should fit snugly to the loading dilator for insertion.
• The generous lubrication of the loading dilator surface will enhance fit and
placement of the tracheostomy tube.
• Loading dilators are designed to be inserted within a tracheostomy tube
only. Loading dilators should not be used for creation of a stoma.
• Tracheostomy tube position should be verified by a chest X-ray.
• Take care not to advance the Ciaglia Blue Rhino G2 Advanced Dilator too
far into the patient’s airway.
• The potential effects of phthalates on pregnant/nursing women or
children have not been fully characterized and there may be concern for
reproductive and developmental effects. NOTE: The bronchoscopy adapter
is the only component in this kit that contains phthalates.
INSTRUCTIONS FOR USE
Patient Preparation
1. Following the tracheostomy tube manufacturer’s instructions, test the
balloon cuff and inflation system.
2. Place the patient in the tracheostomy position. (Fig. 4) Position a pillow under
the shoulders to permit full extension of head and neck. The head of the patient‘s
bed may be elevated 30-40 degrees at the physician‘s discretion.
3. Use ventilator changes and sedation to control patient respiration. A PEEP
(Positive End Expiratory Pressure) level of 5-10 is recommended.
4. Instruct the clinician managing the airway to loosen the fixation tapes
of the in-place endotracheal tube and deflate the cuff, making necessary
changes in tidal volume, frequency, etc., to evaluate compensation
needed for air leak. Reinflate the endotracheal tube cuff. Continuous
oximetry monitoring should be employed.
12

5. Prep and drape the anterior neck area.
6. Generously lubricate the surface of the appropriately sized loading
dilator and load the tracheostomy tube onto the dilator. Ensure that the
tracheostomy tube’s tip fits snugly on the dilator. (Fig. 2) Ensure that the
balloon is completely deflated. Thoroughly lubricate tracheostomy tube
assembly.
Tracheostomy Procedure
NOTE: Dual cannula tracheostomy tubes may also be placed using the
following technique. The inner cannula must be removed for introduction.
Always check the fit of the dilator to the tracheostomy tube prior to insertion.
1. Palpate landmark structures (thyroid notch, cricoid cartilage) to
ascertain proper location for tracheostomy tube placement. Access and,
ultimately, tube placement is ideally made at the level between the
first and second tracheal cartilages or between the second and third
tracheal cartilages whenever feasible. (Fig. 3)
2. After introducing local anesthesia, make a 1.5-2.0 cm skin incision
(vertical or horizontal) at the chosen insertion site. (Fig. 5)
3. If desired, use a curved mosquito clamp to gently dissect vertically
and transversely down to the anterior tracheal wall. (Fig. 6) With a
fingertip, dissect the front of the trachea, in the midline, free of any
tissues and identify the cricoid cartilage. Displace the isthmus of the
thyroid downward, if present. NOTE: an adequate skin incision and
blunt dissection of the subcutaneous tissue can minimize the need for
excessive force and torque throughout the procedure. Excessive force and
rotation may lead to long-term complications (e.g., stenosis).
4. Deflate the endotracheal tube cuff and withdraw to an appropriate
distance above the insertion site, yet still within the trachea. Re-inflate the
cuff once the proper position of the endotracheal tube has been reached.
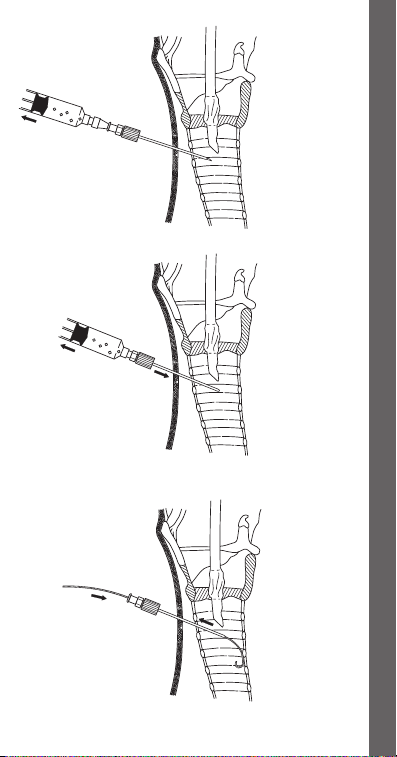
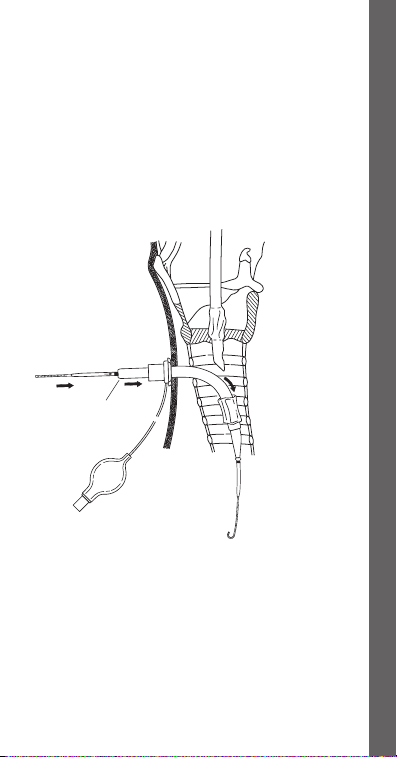
5. Attach a syringe half-filled with fluid to the introducer needle and seek
the tracheal air column by directing the needle, in the midline, posterior.
Verify entrance into the tracheal lumen via aspiration on the
syringe resulting in air bubble return. (Fig. 7) Alternatively, if using
bronchoscopy, visualize the needle entering the trachea.
NOTE: It is important that the needle not impale the endotracheal
tube. To ensure that the endotracheal tube is not impaled, gently
move it in and out 1 cm. If the tube is impaled, the needle will be
seen and felt to also move. If this occurs, it will be necessary to
withdraw the needle, pull back the endotracheal tube, and then
reinsert the needle. NOTE: Proper positioning and alignment may help
minimize complications (e.g., stenosis).
6. With the needle tip positioned in the trachea, local anesthesia may be
injected (if necessary).
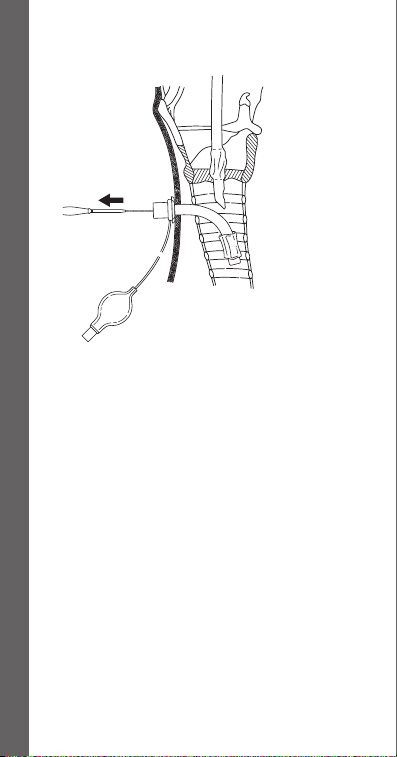
7. When free flow of air is obtained, with no impalement of the endotracheal
tube, remove the inner needle of the introducer needle assembly and
advance the outer FEP sheath several millimeters. NOTE: If using an
introducer needle without a sheath, proceed to step 9.
8. Attach a syringe to the FEP sheath and re-confirm position within the
tracheal lumen by visualizing free flow of air into the syringe when
aspirated. (Fig. 8) Alternatively, re-confirm position by visualizing the FEP
sheath in the trachea with the bronchoscope. Remove the syringe.
13

9. Introduce the J-tipped wire guide several cm into the trachea. (Fig. 9)
NOTE: The wire should advance freely, without resistance. If resistance
is encountered, do not force wire guide. Confirm correct FEP sheath or
introducer needle placement via bronchoscopy, then advance wire guide
into the trachea until the distal mark on the wire guide reaches skin level.
10. Remove the FEP sheath or introducer needle while maintaining wire
guide position within the tracheal lumen. (Fig. 9)
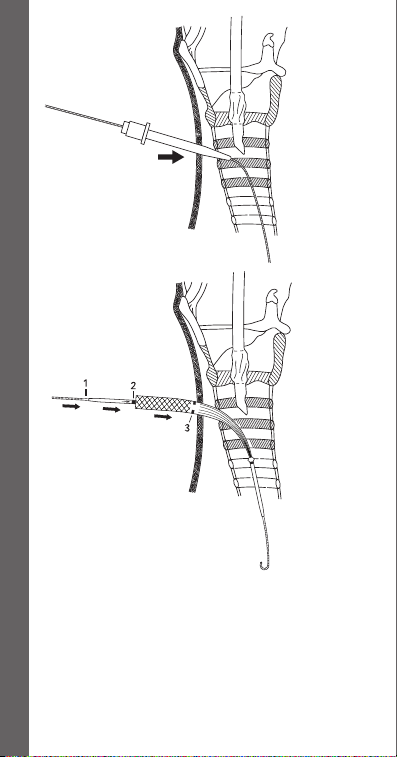
11. Maintaining the wire guide‘s position at the skin level mark, dilate the
initial tracheal access site by advancing the short, 14 French introducer
dilator over the wire guide with a slight twisting motion. (Fig. 10)
12. Remove the dilator while maintaining wire guide position.
13. Activate the hydrophilic coating by immersing the distal end of the
Ciaglia Blue Rhino G2 Advanced dilator in sterile water or saline.
14. Advance the Ciaglia Blue Rhino G2 Advanced dilator and the guiding
catheter as a unit over the wire guide, while maintaining wire guide
position. (Fig. 11) NOTE: Align the proximal end of the guiding catheter
at the mark on the proximal portion of the wire guide. (Fig. 1) This will
ensure that the distal end of the guiding catheter is properly positioned
back on the wire guide, preventing possible trauma to the posterior
tracheal wall during subsequent manipulations. NOTE: Bronchoscopic
guidance may also prevent possible trauma to the posterior tracheal wall.
15. Begin to dilate the tracheal access site by advancing the guiding catheter
and Ciaglia Blue Rhino G2 Advanced dilator into the trachea. To properly
align the dilator on the wire guide/guiding catheter assembly,
position the proximal end of the dilator at the single positioning
mark on the guiding catheter. This will ensure that the distal tip of
the dilator is properly positioned at the safety ridge on the guiding
catheter to prevent possible trauma to the posterior tracheal wall
during introduction. While maintaining the visual reference points and
positioning relationships of the wire guide, guiding catheter and dilator,
advance them as a unit to the skin level mark on the Ciaglia Blue Rhino
G2 Advanced dilator. (Fig. 11) NOTE: proper positioning and alignment
may help minimize complications (e.g., stenosis).
16. Advance and pull back the dilating assembly several times to effectively
dilate the tracheal access site.
NOTE: The wire guide must always lead the dilator and the guiding
catheter assembly to prevent possible trauma to the posterior tracheal
wall during dilation. Care should be taken to keep the guiding catheter
assembly properly aligned with the mark on the proximal portion of the
wire guide. This will ensure that the tip of the guiding catheter assembly
does not advance beyond the distal tip of the wire guide within the
trachea.
17. Remove the Ciaglia Blue Rhino G2 Advanced dilator, leaving the wire
guide/guiding catheter assembly in position. Respiratory air leak
through the tracheostomy stoma should be noted to confirm
intratracheal location of the wire guide and guiding catheter.
18. Advance the tracheostomy tube (loaded on the dilator) over the wire
guide/guiding catheter assembly to the safety ridge of the guiding
catheter, then advance wire guide, guiding catheter, loading dilator and
tracheostomy tube as a unit into trachea. (Fig. 12)
14

NOTE: The assembly should be directed perpendicular to the axis of the
trachea during insertion for uniform dilation between tracheal cartilages.
Once the tracheostomy tube is within the tracheal lumen, the assembly
may be directed caudad. NOTE: proper positioning and alignment may
help minimize complications (e.g., stenosis).
19. Advance the tracheostomy tube to its flange. Remove the dilator,
guiding catheter and wire guide, leaving the tracheostomy tube in place.
(Fig.13) NOTE: At this point, the bronchoscope may be inserted into the
tracheostomy tube to confirm correct placement. NOTE: If using a dual
cannula tracheostomy tube, insert the inner cannula at this point.
20. Connect the tracheostomy tube to the ventilator, inflate the balloon
cuff, and remove the endotracheal tube. NOTE: Prior to complete
removal of the endotracheal tube, test for adequate ventilation through
tracheostomy tube.
21. Perform suction to determine if any significant bleeding or possible
obstruction exists that has not been noted to this point.
22. If necessary, one suture may be taken at the bottom of the initial incision.
Post-Placement
Follow hospital protocol for post-tracheostomy care and maintenance.
HOW SUPPLIED
Supplied sterilized by ethylene oxide gas in peel-open packages. Intended
for one-time use. Sterile if package is unopened or undamaged. Do not use
the product if there is doubt as to whether the product is sterile. Store in a
dark, dry, cool place. Avoid extended exposure to light. Upon removal from
package, inspect the product to ensure no damage has occurred.
REFERENCES
These instructions for use are based on experience from physicians and (or)
their published literature. Refer to your local Cook sales representative for
information on available literature.
ČESKY
PERKUTÁNNÍ TRACHEOSTOMICKÝ ZAVADĚČ
CIAGLIA BLUE RHINO® G2 ADVANCED
POZOR: Podle federálních zákonů USA smí tento prostředek být prodáván
pouze lékařem nebo na předpis lékaře (nebo kvalikovaného zdravotníka
s licencí).
POPIS PROSTŘEDKU
Souprava/tácek perkutánního tracheostomického zavaděče Ciaglia Blue
Rhino G2 Advanced obsahuje tyto hlavní komponenty: zaváděcí jehlu, vodicí
drát shrotem J, zaváděcí dilatátor, vodicí katetr, nasazovací dilatátory a
jednofázový dilatátor Ciaglia Blue Rhino G2 Advanced. Dilatace se provádí
v jednom kroku dilatátorem Blue Rhino G2 Advanced pomocí Seldingerovy
techniky. Správné zarovnání komponent je vyobrazeno na obr. 1.

URČENÉ POUŽITÍ
Souprava/tácek perkutánního tracheostomického zavaděče Ciaglia Blue Rhino
G2 Advanced je určena pro perkutánní dilatační tracheostomii při zásazích do
dýchacích cest pouze u dospělých pacientů. Umisťování trubice pomocí zde
popsané techniky je třeba provádět v kontrolovaných podmínkách (např. na
JIP nebo na operačním sále) za pomoci vyškolených pracovníků.
KONTRAINDIKACE
• naléhavé umístění tracheostomické trubice
• pacienti se zvětšenou štítnou žlázou
• nehmatná prstencová chrupavka
• pediatrické aplikace
• neintubovaní pacienti
• hodnota PEEP (expirační přetlak na konci výdechu) 20 nebo vyšší
• nekorigovatelná koagulopatie
• existující infekce v místě tracheostomie
• existující malignita v místě tracheostomie
• nestabilní zlomenina krční páteře
• předcházející chirurgický zákrok v místě tracheostomie (např.
thyroidektomie)
VAROVÁNÍ
• Toto zařízení smějí používat pouze lékaři, kteří jsou vyškoleni v technikách
perkutánní tracheostomie a mají s nimi zkušenosti.
• Dbejte, aby komponenty použité v každém kroku byly v průdušnici
správně umístěny. Nesprávné umístění komponent může vést k
potenciálně život ohrožujícímu zranění.
• Nevhodná technika dilatace nebo nevhodné umístění tracheostomické
trubice mohou způsobit pozdější komplikace (např. stenózu trachey).
• Při umisťování tohoto zařízení je nutné přísné dodržování aseptických
technik.
• Před zahájením perkutánní tracheostomie musí být dýchací cesty pacienta
zajištěny endotracheální trubicí.
• Anatomické anomálie mohou zásah zobtížnit. Přítomnost anomálních
krevních cév může způsobit nadměrné krvácení v průběhu zákroku.
• U malých pacientů nebo pacientů s nízkou hmotností (40-50 kg nebo méně
a/nebo 122 cm nebo méně) postupujte opatrně, abyste neporanili dýchací
cesty na úrovni carina tracheae.
UPOZORNĚNÍ
• Při umisťování tohoto zařízení se důrazně doporučuje navádění
bronchoskopem, aby se snížila pravděpodobnost paratracheálního
zavedení a určila intratracheální poloha jehly, vodicího drátu, dilatátorů
atracheostomické trubice.
• Ultrazvukové vyhodnocení pacientova krku před zákrokem může pomoci
při identifikaci anatomických odchylek.
• Tento výrobek je určen k použití pouze lékaři, kteří jsou vyškoleni v použití
technik perkutánní tracheostomie a mají s nimi zkušenosti. Je třeba použít
standardní metody perkutánního zavádění tracheostomických trubic.
• Dilatátory neresterilizujte.
16

• Přístup jehly do trachey vždy potvrďte aspirací vzduchové bubliny nebo
vizualizací.
• V průběhu dilatace dbejte na bezpečnostní polohovací značky vodicího
drátu, vodicího katetru a dilatátoru, abyste předešli traumatu posteriorní
stěny průdušnice.
• Pro zavedení musí být tracheostomická trubice těsně nasazena na
nasazovacím dilatátoru.
• Hojná lubrikace povrchu nasazovacího dilatátoru zlepší nasazení a
umístění tracheostomické trubice.
• Nasazovací dilatátory jsou určeny k zavedení pouze uvnitř tracheostomické
trubice. Nasazovací dilatátory se nesmějí používat pro vytvoření stomie.
• Polohu tracheostomické trubice ověřte rentgenem hrudníku.
• Dbejte, abyste dilatátor Ciaglia Blue Rhino G2 Advanced nezavedli příliš
hluboko do dýchacích cest pacienta.
• Potenciální účinky ftalátů na těhotné/kojící ženy nebo děti nejsou zcela
určeny a mohou existovat obavy z reprodukčních a vývojových účinků.
POZNÁMKA: Bronchoskopický adaptér v této soupravě je jedinou
komponentou soupravy, která obsahuje ftaláty.
NÁVOD K POUŽITÍ
Příprava pacienta
1. Podle pokynů výrobce tracheostomické trubice vyzkoušejte balónkovou
manžetu a plnicí systém.
2. Pacienta uložte do tracheostomické polohy. (Obr. 4) Pod ramena pacienta
dejte polštář, aby byla umožněna plná extenze hlavy a krku. Podle volby
lékaře se může hlavová část pacientova lůžka zvednout o 30-40 stupňů.
3. Pro kontrolu pacientova dýchání použijte změny ventilátoru a sedaci.
Doporučuje se PEEP (expirační přetlak na konci výdechu) na úrovni 5-10.
4. Požádejte klinického pracovníka udržujícího dýchací cesty o uvolnění
fixační pásky zavedené endotracheální trubice a vyprázdnění manžety,
provedení nezbytných změn dechového objemu, dechové frekvence
atd. a vyhodnocení kompenzace nutné pro únik vzduchu. Znovu naplňte
manžetu endotracheální trubice. Provádějte průběžné oxymetrické
sledování.
5. Připravte a zarouškujte anteriorní oblast krku.
6. Vydatně lubrikujte povrch nasazovacího dilatátoru vhodné velikosti
a nasaďte tracheostomickou trubici na dilatátor. Dbejte, aby hrot
tracheostomické trubice byl na dilatátoru těsně nasazený. (Obr. 2) Ujistěte
se, že je balónek zcela vyprázdněný. Sestavu tracheostomické trubice
důkladně lubrikujte.
Tracheostomický zákrok
POZNÁMKA: Také je možné zavést tracheostomické trubice se dvěma
kanylami s použitím níže uvedené techniky. Vnitřní kanyla se pro zavedení
musí odstranit. Před zavedením vždy zkontrolujte nasazení tracheostomické
trubice na dilatátoru.
1. Nahmatejte orientační struktury (zářez štítné chrupavky, prstencovou
chrupavku) pro určení správného místa pro umístění tracheostomické
trubice. Přístup a umístění trubice se ideálně provádí na úrovni mezi
první a druhou průdušnicovou chrupavkou nebo mezi druhou a třetí
průdušnicovou chrupavkou, kdykoli je to možné. (Obr. 3)

2. Po podání místní anestézie proveďte incizi kůže v délce 1,5-2,0cm
(vertikálně nebo horizontálně) ve vybraném místě zavedení. (Obr. 5)
3. Pokud chcete, pomocí zakřivené svorky Mosquito proveďte jemnou
disekci vertikálně a příčně dolů do anteriorní tracheální stěny. (Obr. 6)
Špičkou prstu proveďte disekci přední části průdušnice (ve střední čáře,
zbavené ostatních tkání) a identifikujte prstencovou chrupavku. Pokud
je přítomen, posuňte isthmus štítné žlázy směrem dolů. POZNÁMKA:
Adekvátní incize kůže a tupá disekce podkožní tkáně mohou na minimum
omezit nutnost vyvinutí nadměrné síly a otáčení v průběhu zákroku.
Nadměrná síla a otáčení mohou vést k dlouhodobým komplikacím (např.
ke stenóze).
4. Vyprázdněte manžetu endotracheální trubice a vytáhněte ji na vhodnou
vzdálenost nad místem zavedení, přičemž ji stále udržujte v průdušnici. Po
dosažení správné polohy endotracheální trubice manžetu znovu naplňte.
5. K zaváděcí jehle připojte stříkačku do poloviny naplněnou kapalinou a
vyhledejte sloupec tracheálního vzduchu směřováním jehly ve střední linii
posteriorně. Vstup do tracheálního lumenu ověřte aspirací stříkačky
vedoucí k natažení vzduchové bubliny. (Obr. 7) Alternativně, pokud
používáte bronchoskopii, vizualizujte vstup jehly do průdušnice.
POZNÁMKA: Je důležité, aby jehla nepropíchla endotracheální
trubici. Abyste se ujistili, že nedošlo k propíchnutí endotracheální
trubice, trubici jemně posuňte dovnitř a ven asi o 1 cm. Pokud došlo
k propíchnutí trubice, budete vidět i cítit, že se jehla také pohybuje.
Pokud k tomu dojde, bude nutné vytáhnout jehlu, stáhnout zpět
endotracheální trubici a poté znovu zavést jehlu. POZNÁMKA:
Správná poloha a správné vyrovnání mohou pomoci minimalizovat
komplikace (např. stenózu).
6. Po umístění hrotu jehly v průdušnici můžete vstříknout místní anestézii
(pokud je třeba).
7. Po dosažení volného průtoku vzduchu bez propíchnutí endotracheální
trubice odstraňte vnitřní jehlu ze sestavy zaváděcí jehly a posuňte vnější
FEP sheath vpřed o několik milimetrů. POZNÁMKA: Pokud používáte
zaváděcí jehlu bez sheathu, pokračujte ke kroku 9.
8. K FEP sheathu připojte stříkačku a znovu potvrďte polohu v lumenu
průdušnice vizualizací volného průtoku vzduchu do stříkačky při aspiraci.
(Obr. 8) Alternativně znovu potvrďte polohu vizualizací FEP sheathu v
průdušnici pomocí bronchoskopu. Odpojte stříkačku.
9. Zaveďte vodicí drát s hrotem J několik centimetrů do průdušnice. (Obr.9)
POZNÁMKA: Drát se musí posunovat vpřed volně a bez odporu. Narazíte-li
na odpor, vodicí drát netlačte silou. Potvrďte správné umístění FEP sheathu
nebo zaváděcí jehly bronchoskopem, poté posouvejte vodicí drát do
průdušnice, dokud distální značka na vodicím drátu nedosáhne úrovně
kůže.
10. Vyjměte FEP sheath nebo zaváděcí jehlu při současném udržování polohy
vodicího drátu v lumenu průdušnice. (Obr. 9)
11. Udržujte polohu vodicího drátu na značce na úrovni kůže, dilatujte
prvotní přístupové místo do průdušnice posouváním krátkého zaváděcího
dilatátoru 14 Fr vpřed po vodicím drátu jemně otáčivým pohybem.
(Ob r.10)
12. Udržujte polohu vodicího drátu a vyjměte dilatátor.
18

13. Aktivujte hydrofilní povlak ponořením distálního konce dilatátoru Ciaglia
Blue Rhino G2 Advanced do sterilní vody nebo fyziologického roztoku.
14. Posouvejte dilatátor Ciaglia Blue Rhino G2 Advanced a vodicí katetr jako
jednu jednotku po vodicím drátu, udržujte přitom polohu vodicího drátu.
(Obr. 11) POZNÁMKA: Vyrovnejte proximální konec vodicího katetru
a značku na proximální části vodicího drátu. (Obr. 1) Tím se zajistí, že
distální konec vodicího katetru se umístí správně zpět na vodicí drát,
a zabrání se tak možnému poranění posteriorní tracheální stěny při
následných manipulacích. POZNÁMKA: Možnému poranění posteriorní
tracheální stěny může také zabránit bronchoskopické navádění.
15. Začněte dilatovat přístupové místo do průdušnice posunováním vodicího
katetru a dilatátoru Ciaglia Blue Rhino G2 Advanced do trachey. Pro
správné vyrovnání dilatátoru na sestavě vodicího drátu/vodicího
katetru, umístěte proximální konec dilatátoru na jediné polohovací
značce na vodicím katetru. Tím se zajistí správné umístění distálního
hrotu dilatátoru na bezpečnostním hřebenu vodicího katetru, aby
se zabránilo možnému poranění posteriorní tracheální stěny při
zavádění. Udržujte vizuální referenční body a polohovací poměry mezi
vodicím drátem, vodicím katetrem a dilatátorem a posouvejte je jako
jednu jednotku na značku na úrovni kůže na dilatátoru Ciaglia Blue
Rhino G2 Advanced. (Obr. 11) POZNÁMKA: Správné umístění a správné
vyrovnání mohou pomoci minimalizovat komplikace (např. stenózu).
16. Dilatační sestavu několikrát posuňte vpřed a vytáhněte zpět pro účinnou
dilataci přístupového místa do průdušnice.
POZNÁMKA: Vodicí drát musí vždy vést sestavu dilatátoru a vodicího
katetru, aby se předešlo možnému poranění posteriorní tracheální stěny
vprůběhu dilatace. Dbejte, abyste udržovali sestavu vodicího katetru
řádně vyrovnanou se značkou na proximální části vodicího drátu. Tím
se zajistí, že se hrot vodicího katetru nedostane za distální hrot vodicího
drátu v průdušnici.
17. Vyjměte dilatátor Ciaglia Blue Rhino G2 Advanced, přičemž sestavu
vodicího drátu a vodicího katetru ponechejte na místě. Je třeba
zaznamenat únik respiračního vzduchu tracheostomickou stomií
pro potvrzení intratracheálního umístění vodicího drátu a vodicího
katetru.
18. Posouvejte tracheostomickou trubici (nasazenou na dilatátor) po sestavě
vodicího drátu/vodicího katetru k bezpečnostnímu hřebenu vodicího
katetru, poté posouvejte vodicí drát, vodicí katetr, nasazovací dilatátor a
tracheostomickou trubici jako jednu jednotku do průdušnice. (Obr. 12)
POZNÁMKA: Sestavu při zavádění směřujte kolmo k ose průdušnice pro
stejnoměrnou dilataci mezi průdušnicovými chrupavkami. Jakmile je
tracheostomická trubice v tracheálním lumenu, sestava se musí směřovat
kaudálně. POZNÁMKA: Správné umístění a správné vyrovnání mohou
pomoci minimalizovat komplikace (např. stenózu).
19. Tracheostomickou trubici posuňte až k její manžetě. Vyjměte
dilatátor, vodicí katetr a vodicí drát, přičemž tracheostomickou trubici
ponechejte na místě. (Obr. 13) POZNÁMKA: V tomto okamžiku se do
tracheostomické trubice může zavést bronchoskop pro potvrzení jejího
správného umístění. POZNÁMKA: Pokud používáte tracheostomickou
trubici se dvěma kanylami, nyní zaveďte vnitřní kanylu.

20. Připojte tracheostomickou trubici k ventilátoru, naplňte balónkovou
manžetu a vyjměte endotracheální trubici. POZNÁMKA: Před úplným
odstraněním endotracheální trubice vyzkoušejte adekvátní ventilaci
tracheostomickou trubicí.
21. Proveďte odsávání, abyste zjistili, zda nedošlo k významnému krvácení
nebo možným překážkám, kterých jste si předtím nepovšimli.
22. V případě potřeby je možné v dolní části původní incize umístit
jedensteh.
Po zavedení
Dodržujte nemocniční protokol post-tracheostomické péče a údržby.
STAV PŘI DODÁNÍ
Výrobek je dodáván v odtrhovacím obalu a je sterilizován plynným
ethylenoxidem. Určeno pro jednorázové použití. Sterilní, pokud obal není
otevřen nebo poškozen. Nepoužívejte výrobek, pokud existují pochybnosti
o jeho sterilitě. Skladujte na tmavém, suchém a chladném místě. Zamezte
dlouhodobému vystavení světlu. Po vyjmutí z obalu výrobek prohlédněte a
ujistěte se, že není poškozen.
REFERENCE
Tento návod k použití je založen na zkušenostech lékařů a (nebo) na jejich
publikované odborné literatuře. S otázkami na dostupnou literaturu se obraťte
na svého nejbližšího obchodního zástupce společnosti Cook.
DANSK
CIAGLIA BLUE RHINO® G2 ADVANCED PERKUTAN
TRACHEOSTOMIINDFØRER
FORSIGTIG: I henhold til amerikansk lovgivning må dette produkt kun
sælges til en læge (eller en autoriseret behandler) eller efter dennes
anvisning.
BESKRIVELSE AF PRODUKTET
Ciaglia Blue Rhino G2 Advanced perkutan(t) tracheostomi-indføringssæt/-bakke
består af disse primære komponenter: en indføringskanyle, enJ-kateterleder,
en indføringsdilatator, et styrekateter, ladedilatatorer og en enkelttrins Ciaglia
Blue Rhino G2 Advanced dilatator. Dilatation finder sted i ét trin med Blue Rhino
G2 Advanced dilatatoren under anvendelse af Seldinger teknik. Den korrekte
justering af komponenterne vises i Figur 1.
TILSIGTET ANVENDELSE
Ciaglia Blue Rhino G2 Advanced perkutan(t) tracheostomi-indføringssæt/-bakke
er kun beregnet til perkutan dilatations-tracheostomi til luftvejsbehandling hos
voksne. Tubeanlæggelsen, ved hjælp af den teknik, som er beskrevet i denne
vejledning, bør foretages i et kontrolleret miljø (fx intensivafdelingen eller
operationsstuen) med assistance fra uddannet personale.
KONTRAINDIKATIONER
• Anlæggelse af nød-tracheostomitube
• Patienter med forstørret thyroidea
20

• Cricoideabrusk, der ikke kan palperes
• Pædiatriske anvendelser
• Ikke-intuberede patienter
• En PEEP-værdi (positivt slutekspiratorisk tryk), som er større end eller lig
med 20
• Ukorrigeret koagulopati
• Præeksisterende infektion på tracheostomistedet
• Præeksisterende malignitet på tracheostomistedet
• Ustabil cerebrospinal fraktur
• Tidligere operation på tracheostomistedet (fx thyroidektomi)
ADVARSLER
• Kun læger, som er uddannet i og har erfaring med perkutane
tracheostomiteknikker, bør bruge denne anordning.
• Udvis forsigtighed for at sikre, at de komponenter, der anvendes på hvert
trin, placeres korrekt i trachea. Forkert placering af komponenterne kan
føre til potentielt livstruende skade.
• Forkert dilatationsteknik eller anlæggelse af tracheostomituben kan føre til
forsinkede komplikationer (fx proptrækker-stenose).
• Aseptisk teknik skal nøje overholdes under anlæggelse af denne anordning.
• Patientens luftvej skal sikres med en endotrachealtube, inden perkutan
tracheostomi forsøges udført.
• Anatomiske anomalier kan gøre det vanskeligt at udføre proceduren.
Tilstedeværelsen af abnorme blodkar kan forårsage for kraftig blødning
under proceduren.
• Pas på ikke at beskadige luftvejen ved carina tracheae niveauet hos små
patienter (40-50 kg eller derunder og/eller patienter, der er 122 cm høje
eller derunder).
FORHOLDSREGLER
• Det tilrådes stærkt at anvende bronkoskopisk vejledning under
anlæggelse af denne anordning for at nedsætte sandsynligheden for
paratracheal indføring og for at bestemme kanylens, kateterlederens,
dilatatorernes og tracheostomitubens position i trachea.
• En ultralydsevaluering af patientens hals inden proceduren kan være en
hjælp til identifikation af anatomiske afvigelser.
• Produktet er beregnet til brug af læger med uddannelse og erfaring
iperkutane tracheostomiteknikker. Der skal anvendes standardteknikker
for perkutan anlæggelse af tracheostomituber.
• Dilatatorerne må ikke resteriliseres.
• Bekræft altid, at der er kanyleadgang til trachea vha. aspiration af
luftbobler eller visualisering.
• Oprethold kateterlederens, styrekateterets og dilatatorens
sikkerhedspositioneringsmærker under dilatationsproceduren for at
forhindre traume af tracheas posteriore væg.
• Tracheostomituben bør passe tæt på ladedilatatoren ved indføring.
• Hvis ladedilatatorerne smøres grundigt på overfladen, vil det fremme
tilpasningen og anlæggelsen af tracheostomituben.

• Ladedilatatorerne er beregnet til kun at blive indført inden i en
tracheostomitube. Ladedilatatorerne bør ikke anvendes til dannelse af en
stomi.
• Tracheostomitubens position bør verificeres ved røntgen af brystkassen.
• Vær forsigtig med ikke at føre Ciaglia Blue Rhino G2 Advanced dilatator for
langt ind i patientens luftvej.
• Den potentielle virkning af phthalater på gravide/ammende kvinder eller
børn er ikke undersøgt til fulde, og der kan være risiko for påvirkning af
reproduktion og udvikling. BEMÆRK: Bronkoskopiadapteren i dette sæt er
den eneste komponent, der indeholder phthalater.
BRUGSANVISNING
Patientforberedelse
1. Følg anvisningerne fra producenten af tracheostomituben og test
ballonmanchetten og oppustningssystemet.
2. Lejr patienten i tracheostomileje. (Fig. 4) Anbring en pude under
skuldrene for at tillade fuld ekstension af hoved og hals. Hovedgærdet på
patientens seng kan hæves 30-40 grader efter lægens skøn.
3. Brug respiratorskift og sedering til at kontrollere patientens vejrtrækning.
Der anbefales et PEEP-niveau (positivt slutekspiratorisk tryk) på 5-10.
4. Bed respirationsterapeuten om at løsne fikseringstapene på den indlagte
endotrachealtube og tøm manchetten, idet de nødvendige ændringer
af tidalvolumen, frekvens osv. foretages for at evaluere den nødvendige
kompensation for luftlækage. Oppust manchetten på endotrachealtuben
igen. Der skal anvendes kontinuerlig oximetriovervågning.
5. Klargør og afdæk det anteriore område af halsen.
6. Smør overfladen på en ladedilatator i den relevante størrelse grundigt og
læg tracheostomituben på dilatatoren. Sørg for, at tracheostomitubens
spids passer tæt på dilatatoren. (Fig. 2) Sørg for, at ballonen er helt tømt.
Smør tracheostomitubesamlingen grundigt.
Tracheostomiprocedure
BEMÆRK: Der kan også anlægges tracheostomituber med dobbelt kanyler
ved hjælp af følgende teknik. Den indre kanyle skal fjernes før indføring.
Kontrollér altid, at dilatatoren passer til tracheostomituben før indføring.
1. Palpér landemærkestrukturer (thyroideafordybningen, cricoideabrusken)
for at sikre korrekt position for anlæggelse af tracheostomituben.
Adgang og, ultimativt, tubeanlæggelse foretages idéelt ved niveauet
mellem første og anden trachealring eller mellem anden og tredje
trachealring, når det er muligt. (Fig. 3)
2. Efter indføring af lokalanæstesi foretages en hudincision på 1,5-2,0 cm
(vertikal eller horisontal) på det valgte indføringssted. (Fig. 5)
3. Hvis det ønskes, kan der bruges en krum moskitoklemme til forsigtigt
at dissekere vertikalt og transversalt ned til den anteriore tracheavæg.
(Fig.6) Med en fingerspids dissekeres forsiden af trachea, i midterlinjen,
fri for væv og cricoideabrusken identificeres. Flyt isthmus thyroidea
nedad, hvis den er til stede. BEMÆRK: En adækvat incision og stump
dissektion af det subkutane væv kan minimere behovet for overdreven
kraft og drejningsmoment under hele proceduren. Overdreven kraft og
drejning kan føre til langvarige komplikationer (fx stenose).
22
 Loading...