

Page 1
Masterbuilt Manufacturing, Inc
1 Masterbuilt Court
Columbus, Georgia 31907
Customer Service 1-800-489-1581
Burning wood gives off carbon
monoxide which can cause death.
DO NOT burn wood chips inside homes,
vehicles, tents, garages or any enclosed
areas.
Use only outdoors where it is well
ventilated.
CARBON MONOXIDE HAZARD
This manual contains important
information necessary for the proper and
safe use of this unit.
Read and follow all warnings
and instructions before using
smoker and during use.
Keep this manual for future reference.
Some parts may have sharp edges.
Handle with care.
WARNING
Manual Code: 9807100041 082311-04JH
Failure to follow these warnings and instructions properly could result in personal injury or death.
ASSEMBLY, CARE & USE MANUAL
WARNING & SAFETY INFORMATION
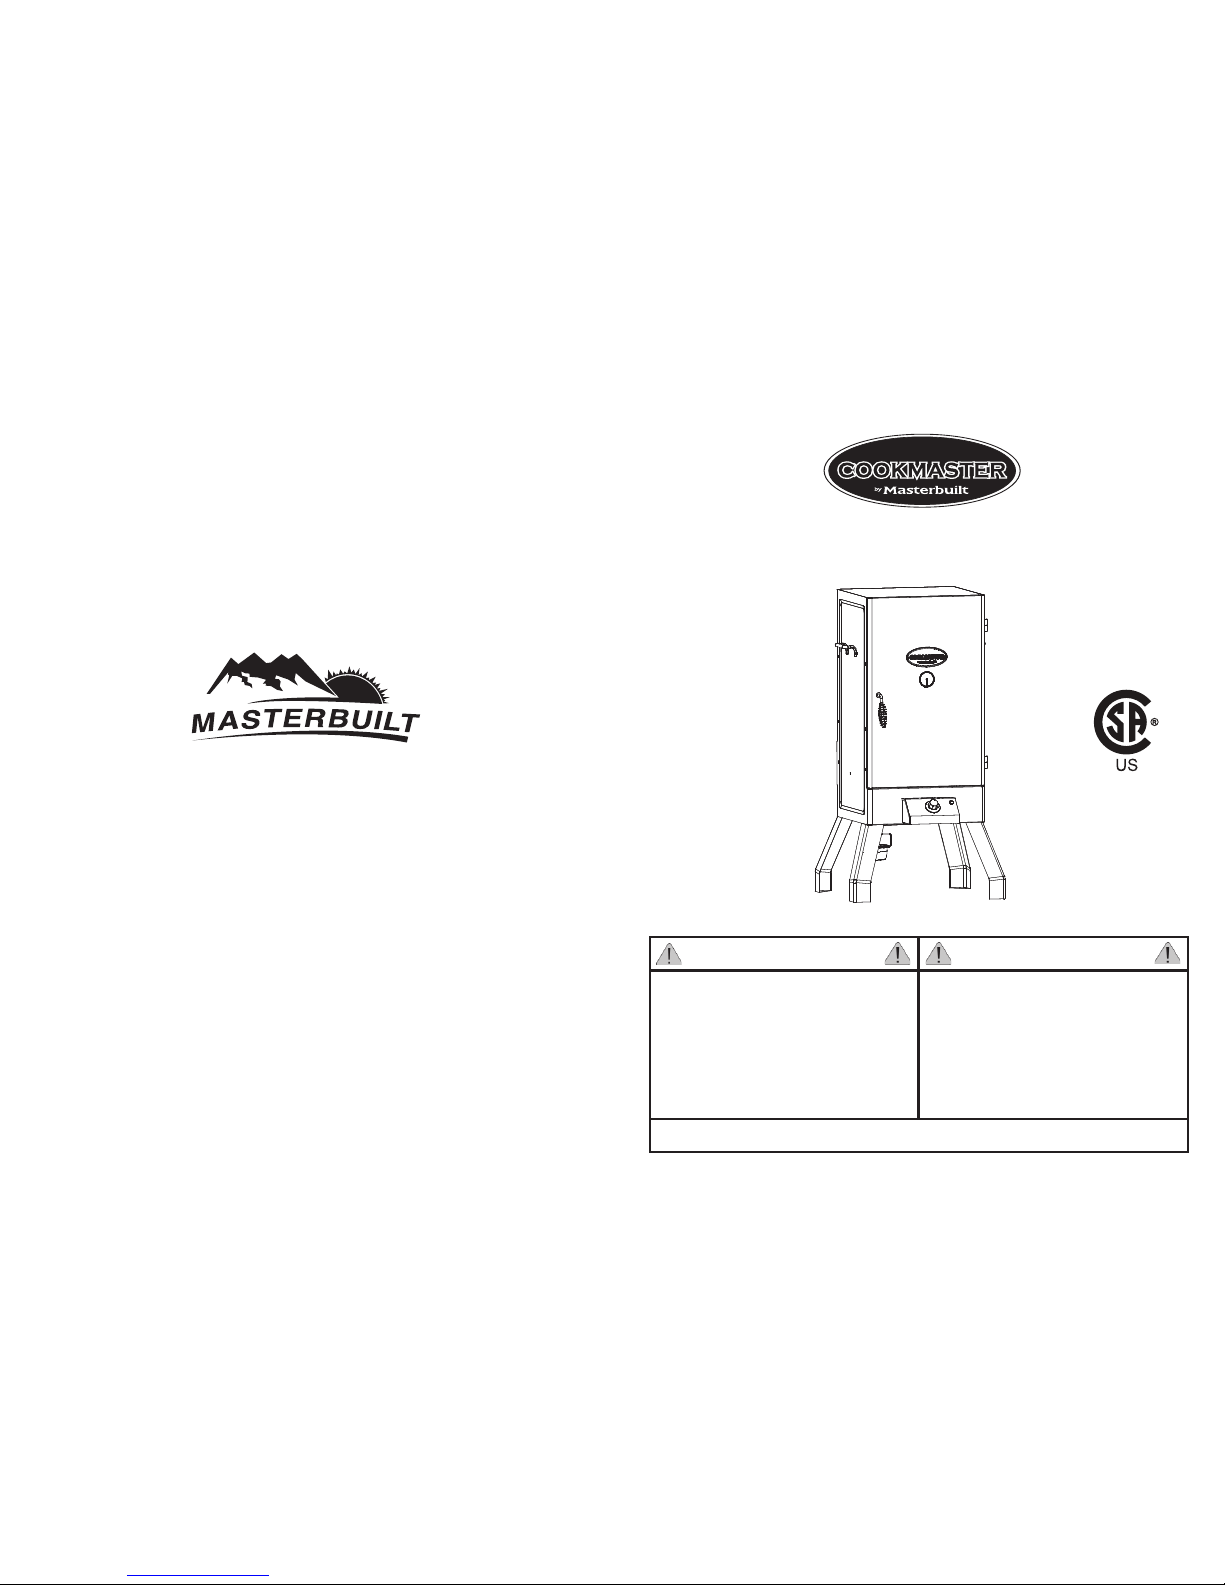
ELECTRIC SMOKER MODELS 20070111, 20071712
THIS PRODUCT IS FOR OUTDOOR USE ONLY ~ HOUSEHOLD TYPE
Tools required for assembly: Adjustable Wrench, Phillips Head Screwdriver.
Page 2
WARNINGS & IMPORTANT SAFEGUARDS
READ ALL INSTRUCTIONS
When using electrical appliances, basic safety precautions should always be followed including
the following:
• For outdoor use only. Do not operate in an enclosed area.
• Unit MUST be on the ground. Do not place unit on tables or counters.
• Do not plug in electric smoker until fully assembled and ready for use.
• Use only on properly grounded outlet.
• Do not use during an electrical storm.
• Do not expose electric smoker to rain or water at anytime.
• To protect against electrical shock do not immerse cord, plugs, controls, portable applianaces (or other
specified part or parts) in water or other liquid.
• Do not operate any appliance with a damaged cord or plug, or after appliance malfunctions or is dropped
or damaged in any manner. Contact Masterbuilt Customer Service for assistance at 1-800-489-1581.
• Keep a fire extinguisher accessible at all times while operating electric smoker.
• Do not let cord touch hot surfaces.
• Do not place on or near a hot gas or electric burner, or in a heated oven.
• Store products indoors when not in use - out of reach of children.
•
Keep children and pets away from electric smoker at all times. Do not allow children to use electric smoker.
Close supervision is necessary should children or pets be in area where electric smoker is being used.
• Fuel, such as charcoal briquettes or heat pellets, are not to be used in electric smoker.
• Never use electric smoker as a heater (READ CARBON MONOXIDE HAZARD).
• Use electric smoker only on a level, stable surface to prevent tipping.
• Electric smoker is HOT while in use and after.
• Electric smoker is HOT while in use and will remain HOT for a period of time afterwards. Use caution.
• Do not touch HOT surfaces. Use handles or knobs. Be sure handles are assembled and fastened properly.
• Do not allow anyone to conduct activities around electric smoker during or following its use until the unit
has cooled. Electric smoker is HOT during operation and remains HOT for a period of time following use.
• The use of alcohol, prescription or non-prescription drugs may impair the user’s ability to properly assemble or safely operate electric smoker.
• Avoid bumping or impacting electric smoker.
WARNINGS & IMPORTANT SAFEGUARDS CONTINUED ON PAGE 2
1
LIMITED WARRANTY INFORMATION
Masterbuilt warrants its products to be free from defects in material and workmanship under proper assembly, normal
use and recommended care for 90 days from the date of original retail purchase.
Masterbuilt warranty does not cover paint finish as it may burn off during normal use.
Masterbuilt warranty does not cover rust of the unit.
Masterbuilt requires reasonable proof of purchase for warranty claims and suggests that you keep your receipt. Upon
the expiration of such warranty, all such liability shall terminate.
Within the stated warranty period, Masterbuilt, at its discretion, shall repair or replace defective components free of
charge with owner being responsible for shipping. Should Masterbuilt require return of component(s) in question for
inspection Masterbuilt will be responsible for shipping charges to return requested item.
This warranty excludes property damage sustained due to misuse, abuse, accident, damage arising out of
transportation, or damage incurred by commercial use of this product.
This expressed warranty is the sole warranty given by Masterbuilt and is in lieu of all other warranties, expressed or
implied including implied warranty, merchantability, or fitness for a particular purpose.
Neither Masterbuilt nor the retail establishment selling this product, has authority to make any warranties or to promise
remedies in addition to or inconsistent with those stated above.
Masterbuilt’s maximum liability, in any event, shall not exceed the purchase price of the product paid by the original
consumer/ purchaser. Some states do not allow the exclusion or limitation of incidental or consequential damages. In
such a case, the above limitations or exclusions may not be applicable.
California residents only: Not withstanding this limitation of warranty, the following specific restrictions apply; if service,
repair, or replacement of the product is not commercially practical, the retailer selling the product or Masterbuilt will
refund the purchase price paid for the product, less the amount directly attributable to use by the original buyer prior to
the discovery of the nonconformity. Owner may take the product to the retail establishment selling this product in order
to obtain performance under warranty.
This expressed warranty gives you specific legal rights, and you may also have other rights which vary from state to
state.
Go Online www.masterbuilt.com
or complete and return to
Attn: Warranty Registration
Masterbuilt Mfg. Inc.
1 Masterbuilt Court - Columbus, GA 31907
Name:
Address:
City, State/Province, Postal Code:
Phone Number: E-Mail Address:
Model Number: Serial Number:
Purchase Date: Place of Purchase:
*Model Number and Serial Number are located on silver label on back of unit.
14
Page 3
MASTERBUILT SMOKIN’ RECIPES
MASTERBUILT SMOKIN’ RECIPES
MASTERBUILT SMOKIN’ RECIPES
MASTERBUILT SMOKIN’ RECIPES
SMOKED STUFFED SALMON
Servings for 4
INGREDIENTS:
Salmon (drawn) 4 - 5 lbs (1.8-2.2 kgs)
Oil 3 tbs
Green Onion (chopped)
1
/4 cup
Tomato (peeled and chopped) 1 cup
Dill (fresh and chopped) 1/4 cup
Bread Cubes (dry)
1
/2 cup
Celery (chopped) 1/4 cup
Salt 1/4 tsp
Lemon Pepper 1/2 tsp
Garlic (minced) 1 clove
SUGGESTED WOOD FOR SMOKING:
Hickory Chips
INSTRUCTIONS:
Prepare salmon and brush with oil. Combine remaining ingredients in
a small bowl. Stuff salmon with mixture. Place salmon on a sheet of
heavy aluminum foil that has been doubled and greased. Place in
smoker at 225°F (107°C) and cook for 3 to 4 hours. Make sure there
is room on either side of foil to allow airflow inside smoker.
SMOKED TROUT
Servings for 6
INGREDIENTS:
Trout Fillets 4 - 6
Water 2 cups
Soy Sauce 1/4 cup
Teriyaki Sauce 1/4 cup
Salt
1
/2 cup
Lemon Pepper 1 tsp
Garlic Salt
Dill Seed
SUGGESTED WOOD FOR SMOKING:
Hickory, Alder or Apple Chips
INSTRUCTIONS:
Mix recommended amounts of water, soy sauce, teriyaki sauce and
salt with other ingredients to your liking in a small container. Place
fillets into marinade, cover and let soak in refrigerator overnight.
Smoke for 3 to 4 hours or until meat is flaky and dry in smoker at
225°F (107°C).
SMOKED PORK BUTT
Servings for 6
INGREDIENTS:
Fresh Pork Butt 7 lbs (3.1kgs)
Salt
1
/2 tsp
Brown Sugar 1/4 cup
Chili Powder 2 tbs
SUGGESTED WOOD FOR SMOKING:
Apple Chips
INSTRUCTIONS:
Mix ingredients and rub onto pork butt. Cook pork butt for 5 hours in
225°F (107°C) smoker using apple wood chips during first 3 hours. After
5 hours remove butt and wrap in heavy foil. Cook for an additional 1 to
1 1/2 hours. Internal temperature should be 160°F (71°C). Serve.
MAPLE GLAZED HAM
Servings for 6-8
INGREDIENTS:
Ham Shank or Butt
(fully cooked, bone-in)
5 - 7 lbs (2.2-3.1 kgs)
Maple Syrup 1
1
/2 cup
Ginger 1 tsp
Nutmeg 1/4 tsp
Allspice 1/2 tsp
Cloves 16 whole
Pineapple Slices (canned) 1 can
Maraschino Cherries 1 jar
SUGGESTED WOOD FOR SMOKING:
Hickory or Mesquite Chips
INSTRUCTIONS:
Remove thick skin and trim fat leaving no more than 1/2” (13mm) thick covering on ham.
Score ham. Combine syrup, ginger, nutmeg, and allspice in a small bowl. Place ham in
a large dish and baste with syrup mixture. Let ham stand in syrup mixture for 1 to 2
hours basting frequently until ham at room temperature. When ready to smoke remove
ham from dish and stud with cloves. Place ham in 225°F (107°C) smoker. Cook for 2 to
3 hours. Baste with syrup mixture at least two times during cooking time. Before last
hour of smoking, decorate ham with canned pineapple and cherries and baste. Internal
temperature of ham should be at 130°F to 140°F (54-60°C) when heated thru
.
SMOKED TURKEY
Servings for 6-8
INGREDIENTS:
Turkey
10 - 14 lbs (4.5-6.3 kgs
)
Salt 1 tbs
Sugar 2 tb
Cinnamon 1-2 tsps
Apple (cored, peeled, and quartered)
1 average
Onion (quartered) 2 medium
Celery stalks with leaves 4 stalks
SUGGESTED WOOD FOR SMOKING:
Hickory or Apple Chips
INSTRUCTIONS:
Thaw turkey according to package directions if necessary. Remove
giblets and neck. Rinse and pat dry. Sprinkle turkey cavity with salt.
Combine sugar and cinnamon in small bowl. Dredge apple in mixture. Stuff apple, onion and celery into cavity. Close with skewers.
Tie ends of legs to tail with kitchen string. Lift wing tips up and over
the back to tuck under. Set smoker to 225°F (107°C). Place turkey
on cooking rack and cook for 8 to 12 hours or until inner thigh temperature reaches 180°F (82°C). Cover turkey and chill or let stand
20 minutes before carving. Serve.
13
WARNINGS & IMPORTANT SAFEGUARDS continued
•
Never move electric smoker when in use. Allow electric smoker to cool completely before moving or storing.
• Be careful when removing food from electric smoker. All surfaces are HOT and may cause burns.
Use protective gloves or long, sturdy cooking tools.
•
Do not cover cooking racks with metal foil. This will trap heat and cause severe damage to electric smoker.
• Drip tray is only for the bottom of electric smoker. Do not put drip tray on cooking racks this may damage
electric smoker.
• Use Extreme caution when removing tray or disposing of hot grease.
• Wood chip bowl is HOT when electric smoker is in use. Use caution when adding wood.
• To disconnect, turn controller “OFF” then remove plug from outlet.
• Remove plug from outlet when the appliance is not in use, before putting on or taking off parts, and before
cleaning. Allow to cool before handling.
• Dispose of cold ashes by placing them in aluminum foil, soaking with water and discarding in a
non-combustible container.
• Do not store electric smoker with HOT ashes inside unit. Store only when all surfaces are cold.
• Accessory attachments not supplied by Masterbuilt Manufacturing, Inc. are not recommended and may
cause injury.
• Never use electric smoker for anything other than its intended purpose. This unit is not for commercial
use.
• Always use electric smoker in accordance with all applicable local, state and federal fire codes.
• Longer extension cords are available and may be used if care is exercised in their use.
• If a longer extension cord is used the marked rating should be at least as great as the electrical rating of the
appliance.
• The extension cord must be a grounding -type 3-wire cord.
• Outdoor extension cords must be used with outdoor use products and are marked with suffix "W" and with
the statement "Suitable for Use with Outdoor Appliances.
• CAUTION - To reduce the risk of electric shock, keep extension cord connection dry and off the ground.
• Extreme caution must be used when moving an appliance containing hot liquids.
• Do not clean this product with a water sprayer or the like.
• Do not clean with metal scouring pads. Pieces can break off the pad and touch electrical parts, creating a
risk of electrical shock.
SAVE THESE INSTRUCTIONS.
Combustion by-product produced when using this product contains
chemicals known to the State of California to cause birth defects,
other reproductive harm, or cancer.
The materials used in this product may contain lead a chemical known to
the State of California to cause birth defects and other reproductive harm.
WARNING
2
Page 4
3
DO NOT RETURN TO RETAILER
For Assembly Assistance, Missing or Damaged Parts
Call: MASTERBUILT Customer Service at 1-800-489-1581 or
EMAIL us at: [email protected].
STOP!
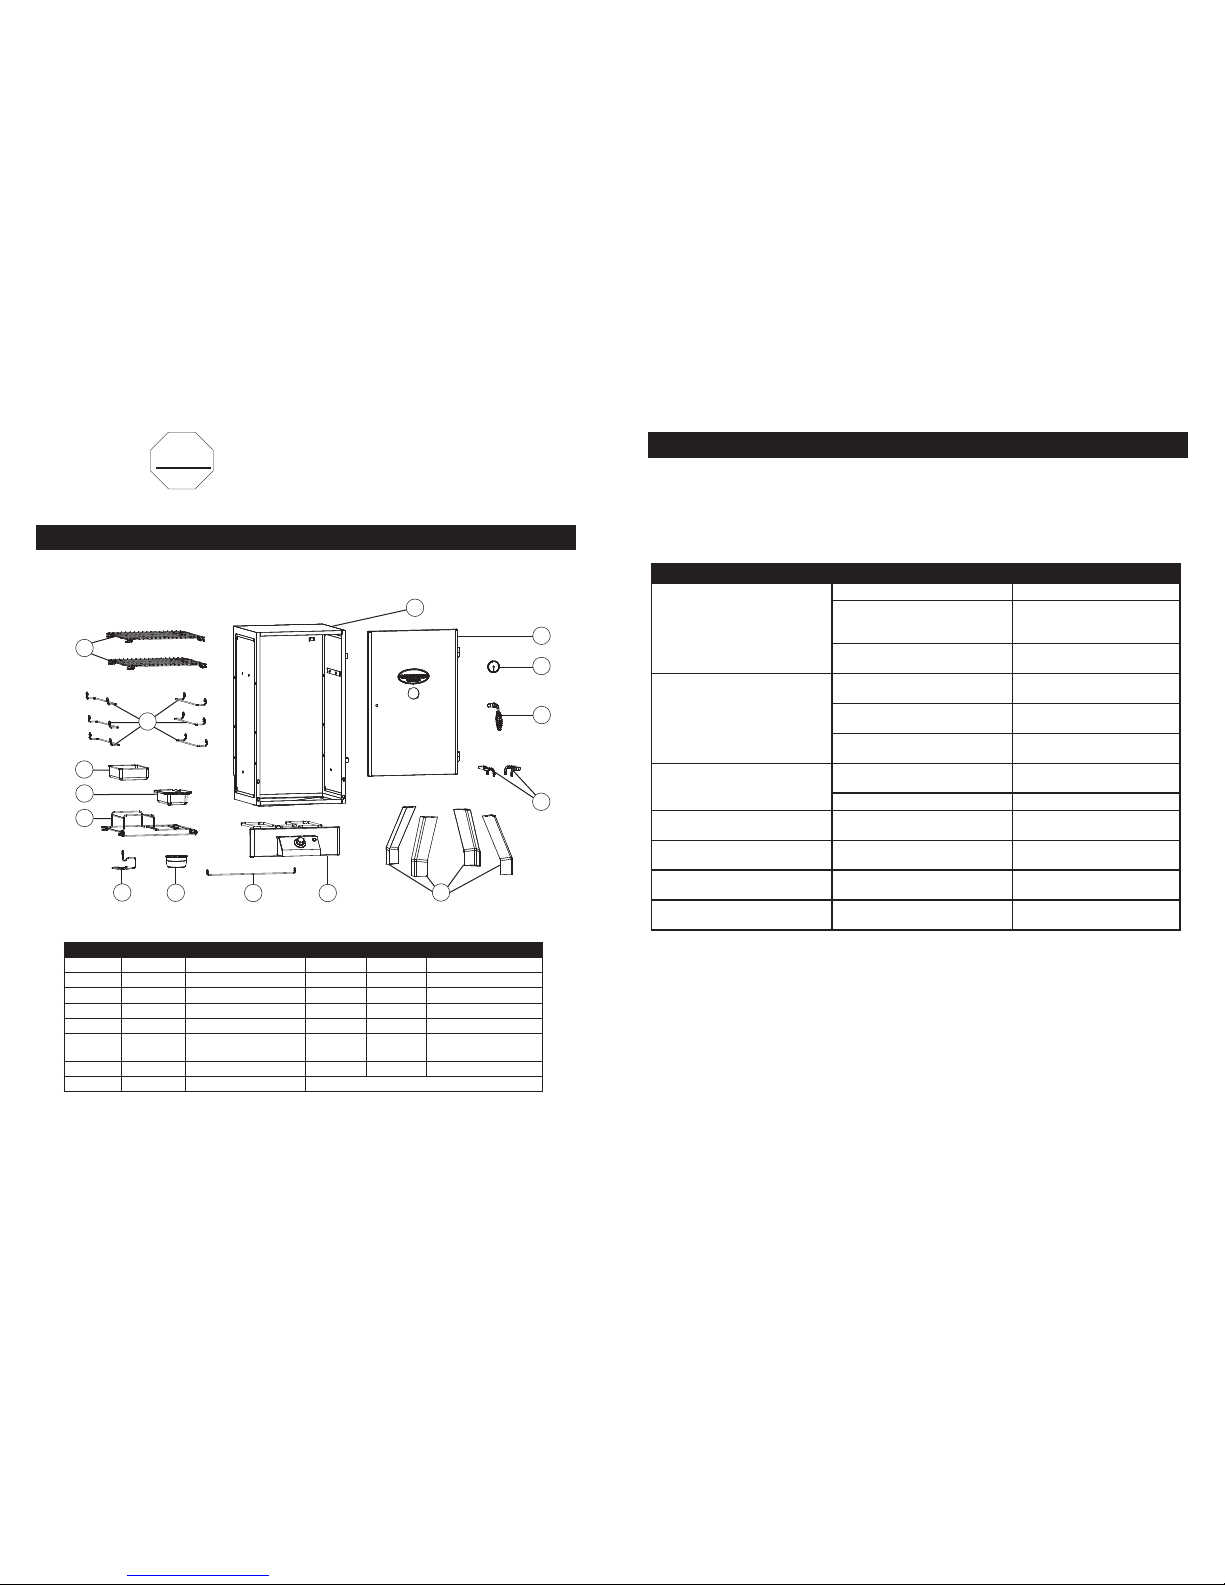
PARTS LIST
PART NO. QUANTITY DESCRIPTION PART NO. QUANTITY DESCRIPTION
1 1 Smoker Body 9 1 Drip Cup
2 1 Door 10 1 Grease Clip
3 1 Temperature Gauge 11 1 Wood Chip Grate
4 1 Door Handle 12 1 Wood Chip Tray w/ Lid
5 2 Side Handle 13 1 Water Bowl
6 4 Leg 14 6
Grate Support (PreAssembled)
7 1 Control Panel/w Element 15 2 Cooking Grate
8 1 Element Support
10
11
13
12
15
9
2
6
78
14
1
3
4
5
Symptom Cause Possible Solution
Power light won’t come on Not plugged into wall Check wall connection
House fuse tripped
Make sure other appliances are not
operating
on the same electrical
circuit. Check household fuses.
Controller malfunctioning Contact Masterbuilt at
1.800.489.1581
Unit takes excessive amount of
time to heat up
Unit plugged into an extension cord Set unit so an extension cord
does not have to be used
Door not closed properly Close door and fasten latch
securely
Controller malfunctioning Contact Masterbuilt at
1.800.489.1581
Grease is leaking out of smoker Drip cup not in place Reposition so drip cup alines to
drain hole in bottom of unit
Excess grease or oil build-up in unit Clean unit
No smoke Add wood chips See Page 8 Contact Masterbuilt at
1.800.489.1581
Temperature rapidly decreased, or
shut down after few hours of use
Faulty control unit Contact Masterbuilt at
1.800.489.1581
Power light is on, unit isn’t
heating
Controller/unit malfunctioning Contact Masterbuilt at
1.800.489.1581
Controller does not adjust heat Controller/unit malfunctioning Contact Masterbuilt at
1.800.489.1581
TROUBLESHOOTING GUIDE
12
Page 5
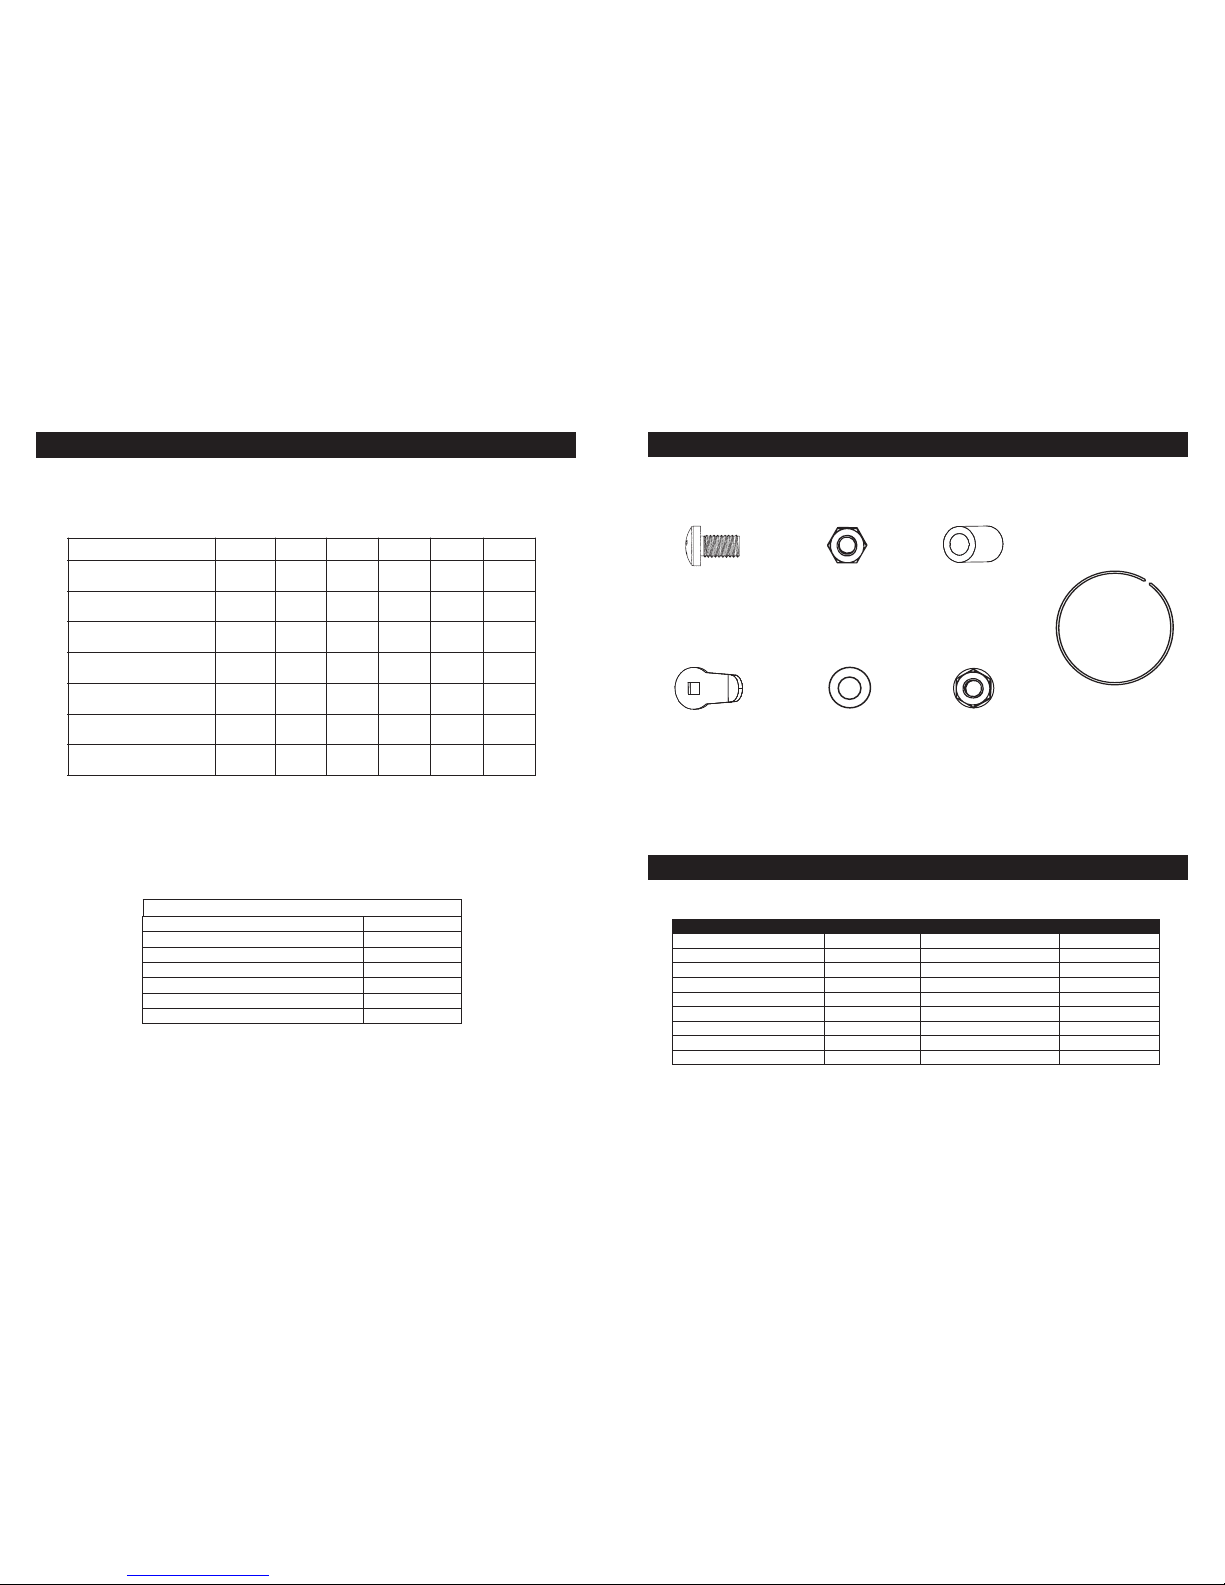
WOOD SMOKING GUIDE FOR MEATS
WOOD FLAVOR POULTRY FISH HAM BEEF PORK LAMB
Hickory
Pungent, smoky, bacon-like flavor
Mesquite
Sweet and delicate flavor
Alder
Delicate, wood smoke flavor
Pecan
Bold and hearty flavor
Maple
Sweet, subtle flavor
Apple
Sweet, delicate flavor
Cherry
Sweet, delicate flavor
TO ENSURE THAT IT IS SAFE TO EAT, FOOD MUST BE COOKED TO THE MINIMUM INTERNAL
TEMPERATURES LISTED IN THE TABLE BELOW.
* United States Department of Agriculture
USDA* Safe Minimum Internal Temperatures
Fish
145°F (63°C)
Pork
160°F (71°C)
Egg Dishes
160°F (71°C)
Steaks and Roasts of Beef, Veal or Lamb
145°F (63°C)
Ground Beef, Veal or Lamb
160°F (71°C)
Whole Poultry (Turkey, Chicken, Duck, etc.)
165°F
(74°C)
Ground or Pieces Poultry (Chicken Breast, etc.)
165°F
(74°C)
11 4
(G)
Retainer Ring
(Included with temperature
gauge assembly)
Qty: 1
(A)
M6x12
Phillips Head Screw
Qty: 18
(B)
#8-32 Lock Nut
Qty: 1
(C)
Handle Bushing
Qty: 1
(D)
Door Latch
Qty: 1
(E)
M8 Flat Washer
Qty: 1
(F)
M6 Hex Flange Nut
Qty: 2
HARDWARE LIST
REPLACEMENT PARTS LIST
DESCRIPTION ITEM NO. DESCRIPTION ITEM NO.
Body Kit 9907100016 Wood Chip Bowl 9007090065
Door Handle Kit 9905100015 Wood Chip Bowl Holder 9007100030
Leg Kit 9905100014 Water Bowl 9007090067
Body Handle Kit 9907100017 Drip Cup 9005100039
Control Panel Kit 9907100018 Grease Clip 9005100025
Element Support Kit 9907100019 Control Knob 9007100031
Grate Support Kit 9907100022 Hardware Kit 9907100020
Door with Logo Plate 9007100029 English Instruction Manual 9807100041
Cooking Grate 9005100034 Temperature Gauge 9904100056
Page 6
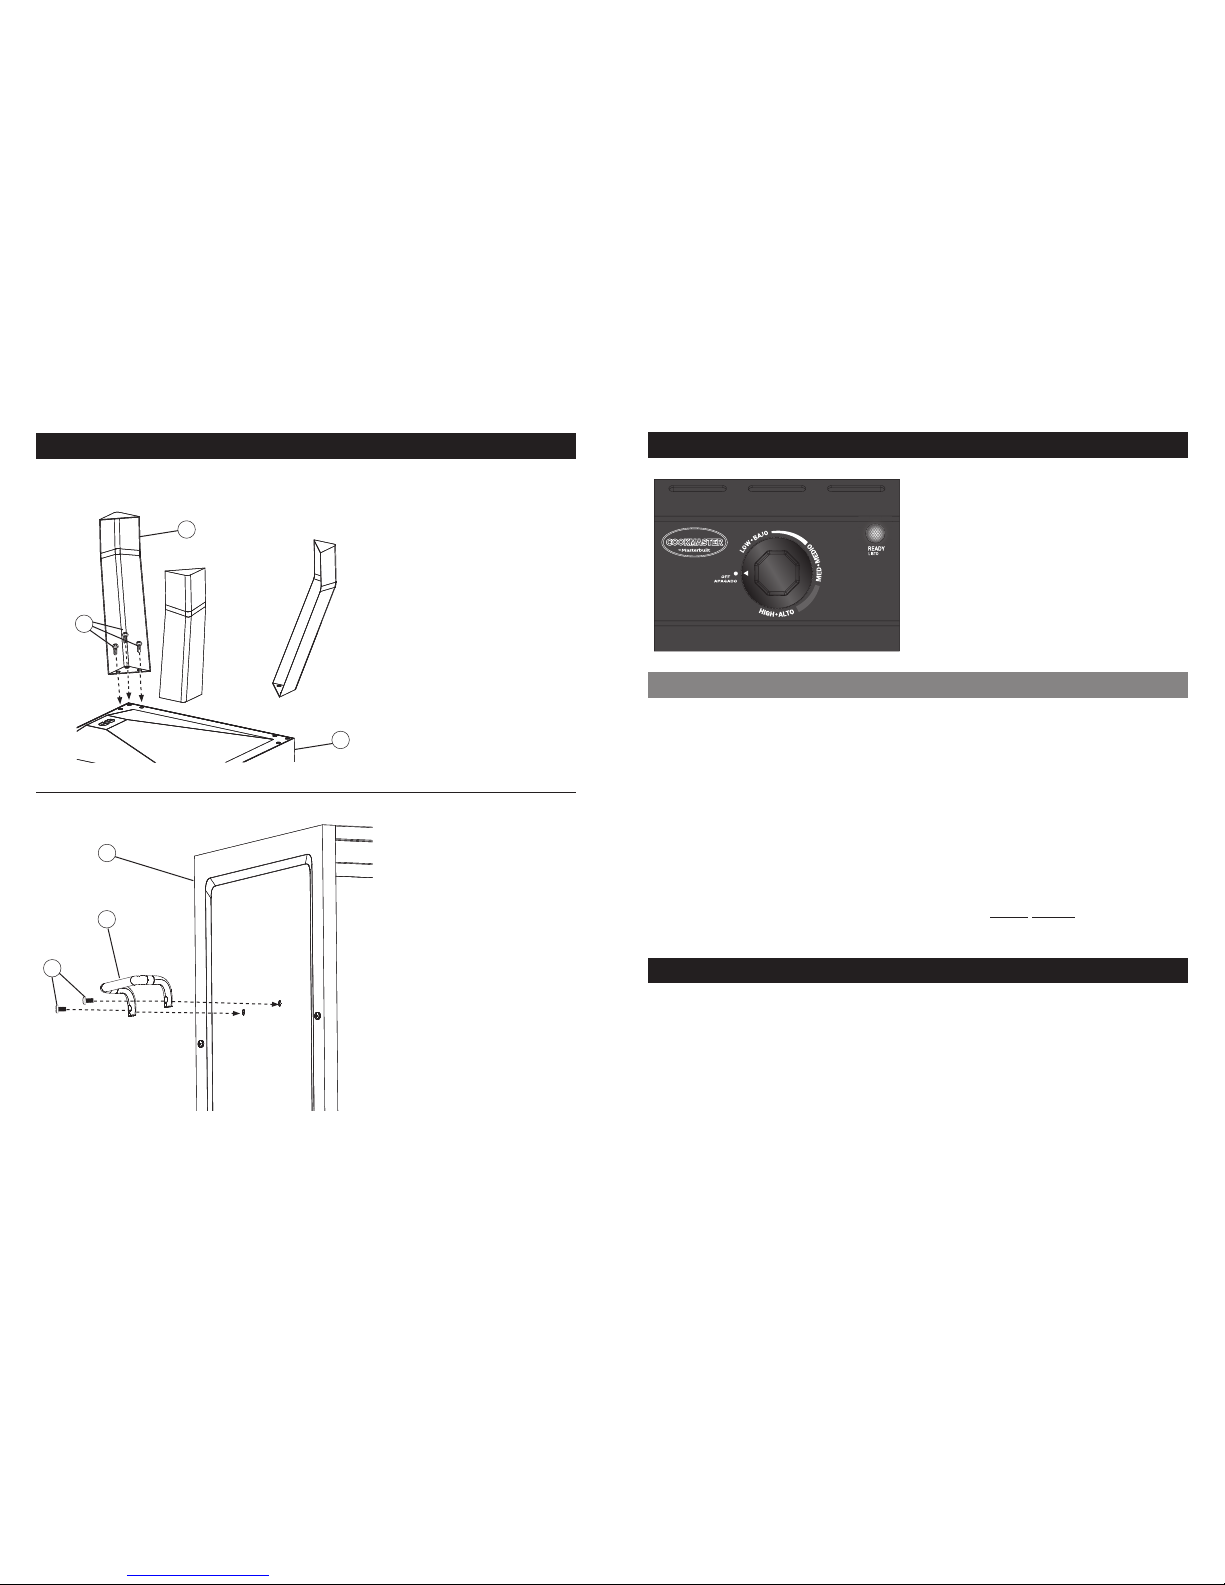
5
ASSEMBLY INSTRUCTIONS
Tools required for assembly: Adjustable Wrench, Phillips Head Screwdriver.
Step 2
Mount side handle (5) to smoker
body (1) using
phillips
screws (A).
Repeat step for opposite side.
Step 1
Carefully position smoker as
shown.
Attach leg (6) to bottom of smoker body
(1) using phillips head screws (A).
Repeat step for remaining legs.
6
1
1
A
5
A
OPERATION INSTRUCTIONS
IMPORTANT FACTS ABOUT USING SMOKER
• Maximum temperature will range between 266°F - 284°F (130°C - 140°C) when control panel is
set on HI.
•
Wood chip bowl MUST be in place when using smoker. This minimizes the chance of wood flare ups.
• Wood chips must be used in order to produce smoke and create the smoke flavor. See “Wood
Smoking Guide for Meats” section in this manual.
• Check drip can often during cooking. Empty drip can before it gets full. Drip cup may need to
be emptied periodically during cooking.
• Do not open smoker door unless necessary. Opening smoker door causes heat to escape and
may cause wood to flare up. Closing the door will re-stabilize the temperature and stop flare up.
• Do not leave old wood ashes in the wood tray. Once ashes are cold empty tray. Tray should be
cleaned out prior to and after each use to prevent ash buildup.
• This is a smoker. There will be a lot of smoke produced when using wood chips. Smoke will
escape through seams and turn the inside of smoker black. This is normal.
HOW TO CLEAN SMOKER
For cooking grates, water bowl and drip cup use a mild dish detergent. Rinse and dry thoroughly.
For wood chip bowl, clean frequently to remove ash build up, residue and dust.
For the interior and exterior of smoker simply wipe down with a damp cloth. Do not use a cleaning
agent. Make sure to dry thoroughly.
Do not clean with metal scouring pads. Pieces can break of the pad and touch electical pars, creating a risk of electrical shock.
ALWAYS MAKE SURE UNIT IS UNPLUGGED AND COOL
TO THE TOUCH BEFORE CLEANING AND STORING.
10
Step 1: Plug power cord into an outlet (refer to
“Warnings & Important Safeguards” section of
manual).
Step 2: Turn dial to set temperature. Ready light
will turn off when unit has reached set temperature
and is ready for use.
Step 3: When cooking time has elapsed and food
is done, turn dial to MIN and unplug power cord
from outlet.
* Allow excess grease to drain into grease clip
shown on page 8.
Page 7
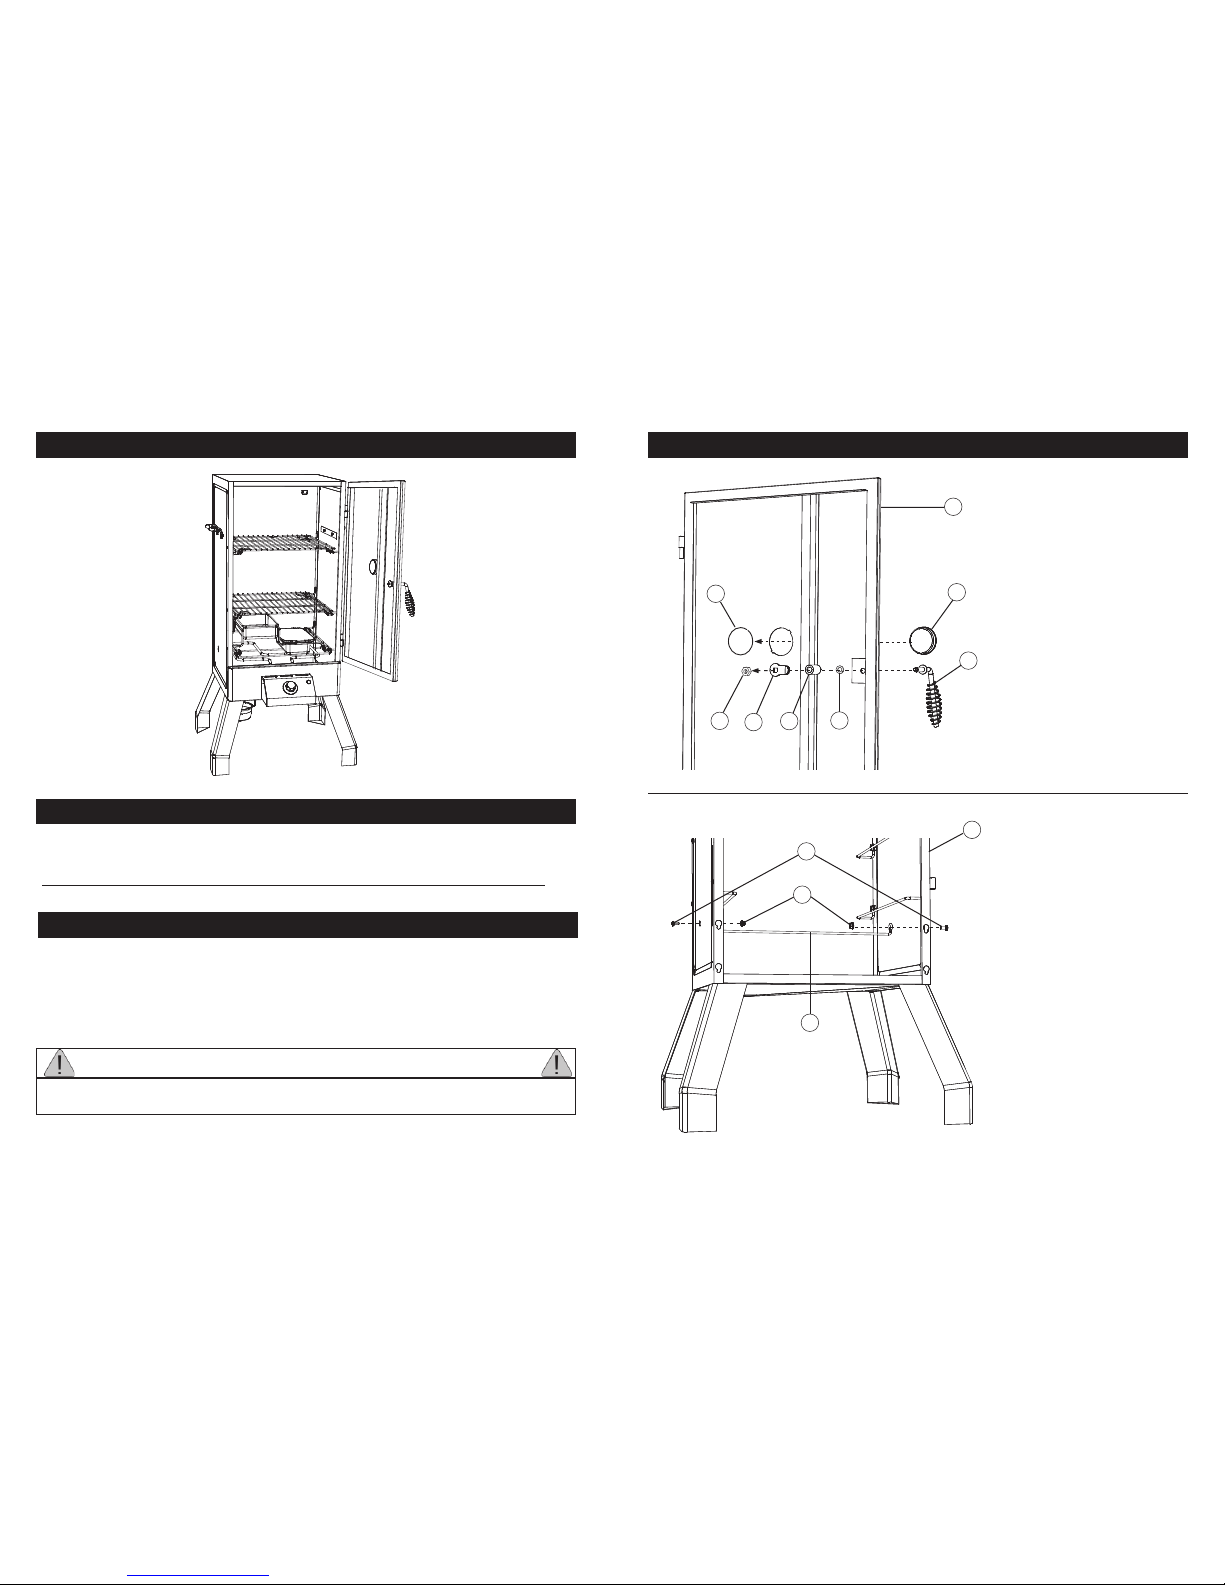
SMOKER IS NOW READY FOR USE
Preseason smoker prior to first use. Make sure water bowl is in place with NO WATER. Set
control panel to MED and run unit for 3 hours. Shut down and allow to cool. Some smoke may
appear during this time, this is normal.
During last 45 minutes, add 1 cup of wood chips in wood chip bowl to complete preseasoning.
• Never use more than 1 cup of wood chips at a time. Never use wood chunks.
• Wood chips should be level with top rim of wood chip bowl.
• Check wood chip bowl periodically to see if wood has burned down. Add more chips as needed.
TIPS FOR USING WOOD CHIPS
PRESEASON INSTRUCTIONS
CAUTION
When door is opened a flare up may occur. Should wood chips flare up, immediately close
door, wait for wood chips to burn down then open door again. Do not spray with water.
9
Step 3
Insert temperature gauge (3)
through slotted hole in smoker
door (2) and secure into place
with retainer ring (G).
Insert door handle (4) through smoker
door
(2). Place washer (E), handle
bushing (C) and door latch (D) onto
handle. Secure with lock nut (B) as
illustrated.
Step 4
Place Element Support (8) into
smoker body (1).
Secure with phillips head screw (A)
and hex flange nut (F) as shown.
C
D
E
B
4
3
2
1
G
ASSEMBLY INSTRUCTIONS
A
F
8
6
Page 8
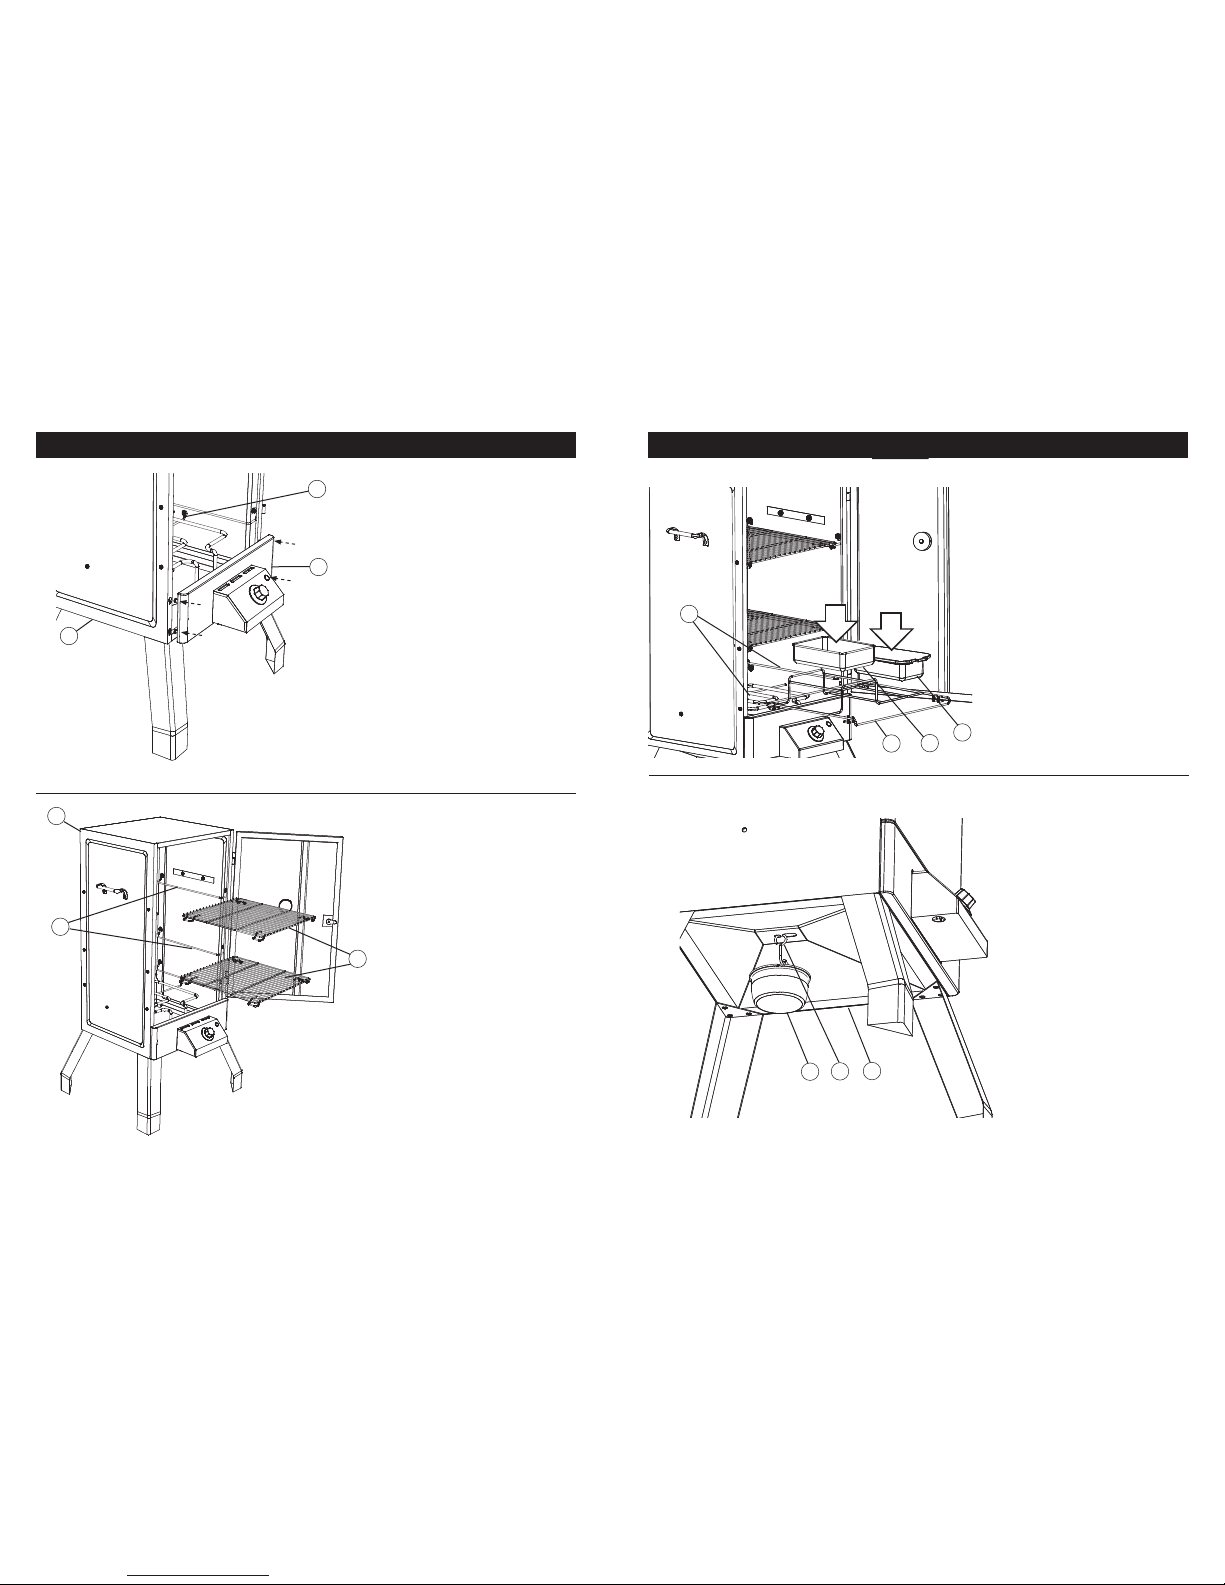
(*Some parts not shown for clarity.)
Step 5
Align
control panel (7)
with smoker
body (1), rest element of control
panel (7) onto element support (8).
Insert phillips head screws located on
rear side of control panel (7) into hole
slots of smoker body (1) as shown.
Tighten screws once nested securely
into place.
(*Some parts not shown for clarity.)
Step 6
Slide cooking grates (15) onto cooking
grate supports (14) inside smoker body (1).
1
14
15
ASSEMBLY INSTRUCTIONS
7
1
7
8
Step 8
Insert grease clip (10) with drip cup (9)
into grooves under smoker body (1).
SOME PARTS NOT SHOWN FOR
CLARITY
.
Step 7
Set wood chip tray (12) and water
bowl (13) into wood chip grate (11)
and slide onto grate support (14) as
shown.
Note: Wood chip tray and water bowl
MUST be in place when using smoker
.
This minimizes the chance of wood
flare ups.
13
12
9
10
1
14
11
ASSEMBLY INSTRUCTIONS
8
 Loading...