

Page 1
Built-in electric oven
GB
CLOVIPK-A - Version: 01
CLOVIPK-A-C&L-IM-V03-EN.indd 1 27/8/15 5:39 pm
Built-in electric oven - Barcode: 5052931557585
IE
Warning! Read the instructions before using the appliance.
Page 2
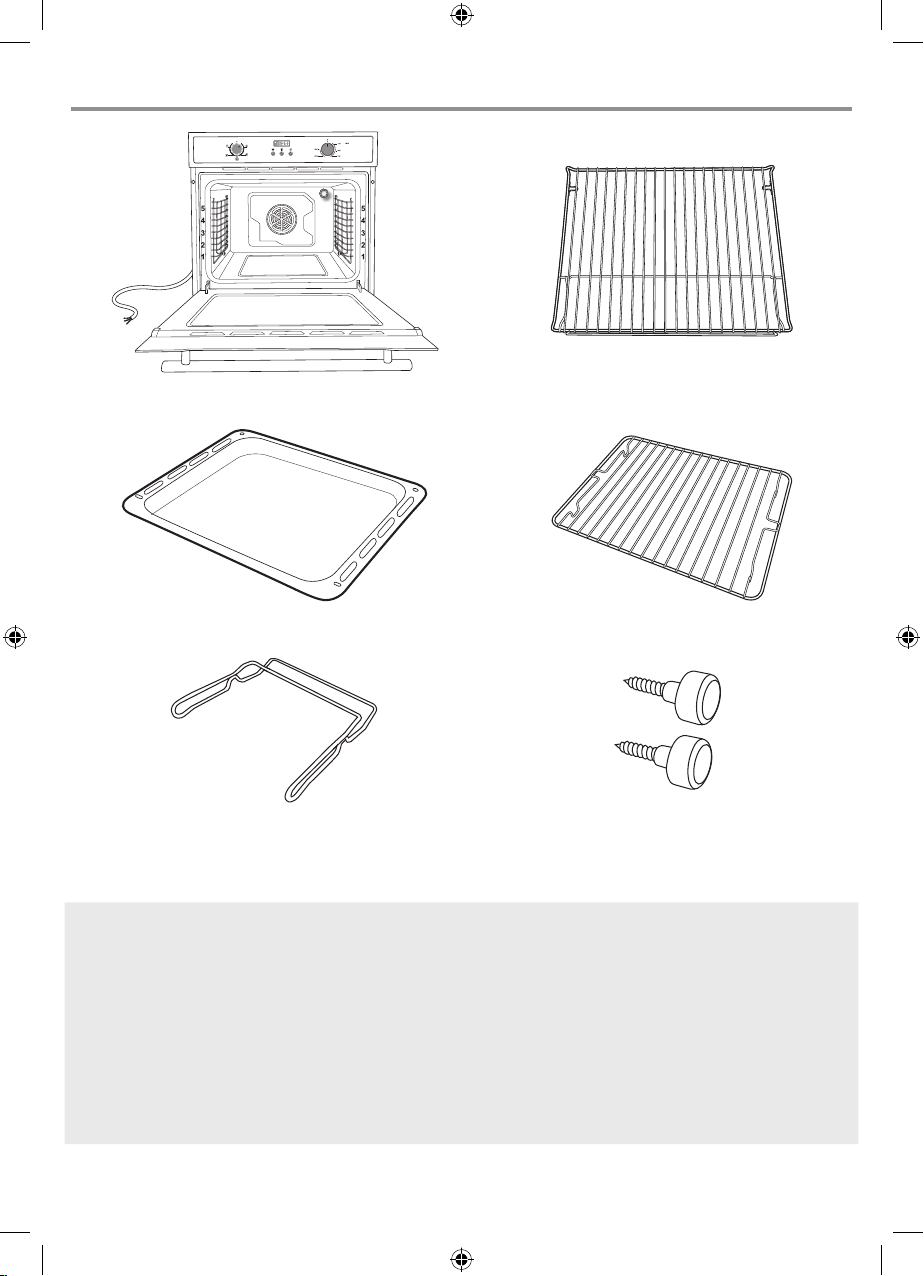
Scope of delivery
[A] x 1 [B] x 1
[C] x 1 [D] x 1
[E] x 1 [F] x 2
[A] Main unit with side rails [D] Grill to place on pan for supporting
food being cooked
[B] Oven shelf [E] Gripper for removing hot grill and
pans, thus avoiding direct contact
[C] Metal pan suitable for cooking and also
[F] Screws
useful for collecting fats from foods
placed on the grill
CLOVIPK-A Built-in electric oven
CLOVIPK-A-C&L-IM-V03-EN.indd 2 27/8/15 5:39 pm
Page 3

Let's
get started...
These instructions are for your safety. Please read through them
thoroughly before use and retain them for future reference.
GB
IE
Getting started…
Safety
Your product 10
Before you start 12
In more detail…
Operation
Care and maintenance
Troubleshooting
Recycling and disposal
Technical and legal information
Guarantee
CE declaration of conformity
Appendix...
Installation
04
04
13
13
23
27
28
29
30
32
33
3
CLOVIPK-A-C&L-IM-V03-EN.indd 3 27/8/15 5:39 pm
Page 4
GB
IE
Safety
CLOVIPK-A Built-in electric oven
These instructions are for your safety.
Please read through them thoroughly prior
to installation and retain them for future
reference.
Getting started...
All installation work must be carried
out by a competent person or qualied
electrician.
This appliance must be installed
correctly by a qualied person,
strictly following the manufacturer’s
instructions.
This appliance complies with all current
European safety legislation, however, the
manufacturer must emphasise that this
compliance does not prevent the surfaces of
the appliance from heating up during use and
remaining hot during its operation.
Do not allow the electric cables to touch the
hot parts of the appliance.
Make sure that the power cord is not caught
under or in the appliance and avoid damage to
the power cable.
4
CLOVIPK-A-C&L-IM-V03-EN.indd 4 27/8/15 5:39 pm
Page 5
CLOVIPK-A Built-in electric oven
Do not install the appliance outdoors in a
damp place or in an area which may be prone
to water leaks such as under or near a sink
Safety
GB
IE
unit. In the event of a water leak allow the
machine to dry naturally.
Please dispose of the packing material
carefully.
Do not use ammable sprays in close vicinity
to the appliance.
This appliance can be used by children
aged from 8 years and above and persons
with reduced physical, sensory or mental
capabilities or lack of experience and
knowledge if they have been given supervision
or instruction concerning use of the appliance
in a safe way and understand the hazards
involved. Children shall not play with the
appliance.
Getting started...
Cleaning and user maintenance shall not be
made by children without supervision.
Regularly check the power cord for damage.
If the supply cord is damaged, it must be
replaced by the manufacturer, its service agent
or similarly qualied persons in order to avoid
a danger or injury.
5
CLOVIPK-A-C&L-IM-V03-EN.indd 5 27/8/15 5:39 pm
Page 6
GB
IE
Safety
CLOVIPK-A Built-in electric oven
The appliance is not intended to be operated
by means of external timer or separated
remote-control system.
Getting started...
The appliance is for domestic use only.
The Manufacturer declines all liability for
personal or material damage as a result
of misuse or incorrect installation of this
appliance.
Danger of burns! During use the appliance
becomes hot. Care should be taken to avoid
touching heating elements inside the oven.
Warning! Accessible parts may become hot
during use. Children should be kept away.
Warning! If the door or door seals are
damaged, the oven must not be operated until
it has been repaired by a competent person.
Do not lean on the door or place any objects
on the door of the appliance. This can damage
the door hinges.
Warning! Ensure that the appliance is
switched off before replacing the lamp to avoid
the possibility of electric shock.
The oven must be installed in accordance with
installation instructions and all dimensions
must be followed.
6
CLOVIPK-A-C&L-IM-V03-EN.indd 6 27/8/15 5:39 pm
Page 7
CLOVIPK-A Built-in electric oven
Before connecting the appliance to the power
supply, check that the power supply voltage
and current rating corresponds with the power
Safety
GB
IE
supply details shown on the appliance rating
label.
Never use a damaged appliance! Disconnect
the appliance from the electrical outlet and
contact your retailer if it is damaged.
Danger of electric shock! Do not attempt
to repair the appliance yourself. In case of
malfunction, repairs are to be conducted by
qualied personnel only.
To avoid damaging the cord, do not squeeze,
bend or chafe it on sharp edges. Keep it away
from hot surfaces and open ames as well.
Lay out the cord in such a way that no
unintentional pulling or tripping over it is
possible.
Keep the appliance and its cord out of reach of
Getting started...
children.
Do not operate the appliance with wet hands
or while standing on a wet oor.
Always turn the appliance off before
disconnecting it from the main power supply.
7
CLOVIPK-A-C&L-IM-V03-EN.indd 7 27/8/15 5:39 pm
Page 8
GB
IE
Safety
CLOVIPK-A Built-in electric oven
Disconnect the oven from the power supply
when not in use and before cleaning.
This appliance is classied as protection
Getting started...
class I and must be connected to a protective
ground (Earth).
Means for full disconnection must be
incorporated in the xed wiring in accordance
with the wiring rules. To achieve this install an
appropriate circuit breaker (CB) and residual
current device (RCD). It should be installed in
an easily reachable place so that in case of
emergency the appliance can be disconnected
from power immediately.
The xed wiring must be protected against
heat surfaces.
Do not hang any objects to the handle of the
oven door.
Do not cover the bottom of the oven with
aluminium foil or other objects. Caution: Risk
of re!
Do not allow aluminium foil, plastic, paper or
fabric contact with heating elements.
Never leave the appliance unattended during
use, especially when cooking with ammable
substances (e.g., hot oil, fat, etc.).
8
CLOVIPK-A-C&L-IM-V03-EN.indd 8 27/8/15 5:39 pm
Page 9
CLOVIPK-A Built-in electric oven
Do not store or never use harsh chemicals,
sprays, ammable or non-food in or near
the oven. Oven is designed specically for
Safety
GB
IE
heating or cooking food. The use of corrosive
chemicals in heating or cleaning will damage
the unit and may cause injury.
Should any food inside the oven catch re,
keep the door closed. Switch the oven off and
disconnect the power supply.
Always exercise caution when opening the
door. Move to side, open the door slowly to
vent the hot air and/or steam. Make sure your
face is away from the opening and make sure
there are no children or pets near the oven.
Only use utensils that are suitable for use in
this type of oven.
The oven should be cleaned regularly and any
food deposits removed.
Getting started...
Do not use harsh abrasive cleaners or sharp
metal scrapers to clean the oven door glass.
They can scratch the surface, which may
result in shattering of the glass.
A steam cleaner is not to be used.
9
CLOVIPK-A-C&L-IM-V03-EN.indd 9 27/8/15 5:39 pm
Page 10
GB
Your product
IE
Your product
Getting started...
CLOVIPK-A Built-in electric oven
Note!
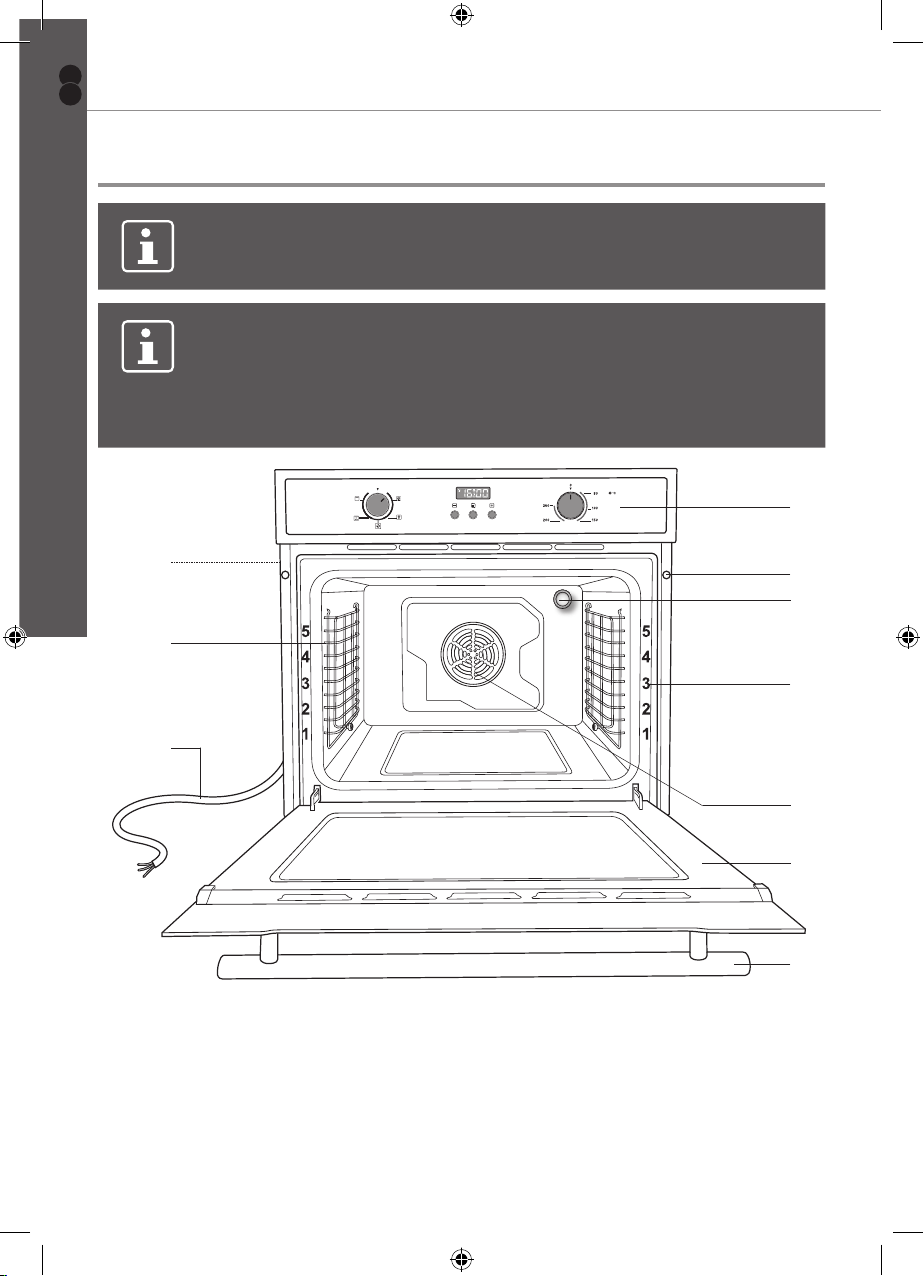
This diagram may be slightly different from the layout of the appliance.
Note!
Shelf levels are numbered from the bottom up. Levels 4 and 5 are
used mainly for the grill function. Please refer to the cooking guides
provided throughout this manual to determine appropriate shelf
levels for your dishes.
1
10
9
8
1 Control panel 6 Door
2 Fixing holes (2x) 7 Handle
3 Oven lamp 8 Power cable
4 Shelf level markings 9 Side rails
2
3
4
5
6
7
5 Fan 10 Handles for carrying the oven
10
CLOVIPK-A-C&L-IM-V03-EN.indd 10 27/8/15 5:39 pm
Page 11
CLOVIPK-A Built-in electric oven
Your product
Your product
GB
IE
22
21
11
12
17 16
13 14
Getting started...
15
18
19
20
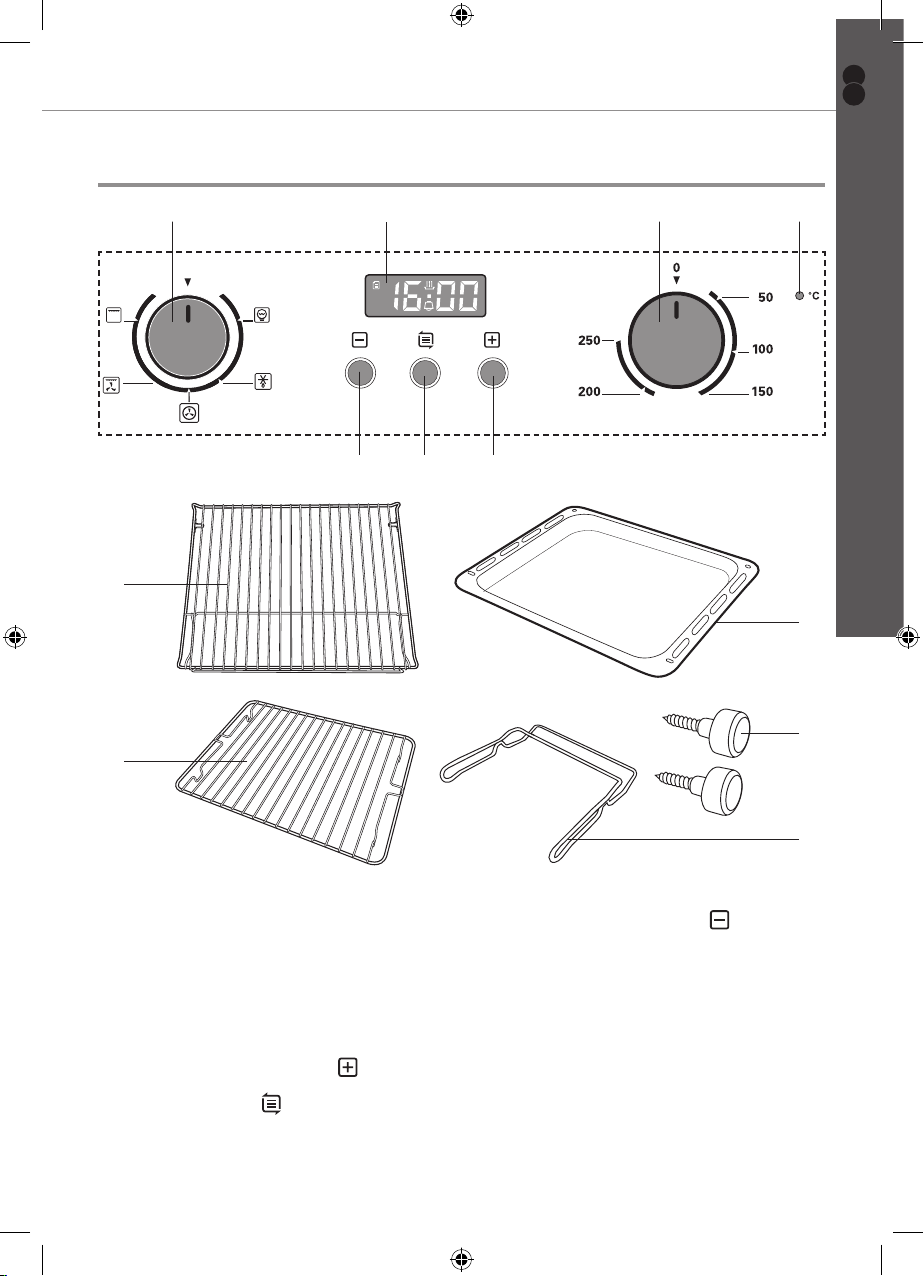
11 Cooking mode control 17 Decrease time button
12 Display 18 Metal pan
13 Temperature control 19 Screws
14 Operating indicator 20 Gripper
15 Increase time button 21 Grill to place on pan
16
Time button
22 Oven shelf
11
CLOVIPK-A-C&L-IM-V03-EN.indd 11 27/8/15 5:39 pm
Page 12
GB
Before you start
IE
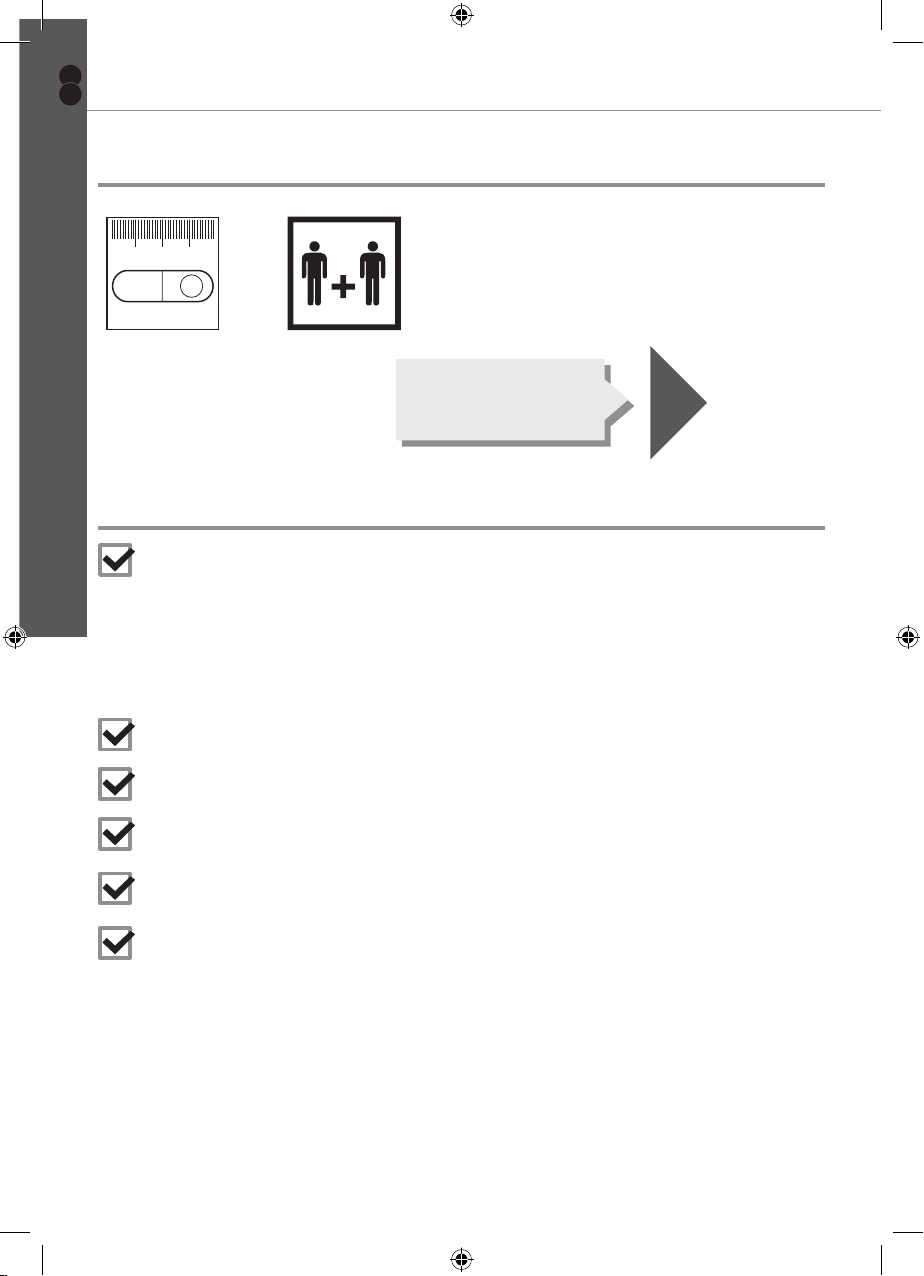
You will need (not supplied)
Getting started...
Installation guide
located at the end of
the guidebook
Things to check before you start
To avoid the risks that are always present when you use an electrical
appliance it is important that this appliance is installed correctly and that
you read the safety instructions carefully to avoid misuse and hazards.
Please keep this instruction booklet for future reference and pass it on to
any future owners. After unpacking the appliance please check that it is
not damaged. If in doubt, do not use the appliance but contact Customer
Services on 0344 800 1128 (UK), 0144 75261 (Ireland).
Check the package and make sure you have all of the parts listed.
CLOVIPK-A Built-in electric oven
33
Decide on the appropriate location for your product.
If this product contains glass please take care when tting or handling to
prevent personal injury or damage to the product.
The specications plate is available on this appliance. This plate displays
all the necessary identication information for ordering replacement parts.
If you sell the appliance, give it away, or leave it behind when you move
house, make sure you also pass on this manual so that the new owner can
become familiar with the appliance and its safety warnings.
12
CLOVIPK-A-C&L-IM-V03-EN.indd 12 27/8/15 5:39 pm
Page 13
CLOVIPK-A Built-in electric oven
Introduction
Note!
• This multifunction oven combines the advantages of traditional
convection ovens with those of the more modern fan assisted
models in a single appliance.
• It is an extremely versatile appliance that allows you to choose
easily and safely between different cooking modes.
Note!
Before using the oven for the rst time we recommend that the oven
be switched on and set to its highest temperature. Keep the oven
door closed and leave the appliance on for 1 hour with nothing in it.
Ensure adequate ventilation during this process by opening doors
and windows in the room. Any odours created during this operation
are due to the evaporation of substances used to protect the
appliance during storage prior to installation.
Note!
Place the grill pan provided on the bottom shelf of the oven when
cooking fatty foods to prevent grease droplets forming on the base of
the oven. Never place anything on the bottom of the oven when it is
in operation. This could cause damage to the enamel. Always place
your cookware (dishes, aluminium foil, etc. etc.) exclusively on the
shelves provided.
Operation
GB
IE
In more detail...
Initial cleaning
Warning!
• Clean the oven thoroughly before using it for the rst time.
• Do not use sharp or abrasive cleaning materials. These could
damage the oven surface.
1. Open the door.
2. Clean all oven accessories with warm water or washing up liquid and polish
dry with a soft clean cloth.
3. Clean the oven interior with a soft clean cloth.
4. Wipe the front of the appliance with a damp cloth.
5. Let the oven and all accessories dry well.
13
CLOVIPK-A-C&L-IM-V03-EN.indd 13 27/8/15 5:39 pm
Page 14

GB
Operation
IE
Control elements
CLOVIPK-A Built-in electric oven
Controls Cooking mode
control
In more detail...
Functions Use the control to
select one of the
available operation
modes.
How to use 1. Press to let the control pop up.
2. Rotate the control to desired setting.
Temperature
control
Use the control to
set the temperature
between 50 °C and
250 °C.
Time buttons
( , , )
Use the buttons
( , , ) to set the
time.
• Press directly to
set desired time.
3. Press the control again to withdraw it.
Setting the time
Once the appliance is connected to the power source, it beeps once and the
display shows . Then the dot "." ashes. The time is now available for setting
in 24-hour format.
1. Press or to set the hour.
2. Press to conrm.
3. Press or to set the minute.
4. Press to conrm. The time is now set and the timer enters standby.
Note!
If the display does not ash, press and for 3 seconds to enter
time setting mode.
Note!
When the oven is disconnected from the power source, the time
settings cannot be saved and need to be re-set.
Note!
In order to use a timer function, the time has to be set rst.
14
CLOVIPK-A-C&L-IM-V03-EN.indd 14 27/8/15 5:39 pm
Page 15
CLOVIPK-A Built-in electric oven
Operation
Product functions
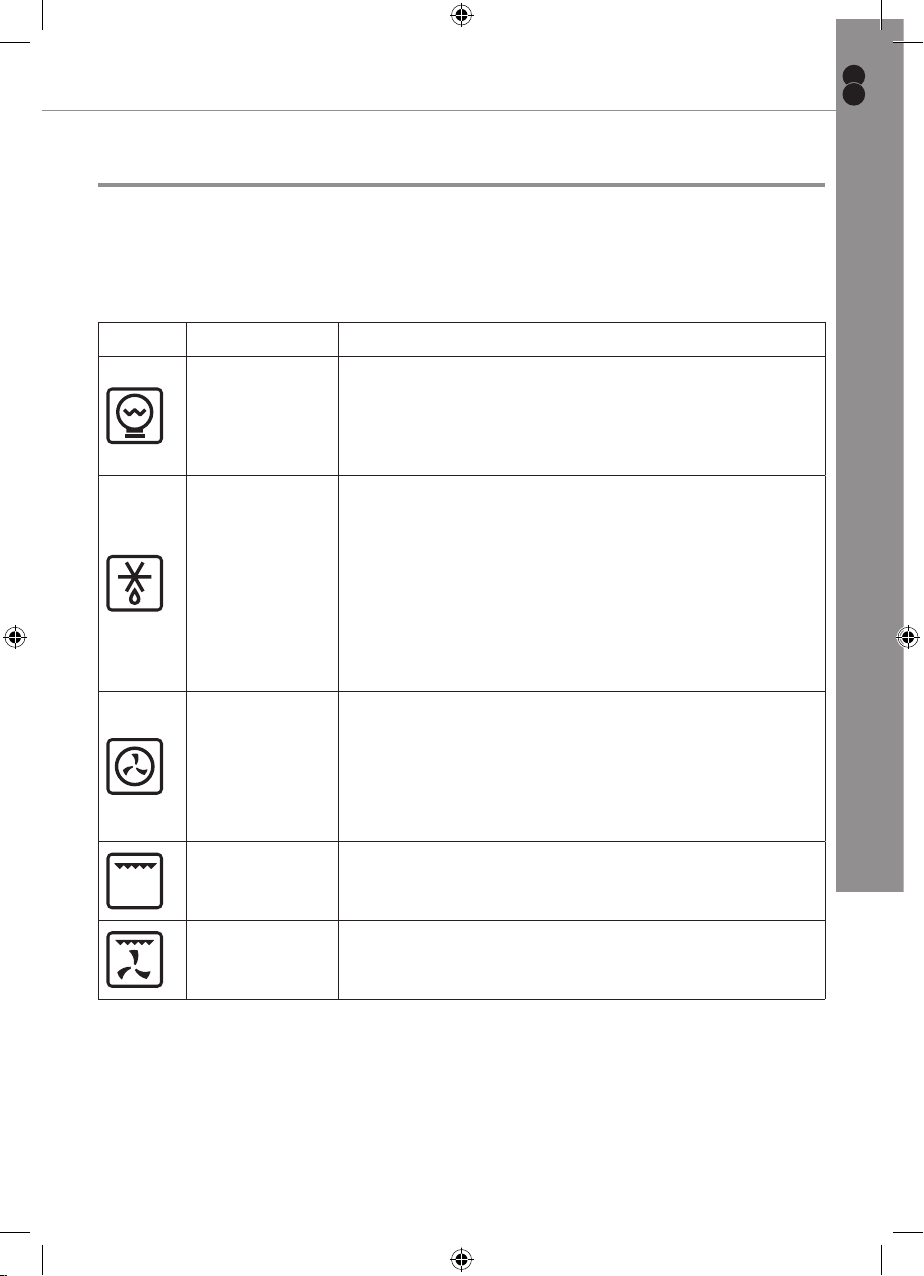
• This oven provides a wide range of settings and functions to choose from, as
described in the following table.
• Use the selector knob to select one of the available operating modes. The
corresponding icon is shown on the display.
Icon Function Description
With the lamp, the user can observe the cooking
process without opening the door.
Oven lamp
The oven lamp will turn on automatically when a
cooking function is started.
The circulation of air at room temperature enables
quicker thawing of frozen food, without the use of
any heat. It is a gentle but quick way to speed up the
defrosting time and thawing of ready-made dishes
Defrost
Convection
Grill
Double grill
with fan
and cream lled products, etc.
The advantage of defrosting at room temperature is
that it does not alter the taste and appearance of the
food.
A heating element around the convection fan
provides an additional source of heat when using
the convection cooking method. In this mode, the
fan automatically comes on to improve the air
circulation within the oven and creates an even heat
for cooking.
The inner grill element switches on and off to
maintain the required temperature. The food is
cooked through radiation heat.
The inner grill element and the top element are both
activated. In this mode, also the fan is in operation to
provide an even distribution of the heat.
GB
IE
In more detail...
15
CLOVIPK-A-C&L-IM-V03-EN.indd 15 27/8/15 5:39 pm
Page 16
GB
Operation
IE
CLOVIPK-A Built-in electric oven
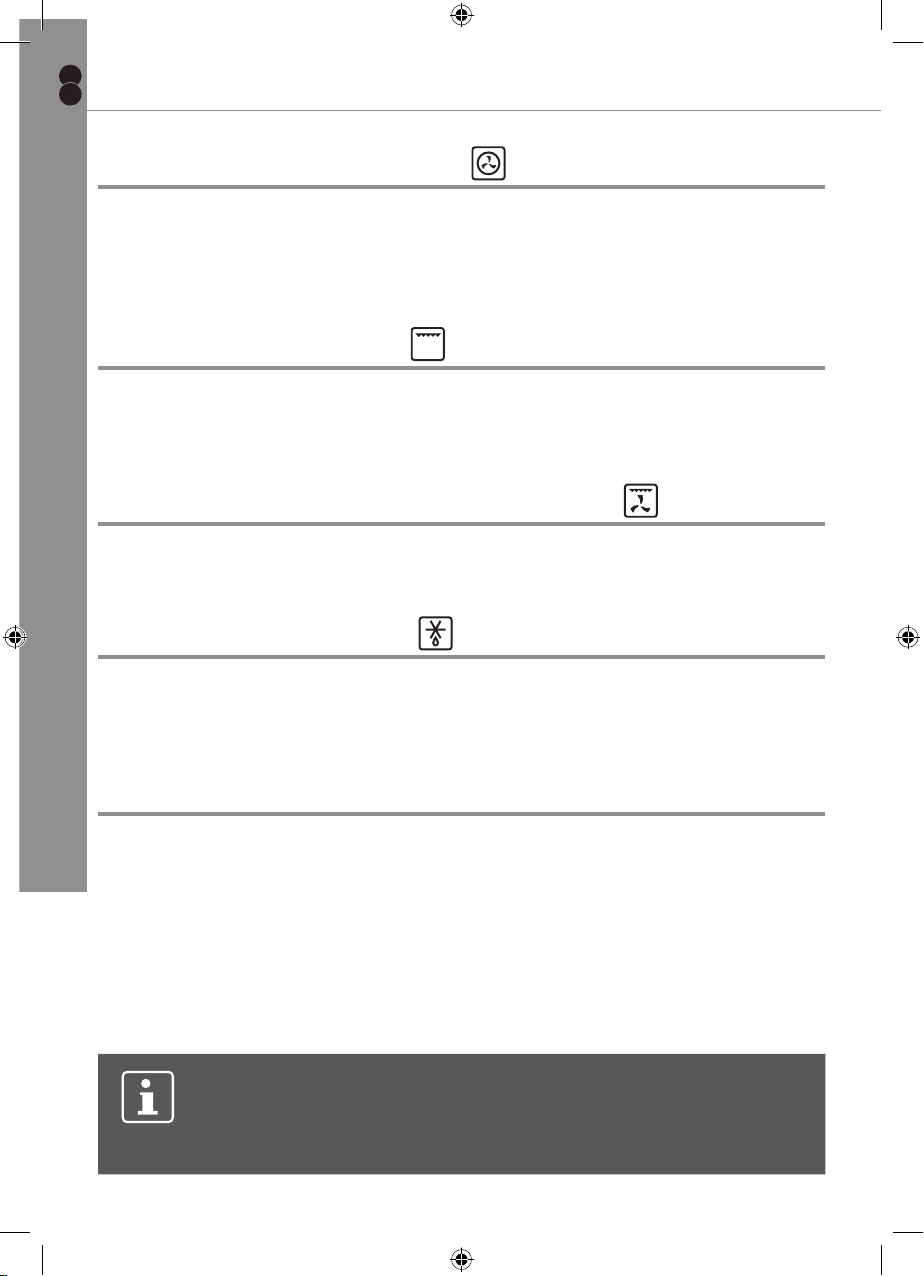
Using the convection mode
The rear circular element and the fan come on and the heat is dispersed by forced
convection. This mode is suitable for cakes and pastry and to roast joints when
you want it well cooked on the outside and tender in the middle. The oven does
In more detail...
not need any pre-heating when using this mode.
Using the grill function
To use the grill ensure that your food is located in the centre of the oven cavity
and adjust the height of the grill pan to control the browning. It is advised to use
the top shelf for small items and the lower shelves for larger items.
Using the double grill function with fan
This mode is recommend for quick browning on the outside but keeping the juices
in. Ideal for chops and burgers.
Using the defrost mode
In this mode only the oven fan comes on. This mode is suitable for the quick
thawing of frozen foods. Thawing times vary depending on the quantity and type
of food to be defrosted.
Practical cooking advice
• The oven offers a wide range of alternatives which allow you to cook any type
of food in the best possible way. With time you will learn to make the best
use of this versatile cooking appliance and the following directions are only a
guideline which may be varied according to your own personal experience.
• Read the information of the food packaging for the cooking temperatures and
times. Once familiar with the performance of the appliance, the temperatures
and times may be varied to adapt them to your personal tastes.
• Check that frozen food is completely thawed before cooking, unless indicated
otherwise.
Note!
The information given in the following charts is intended only as a
guide. Select the lowest temperature quoted and check the food at
the end of the shortest duration quoted.
16
CLOVIPK-A-C&L-IM-V03-EN.indd 16 27/8/15 5:39 pm
Page 17
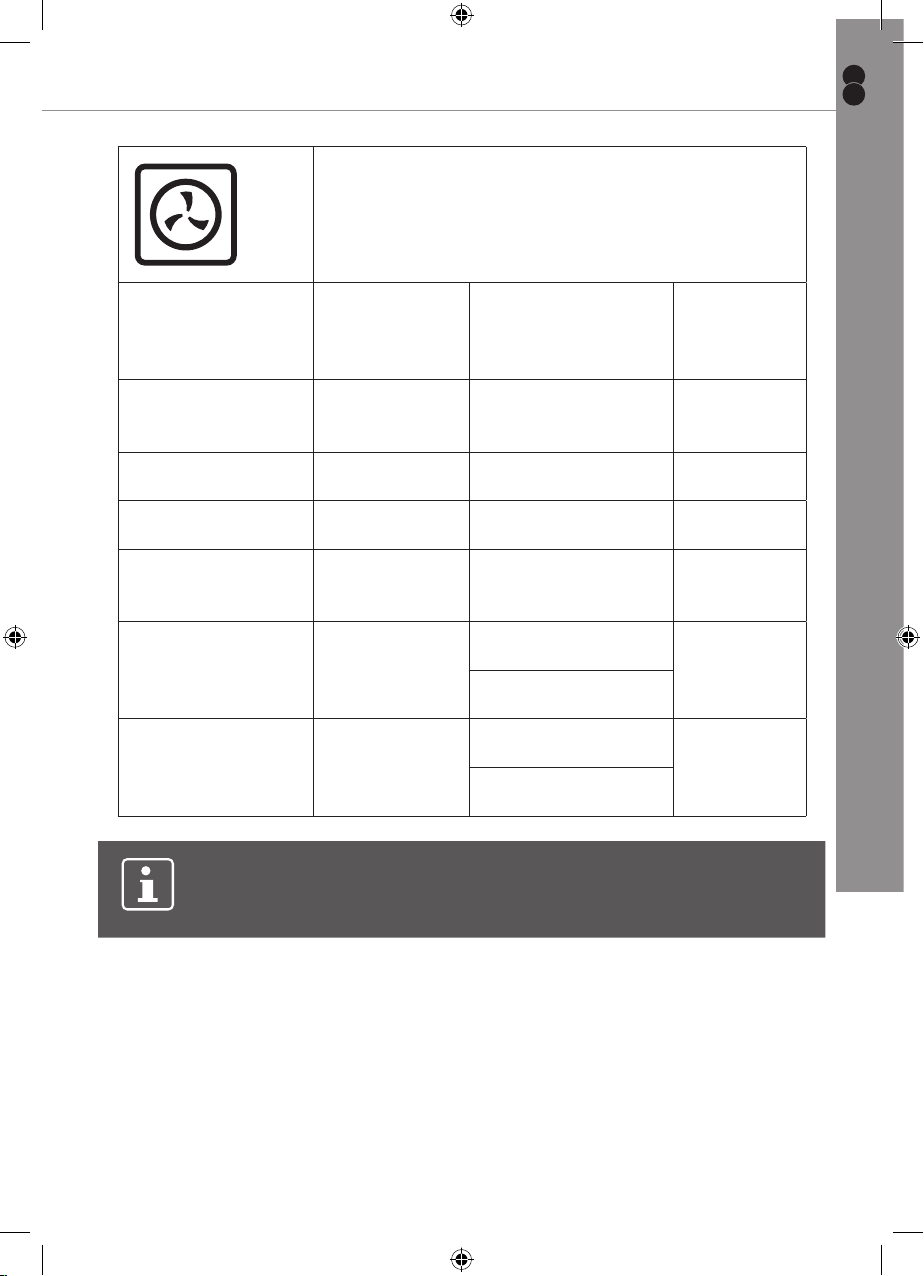
CLOVIPK-A Built-in electric oven
Food Temperature
CONVECTION
setting (ºC)
Recommended
Shelf position
from the bottom
Operation
Cooking
time in
minutes
GB
IE
In more detail...
Small cakes
(single-deck)
165 - 170 2
20 - 23
Sponge cake 160- 165 2 30 - 40
Pizza 170 - 175 3 19 - 25
Apple yeast cake
170 - 175 2 60 - 70
(single-deck)
Small cakes
165 - 170 2 (deep tray) 20 - 23
(double-deck)
4 (shallow tray)
Apple yeast cake
170 - 175 2 (deep tray) 65 - 75
(double-deck)
4 (shallow tray)
Note!
Unless otherwise stated, the times given are for an oven which has
not been pre-heated.
17
CLOVIPK-A-C&L-IM-V03-EN.indd 17 27/8/15 5:39 pm
Page 18
GB
Operation
IE
In more detail...
CLOVIPK-A Built-in electric oven
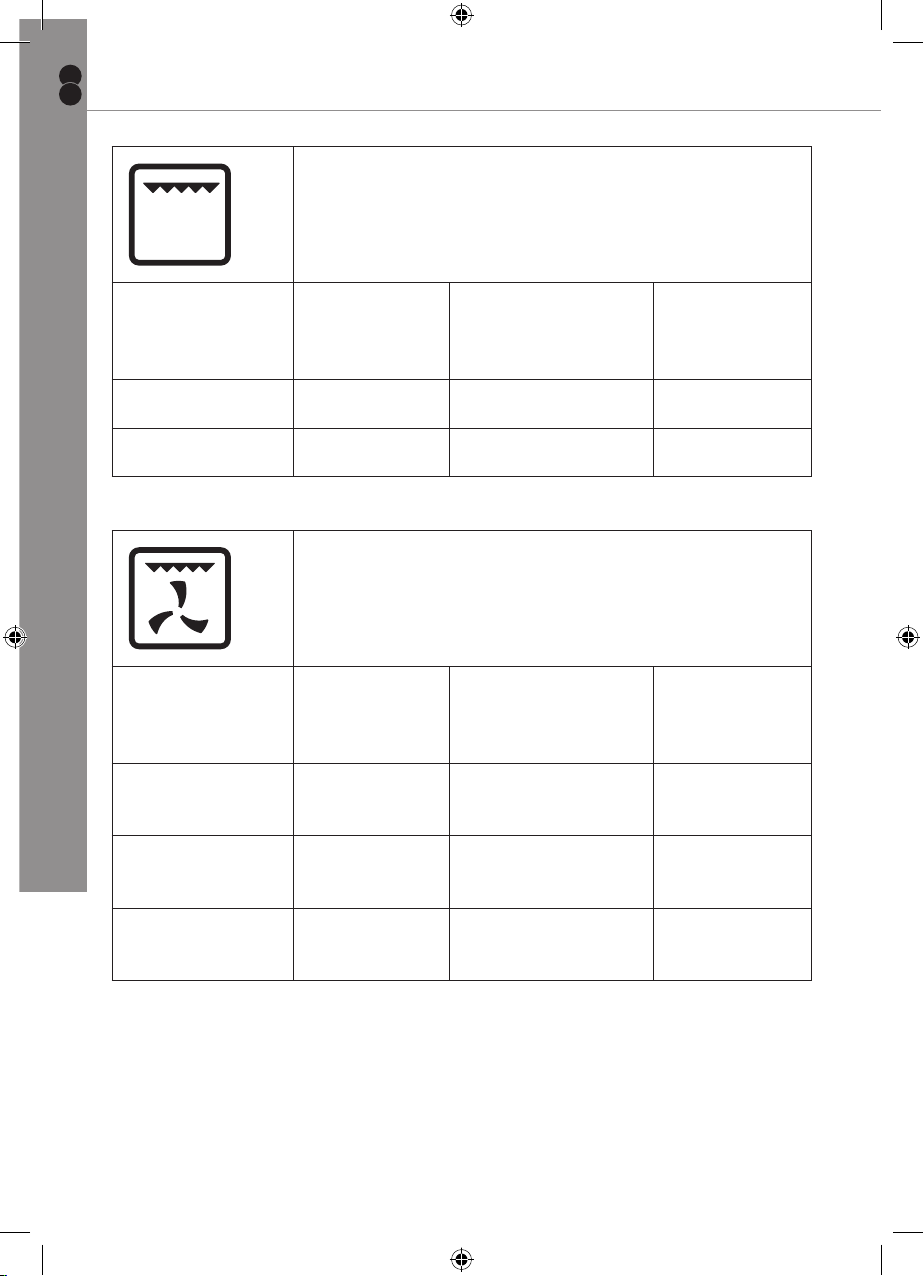
GRILL
Food to be
grilled
Temperature
setting (ºC)
Recommended
Shelf position
from the bottom
Cooking
time in
minutes
Toast 240 3 4 - 5
Beef steak 240 2 15 + (6 - 8)
GRILL WITH FAN
Food to be
grilled
Temperature
setting (ºC)
Recommended
Shelf position
from the bottom
Cooking
time in
minutes
Chicken 180 - 195 2 55 - 65 (Turn
after: 35 min)
Goose 180 - 195 2 75 - 88 (Turn
after: 35 min)
Roasted joint of
pork
180 - 195 1
135 - 150
18
CLOVIPK-A-C&L-IM-V03-EN.indd 18 27/8/15 5:39 pm
Page 19
CLOVIPK-A Built-in electric oven
Operation
Switching on/off
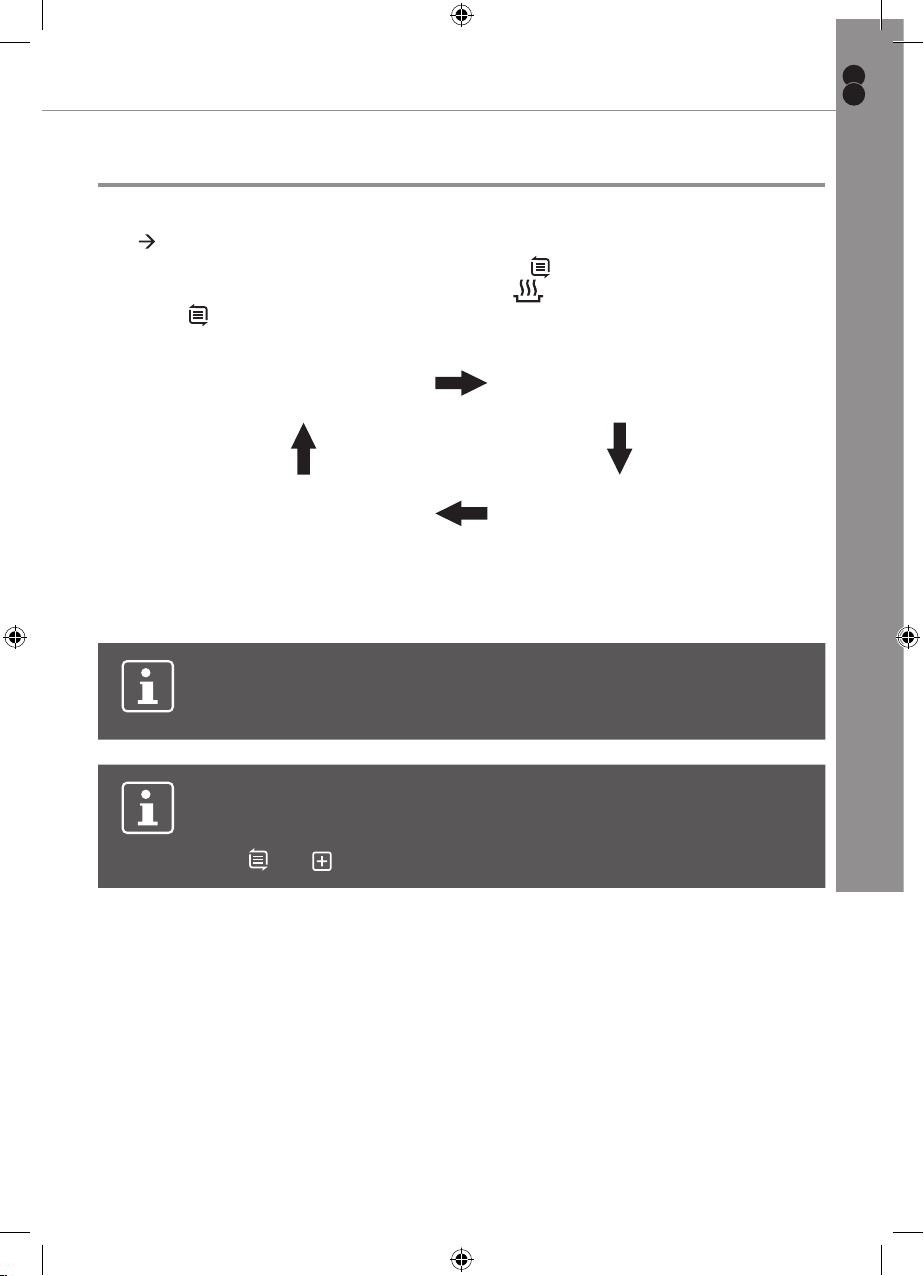
1. Set the desired operation mode and cooking temperature
( Control elements).
2. When the timer is in standby, press and hold for more than 3 seconds. The
timer enters Manual mode with the symbol staying stably on the display.
3. Press to select the time function setting. Available time function settings
are:
Manual mode Alarm reminder
End Dur
4. The oven now switches on automatically and starts heating. The operating
indicator lights up. After the set temperature is reached, The operating
indicator goes off.
GB
IE
In more detail...
Note!
If "Dur" or "End" is selected, the oven will switch off automatically
after cooking.
Note!
If "Manual mode" or "Alarm reminder" is selected, set the cooking
mode control and the temperature control to 0 position. Press and
hold and for more than 3 seconds to let the oven enter standby.
The following shows how to reduce total environmental impact (e.g. energy use)
of the cooking process).
• Try not to open or close the oven door frequently during cooking.
• Keep the oven door clear so that you can look in during cooking easily.
• If possible, defrost frozen food in a way which does not need any power
consumption.
• It takes less time to cook food which has large surface area to volume ratio.
19
CLOVIPK-A-C&L-IM-V03-EN.indd 19 27/8/15 5:39 pm
Page 20
GB
Operation
IE
CLOVIPK-A Built-in electric oven
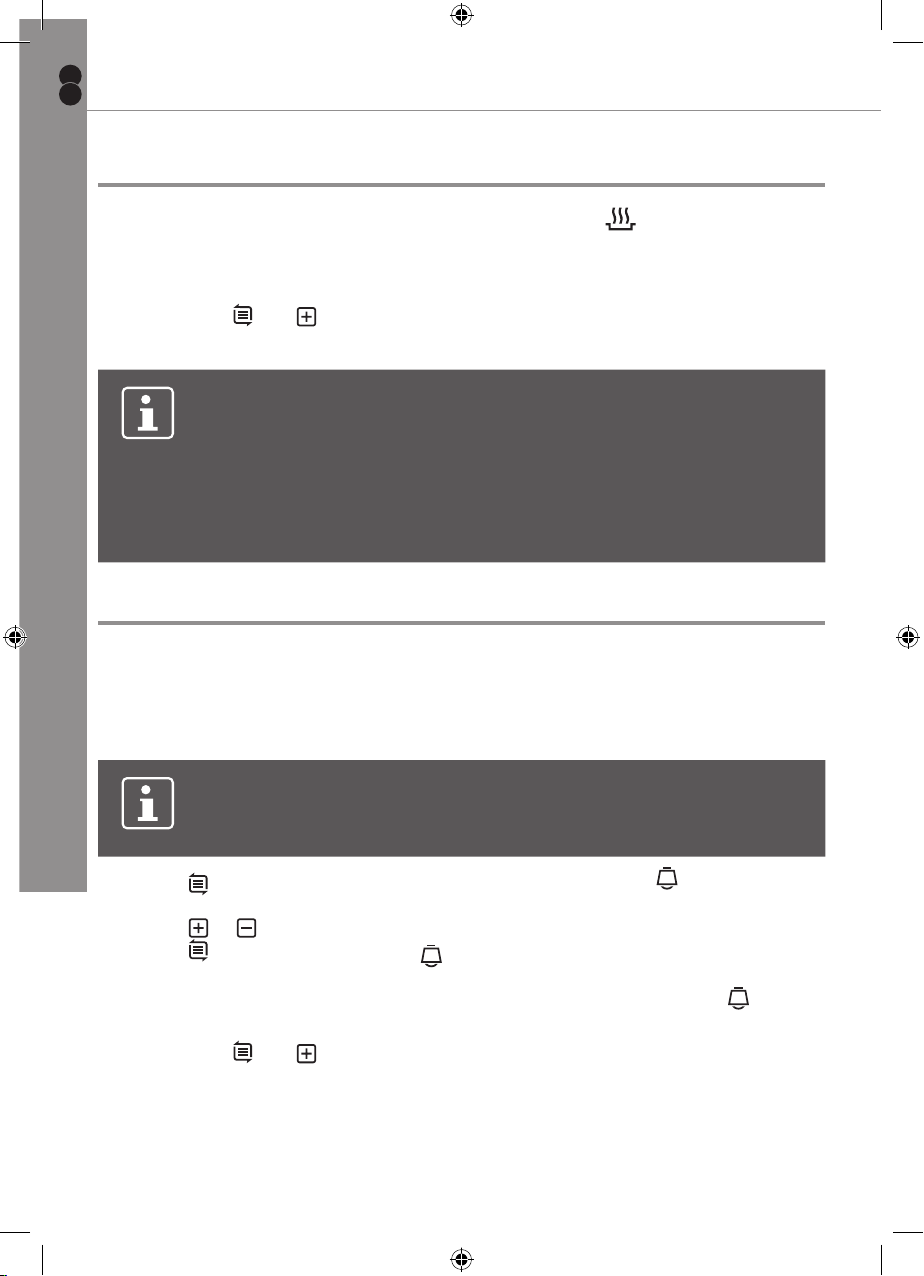
Manual mode
1. In Manual mode, only the actual time and the symbol lights up on the
display. The cooking duration is controlled by the user.
2. After cooking done, set the cooking mode control and the temperature control
In more detail...
to 0 position.
3. Press both and for more than 3 seconds to enter standby if the oven is
not to be used.
Note!
• In Manual mode, to ensure the oven is not left on accidentally,
after 5 hours of inactivity,, the timer will ash once a second to
warn you the oven will enter standby. After a total of 10 hours,
the timer will enter standby.
• When the timer is ashing, pressing any button will reset the
timer if you intend for continual using of the oven.
Setting an alarm reminder
You have the possibility to set a timer to remind you to turn on the oven. You can
also use this function as a kitchen timer to set a time frame for other tasks not
necessarily related to this oven. The timer can be set in a time range between a
minimum of 1 minute, and a maximum of 23 hours and 59 minutes.
Note!
This function can only be activated when the oven is in standby and
not in operation.
1. Press to select the alarm reminder function. The symbol starts ashing
on the display.
2. Press or to set the alarm reminder duration.
3. Press to conrm. The symbol stays continuously on the display. The
alarm reminder is thus activated and starts countdown.
4. When the set time is expired, the oven beeps once and the symbol starts
ashing again.
5. Press both and for more than 3 seconds to enter standby if the oven is
not to be used.
• Note: When the timer arrives, press any button to stop alarming.
20
CLOVIPK-A-C&L-IM-V03-EN.indd 20 27/8/15 5:39 pm
Page 21
CLOVIPK-A Built-in electric oven
Operation
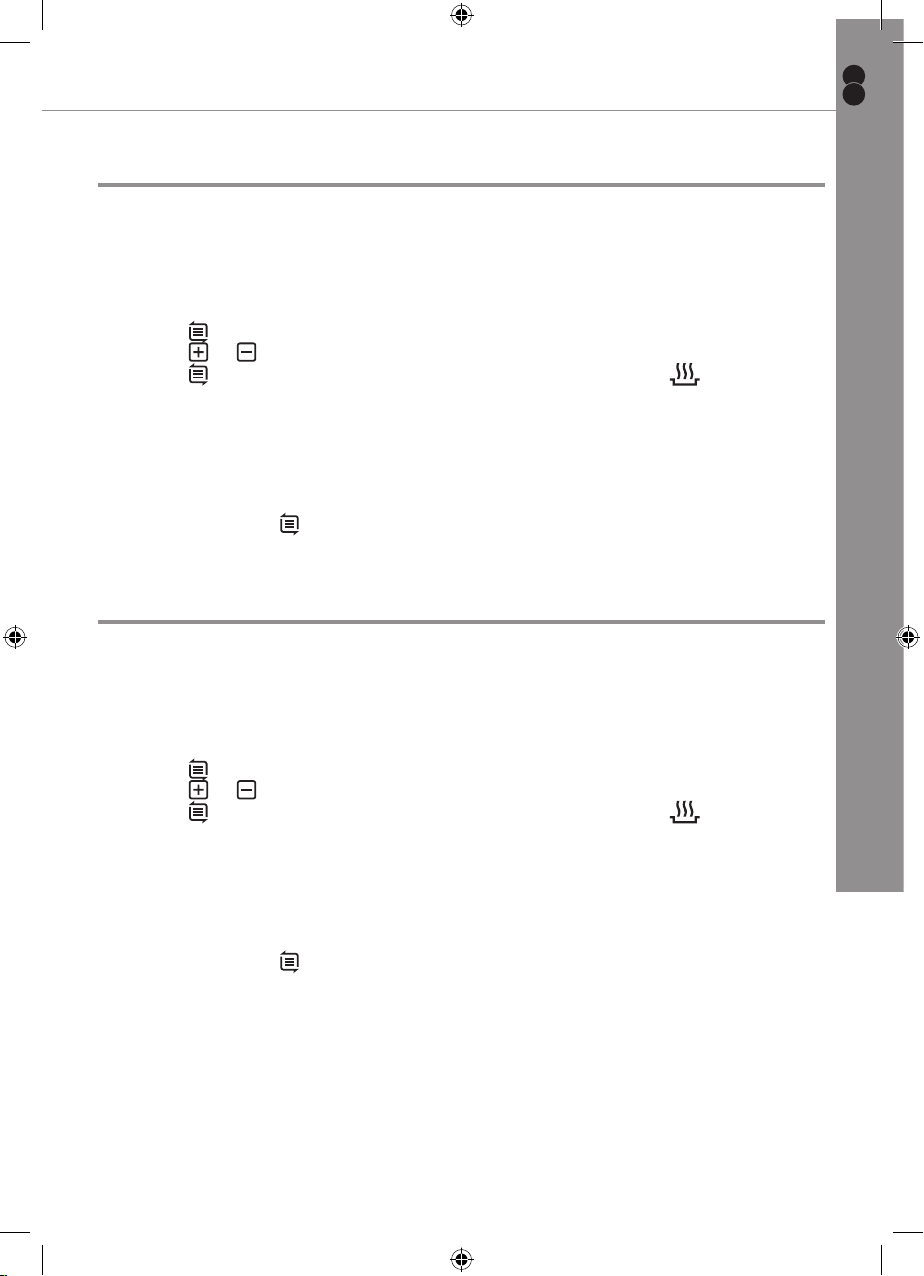
Setting Semi-automatic program as per cooking time
This function is used to cook in the desired time range (up to 10 hours). Before
using this function, ensure to:
• Place the food into the oven rst.
• Set the desired cooking function and temperature.
1. Press until Dur appears on the display.
2. Press or to set the desired cooking time.
3. Press to conrm. The actual time, and the symbols A and appear on
the display. The oven starts to cook.
4. When the set time is expired, the oven beeps and the symbol A starts
ashing.
5. After setting the cooking mode control and the temperature control to
0 position, press any button for less than 3 seconds to stop the audible alarm.
6. If desired, press for more than 3 seconds to let the oven enter the Manual
mode for continuous use.
Setting Semi-automatic program as per cooking end time
GB
IE
In more detail...
This function is used to cook in the desired end time. Before using this function,
ensure to:
• Place the to place food into the oven rst.
• Set the desired cooking function and temperature.
1. Press until End appears on the display.
2. Press or to set the desired end time.
3. Press to conrm. The actual time, and the symbols A and appear on
the display. The oven now starts to cook.
4. When the set end time is expired, the oven beeps and the symbol A starts
ashing.
5. After setting the cooking mode control and the temperature control to
0 position, press any button for less than 3 seconds to stop the audible alarm.
6. If desired, press for more than 3 seconds to let the oven enter the Manual
mode for continuous use.
21
CLOVIPK-A-C&L-IM-V03-EN.indd 21 27/8/15 5:39 pm
Page 22
GB
Operation
IE
CLOVIPK-A Built-in electric oven
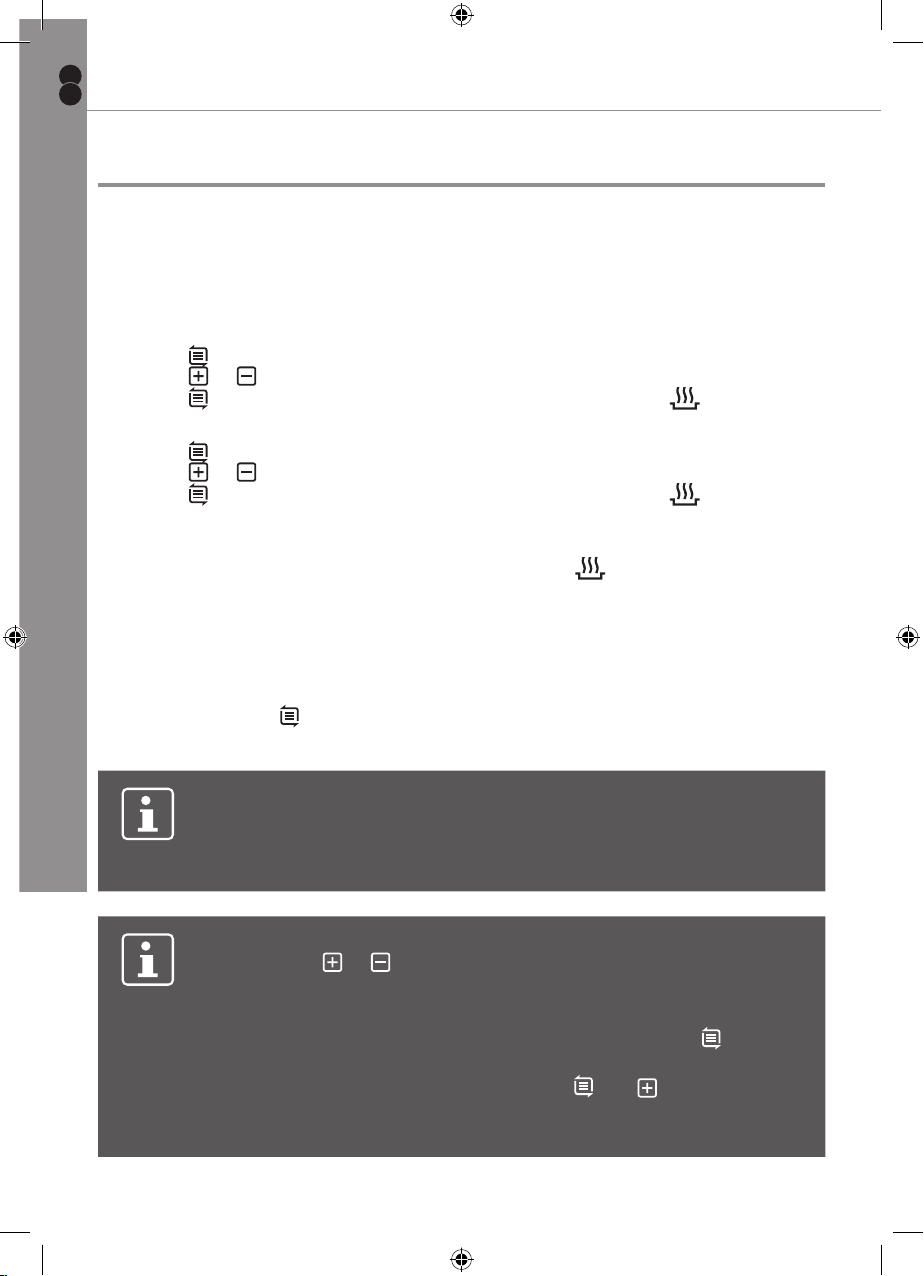
Setting full automatic program
This function is used to cook for a certain duration and stop at a certain end time.
For example, you want a 30-minute cooking process and want the cooking to stop
at 11 am. Before using this function, ensure to:
In more detail...
• Place the food into the oven rst.
• Set the desired cooking function and temperature.
1. Press until Dur appears on the display.
2. Press or to set the desired cooking time.
3. Press to conrm. The actual time, and the symbols A and appear on
the display.
4. Press until End appears on the display.
5. Press or to set the desired end time.
6. Press to conrm. The actual time, and the symbols A and appear on
the display.
7. The oven will start automatically at the time calculated by deducting the
cooking period from the set end time. The symbol disappears from the
display.
8. At the set end time, the oven switches off automatically. The oven beeps and
the symbol A starts ashing.
9. After setting the cooking mode control and the temperature control to
0 position, press any button for less than 3 seconds to stop the audible alarm.
10. If desired, press for more than 3 seconds to let the oven enter the Manual
mode for continuous use.
Note!
Regarding the full automatic program, the set times cannot be
changed. Changing time means cancelling the current automatic
program and entering the pre-set cooking mode.
Note!
• Pressing or for more than 3 seconds to increase/decrease
in increments of 5 seconds.
• When setting the time function, the oven will return to manual
mode if there is no operation for 5 minutes, or when is pressed
for more than 3 seconds.
• When setting the time function, press and for more than
3 seconds will cause the current time function setting to be
cancelled, and the oven to enter standby.
22
CLOVIPK-A-C&L-IM-V03-EN.indd 22 27/8/15 5:39 pm
Page 23
CLOVIPK-A Built-in electric oven
FUSE
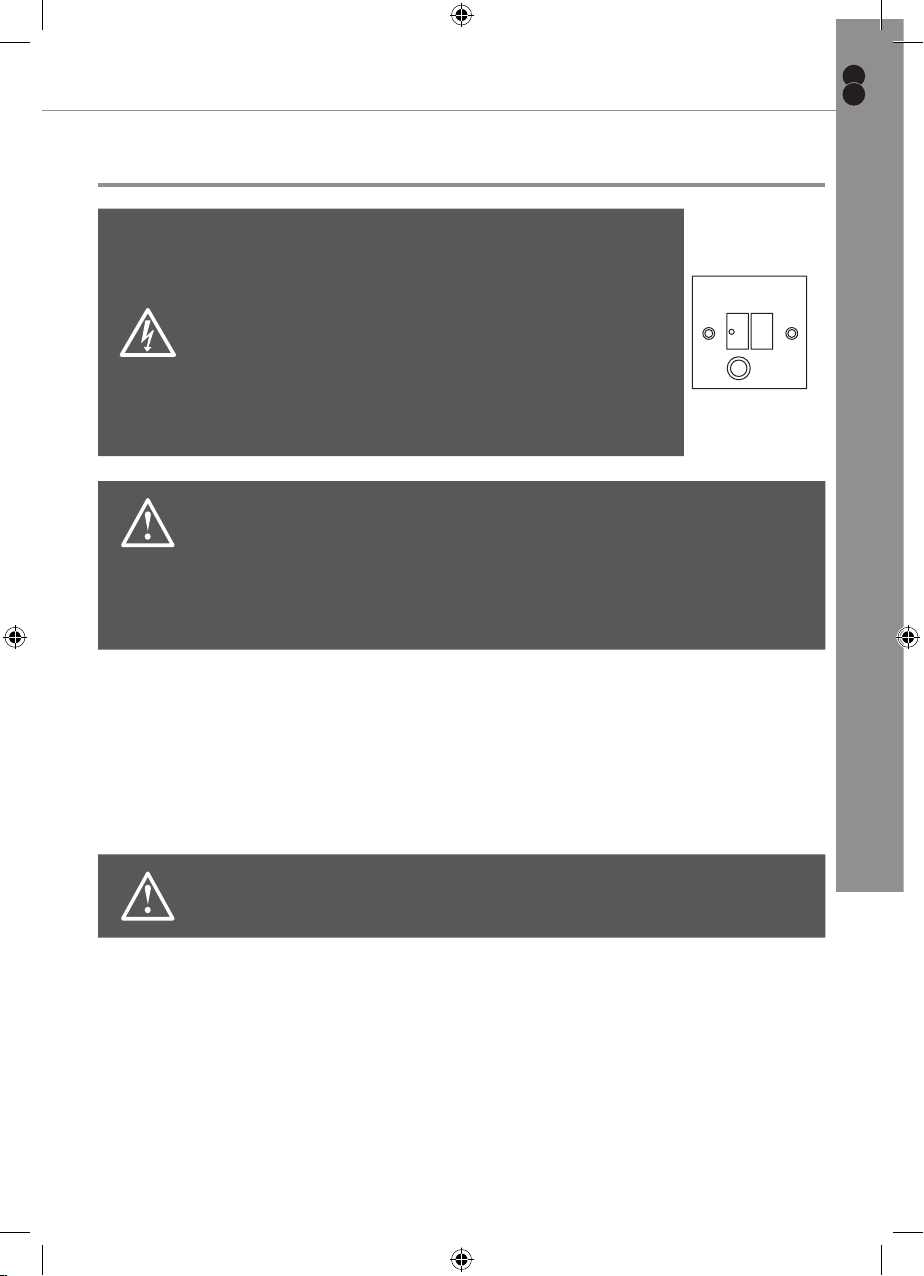
Care and maintenance
Warning!
Always switch off the electricity
supply before performing
maintenance work. In the event
of a fault, contact customer
services.
Caution!
Do not use hot water, diluents, petrol, alcohol, kerosene, washing
powder, cleanser, alkaline detergent, acid, chemical cloth, etc. for
cleaning so as not to damage the enamel coating and plastic. The
appliance must not be cleaned directly with water as this could cause
rusting or render the insulation less efcient.
Care and maintenance
OFF
GB
IE
In more detail...
• The enamelled and stainless steel parts of the appliance should be wiped
clean using a damp cloth using the minimum possible amount of soap and
lukewarm water. Do not use abrasive powders or corrosive substances which
could ruin the surfaces. Remember stainless steel could tarnish and restoring
these surfaces can be difcult. Specialist stainless steel cleaners are available
from major supermarkets. After cleaning, these surfaces should be wiped with
a clean cloth and lukewarm water to remove any traces of detergent.
Warning!
Do not use excessive amounts of water when cleaning the product.
• If the oven is in use for an extended length of time, condensation may form.
Once the oven has cooled, remove the condensation using a dry cloth.
• The inside of the oven should ideally be cleaned when the oven is still warm
using a damp cloth and the minimum possible amount of soap and hot water.
After cleaning the soap should be removed using a clean damp cloth and hot
water. Dry the interior of the oven with a soft dry cloth after cleaning.
• Do not use abrasive powders, cleaners, sponges or acids (lime scale
remover) to clean the interior as these can damage the enamel. If the interior
is very difcult to clean use a specialist oven cleaner. Follow closely the
instructions provided on the packaging.
23
CLOVIPK-A-C&L-IM-V03-EN.indd 23 27/8/15 5:39 pm
Page 24
GB
Care and maintenance
IE
CLOVIPK-A Built-in electric oven
Care and maintenance
Warning!
In more detail...
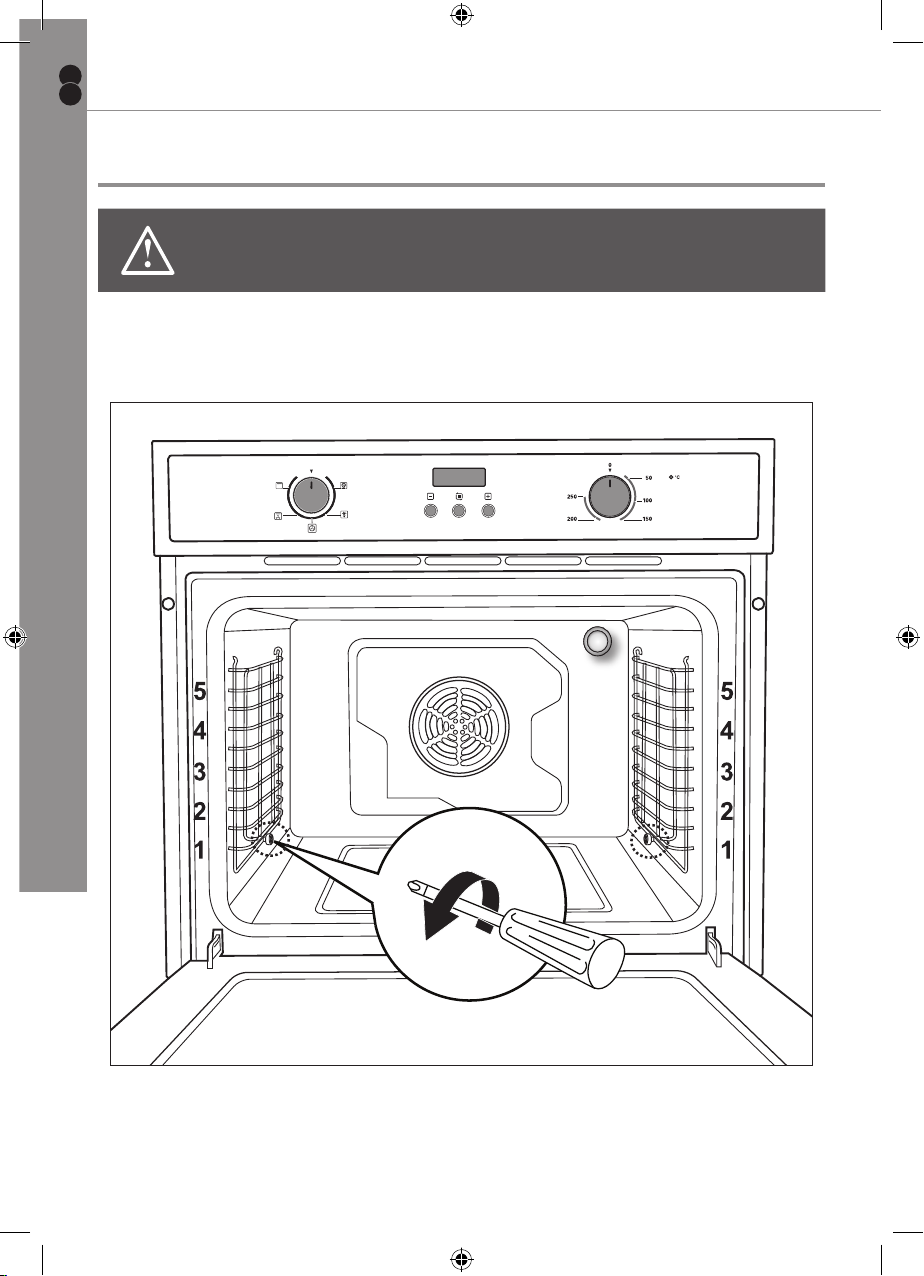
For easier cleaning of the oven interior, the side rails can be removed.
1. Remove all pans and grills from inside the oven to easily access the side rails.
2. Loosen the screws xing the side rails.
Never use a steam cleaner to clean the inside of the oven.
3. After thorough cleaning, dry the oven and the side rails well.
4. Attach the side rails to the oven walls and x with the screws.
24
CLOVIPK-A-C&L-IM-V03-EN.indd 24 27/8/15 5:39 pm
Page 25
CLOVIPK-A Built-in electric oven
Care and maintenance
How to keep your oven in good condition
Before cleaning your oven, or performing maintenance, disconnect it from the
power supply.
GB
IE
To extend the life of your oven, it must be cleaned frequently, keeping in mind that
• The enamelled or stainless steel parts should be washed with lukewarm water
without using any abrasive powders or corrosive substances which could ruin
them. Stainless steel could get stained. If these stains are difcult to remove,
use special products available on the market. After cleaning, it is advisable to
rinse thoroughly and dry.
• The inside of the oven should preferably be cleaned immediately after use,
when it is still warm, with hot water and soap. The soap should be rinsed away
and the interior dried thoroughly. Avoid using abrasive detergents (for example
cleaning powders, etc.) and abrasive sponges for dishes or acids (such as
lime scale remover, etc.) as these could damage the enamel. If the grease
spots and dirt are particularly tough to remove, use a special product for oven
cleaning, following the instructions provided on the packet.
• Never use a steam cleaner for cleaning inside of oven.
• If you use your oven for an extended period of time, condensation may form.
Dry it using a soft cloth.
• There is a rubber seal surrounding the oven opening which guarantees its
perfect functioning. Check the condition of this seal on a regular basis. If
necessary, clean it and avoid using abrasive products or objects to do so.
Should it become damaged, please contact you’re nearest After-Sales Service
Centre. We recommend you avoid using the oven until it has been repaired.
• Never line the oven bottom with aluminium foil, as the build up of heat could
compromise cooking and even damage the enamel.
• Clean the glass door using non-abrasive products or sponges and dry it with a
soft cloth.
In more detail...
Information for dismantling
Do not dismantle the appliance in a way which is not shown in the user manual.
The appliance could not be dismantled by user. At the end of life, the appliance
should not be disposed of with household waste. Check with you Local Authority
or retainer for recycling advice.
25
CLOVIPK-A-C&L-IM-V03-EN.indd 25 27/8/15 5:39 pm
Page 26
GB
Care and maintenance
IE
CLOVIPK-A Built-in electric oven
Replacing the oven light bulb
Warning!
In more detail...
Always disconnect the appliance from
the electricity supply before performing
maintenance work.
Important!
The bulb in the oven lamp is a special bulb and has high temperature
resistance. Replace only with a bulb of the same type.
Warning!
During use the appliance becomes hot. Care should be taken to
avoid touching heating elements inside the oven. Wait until all parts
have cooled down.
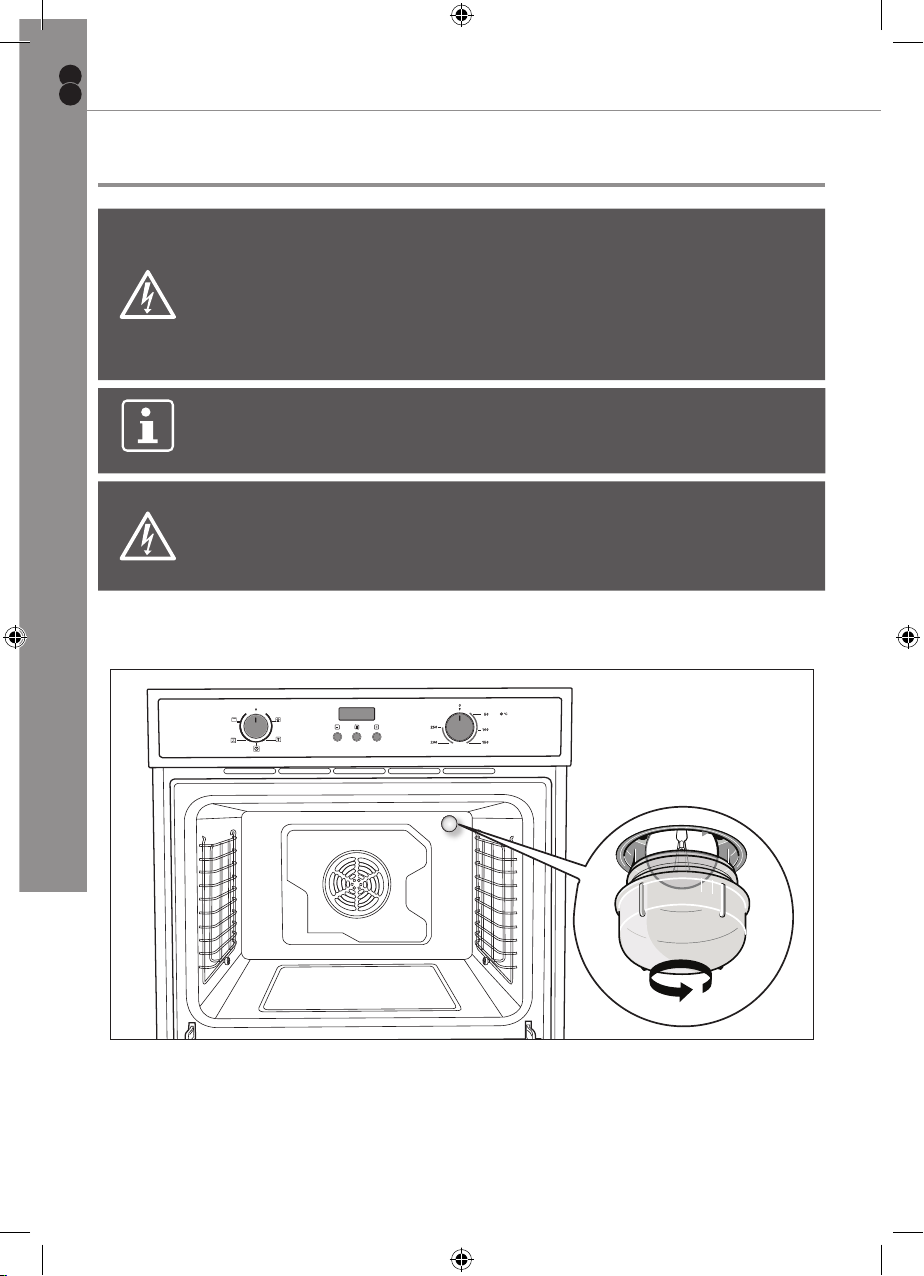
• Remove all pans and grills from inside the oven to easily access the bulb.
• The oven lamp is situated at the rear of the oven cavity.
• Unscrew the glass cover.
• Unscrew the old light bulb. Dispose of it safely and ecologically.
• Screw a new bulb of the same type (type: YR 300 °C, 240 V~, 25 W) in place.
Make sure it is correctly inserted.
• Screw the glass cover back into place.
26
CLOVIPK-A-C&L-IM-V03-EN.indd 26 27/8/15 5:39 pm
Page 27
CLOVIPK-A Built-in electric oven
Troubleshooting
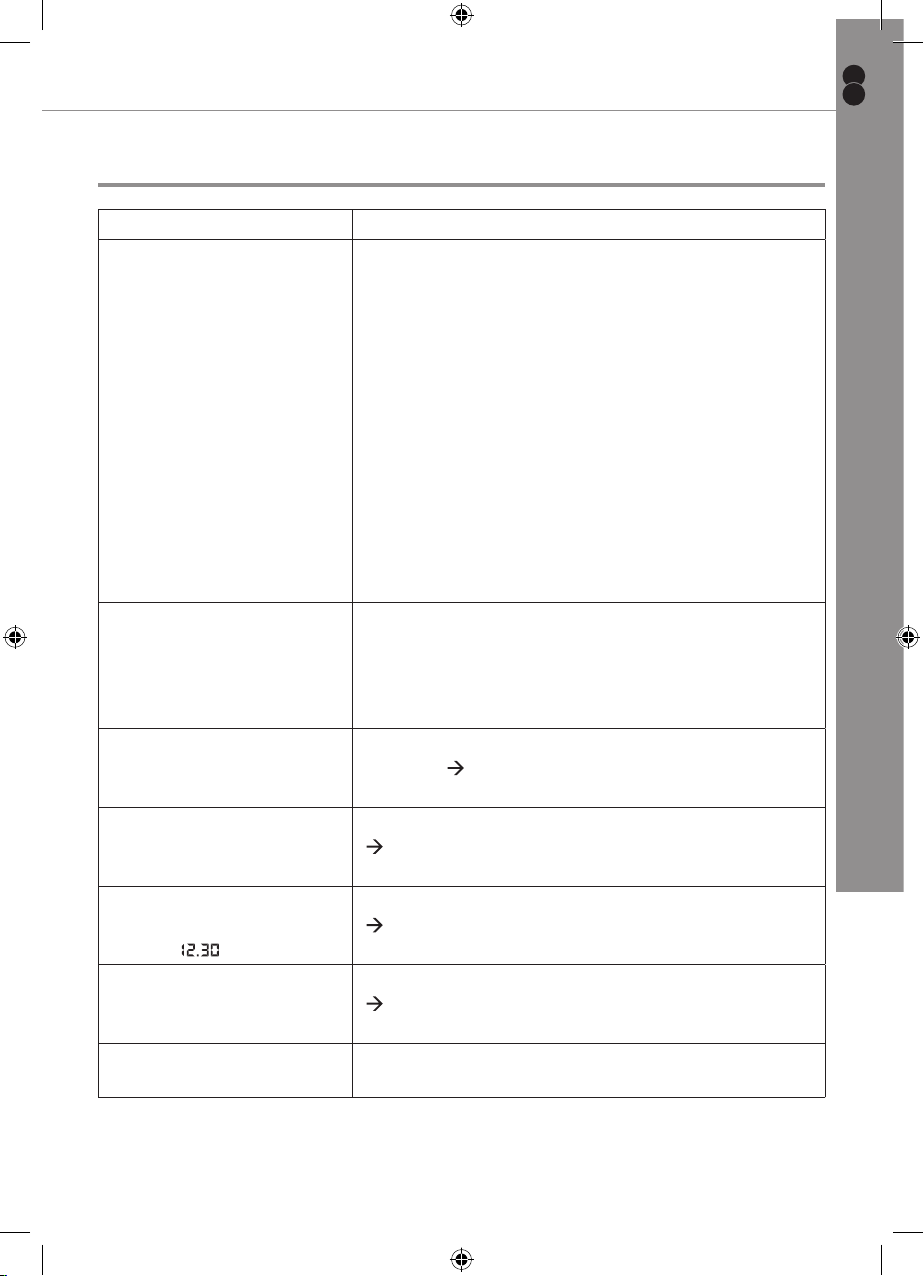
FAQ Solution
What should I do if the
oven does not heat up?
What should I do if, even
though the oven function
and temperature have
been set, the oven does
not heat up?
What should I do if I
cannot change the set
temperature?
What should I do if I
cannot change the timer
settings?
What should I do if the
time display is stably
keeping ?
What should I do if the
oven light does not
illuminate?
The grill does not heat up
properly?
Care and maintenance
Check to see if one of the following actions
resolves the issue:
• The oven may not be switched on. Switch on
the oven. Make sure that the buttons you press
emit an operation sound, otherwise you may
not have pressed correctly.
• Check to see if the required settings have been
applied.
• A household fuse may have blown or a circuit
breaker may have tripped.
• Replace the fuses or reset the circuit. If this
happens repeatedly, call the Service Centre.
There may be problems with the internal electrical
connections. Call the Service Centre.
Make sure to have used the temperature control
correctly ( Control elements).
Make sure to have used the time buttons correctly
( Control elements).
There was a power failure. Set the time again
( Setting the time).
The oven light is faulty. Replace the oven light bulb
( Replacing the oven light bulb).
The grill power is set too low. Turn the temperature
control to a higher temperature.
GB
IE
In more detail...
27
CLOVIPK-A-C&L-IM-V03-EN.indd 27 27/8/15 5:39 pm
Page 28
GB
Recycling and disposal
IE
CLOVIPK-A Built-in electric oven
Recycling and disposal
Environmental protection
Waste electrical products should not be disposed of with household waste.
Please recycle where facilities exist. Check with your Local Authority or retailer for
In more detail...
recycling advice.
The symbol on the product or its packaging indicates that this
product cannot be treated as normal household waste. This product
must be handed over to an electric and electronic equipment
collection point for recycling.
On ensuring that this product is disposed of correctly, you will help to avoid
possible negative consequences for the environment and public health, which
could occur if this product is not handled correctly. To receive more detailed
information about recycling this product, contact your local government, domestic
waste disposal services or the outlet where the product was bought.
28
CLOVIPK-A-C&L-IM-V03-EN.indd 28 27/8/15 5:39 pm
Page 29
CLOVIPK-A Built-in electric oven
Technical and legal information
Technical data
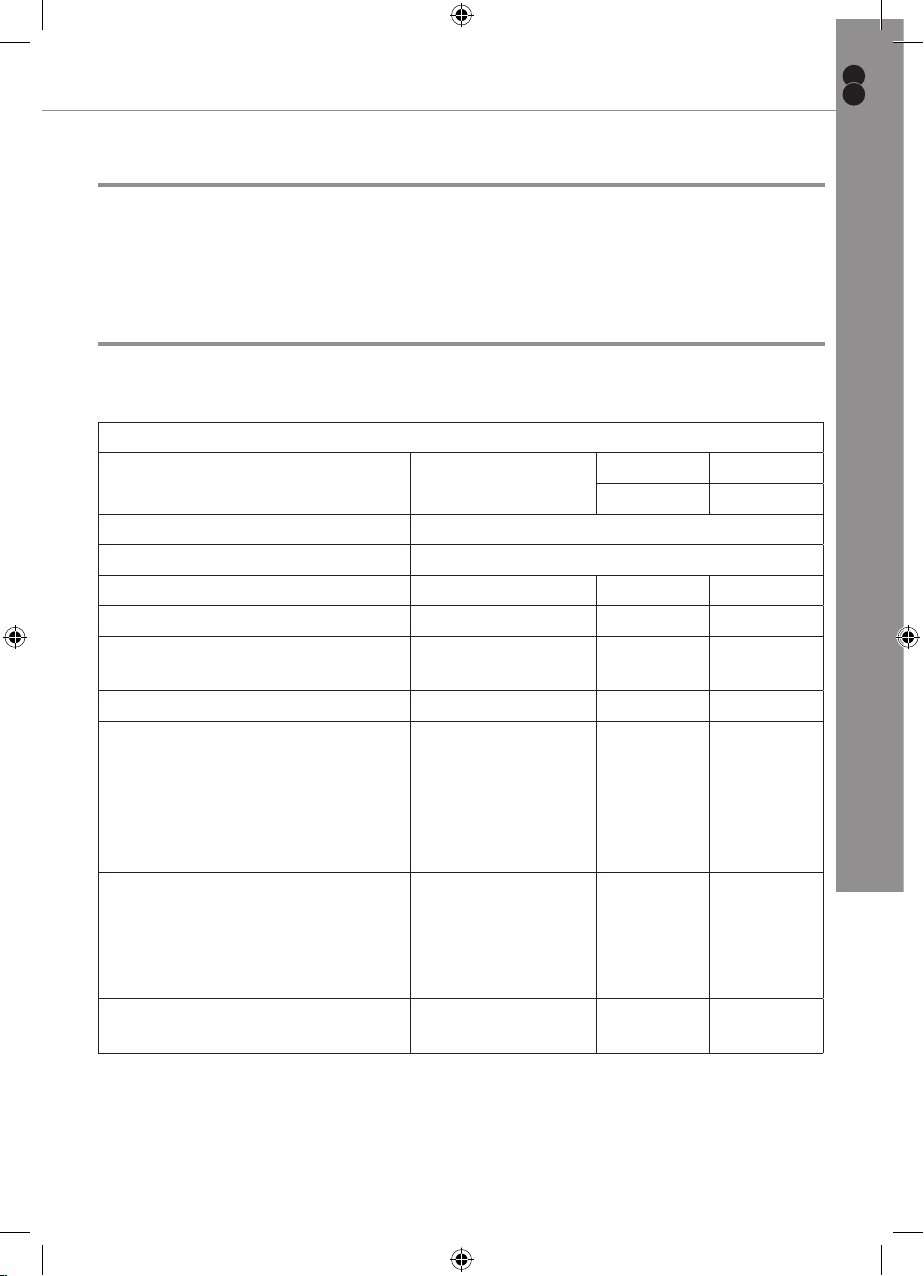
Technical information
Power supply : 220 - 240 V~, 50/60 Hz
Output Power : Max. 2100 W
Legal information
The manufacturer declines all liability for damage caused to persons and objects
due to incorrect or improper installation of the appliance.
Technical parameters (www.diy.com)
Item Symbol Value Unit
Declared
Model identication CLOVIPK-A
Type of oven Built-in electric oven
Mass of the appliance M 30 kg
Number of cavities 1
Heat source per cavity (electricity
or gas)
Volume per cavity V 70 L
Energy consumption (electricity)
required to heat a standardised
load in a cavity of an electric
heated oven during a cycle in
conventional mode per cavity
(electric nal energy)
Energy consumption required
to heat a standardised load in a
cavity of an electric heated oven
during a cycle in fan-forced mode
per cavity (electric nal energy)
Energy Efciency Index per
cavity
Electricity
ECelectric cavity - kWh/cycle
ECelectric cavity 0.89 kWh/cycle
EEIcavity 92.9
GB
IE
In more detail...
The measurement and calculation method of the above table was done in
accordance with commission regulation (EU) No 65/2014 & 66/2014.
29
CLOVIPK-A-C&L-IM-V03-EN.indd 29 27/8/15 5:39 pm
Page 30

GB
Guarantee
IE
CLOVIPK-A Built-in electric oven
Guarantee
This appliance is covered by a full manufacturer’s 2 year parts and 2 year labour
guarantee and covers all parts and labour costs associated with the repair of the
appliance in a domestic environment. We will repair any defect that arises due to
In more detail...
faulty materials or workmanship and use genuine manufacturers parts.
All claims must be supported with the original receipt or other reasonable proof of
purchase.
If, during the guarantee period, the appliance becomes irreparable as agreed
by the engineer approved by GAA then we reserve the right, at our discretion, to
exchange the defective product with a replacement appliance at GAA’s sole cost.
If the same product is no longer available an alternative will be offered with the
same functions as the faulty item.
After an appliance has been repaired or replaced any remaining balance of the
GAA guarantee will be valid and any further call outs during this prescribed period
will be covered by GAA on the replacement appliance.
Should any person other than an authorized engineer modify or attempt to repair
the appliance then the warranty will be invalid.
The guarantee applies to the UK mainland, Scotland, Ireland, ROI and France but
is not transferable between EU countries.
This guarantee is non-transferable to any other person or product.
The guarantee is covered by UK law and is in addition to and does not diminish
your legal rights.
Extended parts only warranty
As testimony to our commitment to you as a valued customer of Cooke & Lewis,
we will offer you an additional 3 years parts warranty absolutely free.
If during the extended parts warranty period the appliance fails and it is
considered uneconomical to repair our Customer Service Department will offer
you the opportunity to purchase the same or equivalent model at a discounted
price.
All parts supplied free of charge under the extended warranty must be tted by
our approved engineers and will be subject to a call out charge to t the part.
30
CLOVIPK-A-C&L-IM-V03-EN.indd 30 27/8/15 5:39 pm
Page 31
CLOVIPK-A Built-in electric oven
Guarantee
Exclusions to the guarantee
Guarantee
GB
IE
This guarantee does NOT cover:
Appliances that have been damaged or neglected as a result of failure to
store, assemble, install, use or care of the products in accordance with the
manufacturer’s instructions - GAA will not accept responsibility under this
guarantee if a product is damaged or becomes defective due to, misuse, neglect,
wilful or accidental damage or act of god.
Normal wear and tear.
Consumable items such as carbon lters and bulbs.
Claims arising from non-domestic use or commercial environment.
Any gas appliance not tted by a gas safe qualied installer.
If no fault is found then GAA reserves the right to charge for the call out at the
going rate.
In the course of the service work carried out it may be necessary to remove the
built in appliance from its tted position. If the appliance is glued, grouted or
tiled in such a manner that it cannot be removed, it is the responsibility of the
customer/installer to remove and reinstall the appliance to facilitate the repair.
This Guarantee does not affect your statutory rights.
The guarantee is offered by GAA Ltd, 1301-1303 Lu Plaza,
2 Wing Yip St, Kwun Tong, Kowloon, Hong Kong.
In more detail...
Customer Service
To arrange an in guarantee service call, please contact customer services on the
following numbers.
UK & Northern Ireland Republic of Ireland (Eire)
Phone: 0344 800 1128* Phone: 014475261
Email: [email protected]
Web: www.spareszone.co.uk
*Local call rates apply.
31
CLOVIPK-A-C&L-IM-V03-EN.indd 31 27/8/15 5:39 pm
Page 32
GB
CE declaration of conformity
IE
CE declaration of conformity
In more detail...
MANUFACTURER: CATA
CLOVIPK-A Built-in electric oven
ADDRESS:
We hereby certify that the mentioned accessory complies with the essential requirements of the
European Directives applicable, including their modifications and the corresponding transpositions
from the national law.
MACHINE APPLICATION:
TYPE :
EC DIRECTIVES APPLIED:
APPLIED HARMONIZED
STANDARDS:
EN 60335-2-6
EN 60335-1
EN 62233
APPLIED INTERNATIONAL TECHNICAL
STANDARDS AND SPECIFICATIONS: ISO9001.2008
PLACE: Torelló
C/ Ter nº 2, Torelló 08570 - Barcelona (Spain)
CLOVIPK-A
Built-in oven
Comply with the European Directives 2006/95/EC: LVD and
the 2004/108/EC: EMC
David Sala
Technical Manager
This appliance respects laws of the suppression of radio-interference.
As the manufacturer has a policy of continuous product improvement, it reserves
the right to adapt and carry out any modication considered necessary without
prior warning.
B&Q plc,
Chandlers Ford, Hants,
SO53 3LE United Kingdom
www.diy.com
32
CLOVIPK-A-C&L-IM-V03-EN.indd 32 27/8/15 5:39 pm
Page 33
Installation
Warning! Danger of electric shock!
The power supply to the appliance
must be cut off before the appliance is
installed completely.
Only a qualied person in compliance with the instructions provided can install the
appliance. The manufacturer declines all responsibility for improper installation,
which may harm persons and animals and damage property.
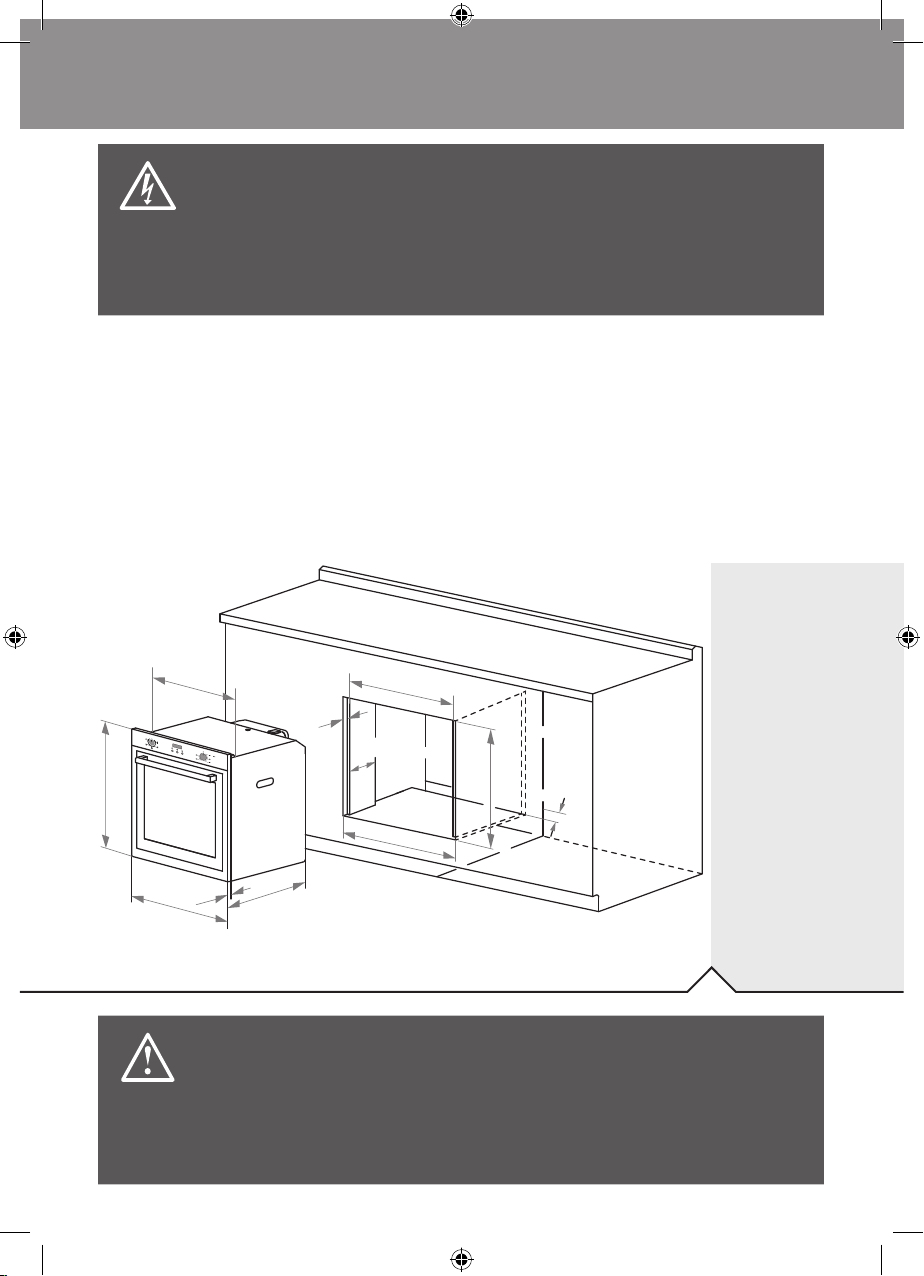
Installation of Built-in Ovens
For correct installation, this product can be tted under the work surface in a built
under housing unit or in a tall oven housing unit.
01
33
595
560
22
21
595
575
Caution!
The panels of the adjacent cabinets must be made of heartresistant material. In particular the adhesive that bonds the
plastic laminate to the furniture must be able to withstand
temperatures of not less than 150 °C to avoid delamination. The
appliance must be housed in heat-resistant cabinets.
200
565
min.
600
600
min.
45
CLOVIPK-A-C&L-IM-V03-EN.indd 33 27/8/15 5:39 pm
Page 34
Ensuring sufcient ventilation
02
min. 10 cm
2 mm
Upper vent
cm
200
min.
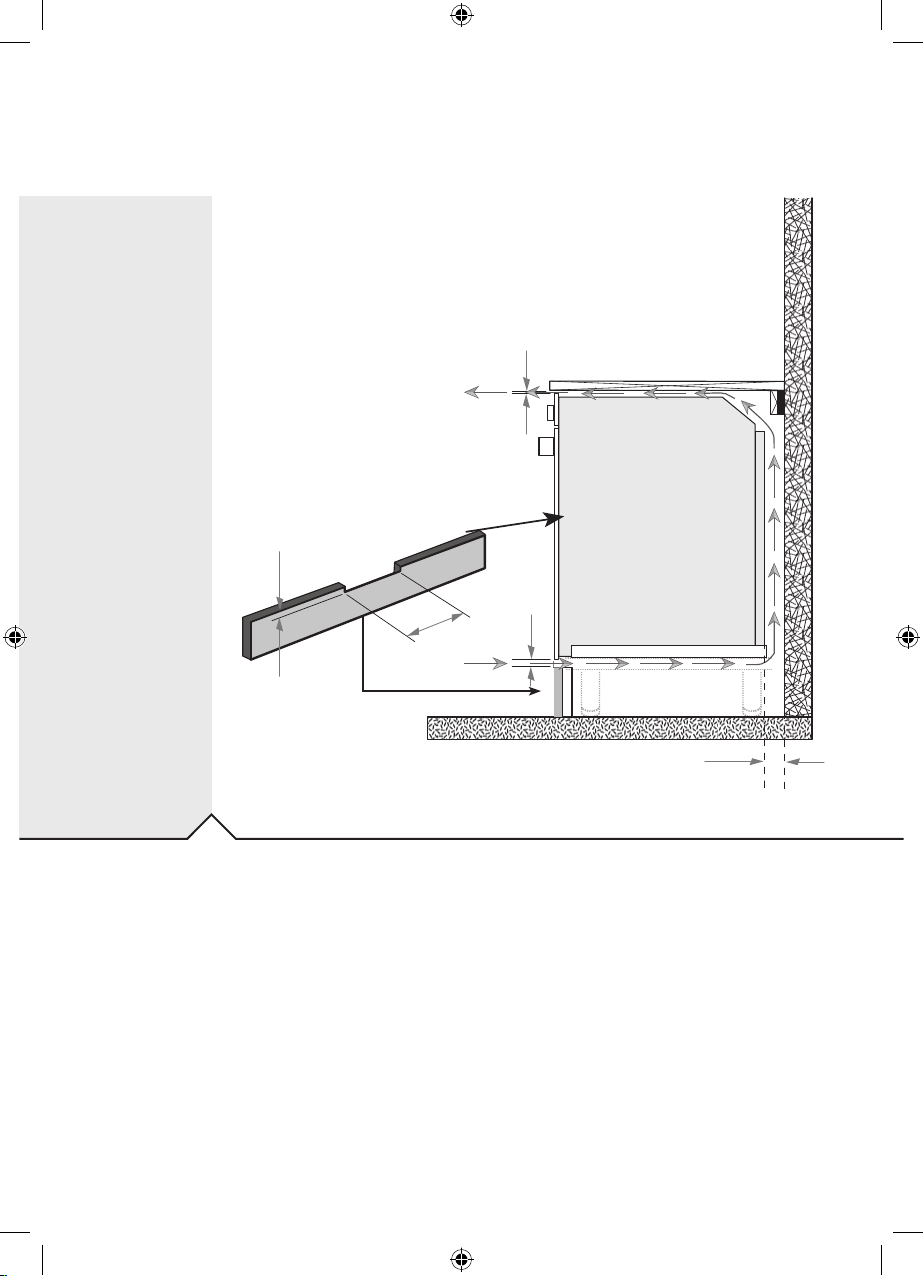
Figure above shows the air circulation requirements including a slot that should
be cut into the plinth if tted.
It is essential when installing your oven there is adequate air circulation around
the appliance to ensure the correct operation of the appliance. Inadequate air
circulation will greatly impair the performance of the appliance and can affect
adjacent cabinets due to the rise in temperature. The panels of the kitchen unit
that are next to the oven must be made of a heat resistant material. Ensure that
the glues of units that are made of veneered wood can withstand temperatures
of at least 150 ºC. Remove the back of the kitchen unit to ensure an adequate
current of air circulates around the oven. The rear gap should measure at least
45 mm.
34
10 mm
min. 45 mm at rear
CLOVIPK-A-C&L-IM-V03-EN.indd 34 27/8/15 5:39 pm
Page 35
Electrical connection
FUSE ON
All installation work must be carried out by a competent
person or qualied electrician.
Before connecting the mains supply, ensure that the mains
voltage corresponds to the voltage on the rating plate on
the appliance.
Warning!
This appliance must be earthed.
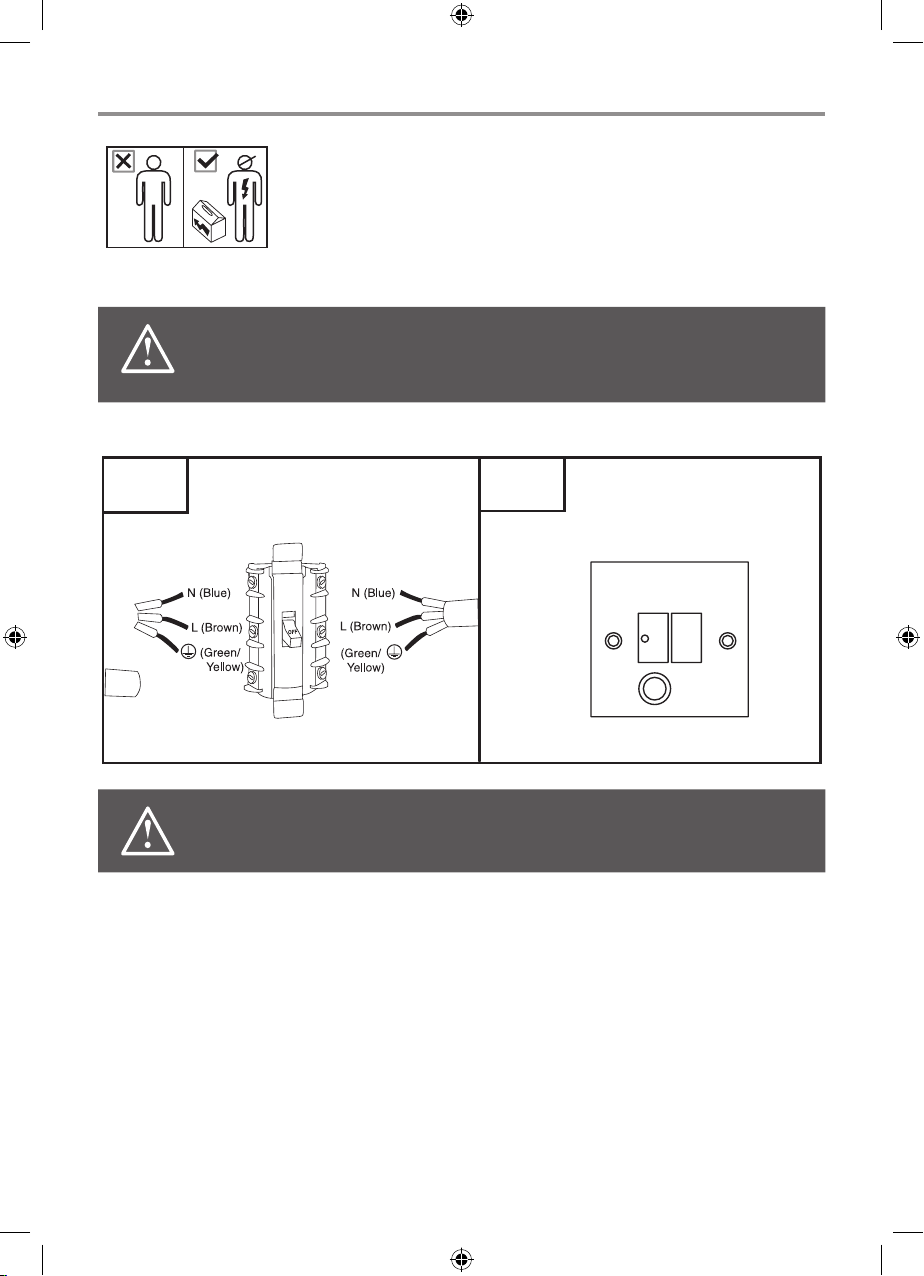
Mains Supply could be connected to the Mains Voltage by Direct Connection.
EUR UK
DOUBLE POLE SWITCHED
FUSED SPUR OUTLET
USE A 13 AMP FUSE
Warning!
Make sure the fused spur outlet is located in an accessible position.
Direct Connection
• If the appliance is being connected directly to the mains, an omnipolar circuitbreaker must be installed with a minimum opening of 3 mm between contacts.
• If the cable is damaged or to be replaced, the operation must be carried out
the by a qualied electrician with dedicated tools to avoid any accidents.
• The installer must ensure that the correct electrical connection has been made
and that it complies with wiring diagram.
• The cable must not be bent or compressed.
• The cable must be checked regularly and replaced by authorized technicians
only.
35
CLOVIPK-A-C&L-IM-V03-EN.indd 35 27/8/15 5:39 pm
Page 36
Electrical Requirements
Any permanent electrical installation must comply with the latest I.E.E.
Regulations and local electricity company regulations. For your own safety a
qualied electrician or contractor who is on the roll of the National Inspection
Council for Electrical Installation Contracting (NICEIC) should undertake the
electrical installation.
Electrical Connection
Before connecting the mains supply ensure that the mains voltage corresponds to
the voltage on the rating plate on the appliance.
Warning!
This appliance must be earthed.
The appliance is supplied with a 3-core mains cable and must be connected to the
electricity supply via a double pole switch having a 3 mm minimum contact gap on
each connector.
For UK only
A Switched Fused Connection Unit to BS 1363 Part 4 is recommended.
The fuse must be rated at 13 Amps.
The wires in the mains lead are coloured in accordance with the following code:
Brown = L - Live
Blue = N - Neutral
Green and Yellow = - Earth
The connection point must be placed in a position adjacent to the appliance so as
to be readily accessible for an engineer in the event of a breakdown.
Disconnect the appliance from the mains supply before carrying out any
kind of maintenance or cleaning.
36
CLOVIPK-A-C&L-IM-V03-EN.indd 36 27/8/15 5:39 pm
Page 37
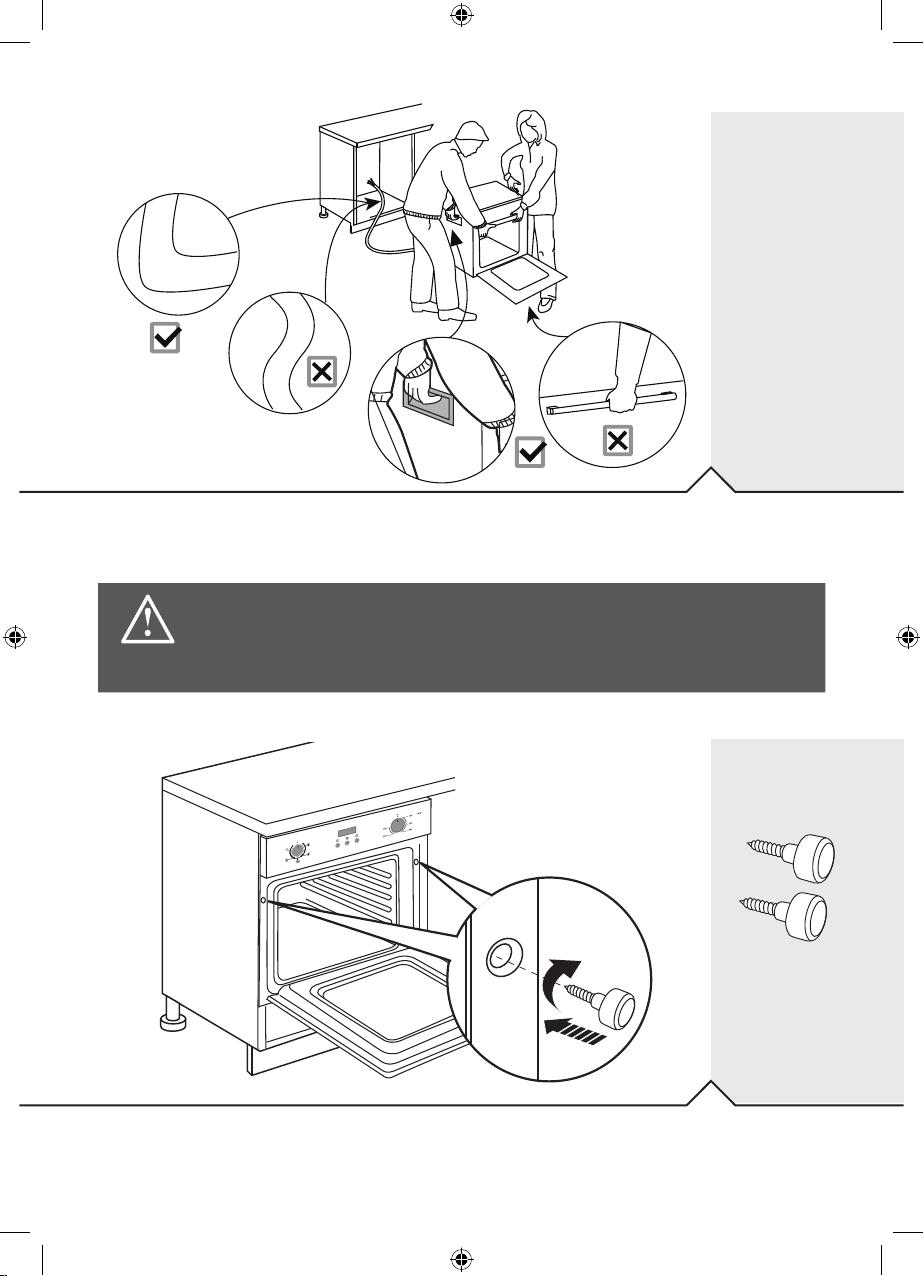
Handling and xing the oven
Connect to mains power supply ensuring the cable is not bent.
Lift the oven into housing unit using the 2 handles at the sides of the appliance.
Do not lift it with the door handle, otherwise, the glass door might shatter.
Caution!
If the supply cord is damaged, it must be replaced by the
manufacturer, its service agent or similarly qualied persons in order
to avoid a hazard.
3
4
[F] x 2
Once the oven has been lifted into place inside the housing unit, use the two
holes located within the sides of the metal casing of the oven to secure it. Secure
with the 2 screws [F].
37
CLOVIPK-A-C&L-IM-V03-EN.indd 37 27/8/15 5:39 pm
Page 38
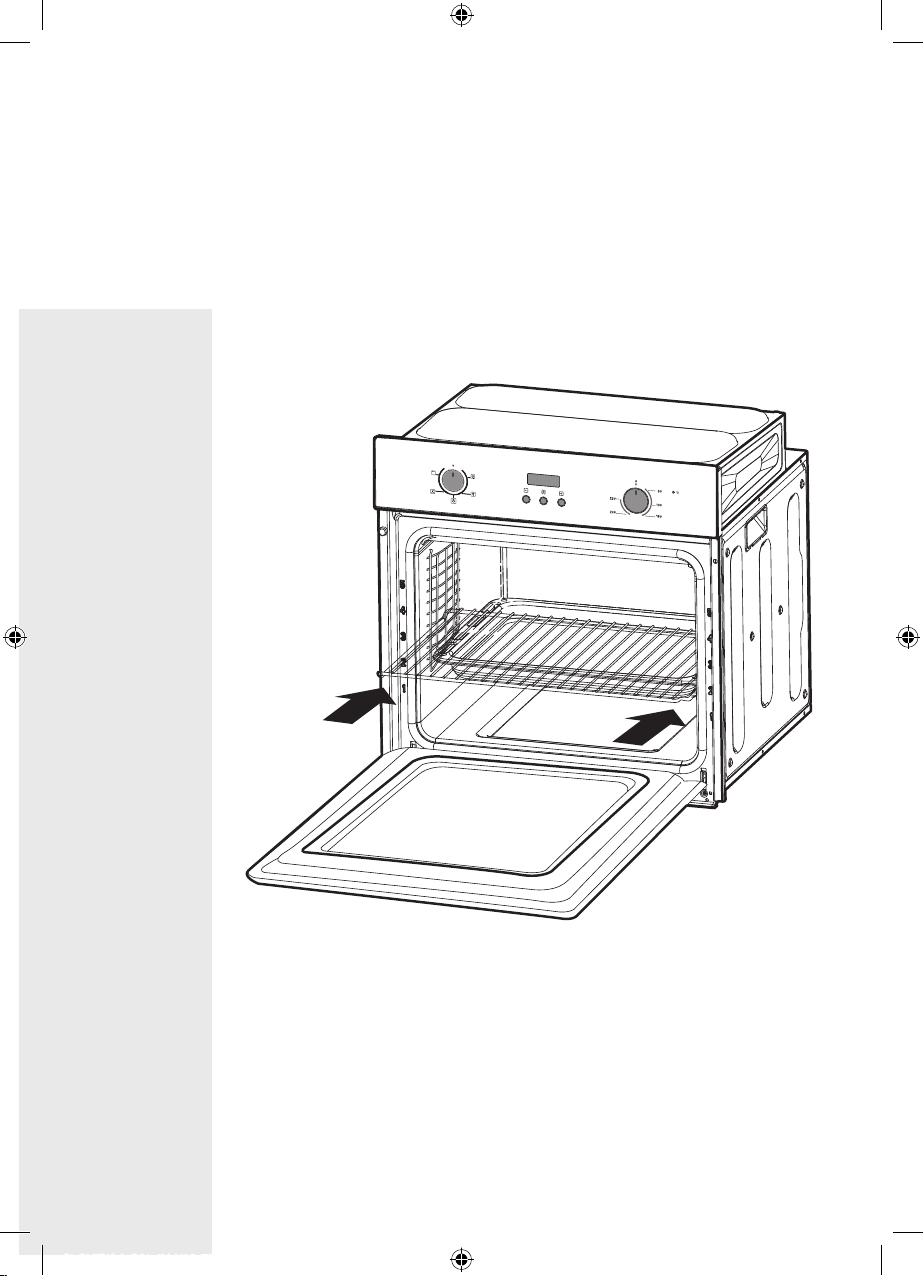
Adjusting the shelf position
• To minimize the risk of burns when handling hot pans, grills or oven dishes,
always ensure to place pan and grill correctly between the side rails.
• For better cooking, other tools, e.g. a rotisserie (not provided), can be used.
The rotisserie works in combination with the grill element to heat the food
equally.
05
38
CLOVIPK-A-C&L-IM-V03-EN.indd 38 27/8/15 5:39 pm
Page 39

39
CLOVIPK-A-C&L-IM-V03-EN.indd 39 27/8/15 5:39 pm
Page 40

GB IE
B&Q plc,
Chandlers Ford, Hants,
SO53 3LE United Kingdom
www.diy.com
CLOVIPK-A-C&L-IM-V03-EN.indd 40 27/8/15 5:39 pm
 Loading...