

Page 1

INSTRUCTIONS FOR USE
Page 2

Page 3

Safety Instructions ............................................. 2
Technical data/Energy-saving mode �������������������� 5
General description �������������������������������������������� 6
Setting Up your appliance and switching it on ������ 7
Control panel �����������������������������������������������������8
Navigation ��������������������������������������������������������9
Programmes/Menus ����������������������������������������� 11
Choosing the bowl/programmes ����������������������� 12
Metal bowl ......................................................13
Metal bowl uses ���������������������������������������������������������� 13
Assembling the parts ��������������������������������������������������� 14
Blade assembly ����������������������������������������������������������� 15
Egg whisk ������������������������������������������������������������������16
Steam ������������������������������������������������������������������������17
Tips and advice ����������������������������������������������������������19
Cleaning ��������������������������������������������������������������������20
Clear bowl ......................................................21
Clear bowl use �����������������������������������������������������������21
Assembling the parts ��������������������������������������������������� 22
Metal blade assembly �������������������������������������������������23
Mini bowl�������������������������������������������������������������������23
Discs �������������������������������������������������������������������������� 24
Cleaning ��������������������������������������������������������������������26
Settings menu ��������������������������������������������������27
Recipes ������������������������������������������������������������28
Troubleshooting ������������������������������������������������ 30
Recycling ��������������������������������������������������������� 31
Please visit our websites www�magimix�uk�com - www�cookexpert�com�au
or download our Magimix Cook Expert app� This will give you access to
videos, advice and tips on how to get the most from your Cook Expert�
Page 4

2
SAFETY INSTRUCTIONS
WARNING: These safety instructions are an integral part of this product�
For your own safety, make sure you read them through carefully before
using your new appliance�
• This appliance can be used by children aged from 8 years and above
if they have been given supervision or instruction concerning use of the
appliance in a safe way and if they understand the hazards involved�
Cleaning and user maintenance shall not be made by children unless
they are aged from 8 years and above and supervised by an adult�
Keep the appliance and its cord out of reach of children aged less than
8 years�
• This appliance is intended solely for use in the home�
• The following are not covered by the guarantee : use in staff kitchen
areas in shops, offices and other working environments; farm houses;
by clients in hotels, motels and other residential type environments;
bed and breakfast type environments or any commercial use�
• Never immerse your appliance in water or any other liquid, to avoid
the risk of electrocution�
• Never place your appliance either on or near a gas burner or heating
element, or in a hot oven�
• Never use your appliance outdoors�
• Never operate your appliance in heating mode if the bowl is empty�
• This appliance can be used by children aged from 8 years and above
and persons with reduced physical, sensory or mental capabilities or
lack of experience and knowledge if they have been given supervision
or instruction concerning use of the appliance in a safe way and
understand the hazards involved� Children shall not play with the
appliance� Cleaning and user maintenance shall not be made by
children without supervision�
Page 5

3
SAFETY INSTRUCTIONS
RISKS LINKED TO USAGE
• Always handle the discs and blades with caution, as they are
extremely sharp.
• Never push ingredients through the feedtube with your hands,
particularly when using one of the discs� Always use the pusher
provided�
• Never insert your hands or a kitchen utensil in the feedtube or any
other lid opening while the appliance is running, to prevent serious
injury and avoid damaging the machine�
• You can use a spatula, but only when the machine is no longer running�
• Always check that the lid is properly locked into place before switching
your appliance on�
• Never attempt to override the lid-locking mechanism�
• Always remove the blade or disc before removing food items using
your hands�
RISK OF BURNS: metal bowl and Cook and Expert programmes
When the machine is in use, some parts can become extremely hot
(e.g. outer steel sides of the metal bowl, lid, cap, metal parts under
the bowl, basket) and inflict burns.
Make sure you only handle the cold plastic parts (e.g. handles) whilst
the machine is in use and immediately after use.
Accessible surfaces may become extremely hot when the machine
is in use.
Your appliance releases steam that can cause burns.
• Always hold the cap by its central plastic part and the lid by its
handles.
• Never run your appliance if the lid, the lid seal and the blade assembly
seal have not been correctly fitted�
• Only use your appliance if the cap is in place, unless stipulated
otherwise in the recipe�
• Never fill above the 2�5-litre mark�
Page 6

4
SAFETY INSTRUCTIONS
INDUCTION
For users with pacemakers or active implants:
• The functioning of this appliance conforms to current electromagnetic
interference standards and thus is in total compliance with legal
requirements�
• To ensure that there is no interference between your appliance and a
pacemaker, the latter must have been designed and programmed in
compliance with the regulations that apply to it� As such, we can only
guarantee the compliance of our own product with current standards�
With regard to the compliance of the pacemaker or any potential
incompatibility, you should obtain information from the manufacturer
or your attending physician�
ELECTRICAL CONNECTION
• Your appliance should always be connected to an earthed socket�
• Always check that the voltage shown on the identification plate of your
appliance corresponds to the voltage of your mains supply�
• Never allow the power cord to dangle over the edge of your worktop
or counter, and make sure that it does not come into contact with hot
surfaces�
• Always turn your appliance off with the switch at the back, once
you have finished using your appliance, if you are going to leave it
unattended, clean it, or remove or add accessories�
SERVICE AGENT
• If the power cord has been damaged, it must be replaced or repaired
by the manufacturer, a Magimix-approved service agent or a similarly
qualified person, in order to avoid all risks�
• The use of parts that are not sold or recommended by Magimix may
cause a fire, electric shocks or injury�
• Consult the “Troubleshooting” table (p� 30)�
Page 7
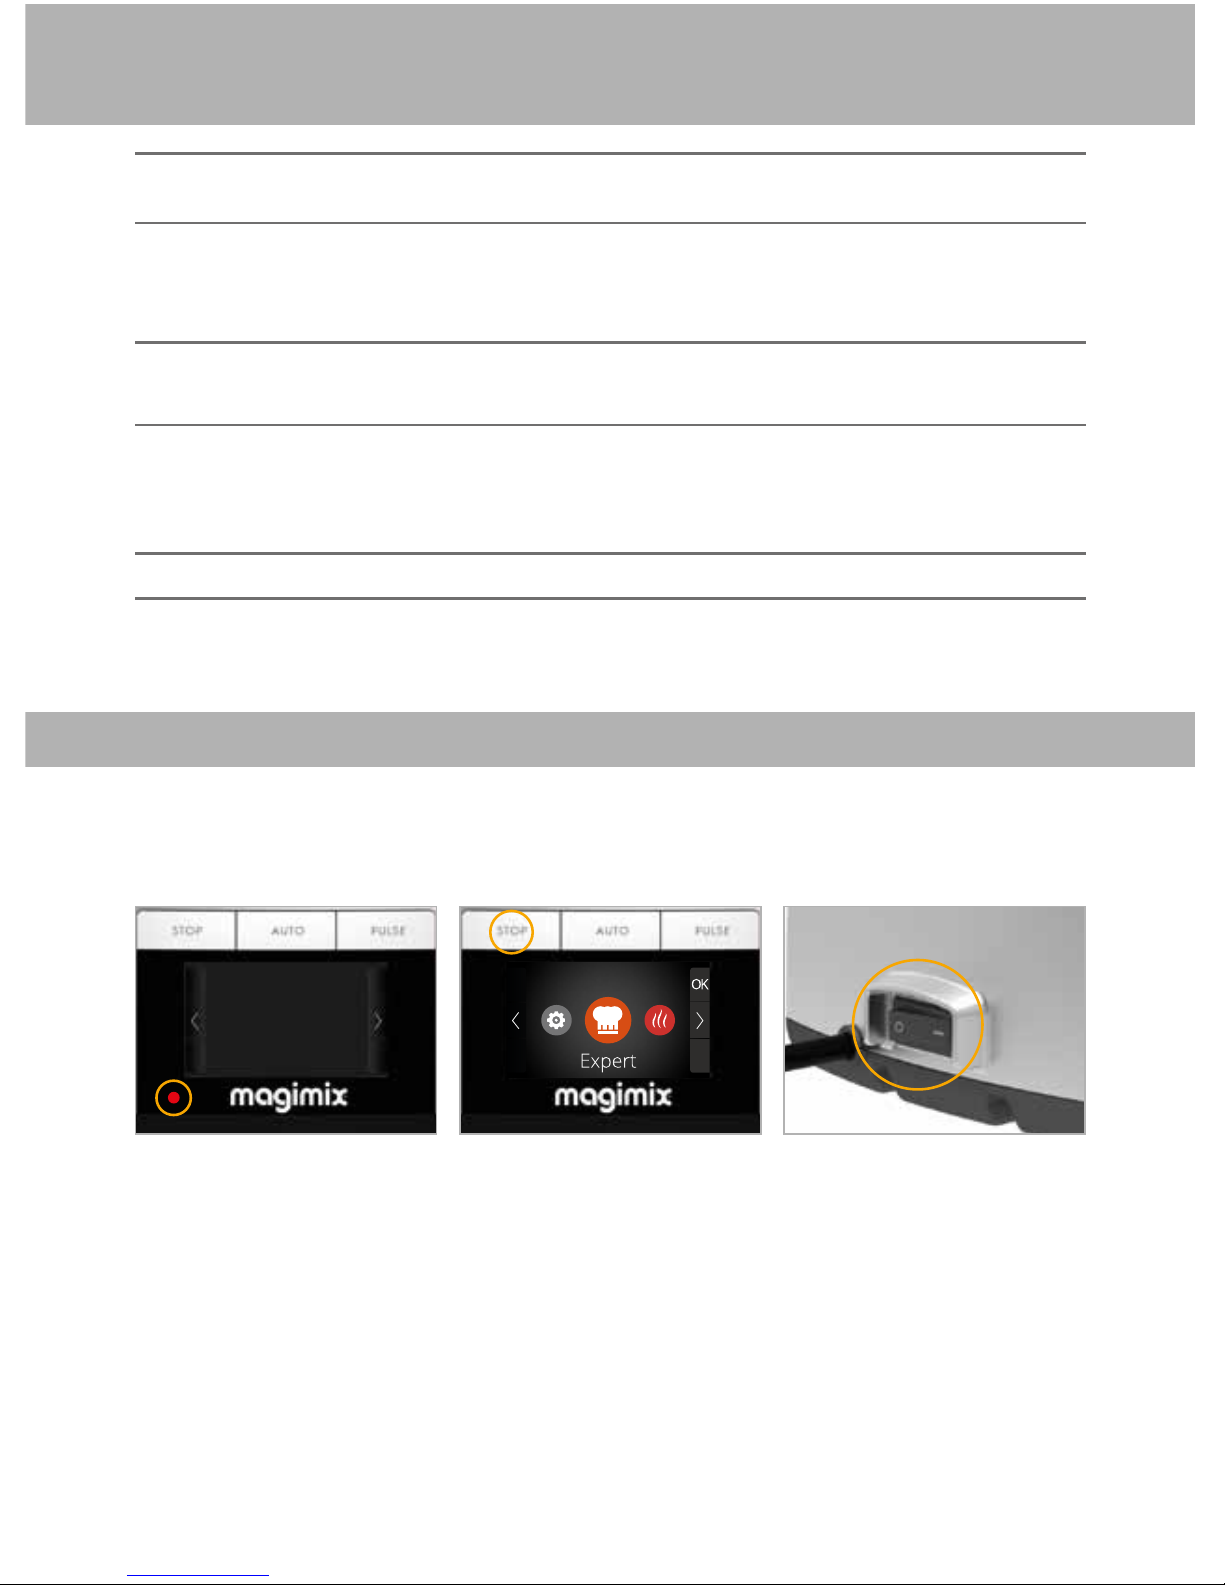
TECHNICAL DATA
ENERGY-SAVING MODE
Appliance in standby (< 0�5 W):
screen off + red indicator
light on�
To put your appliance into
standby, press the STOP
button for 2 s�
To switch your appliance off
(0 W), flip the switch to 0�
If you do not use your appliance for a few minutes, it will automatically go into standby.
Press any button and the screen will come back on�
You can set the standby delay to between 2 and 8 minutes (see p� 27)�
5
Bowls
Metal: 3�5 litres (stainless steel)
Clear: 3�6 litres (0% BPA)
Cooking
Temperature range
Temperature accuracy
Induction
30 - 140°C
±1 °C
Cooking duration
range
from 5 seconds to 2 hours
Speeds
0 for heating without stirring
1A intermittent speed for very delicate mixtures
2A intermittent speed for delicate mixtures
3 - 18 continuous speeds
Power
1700 W
Power supply
200-240 V, 50/60 Hz
Page 8
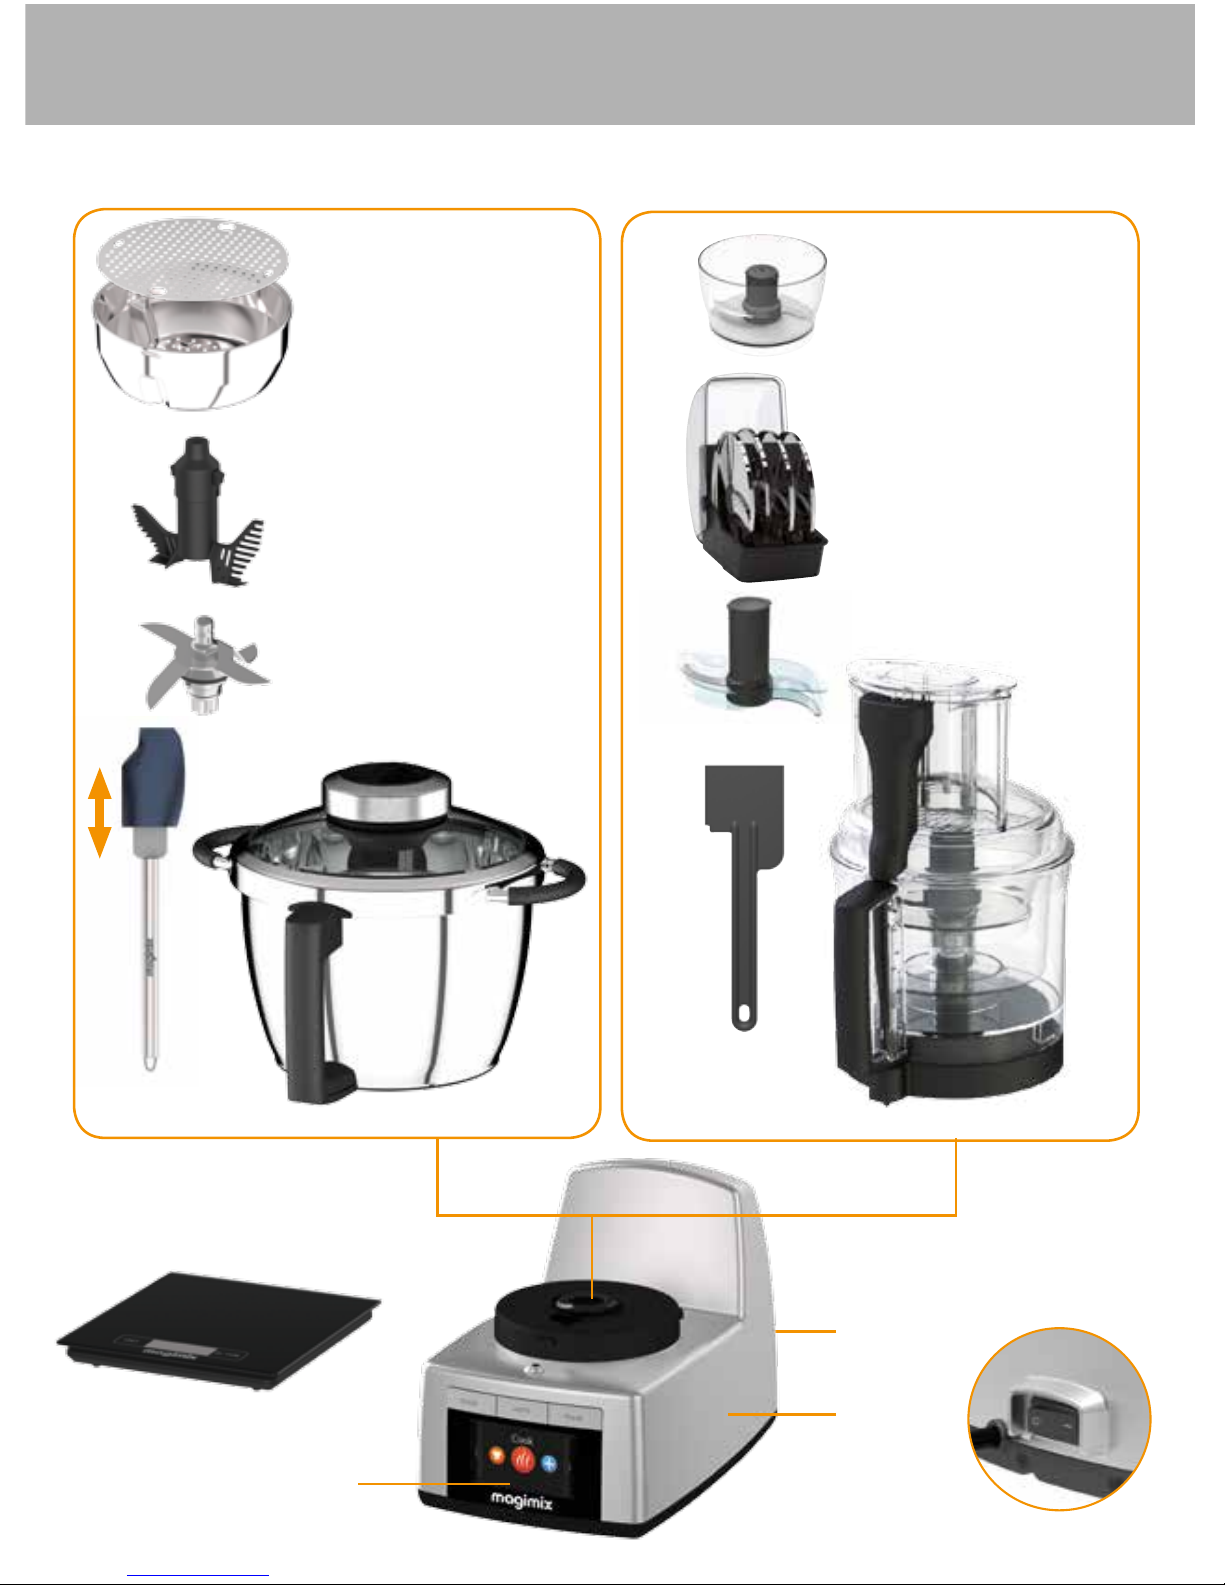
GENERAL DESCRIPTION
Steam tray
Metal bowl and accessories Clear bowl and accessories
Steam basket
Mini bowl and mini blade
assembly
Egg whisk
Four 2- or 4-mm discs for
slicing or grating
+ disc support
+ storage box
Universal tool
Metal blade + cover
Switch 0/1
Base
Scales
Control panel
2-in-1
scraper/spatula
Details p� 13 - 20 Details p� 21 - 26
Spatula
6
Page 9
7
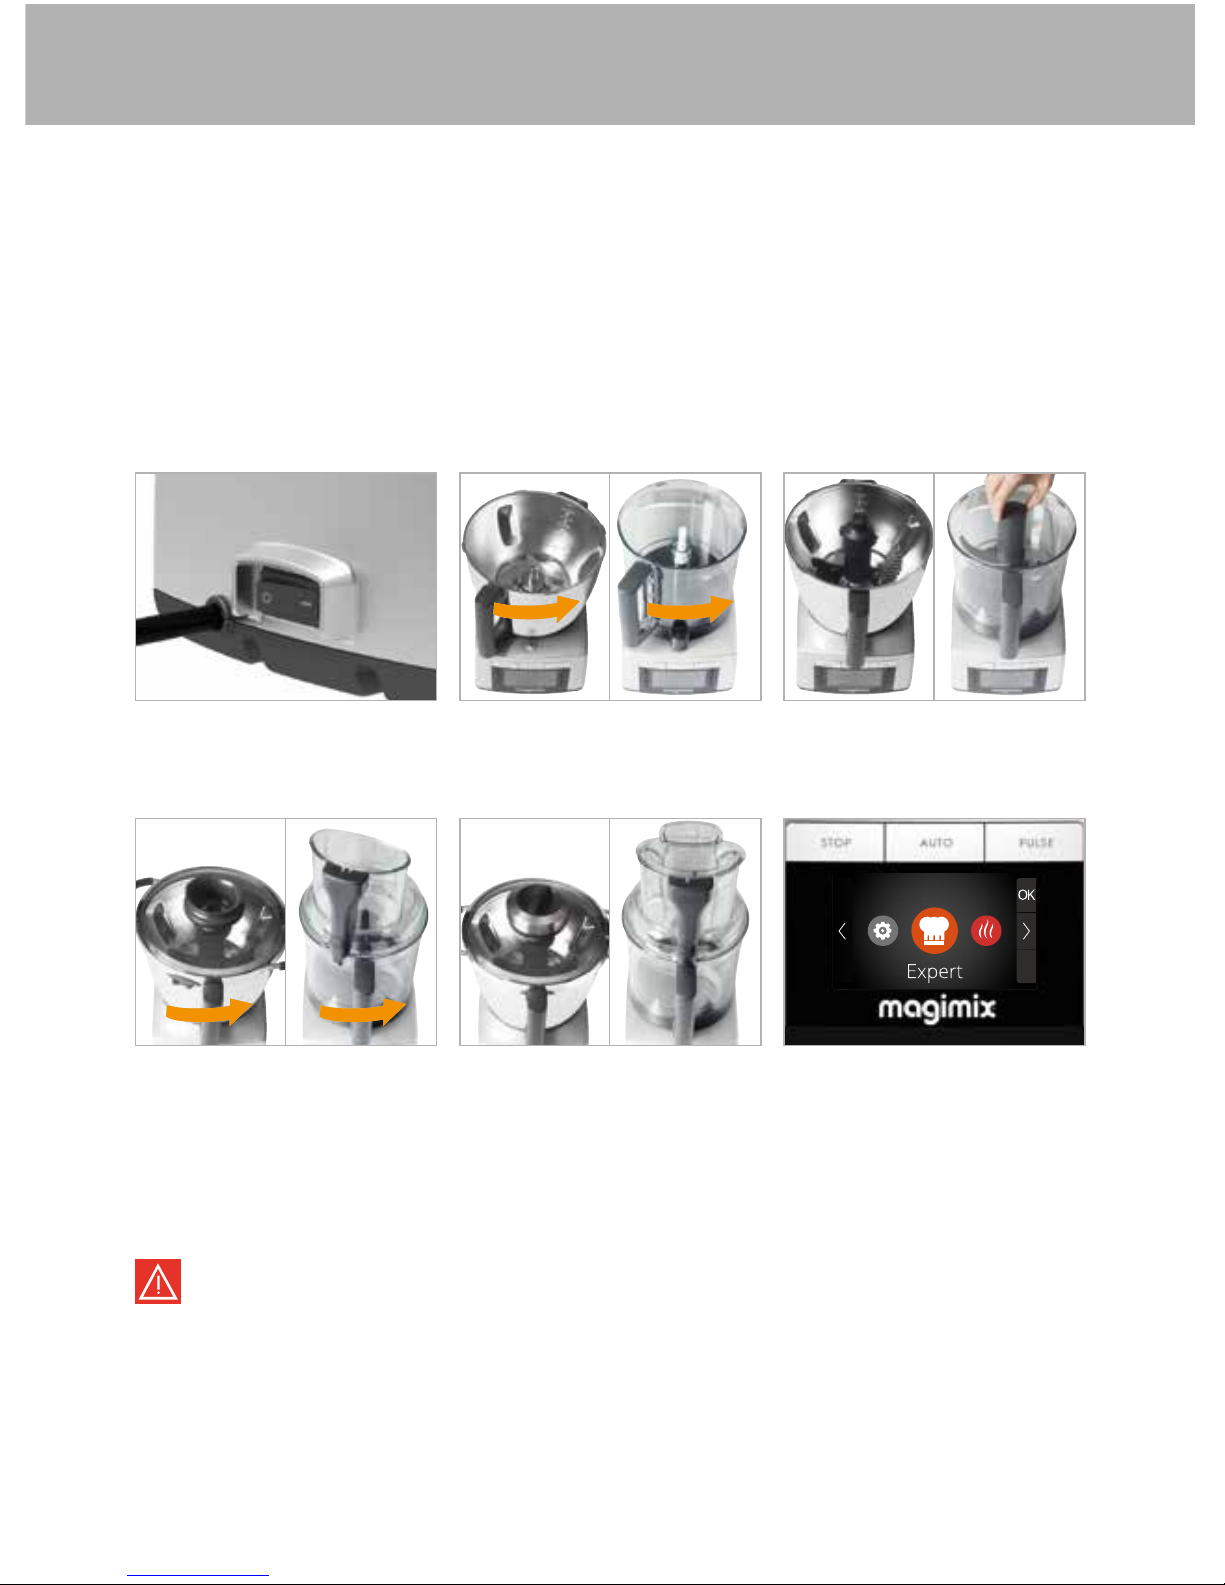
SETTING UP YOUR APPLIANCE AND SWITCHING IT ON
Setting Up your appliance
Place your Cook Expert on a flat worktop, away from sources of heat and water splashes�
Give it plenty of room so that you do not have to move it each time you want to use it�
The steam it releases could damage your kitchen units over time, so avoid installing your
appliance directly underneath a shelf or cupboard�
Before using your appliance for the first time, clean all the parts with hot water and washingup liquid (see Cleaning p�26)�
Switching your appliance on
Connect your appliance to
the mains supply and flip the
switch to 1�
Add the ingredients and
close the lid by turning it to
the right�
If you fit the food processor bowls (clear bowl(s) + lid + pushers), your appliance will
automatically select the Food Processor programme�
Before opening the lid, press STOP, and always check that the blades have stopped
turning. Your appliance will only work if the bowl, lid (and pusher when using the
Food Processor attachment) are correctly locked into place.
Fit the bowl you have
selected and turn it to the
right�
Position the cap or pusher
(unless stated otherwise in
the recipe)�
If necessary, attach the
accessory�
Select the programme and
start it by pressing AUTO�
Page 10
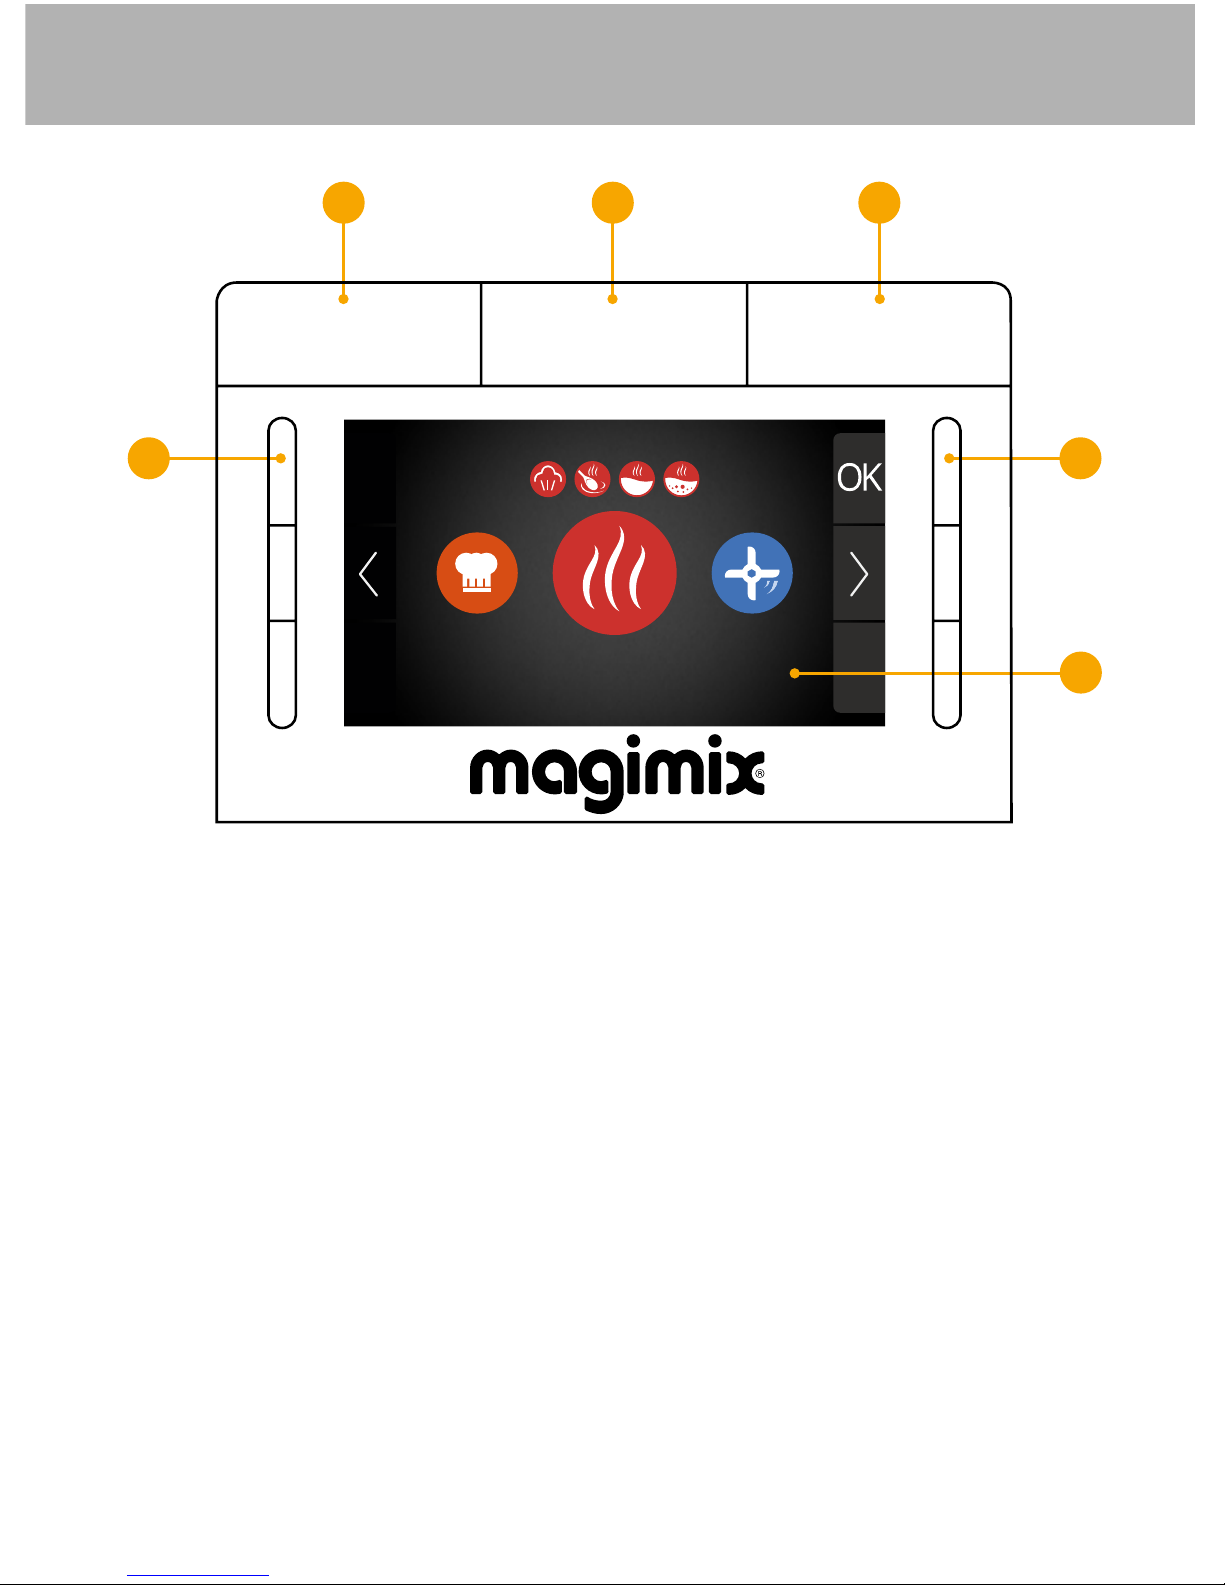
8
1. STOP: manual stop button�
If you press this button for 2 seconds, your appliance will go into standby
mode�
2. AUTO: to switch your appliance on� Press this button to start the programme�
3. PULSE: processing at maximum speed� Your appliance stops as soon as
you release this button�
This function gives you:
• more accurate control, if you work in pulses from the very start�
• an even smoother end result if you press this button at the end of the
task�
4. OPTIONS BUTTONS: the function of these buttons varies according to the
information displayed on the screen�
5. SCREEN: displays the menus and submenus as well as the time, speed and
temperature options�
1 2 3
44
CONTROL PANEL
STOP AUTO PULSE
5
Cook
Page 11
9
NAVIGATION
Simmer
Simmer
Cook
Cook
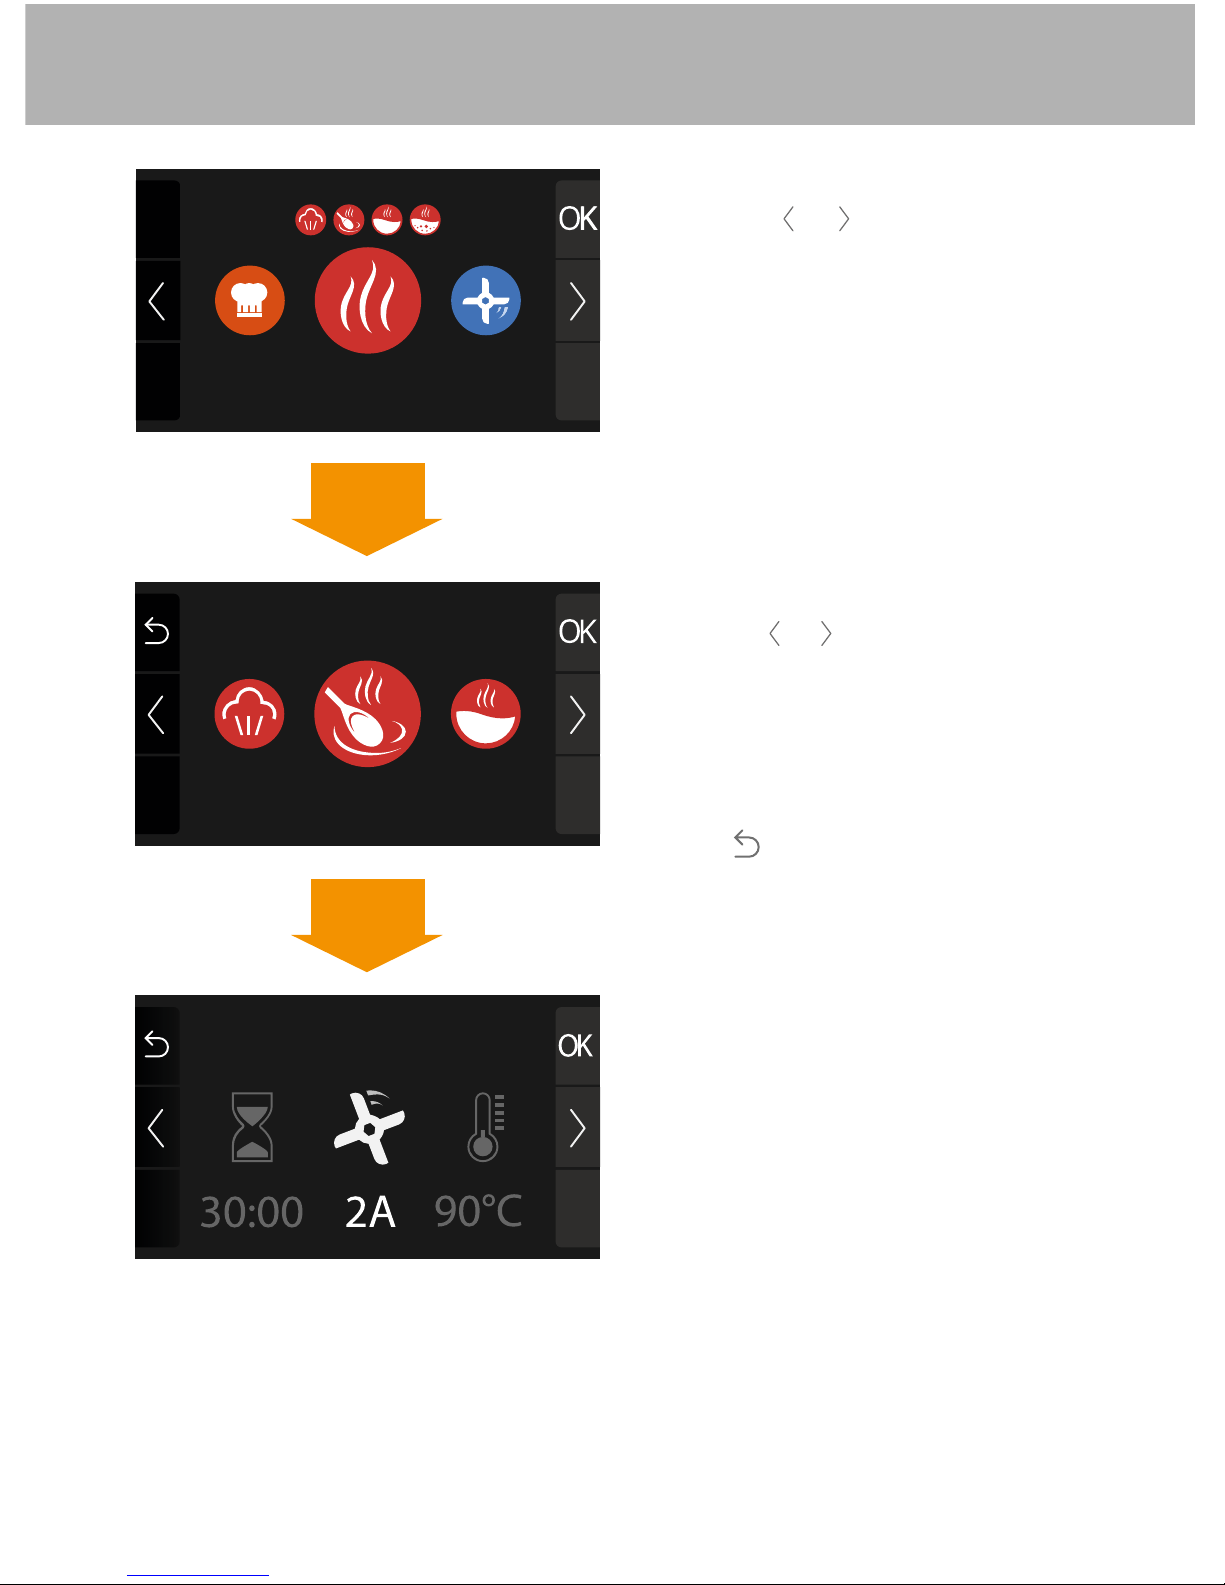
Menus
1� Press the
or button to select the
menu (the small circles at the top
indicate that there are submenus)�
2� Press OK to select a submenu or
directly access the options of the
menu you have selected�
Submenus
1� Press the
or button to select the
submenu�
2� Press AUTO to start the programme
or OK if you wish to modify the
options of the programme you have
selected�
Press
to go back to the menus�
Options
(time, speed, temperature)
With the exception of the Expert
menu, all the menus are driven by
automatic programmes:
to start the relevant programme, simply
press the AUTO button.
However, you can still adjust the automatic
settings:
• totally for the Expert menu
• partially for the other menus
Page 12

10
NAVIGATION
1� Press the < or > button to select the option (highlighted)�
2� Immediately press – or + to adjust the highlighted option�
• The heating function is only activated if you programme a cooking time�
• The programme includes an automatic timer�
• You can press the STOP button at any time to pause the programme�
Press AUTO again to resume the programme�
• When the programme is finished, you will hear a beep and the appliance will
automatically stop�
• The time is displayed in minutes, then hours�
• The maximum amount of time you can programme depends on which speed
you select:
- Speed 0 - 4: 2 hr
- Speeds 5 - 13: 10 min
- Speeds 14 - 18: 1 min
- the maximum programmable speed will vary according to the speed and /
or the programmed time (ex� : speed 0 max� 110°C)
• If you encounter a problem with the display, simply switch your appliance off
(flip the switch to 0) then on again�
Time Speed Temperature
Adjusting the options (time, speed, temperature):
Simmer
Page 13

11
PROGRAMMES / MENUS
Expert
With this manual programme, you can adjust all the options (time, speed and
temperature) to your taste�
Food Processor
Select this programme when you are using the clear bowl� The menu
automatically appears on the screen when you fit the clear bowl�
Recipes
If you select this menu, a QR code will appear on the screen� If you scan this
QR code with your smartphone or tablet you can directly access our Cook
Expert app�
Settings
This menu allows you to personalise your appliance (e�g� choice of language,
sound level)�
Rinsing
Automatic rinsing programme (for the metal bowl only)�
This programme lasts 1 minute, for optimum rinsing, but you can stop it earlier
if the bowl is not very dirty�
Puréed soup Creamed soup Simmer Steam
Cooking
Metal bowlClear bowlAll bowls
Frozen dessert Crush ice Smoothie
Blender
Pastry/cake Whisking Bread/brioche
Baking
Page 14

12
CHOOSING THE CORRECT BOWL / PROGRAMMES
simmer
cook and blend
grate
whisk egg whites
smoothies and milkshakes
chop
crush ice
blend
quick and easy sorbet
steam
slice
knead and mix
Page 15

13
METAL BOWL USE
Menu Sub-
menu
Use Attachment Max�
cap�
Chop onions 600g 2 min 13 -
Fry 500g 3 min 3 130°C
Purée 1kg
cf� recipe
book
Grate Parmesan 600g* 1 min 15 -
Chop walnuts 600g 1 min 15 -
Make icing sugar
200g
caster sugar
1 min 18 -
Pancake batter 1�5 l
cf� recipe
book
Creamed soup - 2�5 l AUTO
Puréed soup - 2�5 l AUTO
Simmer - 2�5 l AUTO
Steam cf p�17 AUTO
Smoothie - 2�5 l AUTO
Frozen dessert** -
400g
frozen fruit*
AUTO
Crush ice** -
300 g
(15-20 ice cubes)
AUTO
Bread
Brioche
-
0�8kg***
0�6kg***
AUTO
Pastry (shortcrust, etc�)**
Cakes (e�g� yoghurt pot)
-
1kg***
1�2kg***
AUTO
Whisk
2 - 6 egg
whites
AUTO
EXPERTCOOKINGBAKE BLENDER
* to maximize efficiency, cut into 3cm cubes� / ** you can stop the programme, if the ingredients
have already reached the desired consistency� / *** total weight of the ingredients�
Page 16

ASSEMBLING THE PARTS
Cap: it must always be fitted into the lid except when
stated otherwise in the recipe� Turn it in a clockwise
direction to secure�
The cap can become very hot in the cooking mode.
Make sure you hold it by the central black plastic part.
Temperature sensor
Induction hot plate
Watertight lid seal: always make sure it is correctly
slotted into the rim of the lid�
Double-wall metal bowl
Universal blade
Screw (fits on underside of the bowl)
Open
Open
Blade
See p� 14
Closed
Closed
Glass lid:
Assembly
Begin by attaching the blade (see p�15)�
Next, lock the bowl into position, followed by the lid (with its
watertight seal), then the cap� The appliance will only work
if the bowl and lid are correctly locked into position�
Simply follow these steps in reverse order to take them
apart�
14
Make sure you regularly check the seal for damage. If it is damaged or leaks, it must
be replaced immediately.
Page 17

BLADE ASSEMBLY
15
Removing the blade assembly
Attaching the blade assembly
Turn the bowl upside down
and use the cap as indicated
in image above� Ensure you
place a soft protection on
your worktop as once the
blade is loose it will fall out
of the bowl�
Whenever you use the metal bowl, always check that the seal is properly fitted and
the screw has been tightened.
Danger of burns from hot food splashes:
Always insert the cap in the lid (unless stated otherwise in the recipe), especially
when you are blending hot ingredients above Speed 7.
If you are making soup and need to add ingredients via the lid opening:
Always press STOP, then add the ingredients, put the cap back, and press AUTO to
resume the programme.
Always hold the cap by the central plastic part.
Never fill the bowl above the max. mark:
0.5 l for steaming, 2.5 l for other preparations.
Never exceed the maximum amounts (p.13).
Put the seal back on the blade�
The seal has two straight sides
to help you position it correctly�
Turn the cap in a clockwise
direction to release the blade�
Slot the base of the blade
assembly into the hole at the
bottom of the bowl� Turn the
bowl upside down, ensuring
you are securely and safely
hold the blade in place�
Holding the universal blade
assembly by the top, remove
the seal for cleaning�
Position the screw on the
underside of the bowl and
tighten with the cap by
turning in an anti-clockwise
direction�
Page 18

EGG WHISK
Always check that the egg whisk is correctly slotted onto the blade assembly before
starting a programme, to avoid damaging the attachment.
Never go beyond Speed 7 or 80 °C to avoid damaging the egg whisk.
Never add ingredients that might prevent the whisk from turning properly.
Slot the egg whisk onto the
universal blade�
TIPS AND ADVICE
Beaten egg whites
• Your bowl must be clean and dry� It only takes a tiny amount of fat /grease to prevent
the egg whites from expanding�
• To create more volume, make sure your eggs are at room temperature and add a pinch
of salt�
• Always remove the cap beforehand, otherwise your egg whites will not have enough
air in them�
• The WHISK programme is intended to produce very frothy egg whites, so for a closer
texture (e�g� for meringues), you can increase the speed to 7�
Whipped cream
• Always use full-fat whipping cream�
• Refrigerate the cream and the whisk for at least 30 min�
• You can chill the bowl by placing a few ice cubes inside, running the CRUSH programme,
then empty and thoroughly dry the bowl�
• Pour the cream and icing sugar into the bowl, remove the stopper from the lid and run
the EXPERT programme for 2½ minutes at Speed 7 (no heat)� Depending on the sort
of cream you use and its temperature, you may need to run the programme again for
a few minutes, keeping a careful eye on the cream to make sure it does not turn into
butter� The cream is whipped when the whisk leaves a trail�
Other uses
• To make a sorbet even lighter, at the end of the FROZEN DESSERT programme, fit the
egg whisk and run the EXPERT programme for 30 seconds at Speed 6�
• For some recipes, you may need to heat the mixture as you whisk it (e�g� Swiss meringue),
in which case you will have to switch to EXPERT mode� Always follow the recipes in the
book to avoid any damage to your product�
Add the ingredients, close the
lid and remove the cap before
starting the programme�
Press both buttons at once to
release the egg whisk� The
whisk can be fully dismantled
for thorough cleaning�
16
Page 19
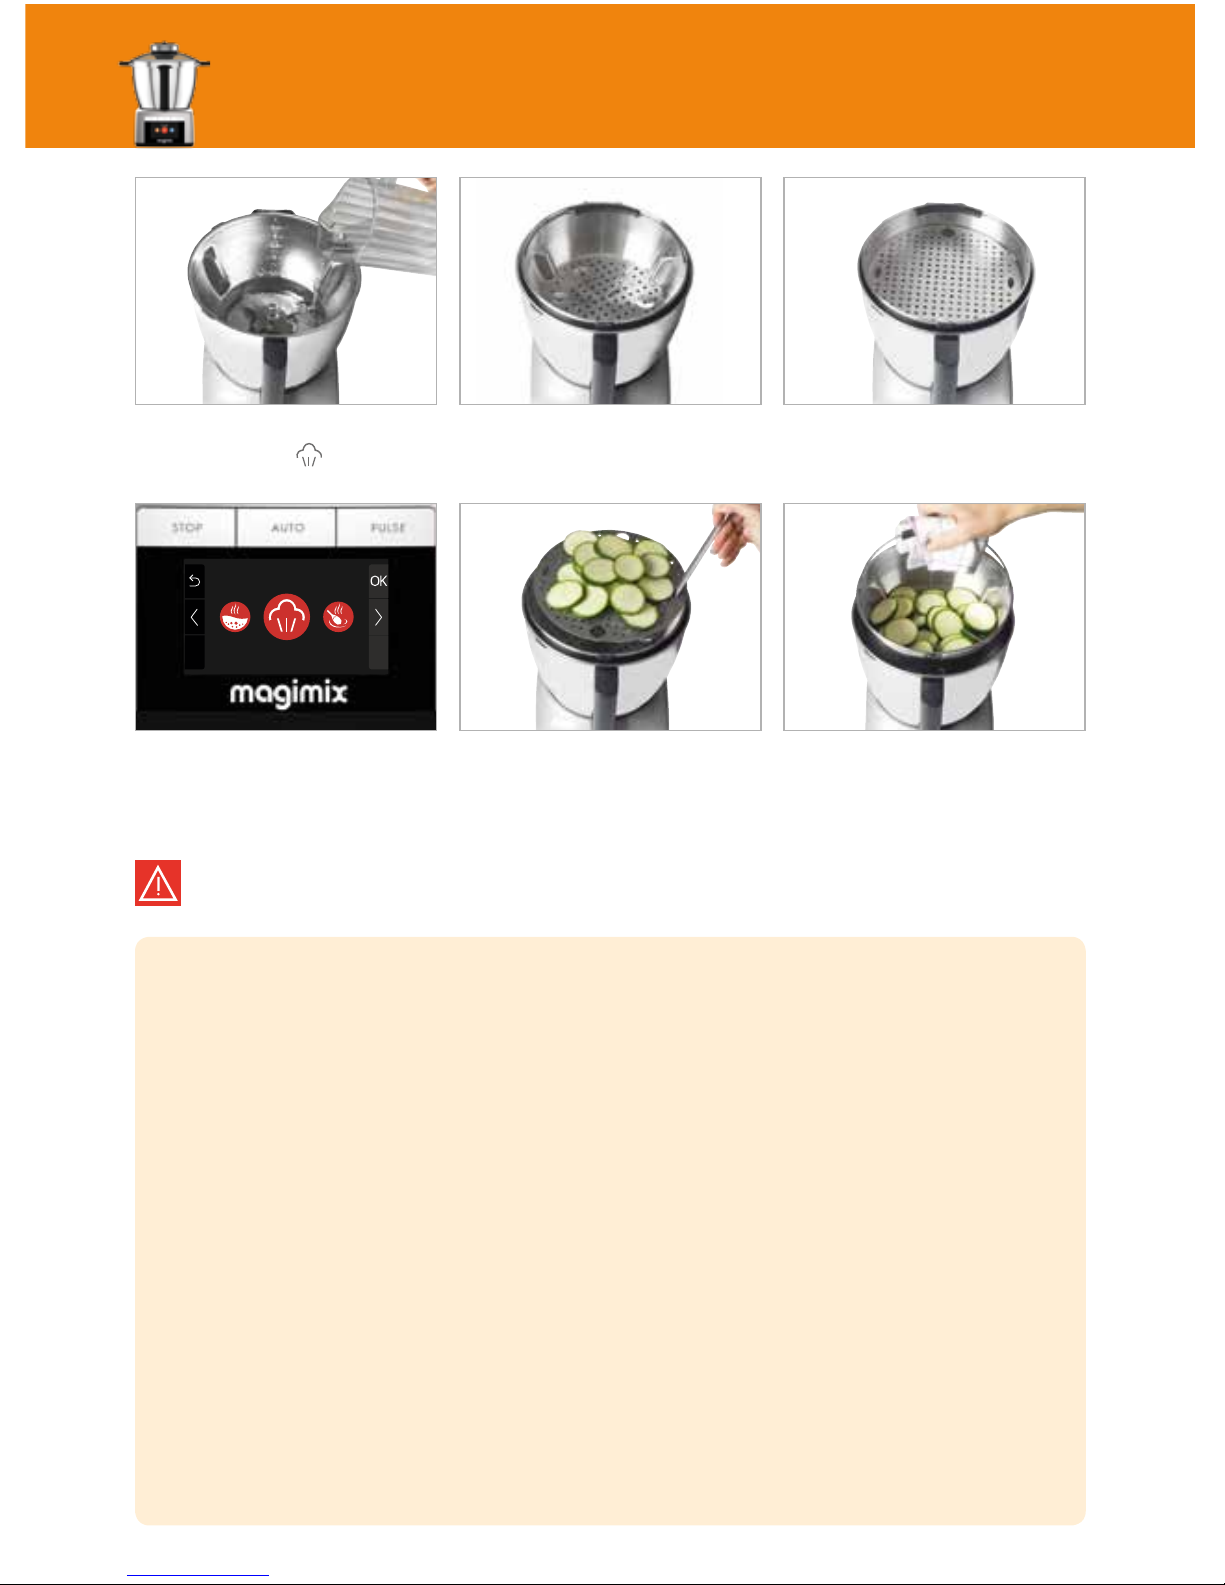
STEAM
17
Pour 0�5 litre of water into the
bowl (up to the level)�
Select the Steaming submenu�
Press AUTO to start the
programme�
Fit the steamer basket�
Use the spatula handle to
remove the steam tray�
If needed, add the steam tray
to create a second level�
Lift the basket out with a cloth
or oven glove�
Risk of burns. Stay away from the steam and handle the parts (bowl, lid, etc.) with
caution. Never use the steam tray without the steamer basket.
TIPS AND ADVICE
• If the bowl has no more water in it, a warning signal rings�
• To avoid ingredients (e�g� fish) sticking, grease the bottom of the steamer basket
beforehand�
• To steam fish, we recommend reducing the temperature to 100 °C, to preserve its delicate
consistency and flavour�
• You can directly steam frozen fish by extending the cooking time by 40 - 50%� However,
in terms of appearance and flavour, it is best to defrost the fish first�
• Add herbs, spices or a stock cube to the water (0�5 l) to add a delicate flavour to the
ingredients as they cook�
• Your food will cook better if you avoid overloading the basket and/or tray so that the
steam can circulate freely (do not block all the holes)� Cut all the ingredients at the same
size to ensure consistent results�
• If you are using the tray, place the ingredients that require the longest cooking time in
the basket below�
• Do not put more than 0�5L of water, especially if you are steaming fish as certain types
of fish cause the water to foam�
Steam
Cook
Page 20

STEAM
These cooking times are provided for a given amount, with water at room temperature (about
20°C), and may vary according to the thickness, freshness and nature of your ingredients�
(E�g� It takes less time to steam a new carrot than it does a winter carrot of the same size)�
Check the cooking progress intermittently and adjust cooking times accordingly�
Fish fillets
600g (4 fillets/about 2cm thick) 20 min 100°C
Salmon steaks
600g (4 steaks) 25 min 100°C
Prawns
500g, raw and unpeeled 15-20 min 110°C
Chicken breasts
600g (4 breasts) 25 min 110°C
Sausages
4 Frankfurter type (pricked with a fork)
4 smoked Montbeliard type (pricked with a fork)
10 min
20-25 min
110°C
Asparagus
600g 30-40 min 110°C
Broccoli
400g, divided into florets 25 min 110°C
Carrots
600g, sliced 50 min 110°C
Cauliflower
500g, divided into florets 40 min 110°C
Courgettes
500g, sliced 20 min 110°C
Spinach
250g, fresh 15 min 110°C
French beans
400g, topped and tailed 45-50 min 110°C
Peas
500g, frozen 35 min 110°C
Leeks
600g, sliced 30 min 110°C
Apples
4, quartered 30 min 110°C
Potatoes
600g, either small (e�g� new), whole and with skins left on, or
large, peeled and cut into 3cm pieces
30-40 min 110°C
Rice
Max� 300g: in a steel bowl that fits on the steam tray,
one part rice to one part water
25 min 110°C
18
Page 21

TIPS AND ADVICE
19
Cooking
• Cooking times can vary, according to the temperature or size of your ingredients, as well
as their nature� A winter carrot, for instance, will take longer to cook than a new carrot�
Always check the cooking progress and adjust the cooking time slightly, if necessary�
• Milk-based preparations tend to stick (as they do in saucepans), so use milk at room
temperature rather than milk straight out of the fridge�
• When simmering, avoid dicing the food too fine, so that it holds its shape better when
cooked�
• Cut the food into uniform pieces so that it is evenly cooked�
• To rescue a sauce that has curdled (e�g� custard), switch to EXPERT mode for 1 minute at
Speed 13 (no heat)�
Keep-warm function
• The bowl can keep your food warm for up to 2 hours without consuming any electricity�
• You can also customize the keep-warm function� Simply select the Expert mode, then adjust
the duration to suit your needs, set the speed to 0, and choose a temperature between
40 °C and 80 °C (60 °C is generally recommended for keeping most foods warm)�
Lid
• To prevent the lid from dripping onto your worktop or your appliance when you remove it,
check that the cap is properly secured, then lift the lid and invert it directly above the bowl
and set it upside down on your worktop�
• Always remove the lid using the handles on either side� Never remove the lid by holding
the cap�
Using the 2-in-1 spatula (metal bowl)
The 2-in-1 spatula supplied with your appliance has a silicone head for mixing ingredients,
and a metal head for scraping the bowl if food has become stuck to the bottom of the bowl
during use�
Page 22

CLEANING
Automatic rinsing
To make cleaning easier, run the Rinsing programme immediately after use�
Thorough cleaning
Always unplug your appliance first and wait for it to cool down if necessary�
Pour in 0�5 litre water add a
few drops of washing-up liquid�
Remove the seal from the rim
of the lid� If necessary, use a
spoon handle to help you�
• All the parts (except for the motor base) are dishwasher safe and can also be washed by
hand� The bowl should be placed completely upside down in the dishwasher, then allowed
to drain the right way up on your draining board before being put back on its base� That
way, any water that has found its way inside the double wall will run out through the hole
beneath the handle intended for that purpose�
• Wipe the motor base with a soft damp cloth and dry thoroughly�
• Check that the underside of the bowl is dry before putting it back on its base�
Close the lid and replace cap�
Start the Rinsing programme�
Unscrew the blade assembly
(p�14) and remove the seal�
Rinse with tap water� Clean
thoroughly�
Use a brush to clean under the
blades properly�
Never immerse the motor base in water or wash it under running water.
TIPS AND ADVICE (see also Frenquently Asked questions on our website)
• To avoid resistant smells (eg: onions) : wash the seal in the dishwasher and remove the
cap when you don’t use the Cook expert�
• If food is firmly stuck to the bottom, use white vinegar: leave it to soak� You can also use
a metal scourer and if necessary the metal part of the spatula�
• If necessary, use a bottle brush to clean inside the egg whisk�
20
Rinsing
Page 23

CLEAR BOWL USE
21
Menu Sub-
menu
Use Accessory Max�
cap�
Chop herbs 30g parsley
Washed and
dried
Make mayonnaise 300ml oil
Make dips 1 big bowl
Slice (e�g� cucumbers) 1�4kg
Grate (e�g� carrots) 1�4kg
Mince meat 1�4kg
Cut into 2-3 cm
pieces
Mince fish 1�4kg
FOOD PROCESSOR
E4E2
R4R2
OPTIONAL ACCESSORIES (transparent bowls)
You can add the following optional attachments to your Cook Expert - all available from
your Magimix retailer�
They are all used with a clear bowl (FOOD PROCESSOR programme)�
The dice and french-fry kit
6mm grater
Wide julienne
Fluted
Julienne
6mm slicer
Parmesan
Narrow julienne
The juice extractor and smoothiemix kit
The citrus press kit
Page 24

ASSEMBLING THE PARTS
Graduated 250ml measuring pusher
Motor shaft
Bowl adapter
Lid
Mini bowl: equipped with a mini metal blade for
blending, chopping or emulsifying small amounts
Midi bowl: practical and easy to clean� Specially
designed for use with the discs�
Main bowl: main bowl equipped with a metal blade
assembly
Double pusher
Assembly
Begin by fitting the adapter, then secure the bowl� If
necessary, insert the midi or mini bowl, then lock the
lid in position and fit the pushers�
Your appliance will only work if the bowl and lid and
XL pusher are correctly locked into place�
Simply follow these steps in reverse order to take them
apart�
22
Page 25

METAL BLADE ASSEMBLY/MINI BOWL
23
Fitting the metal blade.
Fitting the mini bowl
Remove the blade from the
plastic shield�
Keep it to store the blade�
The metal blades are extremely sharp. Always hold the blade by the central hub.
When emptying your bowl, either hold the top of the blade assembly to stop it falling
out or remove it first.
Lower the mini bowl onto the
motor shaft�
Slot the blade onto the motor
shaft�
Note: The metal blade will
only fit in the main bowl�
Slot the mini blade onto the
motor shaft�
TIPS AND ADVICE
Metal blade
• When processing large amounts, cut the ingredients into 2-cm dice�
• Meat or fish: use the Pulse button to obtain exactly the result you want�
Mini bowl
• Chopping fresh herbs: check that both the herbs and the bowl are perfectly clean and
dry� You will achieve a better cut and the herbs will keep for longer�
• You don’t have to have the midi bowl in place to use the mini bowl�
Page 26
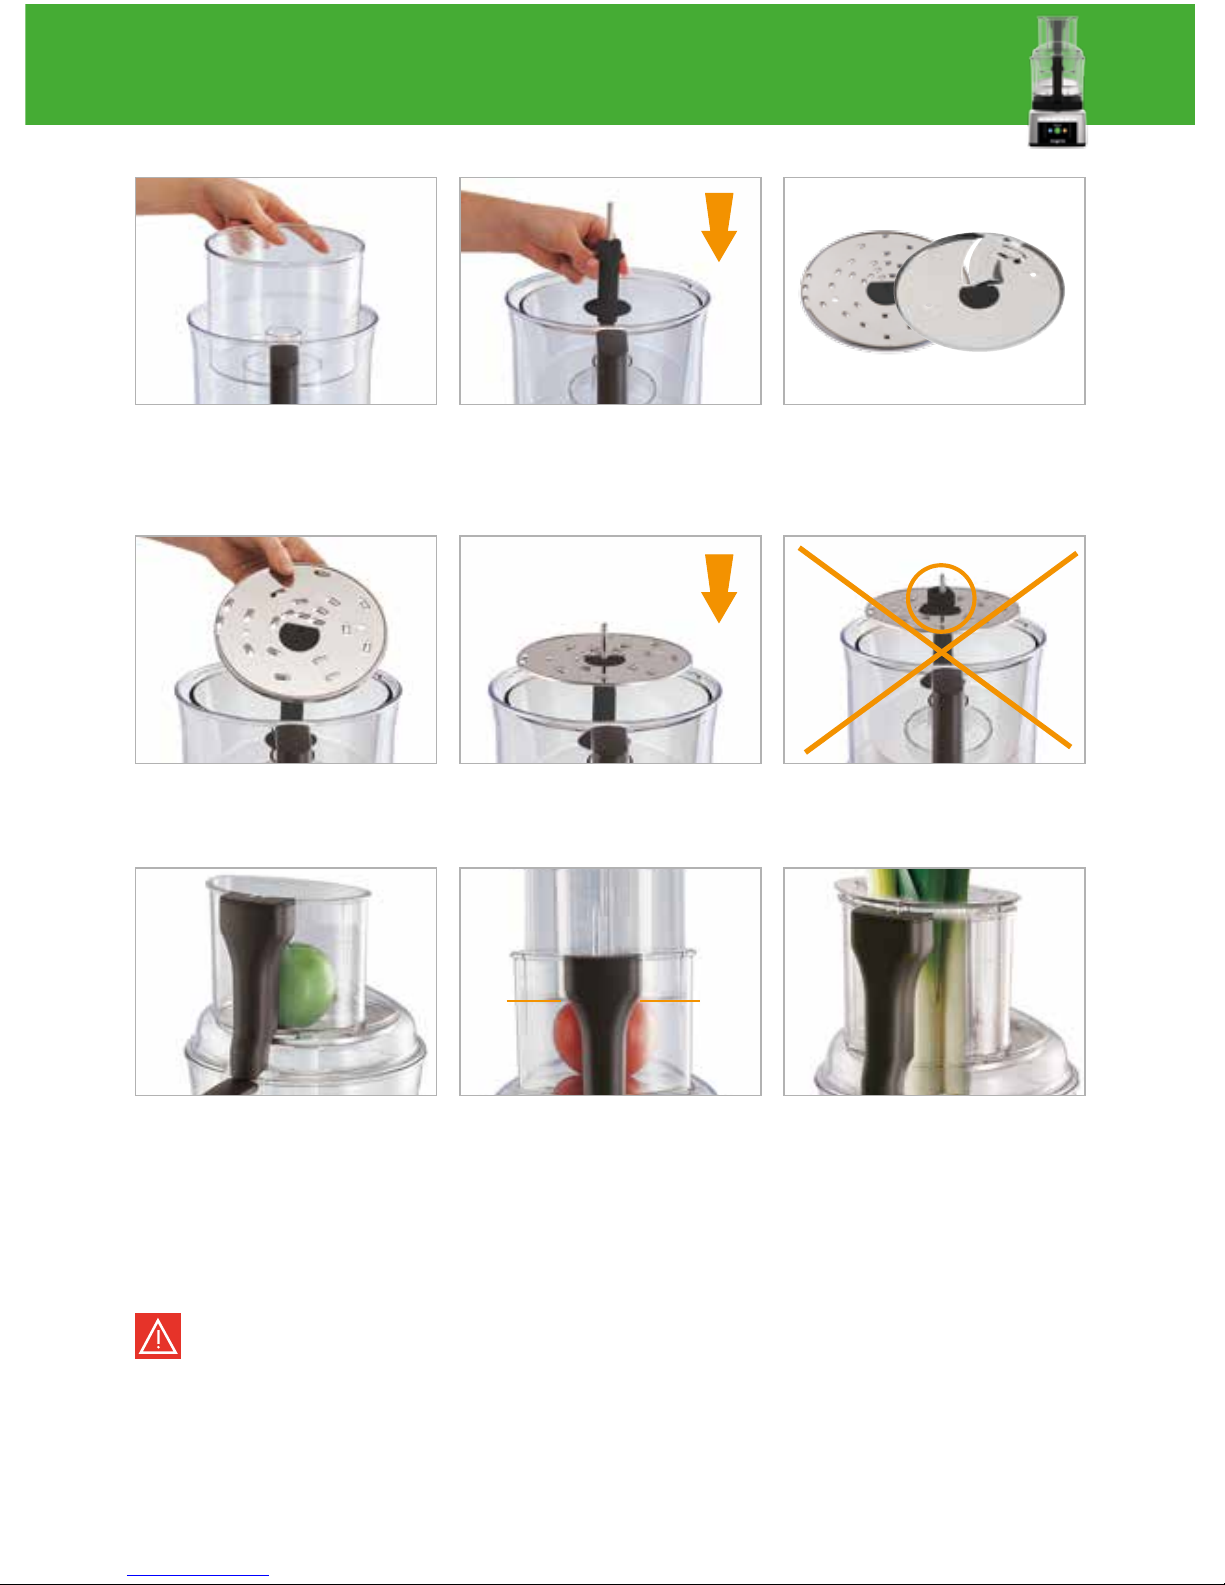
MIDI BOWL AND DISCS
Lower the midi bowl into the
main bowl�
After grating or slicing, you will be left with tiny pieces of fruit or vegetables on your discs�
This is entirely normal, and ensures a flawless end result� Simply remove them before serving�
Fit the disc on its support�
Large feed tube: for fruit and
vegetables that are round or
cut into large pieces�
Slot the disc support onto the
motor shaft�
Turn it until it locks into
position�
Your appliance will only work
if the large pusher is below
the max� mark�
Select the disc (e�g�
R/G 4 = 4mm grater or
E/S2 = 2mm slicer)�
Make sure you do not put the
disc on upside down�
Small feed tube: for small
or long and thin fruit and
vegetables�
Always handle the discs with caution.
Only use the pushers to guide the food down the feed tube.
Do not press down too hard on the pusher, to avoid damaging the appliance.
R
/
G
4
E
/
S
2
R
/
G
4
MAX
24
Page 27

DISCS
25
Large feed tube: for round
fruit or vegetables (can be left
whole)�
Small feed tube: when
grating fruit or vegetables,
lay them flat in the feed tube�
Small feed tube: to obtain
perfectly round slices, stand
your long fruit or vegetables
upright in the feed tube�
TIPS AND ADVICE
• For long slices or shreds, cut the fruit or vegetables into sections equal to the width of the
feed tube and stack them horizontally, taking care not to go above the maximum mark
(e�g� for potato gratin)�
• To grate or slice soft foodstuffs (e�g� tomatoes), only push them down very gently to avoid
squashing them�
• You can also slice meat or fish (e�g� carpaccio), in which case, place it in the freezer
until it is hard to the touch but still easy to pierce with the tip of a knife� Place the meat
or fish flat in the feed tube�
• When slicing spring onion, use the small feed tube�
• We recommend grating or slicing hard cheeses (e�g� Parmesan) when they are at room
temperature� However, for slightly softer cheeses (e�g� gruyere), it is best to chill them
beforehand�
Page 28

CLEANING
TIPS AND ADVICE
• Some foods (e�g� carrots) can stain plastics: rub with kitchen paper soaked in vegetable
oil to reduce the staining�
• Do not leave the discs and blades to soak in water, and dry them thoroughly after
washing to avoid oxidation spots� This spotting does not affect the quality of the blades�
Remove the Food Processing
bowls from the adaptor�
Bowl and accessories: clean
immediately after use using
hot water and washing up
liquid�
To preserve the appearance and lifetime of the removable parts, make sure you follow these
simple rules:
• Dishwasher: select the programme with the minimum temperature (ideally < 40°C) and
avoid the drying cycle (generally > 60°C)�
• Washing by hand: avoid leaving the parts to soak in detergent for too long� Avoid abrasive
products (e�g� scourer)�
• Detergents: read the manufacturer’s instructions to check whether the product is suitable for
plastic parts�
Always unplug your appliance before you start to clean it�
Use a bottle brush to clean
inside the blade assembly�
Motor housing and adapter:
wipe with a soft damp cloth,
then dry�
Never immerse the motor base in water or wash it under running water.
Always handle the blades and discs with caution.
26
Page 29

SETTINGS MENU
27
Download the instructions for
use on your Magimix website�
Useful information for your
service�
Choose when your appliance
will go into standby�
Personalise your appliance
Meter
Select the Settings menu to access the list of parameters you can adjust to personalize your
appliance�
Select your language� Press
OK to set�
Adjust the volume of the beep
that tells you when a task is
finished�
Select the temperature display:
Celsius or Fahrenheit�
Select the menu you wish to see
when you switch your appliance
on�
Versions Working Hours
SYSTEM: V1�63q Motor: 0
Motor: 1�09
TEMP: V1�03
LanguagesInstructions
www.magimix.uk.com
www.cookexpert.com.au
Sound
Meter
Menu order
Settings
Recipes
Rinsing
Expert
Cooking
Blender
Standby
Solely for demonstrating the
appliance in the shop� When
«On», the screen works,
but the induction system does
not heat and the blades do
not turn�
Demonstration mode
Off
On
Demonstration
Page 30

RECIPES
The book supplied with your appliance contains a generous selection of recipes, from starters
to desserts�
You can find all these recipes, along with variations, tips and advice, on our website or our
Magimix app:
It is well worth regularly paying a visit to our recipe section to find new recipes and/or share
your own tips and recipes with us�
Meanwhile, here is a selection of recipes to introduce you to your appliance
Cream of mushroom soup
Waldorf salad
Serves 4
500 g button mushrooms
1 onion
500 ml water
1 chicken stock cube
200 ml crème fraiche
4 sprigs parsley
Salt & pepper
Serves 4
2 Red Delicious apples
2 sticks celery
80 ml very lemony
mayonnaise
50 g walnut halves
Few lettuce leaves
Trim the stems of the mushrooms, wash them carefully and
halve or quarter them depending on their size�
Peel and quarter the onion� Place all the ingredients in the
metal bowl except the cream and parsley�
Start the PUREED SOUP programme�
About 1 minute before the end of the programme, press
STOP. Add the cream, check the seasoning and resume the
programme� Serve with chopped parsley�
Wash and core the apples� Wash the celery and remove any
tough strings� Lower the midi bowl into the clear main bowl
and install the 2-mm slicing disc� Slice the apples and celery�
Set aside�
Make the mayonnaise in the mini bowl (see recipe book)�
Gently stir the sliced apple and celery into the mayonnaise
and add the walnuts�
1. Log onto www�magimix�uk�com/recipes
www�cookexpert�au�com/recipes
2. Download the “Cook Expert Magimix” app directly to your smartphone or tablet (Apple,
Android or Windows Phone)�
28
Page 31

RECIPES
29
Prune fruit paste
Chocolate fondue
Red berry and yoghurt milkshake
Serves 4
225 g prunes
130 g sugar
Serves 4
250 g plain chocolate
400 ml full-fat single cream
20 g icing sugar
Serves 4
250 g raspberries
250 g blueberries
2 pots creamy yoghurt
2 glasses milk
2 tablespoons honey
Place the ingredients in the metal bowl�
Run the EXPERT programme for 40 seconds, at Speed 18
(no heat)� Serve, for example, with plain yoghurt or fromage
frais�
Place all the ingredients in the metal bowl�
Run the EXPERT programme for 10 minutes at Speed 3
(60 °C)� Ideal for coating fruit kebabs�
Put the milk and yoghurt in the metal bowl, followed by the
other ingredients�
Start the SMOOTHIE programme�
Serve chilled�
Page 32

TROUBLESHOOTING
Problem Solution
The appliance will not
switch on
Check that it is connected to the mains�
Flip the switch to 1�
Glass lid leaks Check that the seal is properly slotted in the rim�
Check that the seal is not damaged�
If you are heating milk, reduce the amount (milk can easily boil
over, just as it does in a saucepan)�
Leak at the base of the
metal bowl
Check that the blade seal is in place�
Check that the blade is securely fitted�
Leak at the base of the
metal bowl handle
After washing the bowl in the dishwasher, leave it to drain on
your draining board before putting it back on its base: water
may sometimes find its way between the two walls of the bowl
and will run out through the hole beneath the handle�
The motor smells When you use your appliance for the first time, or if it
overheats, it may smell slightly� This is nothing to be alarmed
about, and will disappear after you have used your appliance
a few times� Allow the motor to cool down for 30 minutes
before switching it back on�
“CLOSE THE LID” message
on screen
Either the bowl or the lid has not been correctly secured�
“CHANGE THE BOWL”
message on screen
Replace the metal bowl with the clear one, or vice versa�
“MOTOR OVERLOAD”
message on screen
Your appliance is fitted with a thermal device that protects the
motor from overheating� Reduce the amount of ingredients
and/or reduce the size of some of the pieces� Allow the motor
to cool down for 30 minutes before you switch it back on�
«ER 1», «ER 2» or «ER 3»
message on screen
Contact your service agent�
Problem with the display
and/or screen frozen
Switch your appliance off then on again�
The appliance doesn’t turn
and/or heat
Make sure the demonstration mode is not selected (see p�27)�
30
Find more tips on our website’s Frequently Asked Questions section�
Page 33

RECYCLING
31
Packaging
Electrical and electronic goods at the end of their lives
Sort your packaging:
Cardboard can be recycled: place it in the relevant bin�
Dispose of according to your local authorities instruction/regulations�
To find our more, log onto ecoemballages�fr
European legislation states that electrical or electronic and electric
goods must not be treated as regular household waste� Your appliance
contains many materials that can be recovered or recycled� It should
be taken to a suitable collection point� For more details about
collection points, please contact your local council or your household
waste disposal service� You can also take your appliance to a shop
selling household goods�
To find out more, log onto www�recyclenow�com/what-to-do-with/
electrical-items
Helping to protect the environment
Page 34

NOTES
32
Page 35

Page 36

460 151
 Loading...