

Page 1
Pneumatic Balloon Exploder
Instruction Sheet
1. Layout of the Path of the Airline
There are several ways to run the line. For best results, use graph paper to layout the job to scale. When running the line, make sure that it is free of kinks
or sharp bends and follows only smooth curves. Use the Quick-Fit Tee Fittings to branch the air line in different directions.
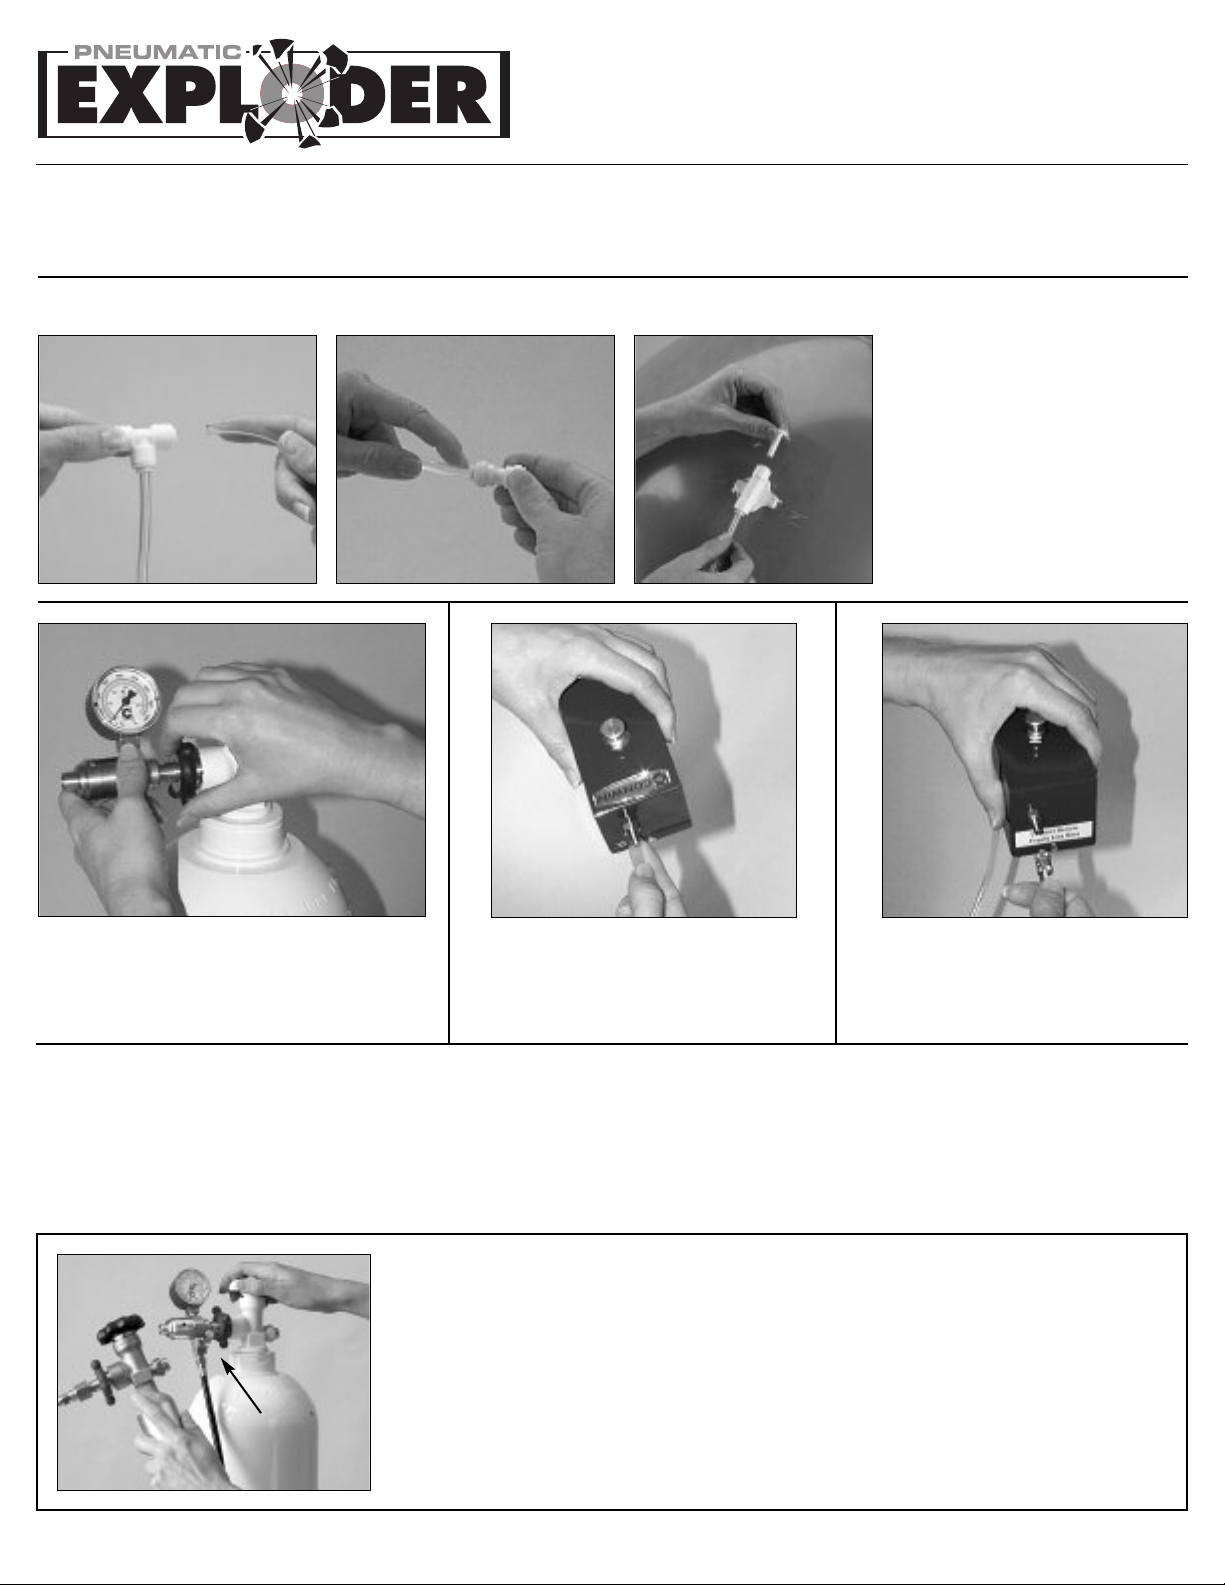
2. Connect the Air Lines
Cut the air line with scissors at each interval
where an exploding balloon is required.
Press the end of the air line into the QuickFit Connector until it reaches the back of the
fitting, approximately 1/2 inch. Pull on the
air line to insure that the Quick-Fit
Connector properly grips the line. Attach
the Twin-Pin Exploder at the end of the air
line. Keep the Plug in place when terminating the line at the exploder or remove the
Plug to run a continual line of exploders.
Press together
to connect.
Quick Fit Connecting SpliceQuick-Fit Connecting Tee Twin-Pin Exploder
Press center ring
in to release.
3. Pressurize the System
Hand tight connect the Exploder Regulator to any size helium or nitrogen cylinder. (Important: The cylinder must have
a minimum pressure of 500 PSI to explode the balloons).
4. Connect The Air Supply
Press the air line onto the hose barb fitting on
the detonator box until the line is touching the
box.
6. Test The Exploders
Test each exploder prior to taping the exploders to the balloon. First, open the
ylinder valve and verif
c
exploder with the smooth surface facing upward. Press and hold down the detonator button. The exploder pin will pop out of the exploder when the button is
depressed and will spring back into the unit when the button is released. This test
y there is at least 5
00 PSI in the cylinder. Next, hold the
Deluxe Exploder Kit Cylinder Filling Instructions
Hand tight connect the regulator end of the tr
•
a minimum of 500 PSI pressure.
• Hand tight connect the other end to the small cylinder.
wing the gas to automatic
Bleed Valve
Open both valves, allo
•
500 PSI, the small cylinder is full and the system will stop filling.
• Close both cylinders and open the bleed valve to release the gas remaining in the transfill hose.
• Hand tight connect the Exploder Regulator to the small cylinder.
5. Connect the Detonator Box
Attach the supply hose to the Detonator Box
by pressing the quick-disconnect fittings
.
together
insures the exploder is operating properly and the system is ready to install. If the
pin remans in the out position, lightly press the pin on a hard surface to reset the
unit. When using 2
test that system is working properly. When the detonator button is pressed, all the
test balloons should pop. If not, confirm that the airline is properly attached to all
fittings and retest the system.
0 or more exploders, tape 5-inch balloons to each exploder to
ansfill hose to a helium or nitrogen c
ansfer between cylinders. Once it reaches
ally tr
ylinder with
Page 2

Packing Tape
Exploder Air Line
Twin Pin
Balloon Exploder
7. Tape The Exploders To the Balloon
Position the exploder near the midsection of a fully inflated balloon. Use clear packing tape to attach each side of the exploder to the balloon. Important: Leave approximately 1/2" of space between the tape and the center upright point of the exploder.
This allo
After the exploder(s) have been taped to the balloon, use Dacron Archline to suspend the balloon from the ceiling. Tape the air line to the Dacron Archline. Make
sure the weight of the balloon is supported by the archline and not by the air line.
ws the air to escape and pop the balloon when the exploder is detonated.
8. Explode The Balloon(s)
1. Fully open the cylinder valve and verify there
is a minimum of 5
2. Continually hold down the detonator button
on the Detonator Box until all of the balloons
have exploded.
00 PSI in the cylinder.
Reusing The System
1. After each use, carefully remove the balloon exploders and connecting fittings from
the air line. To remove the air line from the Quick-Fit Connector, press and hold
the center grip ring down on the connector and the air line will easily release
from the fitting. Inspect each exploder and fitting to insure it was not damaged on
the job.
Exploder Components Sold Separately
A Quick-Fit Connecting Splice (6/pack)
B Quick-Fit Connecting Tee (6/pack)
A
Air Line 100-Ft. Spool
Compact Aluminum Cylinder
Automatic Cylinder Charger
Pneumatic Balloon Exploder Regulator
Exploder Detonator Box
B
Twin Pin Exploders
Our new versatile Twin Pin Exploder includes a removable
plug enabling you to explode a single balloon or multiple
balloons from one air line. Quick Fit connections on both
sides allow you to easily connect to air line. On cue, two
pins pierce and explode the balloon. (6/pack)
(Charger sold separately)
2. Cut off approximately 1" of the air line at each place where it was attached to a fitting or exploder. This will insure a proper connection when the air line is reused and
attached to fitting or exploder.
3. Retest the exploders after each use to insure they are operating properly. This will allow
enough time to order more exploders if necessary, well in advance of your next job.
Air Line Rigging Tip
If you're working in a room with a track drop ceiling, Conwin's adhesive
Grip-Tabs are ideal for rigging the air line. First, cut the Grip Tabs from the
adhesive side to the center hole. Slide the air line through the cut to the
center of the tab. Remove paper backing from the adhesive surface and
press the tab to the ceiling track.
Air Line
Service & Warranty
For assistance with service & repair
issues, or for warranty information,
please visit
or call
ConwinOnline.com,
(818)246.9233
Online
Projects
Designs
Galleries
...and more!
Conwin’s Masterpiece Series Videos
These exciting instructional videos
feature the industry's top balloon
artists sharing their secrets of the
trade on everything from the latest
decorating techniques to business
management and marketing skills.
Visit ConwinOnline.com to see our
complete line of educ
ational videos.
07082004
Visit www.ConwinOnline.com today!
 Loading...