

Page 1
Bubblematic Dial Inflating Bubble Balloon™
Inflating Bubble Balloons™
1 Set the dial to "B." Slide the inflator outlet into the neck of the outer
balloon (the longer of the two tabs) and inflate the balloon to 1/3 it’s
size.
2 Leaving the dial setting at "B", slide the inflator outlet into the neck of
the inner balloon and press upward, inflating the balloon until the
inflator automatically shuts off the flow of helium. Remove from outlet
immediately; do not continue to push balloon against outlet. This will
prevent the inner balloon from being over inflated.
3 Set the dial to "C." Slide the inflator outlet back into the neck of the outer
balloon. Fully inflate outer balloon by pinching the neck of the balloon
firmly against the outlet to prevent helium from leaking, and push the
outlet upward.
See Reverse Page for Important Inflation Tips!
Inflating Standard Foil Balloons
Set the dial to “A” by turning the dial
completely counter clockwise. Slide the
tapered filling outlet into valve in the neck of
the balloon and press upward for inflation.
When the balloon has reached the proper size
and pressure, the inflator will automatically
shut off the flow of helium. This guarantees
maximum balloon flying time, and eliminates
costly balloon breakage.
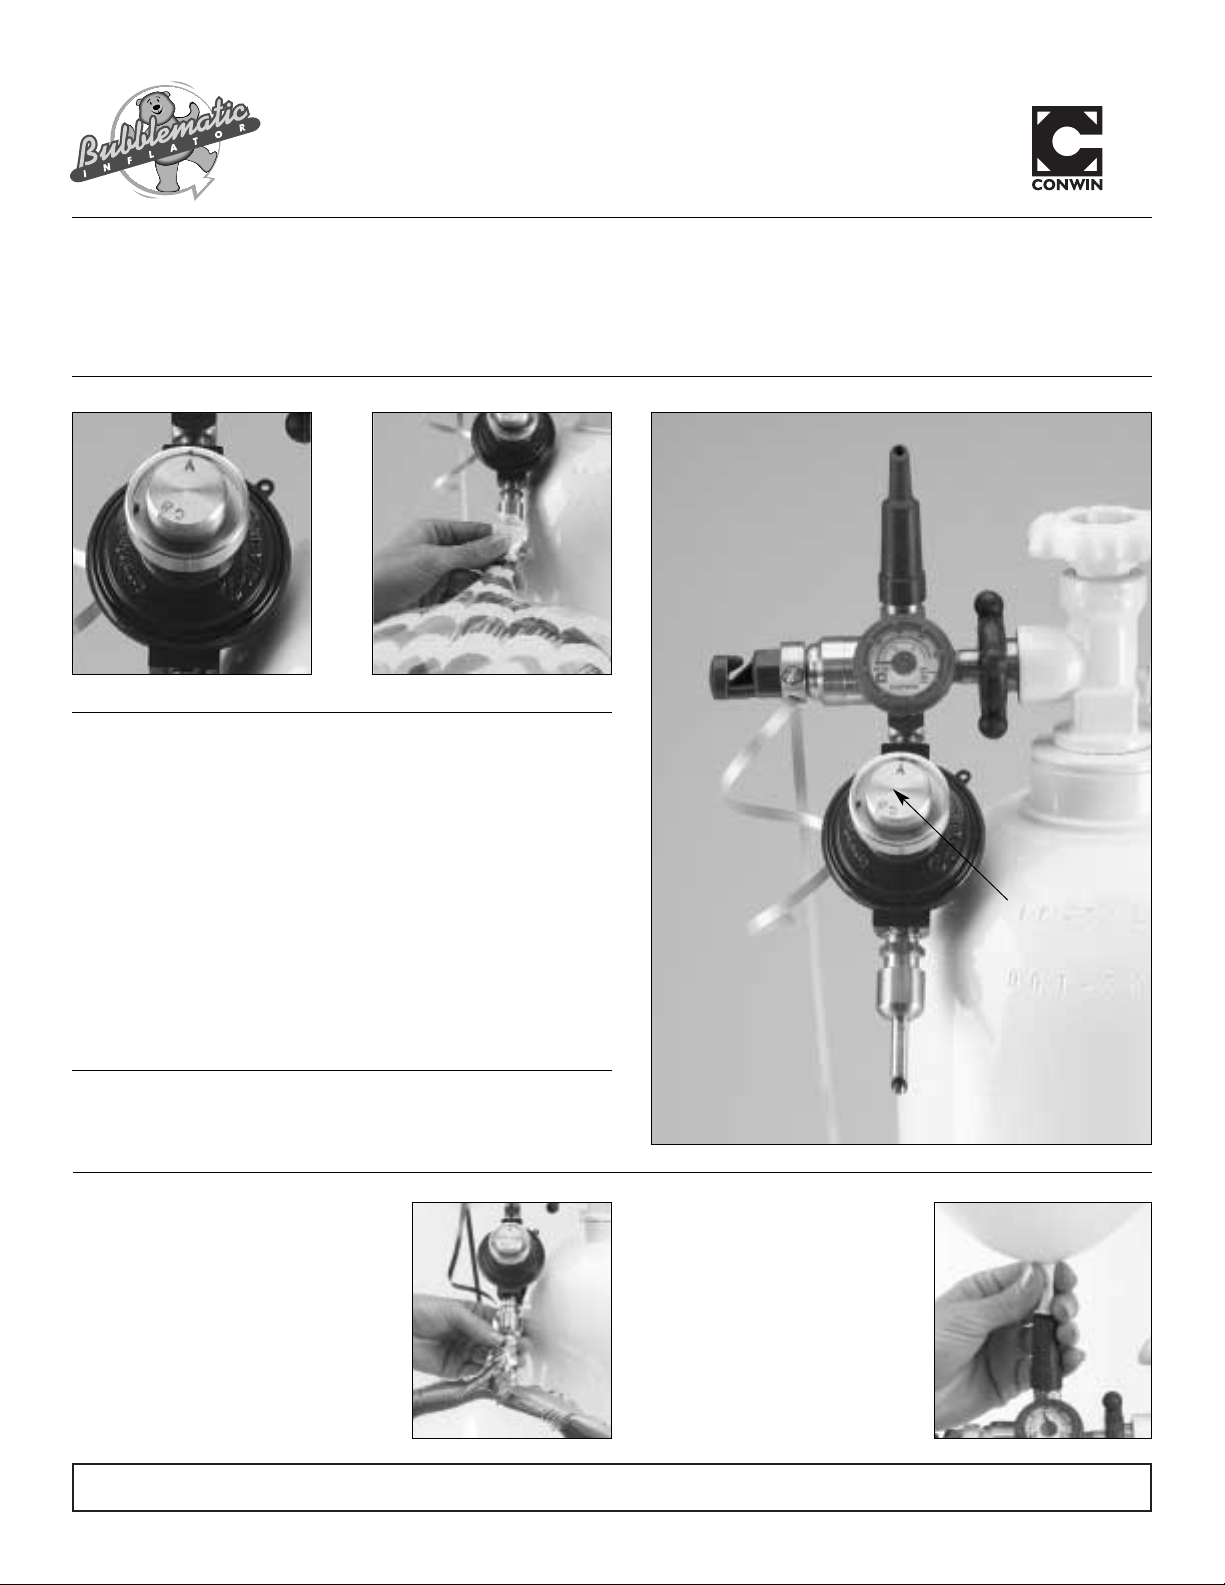
Bubblematic Inflator Conwin #83800
Instruction Sheet
Inflator Hook-Up
1. Firmly hand-tighten connection to the cylinder valve by turning
the handwheel clockwise. Do not use a wrench.
2. Slowly open the cylinder valve. Cylinder pressure locks inlfator in place.
3. Feed ribbon through the guide hole.
Inflating Latex Balloons
1. Place the balloon over the flex-tilt
valve outlet (located on the top
of the unit) and tilt the valve
forward.
2. When balloon has reached the
desired size, remove it from the
outlet and tie it using Conwin’s
balloon tying discs.
Hand-Tight
Connection
Latex Balloon
Flex Tilt Outlet
Pressure
Gauge
Disc Tyer Post
Ribbon Cutter
Foil Balloon
and Bubble Balloon
Filling Outlet
Inflation Setting Dial
Inflator Removal
1. Close cylinder valve firmly.
2. Release pressure by pushing down on the latex or foil balloon
inflating outlet.
3. Unscrew the hand-tight connection and remove inflator from cylinder.
02 0120 02
Bubble Balloons™ Are Available from TK Innovations
www.tkinnovationsinc.com 1-866-TK-Today
Page 2

2
Slide the disc over the neck
of the balloon.
1
Stretch the balloon and
ribbon around the post.
Conwin’s Tools of the Trade Video
ConwinOnline.com
Our site features Conwin’s complete line,
balloon galleries, inspirational ideas,
seasonal designs, step-by-step projects,
and so much more.
Visit www.ConwinOnline.com today!
Learn more about the entire line of Conwin
products from the popular Precision
Air Inflator to the spectacular
Confetti Cannon! You'll also see
many award-winning productions
by leading balloon artists! Visit
ConwinOnline.com’s Education Center
to see our complete line of videos.
Designs
Galleries
Projects
...and more!
Online
Visit www.ConwinOnline.com today!
Conwin Balloon Tying Discs The Fast and Easy Way to Tie Latex Balloons!
Discs available in convenient 100 packs and 1000 packs from your Conwin distributor.
Bubble
Balloons™
Are Available from
TK Innovations
www.tkinnovationsinc.com
1-866-TK-Today
Conwin #30120
IMPORTANT SAFETY TIP: To insure worker safety, cylinders should always be secured
in the work area and during transportation. Conwin’s Cylinder Safety Stand and Cylinder
Safety Wall Bracket secure all size cylinders and meet required safety standards.
Features durable steel
construction designed
to support all size
cylinders. A must for
worker safety in the
shop and on the job.
Outer Bubble Balloon™ Inflation Tip!
The inflator will slow the flow of gas to a minimal level when the outer
Bubble Balloon is properly inflated. Make sure gas has completely
stopped (even if flow is slow) during step 3 above. You can observe gas
flow by watching the clear valve inside the balloon. In extreme weather
conditions, the gas flow may not stop automatically (see below).
Extreme Weather Conditions
In extreme weather conditions the outer balloon may not stop
automatically. In very warm or humid conditions, manually stop inflation
leaving at least 1/2 inch wrinkles on the sides of the outer balloon. In
extremely cold or dry conditions, the outer balloon may not stop inflating
automatically (and may pop). In this case manually stop inflation leaving
at least 3 inch wrinkles on the sides of the outer balloon. If the balloon
does not float properly due to under-inflation, we suggest inflating and storing
Bubble Balloons in a warmer and more humid location, allowing the plastic
film to become softer and to stretch more easily.
Contraction & Expansion
If you are transporting your inflated Bubble Balloon into warm
conditions, it is best to under inflate the inner balloon slightly so that it
is able to adjust to the warmer temperature without popping. See
“Customizing Pressure Settings” below.
Noise Reduction
Gas flows smoothly into the Bubble Balloon™ when the valve for the outer
balloon is on top of the inner balloon. This insures that the inner balloon will
not block the flow of gas into the outer balloon, creating a vibrating noise.
Customizing Pressure Settings
The settings dial allows you to customize settings to suit your particular needs.
If you need to inflate your foils fuller due to elevation issues, turn the dial
clockwise beyond the setting recommended (Setting A on the dial). To under
inflate your Bubble Balloons™ due to weather conditions, turn the dial counterclockwise beyond the setting recommended (Setting B or C). Customize the
settings to suit all your needs, and mark your dial for future reference.
Bubblematic Inflation Tips for Best Results!
3
For a finishing touch, curl
the ends of the ribbons.
 Loading...