

Page 1
©
CONVOY SECURITY
USER’S MANUAL
WIRELESS RADIO LINK
PHOTOELECTRIC SMOKE AND FIRE ALARM
MODEL DG333
Wireless Radio Link
A.C. Wire-in Photoelectric Smoke Alarm
with 9 Volt Battery Back Up
IMPORTANT!
PLEASE READ CAREFULLY AND SAVE.
This user’s manual contains important information about
your Smoke Alarm’s operation. If you are installing this
Smoke Alarm for use by others, you must leave this
manual—or a copy of it—with the end user.
For your convenience, write down the following
information.
If you call our Consumer Hotline, these are the first
questions you will be asked.
Smoke Alarm Model Number (located on back of
detector):
Date Code (located on back of detector). Manufacturer
recommends replacing this alarm five years from the date
code:
Date of Purchase:
Where Purchased:
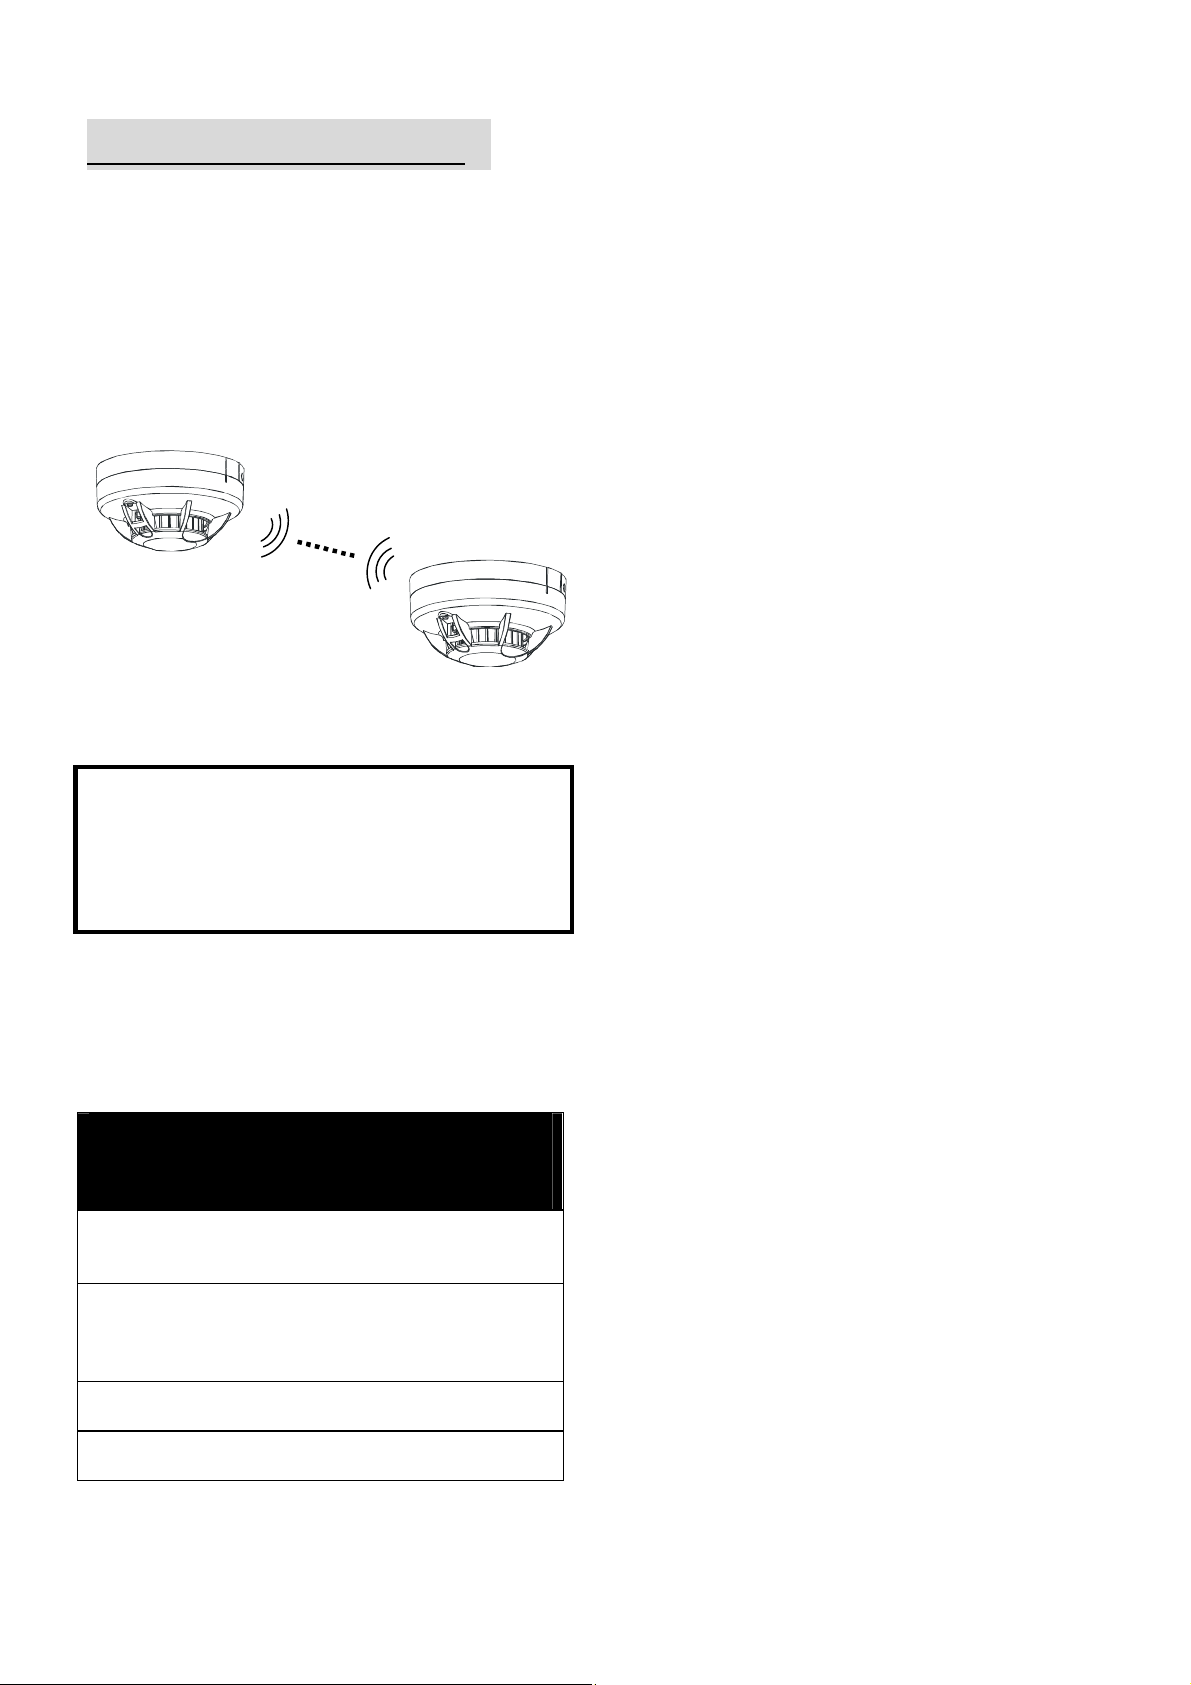
WIRELESS OPERATION
Thank you for purchasing the Wireless Radio Link DC
Powered Smoke Alarm. Wireless Radio Link Technology is
the easy, cost-effective way to provide your family with
whole-home safety. All Wireless Radio Link Alarms
communicate with each other without wires or connectors.
When one Alarm sounds, they all sound. This provides your
family with an earlier warning of potential danger, and gives
you more time to react.
The communication distance (range) between any two
Wireless Radio Link Alarms is typically 100 feet (30 meters)
inside of a home. Some features of a home, such as the
number of floors, number/size of rooms, furniture and types
of building materials used may reduce the range of the
Alarms. Examples include: suspended ceilings, ductwork,
large metallic appliances (refrigerators) and metal studs. A
feature of Wireless Radio Link Alarms is that they operate
as a mesh network. All Alarms will repeat any alarm signal
that is received to all other Wireless Radio Link Alarms.
Interference from structural conditions can be overcome by
adding additional Alarms to route the wireless signal around
obstructions.
IMPORTANT!
• The range and proper operation of any wireless device
will vary depending on its surroundings. It is very important
that each Alarm is tested individually before and after
installation to make sure that all Alarms respond properly.
• The Wireless Radio Link Alarms are not to be used
outdoors or to transmit between buildings. The Alarms will
not communicate properly under these conditions.
• Metal objects and metallic wallpaper may interfere with
signals from wireless Alarms. Alarms should be tested
after changes to your home such as remodeling, moving
furniture, and with metal doors opened and closed.
Your Wireless Radio Link Smoke Alarm will automatically
communicate potential fires with all other Wireless Radio
Link Smoke Alarms.
IMPORTANT! READ ALL INSTRUCTIONS BEFORE
INSTALLATION AND KEEP THIS MANUAL NEAR THE
ALARM FOR FUTURE REFERENCE.
CONTENTS OF THIS MANUAL
1 -- RECOMMENDED LOCATIONS FOR SMOKE ALARMS
2 -- LOCATIONS TO AVOID FOR SMOKE ALARMS
3 -- INSTALLATION INSTRUCTIONS
4 -- OPERATION AND TESTING
5 -- NUISANCE ALARMS
6 -- MAINTENANCE
7 -- LIMITATIONS OF SMOKE ALARMS
8 -- GOOD SAFETY HABITS
9 -- NFPA PROTECTION STANDARD 72, SECTION 2-2.1
10 -- SERVICE AND WARRANTY
Do not try to repair the smoke alarm yourself. Refer to the
instructions in Section 10 for service.
DG333Manual Page 1 of 6 © 2008 CONVOY SECURITY
Page 2
1. RECOMMENDED LOCATIONS FOR ALARMS
• Locate the first alarm in the immediate area of the
bedrooms. Try to protect the exit path as the bedrooms are
usually farthest from the exit. If more than one sleeping
area exists, locate additional alarms in each sleeping area.
• Locate additional alarms to protect any stairway as
stairways act like chimneys for smoke and heat.
• Locate at least one alarm on every floor level.
• Locate an alarm in every bedroom.
• Locate an alarm in every room where electrical
appliances are operated(i.e. portable heaters or
humidifiers).
• Locate an alarm in every room where someone sleeps
with the door closed. The closed door may prevent the
alarm from waking the sleeper.
• Smoke, heat, and combustion products rise to the ceiling
and spread horizontally. Mounting the smoke alarm on the
ceiling in the center of the room places it closest to all
points in the room. Ceiling mounting is preferred in ordinary
residential construction.
• For mobile home installation, select locations carefully to
avoid thermal barriers that may form at the ceiling. For
more details, see MOBILE HOME INSTALLATION below.
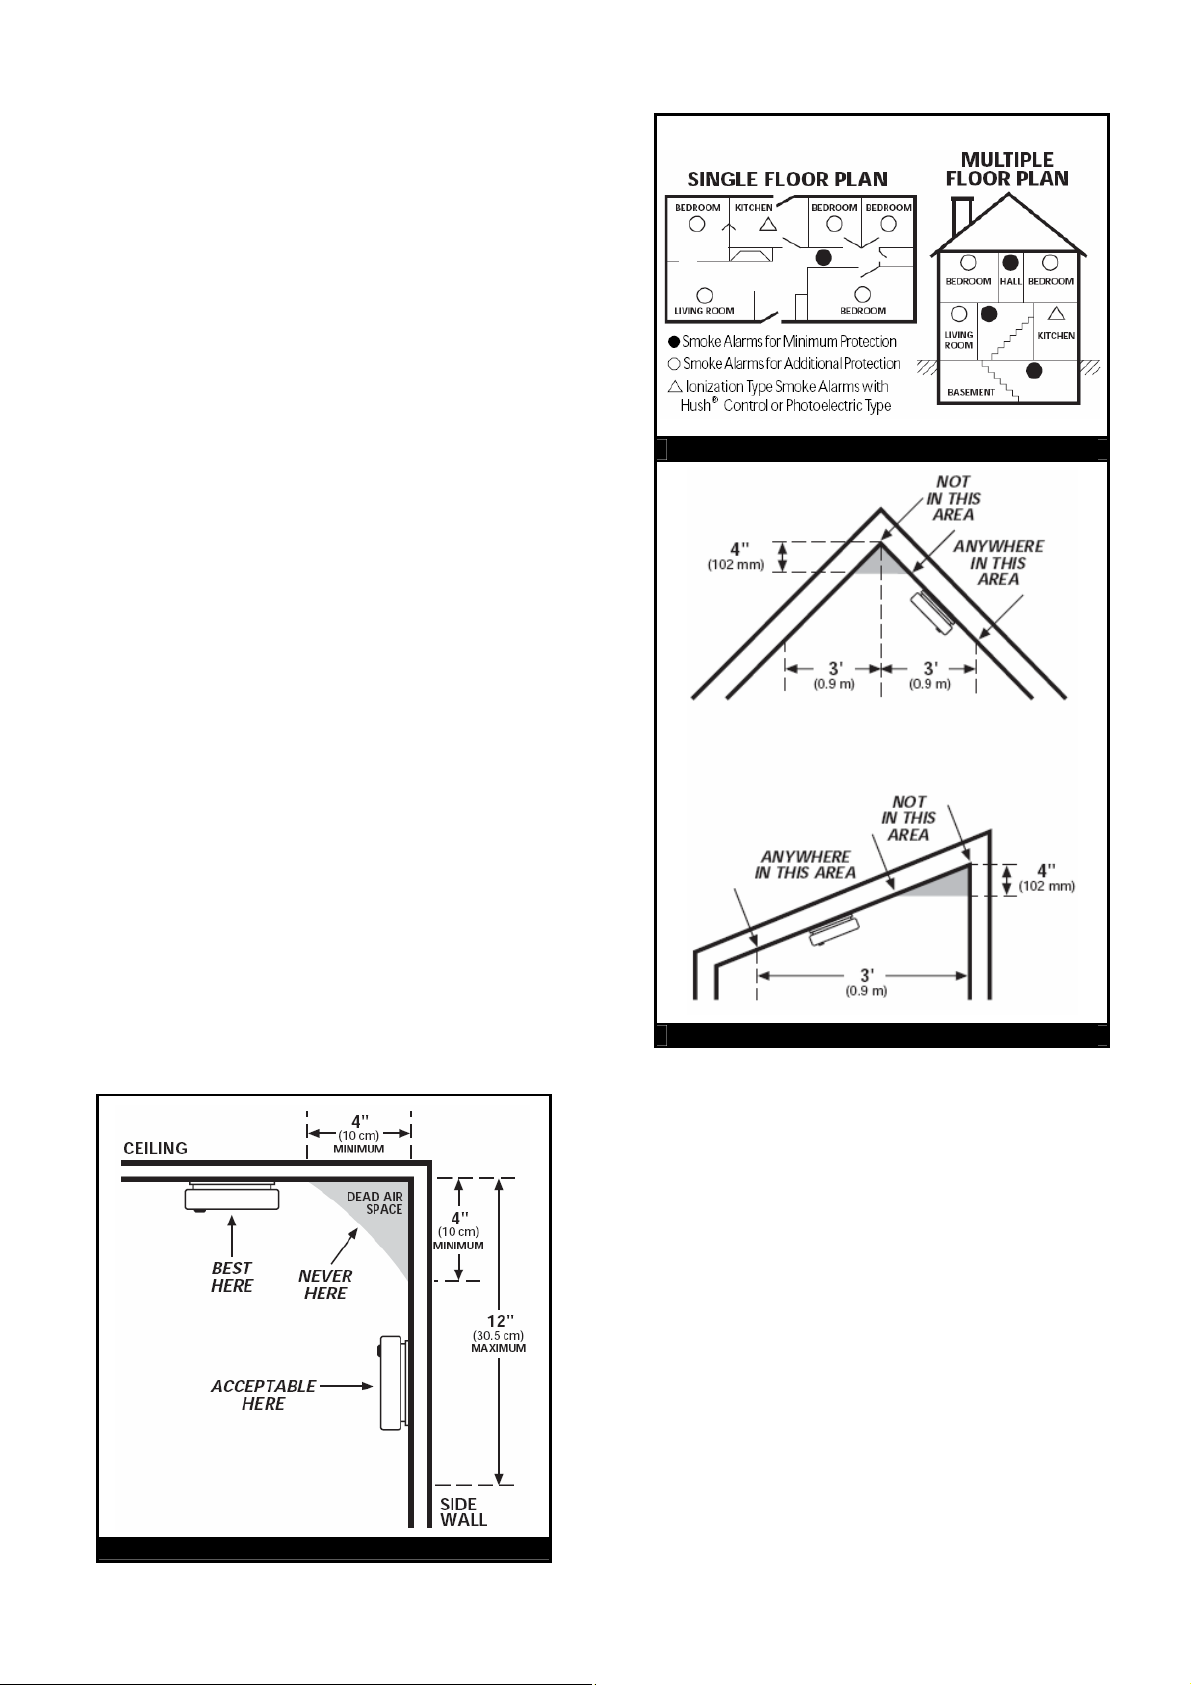
• When mounting an alarm on the ceiling, locate it at a
minimum of 4” (10 cm) from the side wall (see Figure 1).
• When mounting the alarm on the wall, it is best to use an
inside wall with the top edge of the alarm at a minimum of
4” (10 cm) and a maximum of 12” (30.5 cm) below the
ceiling, (see Figure 1).
• Put smoke alarms at both ends of a bedroom hallway or
large room if the hallway or room is more than 30 feet (9.1
m) long.
• Install Smoke Alarms on sloped, peaked or cathedral
ceilings at or within 3ft (0.9m) of the highest point
(measured horizontally). NFPA 72 states: “Smoke alarms
in rooms with ceiling slopes greater than 1 foot in 8 feet
(.3m in 2.4 m) horizontally shall be located on the high side
of the room.” NFPA 72 states: “A row of detectors shall be
spaced and located within 3 ft (0.9m) of the peak of the
ceiling measured horizontally” (see Figure 3).
FIGURE 1
FIGURE 2
FIGURE 3
MOBILE HOME INSTALLATION
Modern mobile homes have been designed and built to be
energy efficient. Install smoke alarms as recommended
above, refer to RECOMMENDED LOCATIONS and Figure
1. In older mobile homes that are not well insulated
compared to present standards, extreme heat or cold can
be transferred from the outside to the inside through poorly
insulated walls and roof. This may create a thermal barrier
that can prevent the smoke from reaching an alarm
mounted on the ceiling. In such units, install the smoke
alarm on an inside wall with the top edge of the alarm at a
minimum of 4” (10 cm) and a maximum of 12” (30.5 cm)
below the ceiling (see Figure 1). If you are not sure about
the insulation in your mobile home, or if you notice that the
outer walls and ceiling are either hot or cold, install the
alarm on an inside wall. For minimum protection, install at
least one alarm close to the bedrooms. For additional
protection, see SINGLE FLOOR PLAN in Figure 2.
DG333Manual Page 2 of 6 © 2008 CONVOY SECURITY
Page 3
WARNING: TEST YOUR SMOKE ALARM OPERATION
AFTER R.V. OR MOBILE HOME VEHICLE HAS BEEN IN
STORAGE, BEFORE EACH TRIP AND AT LEAST ONCE
A WEEK DURING USE.
2. LOCATIONS TO AVOID FOR ALARMS
Alarms must not be located within 3 feet of the following:
• Supply and return registers used for forced air heating
and air conditioning.
• Ceiling fans and other high air flow areas.
• Bathrooms which contain a tub or shower.
In general, alarms should not be located:
• In the garage. Products of combustion are present when
you start your automobile.
• In an area where the temperature may fall below 40ºF or
rise above 100ºF.
• In dusty areas. Dust particles may cause nuisance
alarms or failure to alarm.
• In very humid areas or near a bathroom. Moisture or
steam can cause nuisance alarms.
• Near fluorescent lights. Electronic “noise” may cause
nuisance alarms.
3. INSTALLATION INSTRUCTIONS
WIRING REQUIREMENTS
• This smoke alarm should be installed on a U.L. listed or
recognized junction box. All connections should be made
by a qualified electrician and must conform to article 760 of
the U.S. National Electrical Code, NFPA 72 and/or any
other codes having jurisdiction in your area.
• The appropriate power source is 120 to 240 Volt A.C.
Single Phase supplied from a non-switchable circuit which
is not protected by a ground fault interrupter.
WIRING INSTRUCTIONS FOR A.C. QUICK
CONNECT HARNESS
CAUTION! TURN OFF THE MAIN POWER TO THE
CIRCUIT BEFORE WIRING THE ALARM.
• For units that are used as single station, DO NOT
CONNECT THE WHITE (INTERCONNECT) WIRE TO
ANYTHING. Leave the white wire insulating cap in place to
make certain that the white wire cannot contact any metal
parts or the electrical box.
• When alarms are interconnected, all interconnected units
must be powered from a single circuit.
• A maximum of 18 devices may be interconnected in a
multiple station arrangement.
The interconnect system should not exceed the NFPA
interconnect limit of 12 smoke alarms and/or 18 alarms
total (smoke, heat, carbon monoxide, etc.) With 18 alarms
interconnected, it is still possible to interconnect up to a
total of 6 remote signaling devices and/or relay modules.
• When mixing models which have battery backup with
models without battery backup be advised that the models
without battery backup will not respond during an AC
power failure.
• The maximum wire run distance between the first and last
unit in an interconnected system is 1000 feet.
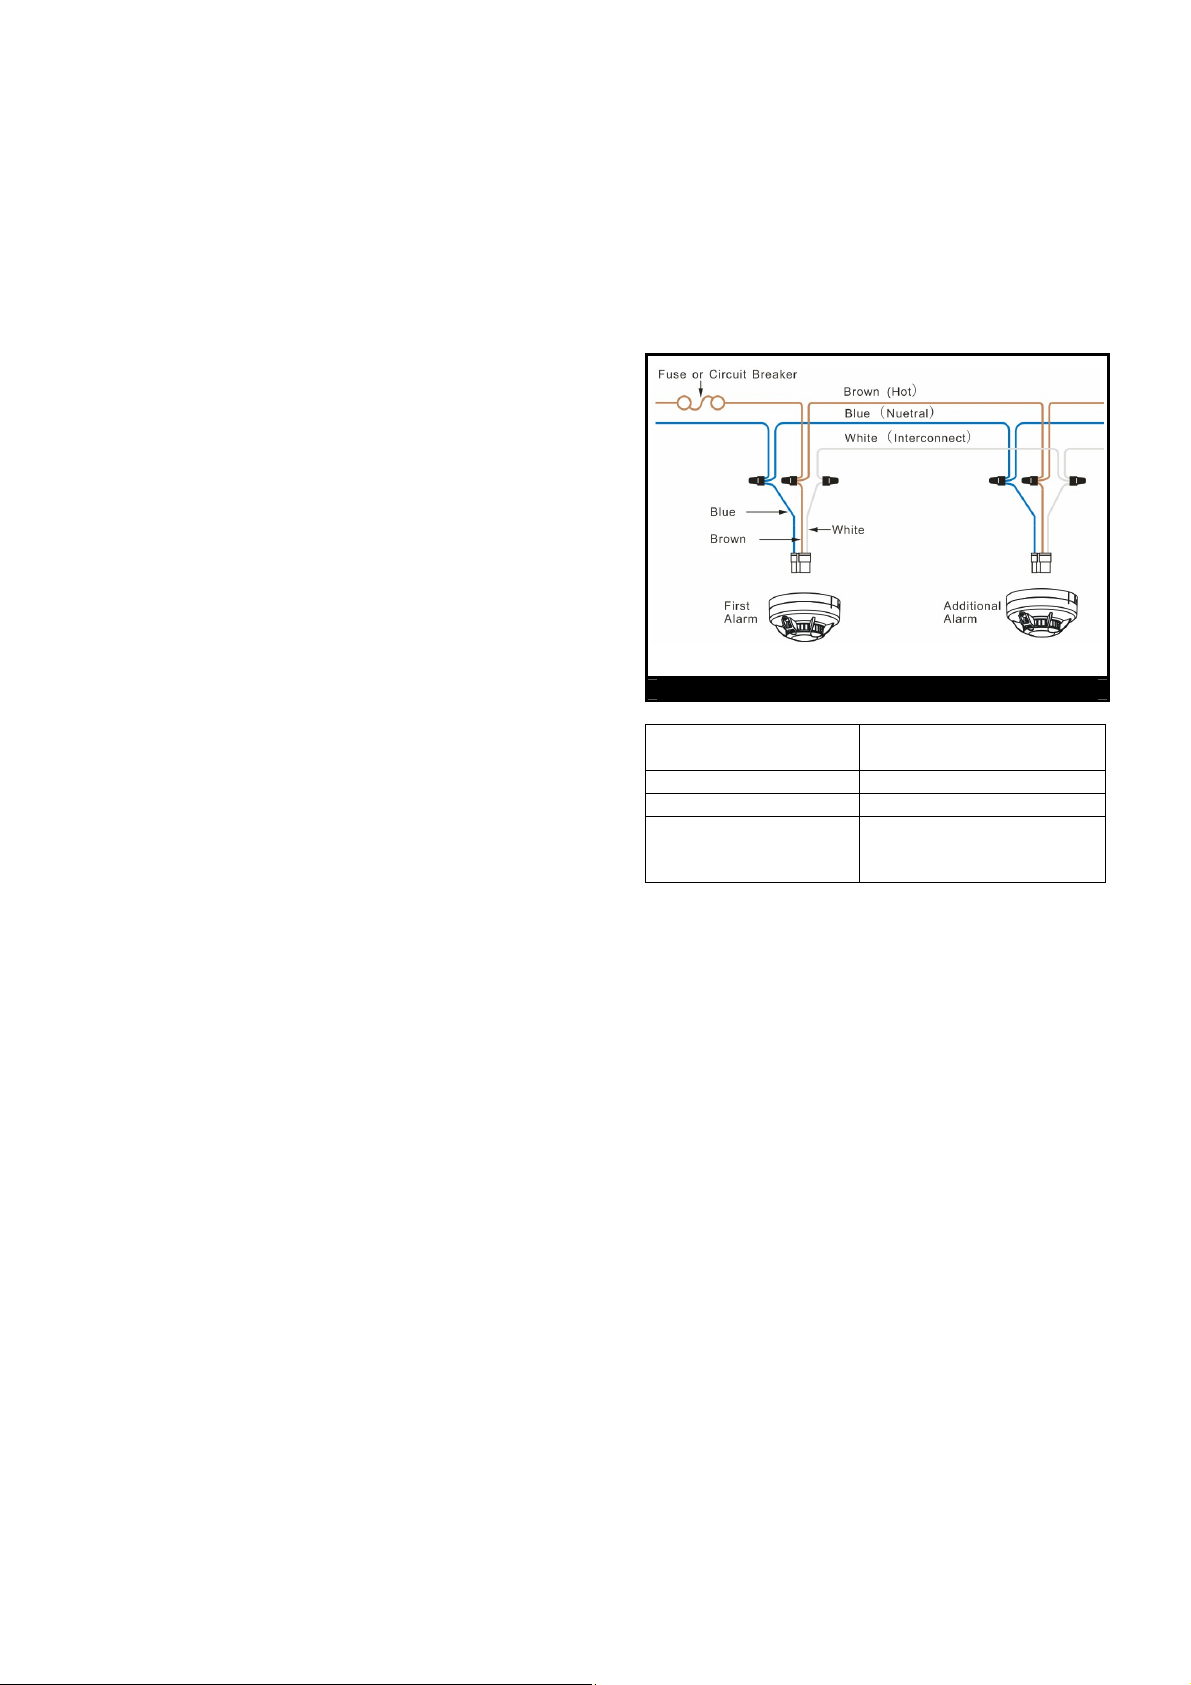
• Figure 1 illustrates interconnection wiring. Improper
connection will result in damage to the alarm, failure to
operate, or a shock hazard.
• Make certain alarms are wired to a continuous
(non-switched) power line. NOTE: Use standard UL listed
household wire (18 gauge or larger as required by local
codes) available at all electrical supply stores and most
hardware stores.
FIGURE1 INTERCONNECT WIRING DIAGRAM
WIRES ON
DETECTOR HARNESS
Brown Hot Side of A.C. Line
Blue Neutral Side of A.C. Line
White
CONNECTED TO
Interconnect Lines (Red
Wires) of Other Units in the
Multiple Station Set up
BATTERY INSTALLATION
See MAINTENANCE (Section 6) for battery installation.
MOUNTING INSTRUCTIONS
1. Hold base firmly and twist the detector counterclockwise
to separate it from the base.
2. After selecting the proper smoke alarm location as
described in Section 1 and wiring the A.C. QUICK
CONNECT harness as described in the WIRING
INSTRUCTIONS, attach the detector base to the electrical
box (see Figure 2).
3. Use a screwdriver to punch out only the pair of holes in
the base that match your type of electrical box or plaster
ring. Mount the base to the electrical box, using the
appropriate holes.
4. Pull the A.C. QUICK CONNECTOR through the center
hole in the base and mount the base, making sure that the
mounting screws are positioned in the small ends of the
keyholes before tightening the screws (see Figure 2).
5. Plug the A.C. QUICK CONNECTOR into the back of the
alarm (see Figure 3), making sure that the locks on the
connector snap into place. Then push the excess wire back
into the electrical box through the hole in the center of the
base.
6. If you have finished all the WIRING, BATTERY
INSTALLATION AND BASE MOUNTING STEPS, you can
install the alarm on the base. Alignment marks are provided
DG333Manual Page 3 of 6 © 2008 CONVOY SECURITY
Page 4
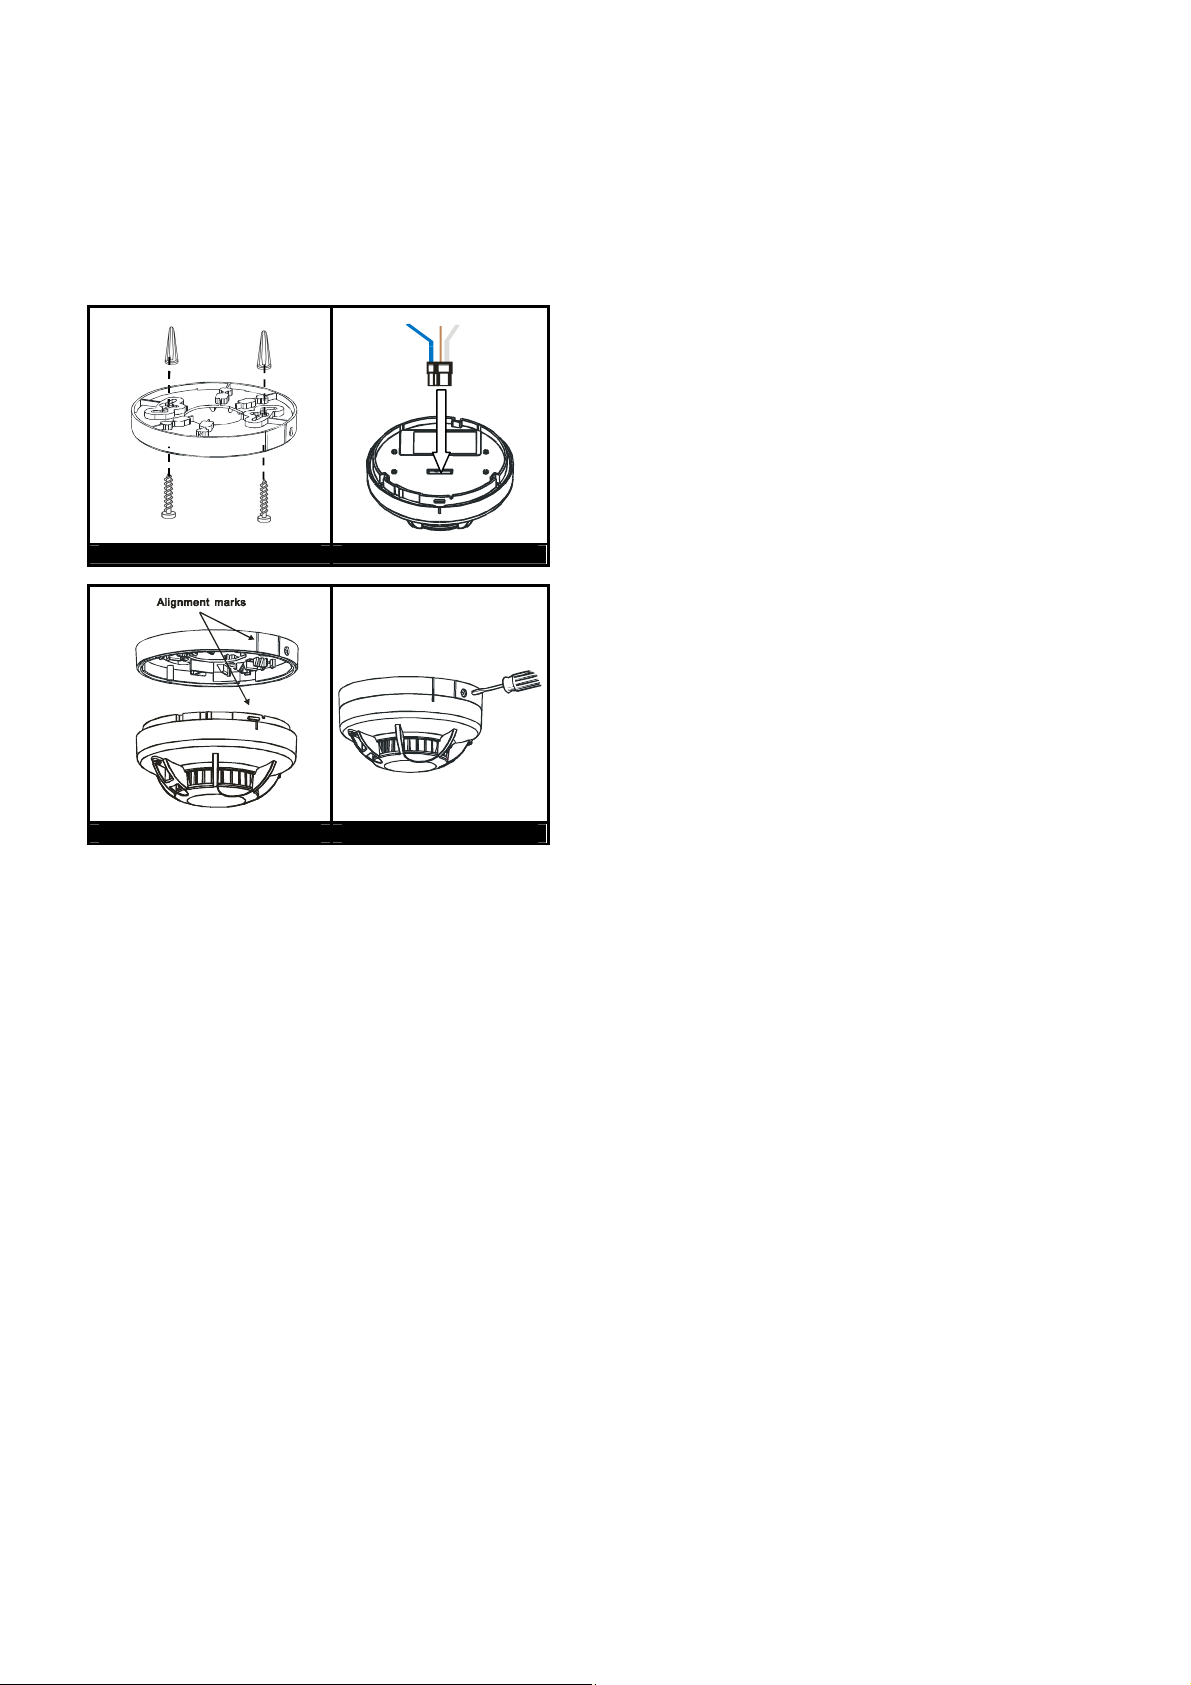
on the side of the alarm and on the base (see Figure 4).
7. Attach the Smoke Alarm to the base. Line up the guides
on the alarm’s base with the guides on the base. When
guides are lined up, turn the base clockwise (right) until it
snaps into place.
8. Turn on the A.C. power. The green A.C. Power On
Indicator should be lit when the alarm is operating from A.C.
power.
FIGURE 2 FIGURE 3
FIGURE 4 FIGURE 5
After installation, TEST your alarm by pressing and holding
the test button for several seconds, or by blowing smoke
into the alarm. This should sound the alarm.
CAUTION! Early warning fire detection is best achieved by
the installation of fire detection equipment in all rooms and
areas of the household as follows: A smoke alarm installed
in each separate sleeping area (in the vicinity of - but
outside of the bedroom), and heat or smoke alarms in the
living room, dining room, kitchen, hallways, attic, furnace
room, closets, utility storage room, basement, and
attached garage.
4. OPERATION AND TESTING
OPERATION: The smoke alarm is operating once A.C.
power is applied, fresh batteries are installed and testing is
complete. When the smoke alarm’s photoelectric chamber
senses products of combustion, the horn will sound a loud
(85db) pulsing alarm until the sensing chamber is cleared
of smoke particles.
FLASHING LED LIGHT: This smoke alarm is equipped
with a flashing red indicator LED. The LED has three
modes of operation.
Standby Condition The red LED will flash every 30-40
seconds to indicate that the smoke alarm is operating
properly.
Alarm Condition When the alarm senses products of
combustion and goes into alarm, the red LED will flash
rapidly (2-3 times per second). The rapid flashing LED and
pulsating alarm will continue until the air is cleared.
Low Battery Condition The LED flash will be accompanied
by an audible chirp. Replace the battery when this condition
occurs.
SMOKE SENSING CHAMBER OPERATION: This alarm
will “chirp” if any of the components in the smoke sensing
chamber fail. This chirp will occur between the flashes of
the red LED indicator light. (If the chirp occurs at the same
time as the red LED flash, see Section 6 for low battery
information.)
WHEN UNITS ARE INTERCONNECTED, only the red LED
of the unit which senses the smoke or is being tested (the
originating unit) will flash rapidly. All other units in the
interconnect system will sound an alarm but their red LED’s
will NOT flash rapidly.
TESTING: Test by pushing the test button on the cover and
hold it down for a minimum of 5 seconds. This will sound
the alarm if all the electronic circuitry, horn and battery are
working. If no alarm sounds, check the fuse or circuit
breaker supplying power to the alarm circuit. If the alarm
still does not sound, the unit has defective batteries or other
failure. You can also test the alarm by blowing smoke into it.
TEST THE ALARM WEEKLY TO ENSURE PROPER
OPERATION. Erratic or low sound coming from your alarm
may indicate a defective alarm, and it should be returned for
service (see Section 11).
5. NUISANCE ALARMS
Smoke alarms are designed to minimize nuisance alarms.
Cigarette smoke will not normally set off the alarm, unless
the smoke is blown directly into the alarm. Combustion
particles from cooking may set off the alarm if the alarm is
located close to the cooking area. Large quantities of
combustible particles are generated from spills or when
broiling. Using the fan on a range hood which vents to the
outside (non-recirculating type) will also help remove these
combustible products from the kitchen.
If the alarm does sound, check for fires first. If a fire is
discovered, get out and call the fire department. If no fire is
present, check to see if one of the reasons listed in Section
2 may have caused the alarm.
6. MAINTENANCE
BATTERY REPLACEMENT
To replace the battery, remove the alarm from the mounting
bracket by rotating the alarm counterclockwise.
This smoke alarm uses a 9V carbon zinc back up battery
(alkaline and lithium batteries may also be used). A fresh
battery should last for one year under normal operating
conditions.
This alarm has a low/missing battery monitor circuit which
will cause the alarm to “chirp” approximately every 30-40
seconds for a minimum of seven (7) days when the battery
gets low. Replace the battery when this condition occurs.
Replace the battery when this condition occurs.
DG333Manual Page 4 of 6 © 2008 CONVOY SECURITY
Page 5

FIGURE 6
CLEANING YOUR ALARM
To clean your alarm, remove it from the mounting bracket
as outlined in the beginning of this section. You can clean
your alarm by using compressed air or your vacuum
cleaner hose to blow or suck air through the openings
around the perimeter of the alarm. The outside of the alarm
can be wiped with a damp cloth.
After cleaning, reinstall your alarm. Test your alarm by
using the test button.
7. LIMITATIONS OF SMOKE ALARMS
WARNING:
PLEASE READ CAREFULLY AND THOROUGHLY.
Smoke alarms are devices that can provide early warning
of possible fires at a reasonable cost; however, alarms
have sensing limitations. Ionization type alarms offer a
broad range of fire sensing capabilities but are better at
detecting fast flaming fires than slow smoldering fires.
Photoelectric alarms sense smoldering fires better than
flaming fires. Home fires develop in different ways and are
often unpredictable.
Neither type of alarm (photoelectric or ionization) is always
best, and a given alarm may not always provide warning of
a fire.
• A battery powered alarm must have a battery of the
specified type, in good condition and installed properly.
• A.C. powered alarms will not operate if the A.C. power
has been cut off, such as by an electrical fire or an open
fuse.
• Smoke alarms must be tested regularly to make sure the
batteries and the alarm circuits are in good operating
condition.
• Smoke alarms cannot provide an alarm if smoke does
not reach the alarm. Therefore, smoke alarms may not
sense fires starting in chimneys, walls, on roofs, on the
other side of a closed door or on a different floor.
• If the alarm is located outside the bedroom or on a
different floor, it may not wake up a sound sleeper.
• The use of alcohol or drugs may also impair one’s ability
to hear the smoke alarm. For maximum protection, a
smoke alarm should be installed in each sleeping area on
every level of a home.
• Although smoke alarms can help save lives by providing
an early warning of a fire, they are not a substitute for an
insurance policy. Home owners and renters should have
adequate insurance to protect their lives and property.
8. GOOD SAFETY HABITS
DEVELOP AND PRACTICE A PLAN OF ESCAPE
• Make a floor plan indicating all doors and windows and at
least two (2) escape routes from each room. Second story
windows may need a rope or chain ladder.
• Have a family meeting and discuss your escape plan,
showing everyone what to do in case of fire.
• Determine a place outside your home where you all can
meet if a fire occurs.
• Familiarize everyone with the sound of the smoke alarm
and train them to leave your home when they hear it.
• Practice a fire drill at least every six months. Practice
allows you to test your plan before an emergency. You may
not be able to reach your children. It is important they know
what to do.
WHAT TO DO WHEN THE ALARM SOUNDS
• Leave immediately by your escape plan. Every second
counts, so don’t waste time getting dressed or picking up
valuables.
• In leaving, don’t open any inside door without first feeling
its surface. If hot, or if you see smoke seeping through
cracks, don’t open that door! Instead, use your alternate exit.
If the inside of the door is cool, place your shoulder against
it, open it slightly and be ready to slam it shut if heat and
smoke rush in.
• Stay close to the floor if the air is smoky. Breathe
shallowly through a cloth, wet if possible.
• Once outside, go to your selected meeting place and
make sure everyone is there.
• Call the fire department from your neighbor’s home - not
from yours!
• Don’t return to your home until the fire officials say that it
is all right to do so.
There are situations where a smoke alarm may not be
effective to protect against fire as stated in the NFPA
Standard 72. For instance:
a) smoking in bed
b) leaving children home alone
c) cleaning with flammable liquids, such as gasoline
Further information on fire safety can be obtained in a
pamphlet titled “IN A FIRE SECONDS COUNT” published
by the NFPA, Batterymarch Park, Quincy, MA 02269
9. NFPA REQUIRED PROTECTION
The National Fire Protection Association’s Standard 72
reads as follows:
2-2.1.1.1 Smoke alarms shall be installed outside each
separate sleeping area in the immediate vicinity of the
bedrooms and on each additional story of the family living
unit, including basements and excluding crawl spaces and
unfinished attics. In new construction, a smoke alarm shall
be installed in each sleeping room.
A-2.5.2.1 Smoke Detection - Are More Smoke Detectors
Desirable? The required number of smoke alarms might not
provide reliable early warning protection for those areas
separated by a door from the areas protected by the
required smoke alarms.
For this reason, it is recommended that the householder
consider the use of additional smoke alarms for those areas
for increased protection. The additional areas include the
basement, bedrooms, dining room, furnace room, utility
room, and hallways not protected by the required smoke
alarms. The installation of the smoke alarms in the kitchen,
attic (finished or unfinished), or garage is normally not
DG333Manual Page 5 of 6 © 2008 CONVOY SECURITY
Page 6

recommended, as these locations occasionally experience
conditions that can result in improper operation.
This equipment should be installed in accordance with the
National Fire Protection Association’s Standard 72 (NFPA,
Batterymarch Park, Quincy, MA 02269).
NOTIFY YOUR LOCAL FIRE DEPARTMENT AND
INSURANCE COMPANY OF YOUR SMOKE ALARM
INSTALLATION.
10. SERVICE AND WARRANTY
If after reviewing this manual you feel that your smoke
alarm is defective in any way, do not tamper with the unit.
Return it for servicing to: Convoy Security. (See Warranty
for in-warranty returns)
FIVE YEAR LIMITED WARRANTY
Convoy Security warrants to the original purchaser
that the enclosed smoke alarm (but not the battery) will
be free from defects in material and workmanship or
design under normal use and service for a period of
five years from the date of purchase. The obligation of
Convoy Security under this warranty is limited to
repairing or replacing the smoke alarm or any part
which we find to be defective in material, workmanship
or design, free of charge to the customer, upon
sending the smoke alarm with proof of date of
purchase, postage and return postage prepaid, to
Warranty Service Department, Convoy Security.
This warranty shall not apply to the smoke alarm if it
has been damaged, modified, abused or altered after
the date of purchase or if it fails to operate due to
improper maintenance or inadequate A.C. or D.C.
electrical power.
THE LIABILITY OF CONVOY SECURITY OR ANY OF
ITS PARENT OR SUBSIDIARY CORPORATIONS
ARISING FROM THE SALE OF THIS SMOKE ALARM
OR UNDER THE TERMS OF THIS LIMITED
WARRANTY SHALL NOT IN ANY CASE EXCEED
THE COST OF REPLACEMENT OF SMOKE ALARM
AND, IN NO CASE, SHALL CONVOY SECURITY
OR ANY OF ITS PARENT OR SUBSIDIARY
CORPORATIONS BE LIABLE FOR
CONSEQUENTIAL LOSS OR DAMAGES
RESULTING FROM THE FAILURE OF THE SMOKE
ALARM OR FOR BREACH OF THIS OR ANY OTHER
WARRANTY, EXPRESS OR IMPLIED, EVEN IF
THE LOSS OR DAMAGE IS CAUSED BY THE
COMPANY’S NEGLIGENCE OR FAULT.
Since some states do not allow limitations on the
duration of an implied warranty or do not allow the
exclusion or limitation of incidental or consequential
damages, the above limitations or exclusions may not
apply to you.
While this warranty gives you specific legal rights, you
may also have other rights which vary from state to
state.
Also, Convoy Security makes no warranty, express or
implied, written or oral, including that of
merchantability or fitness for any particular purpose,
with respect to the battery.
The above warranty may not be altered except in
writing signed by both parties hereto.
DG333Manual Page 6 of 6 © 2008 CONVOY SECURITY
 Loading...