

Page 1

Convey™ HC-1EX Server Quick Start
Guide
January 2012
Version 1.3
900-000017-000
Convey ComputerTM Corporation 2011
All Rights Reserved.
1302 East Collins
Richardson, TX 75081
Convey HC-1EX Server Quick Start Guide v1.3
Page 2

THE INFORMATION CONTAINED IN THIS DOCUMENT IS THE PROPRIETARY AND
CONFIDENTIAL INFORMATION OF THE CONVEY COMPUTER CORPORATION. YOU MAY
NOT DISCLOSE, PROVIDE OR MAKE AVAILABLE THIS DOCUMENT, OR ANY
INFORMATION CONTAINED IN THIS DOCUMENT, TO ANY THIRD PARTY, WITHOUT THE
PRIOR WRITTEN CONSENT OF CONVEY COMPUTER CORPORATION.
The Information in this document is provided for use with Convey Computer Corporation
(“Convey”) products. No license, express or implied, to any intellectual property associated with
this document or such products is granted by this document.
All products described in this document whose name is prefaced by “Convey” or “Convey
enhanced “ (“Convey products”) are owned by Convey Computer Corporation (or those
companies that have licensed technology to Convey) and are protected by patents, trade secrets,
copyrights or other industrial property rights.
The Convey products described in this document may still be in development. The final form of
each product and release date thereof is at the sole and absolute discretion of Convey. Your
purchase, license and/or use of Convey products shall be subject to Convey’s then current sales
terms and conditions.
Trademarks
The following are trademarks of Convey Computer Corporation in the United States and other
countries:
Convey Computer
The Convey Logo
Convey HC-1EX
Trademarks of other companies
Intel is a registered trademark of Intel Corporation
Adobe and Adobe Reader are registered trademarks of Adobe Systems Incorporated
Linux is a registered trademark of Linus Torvalds
Convey HC-1EX Server Quick Start Guide v1.3 ii
Page 3

Revisions
Version
Description
1.0
1.1
July 2010 Original printing.
Unreleased
1.2
April 2011. Update rack mount details and other clarifications
1.3
January 2012. Clarify power connections
Convey HC-1EX Server Quick Start Guide v1.3 iii
Page 4

Preface
Intended Audience
This manual is written for users who are responsible for initial setup, power on and quick
validation of the server system. This document provides basic information, and is not
intended to be the source for in-depth system understanding or troubleshooting. The
latest revision of this document is always available at www.conveycomputer.com .
Manual Organization
Chapter 1 provides a quick start checklist to guide the experienced user through the
installation process.
Chapter 2 provides more details and illustrations of steps in the installation and setup
process.
Chapter 3 provides a brief overview of the server system. In this chapter, you will find a
list of the server system features, overview of specifications, illustrations of the product,
and product diagrams to help you identify components and their locations.
Chapter 4 provides a list of reference resources. In this chapter you will find a list of
technical documents that give additional details on the Convey™ HC-1EX and the
location where they can be found.
Convey HC-1EX Server Quick Start Guide v1.3 iv
Page 5

Safety Information
Important Safety Instructions
Read all caution and safety statements in this document before performing any of the
instructions. See also Convey Server Safety Information on the Intel® Server Deployment
Toolkit 2.0 CD and/or at
http://support.intel.com/support/ motherboards/server/sb/cs-010770.htm.
Warnings
Heed safety instructions: Before working with your server product, whether you are
using this guide or any other resource as a reference, pay close attention to the safety
instructions. You must adhere to the assembly instructions in this guide to ensure and
maintain compliance with existing product certifications and approvals. Use only the
described, regulated components specified in this guide. Use of other products /
components will void the UL listing and other regulatory approvals of the product and will
most likely result in noncompliance with product regulations in the region(s) in which the
product is sold.
System power on/off: The power button DOES NOT turn off the system AC power. To
remove power from system, you must unplug BOTH AC power cords from the wall outlet.
Make sure the AC power cords are unplugged before you open the chassis, add, or
remove any components.
Hazardous conditions, devices and cables: Hazardous electrical conditions may be
present on power, telephone, and communication cables. Turn off the server and
disconnect the power cord, telecommunications systems, networks, and modems
attached to the server before opening it. Otherwise, personal injury or equipment damage
can result.
Convey HC-1EX Server Quick Start Guide v1.3 v
Page 6

Table of Contents
Preface iv
Intended Audience iv
Manual Organization iv
Safety Information v
Important Safety Instructions v
Table of Contents vi
List of Figures viii
List of Tables ix
1 Quick Start Checklist 1
2 Installation and Setup 3
2.1 At Delivery 3
2.2 Unpacking 3
2.3 Convey Server HC-1EX Contents 3
2.4 Rack Mount Usage 4
2.5 Desktop Usage 7
2.6 Power 7
2.7 Power On 7
3 Server System Features 8
3.1 Feature Summary 8
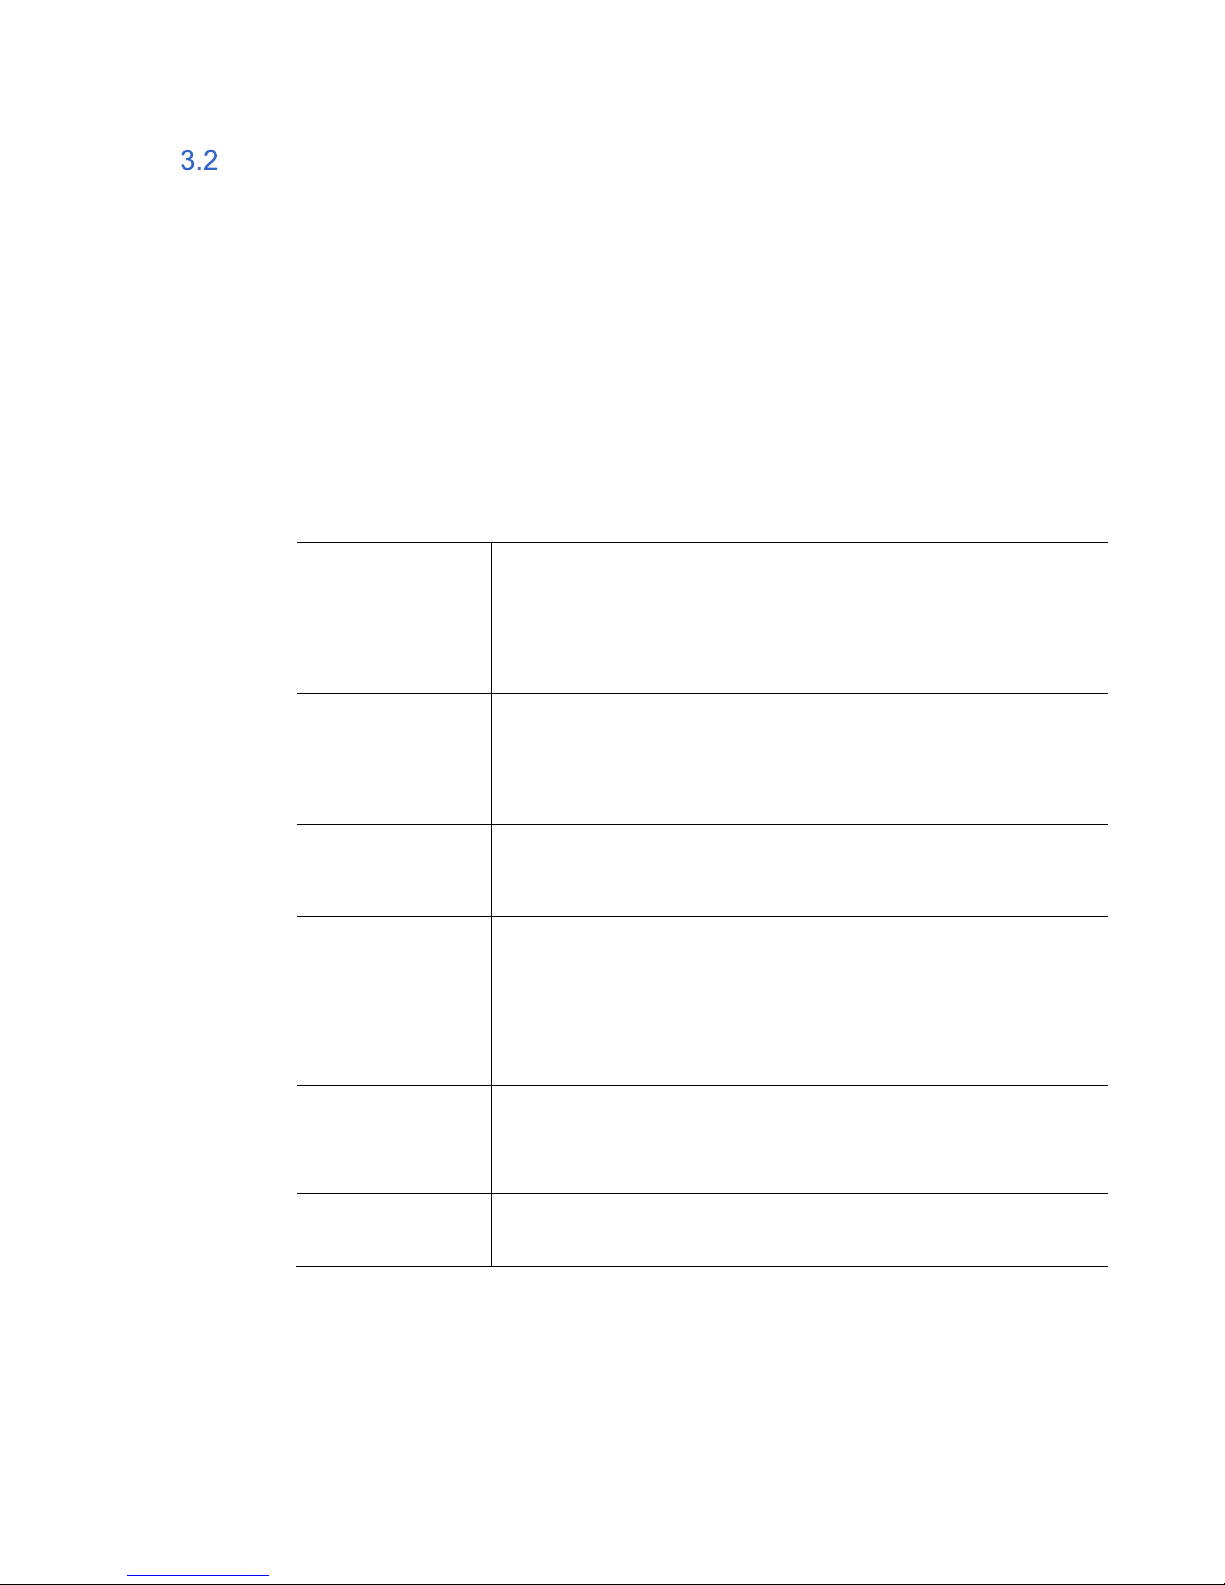
3.2 Quick
3.2.1 600W Single Power Supply Input (Lower) 11
3.2.2 700W Single Power Supply Input (Upper) 11
3.2.3 System Environmental Specifications 11
3.3 Back of Server System 12
3.3.1 Features on Back of Server System 12
3.3.2 Back Panel Connectors 13
3.4 Front of Server System 14
3.4.1 Standard Control Panel 14
3.4.2 Peripheral Devices 16
3.4.3 Hard Disk Drives 17
3.4.4 Slimline Optical Drive 17
4 Server System References 18
Technical
Reference
11
Convey HC-1EX Server Quick Start Guide v1.3 vi
Page 7

Convey HC-1EX Server Quick Start Guide v1.3 vii
Page 8

List of Figures
Figure 1 Slide Mounting 5
Figure 2 System Mounting to Slides 6
Figure 3 Convey HC-1EX Server System 8
Figure 4 Server System Rear View 12
Figure 5 Back Panel Connectors 13
Figure 6 Standard Control Panel 15
Figure 7 Optional Peripherals 17
Convey HC-1EX Server Quick Start Guide v1.3 viii
Page 9

List of Tables
Table 1 Convey Server System HC-1EX Feature Summary 9
Table 2 System Environmental Specifications 11
Table 3 NIC LED Descriptions 13
Table 4 Lower Chassis Power Supply LED Description 14
Table 5 Upper Chassis Power Supply LED Description 14
Table 6 Server System References 18
Convey HC-1EX Server Quick Start Guide v1.3 ix
Page 10

1 Quick Start Checklist
This section provides a concise list of steps to get your Convey HC-1EX system installed
and running. Details related to each step are provided in the following sections.
1. At delivery, check for shipping damage. In a multi-system shipment, check each
server box. Section 2.1 includes instructions for handling shipping damage.
2. Open the box, remove the foam packing inserts and lift the system out of the box.
Two person lift is recommended as the unit’s total weight may exceed 25 kg.
3. If rack mounting, attach the slide rails to the rack, extend the rails, mount the
Convey server in the rails, push the chassis into position in the rack and secure it
using the mounting brackets. See section 2.4 for details and illustrations. See
section 2.3 for desktop usage instructions.
4. Connect the two AC power cords provided to a power source appropriate for your
location. The default configuration is for North American power cords at 115
VAC. Note that there are two independent power supplies which must both be
connected to the same power circuit.
5. As soon as AC power is applied the system status LED will blink for a few
seconds, followed by the blue system identification LED blinking for up to two
minutes. Note that server cooling fans will start up when AC power is applied.
Do not turn on server power until a console is set up, as described in the next
steps.
6. If the system includes the optional Remote Management Module (RMM2),
connect it to your management network. Use the psetup utility to configure the
RMM2 including IP address, user name and password. The RMM2 MAC
address is printed on a label on the system rear panel near the RMM2 network
interface connector.
7. If not using the optional RMM2, or if a physical console is desired, connect an
external monitor, PS2 or USB keyboard and PS2 or USB mouse to the
connectors on the rear of the system or on the front panel. See sections 3.3 and
3.4 for locations of indicators and connectors.
8. Connect the server to your network(s), if desired, using the RJ45 connectors on
the rear panel.
9. If a serial console is desired, connect it to the RJ45 connector on the rear panel.
10. After the blue system identification LED stops blinking it is safe to power on the
server. Turn on server power using the power button on the front panel, or via
the RMM2 power-on controls. After the server runs through its Power-On Self
Test, you should see startup messages on the console from the BIOS and
operating system boot. Note that there is a delay of about 40 seconds between
turning on server power and the first output to the VGA console.
11. Attach the front bezel if desired.
12. The operating system comes up in the first-boot configuration utility. Follow the
on-screen instructions to configure your networks, assign root password, and set
up initial user accounts if desired. Note that the RMM or a physical keyboard,
mouse and monitor are required for this step.
Convey HC-1EX Server Quick Start Guide v1.3 1
Page 11

13. From the shell, run the /opt/convey/bin/cnyinfo command to verify that the
Convey CoProcessor is configured. If the CoProcessor is not available, contact
Convey support for assistance.
14. Finish any system administration tasks such as adding user accounts,
configuring network security policies, mounting file systems, etc. See the
Convey System Administrator’s Guide for details.
15. Your Convey HC-1EX server is now ready to use. A suggested first step is to
compile and execute one or more sample programs provided in
/opt/convey/examples/ applicable for your CoProcessor personality or
personalities.
Convey HC-1EX Server Quick Start Guide v1.3 2
Page 12

2 Installation and Setup
This chapter gives information on the unpacking, installation and basic setup of the
Convey HC-1EX Server System.
At Delivery 2.1
Each HC-1EX Server System comes packaged in its own corrugated box. Confirm that
the box is undamaged before releasing the freight carrier. Note any other damage on the
shipping documentation. If the system is damaged, contact Convey support.
In larger systems, more than one system may be packaged on a pallet, and it is always
best to inspect each box for damage.
Depending upon the exact configuration of the system, multiple boxes may be required to
complete the delivery of all components. The total quantity of boxes should be clearly
identified in the shipping documentation, so confirm that all boxes have been delivered
prior to releasing the freight carrier.
Unpacking 2.2
Carefully open the upper flaps of the Convey HC-1EX shipping container. The unit may
be removed by pulling the foam packing inserts on the top. The unit may then be lifted
out of the box.
Use caution in lifting since the total weight of the unit may exceed 25Kg. Two person lift is
suggested.
Convey Server HC-1EX Contents 2.3
Your Convey System HC-1EX ships with the following items:
Intel® Server Board S5400SF, installed in the SR1560SFHS base server system
One 600 W power supply, installed in the base server subsystem
One 920 W power supply installed in the Convey CP subsystem
PCIe* riser card assembly, installed in the base server system (PCIe card
optional)
Optical drive tray assembly and filler panel (drive is optional)
Open-me-first envelope
Rack mount brackets
Slide pair
Standard control panel module installed in the base server system
One Hot swap Drive assembly (size optional)
Two hot-swap drive trays and drive filler blanks (population and size optional)
System fan assembly, including five dual-rotor fans, installed in the base server
system
Convey HC-1EX Server Quick Start Guide v1.3 3
Page 13

System fan assembly, including four dual-rotor fans, installed in Convey CP
section on a removable access panel.
Passive hot-swap disk backplane
Optional RMM2 module and NIC
Rack Mount Usage 2.4
The system ships with slide rails that accommodate cabinet mounting rail spacing from
24 to 30 inches. Cabinet mounting rails must include square hole mounts on ANSI/EIA310 spacing.
When installing the rails into the cabinet refer to Figure 2:
Compress the cabinet rail mount width-compensation slide to the minimum (24
inch dimension).
Install the rear mounts first and listen for the audible click to confirm they are
properly secured.
Install the front mount by extending the width-compensation slide until the front
mount clicks secure.
Test the slides by shaking them to confirm secure slide installation prior to
installing the system.
If a screw is desired to hold the slide, it must be a 10-32 with large washer.
Convey HC-1EX Server Quick Start Guide v1.3 4
Page 14
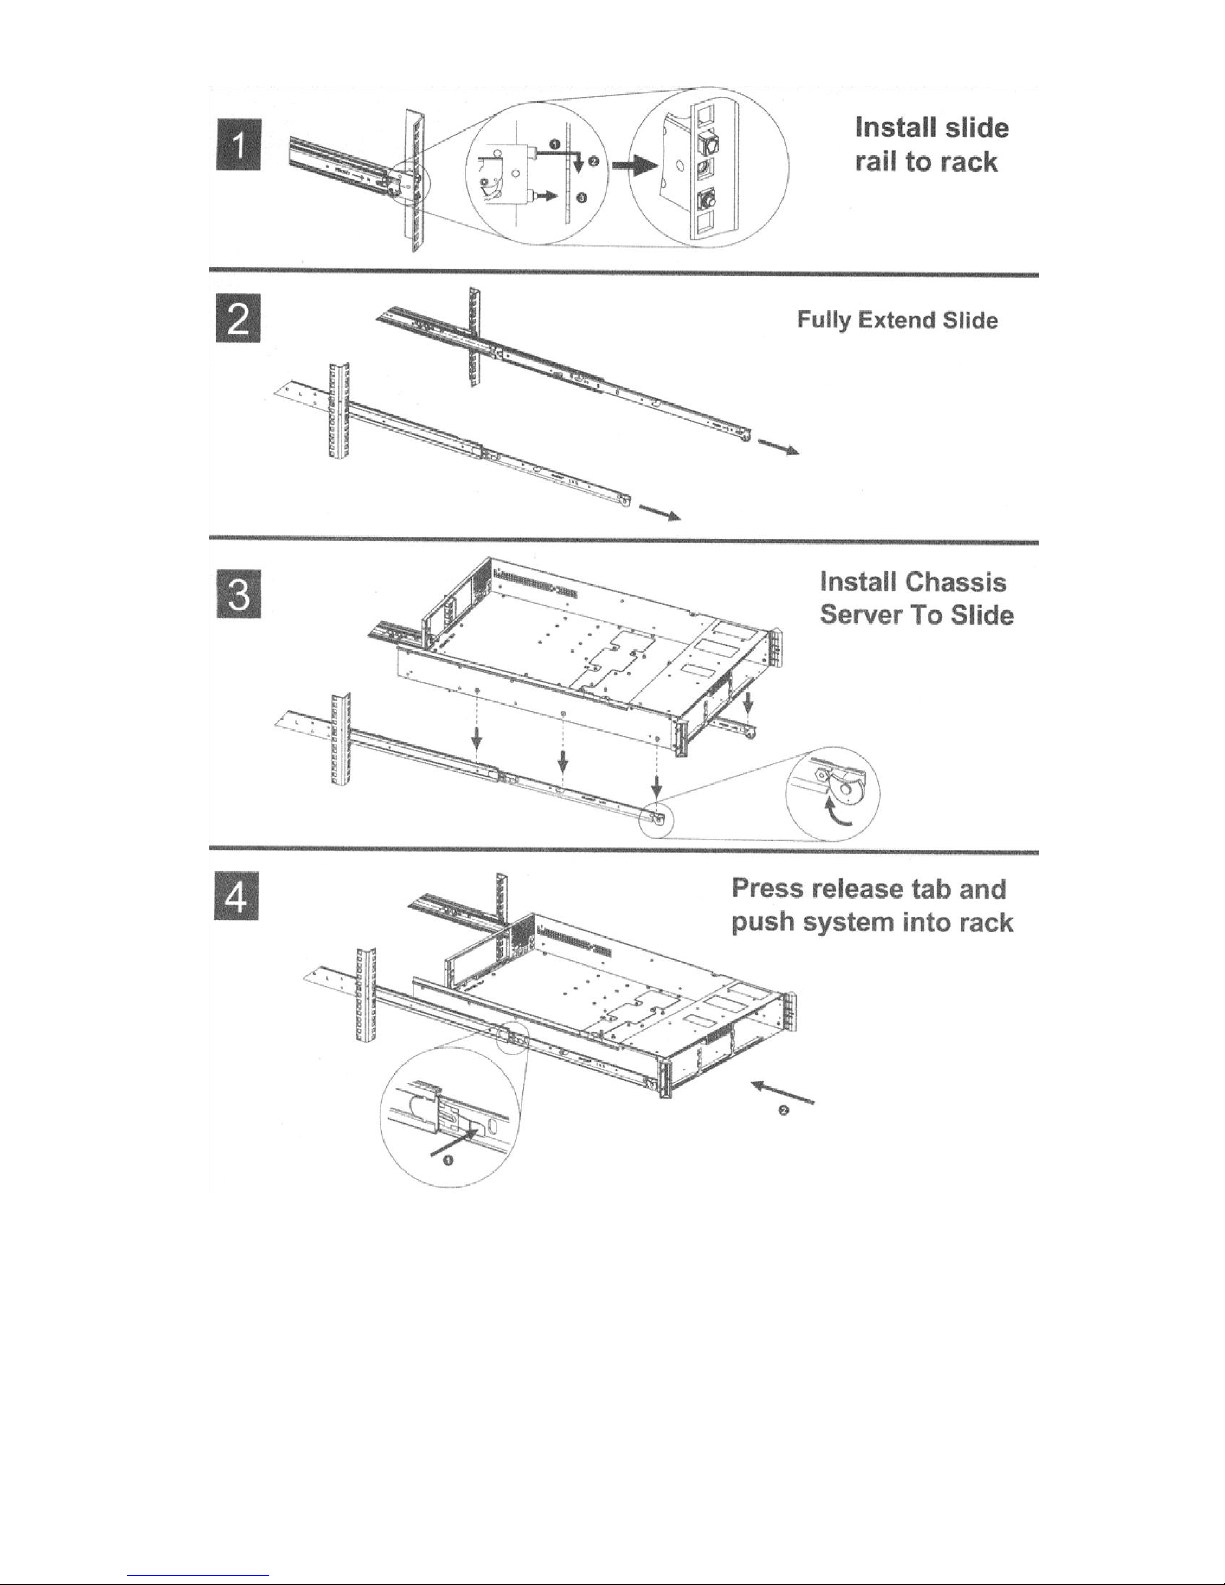
The slides are designed for quick installation and release of the HC-1EX system using
the following steps:
Extend the slides from the rack to their full length
Lift the HC-1EX chassis and support the front and rear ends
Use caution in lifting since the total weight of the unit may exceed 25Kg. Two
person lift is suggested.
Convey HC-1EX Server Quick Start Guide v1.3 5
Figure 1 Slide Mounting
Page 15
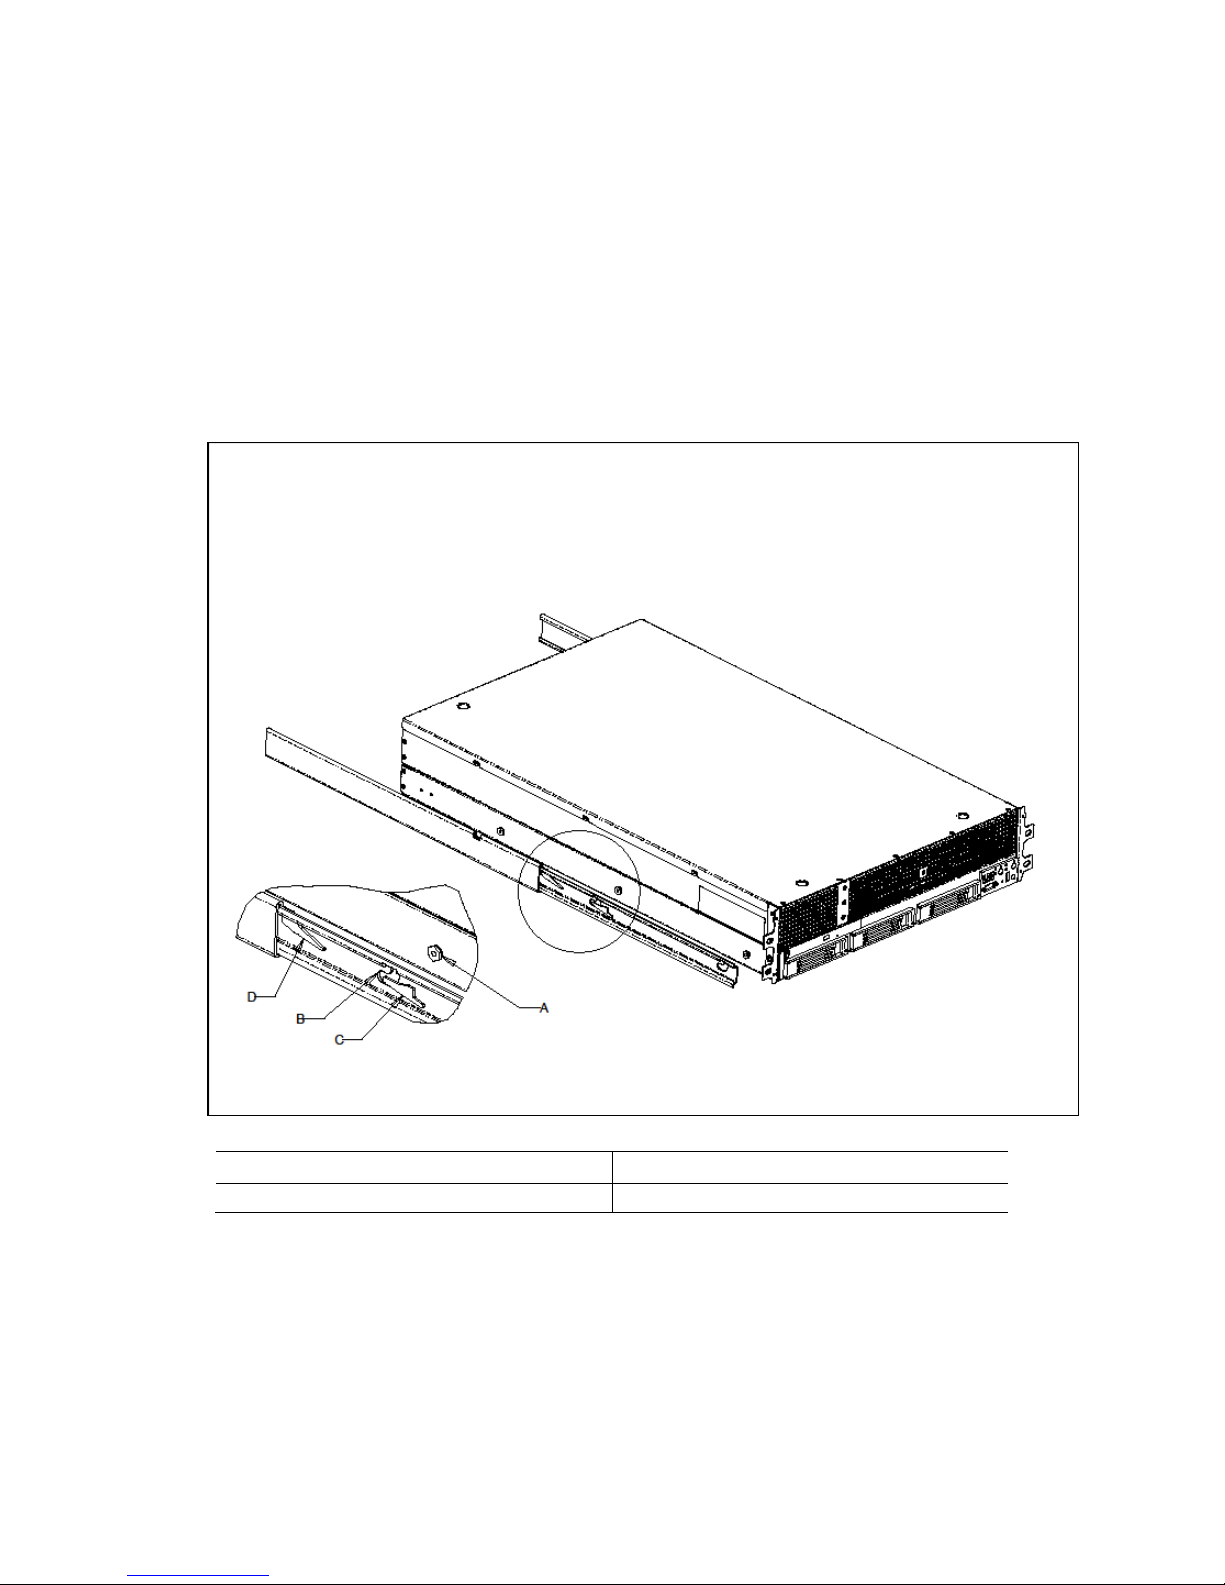
Move the HC-1EX chassis between the extended slides and position the 6
A. Mounting lugs
C. Mount retainer
B. Mounting slot
D. Slide extension latch
chassis mounting lugs (3 on each side) in line with the slots in the slides
Lower the chassis into the slots
Push the chassis slightly to the rear until the retainers click into the locked position
Push the chassis carefully into the cabinet.
Install one 10-32 screw into the lower hole of the system mounting brackets on
each side to retain the system in the rack.
Convey recommends you install systems from the bottom of the rack to the top. In other
words, install the first system in the rack into the bottom position of the rack, the second
system in the second position from the bottom, and so on. Instructions for installing your
chassis into a rack are included in each rack mount option kit.
Convey HC-1EX Server Quick Start Guide v1.3 6
Figure 2 System Mounting to Slides
Page 16

Desktop Usage 2.5
The Convey HC-1EX Server System is normally intended to be installed in a standard
equipment rack, however, it is understood that some applications will require the system
to be placed on a desktop. Please observe the following installation suggestions:
Consider a foam cushion beneath the server to reduce vibration and noise
coupling to the mounting surface
Consider placing the unit so that the air is exhausted away from any nearby users
The front mounting brackets are necessary to keep the top and bottom chassis
segments joined, and cannot be removed. If this is unacceptable, Convey offers
an alternate, flat bracket to reduce the size of the brackets.
Power 2.6
The Convey HC-1EX Server System consists has two power supplies, and consequently
two independent power cords. North American 115V cord sets are the default; however
the user is responsible for insuring that local codes are met by the power cords. The
power supplies may be run at 100-127/200-240 VAC 50-60 Hz, so confirm that the
default cords are appropriate to the application. Other options may be available from
Convey.
Because the power requirements are highly code-dependent, site preparation and peak
power allocations are hard to specify universally. For maximum headroom and flexibility,
Convey suggests a dedicated 15-amp 115 VAC service be allocated to each HC-1EX
Server System in a standalone installation.
Note that the two power cords do not provide redundant 2.7
power. As such, they should be connected to the same AC
power circuit.Power On
The Convey HC-1EX has a required power on sequence. If AC power is not switched to
both power cords, connect the lower chassis (host) power cord first, followed closely by
the upper chassis (coprocessor) power cord. After AC power is supplied, the host and
coprocessor management subsystems are initialized. The system status and System ID
LEDs on the Control Panel and rear of host chassis will blink during this initialization.
The system Power On button should be pressed only after the blue system ID LED stops
flashing. If the blue system ID LED does not flash after connecting the AC power cords,
wait a minimum of two minutes before powering on the system. Server fans will start up
during this time.
After turning on system power, the server runs through its Power-On Self Test, BIOS and
operating system boot messages are displayed on the VGA console. Note that there is a
delay of about 40 seconds between turning on server power and the first output to the
VGA console.
Installing Optional Hardware 2.8
To install any optional hardware not preconfigured in your system, see the Convey HC1EX Server System Service Guide.
Convey HC-1EX Server Quick Start Guide v1.3 7
Page 17
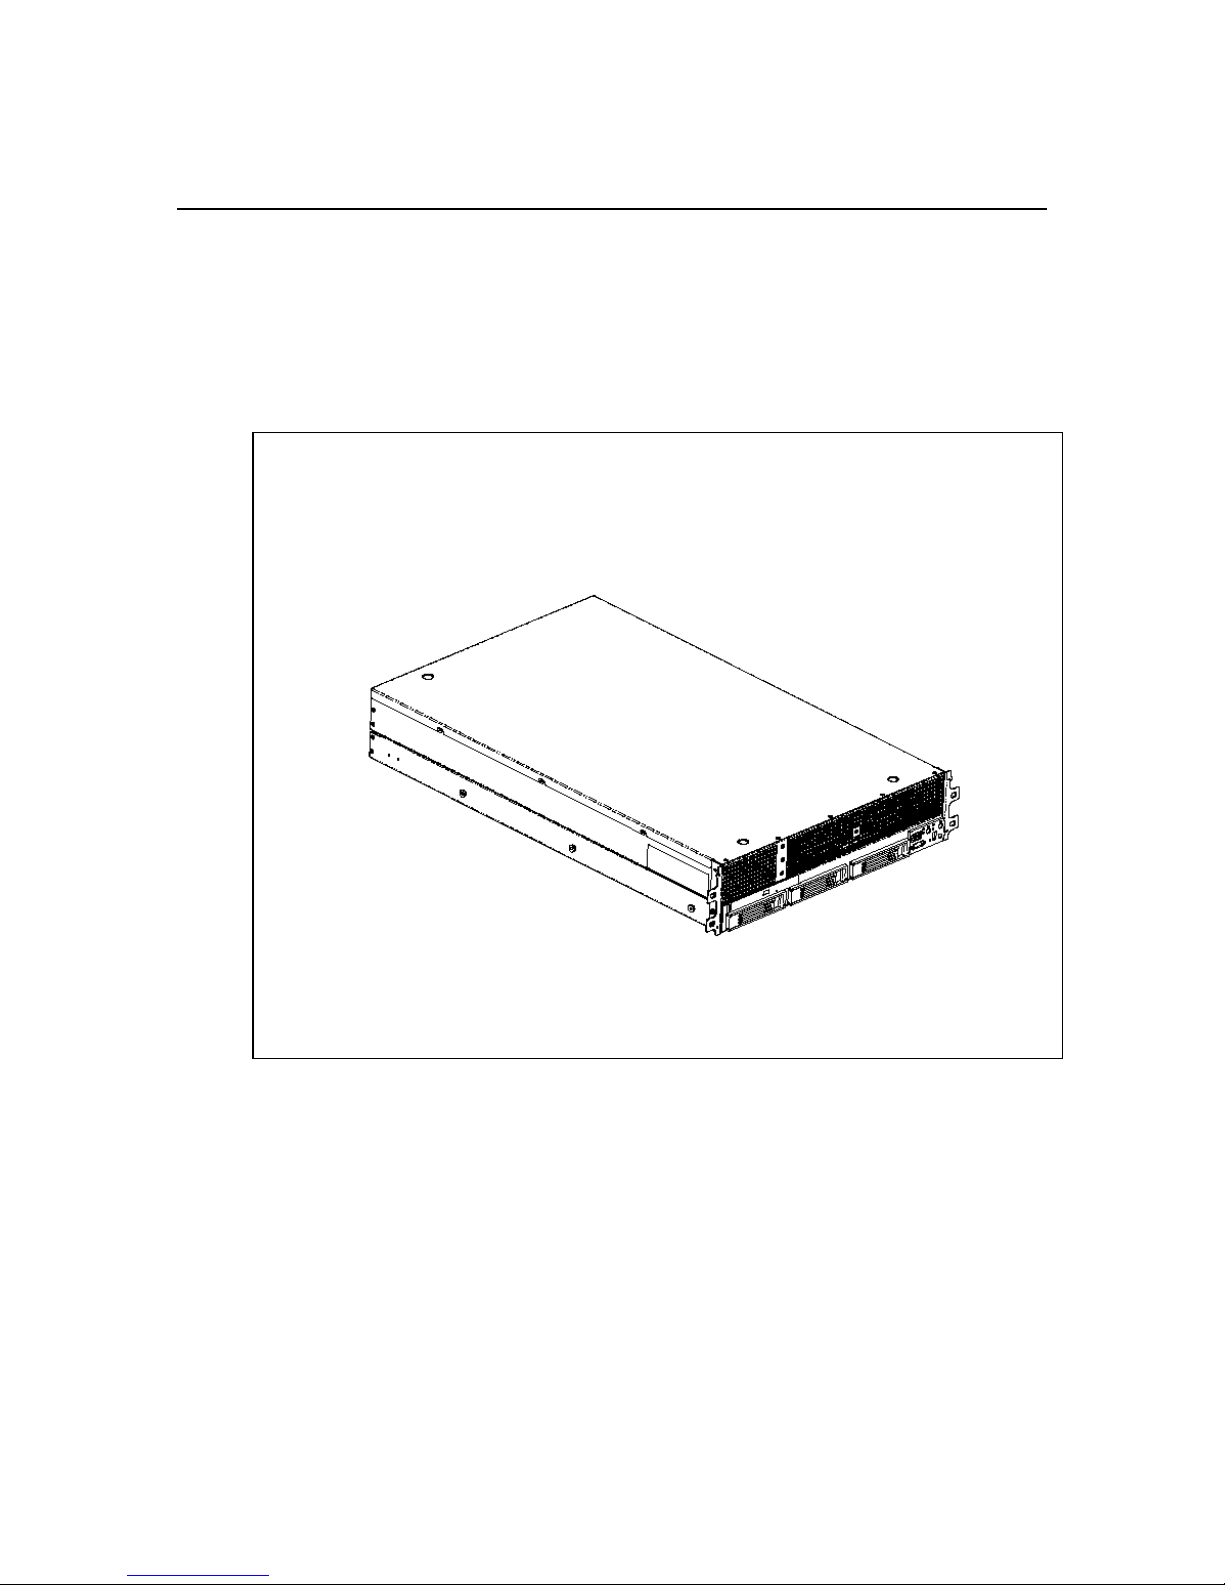
3 Server System Features
This chapter briefly describes the main features of the Convey HC-1EX Server System.
This chapter provides illustrations of the product, a list of the server system features, and
diagrams showing the location of important components and connections on the server
system.
Feature Summary
3.1
The following information provides a summary of the items found on the HC-1EX Server
System.
Convey HC-1EX Server Quick Start Guide v1.3 8
Figure 3 Convey HC-1EX Server System
Page 18
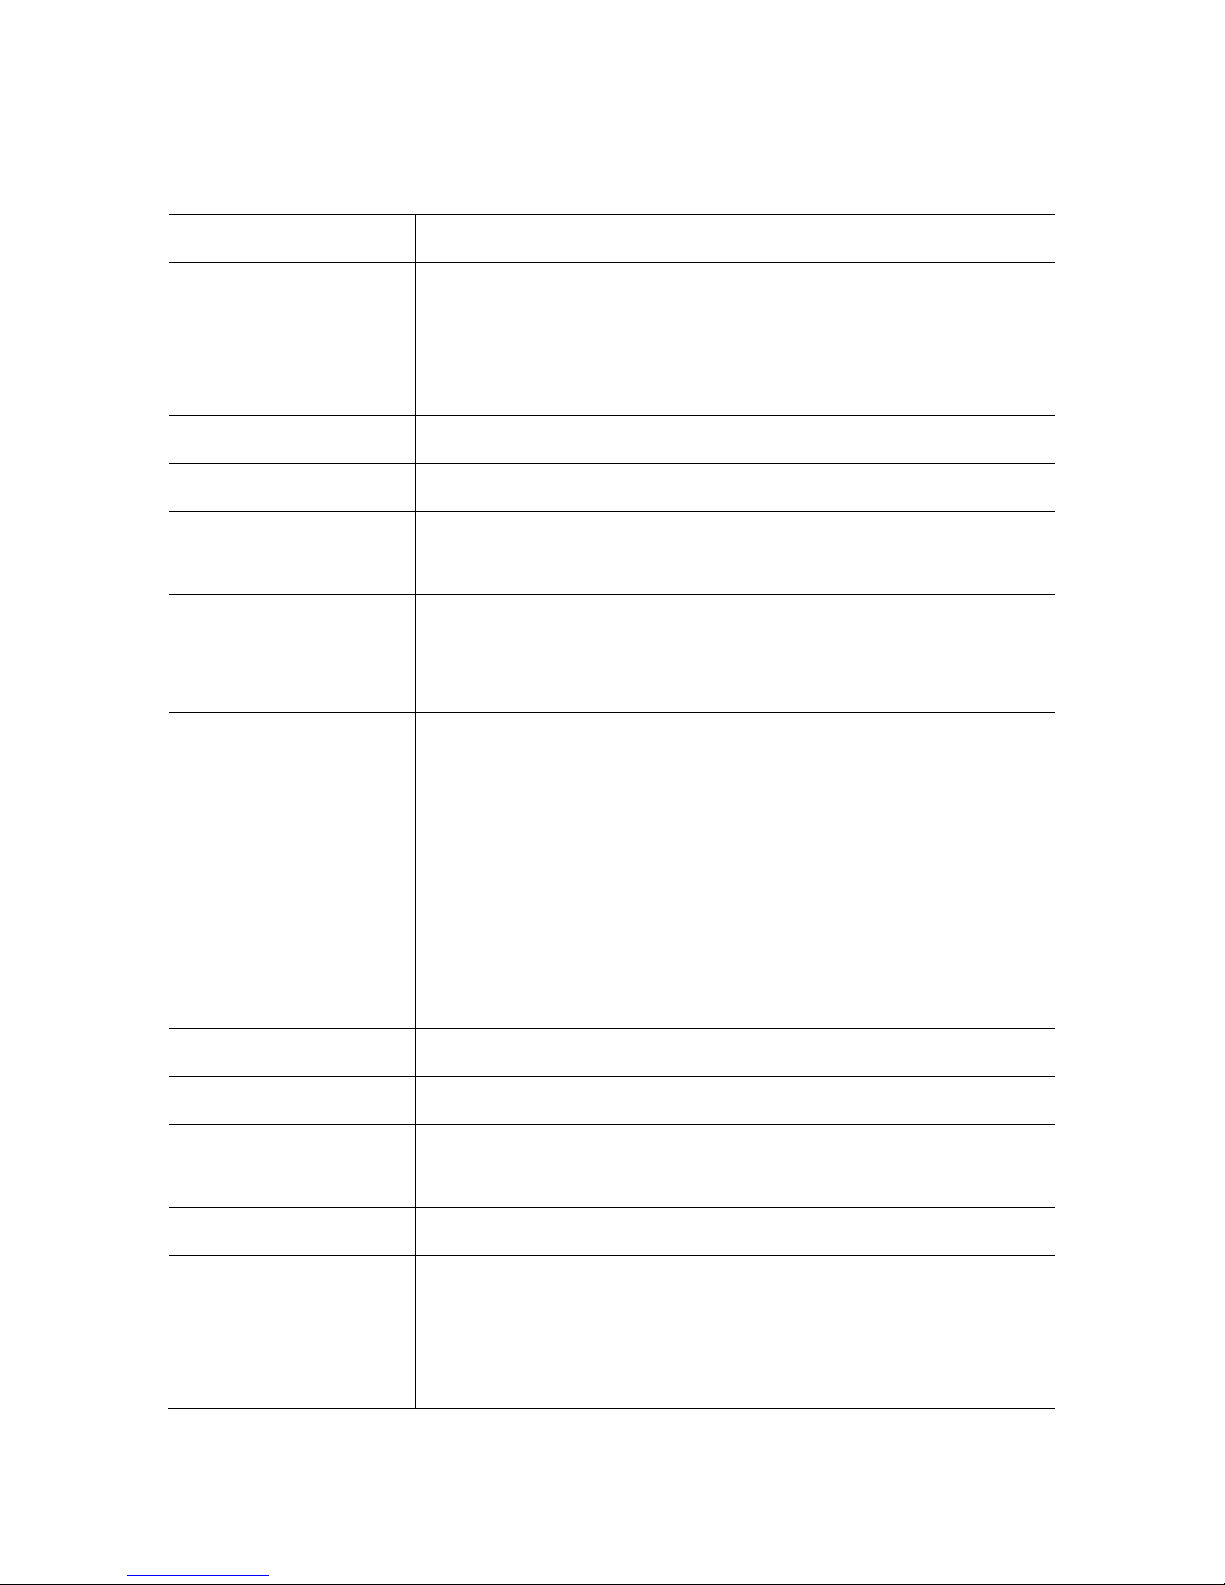
Table 1 summarizes the features of the server system.
Feature
Description
Dimensions
• 4.22inches (107.2 mm) high
• 16.93 inches (430 mm) wide
• 27.25 inches (692 mm) deep
• 55 pounds (25 kg) - max chassis weight
Host Server Board
Intel® Server Board S5400SF
Host Processor
One Intel® Xeon® Quad-Core L5408 processor.
Host Memory
Sixteen DIMM slots
• Support for stacked DDR2 667 MHz FBDIMM memory
Host Chipset
Intel® 5400 Chipset, consisting of:
• Intel® 5400 Memory Controller Hub (MCH)
• Intel® 6321ESB I/O Controller Hub
Peripheral Interfaces
External connections:
• Stacked PS/2* ports for keyboard and mouse
• RJ45 Serial B port (use of shielded cable recommended for use
with this connection for optimum EMC performance)
• Two RJ45 NIC connectors for 10/100/1000 Mb connections
• Two USB 2.0 ports
Available Internal connections:
• Optional Intel® Remote Management Module 2
• Optional Intel® Remote Management Module 2 NIC
I/O Control
National Semiconductor* PC87427 controller
Video
On-board ATI* ES1000 video controller with 16 MB DDR SDRAM
LAN
Intel® 82563EB dual port controller for 10/100/1000 Mbit/sec
Ethernet LAN connectivity
Expansion Capabilities
• One PCI Express* x16 GEN2 add-in card slot
Hard Drive Options
• Hot-swap drive system:
– Three SATA drives
• Intel® Embedded Server RAID Technology II with SW RAID
levels 0/1/10
Table 1 Convey Server System HC-1EX Feature Summary
Convey HC-1EX Server Quick Start Guide v1.3 9
Page 19

Feature
Description
Peripherals
• Slimline bay for IDE optical drive
• Optional USB floppy drive (product code SR1560SFHS)
Control Panel
• Standard control panel
LEDs and displays
With standard control panel:
• NIC1 Activity
• NIC2 Activity
• Power / Sleep
• System Status
• System Identification
• Hard Drive Activity
Internal light guided diagnostics:
• Fan Fault
• Memory Fault
• CPU Fault
• 5VSB
• System Status
• System Identification
Power Supplies
Single 600 W power supply in host subsystem
Single 920 W power supply in Convey CP subsystem
Fans
• Five non-redundant, monitored and controlled fans in host
subsystem
• Four non-redundant, monitored and controlled fans in Convey
subsystem
• Separate fans in power supplies
USB
• One front panel USB 2.0 port
• Two back I/O USB 2.0 ports
Convey HC-1EX Server Quick Start Guide v1.3 10
Page 20
Temperature
Non-operating
Operating
-40 ° to +70 °C.
10° C to 35° C (50° F to 90° F) with the maximum rate of change
not to exceed 10° C per hour
Altitude
Non-operating
Operating
-16 to 10,600m (-50 to 35,000 feet)
-16 to 1,800m (-50 to 5,905 feet) @ 35°C
1,800 to 3,048m (5,905 to 10,000 feet) @ 30°C
Humidity
Non-operating
90% relative humidity (non-condensing) at 28 °C.
Shock
Operating
Unpackaged
Packaged
2.0 g, 11 msec, 1/2 sine
Trapezoidal, 25 g, velocity change 136 inch/sec (40 lbs to > 80lbs)
Non-palletized free fall at a height of 24 inches (40 lbs to > 80 lbs)
Acoustic noise
Sound Pressure: 55 dBA (rack mount) in an idle state at typical
office ambient temperature. (23 +/- degrees C) Sound Power: 7.0
BA in an idle state at typical office ambient temperature. (23 +/- 2
degrees C).
Electrostatic
discharge (ESD)
+/-15kV except I/O port +/-8KV, per Intel Environmental Test
Specification.
Quick
Technical
Reference
600W Single Power Supply Input (Lower) 3.2.1
• 100-127VAC~ at 50/60 Hz; 7A max.
• 200-240VAC~ at 50/60 Hz; 3.5A max.
920W Single Power Supply Input (Upper) 3.2.2
• 100-240VAC~ at 50/60 Hz; 11-4.4A max.
System Environmental Specifications 3.2.3
Table 2 System Environmental Specifications
Convey HC-1EX Server Quick Start Guide v1.3 11
Page 21
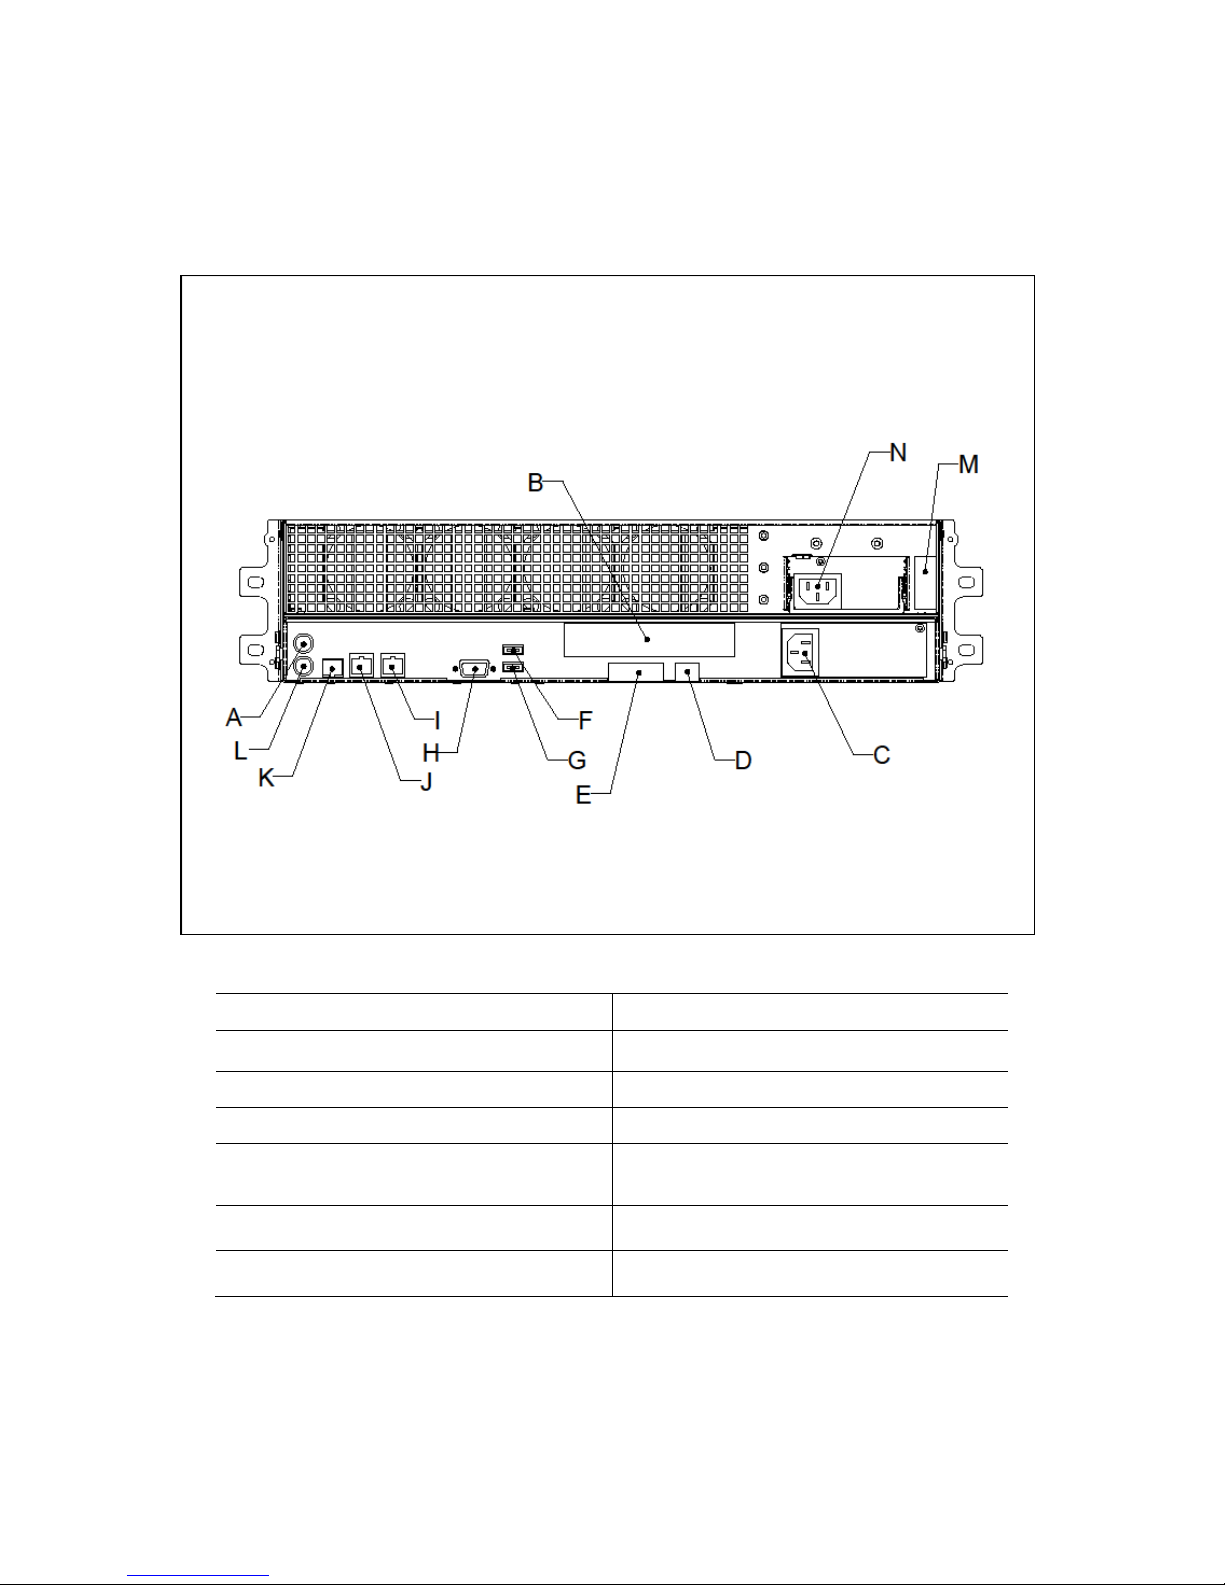
Back of Server System
A. PS2 mouse connector
H. Video connector
B. PCIe card bracket (full height)
I. NIC 2 connector
C. Lower chassis AC power receptacle
J. NIC 1 connector
D. RMM Network Interface (optional)
K. RJ45 serial B port
E. IO module external connector
(optional)
L. PS2 keyboard connector
F. USB 6 connector
M. Power cord warning label
G. USB 5 connector
N. Upper chassis AC power receptacle
3.3
Features on Back of Server System 3.3.1
Figure 4 Server System Rear View
Convey HC-1EX Server Quick Start Guide v1.3 12
Page 22
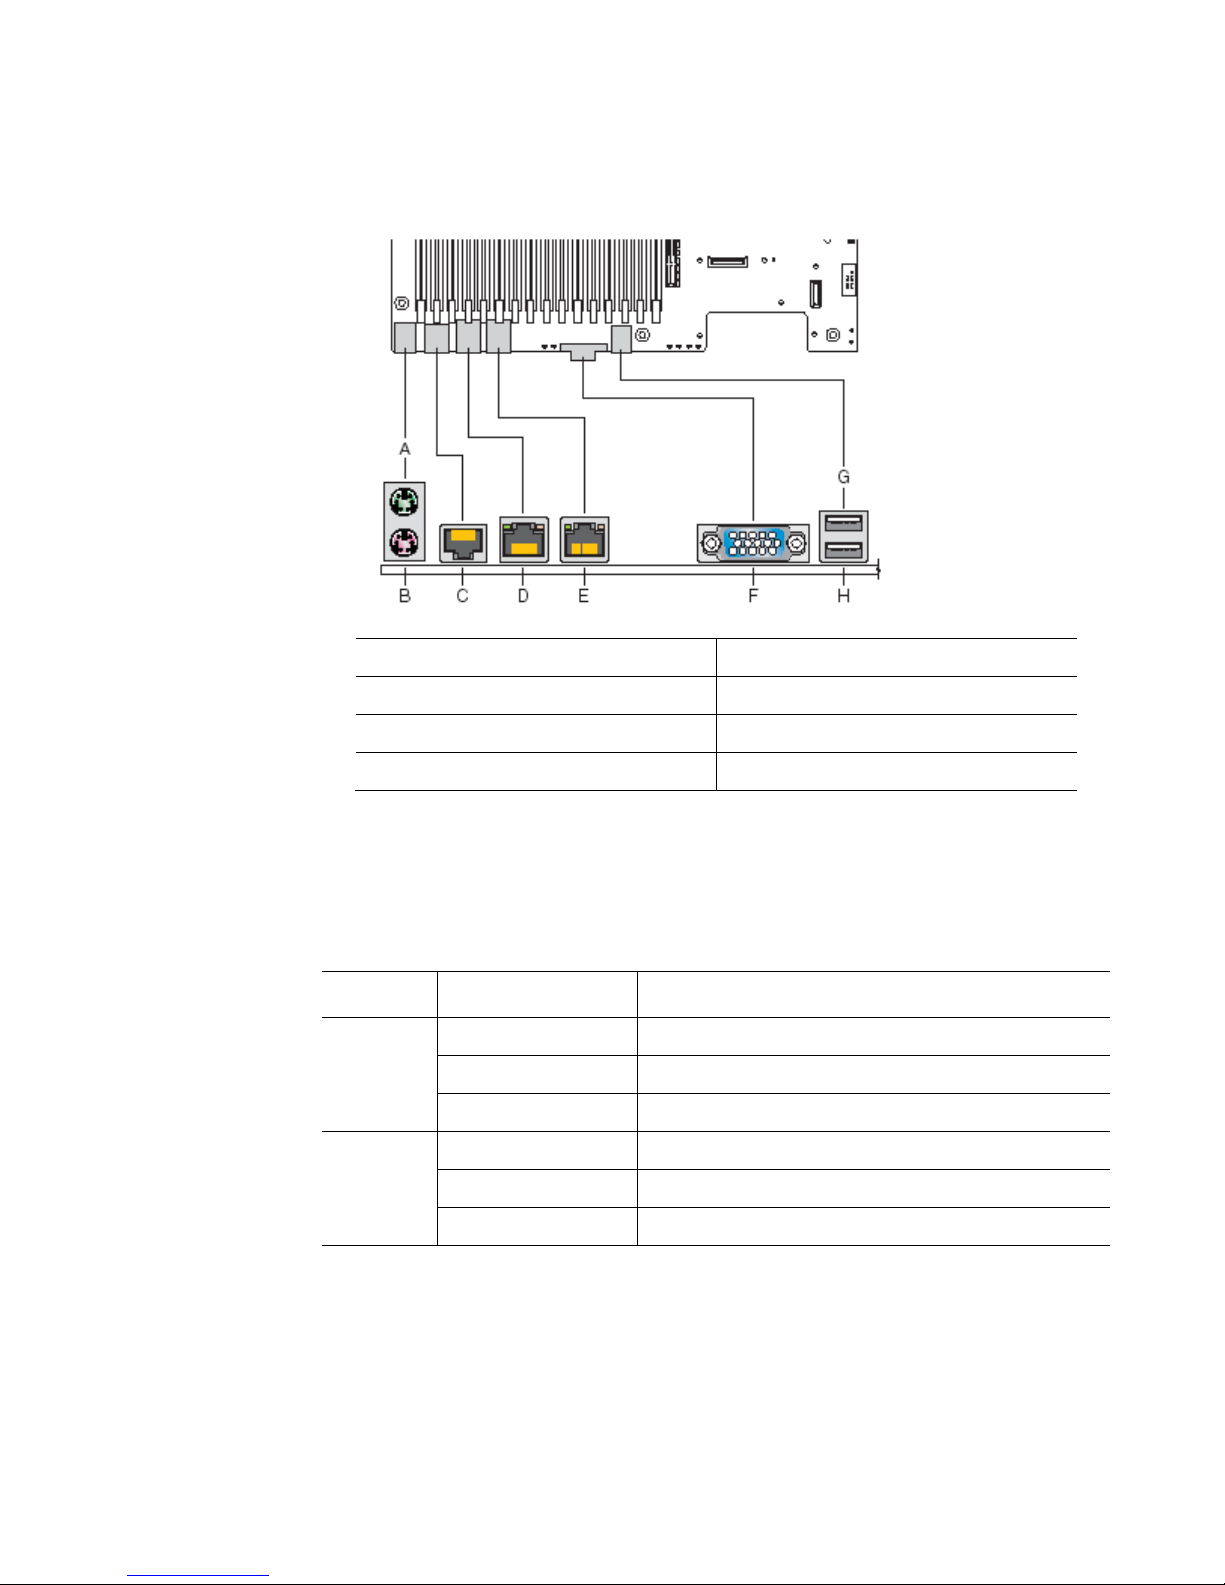
Back Panel Connectors
A. Mouse PS/2
B. Keyboard PS/2
C. Serial Port B (RJ45)
D. NIC 1 (10/100/1000 Mb)
E. NIC 2 (10/100/1000 Mb)
F. Video
G. USB Port 6
H. USB Port 5
LED LED State Description
Left
Off
No network connection
Solid Amber
Network connection in place
Blinking Amber
Transmit/receive activity
Right
Off
10 Mbps connection (if left LED is on or blinking)
Solid Amber
100 Mbps connection
Solid Green
1000 Mbps connection
3.3.2
Figure 5 Back Panel Connectors
The NIC LEDs at the right and left of each NIC provide the following information.
Table 3 NIC LED Descriptions
Convey HC-1EX Server Quick Start Guide v1.3 13
Page 23

Each chassis Power Supply includes a status LED providing the following information.
LED State
Description
Off
No AC power to supply
Solid Amber
Power supply critical event causing a shutdown; Failure, OCP,
OVP, Fan Fail
Blinking
AC present / Only 5VSB on (PS off)
Solid Green
Output ON and OK
LED State
Description
Off
No AC power to supply
Blinking
Amber
Internal power supply temperature has reached 63C and will shut
down if the temperature reaches 70C.
Solid Amber
System is off and plugged in
Solid Green
Output ON and OK
Table 4 Lower Chassis Power Supply LED Description
Table 5 Upper Chassis Power Supply LED Description
Front of Server System 3.4
Standard Control Panel 3.4.1
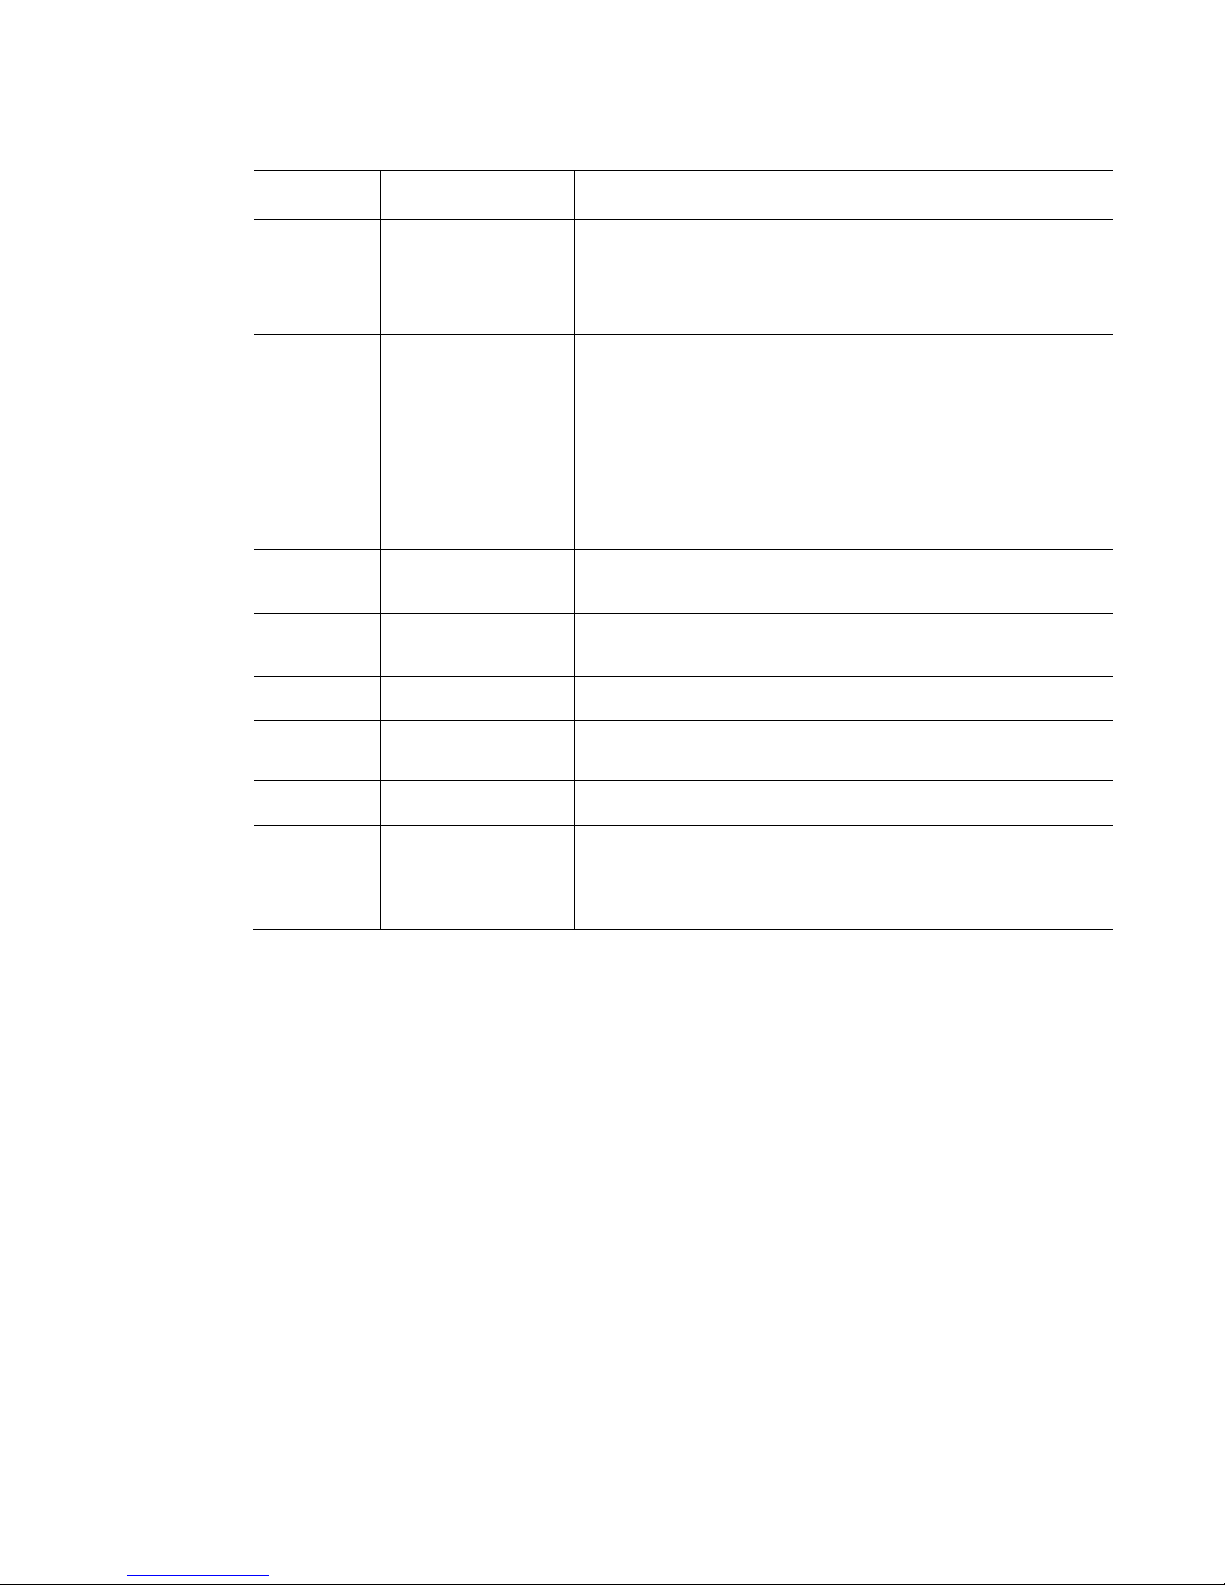
The diagram below shows the features of the host standard control panel.
Convey HC-1EX Server Quick Start Guide v1.3 14
Page 24
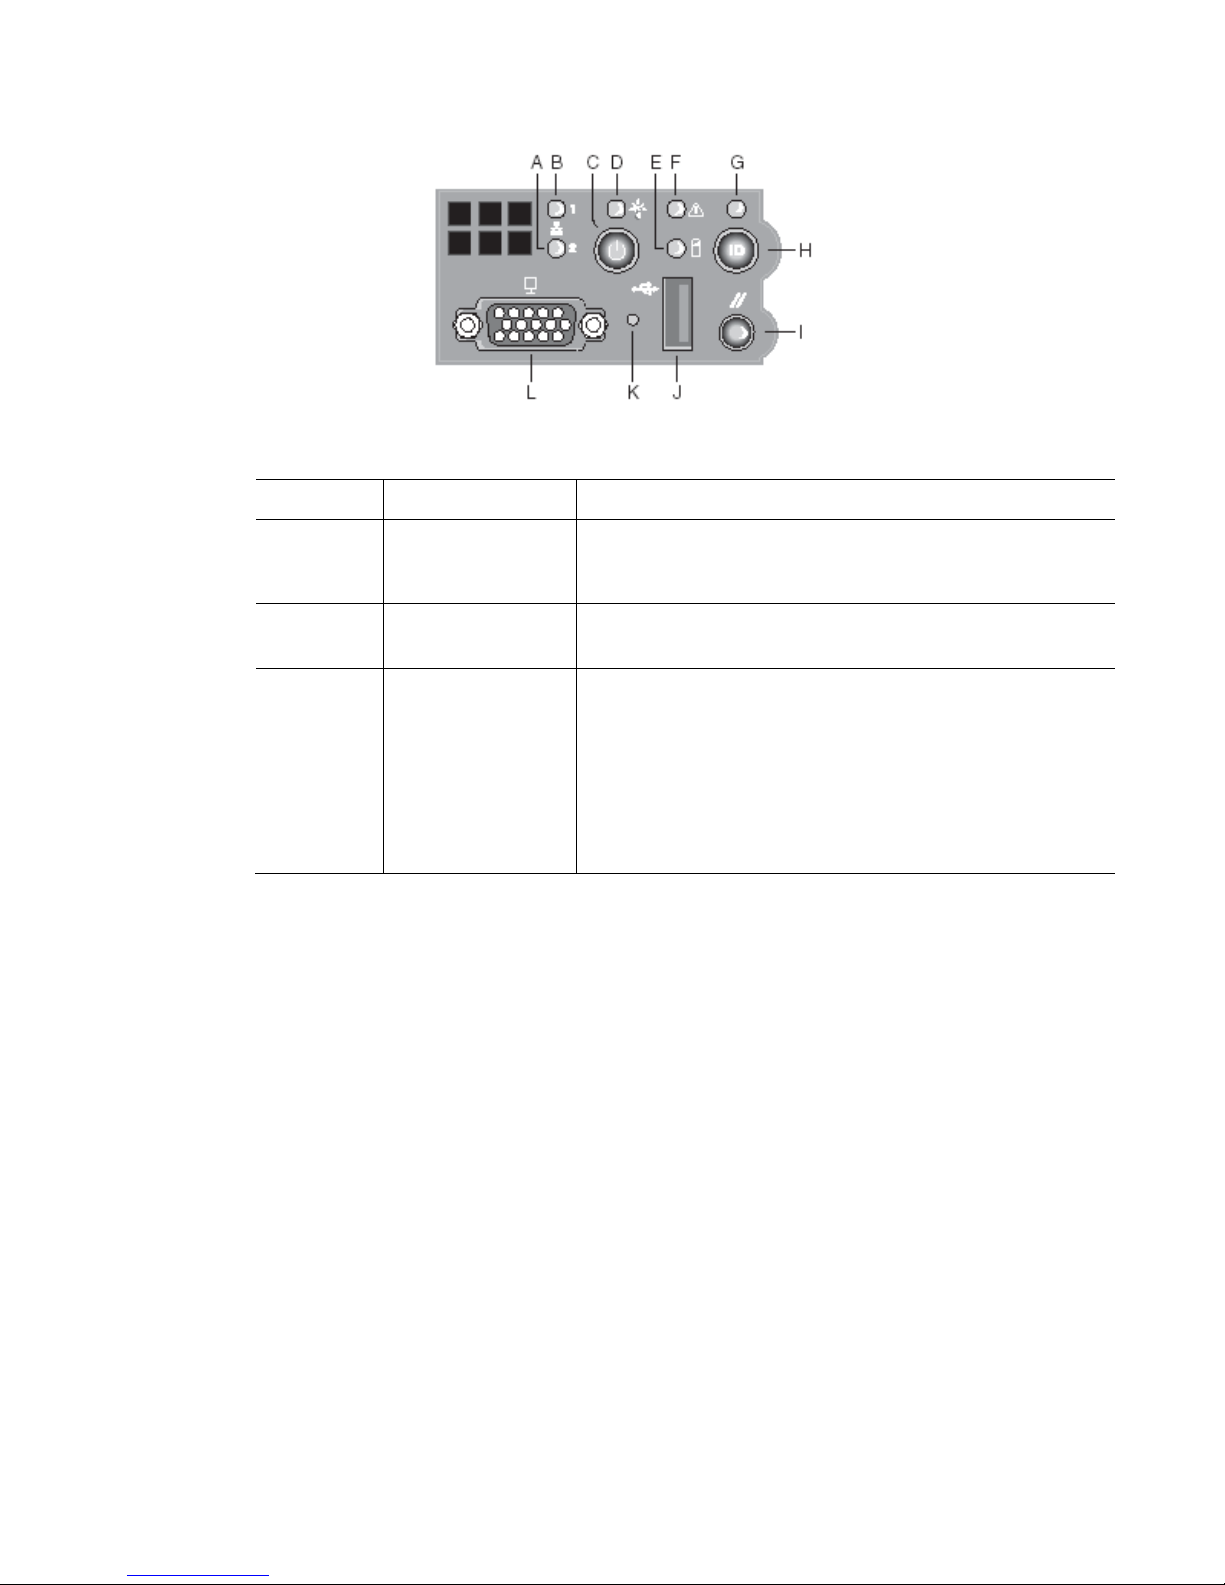
Callout
Feature
Function
A. B.
NIC 2 Activity LED
NIC 1 Activity LED
Continuous green light indicates a link between the system
and the network to which it is connected.
C.
Power/Sleep Button
Powers on/off the system.
D.
Power/Sleep LED
Continuous green light indicates the system has power
applied to it.
Blinking green indicates the system is in S1 sleep state.
No light indicates the power is off / is in ACPI S4 or S5
state.
Figure 6 Standard Control Panel
Convey HC-1EX Server Quick Start Guide v1.3 15
Page 25
Callout
Feature
Function
E.
Hard Disk Drive
Activity LED
Random blinking green light indicates hard disk drive
activity
No light indicates no hard disk drive activity.
F.
System Status LED
Solid green indicates normal operation.
Blinking green indicates degraded performance.
Blinking amber indicates a non-critical condition.
Solid amber indicates a critical or non-recoverable
condition.
No light indicates POST is running or the system is off.
G.
System
Identification
Solid blue indicates system identification is active. Flashing
blue indicates power up sequence in process.
H.
System
Identification
Turns on/off the system identification LED.
I.
Reset Button
Reboots and initializes the system.
J.
USB 2.0 Port
Allows you to attach a USB component to the front of the
chassis.
K.
NMI Button
Puts the server in a halt-state for diagnostic purposes.
L.
Video Port
Allows you to attach a video monitor to the front of the
chassis. The front and rear video ports cannot be used at
the same time.
Peripheral Devices 3.4.2
The server system provides locations and hardware for installing hard drives, a USB
floppy drive, and an optical drive. The drives configurations (population and capacity) are
optional. The following figure shows the available locations.
Convey HC-1EX Server Quick Start Guide v1.3 16
Page 26
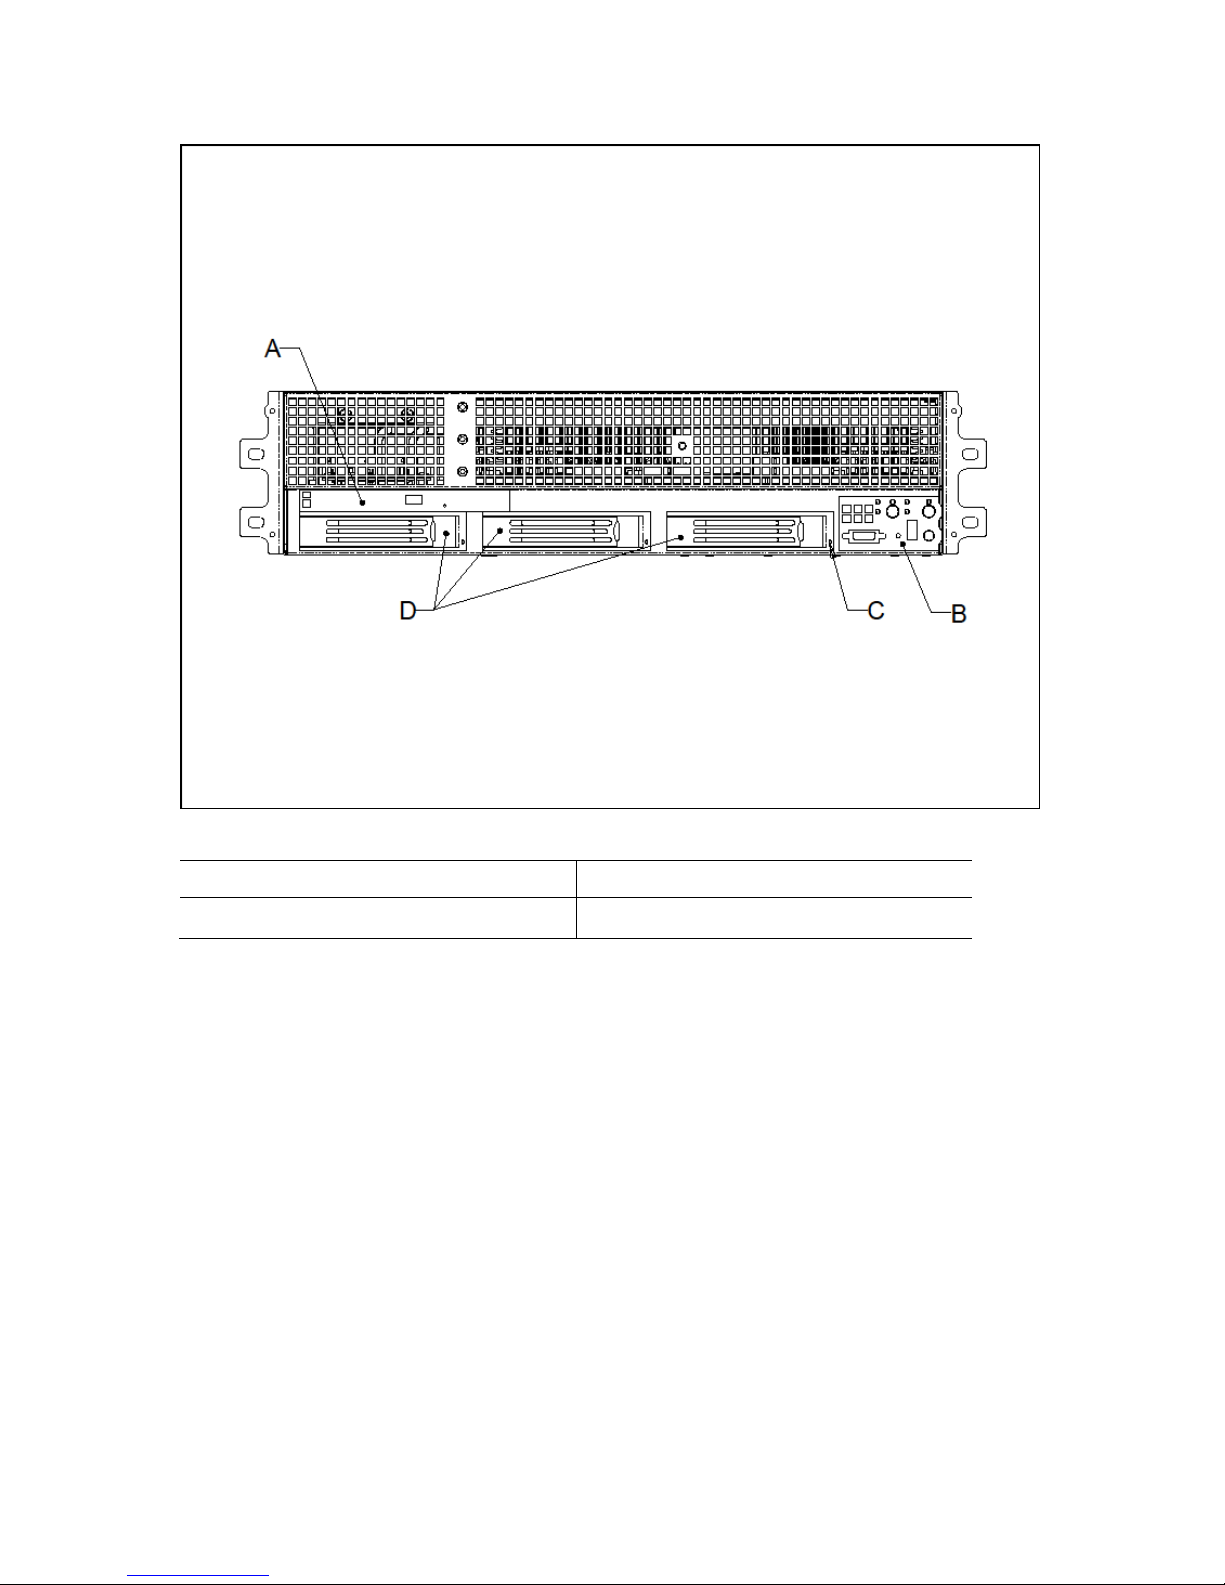
A. Slimline Drive bay (optional)
C. Hard drive status LEDs
B. Control panel
D. Hard drive bays (optional)
Figure 7 Optional Peripherals
Hard Disk Drives 3.4.3
The server system ships with three hot-swap drives or drive carriers (at unused slots) for
installing three Serial ATA (SATA) drives.
Note: Drives can consume up to 17 watts of power each. Drives must be specified to run at a
maximum ambient temperature of 35C.
Slimline Optical Drive 3.4.4
The slimline optical drive is an option available on the HC-1EX Server System.
Convey HC-1EX Server Quick Start Guide v1.3 17
Page 27
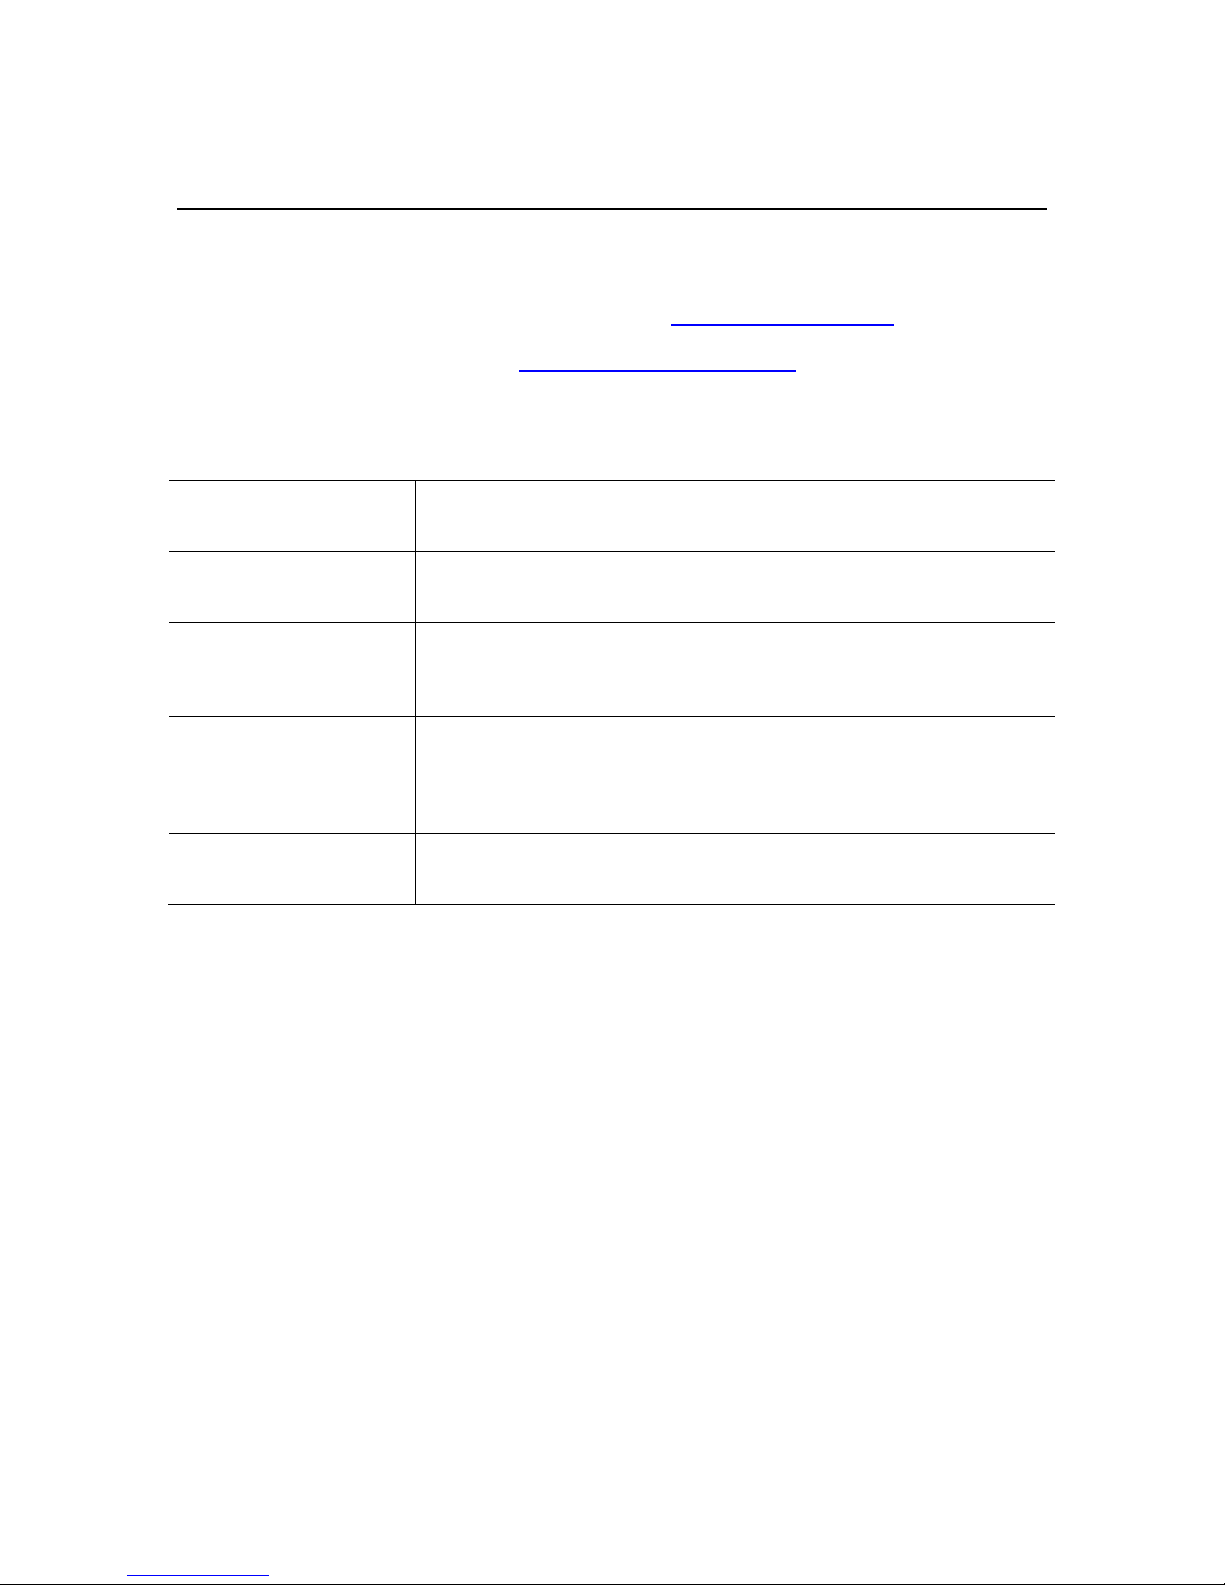
4 Server System References
For this information or
software
Use this Document or Software
System organization &
architecture
Convey Reference Manual, p/n 900-000001-000
System upgrades,
troubleshooting or
repair
Convey HC-1EX Server System Service Guide, p/n 900-000016000
Software installation,
updates, configuration,
system & personality
management
Convey System Administration Guide, p/n 901-000002-000
Software development,
debug & support
Convey Programmers Guide, p/n 901-000003-000
If you need more information about this product or information about the accessories that
can be used with this server system, use the following resources. All documents are
available on the Convey main support web site www.conveysupport.com. A Convey
supplied username and password are required to access these documents. See your
system administrator or email [email protected] for your site’s web access
username and password.
Table 6 Server System References
Convey HC-1EX Server Quick Start Guide v1.3 18
 Loading...