

Page 1

16:916:9
TFT wide-screen
Auto Display
C-TV7020
X-V IEW C-TV 7020
TV
With TV tuner
Clock function
16:916:9
USER MANUAL
Page 2

Thank you for your purchasing LCD monitor. Ple ase read this
manua l carefully befor e operating and res erve it for future
reference. It will be helpful to you if you encounter any
opera tional problem.
1. Appearance an d function
2
3
1
8
Note d: Thi s pr oduct is fo r to uch influ en ce type but to n. More
conv en ient for op er ation. Ju st t ouch the butt on , the butto n in dicator
ligh t wi ll flicke r; The u ni t can adjus t to t he pictur e wh ich you nee d fo r
TV anten na
12
4
5
6
7
2. Specificati on
Name: 7” TFT LCD M onitor with TV
Resol ution:480x3(R GB)x234
System::
PAL/NTSC
Power :DC+12V ±10%
Power consumption: 8W
Signa l: AV+TV
Screen size:7”(16:9)
Remote control: full function remote control within 6m.
3. Operation instruction
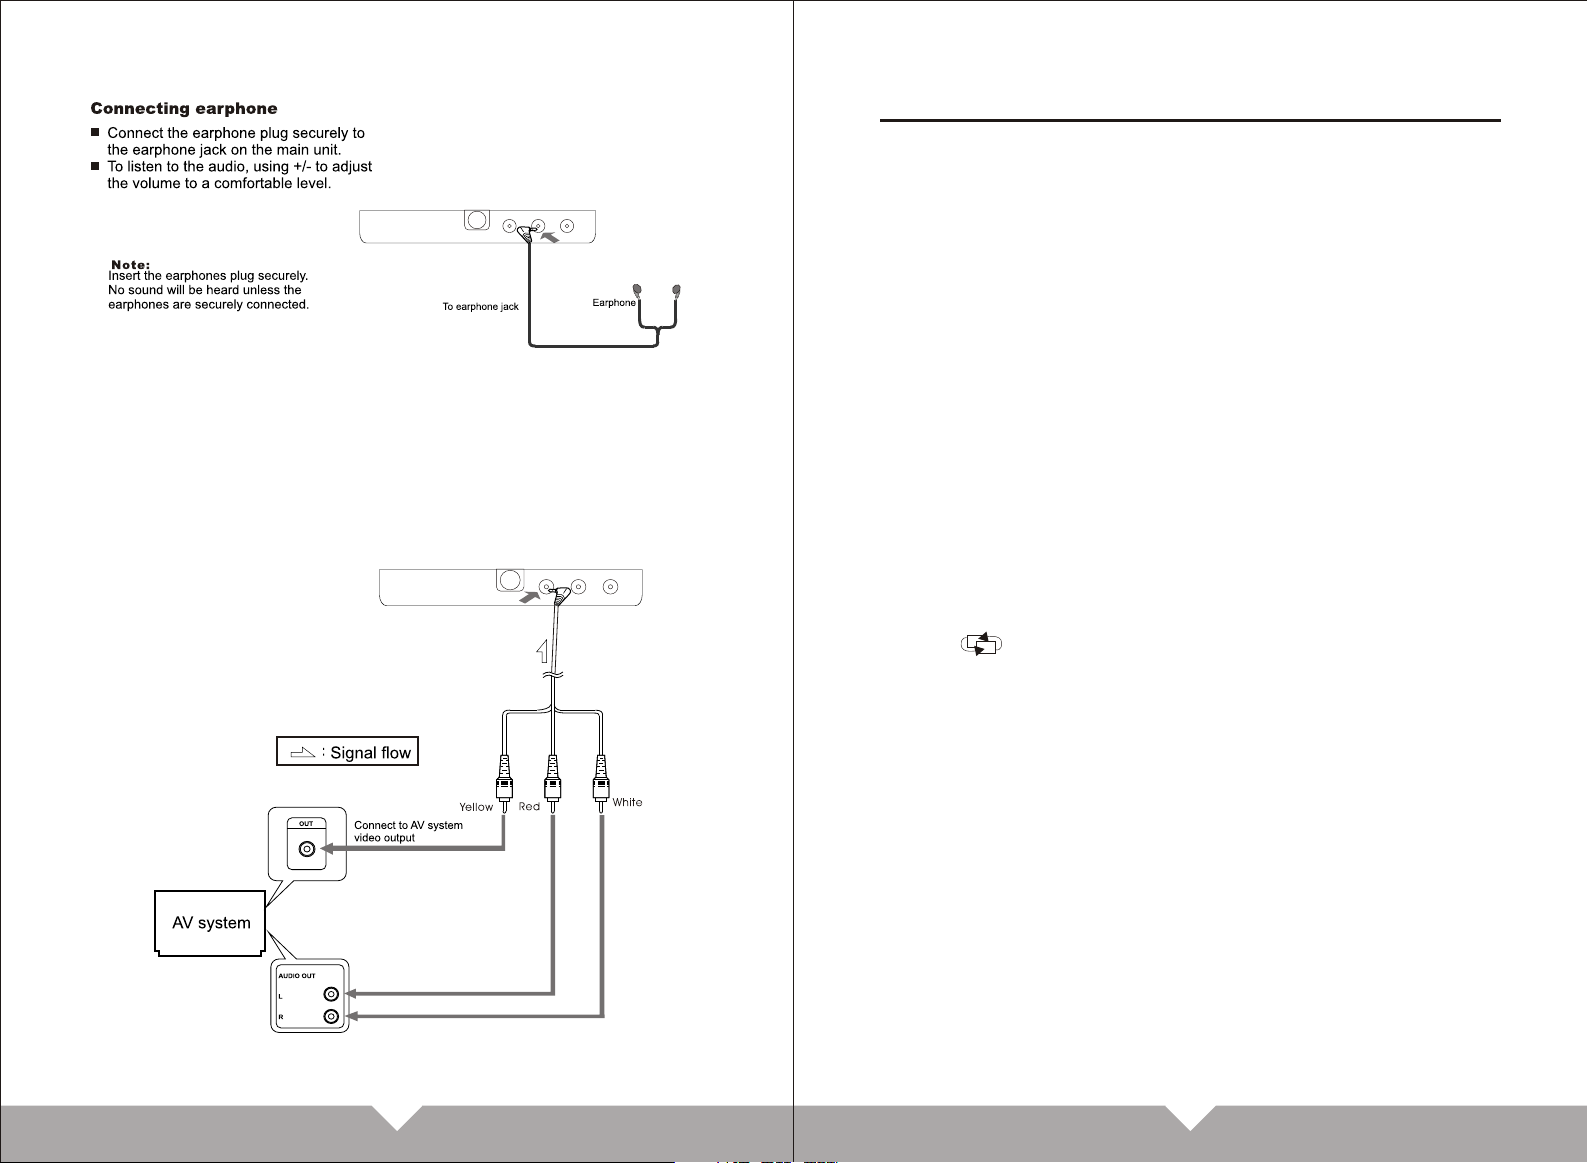
1. Please connec t the one side of AV cable to the signal
source. The anothe r side of AV cable co nnect to the monitor.
Yellow jack con nect to the video sig nal, red and white ja ck
conne ct to the audio output.
2. When use in house, please u se the 12Vhome adap tor
conne ct to power. If use in car, please connect with car
adapt or. Then turn On the power button on un it.
3. It will be auto identify for the PAL system and NTSC syst em.
If the connection is correct it will be show the picture with
clear ly and colorful.
4. Can ad just the MENU button on monitor to adjust the
brigh tness , color , contrast mode to reach to the bes t
effect. Also can through the
remote control to adjust the menu.
POWER: Po wer on or off
1).
TV/AV: Disp lay mode swi tch
2) .
adjustm ent reduce .
VOL+: Volu me or MENU
3).
adjustm ent increa se
VOL-: Volu me or MENU
4).
MENU: Men u adjustme nt
5).
.CH+:On TV fo r next chann elchoose
6)
, On MENU for s ubmenu choose
9 10 11
4. Main unit and parts connection
(Jack on bottom of uni t )
CH-: On TV for pr evious
7) .
channel c hoose, On ME NU
for subme nu choose
8) . Remote cont rol window
Power jac k
9) .
Earphon e jack
10) .
AV signal inpu t jack
11) .
ANT signal in put
12) .
01 02
.
Noted: Wh en you opera tion the uni t in the ca r, please
use the car p ower adapt or to connec t with th e unit. The
connect ion method i s same as the ho me adap tor.
Car power c able
Page 3
(Jack on bottom of uni t )
AV input connection
Pleas e connect the AV signal inputaccording to the picture
showi ng. After connection, then setting the unit in AV mode, then
will di splay the clearly p icture.
(Jack o n bo tt om of unit )
5. Operating Instructions
Turn on the unit, then press “AV/TV” to choose the d isplay
mode.
AV MODE
If connect to the VCD or DVD correctly, then will s how picture
norma lly. If not connect to the VCD, DVD or no sign al, then
will be s how the character of AV on the top left corner, and
also show “no signal”
1. Picture setting
1.1 Bright
1.2 Contrast
1.3 Col or
Press the “AV/TV ” button on u nit ,or “CH+ , CH-“ on re mote
control to choose adjusted item. Then press “CH+ , CH-“
button on unit or “V+ , V-“ on remote control to adjust the
picture effect.
2. Audio setting
Volume a djustment
Press “vol+””vol-“on unit or “v+ , v-“ on remote con trol to
adjus t the volume.
3. Functio n setting
3.1
3.2 zoom
3.3 language
3.4 Input
Press “CH+” “ CH-” on the unit or remote control to choo se
the different function that you need to switch. Then Press
“VOL+,VOL-“ button on unit or “ V+” “ V- ” to adjust that yo u
need.
4. System setting
1). S-roloc
Press “v+” “ v- ” on the unit or remote c ontrol to choose th e
auto ,pal ,nest,secam syste m that you need to adju sting.
5. Clock
5.1 Sleep
5.2 Time
5.3 Off-time
5.4 On-time
03
04
Page 4

Press “ch+ , ch-“ on remote contr ol to choose adjusted
item. Then press “vol+,vol-“button on unit or “v+ , v-“ on
remote control to adjust the time.( note: under no n-setting
time situation , don't adjust the unit time on or off.)
TV MODE
If you have choose the TV mode, and connected the TV signal,
then wi ll show picture nor mally. If not connect to the TV or no
signa l, then will be show “n o signal”.
Press “ MENU “ button on unit or remote control to enter t he
main me nu, then to setting the picture ,sound , func tion ,
system ,preset and time.
1. Picture setting
1.1 Bright
1.2 Contras t
1.3 Color
Press the “AV/TV” button o n unit ,or “CH+ , CH-“ on r emote
control to choose adjusted item. Then press “VOL+,VOL-““
button on unit or “V+ , V-“ on remote control to adjust the
picture effect.
2. Audio setting
Volume
Press “vol+,vol-“ on unit or “v+ , v-“ on remote contr ol to
adjus t the volume.
3. Functio n setting
3.1
3.2 Zoom
3.3 Lan guage
Input
3.4
Press “CH+” “ CH-” on the unit or remote control to choo se
the different function that you need to switch. Then Press
“VOL+,VOL-“ button on unit or “ V+” “ V- ” to adjust that yo u
need.
4.Syste m setting
4.1 S-roloc (auto, pal, ntsc) (secam as option )
4.2 S-sys (dk, i, m, bg ) (l as option)
4. 3 swap
4. 4 copy
Press “ch+ , ch-“ on remote contr ol to choose adjusted item.
Then press “vol+,vol-“ button on unit or “v+ , v-“ on re mote
control to switch pal,ntsc,secam system.
5. Preset
5.1 Auto-sea rch
5.2 search
5.3 Fine
5.4 Skip
Press “CH+ , CH-“ on remote control to choose adjusted
item. Then press “VOL+,VOL-“ button on unit or “V+ , V-“
on remo te control to adjust what you need.
6. Clock
6.1 sleep
6.2 time
6.3 off-time
6.4 on-time
Press “CH+ , CH-“ on remote control to choose adjusted
item. Then press “VOL+,VOL-“ button on unit or “V+ , V-“
on remo te control to adjust the time.( NOTE: Under n onsetting time situation , don't adjust the unit tim e on or off.)
6. Using remote control unit
1).p ow er: switc h ON /OFF powe r.
2).M ut e: press th is b utton, the so und disappe ar,
then p re ss V+ or V- to res to re to norma l.
3).T V/ AV: Select ch an nel(TV)AV outp ut .
4).0 -9 ,-/--:S el ect chann el p rogram. whe n th e
chan ne l number is o ne d igit, pre ss t he
corr es pondent n um ber. when th e ch annel num be r
is two o r th ree digit , pr ess-/-- key,wh ic h
the sc re en will sho w tw o or three li gh t bars, and
then e nt er into the c or respond en t numbers.
5).V+ /- :Press th es e two button to i nc rease and r ed uce
volu me , it is also us ed f or adjust in g and confirm in g menu.
6) CH+ /- :Press th es e two butto ns t o increase or d ec rease
chan ne l number, an d al so contro l th e submenu u p an d
down w he n adjusti ng m enu.
7) Men u: P ress it to en te r into or clo se f ro m menu.
8) Mod e : St andard, B ri ghtness , Co lorful, Sof tn ess, Choi ce
1
2
3
4
5
6
7
5
6
8
05 06
Page 5

Replacing the batter
SIMP LE T ROUBLE- SH OOTING GUID E
Plea se c heck the fo ll owing fau lt s before send in g your unit s fo r repairs .
2.1.
Symptom
Probabl e Ca us e
Solut io n
3.
7. Attention
1. Be sure to distinguish the anode and the cathode when
conne ct the power.
2. Keep this machine away from too hot, or under effect of
moisture, dust or oil smoke, avoid this machine from
dropp ing or impacting, n ever extrude or chafe this
machi ne with sharp objec ts.
3. Dang erous high voltag es are present insi de the
enclo sure. Do not open the cabinet, Refer servicing to
quali fied personnel on ly.
4. A few high l ights or dark spots may occur on the LCD
screen. It is a very common phenomenon to the active
matrix display technology, and never necessary means
any defects or faults.
1 .chec k th e po we r is on or
conne ct r ig ht ly
2. chec k th e A/V C ab le
is loos e or n ot
3. Incr ea se t he b right ne ss
and con tr as t ra tio
1.Che ck t he o ut put of VC D
or DVD
2.Rep la ce w it h the A/Vc ab le
3.Tig hten th e Vi deo inp ut
cable
1.che ck t he v id eo sour ce s
2.Ent er i nt o th e Menu to
re-ad ju st
it is nor ma l sy mp tom in
view ra ng e wi th a l ittle
regul ar l ig ht s pots on
displ ay s cr ee n.
1.Rep la ce w it h the hig h
quali ty v id eo disc
2.Res et B ri gh t &cont ra st .
1.The s ur ro un d tempe ra tu re
shoul d no t ex ce ed to 0-6 0
degre es .
2.Tur n off t he p ow er afte r
using t he u ni t.
Black S cr ee n
NO pict ur e
color p ic tu re
With a li tt le r eg ular li gh t
spots a nd c ol or s pots on
the scr ee n or b la ck
horiz on ta l li ne in the
pictu re
Uncle ar p ic tu re
The out er c ov er o f the
monit or h as b ee n defor me d
1.No1 2 vo lt ag e
2.Bri gh tn es s or cont ra st
ratio i s to o sm al l
3.no hi gh -v ol tage
1.No so ur ce s ou tput
2.The v id eo c on centr ic p lu g
becom es l oo se
1 Vid eo s ou rces have
no outp ut
2.Col or r at io s hould b e
re-ad ju st
It is nor ma l sy mp tom in th e
activ e ma tr ix d ispla y
techn ol og y.
1.Poo r qu al it y of the
video s ou rc es
2.Bri gh t &C on trast
1.Ext er na l te mpera tu re i s
too hig h.
2.The p ow er h as n ot been
switc he d off for a lon g ti me .
AL A RM
For your saf et y, driver are a dv is ed n ot t o wa tc h th e di splay when driving.
It's prohi bi te d in l aw o f so me c ou nt ries when driving and ope ra ti ng t o
watche d di sp la ye r.
07 08
 Loading...