

Converters.TV 706 Operation Manual
USB to HDMI Converter w/RJ45
- ID# 706
Operation Manual

Introduction
Features
The Ethernet and USB to HDMI Converter allow users to use TV as the PC primary
display with keyboard and mouse at hand for Internet browsing, using Microsoft
Office, listening music and watching movies from a PC on the network. Simply
connect the TV to the device and then plugging the device into an Ethernet network,
this TV instantly become the PC monitor with keyboard and mouse for any computer
on that network. The device will enable this TV to be used as if it was directly
connected to the computer. The distance between TV and computer can be 100
meters apart within the same LAN.
The device removes the limitations of running expensive audio and video wiring in
long distance digital signage extending. All that is needed is an Ethernet network.
Multiple users will have the ability to access the same TV without physically connect
with computers. This will eliminate the distance limitations of conventional audio and
video cabling for easy AV sharing between computers.
1. Move the complete PC operation environment into TV with 100 meters
away from computer. Original PC monitor can different content with TV.
2. Allow TV as the PC pr imar y di spla y with keyboard and mouse at hand
for Internet browsing, using Microsoft Office, listening music and watching
movies from a PC on the network.
3. Extend or mirror video through network or USB cable to HDMI display, including
both video and audio output signals.
4. Share HDMI displays with multiple users through your existing office or home IP
network.
System
Requirements
5. Add a HDMI dis p l a y t o your computer thr o u g h a U SB 2.0 port.
6. Sup p or t s m i rr o r a n d e xte n de d v i de o mo d es .
7. Frien d l y i n t e r f ac e f or ea s y co n f i g ur ation and monitoring .
1. System Hardware Requirements: 2.4 Ghz CPU with 1 GB RAM for optimal
pe rformanc e
2. Op e r a ti n g S y s t e m s :
3. Windows 2K SP4
4. Windows XP Home or Professional 32 bits SP2
5. Windows Vista 32 bits
6. Exte n di n g t hr o ugh a U SB por t :
7. Available USB 2.0 port with USB to mini USB cable
8 . Ex te n d i n g t h r o ug h a n et wo r k :
9. Available Ethernet port on home, business or office network with RJ-45 cable
10. Keyb o ard and Mou s e f o r e x t ra p air o f c o ntr o l to o l

Software
Installation
To install the USB to HDMI and USB device drivers, please follow below steps.
USB to HDMI Software
Insert the provided driver CD into your CD-ROM driver, selected "USB to HDMI
Software " fo lder an d then e xec ute " Setup.exe" file to inst all the driver. During
the installation you can select your prefer language to install.
USB device driver
Press "XP_VS_Setup.exe" to install USB device driver. After install the driver,
select "Yes" to restart the computer.
Operating Functions
and
Controls
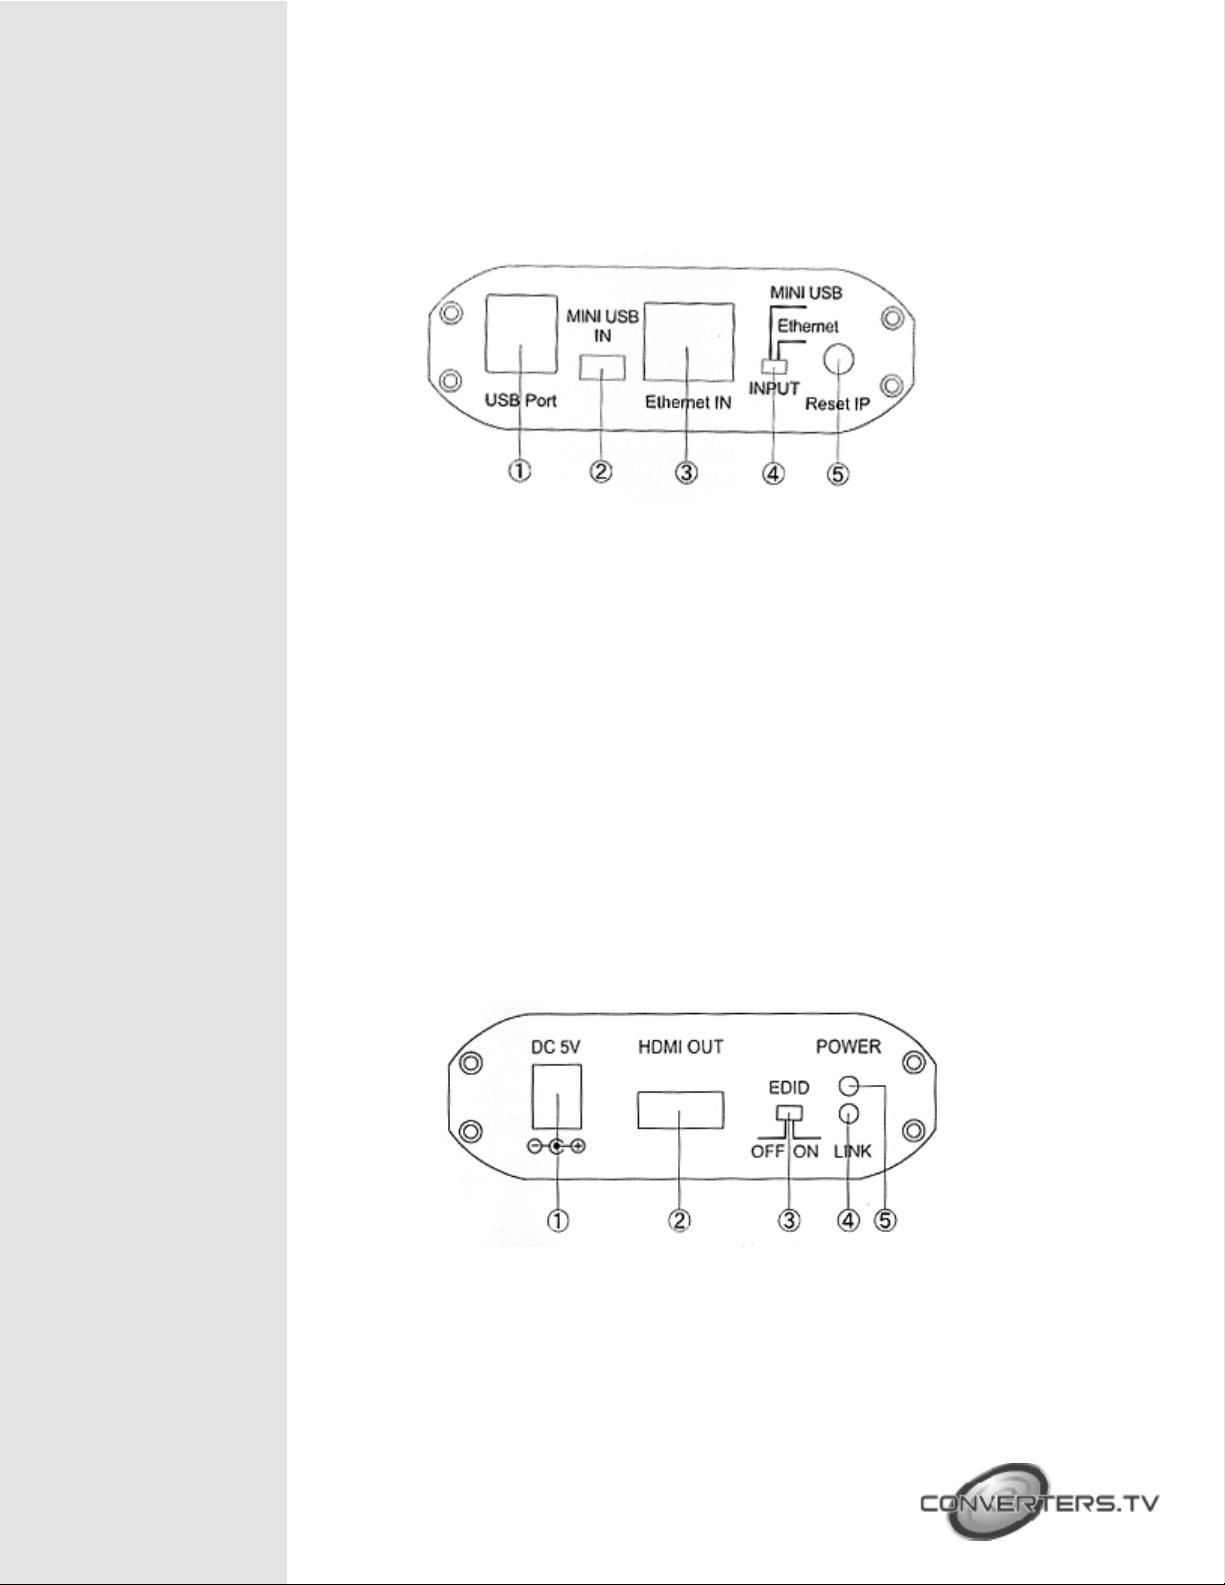
Front Panel
1. USB Port: Connect USB device into USB port such as, USB Hard Drive, USB
web c amera, Keyboard or Mous e.
Note:
These two USB ports can't extend with other USB Hub, otherwise it will
cause the system failure to detect the external USB Hub.
Before removed the USB device, user need to follow USB device safely
remove hardware procedure to remove the device, otherwise, it will
cause the system crash down.
2. Mini USB IN: Support extends or mirror video through USB cable to HDMI display,
including both video and audio output signals.
3. Ethe rnet IN: Connec t to home IP router or PC Ethernet port. When con nect
direc tly to the PC Ethernet port, us er n eed to s et m anually the Internet Protocol
(TCP/IP) to "169.254.10.1". If connect to IP router, the system will automatically be
connected and user do not to set up Internet Protocol.
4. Input connection switch: Switch to select the PC source from Mini USB port or
through Ethernet port.
5. Reset IP: Press to reset Ethernet IP address only if the system's IP address is incorrect
Rear Panel
1. Power: Plug the 5V DC power supply into the unit and connect the adaptor to
AC wall outlet.
2. HDMI out: Connect HDMI output port to the HDMI display.
3. EDID control switch: Default factory setting is "ON", leave as it is if the display is
properly. If the display has built-in native EDID, the screen will show display's resolution
 Loading...