

Convert-a-Ball C5GX Installation Instructions Manual
3/8 inch allen wrench, 1-1/8 inch wrench and torque wrench w/ 3/4 inch 8pt socket
Tools required:
C5GX Adapter Installation Instructions
Ball Coupler Platform
BOX 1
BOX 2
Adapter
Body
Top Front
27
07148
Locking Collar
White Line
Locator Notch
Three Allen
head screws
Remove the Fifth Wheel
Lube Plate or Lubrication
Disk from around your
King Pin, (if your trailer is
equipped with one.)
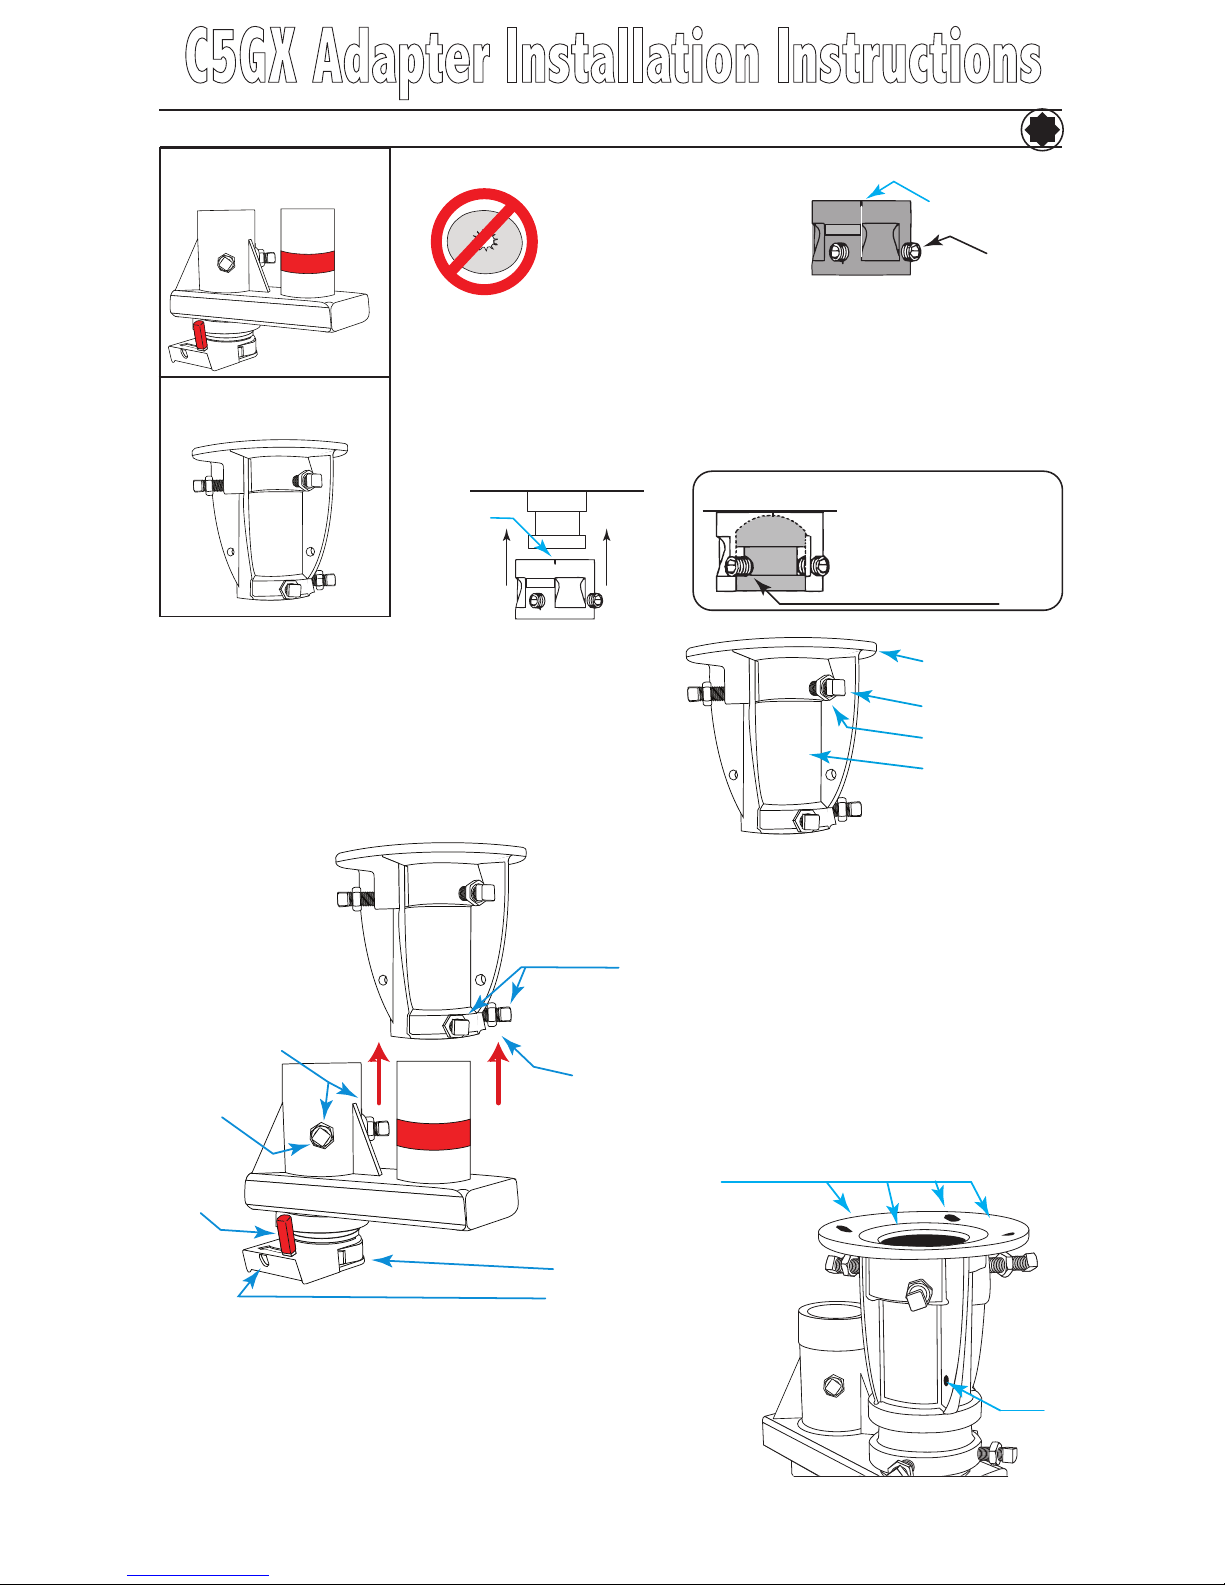
Slide the locking collar over the the trailer King Pin. Before tightening
allen-head screws, rotate the collar so that the white line of the locator notch
on the front of the collar is in the exact center of the front of the King Pin
box. Tighten each of the allen-head screws evenly, making sure the allen
head screws rest on the bottom lip of the trailer king pin.
Firmly seat the allen-head screws flush with the surface of the collar.
If screws are not flush, loosen all screws and re-tightened evenly.
To prepare, move the Jamb Nuts out to the head of the Cap
Bolts. The adapter body weighs over 50 lbs, so an additional
person may be required to help. Have your large crescent
wrench handy. Slide Adapter Body up over the Locking Collar,
with the “Front” label facing towards the cab of the vehicle.
Begin tightening Cap Bolts evenly, making sure the adapter
body is moving upwards, until firmly against the pin box.
Tighten down the Cap Bolts to approx. 185 ft. lbs. Tighten jamb
nuts firmly.
Part 1 - Installation of locking collar:
Align the Ball Coupler Platform so the FRONT
Label facing towards the cab of the vehicle.
Slide the Ball Coupler’s pipe with the red stripe
into the Adapter Body until it touches the Ball
Coupler Platform. Tighten the Rear Adjustment
Bolts, securing the Adapter Body to the Ball
Coupler Platform.
Part 3 - Installation of Ball Coupler Platform:
Part 2 - Installation of adapter to the trailer:
Trailer
King Pin
Front of Pin Box Base
Top Front
27
07148
White Line
Locator
Notch
REQUIRED!!!
A bolt-on kit for the 5GX has been provided in this package. For safety,
you MUST bolt the C5GX to your King Pin Box. Drill 1/2” holes to attach
the included bolts or if you wish to tap and thread the kingpin box: drill a
27/64 in. hole and use a 1/2 in. No. 13 tap to thread the holes. At least
one or two bolts are neccessary to prevent the adapter from turning on
the kingpin IN AN EXTREME SITUATION. There are 2 holes in the Adapter
Body Fins to attach the included Safety Chains. Always secure safety chains and lock the ball coupler
before operating. Follow the instructions on the reverse of this page to properly install the Positive Lock
Handle. Check all vehicle trailer clearances and equipment each time before towing.
WARNING!
If the Rear Adjustment Bolts are not
sufficiently tightened, the Ball Coupler
Platform could fall out of the Adapter Body
when attached to the king pin adapter.
Ball Coupler
Padlock Hole
Jamb Nuts
Locking
Handle
Rear
Adjustment
Bolts
Jamb Nuts
Front
Adjustment
Bolts
Hitch Plate Bolt Holes
Safety
Chain
Hole
Cut-Away View
Trailer
King Pin
IMPORTANT!
To be properly installed
the allen-head screws in
the locking collar must
rest on the bottom lip of
the trailer king pin.
Jamb Nut
Hitch Plate
Adapter Body
Cap Bolt
INTALLERS - PLEASE GIVE THIS INSTRUCITON SHEET TO THE OWNER OF THE C5G

1
”
7
8
2
”
2
”
5
16
The Original
®
Interchangeable Hitch System Products
For Many More Original Convert-A-Ball® Products
Contact your local Convert-A-Ball dealer or
Call 1-308-254-7115 or Fax 1-308-254-7194
www.convert-a-ball.net • email: info@convert-a-ball.net
Made in The U.S.A.
Sidney, Nebraska
IMPORTANT WARNING!
Each ball coupler and platform is
marked in RED when its is too low
or high to be safely connected to
the adapter body. If you see red
when you are hooking up your
adapter, you need to lower the trailer
jacks until there is NO red showing
before tightening the adjustment
bolts and jamb nuts.
Help Line: 1-800-543-1732
Raise your trailer with the adapter attached and back the truck
under the trailer, centering the adapter over the gooseneck ball. Lower the trailer to a level towing position.
Loosen the two Rear Adjustment Bolts and lower the Ball Coupler Platform over the ball, securing it with the
Locking Handle. Ensure there is no RED showing between the Ball Coupler and the Adapter Body. Tighten
down the Adjustment Bolts to approx. 185 ft. lbs. Tighten jamb nuts firmly. Repeat with the Front Adjustment
Bolts to lower the ball coupler over the gooseneckball, if necessary as shown below:
Disconnecting the coupler
If you are unable to move the coupler handle
to uncouple your trailer, you have negative
towing weight. (Up pressure on your ball
coupler) Be sure you unlock the coupler
before you jack the trailer up. Also, you
need to be on fairly level ground. If all else
fails, call us at 800-543-1732.
Lower the Adapter Body all the way
down until it rests on the platform
to set the C5GX1216 to 12 inches.
To set the C5GX1216 from 12 to 14
inches, loosen the rear adjustment
bolts and lift the Adapter Body up.
To set the C5GX1216 from 14 to 16
inches, loosen the front adjustment
bolts and drop the Ball Coupler down.
Caution!!!
Using this extension may restrict turning radius of the towing vehicle. Check your turning radius
and make sure your pin box will not hit the sides of your pickup box or the rear of the passenger cabin.
The factory, Convert-A-Ball® Inc., dealers and installers will not be responsible for damages
to your trailer or towing vehicle caused by turning tighter than is possible with the 5GX installed.
Part 4 - Adjusting the adapter:
L
O
C
K
O
P
E
N
LO
C
K
O
P
E
N
LO
C
K
O
P
E
N
L
O
C
K
O
P
E
N
Ball Coupler - Positive Lock Handle Instructions
With the lock handle in
front of the slide lever,
twist curved end through
lock hole in the base.
Lock
Hole
Lock Handle
Slide
Lever
To achieve positive lock,
lift the lock handle up
and move behind the
slide lever.
Lower the handle to the
bed of the truck. This will
prevent the sliding lever
from moving from the
locked position
To Remove, lift the handle
back up and over the slide
handle.
Either end of the lock handle can
be used to move the slide lever
to the open or locked position
from the side of the truck.
A C DB
Lowest setting 12”
Adjust 12” - 14” Adjust 14” - 16”
 Loading...