

Page 1
HOME ENTERTAINMENT FOR ALL
Plato Complete Guide V1.3.3
Convert Technologies
Suite 3
Acorn Place
Alfreton Road
Derby.
DE21 4AS
Page 2

Plato Complete Guide V1.3.3
Convert Technologies 1
Plato Introduction
Congratulations on your purchase of Plato!
Plato is a highly capable product and will revolutionise the way you, and your family, access
audio and video content in your home; consolidating all media access through one simple
interface. This home entertainment/media management system is designed and
manufactured to the highest specification in the UK and rigorously tested to ensure you
enjoy many years of listening and viewing pleasure.
Our vision is to bring harmony to your media. As such, its correct installation and operation
will have a major influence on the overall performance of your new set up. Please read the
contents of this manual thoroughly, as it will help you to understand your Plato system
better.
Page 3

Plato Complete Guide V1.3.3
Convert Technologies 2
Contents
1. Before you begin ........................................................................................................................ 7
1.1. Safety First .................................................................................................................................. 7
1.1.1. Warnings and cautions ....................................................................................................... 7
1.1.2. Location of your Plato unit ................................................................................................. 8
1.1.3. Ventilation .......................................................................................................................... 8
1.1.4. Servicing ............................................................................................................................. 8
1.2. Unpacking your Plato box ........................................................................................................... 9
1.3. Maintenance ............................................................................................................................... 9
2. Your Plato Unit ......................................................................................................................... 10
2.1. Front View ................................................................................................................................ 11
2.2. Rear View .................................................................................................................................. 11
2.2.1. Pre-Amplifier module ....................................................................................................... 12
2.2.2. Power amplifier module .................................................................................................. 12
2.2.3. Power supply module ...................................................................................................... 12
2.2.4. Digital module .................................................................................................................. 12
2.2.5. External connections ........................................................................................................ 13
2.3. Connecting your Plato .............................................................................................................. 14
2.3.1. Connecting to the mains supply....................................................................................... 14
2.3.2. Connecting your analogue inputs .................................................................................... 14
2.3.3. Connecting your digital inputs ......................................................................................... 15
2.3.4. Connecting your speakers via 4mm banana plugs ........................................................... 16
2.3.5. Connecting to an external amplifier ................................................................................ 16
2.3.6. Connecting to a digital sound system .............................................................................. 17
2.3.7. Connecting to the internet directly via your home router .............................................. 17
2.3.8. Connecting to your TV via HDMI ...................................................................................... 18
2.3.9. Playing to remote TVs and speakers ................................................................................ 18
2.4. Switching on your Plato unit and launching the Plato App ...................................................... 19
2.4.1. Switching off your Plato unit using the rear panel switch ............................................... 19
2.4.2. Switching off your Plato unit using the front panel On/Off button ................................. 19
2.4.3. Switching on your Plato unit using the front panel On/Off button ................................. 19
3. The Plato Control App for Android ........................................................................................... 21
3.1. Introduction .............................................................................................................................. 21
3.2. Using the touchscreen .............................................................................................................. 21
Page 4

Plato Complete Guide V1.3.3
Convert Technologies 3
3.3. The Plato App Overview ........................................................................................................... 21
3.3.1. The Plato Main Drawer Feature Menu ............................................................................ 22
3.3.2. Selected Device ................................................................................................................ 23
3.4. Plato features menu options overview .................................................................................... 24
3.4.1. External Source ................................................................................................................ 24
3.4.2. Media Library ................................................................................................................... 24
3.4.3. Internet Radio .................................................................................................................. 24
3.4.4. Playlist .............................................................................................................................. 24
3.4.5. Import .............................................................................................................................. 25
3.4.6. HighResAudio ................................................................................................................... 25
3.5. Now Playing .............................................................................................................................. 25
3.5.1. Volume control ................................................................................................................ 26
3.5.2. Mute ................................................................................................................................. 27
3.5.3. HDMI audio route ............................................................................................................ 27
3.5.4. Media controls ................................................................................................................. 27
3.5.5. Lyrics ................................................................................................................................ 27
3.5.6. Show Media Info .............................................................................................................. 27
3.6. Downloading the Plato Android app to your smartphone or tablet ........................................ 28
3.7. Updating your Plato App & System Firmware .......................................................................... 29
3.8. Advanced Menu Options Overview .......................................................................................... 30
3.8.1. Search ............................................................................................................................... 30
3.8.2. Video mode select............................................................................................................ 30
3.8.3. Exiting the Plato App ........................................................................................................ 31
3.8.4. Advanced menu list .......................................................................................................... 32
4. Configuring and using external (pre-amp) inputs .................................................................... 33
4.1. Adding a Turntable ................................................................................................................... 34
4.2. Adding a CD Player ................................................................................................................... 35
4.3. Adding other devices ................................................................................................................ 37
5. Configuring Inputs .................................................................................................................... 38
5.1. Generic Controls ....................................................................................................................... 38
5.2. Input Gain ................................................................................................................................. 38
5.3. Phono controls ......................................................................................................................... 38
5.3.1. Moving Magnet/Moving Coil Select ................................................................................ 39
5.3.2. Input Resistance ............................................................................................................... 39
Page 5

Plato Complete Guide V1.3.3
Convert Technologies 4
5.3.3. Input Capacitance ............................................................................................................ 39
5.3.4. Rumble Filter .................................................................................................................... 39
5.4. Record Controls ........................................................................................................................ 39
5.4.1. Record default setting ...................................................................................................... 39
5.4.2. Record Bit Depth .............................................................................................................. 39
5.4.3. Record Sample Rate ......................................................................................................... 39
6. Playing music from external inputs .......................................................................................... 40
7. Recording from an external source .......................................................................................... 42
7.1. Monitoring Input Levels ........................................................................................................... 42
7.2. Changing Input Gain settings. ................................................................................................... 44
7.3. Recording a track or album ...................................................................................................... 44
7.3.1. Media list tab ................................................................................................................... 45
8. Media Library ............................................................................................................................ 48
8.1. Playing music from your Library ............................................................................................... 48
8.2. Using media Search .................................................................................................................. 50
8.3. Additional features on the More Options menu ...................................................................... 51
8.3.1. Play Menu ........................................................................................................................ 51
8.3.2. Add to Playlist .................................................................................................................. 51
8.3.3. Edit ................................................................................................................................... 51
8.3.4. Delete ............................................................................................................................... 51
8.3.5. Download ......................................................................................................................... 52
8.3.6. Export As .......................................................................................................................... 52
8.4. Viewing image files ................................................................................................................... 53
8.5. The Play Queue tab .................................................................................................................. 54
8.5.1. Modifying the Play Queue ............................................................................................... 54
8.5.2. Saving a Playlist from the Play Queue .............................................................................. 55
8.6. Now Playing in Media Library ................................................................................................... 56
9. Internet Radio ........................................................................................................................... 57
9.1. Saving radio stations to your PRESETS list ................................................................................ 58
9.2. Listening to your saved radio stations ...................................................................................... 59
9.3. Search for radio stations .......................................................................................................... 59
10. Playlists ..................................................................................................................................... 60
10.1. To create a Playlist from the Media Library ............................................................................. 60
10.2. To Play a Playlist ....................................................................................................................... 61
Page 6

Plato Complete Guide V1.3.3
Convert Technologies 5
10.3. Recently Added playlist ............................................................................................................ 61
10.4. Playlist options ......................................................................................................................... 62
10.5. Mood Grid ................................................................................................................................ 62
10.5.1. Building a mood based playlist ........................................................................................ 63
11. Import ....................................................................................................................................... 65
11.1. Importing from a CD ................................................................................................................. 65
11.1.1. Alternatives ...................................................................................................................... 67
11.1.2. Eject CD ............................................................................................................................ 67
11.1.3. Individual track ripping .................................................................................................... 67
11.1.4. Show Media Info .............................................................................................................. 67
11.2. Importing from a USB memory stick or drive. .......................................................................... 68
11.3. Importing video files ................................................................................................................. 69
11.4. Importing image files ................................................................................................................ 69
11.5. File Manager ............................................................................................................................. 69
12. Streaming audio and video ....................................................................................................... 71
12.1. Streaming music out to remote wireless speakers .................................................................. 71
12.2. Video playback.......................................................................................................................... 71
12.2.1. To watch video from your Media Library......................................................................... 72
13. Accessing HighResAudio content ............................................................................................. 73
13.1. Download manager .................................................................................................................. 73
14. Advanced menu options ........................................................................................................... 75
14.1. Server Settings and Status ........................................................................................................ 75
14.1.1. Info ................................................................................................................................... 75
14.1.2. Progress ............................................................................................................................ 76
14.1.3. Backup and restore .......................................................................................................... 77
14.1.4. Media Rescan ................................................................................................................... 77
14.1.5. Settings ............................................................................................................................. 77
14.1.6. Debug ............................................................................................................................... 78
14.2. Factory Reset ............................................................................................................................ 78
14.3. Exit ............................................................................................................................................ 79
14.4. UPnP friendly name .................................................................................................................. 79
15. Operating Plato using an Air Mouse remote controller ........................................................... 80
16. Advanced Media Library editing options .................................................................................. 81
16.1. Editing Artwork ......................................................................................................................... 83
Page 7

Plato Complete Guide V1.3.3
Convert Technologies 6
16.2. Adjust start/end points of a track ............................................................................................ 84
16.3. Creating a missing track............................................................................................................ 86
16.4. Merging a fragmented album ................................................................................................... 90
17. Backup and restore ................................................................................................................... 94
17.1. Selecting a backup device ......................................................................................................... 94
17.2. Configuring your backup .......................................................................................................... 95
17.3. Restoring data from a backup copy .......................................................................................... 96
18. iOS Application ......................................................................................................................... 97
19. Specifications ............................................................................................................................ 98
Page 8

Plato Complete Guide V1.3.3
Convert Technologies 7
1. Before you begin
This product bears the CE mark .
230V Products are designed to comply with the legal provisions of EU Directives
2006/95/EC, 2004/108/EC and 2011/65/EU. The standards which have been applied are
those which were in force at the time of the introduction of these products.
230V Products comply with the following safety standard EN60065:2002 + A12:2011.
100-120/230V Products are designed to comply with the legal provisions of EU Directives
2014/35/EU, 2014/30/EU, 2011/65/EU, 2012/19/EU, 2009/125/EC. The standards which
have been applied are those which were in force at the time of the introduction of these
products.
100-120/230V Products are designed to comply with the following safety standards
EN60950-1: 2006 + A2: 2013
For the USA and Canada, UL 60950-1 & CAN/CSA C22.2 No. 60950-1.
This product must be earthed. Please ensure that other equipment connected to it is earthed
according to the manufacturer’s instructions.
1.1. Safety First
1.1.1. Warnings and cautions
Your Plato unit operates from a fixed supply voltage which is marked on a label below the
mains inlet on the rear panel. Before connecting the mains lead please check that your mains
supply corresponds to the appropriate label below:
230V Products: Voltage Range 220V-240V AC, 50Hz
100-120/230V Products: Voltage Range 100-120/230V, 50/60Hz
If you move to another area with a different mains voltage, please contact your local
distributor to have your product converted.
Use only the mains lead supplied to connect your Plato to the mains power socket. The
mains lead supplied has a moulded IEC connector which plugs into the IEC power inlet on the
unit’s rear panel. Keep the mains lead away from heat sources. Do not place a heavy object
on the mains lead. Do not modify the mains lead. Do not overload the mains socket. Do not
use a poor fitting mains socket. Do not use a damaged mains lead.
This product must be earthed and must be connected to a MAINS socket outlet with a
protective earthing connection. This product includes a MAINS switch that is located on
the rear of the unit, see the diagram in section 2.2.
Please ensure that other equipment connected to Plato is earthed according to the
manufacturer’s instructions.
Page 9

Plato Complete Guide V1.3.3
Convert Technologies 8
The Plato unit incorporates a mains fuse that is located on the rear panel, next to the AC
switch. This must only be replaced by a fuse of the type and rating as described on the
rating label on the rear panel of the unit. If in any doubt, consult a qualified electrician.
If the Plato unit is likely to be unattended for some time, unplug it from the mains supply.
Disconnect the Plato unit from the mains supply before you connect or disconnect any
equipment from the unit’s rear panel. Make sure all electrical connections are properly
made.
1.1.2. Location of your Plato unit
Your Plato unit should be situated in a well ventilated area.
Your Plato unit should be situated on a hard surface such as a strong shelf or open support
cabinet.
Your Plato unit should not be situated in a closed cabinet.
Your Plato should be kept away from sources of heat, excess dust, humidity and from direct
sunlight.
Ensure there is a minimum of 10cms (4 inches) of ‘free space’ all the way around the Plato unit.
Do not expose your Plato to rain or moisture, this unit must not be exposed to dripping or
splashing water.
Do not place objects filled with liquid such as vases on top of or above the unit.
Never allow liquids or other objects to fall into the unit.
Your Plato unit should not be placed directly on top of or underneath another unit.
Do not use your Plato unit outdoors.
Your Plato unit is designed to be operated at an ambient temperature of 10C to 35C.
No naked flame sources, such as lighted candles should be placed on the unit.
1.1.3. Ventilation
Your Plato unit includes slots and openings in the cabinet to provide ventilation. These openings
should not be blocked or covered. Do not place your Plato unit on soft furnishings, carpets or
any other surface likely to hinder normal ventilation. Do not allow curtains, tablecloths
newspapers or other similar items to block the ventilation slots. Never insert any items into the
ventilation openings.
1.1.4. Servicing
This unit contains no user serviceable parts.
DO NOT attempt to service it yourself. Never remove any covers from the Plato unit.
There are no user serviceable parts inside but there are high voltage live parts. Remember
that contact with AC mains can be lethal or can cause an electric shock.
Unauthorised servicing will render the warranty void. Refer all servicing to qualified service
personnel.
Page 10

Plato Complete Guide V1.3.3
Convert Technologies 9
1.2. Unpacking your Plato box
Included in the packing of your Plato system you will find:
• Plato Unit
• 1 x Mains lead
• 1 x HDMI Cable
• Important User Notes (Includes Safety Instructions)
• USB CD/DVD drive
• Android remote control tablet (Amplified Models)
1.3. Maintenance
After disconnecting the Plato unit from the mains supply, the casing and front panel may be
cleaned with a lightly dampened soft cloth or chamois leather. Avoid using abrasives or
solvents.
Page 11

Plato Complete Guide V1.3.3
Convert Technologies 10
2. Your Plato Unit
Plato integrates with traditional Hi-Fi components (CD player, Turntable, Tape Deck) via
analogue or digital inputs connected to the Plato pre-amplifier, which can be accessed at the
rear of the unit. Plato can connect to your home/office network and is therefore able to
access audio/video content that may exist on other UPnP (Universal Plug and Play) servers
connected on that network, and stream that content to other UPnP compliant devices.
The Plato system elements are:
Integrated Pre-amplifier including:
• 4 x pairs Analogue Inputs
• 4 x Digital Inputs
• 1 x pair Analogue Output
• 2 x Digital Outputs
• Digital to Analogue Convertor Module (DAC)
• Analogue to Digital Convertor Module (ADC)
Integrated Stereo Power Amplifier with 4mm banana speaker connectors
Internal Hard Drive
A touch screen control panel (front panel)
A USB Interface (front panel)
System start up/shut down button (front panel)
Main power on/off switch (rear panel)
HDMI output, network connectivity, and USB interfaces for additional storage
Android Plato Control App
Note that Plato may also supplied with an Amazon Kindle Fire tablet, and a USB CD/DVD
drive (*Plato-B/Plato-A only). The Kindle tablet can be used as a remote-control device to
provide remote access to Plato’s features. The CD/DVD drive integrates high speed ripping of
audio CDs direct to Plato.
Page 12
Plato Complete Guide V1.3.3
Convert Technologies 11
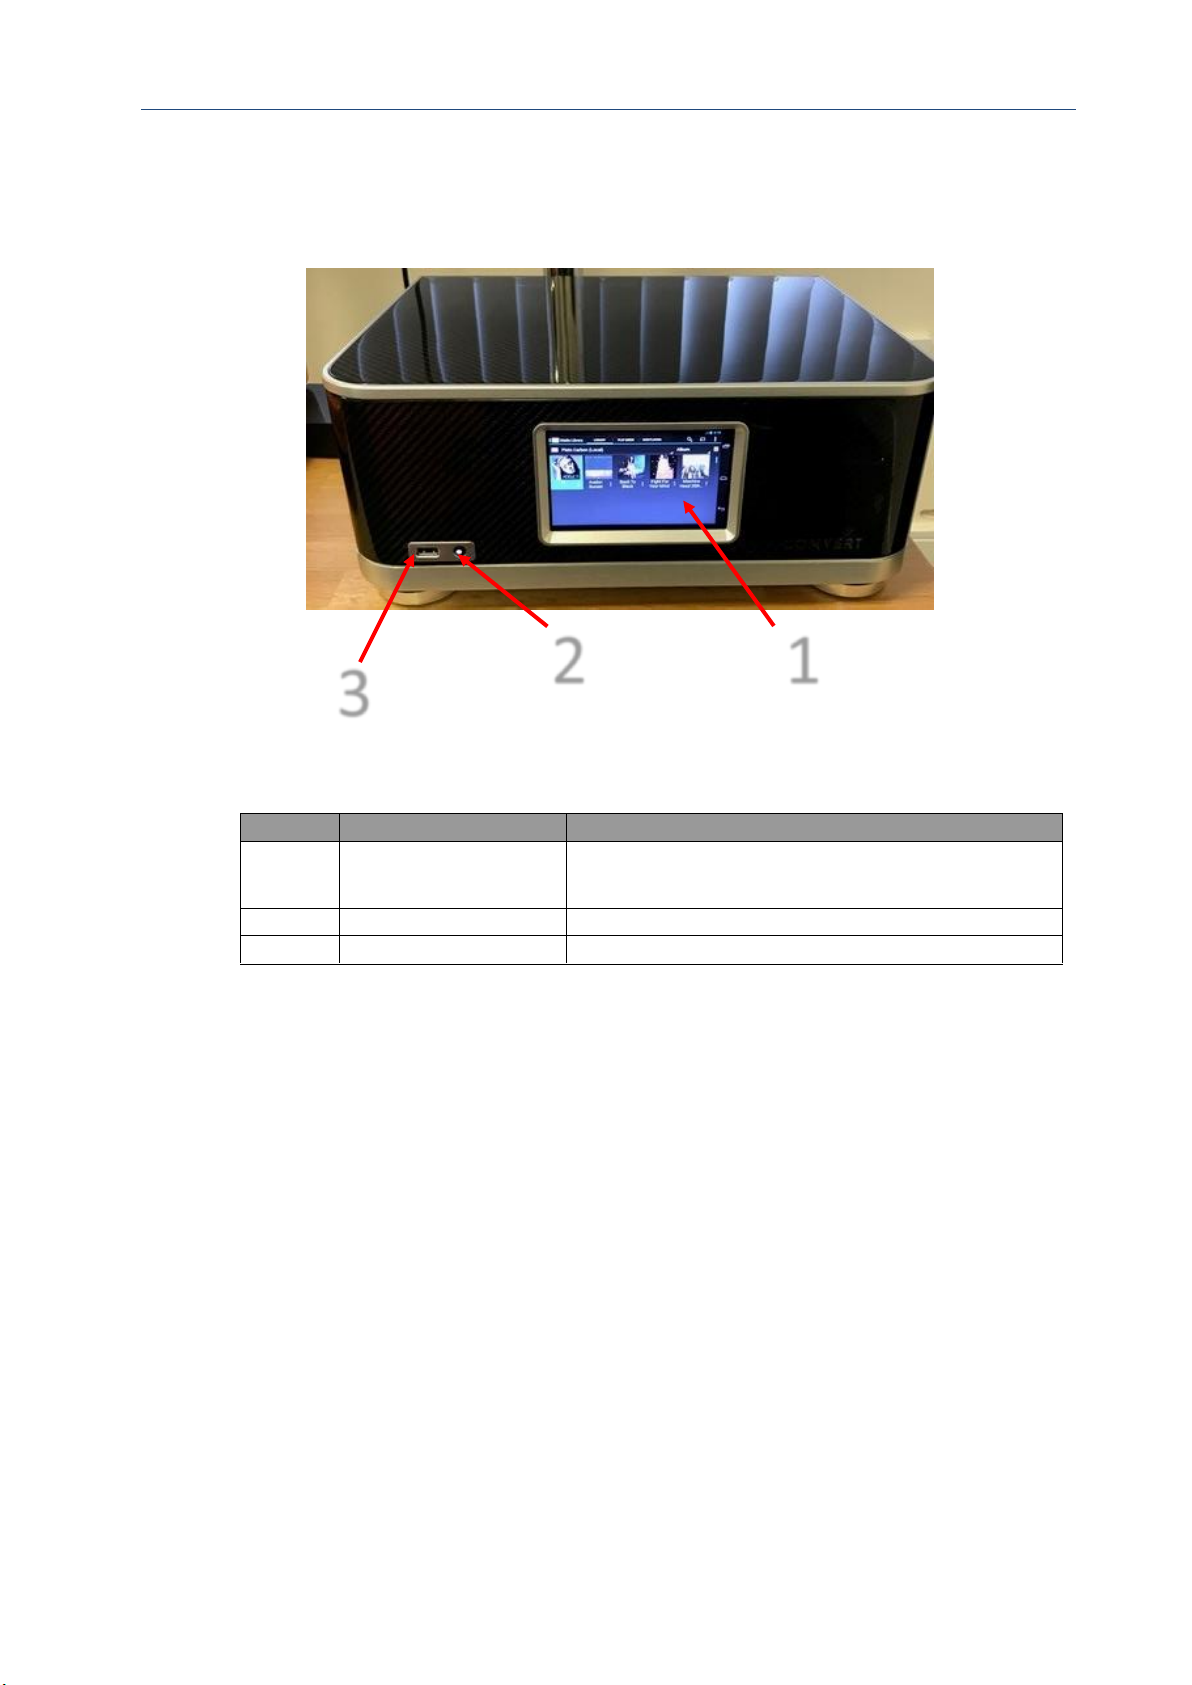
2.1. Front View
Item No
Item
Description
1
Android Display
A touchscreen display and app controller to operate
your Plato unit.
2
System On/Off Button
To switch your Plato unit to standby mode.
3
USB Connector
To connect a USB device to transfer media files.
Plato is set by default to go to sleep after 10 minutes of inactivity using the display. This can
be changed by selecting the android settings/display/sleep timer or by selecting “standby
timer” in the Plato App
If your Plato units goes to sleep, simply tap the screen to wake it up. Should tapping the
screen not wake the unit, simply single press the System On/Off Button once and wait
approx. 7 seconds.
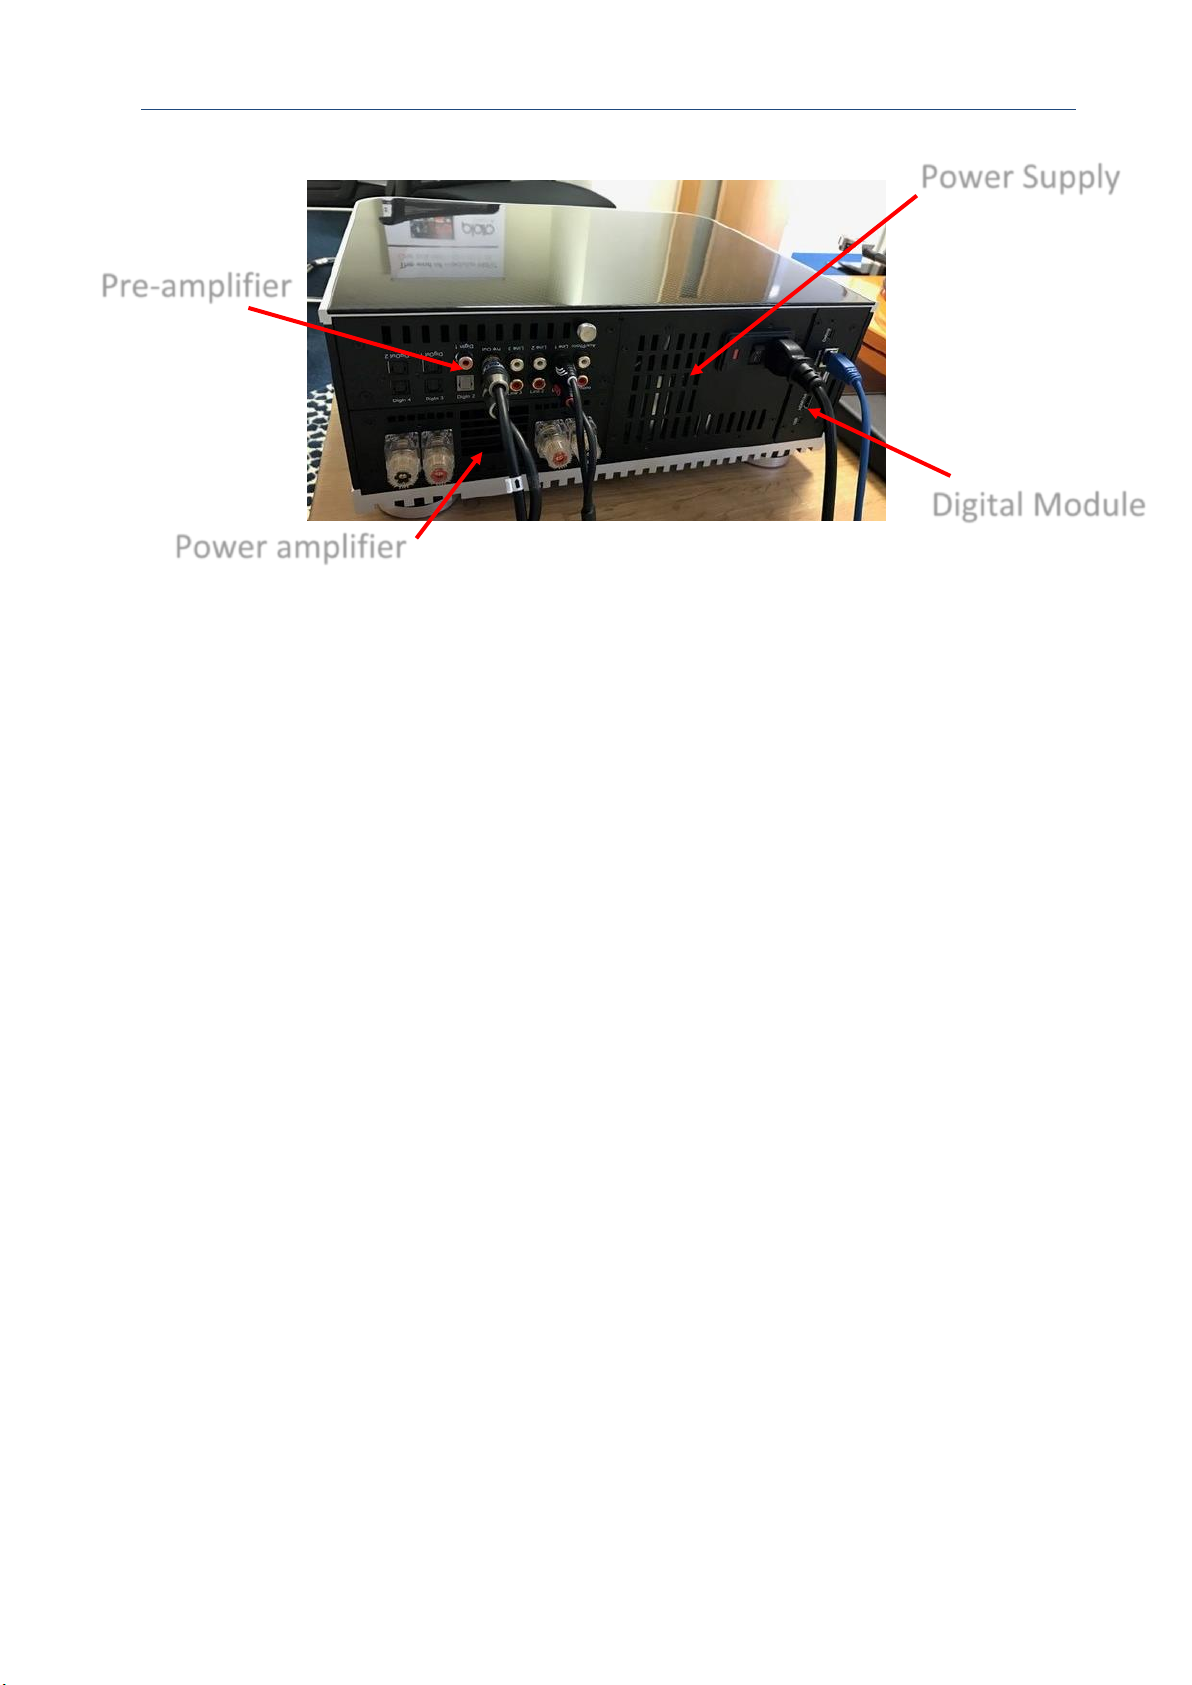
2.2. Rear View
The design of Plato is highly modular. There are separate modules for:
• Pre-amplifier
• Power amplifier
• Power supply
• Digital module
3
1
2
Page 13
Plato Complete Guide V1.3.3
Convert Technologies 12
#Note that Plato’s modules are not user-replaceable. Unauthorised removal can expose
hazardous voltages, and will invalidate the product warranty.
2.2.1. Pre-Amplifier module
The pre-amplifier provides inputs to connect digital or analogue sources to Plato. It includes
volume control for both digital and analogue sources.
The pre-amplifier also includes an Analogue to Digital Convertor (ADC) to convert analogue
sources into digital formats (digital recording); and a Digital to Analogue Convertor (DAC) to
playback digital sources through analogue speakers.
The pre-amplifier is also equipped with analogue and digital outputs to allow connection of
third party power amplifiers or DAC devices.
2.2.2. Power amplifier module
The power amplifier takes the pre-amplifier output and converts it into a signal suitable to
drive external speakers. Connection to speakers is via the 4mm banana plug connectors.
It is possible to purchase Plato without the power amplifier module installed, in this case a
blanking plate will be supplied in place of the power amplifier module.
2.2.3. Power supply module
The power supply module provides power to the system. The linear power supply is very
substantial in order to provide the highest audio quality.
2.2.4. Digital module
The digital module contains the main microprocessor unit and an internal disk drive for
storing data. This module provides all digital connections to Plato including home/office
network, and USB expansion.
Pre-amplifier
Power amplifier
Digital Module
Power Supply
Page 14
Plato Complete Guide V1.3.3
Convert Technologies 13
An HDMI output connection allows direct connection of a TV to Plato for video playback. It is
also possible to mirror the front screen controls to a connected TV.
Note that Plato offers 3 USB sockets for expansion. The socket on the front of the unit is
configured for import/export (see section 11.2) to transfer data into, or out of Plato. Media
files located on USB devices plugged into the front port will not be directly accessible to
Plato. Please connect memory sticks or devices containing data you with to import to the
front USB socket.
Please use the rear USB ports for adding expansion storage capacity to Plato.
CD drives, and backup drives can be connected to any of the USB sockets whichever is most
convenient.
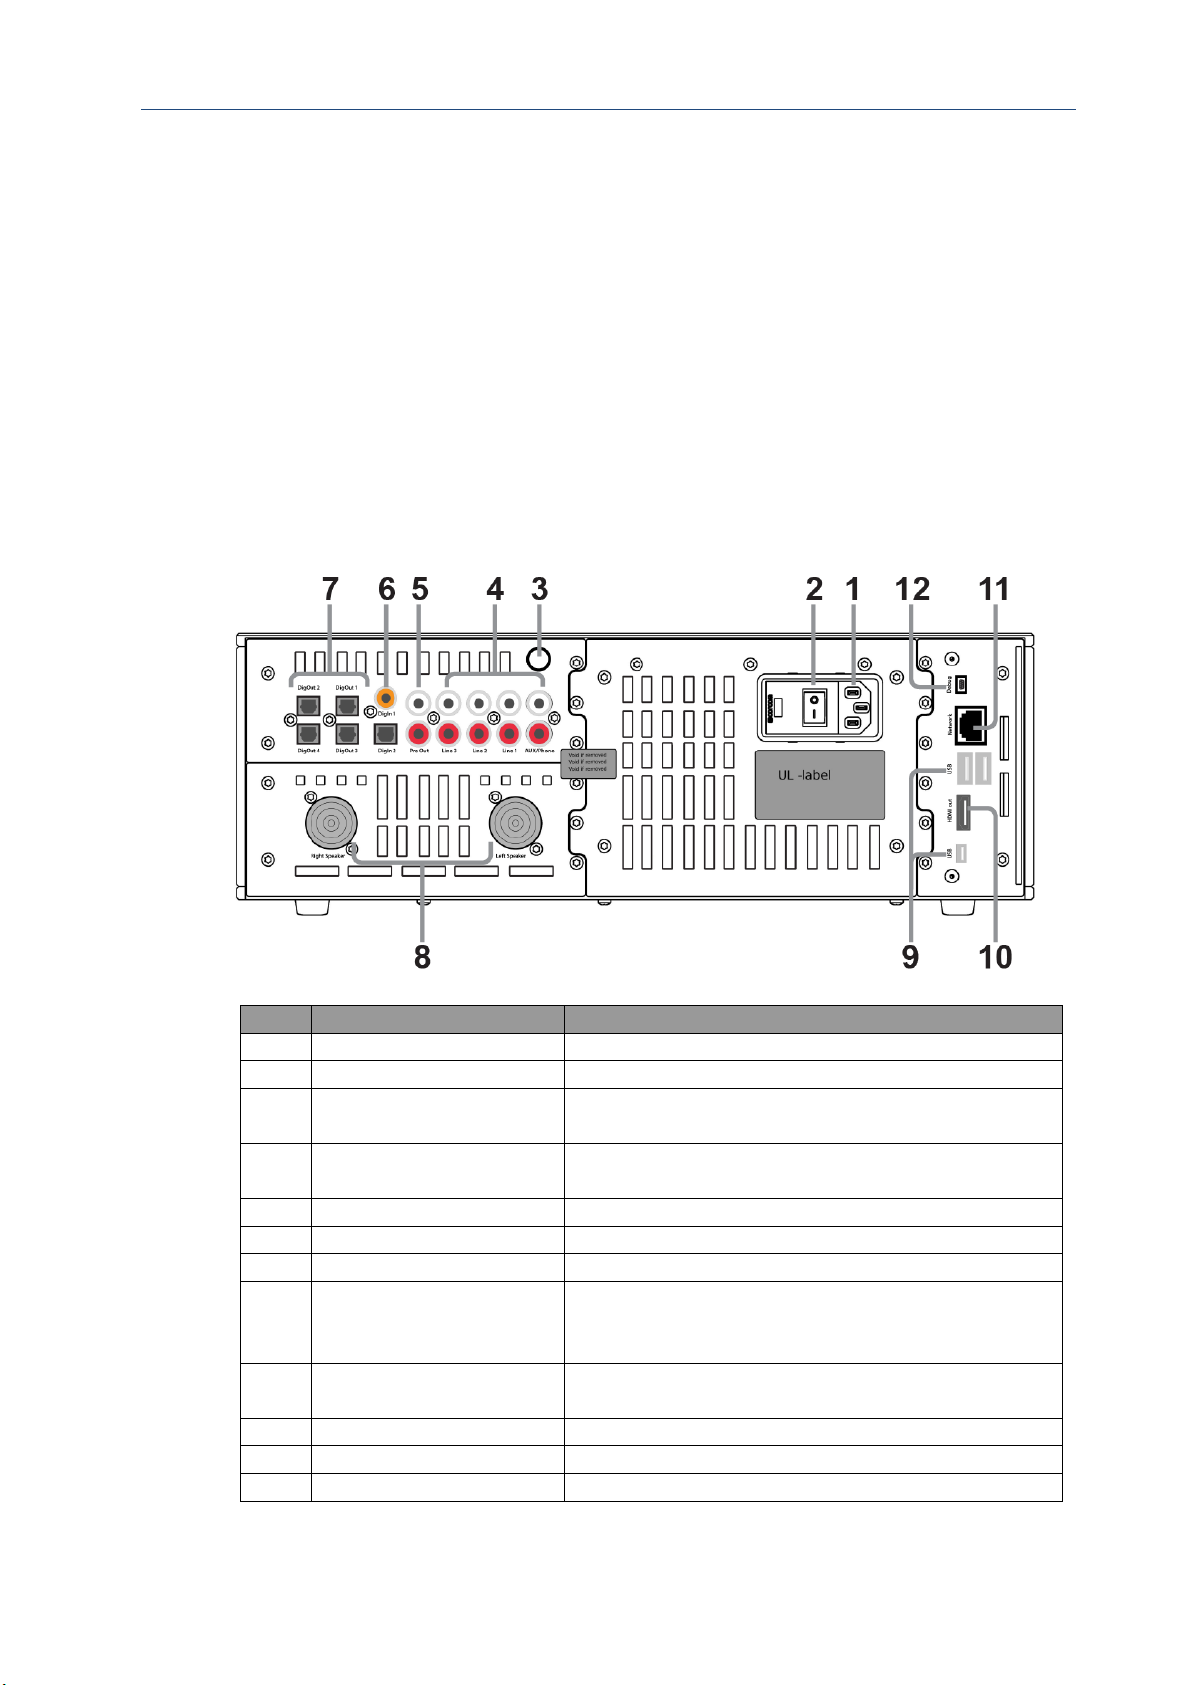
2.2.5. External connections
No
Item
Description
1
Mains power input
To connect you power lead (supplied).
2
Mains power switch
To switch on your unit.
3
Phono earth point
To earth phono input (check with turntable
manufacturer’s details).
4
Analogue phono/line
Inputs
4 Analogue inputs.
AUX/Phono reserved for a turntable.
5
Analogue pre-amp output
To connect to external amplifier and speaker system.
6
Digital inputs
To connect 3 x Optical + 1 x Coaxial Digital Inputs.
7
Digital outputs
To connect to external digital systems.
8
Neutriks now
replaced with 4mm
Banana Plug Connectors
To connect to your speakers.
9
USB Connections
To connect additional USB devices for storage
expansion or backup.
10
HDMI Output
To connect to TV.
11
Ethernet Network
To connect your home router.
12
Debug
Reserved.
Page 15

Plato Complete Guide V1.3.3
Convert Technologies 14
2.3. Connecting your Plato
2.3.1. Connecting to the mains supply
You must not plug your Plato unit into the mains until you have connected your Plato unit
to the other equipment in your system.
Your Plato unit operates from a fixed supply voltage which is marked on a label below the
mains inlet on the rear panel. Before connecting the mains lead please check that your mains
supply corresponds to the appropriate label below:
230V Products: Voltage Range 220V-240V AC, 50Hz
100-120/230V Products: Voltage Range 100-120/230V, 50/60Hz
Do not connect it to a DC or any other supply.
If you move to another area with a different mains voltage, please contact your local
distributor to have your product converted.
Insert the 3-way connector on the supplied mains lead into the mains connector on the rear
panel of your Plato unit before you insert the plug into the mains supply.
Connect the plug on the other end of the mains lead into the mains socket outlet (and then
switch it on, if there is a switch by the mains wall socket).
The only way to disconnect your Plato unit from the mains is to remove the mains lead plug
from the mains socket. Therefore you must install your Plato unit near to the mains outlet
socket which should be easily accessible.
Whenever you disconnect your Plato unit from the main supply, always remove the mains
lead from the mains outlet socket before you remove the 3-way connector from the rear
panel of your Plato unit.
If you are in any doubt about the mains lead, its plug or its connection, consult a competent
electrician.
2.3.2. Connecting your analogue inputs
You can connect many audio devices to your Plato system using either digital or analogue
inputs.
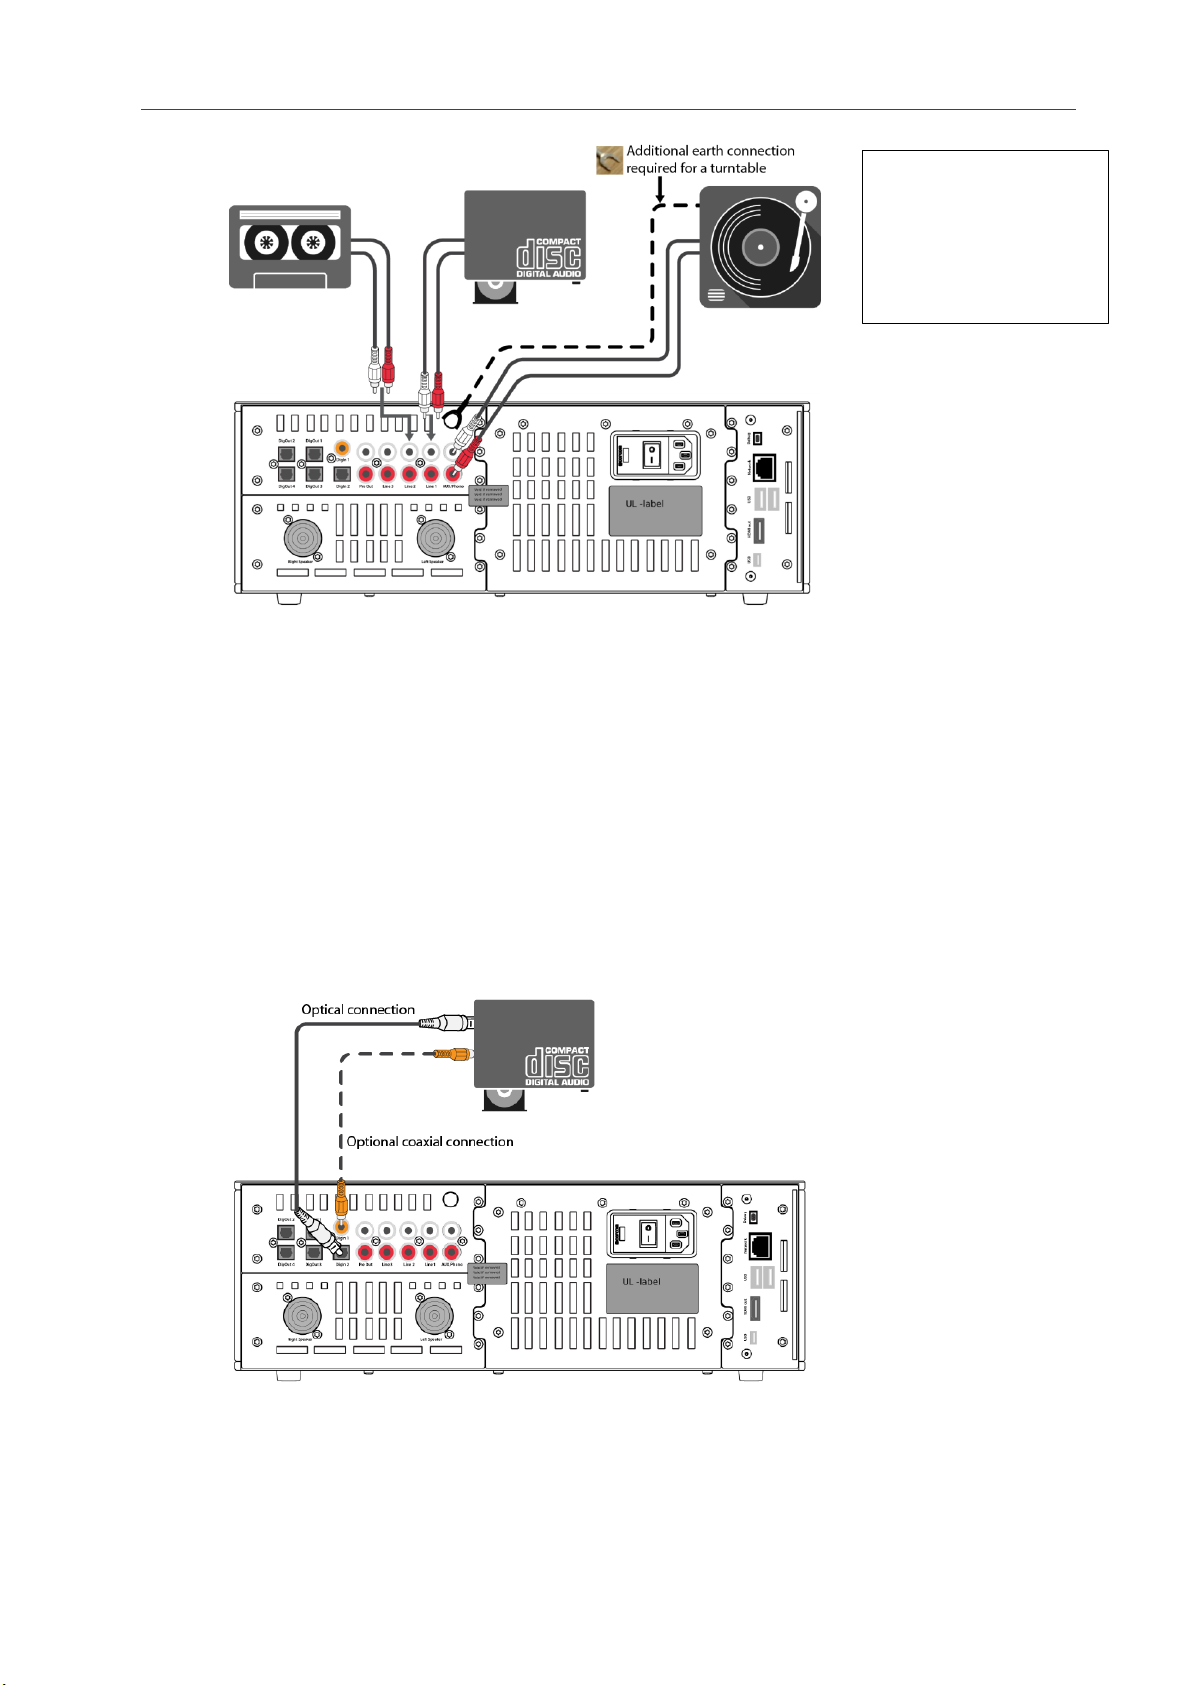
In the example shown below, a turntable, a CD player and a cassette player are connected
via the analogue inputs.
Page 16
Plato Complete Guide V1.3.3
Convert Technologies 15
The input on the far right labelled ‘AUX/Phono’ is reserved for a turntable/record player
input. If connecting a turntable to this input, you may also be required to add an earth
connection from the turntable to the Plato unit.
2.3.3. Connecting your digital inputs
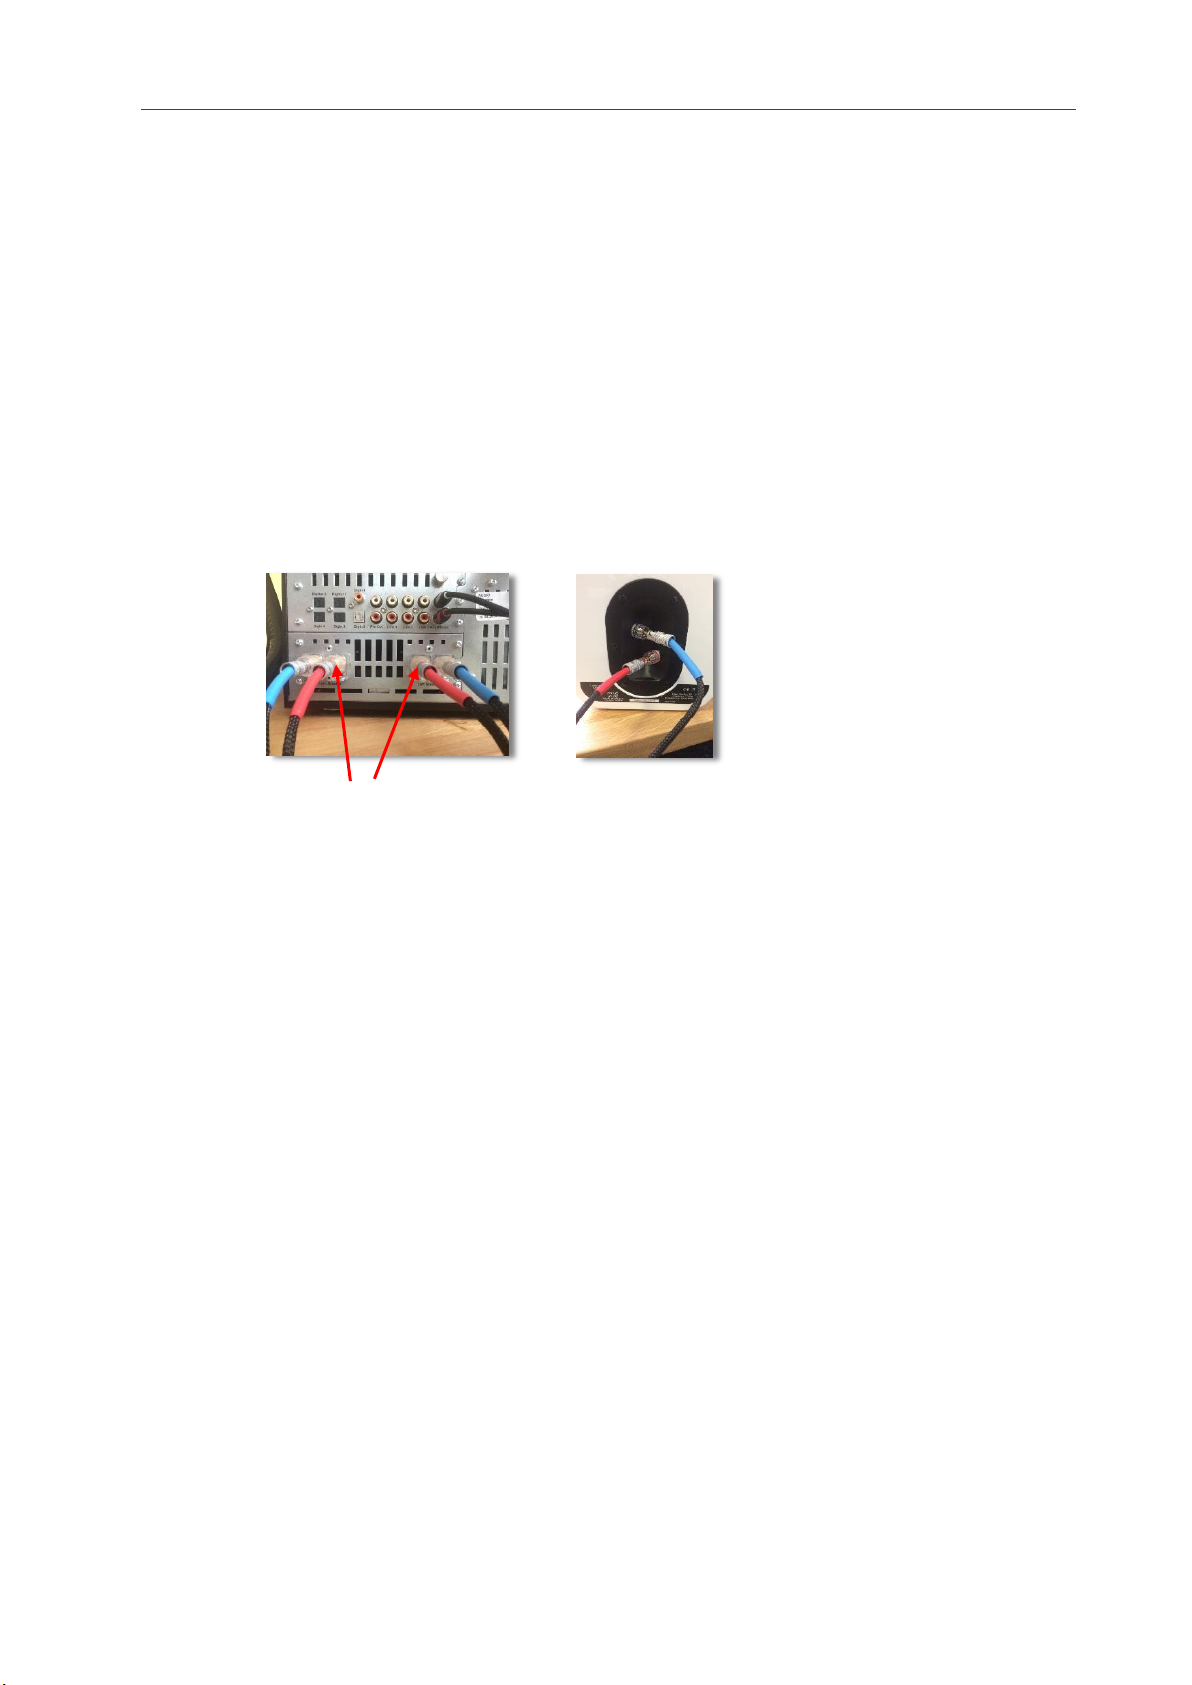
Some devices may provide a digital instead of analogue connection.
There are four digital input connectors on the rear panel of your Plato unit.
One is coaxial and three are optical. Select the appropriate connector for your digital input.
Note: Turntables
sometimes require an
additional earth
connection to the earth
point on the Plato rear
Page 17
Plato Complete Guide V1.3.3
Convert Technologies 16
2.3.4. Connecting your speakers via 4mm banana plugs
These connections only apply to Plato models with an integrated power amplifier.
For models without this option, see following section 2.3.5: ‘Connecting to external
amplifier’.
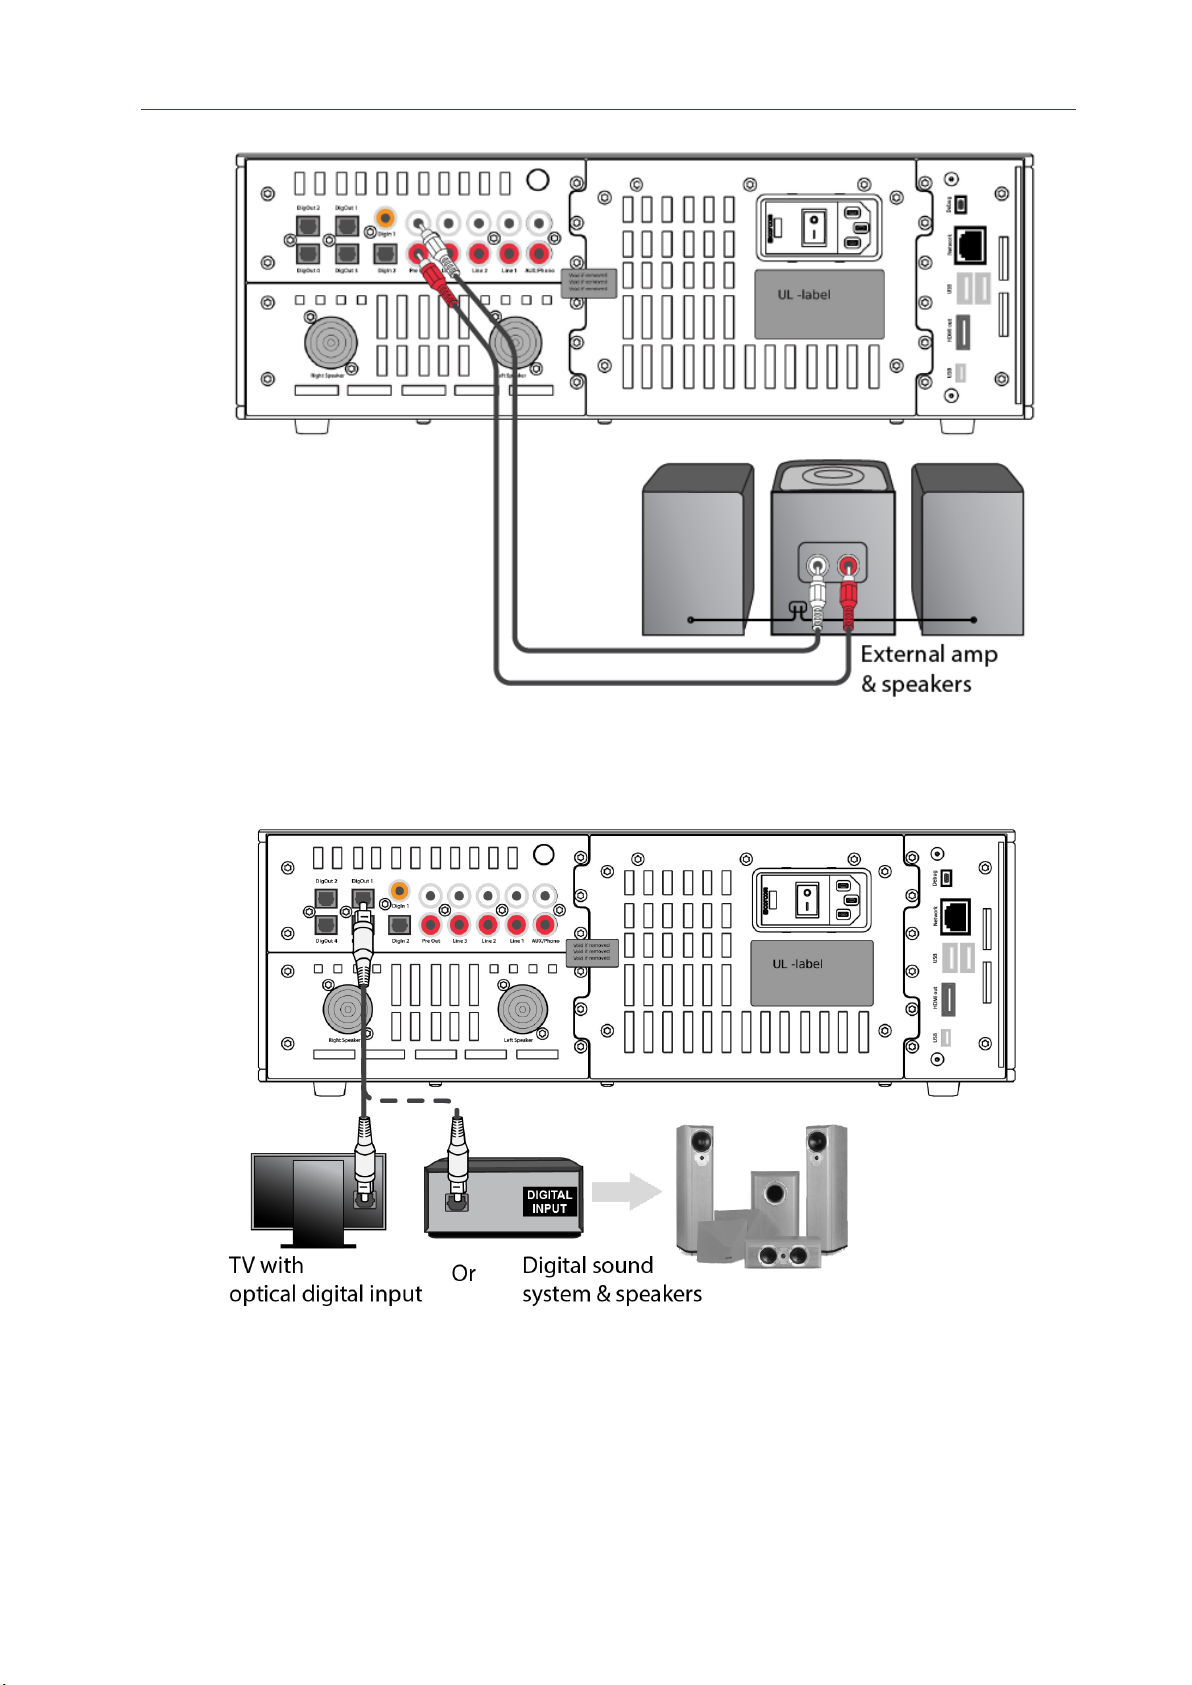
For best results use equal length speaker cable for both left and right outputs
Note that when connecting the speaker cables, always connect the speaker terminals before
plugging in the banana plugs to Plato.
Connect both left and right speaker to the rear of your Plato unit.
The connection to your speaker will vary according to speaker type. See typical types of
speaker connections below.
4mm Binding posts for banana plugs
2.3.5. Connecting to an external amplifier
This applies for Plato models without the integrated power amplifier option.
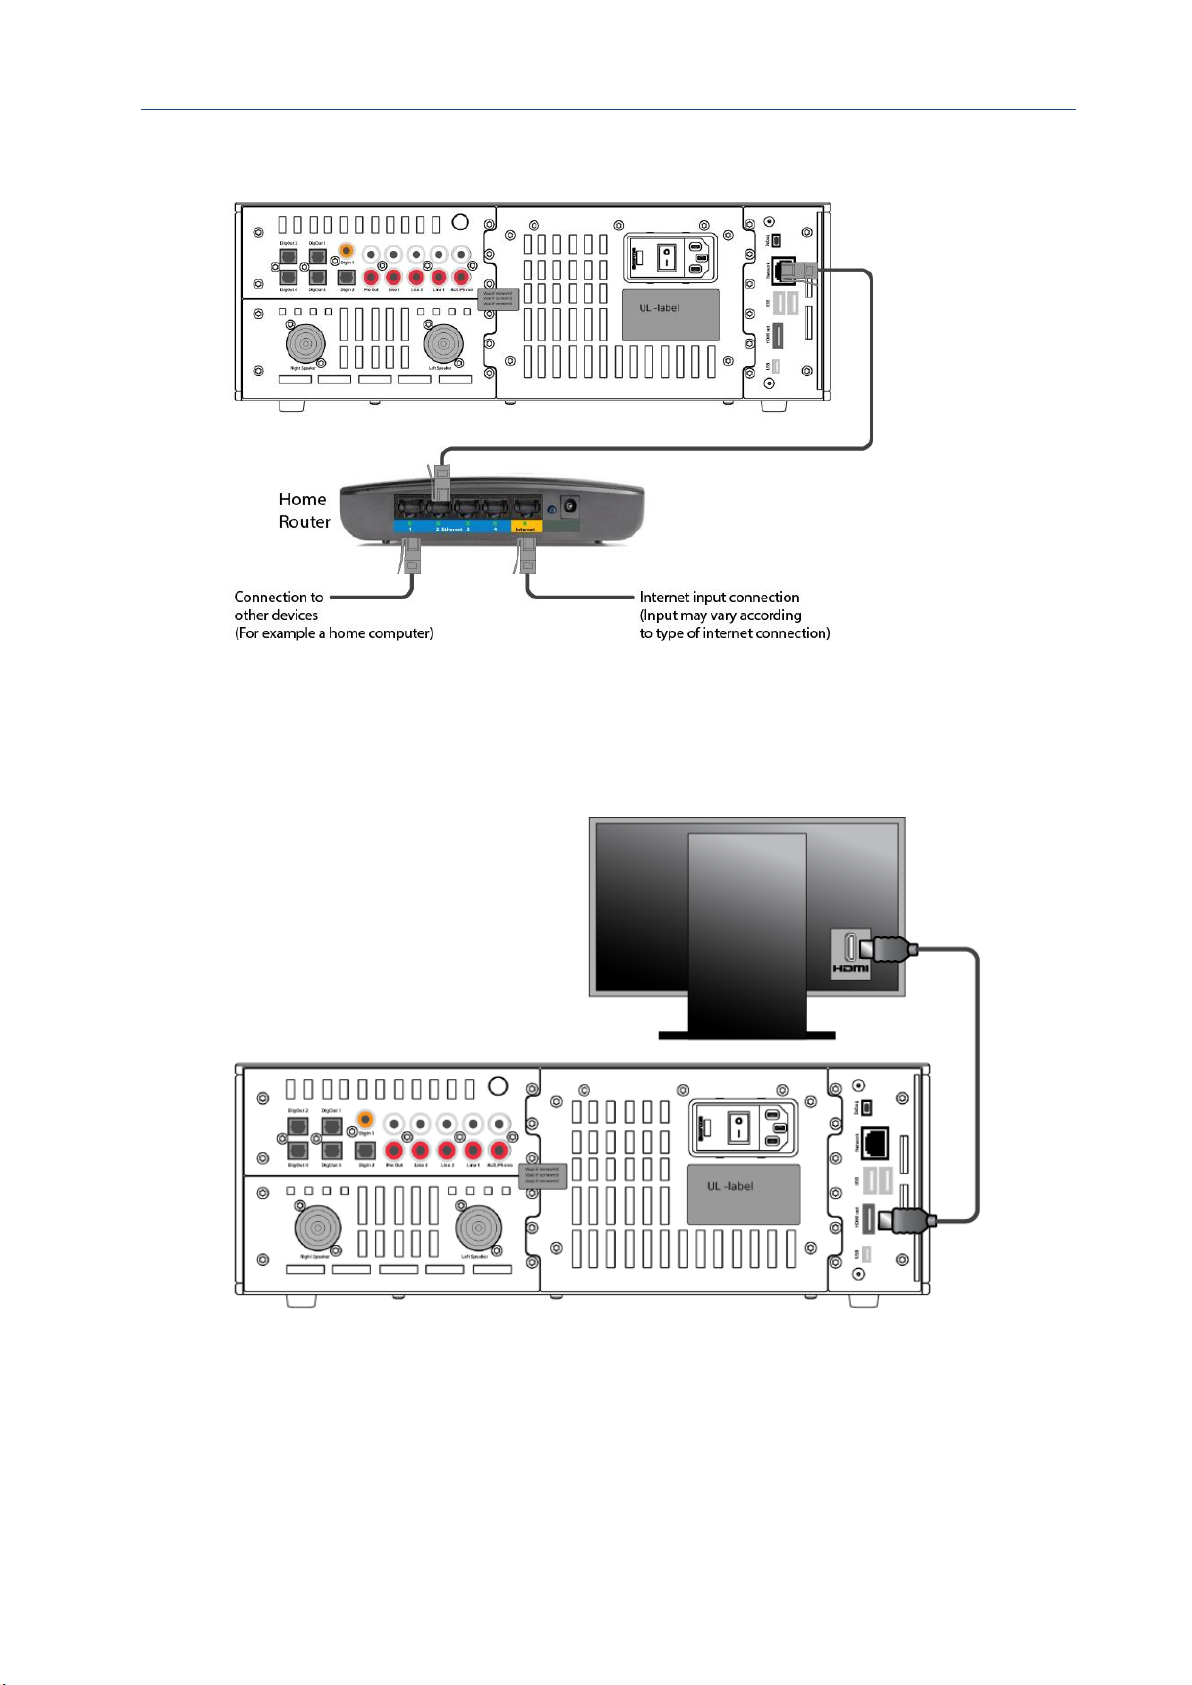
Use Phono cables from the Pre Out connections on the rear of the Plato unit to connect to
an external power amplifier and speaker system.
Page 18
Plato Complete Guide V1.3.3
Convert Technologies 17
2.3.6. Connecting to a digital sound system
You can also connect directly to an external digital sound type system.
2.3.7. Connecting to the internet directly via your home router
To use all the functions of your Plato unit, an internet connection is required.
The best option is to connect directly to your home router via an Ethernet cable.
See connection diagram below. Note that your home router and its connections may vary
according to the specific router and type of internet connection.
Page 19
Plato Complete Guide V1.3.3
Convert Technologies 18
2.3.8. Connecting to your TV via HDMI
Use the HDMI cable provided with your Plato unit to connect Plato directly to your TV.
2.3.9. Playing to remote TVs and speakers
You can play music and video to remote TVs and speakers using your home network, either
wired directly or through Wi-Fi.
Page 20
Plato Complete Guide V1.3.3
Convert Technologies 19
Note: All devices must be UPnP (universal plug and play) or DLNA (Digital Living Network
Alliance) compliant.
Using UPnP, there is no need to make any physical connections, the music or video data will
be sent via your home network, and you can use Plato’s control app to control all aspects of
playback.
See section 12 on how to output video and audio to other devices.
2.4. Switching on your Plato unit and launching the Plato App
1. Ensure that all connections are correct.
2. On the back of the unit, push the power switch down.
The front panel screen display launches the android
operating system.
3. Wait for the android operating system to complete its
startup routine (Approx 45 secs).
4. The Plato control app will start automatically once the system has completed it start up
sequence.
5. If the Plato control app does not start automatically, or has been previously closed, it can
be re-started by pressing the Plato logo:
See section 3 for details on using the Plato App.
2.4.1. Switching off your Plato unit using the rear panel switch
Warning: Do not switch off your Plato unit while the Plato App is running.
Always exit the Plato App before switching off using the rear panel switch. (See section 14.3).
Once the app has closed, you can turn off the Plato system using the front panel button as
described below.
2.4.2. Switching off your Plato unit using the front panel On/Off button
To switch off your Plato unit using the front panel On/Off button:
1. Press the On/Off button and keep button pressed for 2 seconds.
The android power menu appears.
2. Select Power Off from the menu.
Your Plato unit will power down.
Tips: If your Plato unit will be switched off for any length of time (more than 2 days) it is
recommended that you fully power down the unit using the rear panel switch.
2.4.3. Switching on your Plato unit using the front panel On/Off button
If your Plato unit has not been switched off using the rear panel switch, use the front panel
switch to power on again.
To switch your Plato unit on using the front panel on/off button:
Page 21

Plato Complete Guide V1.3.3
Convert Technologies 20
1. Press the front panel On/Off button. (Please wait up to 7 seconds for the front panel
display to light up again).
2. If the Plato control app is not already running, touch on the Plato icon located on the
desktop.
Page 22

Plato Complete Guide V1.3.3
Convert Technologies 21
3. The Plato Control App for Android
3.1. Introduction
The Plato App provides an easy to use, intuitive control surface to manage all aspects of
Plato’s operation. The App should be running at all times on Plato itself, and the touchscreen
on Plato can be used to control its operation. However, it is often more convenient to use a
remote device (standard tablet or smart-phone) to allow remote operation of Plato and its
features. Provided your remote device has access to the same network as Plato, you will
have access to Plato and its functions, even if Plato is located in a different room of the
house.
Plato is now supplied with a basic Android Kindle Fire tablet which supports the Plato control
app. See section 3.6 for details on how to download the Plato app to the supplied tablet.
This section describes the operation of the Android control App. An iOS version of the app is
also available for iOS based devices. (See section 18) for details on using Plato with an iOS
device.
The Android version of Plato’s control app is freely available from the Google PLAY, or
Amazon app stores. Simply type ‘Plato Convert Technologies’ into the app search and you
will find the app. Note that the app is capable of controlling many UPnP devices, but is
intended for use by Plato customers. For this reason the app will remain unusable until it has
detected a Plato device on your network.
Note that we realise operating Plato can be a tricky business, and not everyone has time to
read a 100 page user manual. So, we have generated a number of short How-To videos
together with a list of common questions to help. Please go to our Plato online support page
for more details:
www.convert-av.com/plato-faqs/
3.2. Using the touchscreen
Throughout this manual, specific terms are used that refer to actions used with the
touchscreen display.
Term
Meaning
Physical Action
Select
To select an item or menu option
Touch briefly on the item or
menu on the touchscreen display.
Long Press
To access additional options for
that item or menu option
Touch and hold on the item or
menu on the touchscreen display.
3.3. The Plato App Overview
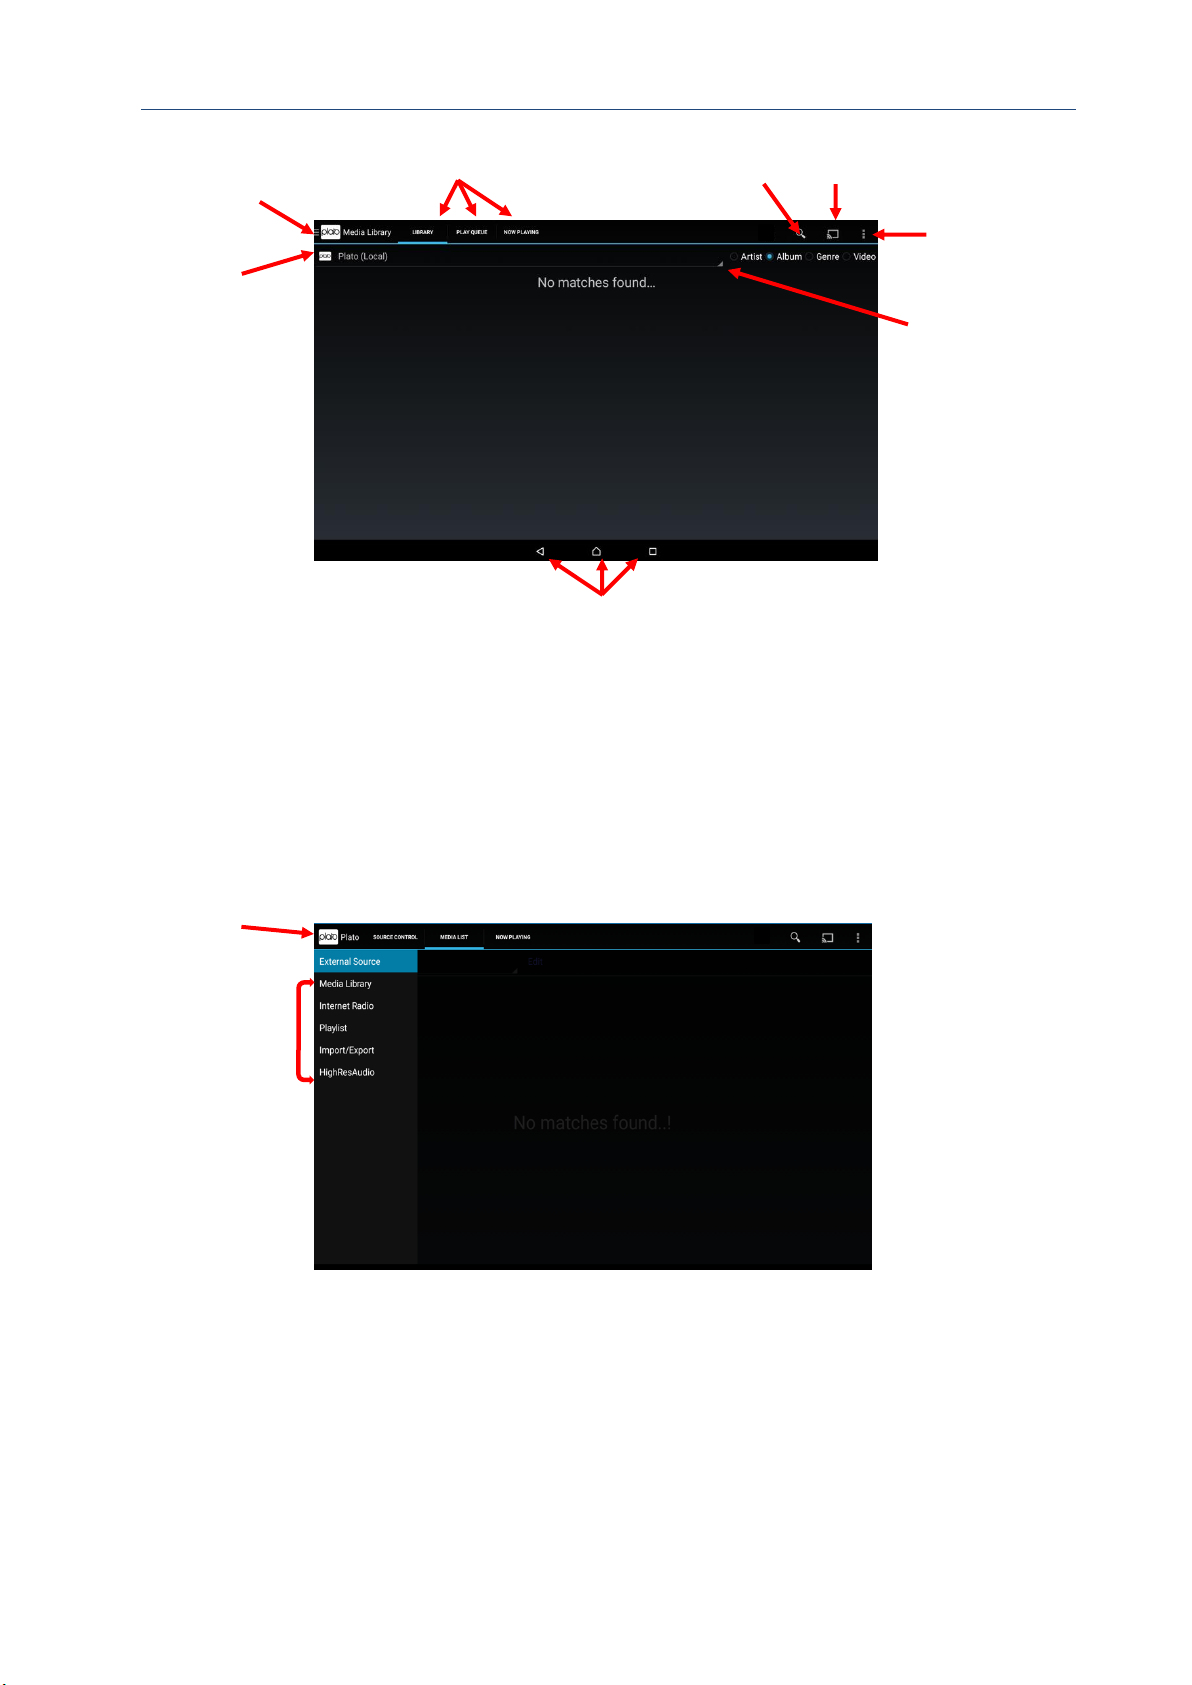
The first time that you start the Plato App, it displays a screen similar to one shown below.
Page 23
Plato Complete Guide V1.3.3
Convert Technologies 22
Position of the standard Android control may vary according to device.
The Advanced Menu Options will be discussed later in this manual.
3.3.1. The Plato Main Drawer Feature Menu
Select the Plato logo in the top left hand corner of the display to show the Main Drawer
Feature Menu.
The Main Feature Drawer provides access to Plato’s individual operations.
Each feature option can be activated by selecting its entry in the menu drawer. Once
selected the feature contains 3 tab-pages to provide configuration control and feedback
about what the device is doing. Each tab shows a different screen, and can be selected by
touching the tab title at the top of the screen.
Main Drawer
Feature Menu
Selected
Device
Tabs
Search
HDMI Options
Advanced
Menu Options
Device List
Access
Standard Android Controls
Main Drawer
Feature Menu
Features
Page 24
Plato Complete Guide V1.3.3
Convert Technologies 23
For each Feature the name and function of the 3 tabs at the top of the screen may vary,
although the general tab structure is always the same:
• The left tab provides a configuration screen, touch here to configure the options
available for the selected feature.
• The middle tab provides a history timeline. This shows information about which tracks
have been played previously, and which are queued waiting to be played for the
selected feature.
• The rightmost tab shows what the selected device is playing now. It provides media
info, and additional media controls for play/pause/volume control.
Note that specific controls vary depending on which feature is currently selected.
3.3.2. Selected Device
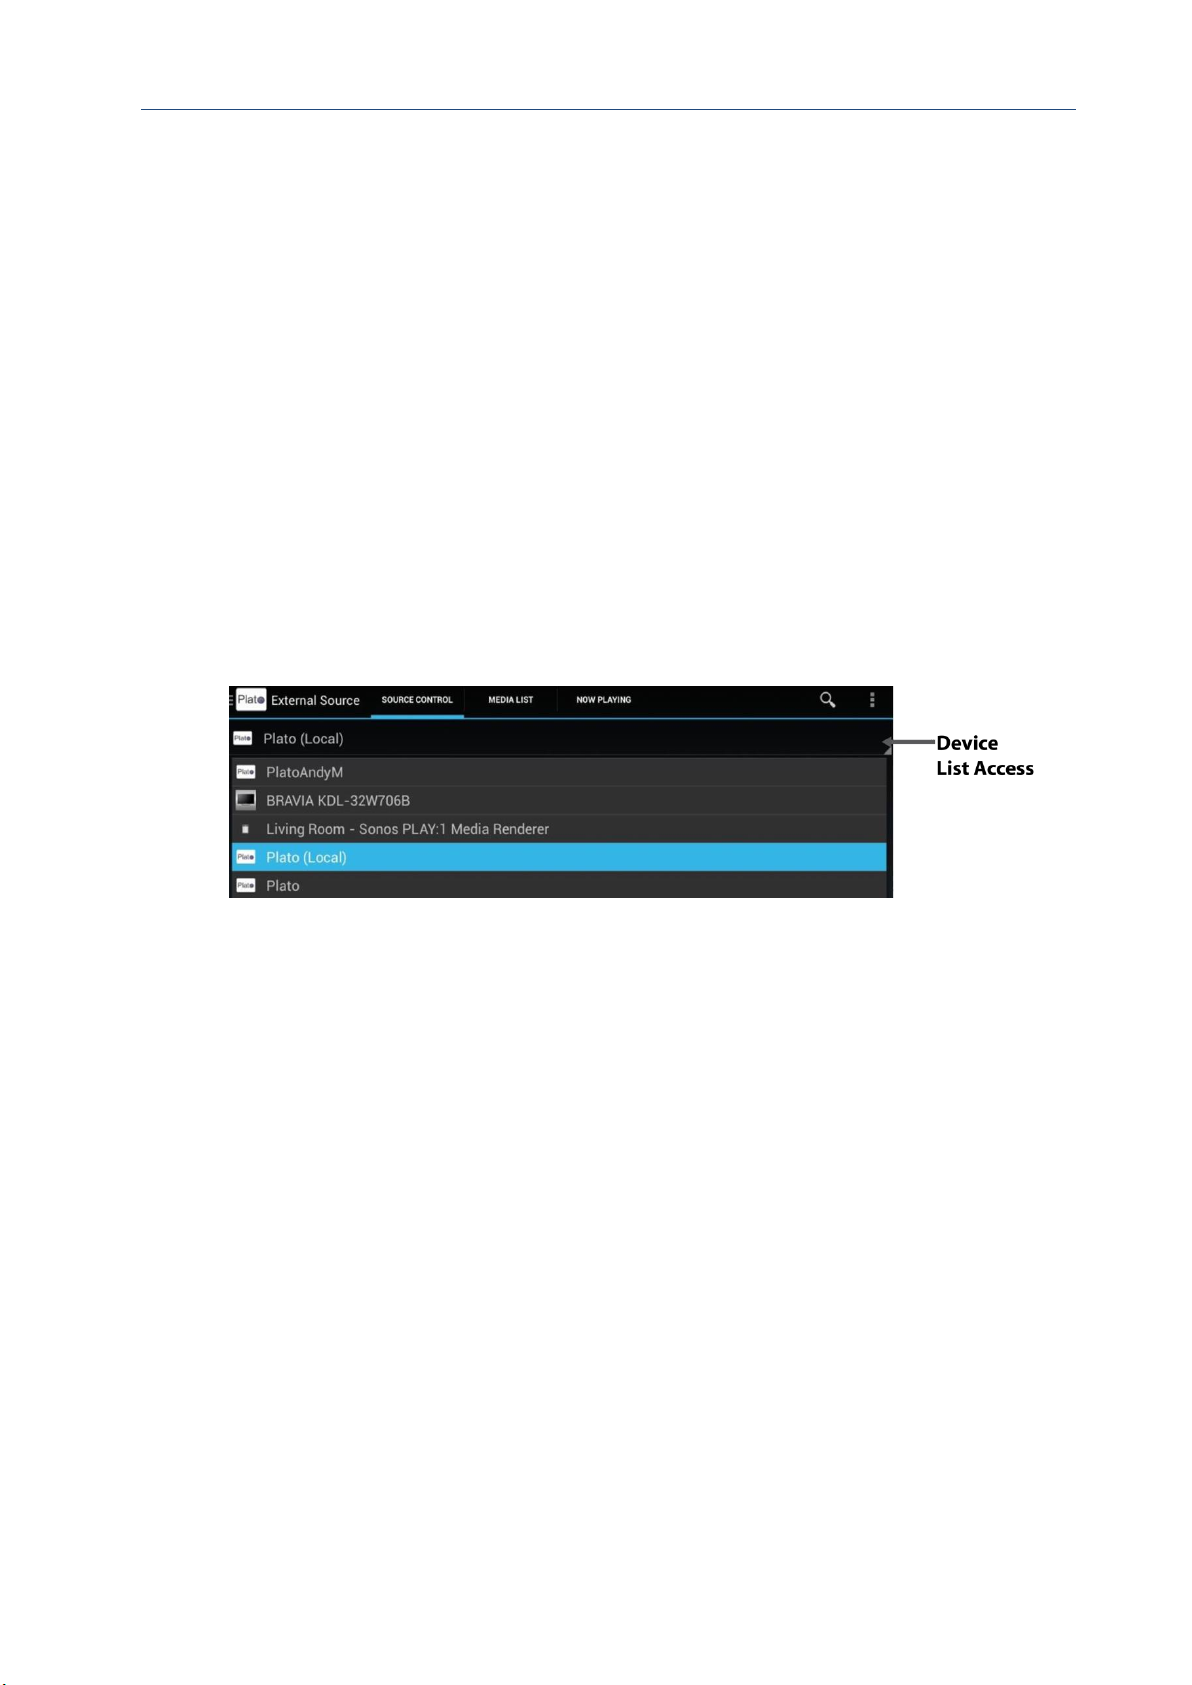
Many of the tab pages have a device selector at the top of the page. This is used to direct the
Plato app to different devices on your network.
Select anywhere in the Device List Access bar to display available devices.
After an initial scan of devices, the Plato App lists all appropriate UPnP devices available on
the network in the drop down list box. The list will show all UPnP devices available for this
tab feature, and may vary depending on which feature/tab is currently selected. It may
include remote UPnP servers, speakers, TVs, other Plato units, or tablets/smartphones that
are running UPnP services. This would include tablets/smartphones running the Plato control
app.
Each device has a UPnP name which is displayed in this list. The device that is running the
Plato App you are currently using always has (Local) displayed after its name to make it
easier to identify.
By default, the Plato app assigns a unique ‘Plato’ name on start-up as its UPnP name. It is
recommended that you modify the name of each unit running the Plato app to make it easier
to identify different devices on your network.
Details of how to change the UPnP name, and to output music and video to other devices
listed is provided in section 14.1.
Page 25

Plato Complete Guide V1.3.3
Convert Technologies 24
3.4. Plato features menu options overview
3.4.1. External Source
Use External Source to select and configure your pre-amplifier inputs.
The tabs for External Source are:
SOURCE CONTROL
Select and configure external pre-amplifier inputs on the selected device.
MEDIA LIST
History of tracks that have been played or recorded on an external input.
NOW PLAYING
3.4.2. Media Library
Use Media Library to access your media files stored on Plato, or other UPnP servers.
The Tabs for Media Library are:
LIBRARY
Browse all media on the selected device.
PLAY QUEUE
A list of tracks that have either been played or are queued up to play.
NOW PLAYING
3.4.3. Internet Radio
Use Internet Radio to listen to online radio stations. You can save your favourite stations as
presets.
The Tabs for Internet Radio are:
STATIONS
Browse all stations in different categories and genres. Use this tab to find
stations.
PRESETS
Lists saved stations.
NOW PLAYING
3.4.4. Playlist
Use Playlist to access stored playlists on the selected device.
The Tabs for Playlists are:
PLAYLISTS
Page 26

Plato Complete Guide V1.3.3
Convert Technologies 25
Lists all your playlists stored on the selected device.
MOOD GRID
Shows your music collection categorised according to its ‘mood’ which allows
you to generate playlists based on mood settings.
NOW PLAYING
3.4.5. Import
Use to import media files from a connected USB device. This could be a USB memory stick,
disk drive, or the supplied CD-ROM drive.
The Tabs for Import are:
IMPORT MEDIA
Basic automated import functions for importing from attached USB devices
FILE MANAGER
Folder based view for full access to internal and external storage devices
NOW PLAYING
3.4.6. HighResAudio
Use to access the ‘High Res Audio’ website and download material direct to your Plato device.
The Tabs for HighResAudio are:
BROWSE
An embedded web browser to access the contents of HighResAudio online.
DOWNLOAD MANAGER
Provides feedback on downloaded material, and additional download
controls.
NOW PLAYING
3.5. Now Playing
The Now Playing tab provides direct feedback and control of what the selected device is
currently playing.
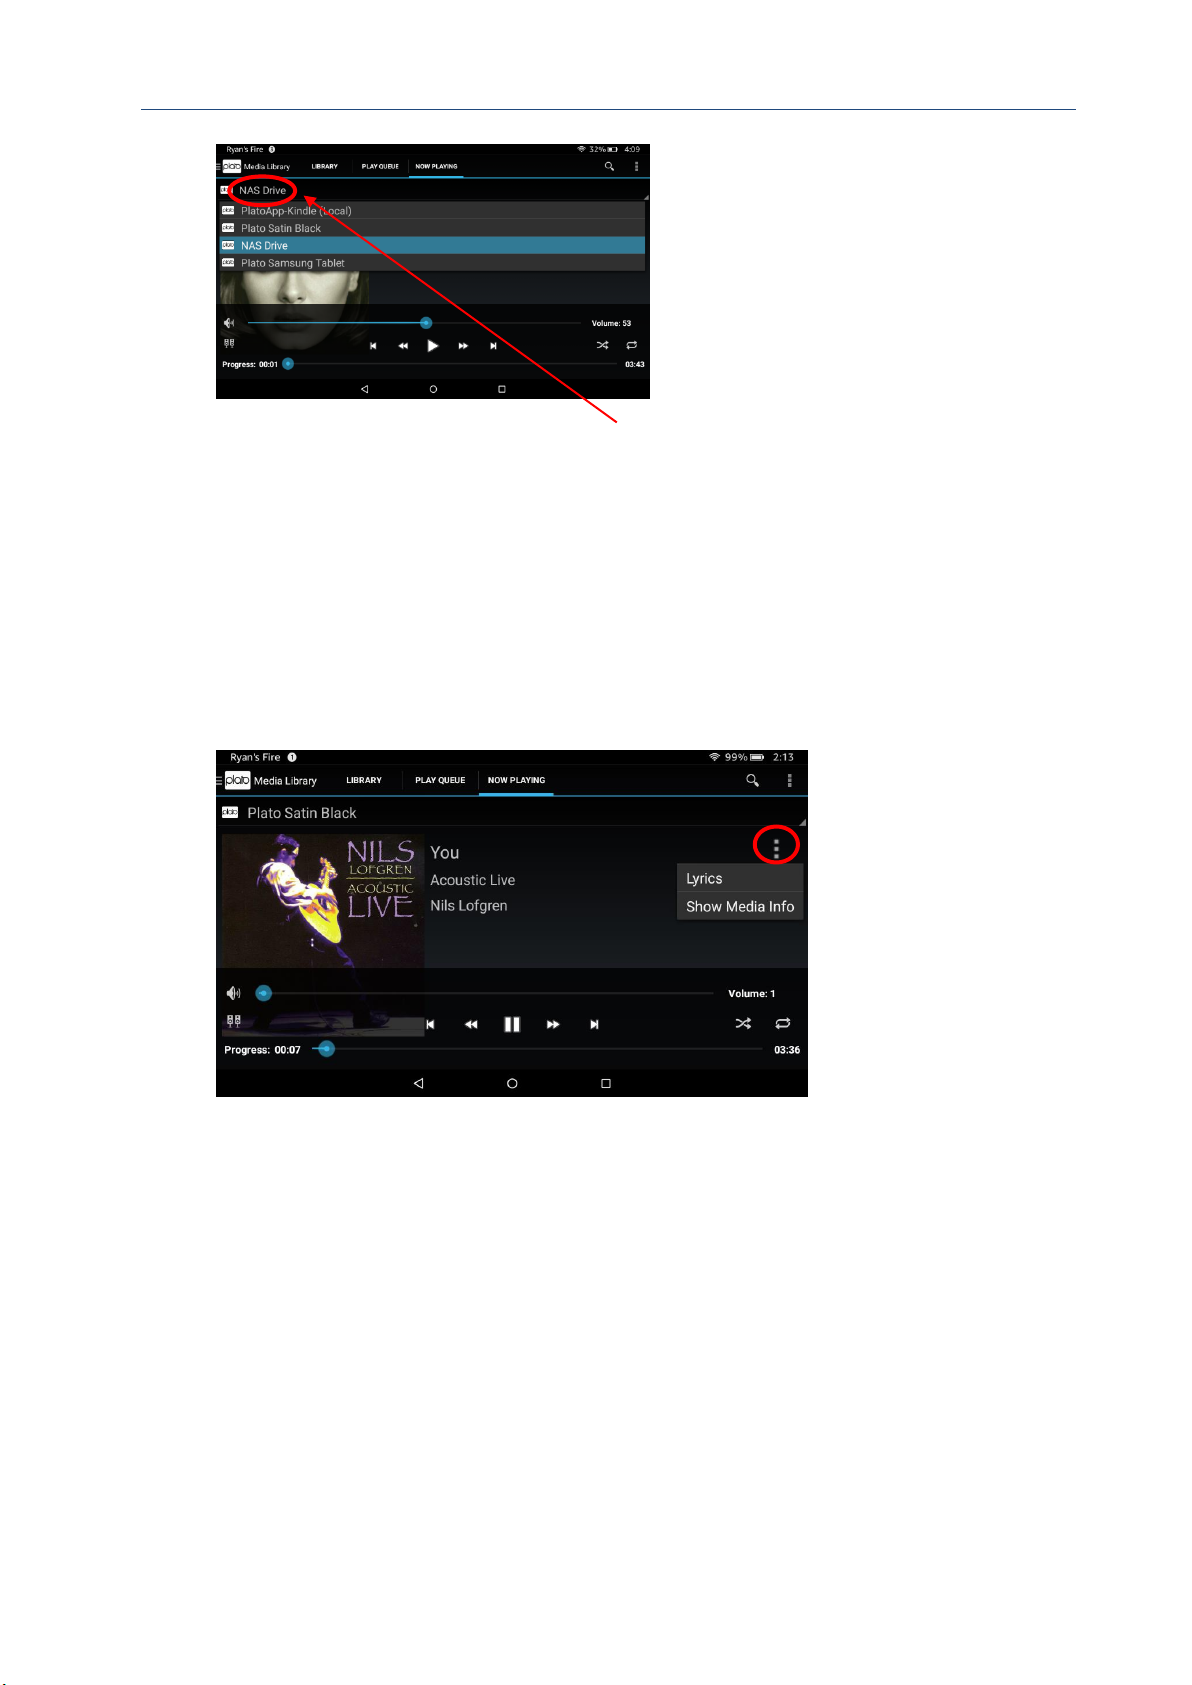
At the top of the tab-screen is a drop down menu to select the required playback device, this
could be Plato itself, or another UPnP playback device (e.g. wireless speaker, TV) on your
home network.
Page 27
Plato Complete Guide V1.3.3
Convert Technologies 26
The device shown in the dropdown list is the currently selected playback device. If you would
like to see what is playing on a different device, simply select it from the list.
Any tracks selected for playback will automatically play out to the selected device. See section
12 for more details on playing tracks to different devices
The media playback controls are available on the Now Playing tab for all selected feature
options. They provide access to playback volume and media controls.
The playback controls are displayed by touching anywhere in the background of the Now
Playing tab. The control will disappear after 5 seconds of inactivity.
The controls available vary slightly depending on which feature is selected, but the main
structure is the same.
The Now playing screen also provides access to extended options via the Additional Options
menu located next to the track title.
Two options are available: Lyrics and Show Media Info, see sections 3.5.5 & 3.5.6 for more
details on these options
3.5.1. Volume control
To adjust the volume, press and slide the Volume Control blue circle icon along the line until
the volume is at the desired level.
Page 28
Plato Complete Guide V1.3.3
Convert Technologies 27
3.5.2. Mute
It is possible to mute (silence) the audio by pressing the mute icon. The previous volume can
be restored by either pressing the mute icon again, or sliding the volume control to the
desired level.
3.5.3. HDMI audio route
It is possible to route audio playback to the HDMI output, or through the power amplifier to
the connected speakers using the HDMI audio route control. It could be useful to route audio
through HDMI for playback through video processor devices.
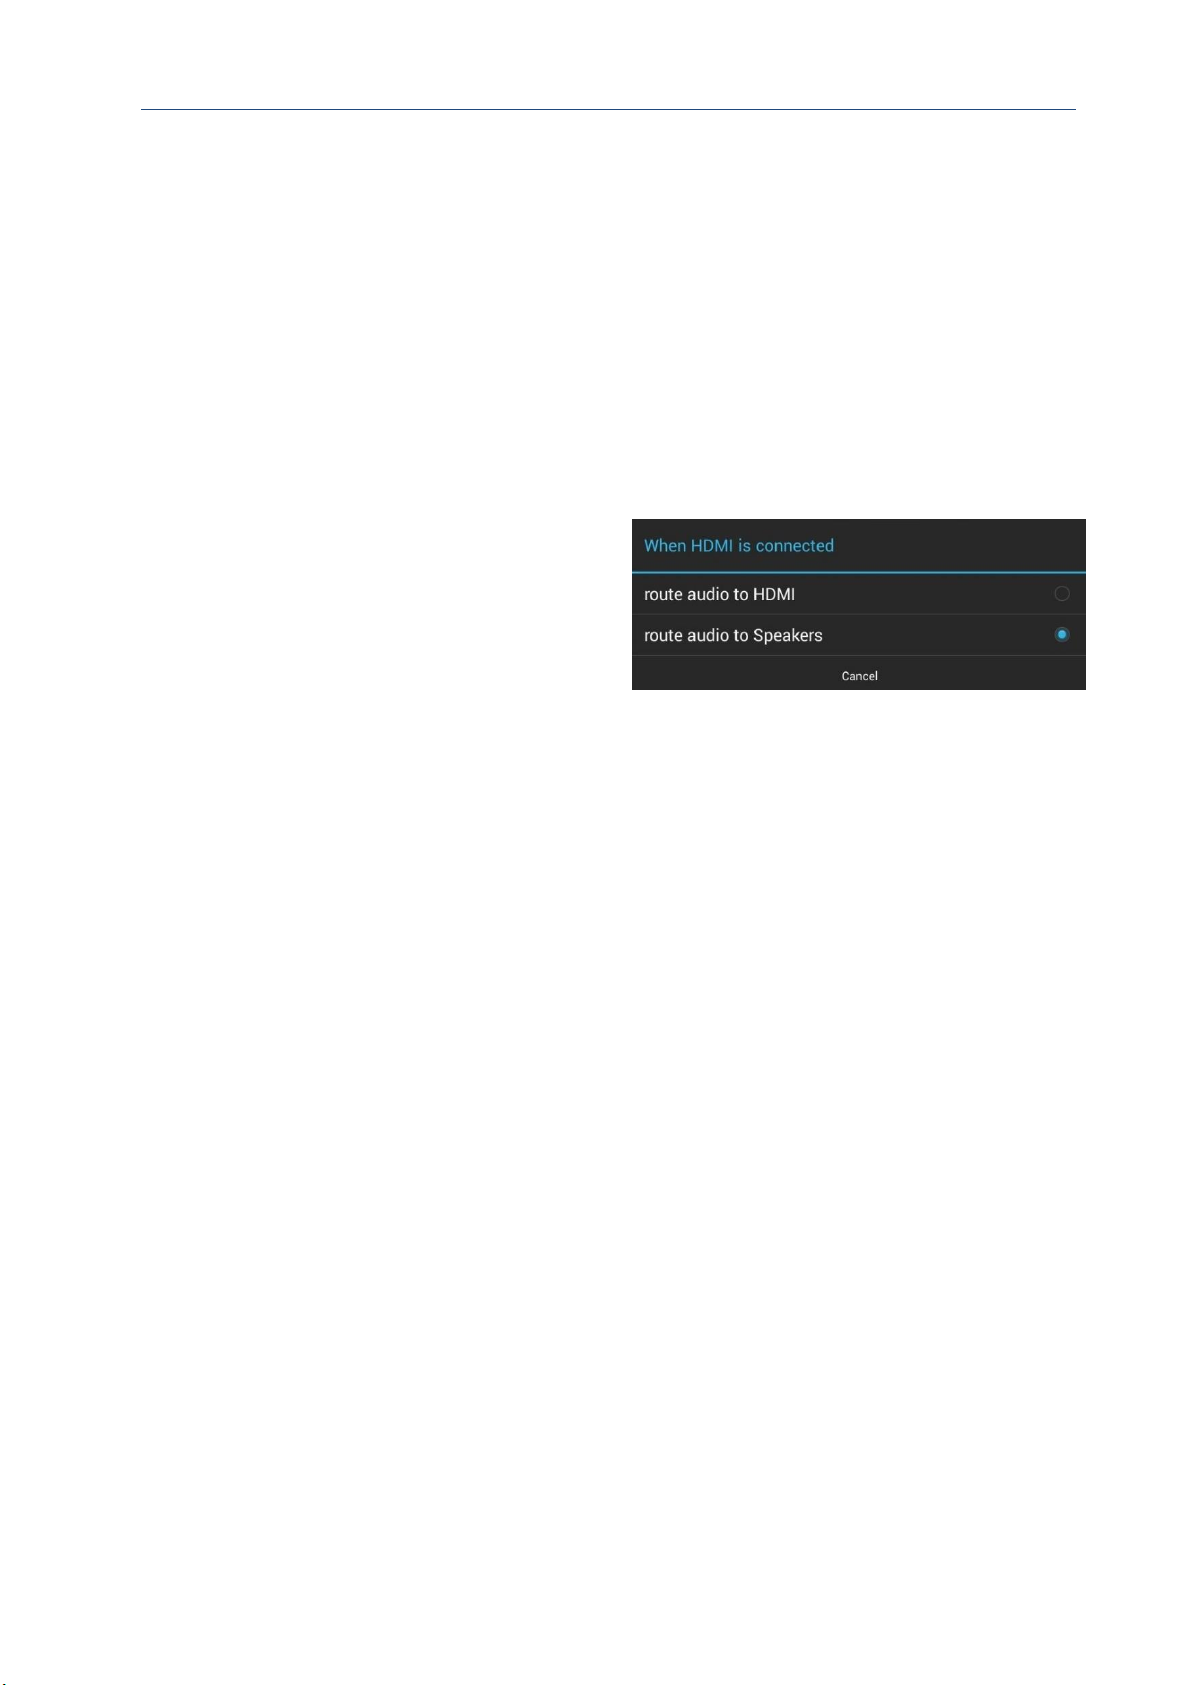
To configure HDMI audio outputs
1. Press on the HDMI Audio icon.
The screen shown right is displayed.
2. Select route audio to HDMI to
mute the audio output from your Plato
speakers and direct audio to the
connected HDMI device.
Or
Select route audio to Speaker to use the
speakers connected to the rear panel of your Plato unit.
3.5.4. Media controls
Specific media controls will vary depending on which feature is selected. They provide access
to standard playback controls.
3.5.5. Lyrics
The Lyrics option is only available from a tablet and will not be available on Plato’s touch
screen.
This option integrates with the MusixMatch app to display lyrics for the currently playing
audio track.
If the MusixMatch app is not installed on the tablet, the app will re-direct to the Google Play,
or Amazon App stores where you can download MusixMatch. If MusixMatch is already
installed on the current device, it will be opened with the current track title/artist details
showing the appropriate lyrics (assuming they are available from the MusixMatch service).
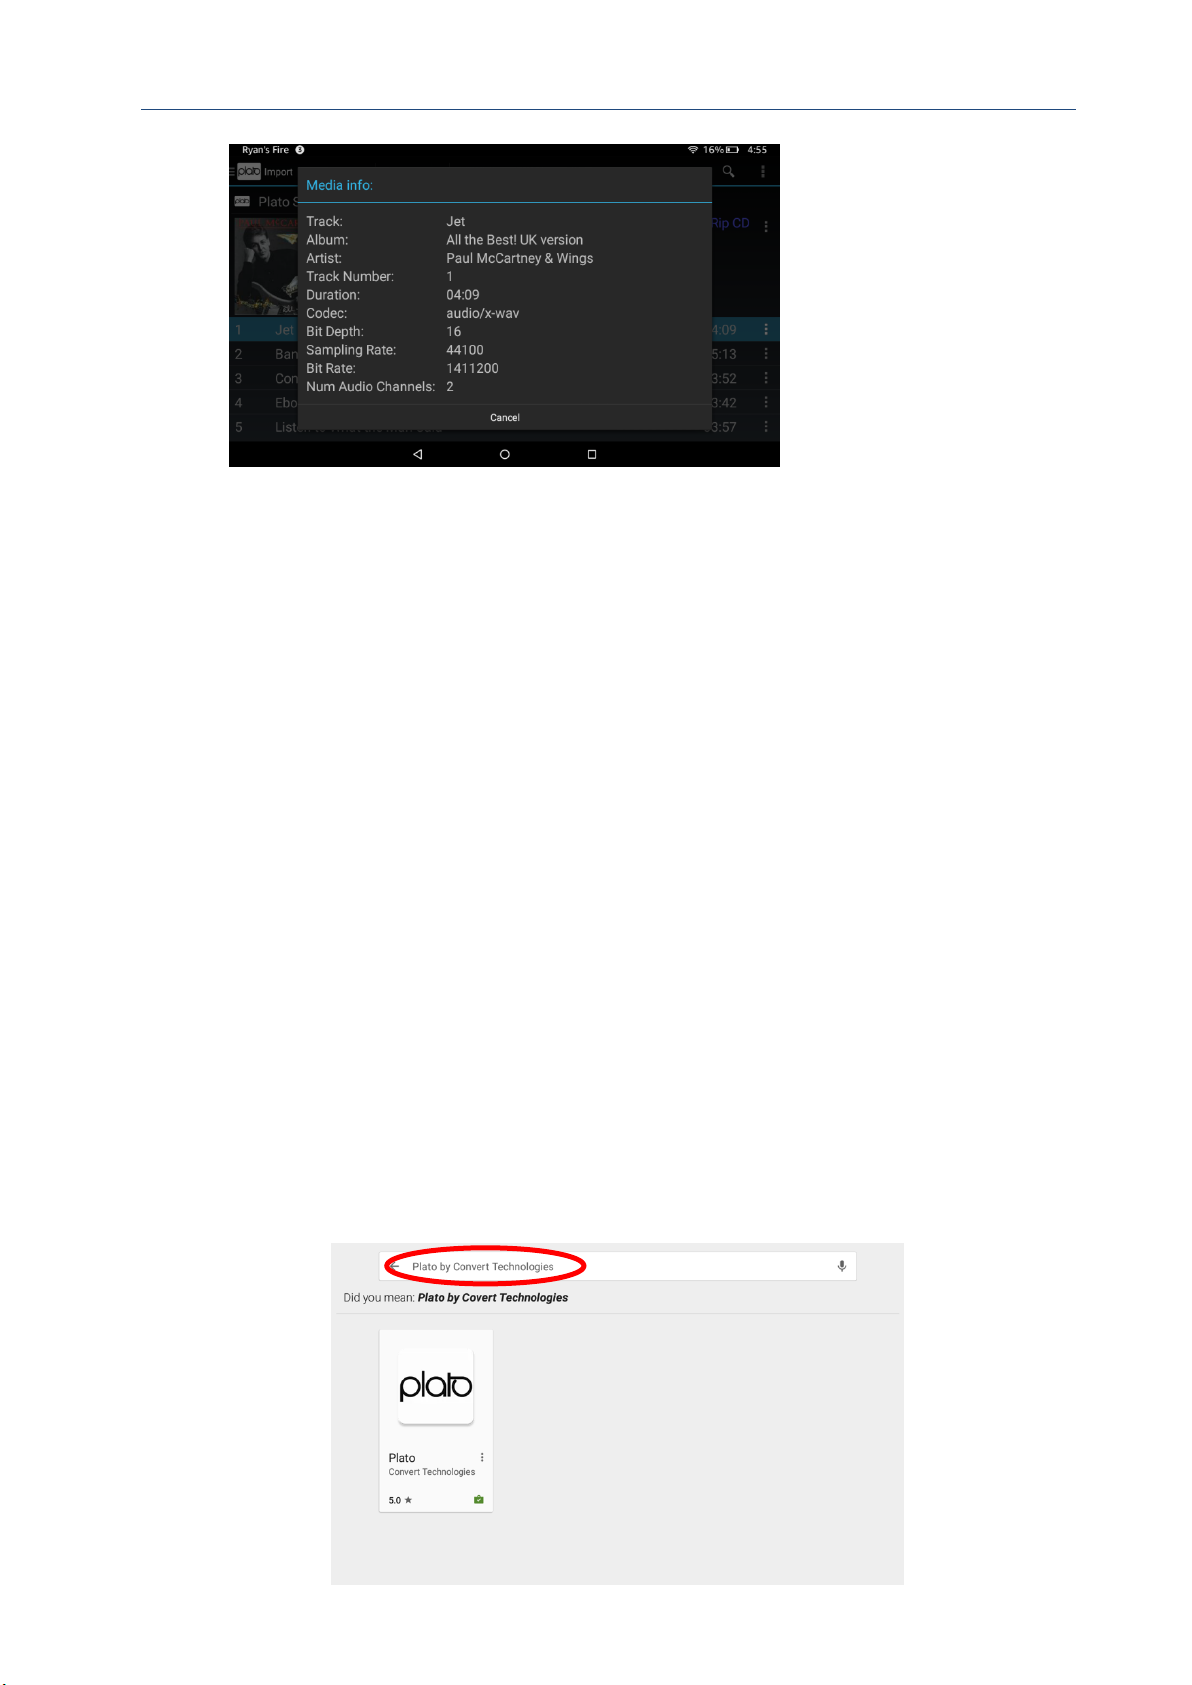
3.5.6. Show Media Info
Select Show Media Info to display details on the currently playing track. Note that these
details are also available by long-pressing the track artwork on the Now Playing screen.
Page 29
Plato Complete Guide V1.3.3
Convert Technologies 28
3.6. Downloading the Plato Android app to your smartphone or tablet
The most convenient way to operate Plato is by using a smartphone or tablet as a remote
control device. This is possible by loading the Plato control app onto your chosen device.
Control apps are available for Android or iOS device. See section 18 for instructions on
downloading and using the iOS Plato control app.
The Android version of the Plato app is available from the Google PLAY store, or from the
Amazon app store if you are using an Amazon tablet.
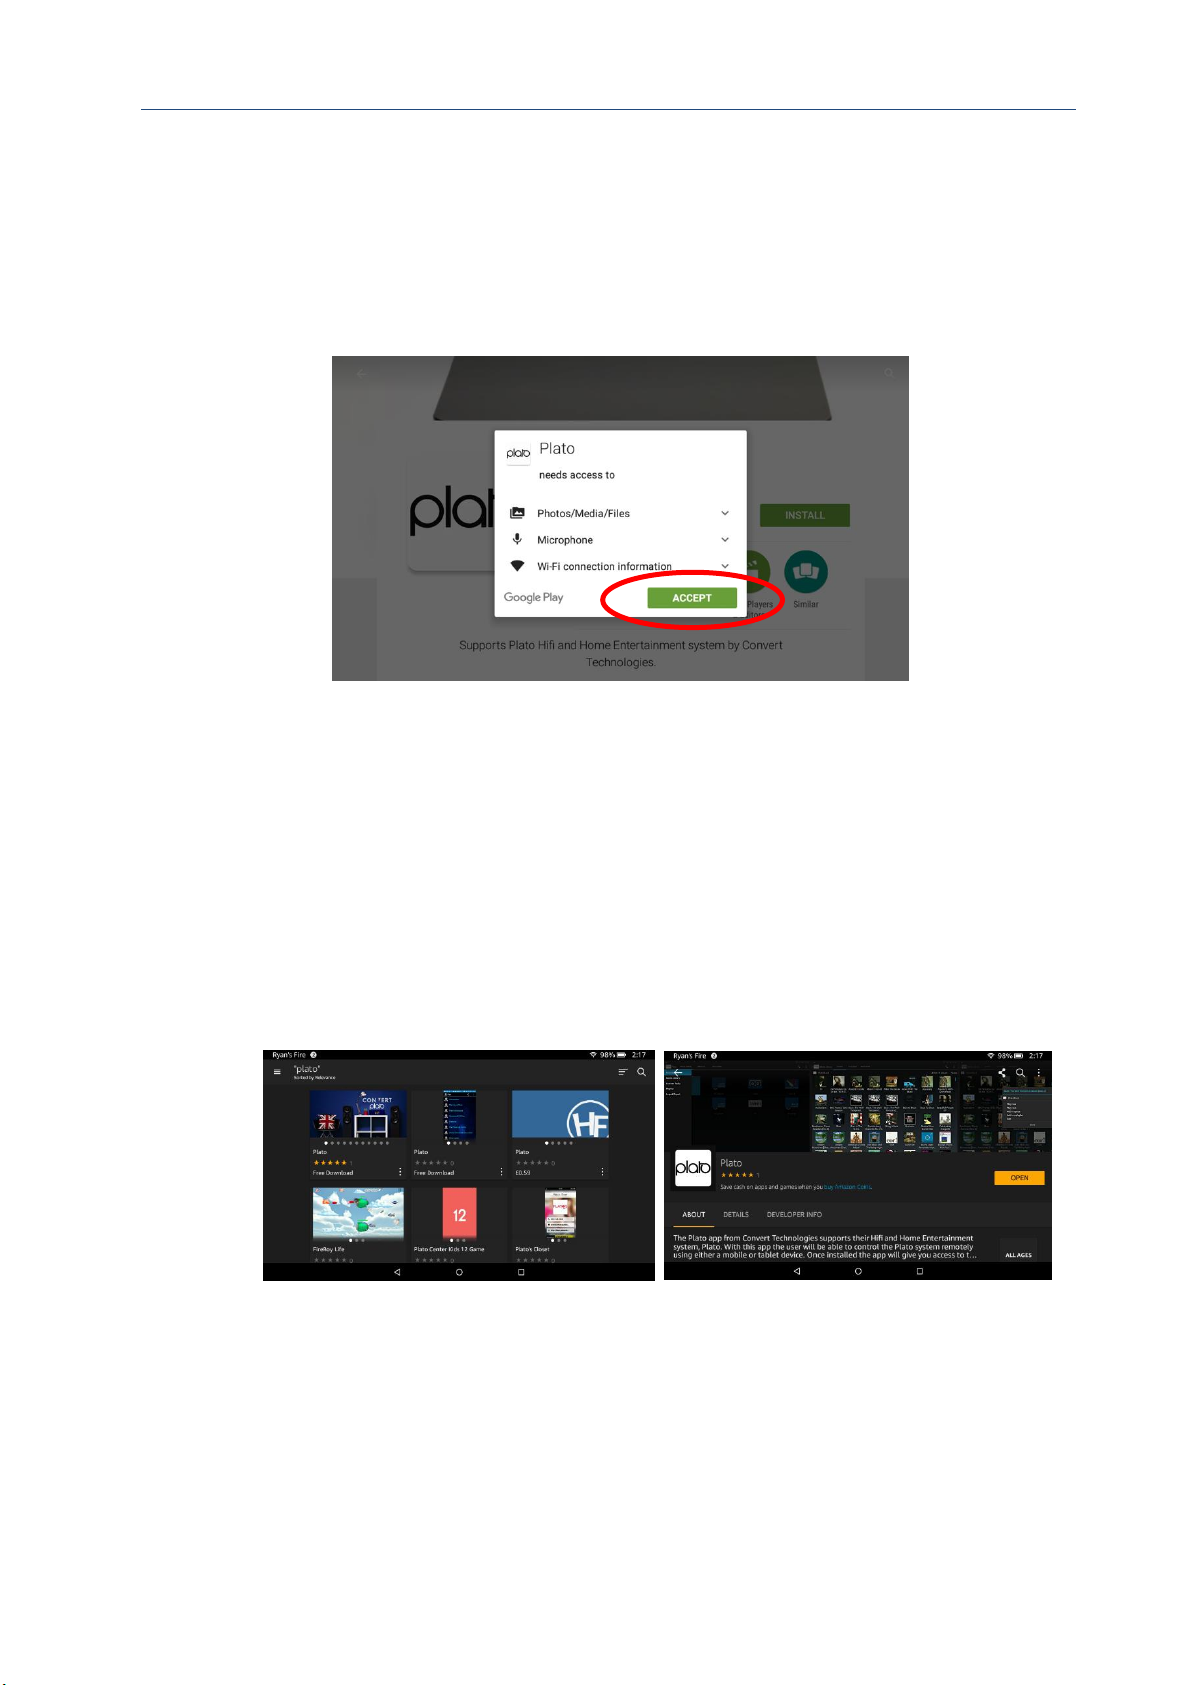
To download and install the Plato App from Google Play
1. Open the Google PLAY store and search for ‘Plato Convert Technologies’.
2. Select Install/accept.
The app will download and install to your device.
Page 30
Plato Complete Guide V1.3.3
Convert Technologies 29
To download and install the Plato App from Amazon’s AppStore
Use these instructions to install the app on the Kindle Fire tablet supplied with Plato.
1. Open the Amazon AppStore and search for ‘Plato Convert Technologies’.
2. Select Install/accept.
The app will download and install to your device.
3.7. Updating your Plato App & System Firmware
Plato App
Updates to your tablet or smartphone will be issued automatically via the Google PLAY store.
When using your Plato app, keep an eye out for a small icon appearing at the very top left of
your Android Notifications screen. Place your finger at the top of the screen and drag it
downwards to reveal the update notification message. Tap it and follow the instructions
Page 31

Plato Complete Guide V1.3.3
Convert Technologies 30
provided to update the app. Accept the default questions in the pop up menus and ‘install’
the latest version. This should only take a few seconds. You will be presented with the Plato
app again when the install has finished.
Alternatively, it is possible to check for updates from within the app as explained in section
14.1.1
System Firmware
1. Close the Plato app by selecting the Android backspace icon on the right of the screen (It’s
the bottom icon of the three displayed). You may have to press this several times before it
asks if you would like to close the app. This will take you to the Android home screen.
2. Select the Android menu icon in the middle on right hand side of the screen (circle with 6
dots in)
3. Select the ‘settings’ icon.
4. Scroll down and select “About tablet”
5. Select "additional system update” to upgrade your firmware upgrade to the latest version.
If you are already on the latest update, the pop up message will confirm that. If not, select
the upgrade button and a download will now begin. *Please note* Your Plato unit will
reboot twice during the upgrade process. Please don’t turn off the unit or press anything
until this process has completed. You will be presented with the Plato app when finished.
3.8. Advanced Menu Options Overview
The advanced menu options provide additional controls which are not related to the normal
day to day operation of Plato or its control app. The specific options available vary slightly
depending on whether the app is run on a Plato device, or a standard Android smartphone or
tablet, as some options are not relevant to a tablet or smartphone. This section will describe
all options available to the Plato device itself.
3.8.1. Search
The search option provides a context based search function. Search functions are available
for Media Library and Internet Radio functions, and are described in more detail in later
sections 8.2 & 9.3.
3.8.2. Video mode select
The video mode select option provides a mechanism to configure the HDMI output video
display mode.
Note that this icon is only available on Plato devices.
Before changing these settings, check that your HDMI device is correctly connected to your
Plato unit. See section 2.3.8 for connection details.
Two video modes are available for the HDMI output:
Page 32
Plato Complete Guide V1.3.3
Convert Technologies 31
• Mirror mode
• Video mode
Mirror mode shows a mirror copy of the Plato touch screen on the connected HDMI device,
including all Android controls. This mode can be useful when using a remote Air-Mouse
device to control Plato (see section 15).
Video mode is intended for normal Plato use. In this mode the HDMI device will display
information about the current playing track (album artwork, track name, artist etc.). If the
current track contains video data, this will be displayed in full screen mode without Android
controls.
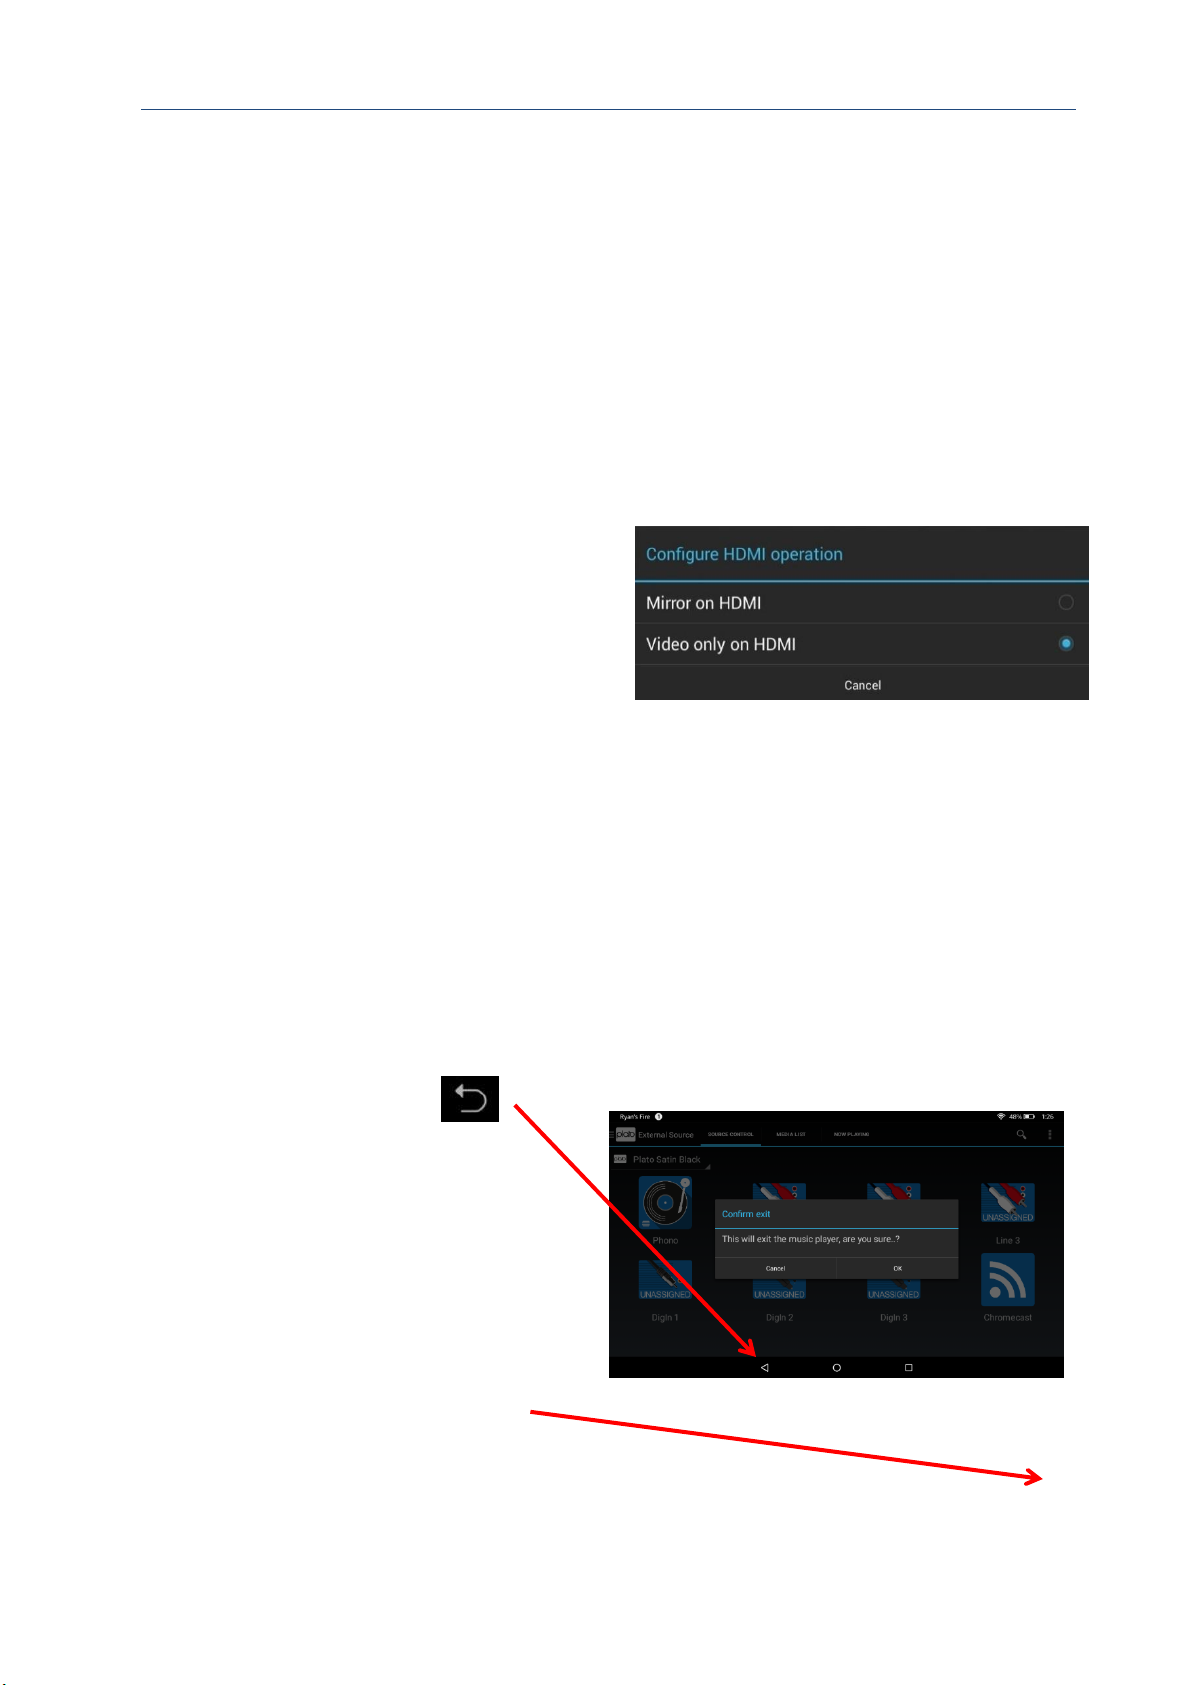
To configure HDMI video outputs
1. Press on the HDMI Video icon.
The screen shown right is displayed.
2. Select Mirror on HDMI to show the
entire Plato touch screen display
‘mirrored’ on to the HDMI TV.
Or
Select Video only on HDMI for the
HDMI TV to display selected track
information when audio content is
played, or video output in full screen
mode during video playback.
3.8.3. Exiting the Plato App
Caution: You must exit the Plato App on your Plato unit before switching off your Plato unit.
To exit the Plato App
1. Press the Back icon (these
can vary from device to device)
repeatedly from the standard
Android control at the bottom of
the screen until the Confirm exit
dialog box is displayed.
2. Press OK.
Or
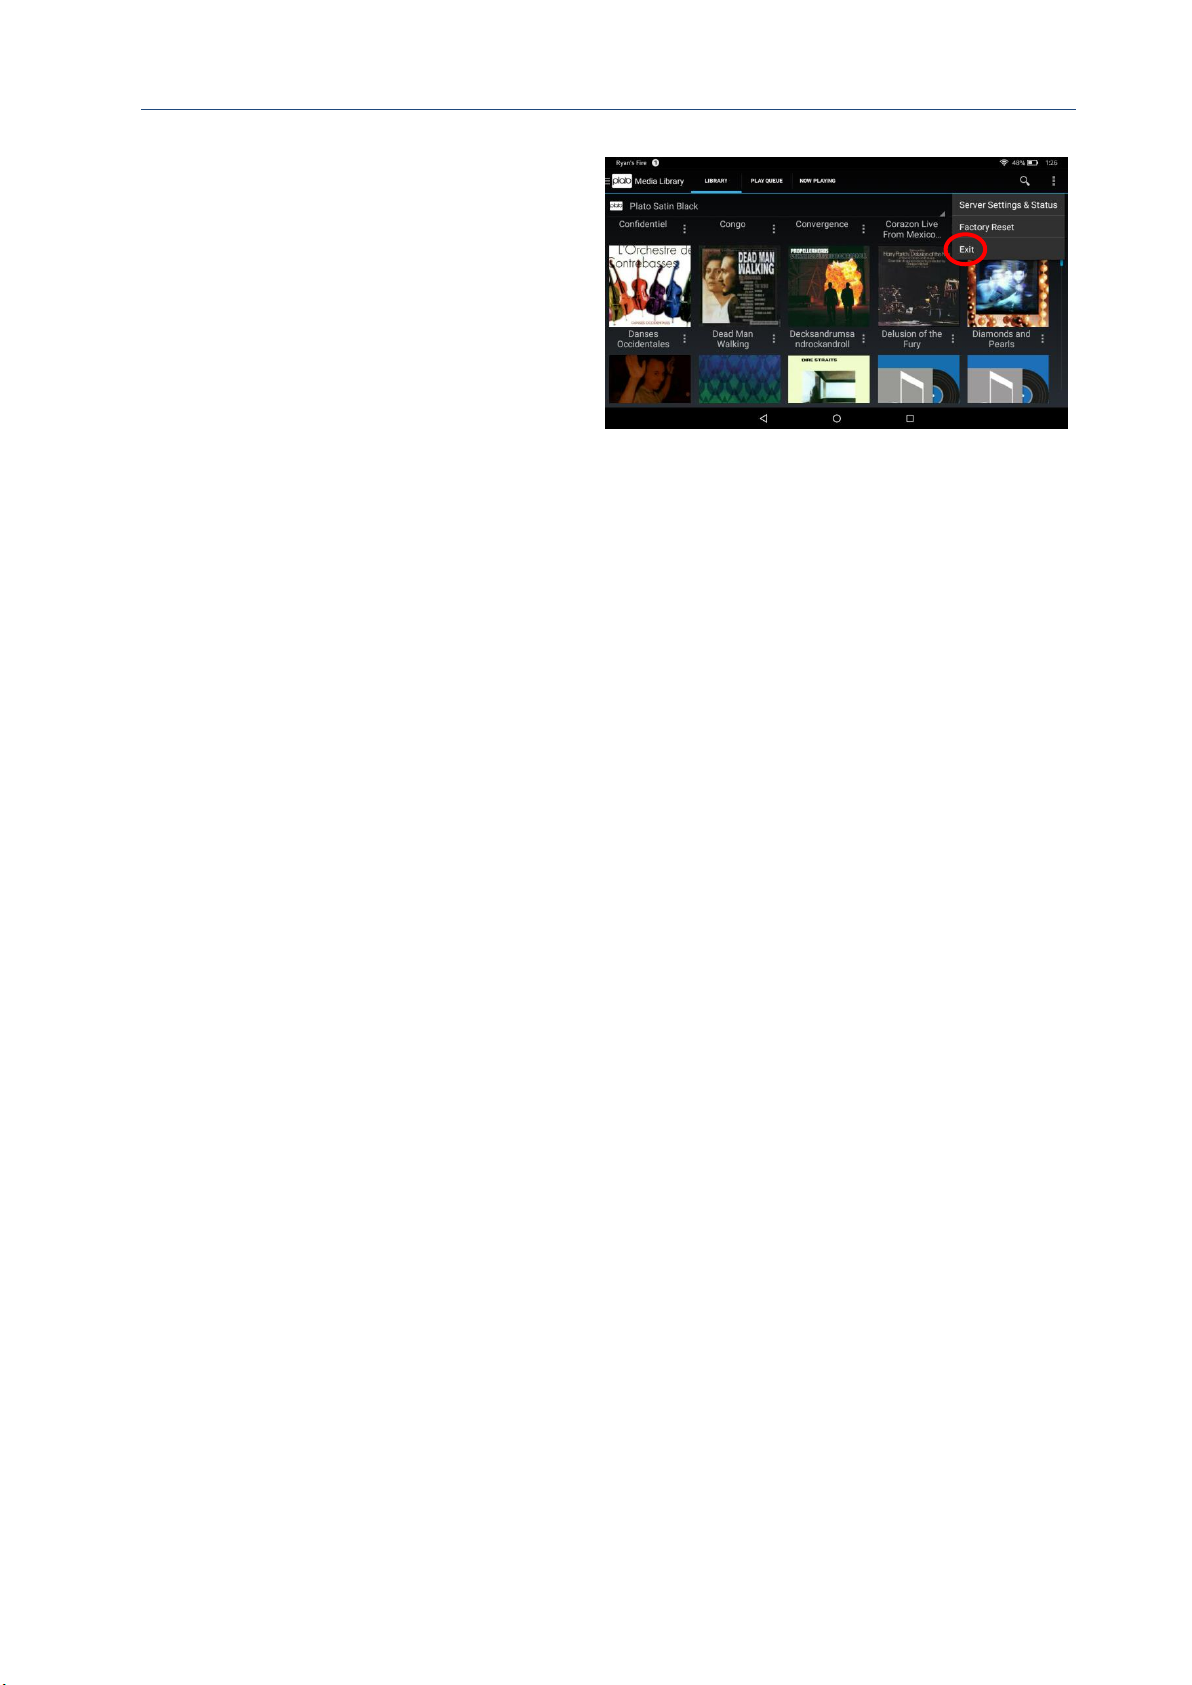
1. Press on the advanced menu.
Page 33
Plato Complete Guide V1.3.3
Convert Technologies 32
2. Select Exit.
The Confirm exit dialog box is
displayed.
3. Press OK.
3.8.4. Advanced menu list
The additional advanced menu options are used less frequently and described in more detail
in section 14.
Page 34
Plato Complete Guide V1.3.3
Convert Technologies 33
4. Configuring and using external (pre-amp) inputs
To configure and select external pre-amp inputs, select External Source from the Main
Drawer Feature Menu.
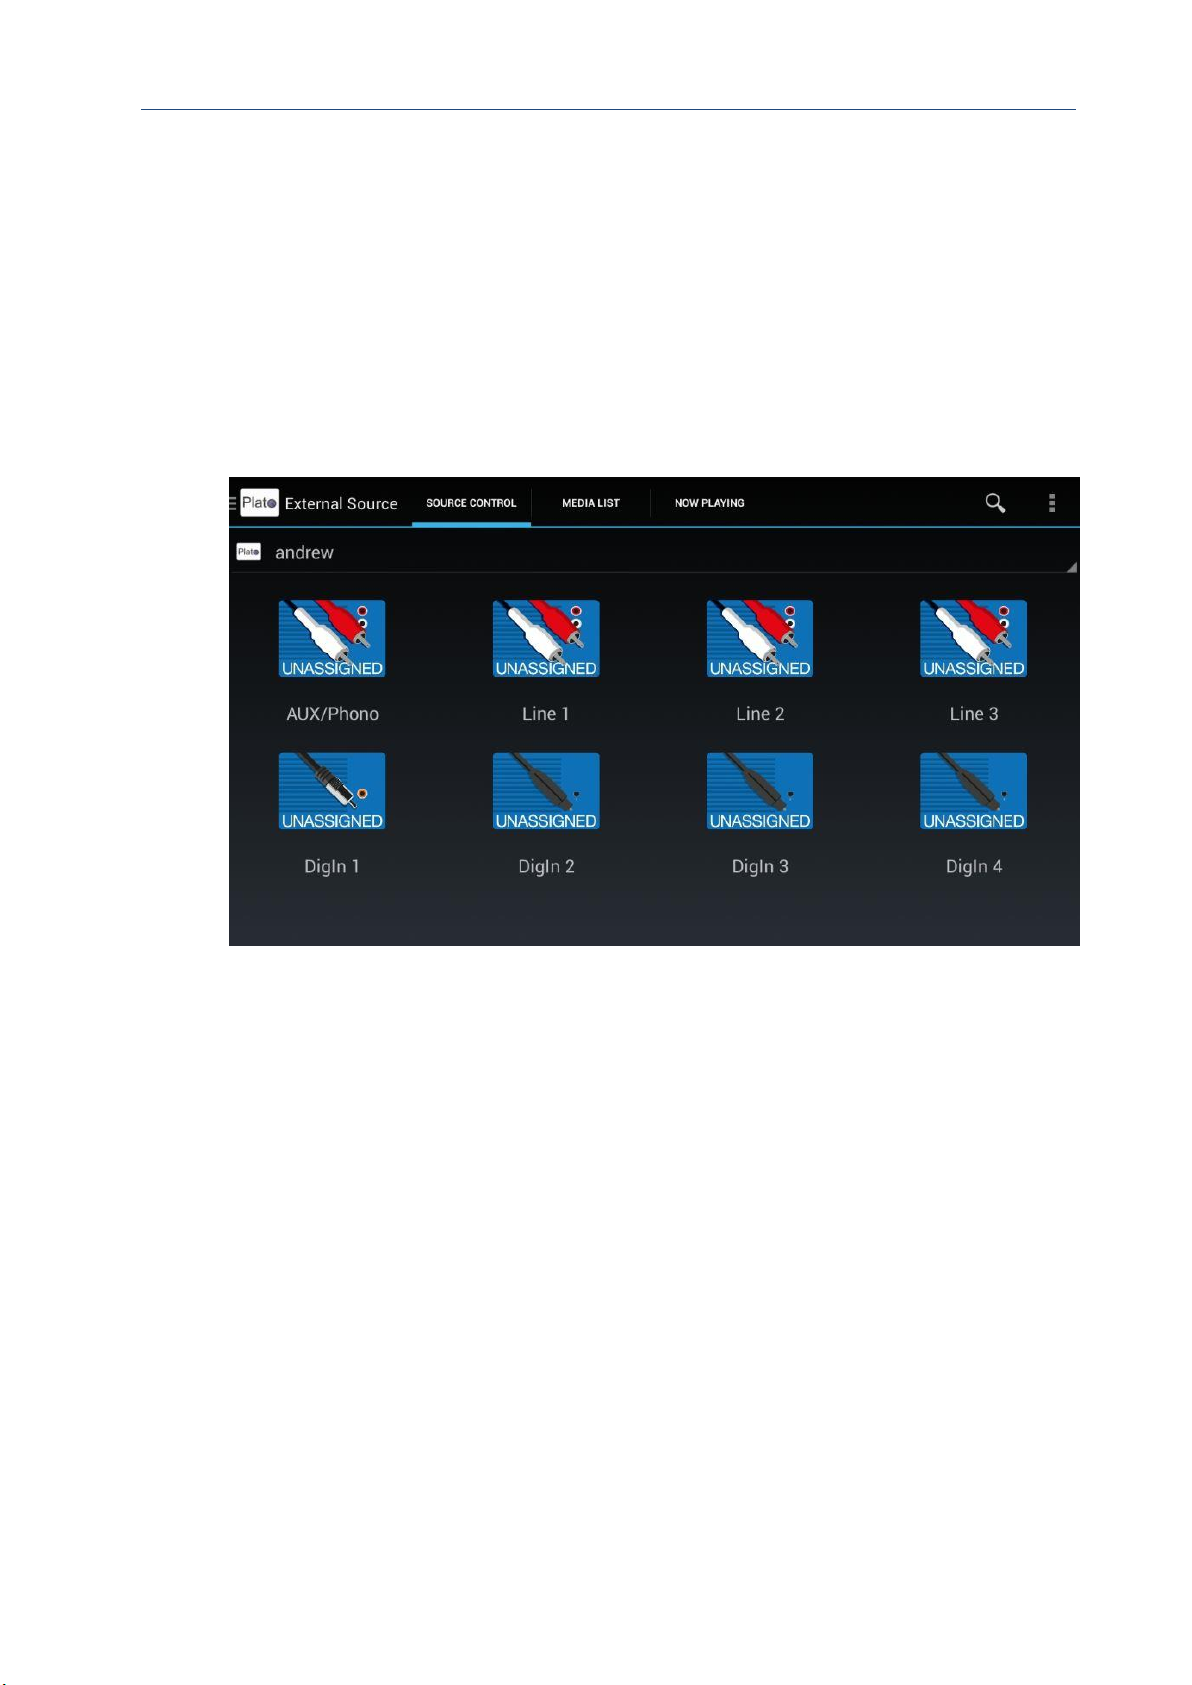
The SOURCE CONTROL tab shows a diagrammatic view of the pre-amp inputs. When you use
your Plato unit for the first time, all the inputs are marked unassigned.
By configuring your inputs, it will be easier to determine which audio device is connected to
which input, and configure the inputs to ensure the best quality of playback, and get the
most from your Plato.
Before assigning the inputs, check that all the input devices (turntables, CD players etc.) are
connected correctly. Make a note of what device you have connected to a specific input.
If connecting a turntable, it must be connected to the ‘AUX/Phono’ input.
To assign and configure each input, Long Press (press and hold) the icon corresponding to
the input you would like to modify.
For each input you can assign a suitable icon and name. You can also make changes to the
configuration settings.
When you assign an input, there are also configuration menus and options for each input
device.
Tip. Do not change configuration settings until you have:
• Checked any recommended settings provided for that specific device.
• Played music through that input device and checked the gain levels.
See section 6 for full details.
Page 35
Plato Complete Guide V1.3.3
Convert Technologies 34
4.1. Adding a Turntable
The turntable must be connected to the AUX/Phono input.
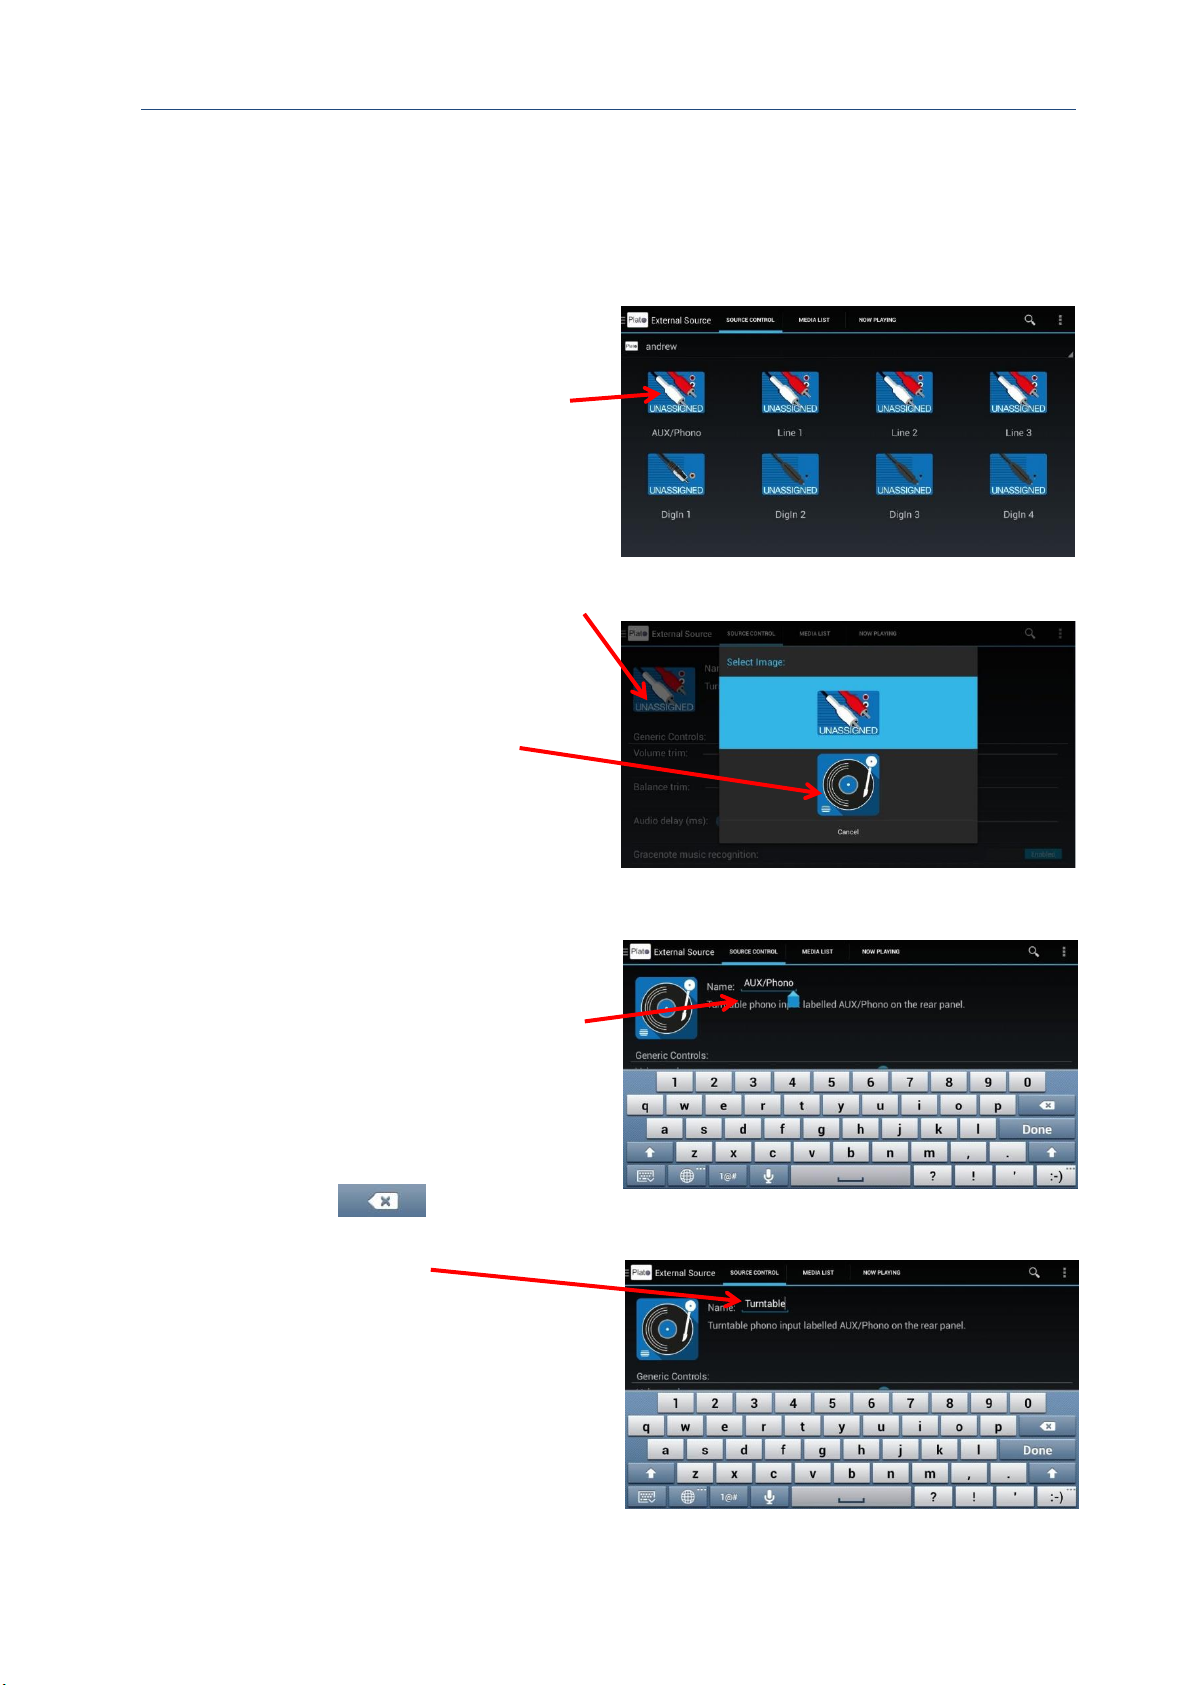
To assign a turntable
1. From the Main Drawer Feature
Menu, select External Source, and
open the SOURCE CONTROL tab.
2. Long Press the UNASSIGNED icon
above the AUX/Phono text.
The configuration option screen for
this input is displayed.
3. To change image icon:
touch the image in the top left hand
corner of the configuration screen.
The Select Image dialog screen is
displayed.
4. Select the turntable image.
5. To change the name:
Press on the text area after ‘Name’.
(Note: screen image of keyboard may
vary depending on type of Android
device you are using.)
6. Use
the
or
the Delete key
to delete the existing text.
7. Type in new text.
8. Select Done.
Page 36
Plato Complete Guide V1.3.3
Convert Technologies 35
4.2. Adding a CD Player
A CD player with analogue outputs can be connected to the Line 1, Line 2 or Line 3 input.
A CD player with digital outputs can be connected to either the coaxial or optical digital
input. Example below shows CD player connected to the Line 1 analogue input.
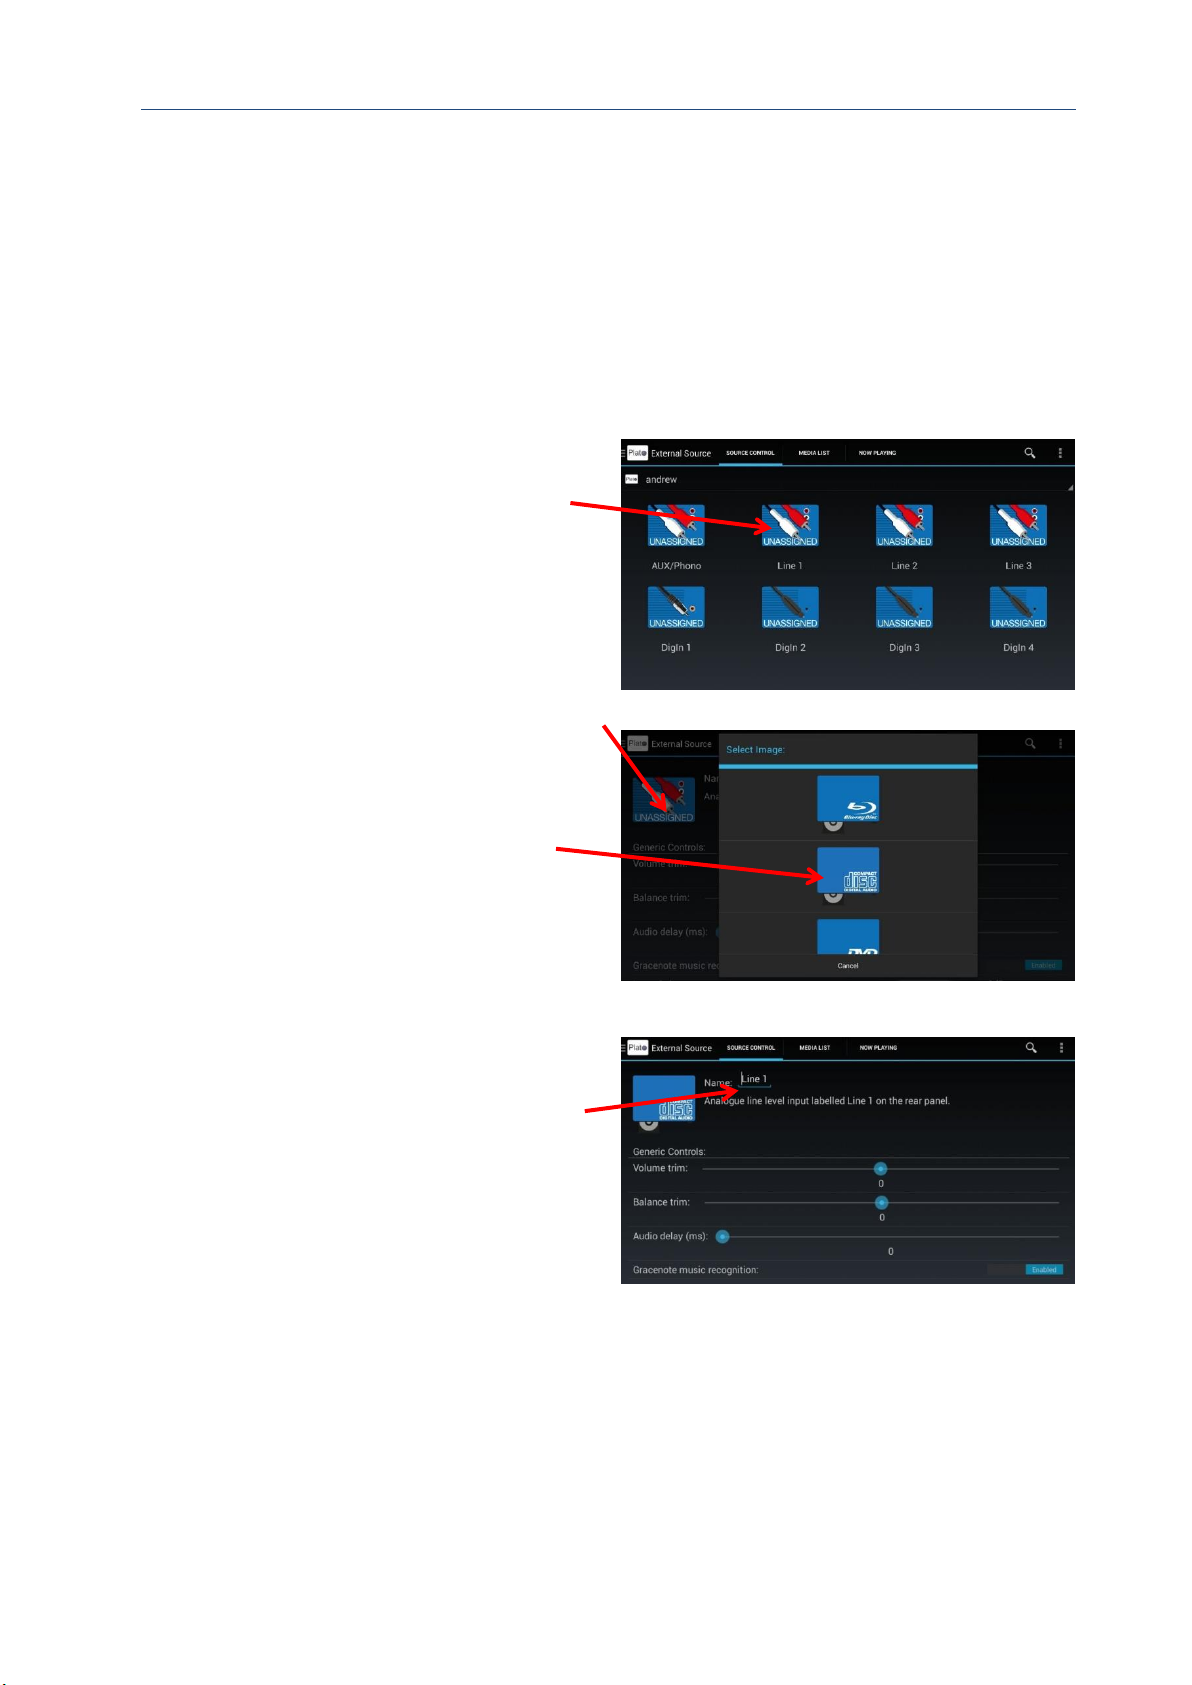
To assign a CD player
1. From the Main Drawer Feature
Menu, select External Source.
2. Long Press the UNASSIGNED icon
above the Line 1 text.
The configuration option screen for
this input is displayed.
3. To change image icon:
touch the image in the top right hand
corner of the configuration screen.
The Select Image dialog screen is
displayed.
4. Select the Compact Disc image.
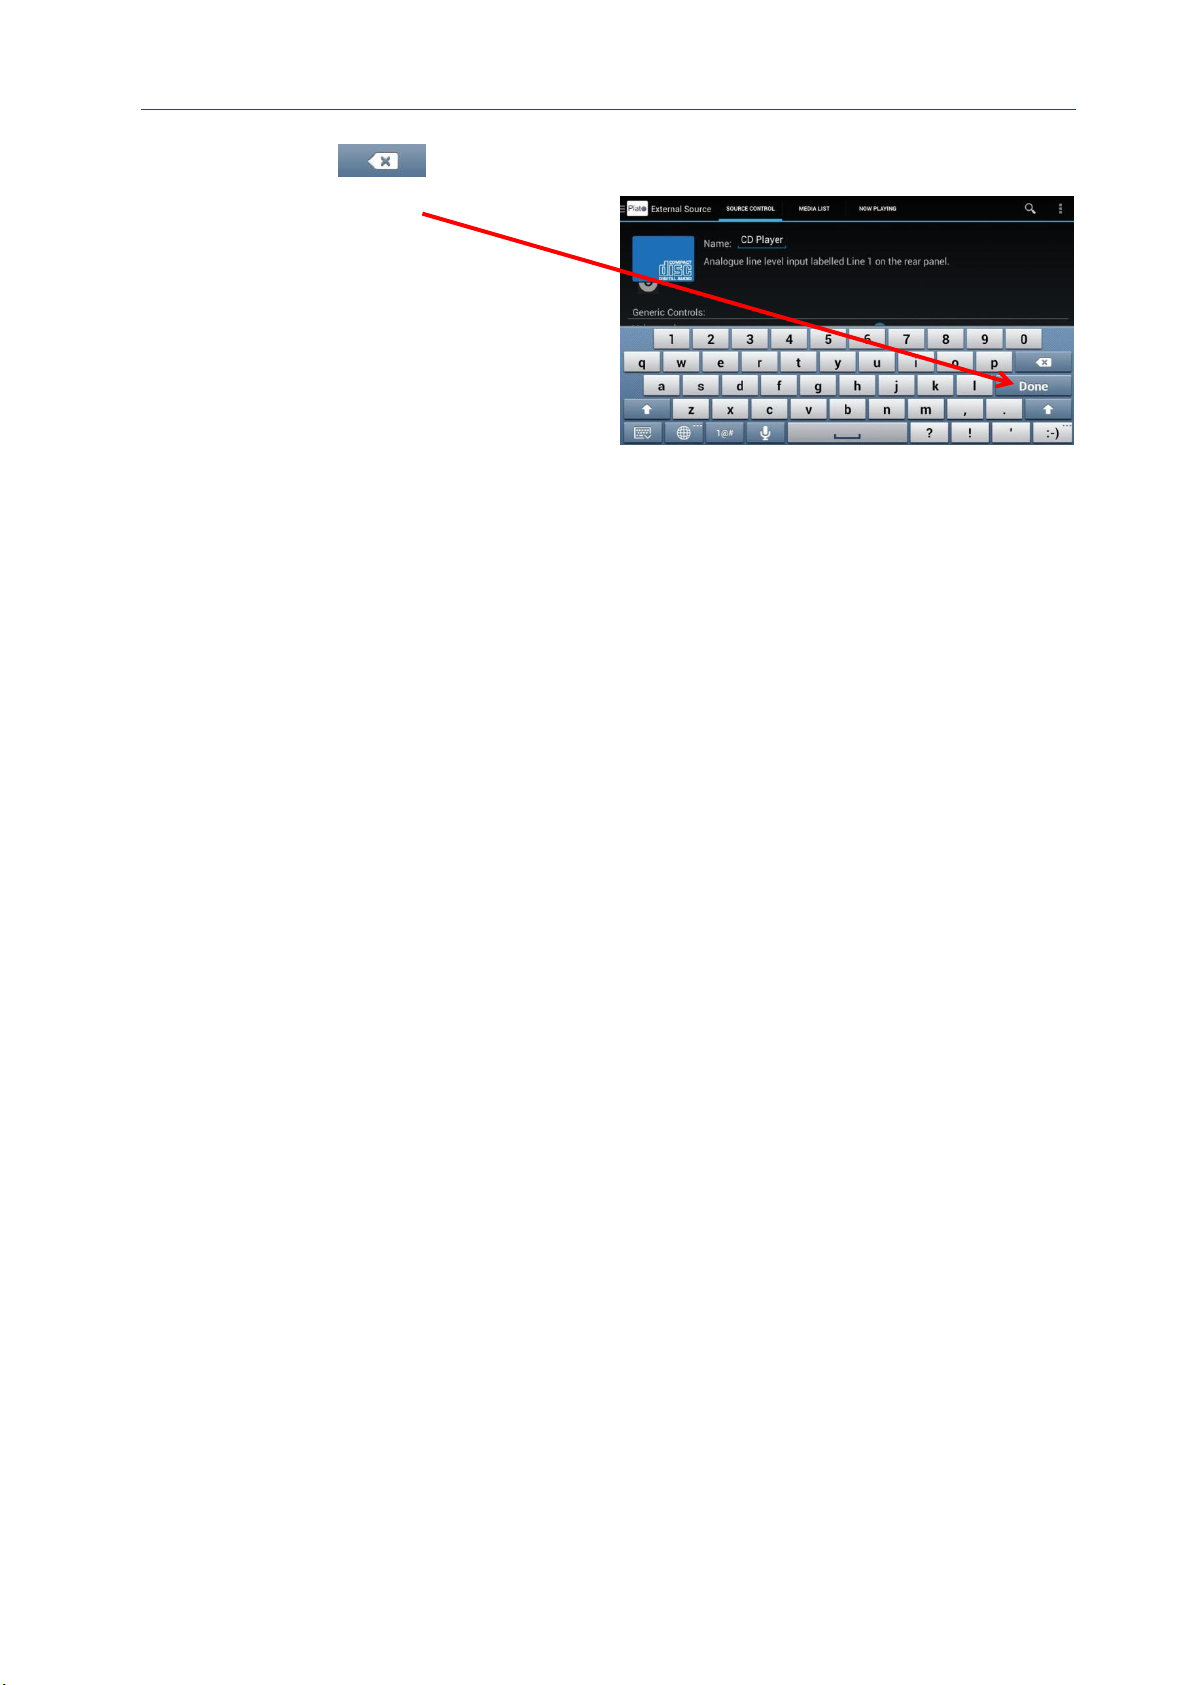
5. To change the name:
Press on the text area after ‘Name’.
(Note: screen image of keyboard may
vary depending on type of Android
device.)
Page 37
Plato Complete Guide V1.3.3
Convert Technologies 36
6. Use
the
or
the Delete key to delete the existing text
7. Type in new text.
8. Select Done.
Page 38
Plato Complete Guide V1.3.3
Convert Technologies 37
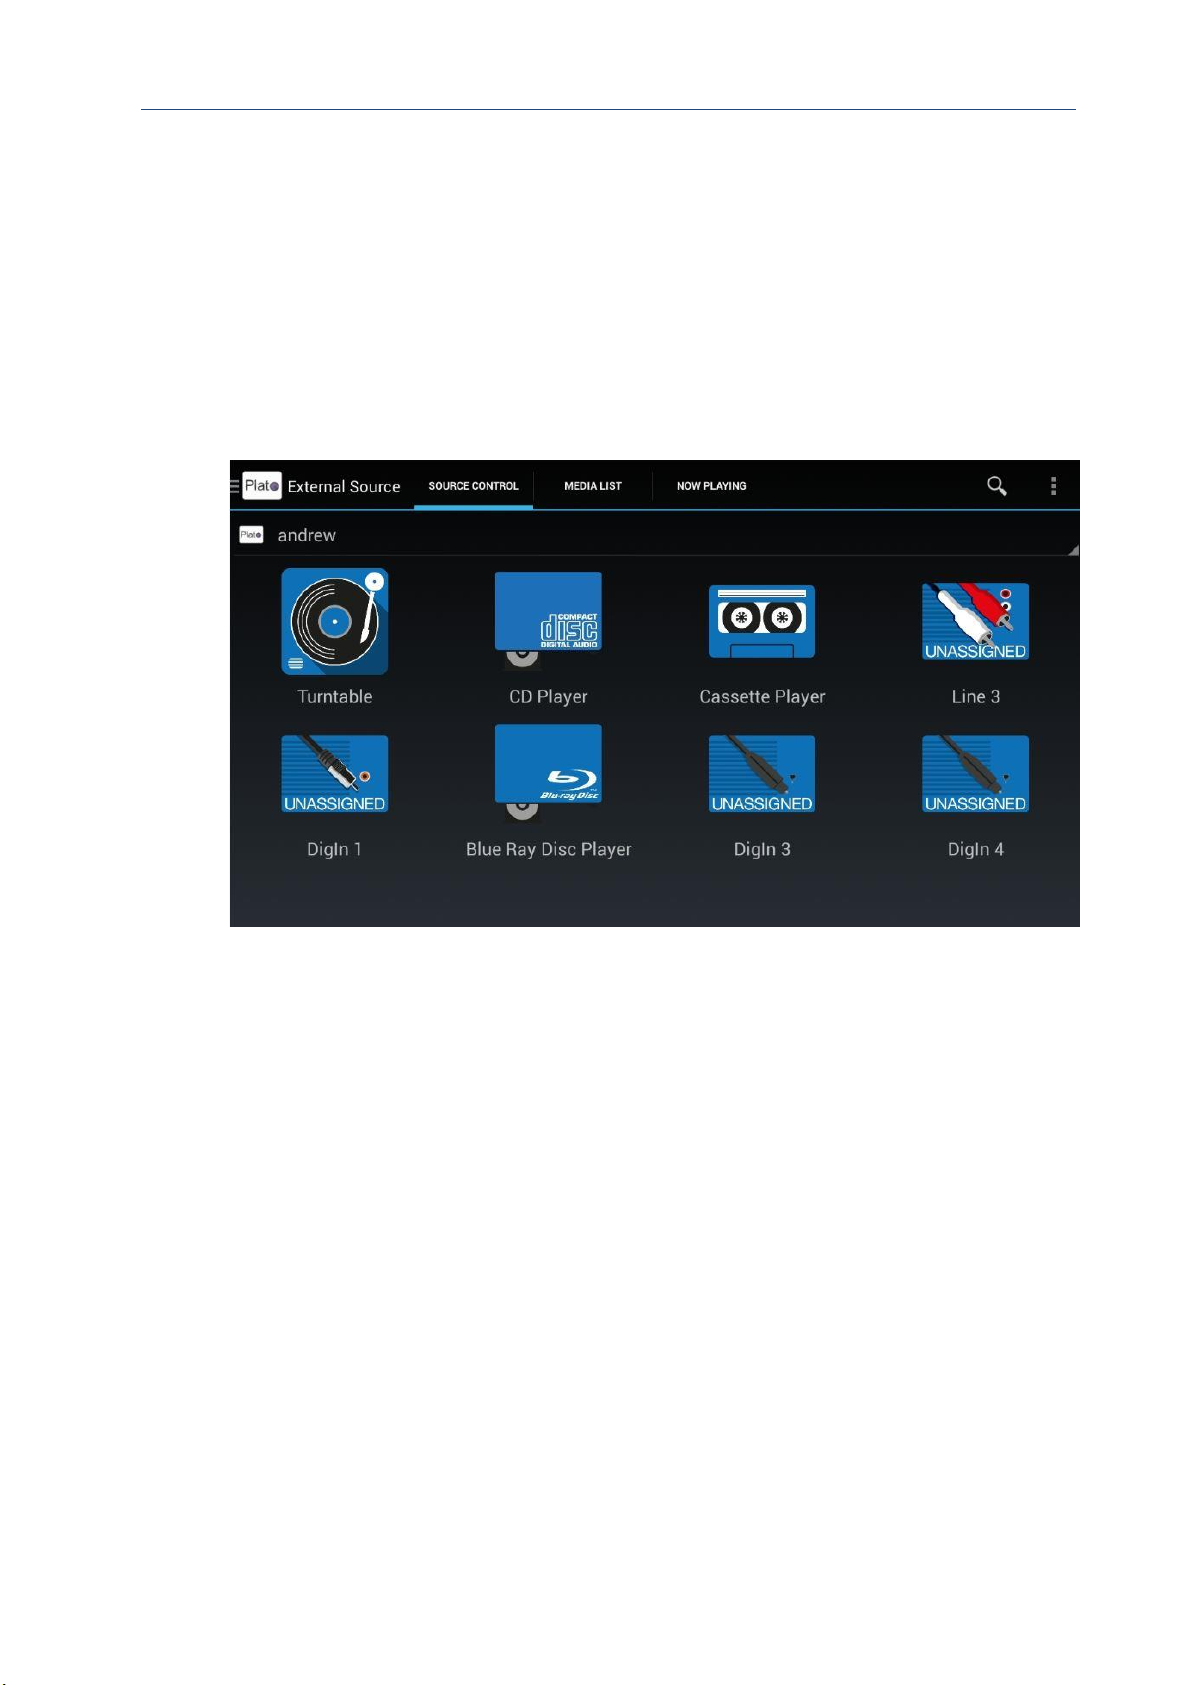
4.3. Adding other devices
Continue to assign all your other input devices.
There are a range of icons you can choose to match your connected device for general line
and digital inputs.
Once all your inputs are correctly labelled it is very easy to see which port should be selected
to allow playback from each connected device.
A typical example is shown below.
Page 39
Plato Complete Guide V1.3.3
Convert Technologies 38
5. Configuring Inputs
In addition to assigning icons/names to each input, it is possible to configure port settings to
ensure the input device matches Plato for the best possible audio playback.
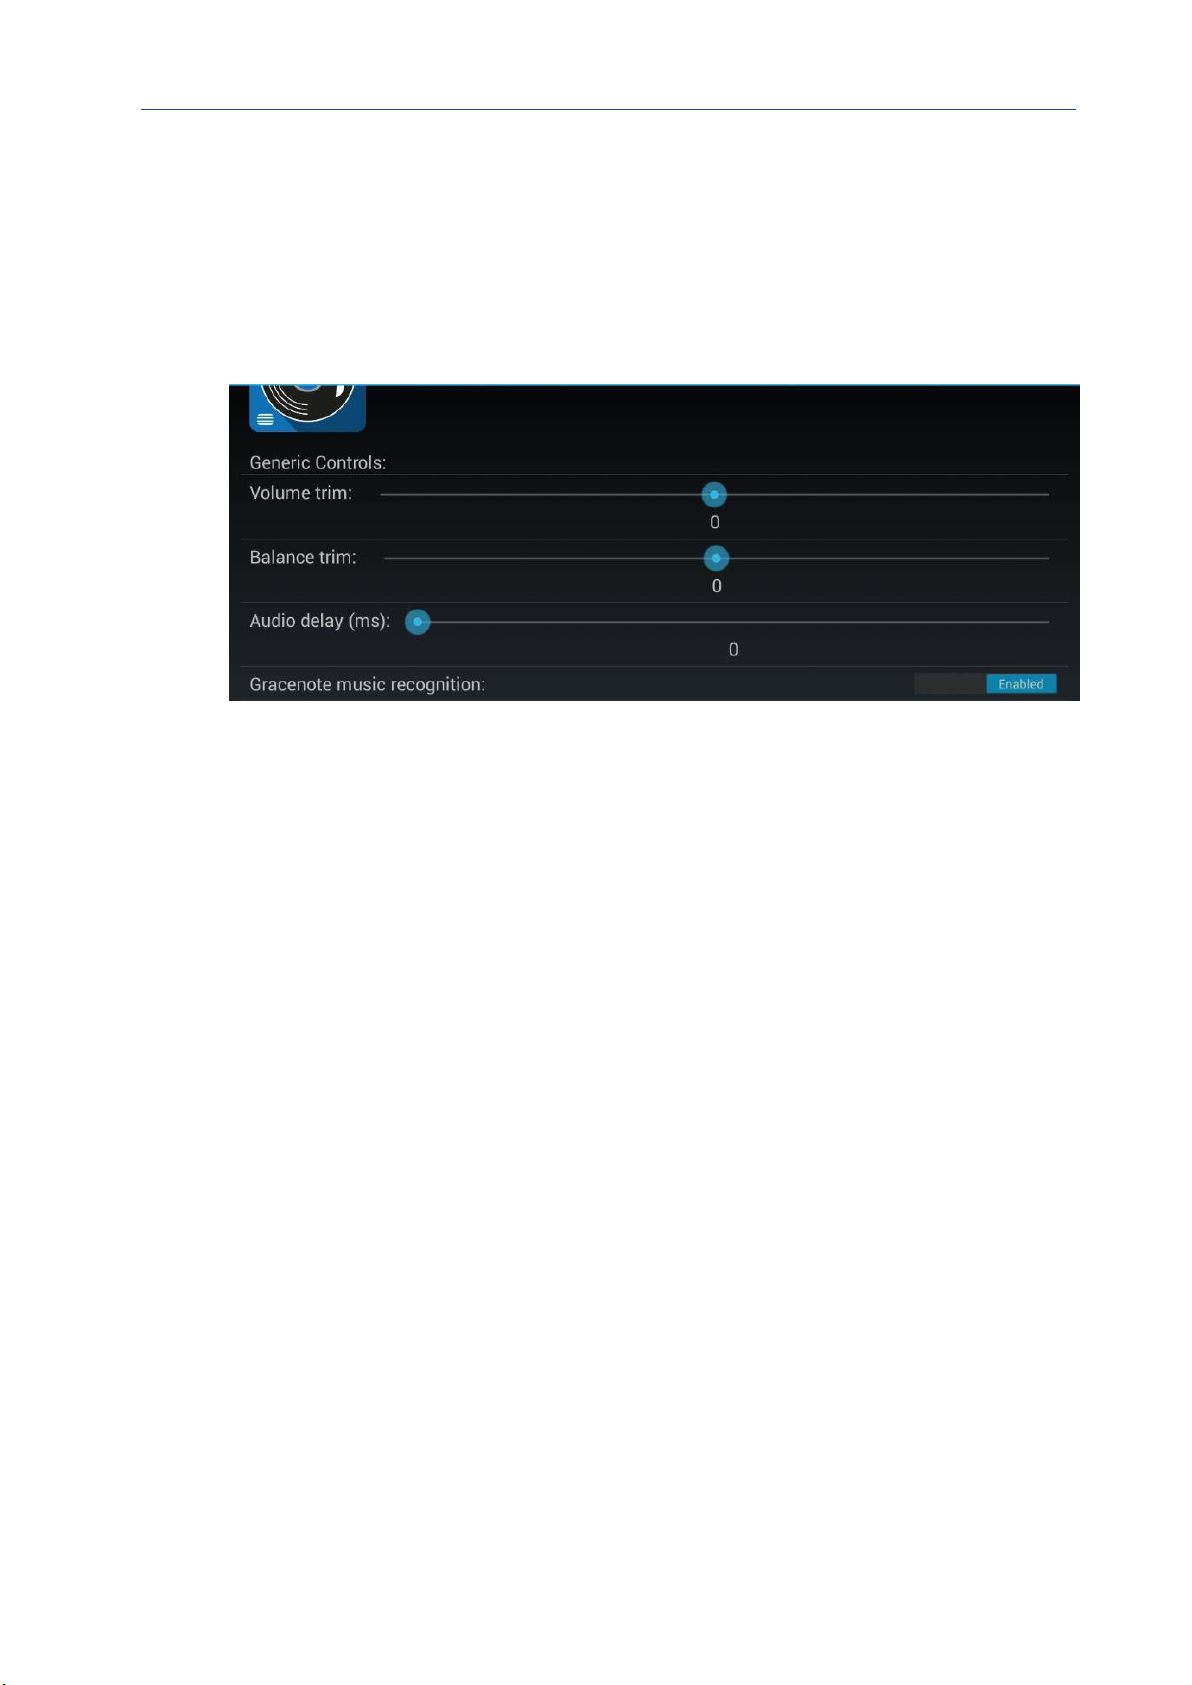
5.1. Generic Controls
All input devices have the same generic controls.
The following options can be modified for each specific port:
• Volume trim: Applies a volume offset to this port, allows you to balance volume
levels across all the ports, adjusting for devices with differing output levels.
• Balance trim: Adjusts left and right speaker balance for this port.
• Audio delay: Applies a digital delay to the audio signal for lip-synching with
external audio processors.
• Gracenote music recognition: can be Enable or Disabled. (Tip: leave as Enabled).
5.2. Input Gain
All input devices have a setting for Input Gain.
The pre-amp applies gain to the input signal before it is fed into the ADC. By adjusting the
input gain it is possible to ensure the maximum range of the ADC is utilised during analogue
recording, without causing distortion due to clipping.
See section 7 for full details on selecting the correct input gain.
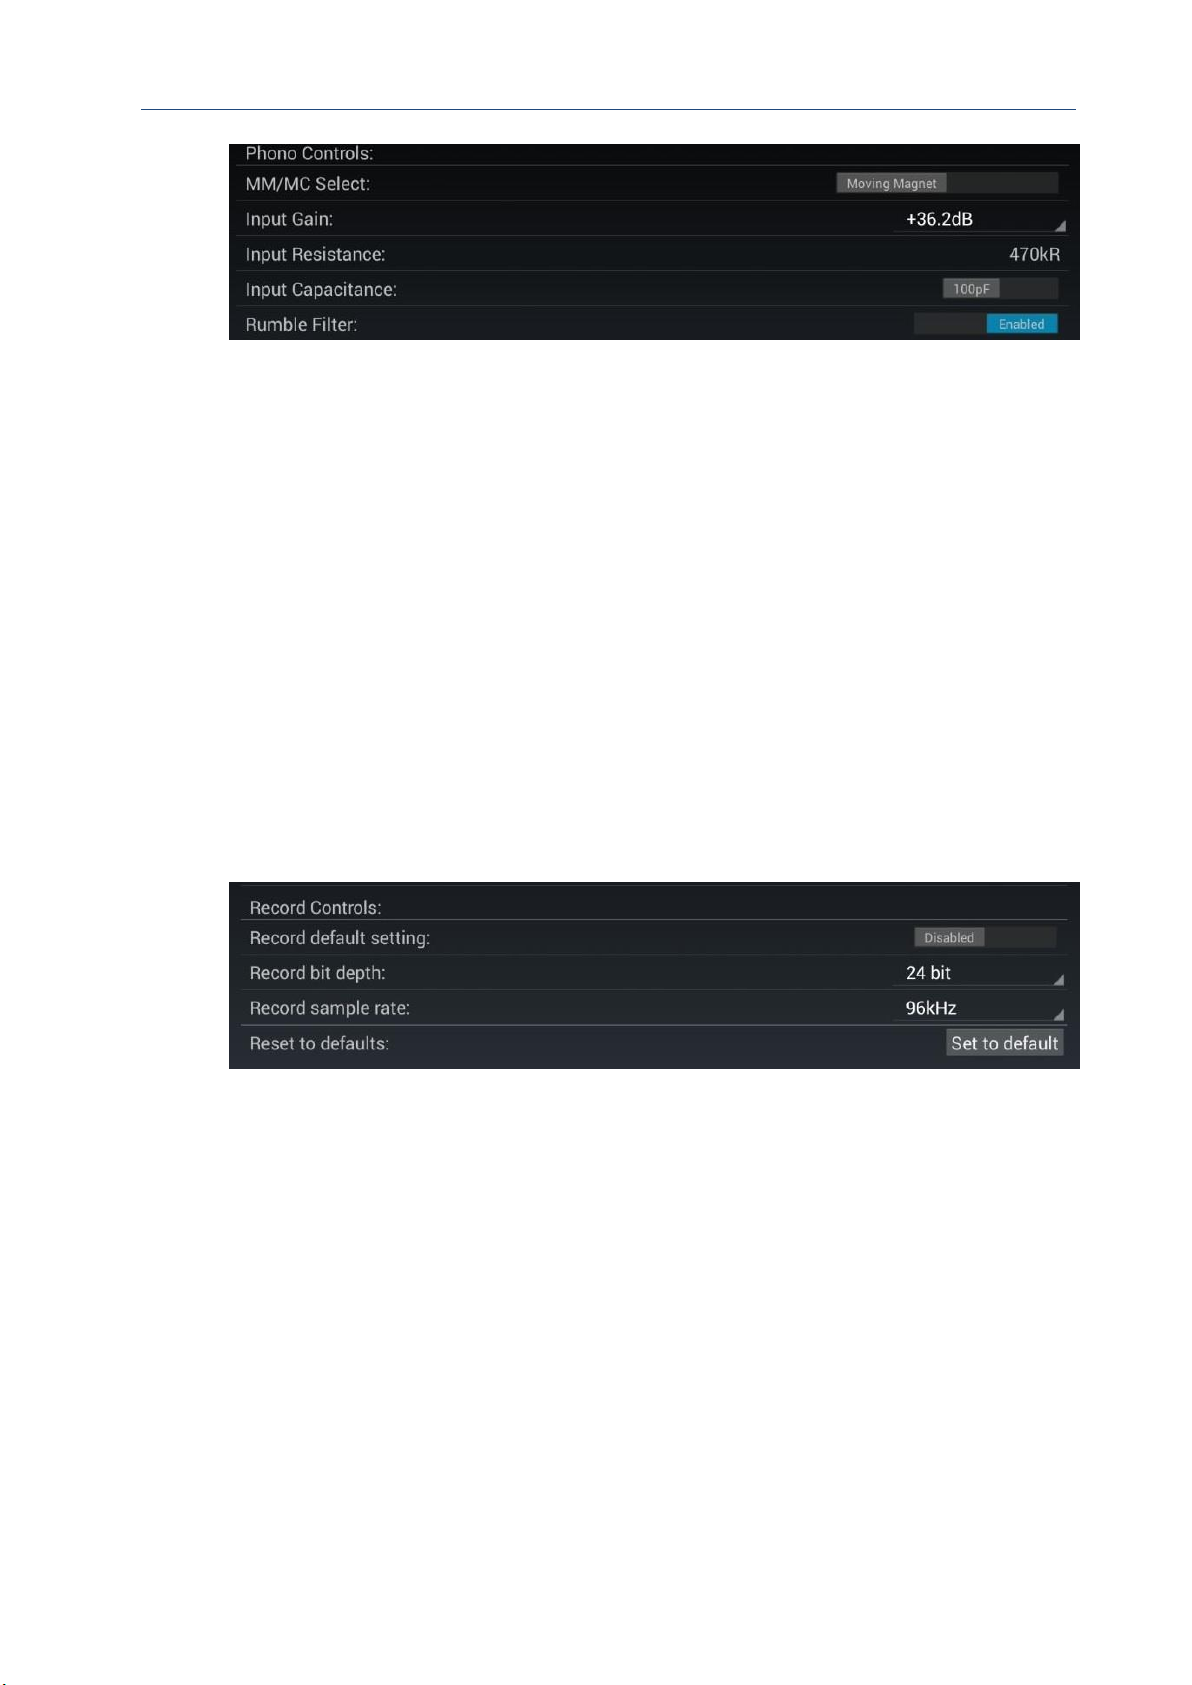
5.3. Phono controls
There are additional settings that only apply to turntable input devices which must be
connected to the ‘AUX/Phono’ inputs. These allow you to match Plato to the connected
cartridge to ensure the best quality audio reproduction.
Page 40
Plato Complete Guide V1.3.3
Convert Technologies 39
Check with your cartridge manufacturer’s details for appropriate settings for:
5.3.1. Moving Magnet/Moving Coil Select
Select the appropriate choice to match your cartridge.
5.3.2. Input Resistance
Input resistance is fixed at 47kR for Moving Magnet sources, but selectable as 100R/200R for
Moving Coil sources.
5.3.3. Input Capacitance
Selectable as 100pf/200pF for Moving Magnet and Moving Coil sources.
5.3.4. Rumble Filter
Applies a 14Hz cut-off frequency filter to reduce cone flap caused by warped records.
5.4. Record Controls
The record controls provide some control over the digital recording for this input source.
5.4.1. Record default setting
Set to Enabled to activate recording whenever this source is selected. Leaving this set to
Disabled means recording must be started using the media controls on the Now Playing
screen.
5.4.2. Record Bit Depth
Set the digital bit depth to 16/24 bits for all recordings on this source. 24 bit recordings will
give the best quality for analogue sources, but will also result in larger audio files.
5.4.3. Record Sample Rate
Select the required digital sampling rate for all recordings on this source. A higher sampling
rate will give the best quality, but will also result in larger audio files.
Page 41
Plato Complete Guide V1.3.3
Convert Technologies 40
6. Playing music from external inputs
Once your system is correctly installed, you can begin playing music from your connected CD
player or turntable.
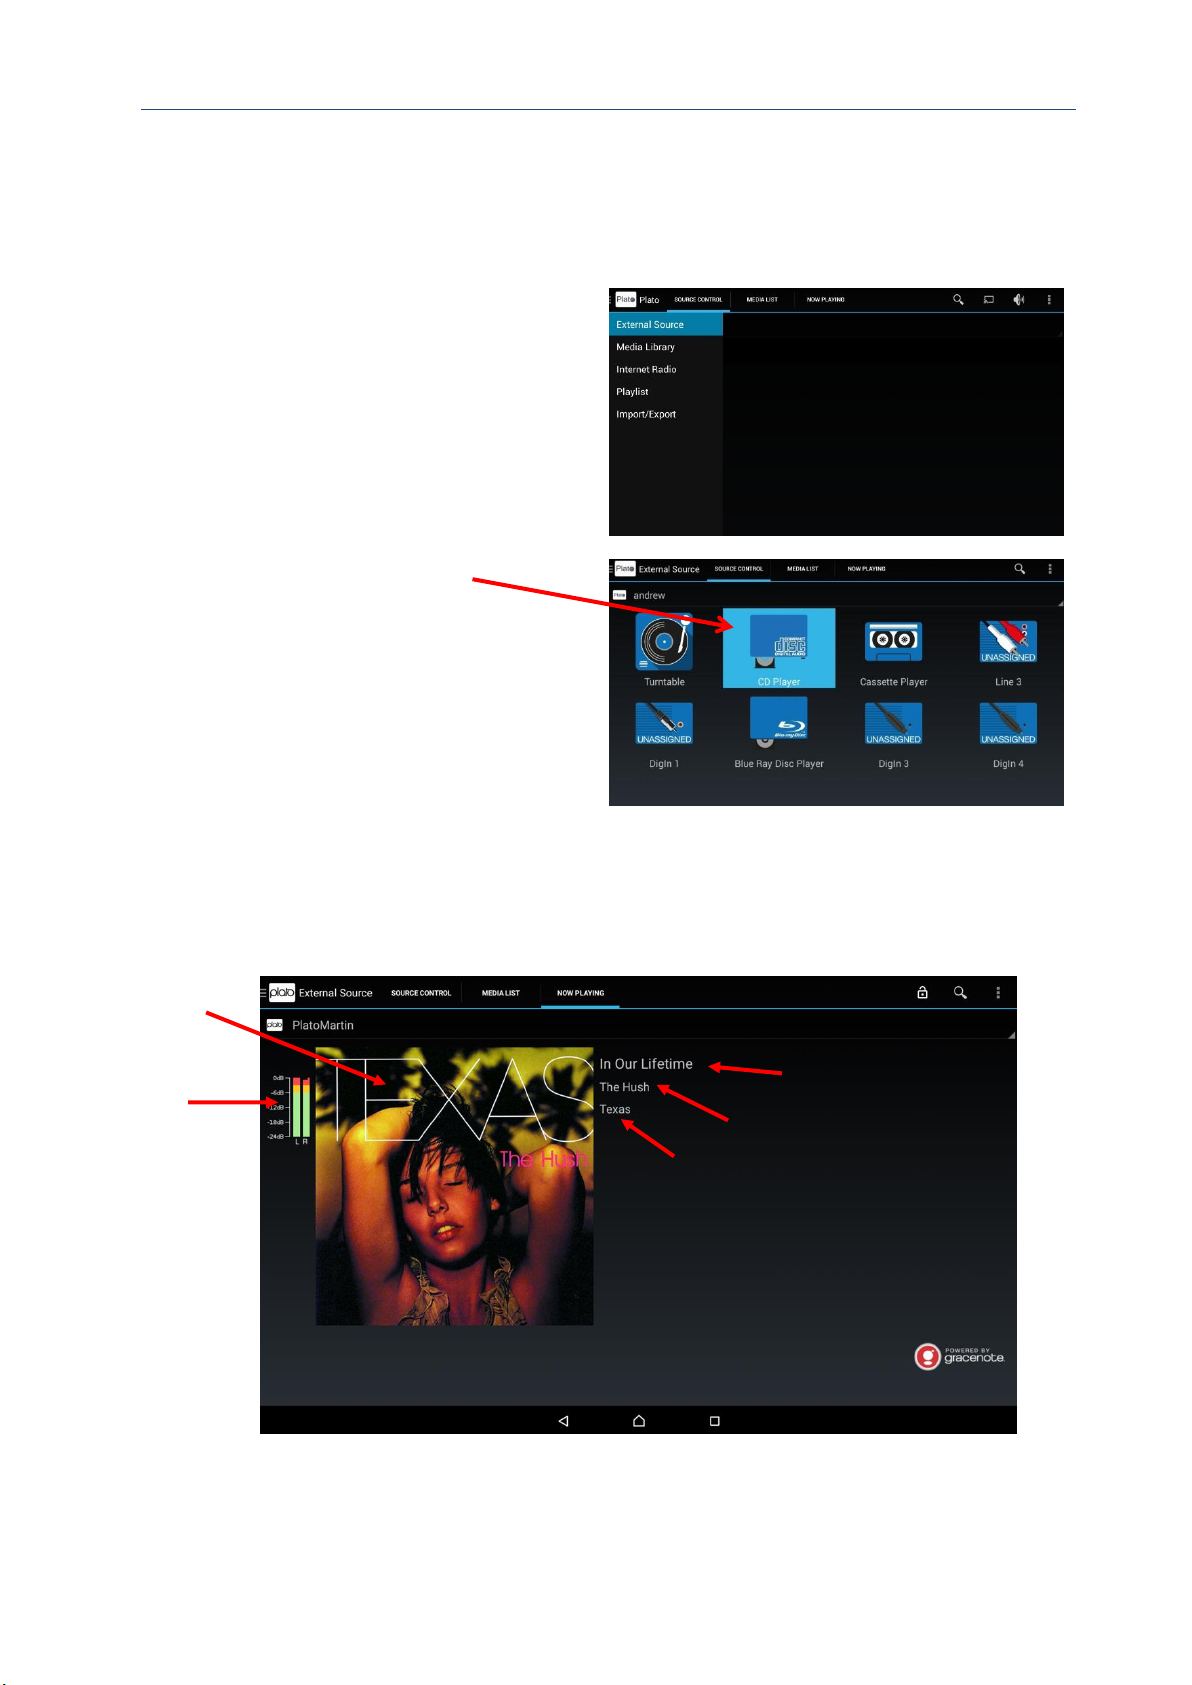
1. Select External Source from the
MAIN Plato menu.
2. Select the appropriate source by
touching the appropriate icon.
For example, Turntable (your record
player), CD Player or Cassette
Player.
The selected input is highlighted.
In the example shown, this is the
CD Player.
3. Start playing music from the
selected source. For example, press
‘Play’ CD player.
4. Select the NOW PLAYING tab to
display the screen below.
Album Cover Artwork
(Powered by
Gracenote)
Input Level
Meter
Name of
Artist
Name of Album
Name of Song
Page 42

Plato Complete Guide V1.3.3
Convert Technologies 41
Plato’s music recognition software automatically detects the music being played and then
displays the appropriate album artwork plus the name of the song, album and artist name.
There will be a variable delay before this information appears depending on many factors,
such as the speed of the internet connection.
Note that Plato’s music recognition software requires an internet connection to return track
information.
The album (including artwork) is determined by looking at a sequence of tracks and thus Plato
may need to play multiple tracks before finding the correct match. This is especially difficult
for tracks which have been released on multiple albums (e.g. best-of collections).
As each track is recognised a new entry is added to the MEDIA LIST tab. The MEDIA list tab lists
all tracks as they are detected, a new entry is also generated whenever the recording state
changes, and the list is updated to reflect the current recorded status of the track. This is
described in more detail in section 7.
Page 43
Plato Complete Guide V1.3.3
Convert Technologies 42
7. Recording from an external source
Now that you have your Plato system up and running, you can play music and record your
music collection to the internal Plato disk drive automatically. Plato’s automatic music
recognition system will detect the music that is playing and generate tag information. This is
especially useful for recording records.
Note that audio recording can only be done at playback speed. If you would like to rip your
CD collection directly into Plato, use the supplied USB CD/DVD drive which can perform high
speed rips directly to Plato’s internal hard drive. See section 11.1 for more details.
Before recording can begin it is important to ensure the input level is set correctly.
7.1. Monitoring Input Levels
For optimum recording quality please ensure the input level to the ADC is set correctly. If it is
too low the recording will not be making the most of the available resolution of the ADC, if it
is too high the recording could be distorted as the ADC input saturates (clips).
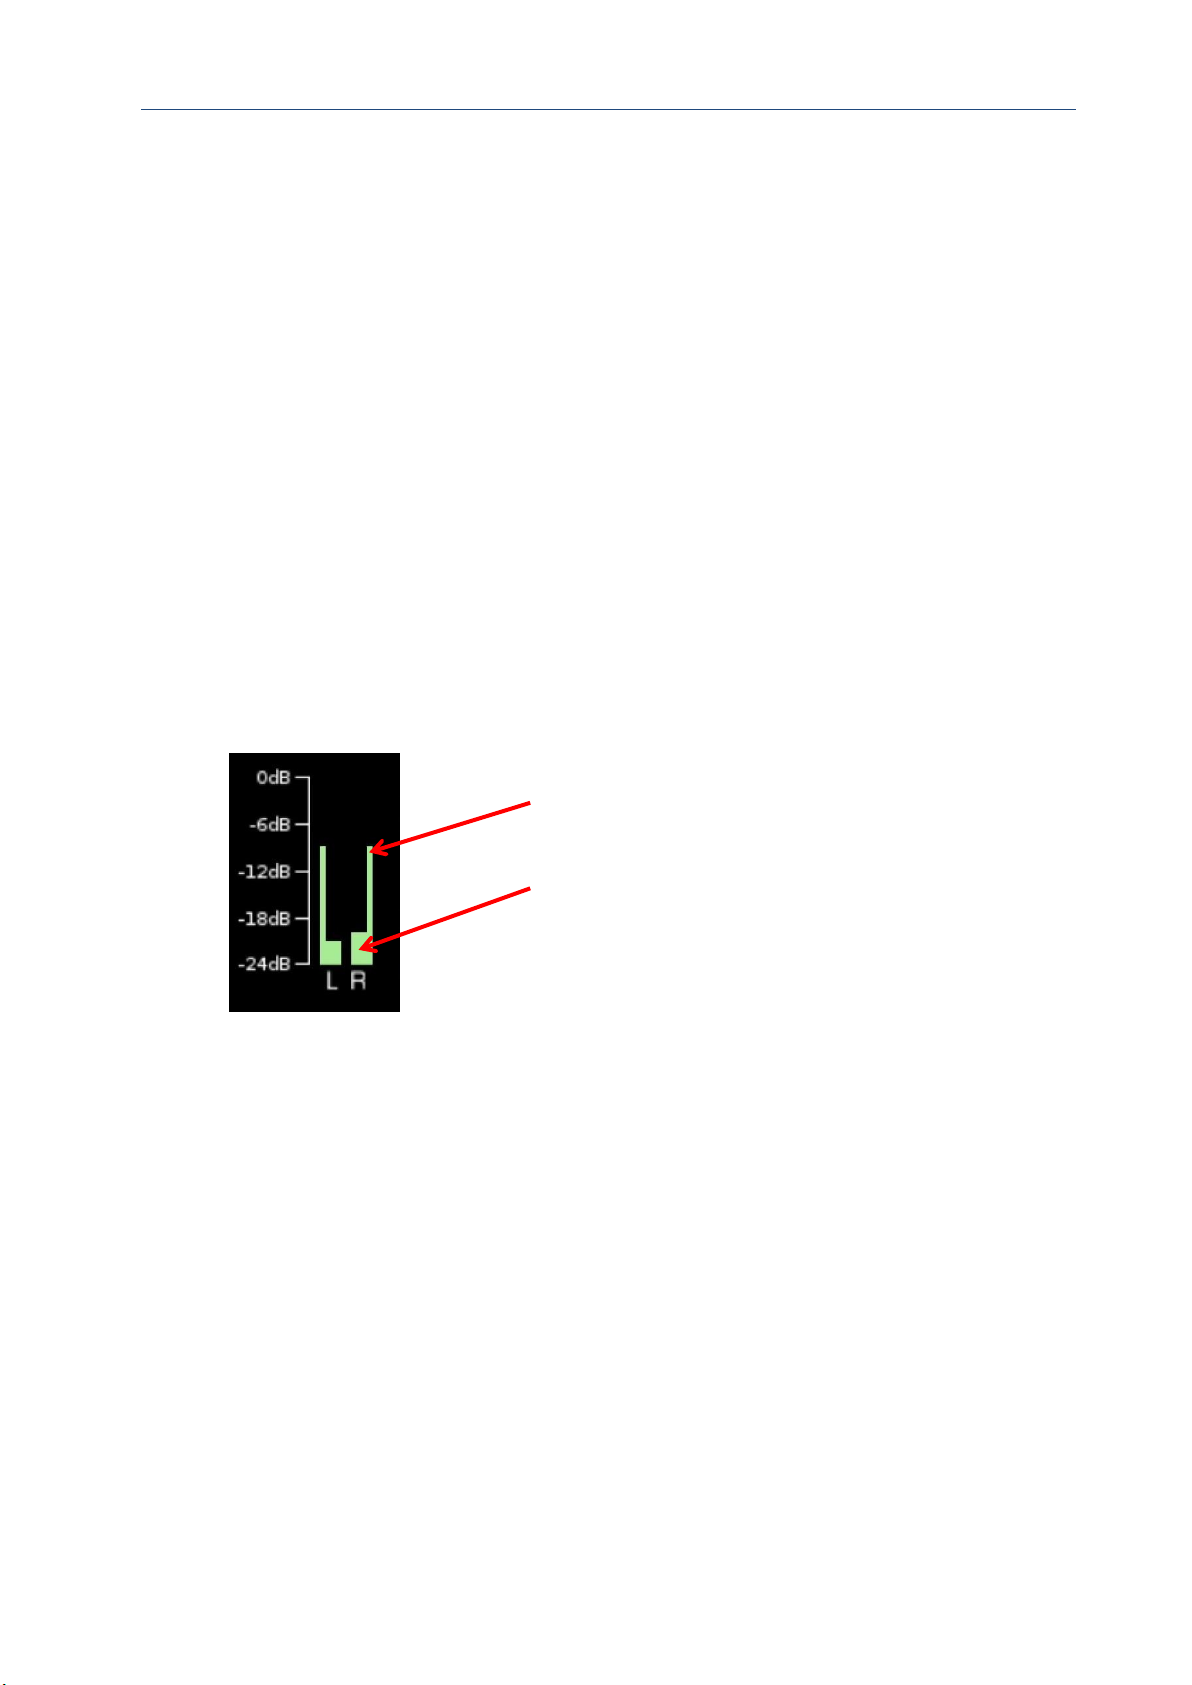
The input level can be monitored via the level meters on the Now Playing screen. For
optimum recording the peak gain levels should not peak at over -6dB.
The input levels for both the left and right channels are displayed in the input level meter.
The input levels change as the music changes. The current input levels go higher when the
music is louder. The peak input level shows the highest input level reached during the
previous 20 seconds.
If the level peaks at 0dB, then the recording has been clipped, and this will lead to distortion
of the recorded track. This is shown by a red dot above the channel’s level meter. This clip
indicator dot stays visible until the Reset Clip button is pressed.
For optimum listening and recording quality, the level meters should be averaging at around
-6dB. This will ensure the full dynamic range of the ADC is achieved, without leading to
distortion due to clipping.
The peak input level will show spikes into yellow (-6 dB to -3 dB) and red (-3 dB to 0 dB)
regions to serve as a warning that clipping may be imminent, but no data will be lost until
clipping actually occurs.
Peak input level
Current input level
Page 44

Plato Complete Guide V1.3.3
Convert Technologies 43
If the levels are too low (too quiet) or are clipping, you should adjust the input gain up or
down using the appropriate ‘Source Configure’ controls to correct this. See section 7.2 for
instructions on how to make adjustments.
Page 45
Plato Complete Guide V1.3.3
Convert Technologies 44
7.2. Changing Input Gain settings.
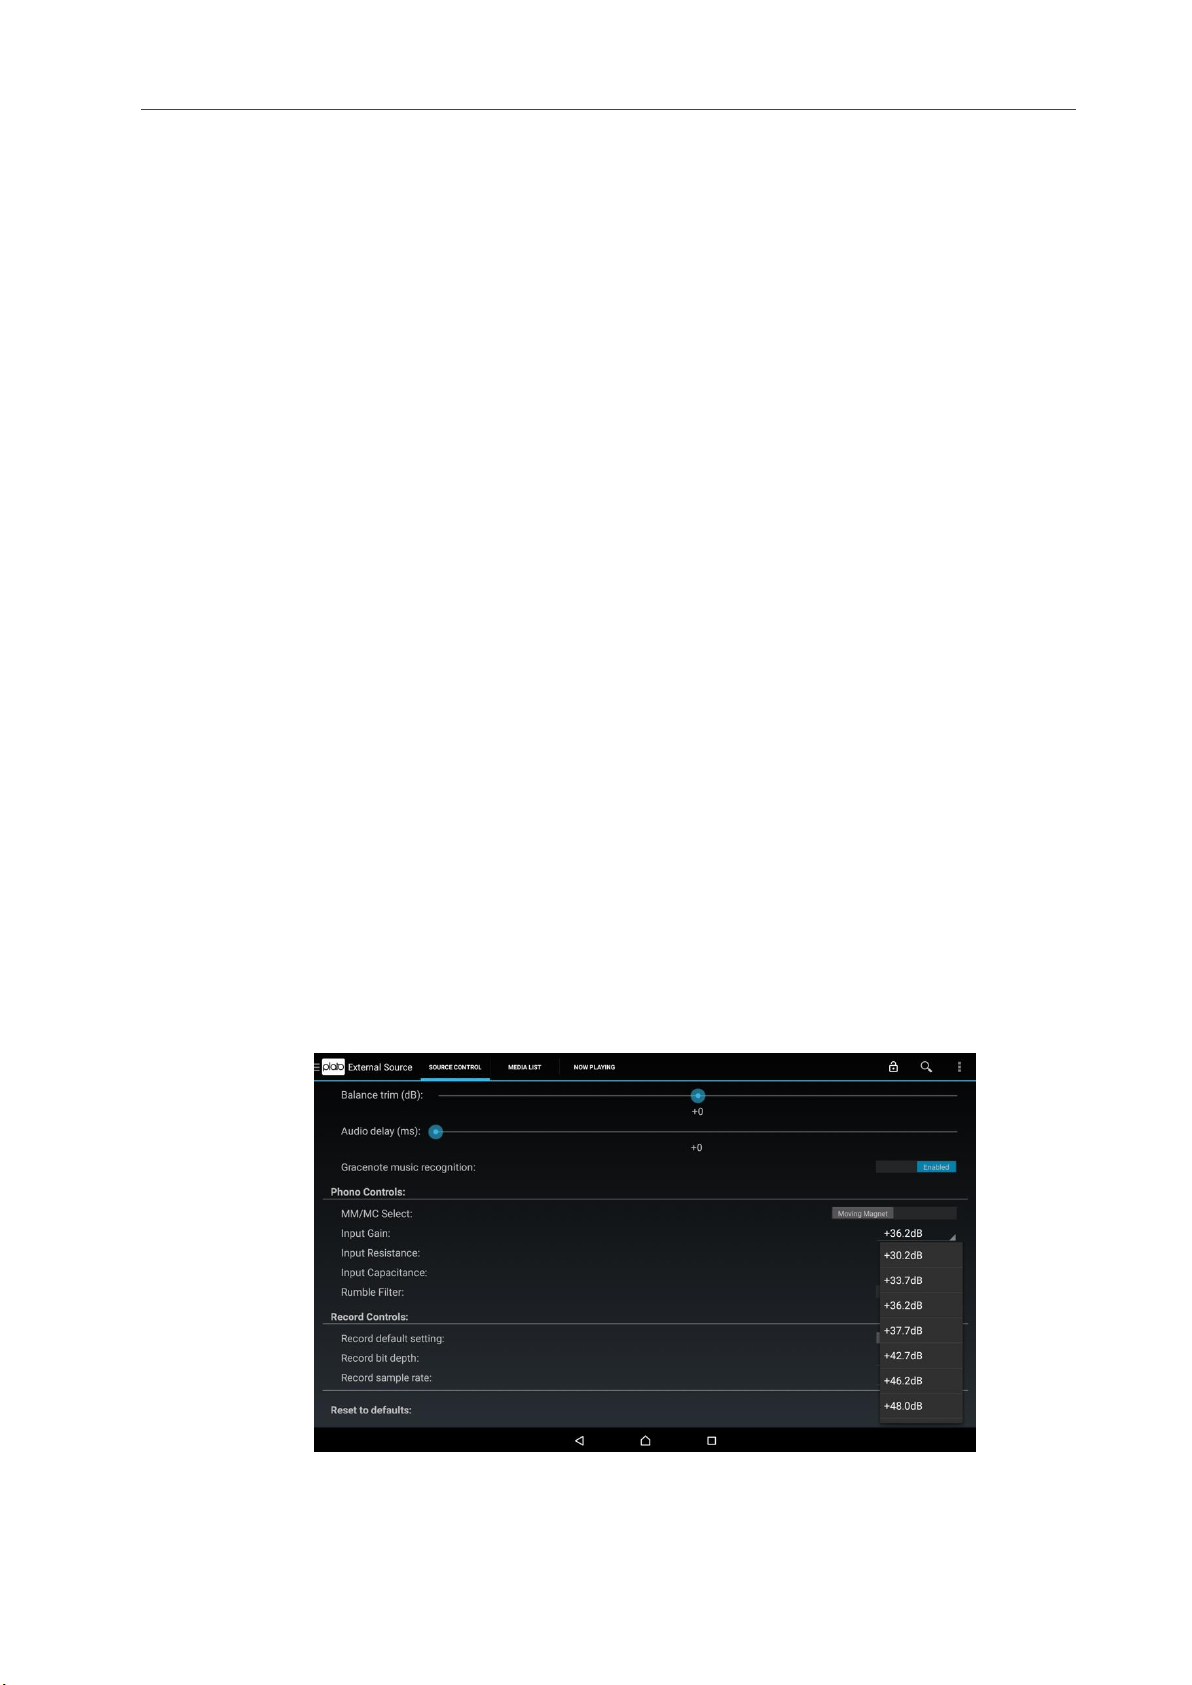
Open the configurations options display for the device that you want to change input gain
levels for.
For most standard line level devices (excluding PHONO input), Input Gain can be set to:
• -6dB
• 0dB (default)
• +6dB
• +12dB
Increase the gain setting to boost the level as shown in the level meters on the Now Playing
screen, reduce the gain to lower the level.
Any change to the input gain should be verified by playing music and noting the values
showing on the level meters on the Now Playing screen.
It is desirable to choose a loud section of music during these tests to ensure clipping will not
occur during any of your recording.
Tip: Typical settings for the Input Gain levels:
• 0db for CD/DVD input
• +6dB for tape
• -6dB for high output DAC devices
For a turntable input, Plato provides a wide range of gain settings to support a large range of
cartridge types. Follow the same procedure to setup the phono input gain.
See option list below.
7.3. Recording a track or album
Once you are satisfied with the input level you can record your favourite music.
Page 46
Plato Complete Guide V1.3.3
Convert Technologies 45
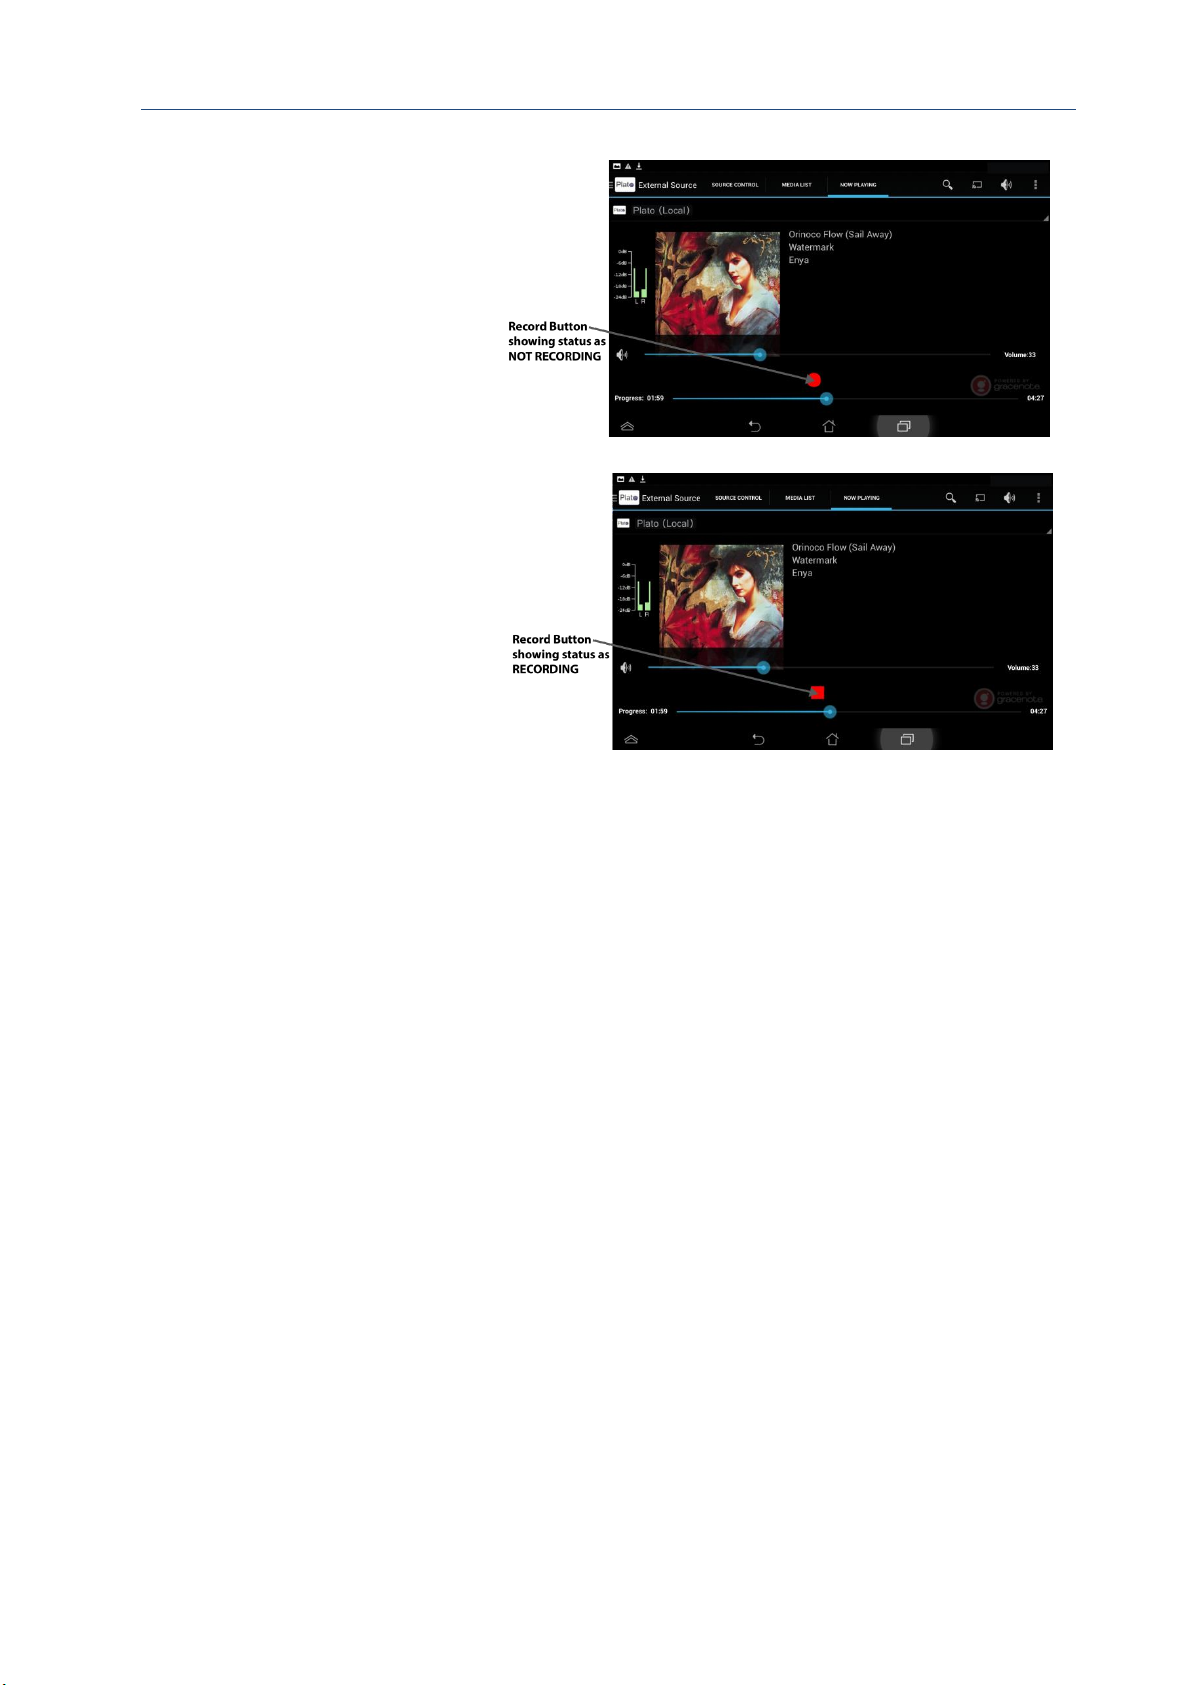
1. Select the music that
you want to record and
start playing it from the
external source.
2. Go to the NOW
PLAYING tab.
3. Press the round red
Record button to start
the recording process.
4. The red button changes
from being round to
square. This indicates
that Plato is recording
the music.
5. To stop recording, press
the red button again. It
changes back from
square to round.
Note that if you forget to stop recording, Plato will automatically stop after approximately 3
minutes of silence.
It is possible to record multiple tracks without touching the record controls. Plato has
automatic silence detection which, combined with the track detection algorithms, mean it is
able to accurately determine when one track stops and another begins. Plato looks at
collections of tracks in order to accurately determine which album is playing. So, to record an
album, simply cue up the record, start the recording and stop once both sides of the album
have finished playing through the system. Plato will then generate a fully tagged FLAC file for
each track on the album.
7.3.1. Media list tab
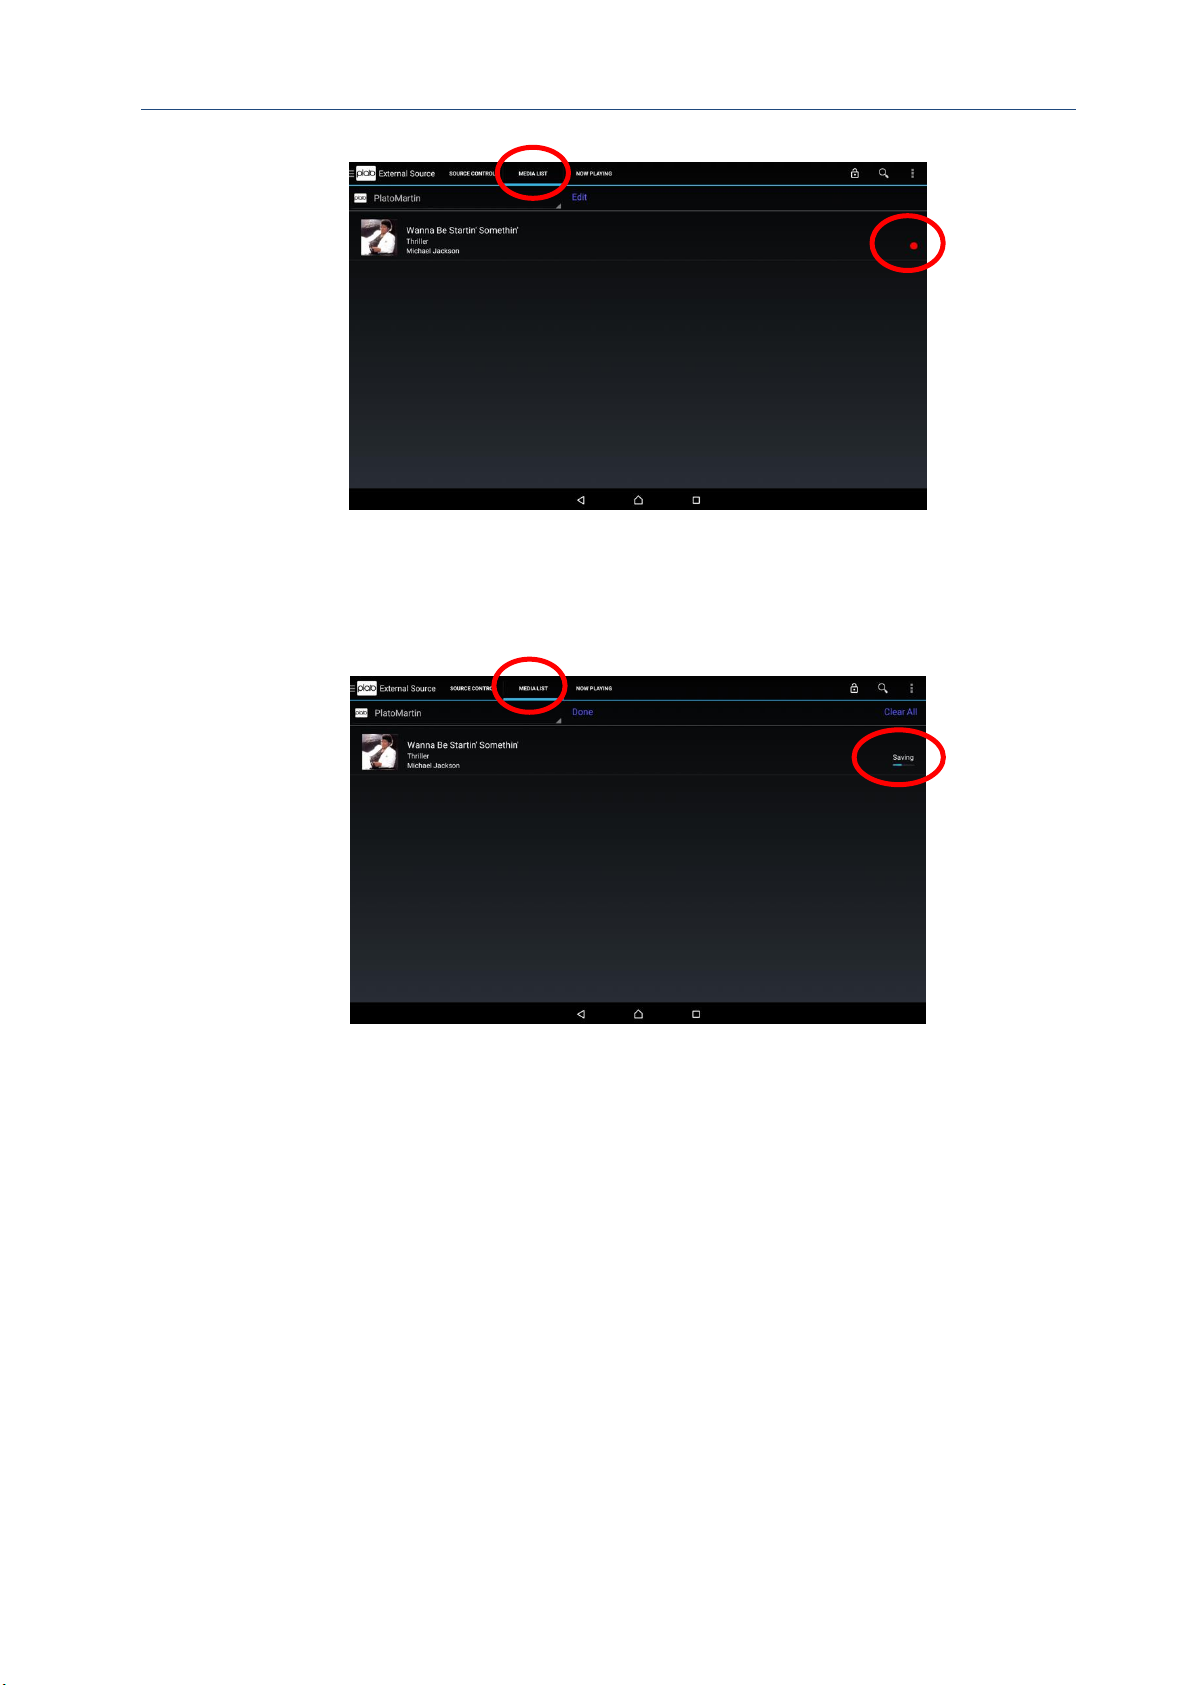
Once the recording has started the MEDIA LIST tab adds a new entry for each track with a
red dot to indicate that this track is currently being recorded.
Page 47
Plato Complete Guide V1.3.3
Convert Technologies 46
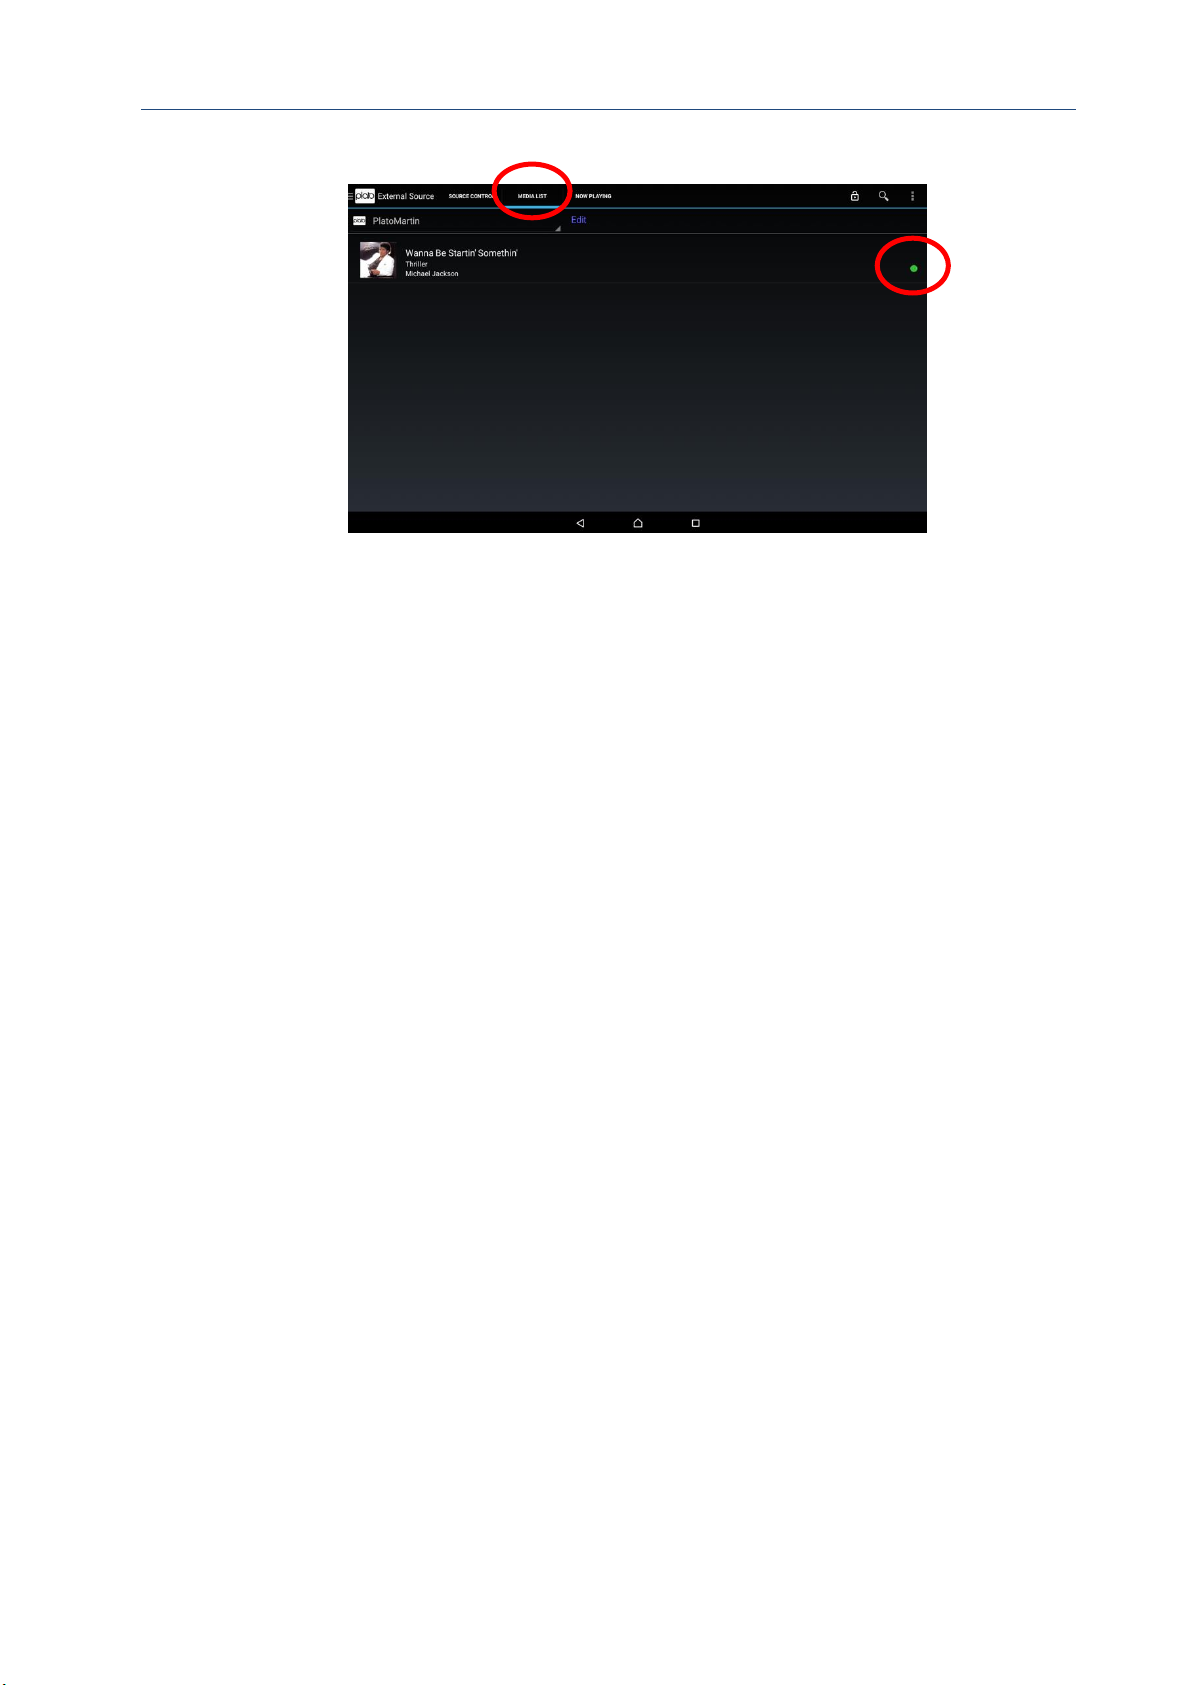
When the recording is stopped Plato processes the track and generates a FLAC file. This
process could take some time, and the MEDIA LIST shows this as indicated:
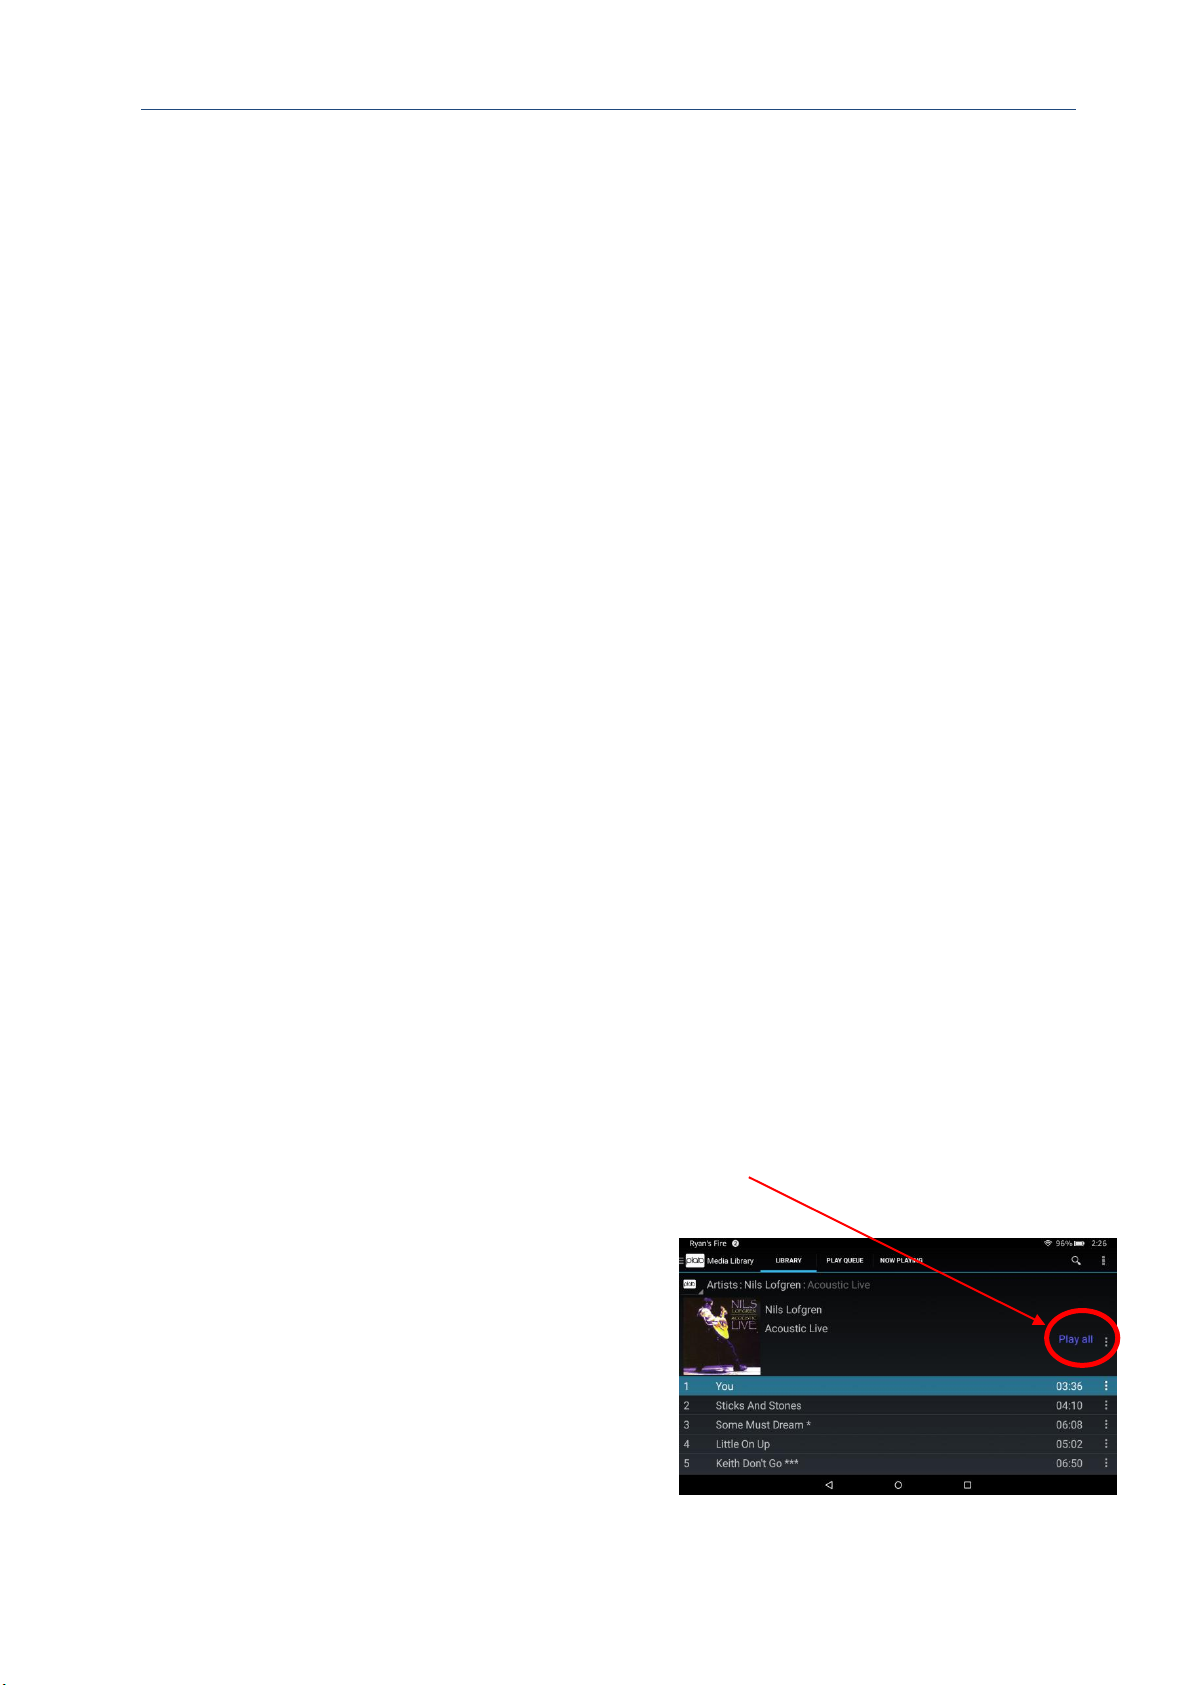
Once the FLAC file has been generated and added to Plato’s database the MEDIA LIST will
show the track with a green dot. Now the track (or tracks) are available for playback from
Plato’s internal database.
Page 48
Plato Complete Guide V1.3.3
Convert Technologies 47
Page 49
Plato Complete Guide V1.3.3
Convert Technologies 48
8. Media Library
The Media Library feature allows you to play back or queue media tracks from Plato’s
internal hard drive, or from other compliant UPnP servers on your home network.
The Device Access List allows you to select the UPnP server you would like to use as your
playback source.
Plato’s internal media library includes all music that you have recorded, plus music, images,
and video content that you have imported.
You can filter your music collection by Album, Artist, or Genre by selecting the appropriate
option from the drop down list in the top right of the screen.
Video or image content is viewed by selecting the Video or Image button. An additional
Browse option is provided to perform low level UPnP Browse actions on the selected server
if it does not support enhanced search capability.
It is possible to view the Media Library as a grid or list view using the list/grid icon on the
right of the view filter drop down list.
The library entries are listed in alphabetical order, and the alphabetised slider on the far right
hand side of the main library screen provides fast access to specific parts of the library.
8.1. Playing music from your Library
It is possible to descend the media hierarchy from artist-album-track by touching the
appropriate icon. The artist view displays images collected from Gracenote’s lookup service
where possible.
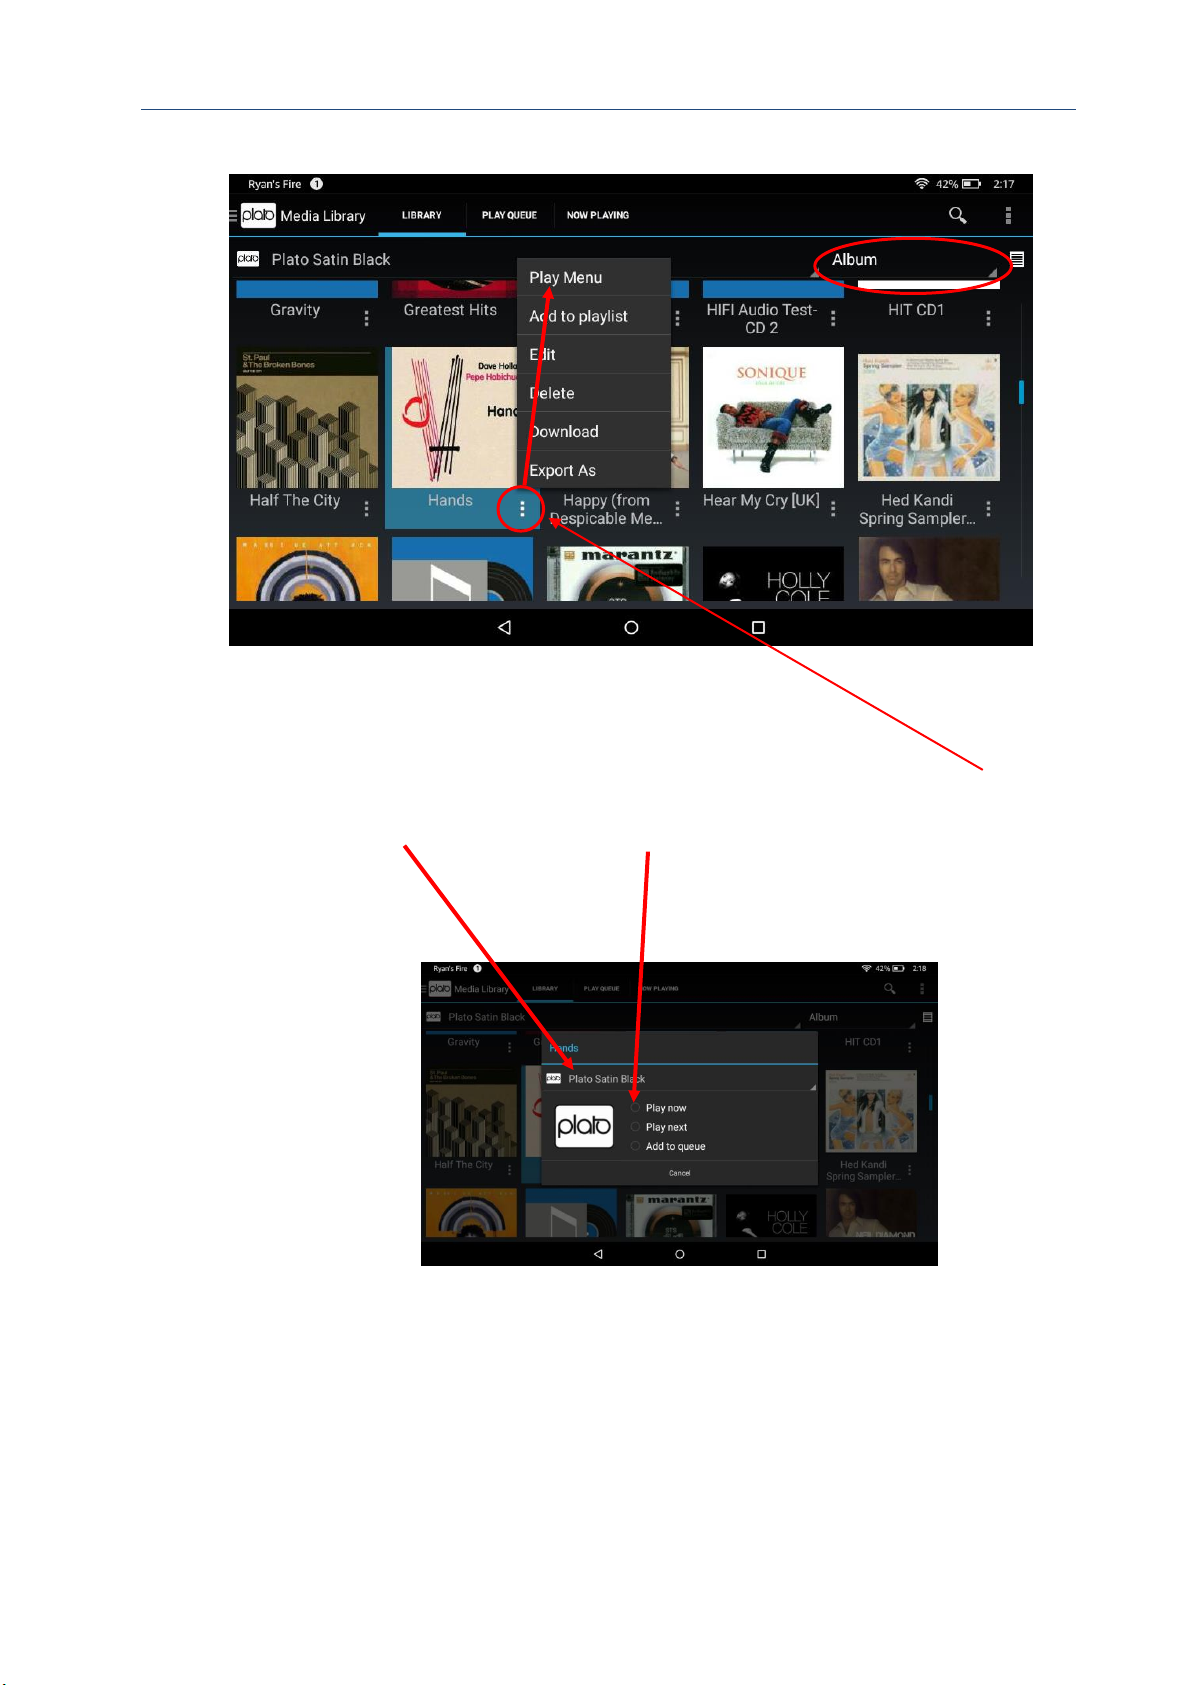
At any point in the hierarchy you may also choose to play all the tracks from that point in the
hierarchy (e.g. all tracks by a certain artist, or all tracks on an album):
• Long press the appropriate icon to show the Play Menu dialog box, OR:
• Activate the Play Menu dialog box from the More Options icon on the right of the
Artist/Album name, and select Play Menu, OR:
Short press on the album artwork and select ‘Play All’ from the Album Details screen
Plato is a streaming device which means you can choose to play media to any compliant
device on your home network. The Play Menu
dialog box provides a Selected Device list to
allow you to select any UPnP device to playback
the selected track(s).
Note that Plato is able to support many streams
running simultaneously.
Page 50
Plato Complete Guide V1.3.3
Convert Technologies 49
To listen to an album that you have recorded or imported.
1. From the Main Drawer Feature Menu, select Media Library.
2. Select Album in the option list in the top right hand corner of the display.
3. Long Press your chosen album, OR, select the Play Menu option from the More Options
icon.
4. From the drop down list, select the playback device on which you would like to play the
track(s).
5. Select the appropriate playback options to play the track, or add it to your listening
queue.
The Play Menu dialog box provides the following playback options:
Page 51
Plato Complete Guide V1.3.3
Convert Technologies 50
• Play now
Inserts this track (or tracks) at the end of the current play
queue, and begins to play the selected track immediately.
• Play next
Inserts this track (or tracks) after the current playing track, and
begins playing once the current playing track has finished.
• Add to queue
Add this track (or tracks) to the end of the current play queue.
8.2. Using media Search
When the Media Library feature is selected, the search icon can be used to search the
selected server for specific material. The search is text based and returns matches based on:
• Artist name
• Album name
• Track name
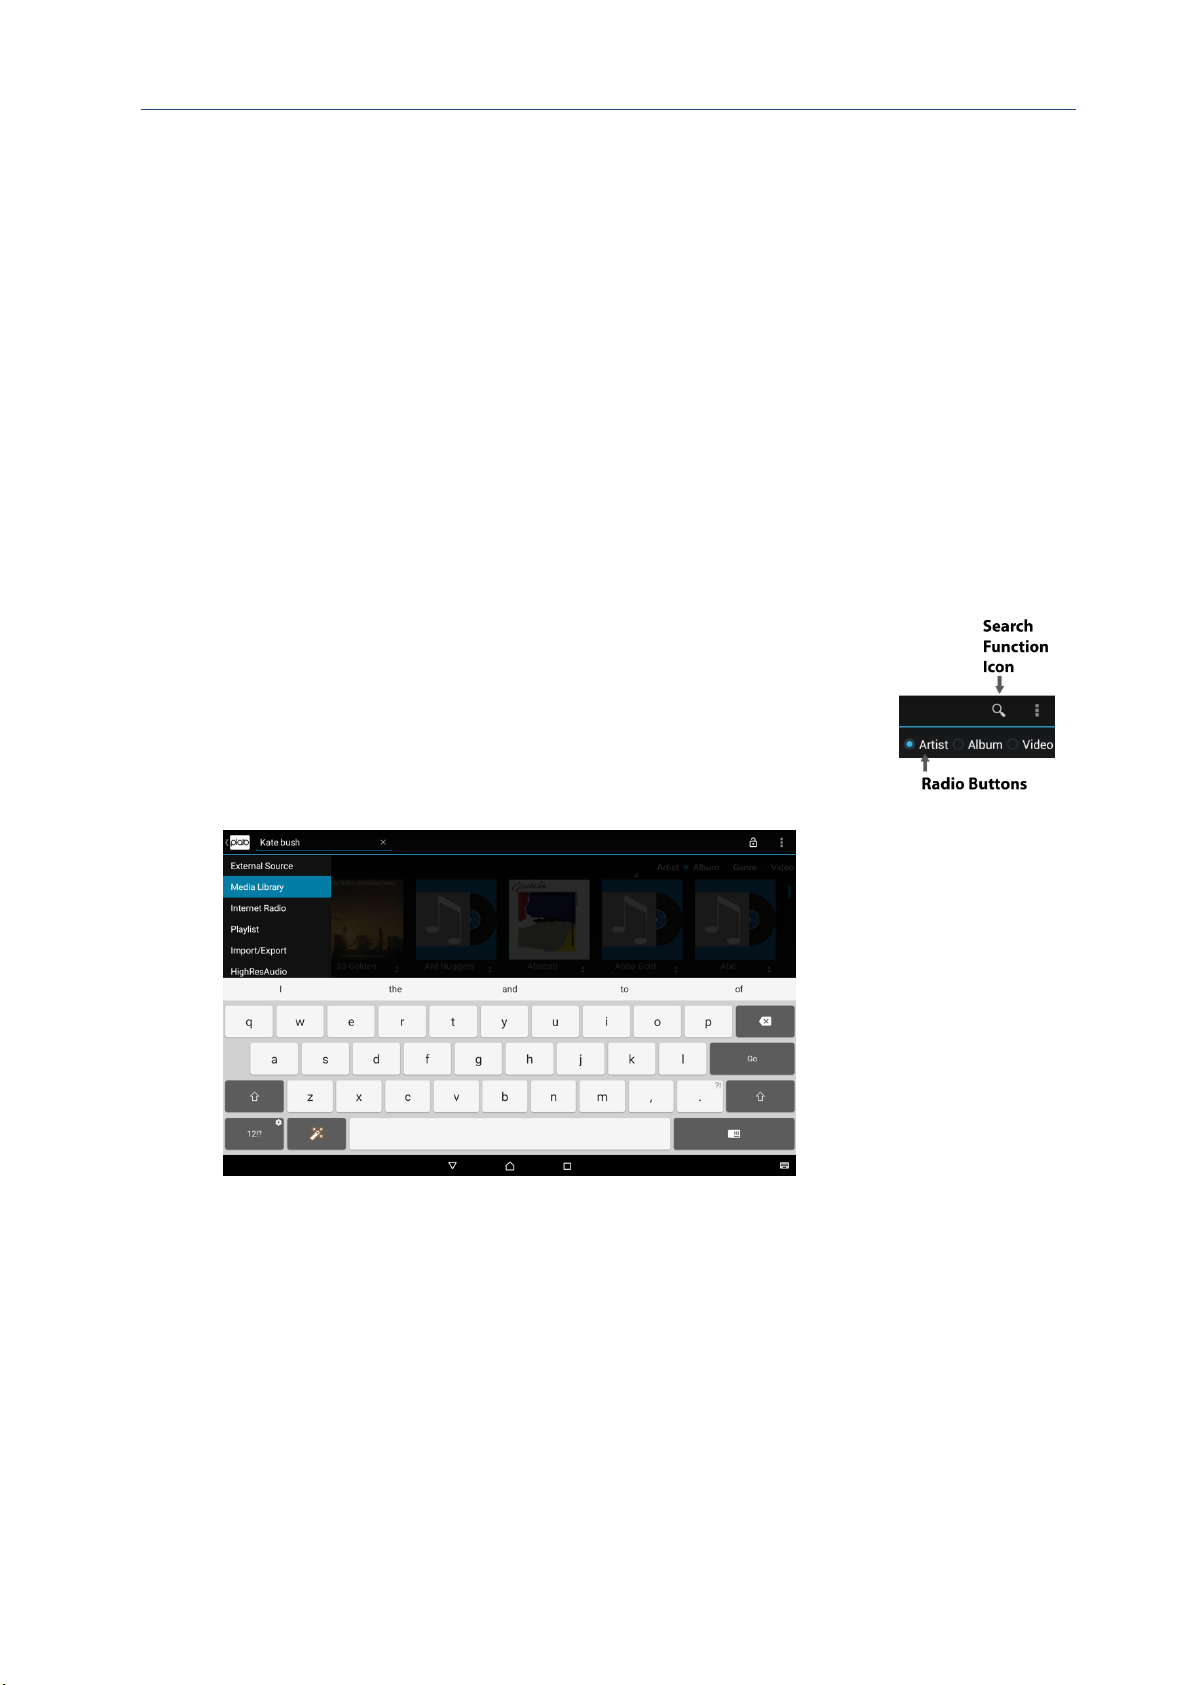
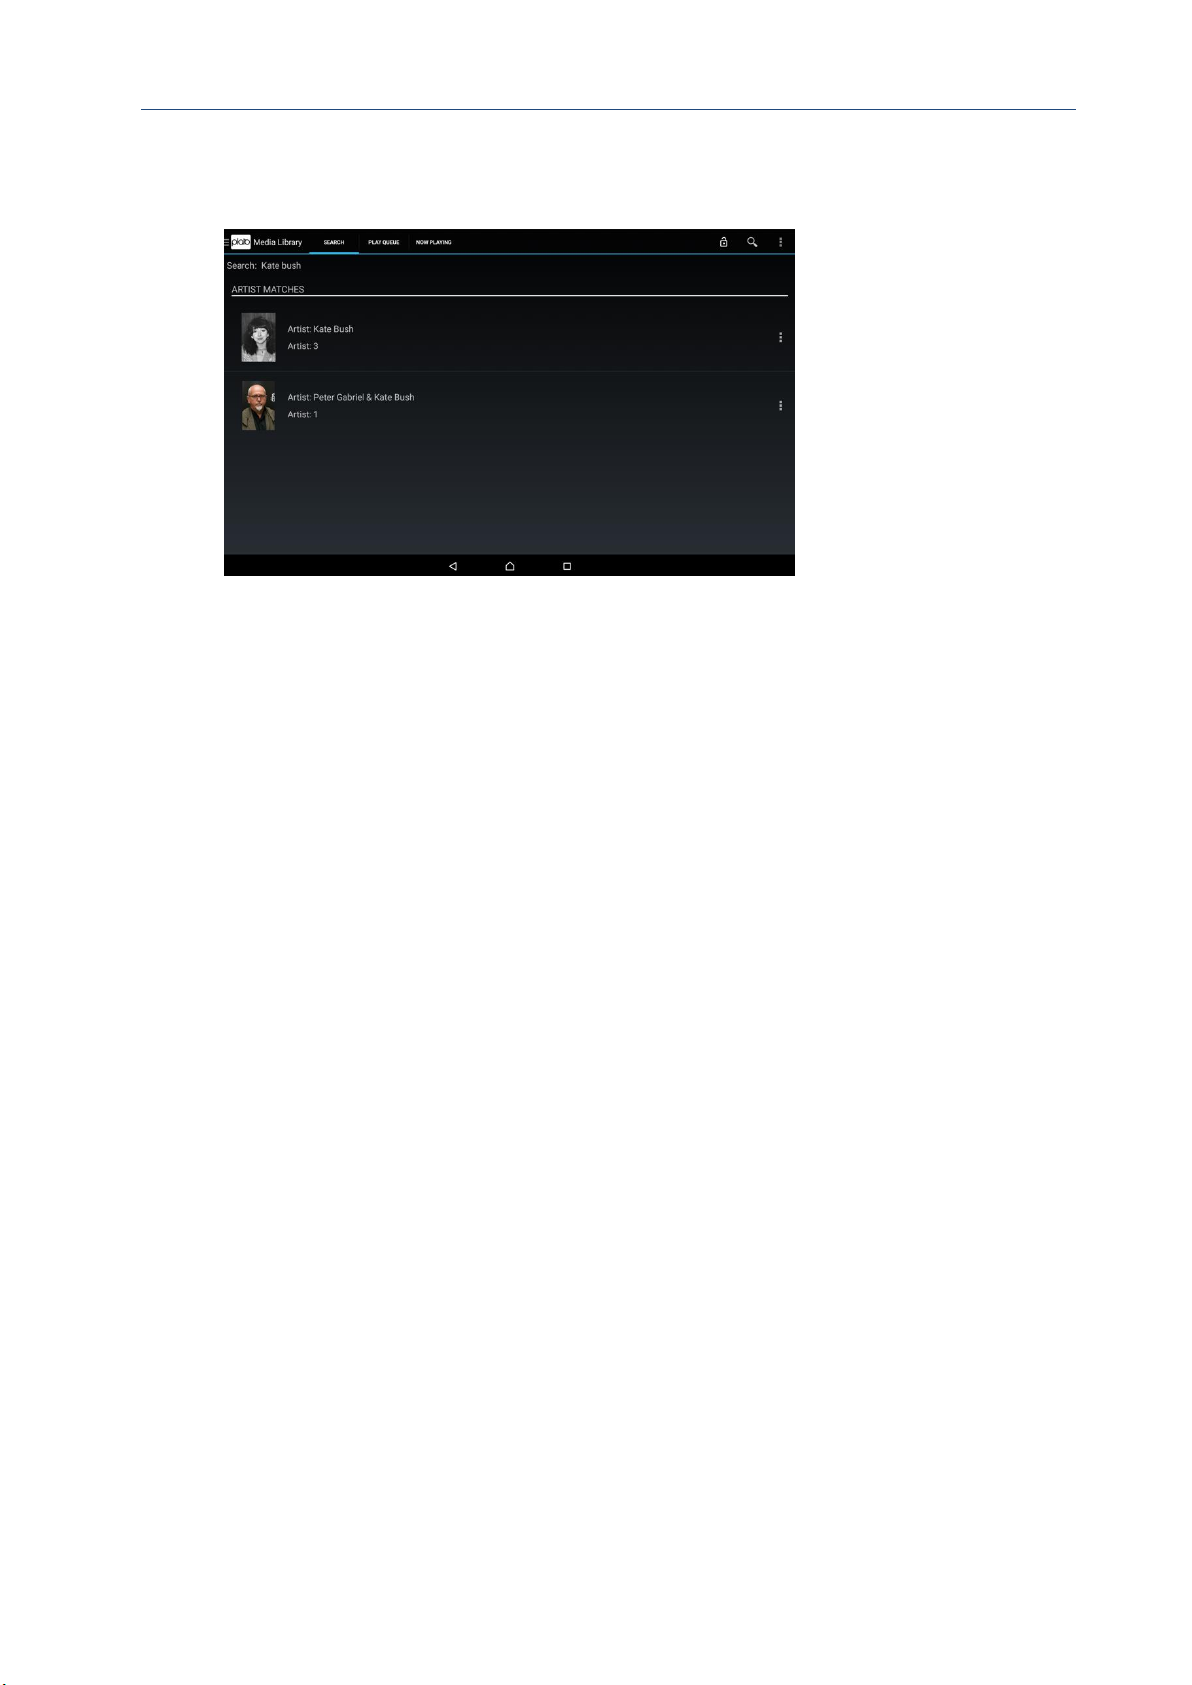
Select the Search Function and type in the name, or part of a name of
artist, album or song title.
In example below ‘Kate bush’. (Note search is not case sensitive and
keyboard types may vary).
Page 52
Plato Complete Guide V1.3.3
Convert Technologies 51
The matches are displayed grouped as artist, album and track. You can then select any of the
matches to display the standard Play options.
It is possible to select any entry in the search results for playback using standard playback
controls described in section 8.1.
8.3. Additional features on the More Options menu
Touching the More Options icon shows the following menu options:
• Play Menu
• Add to playlist
• Edit
• Delete
• Download
• Export As
8.3.1. Play Menu
Use the Play Menu option to display the Play Now dialog controls as described in section 8.1
8.3.2. Add to Playlist
Generating playlists is described later in this manual.
8.3.3. Edit
The edit option is described later in this manual in section 16.
8.3.4. Delete
The Delete option provides a means of removing the selected media from the selected Plato
server. To use this option, it must be enabled in the Advanced Settings as described in
section 14.
Page 53
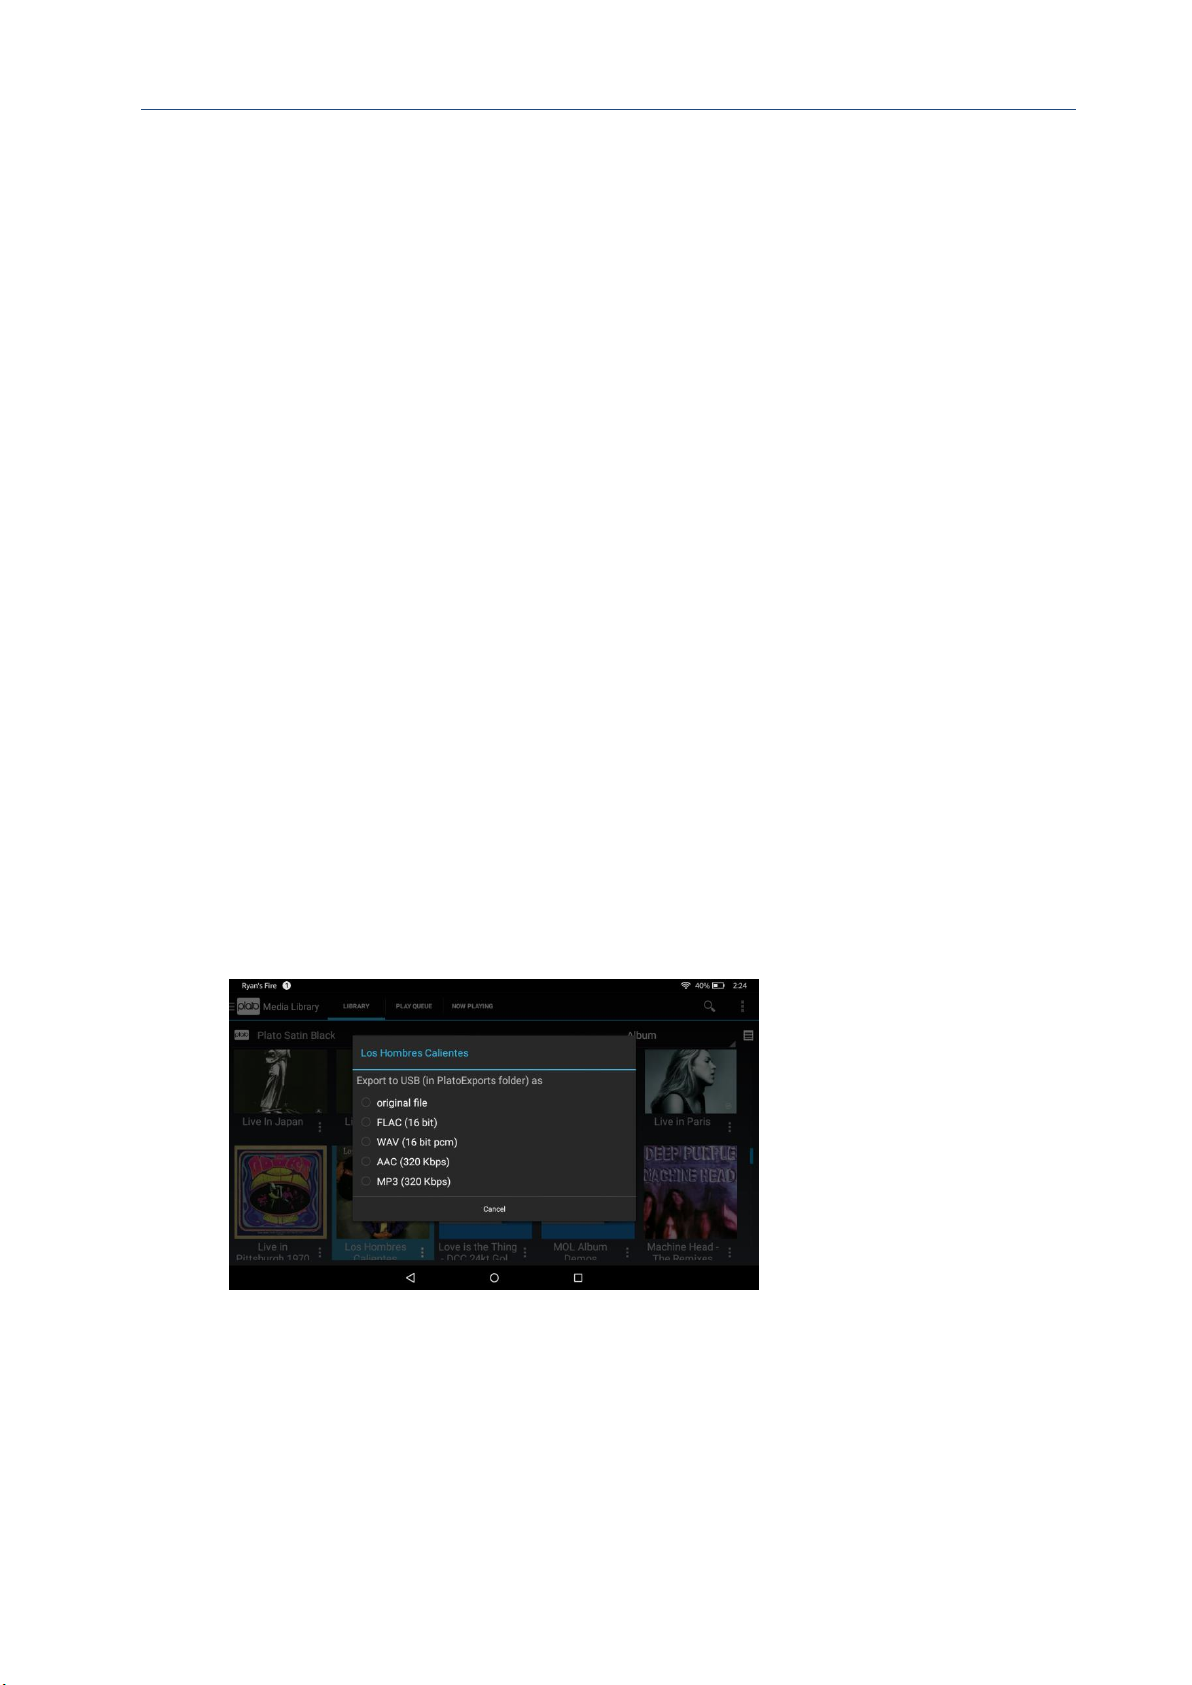
Plato Complete Guide V1.3.3
Convert Technologies 52
It is possible to add a 4-digit pin code to prevent unauthorised deletion of media content,
please see section 14 for details.
Once the data has been deleted there is no means of recovery, so use with caution!
8.3.5. Download
The download option is only available if the selected server is a Plato device.
It provides a simple means of transferring the selected media item from the Plato server to
the current mobile device. This could be useful for transferring data to your phone for use in
the car or on the move. The selected media item could be an artist collection, album, track,
image or video.
The download process also includes format conversion where appropriate, and will attempt
to match the downloaded format to one which is supported on the target device (usually 16
bit 48kHz FLAC or MP3).
The download will begin once the option is selected. Its progress can be tracked using the
Android notifications available in the top-left hand corner of the main screen on the mobile
device.
8.3.6. Export As
The export option is only available if the selected server is a Plato device.
Export provides a means of exporting the selected media item onto a USB device plugged
into the FRONT USB socket of Plato.
In this case it is possible to select which audio format you would like to export your data as:
Once the format is chosen export progress can be tracked via Android notifications in the top
left hand corner of the main screen.
If there is no USB device plugged into the main Plato unit, the notification will show this. The
export process will start once a valid USB device (with enough free space) has been plugged
into the front USB socket.
Page 54
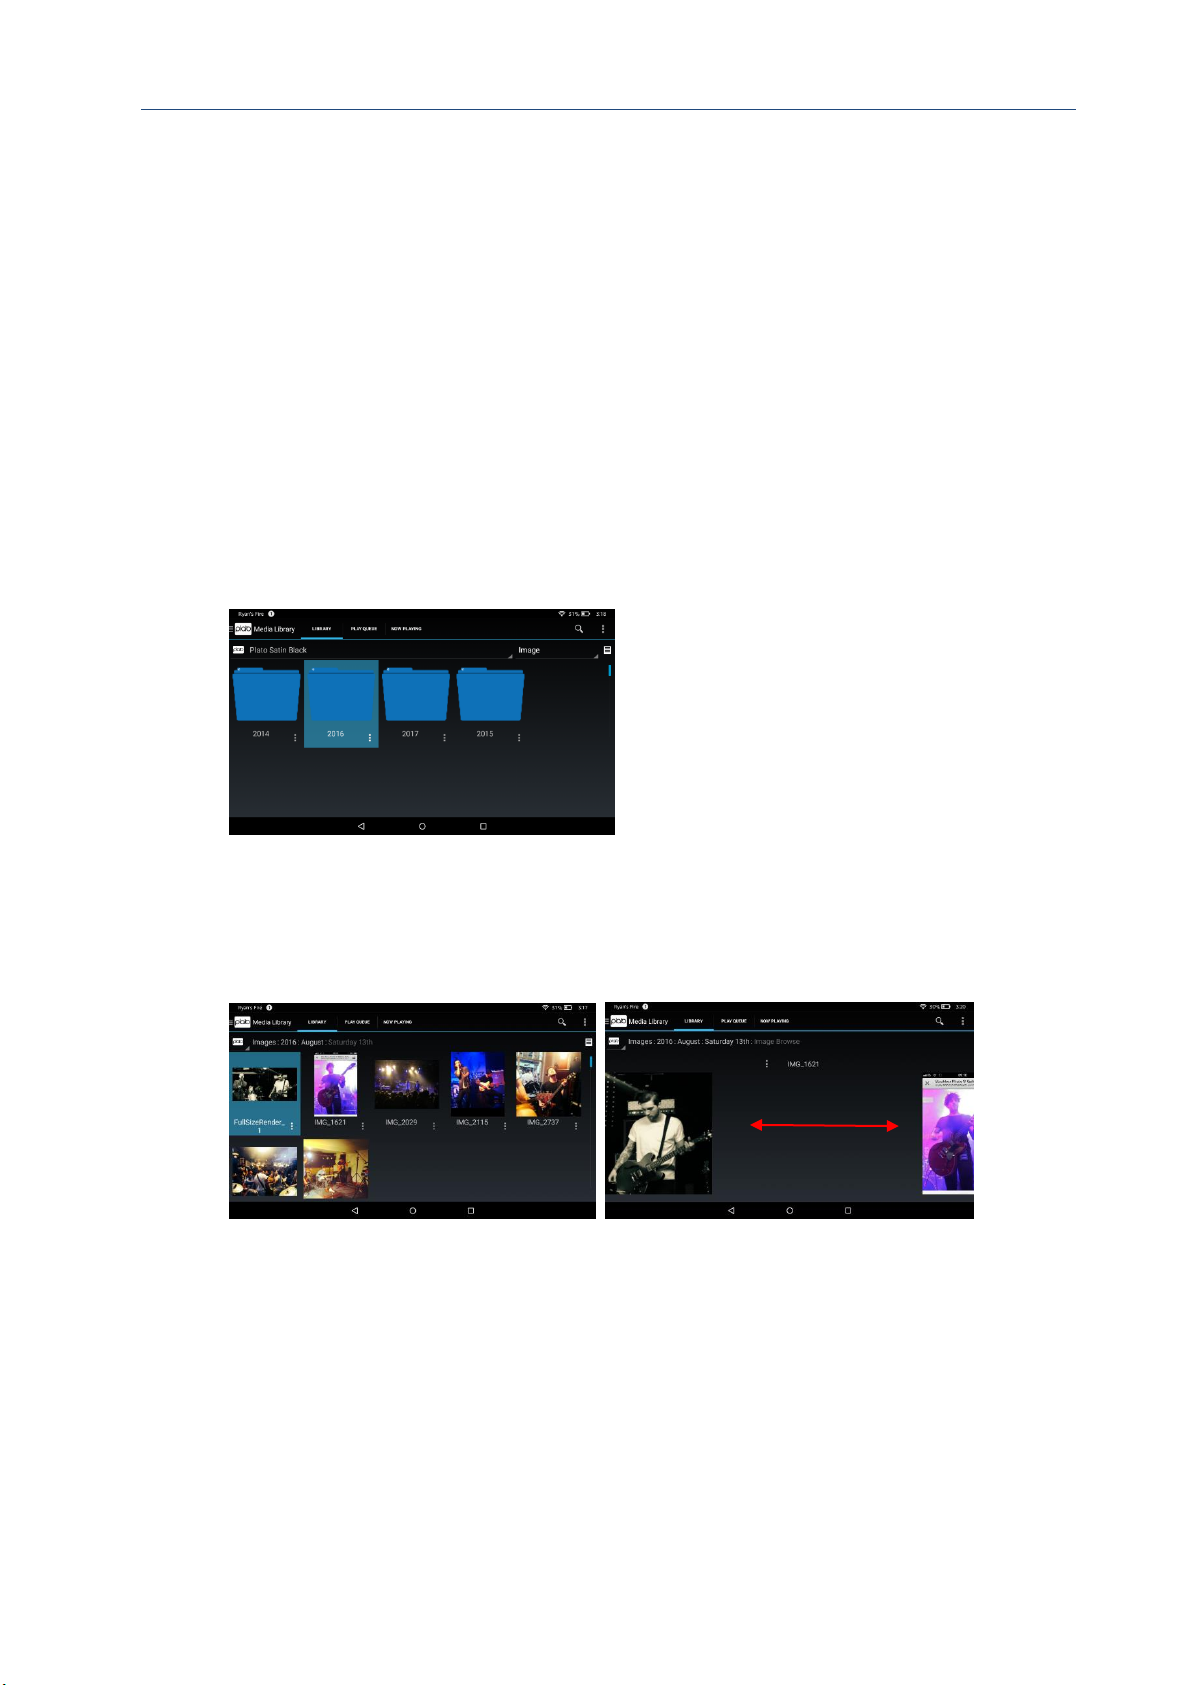
Plato Complete Guide V1.3.3
Convert Technologies 53
Note that all exported media files will be placed under the PlatoExports directory on the USB
storage device. Further subdirectories will be added indicating Artist->Album->Track files.
It is also possible to export image or video media files, though these are copied in their
native format under the appropriate directory.
8.4. Viewing image files
Plato supports viewing collections of image files as well as audio and video data. Details on
how to import image files are given in section 11.4. To view your image files select Image
from the drop down filter in the main library view. This will show the top-level folder view of
your image collection. As indicated in section 11.4, it is suggested that you import your
images in year-month-day based folder hierarchies so you can keep track of your collection
more effectively.
To view your images, descend into the relevant folder to your chosen image by touching the
folder icon. It is possible to browse images in a selected folder by touching the image icon
which will display the image fullscreen on your mobile device. Scroll to the next/previous
image by swiping left or right from the browse image view.
It is possible to ‘play’ an image to another UPnP device (e.g. TV) in the same way as playing
other media files: by long pressing the image, or accessing the play menu via the more
options menu.
It is also possible to build playlists of images using the play menu dialog as described for
audio files. Note that image playlists must to be skipped manually via the media playback
controls in the Now Playing tab to progress from one playlist entry to the next.
Page 55
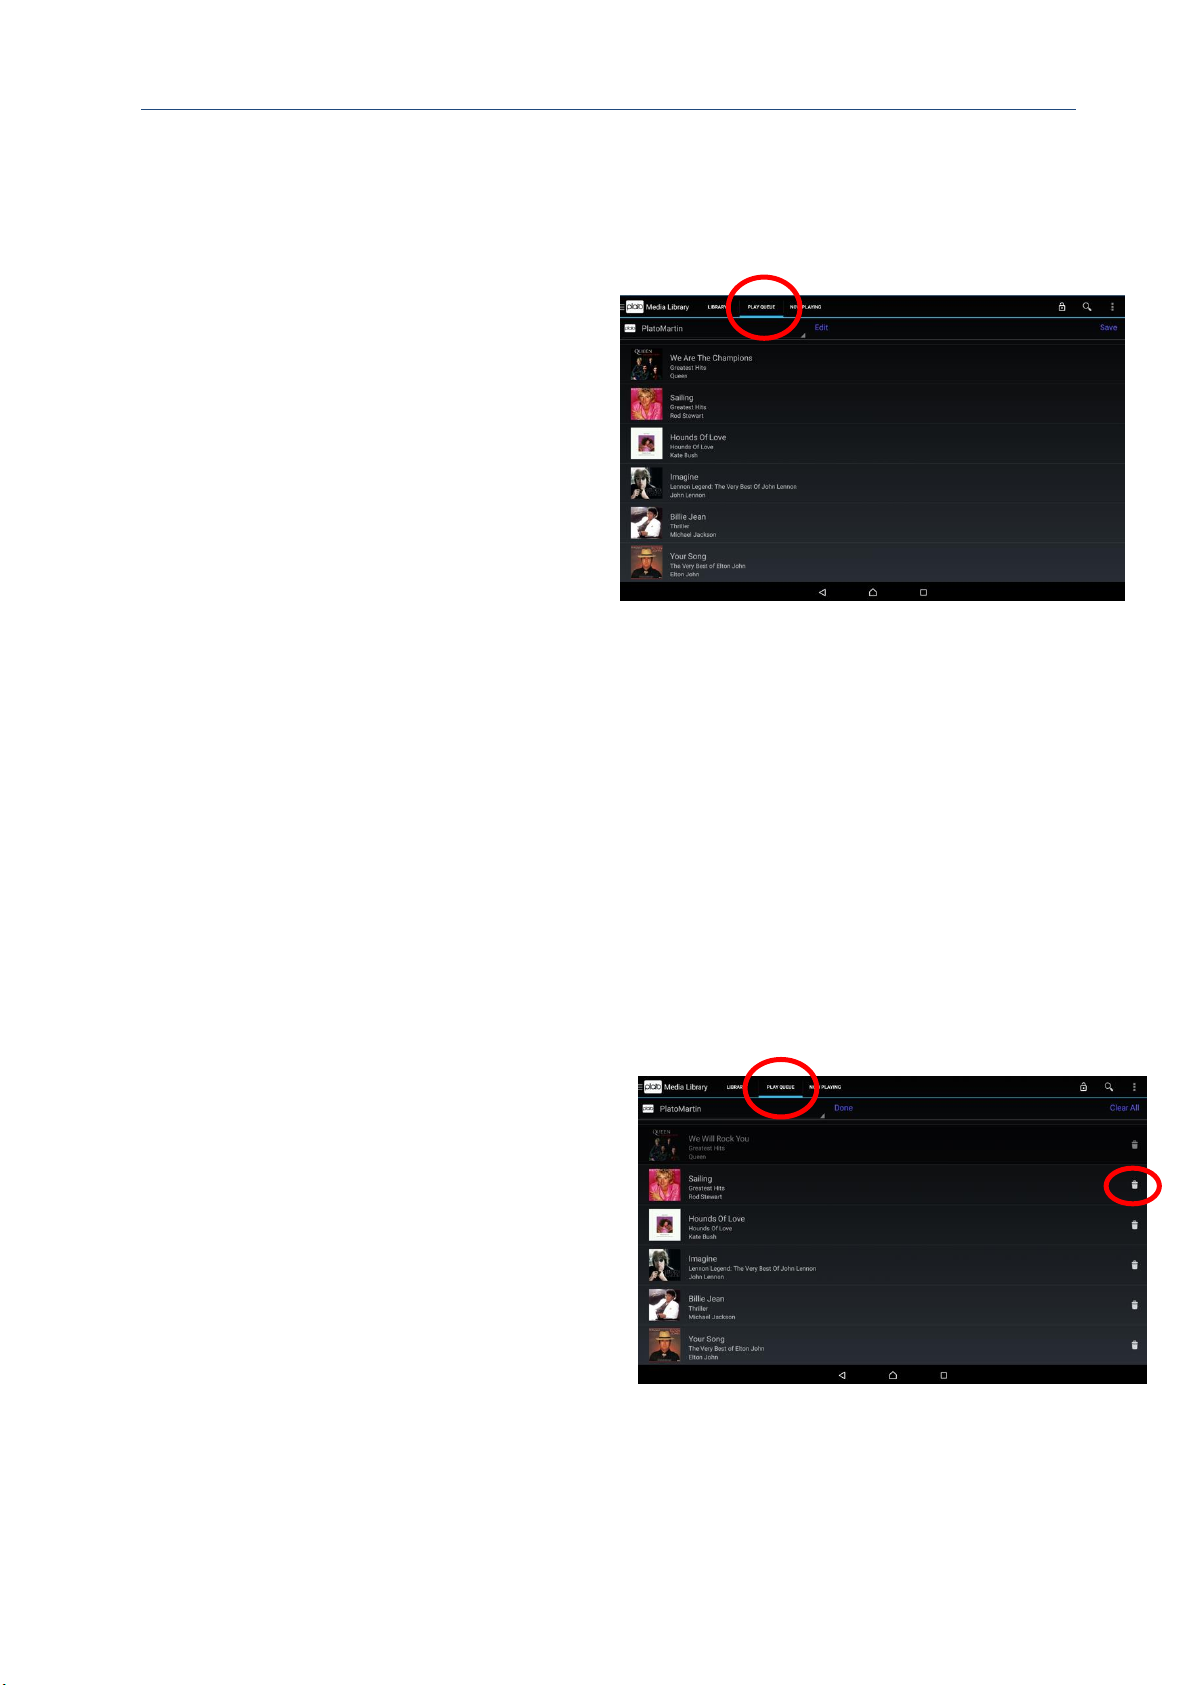
Plato Complete Guide V1.3.3
Convert Technologies 54
8.5. The Play Queue tab
The Play Queue tab shows a running list of tracks which have been played on the selected
device, or are queued waiting to be played on the selected device.
Select the PLAY QUEUE tab to see what
songs have played and which are queued
to play. Ensure you have the appropriate
device selected from the Selected Device
list at the top of the screen.
Selecting an album to play, will add every
track, in order, to the Play Queue.
The track which is currently playing is
selected and highlighted in the list.
You can choose to skip to a different entry in the Play Queue by selecting the entry you
would like to play. This entry will now start playing, and you will be directed to the Now
Playing screen.
From this view it is also possible to display detailed media information by selecting the
appropriate album artwork image in the list.
8.5.1. Modifying the Play Queue
It is possible to modify the Play Queue. This could be useful if you want to modify the current
playing order, especially if you would like to save the current list as a PlayList for playback at
a later date.
If you want to change the order of the tracks, or delete entries that you no longer wish to
play select Edit.
To delete a song from the list, select the
Trash Can icon on the right hand side of
the track entry.
If you want to change where the selected
song is played, you can drag the song up or
down the list to a new position.
First press and hold the background of the
entry you wish to move; its background
colour will change. Now slide your finger up or down to alter its position in the list.
Page 56
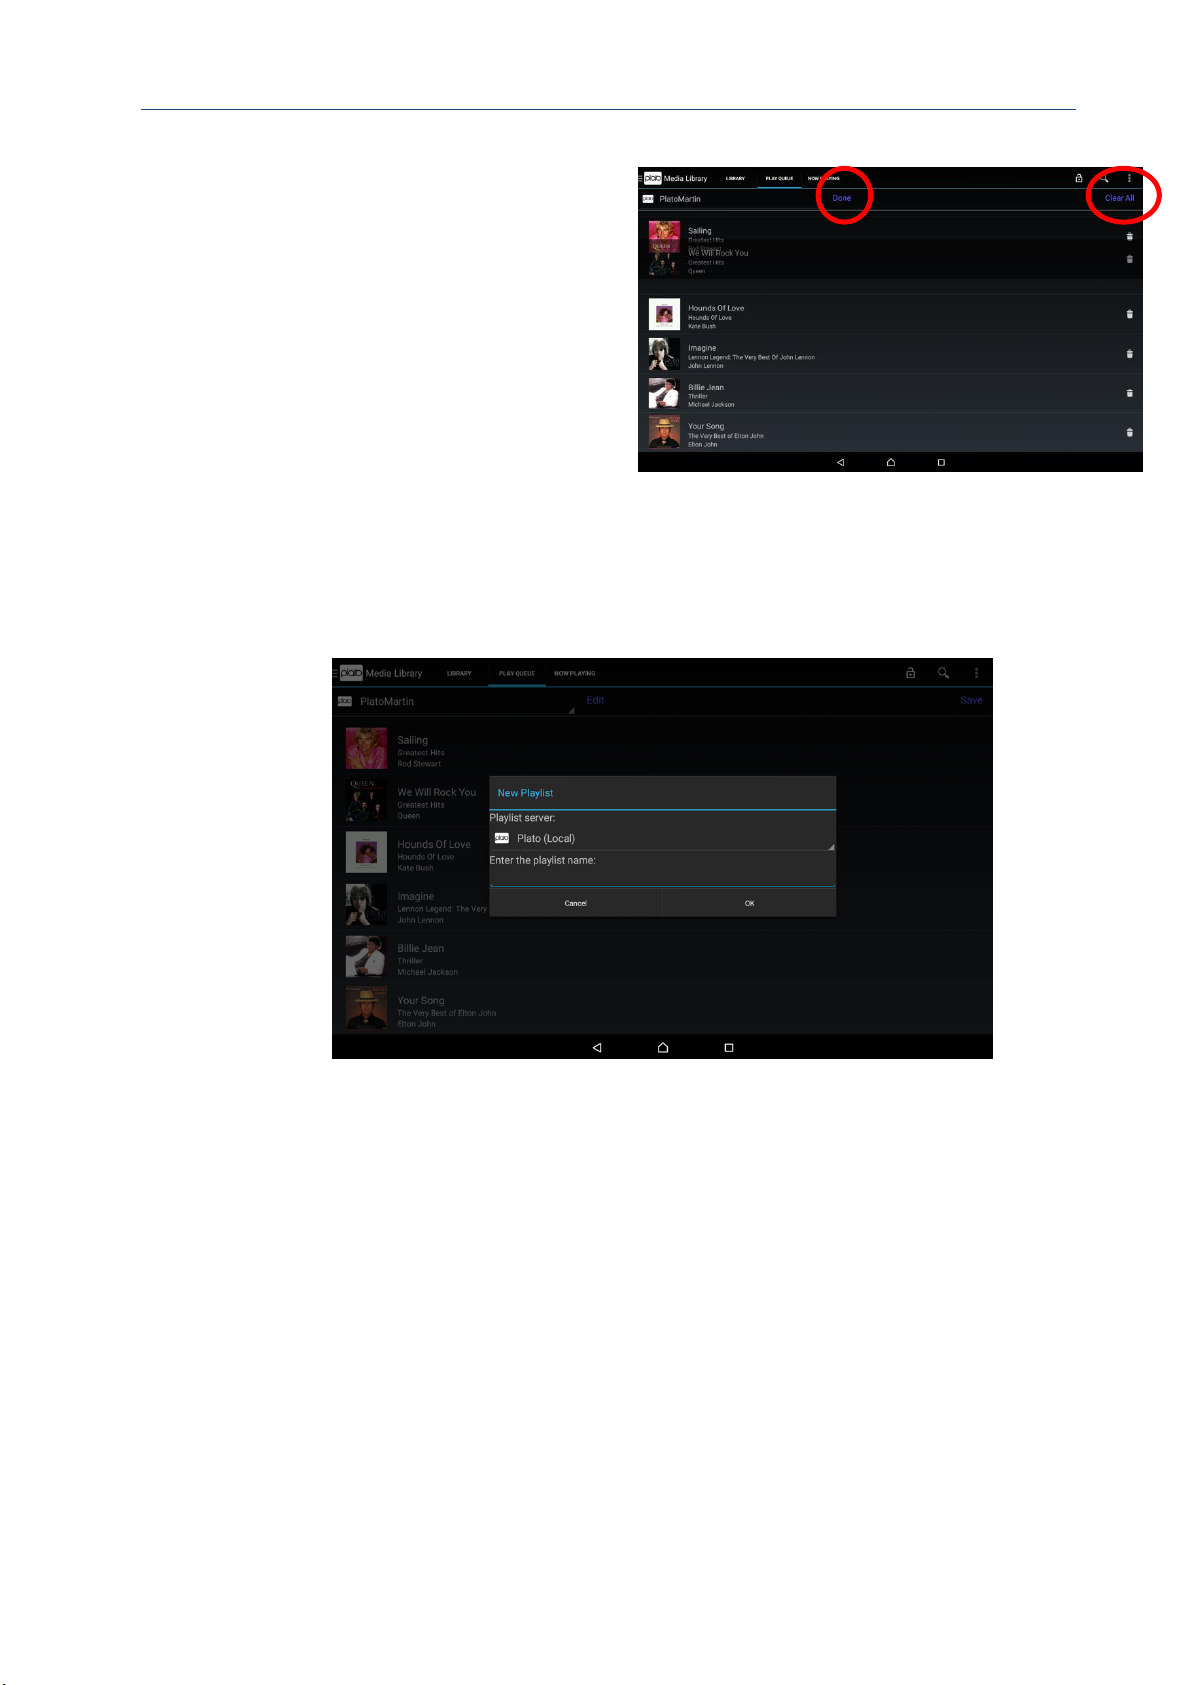
Plato Complete Guide V1.3.3
Convert Technologies 55
When you have finished making
changes to the Play Queue, select Done.
Whilst in Edit mode, you also have the
option to empty the whole Play Queue by
selecting Clear All in the top right hand
corner of the display.
8.5.2. Saving a Playlist from the Play Queue
Once you are happy with the entries in
your Play Queue, you may decide to save
this as a new Playlist for use at a later date.
To save the current Play Queue, select Save.
This will display the Playlist dialog:
Select the device on which you would like to save the playlist, normally this will be the
default Plato device.
Enter a name for the new playlist, and select OK.
Page 57
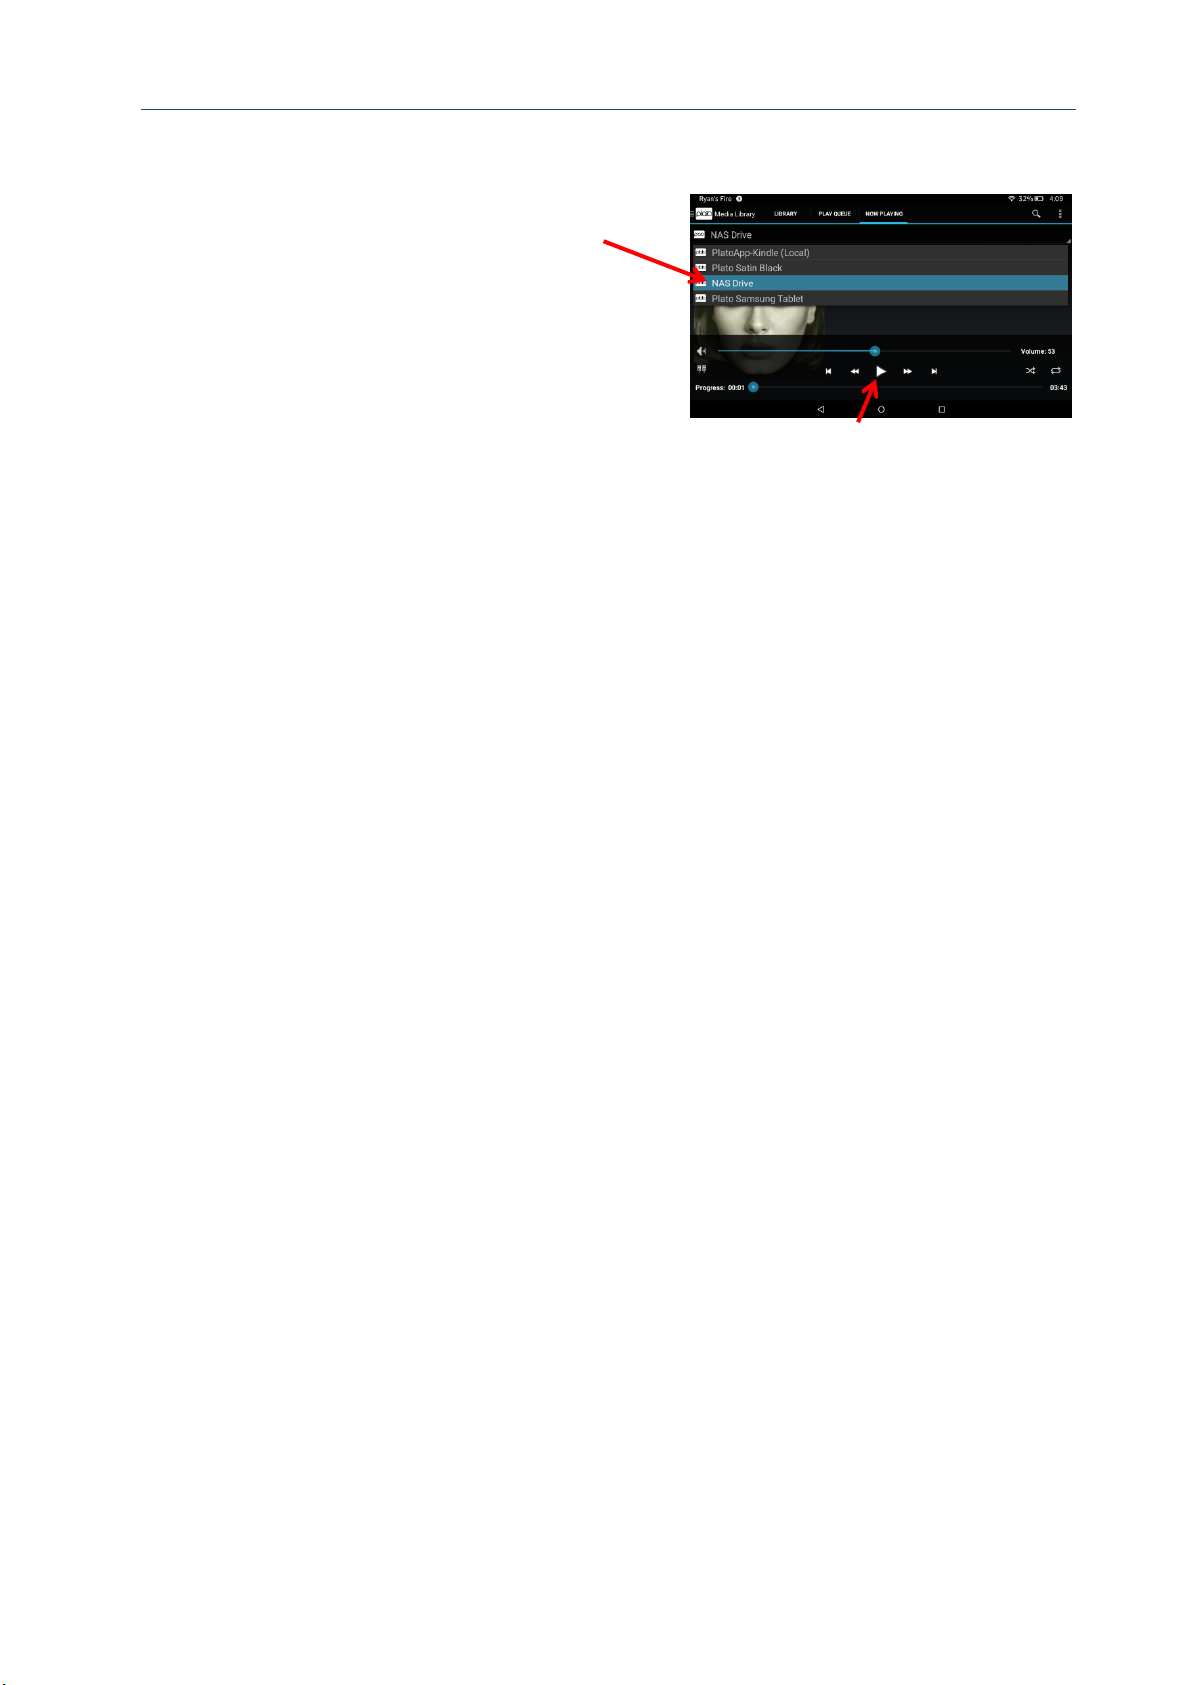
Plato Complete Guide V1.3.3
Convert Technologies 56
8.6. Now Playing in Media Library
Like many other screens in Plato’s control app,
the Now Playing screen also has a Device
Selector list which indicates which device this
screen is controlling. The selector list will show
all compatible UPnP playback devices on your
home network.
Before using this page ensure you have
selected the correct device.When playing
a file from the Media Library, the media
controls show volume controls, as well as
more comprehensive media access controls to allow:
• Pause/Play
• Fast forward
• Rewind
• Skip forward
• Skip back
Two options on the right hand side of the media access controls provide some additional
control of playback through the current Play Queue:
• Random play: Plato will randomly step through the current Play Queue.
• Loop play: Plato will continuously loop through the current Play Queue.
The progress bar at the bottom of the media controls shows the current playback progress
through the track, and allows you to slide to any position in the track.
Media info and lyrics options are available as described in section 3.5.5.
Pause, forward, fast forward and back and fast back controls.
Page 58
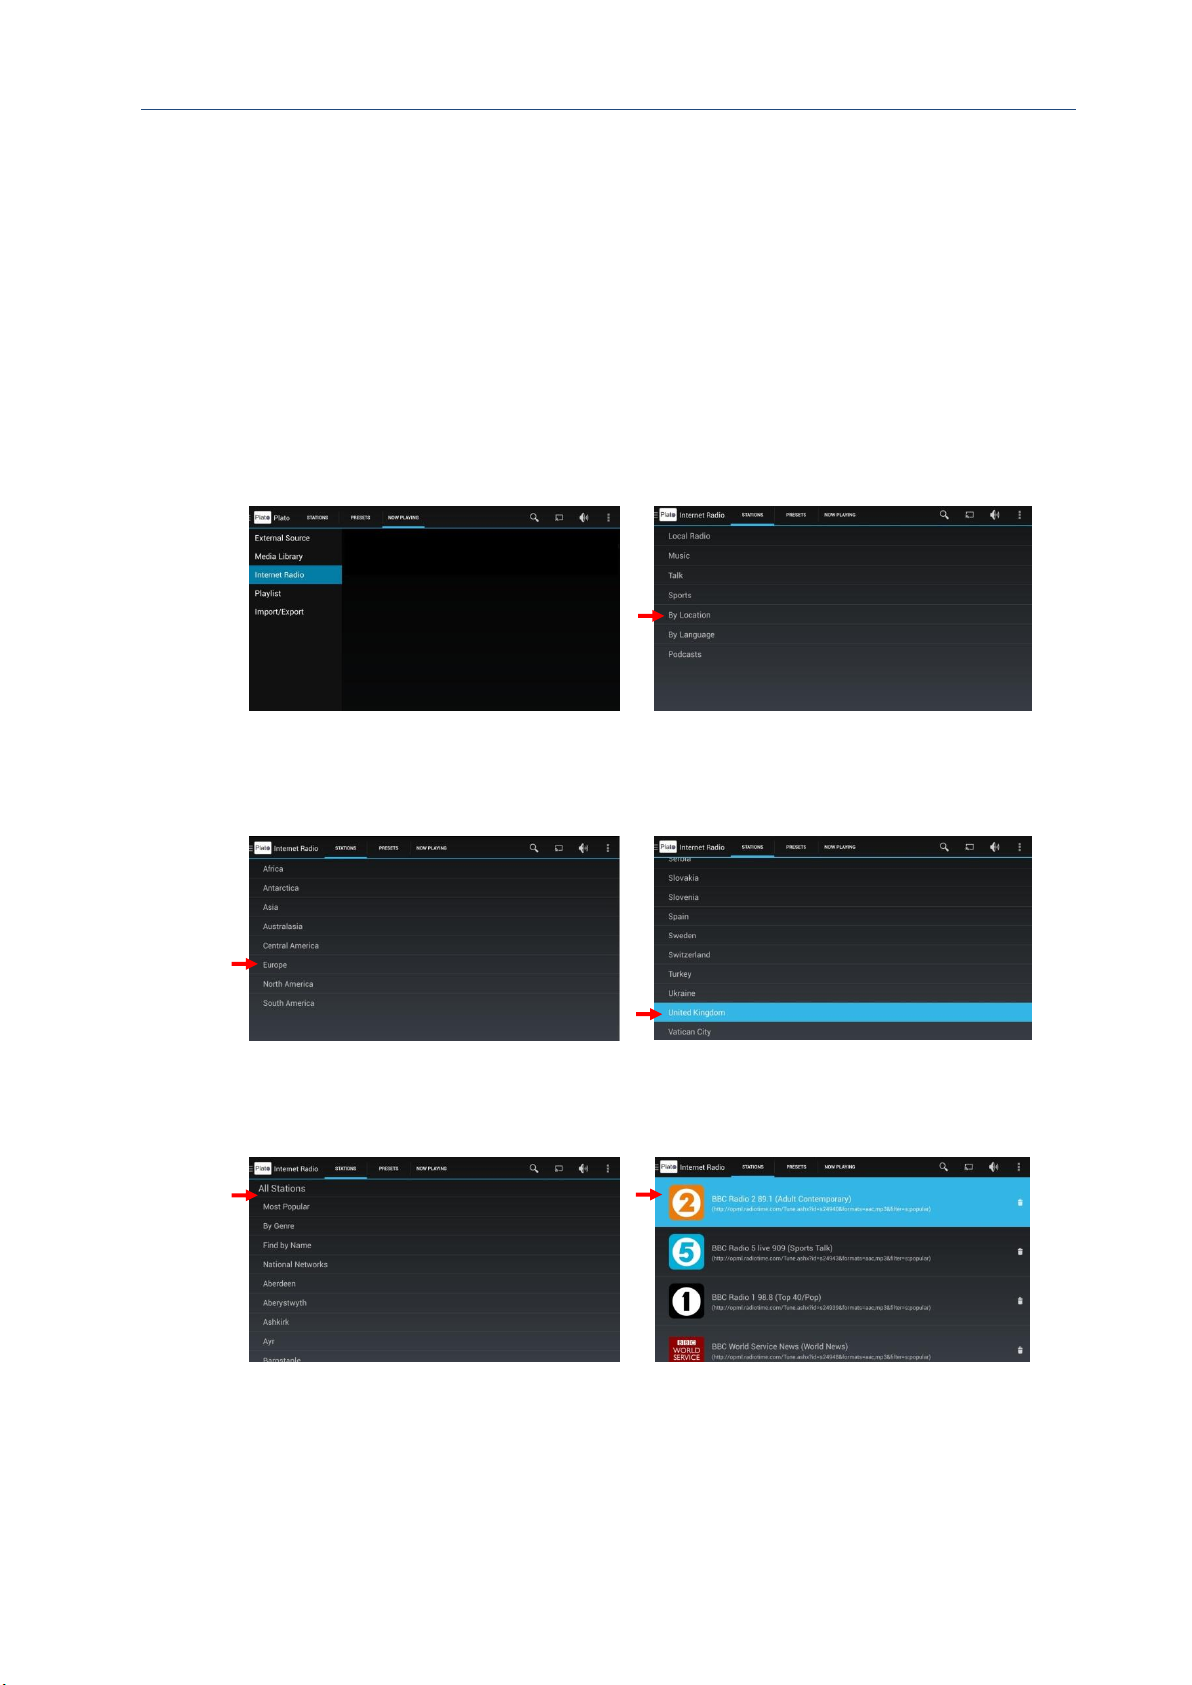
Plato Complete Guide V1.3.3
Convert Technologies 57
9. Internet Radio
The Internet Radio feature provides access to online radio stations from around the world.
From the STATION tab it is possible to browse categories to your chosen radio station.
The example below shows browse steps to find BBC Radio 2.
The screens and menus displayed will vary depending on which browse options you choose.
1. Select Internet Radio 2. Select by Location
3. Select Europe 4. Select United Kingdom
6. Select Most Popular 6. Select Station
Once the station is selected, the Plato screen automatically changes to display the NOW
PLAYING tab and shows an icon of the selected radio station.
Note that there may be a short delay before audio content is played while Plato fills its
internal buffers prior to audio playback.
Page 59
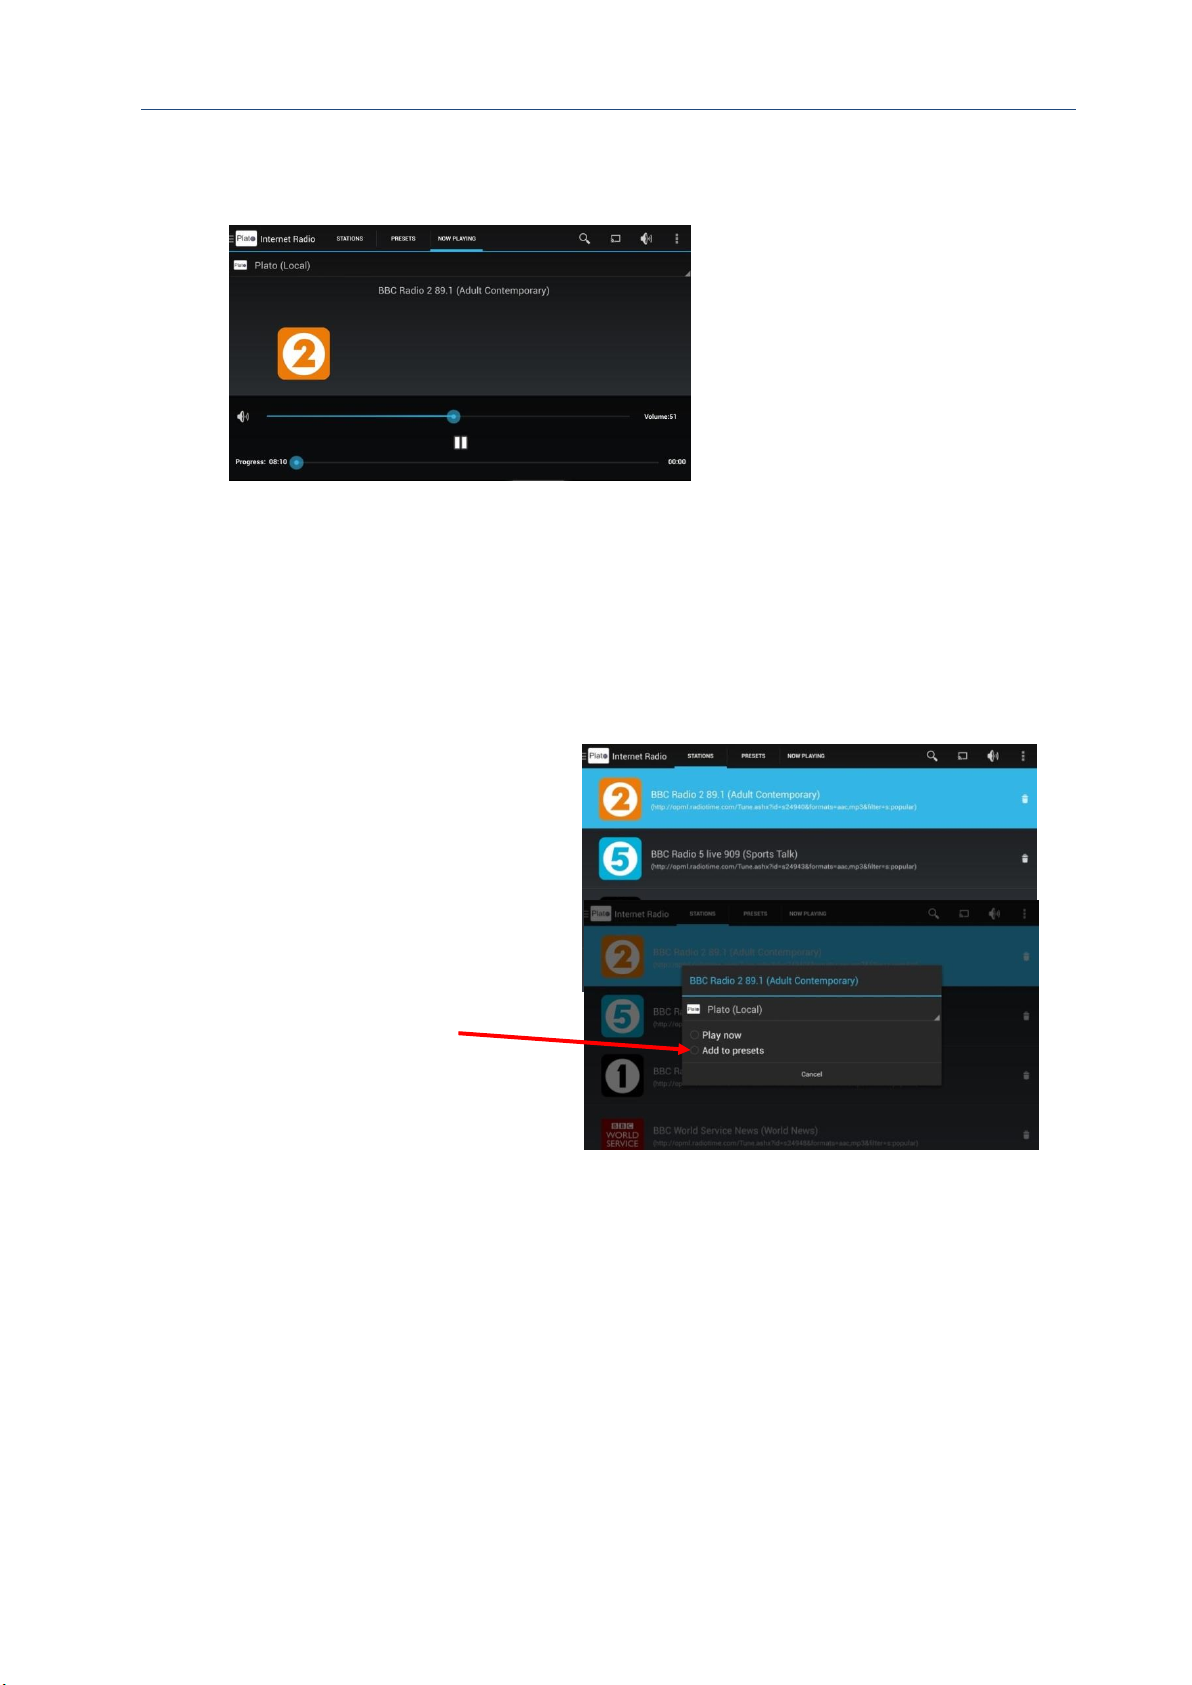
Plato Complete Guide V1.3.3
Convert Technologies 58
From the Now Playing screen, press anywhere on the screen to bring up further media
control options.
With the options displayed, you can change the volume, using the volume slider control, and
pause playing of the station.
Note that it is NOT possible to record radio based content.
9.1. Saving radio stations to your PRESETS list
When you find one of your favourite radio stations, you can save it to your PRESETS list to
make it easier to find again.
1. Search for the radio station that
you want to save.
2. Long Press (press and hold) the
selected station.
The Play now/Add to presets
option menu is displayed.
3. Select Add to presets.
Page 60
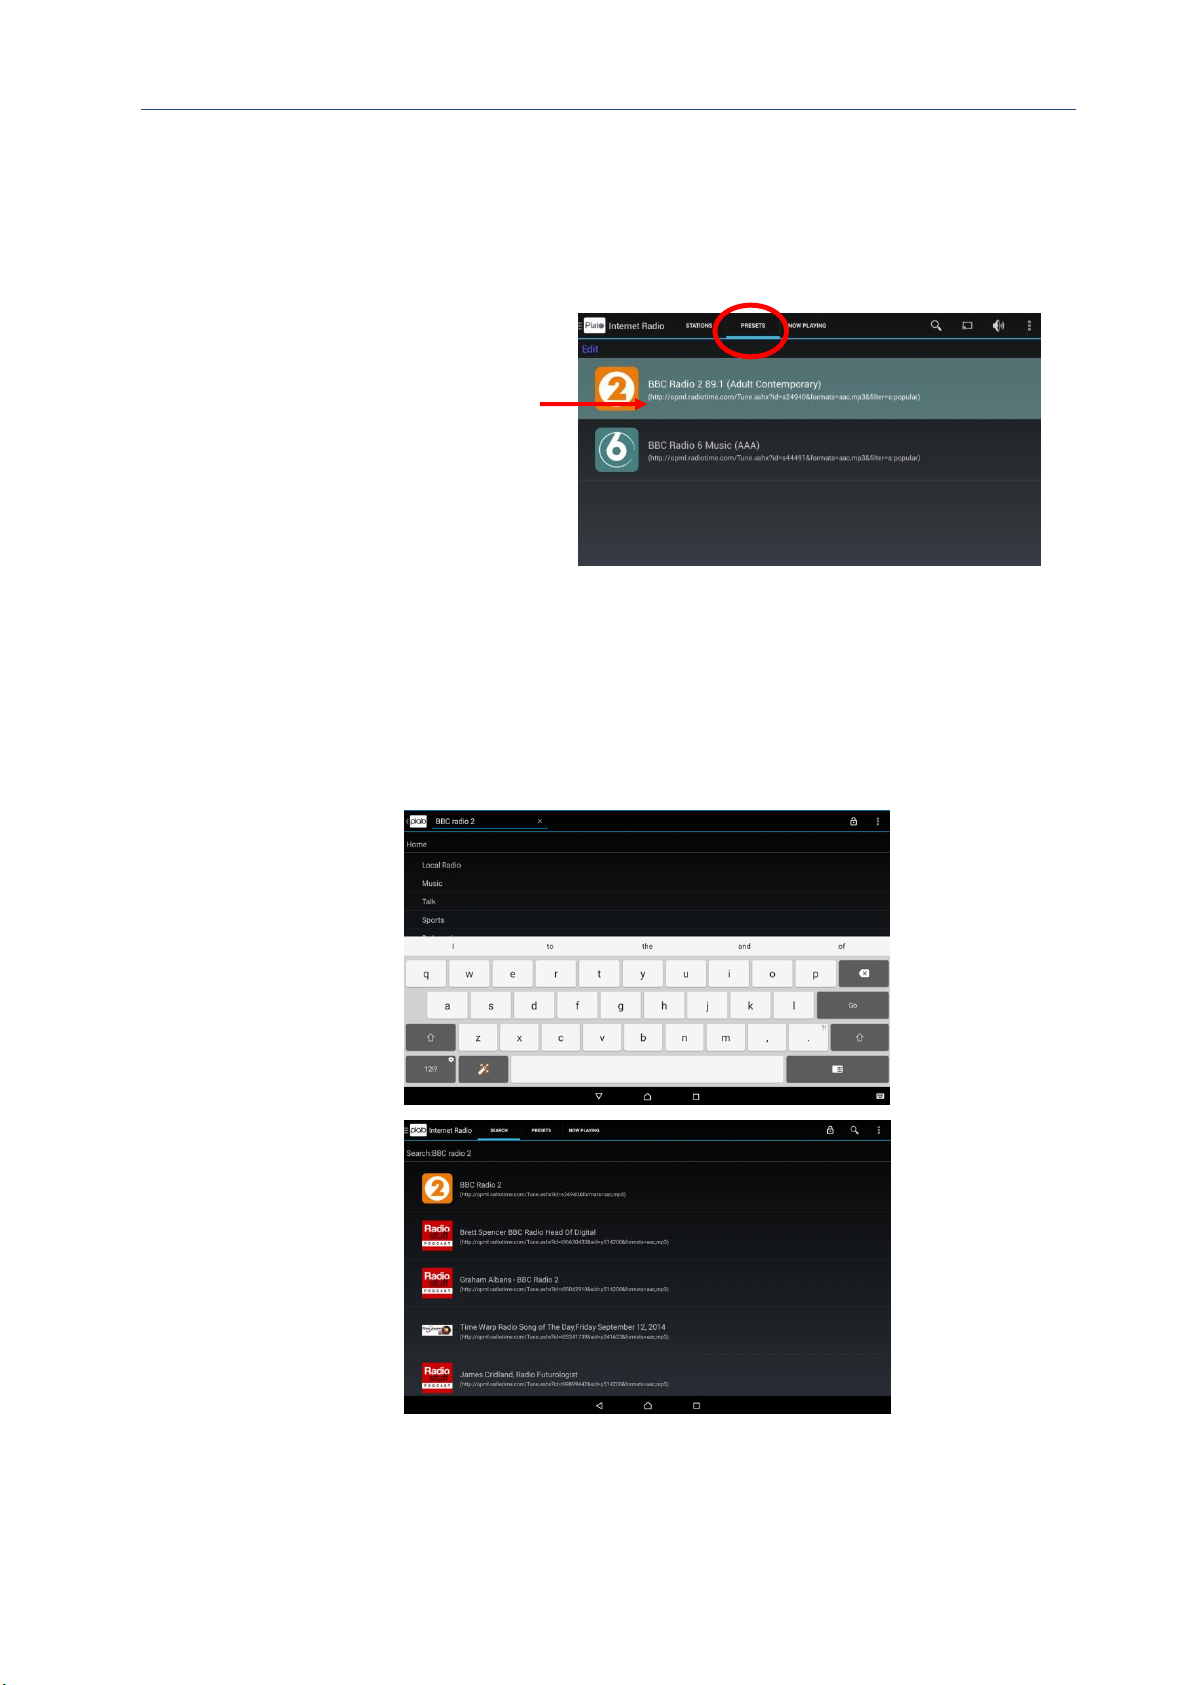
Plato Complete Guide V1.3.3
Convert Technologies 59
9.2. Listening to your saved radio stations
After you have saved at least one station into your PRESETS list, it is easy to find it again.
1. From the Features Drawer,
select Internet Radio.
2. Select the PRESETS tab.
3. Select a radio station from the
displayed list
9.3. Search for radio stations
When the Internet Radio feature is selected Plato’s search function will return matches on
internet radio stations. Using this feature, it is possible to search for:
• Stations by name
• Stations by genre
• Stations playing a certain artist/album/track
Select the search option and type in your chosen station name/music genre/artist/track.
Plato will interrogate internet radio providers and return appropriate station matches in a
list. Any of these entries can be played directly, or saved as a preset for later use.
Page 61
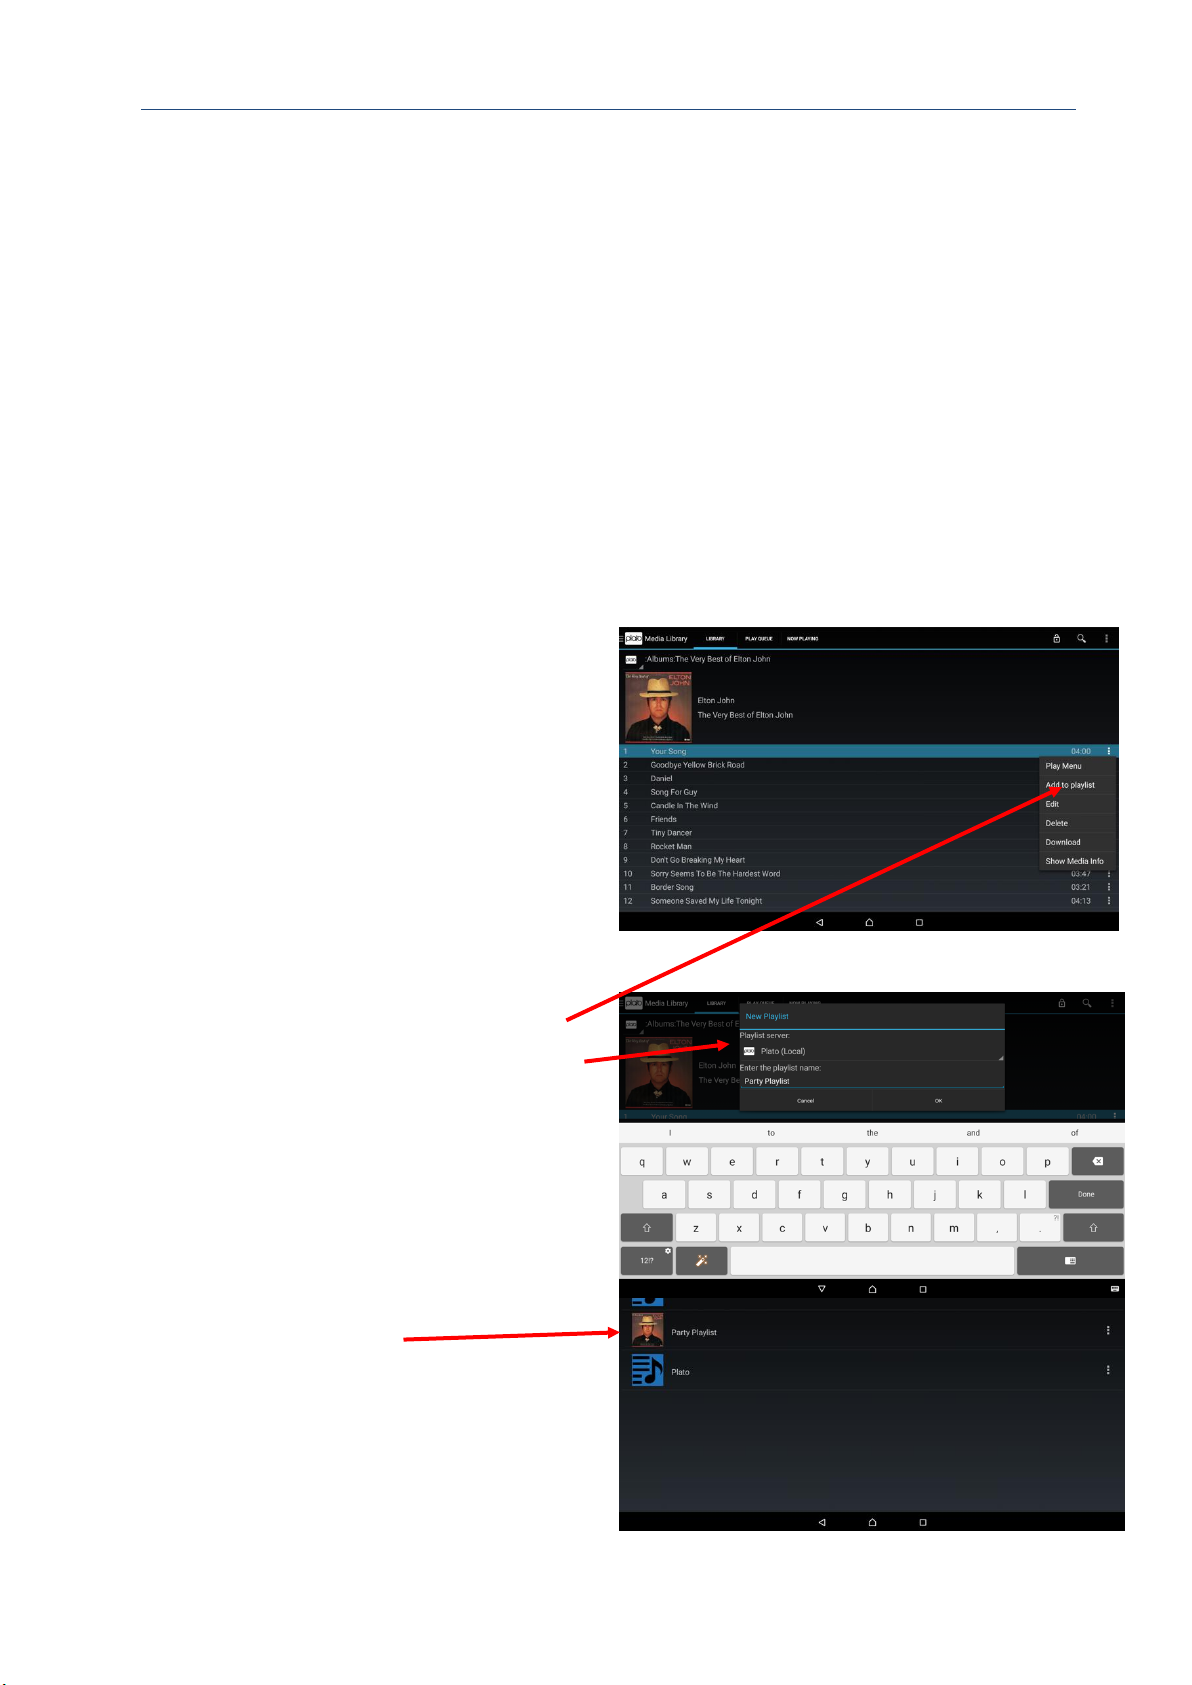
Plato Complete Guide V1.3.3
Convert Technologies 60
10. Playlists
Playlists are useful if you want to queue up material for playback at a later date. Your
playlists may contain tracks in any order, not necessarily as complete albums.
Playlists are stored on UPnP servers. Normally you will store them on your main Plato device,
but you could choose to store them on a different UPnP server (maybe a tablet or
smartphone). For this reason, the PLAYLISTS tab has a Device Access List to select which
server you would like to view.
The PLAYLISTS tab shows a list of playlists on the selected server.
If a playlist is selected from the PLAYLISTS tab its contents (tracks) will appear in the PLAYLIST
tab where they can be modified.
There are 3 ways to create Playlists:
• From the Media Library
• From the Play Queue (See
section 8.5.2)
• From the Mood Grid (See
section 10.5.1)
10.1. To create a Playlist from the
Media Library
1. From the LIBRARY tab, find the
artist/album/track you would like to
add to a Playlist.
2. Open the More Options menu by selecting the 3-dot icon, and select Add to playlist.
3. Select a server on which you would
like to store the Playlist.
4. Select an existing playlist from the
drop down list, or create a new one.
5. Complete the action by pressing OK.
The new playlist is added to the
PLAYLISTS selection in the Playlist
feature menu.
Note that album artwork for first
song will be used as the image for
that Playlist.
Page 62
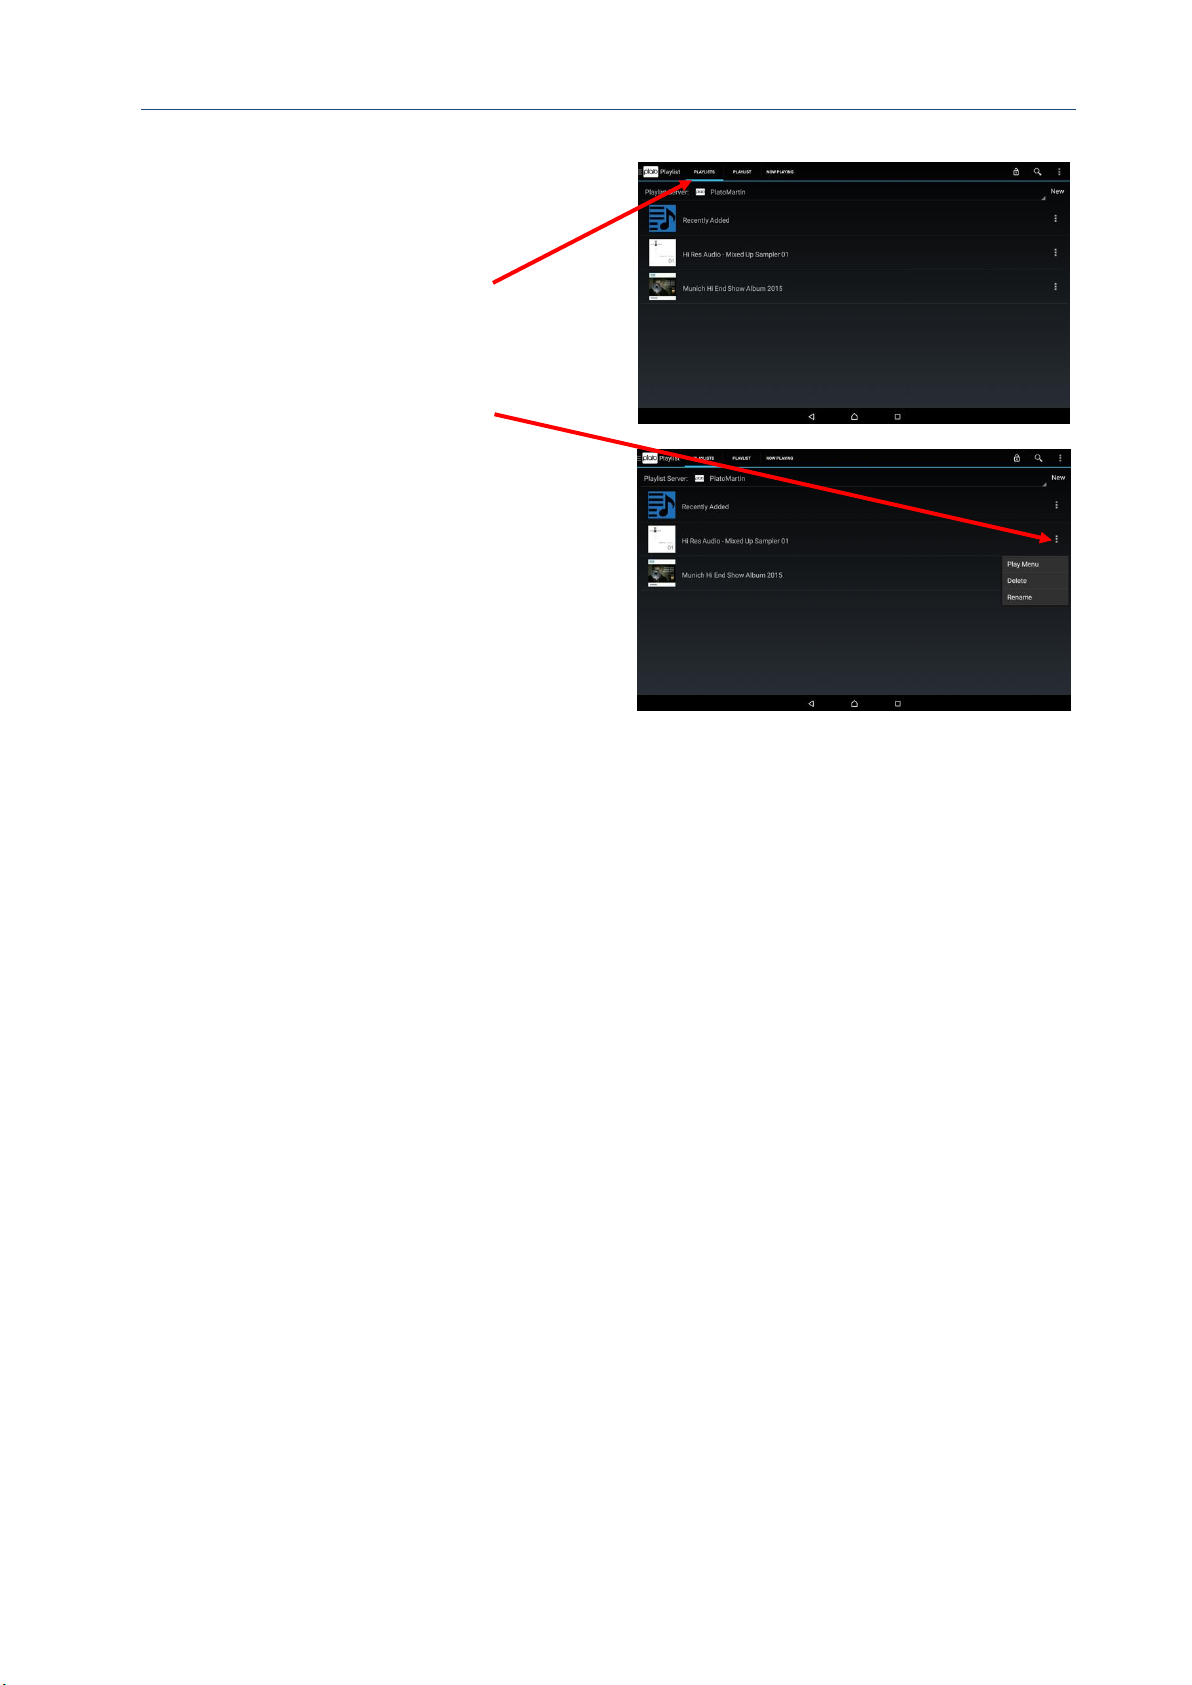
Plato Complete Guide V1.3.3
Convert Technologies 61
10.2. To Play a Playlist
1. From the Main Drawer Feature Menu,
select Playlist.
2. Select the PLAYLISTS tab.
3. Choose a Playlist to play back, and
commence playback using Long press
on the playlist background, or opening
the More Options menu.
4. Complete the action from the Play
Now dialog as described previously.
10.3. Recently Added playlist
The recently added playlist provides a list of recently added, or recorded, tracks in the order
they were added or recorded. This list can be useful in finding new tracks, especially if some
of the tags need to be modified after recording.
The number of entries stored in the Recently Added playlist can be tailored using the
Settings option in More Options menu.
Page 63
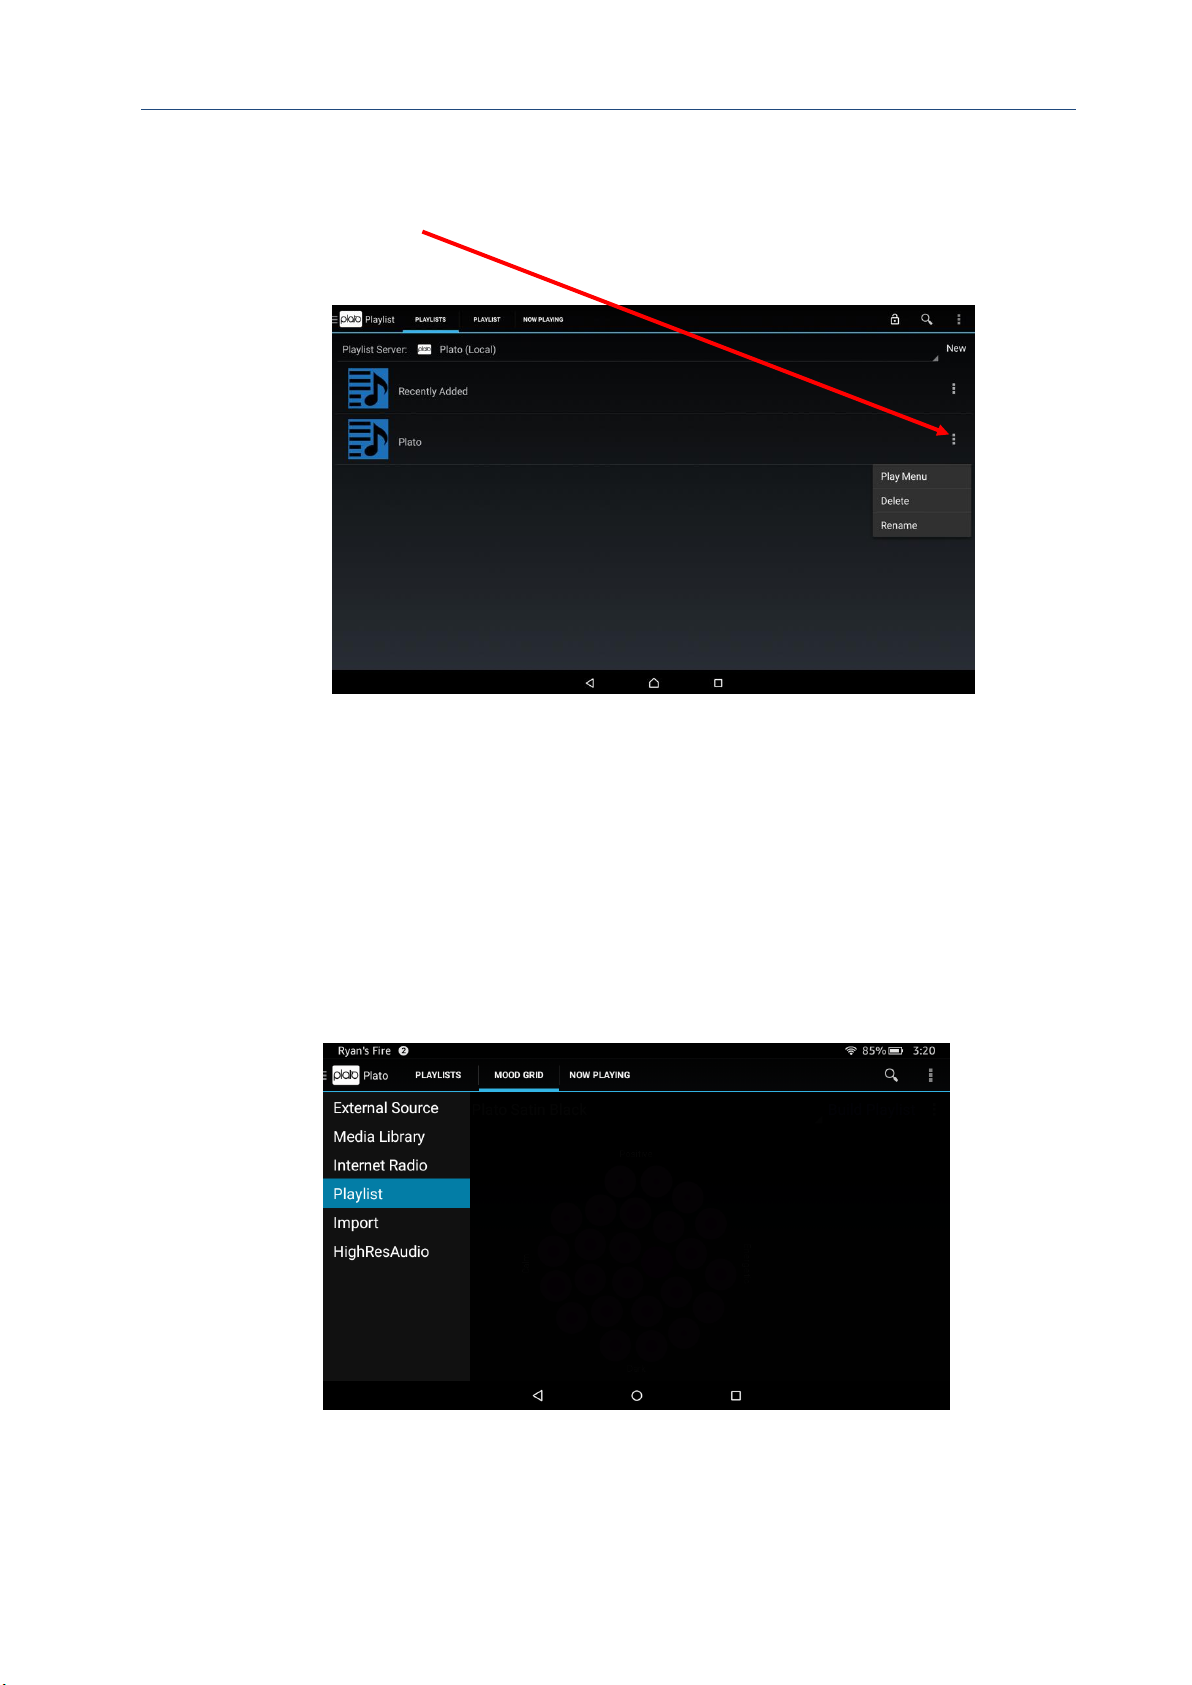
Plato Complete Guide V1.3.3
Convert Technologies 62
10.4. Playlist options
The More Options menu available on the PLAYLISTS tab provides a means of deleting and
renaming a playlist.
10.5. Mood Grid
The Mood Grid provides a different method of selecting your music. As you import music
Plato will automatically categorise it according to the mood the track evokes. The mood grid
provides a means of generating lists of tracks based on a mood rather than selecting them by
hand.
The Mood Grid is available from the middle tab of the Playlist feature:
Like many other screens on Plato, first select the device which contains your music
collection, normally this will be your main Plato.
Page 64
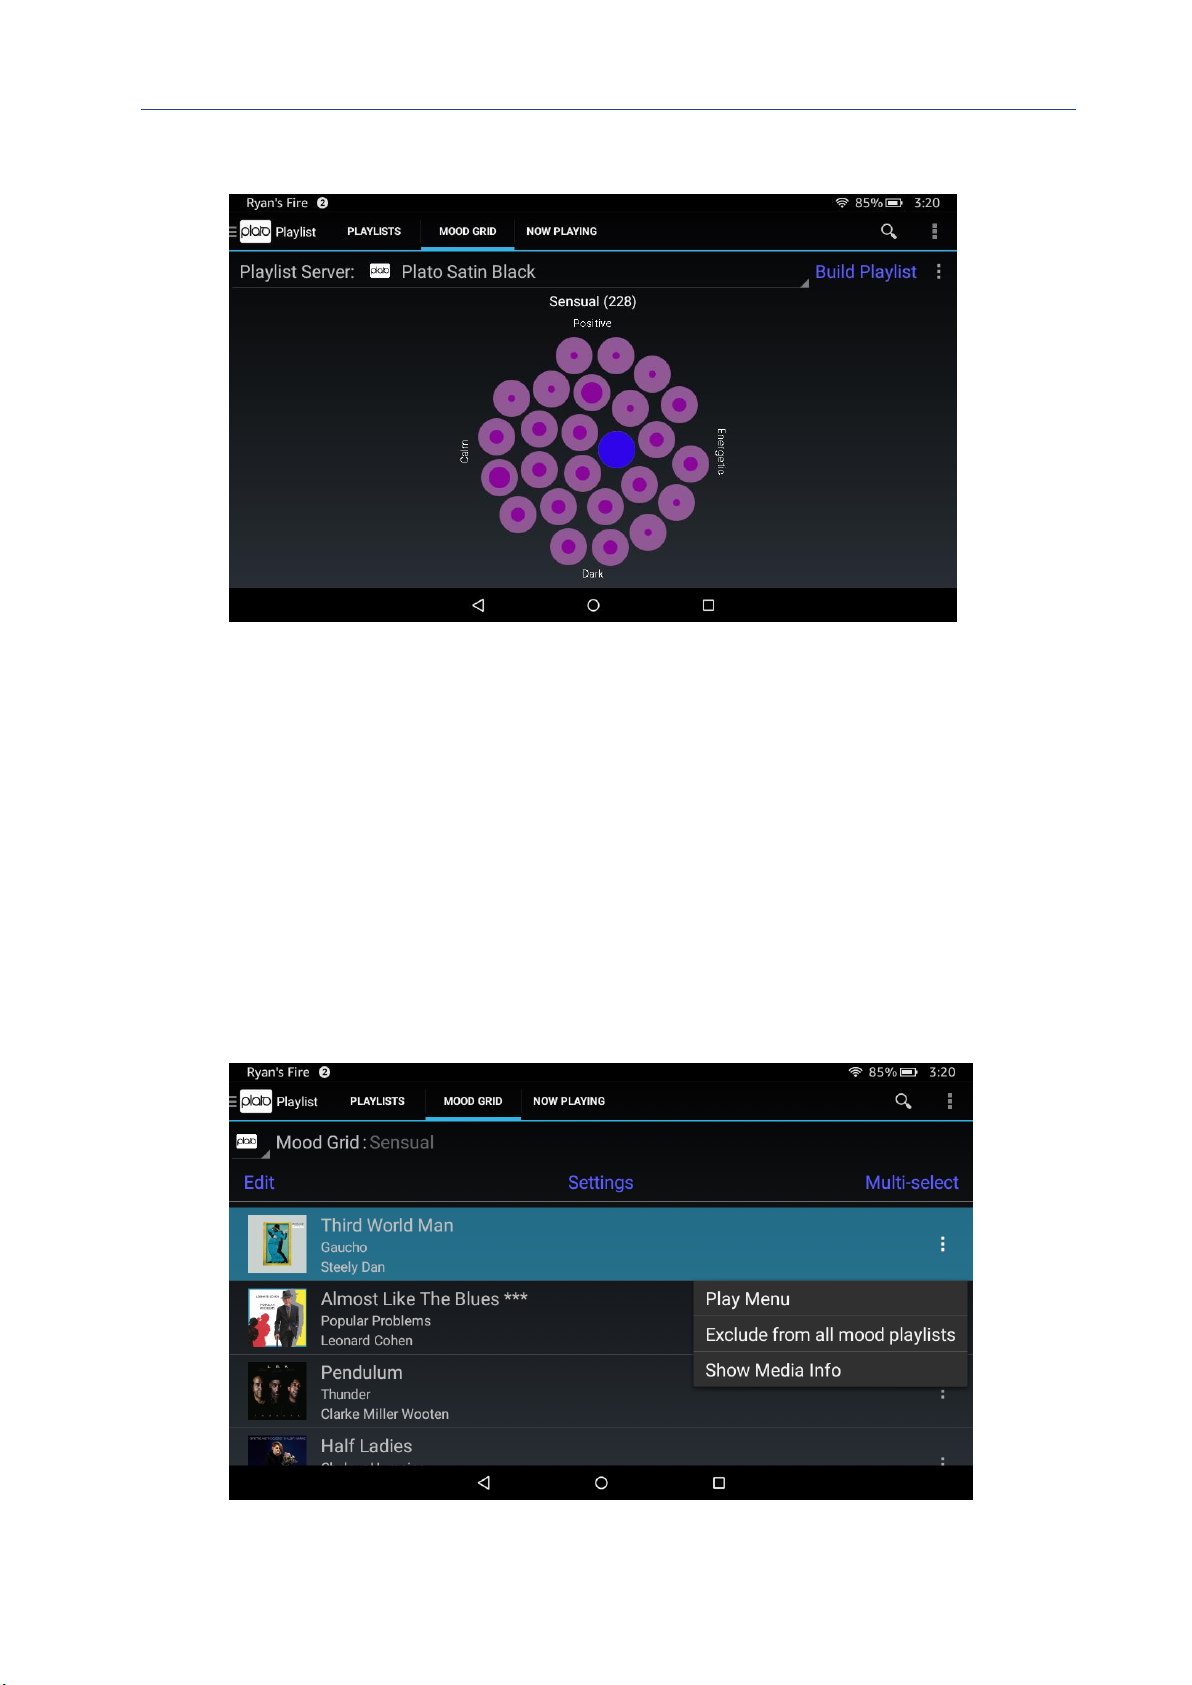
Plato Complete Guide V1.3.3
Convert Technologies 63
Each mood is represented by a pink circle, the dark purple circles indicate the number of
tracks associated with this mood on the grid (a larger circle indicates more tracks are
available). It is possible to select a mood by touching the appropriate circle, and the selected
mood is displayed at the top of the screen, with the number of available matching tracks in
brackets. In this example, we have selected Sensual, which has 228 matching tracks.
The more options menu in the right hand corner of the mood grid screen allows you to select
the number of available moods (100 or 25), list all excluded tracks, and set the maximum
playlist size for mood generated playlists.
10.5.1. Building a mood based playlist
Once you have selected the mood you would like to play, touch ‘Build Playlist’. This will build
and display a playlist of randomly selected tracks associated with the selected mood.
Page 65

Plato Complete Guide V1.3.3
Convert Technologies 64
It is possible to edit the order of the list, or remove tracks just list like any playlist using the
Edit controls.
The Settings control allows you to generate a new playlist, and configure the maximum
number of tracks in each generated list. Note that this assumes you have more than the
maximum number of tracks associated with this mood in your collection.
Use the Play Menu to play the playlist, available from the ‘more options’ menu in the track
list.
The more options menu also allows you to exclude certain tracks from mood playlists, or
show media info associated with this track.
Page 66
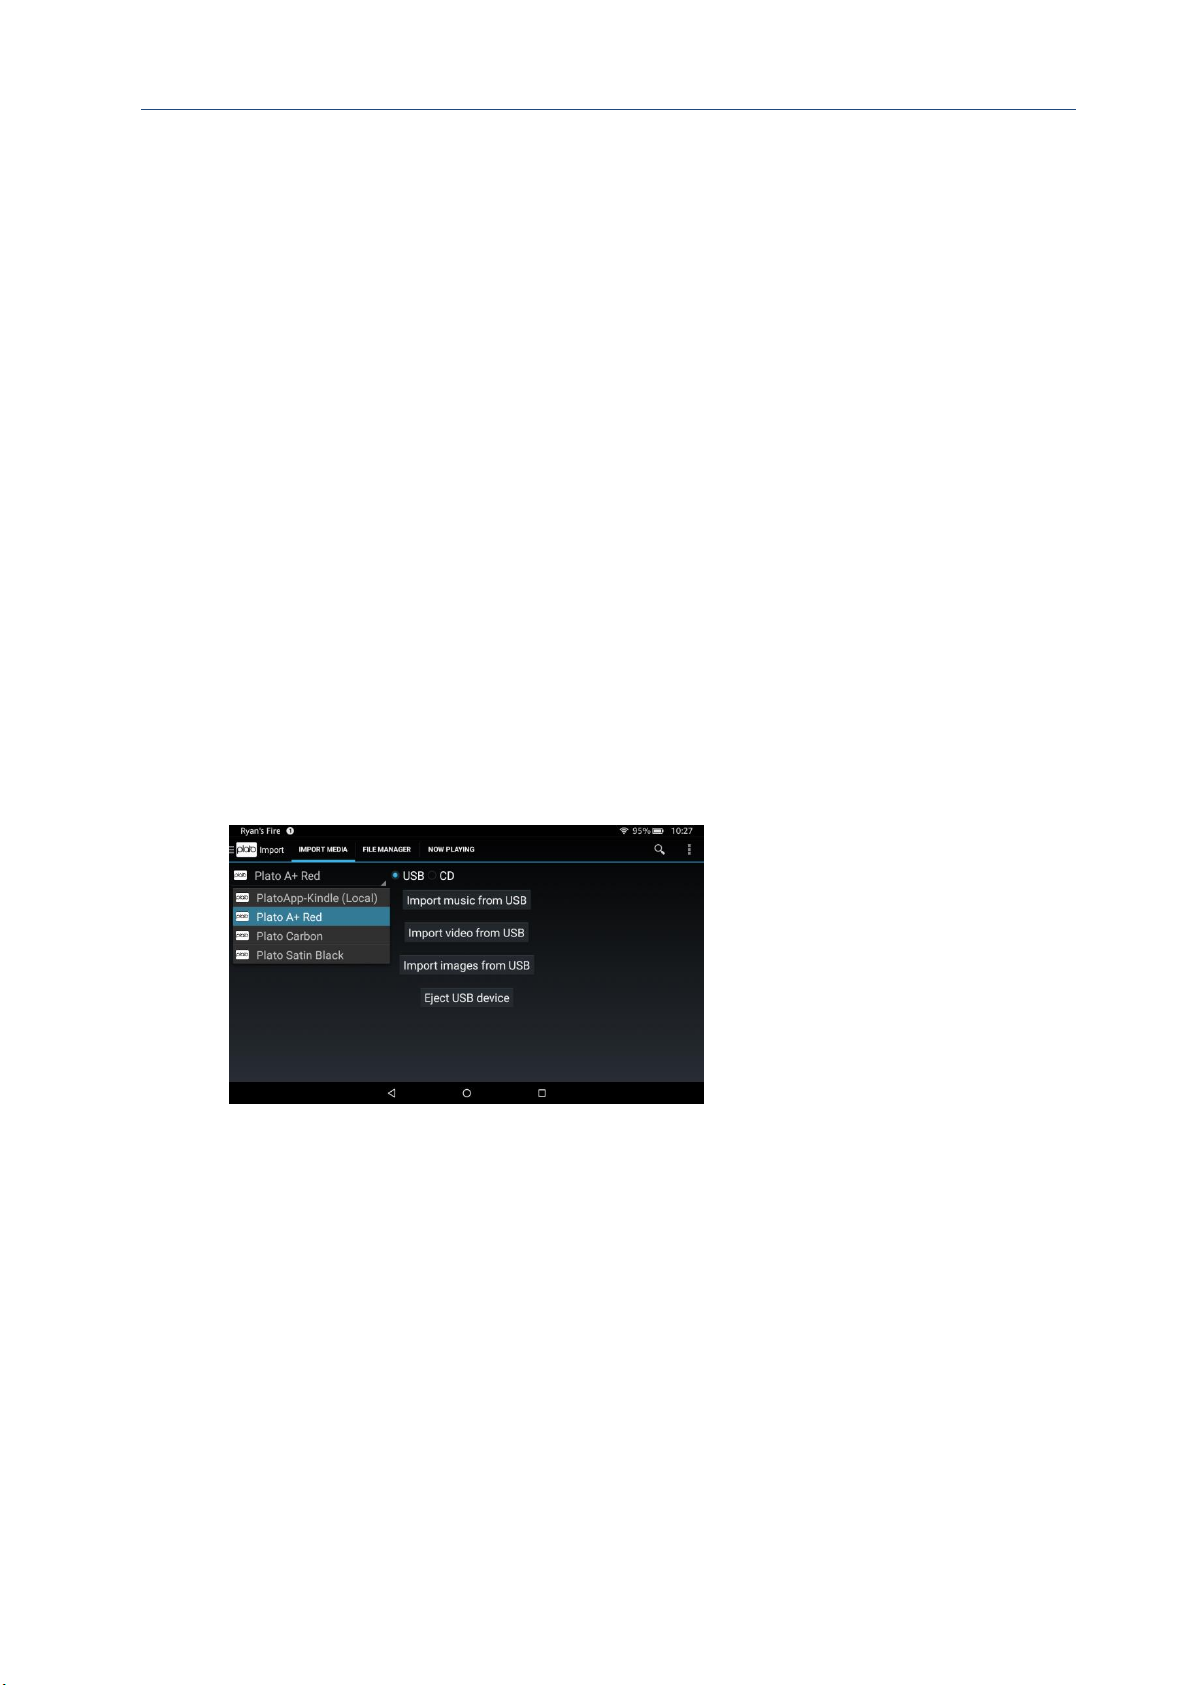
Plato Complete Guide V1.3.3
Convert Technologies 65
11. Import
The Import Feature allows you to import media files to your Plato unit. This option provides a
fully automated import facility from a USB device plugged into the FRONT USB port. The
import will include file copy, additions to the internal media database, and Gracenote checks
to find artist images and other tagging information.
This feature also includes controls to support the supplied USB CD drive included with Plato.
Using this option it is possible to rip audio CDs at high speed directly onto Plato’s internal
hard drive.
Although the import operation is all done on Plato itself, it is possible to control the process,
and monitor its progress using a remote tablet. First select the appropriate Plato device from
the device drop-down list.
The IMPORT MEDIA tab provides automated controls to import from the connected USB
device. The File Manager tab provides more detailed controls to allow single files or
directories to be imported one at a time.
Note that the import controls can all be activated from a remote device running the Plato
app. Each control screen contains a drop down device selector list which indicates which
device you are talking to. In most cases the device you are interested in will be your main
Plato unit. Please ensure you have selected the correct device.
11.1. Importing from a CD
Note that this feature requires Plato system version 1.2.5 or later. See section 3.7 for
details on how to check/upgrade your Plato system firmware.
Note that it is only possible to import audio CDs via the supplied USB CD drive.
Note that the ripping process requires an internet connection for the Plato device.
Plug your supplied USB CD drive into Plato’s front USB socket, and select CD on the IMPORT
MEDIA tab.
Page 67
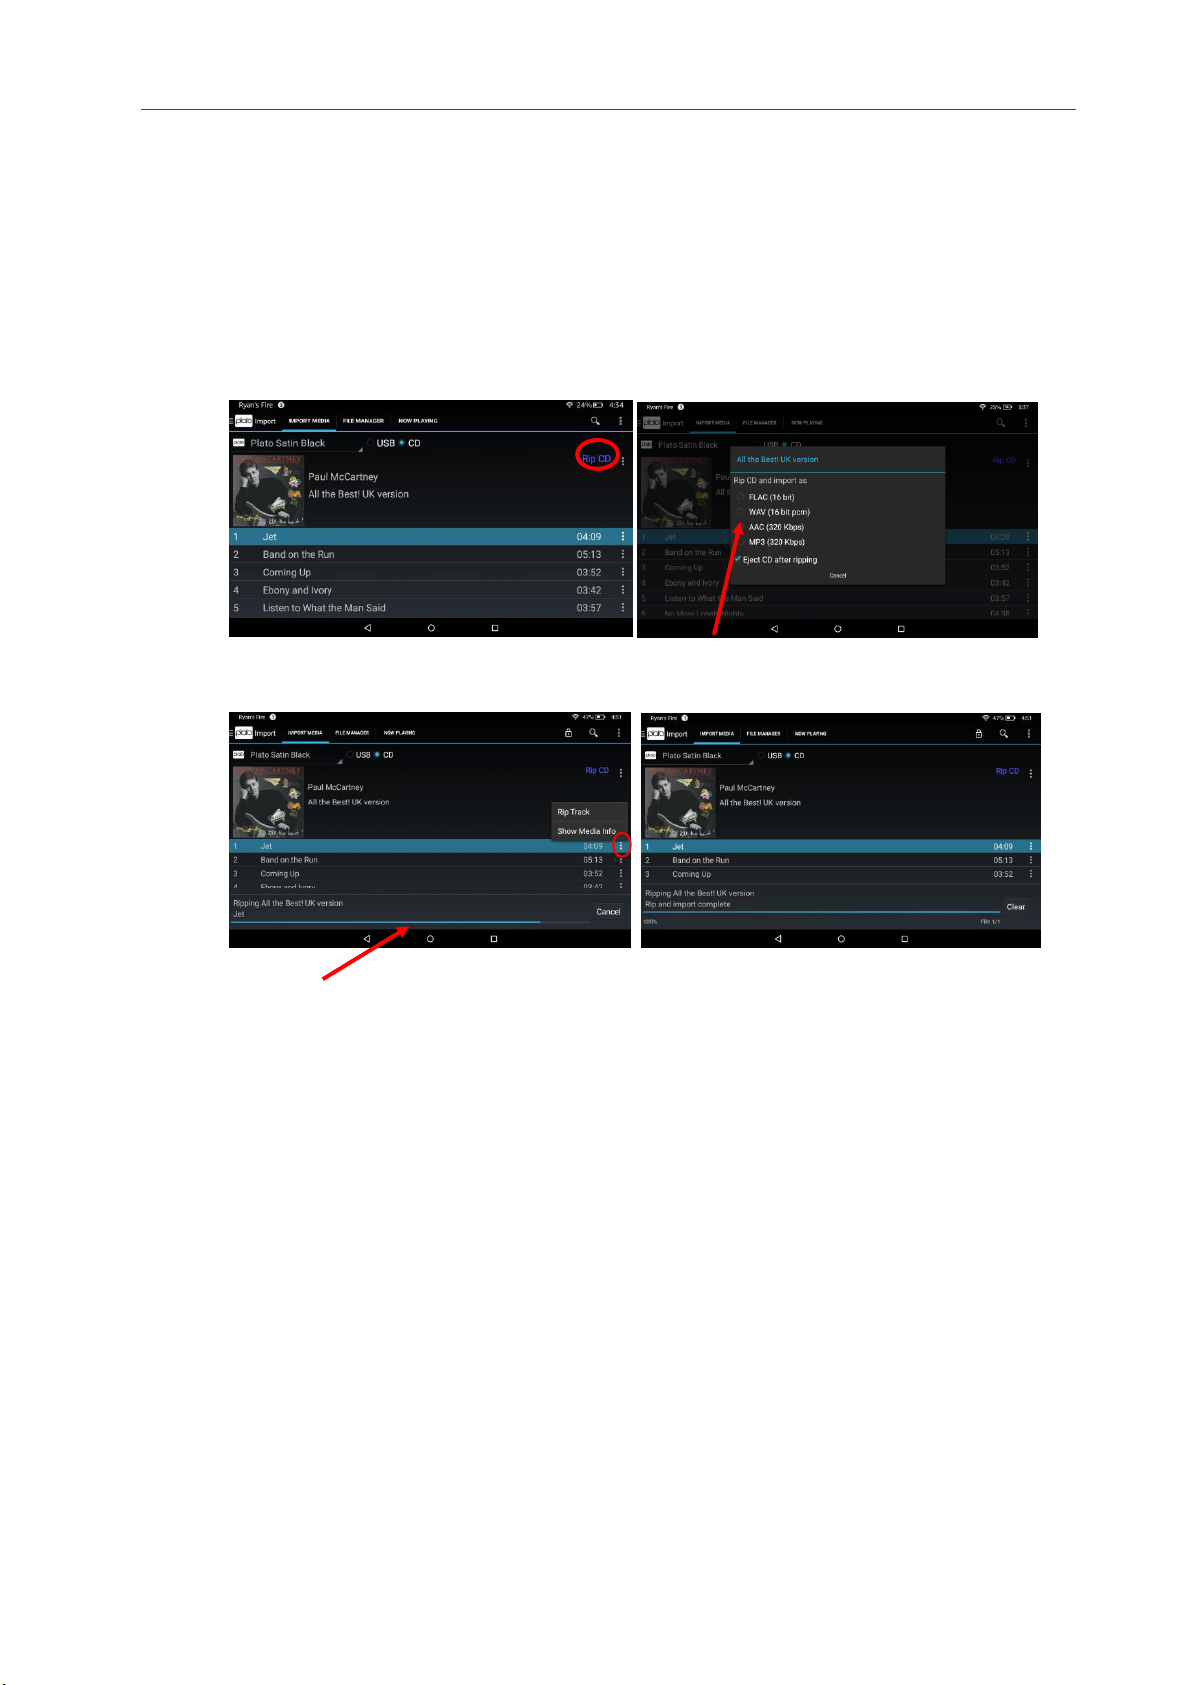
Plato Complete Guide V1.3.3
Convert Technologies 66
The first time you plug in your supplied CD drive you will have to grant access on the Plato
device. Simply follow on-screen instructions on the Plato touchscreen to complete the
operation. Once this has been done once, it should not be necessary again.
Once an audio CD has been detected in the drive, Plato will read the data and search online
for appropriate META data information based on information read off the CD.
If the supplied META data information is correct, and you would like to rip the whole CD,
click on Rip CD to begin the high speed ripping process
Choose the appropriate format for the ripped data from the list, and the process will start.
A progress bar at the bottom of the screen indicates progress through the ripping process,
and it is possible to abort the process at any time using the Cancel button. The rip process
progresses in 3 steps: read the data from the drive, prepare final tracks, import data into
Plato.
The control of the CD drive has been optimised to obtain the best possible audio data, in the
shortest time. Normally this will mean the drive is not spinning at maximum speed, and a CD
will typically be imported in around 10 minutes.
Page 68
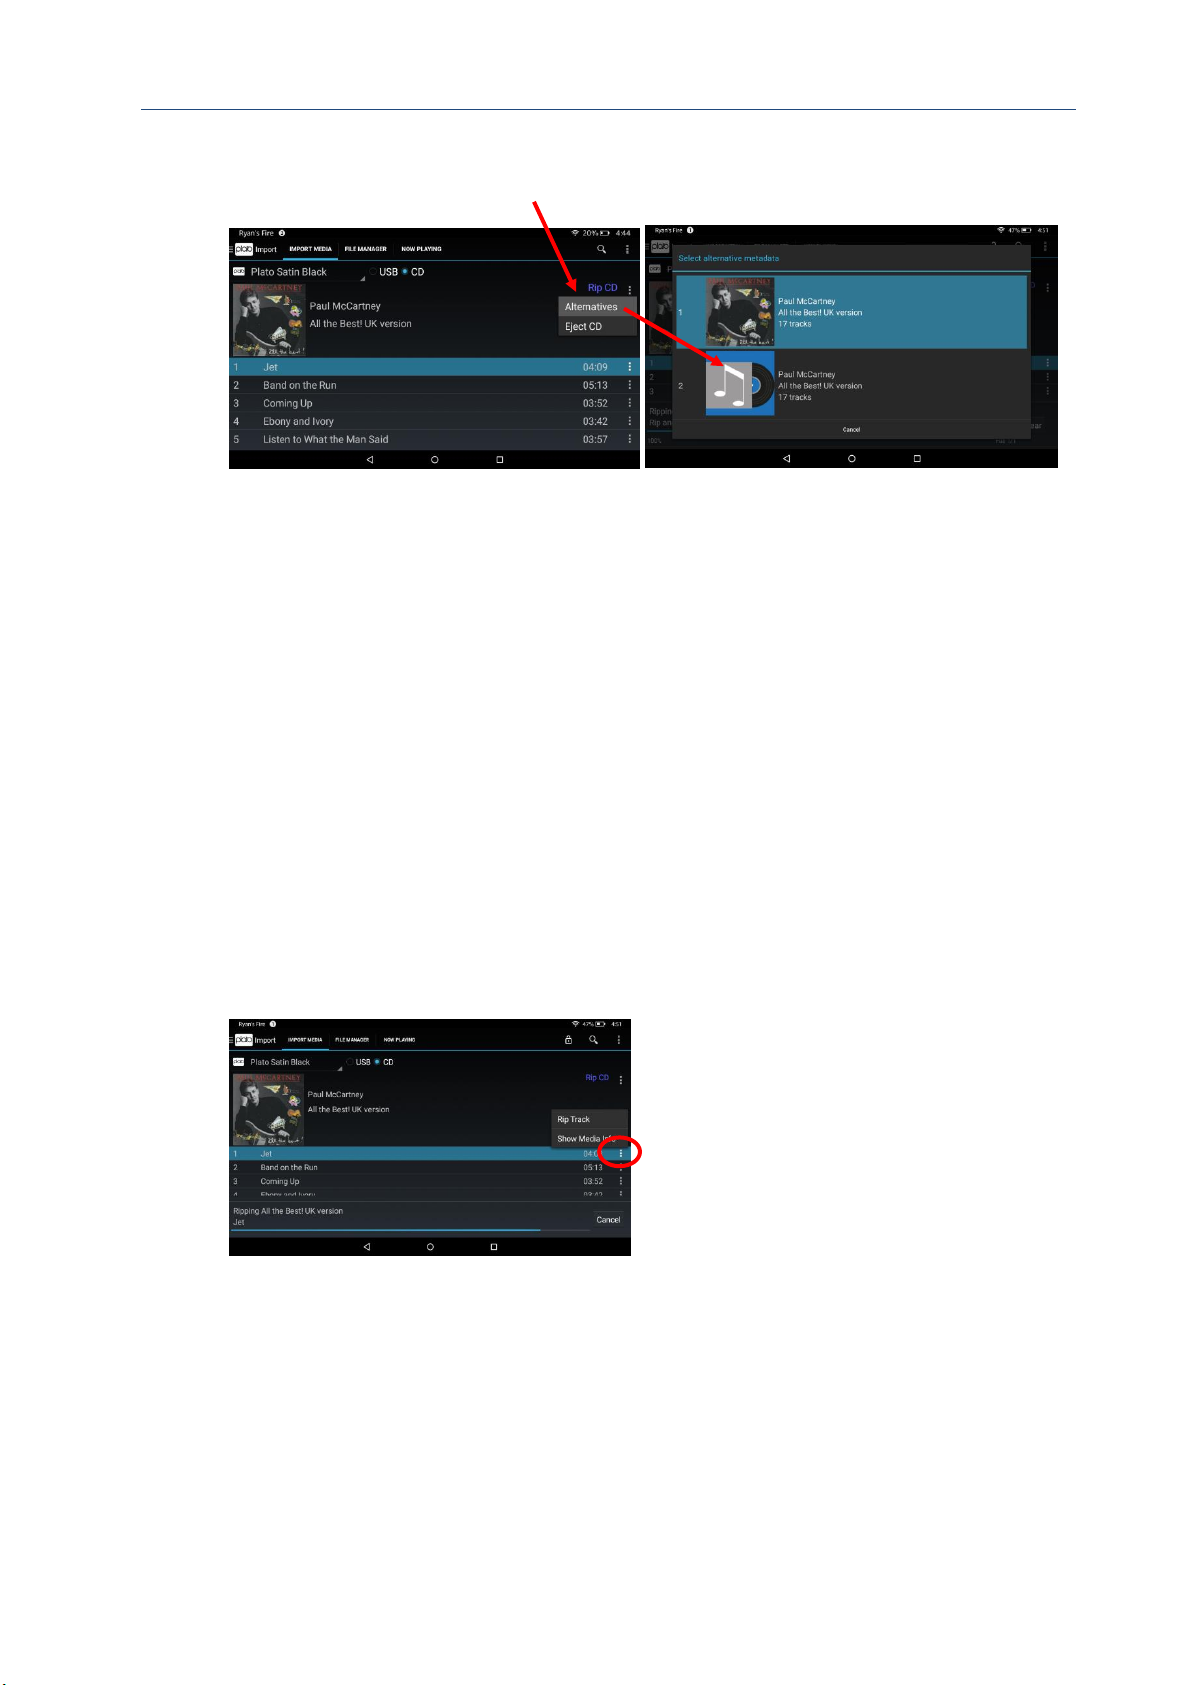
Plato Complete Guide V1.3.3
Convert Technologies 67
The more options menu in the top right hand side of the screen offers additional functions to
show alternative tagging options, or eject the drive.
11.1.1. Alternatives
If the META tags suggested do not match your version of the CD (maybe because the CD was
re-released a number of times), you can explore alternative options via the More Options
menu before you choose to start the rip operation.
Note that it is possible to edit META data tags once the CD has been imported into Plato
using the editing tools as described in section 16.
11.1.2. Eject CD
Choose this option to eject the CD immediately from the drive.
11.1.3. Individual track ripping
If you are not interested in ripping the entire CD it is possible to rip each track individually by
selecting the Rip Track option from the more options menu option in the track listing
11.1.4. Show Media Info
Select Show Media Info for each track to display the detailed META tags, and data formatting
information read from the drive.
Page 69
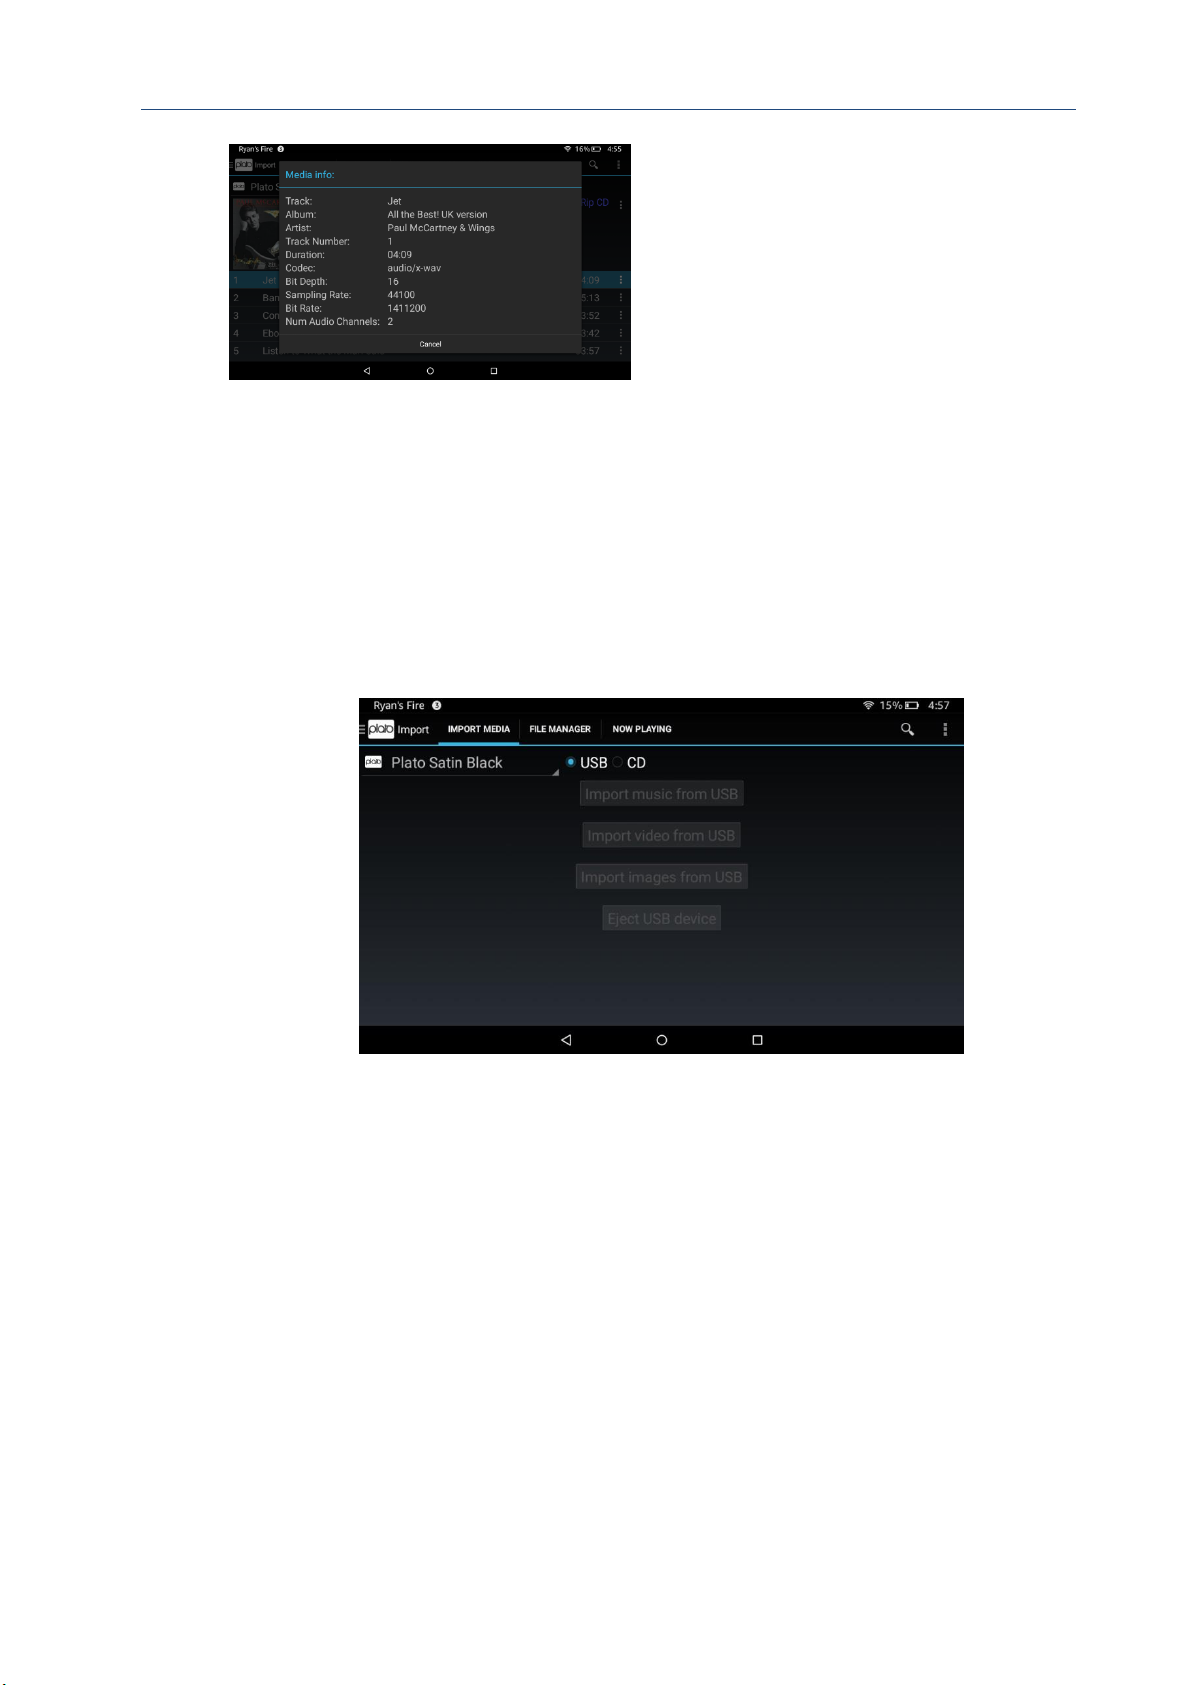
Plato Complete Guide V1.3.3
Convert Technologies 68
11.2. Importing from a USB memory stick or drive.
Plug your USB memory stick or USB disk drive into Plato’s front USB socket, and select USB
on the IMPORT MEDIA tab.
This shows a simplified view to import all media files from the attached device. The buttons
will remain inactive (greyed out) until a suitable USB device has been added to USB port on
the front of Plato.
Operation is very simple. Import all music, video, or image media files from the attached USB
device into Plato using the appropriate button.
A progress screen indicates how much data needs to be imported. Note that if Plato
discovers tracks on the USB device which are already in its database, it will prompt the user
to decide whether to overwrite existing tracks, or ignore and move onto the next track.
Note that the import process may take a considerable amount of time as Plato will scan the
whole USB device for matching (audio or video) data.
Once the import is complete, press the Eject button before removing the USB device. This
will display the Android Storage Settings configuration page. Scroll to the bottom of this page
and select Unmount SD card for the TOP USB device
Once the unmount process is complete it is safe to remove the USB device.
Page 70
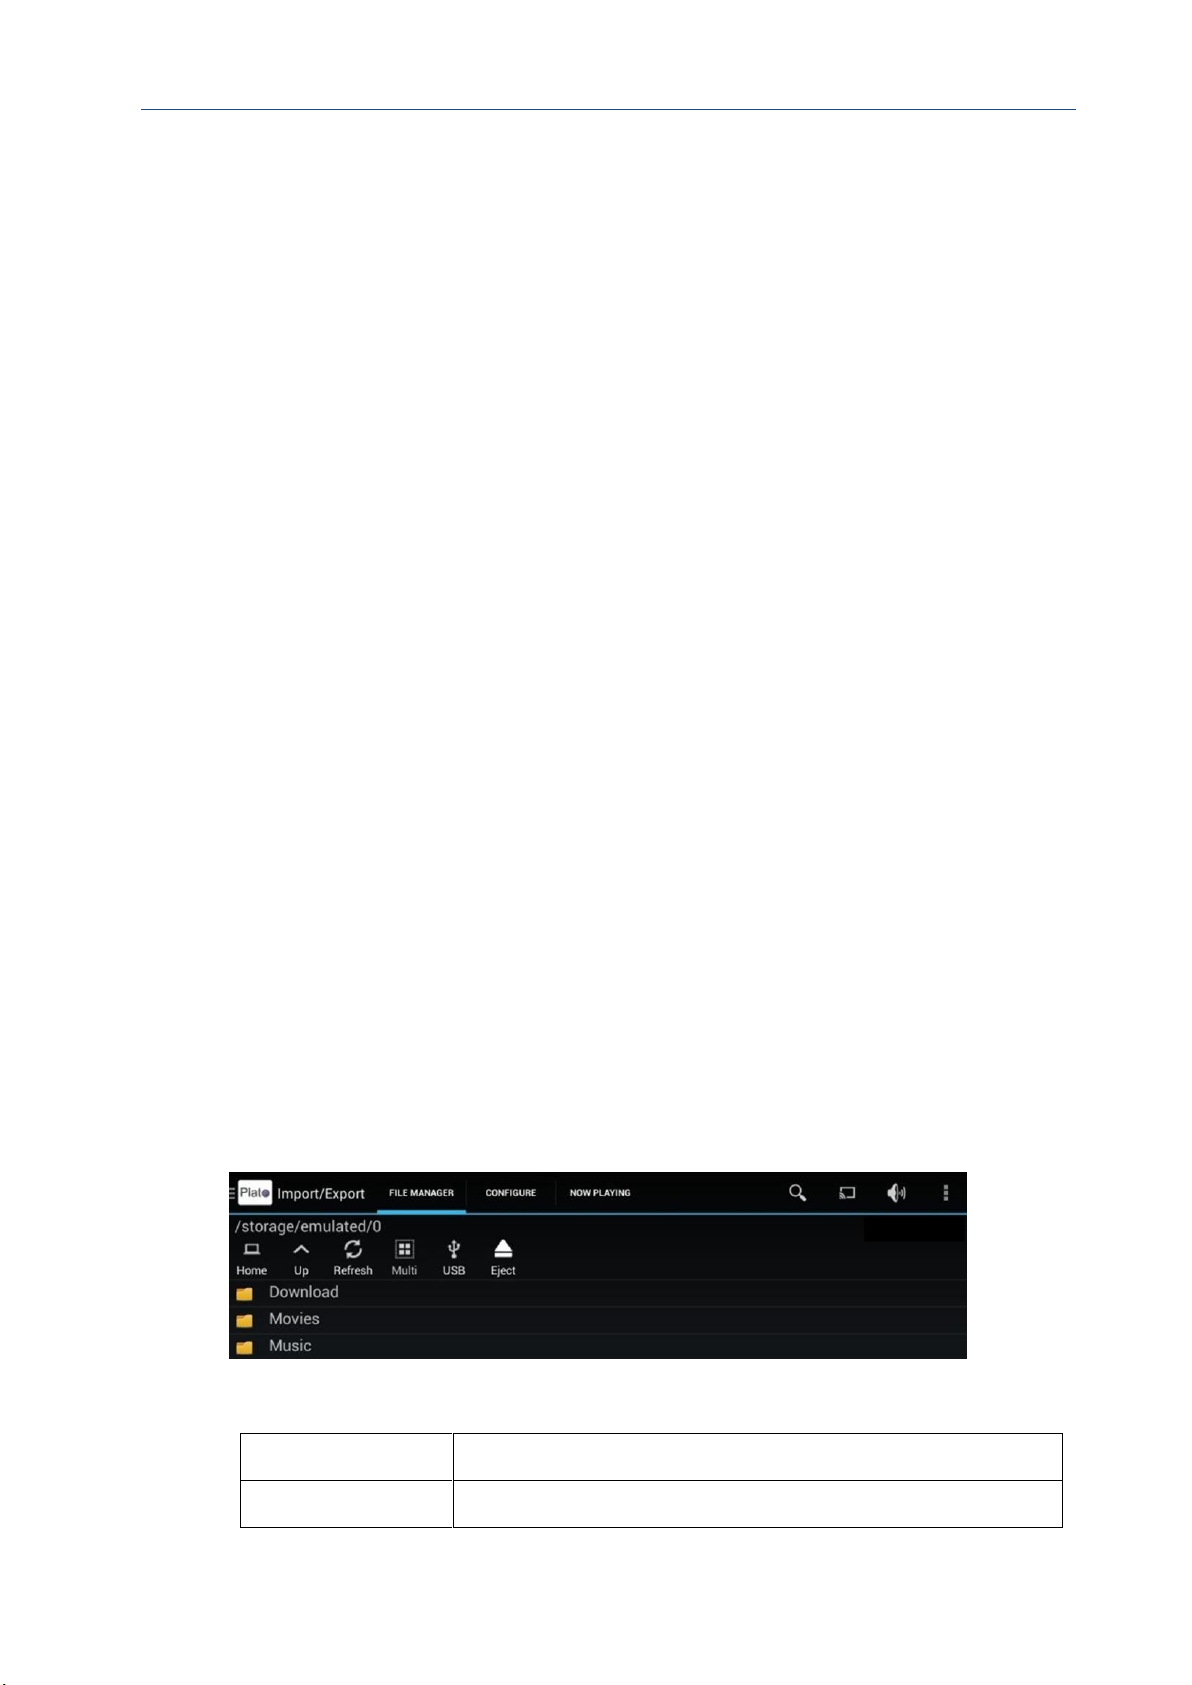
Plato Complete Guide V1.3.3
Convert Technologies 69
11.3. Importing video files
The tagging information for video files is very inconsistent, so Plato uses a folder based
mechanism for storing and presenting video data. Plato preserves two levels of folder in its
importing of video files, and to make your files easy to find at a later date it is worth
spending some time organising it into folders before importing into Plato.
Prior to importing, video files should be sorted into up to 2 folders as follows:
• Collection->Series->Video file
The collection folder will identify the box set (e.g. Breaking Bad), and the Series folder will
identify which series the individual episodes belong to (series 1-5).
11.4. Importing image files
It is possible to import image files into Plato for viewing on UPnP devices around the home.
As with video, image tagging is highly inconsistent so Plato uses a folder based mechanism
for cataloguing image files according to date.
Prior to importing, image files should be sorted in up to 3 levels of folder as follows:
• Year->Month->Day
Each level will be preserved on Plato after the import process so it is possible to view images
sorted into date based folders.
11.5. File Manager
The middle tab of the Import/Export feature shows a fully featured file browser screen. This
provides a means of viewing, importing and copying individual folders from a USB device.
Note that it is much easier to import folders rather than individual files as this is more likely
to maintain album/artist groupings of the source material.
In the File Manager Tab, there are top level menus for
• Home
Returns the screen to display top level folders on your Plato unit.
• Up
Goes up one folder level.
Page 71
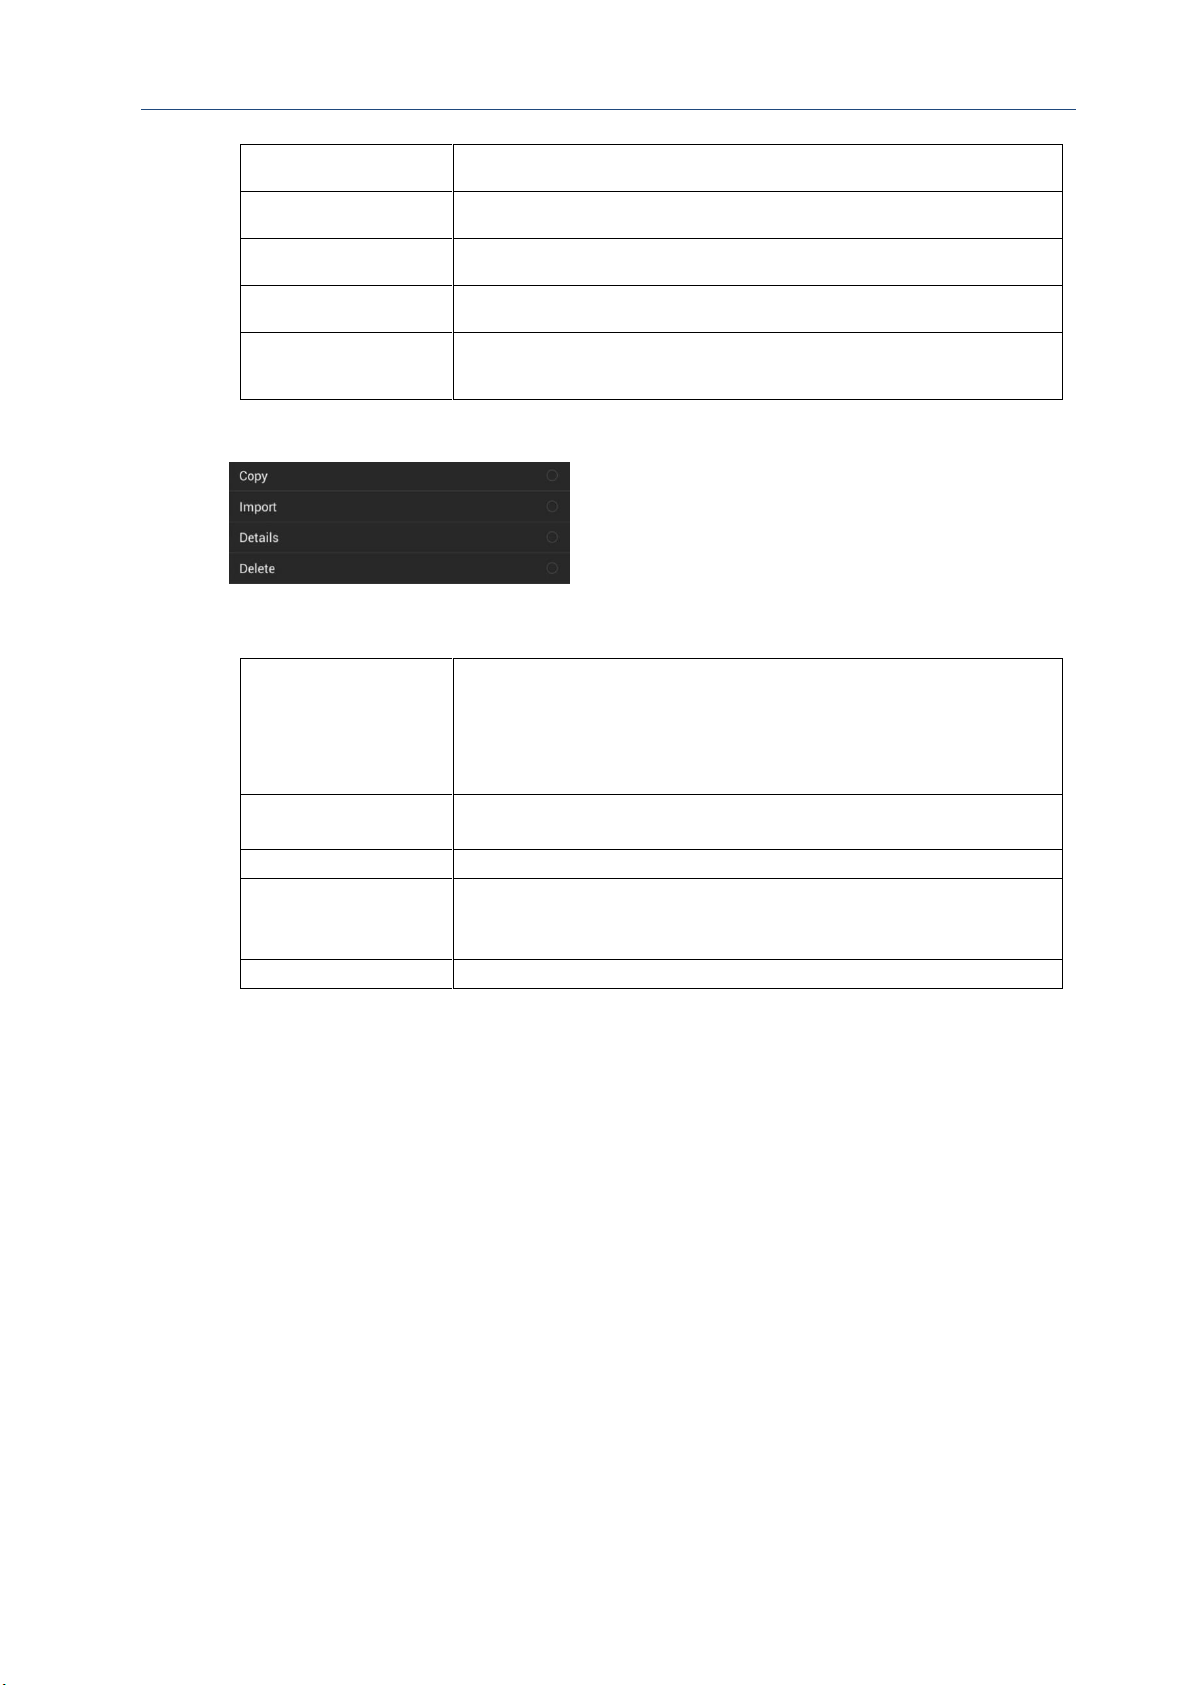
Plato Complete Guide V1.3.3
Convert Technologies 70
• Refresh
Refreshes folder information.
• Multi
Allows you to select multiple files to copy.
• New
Create a new folder.
• USB
Shows data stored to a USB device connected to front/rear panel.
• Eject
Select to eject a USB device before physically removing it from
your Plato unit.
Long Press on any file or folder to display the Import/Export option dialog box.
Options are:
• Copy
Select file/folder to copy. Navigate to destination folder and
press paste button from the menu bar. This is useful to copying
files off of Plato.
Do not use copy to import media files into Plato, as Copy does not
perform the database operations required for media files.
• Import
Imports selected file/folder onto Plato. Plato will decide where to
store the files and for music files, what to call them.
• Details
Details about the file/folder including size, date, etc.
• Delete
Deletes files from the disk and remove them from Plato
databases. The media file will no longer appear in the Plato
media library.
• Install
Option available for installing .apk Android application files.
Page 72
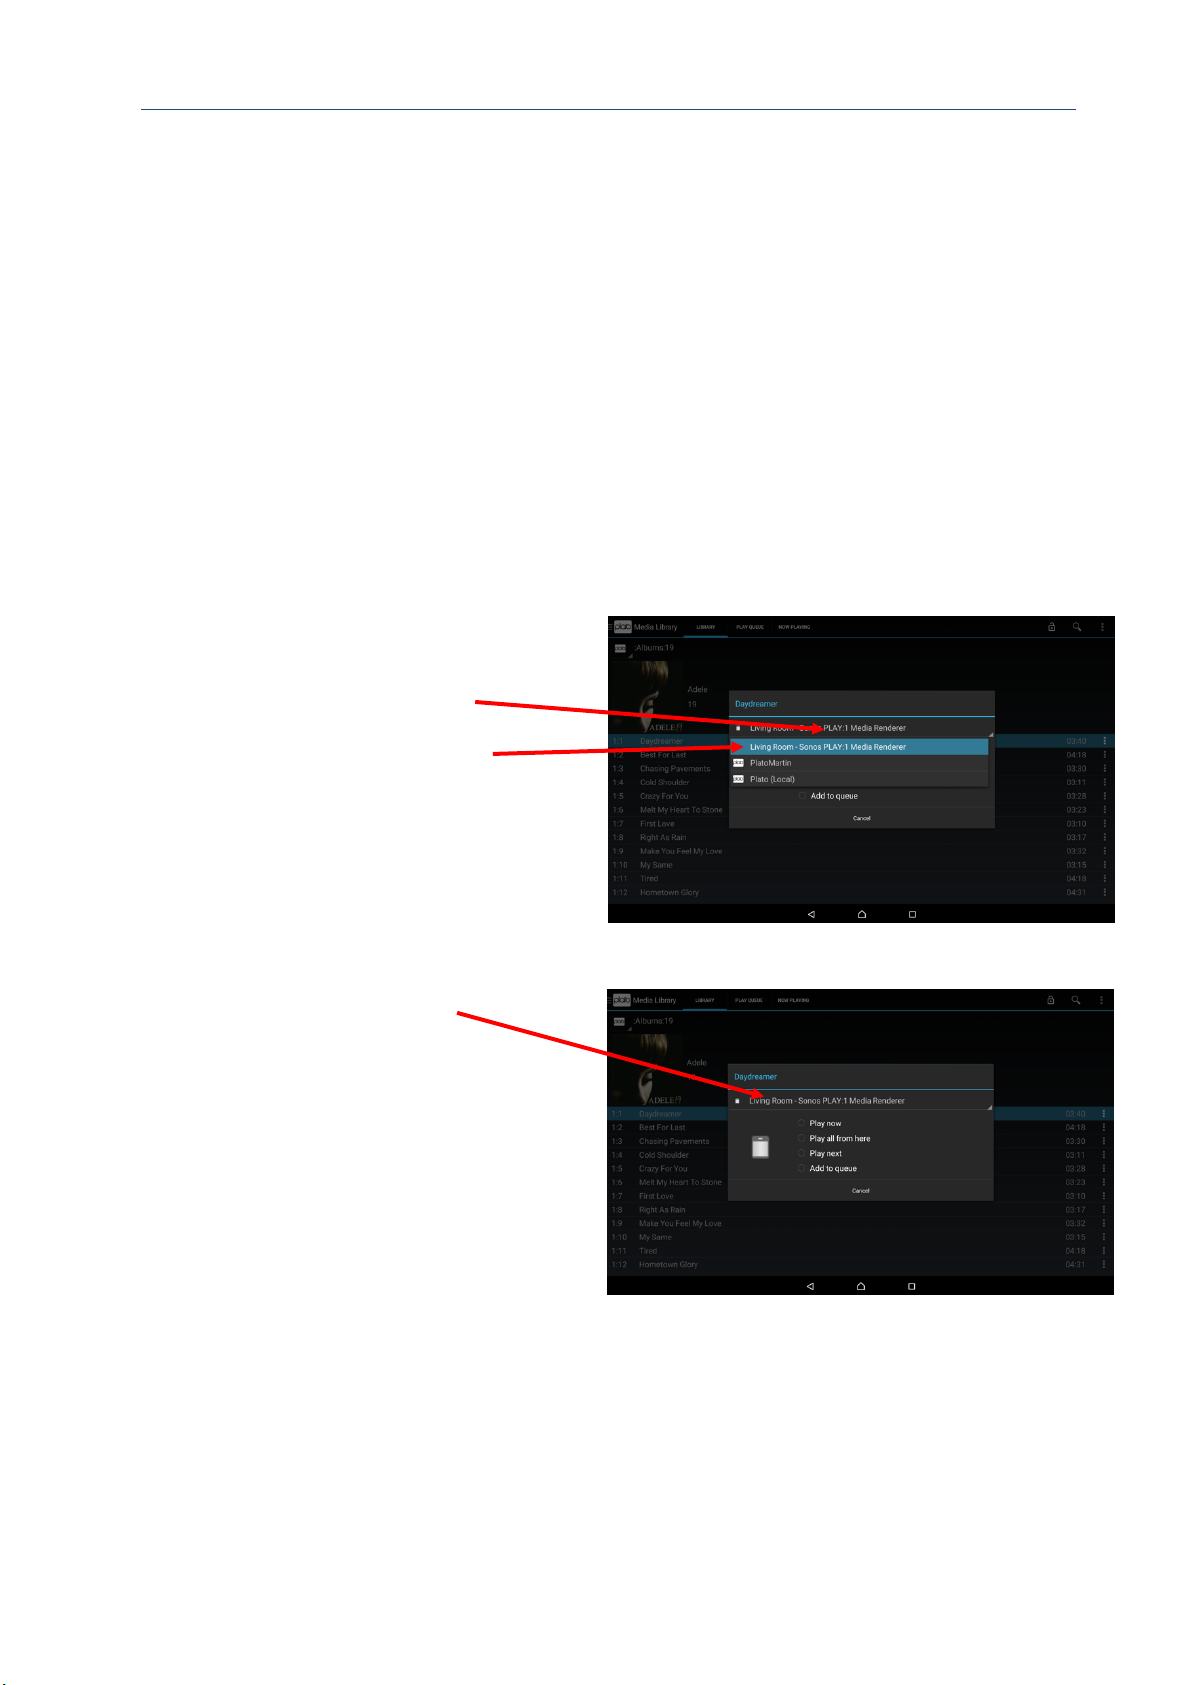
Plato Complete Guide V1.3.3
Convert Technologies 71
12. Streaming audio and video
You can use your Plato unit to stream music to a wireless speaker, or video to a Smart TV in
other locations in your house.
You must first have wireless speakers or Smart TVs configured on the same home network
that your Plato unit is connected to.
Plato is capable of supporting multiple simultaneous streams to different devices, so you can
use Plato to supply audio/video streams to different rooms in the house. Note each stream
can be controlled using a different control device (tablet or smartphone).
12.1. Streaming music out to remote wireless speakers
The Plato unit automatically detects UPnP compliant wireless speakers.
1. Choose a song, album or playlist.
2. Activate the device list to display
available devices.
3. Select the correct playback device.
In example right, this is a Sonos
PLAY:1 Media Renderer.
The speaker device is then shown as
the selected device.
4. Choose from the Play options.
The selected music plays to your
selected device.
12.2. Video playback
Using Plato, it is possible to playback video:
• To a device directly connected to Plato’s HDMI connection.
• To a SMART TV by streaming over your home network.
• To a tablet or smartphone running the Plato app.
Page 73
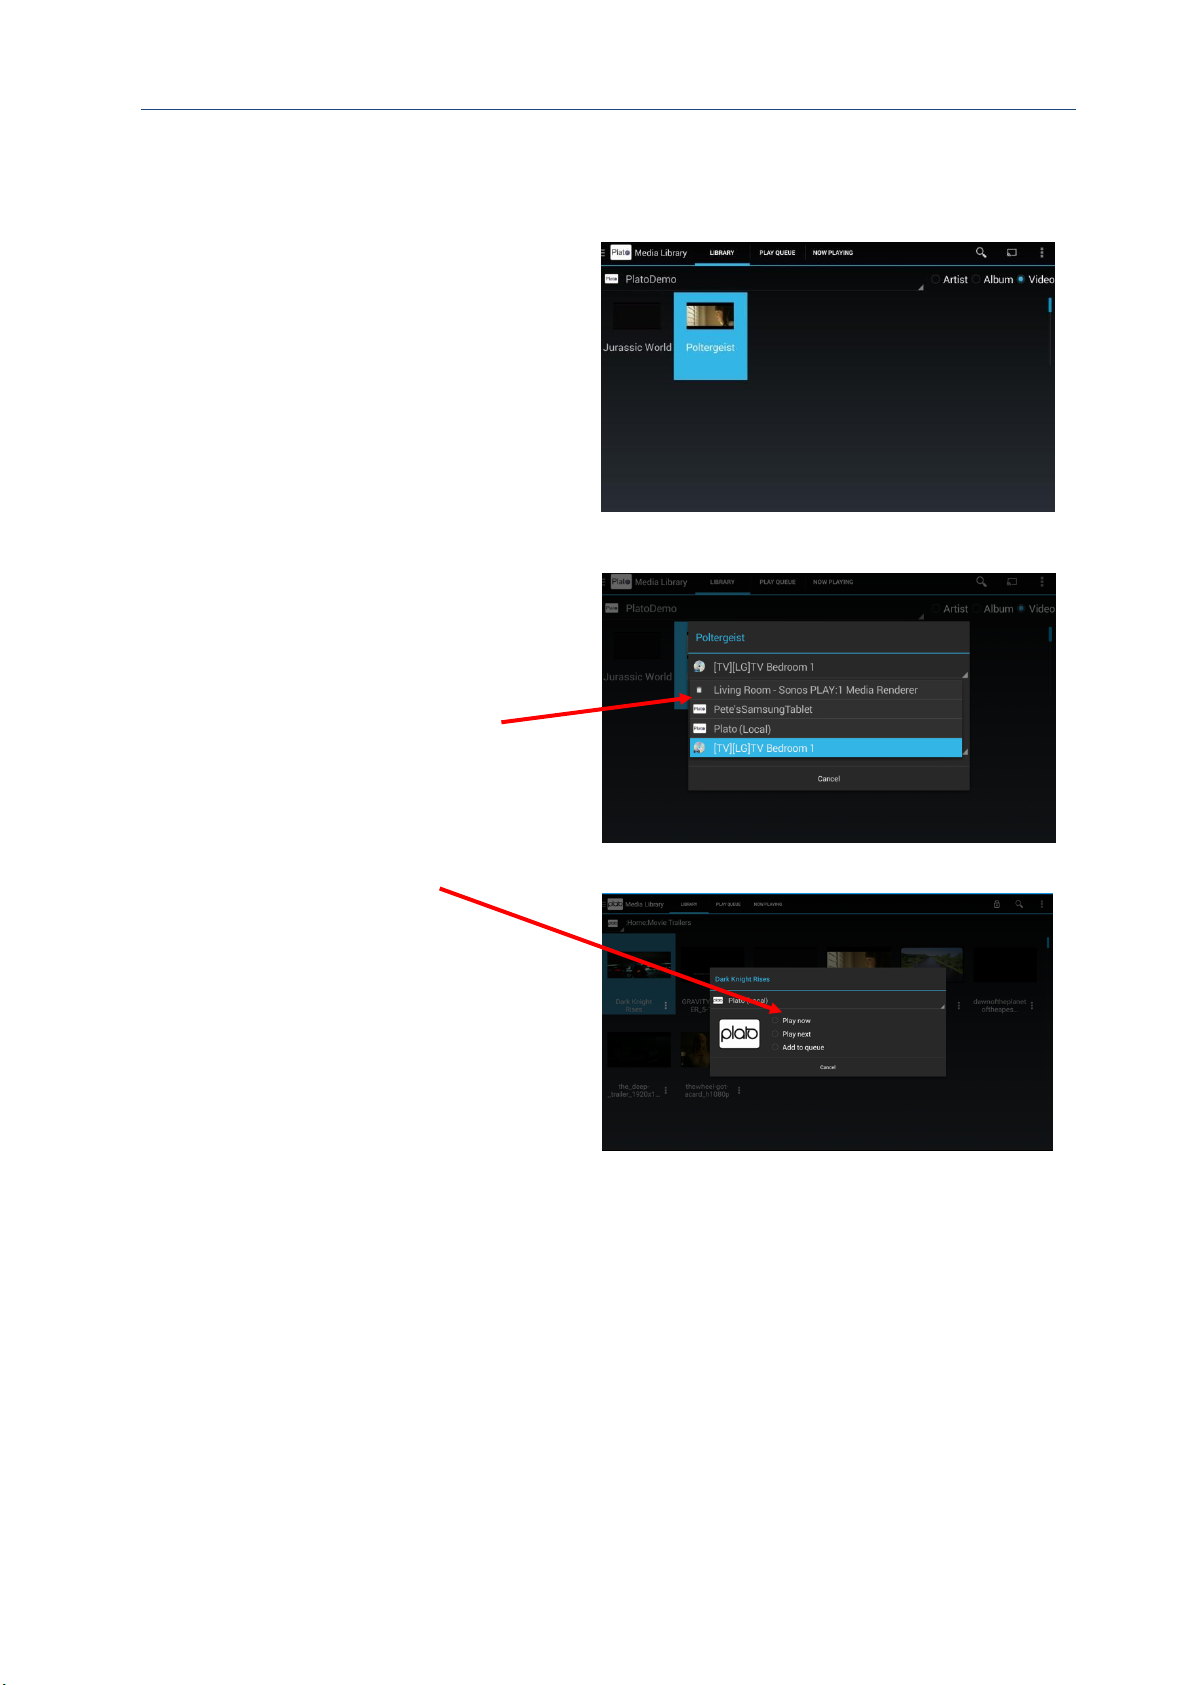
Plato Complete Guide V1.3.3
Convert Technologies 72
12.2.1. To watch video from your Media Library
1. Select the Video radio button to
view available content.
2. Access the Play Now dialog control
using long press, or the Media
Options icon.
3. Select the top device to display the
full drop down device list.
4. Select
Either
Your main Plato unit if you want to watch on the HDMI TV connected to your Plato unit,
Or
Any compatible TV/tablet
connected to your router to stream
to that external device.
5. Select Play now from the play
option to start watching the
selected video content on the
selected device.
Note that for playback to be successful
the device selected as the playback
device, must be capable of decoding the
supplied video file. Check with your
device documentation to determine
which file formats are compatible with
your specific device.
Page 74
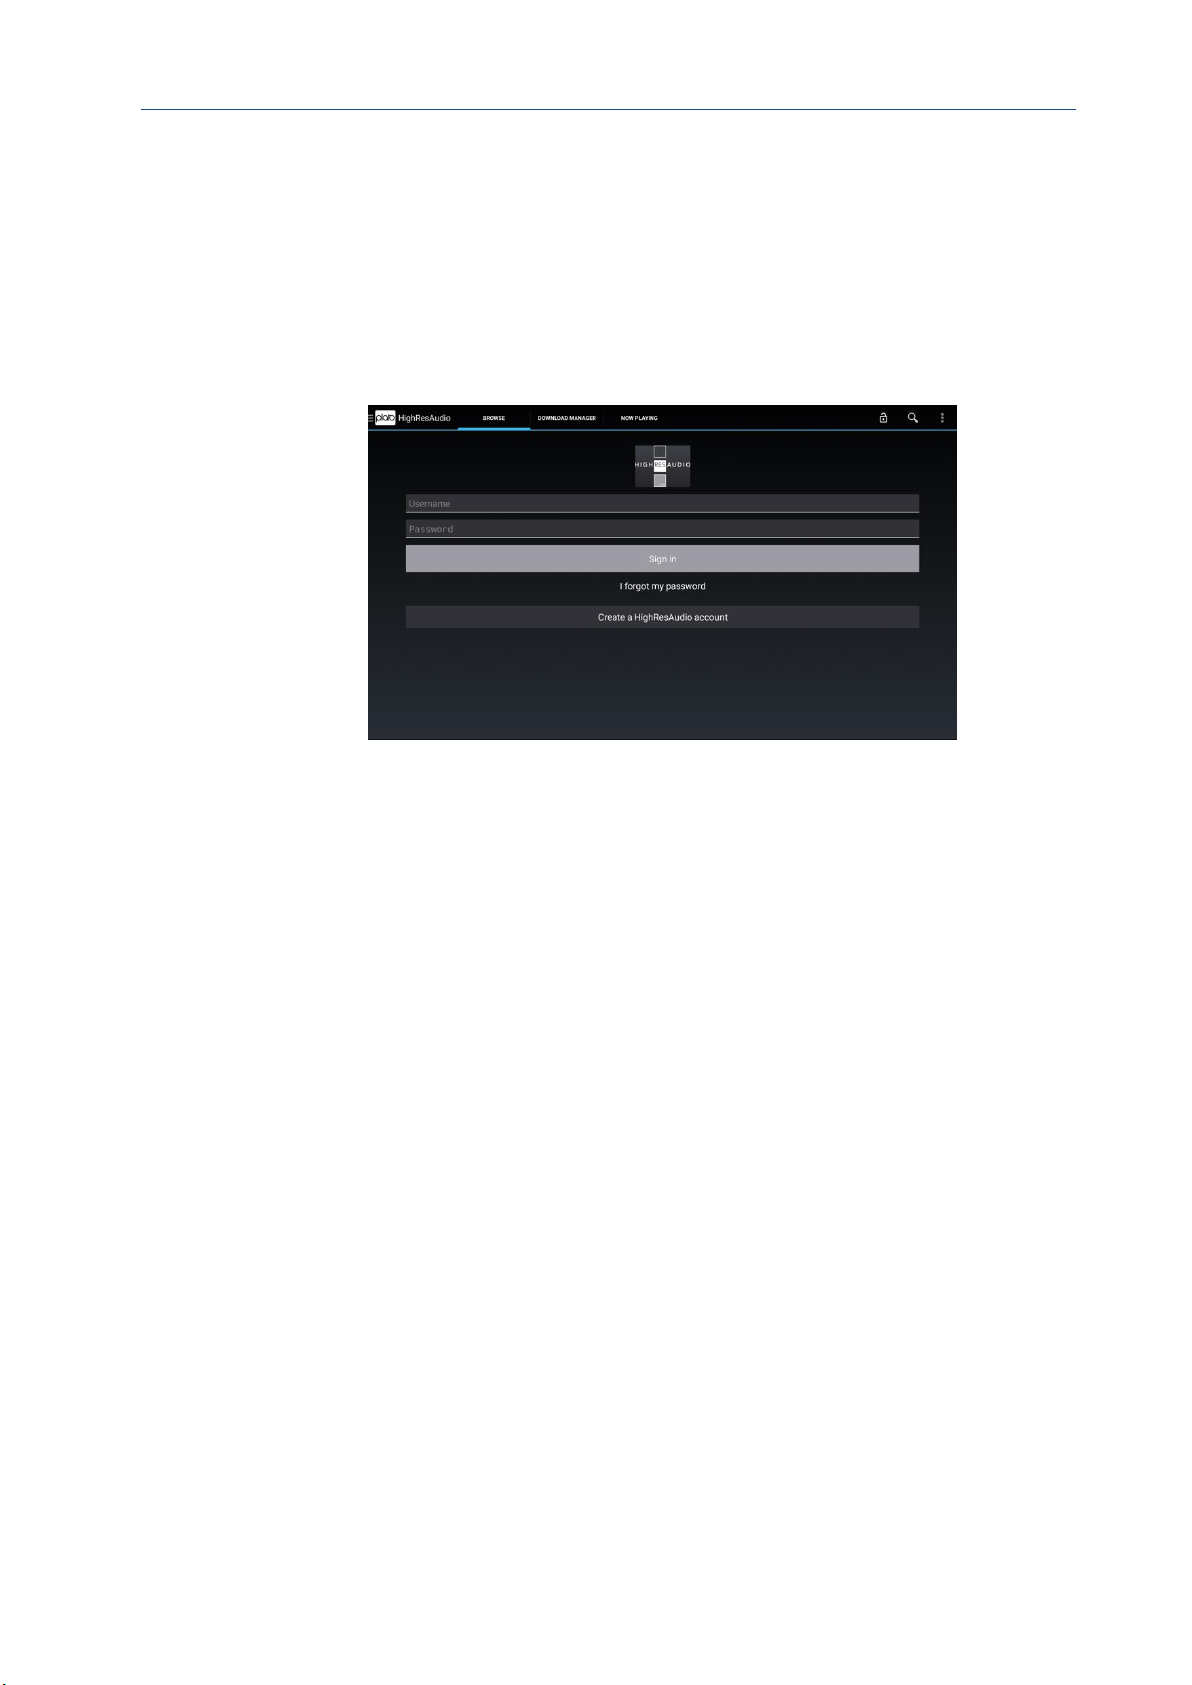
Plato Complete Guide V1.3.3
Convert Technologies 73
13. Accessing HighResAudio content
The HighResAudio feature (located within the main drawer feature menu) provides a
convenient way of browsing and downloading high resolution content from the
HighResAudio website.
Initially the BROWSE tab will show a login screen. If you have an account setup enter your
login details and select Sign In.
If you do not have an account, the bottom of the login screen has a link to create a new, free
account. This account registration can also be completed using your pc or tablet by directly
accessing www.hiresaudio.com.
Once you have logged in once, Plato will remember your login details and automatically log
you in next time you access this feature (unless you choose to logout from the previous
session).
Now the BROWSE tab will show the HighResDownloads webpage where you can browse
their content. From this page it is also possible to go through the site checkout and purchase
new material.
Once you have purchased new material it is possible to download it direct to Plato using the
DOWNLOAD MANAGER tab. Note that registration can be done via a PC using a full sized
keyboard for ease of use.
13.1. Download manager
The DOWNLOAD MANAGER shows a list of all items purchased and provides controls to
enable download direct to your Plato device.
Choose the material you wish to download from the list, and select Download. You can
download individual tracks or complete albums depending on the content you have
purchased.
This will display the download dialog control.
Page 75
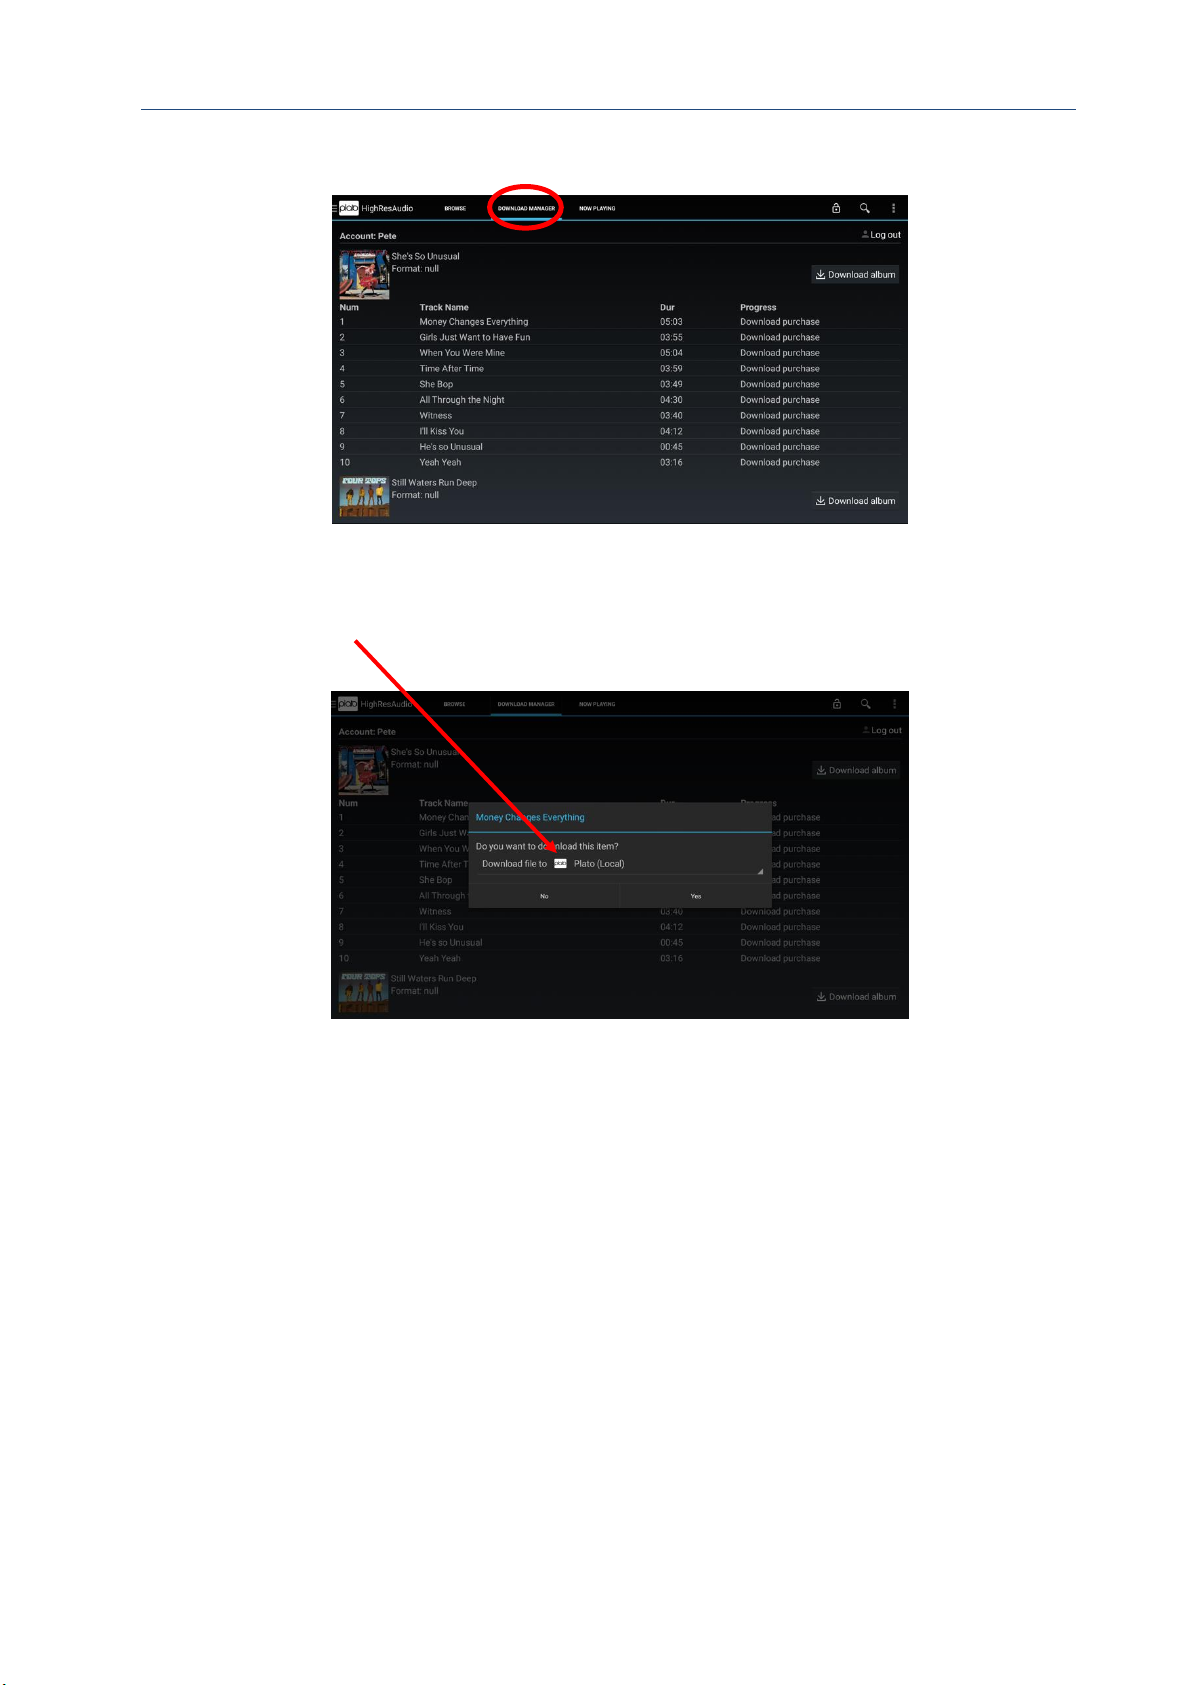
Plato Complete Guide V1.3.3
Convert Technologies 74
Select the Plato device onto which you wish to download from the drop down list of
compatible devices, and start the download.
The download manager will show the download progress. Once the download is complete
your files will be ready for playback in the Media Library as described elsewhere in this
manual.
Note that the download manager synchronises with HighResAudio to manage your
downloads. Check the terms and conditions of the HighResAudio website for details of how
many downloads are available per purchase.
Page 76
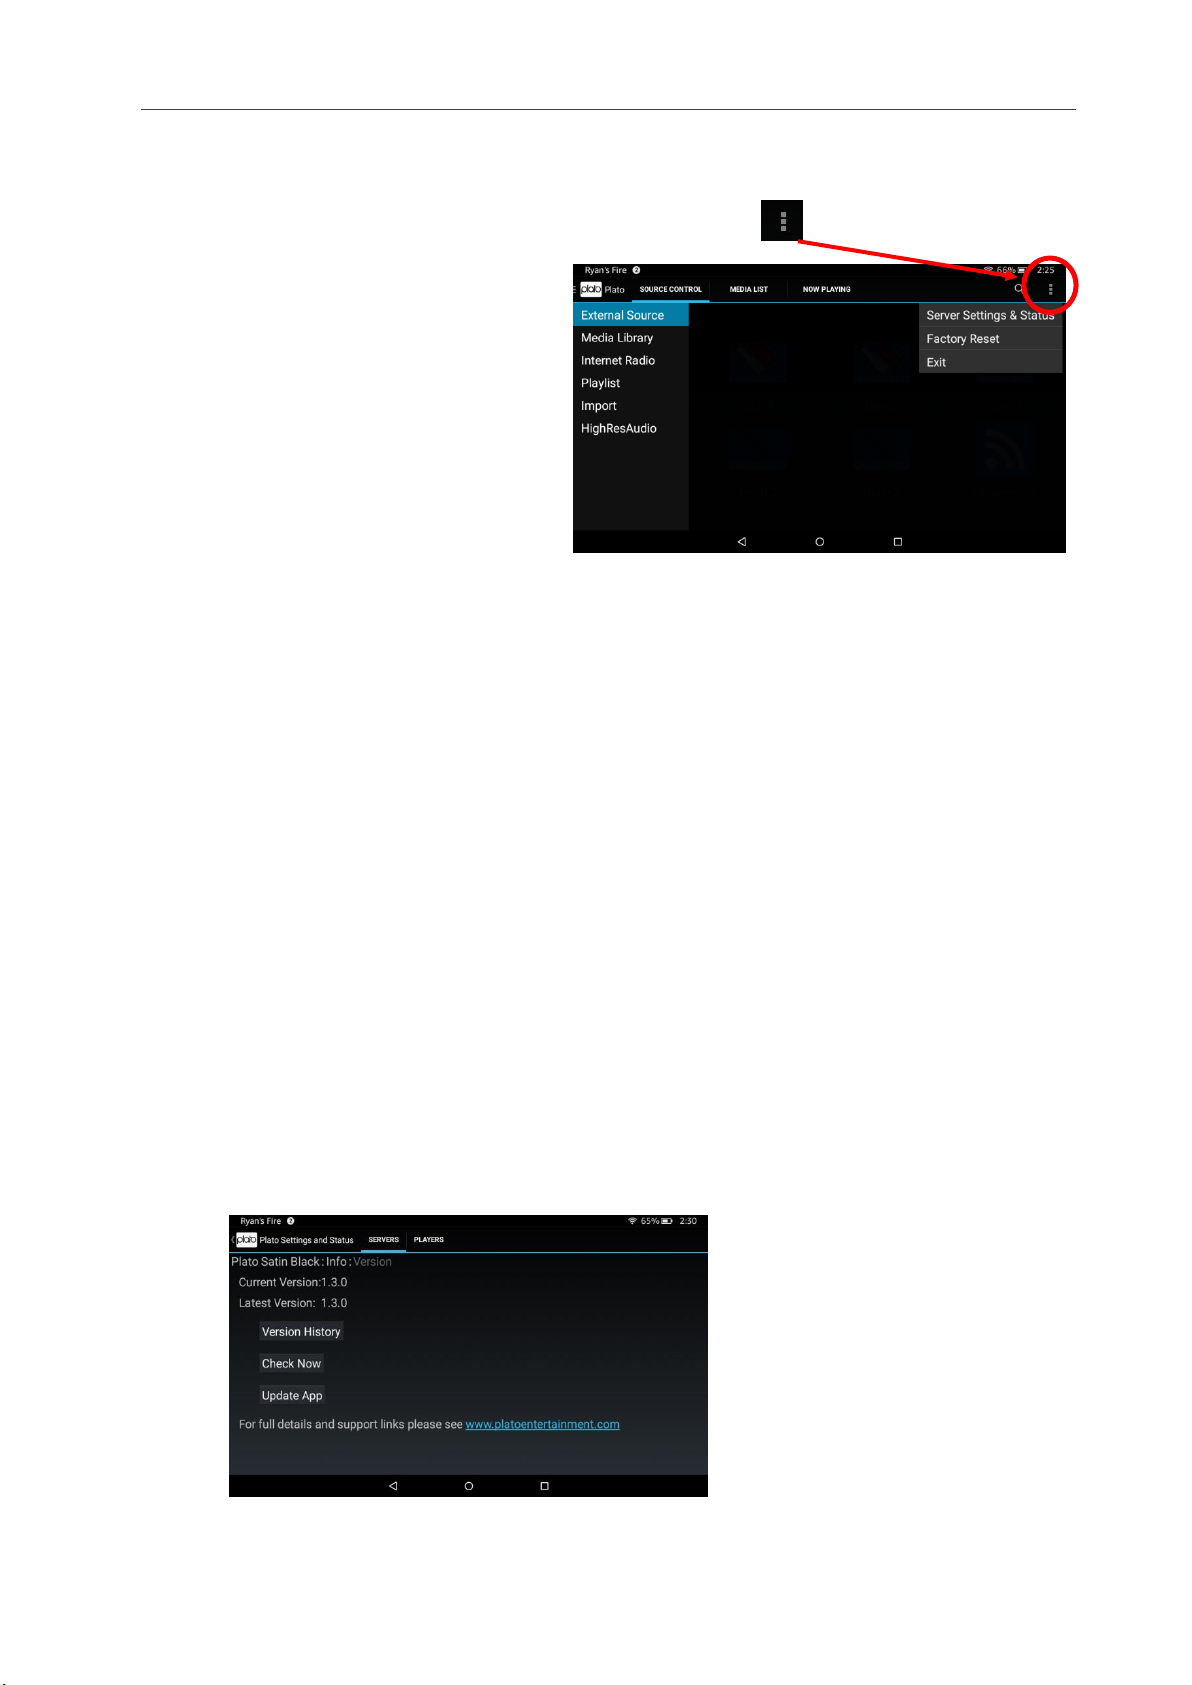
Plato Complete Guide V1.3.3
Convert Technologies 75
14. Advanced menu options
More advanced menu options are available by pressing the icon on the top right hand
corner of the screen.
14.1. Server Settings and Status
The server settings and status
option directs you to a view of all
detected UPnP servers and players
on your home network.
Two tabs are presented, one listing UPnP Server devices, the other listing UPnP Player
devices discovered on your home network. It is possible to swipe between tabs to view each
list individually.
Plato servers support extended functions allowing fine control of server based operations
from any remote device using the icons as a guide to function. If you are unsure what
function each icon provides, long press the icon and a small popup will describe the function.
Some functions are only available on Plato devices, others are applicable to mobile devices
running the Plato App. The friendly name should allow you to identify which device you are
talking to in each case.
14.1.1. Info
The info option shows the following information: Version, Media usage, Hardware
information, EULA
Version
Use the Version option to show current app version number. From here it is possible to
check the version history, check for updates, and force an update using the buttons
provided.
Page 77
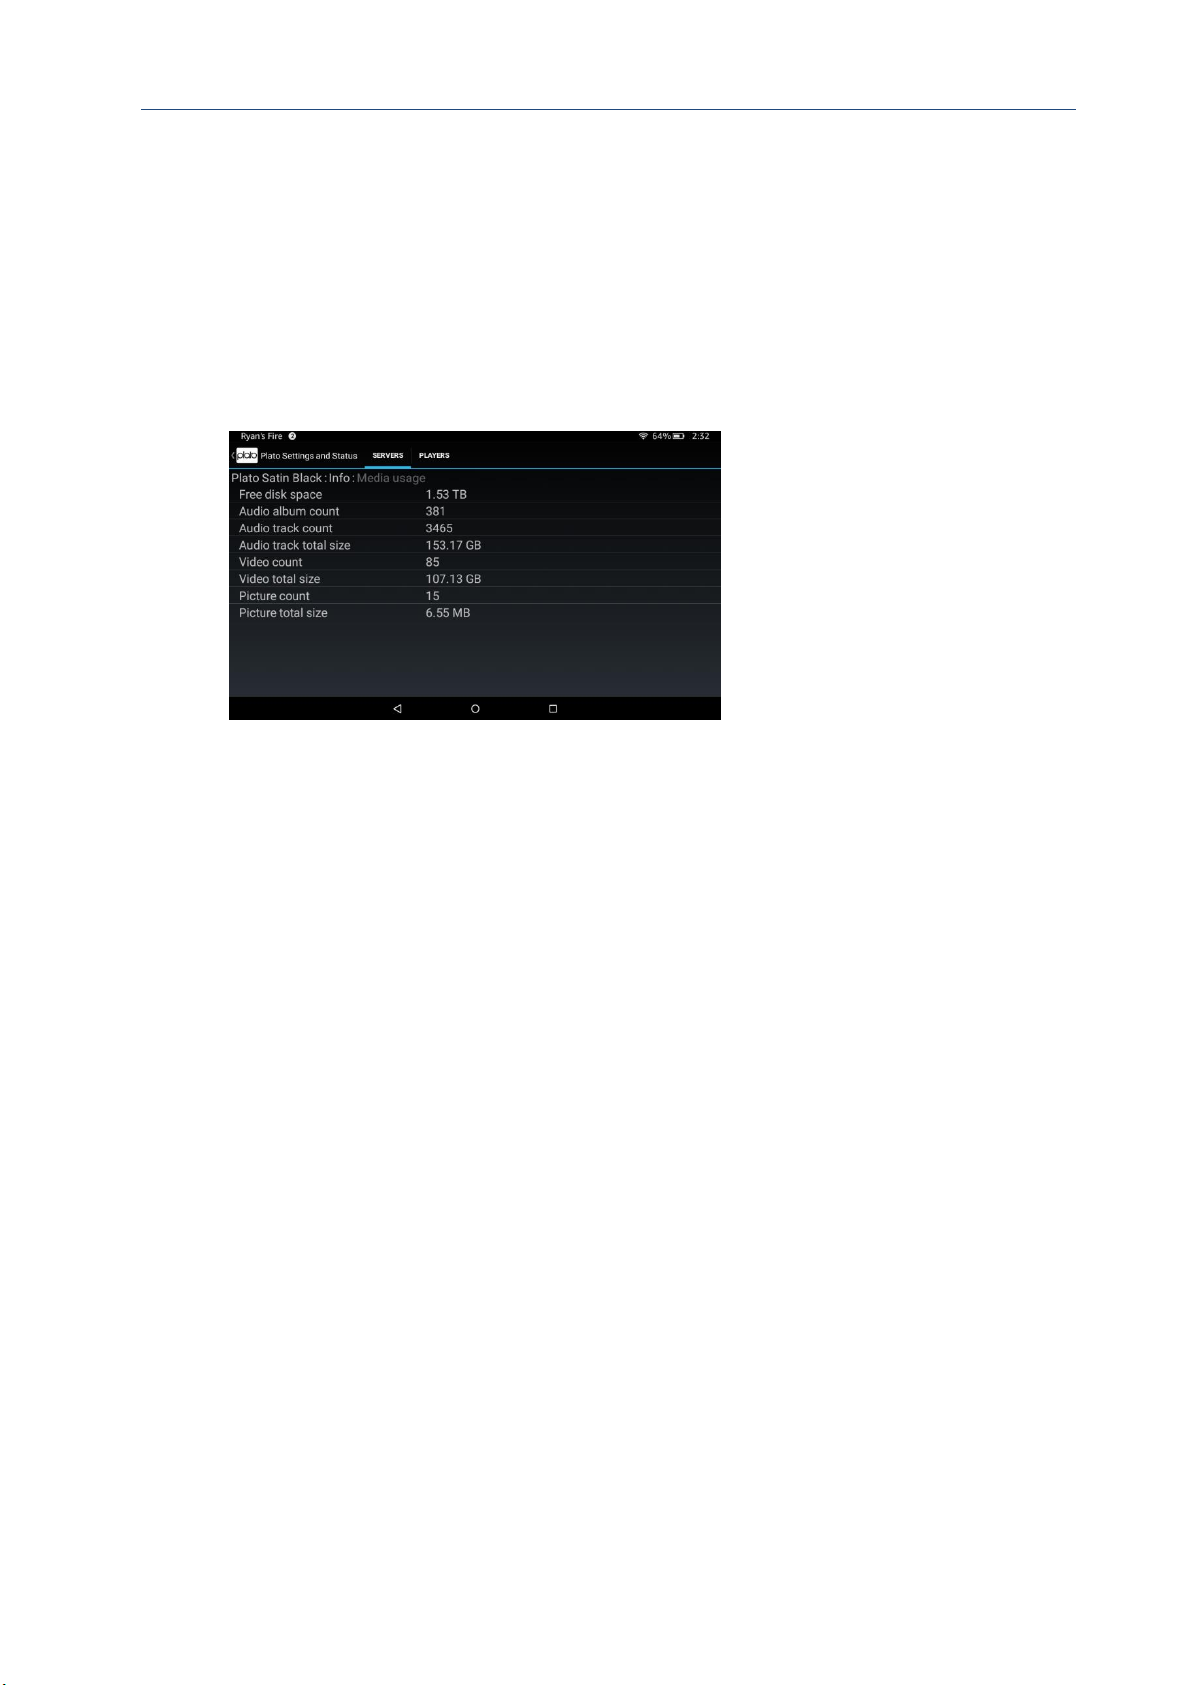
Plato Complete Guide V1.3.3
Convert Technologies 76
Note that mobile devices will be directed to the Google Play store, or Amazon App store
(depending on individual device support) for app updates. Plato devices will update directly
using our own Convert Technologies service.
Note that updates to the Plato device will require access to its touch screen. Follow all onscreen prompts to complete the update process.
Media Usage
The media usage option shows current drive use statistics on the selected server.
Hardware Info
The hardware info option displays hardware revision numbers of all hardware components.
Sometimes this information is useful in dealing with support issues.
This information is sent automatically in all debug logs (see section 14.1.6).
EULA
Select the EULA option to display the end user license agreement. The EULA has to be agreed
on the first run of Plato, but can be viewed at any time using this option.
14.1.2. Progress
The progress page is used to report progress of time-consuming server based operations.
These operations include:
• Export,
• import, including CD ripping,
• downloads from HighResAudio website,
• media rescan,
• meta data tag editing.
Each operation includes a progress bar which indicates how much of the process has
completed. We also use this page to show basic error reporting where appropriate.
Page 78
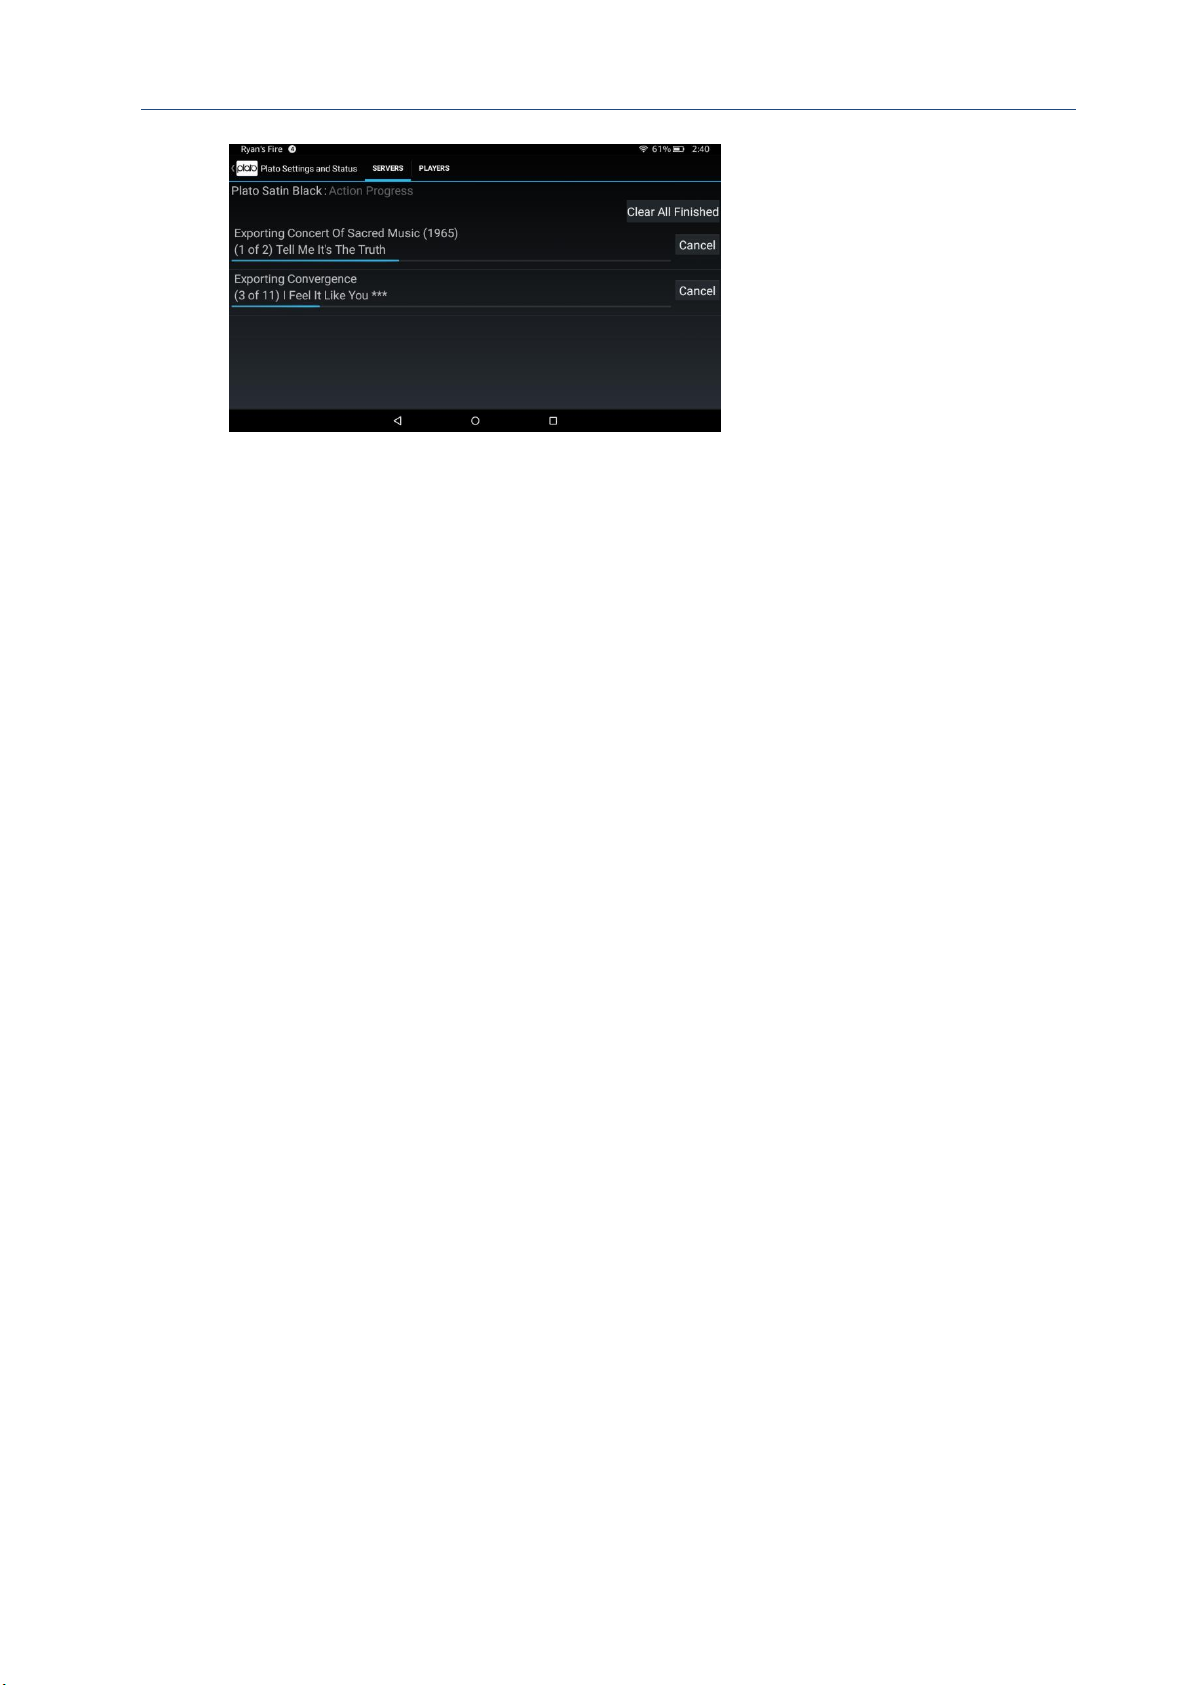
Plato Complete Guide V1.3.3
Convert Technologies 77
14.1.3. Backup and restore
Plato now supports automated backup and restore of all media data. Use this option to
configure automated backups, or restore data from a previous backup.
See section 17 for more details on backup and restore.
14.1.4. Media Rescan
Media rescan is sometimes required to regenerate internal audio structures required for
some of Plato’s advanced features.
This process can take a long time to complete, it’s progress is reported via the server
progress page as described above. While the rescan is running, basic Plato operations may be
compromised as the system is busy with the rescan operation.
Media rescan should only be performed at the request of Convert Technologies technical
staff.
14.1.5. Settings
The settings page provides a means of configuring Plato for your specific system and
requirements. The following options are available:
Friendly Name
Defines the UPnP friendly name displayed in Plato’s device lists.
Standby Timer
Defines the time to enter low power standby state after inactivity.
Always keep media server awake
Ensures server operations are left active at all times. Enabling this mode will ensure the
system is immediately responsive to new requests for media, but will consume more power
in its low power state.
Power amplifier mode
Provides a means of forcing the power amplifier to be off, even when fitted. This will result in
quieter pre-amplifier operation, useful for demonstrating pre-amplifier only operation in a
fully loaded Plato system.
Page 79

Plato Complete Guide V1.3.3
Convert Technologies 78
Generally this option should be left as Powers on/off with pre-amplifier.
Maximum cache file age
Sets the maximum size of the record cache in days. The record cache is used to store raw
recorded data on the internal disk drive. Track start and end points can only be edited if the
raw data exists in the record cache, so once recorded data has aged out of the record cache
it will no longer be possible to edit track start and end points.
Generally this should be left at the default setting.
Maximum cache size
Sets the maximum record cache size in GB, as opposed to days suggested above. This setting
is applied along with the age setting above to determine cache entries.
Output sampling rate
Provides a means of limiting the digital output rates of optical digital outputs.
Save bookmarks for audio files
Enables bookmark save for audio files. By default bookmarks are only stored for video files.
Remote deletion
Allows deletion of media data from a remote mobile device. If this option is disabled it is only
possible to delete media data from Plato’s touch screen.
Security PIN
If set the security PIN will be required to perform delete operations on this server.
Show hidden files in file manager
Enable this option to show hidden Android files in the file manager view.
14.1.6. Debug
Use the debug option under the instruction of Convert Technologies support staff to collect
debug information. This can be very useful after a specific problem or system bug.
The log process is fully automated and involves collecting internal configuration and logging
information, which is then emailed to Convert Technologies. Note that no personal
information, or user data is collected during this process.
When a log is requested a popup prompts for user name, and a short description of the
reason for the log collection. Note that adding this information is not required but can be
very helpful in helping us deal with support cases more quickly and effectively.
14.2. Factory Reset
The factory reset option will return the Plato app configuration to its factory default settings.
This will have no effect on user data (including media files, and recorded data), or additional
Page 80
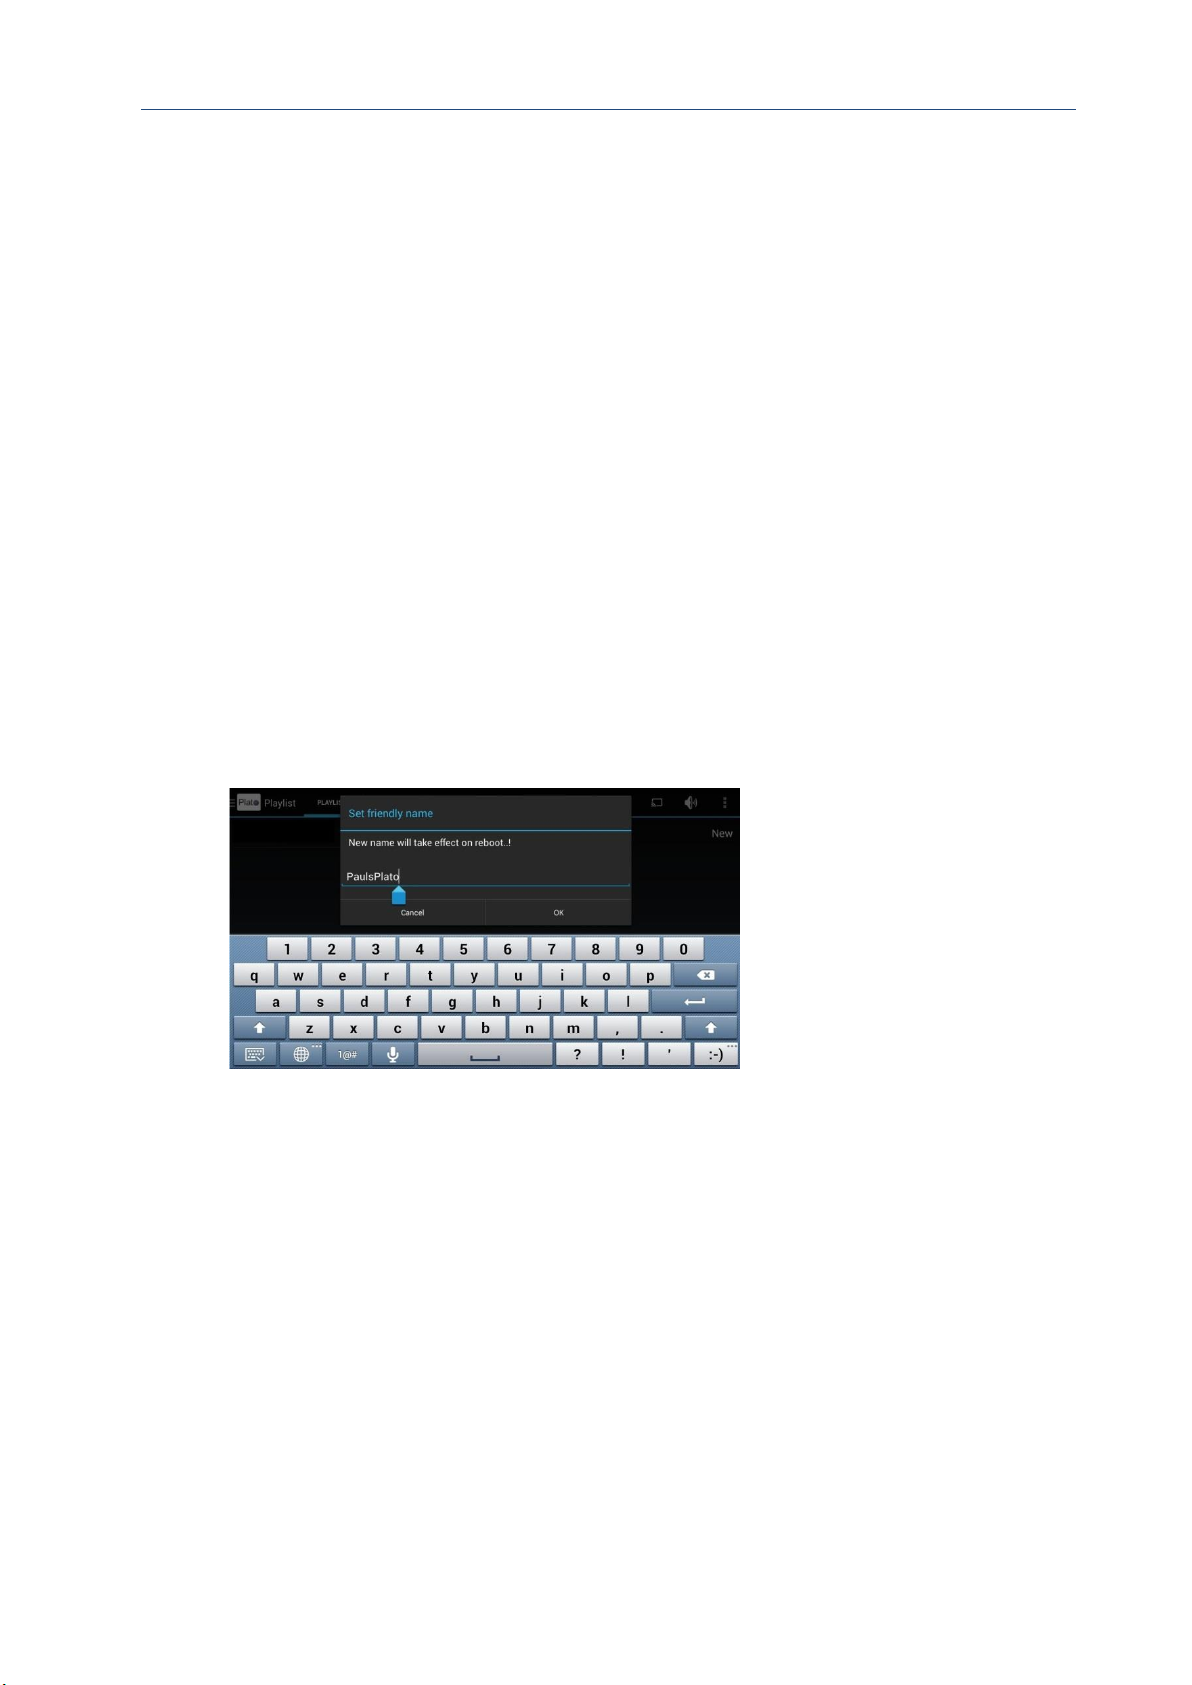
Plato Complete Guide V1.3.3
Convert Technologies 79
apps which have been installed on Plato since its installation. However it will remove all user
based configurations made to Plato since installation.
14.3. Exit
Use Exit to exit the Plato app. The app should be exited prior to powering the unit off.
14.4. UPnP friendly name
It is strongly recommended that you set an individual friendly name for each device running
the Plato app on your home network.
Plato assigns a unique default name based on Plato-device_info when the app starts. This
name is used in the Device Selection Lists on many of Plato’s app controls. With the Plato
system itself and a number of tablets and smartphones also running the Plato control app it
can get very confusing determining which device you are accessing if they all have the similar
names.
Select this option to change the name of your Plato unit, or tablet/smartphone running the
Plato application.
Select the option and type in new name.
Click OK when done.
You must restart the Plato App for the new name to take effect.
Note that in all device lists the text ‘(Local)’ indicates the device that the Plato app is
currently running on.
Page 81

Plato Complete Guide V1.3.3
Convert Technologies 80
15. Operating Plato using an Air Mouse remote controller
If you do not wish to use a separate tablet or smartphone controller, it is possible to operate
Plato using commercially available, Android-compatible remote pointer devices, commonly
called an Air Mouse. For ease of use this type of operation would require connection to an
HDMI screen to provide visual feedback on what Plato is doing.
This could be useful if you want to drive Plato without using an Android or iOS tablet or
smartphone, or if you would like to try controlling a third party Android application running
on Plato.
First, configure the screen in HDMI Mirror Mode (see section 3.8.2). Normally the Air Mouse
will have a USB dongle which receives radio control signals from the hand-held controller.
This should be inserted into one of Plato’s spare USB slots. Note that you may need to reboot
Plato after inserting the Air Mouse dongle.
Once the Air Mouse is plugged in and running, its pointer should be visible on the HDMI
screen. As you wave the controller through space, the on-screen pointer will match your
movements across the screen. Instead of activating a control via the touchscreen, simply
move the on-screen pointer to the Android control you want to modify, and use the action
button on the remote Air Mouse to activate the control.
Certain devices are equipped with basic media controls (play, pause, mute etc.) and these
should operate Plato’s media player as you would expect.
The most useful devices are also equipped with a full QWERTY remote keyboard. In this case
whenever an edit-text control is activated text entry should be made via the Air Mouse
keyboard which will override any in-app keyboard control.
The following devices are known to work with Plato:
• MINIX NEO A2 Lite
• Rii mini i25
• Rii mini K08
Page 82
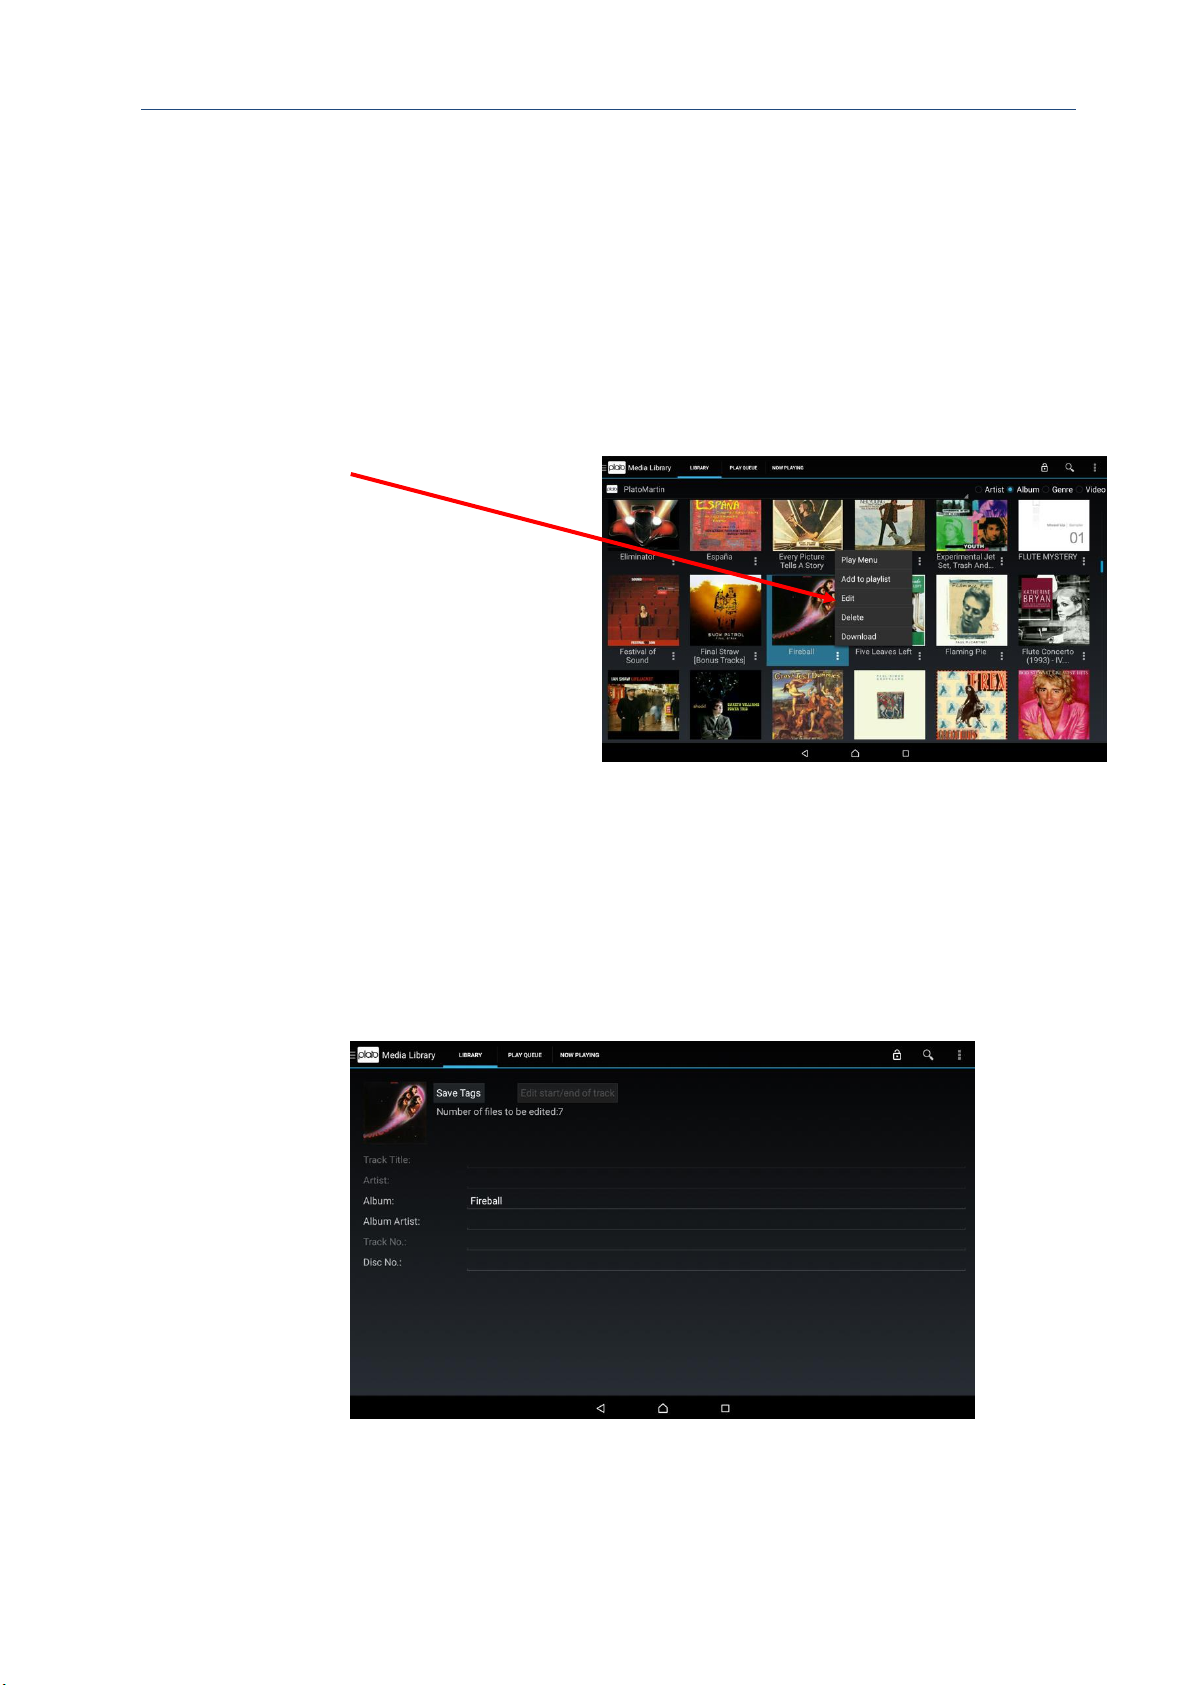
Plato Complete Guide V1.3.3
Convert Technologies 81
16. Advanced Media Library editing options
There are a variety of editing options available to modify META data tags in your Media
Library.
For all options, you must choose the Edit option for a song or album.
To access the edit menu for basic editing of song or album details
1. Press the More Options icon (three vertical dots) next to the track or album you wish to
edit.
2. Select Edit from the pop up menu.
Song/Album details are displayed.
You can select non-greyed out data and then use the Android keypad to change details.
Note: You can edit ALL tags if you selected a single track but only album specific tags if
you selected an album.
Page 83
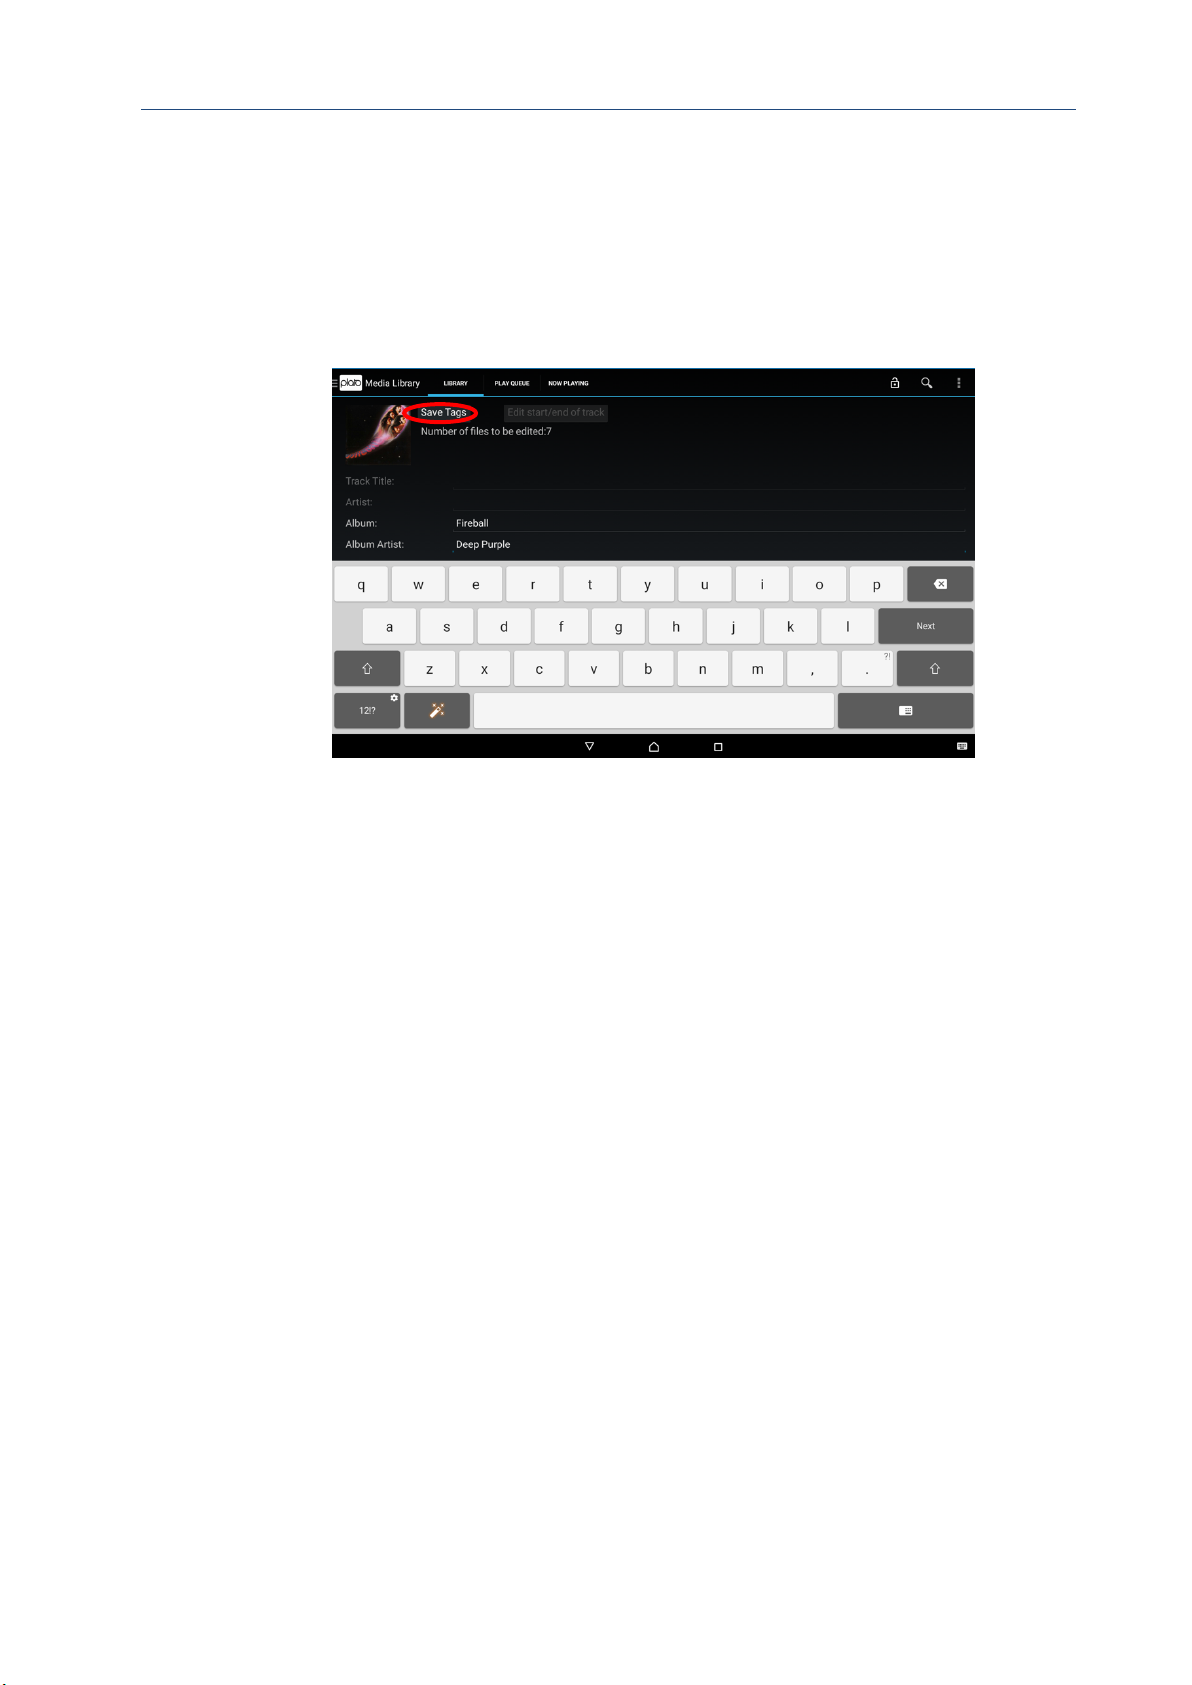
Plato Complete Guide V1.3.3
Convert Technologies 82
3. Select Save Tags after making any changes.
4. Progress on saving the changes can be seen as a progress bar at the bottom of your
screen. Press the ‘Clear’ button after saving edited tags.
Note that Android uses album title and album artist to define an album. So, all tracks with
the same album title and album artist will be grouped into a single album on the Media
Library view.
Page 84
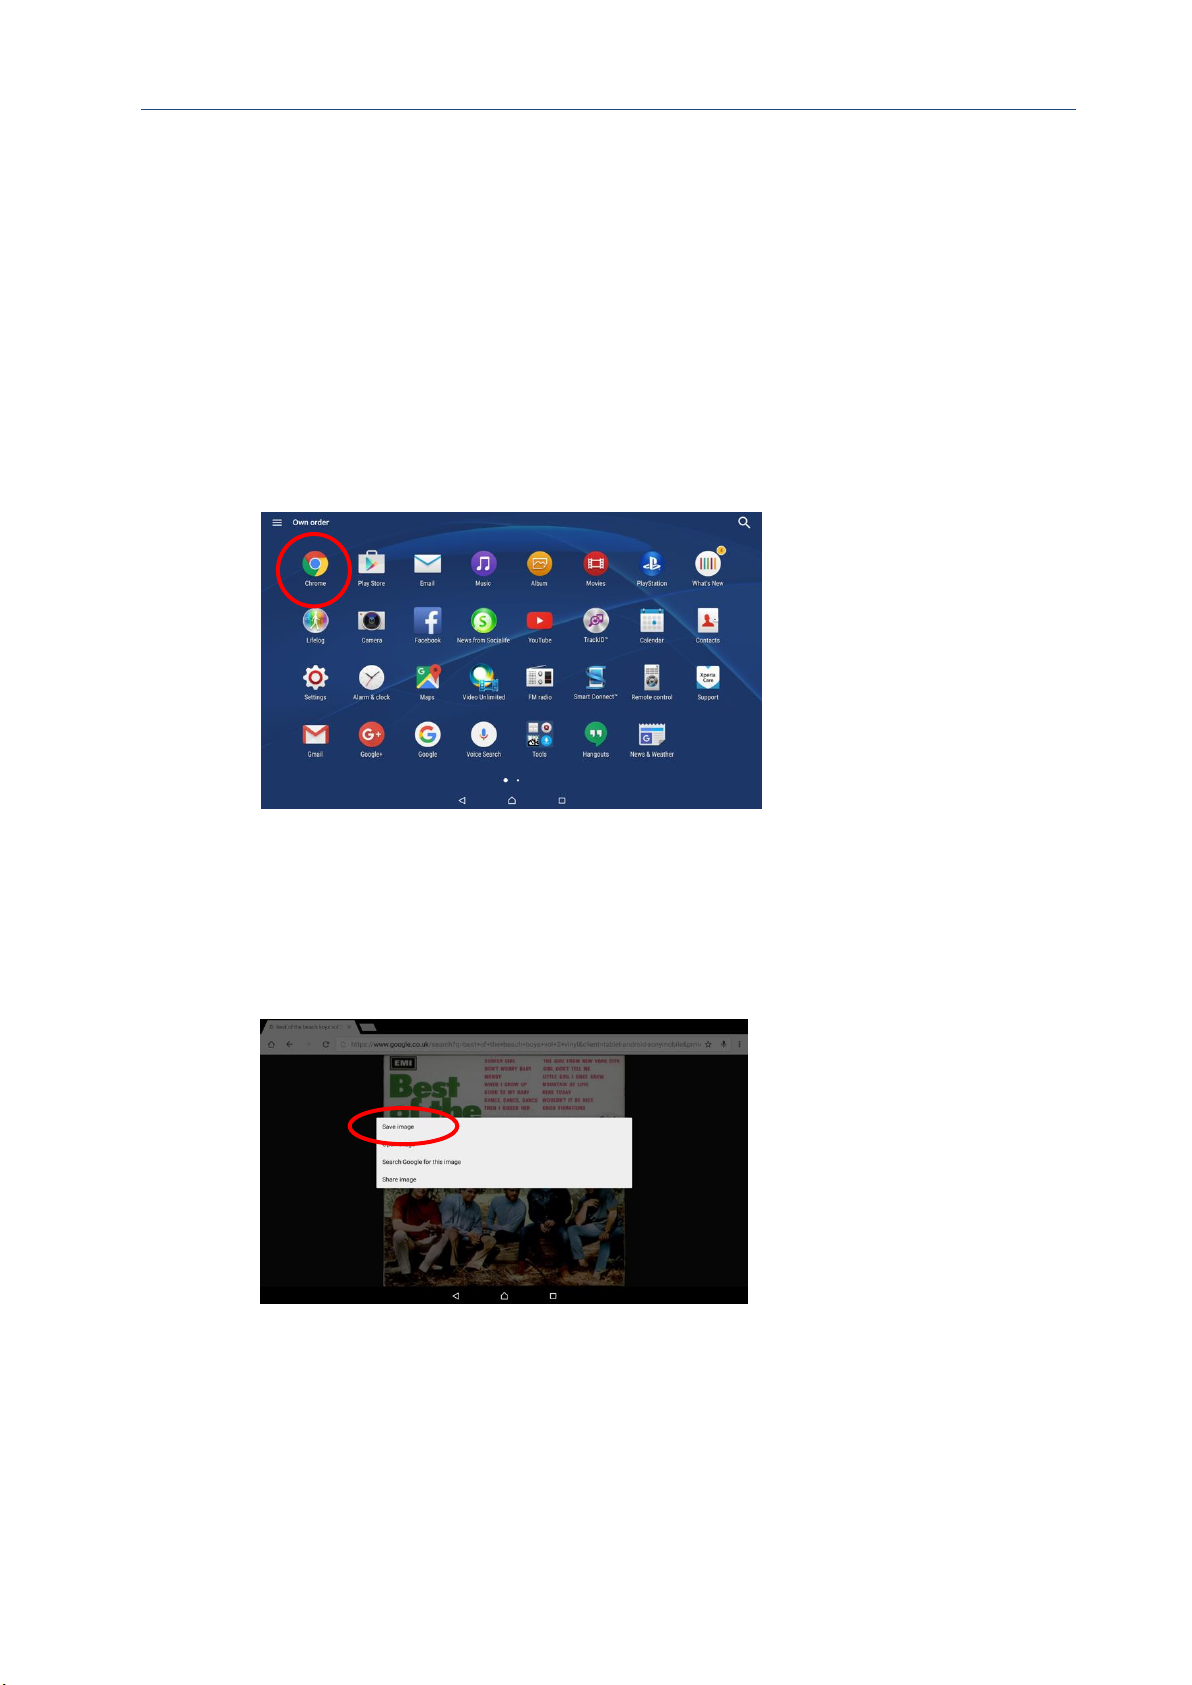
Plato Complete Guide V1.3.3
Convert Technologies 83
16.1. Editing Artwork
Gracenote occasionally returns an incorrect album art thumbnail image. This can happen
when recording a ‘Greatest Hits’ or ‘Best of’ album, or if Gracenote is unable to determine
the track being played.
The following example shows changing a thumbnail image for Bob Marley’s greatest hits
‘Legends’ album.
1. Obtain the correct image
This requires you to use a web browser app.
2. Use the selected web browser to search for a
suitable image. Then long press the artwork to
either ‘download image’ or ‘save Image’ to your
tablet. This specific action is browser dependant.
Page 85
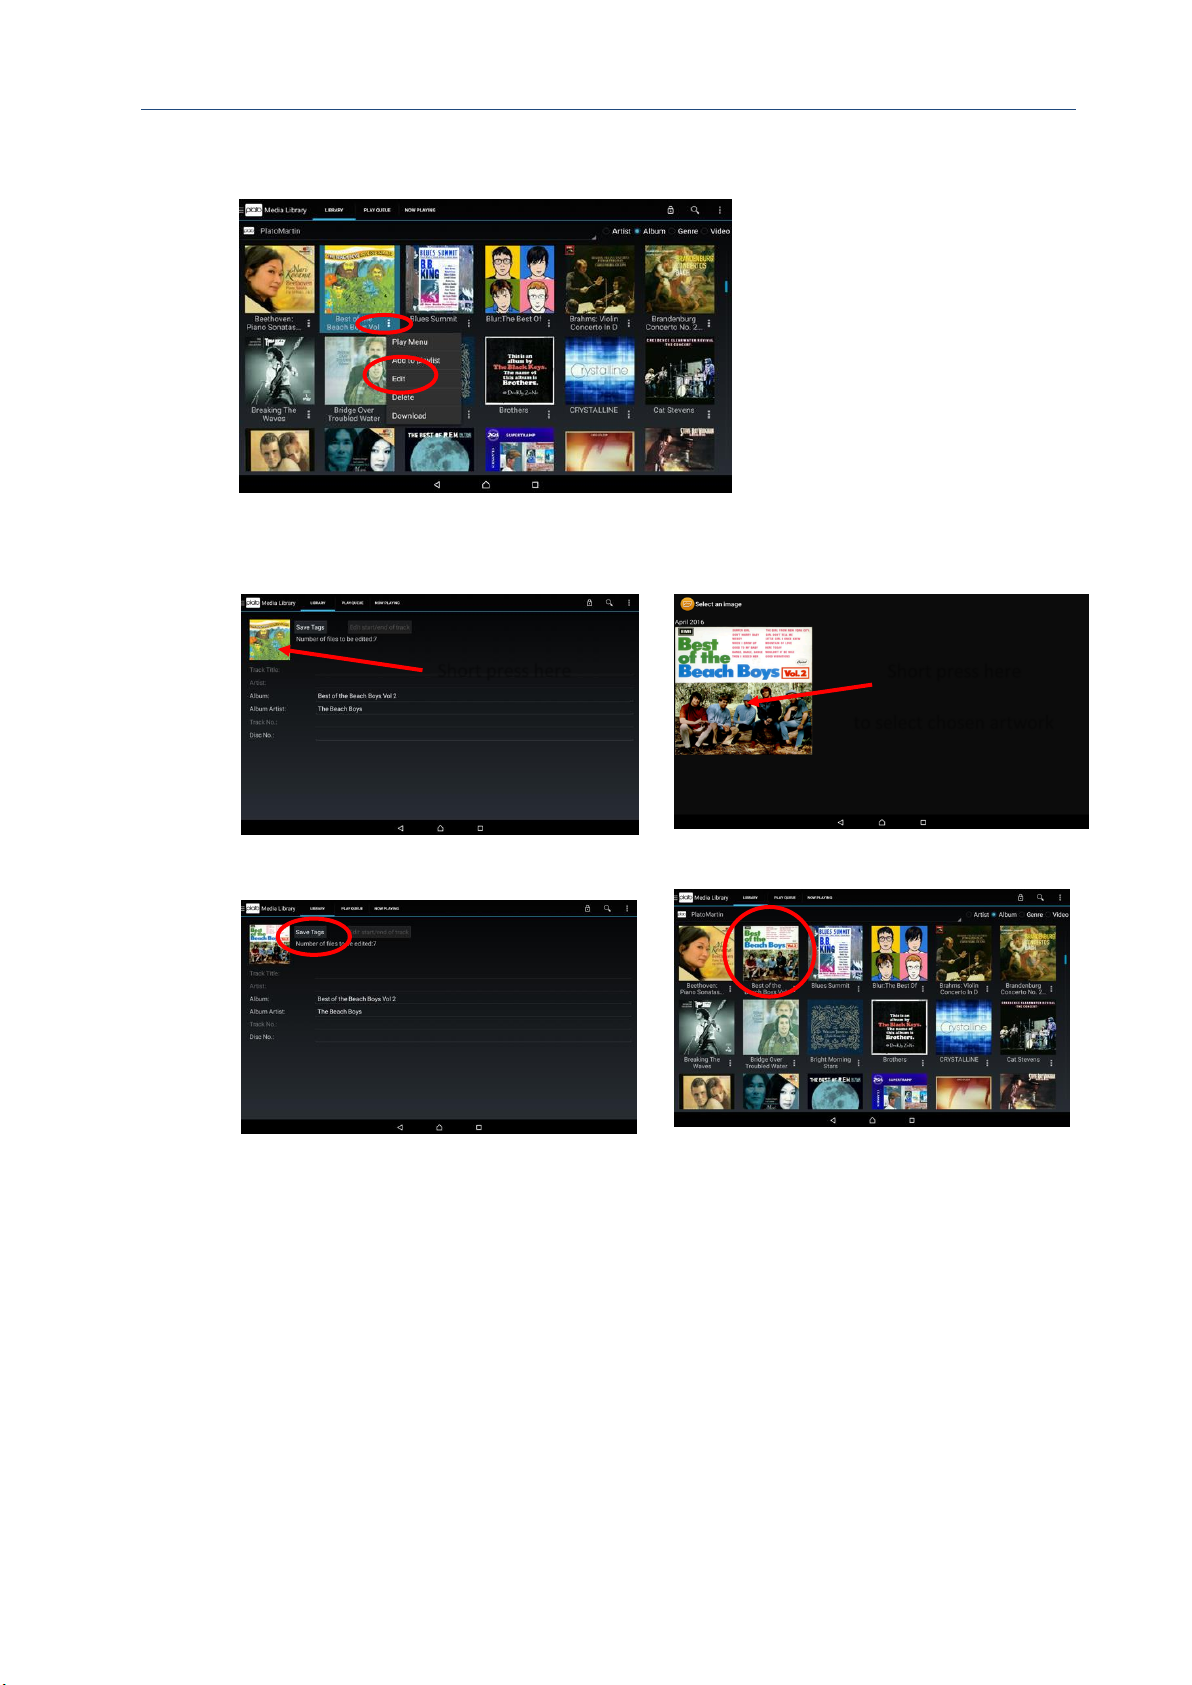
Plato Complete Guide V1.3.3
Convert Technologies 84
3. In the Media Library, press the More Options icon
for the album and select edit from the pop up list.
4. Swap incorrect image for new one. Note that
exactly how the image browser looks depends on
the version of Android running on your device.
5. Select Save Tags to keep new artwork.
16.2. Adjust start/end points of a track
In the event that Gracenote returns a track length that is different to what you have
recorded, you may want to edit the recorded audio file by trimming either the start or the
end points. This happens when Gracenote retrieves meta data from a track that has
Short press here
Short press here
to select chosen artwork
Page 86
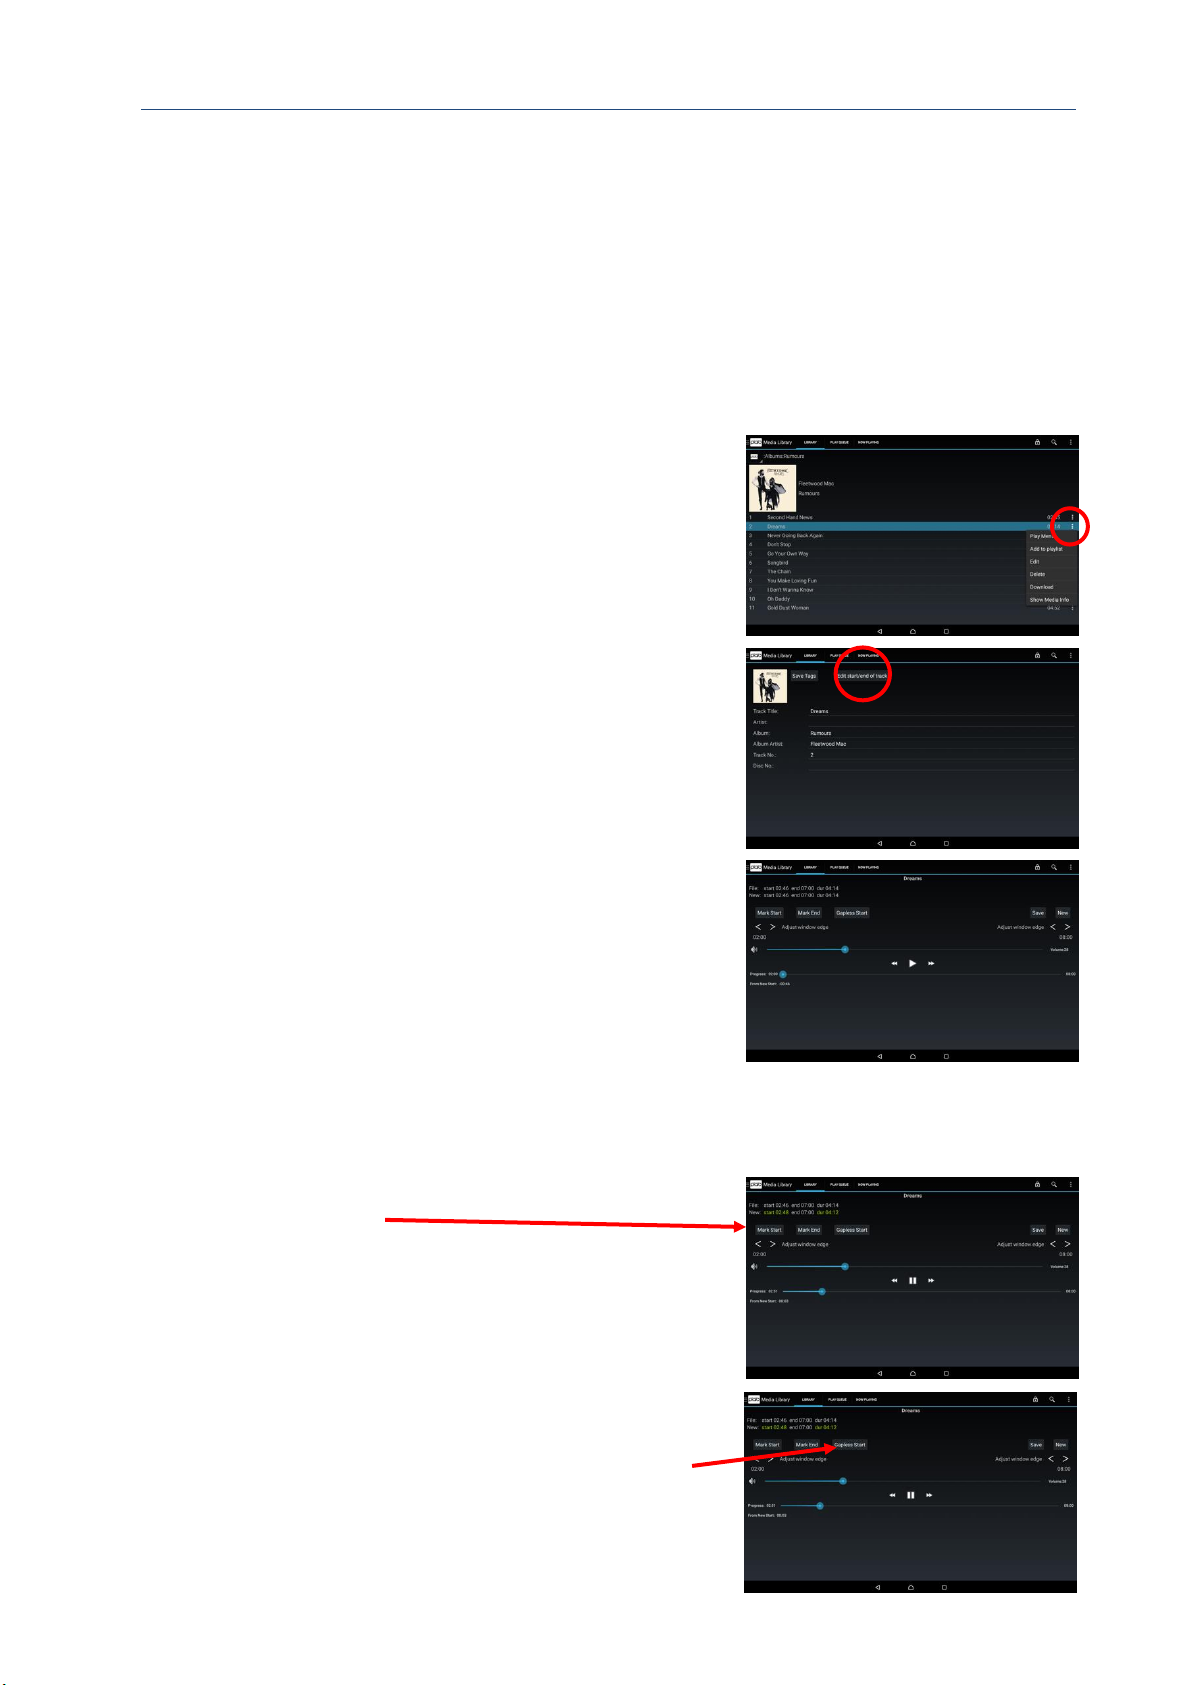
Plato Complete Guide V1.3.3
Convert Technologies 85
appeared on numerous albums and then selects one that is different to the one you’re
actually recording.
Note: The ‘Edit Start/End of track’ button will only appear if the raw data is still in the record cache. If you
recorded the track a long time ago, or have recorded lots of other material in the meantime, this data may be
deleted and you won’t be able to edit these files anymore.
To edit the recorded track
1. Press the More Options icon for the track and
then select Edit from the pop up menu.
2. Select Edit start/end of track.
The edit screen is displayed.
In this example, the window starts 2 minutes 46
secs into the recording and finishes 8 minutes into
the recording.
This window is sufficient to contain the track
“Dreams”, which starts at 2 min 48 sec and
finishes at 7 min 00 sec.
3. Select (Play) and then press Mark Start at the
point you want the track to really start.
Here, the Mark Start button was pressed at 2 min
and 48 sec.
If the track had started before 2 minutes, then
pressing the left Adjust window edge arrow would
move the window edge back by 1 minute per
button press.
This will let you get to a point before the track
really starts.
Alternatively, if you are happy that the previous
track ends at the right time, you can press the
Gapless Start button (greyed out if this is the first
Page 87
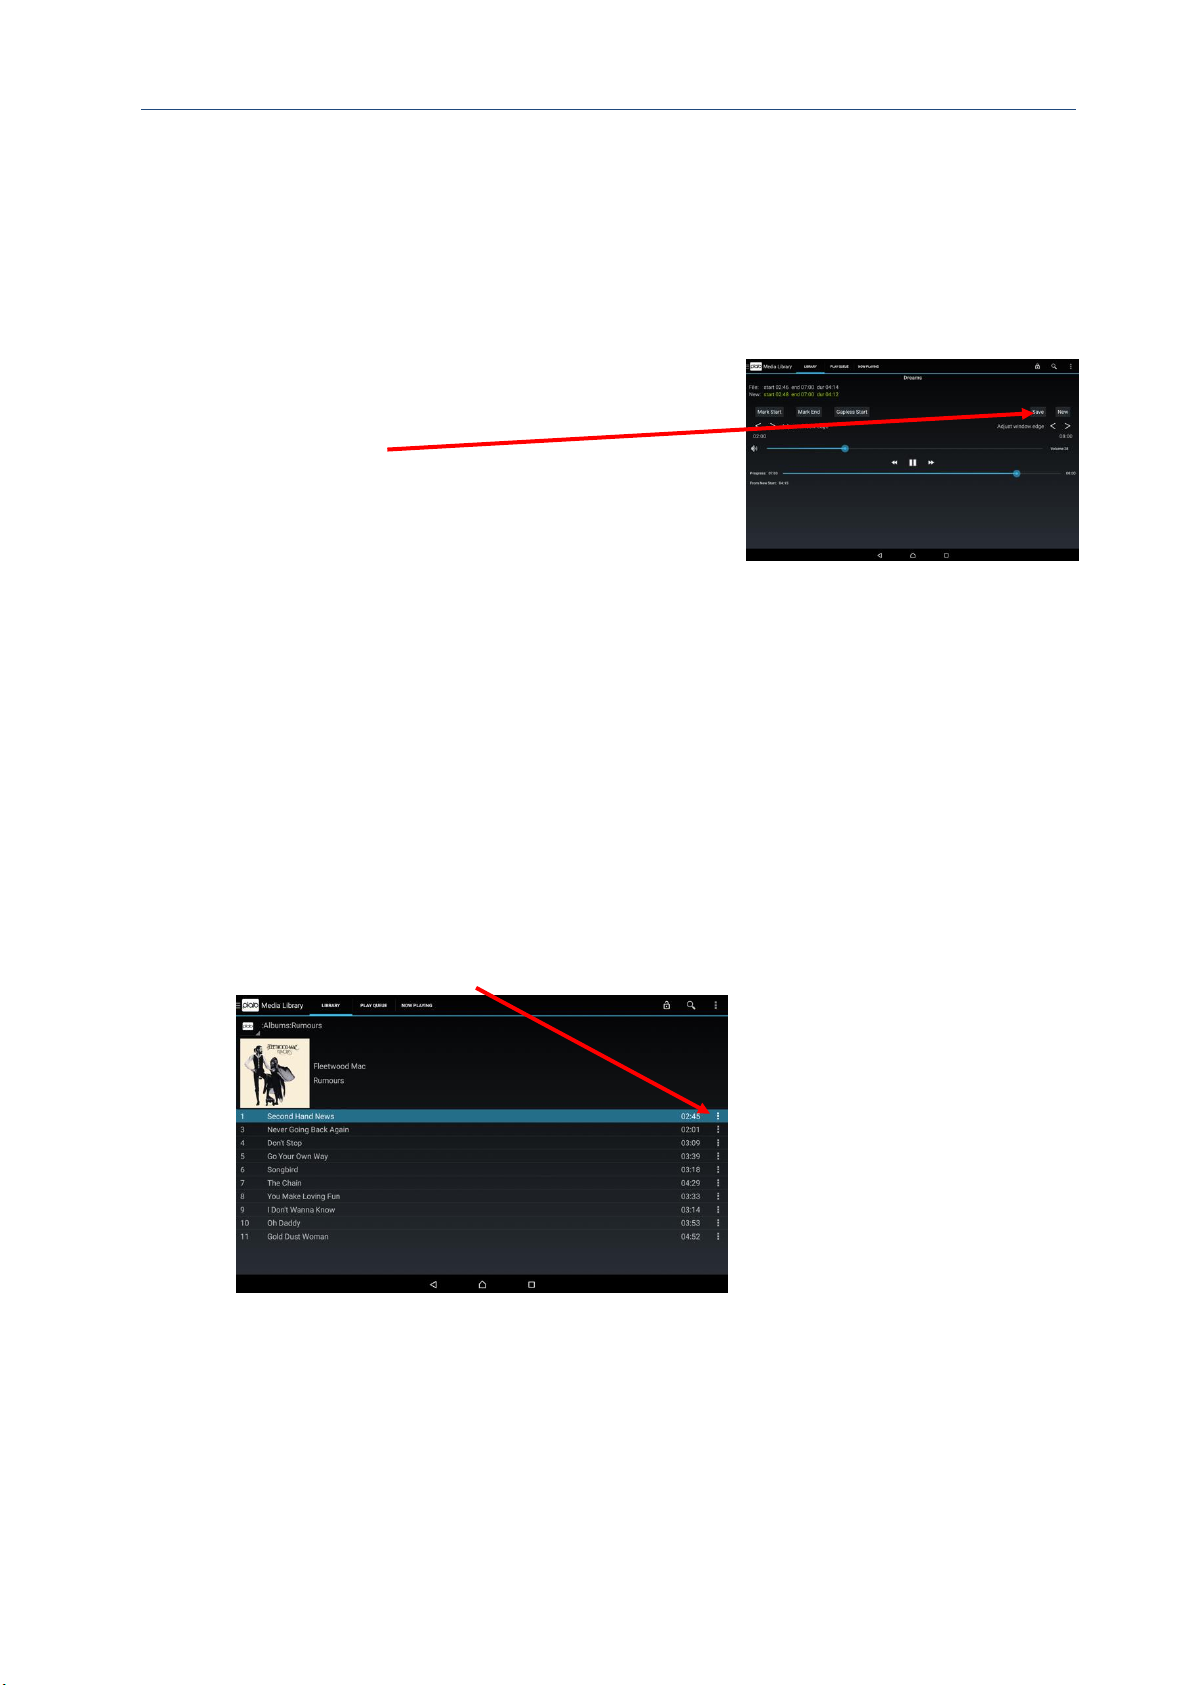
Plato Complete Guide V1.3.3
Convert Technologies 86
track of the album). This will set the start point of
this track to the end of the previous one, with no
gap.
4. Select the Mark End button at the point you want
the track to end. In this example, the button was
pressed at 7 min and 00 sec. If the track end was
beyond the window edge at 8 minutes, then press
the right Adjust window edge right arrow to move
the window edge by 1 min, to 9 min 00 sec. This
will allow you to get beyond the end of the track.
5. Select Save.
This will re-write the flac (Free Lossless Audio
Codec) file for ‘Dreams’ with the new start and
end points.
6. Press the Android return button to return to the
previous screen.
16.3. Creating a missing track
Occasionally, a track can be missed out if it was not recognised by Gracenote as anything at
all. This means that a flac file for the track has not been created but the raw music recording
is still in Plato’s record cache, as Plato records everything from the start to the end of a
recording session.
To create the missing flac (Free Lossless Audio Codec) file and add it to the Media Library
Note that in this song list, track 2 is missing.
1. Press the More Options icon on track 1.
Page 88
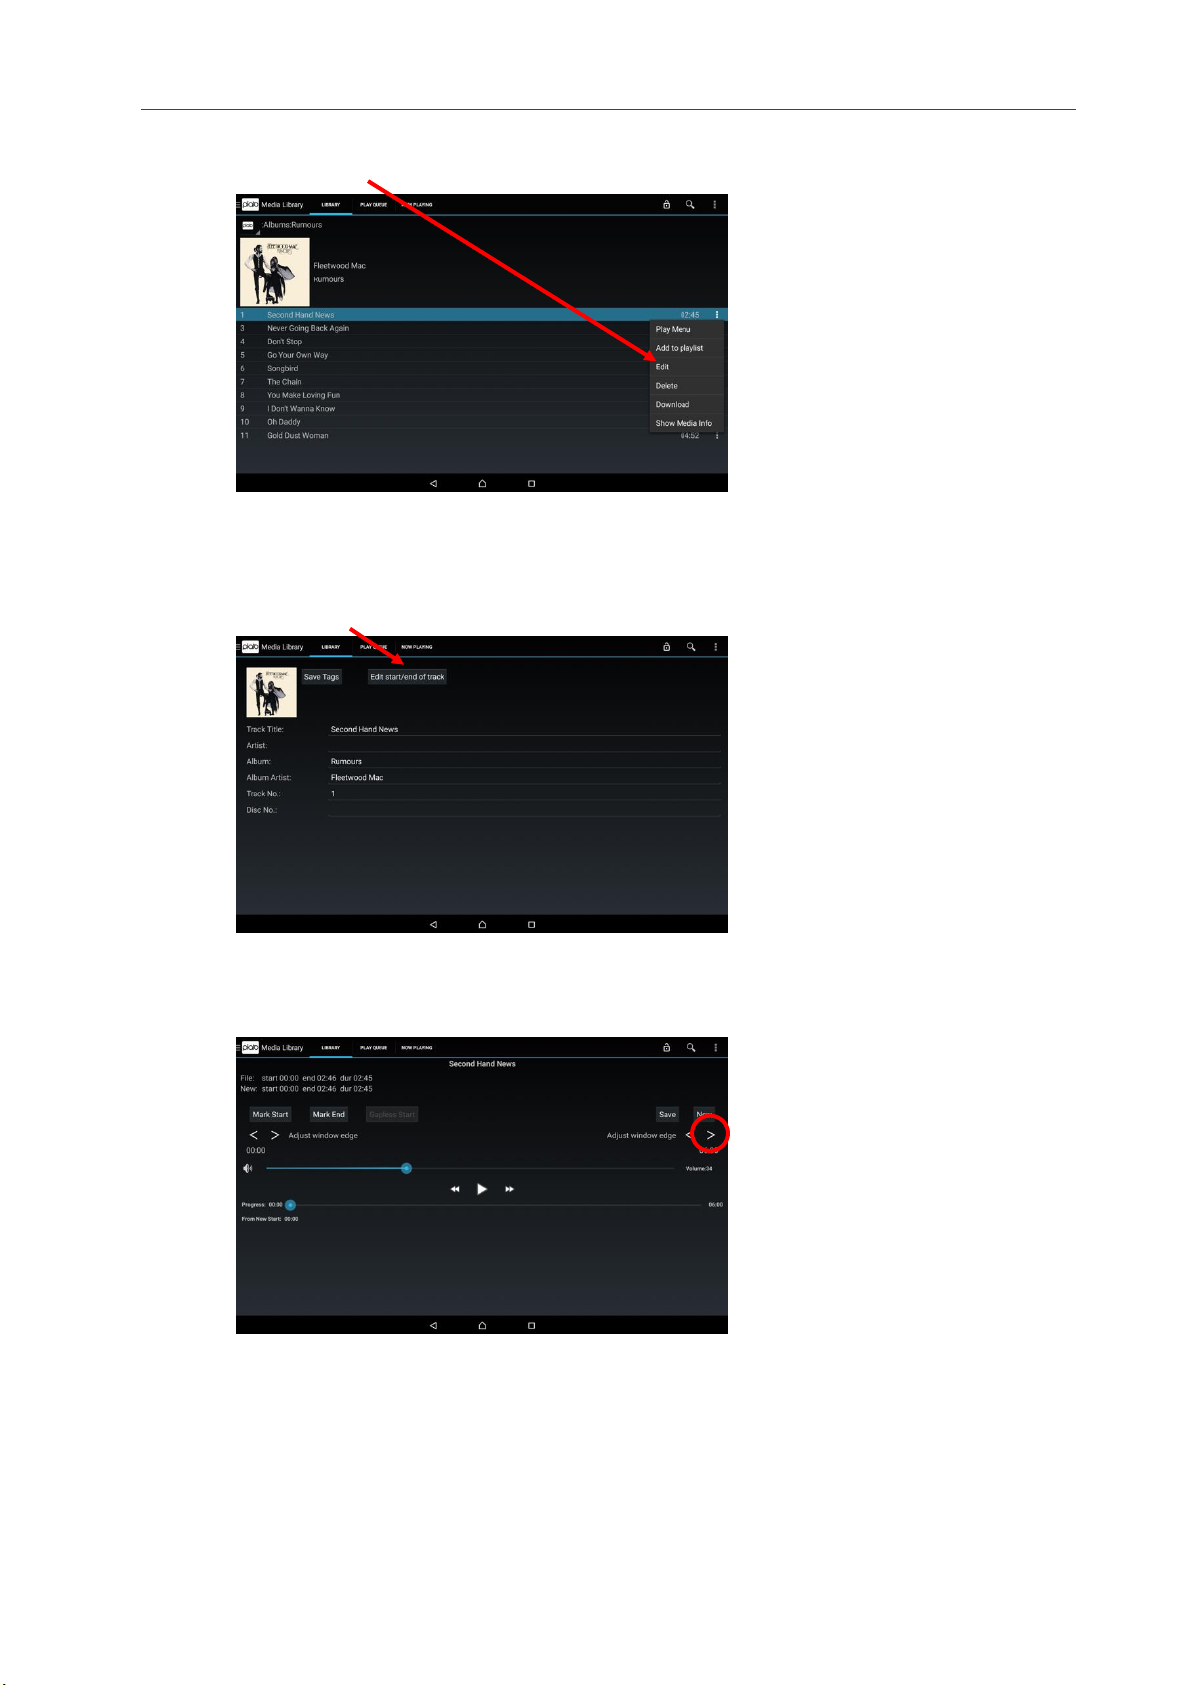
Plato Complete Guide V1.3.3
Convert Technologies 87
2. Select Edit.
3. Select Edit start/end of track.
4. Select the Adjust window edge right arrow several
times to extend the window size to large enough to
cover the track after ‘Second Hand News’.
5. Select (Play) and then select the Mark Start
button where the next track starts. Here, it was
pressed at 2 min and 46 sec.
Page 89
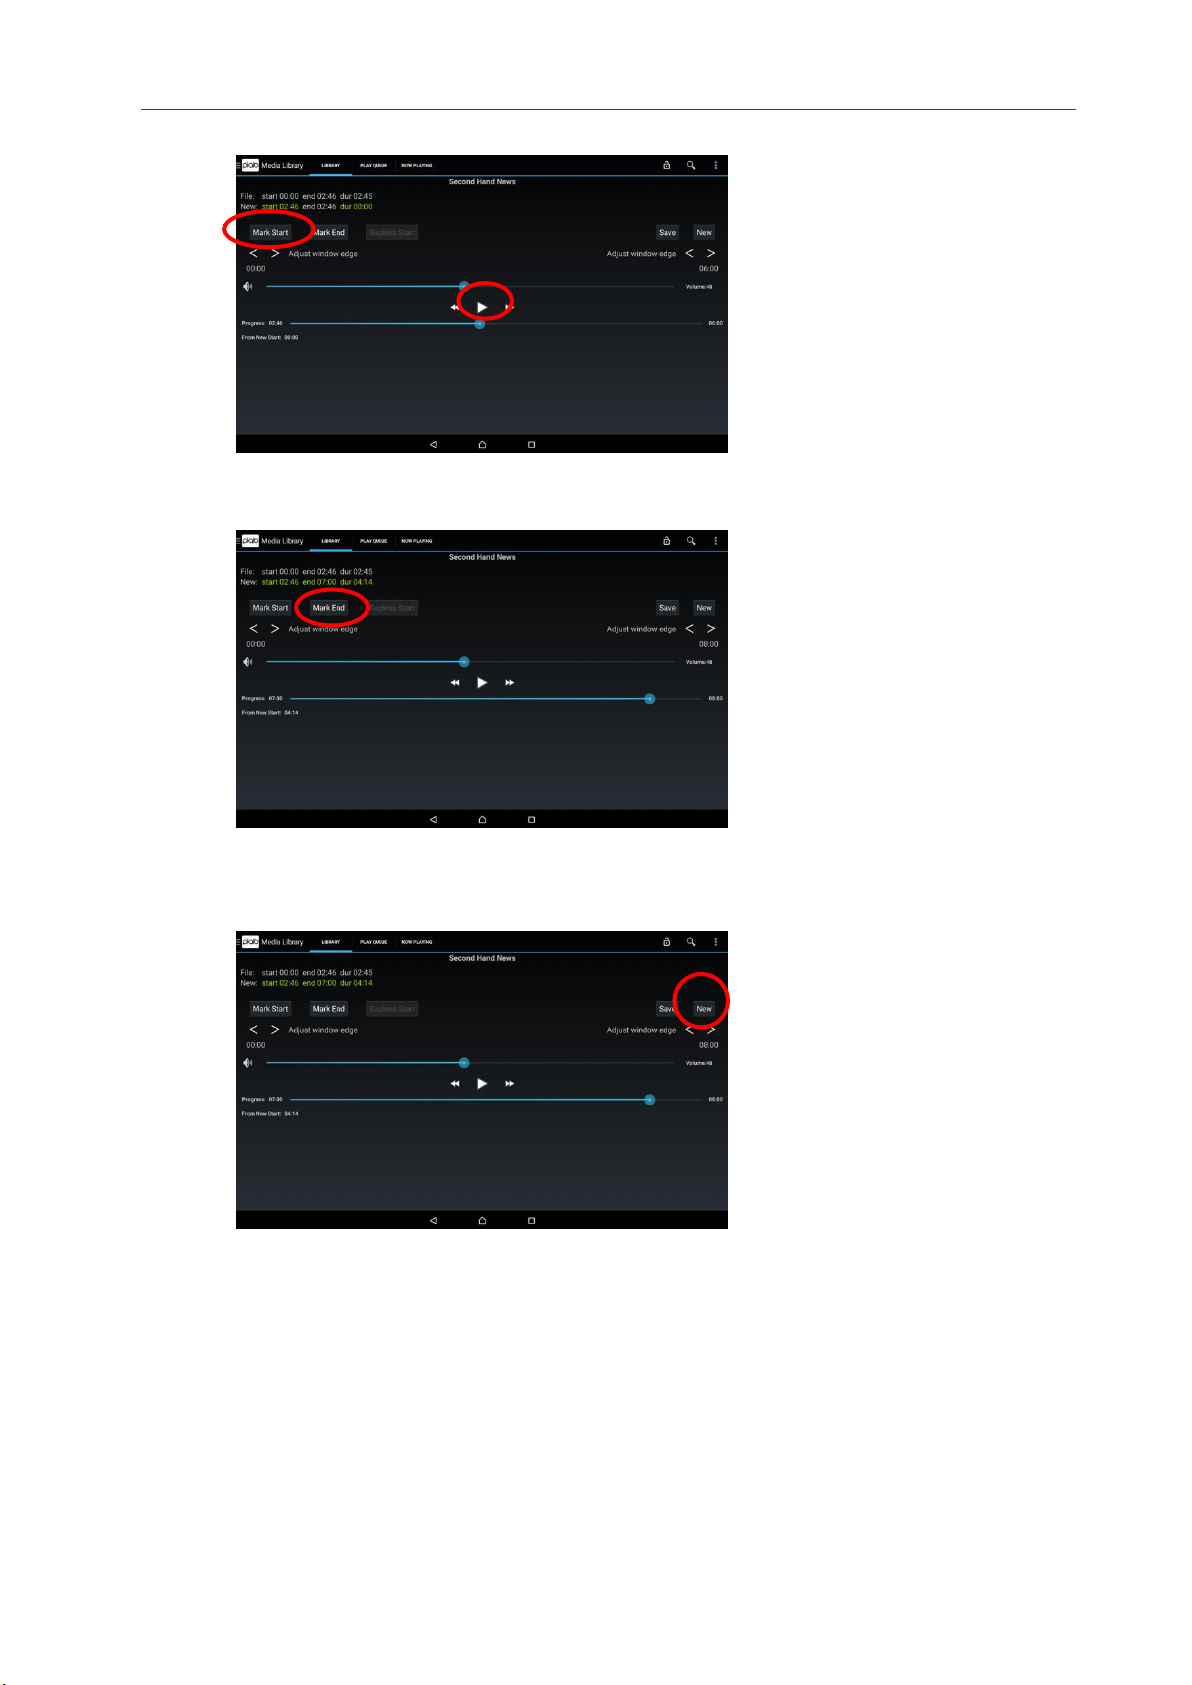
Plato Complete Guide V1.3.3
Convert Technologies 88
6. Select the Mark End button where the next track
ends. Here, it was pressed at 7 min and 00 sec.
7. Select the New button. This will set a new track
that starts at 2 min 46 sec and ends at 7 min 00
sec.
8. Use the pop up dialog to enter the track specific
tags. The album specific tags, including the
artwork, will be copied from the current track,
track 1. Change the title and track number and
press OK to save this new track
Page 90
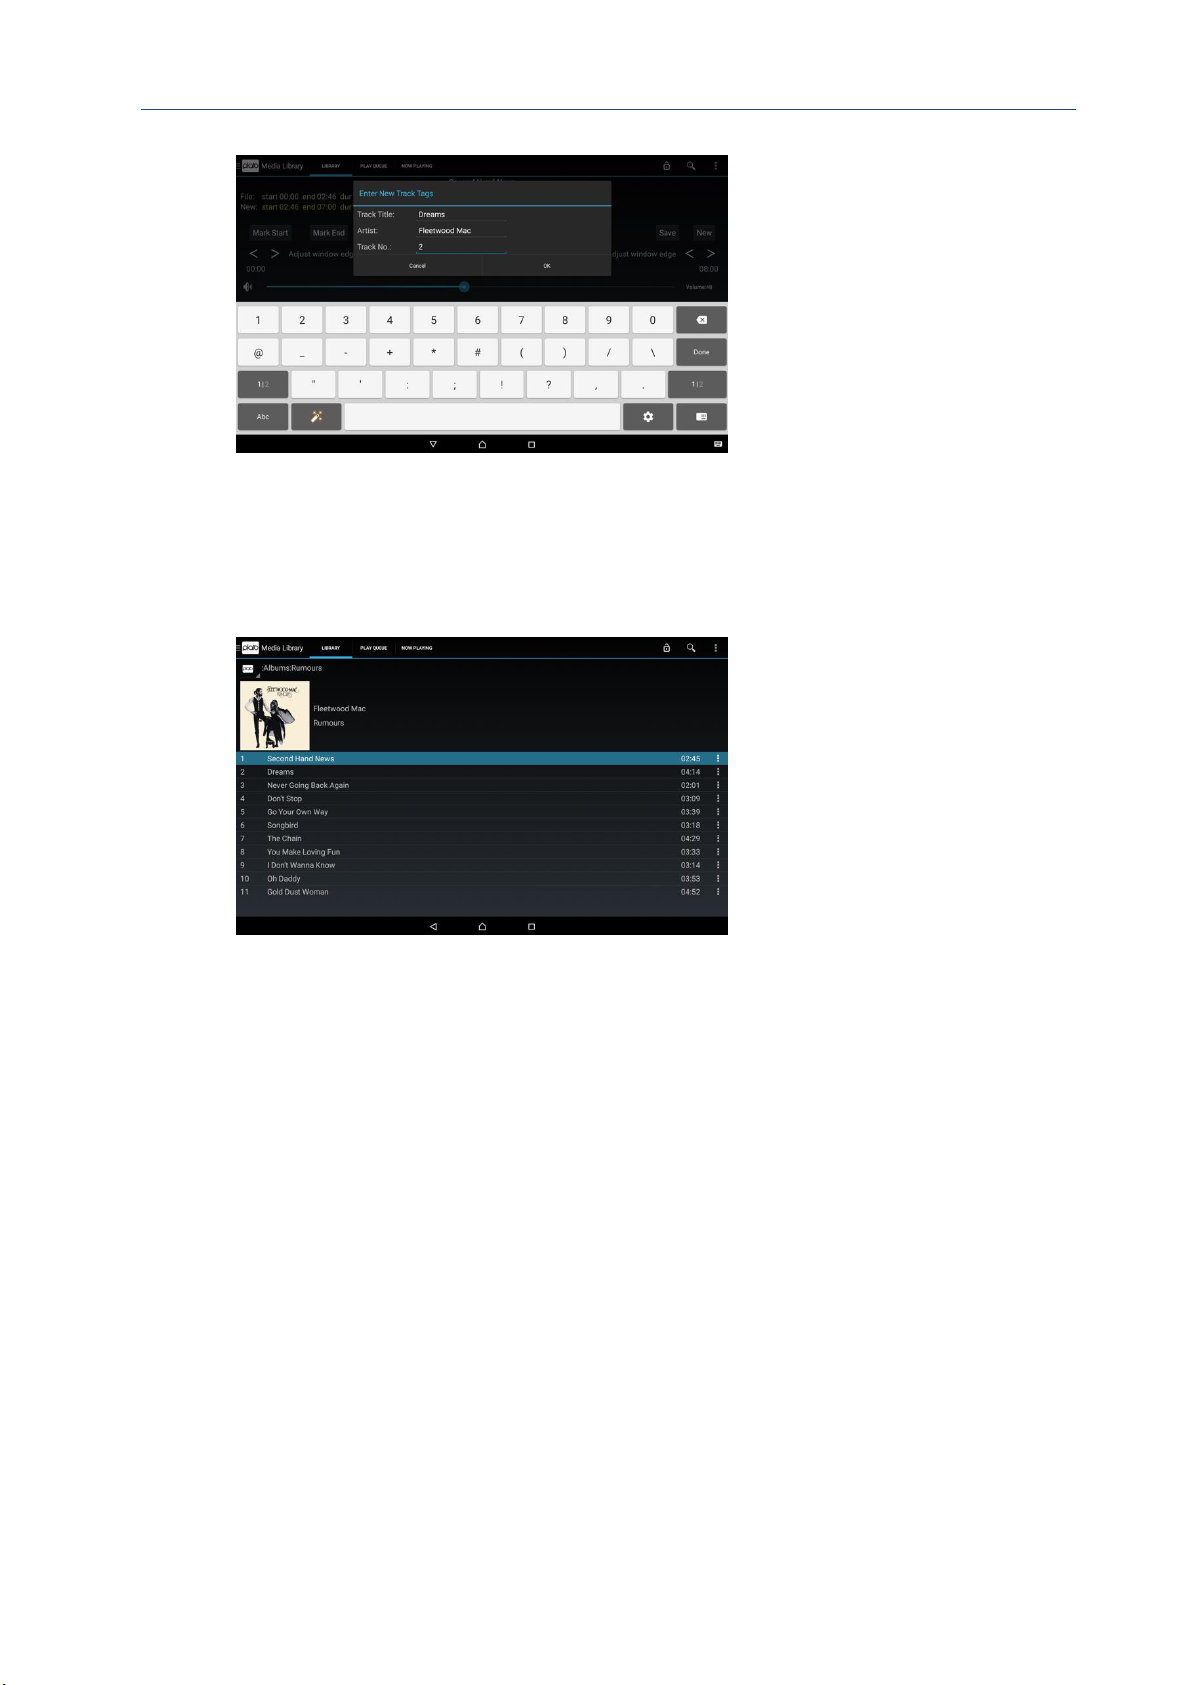
Plato Complete Guide V1.3.3
Convert Technologies 89
9. When the save has finished, the screen will have
been updated for the new file. The new start will
have been set to the end of this file and the new
duration will have been set to 3 minutes. This
makes it as easy as possible to create the next
track if that is needed.
Page 91
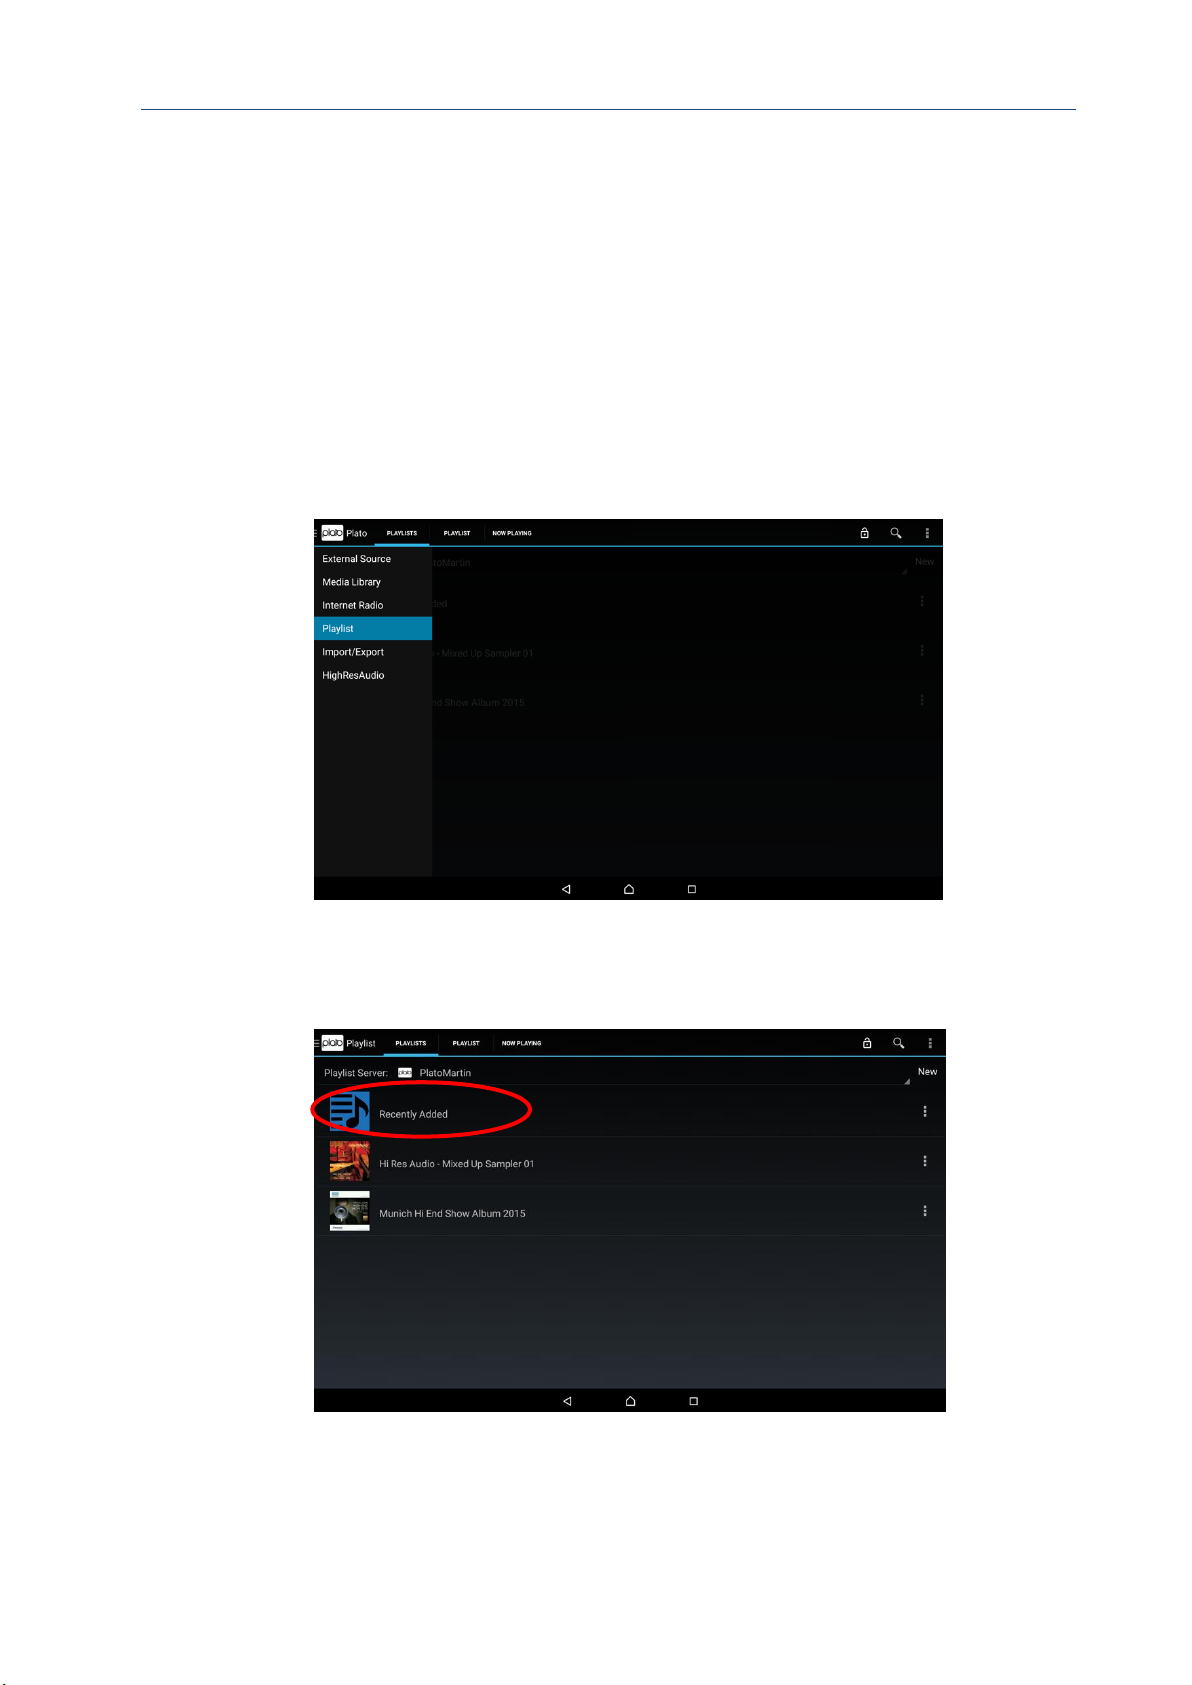
Plato Complete Guide V1.3.3
Convert Technologies 90
16.4. Merging a fragmented album
When recording a compilation or greatest hits album, Gracenote can sometimes return
incorrect artwork for individual tracks, thereby creating numerous album titles/covers with
only one or two tracks contained within them. This happens because some of these songs
may well have appeared on multiple albums over the years, so Gracenote can’t be 100% sure
which album you are recording. Again, Plato has editing tools to help merge all songs into a
single album, as described below. If you have only just recorded this album, then the easiest
way of modifying all of the tracks is to use the Recently Added playlist.
1. Download the correct album artwork, as in Section 16.1. This will be used later.
2. Select the Playlist drawer.
3. Ensure that the Playlist Server is set to the Plato box that recorded the music, then
select the Recently Added playlist.
Page 92
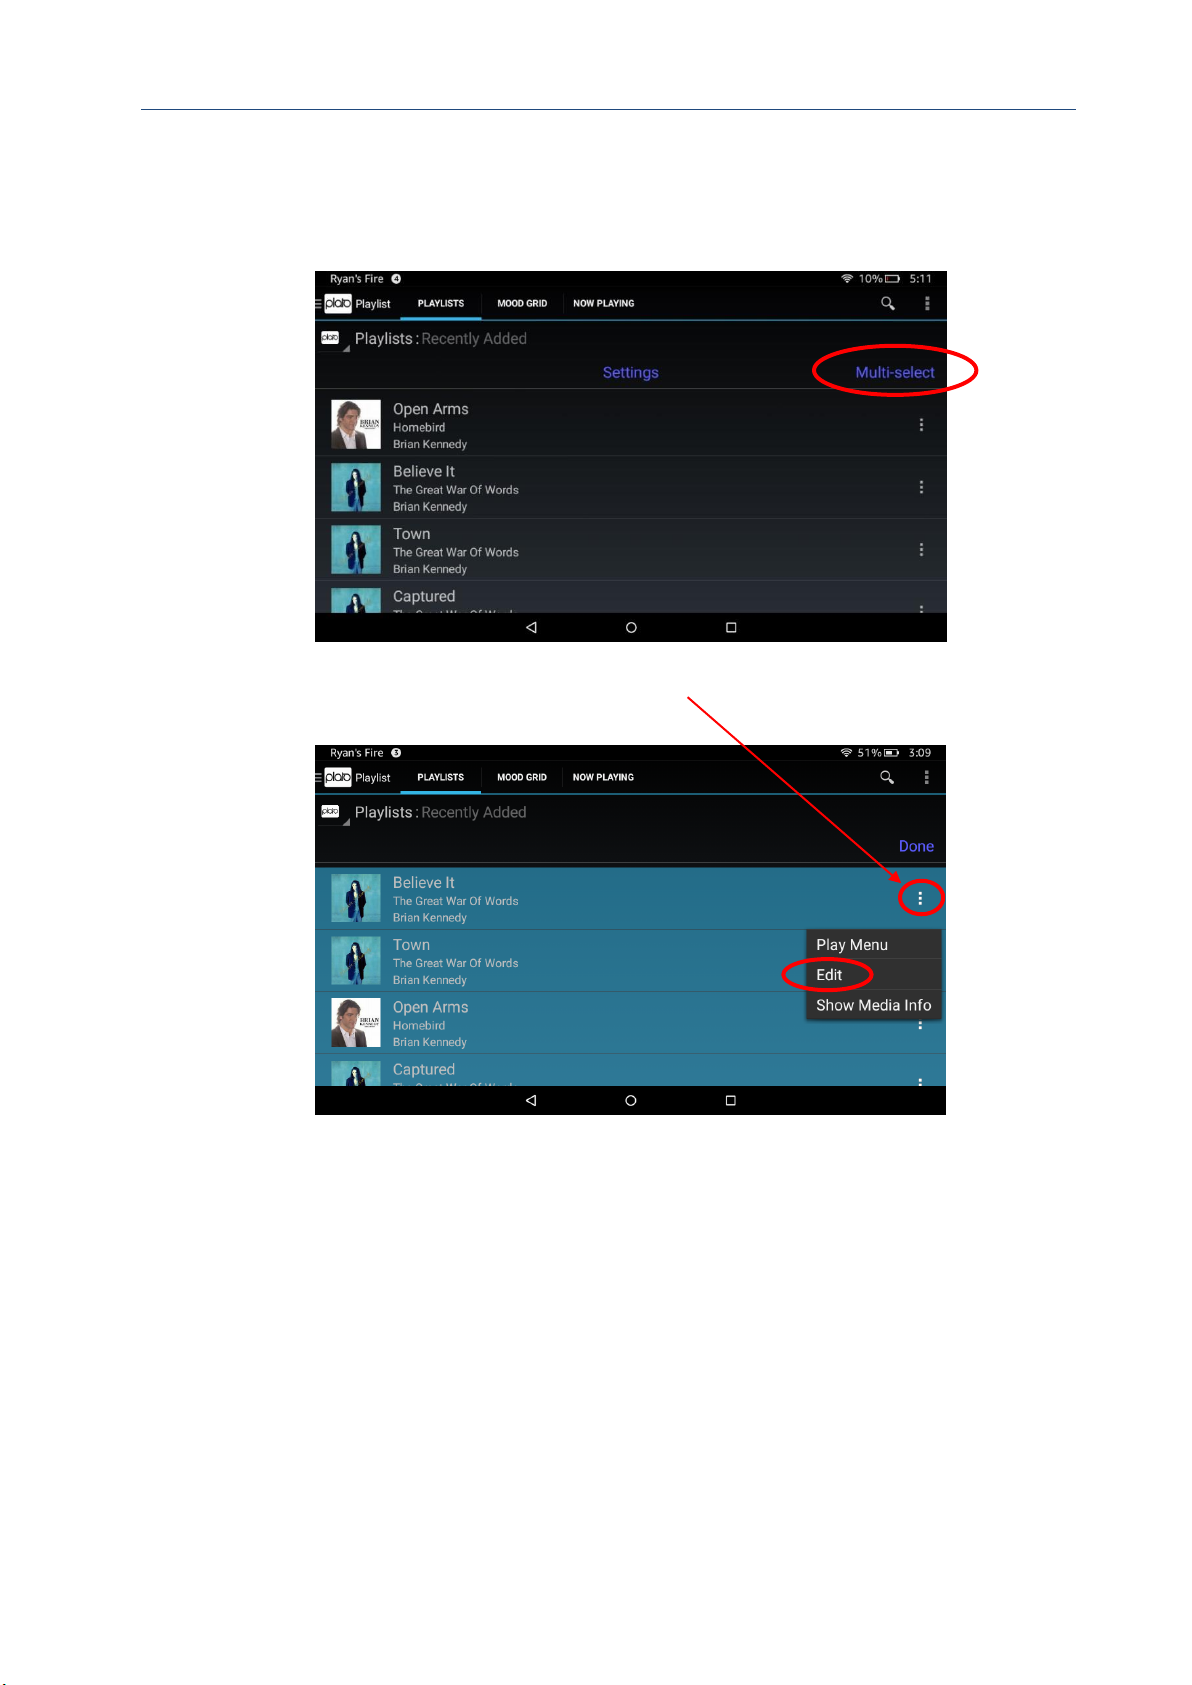
Plato Complete Guide V1.3.3
Convert Technologies 91
4. Press Multi-select, then select the tracks that make up the album. If this album was
the last thing you recorded, then these tracks will be at the top of this playlist.
5. Short press the ‘more info’ (three dots) icon adjacent to one of the selected
(correctly tagged) tracks and select edit from the pop up menu.
Page 93
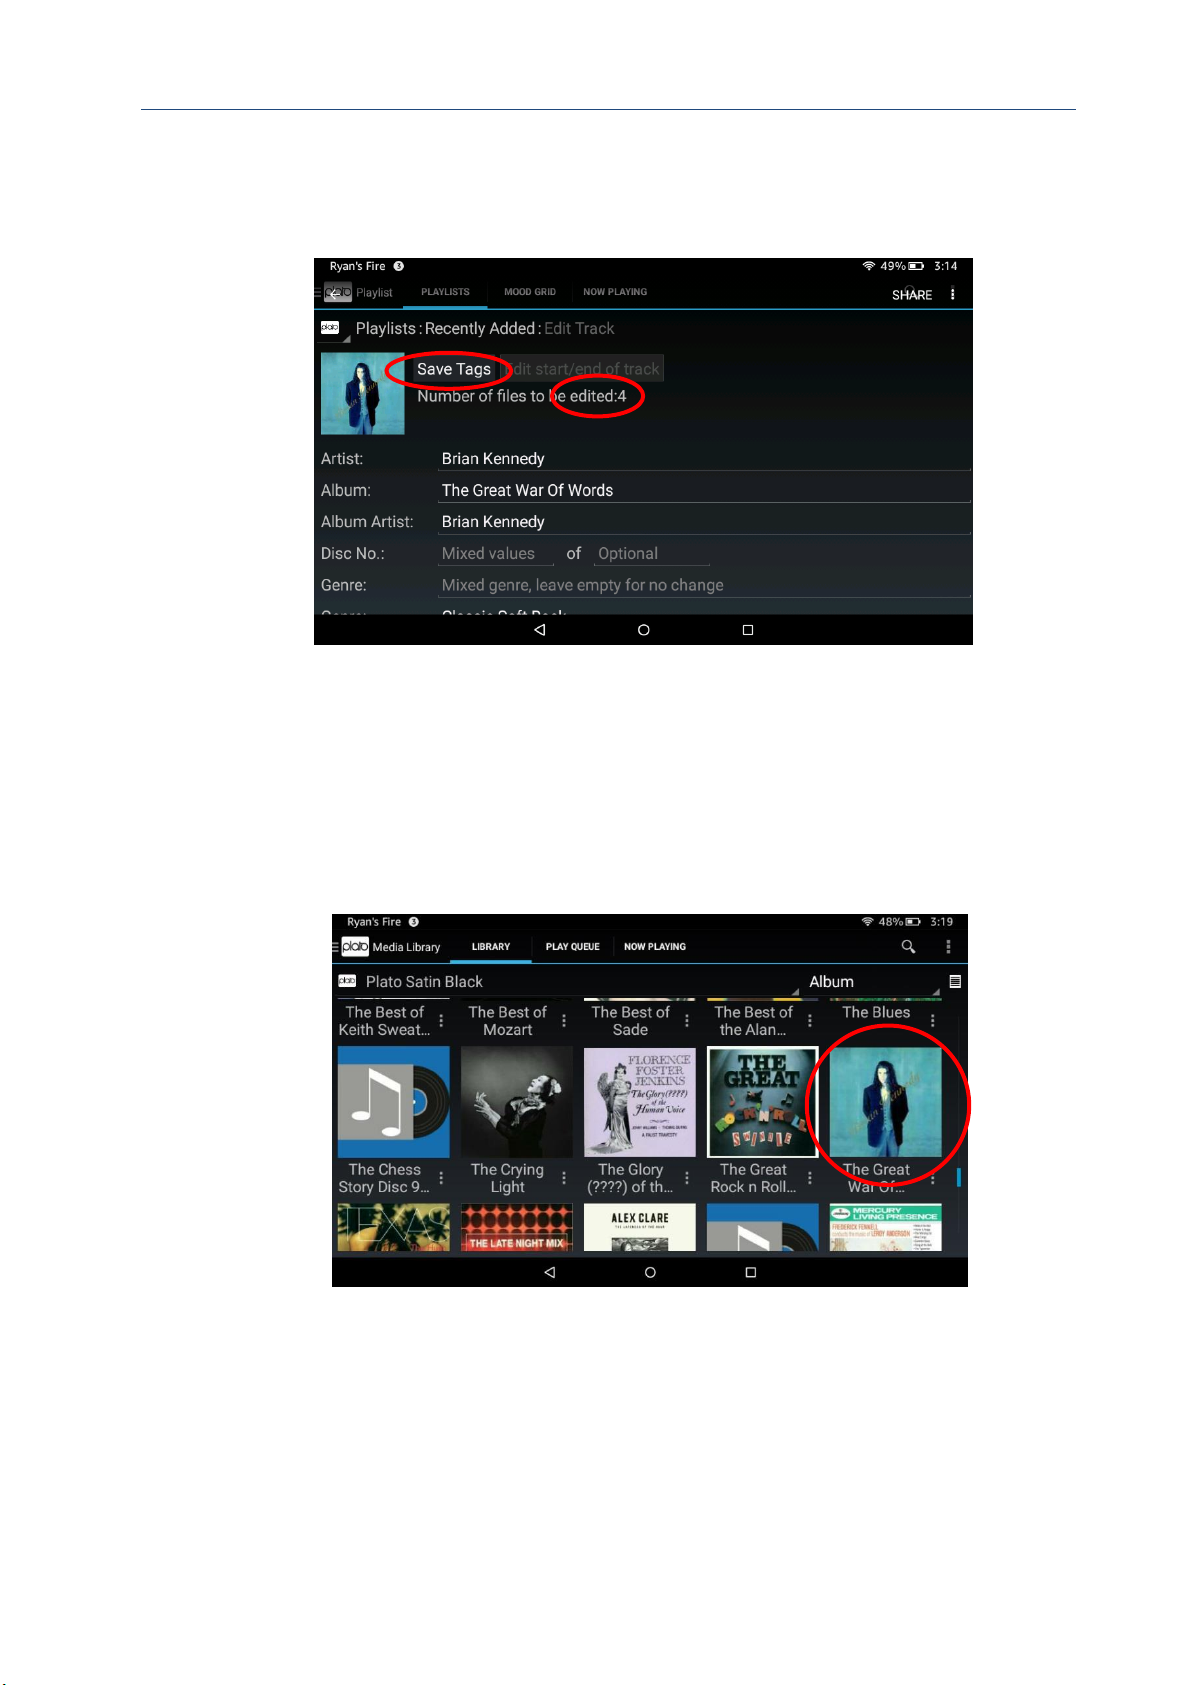
Plato Complete Guide V1.3.3
Convert Technologies 92
6. If none of the tracks listed are correctly tagged, fill in the correct album title and
album artist. This will ensure all the tracks are recognised as part of a single album.
Correct the album artwork if needed and set a disc number, or leave blank for
asingle disk album.
7. Press the Save Tags button. This will edit all of the tracks.
8. All of the tracks will now be in a single correctly named album in the Media Library
view. Select this album to bring up the Album Details page.
Page 94
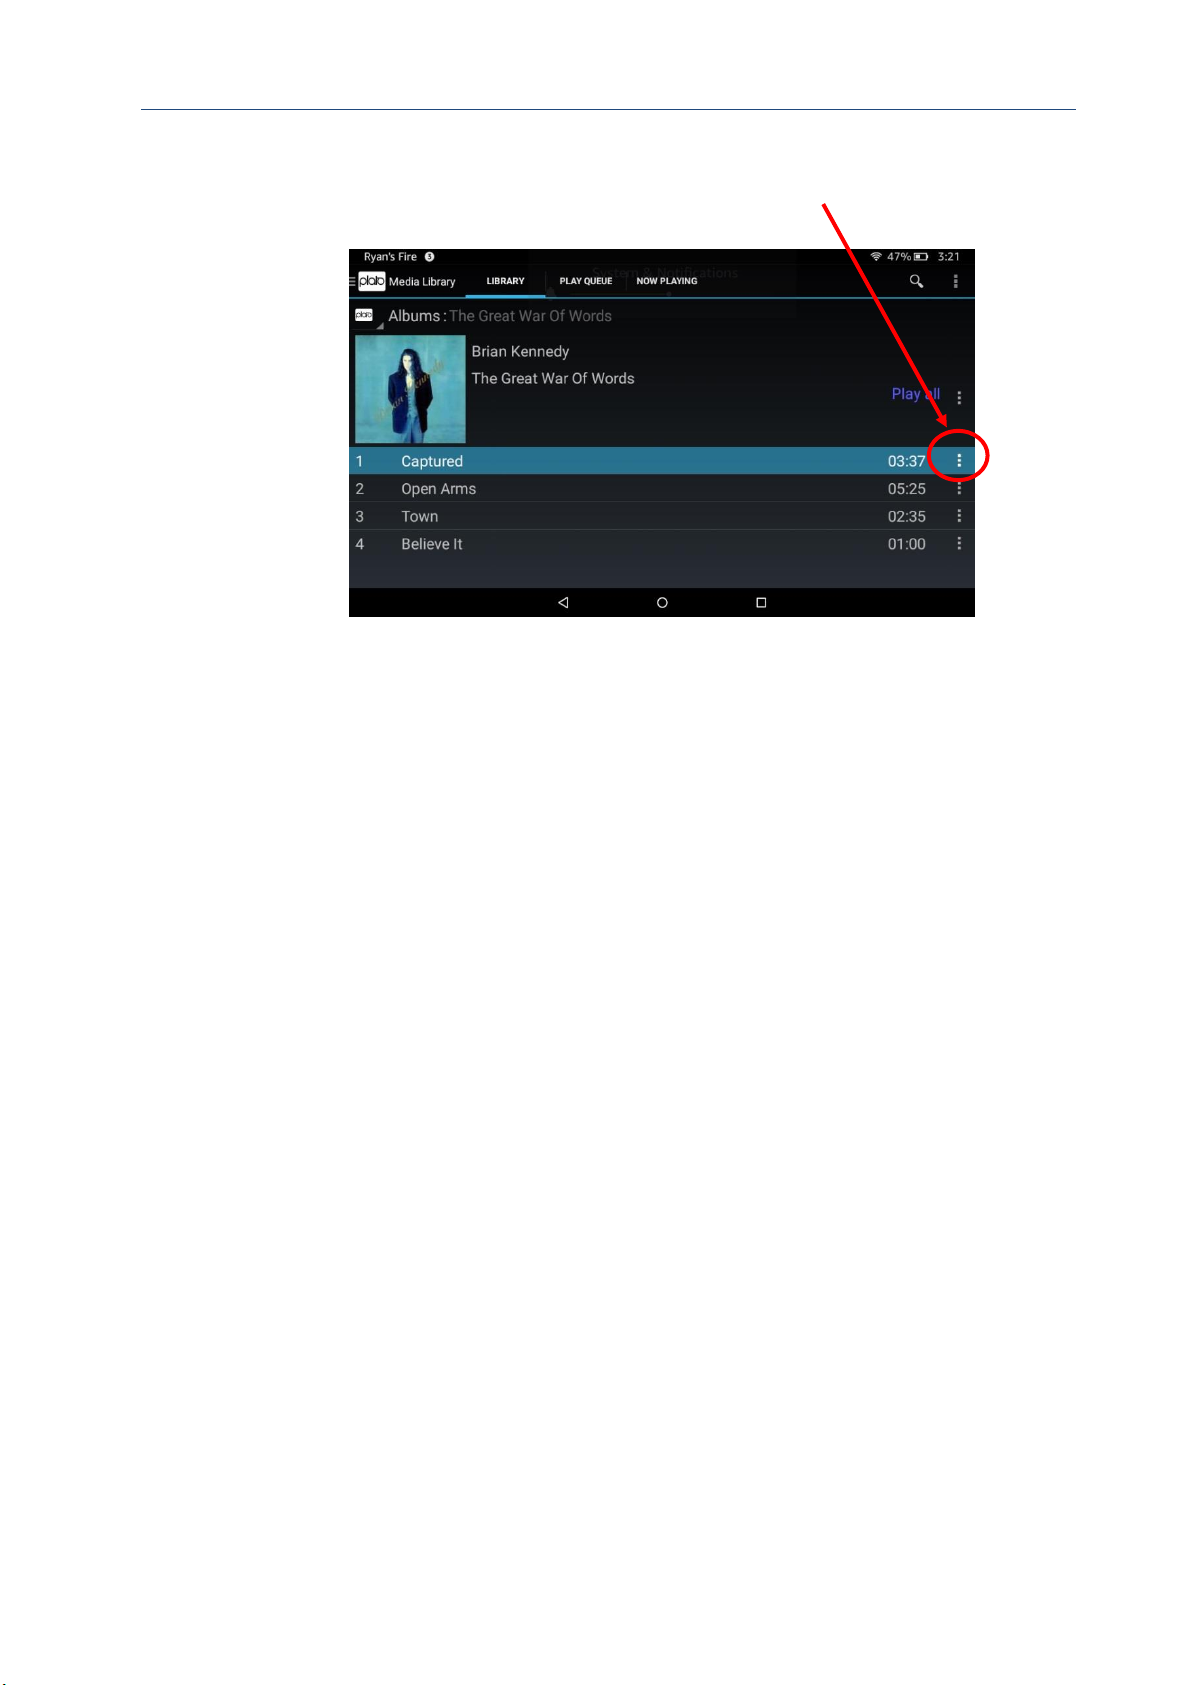
Plato Complete Guide V1.3.3
Convert Technologies 93
9. Some or all of the tracks listed may need to be edited to correct the track number
and track title. This can be done one at a time using the ‘Edit’ option in the ‘More
Options’ menu available on the ‘Album Details’ view.
Page 95

Plato Complete Guide V1.3.3
Convert Technologies 94
17. Backup and restore
Plato is designed to form the central hub for all digital media data. This could include ripped
files from a CD collection, recorded albums, downloaded hi-resolution material, as well as
video files and photo collections. Putting all your data in one place has many advantages, it is
easier to access, and easier to manage. However, it also leaves you exposed to a single point
of failure resulting in the potential loss of all your digital media data. For this reason, backing
up your data is no longer a luxury, it is essential.
Plato app versions 1.3.0 and above support a built in automated backup feature. Using this
feature, you can configure an incremental backup to run on a repeated schedule which will
ensure your data remains protected against accidental deletion or drive failure.
Automated restore tools also mean that if the worst does happen, with a few touches from
your tablet you can restore your Plato system back to its previous state and start playing
music again very quickly…
The backup feature is designed to be incremental, that means once you have successfully
completed one backup, subsequent backups will only record differences between the
current collection and the last backup. This will minimise wear and tear to your disk drives,
and ensure you remain up to date with your backups.
Plato’s backup has been designed to ensure normal service continues during the backup
process. However, it should be remembered that any backup, however carefully
implemented, requires additional system resources to do its job, so some reduction of
performance may be detected during backups. For this reason, we suggest you schedule your
backups during quiet periods of use or inactivity. Remember, once the first backup has
completed, Plato will only backup changes, so subsequent backups should run very quickly.
17.1. Selecting a backup device
Plato uses an external USB disk drive to store its backup data. The backup drive is not
included with Plato, but can be bought from third party vendors. When purchasing a backup
drive please ensure the drive is independently powered, rather than drawing power from its
USB port. Externally powered drives are possible using a powered caddie, or by connecting
the drive via an externally powered USB hub. Convert Technologies recommends the
following powered backup drive:
• LaCie USB 3.0 Desktop 3.5” External Hard Drive for PC/Mac
Before connecting your backup drive please ensure it is formatted correctly using a PC or
laptop before connecting it to your Plato unit. Different manufacturers prepare their drives
differently so please follow the instructions carefully to present a single GPT partition for
backup purposes. Normally we would recommend you format your drive using NTFS as this
supports large (>2TB) drives, and large (>4GB) files. However, Plato is also able to access
FAT32 partitions (which will not support single files >4GB). Note that Plato is not able to
access ExFAT or MacOS partitions. The screenshots below show how to partition the La Cie
Page 96
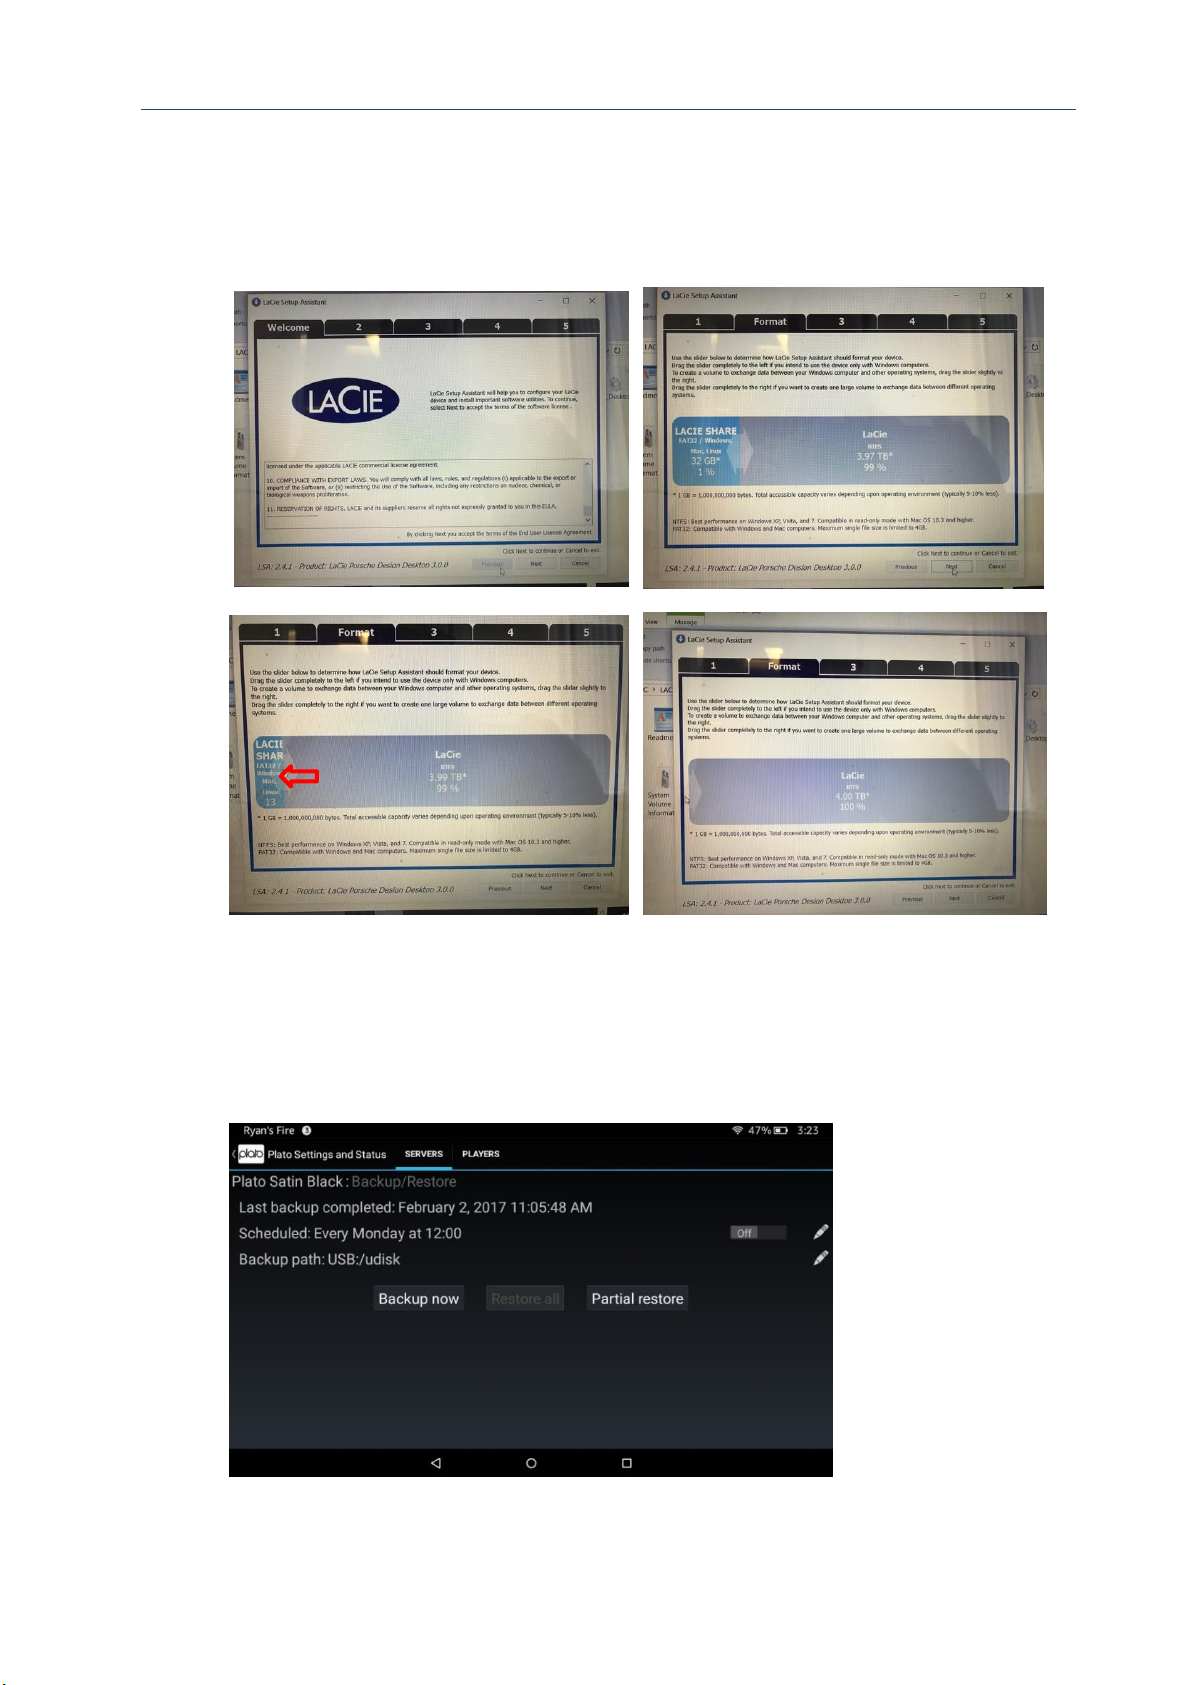
Plato Complete Guide V1.3.3
Convert Technologies 95
drive to be a single 4TB NTFS partition, using the pre installed LaCie Setup Assistant. Simply
follow the instructions on screen and click on the partition ‘arrow slider’, moving it all the
way to the left hand side. This reduces the exisiting FAT32 (32Gb) partition to zero and
increases the NTFS partition to use the full amount of available space on the drive.
17.2. Configuring your backup
As described in section 14.1 the backup feature is available in the Server Settings and Status
controls, on the advanced options menu. The main backup screen shows the current backup
status as shown below.
Page 97
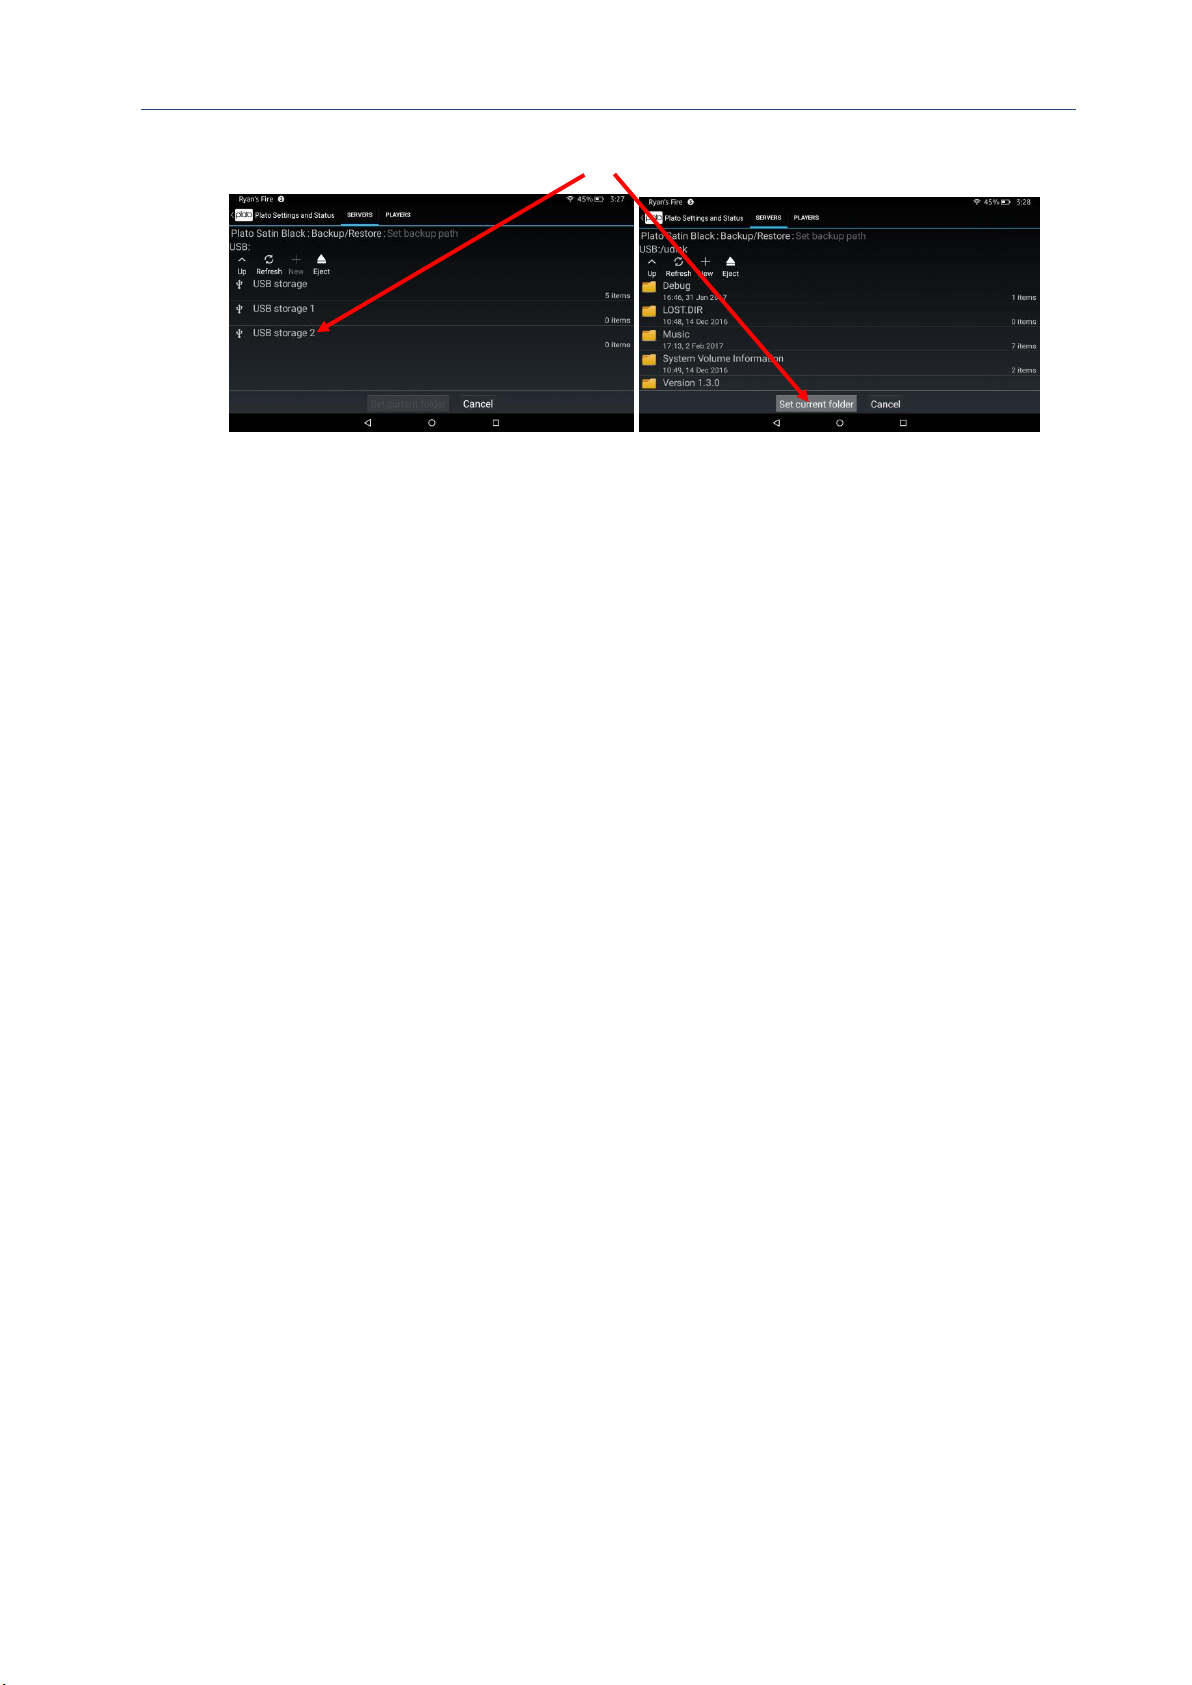
Plato Complete Guide V1.3.3
Convert Technologies 96
Configure the backup path to set the location for your backup copy.
If you would like to ensure your backups run automatically, configure the backup schedule,
and enable Scheduled Backup using the slider.
Alternatively, you can choose to backup manually by selecting Backup Now.
Once the schedule (or Backup Now) has been activated tick the appropriate check boxes to
run backups on music, movies and image data as required.
17.3. Restoring data from a backup copy
To restore your data from a previous backup, ensure your previous backup drive is
connected to Plato and turned on. Then check the backup path is correctly configures to
point to the folder containing the backup data. Now select either Restore All, or Partial
Restore.
Restore all will attempt a restore of all data from the last complete backup. It will re-install
all data from the backup location to your Plato system. Note that if your Plato system already
contains files with the same name (maybe some of your data is still available), you will be
asked whether you would like to overwrite with backup data, or keep the current version on
Plato.
Note that a full system restore could take a long time to complete.
Page 98
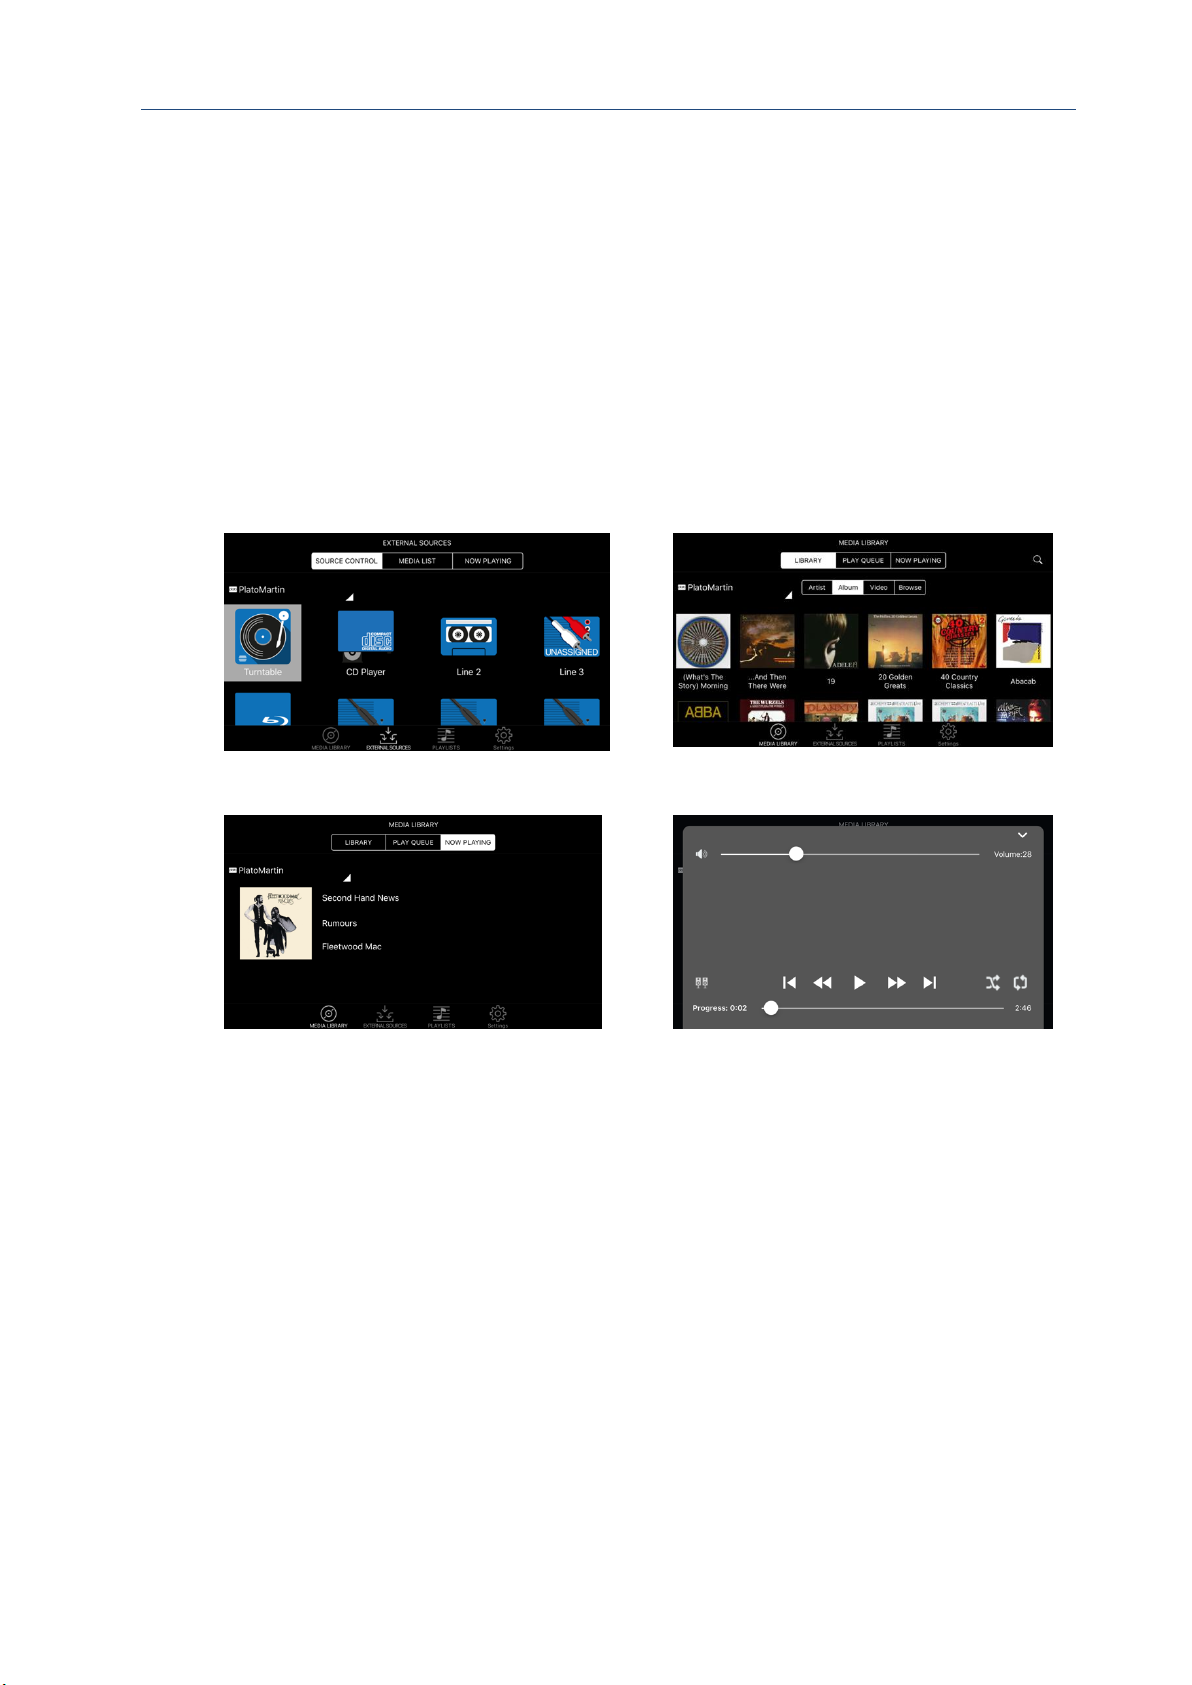
Plato Complete Guide V1.3.3
Convert Technologies 97
18. iOS Application
There is an iOS version of the application which can be downloaded from the iOS App Store.
Simply type ‘Plato Convert Technologies’ into the search field of the App Store to download
the app to your device. Note that the app is free to download, but support will only be
provided to Plato customers.
To access all of Plato’s features it is recommended that you use an Android tablet or
smartphone. The iOS control app provides access to the most commonly used features.
The general look and feel of the iOS app is very similar to the Android version, and some
understanding of the Android app will greatly assist in understanding the iOS version.
Page 99
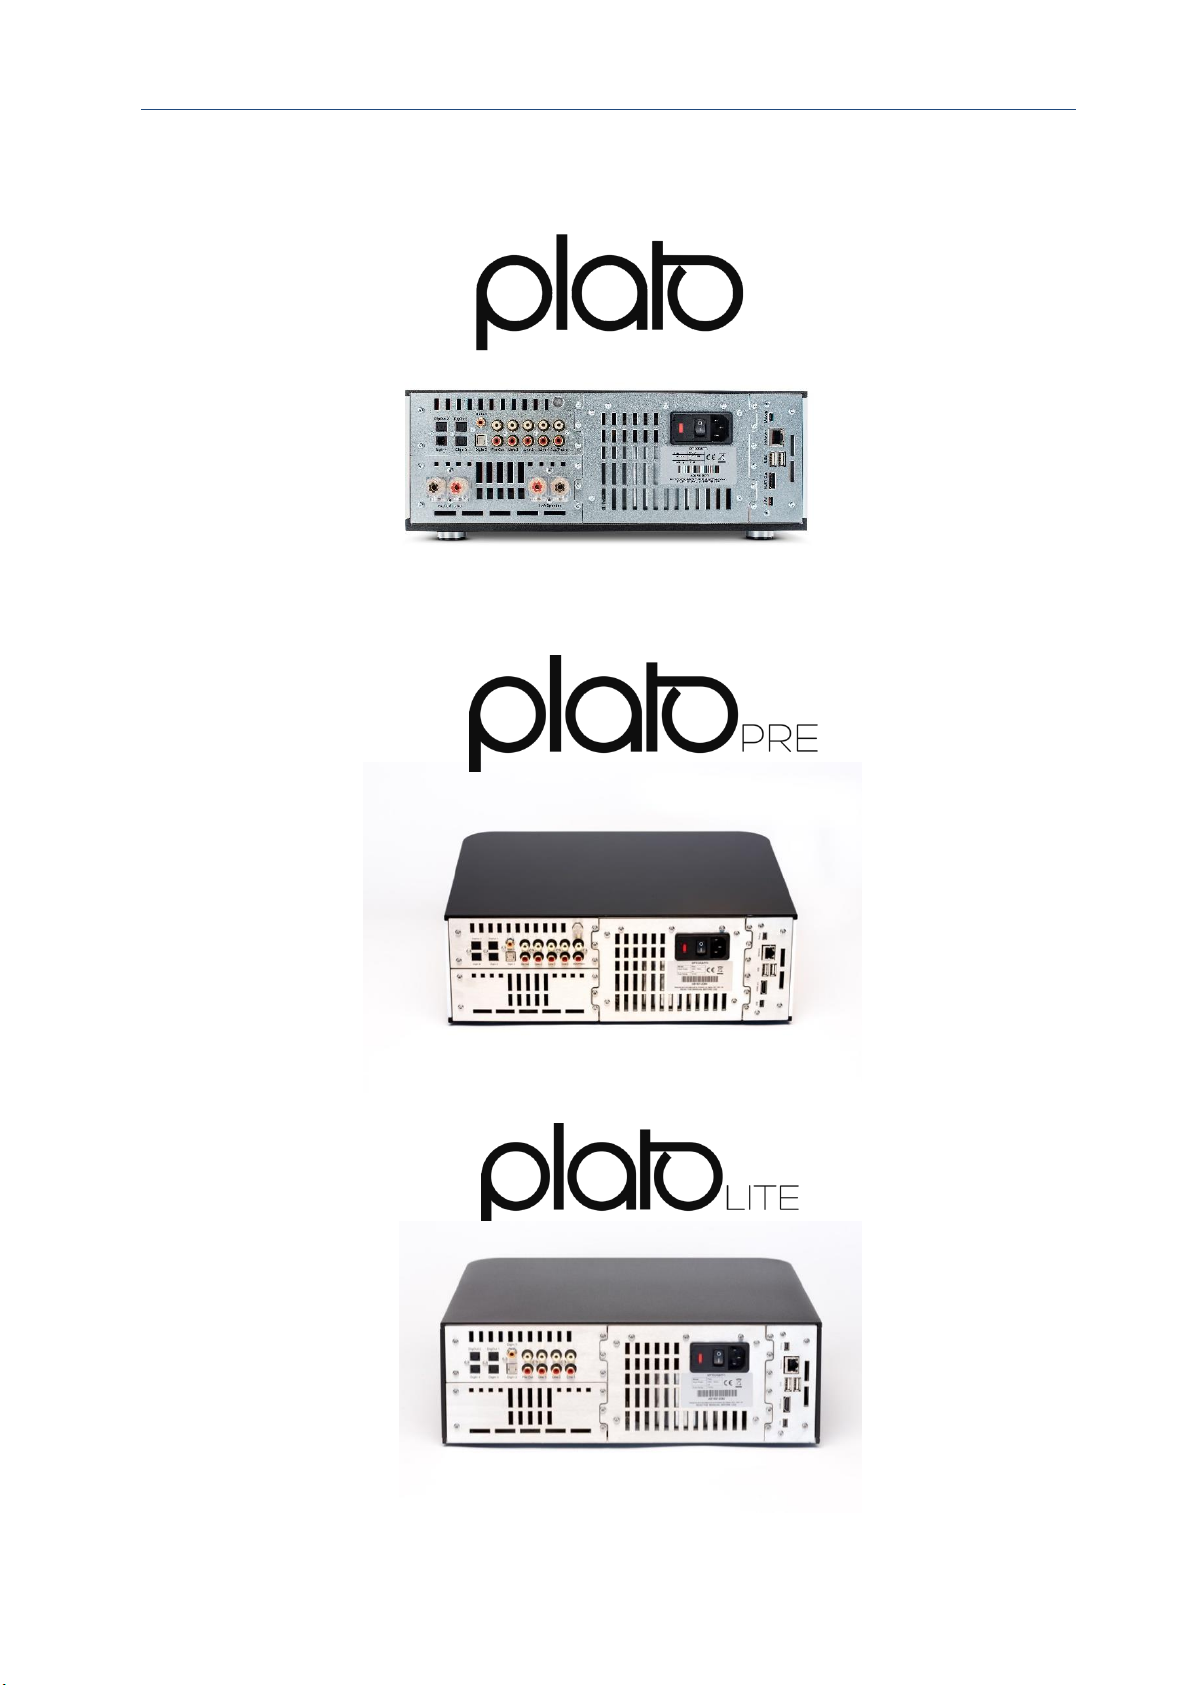
Plato Complete Guide V1.3.3
Convert Technologies 98
19. Specifications
.
Page 100

Plato Complete Guide V1.3.3
Convert Technologies 99
Plato
Plato Pre
Plato Lite
Brief Description
Plato is a one box, home
entertainment solution that
combines hifi amplification with
the ability to record from both
analogue and digital sources, such
as vinyl, tapes and CD’s. Enjoy
listening to your precious
collections played through Plato’s
own stunning high performance
amplifier.
Plato is a one box, home
entertainment solution with the
ability to record from both
analogue and digital sources, such
as vinyl, tapes and CDs. Enjoy
listening to your precious
collections by connecting your
own amplifier to Plato’s analogue
pre-amp output.
Plato Lite, as the name suggests,
is a slimmer version of the Plato
Product. It still has Plato’s great
capabilities of recording and
streaming, together with being
operated by the same Control
App. Plato Lite is ideal for
customers who have their own
Phono stage and amplifier and
have therefore made
considerable investments in their
HiFi, but still want to take
advantage of Plato’s unique
strengths.
Amplifier Connections
1 x MM/MC phono input, 3 x Line
analogue input, 1 x Coax digital
input, 3 x Optical digital inputs, 1
x Analogue pre-amp output, 2 x
Optical digital output, 2 x Speaker
output, via Neutrik connectors
1 x MM/MC phono input, 3 x Line
analogue input, 1 x Coax digital
input, 3 x Optical digital inputs, 1
x Analogue pre-amp output, 2 x
Optical digital output
3 x Line analogue input, 1 x Coax
digital input, 3 x Optical digital
inputs, 1 x Analogue pre-amp
output, 2 x Optical digital output
Video Formats Suppoprted
Video formats: H263, H264
(BP/MP/HP), MPEG-4 SP/ASP,
MPEG2, VP8, MJPEG, Xvid. Video
playback up to HD 1080p, 30fps.
Video formats: H263, H264
(BP/MP/HP), MPEG-4 SP/ASP,
MPEG2, VP8, MJPEG, Xvid. Video
playback up to HD 1080p, 30fps.
Video formats: H263, H264
(BP/MP/HP), MPEG-4 SP/ASP,
MPEG2, VP8, MJPEG, Xvid. Video
playback up to HD 1080p, 30fps.
File Formats Supported
Audio formats: AAC LC/PLUS,
ALAC, FLAC, MP3, VORBIS,
PCM/WAVE, AIFF. Audio
playback/record at 24 bits, up to
192kHz.
Audio formats: AAC LC/PLUS,
ALAC, FLAC, MP3, VORBIS,
PCM/WAVE, AIFF. Audio
playback/record at 24 bits, up to
192kHz.
Audio formats: AAC LC/PLUS,
ALAC, FLAC, MP3, VORBIS,
PCM/WAVE, AIFF. Audio
playback/record at 24 bits, up to
192kHz.
Power Source
220V – 240V 50Hz / 60Hz (Plato)
110-120/230V 50Hz/60Hz (Plato2)
220V – 240V 50Hz / 60Hz (Plato)
110-120/230V 50Hz/60Hz (Plato2)
220V – 240V 50Hz / 60Hz (Plato)
110-120/230V 50Hz/60Hz (Plato2)
Operating Temperature Range
10-35°C
10-35°C
10-35°C
Power Consumption
Idle <9W, Full Power 2-CH 8Ω <
200W (Plato), 265W
(Plato2/Tempus)
Idle <9W, Full Power 2-CH 8Ω <
200W (Plato), 265W
(Plato2/Tempus)
Idle <9W, Full Power 2-CH 8Ω <
200W (Plato), 265W
(Plato2/Tempus)
Dimensions
370 x 300 x 130 (W x D x H) mm
(Plato)
370 x 300 x 140 (W x D x H) mm
(Plato2)
370 x 300 x 130 (W x D x H) mm
(Plato)
370 x 300 x 140 (W x D x H) mm
(Plato2)
370 x 300 x 130 (W x D x H) mm
(Plato)
370 x 300 x 140 (W x D x H) mm
(Plato2)
Power Output
50W/channel into 8 ohms (Plato)
60W/channel into 8 ohms (Plato2)
NA
NA
Weight
14 Kg
14 Kg
14 Kg
Optical Inputs
TOSLINK x2, up to 192kHz sample
rate TOSLINK x1, up to 96kHz
sample rate
TOSLINK x2, up to 192kHz sample
rate TOSLINK x1, up to 96kHz
sample rate
TOSLINK x2, up to 192kHz sample
rate TOSLINK x1, up to 96kHz
sample rate
SPDIF Inputs
Transformer Isolated x1, up to
192k SR.
Transformer Isolated x1, up to
192k SR.
Transformer Isolated x1, up to
192k SR.
Optical Outputs
TOSLINK x2, up to 192kHz sample
rate
TOSLINK x2, up to 192kHz sample
rate
TOSLINK x2, up to 192kHz sample
rate
 Loading...