

Page 1
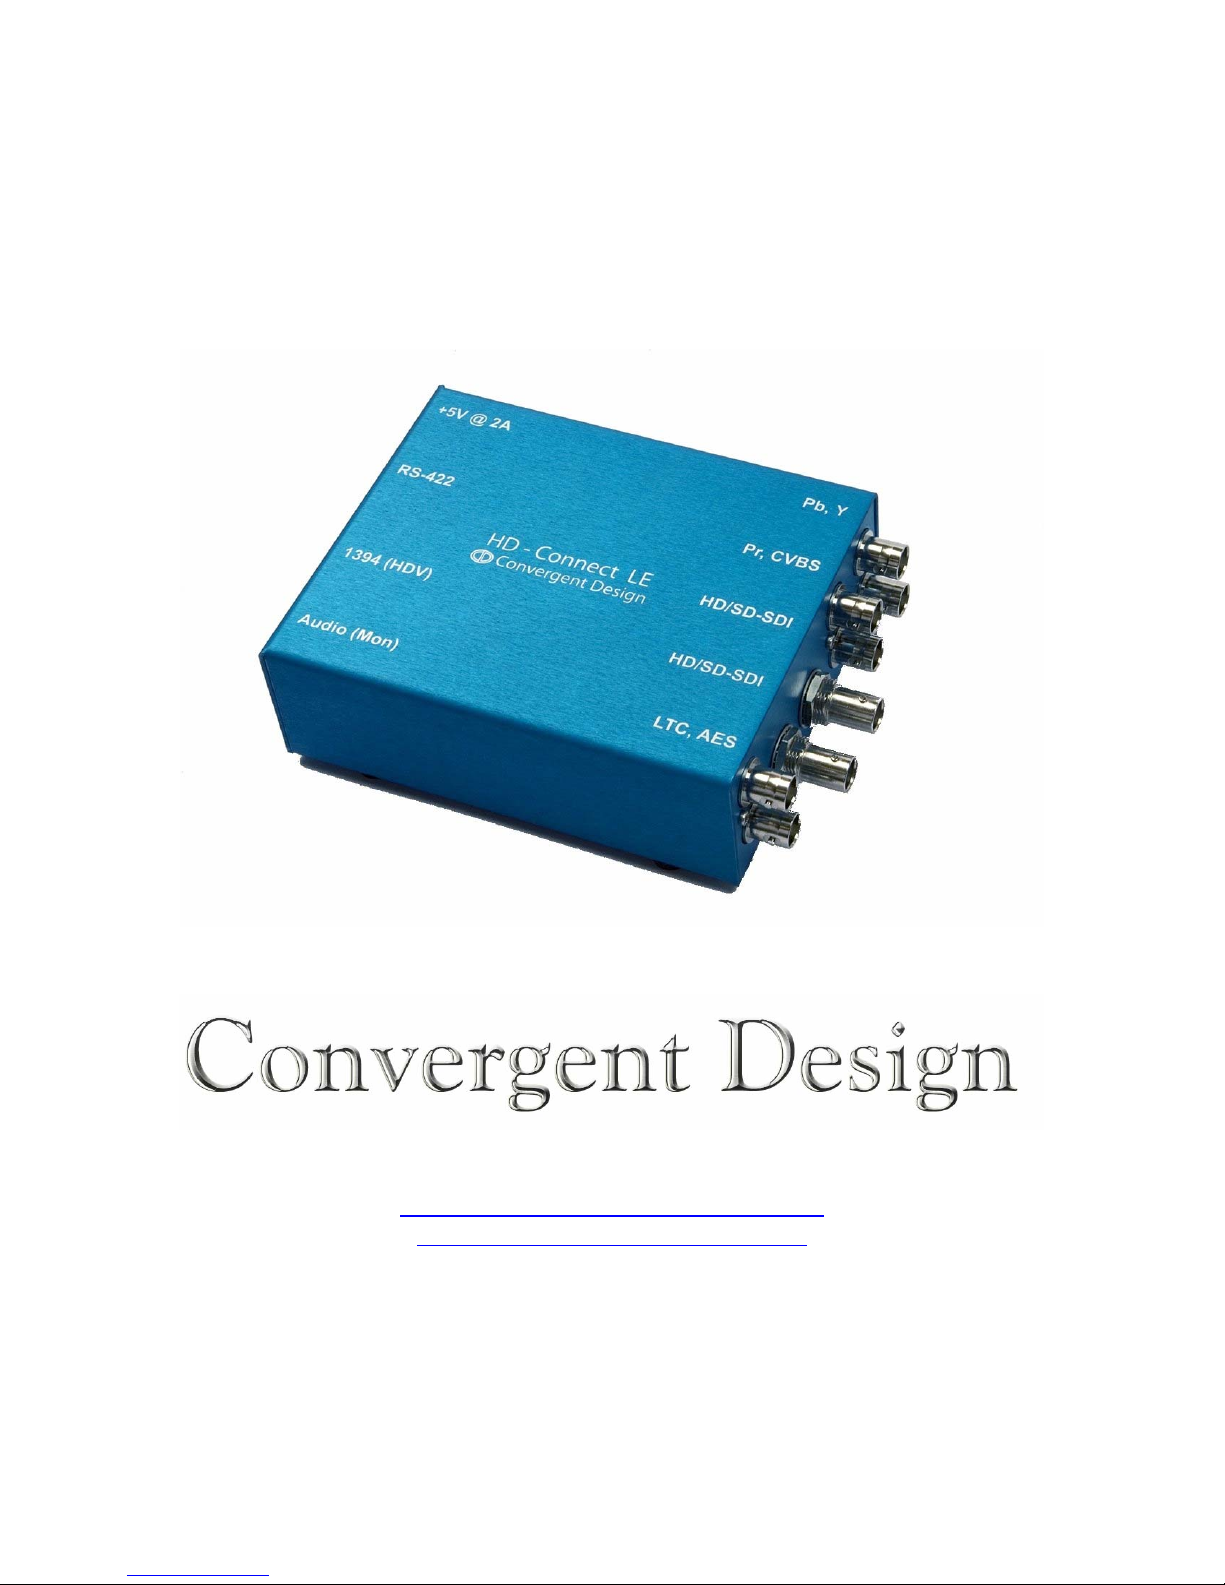
HD-Connect LE™
Guide and User’s Manual
1
4465 Northpark Drive, Suite 201
Colorado Springs, CO 80907
http://www.convergent-design.com
support@convergent-design.com
Support: 720-221-3861
Toll-Free: 866-654-0080
HD-Connect LE™ Guide and User’s Manual.
Page 2

2
©2006 Convergent Design, Inc. All Rights Reserved. No part of this publication may be
reproduced, stored in a retrieval system, or transmitted, in any form or by any means,
electronic, mechanical, photocopying, recording or otherwise, without prior written
permission.
Table of Contents
1 GETTING STARTED.........................................................................................4
1.1 Welcome.................................................................................................................................................. 4
1.2 FCC Compliance.................................................................................................................................... 4
1.3 Shipping Contents.................................................................................................................................. 4
2 HD-CONNECT LE™..........................................................................................4
2.1 Overview.................................................................................................................................................. 4
2.2 Features................................................................................................................................................... 5
2.3 Functional Block Diagram..................................................................................................................... 6
3 INSTALLATION AND QUICK START ..............................................................7
3.1 Connections............................................................................................................................................. 7
3.2 DIP Switch Settings................................................................................................................................8
4 UPDATING HD-CONNECT LE™...................................................................... 9
4.1 Preparation............................................................................................................................................. 9
4.2 Using the Update Application................................................................................................................ 9
4.3 Rollbacks............................................................................................................................................... 16
5 CONTROLLING HD-CONNECT LE™ ............................................................17
5.1 Preparation........................................................................................................................................... 17
5.2 Using the Control Application............................................................................................................. 18
6 TIPS, FAQS, AND TROUBLESHOOTING......................................................22
6.1 Operating Tips...................................................................................................................................... 22
HD-Connect LE™ Guide and User’s Manual.
Page 3

3
6.2 Frequently Asked Questions................................................................................................................ 25
6.3 Troubleshooting Guide........................................................................................................................ 31
7 SAFETY AND ESD PRECAUTIONS...............................................................32
8 CONNECTION DIAGRAMS AND APPLICATIONS........................................33
8.1 HDV Capture with HD/SD-SDI based editing system....................................................................... 33
8.2 HDV Dub to High Definition Deck...................................................................................................... 34
8.3 HDV Playback from Computer...........................................................................................................35
8.4 HDV Downscaled to Standard Definition........................................................................................... 36
8.5 HDV to HD-CAM Tape Transfer w/ Time Code............................................................................... 37
9 SPECIFICATIONS...........................................................................................37
9.1 Inputs..................................................................................................................................................... 37
9.2 Outputs.................................................................................................................................................. 38
9.3 Physical.................................................................................................................................................. 39
9.4 Power..................................................................................................................................................... 39
9.5 Temperature Ranges............................................................................................................................ 40
9.6 Humidity................................................................................................................................................ 40
10 RMA AND WARRANTY................................................................................41
10.1 Conditions of the Warranty............................................................................................................... 41
10.2 Obtaining an RMA............................................................................................................................. 42
HD-Connect LE™ Guide and User’s Manual.
Page 4

1 Getting Started
1.1 Welcome
Congratulations on selecting Convergent Design HD-Connect LE™. HD-Connect
LE™ is shipped from the factory in the most secure packaging available. Please
inspect the content of the package and make sure to email us if you find any
shipping damage or missing components.
1.2 FCC Compliance
This professional equipment has been tested and found to comply with the
provisions for a Class A digital device under part 15 of the FCC rules. These
provisions are designed to provide reasonable protection against radio-frequency
emissions by digital devices in a commercial environment. This device may
interfere with radio and television reception in residential areas and is required to
accept all interference received, including that which may cause undesired
operation.
4
1.3 Shipping Contents
Your HD-Connect LE™ should come packaged with the following:
1) HD-Connect LE™
2) Power Supply with Changeable Plugs
3) Quick Start Guide
2 HD-Connect LE™
2.1 Overview
The Convergent Design HD-Connect LE™ integrates video, audio, time-code
and deck control into a simple to use, cost-effective box. This ultra portable unit
offers the unique feature of conversion to HD or SD, allowing users to output to
the widest variety of formats: HD-CAM, DVC Pro HD (via HD-SDI), DigiBeta or
Betacam. HD-Connect LE offers two modes of deck control: RS-422 to 1394 and
1394 to RS-422. The RS-422 to 1394 deck control is intended for HD/SD-SDI
based editing systems, while the 1394 to RS-422 mode (upcoming feature) is
intended for HDV based editing systems.
HD-Connect LE™ Guide and User’s Manual.
Page 5

The HD-Connect LE™ features an internal cross converter from 1080i to 720p
HDV and 720p to 1080i.
The HD-Connect LE™ is your HDV connection, bringing HDV to your studio and
edit bays as well as supporting over-the-air playout.
2.2 Features
1) HDV (over 1394) to HD/SD-SDI (with embedded audio and time code.)
Embedded audio and time code is an upcoming feature for SD.
2) 720/24p, 720/25p, 720/30p, 1080/50i and 1080/60i support.
3) 50Hz (PAL) and 59.94Hz (NTSC) support..
4) HDV Deck Control via RS-422 →1394 and 1394→ RS-422 (coming soon)
translation.
5
5) Component and Composite output.
6) Unbalanced Audio out (for local monitoring).
7) All outputs simultaneously active.
8) HD to SD scaling support. In HD, can cross convert 1080i↔720p.
9) 1394-based Firmware Updates.
10) DIP Switch Interface.
11) Color Bars and Tones on HD/SD-SDI (not available on analog outputs).
12) Anamorphic, Edge Crop, or Letter Box scaling selectable in SD.
13) Two 1394 ports (4-pin and 6-pin).
14) Dual identical HD/SD-SDI outputs.
HD-Connect LE™ Guide and User’s Manual.
Page 6
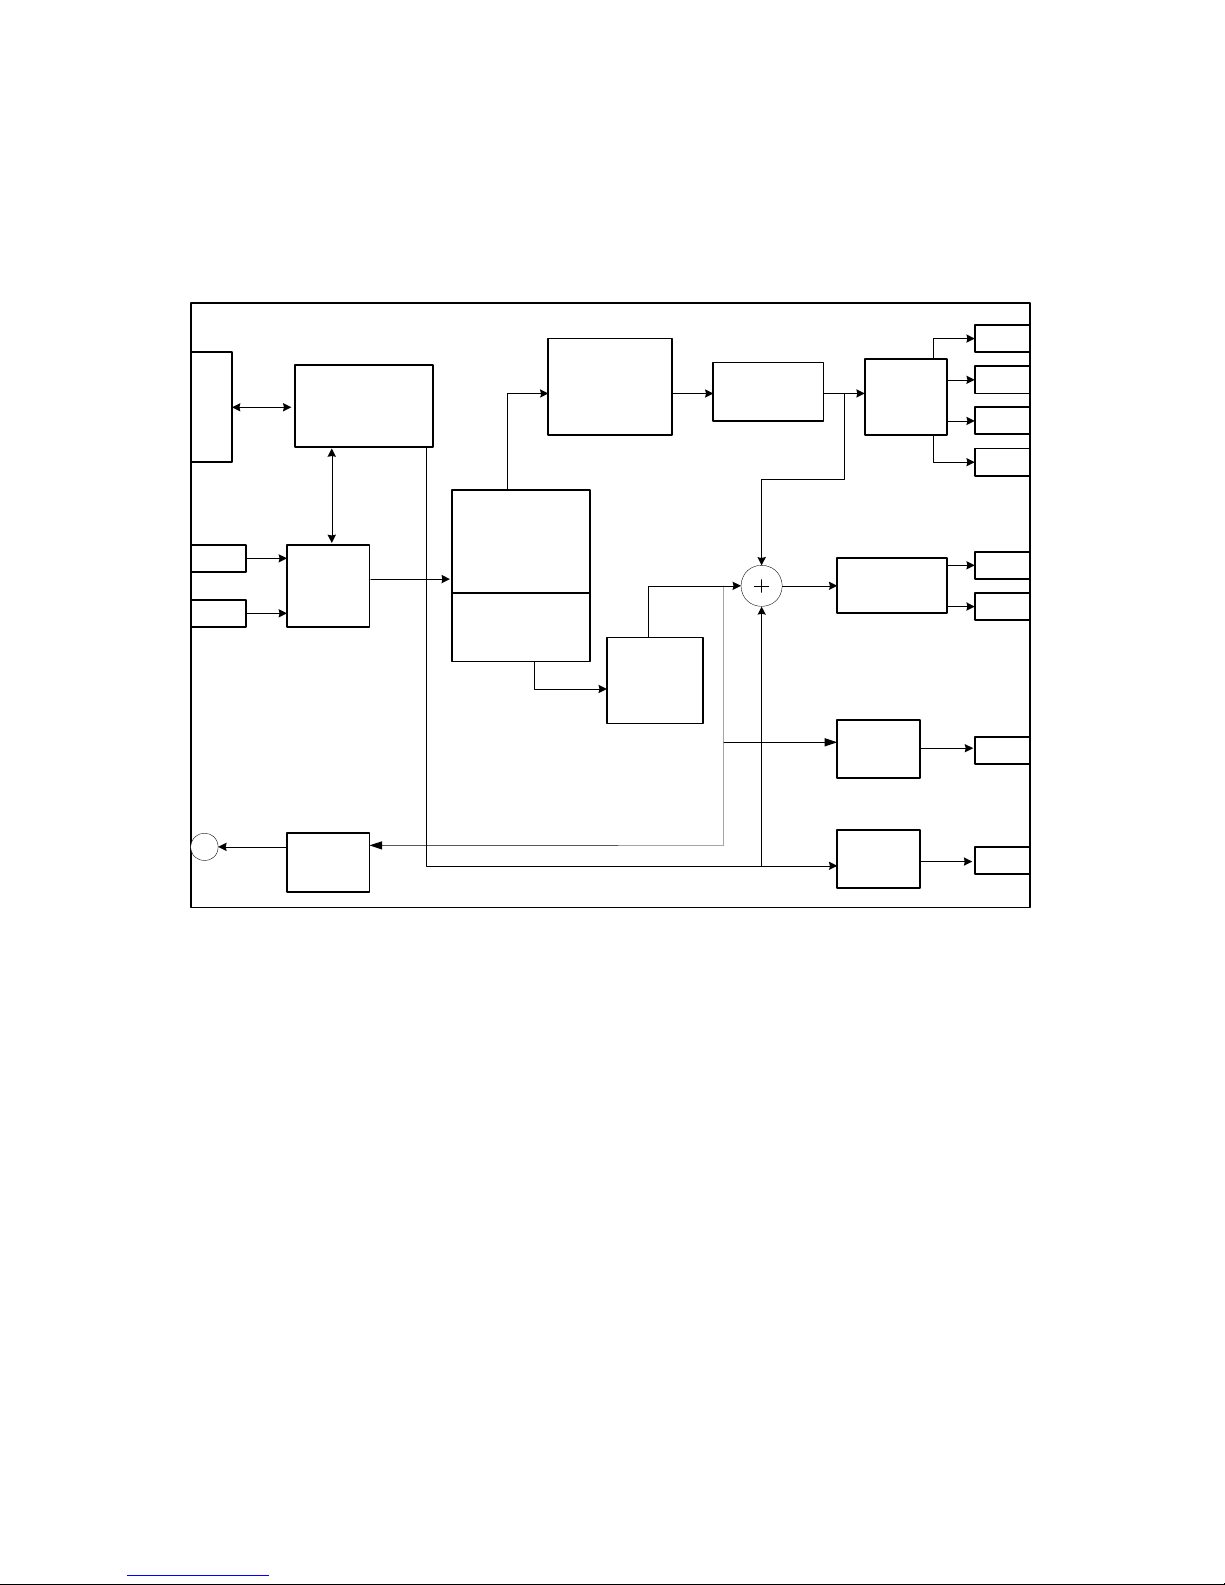
2.3 Functional Block Diagram
HD - Connect LE™
6
RS-422
HDV
Source
Unbalanced
Audio Out
RS-422
Deck
Command/
Cntrl
1394 Deck
Commands/
Time Code
Micro
Controller &
Flash
1394
Interface
Audio D/A
MPEG2
TS/PS
Time Code
Data
Video
HDV Video
Decoder
HDV Audio
Decoder
Up/Down
Cross Scaler
A/V Sync
Audio
HD <-> SD
Color Space
Conversion
Audio
Embed
Y
Video
(HD/SD)
Encoder
(D/A)
Pb
Pr
CVBS
`
HD/SD-SDI
Driver
HD/SD - SDI
HD/SD - SDI
AES
Driver
LTC
Driver
AES-Out
LTC-Out
Convergent Design
Figure 1 Functional Block Diagram of HD-Connect LE™
HD-Connect LE™ Guide and User’s Manual.
Page 7
7
3 Installation and Quick Start
3.1 Connections
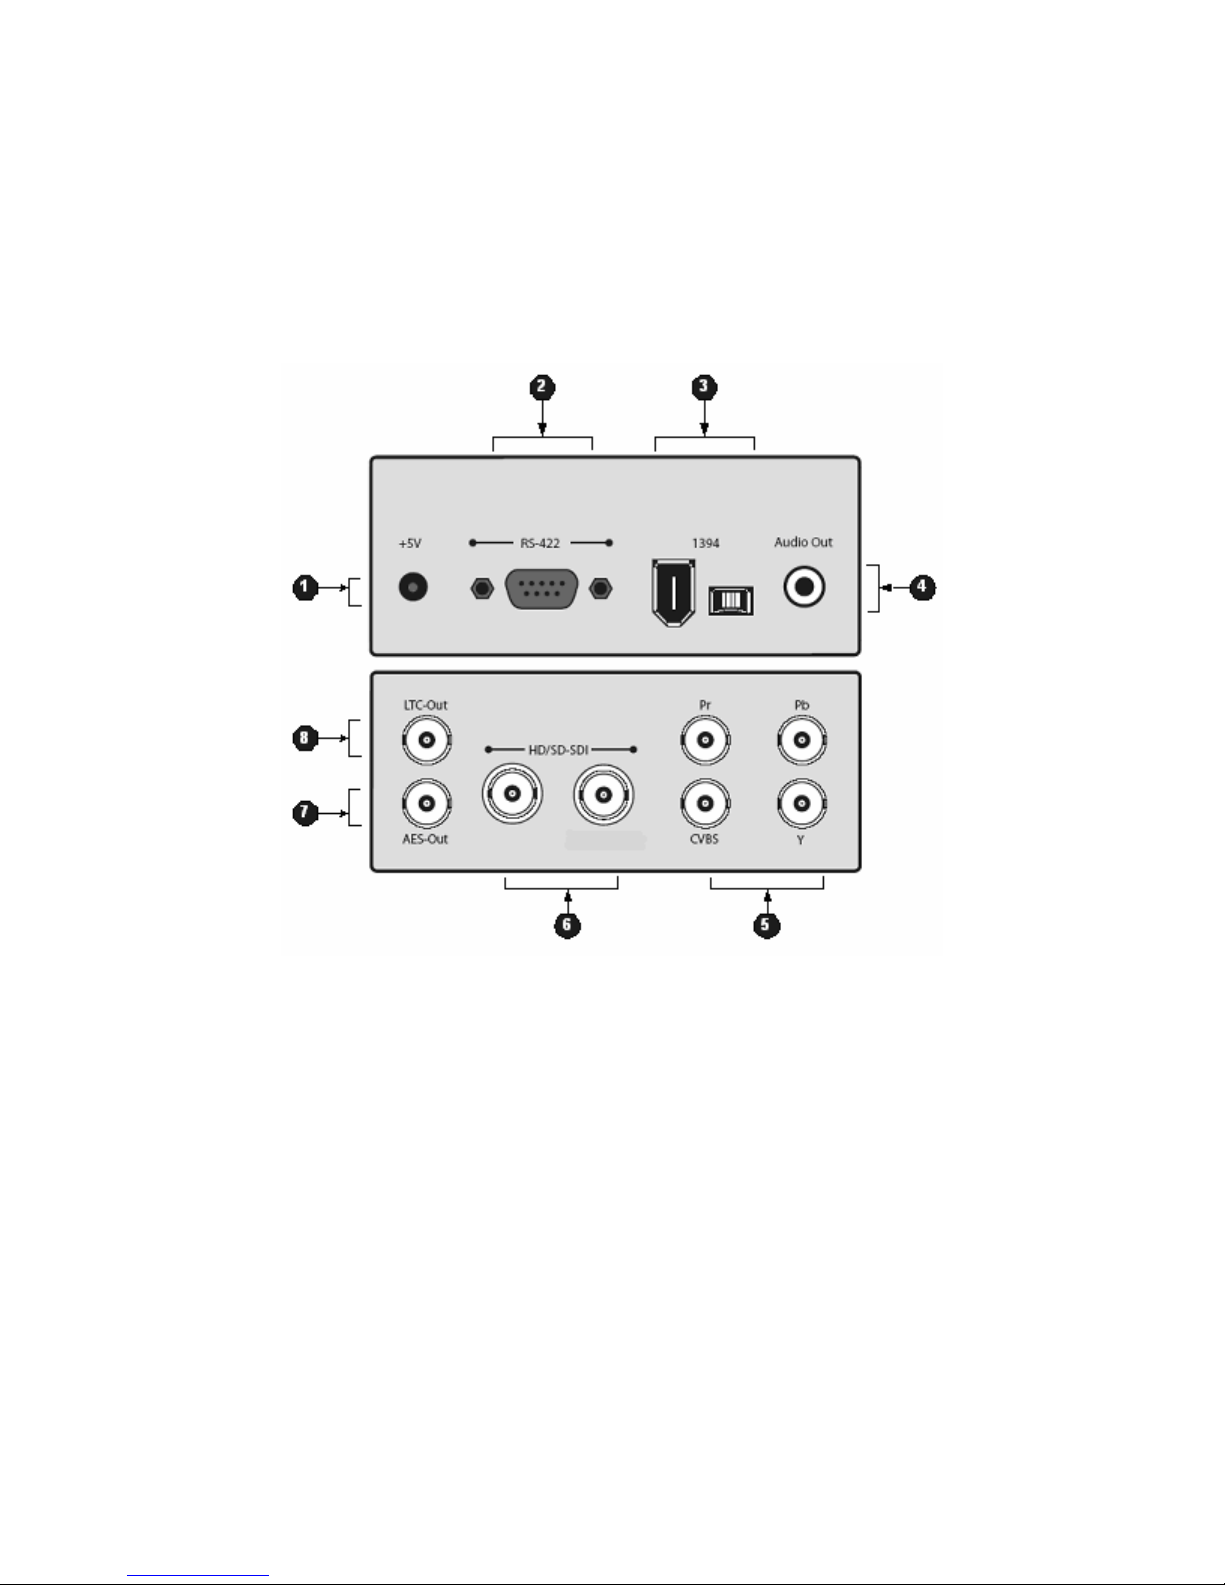
Refer to Figure 2 and the descriptions below when connecting HD-Connect LE™.
Figure 2 Connectors on the HD-Connect LE™
1) DC +5V in: Connect the supplied DC power supply unit.
2) RS-422: Connect to HDV based editing system for 1394→ RS-422 or to
your SDI based editing system for RS-422 ↔ 1394.
3) HDV In: Connect to your HDV source. You can use either the 4-pin or the
6-pin 1394 connector. NOTE: HD-Connect LE™ can only use one 1394
HDV source at a time.
4) Unbalanced Audio Out: 3.5 mm unbalanced audio connector for
monitoring. HD-Connect LE™ outputs audio simultaneously through this
port, the AES port, and in the HD/SD-SDI stream.
5) Analog Video Out: Component HD and Composite SD output. CVBS is
not active in HD mode. Component is active in both HD and SD.
HD-Connect LE™ Guide and User’s Manual.
Page 8
6) HD/SD-S DI Out Dual HD/SD-SDI outputs. DIP switch 1 determines
whether output is HD or SD.
7) AES Out Single-ended AES audio out.
8) LTC Out Single-ended Linear Time Code out.
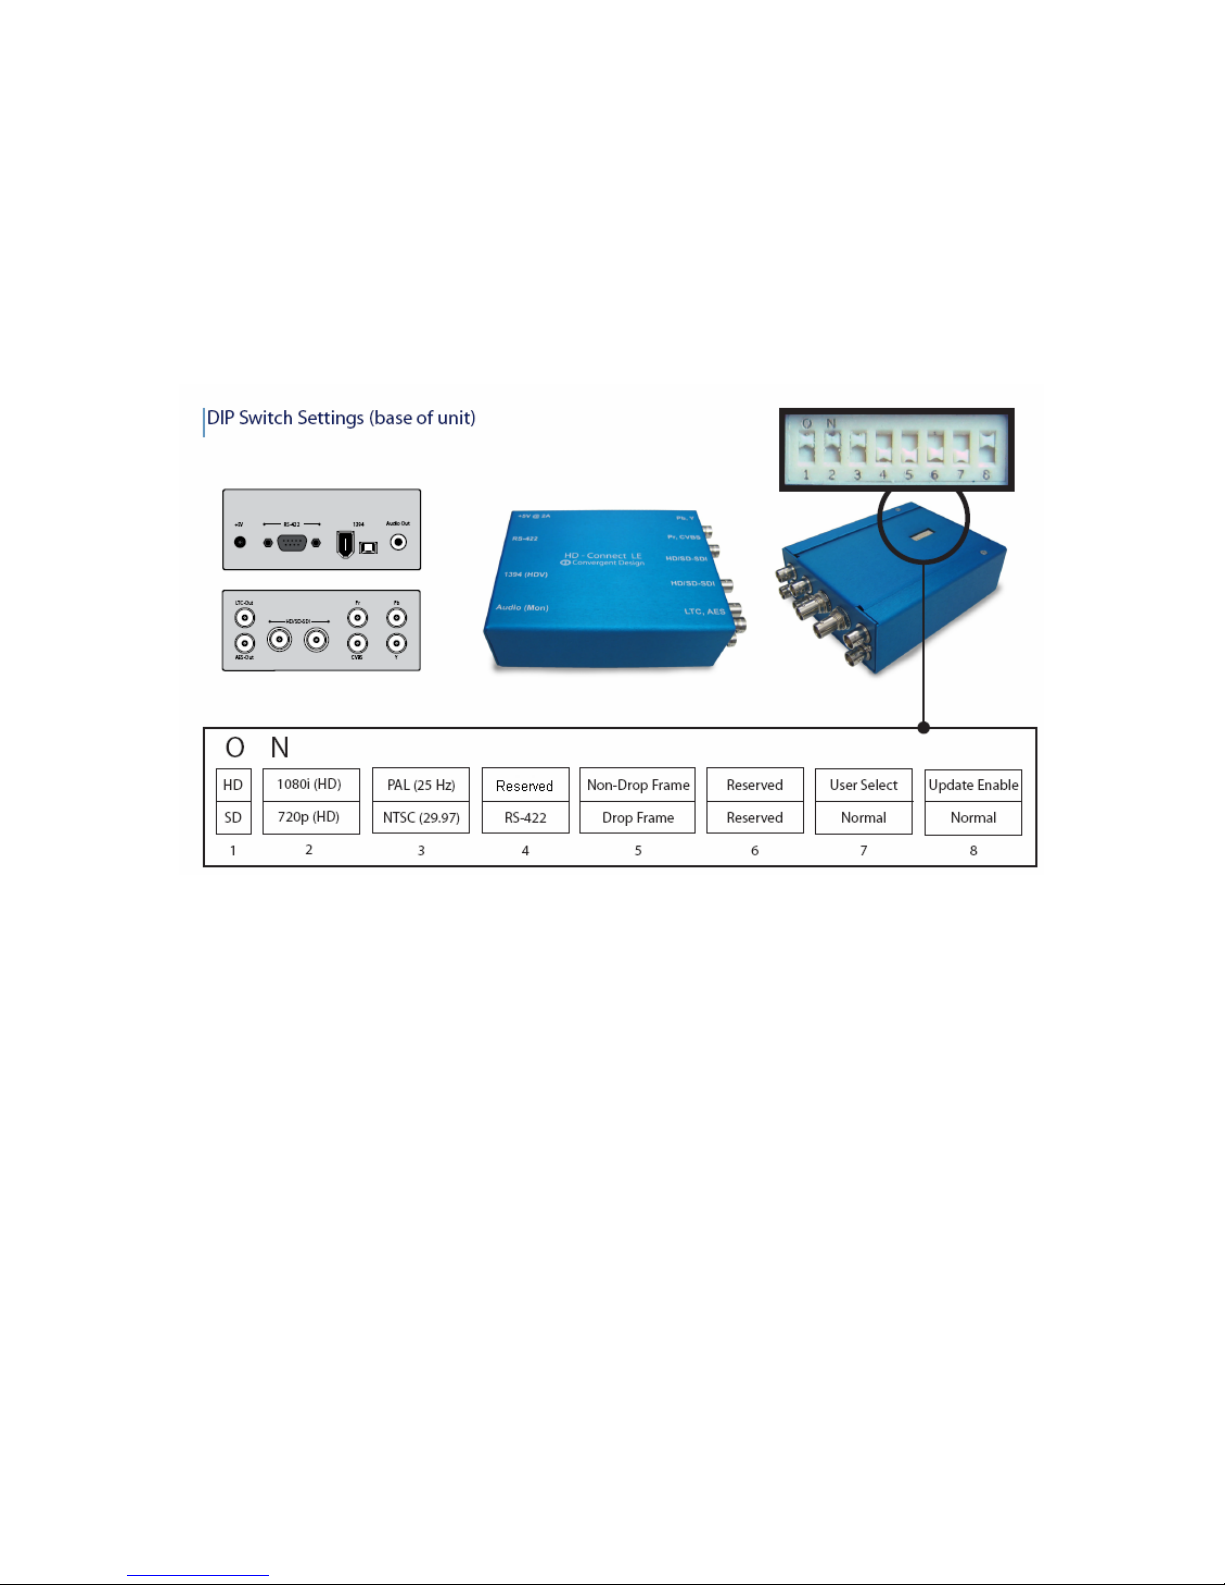
3.2 DIP Switch Settings
8
Figure 3 DIP Switch Settings on HD-Connect LE™
Figure 3 illustrates the DIP switch and its various control options. Below is an
explanation of each switch and its functions:
1) Selects SD (Standard Definition) or HD (High Definition) video output for
both HD/SD-SDI and analog.
2) Enables 720p or 1080i in HD (Switch 1=On).
3) Selects NTSC (29.97/59.94) or PAL (25/50) video standard – This must
correspond to the HDV input format.
4) Selects deck control direction. Switch 4 = On enables 1394 to RS-422
control
(upcoming feature) and Switch 4 = Off enables RS-422 to 1394
control. Currently Switch 4 = On is a reserved feature.
5) Selects NTSC timecode format. Switch 5 = On selects non-dropframe
timecodes and Switch 5 = Off selects dropframe timecodes.
HD-Connect LE™ Guide and User’s Manual.
Page 9

6) When used in conjunction with Switch 7, enables scaling features in SD
and options enabled with the control application. See the table below for
an explanation of these features.
7) Same as with Switch 6.
8) Enables flash memory update.
Switch 6 Switch 7 Feature
Off Off Style from Control App
On Off SD Letterbox
Off On SD Edge Crop
On On SD Anamorphic
4 Updating HD-Connect LE™
9
4.1 Preparation
To prepare for updating the HD-Connect LE™, complete the following steps:
1) Download and install the update and control application from the website.
Go to the HD-Connect LE™ downloads page at http://www.convergent-
design.com/LEdownloads.htm . Here you may download the latest code
updates for either PC or Mac. The page has links to .exe files to install the
control application for either PC or Mac.
2) In order to run the control application, you will need the Java Runtime
Environment 1.4.1 or better. If you need this to be installed on your
machine, follow the instructions on the product downloads page where the
.exe files are located.
3) Connect the HD-Connect LE™ to your computer via the 1394 port with the
DIP switch 8 set to the “On” position. It is recommended that the control
and update application not be run alongside other applications that use
the 1394 port.
4.2 Using the Update Application
Follow the instructions below to complete the update process using either a PC
or a Mac.
HD-Connect LE™ Guide and User’s Manual.
Page 10

PC
1) Connect the HD-Connect LE™ to your computer using the 1394 port. You
must wait for your computer to recognize the box before the update
application will work. This will take around 30 seconds. In Windows XP, a
window similar to Figure 4 should pop up. For Mac, there is no indicator
and it is recommended you wait for 30 seconds.
10
Figure 4 Windows XP recognizing the box.
2) Install the update and control application by running the .exe. Figure 5
shows the installation process.
HD-Connect LE™ Guide and User’s Manual.
Page 11
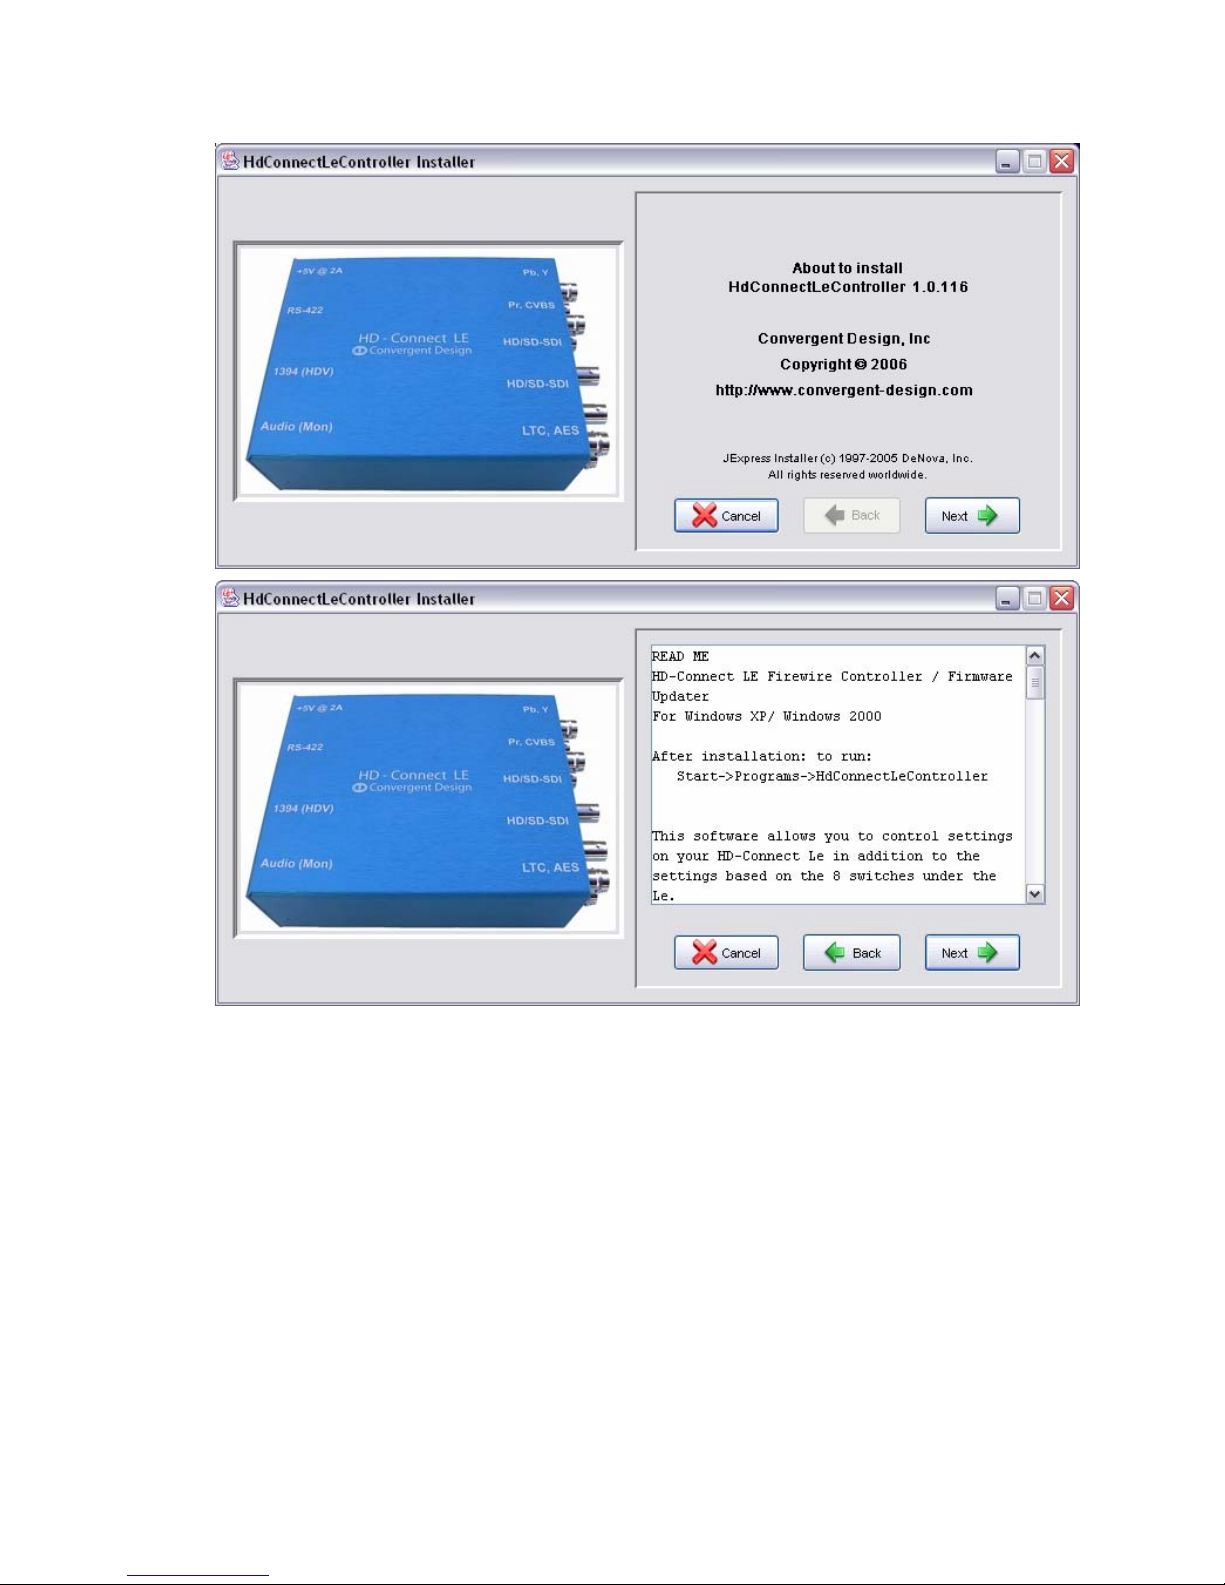
11
Figure 5 Installing the Control Application the PC & Mac
3) From the Start Menu, open the newly installed application
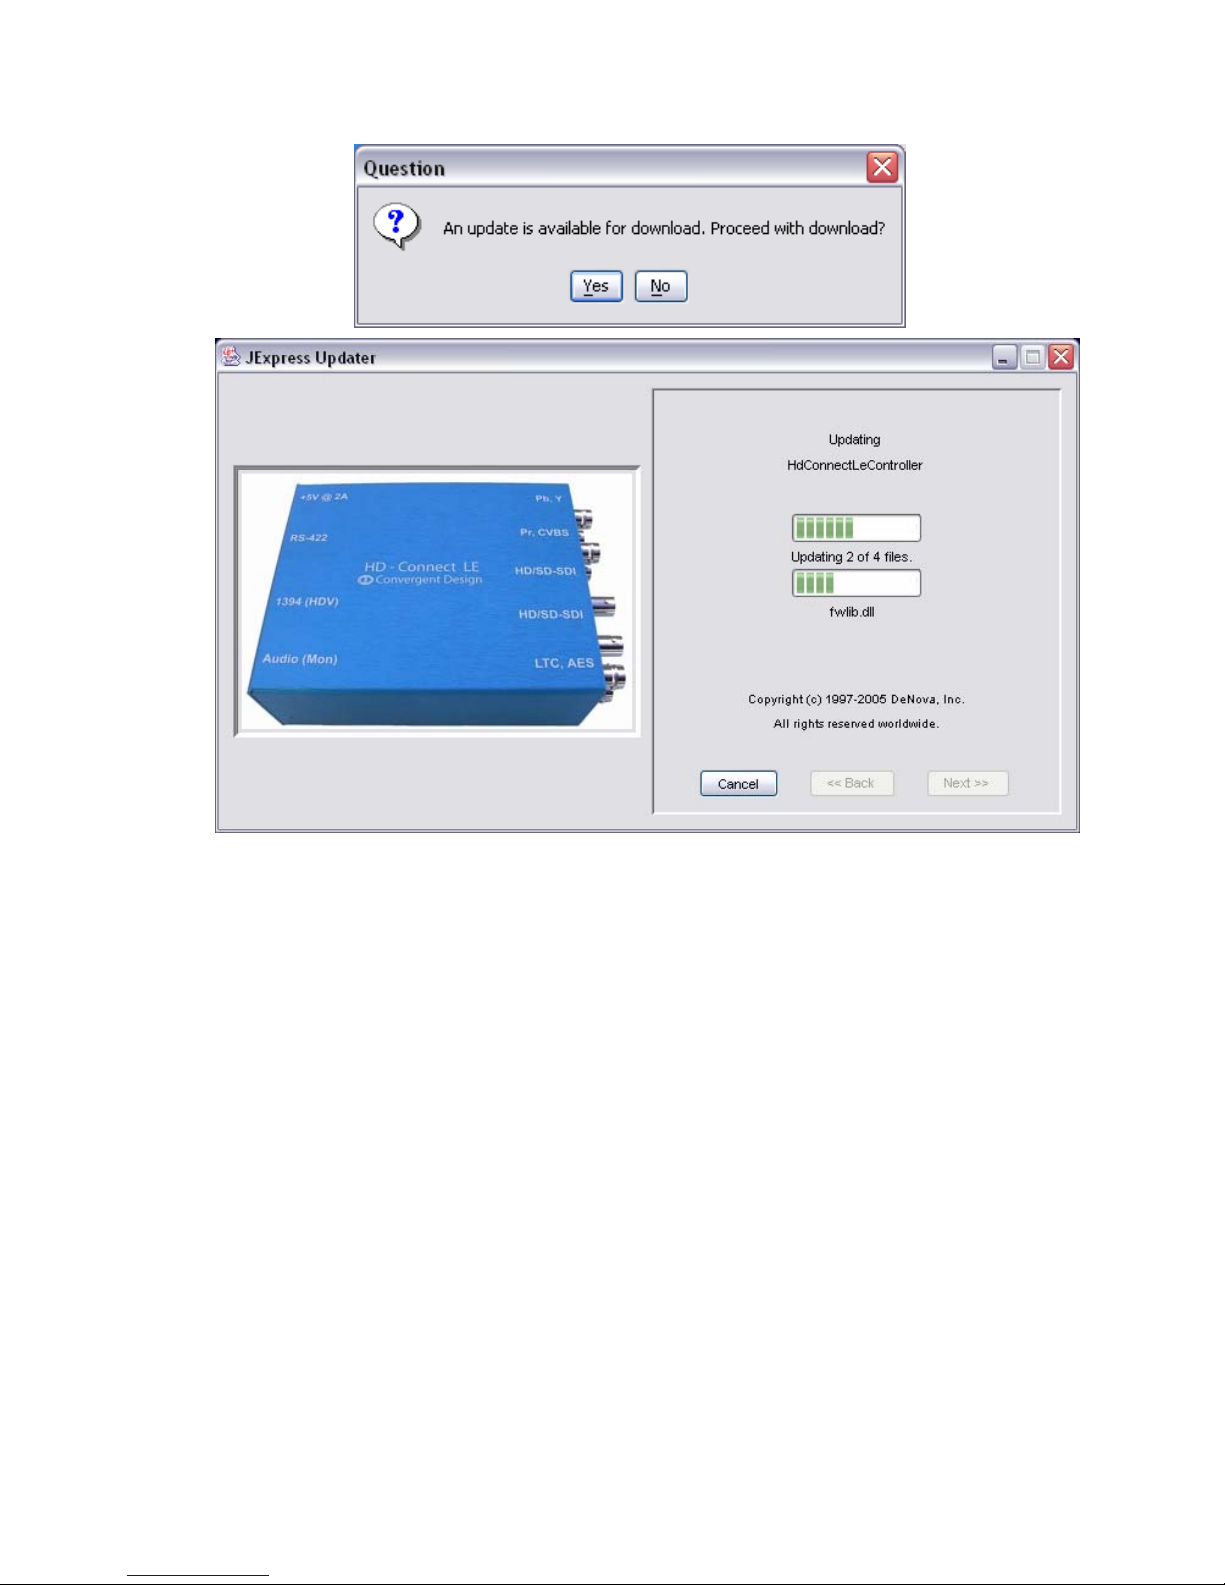
“HdConnectLeController”. When the application first starts, it will check
online for available updates. You will be prompted to update it upon first
use, click ok. When the update is finished, you will need to restart the
application. Figure 6 shows the dialog window.
HD-Connect LE™ Guide and User’s Manual.
Page 12
12
Figure 6 Control Application Asking for Updates
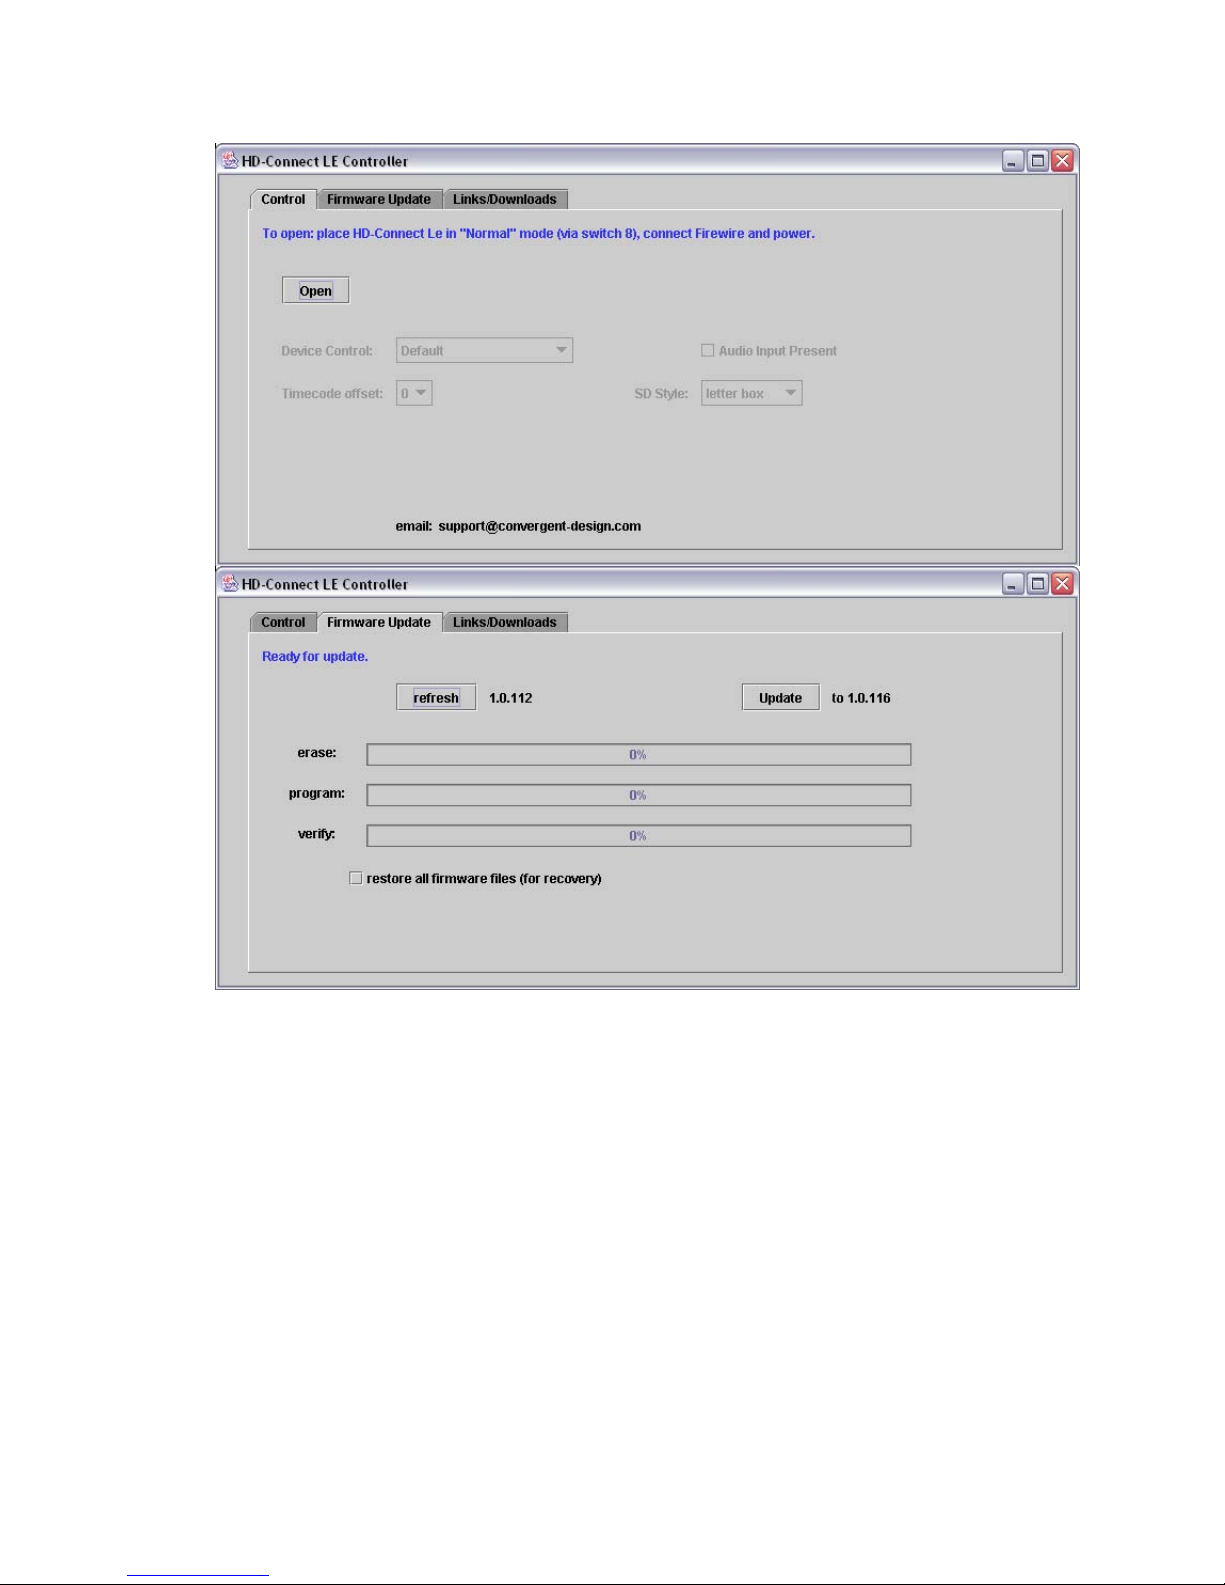
4) Open the Control Application again. With the box in update mode (Switch
8 = On), click on the “Firmware Update” tab, and click the “Refresh” button
to check the current software loaded into the HD-Connect LE™, and
display the newest version to update to. Figure 7 illustrates.
HD-Connect LE™ Guide and User’s Manual.
Page 13
13
Figure 7 Using the Update Application
5) Click on the “Update” button to begin the update. It is recommended that
you record the current version before updating the box, so that you can
roll back to it if the new version does not work. Check the “Restore All
Firmware Files” box if your box did not complete an update or if the box is
in an unstable state. This process takes 3-6 minutes. During that time DO
NOT unplug the box. A success window will appear when the update is
complete. See Figure 8 for a screenshot of a complete update.
HD-Connect LE™ Guide and User’s Manual.
Page 14

14
Figure 8 Update Application in Action.
6) Once the update is complete, close the application and take the box out of
update mode by switching selector 8 to the “Off” position. All normal
operations cease while the box is in update mode, so it is important not to
forget this step.
Mac
1) For the Mac OSX, the procedure for installation is identical to the PC.
Follow the instructions as before. Figure 9 shows the Mac installer
window.
HD-Connect LE™ Guide and User’s Manual.
Page 15

Figure 9 Mac OSX Installer Screen
2) Open the HD-Connect LE Update Application window itself, using Finder
to locate the Applications, and select “HdConnectLeController”. Figure 10
illustrates this.
15
3) When you open the application, it should appear as in Figure 11. Use the
exact same procedure for PC to update the box. With the box in update
mode, click the “Refresh” button, then click the “Update” button. The
update should take around three to five minutes. During that time DO NOT
unplug the box.
Figure 10 Finder in OSX
HD-Connect LE™ Guide and User’s Manual.
Page 16

16
Figure 11 Mac Update Application
4.3 Rollbacks
Firmware updates will appear periodically on the website, so stay tuned. If you
update your HD-Connect LE™ as described above and find problems with the
box in your application, you can roll back to a previous code version using the
Control App. To do this, with the box in Update mode, click on the
“Links/Downloads” tab. Click on “Refresh List”. Using the drop down menu, select
the code you wish to use. This tells the Control App what code to load when it is
restarted. Close the Control App, restart it and allow it to download the
appropriate code, then proceed with the normal update procedure. Figure 12
below shows the “Links/Downloads” tab.
HD-Connect LE™ Guide and User’s Manual.
Page 17

17
Figure 12 Code Rollback Feature in the Control App
5 Controlling HD-Connect LE™
5.1 Preparation
To prepare for using the HD-Connect LE™ control application, you need only
ensure that the box is not in update mode. If Switch 8 is still in the “On” position,
you will see a popup similar to the one below in Figure 13.
Figure 13 Alert message when in update mode.
When selecting options in the Control App, occasionally the HD-Connect LE™
will lose track of the 1394 uplink and may give you either of the following alert
messages. If so, we recommend unplugging and re-plugging the 1394
connection or power cycling the box.
HD-Connect LE™ Guide and User’s Manual.
Page 18

Figure 14 Error Messages
5.2 Using the Control Application
18
Follow the instructions below to complete the update process.
PC & Mac
1) Connect the HD-Connect LE™ to your computer using the 1394 port. You
must wait for your computer to recognize the box before the control
application will work. This will take around 30 seconds for either Windows
XP or Mac.
2) Open and run the control application. Click on the “Open” button under the
“Control” tab. The application will then display the current firmware
version. Figure 15 shows a screenshot of the application.
HD-Connect LE™ Guide and User’s Manual.
Page 19

19
Figure 15 HD-Connect LE™ control application screen.
3) Perform the desired control operation as described below.
Control Operations
The operations available in the control application are described below. Following
your selection of a list item, checkbox, or radio button, a message should appear
confirming that your selection has been successfully loaded into your HDConnect LE™ box. Figures 16-18 show the use of the control app for each
operation. The interface for the PC and the Mac are identical in operation.
HD-Connect LE™ Guide and User’s Manual.
Page 20

1) Device Control. The device-control dropdown list allows selection of a
template representing a certain RS-422 controller or a set of controllers.
The text box should display the controller currently selected. Click on the
down arrow to show the list and click on the text identifying the template to
select the controller the box should use. Once selected, the blue text
should display a confirmation message. By default, HD-Connect LE™
comes pre-loaded with “Avid Generic” selected. Figure 16 illustrates.
20
Figure 16 Device Control selection confirmation.
2) Timecode Offest. This setting allows you to add an offset to the timecode
that will be reported to an RS-422 controller. HD-Connect LE™ already
imposes its own offset to account for frame latency through the box.
HD-Connect LE™ Guide and User’s Manual.
Page 21

Should you have other pieces of equipment downstream from HDConnect LE™ that add further frame delays through your setup, you may
wish to set an additional offset here.
21
Figure 17 Timecode Offset Selection.
3) Audio Present. This checkbox indicates whether audio should always be
present in the HDV data that streams to HD-Connect LE™ over the 1394
bus. For capture of source material from an HDV device, this checkbox
should normally be checked, since the device should always record audio
as it records the source material in the field. When HD-Connect LE™
knows that audio is expected in the HDV stream, it can correct for
problems that arise at scene transitions in the playback from certain HDV
sources and ensure that audio start up faithfully each time a controller
asks the device to play forward at normal speed. On the other hand, for
decoding HDV material that has been processed by an editing application
and recording it to tape, or for playing back material so recorded, this
checkbox should be unchecked. If it is left checked, HD-Connect LE™ will
expect audio and will repeatedly reset its decoding logic when it fails to
find audio data, causing the video to flash off and on.
4) SD Style. This drop down menu lets you select with what style the video
should be scaled in Standard Definition mode. This feature can either be
selected using the Control App (with DIP switches 6 and 7 both off), or can
be manually selected using the right combination of switches 6 and 7. The
HD-Connect LE™ Guide and User’s Manual.
Page 22

22
choices are Letterbox, Edge Crop, or Anamorphic. Figure 18 illustrates.
Figure 18 SD Scaling Features
6 Tips, FAQs, and Troubleshooting
6.1 Operating Tips
The follow are recommendations for video-editing workflow and operation of HDConnect LE™ with other products that may appear in your configuration.
1) Offline/Online Workflow. While HD-Connect LE™ will allow you to use
your RS-422 controller to navigate through a tape in an HDV device, it is
best to reserve this capability for a rough look at source material rather
than for logging in and out points for later batch capture. Due to the
GOP (Group Of Pictures) structure of MPEG video and the transport
limitations of HDV devices, navigation can be quite choppy compared to
navigation through a tape on an RS-422-controlled deck. Timecode
reporting issues (see Using the Control Application/Control Operations)
make the logging of inpoints and outpoints problematic. For both ease
of clip logging and frame-accuracy in the final captured clips, it may be
better to capture an entire tape at a low resolution, decompose the
captured material through an editing application into clips that will be a
part of the final project, and then capture just those clips again at the
desired final resolution
Two scenarios illustrate this approach. In the first, the DV scenario,
material from source tapes is captured directly using a DV editing
application and the DV output from an HDV device. In the second, the
SDI scenario, source material is captured instead from one of the SDI
HD-Connect LE™ Guide and User’s Manual.
Page 23

23
outputs on HD-Connect LE™ connected to an SDI card installed in the
editing computer. The discussion below focuses on the advantages and
disadvantages of these two scenarios.
The DV scenario supports a simple offline capture and edit process that
can be accomplished on a laptop. Since the material is captured in a
format (DV) available as a direct output of the camera, the offline stage
of the process does not require any equipment beyond the camera and
the editing computer. Given minimal equipment and the relatively low
DV data rate, material could easily be captured and edited in the field.
For Avid users, DV also opens up the possibility of capture and edit on
low-cost Xpress Pro systems followed by full-resolution capture and
finishing on high-end Avid products. Of course, capturing and editing in
DV will mean that editors have no choice but to work with lower-quality
standard-definition video. Another problem in the DV scenario is that
timecode for the offline capture will be from one device in one mode (the
camera in DV mode), while the final online capture will be from a
different device in a different mode (HD-Connect LE™ in HD mode). It
may be necessary to set a timecode offset in the capture application to
ensure that the logged DV inpoints and outpoints correspond to the
correct frames during final online capture through HD-Connect LE™. In
addition, some HDV devices will not down-convert to SD and provide a
DV output, so this scenario would not be possible with all HDV devices.
While the need for an SDI capture card (HD or SD) in the SDI scenario
eliminates the possibility of capturing and editing on a laptop or with
Avid Xpress Pro, the SDI offline/online scenario eliminates the
difference in timecode source, since clips are captured through HDConnect LE™ at both offline and online stages. Also, the SDI scenario
allows the selection of a number of different codecs for video
compression during the offline tape capture. With SD-SDI output from
HD-Connect LE™ set in SD mode, a software DV codec could achieve
the same savings in disk space as in the DV scenario. For higherquality material during offline capture and edit, HD-Connect LE™ could
be set in HD mode and a DVC Pro HD codec used to compress
captured video. Recapture of just the final project clips could then be
done at the full HD data rate. The SDI scenario is also more universal
than the DV scenario, since it covers an HDV source such as the JVC
BR-HD50 deck that do not down-convert to DV.
The table below summarizes the advantages and disadvantages of the
DV and SDI scenarios.
HD-Connect LE™ Guide and User’s Manual.
Page 24

DV Offline Capture SDI Offline Capture
24
Advantages
• Laptop ok
• Avid Xpress Pro ok
• Minimal equipment
• Low data rate
• SD or HD
• Choice of SD or HD
codecs (DV, DVC Pro HD,
etc.)
• Ok for HDV device
without down-conversion
Disadvantages
• Lower offline quality
• SD only
• No laptop
• No Xpress Pro
• DV compression only
• May need timecode
offset in edit app
• Requires HDV
device that downconverts
2) Continuous Timecode and Leaders in Video Capture. For purposes of
searching in the course of a batch capture, it is best to have a tape
without timecode breaks. A camera in free-run timecode mode will
continue to advance its internal timecode while the camera is not
recording. This can create significant gaps in timecode from one clip
recording to the next and may cause search problems in later searches.
Even greater problems arise when there are multiple instances of the
same timecode on a single tape. For best results, the camera should
be set in record-run mode with a desired starting timecode and the
timecode not reset until the full tape has been recorded. This should
cause the camera to begin advancing its internal timecode only each
time the record button is pushed. It is also recommended that the first
scene recorded on a tape have a leader of 30 seconds or more of
sacrificial material in order to prevent a reverse search from overrunning
the timecodes on the tape. There should also be a leader before each
subsequent scene at least as long as the preroll during batch capture.
The recommended preroll time for a batch capture is 6 seconds
3) Avoiding Multiple IEEE-1394 Devices
(e.g., on power-up or plugging or unplugging a 1394 device), HDConnect LE™ searches the bus for the first HDV device it can find.
Where there is more than one, any beyond the first are ignored. The
order in which devices are queried may change from one reset to the
next, so it is best never to have more than a single HDV device plugged
in at the same time. With more than one device on the bus sending out
. On any reset of the 1394 bus
HD-Connect LE™ Guide and User’s Manual.
Page 25

queries in the wake of a bus reset (e.g., HD-Connect LE™ and a PC or
Mac), communications between HD-Connect LE™ and an HDV device
may fail. This is known to happen with the Canon XLH1 camera. This
seems to result from queries from HD-Connect LE™ and the computer
arriving at the HDV device too close to one another. It is best,
especially with the Canon camera, to include only HD-Connect LE™
and a single HDV device on the 1394 bus and plug a computer in only
to run the update or controller application for HD-Connect LE™.
4) Avoiding Avid Auto-Configure. Rather than use Avid’s automatic deck
configuration, select Generic Play Deck as a specific device-control
template.
5) Avid Check Decks Retries. If a Check Decks operation from Avid fails,
just do the check again. Testing has shown that the Check Decks
operation sometimes sends a couple of lead bytes that cannot be part of
a legitimate RS-422 command.
25
6.2 Frequently Asked Questions
1) What are the capabilities of HD-Connect LE™? The HD-Connect LE™ is
a compact HDV → HD/SD-SDI converter box with component (HD/SD)
and composite (SD only) as well as LTC and AES audio outputs. Deck
control is supported via RS-422 → 1394 (available now) or 1394 → RS422 (upcoming feature).
2) Can you perform HD-SDI → HDV conversions? No, the box only decodes
(HDV→ HD/SD-SDI); it does not encode (HD-SDI→ HDV) video/audio. An
economical HDV encoder is about 12-18 months away.
3) Can I copy an HDV tape to HD-CAM deck?
SDI output from the HD-Connect LE™ to your HD-CAM deck. The video,
audio, and time code are all carried through this single connection.
4) Can I edit in HDV and then output to HD or SD decks? Yes, one of the
advantages of using “native HDV” editing with the HD-Connect LE™ is the
ability to output your finished project in either HD or SD formats (though
not both simultaneously). Supported decks include HD-CAM, DigiBeta,
DVC-Pro HD, and BetaCam SP.
5) What is the frame latency through the box?
three frames through the HD-Connect LE™. The overall latency from a
live camcorder shoot is about eight to ten frames, due to the frame delay
in the camcorder.
6) What does the HD-Connect LE™ offer over similar HDV products?
Yes, simply connect the HD-
There is a latency of one to
HD-Connect LE™ Guide and User’s Manual.
Page 26

• The ability to downscale to standard definition video as well as cross
conversion (720p ↔ 1080i).
• Smaller size, lower cost, less power.
• 24 fps support.
• 1394 → RS-422 control (upcoming feature).
7) What are the various input formats supported?
The MPEG2 (HDV) formats include:
• 1440x1080i, 29.97 Hz
• 1440x1080i, 25 Hz
• 1440x1080i, 23.98 Hz
• 1280x720p, 59.94 Hz
• 1280x720p, 50 Hz
• 1280x720p, 29.97 Hz
• 1280x720p, 25 Hz
• 1280x720p, 23.98 Hz
8) What is the maximum MPEG2 data-rate?
Up to 40Mbps.
9) Can HD-Connect LE™ decode other MPEG streams, besides HDV? Yes,
the board supports most of the ATSC (ISO/IEC 13818-2) streams, but is
limited to bit rates below 40Mbps.
10) Does the HD-Connect LE™ support DV? No, this is a likely feature for a
future box in the HD-Connect family.
11) What is the data rate of HDV? 720p HDV is approximately 19Mbps, 1080i
is 25Mbps.
12) What is the recommended workflow using HD-Connect LE™?
Use HDConnect LE™ to convert from HDV to HD/SD-SDI via firewire. Connect
the HD-SDI output to an HD/SD-SDI capture card. Capture the video and
audio either uncompressed or using the I-Frame CODEC such as
DVCProHD or DNxHD. You can control the HDV deck by connecting the
RS-422 from your capture card to the LE box.
13) I edit native HDV on my laptop, how do I monitor HDV and master to
tape? Connect your HD-Connect LE™ to your firewire port and do a
“Print to Tape”. You can monitor the video via the composite output (when
scaled down to SD) or an analog component or SDI monitor. Using the
upcoming HD-Connect LE™ 1394→RS-422 control, you can use this
same setup to output to a BetaCam, DigiBeta, or HD-CAM deck.
26
HD-Connect LE™ Guide and User’s Manual.
Page 27

14) Can I output to a DigiBeta deck? Yes, the SD-SDI includes audio and will
include time code in an upcoming release. Connect the SDI output directly
to the DigiBeta deck and set the box up in SD mode. Connect the LTC out
of the HD-Connect LE™ to the in of the DigiBeta deck. The DigiBeta deck
will lock to the HD-Connect LE™ SDI connection, so no reference is
required.
15) Can I down-convert my HDV project and output to a BetaCam deck?
Yes, just connect the component outputs to your BeatCam deck and the
composite out to the reference input of the deck. The Beta deck will flash
“Invalid Ref”, but the video will be recorded correctly. Connect the AES out
of the box to an audio A/D converter with balanced outputs. Then connect
the balanced outputs to your BetaCam audio inputs.
16) I have a high-end Avid system, how can I import HDV? First, connect a
1394 cable between your HDV source and the HD-Connect LE™. Then
connect the HD-SDI output from the box to your Avid system. Finally,
connect an RS-422 from your Avid system to the HD-Connect LE™. Using
the selector switches, set the video output to HD or SD and 1080i or 720p
as appropriate. Set the deck control to RS-422. You can now drive the
HDV deck/camcorder from your Avid NLE program.
17) Which NLE software programs work with HD-Connect LE™? For native
HDV editing, we have tested the following: Sony Vegas and Final Cut Pro
(need to test Avid, Premiere, and Liquid Edition). For HD/SD-SDI editing,
we have tested the following: Avid, Final Cut Pro, Media 100, Leitch
Velocity, etc.
18) I use Final Cut Pro and want to edit all the material using the DVCProHD
codec, can the HD-Connect LE™ help with HDV material? Yes, use the
HD-Connect LE™ to convert HDV→ HD-SDI and then capture into FCP
via an HD-SDI card (AJA or Blackmagic, for example) using the
DVCProHD codec.
19) Is HDV at 24fps (actually 23.98 fps) supported?
Yes, in both 720p and
1080i formats.
20) What are the possible output formats?
There are six output formats (SDI
and Component):
• 1920x1080i, 29.97 Hz, 16:9, 4:2:2 color space
• 1920x1080i, 25 Hz, 16:9, 4:2:2 color space
• 1280x720p, 59.97 Hz, 16:9, 4:2:2 color space
• 1280x720p, 50 Hz, 16:9, 4:2:2 color space
• 720x480i, 29.97 Hz, 4:3, 4:2:2 color space
• 720x576i, 25 Hz, 4:3, 4:2:2 color space
27
HD-Connect LE™ Guide and User’s Manual.
Page 28

21) What are the SD output formats? Anamorphic, edge crop, and letter box,
selectable on the bottom of the HD-Connect LE™ or through the Control
App.
22) Does the box upscale the 1080i HDV from 1440 to 1920?
Yes, using a
multi-tap filter for smoother scaling.
23) Is the video stream 8-bit or 10-bit resolution?
All HDV video is 8-bit
resolution. Video is extended to 10 bits before transmission over HD/SDSDI.
24) Can the box perform frame rate conversions (50i→60i, for example)?
Yes, but we do not recommend this feature.
25) How does the downscaled video (SD) compare to the DV out of the HDV
camcorder? The downscaled video is definitely superior because it has
only seen one compression (HDV). The DV video has seen an HDV
compression followed by a DV compression after downscale.
26) Does HD-Connect LE™ work in true NTSC frame rates (29.97fps)? Yes.
27) Can I add color or gamma correction to the video? A firewire-based
control application is planned for 2nd quarter 2006 release, which will
include the capability to adjust colors, stretch the black levels, and
program a specific gamma curve.
28) Does HD-Connect LE™ support true SD (BT-601) and HD (BT-709) color
spaces? Yes, a color space conversion is automatically performed to
convert between the SD and HD color spaces as necessary.
29) How can I edit HDV shot with the JVC HD100 (720p) and Sony Z1 (1080i)
together? HD-Connect LE™ includes a cross converter (720p↔1080i), so
you can convert video into either format.
30) Does the box work with HDV camcorders from Sony, Canon, and JVC?
Yes, all three are supported.
31) How do I select the output format?
Using the selector switches on the
bottom of the box, you can select the desired video output format. The box
automatically detects the format of the incoming HDV and scales the
video, as necessary, for the desired output.
32) What is the data rate of the uncompressed HD and SD stream?
• 1080i HD= 125Mbytes/sec
• 720p HD= 110Mbytes/sec
28
HD-Connect LE™ Guide and User’s Manual.
Page 29

• SD Video= 21Mbytes/sec (8-bit)
33) Are the analog component, SDI, AES, and LTC outputs all active (hot)?
Yes, you can use all the outputs simultaneously, though the analog
composite output is active in SD mode only.
34) Can I connect the outputs to an LCD or Plasma panel? Yes, via the
component outputs. You can also view the video on a composite video
monitor (SD mode only). Additionally, one of the HD-SDI outputs could be
connected to a low-cost HD-SDI→ DVI/HDMI converter box for pure digital
connection.
35) Can I get HD and SD out simultaneously? No, if you select HD, then the
component and SDI outputs are all operating in HD resolution (720p or
1080i as selected by the switches). If you select SD, then the analog and
SDI outputs all output in standard definition mode. (The Composite out
only works in SD mode).
36) Can I control an HDV Camcorder from an RS-422 cable? Yes, the HDConnect LE™ converts the RS-422 deck commands and time code
queries to 1394 AV/C commands.
37) How does the HD-Connect LE™ handle time code? The time code is
read from the HDV source (over firewire), and then transferred to SDI,
LTC, and RS-422 simultaneously. From the control application you may
select from embedded or queried time-code. Embedded time code is
extracted from the HDV stream, while queried time code derives from
device responses to AV/C time-code queries sent out over the 1394 bus.
Use of embedded time codes will generally lead to somewhat more frameaccurate batch captures. When the HDV device is not playing, HDConnect LE™ will always report queried time codes.
38) Will the box convert 1394 deck control commands to RS-422?
Yes, just
set the selector switches accordingly. (Coming soon)
39) Has the audio/video synchronization been verified? Yes, A/V (lip sync)
has been tested and found to be in sync.
40) Can I monitor the audio out?
Yes, there is a 3.5mm stereo audio
(unbalanced) output for monitoring.
41) Is the audio compressed?
The HDV audio is compressed using MPEG-1
Layer 2 standard. The output of the HD-Connect LE™ box is
decompressed to 16-bit 48Khz audio (for AES, SDI-embedded, and
unbalanced analog output).
29
HD-Connect LE™ Guide and User’s Manual.
Page 30

42) How many channels of audio are in the HD or SD-SDI stream? Four
channels are transmitted, but only audio channels 1-2 have data. Audio
channels 3-4 are muted because HDV only has two channels of audio.
43) Can the firmware be updated in the field?
Yes, a 1394 update utility is
available. The update utility and new firmware can be downloaded from
the Convergent Design website (
http://www.convergent-design.com).
44) What is the physical size of the box and it’s power requirements? The
overall size (including connectors) is: 6” x 4” x 1.75” (152 x 101 x 44 mm).
At less than 1 lb (0.5kg) the box is very lightweight. The box consumes
about 5 Watts of power; an external 5V power supply (with universal AC
100-240V) is included with each HD-Connect LE™ box.
45) I understand that the JVC camcorder has two additional channels of
uncompressed PCM audio. Does the HD-Connect LE™ support this
function? No, we are still investigating if this is possible.
46) Can I capture in true 24p mode? The current code version embeds the
Varicam flags in the HD-SDI stream for 720p 59.9 output, allowing the
NLE capture software to capture only the original 24 frames of data,
dropping the repeated frames.
47) Where can I find additional information?
• http://www.convergent-design.com
• Your local Convergent Design dealer (see website)
• sales@convergent-design.com
• ++(720) 221-3861
30
HD-Connect LE™ Guide and User’s Manual.
Page 31

6.3 Troubleshooting Guide
1) No output from the box.
• Try selecting color bars. (Unplug all 1394 devices to turn color bars on.
Color bars only output on the HD/SD-SDI connections, not analog)
• Check that the HDV source is set to HDV output AND has an HDV (not
DV) tape.
• Check output from HDV source (deck or camcorder)
• Check that DIP switch 8 is “Off”.
2) Video is jumpy
• Check to see if the box is in NTSC or PAL and matches the standard of
the video you are working with.
3) Box failed to update
• Check to see that DIP switch 8 is “On”.
• Make sure the computer recognizes the box before updating.
• Repeat update with the “Update Minimum only” box unchecked.
• Roll back to a previous working version.
4) RS-422 Deck control does not work.
• Be sure the direction of control is set correctly. Refer to the directions
on the DIP switch 4 settings to choose the correct direction.
• Select a generic play deck as the deck template in the NLE software.
5) I only see color bars when I turn on the box.
• When there is no HDV device attached via 1394, the HD-Connect LE
displays color bars in the selected output mode.
6) I can’t stream any video when I plug my HD-Connect LE™ into my
computer.
• Be sure that the box is not in update mode.
• Make sure that the box is in 1394 mode (switch 4 on the bottom).
7) My computer won’t recognize the HD-Connect LE™.
• Again, be sure that DIP switch 4 is set for 1394 mode.
31
HD-Connect LE™ Guide and User’s Manual.
Page 32

7 Safety and ESD Precautions
1) Always connect the box to specified power source: 100 to 240 V AC,
50/60 Hz. DO NOT use any power supply other than the one supplied
with the HD-Connect LE™, as this voids the warranty.
2) Do not operate the unit in an unprotected outdoor installation or in wet
areas. Do not expose this product to rain or snow.
3) Keep the operating temperature between 5º C and 40º C (40º F and
104º F). Avoid conditions which would cause moisture condensation
on the outside cover.
4) There are no user serviceable components inside the box. Only a
qualified technician should perform servicing of the unit. Opening the
box may void the warranty.
5) Do not pour water or any other fluid over the box. Avoid the use of
sharp objects near the box as they may scratch the anodized
aluminum case or damage the DIP switch and board.
6) Clean only with water with a damp cloth.
7) CAUTION: Electrostatic Discharge (ESD) can damage components in
this product. Although HD-Connect LE™ has countermeasures to this
hazard installed inside, it is always best to avoid damage by using
extra caution when adjusting the DIP switch settings.
8) Do not touch exposed connector pins and do not insert any metal
objects in the connectors.
9) Because it is powered, take extra caution when plugging in the 1394
port 6-pin connector. DO NOT cock the connection or you risk
destroying the port. Blown firewire ports are not covered under the
warranty.
10) Ensure that all connections made to the box (including at the “other
end of the cable”) are made in ESD safe environments.
11) Always transport and store the box in the static protected bag included
with the HD-Connect LE™
12) Do not use mechanical pencils to adjust the DIP switches, as this
deposits lead stains on the switch that are impossible to remove.
32
HD-Connect LE™ Guide and User’s Manual.
Page 33

8 Connection Diagrams and Applications
8.1 HDV Capture with HD/SD-SDI based editing system
33
HD-Connect LE Front
1394
HDV Camera or Deck
RS 422
R
L
Audio
Monitor
Switch Settings
1
HD or S D Vide o
2
1080i or 720p (HD)
3
Pal or NTSC
4
Off RS 422 Control
5
Off
6
Anamorphic or Edge Crop
7
or Letterbox
8
Off
HD-Connect LE Back
Analog
Monitor
HD/SDSDI Video
and Audio
HD-Connect LE™ Guide and User’s Manual.
Page 34

8.2 HDV Dub to High Definition Deck
34
HD-Connect LE Front
1394
HDV Camera or Deck
R
Audio
Monitor
Switch Settings
1
On HD Vi deo
2
1080i or 720p
3
Pal or NTSC
4
Off RS 422 Control
5
Off
6
Off
7
Off
8
Off
HD-Connect LE Back
L
Analog
Monitor
HD-SDI
Video,
Audio and
timecode
HD-Connect LE™ Guide and User’s Manual.
Page 35

8.3 HDV Playback from Computer
35
HD-Connect LE Front
1394
Computer with HDV
based NLE
RS 422
R
L
Audio
Monitor
Switch Settings
1
HD or SD Video
2
1080i or 720p (HD)
3
Pal or NTSC
4
On 1394 Control
5
Off
6
Anamorphic or Edge Crop
7
or Letterbox
8
Off
HD-Connect LE Back
HD/SDSDI Video
and Audio
Analog
Monitor
HD-Connect LE™ Guide and User’s Manual.
Page 36

8.4 HDV Downscaled to Standard Definition
36
HD-Connect LE Front
1394
HDV Camera or Deck
R
Monitor
Switch Settings
1
Off SD Video
2
3
4
Off RS 422 Control
5
Off
6
7
8
Off
L
Audio
Pal or NTSC
Anamorphic or Edge Crop
or Letterbox
HD-Connect LE Back
CVBS
SDI Video
and Audio
Analog
Monitor
HD-Connect LE™ Guide and User’s Manual.
Page 37

8.5 HDV to HD-CAM Tape Transfer w/ Time Code
37
HD-Connect LE Front
1394
HDV Camera or Deck
Switch Settings
1
On HD Vi deo
2
1080i or 720p
3
Pal or NTSC
4
Off RS 422 Control
5
Off
6
Off
7
Off
8
Off
HD-Connect LE Back
HD-SDI
Video,
Audio &
Time
Code
9 Specifications
9.1 Inputs
HDV (MPEG2)
Formats:
• 1440x1080i, 29.97Hz
• 1440x1080i, 25Hz
• 1440x1080i, 23.98Hz
• 1280x720p, 59.94Hz
HD-Connect LE™ Guide and User’s Manual.
Page 38

• 1280x720p, 50Hz
• 1280x720p, 29.97Hz
• 1280x720p, 25Hz
• 1280x720p, 23.98Hz
Connector: IEEE-1394a 6-pin and 4-pin
9.2 Outputs
HD-SDI
Standards:
• SMPTE High Def Color Bars RP-219
• 4:2:2 SMPTE 292M
• 4 Channel Embedded Audio
• 24-bit, 48Khz, SMPTE 299M
Formats:
38
• 1920x1080i, 29.97Hz, 16:9
• 1920x1080i, 25Hz, 16:9
• 1280x720p, 59.97 Hz, 16:9
• 1280x720p, 50Hz, 16:9
Connectors: 75 Ω BNC
SD-SDI
Standards:
• SMPTE Standard Def Color Bars RP-178
• 4:2:2 SMPTE 259M-C
• 4 Channel Embedded Audio
• 20-bit, 48Khz, SMPTE 272M-A
Formats:
• 720x480i, 29.97Hz, 4:3
• 720x576i, 25Hz, 4:3
Connectors: 75 Ω BNC
Analog Video
Standards:
• Component (G/Y, B/B-Y, R/R-Y)
• Composite (CVBS)
HD-Connect LE™ Guide and User’s Manual.
Page 39

Connectors: 75 Ω BNC
LTC
Standards:
• SMPTE 12M
• Level: 1 Vp-p
Connector: 75 Ω BNC
Embedded Time Code
Standards:
• SMPTE RP-188
AES Audio
Standards:
• AES-3/EBU
• Level: 1 Vp-p
• Impedance 75 Ω
Connector: 75 Ω BNC
Analog Unbalanced Audio
Standards:
39
• Level: 1 Vp-p
Connector: 3.5 mm Stereo Plug
9.3 Physical
Dimensions
• 4” (101 mm) deep X 1.75” (44 mm) high X 6” (152 mm) wide
Weight
• 1 lb. (0.5 kg)
9.4 Power
Range
• 100 to 240 V AC (50/60 Hz)
Maximum Operating
• 6W
HD-Connect LE™ Guide and User’s Manual.
Page 40

9.5 Temperature Ranges
Operating
• 40º F to 104º F (5º C to 40º C)
Storage
• -5ºF to 140ºF (-20º C to 60º C)
9.6 Humidity
Operating
• Less than 80% (non-condensing
Storage
• Less than 90% (non-condensing)
40
HD-Connect LE™ Guide and User’s Manual.
Page 41

41
10 RMA and Warranty
10.1 Conditions of the Warranty
Convergent Design reserves the right to determine if a repair is subject to the
warranty agreement. Damages caused by products being dropped or mishandled
is not covered by this warranty. Also damage caused by over-voltage conditions
on any of the I/O connectors is not covered by this warranty. Use of any power
supply other than the one provided automatically voids the warranty.
Care must be taken when plugging in the 1394 connector. The 6 pin connector
has power connections, as well as the transmit and receive signals. If the 1394
connector is attached at a cocked angle or upside down, you risk touching the
power connection to the data lines, which almost always results in destroyed
1394 hardware in the circuitry. This action is not covered under this warranty.
There are no user-serviceable parts inside the cabinet. Opening the cabinet
voids the warranty. Transit damage caused by inadequate packaging also
invalidates the warranty agreement. Please ship the unit in its original packaging,
if possible.
All products are shipped prepaid to Convergent Design. For insurance reasons,
Convergent Design cannot accept any product that is returned via U.S. Postal
Service. Returns will be accepted from Federal Express, UPS, DHL, or other
comparable freight carrier. Convergent Design returns the product via a prepaid
two-day delivery service within the continental United States, only if the product
is under warranty and subsequently found to be faulty. Out-of-warranty repaired
products are shipped at customer’s expense. Turnaround time for warranty
repairs normally will not exceed 48 hours (excluding shipping time), unless
extraordinary fault conditions exist. A failure analysis report is returned with each
product.
Labor and defects are covered for the warranty period stated on your original
invoice from the original date of purchase. Only the original purchaser of the
products is covered under this warranty. The warranty is non-transferable. If you
discover a defect, please refer to our Return Merchandise Policy below. The
warranty covers all Convergent Design hardware defective in material or
workmanship. Software is warranted in a separate written statement
accompanying the software. During the warranty period, Convergent Design, at
its option, will repair or replace product or product components, which in its
opinion prove defective. Parts and components used in the repair process may
be recycled or repaired, at Convergent Design’s discretion. This warranty service
HD-Connect LE™ Guide and User’s Manual.
Page 42

42
will be performed at no charge to the registered owner, provided the product is
shipped prepaid to Convergent Design. Convergent Design will return the
repaired product via a like carrier, in the continental United States within 48
hours, shipping time excluded. Convergent Design reserves the right to
determine whether a needed repair is subject to the warranty as per its
provisions sated herein. Transit damage caused by inadequate packing violates
the warranty. The warranty will be void if, in the opinion of Convergent Design,
the product has been damages through accident, misuse, misapplication, or as a
result of service or modification performed not authorized in writing by
Convergent Design.
10.2 Obtaining an RMA
It is our policy that all material and repair returns, whether in warranty or not, are
only accepted if an RMA (Return Merchandise Authorization) number has been
issued for the products being returned. Any unauthorized shipments will be
returned, un-repaired at the customer’s expense.
Damaged or defective Convergent Design products that are purchased from
Convergent Design may be returned for replacement only. Convergent Design
will not accept returns for any other reason. All eligible returns require a Return
Merchandise Authorization (RMA) number. E-mail Convergent Design, Inc. at
support@convergent-design.com to obtain an RMA number. Items must be
returned within 10 days of receiving your RMA number. Returned product must
be in its original packaging with all contents included and must have the RMA
number clearly marked on the outside of the package.
RMA numbers and return address may be obtained from Technical Support.
Convergent Design, Inc.
4465 Northpark Drive
Suite 201
Colorado Springs, CO 80907
EMAIL: support@convergent-design.com
WEBSITE: http://www.convergent-design.com
VOICE: (720) 221-3861 or (866) 654-0080
HD-Connect LE™ Guide and User’s Manual.
 Loading...