

Page 1
1
Page 2

Disclaimer
Trademarks
Copyright
Warranty
Control4® makes no representations or warranties with respect to any Cont rol4 hardware, software, or the
contents or use of this publication, and specifically disclaims any express or implied warranties of merchant ability
or fitness for any particular purpose. Control4 reserves the right to make changes to any and all p arts of Control4
hardware, software, and this publication at any ti me, witho ut any obl igat ion to not ify an y person or en tit y of such
changes.
Control4 is a registered trademark of Control4 Corpora tion. Other product and company names mentioned in this
document may be the trademarks or registered trademarks of thei r respective owners.
Copyright © 2005-2006 Control4 Corporation. All rights reserved. No part of this publication may be reprodu ced,
photocopied, stored on a retrieval system, or transmitted wit hout the express written consent of the publisher.
Control4 Corporation
11734 S. Election Road, Suite 200
Salt Lake City, UT 84020 USA
http://www.control4.com
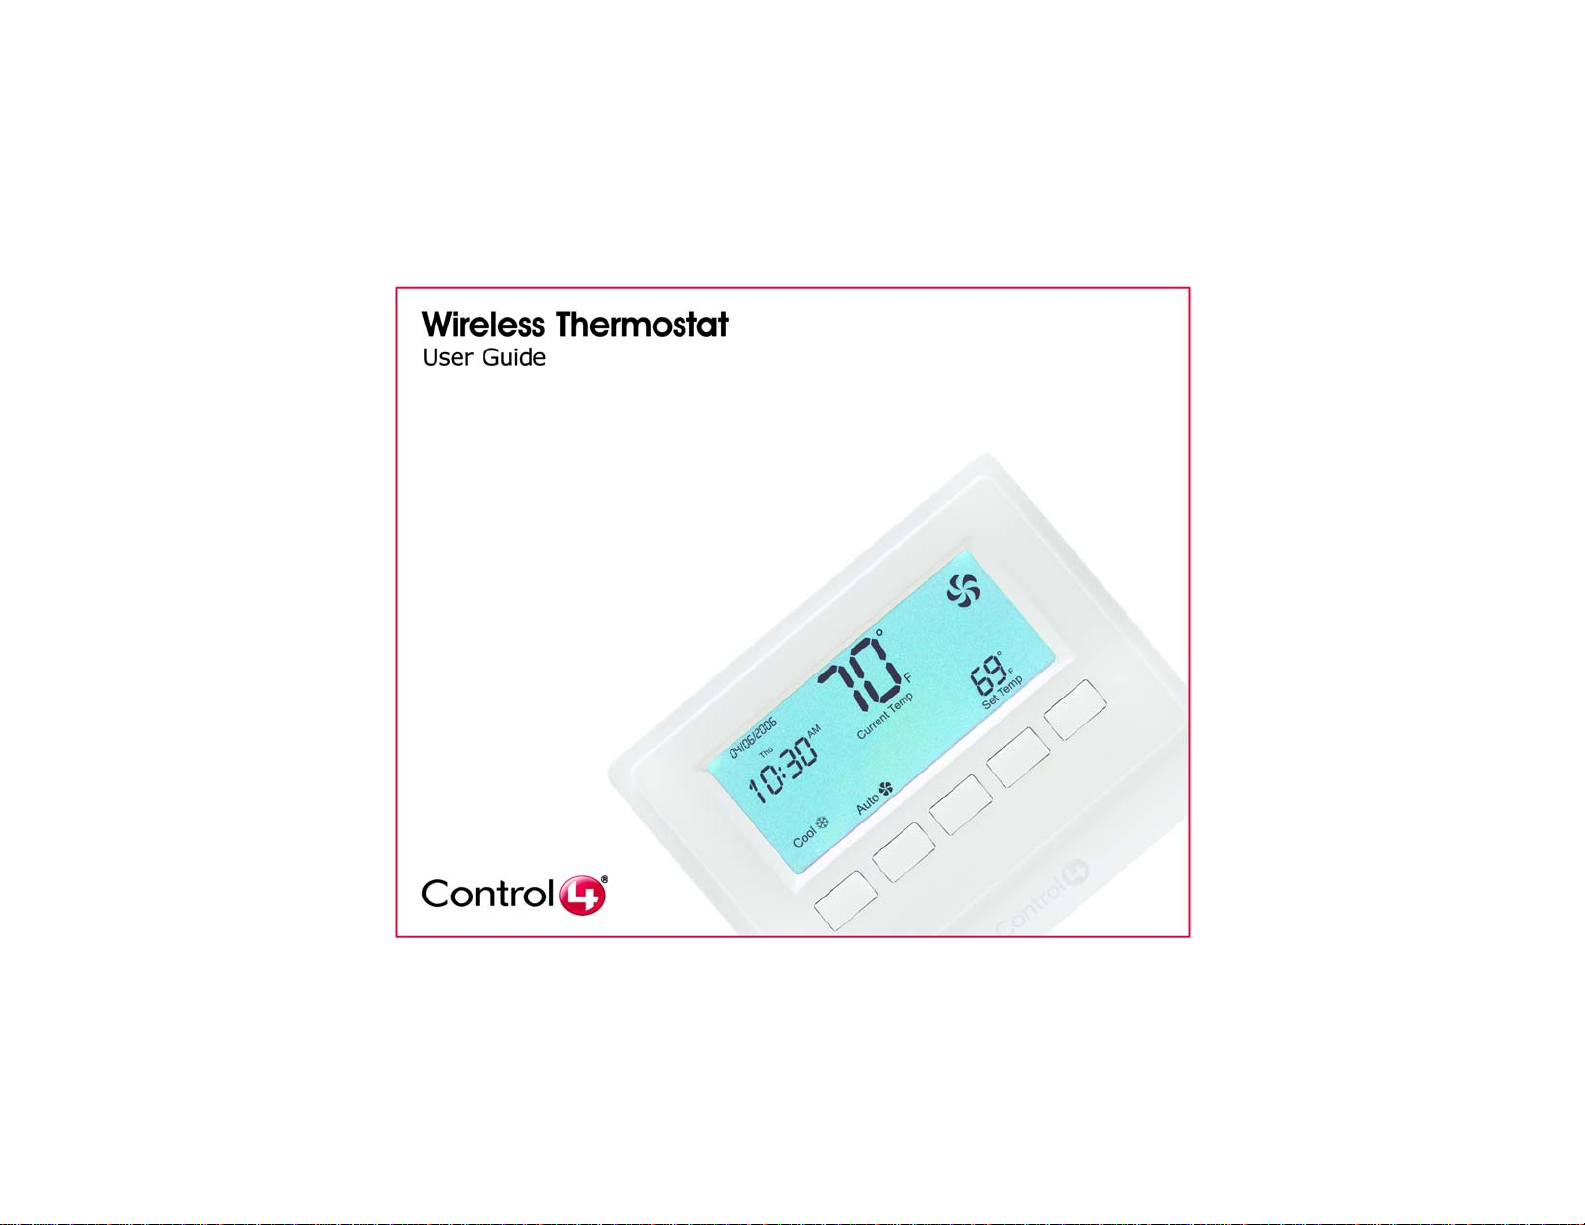
Wireless Thermostat User Guide
Part Number: 21-0171 Rev A
Model Number:
This device has a limited one (1) year warranty on part s from the date of inst allation. Control4 will replace o r repair
any defective unit. Return unit to the place of purchase for replacement . For any damages incurred, the warranty
will never exceed the purchase price of the device. This warranty does not cover installation, removal, or
reinstallation cost. The warranty is not valid in cases where damage was i ncurred due to misuse, abuse, i ncorrect
repair, or improper wiring or instal lation. It does not cover incidental or consequential damage. This warranty gives
you specific legal rights, and you might also be entitled to other rights that vary from state to state. Some states
do not allow limitations on how long an implied warranty lasts or the exclusion or limitation of incidental or
consequential damages. In these cases, the above mentioned limitations might not apply to you.
CCZ-T1-W
2
Page 3
Important Information
Graphical Symbols in this Guide
The following symbols and their descriptions draw your attentio n
to important safe practices and additional informat i on that can
help you avoid injury, death, or loss of material or time.
CAUTION! This indicates a potentially hazardous
situation that, if not avoided, may result in minor or
moderate injury. DO NOT IGNORE A CAUTION!
IMPORTANT! This indicates information that will help
you avoid damage to your equipment, loss of materials,
or loss of time. PAY ATTENTION TO THESE
IMPORTANT STATEMENTS!
NOTE: This indicates a note on related information about
the current topic.
TIP: This indicates a tip that might save you time or
effort.
Safety Instructions
1. Read these instructions.
2. Keep these instructions.
3. Heed all warnings.
4. Follow all instructions.
5. Clean only with dry cloth.
6. Install in accordance with the manufacturer’s instructions.
7. Do not install near any heat sources such as radiators, heat
registers, stoves, or other apparatuses that produce heat.
8. Only use attachments/accesso rie s sp ecified by the
manufacturer.
3
Battery Replacement Safety Rules
• Keep battery contacts and compartment clean.
• Remove battery if thermostat use is not expected for
several months.
• Ensure that you insert the CR123A (3V) battery
(included with the product) in the Control4 thermostat
faceplate according to the polarity labels, POS (+) and
NEG (-), on the thermostat circuit board.
CAUTION! T o prevent battery shorti ng, leakage or
rupture:
• Use CR123A (3V) Battery.
• Do not attempt to recharge a battery unless the
battery is specifically marked “rechargeable.”
• Never dispose of batteries in a fire.
Additional Resources
The following resources are available to provide you with
additional support:
• Your authorized Control4 reseller.
• Control4 Web Site: http://www.control4.com.
• Composer online help.
Page 4

Contents
Introduction................................................................................................................. 5
Features ...................................................................................................................... 6
Display........................................................................................................................6
Options of Control....................................................................................................... 7
Change Heating and Cooling System Mode ........................................................8
Change Fan Settings..........................................................................................11
Change Hold Options......................................................................................... 13
View or Change Temperature Heat and Cool Points .........................................16
Options for Program Scheduling............................................................................... 19
Additional Programming............................................................................................ 22
Battery Maintenance.................................................................................................22
Low Battery......................................................................................................... 23
Battery Replacement..........................................................................................23
Regulatory Compliance............................................................................................. 24
FCC.................................................................................................................... 24
Industry Canada................................................................................................. 24
4
Page 5

Introduction
Congratulations on your purchase of the Wireless Thermostat from Control4. This intelligent programmable
thermostat works as an integral part of the Control4 system. Having the thermostat integrated with the Control4
system allows you to control the temperature either using the Wireless Thermostat or any of the Control4
navigation control options: the 10.5” Wireless Touch Screen, the Mini Touch Screen, the System Remote Control
(On-Screen display or LCD display), or the LCD Keypad. You can use some of these navigation control options
to program the schedule.
This Wireless Thermostat goes beyond typical programmable thermostats. It features ZigBee (802.15.4) mesh
networking for two-way wireless communication. In mesh networking, each node acts as a repeater so there are
multiple paths that a signal can take. If there is trouble communicating on one path due to interference, the signal
automatically takes a different path, making this network topology very robust and reliable. The Wireless
Thermostat also includes the following features:
Beautiful On Any Wall
• Compact design – Sophisticated, sleek profile fits beautifully in any home.
• Backlit LCD
• User-friendly icons – Intuitive icons for common features make the thermostat easy for everyone to use.
Intelligent From Front to Back
• Ultimate climate control – Program the thermostat to follow a schedule of up to six Program Events per day.
• Manual override – Three levels of manual hold settings using the Wireless Thermostat or remote control navigation devices
or displays.
• Bi-directional communication – Home automation system can perform automated functions based on the
temperature.
• Flexible control
• Wireless – Intelligent, reliable, wireless connectivity using ZigBee mesh networking.
This document covers the following main sections:
• Features. See next page.
• Display. See next page.
• Options of Control. See page 7.
• Options for Program Scheduling. See page 19.
– Easy to read and make adjustments.
– Automatic changeover between heating/cooling and manual temperat ure override.
• Additional Programming. See page 22.
• Battery Maintenance. See page 22.
• Regulatory Compliance. See page 24.
5
Page 6

Features
• Heat Point and Cool Point. The Wireless Thermostat works
with your heating and cooling system to maintain a consistent
temperature called a set point. With the Wireless Thermostat,
you can specify separate heating and cooling set points. The
Wireless Thermostat automatically engages the appropriate
heating or cooling system until the room reaches the desired
temperature. The Wireless Thermostat follows a programmed
temperature-change schedule or temperature changes that you
set manually.
• Navigation control options. The Wireless Thermostat gives
you the ability to control your heating and cooling system from
the comfort of your couch using multiple navigation control
options, including the Wireless Touch Screen, the Mini Touch
Screen, the System Remote Control (On-Screen display or LCD
display), and the LCD Keypad.
• Navigation device programming. The Wireless Thermostat is
programmable through navigation control options, including the
Wireless Touch Screen, the Mini Touch Screen, and the System
Remote Control (On-Screen display). You can program the
Wireless Thermostat’s schedule using up to six Program Events
per day (seven days a week), including Wake, Away, Return,
Sleep, Custom 1, and Custom 2.
• Communication with a Control4 controller. The Wireless
Thermostat communicates with your Control4 controller to
obtain scheduling commands. Along with scheduling, the Wireless Thermostat receives time (date, day of week, and time)
data from the Control4 controller and displays it accordin gly. The
Wireless Thermostat also displays temperature, the mode (Off,
Heat, Cool, and Auto), whether the fan is operating, whether its
button’s are locked, and whether the battery needs replacing.
• External temperature sensors available. Through your authorized reseller, external temperature sensors are available that
allow you to install the Wireless Thermostat in an inconspicuous
location. You can then place the easily hidden remote sensor
where you want to measure the temperature for your best comfort level.
• Additional programming. Your authorized reseller can also
help you with a variety of configuration changes. See “Additional
Programming” on page 22.
6
Display
The Wireless Thermostat size is approximately 3 1/2
inches high by 4 1/2 inches wide. It displays an
easy-to-read screen and has five manual control
buttons. Each of the buttons controls a different
aspect of your comfort control system.
• Button 1: System Mode — Changes the mode of
operation to Off, Heat, Cool, Auto and Emergency
Heat (for heat pumps). See “Change Heating and
Cooling System Mode” on page 8.
• Button 2: Fan — Turns Fan On or sets it to be
automatically controlled by heating and cooling
system. See “Change Fan Settings” on page 11.
• Button 3: Hold — Holds a temperature adjustment
for a specified duration (On, 2 Hours, or Permanent) ,
or turns off the Hold feature (see “Change Hold
Options” on page 13).
• Button 4 or Button 5: Temperature Down or Up —
Adjusts temperature down or up in one degree
increments and sets an automatic hold for 2 hours.
See “View or Change Temperature Heat and Cool
Points” on page 16.
Page 7
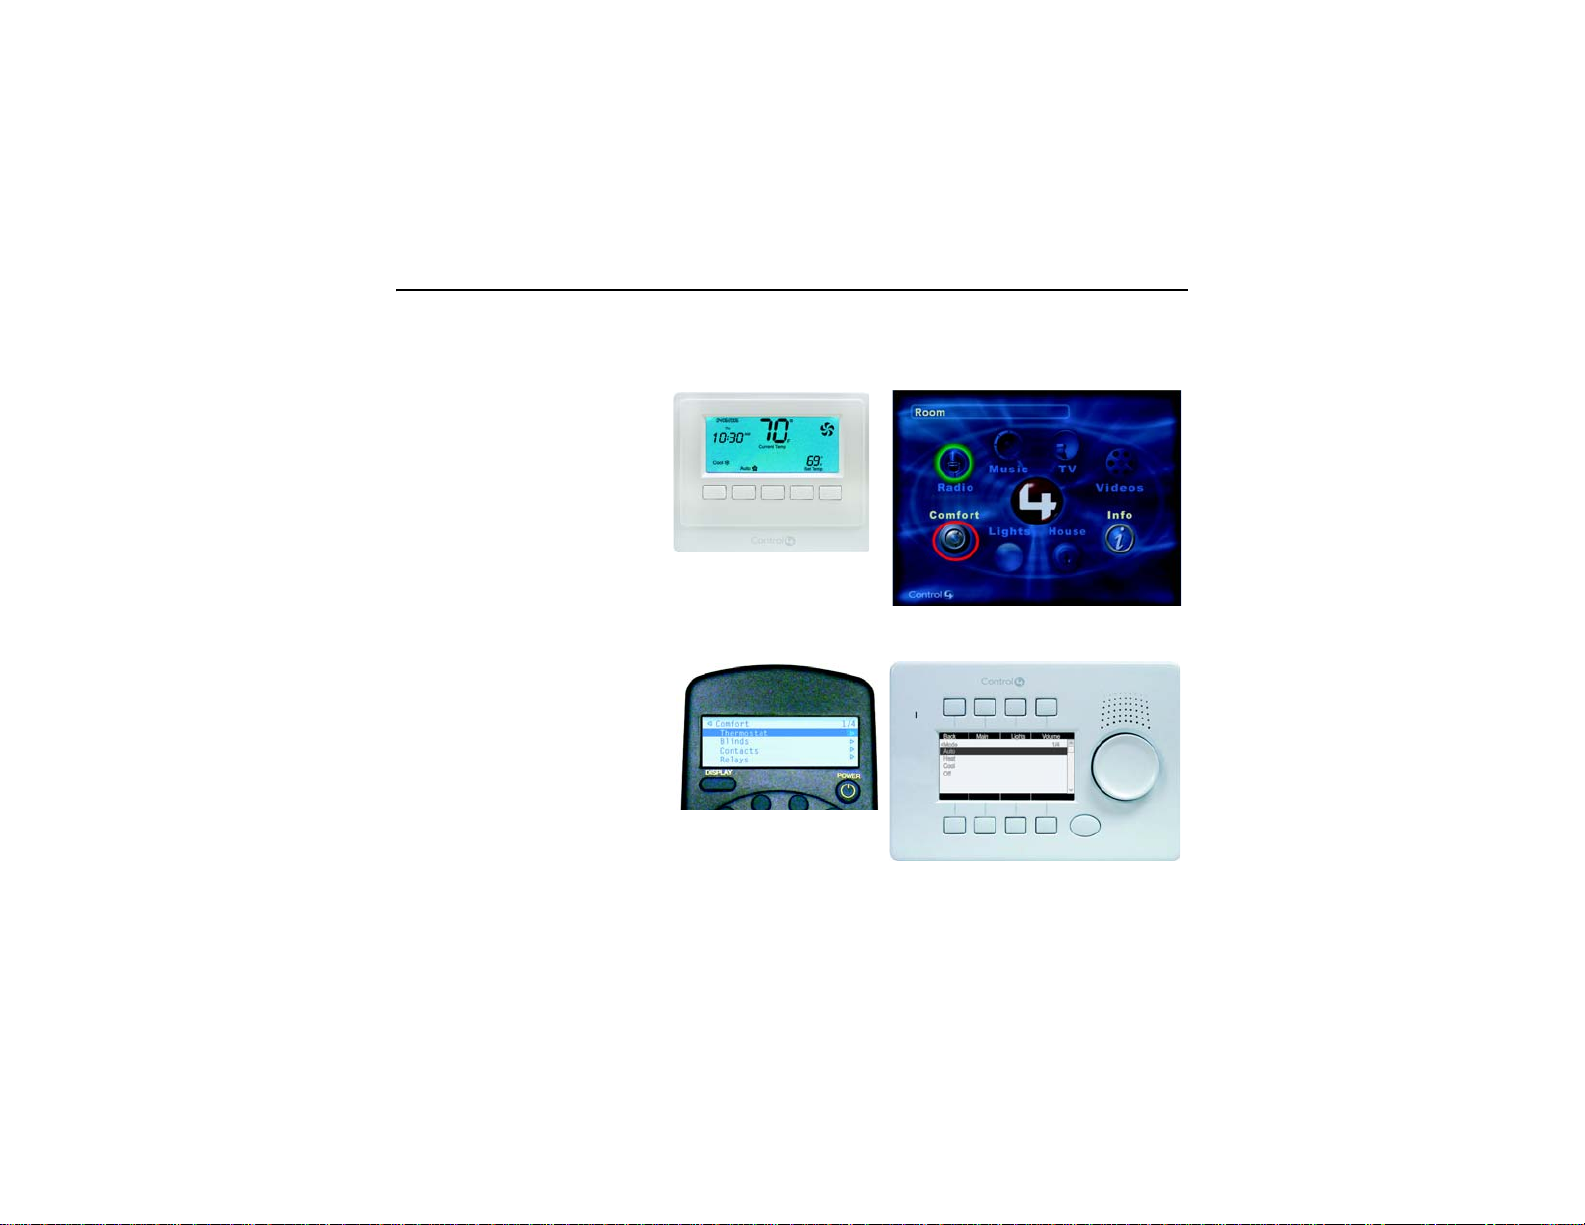
Options of Control
You can change the comfort settings
using the following devices or
displays:
• Wireless Thermostat
• Wireless Touch Screen
• Mini Touch Screen
• System Remote Control (OnScreen display or LCD display)
• LCD Keypad
From either the Wireless Thermostat
or one of the navigation control
options, you can do the following
tasks:
• Change Heating and Cooling
System Mode. See next section.
• Change Fan Settings. See page
11.
• Change Hold Options. See page
13.
• View or Change Temperature
Heat and Cool Points. See page
16.
Wireless Thermostat
System Remote
Control LCD
Navigation Device or Display
LCD Keypad
7
Page 8

Change Heating and Cooling System Mode
The Wireless Thermostat allows you to select the mode of operation for the climate control system. Using modes
can help with efficiency.
Modes include:
• Off. When in the Off state, the Wireless Thermostat does not make any requests to the heating or cooling
system.
• Heat mode. During cold winter months, if you do not want to run your air conditioning system, set the Wireless
Thermostat mode to Heat. The system then uses the furnace exclusively.
• Cool mode. During hot summer months, if you do not want to run your furnace, set the Wireless Thermostat
mode to Cool. The system then uses the cooling system exclusively.
• Auto. During spring and fall when your home might needs to be warmed at times or cooled at other times,
set the
Wireless Thermostat mode to Auto to automatically switch between heating and cooling based on the
desired set points.
To change the Thermostat Mode using one of the navigation control options, see the following sections:
• Change Thermostat Mode using Wireless Thermostat. See next section.
• Change Thermostat Mode using Navigation Device or Display. See page 9.
• Change Thermostat Mode using System Remote Control LCD. See page 10.
• Change Thermostat Mode using LCD Keypad. See page 10.
Change Thermostat Mode using Wireless Thermostat
1 Press Button 1 repeatedly until the desired mode appears (Off, Heat,
Cool, or Auto). The desired mode change is immediately reflected.
2 Leave it on the desired mode when it appears.
8
Page 9

Change Thermostat Mode using Navigation Device or Display
1 From the Main Navigator screen, select Comfort.
2 From the options that appear, select Thermostat (name can vary and some navigation devices skip this
step).
Main Navigator Screen
Options on Menu or Bar
3 From the Thermostat screen, select Mode.
4 From the pull-down menu, select one of the mode
options: Off, Heat, Cool or Auto.
The screen updates immediately to reflect the new
mode and set temperature.
Thermostat Screen
9
Page 10

Change Thermostat Mode using System Remote Control LCD
1 Press the Comfort button.
2 Press the Down or Up Arrow buttons to highlight Thermostat on the LCD screen, then press the Select
button to view the thermostat’s current settings.
3 Press the Down or Up Arrow buttons to highlight the Mode option and press the Select button to view the
mode options.
4 Press the Down or Up Arrow buttons to highlight a mode option: Auto, Heat, Cool or Off.
5 Press the Select button to apply the option you have highlighted.
6 Press the Left Arrow button to go back to view the previous screen to verify that the mode change is
applied.
NOTE: When making a selection on the System Remote Control LCD, if an arrow appears on the right
side of the LCD screen, in addition to using the Select button, you can also use the Right Arrow button
to make the selection. Selecting the Left Arrow or Back button allows you to return to the previous
screen.
Change Thermostat Mode using LCD Keypad
1 From the Main LCD screen, select Comfort.
2 Turn the Select Dial to highlight Thermostat and
press the Select Dial to view the thermostat options.
3 Scroll down to the Mode option and press the Select
Dial.
4 From the Mode options that appear, select one of the
mode options: Auto, Heat, Cool or Off. The screen
updates immediately to reflect the change.
10
Page 11

Change Fan Settings
You can turn the fan on manually or set it to be automatically controlled by the HVAC system. When you turn the
fan manually to On, it stays on through the programmed schedule, creating more circulation. (The next preprogrammed time does not overcome the change you made.) You can set the fan to:
• On — Turns fan on manually and it will continue to run until turned off manually.
• Auto — Allows heating and cooling system to control turning the fan on and off as necessary to maintain the
temperature Heat Point or Cool Point.
NOTE: The system displays the large fan icon in the upper right corner whenever the fan is operating.
To change the Fan Settings using one of the navigation control options, see the following sections:
• Change Fan Setting using Wireless Thermostat. See next section.
• Change Fan Setting using Navigation Device or Display. See page 11.
• Change Fan Setting using System Remote Control LCD. See page 12.
• Change Fan Setting using LCD Keypad. See page 12.
Change Fan Setting using Wireless Thermostat
1 Press Button 2 to toggle between the On or Auto fan setting appear.
2 Leave it on the desired fan setting when it appears.
Change Fan Setting using Navigation Device or Display
1 From the Main Navigator screen, select Comfort.
2 From the options that appear, select Thermostat
(name can vary and some navigation devices
skip this step).
3 From the Thermostat screen, select Fan.
4 From the Fan screen, select one of the fan
options: Auto or On. The Fan mode immediately
changes to selected mode.
11
Page 12

Change Fan Setting using System Remote Control LCD
1 Press the Comfort button.
2 Press the Down or Up Arrow buttons to highlight Thermostat on the LCD screen, then press the Select
button to view the thermostat’s current settings.
3 Press the Down or Up Arrow buttons to highlight the Fan option and press the Select button to view the
fan options.
4 Press the Down or Up Arrow buttons to highlight a fan option: Auto or On.
5 Press the Select button to apply the option you highlighted.
6 Press the Left Arrow button to go back to view the previous screen to verify that the mode change is
applied.
Change Fan Setting using LCD Keypad
1 From the Main LCD screen, select Comfort.
2 Turn the Select Dial to highlight Thermostat and press
the Select Dial to view the thermostat options.
3 Scroll down to the Fan option and press the Select Dial.
4 From the Fan options that appear, select one of the fan
options: Auto or On. The screen updates immediately to
reflect the change.
12
Page 13

Change Hold Options
The Thermostat Hold options allow you to hold a desired temperature setting, overriding the programmed
schedule. You can set the system to hold the temperature (1) until the next programmed event, (2) for two hours,
or (3) permanently.
To change the Hold options using one of the navigation control options, see the following sections:
• Change Thermostat Hold Option using Wireless Thermostat. See next section.
• Change Thermostat Hold Option using Navigation Device or Display. See page 14.
• Change Thermostat Hold Option using System Remote Control LCD. See page 15.
• Change Thermostat Hold Option using LCD Keypad. See page 15.
Change Thermostat Hold Option using Wireless Thermostat
1 Press Button 4 (adjusts set point down) or Button 5 (adjusts set point up)
to desired setting. When you change the temperature it automatically sets
a two-hour hold.
2 Press Button 3 to select the desired setting:
• On — Holds setting until next programming event.
• 2 Hrs — Holds setting for two hours.
• Perm — Holds setting permanently.
• (No display) — Cancels the current hold setting and returns Wireless
Thermostat to follow the programmed schedule.
13
Page 14

Change Thermostat Hold Option using Navigation Device or Display
1 From the Main Navigator screen, select Comfort.
2 From the options that appear, select Thermostat (name can vary and some navigation devices skip this
step).
3 From the Thermostat screen, select Hold.
4 From the Thermostat Hold screen, select one
of the options:
• Hold Until — Holds setting until next
programming event.
• Two-Hour — Holds setting for two hours.
• Permanent — Holds setting permanently.
• Cancel Hold — Cancels the current hold
setting and returns Wireless Thermostat to
follow the programmed schedule.
The Thermostat screen returns and the current
hold status appears next to the Hold button.
NOTE: When a hold is canceled, the Wireless
Thermostat returns immediately to follow the previously programmed schedule.
14
Page 15

Change Thermostat Hold Option using System Remote Control LCD
1 Press the Comfort button.
2 Press the Down or Up Arrow buttons to highlight Thermostat on the LCD screen, then press the Select
button to view the thermostat’s current settings.
3 Press the Down or Up Arrow buttons to highlight the Hold option and press the Select button to view the
hold options.
4 Press the Down or Up Arrow buttons to highlight a hold option: Off, On (Until next event), 2 Hours,
Permanent or Hold Cancel.
5 Press the Select button to apply the option you have highlighted.
6 Press the Left Arrow button to go back to view the previous screen to verify that the mode change is
implemented.
Change Thermostat Hold Option using LCD Keypad
1 From the Main LCD screen, select Comfort.
1 Turn the Select Dial to highlight Thermostat and press
the Select Dial to view the thermostat options.
2 Scroll down to the Hold option and press the Select Dial.
3 From the Hold options that appear, select one of the hold
options: Off, On (Until next event), 2 Hours, or
Permanent. The screen updates immediately to reflect
the change.
15
Page 16

View or Change Temperature Heat and Cool Points
You can set the system to hold a temperature adjustment that varies from the programmed schedule. When you
manually set a temperature, the system automatically sets a two-hour hold.
NOTE: The system automatically makes sure that the Heat Point (the setting that turns the furnace on) is
at least two degrees lower than the Cool Point (the setting that turns the air conditioning on). This keeps
the two systems from competing with each other.
To view or change the Temperature Heat and Cool Points using one of the navigation control options, see the
following sections:
• View or Change Temperature using Wireless Thermostat. See next section.
• View or Change Temperature using Navigation Device or Display. See page 17.
• View or Change Temperature using System Remote Control LCD. See page 18.
• View or Change Temperature using LCD Keypad. See page 18.
16
Page 17

View or Change Temperature using Wireless Thermostat
1 Press Button 1 to toggle between Cool or Heat icons that appear above
Button 1.
2 Press repeatedly Button 4 to decrease or Button 5 to increase the
temperature in one degree increments until the desired temperature is
reached.
When you change the temperature, it sets an automatic hold for 2 hours.
View or Change Temperature using Navigation Device or Display
1 From the Main Navigator screen, select Comfort.
2 From the options that appear, select Thermostat (name can
vary and some navigation devices skip this step).
The current temperature and current-mode settings appear.
3 Press the Down or Up Arrows repeatedly to decrease or
increase the temperature in one degree increments.
When you change the temperature, the thermostat sets an
automatic hold for 2 hours.
As you select the arrow buttons, the screen automatically
updates.
17
Page 18

View or Change Temperature using System Remote Control LCD
1 Press the Comfort button.
2 Press the Down or Up Arrow buttons to highlight Thermostat on the LCD screen, then press the Select
button to view the thermostat’s current settings.
3 Press the Down or Up Arrow buttons to highlight either the Heat Set Point or Cool Set Point and press
the Select button to view the option you have highlighted.
4 Press the Down or Up Arrow buttons to highlight the Lower Set Point -1 to decrease or Raise Set Point
+1 to increase the mode’s temperature.
5 Press the Select button repeatedly to change the temperature down or up in one degree increments until
you have the desired set point.
6 Press the Left Arrow button to go back to view the previous screen to verify that the mode change is
applied.
View or Change Temperature using LCD Keypad
1 From the Main LCD screen, select Comfort.
2 Turn the Select Dial to highlight Thermostat and press
the Select Dial to view the thermostat options.
3 Scroll down to the Heat Set Point or Cool Set Point
option and press the Select Dial.
4 From the Heat Set Point or Cool Set Point options that
appears, scroll down to the Raise Set Point +1 or the
Lower Set Point -1 and press the Select Dial repeatedly
to adjust the temperature down or up as desired. The
screen updates immediately to reflect the change.
18
Page 19

Options for Program Scheduling
Navigation Device or Display
The Wireless Thermostat comes with a pre-programmed
schedule.
Using any of the navigation programming options, you can
modify this pre-programmed schedule to meet individual needs.
Navigation programming options include: Wireless Touch
Screen, the Mini Touch Screen, and the System Remote
Control (On-Screen display).
There are six Program Events per day for each day of the
week. For each Program Event, you can enable, set a time, and
set unique set points for heat and cool.
The default pre-programmed schedule applies to every day of
the week as follows:
MTuWThFSaSu Wake: Enabled 6:00 AM Heat Point: 70 Cool Point: 78
MTuWThFSaSu Away: Enabled 8:00 AM Heat Point: 62 Cool Point: 85
MTuWThFSaSu Return: Enabled 6:00 PM Heat Point: 70 Cool Point: 78
MTuWThFSaSu Sleep: Enabled 10:00 PM Heat Point: 62 Cool Point: 82
MTuWThFSaSu Custom 1: Disabled 11:00 PM Heat Point: 62 Cool Point: 85
MTuWThFSaSu Custom 2: Disabled 11:00 PM Heat Point: 62 Cool Point: 85
NOTE: You cannot program the schedule on the LCD Keypad or with the System Remote Control LCD
Screen.
19
Page 20

To Program a schedule:
1 From the Main Navigator screen, select Comfort.
2 From the options that appear, select Thermostat (name can vary and some navigation devices skip this
step).
3 At the Thermostat screen, select the Program button.
4 From the Day Selection screen that appears, select the day or set of days you want to program.
• Weekday (Monday through Friday) — Allows you to program the Wireless Thermostat for the 5-day
week.
• Weekend (Saturday and Sunday) — Allows you to program the Wireless Thermostat for the 2-day
weekend).
• Mon through Sun (Mon, Tue, Wed, Thu, Fri, Sat, and Sun) — Allows you to program the Wireless
Thermostat for individual days.
TIP: New schedule changes automatically override any conflicting existing schedule.
.
Thermostat Screen
Day Selection screen
20
Page 21

5 For the day (or set of days) you selected, program these
six events as needed, beginning with Wake: Wake,
Away, Return, Sleep, Custom 1 and Custom 2.
When you chose a day (or set of days) in Step
4<StepNumber>, a programming wizard displayed the
Wake event screen (like the example on the right). This
is the first of six screens you can choose to edit. You
can edit the Wake program event or select Next one or
more times to skip to another program event (such as
Away).
a. If you want to edit the program event currently
displayed (such as Wake) for the day(s) selected
(such as Weekday), then:
• Select Enable to make this program event active.
• Set a time for this program event.
• Set a Heat Point and a Cool Point for this program
event.
b. If you want to edit another program event (Away,
Return, Sleep, Custom 1 or Custom 2), select Next
one or more times until the event displays on the
screen (as shown), then repeat Step
a.<StepNumber>
c. If you are done programming events,
select Done to save your changes and
exit the programming wizard.
6 From the Thermostat screen, select Done.
Program Event Screen (Example: Wake)
TIP:The Program Event you are
programming appears in the upper-left
corner of your screen next to the selected
day. To continue to the next Program Event,
select Next (in the lower-right corner of
your screen).
21
Page 22

Additional Programming
Your authorized reseller can help you configure additional preferences for your Wireless Thermostat or Control4
system. These include:
• The use of Celsius, instead of default setting Fahrenheit.
• The use of the Remote Sensor, instead of the default setting On-board Temperature Sensor.
• The use of a Custom Overshoot and Undershoot settings.
• The use of Locked buttons to disable use of buttons, instead of default setting Unlocked buttons.
• The use of the 24 hour clock, instead of the default setting 12 hour clock.
• The use of Date-listed first format — DD/MM/YYYY, instead of Month-listed first format — MM/DD/YYYY.
• The ability to define interaction between the Wireless Thermostat and the other devices on the Control4
system.
Battery Maintenance
NOTE: The Wireless Thermostat requires power from the heating and cooling system to maintain regular
communication with the controller. The battery is intended to provide supplemental or backup power only.
• Keep battery contacts and compartment clean.
• Remove battery if thermostat use is not expected for several months.
• To prevent battery shorting, leakage or rupture, when replacing the battery:
• Use a CR123A (3V) Battery only.
• Do not attempt to recharge a battery unless the battery is specifically marked “rechargeable.”
• Never dispose of batteries in a fire.
22
Page 23

Low Battery
When battery is low, a battery icon indicating a low battery power appears right of the temperature on Wireless
Thermostat LCD screen.
Battery Replacement
To replace battery:
1 Detach front faceplate by releasing the latch at the bottom of the Thermostat and sliding the faceplate up
and off.
2 Remove old battery. See “Battery Replacement Safety Rules” on page3.
3 Install new battery by ensuring that you insert the battery into the thermostat according to the polarity labels,
POS (+) and NEG (-), on the thermostat circuit board.
4 Replace the Thermostat faceplate.
1. Align the faceplate with the
rear plate and push the
straight pins to the back of
the thermostat.
2. With the faceplate slightly
above the rear plate, slide
the top edge of the faceplate
onto the rear plate, engaging
the plastic hooks with the
corresponding holes.
23
3. Press firmly on the bottom
center edge of the faceplace
to snap and lock the bottom
connector in place.
Page 24

Regulatory Compliance
This product complies with standards established by the following regulatory bodies:
• Federal Communications Commission (FCC)
• Industry Canada
FCC
• FCC ID: R33CCZT11: This device complies with Part 15 of the FCC Rules. Operation is subject to the following two conditions: (1) this device may not cause harmful interference, an d (2) this device must accept any int erference recei ved, including
interference that may cause undesired operation.
• This equipment has been tested and found to comply with the limits for a Class B digital device, pursuant to Part 15 of the
FCC Rules. These limits are designed to provide reasonable protection against harmful interference in a residential installation. This equipment generates, uses, and can radiate radio frequency energy and, if not installed and used in accordance
with the instructions, may cause harmful interference to radio communications. However, there is no guarantee that interference ‘not occur in a particular installation. If this equipment does cause harmf ul interference to radio or television reception,
which can be determined by turning the equipment off an d on, the user is en courag ed to tr y to correct t he inte rference b y one
or more of the following measures:
• Reorient or relocate the receiving antenna.
• Increase the separation between the equipment and receiver.
• Connect the equipment into an outlet on a circuit different from that to which the receiver is connected.
• Consult the dealer or an experienced radio/TV technician for help.
IMPORTANT! Changes or modifications not expressly approved by Control4 could void the user’s
authority to operate the equipment.
Industry Canada
This Class B digital apparatus complies with Canada ICES-003.
Cet appareil numérique de la classe B est conforme à la norme NMB-003 du Canada.
24
 Loading...