

Page 1
Wireless Doorbell Button
Installation Guide
for use with Control4
Introduction
Axxess Doorbell Button can be installed
and configured for operation in a Control4
environment to trigger a chime unit
controlled by a Control4 interfaced device.
Typically, the chime will be controlled by
the Axxess Chime Relay. The Doorbell
Button can also be used as a multi-purpose
button anywhere to trigger a desired event.
Included
Doorbell Button Device
2 pcs ½ wide double sided foam tape
(base mounting)
2 mounting screws
1 Wire Harness (external magnetic
contact)
1 Wire Harness (external contact wire
leads)
Battery and Power
This device ships with a high density AAA,
3.6V Lithium battery inserted.
The battery has unique properties, highly
superior to alkaline or Li-ion batteries, with
its high energy density and extra-wide
operational temperature range.
When the device is not joined and in deep
sleep, the battery’s unique chemistry
maintains the highest output quality by
periodically “exercising” for a moment. This
keeps it fresh and ready for immediate use.
We advise against removing and storing
the battery separately.
Batteries can be purchased online. A
common brand is TADIRAN. Distributors
can be found on their website.
Battery Life: 3 Years
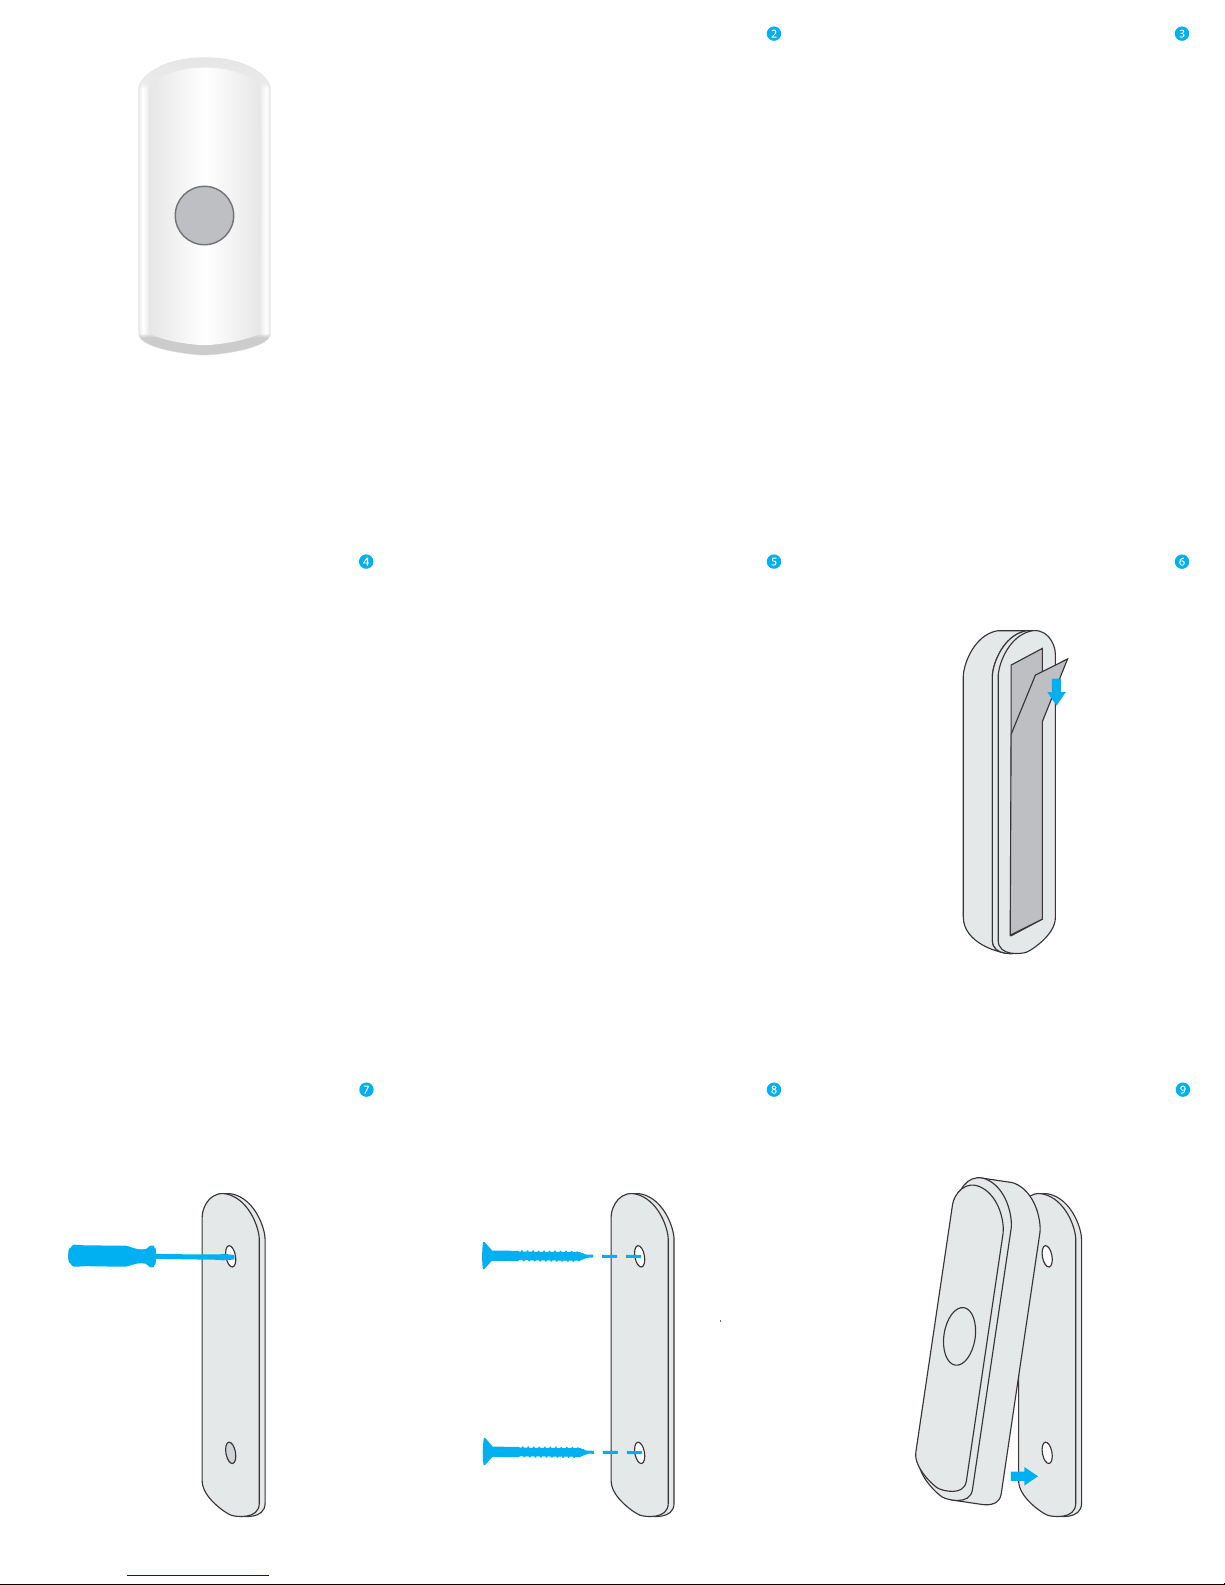
Mounting
Before mounting, make sure the device is in
a location where you can still push the
button to join it to the ZigBee network. If it’s
in a difficult to reach place, view the
instructions for ZigBee networking and join
the de vice to t he ne twork before
mounting.
The Doorbell Button should be mounted
within range of the ZigBee network.
The Axxess Doorbell Button will be
mounted near the entrance door either
with screws or double-sided tape. The
housing of the Axxess Doorbell Button
consists of 2 parts, the back plate, which will
be mounted to the doorframe or wall, and
the face enclosure.
Screw Mount
Break out the 2 screw hole areas with a
screw driver.
The face enclosure is fastened to the backplate with a sliding hook at the top and a
retaining screw at the bottom end of the
face enclosure. After removing the
retaining screw, the face enclosure can be
removed by carefully pulling the bottom
out about 3/16” and sliding it up and off the
top retaining hook.
Mounting the Doorbell Button
It may be mounted by attaching the device
back plate to the desired surface either by:
1. Mounting with double sided adhesive.
2. Mounting with 2 No.4 wood screws.
Attach back plate to the wall with the 2
provided screws.
Adhesive Mount
Peel and stick.
Attach the face by hooking the top and
tightening the retaining screw at the
bottom.
Page 2
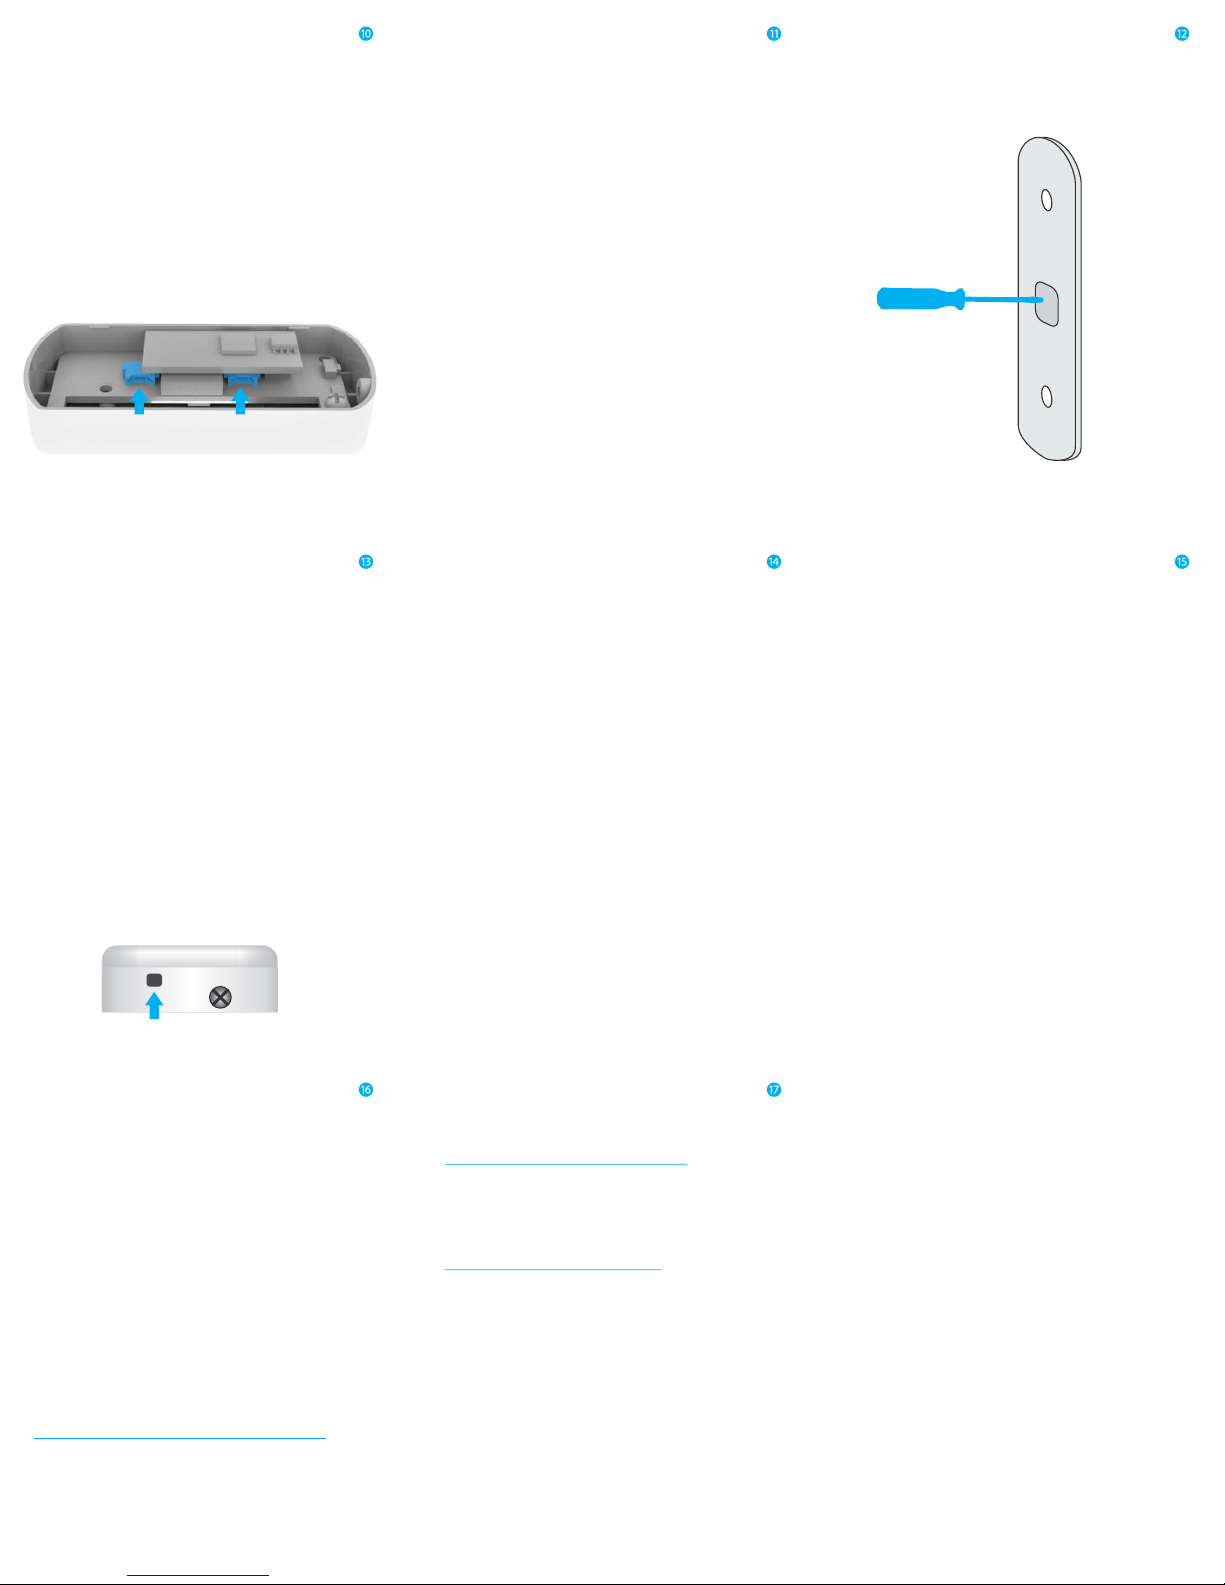
Optional Features
The Doorbell Button can be fitted with 2
external dry contact leads. The contacts
could be mechanical switches or magnetic
reed switches.
The external contacts can be plugged into
receptacles accessible upon removal of the
battery. The receptacle closest to the
negative battery terminal is Contact 1, the
other is Contact 2.
Contact 2 Contact 1
Axxess can supply optional external
contact harnesses either with or without
magnetic reed switches.
In either case the Doorbell Button end of
the harness is terminated with a connector
that plugs into the receptacles.
External Contact Setup
To set up the external contacts, put the
device into setup mode with 8 taps on the
network push button. Once in setup mode,
the device will respond with audible beeps
when Contact 1 or Contact 2 is closed.
Setup will automatically exit after 8
minutes, and can also be turned off in
composer.
External Contact Breakout
Break out the center area with a screw
driver to run external contacts out of the
device.
ZigBee Network
The device has to be mounted within the
range of the ZigBee network in which it is to
operate.
A network push button is located inside the
pinhole to the left of the retaining screw.
Use a paper clip to press the button.
Join:
Leave:
Setup:
Reset:
4 taps
13 taps
8 taps
15 taps
X
6 beeps - ascending
X
6 beeps - descending
X
2 beep - ascending
X
6 beeps - ascending
(If joined)
6 beeps - descending
X
(If not joined)
If the device responds with beeps when the
contact is closed then the message
problem is in the network setup (device is
not joined).
If you don't hear beeps when in setup mode
and when contacts are closed, then there
may be a problem with the device.
ZigBee Network (Cont’d)
When joining, the device will beep up to
two times while searching for a network.
Once it has joined it will give 6 ascending
beeps. When powering up the device it will
give 6 ascending beeps to indicate it is
joined, or 6 descending beeps to indicate it
is not joined.
The range of the device can vary depending on the strength of the router it is
connected to, as well as the physical
elements surrounding the installation.
Typically the device can communicate up
to 400 feet in the open, however, this can be
reduced to 40 feet when indoors depending on the routing device. Make sure the
network is designed properly and that the
strength of the router and physical barriers
are taken into consideration.
Composer
Instructions for using this device with
Composer can be accessed on our website:
axxind.com/dealers/composer
Drivers
Control4 device Drivers are available for
download on our website:
axxind.com/dealers/drivers
Troubleshooting
There are only 2 device conditions that can
be broken.
If you hear the beeps in response to
network taps, then you have battery power.
If not, reseat battery. After reseating battery the device will boot up (1min).
Following boot up network taps should
result in beeps. If not, try a new Axxess
approved battery.
If you have attached external magnetic
contacts and you hear beeps upon taps but
you don’t receive ZigBee messages for
open or close put the device into test mode
(8 taps) and close the external contacts.
Make sure the device is in setup mode by 8
tapping the push button and hearing the 2
confirming beeps.
A complete list of troubleshooting and
additional information is available at:
axxind.com/dealers/troubleshooting
The properties page contains a battery
level value, which may be programmed to
provide notification for battery replacement.
 Loading...