

Page 1
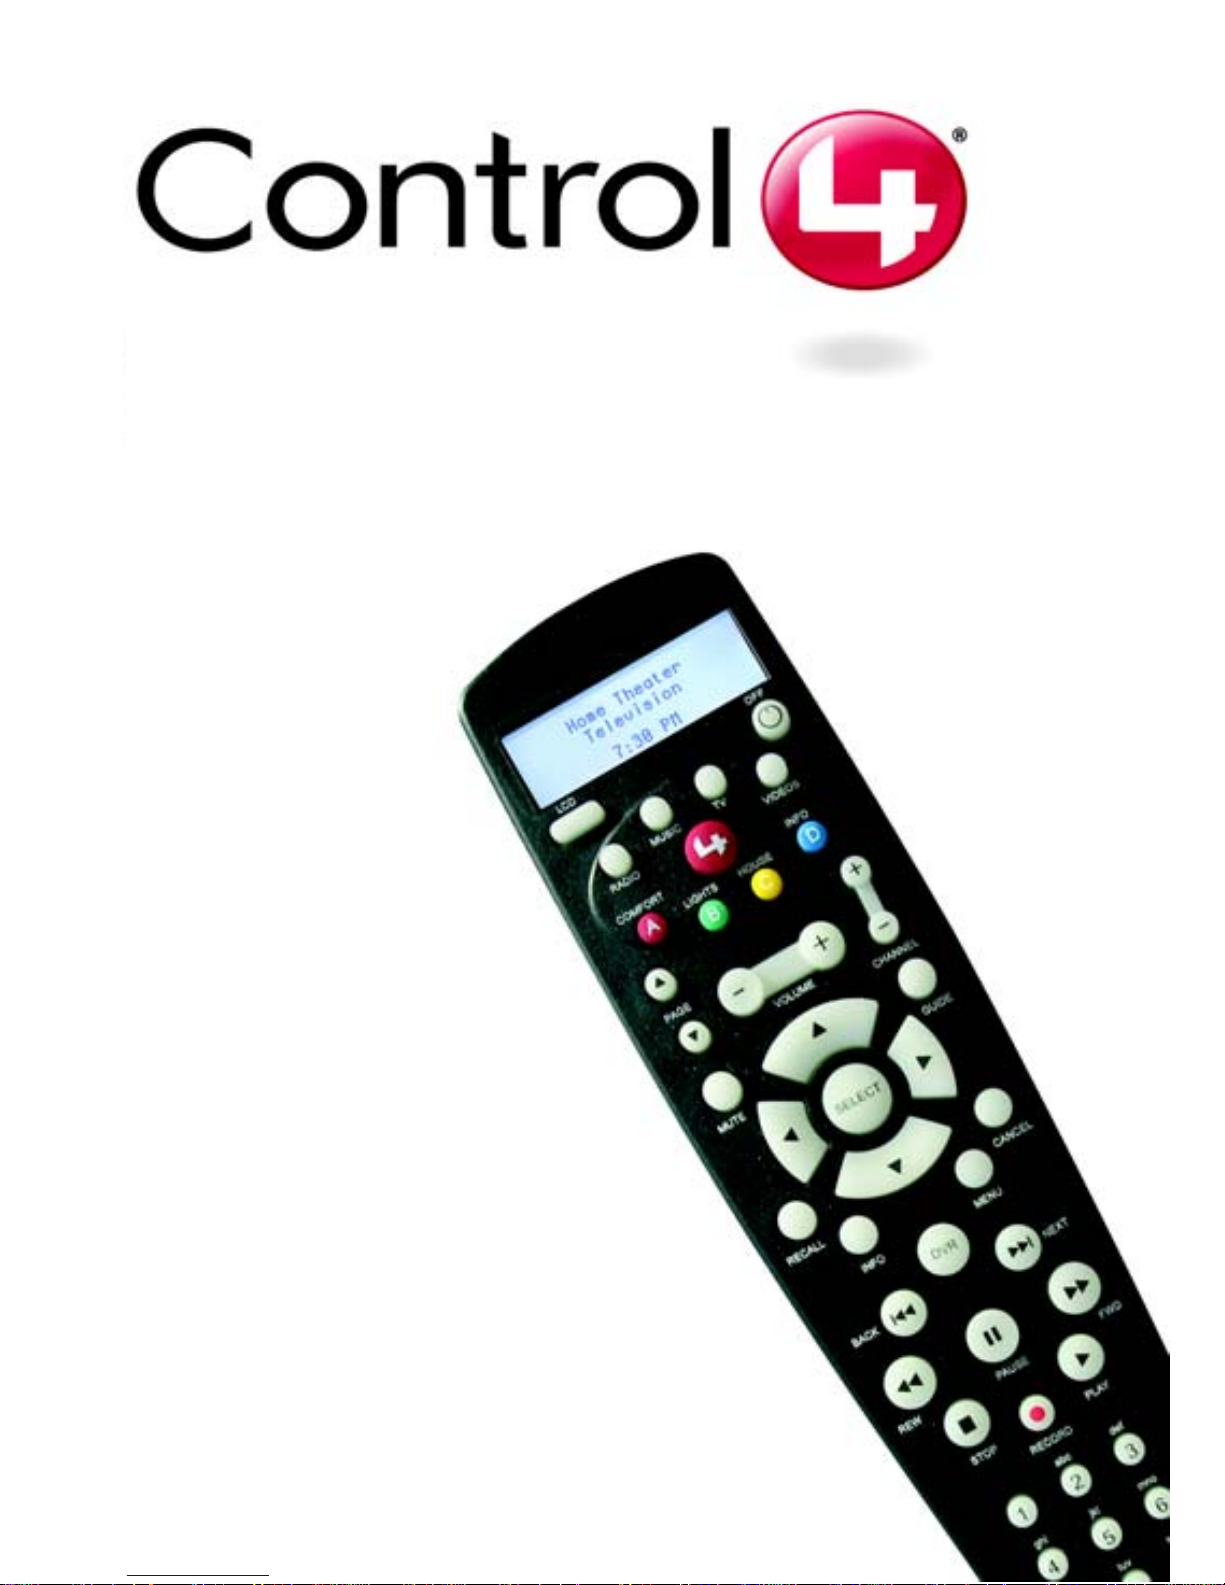
System Remote Control Version 2
User Guide
Page 2

ii
Disclaimer
Control4® makes no represent ations or warranties
with respect to any Control4 hardware, software, or
the contents or use of this publicatio n, and
specifically disclaims any express or implied
warranties of merchantability or fitness for any
particular purpose. Control4 reserves the right to
make changes to any and all part s of Control4
hardware, software, and this publication at any
time, without any obligat ion to notify any person or
entity of such changes.
Trademarks
Control4 is a register ed trademark of Control4
Corporation. Other product and company names
mentioned in this document may be the
trademarks or registered trademarks of their
respective owners.
Copyright
Copyright © 2004-2007 Control4 Corporat ion. All
rights reserved. No p art of t his publ ica tion may be
reproduced, photoco pied, stored on a retrieval
system, or transmitted without the express written
consent of the publisher.
Control4 Corporation
11734 S. Election Road, Suite 200
Salt Lake City, UT 84020 USA
http://www.control4.com
System Remote Control Version 2 User Guide
Part Number: 200-00011 Rev A
Hardware Model Number: RCZ-SRC2-B
Page 3

iii
Contents
Chapter 1 Get Started............... ... ................ ..1
Uses and Features........................................1
About the Modes ...........................................2
What’s New in this Model..............................4
Install and Maintain Batteries ........................6
About System Remote Control
RCZ-SRC2-B.................................................7
Chapter 2 Use the Remote Control ............17
Use Remote with On-Screen Navigator ......17
Use LCD Navigator......................................19
Control Devices............................. ... ...........19
Chapter 3 Regulatory Info...........................21
Regulatory Compliance ...............................21
Page 4

iv
Page 5

CHAPTER
1 Get Started
Uses and Features
Control4 System Remote Control Version 2 (model # RC Z-
SRC2-B)
is intended for use in a Control4® system. It is
included with the purchase of a Media Controller or Home
Theater Controller, but may also be purchased separately.
This remote control can be used to:
• Navigate system menus and access media databases
on a television or monitor
• Navigate system menus and access media databases
in its own LCD window
• Control system devices
This remote control goes beyond a typical “universal”
remote that simply learns IR codes from TVs, VCRs, CD
players, and DVD players. Features of this device include:
• Bi-directional communication with system components
• ZigBee wireless mesh networking
• LCD with menu that provides full system access
• LCD back-lighting for ease of use in dark rooms
• Media playlists and playing options for stored media
• One-button push to control systems (such as music,
television, or videos)
• Ergonomically designed for comfort
• Standard control features for: Digital Satellite Systems
(DSS), Cable Boxes, TV Tuners, Digital Video Recorders (DVR), DVD Players or Changers, VCRs, TVs,
MP3 Players or CD Players or Changers
• Powered by four AAA batteries (included)
Page 6
2
About the Modes
This remote control supports three different modes of
operation:
• On-Screen Navigator mode: In this mode you
access and control all system devices through a monitor or TV on-screen menu (On-Screen Navig a tor).
Press
the Control4 button to access the On-
Screen Navigator home page (or main menu) and
then press a system button (such as Radio or TV) to
display the specific submenu on the TV screen.
• LCD Navigator mode: In this mode you access all
system components through the LCD menu. Press the
LCD button to enter LCD Navigator mode and
display a menu in the LCD and press Cancel to exit.
Once you choose a media source (broadcast or
stored), the remote enters Device-Control mode and
allows you to control the device associated with the
selected media.
Note: The LCD goes to sleep after 15
seconds of inactivity and it will wake up with any button press.
• Device-Control mode: In this mode you use the
System Remote Control to control the selected device.
When devices in the room are off, p
ress RADIO,
MUSIC, TV, or VIDEOS button to enter the Device-
Control mode and begin controlling one of the associated devices. By default, it will be the most recently
used device (such as Multi Tuner) for the selected system (such as Radio) in the current room. The remote
control will continue to control the current device until
another device is accessed.
The current mode affects the remote control behavior. The
following table shows a high-level summary of how
functionality differs from mode to mode.
Page 7
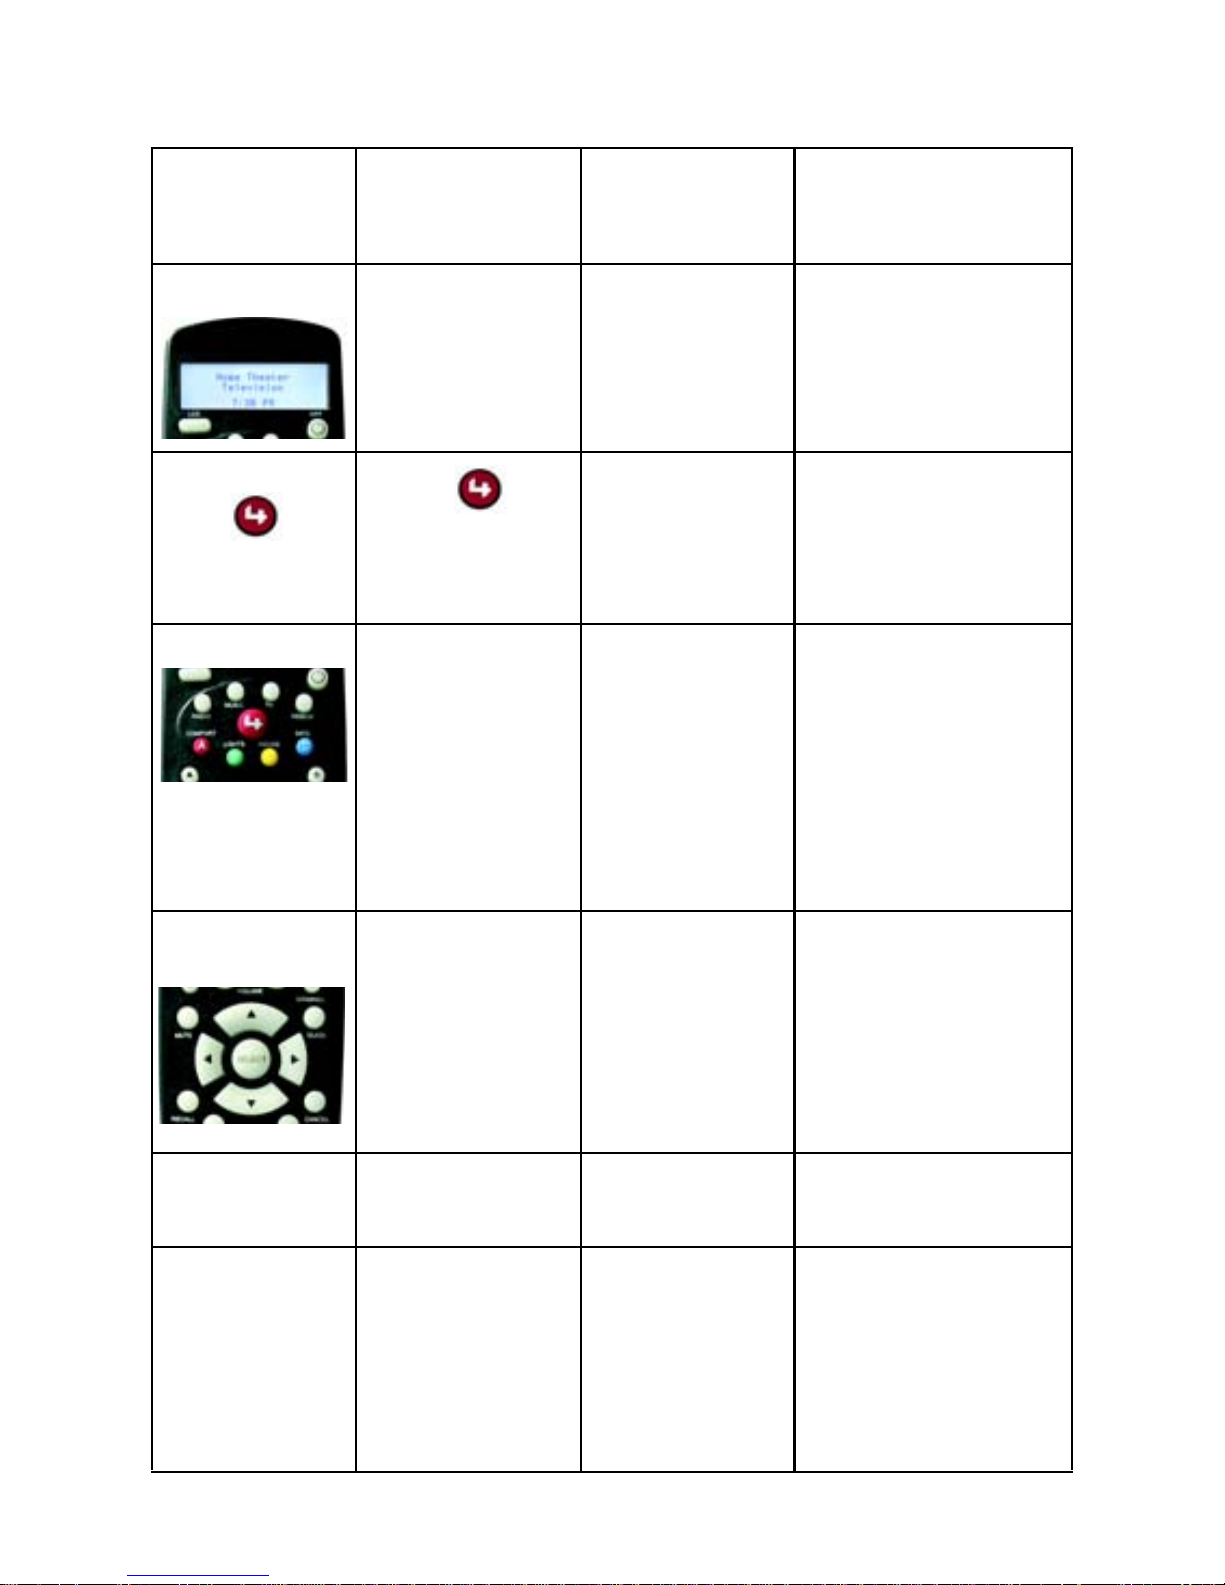
3
Remote
Control
Section:
On-Screen
Navigator
mode:
LCD Navigator
mode:
Device-Control
mode:
LCD
NA Displays LCD
menus related
to current
system.
NA
Control4 Button
Press to
view On-Screen
Navigator on
your monitor/TV.
NA NA
System Buttons
If a video device
is currently on,
press one to
display systemspecific menu on
the TV.
Press one to
display systemspecific menu in
the LCD and to
choose the
device or
playback to be
controlled.
Press Radio, Music,
TV, or Videos to start
the selected system
and control play.
Press A, B, C, or D to
run room-specif ic or
device-specific
program.
Navigation
Buttons
Use arrows to
move the
highlighter on the
TV around or
press Select to
choose the
highlighted item.
Use arrows to
move through
the LCD menu
levels or press
Select to choose
the highlight ed
item.
Use buttons to
control sound,
change channels, or
view information
about current media
or broadcast.
Control Buttons
NA NA Control current
device or playback.
Numeric
Keypad
1 2 3
NA Use numbers to
select lighting
levels.
Enter specific TV
channel numbe r or, if
device-specific
programming is
present, press
*
or # to run.
Page 8
4
What’s New in this Model
System Remote Control Version 2 (Model # RCZ-SRC2-B) is
the next generation of Control4 system remotes:
• We renamed, relocated, and replaced several buttons.
• We replaced black rubber with light, glow-in-the-dark
rubber.
• We added device-level programmable buttons so that
installers could program one-button shortcuts.
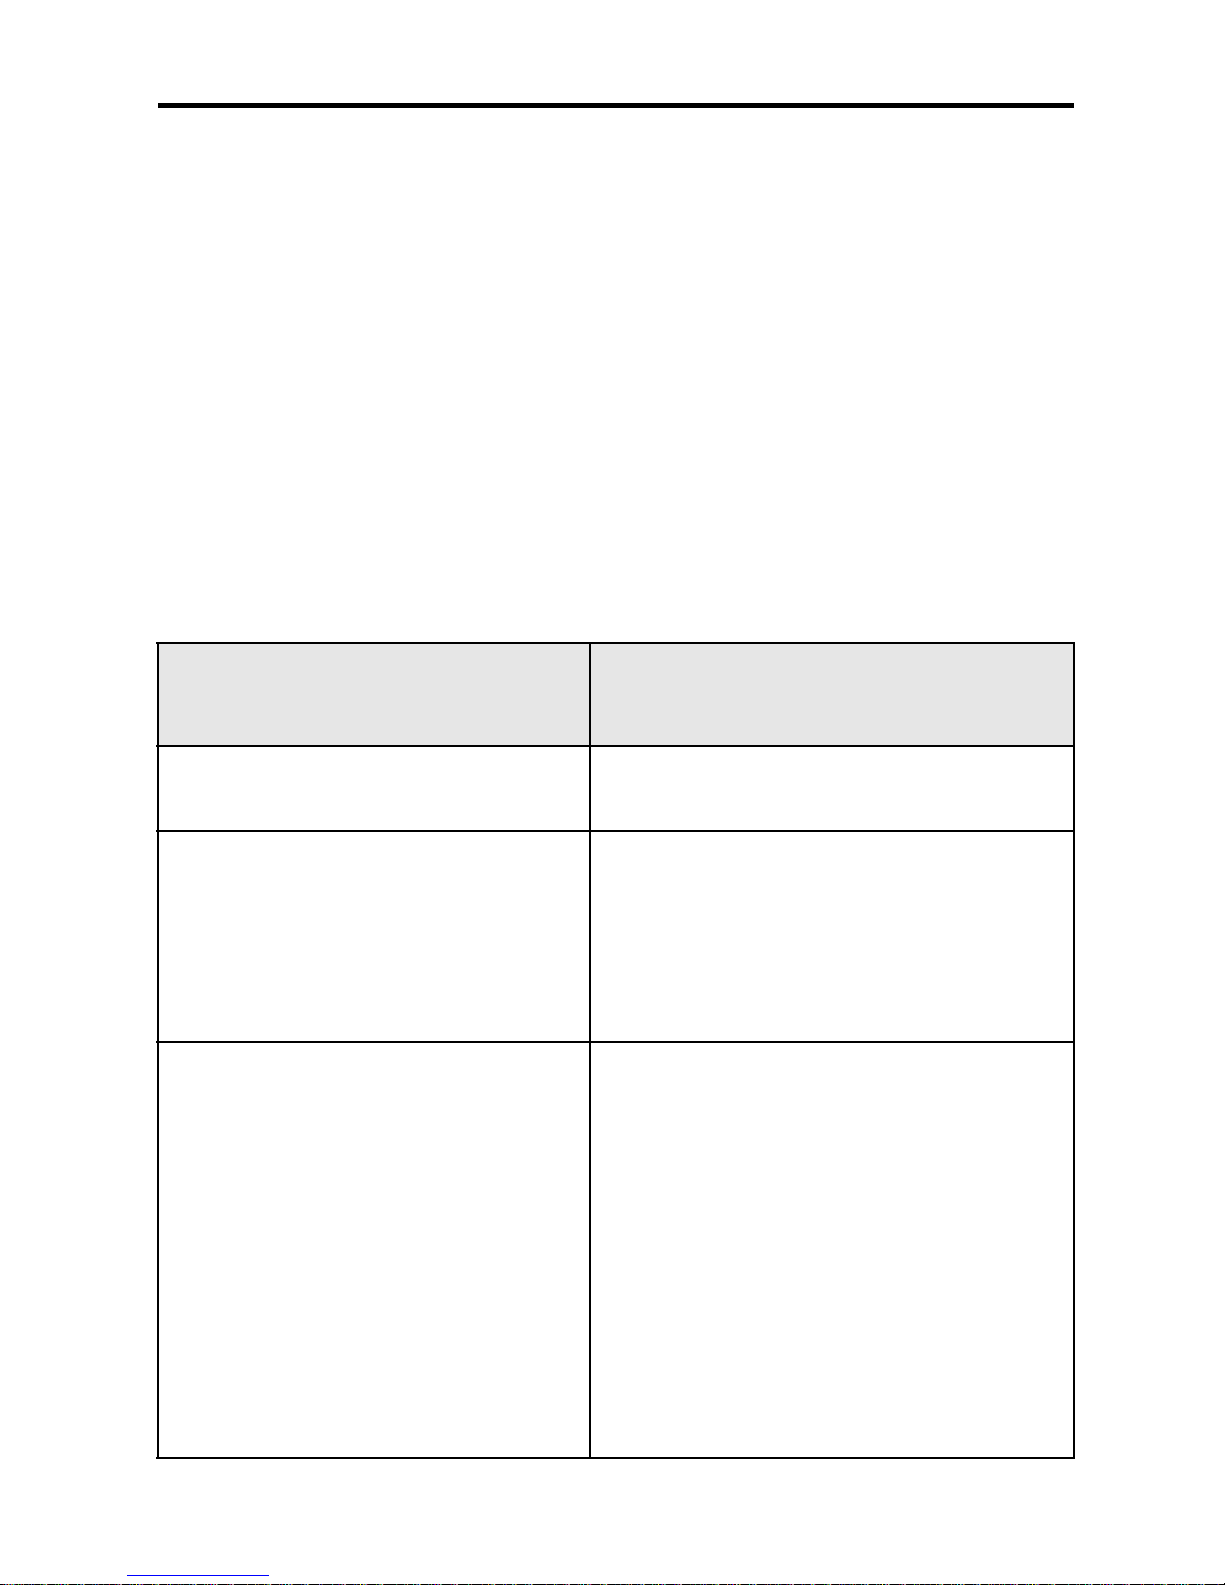
Table 6–1 summarizes changes from Version 1 to 2.
TABLE 6–1 . C
HANGES TO BUTTONS AND FUNCTIONS
Was...RCZ-SRC1-B:
Old Button Name and Function
Now is...RCZ-SRC2-B:
New Button Name and Function
POWER
Turned off all A/V devices in room.
OFF
Turns off all A/V devices in room.
DISPLAY
Provided access to Configuration
menu for the LCD.
LCD
Enters LCD Navigator mode: Displays
top menu of LCD Navigator in the LCD.
Note: The Configuration menu for the
LCD is now located under “Info” in LCD
Navigator.
RADIO, MUSIC, TV, and VIDEOS
• Short press entered LCD
Navigator mode: Displayed
chosen system menu in LCD
and chose the device to be
controlled.
• Long press when a TV was
on would display the chosen
system options on top of the
current display on the TV.
RADIO, MUSIC, TV, and VIDEOS
• Initial press provides shortcut to
the selected system—put s remote
control into Device-Control mod e
and turns on the last used source
(such as a TV t un ed to the last TV
broadcast). The Room name and
current device display in the LCD.
• Subsequent presses toggle
through av ailable sources for the
selected system (such as
alternative TV sources).
Page 9

5
COMFORT, LIGHTS, HOUSE,
and INFO
• Short press entered LCD
Navigator mode: Displayed
chosen system menu in LCD
and chose the device to be
controlled.
• Long press when a TV was
on would display the chosen
system options on top of the
current display on the TV.
COMFORT (
A), LIGHTS (B), HOUSE
(C), and INFO (D)
• If in On-Screen Navigator mode,
these buttons provide shortcuts to
their system’s On-Screen menu
(Comfort, LIghts, House, or Info).
• If in LCD Navigator mode, these
buttons provide shortcut s to their
system’s LCD menu (Comfort,
LIghts, House, or Info).
• If in Device Control mode, the se
buttons can be used as A, B, C, or
D---programma bl e buttons that
may have custom shortcuts fo r the
room or current device.
PAGE
Page up/down for satellite & Cable
menuing.
CHANNEL + -
Arrows are chang ed to + /-, PAG E labe l
on top case is ch anged to " CHANNEL".
Now functions as channel up and
channel down for appropriate devices.
PIP and MENU
Picture in picture button; Menu
button for appropriate devices.
PAGE
Up and Down arr ows are pri nted on the
old PIP and MENU buttons
respectively. Functions as Page up/
down for satellite & cable menuing.
BACK
A Back button for menu navigat io n
with back arrow printed on but ton .
MENU
Functions as Menu button for
appropriate devices.
*Device-specific beh avio r *Available for cus tom programs
# Device-specific behavior # Available for custom programs
Was...RCZ-SRC1-B:
Old Button Name and Function
Now is...RCZ-SRC2-B:
New Button Name and Function
Page 10

6
Install and Maintain Batteries
Install Batteries
Install the four AAA batteries (included with the
product) into the back of the device. Ensure
that you insert them into the remote control
according to the diagram provided in the
battery compartment (with the + and - terminals
aligned correctly).
Use and Care Tips
• Keep battery contacts and compartment
clean.
• Remove batteries from the remote control if
it is not expected to be in use for several
months.
• Extreme temperatures reduce battery per-
formance. Avoid putting the remote control
in very warm places.
Replacement Safety Rules
CAUTION! To prevent battery shorting, leakage or
rupture:
• Use typical AAA Alkaline batteries only in the
remote control.
• Do not mix battery types, such as Alkali ne and
rechargeable NiMH batteries.
• Do not attempt to recharge a batt ery unless the
battery is specifically marked “rechargeable.”
• Never dispose of batteries in a fire.
+ AAA -
+ AAA -
+ AAA -
+ AAA -
Page 11

7
About System Remote Control
RCZ-SRC2-B
System Remote Control
Model #RCZ-SRC2-B can be
divided into these sections:
1. LCD, LCD Button, and Off
Button
2. Control4 Button and Sys-
tem Buttons (also referred
to as the “Circle of Power”
buttons)
3. Navigation Buttons
4. Device Control Buttons
5. Keypad
Once the system setup is
complete, the remote control
responds to each buttonpress in a different way—
depending on:
• mode of remote control
• current location
• devices available in the
current location
• when the button is
pressed
• if the button has been
programmed for a
custom function
5
3
2
1
4
Page 12

8
LCD, LCD Button, and Off Button
LCD (liquid crystal display)—Provides information
related to system activity. The LCD uses highlighting to
show a selected item. It includes a white backlight that
stays on for 15 seconds after a button is pressed.
LCD button—Changes the remote mode to
LCD Navigator mode and displays the menu in the LCD.
See “Use LCD Navigator” on page 19).
OFF button—Turns off all A/V devices in the current
room.
Page 13

9
Control4 Button and System Buttons
Control4 button—If a TV or monitor (TV device) is
available in the current location, it puts the remote control
in On-Screen Navigator mode and displays the OnScreen menu on the TV device. The On-Screen Navigator
display: displays the current location, provides access to
additional locations, and provides access to all systems
available at the current location.
From here you can use the remote control navigation
buttons to choose On-Screen Navigator options.
Note: For more information on using On-Screen
Navigator, refer to the Control4 System User Guide.
Page 14

10
System buttons (or “Circle of Power” buttons)—
The buttons surrounding the red Control4 button (Radio,
Music, TV, Videos, Comfort [A], Lights [B], House [C], and
Info [D]) are system buttons that respond differently
depending on when they are pressed and if and how they
have been programmed, as described in the remainder of
this section:
Radio
When the remote control is in a Navigator mode (when
either On-Screen Navigator or LCD Navigator are active),
the RADIO Button acts as a shortcut into the radio
submenu in the appropriate navigator.
When devices in the room are off or the remote control is
in Device-Control mode (when no Navigator screen is
active), the RADIO button functions as a Quick Access
button: Press it to start playing the radio and to be able to
control the radio source with the device-control buttons.
Initial Press of RADIO button:
• Turns on the last used radio source, tunes to the last
used station on that source.
• The remote enters device-control mode for the current
radio source. The LCD shows current room and current
radio source.
Subsequent Presses of RADIO button prior to LCD
time-out:
• Additional presses toggle through the radio sources
listed in the LCD and turns th em on. When the last radio
source is displayed, the next press loops back to the first
available source.
Page 15

11
Music
When the remote control is in a Navigator mode (when
either On-Screen Navigator or LCD Navigator are active),
the MUSIC Button acts as a shortcut into the music
submenu in the appropriate navigator.
When devices in the room are off or the remote control is
in Device-Control mode (when no Navigator screen is
active), the MUSIC button functions as a Quick Access
button. Press it to start playing music and to be able to
control the music source with the device-control buttons.
Initial Press of MUSIC button
• Turns on th e last used music source and begins playing
music from the last-played entry in the music queue, or
from the analog source.
• If the music queue is empty, or if there is no media in the
analog source, then the button press just turns on the
music source.
• The remote enters device control mode for the music
source. The LCD shows current room and cu rrent music
source.
Subsequent Presses of MUSIC button prior to LCD
time-out
• Additional presses toggle through the music sources
listed in the LCD and turns them on. When the last
music source is displayed, the next press loops back to
the first available source.
Page 16

12
TV
When the remote control is in a Navigator mode (when
either On-Screen Navigator or LCD Navigator are
currently displayed), the TV Button acts as a shortcut into
the TV submenu in the appropriate navigator.
When devices in the room are off or the remote control is
in Device-Control mode (when no Navigator screen is
active), the MUSIC button functions as a Quick Access
button. Press it to turn on the TV and to be able to control
the TV with the device-control buttons.
Initial Press of TV button
• Turns on the TV and selects the last broadcast source
used.
• The remote enters device control mode for the TV &
broadcast source. The LCD shows current room and
current TV source.
Subsequent Presses of TV button prior to LCD timeout
• Additional presses toggle through the TV broadcast
sources listed in the LCD and turns them on. When the
last TV broadcast source is displayed, the next press
loops back to the first available source.
Videos
When the remote control is in a Navigator mode (when
either On-Screen Navigator or LCD Navigator are
currently displayed), the VIDEOS Button acts as a shortcut
into the video submenu in the appropriate navigator.
When devices in the room are off or the remote control is
in Device-Control mode (when no Navigator screen is
active), the VIDEOS button functions as a Quick Access
Page 17

13
button. Press it to begin playing a video and to be able to
control the video source with the device-control buttons.
Initial Press of VIDEO button
• Tu rns on the audio endpoint for the room and the last
video source used.
• The remote enters device control mode for the video
source. The LCD shows current room and cu rrent TV
source.
Subsequent Presses of VIDEO button prior to LCD
time-out
• Additional presses toggle through the video sources
listed in the LCD and turns them on. When the last video
source is displayed, the next press loops back to the first
available source.
Comfort (A), Lights (B), House (C), and Info (D)
Note: Notice that the Comfort, Lights, House, and
Info buttons have the additional labels A, B, C & D
directly on the buttons. The additional labeling is
related to custom programming that may be
provided by your installer.
When the remote control is in a Navigator mode (when
either On-Screen Navigator or LCD Navigator are
currently displayed), each of these 4 buttons acts as a
shortcut into its related submenu in the appropriate
navigator. For example, if the On-Screen Navigator Home
page is displayed on the TV and you press Comfort (A),
then a menu bar (submenu) similar to the following
displays.
Page 18

14
When devices in the room are off or the remote control is
in Device-Control mode (when no Navigator screen is
active), pressing one of these buttons will run the custom
program assigned to that button for the current room or
device. Ask your installer about custom programming or
see Custom Button labels in the House menu:
Button: Custom program for Room or Device control
A: ______________________________________
B: ______________________________________
C: ______________________________________
D: ______________________________________
In the absence of custom programming, a button-press will
only wake up the LCD to display the name of the current
room and the “Options” pull-down menu option.
Page 19

15
Navigation Buttons
The following buttons are for screen and menu navigation.
• PAGE
Page Up/Down
• MUTE
Mute audio
• RECALL
Toggle to previous channel
• INFO
Current channel and program
information
• VOLUME - +
Control
volume
•
Menu/Option
Navigation
• SELECT
Choose the
highlighted
item
• CHANNEL + -
Channel Up/
Down
• GUIDE
Program listings
• CANCEL
Clears screen
of navigation
information
• MENU
Options for current location
Page 20

16
Device Control Buttons
These familiar buttons are for device control.
• DVR (Digital Video
Recorder)
• BACK l
• NEXT l
• REW
• PAUSE ll
• FWD
• STOP
• RECORD
Q
• PLAY
Keypad
The alphanumeric
keypad is for changing
TV channels, setting
lighting levels, or entering
text.
The * and # keys are
available to the installers
for custom programming.
Ask your installer if a
custom program is
present or see Custom
Button labels in the House menu:
Button: Custom program for Room or Device control
*
: ___________________ ___________________
#
: ______________________________________
Page 21

CHAPTER
2 Use the Remote
Control
Here are basic use instructions for the three remote
control modes:
• “Use Remote with On-Screen Navigator” on page 17
• “Use LCD Navigator” on page 19
• “Control Devices” on page 19
For specific, task-oriented instructions, refer to the
Control4 System User Guide.
Use Remote with On-Screen
Navigator
Note: This document explains only general access
to On-Screen Navigator. For specific instructions,
refer to the On-Screen Navigator sections in the
Control4 System User Guide.
Note: If the video device connected to the
controller (such as Home Theater Controller or
Media Controller) is already on, press a system
button to display the associated system menu on
top of the current video display.
Page 22

18
1 Press (the Control4 button) to access the On-
Screen Navigator menu on the monitor or TV.
2 To navigate or choose an On-Screen Navigator item,
(on the monitor or TV), use the arrows
and Select button to move the cursor around the
screen and choose an option.
3 Refer to Control4 System User Guide for user
instructions.
Page 23

19
Use LCD Navigator
Use LCD Navigator to choose a variety of options.
1 Press the LCD button to choose LCD Navigator
mode and view the system menu.
2 Use the arrows and Select button to
choose a system:
3 Explore the system’s submenu (such as Comfort in
the following example).
Control Devices
Choose a Device to Control
To use this remote control to control system devices, you
must first choose a system device using On-Screen
Navigator, LCD Navigator, or by pressing a System button
House
Lights
Music
Videos
TV
Radio
Comfort
Info
Page 24

20
on the remote that has been associated with a controllable
device.
Radio, Music, TV, or Videos: When the devices in the
current room are OFF, the Radio, Music, TV, or Videos
buttons function as a Quick Access button to DeviceControl mode. Press one of them once to start playing the
most recently played source for that system, or press the
same button again to choose the next available source for
that system. For example, in a room where the DVD player
was the most recently used Video source, but there is also
a VCR, you would press Videos once to begin controlling
the DVD player OR press Videos twice to toggle to the
VCR and begin controlling the VCR.
Alternatively, when using On-Screen Navigator or LCD
Navigator to choose a media source (such as a broadcast
channel, an album, or a movi e), you automatically place
the remote control in Device-Control mode.
Use Device-Controls on
the Remote Control
Use the applicable remote control
buttons to operate a supported
third-party device. For example: If
you pressed the Music button
system button, then you can control the audio playback
using the Control buttons on the remote control.
Page 25

CHAPTER
3 Regulatory Info
Regulatory Compliance
North America
This product complies with standards established by the
following regulatory bodies:
• FCC
• Industry Canada
FCC
FCC ID: R33050110011: This device complies with Part
15 of the FCC Rules. Operation is subject to the following
two conditions: (1) this device may not cause harmful
interference, and (2) this device must accept any
interference received, including interference that may
cause undesired operation.
This equipment has been tested and found to comply with
the limits for a Class B digital device, pursuant to Part 15
of the FCC Rules. These limits are designed to provide
reasonable protection against harmful interference in a
residential installation. This equipment generates, uses,
and can radiate radio frequency energy and, if not installed
and used in accordance with the instructions, may cause
harmful interference to radio communications. However,
there is no guarantee that interference will not occur in a
particular installation. If this equipment does cause
harmful interference to radio or television reception, which
Page 26

22
can be determined by turning the equipment off and on,
the user is encouraged to try to correct the interference by
one or more of the following measures:
• Reorient or relocate the receiving antenna.
• Increase the separation between the equipment and
receiver.
• Connect the equipment into an outlet on a circuit dif-
ferent from that to which the receiver is connected.
• Consult the dealer or an experienced radio/TV techni-
cian for help.
IMPORTANT! Changes or modifications not
expressly approved by Control4 could void the
user’s authority to operate the equipment.
Industry Canada
This Class B digital apparatus complies with Canada
ICES-003.
Cet appareil numérique de la classe B est conforme à la
norme NMB-003 du Canada.
Page 27

23
CE Declaration of Conformi ty
DeClaration
OF
CONFORMITY
Control4 Corporation
11734 S. Election Road, Suite 200
Salt Lake City, UT 84020-6432
Tel (801) 523-3100
Product: System Remote Control
Model No: RCZ-SRC2-B
The undersigned hereby declares, on behalf of Control4
Corporation, that the above -re fer enc ed product, to which
this declaration relates, is in conformity with the
provisions of:
Council Directive 89/336/EEC (May 3, 1989) on
Electromagnetic Compatibility
Council Directive 1999/5/EC (Mar 9, 1999) on Radio &
Telecommunication Terminal Equipment (R&TTE)
Council Directive 73/23 /EEC (Fe b 19, 1973 ) on Low Voltage
Equipment Safety
Council Directive 93/68/EEC (Jul 22, 1993) Amending
Directives 89/336/EEC and 73/23/EEC
and has been tested to the requirements of, and shown to
be in compliance with, the following requisite standards:
Page 28

24
EMC
EN 301 489-1 V1.4.1 — Electromagnetic compatibility and
Radio spectrum Matters (ERM); ElectroMagnetic Compatibility (EMC) standard for radio equipment and services–Part 1
Common techn ical requirements.
EN 301 489-17 V1.2.1 — Electromagnetic compatibility and
Radio spectrum Matters (ERM); ElectroMagnetic Compatibility (EMC) standard for radio equipment and services; Part
17: Specific conditions for 2.4 GHz wideband transmission
systems and 5 GHz high performance RLAN equipment.
AS/NZS CISPR 22: 2002 — Information Technology Equipment – Radio disturbance characteristics.
Radio
EN 300 328-2 V1.4.1 — Wide band transmission systems;
data transmission equipment operating in the 2.4GHz ISM
band. Harmo nised EN cove ring essent ial requirem ents under
Article 3(2) of the R&TTE Directive.
AS/NZS 4771: 2000 — Spread Spectrum Equipment using
900MHz, 2.4GHz and 5.8GHz bands.
Safety
IEC 60950-1: 2001 (1st Edition) and/or EN 60950-1: 2001 —
Information Technology Equipment—Safety with national
and group differences in accordance with CB Bulletin No.
109A December 2005: AS/NZS 60950-1: 2003.
The Technical Construction File required by these
Directives is maintained at the corporate headquarters of
Control4, Salt Lake City, Utah, U.S.A.
Signed, Paul E. Nagel—Vice President of Engineering,
January 26, 2007
Recycling
For information on recycling, please go to
www.control4.com/recycling
 Loading...