

Page 1
Page 2

Disclaimer
Control4® makes no representations or warranties with respect to this
publication, and specifically disclaims any express or implied warranties of
merchantability or fitness for any particul ar purpose. Control4 reserves the
right to make changes to any and all parts of this publication at any time,
without any obligation to notify any person or entity of such changes.
Trademarks
Control4 and the Control4 logo are registered trademarks of Control4
Corporation. Other product and company names mentioned in this
document may be the trademarks or registered trademarks of their
respective owners.
Legal Notice
Fraunhofer IIS and Thomson. MPEG Layer-3 audio coding technology
license from Fraunhofer IIS and Thomson. Supply of this produ ct does not
convey a license nor imply any right to distr ibut e conte nt crea ted wit h th is
product in revenue-generating broadcast systems (ter restrial, satellite,
cable, and /or other distribution channels), streaming applications (via
Internet, intranets, and/or other networks), other content distribution
systems (pay-audio or audio-on-demand applications, and the like) or on
physical media (compact discs, digital versatile discs, semiconductor
chips, hard drives, memory cards, and the like).
Decisionmark is the service provider of analog and dig it al TV off-air cable
and satellite channel list.
Radio Locator is the service provider of AM/FM channel list.
© 2005 All Media Guide, LLC provides music and video recognition
technology that provides cover art and related text that enriches the
Control4 user interfaces.
Copyright
Copyright © 2004-2005 Control4. All rights reserved. No part of this
publication may be reproduced, photocopied, stored on a retrieval system,
or transmitted without the express written consent of the publisher.
Contact Information
Control4 Corporation
11734 S. Election Road
Salt Lake City, UT 84020 USA
http://www.control4.com
On-Screen Navigator User Guide
Part Number: 21-6000 Rev A
Page 3

iii
Contents
Chapter 1 Getting Started ..............................................1
Purpose .................................................1
What You Can Do..................................2
Task Definitions .....................................2
Access the Home Page .........................3
About the Home Page ...........................3
Current Location...............................4
Subsystem Buttons...........................4
Change Location....................................6
Access Subsystems............................ ...7
From the Home Page .......................7
From the Remote Control Buttons....8
About Subsystem Buttons .....................9
Chapter 2 Play the Radio.............................................11
Access the Radio Options ...................11
About the Radio Options......................12
Channels Page.................... .... ... ....12
Radio Devices.................................12
Play a Radio Station..... ... ... ... ... .... ... ... .13
Control a Tuner................................ ... .13
Control Other Radio Devices. ... .... ... ... .14
Chapter 3 Play Music...................................................15
Access the Music Options ............ ... ... .15
About the Music Options......................16
Browse............................................17
Now Playing....................................20
Playlist ............................................21
Audio Player and Other Devices.....22
Browse CD’s...................................22
Sessions.........................................22
Play MP3s Stored in the System .........23
Page 4

iv
Play an MP3 Album or Song...........23
Play a Saved MP3 Playlist..............25
Control the MP3 Playback..............26
Create and Save an MP3 Playlist....... .26
Edit an MP3 Playlist.............................27
Play CDs Loaded in a Device....... ... ... .27
Chapter 4 Watch TV....................... ... .... ... ... ... ... .... ... ... .29
Access the TV Options ........................29
About the TV Options ..........................30
Channels Page.................... .... ... ....30
TV Devices .....................................30
Choose a Channel Sort Option. .... ... ... .31
Choose a Channel. ... .... ... ... ... ... .... ... ... .31
Chapter 5 Watch a Video.............................................33
Access the Video Options....................33
About the Video Options......................34
Browse............................................34
Cover Art.........................................36
Video Devices.................................36
Play a Video Stored in a DVD Changer37
Choose from the Entire Database ..37
Sort or Filter the Database..............37
Play a Video Loaded in an Attached
Device..................................................37
Chapter 6 Control Comfort....................... ... ... ... .... ... ... .39
Access the Comfort Page....................39
About the Comfort Page ......................40
Change Comfort Settings ....................40
Set Wakeup Options............................41
Chapter 7 Control Lights ..............................................43
Access the Lights Page .......................43
About the Lights Page .........................43
Change a Light Setting ........................44
Page 5

v
Activate a Lighting Scene ....................44
Chapter 8 View the House Status................................45
Access the House Page ......................45
About the House Page.........................45
View Contact Switch Status.................45
Chapter 9 View or Change Information........................47
Access the Info Pages.. ... ... ... ... .... ... ... .47
About the Info Pages ...........................48
View Information “Abou t” th e Syst em ..49
Connect to a Director...........................49
View or Change Network Settings.......51
Change Themes ..................................52
Change Configuration Preferences .....53
Set Screen Saver Options..............53
Set Default Location .......................54
Enable or Disable Viewing Options 55
Page 6

vi
Page 7
1
CHAPTER
1 Getting Started
This chapter introduces On-Screen Navigator, the default
user interface that ships pre-installed on all Control4
controllers, such as Media Controller.
Purpose
An essential component in every home control system is
a navigation tool that provides a method for users to
communicate with the system. Control4 offers a variety of
navigation options for every room, including On-Screen
Navigator.
On-Screen Navigator is the interface that is common to all
users—that is, users who have access to a Control4
controller (such as Media Controller): homeowners,
trained installers, and Control4 support personnel.
This interface is used in conjunction with the System
Remote Control to navigate and control the system, and
to access media databases.Other user interfaces
available include: Wireless Touch Screen - 10.5”, Mini
Touch Screen, and the front displays found on some
devices. For detailed information on using these
interfaces, refer to the documentation that ships with
these products or see “Products” section of the Control4
web site: http://www.control4.com/products.
NOTE: For a complete list of supported options, see
“Products” at http://www.Control4.com
Page 8
2
What You Can Do
Use the System Remote Control in
conjunction with On-Screen Navigator to
interact with your Control4 system once
the system has been set up.
The general tasks you can accomplish
using On-Screen Navigator are:
Choose a location to control
Play a radio station
Play stored music
Watch TV
Watch a movie
Control comfort
Control lights
View the house status
View or change system information
NOTE: The System Remote Control
can be used to navigate the on-screen
interface or it can function as a stand-alone navigation
option. It is also used to control system devices, such as
DVD players, stereos, and TVs. This document
discusses the remote control only as it pertains to OnScreen Navigator. For complete information on remote
control functionality , refer to the System Remote Control
User Guide.
Task Definitions
The following definitions apply to instructions
involving On-Screen Navigator and the System Remote
Control:
Highlight:
When an item stands out from its peer,
usually because it is a brighter shade, to
indicate that it is currently flagged for a special
purpose.
Page 9
3
Select: Move the cursor to an item, then press
Select to highlight the item or to check a box.
Used when more than one item is available at
one time (such as when setting preferences).
Choose: Move the on-
screen cursor with
the remote control
arrows to highlight
an item, then
press Select to
initiate an action.
Scroll: Move the on-screen cursor into a scrollable
area (such as a list with a scroll bar) , then move
the viewable area up and down or left and ri ght
using the remote control arrows.
Access the Home Page
When you press (the red Control4 button) on the
System Remote Control, the On-Screen Navigator Home
page displays on the monitor or TV connected to the
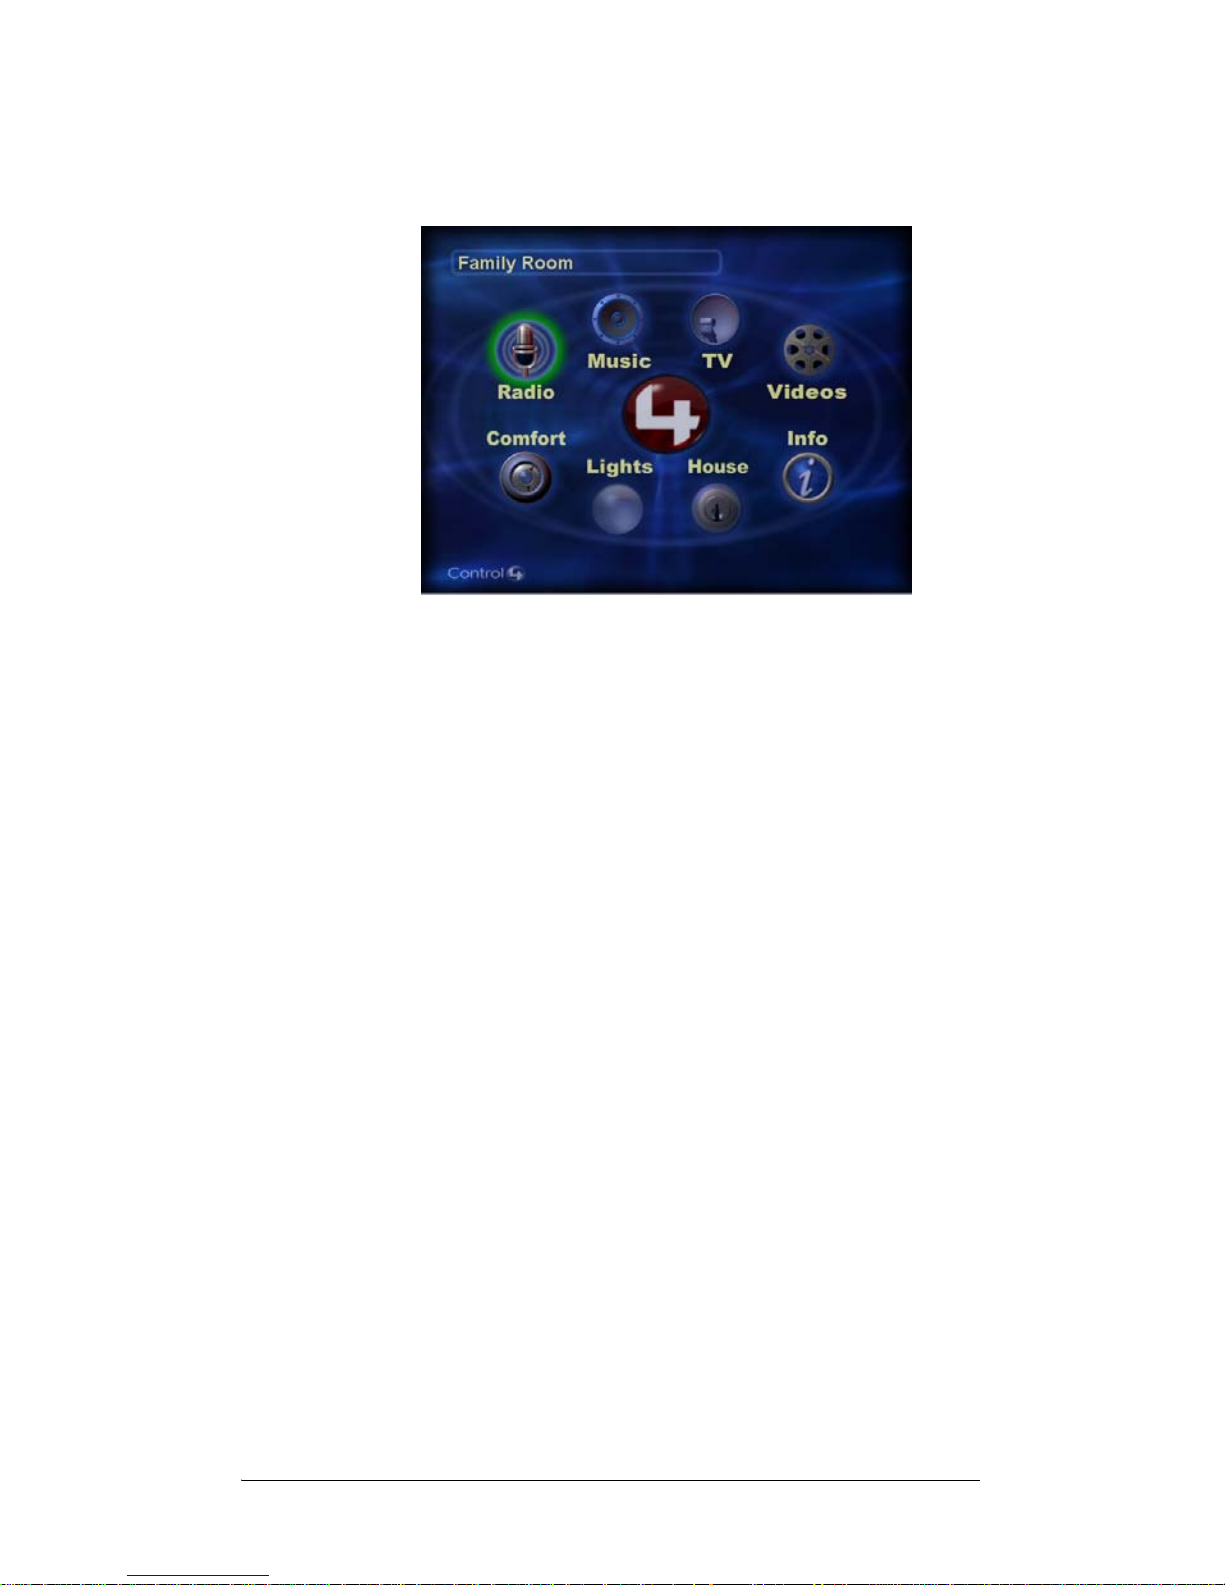
controller (see Figure 1-1).
About the Home Page
NOTE: The instructions in this manual are based on the
default theme (Radiant Blue). When you apply a different
theme, your process steps will deviate from the ones
documented in this manual. We recommend strongly that
you use this manual to become familiar with the default
user interface before changing themes.
Page 10
4
Figure 1-1.
On-Screen Navigator Home Page
The On-Screen Navigator Home page consists of:
Current Location
Subsystem Buttons
Current Location
The current room name displays in the location
placeholder (upper-left of screen), which provides access
to all other rooms in the system available for navigation or
control.
A default location for this device is specified during the
setup. However , y ou may choose a different room at any
time (see “Change Location” on page 6), as long as the
“Disable View” for this location has not been set (see
“Enable or Disable Viewing Options” on page 55).
If a name does not display in the location placeholder,
then On-Screen Navigator is probably not connected to a
Director (see more on this in Chapter 9).
Subsystem Buttons
The subsystem buttons provide access to all subsystems
available for control from the current room. If a subsystem
button is not brightly lit, then controls for that subsystem
are not available from the current location. The potential
subsystems in any given room are:
Page 11

5
`
Radio: Provides access to radio broadcast stations
for the current geographic location, including AM, FM.
XM, Sirius, Satellite or Cable DMX, and radio
broadcast. Also provides on-screen controls for
tuners.
` Music: Provides access to all music stored in the
system with filter options (such as Artist and Genre) to
produce a smaller list to browse. Also provides onscreen controls for CD players and disc changers.
` TV: Provides access to video broadcast channels for
the current geographic location, including those from
Television, Satellite Network, and Cable.
` Videos: Provides access to all movies stored in the
system with filter options (such as Director and
Rating). Also provides on-screen controls for DVD
players, VCRs, and DVRs.
` Comfort: Provides access to all comfort-related
control options for devices (such as fans, curtains,
blinds, or a fireplace).
` Lights: Provides controls for all lighting devices and
lighting scenes that are available in the current room.
` House: Provides a home for security and
communication-related features as they become
available. Displays status information on contact
switches (such as those found on doors, windows,
motion sensors, and security cameras).
` Info: Displays system information, including software
versions, current Director IP address, network
addresses, and configuration preferences (such as
theme and screensaver options).
For detailed instruction on each subsystem, refer to the
subsystem’s chapter.
Page 12

6
Change Location
NOTE: A default room for On-Screen Navigator should
have been set by your installer. If the location is correct,
skip to the next section.
NOTE: If the Location field is empty, then On-Screen
Navigator is not connected to a Director. To resolve this,
see “Connect to a Director” on page 49.
1. On the Home page, highlight the current room name
displayed (upper-left) and then press Select.
A list of the additional floors and/or rooms available
for control is displayed. Here are two sample lists:
One for a multi-level site and the other a multi-room.
Page 13
7
If you are unable to view a list, the option to change
the location may be disabled. See “Enable or Disable
Viewing Options” on page 55 for more information.
If the list is empty , then there are no other floors and/
or rooms available in the current Director.
2. Highlight the room you want to control and press the
Select button on the Remote Control. The new room
name is now displayed on the Home page and that
room is now available for you to control.
Access Subsystems
From the Home Page
You can access any subsystem (Radio, Music, TV,
Videos, Comfort, Light, House, and Info) from the Home
page:
1. Use the arrow keys on the System Remote Control to
highlight a subsystem.
2. Press the Select button on the System Remote
Control to display the subsystem’s option bar or other
related information.
Page 14
8
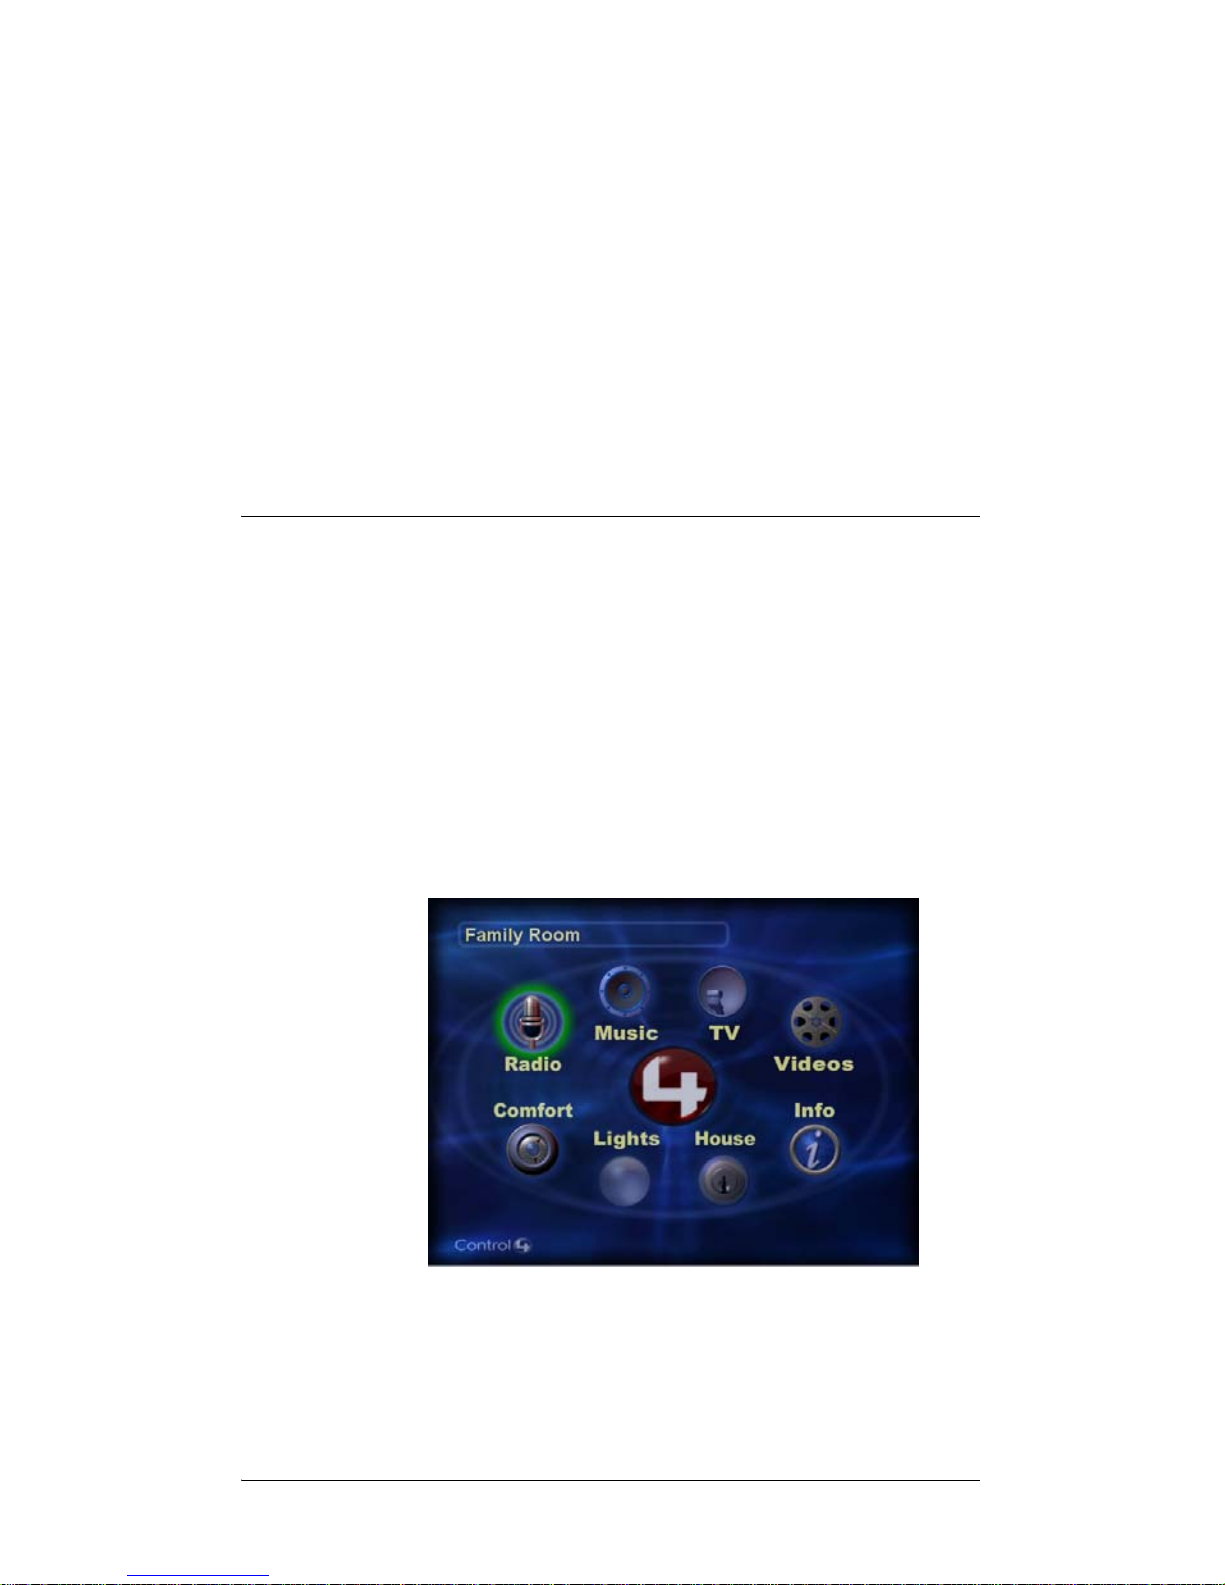
For example, use the arrows to move the highlighter to
Music and then press Select: The Music option bar is
displayed on the screen.
The arrow in the upper-right corner of this option bar
sample indicates that one or more additional options are
outside the current view area. Use the arrow keys to scroll
through all option bar options.
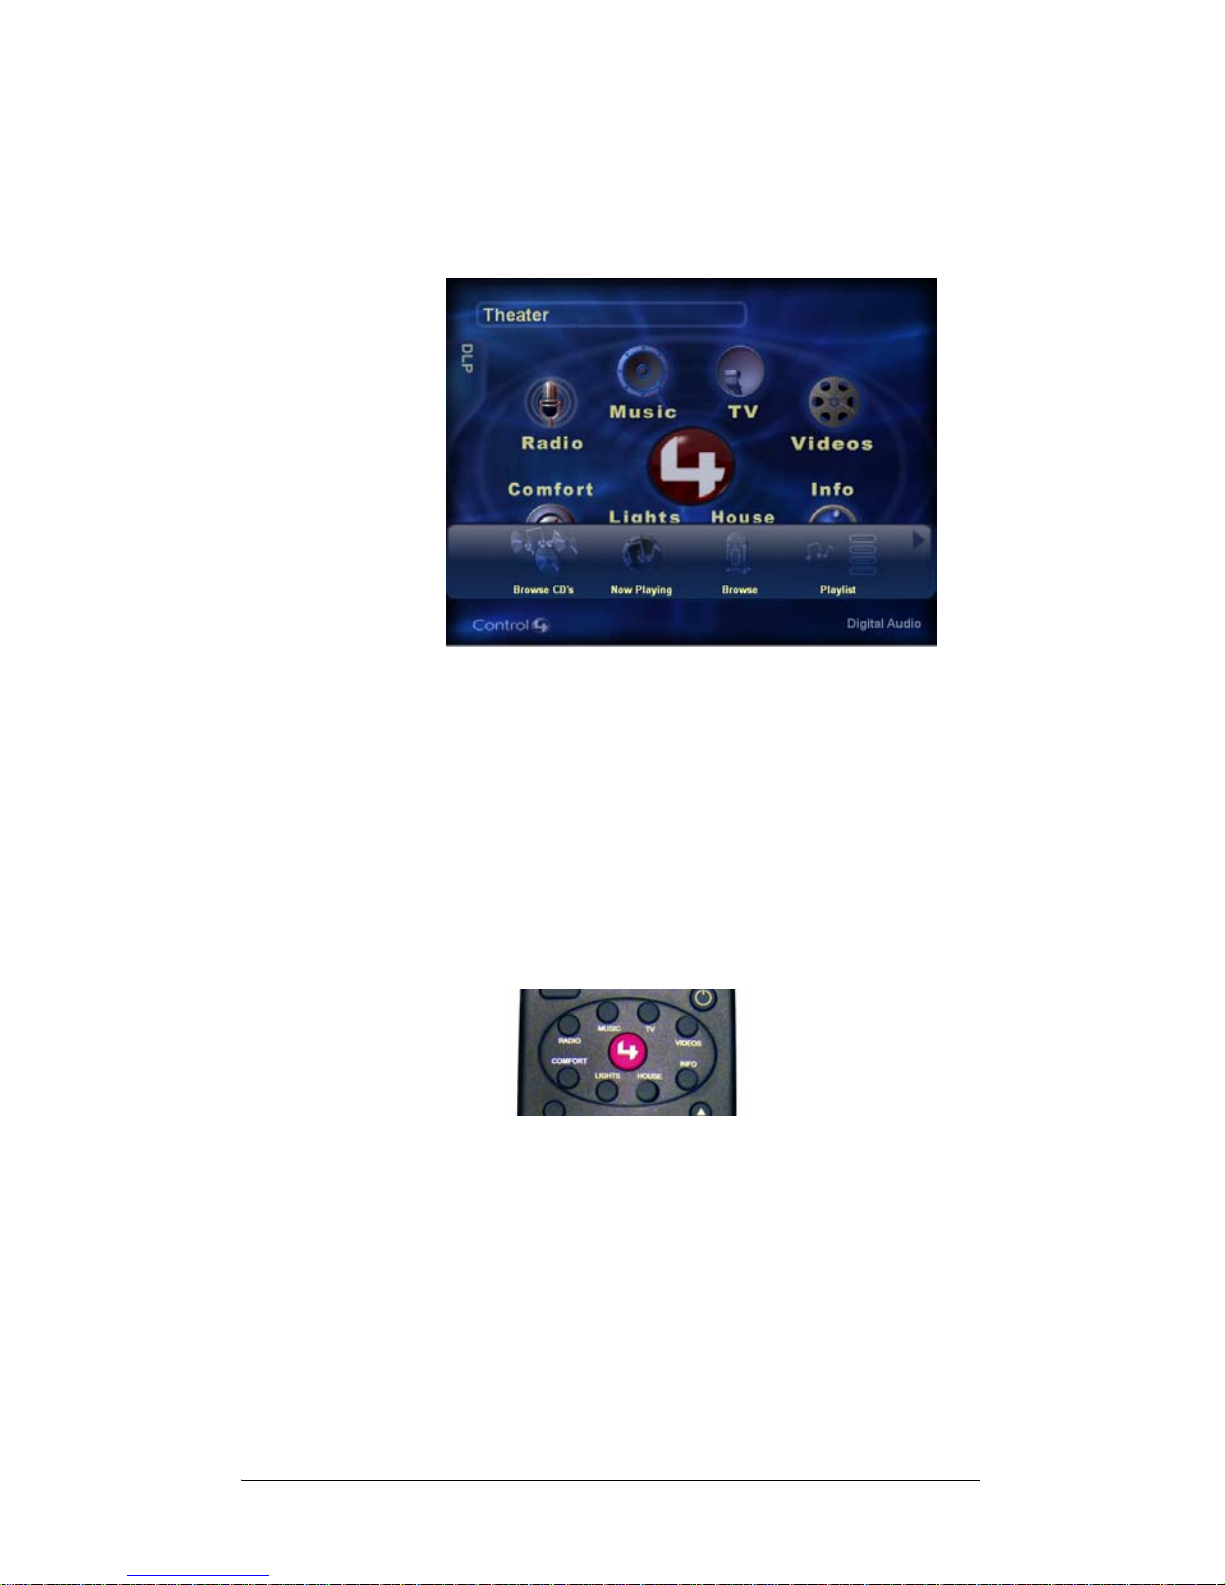
From the Remote Control Buttons
The System Remote Control provides additional options
for accessing the subsystems. Use either a short or long
press on the subsystem buttons on the remote control,
depending on where and how you want to view the
subsystem information.
` A short press (a fraction of a second) on a
subsystem button displays that subsystem’s
menu in the LCD display and chooses the device
to be controlled.
Try it: Quickly press the Music button to display
a music playlist in the LCD and to set the current
Page 15
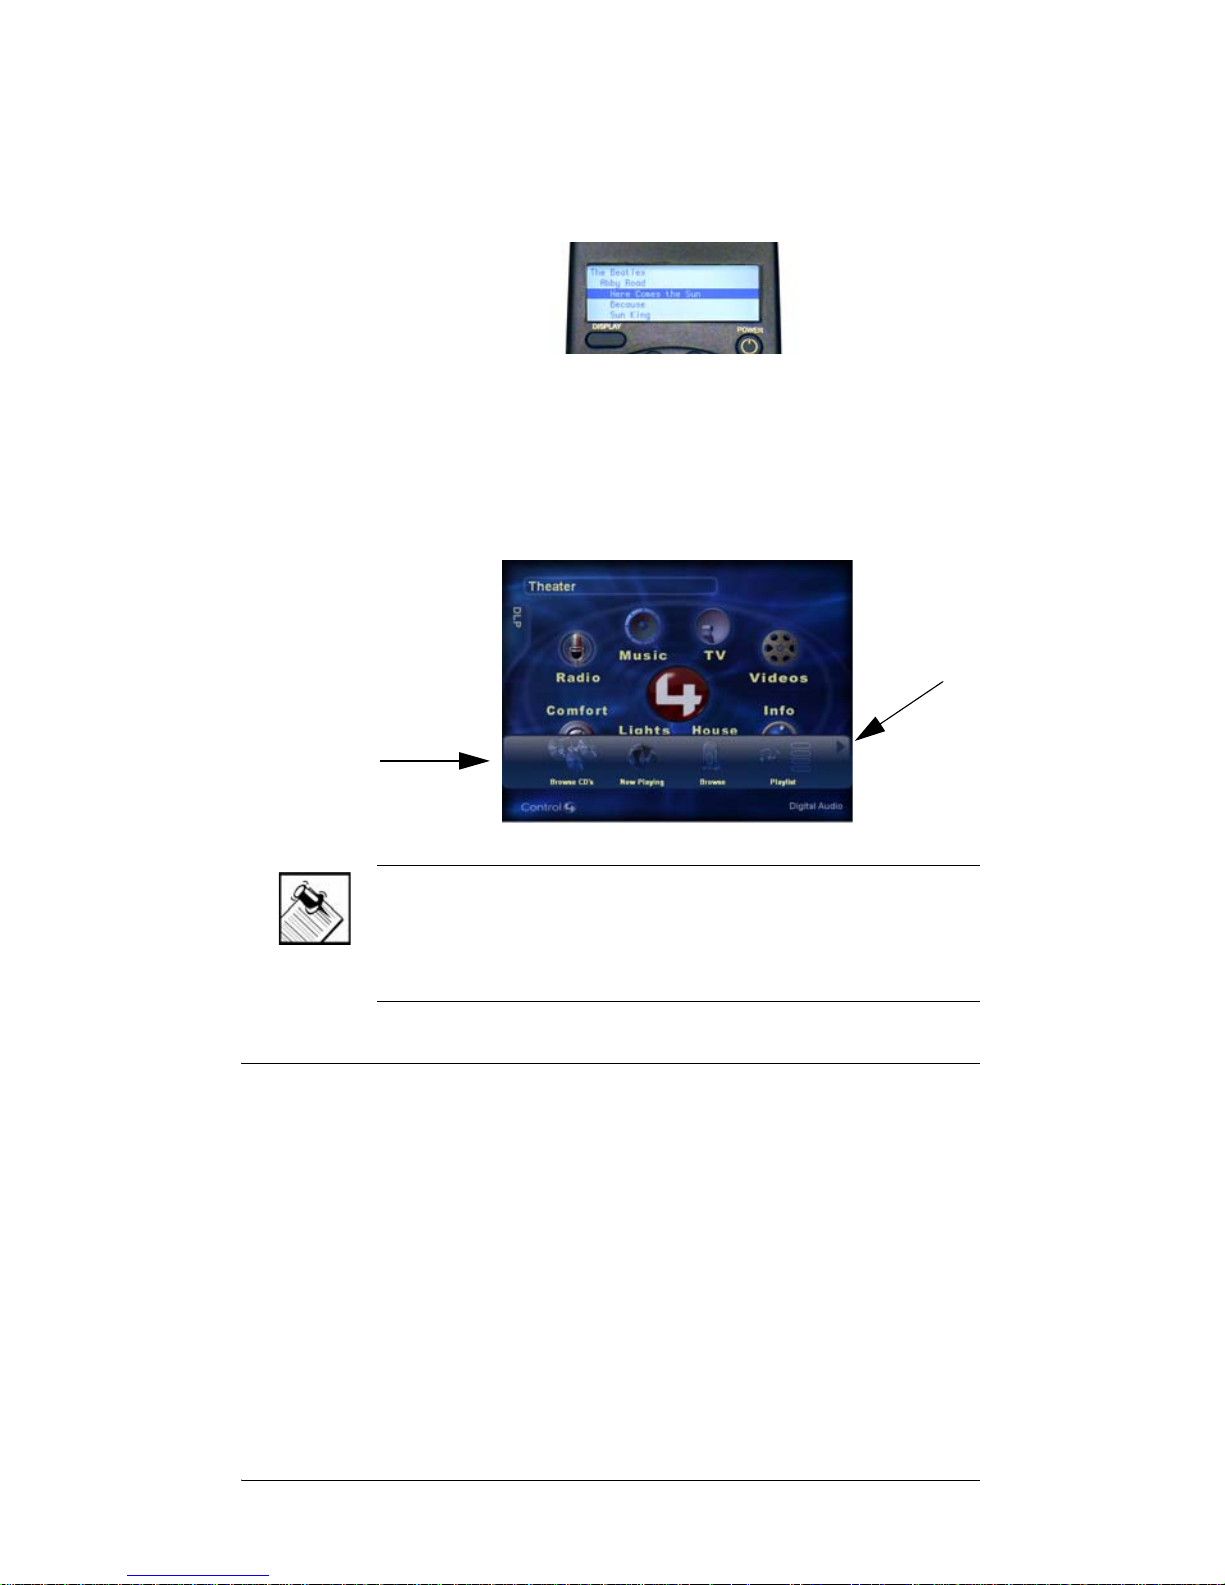
9
control target to the au d i o ou tp ut device
assigned to the curent room.
` A long press (one second or more) on a
subsystem button displays that subsystem’s
option bar on the monitor or TV.
Try it: Press-and-hold the Music button to display
the Music option bar on the monitor or TV.
NOTE: The arrow in the upper-right corner of this option
bar sample indicates that one or more additional options
are outside the current view area. Use the arrow keys to
scroll through all option bar options.
About Subsystem Buttons
Once you choose a subsystem button (either on the
screen or from the remote control), the view changes to
display the options available for that subsystem and the
device that the Remote Cont rol will cur rently con trol. The
options are grouped into media options and/or device
options.
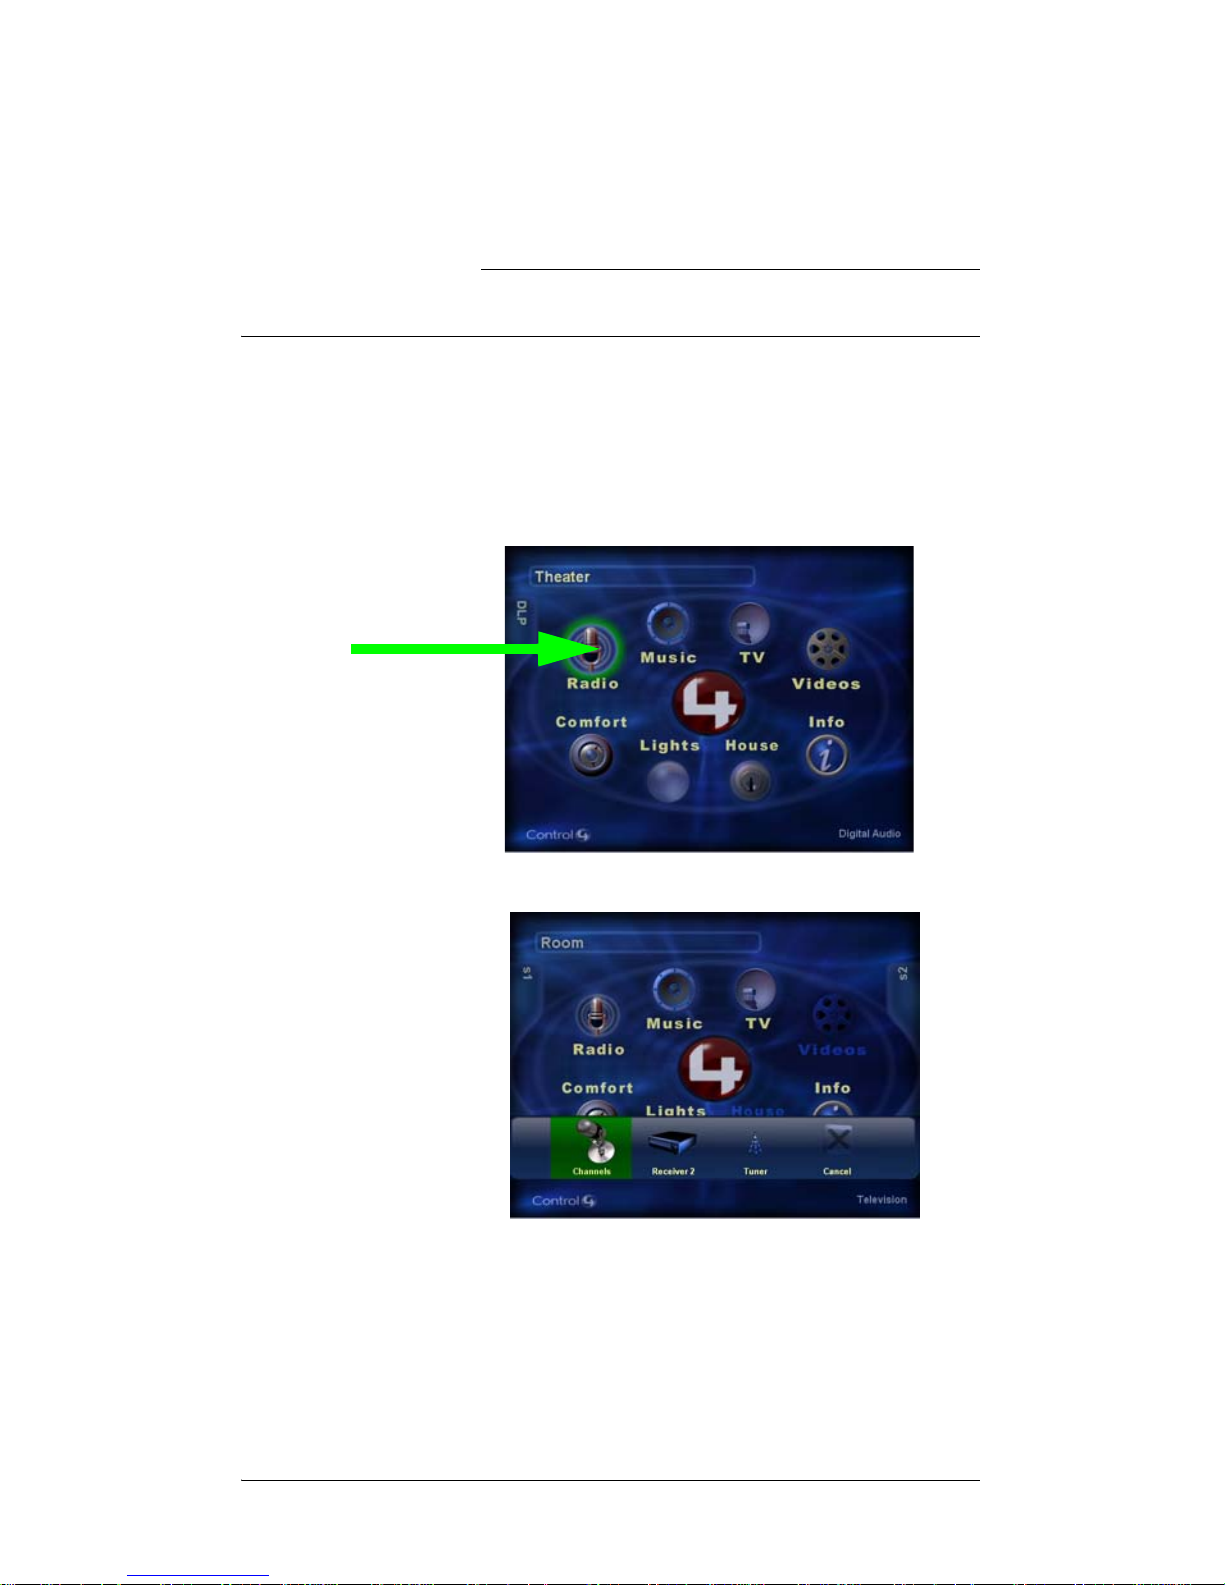
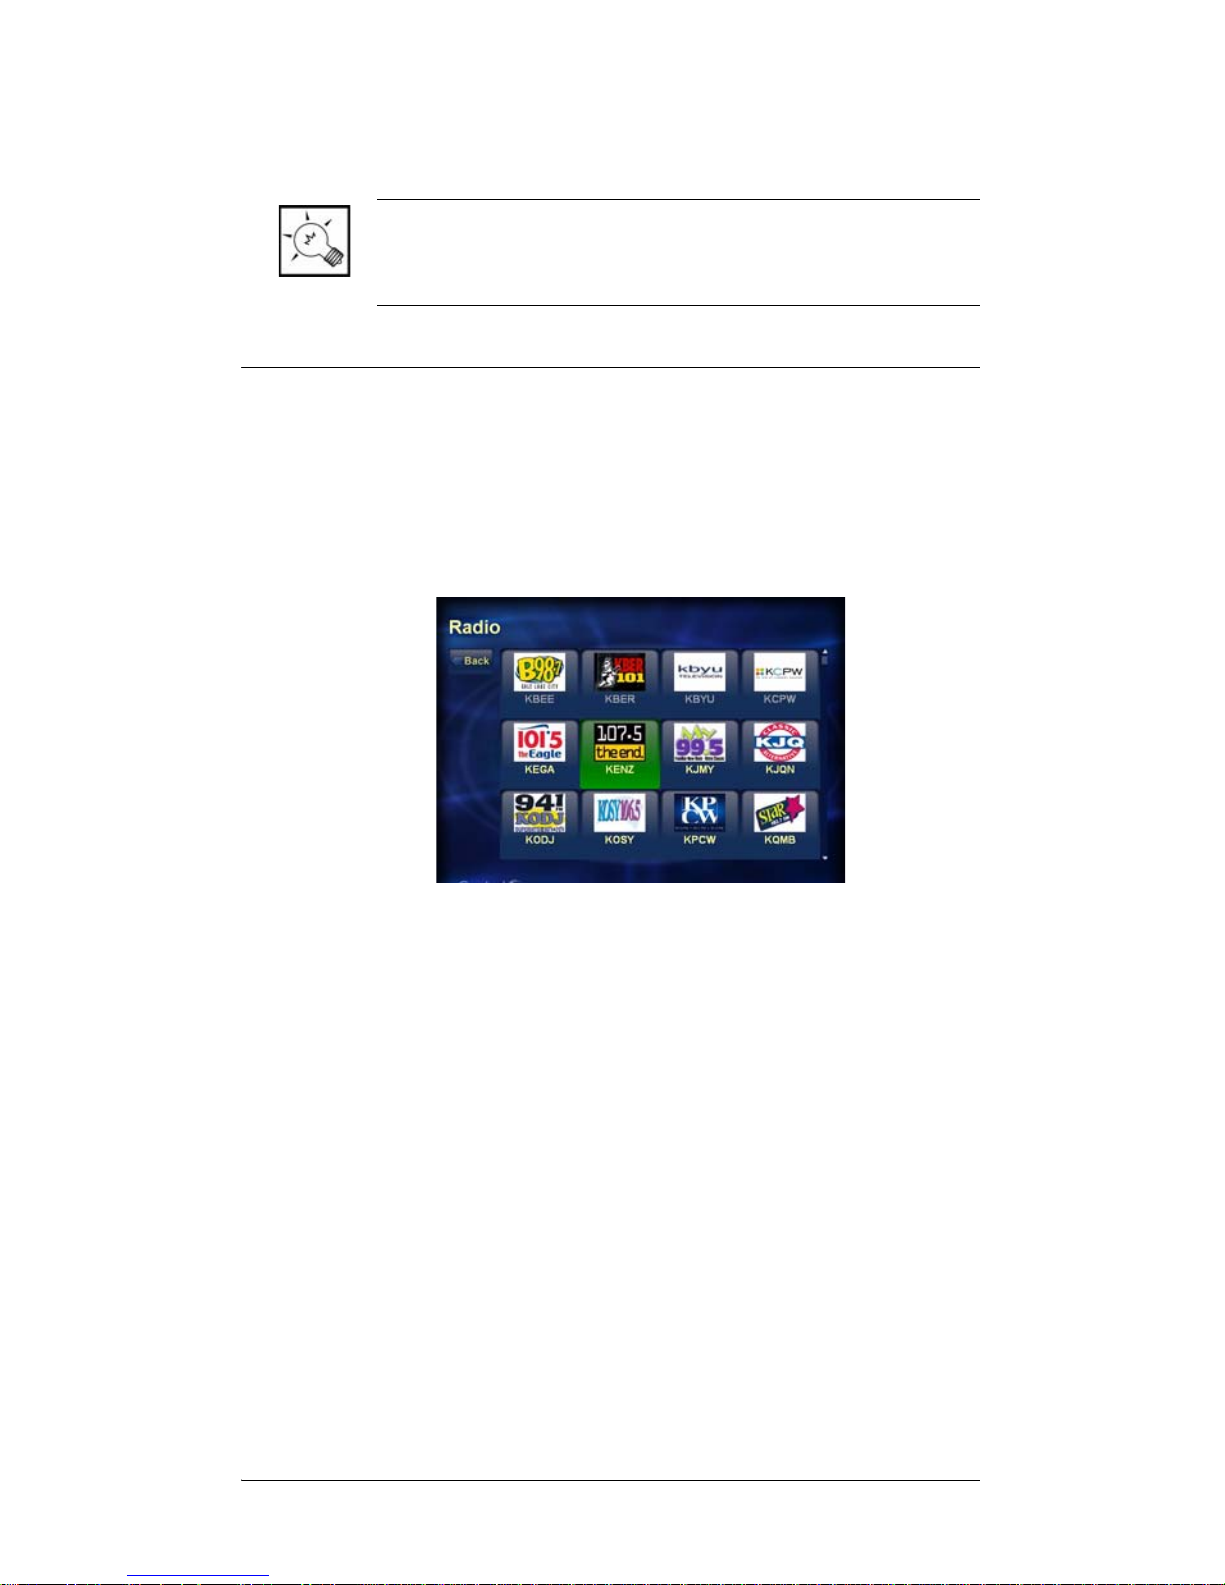
For example, if you press the
Radio button, you will see
a Channels media option plus any available device option
Page 16
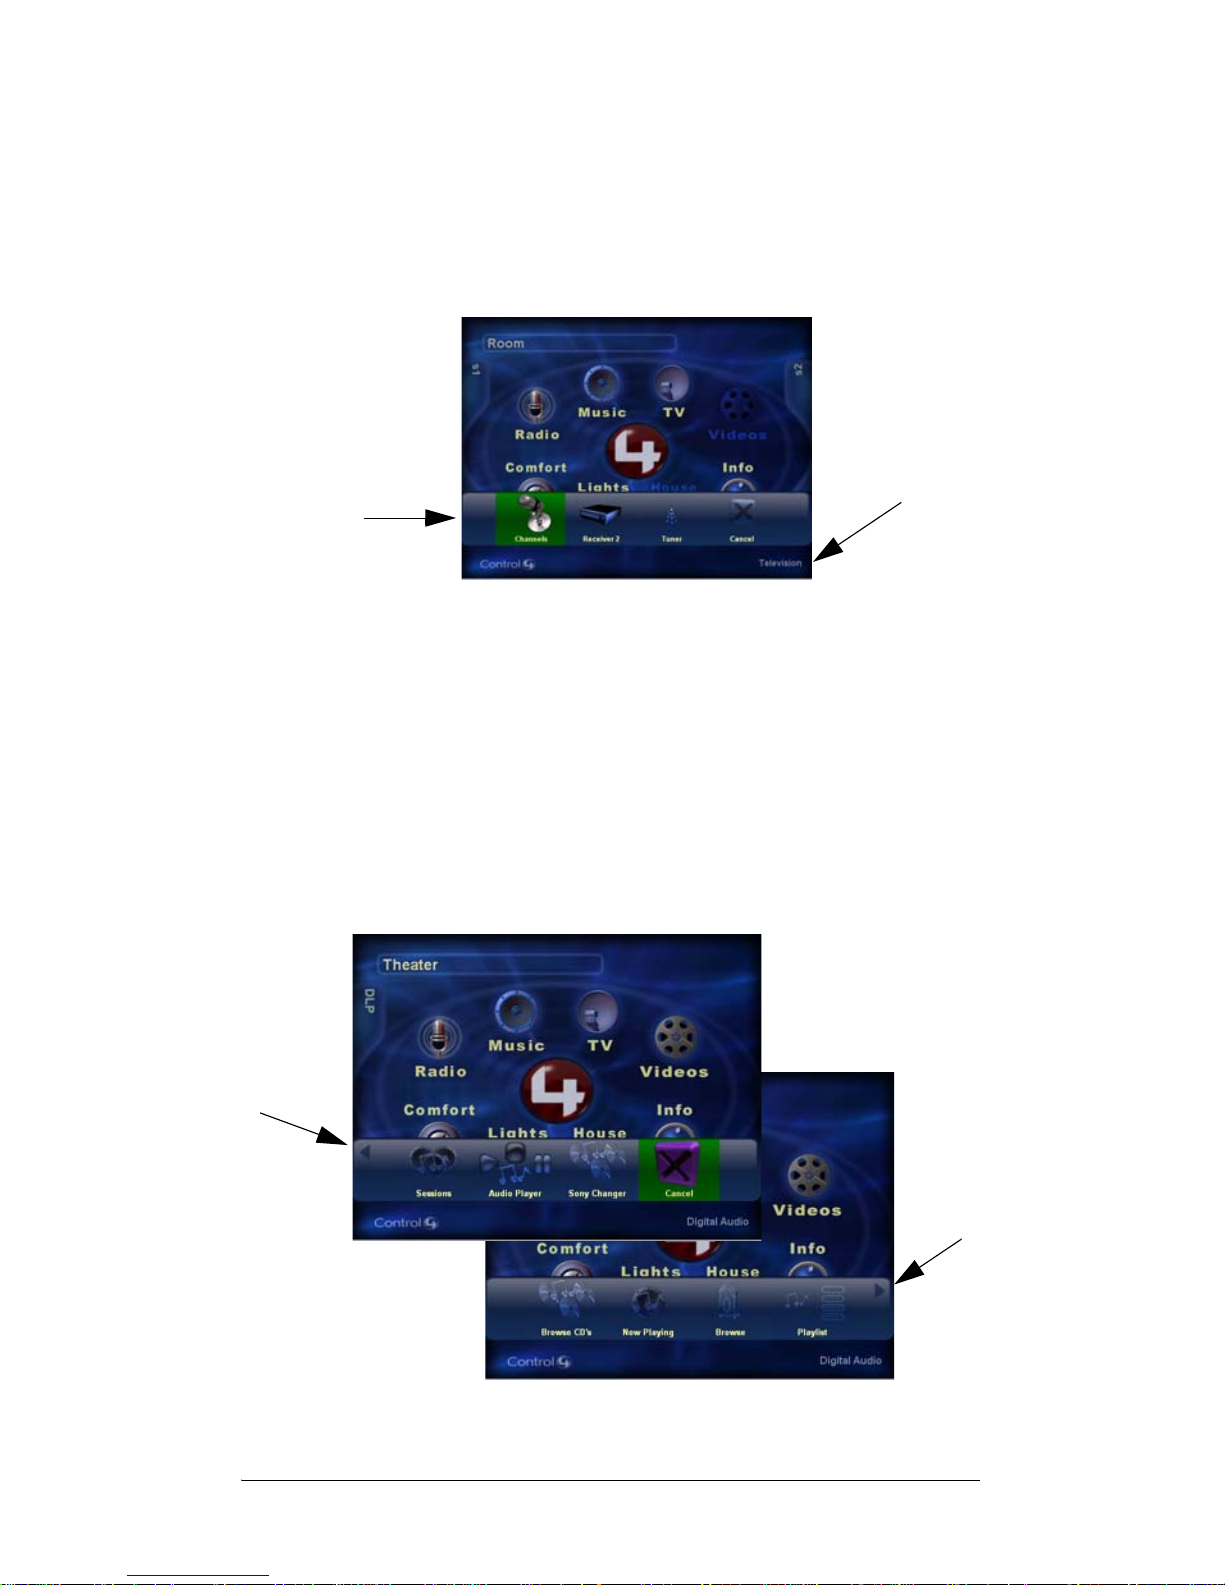
10
(like “Receiver 2” and “Tuner” in this example). You will
also see the name of the audio output device for the
current room (like “Television” in this example).
However, if you choose the Music button from t he Home
page, you will see a very different collection of options.
A variety of media options (Playlist, Now Playing, Browse
Library, Sessions), the Audio Player device option, and
any other device options available.
Notice the arrows at the end of the following sample
option bars. These indicate more options are available
outside the viewing area. Use the arrow keys on the
remote control to scroll and view the additional options.
Page 17
11
CHAPTER
2 Play the Radio
Access the Radio Options
To access the radio options:
1. Ensure the room you want to control is displayed.
2. Use the Remote Control arrows to move the cursor
until it highlights Radio.
3. Press Select. The Radio options bar is displayed.
4. Highlight an option, then press Select.
Page 18
12
TIP: Y ou can also press and hold the Radio button on the
System Remote Control to have the Radio option bar
display on the monitor or TV at any time.
About the Radio Options
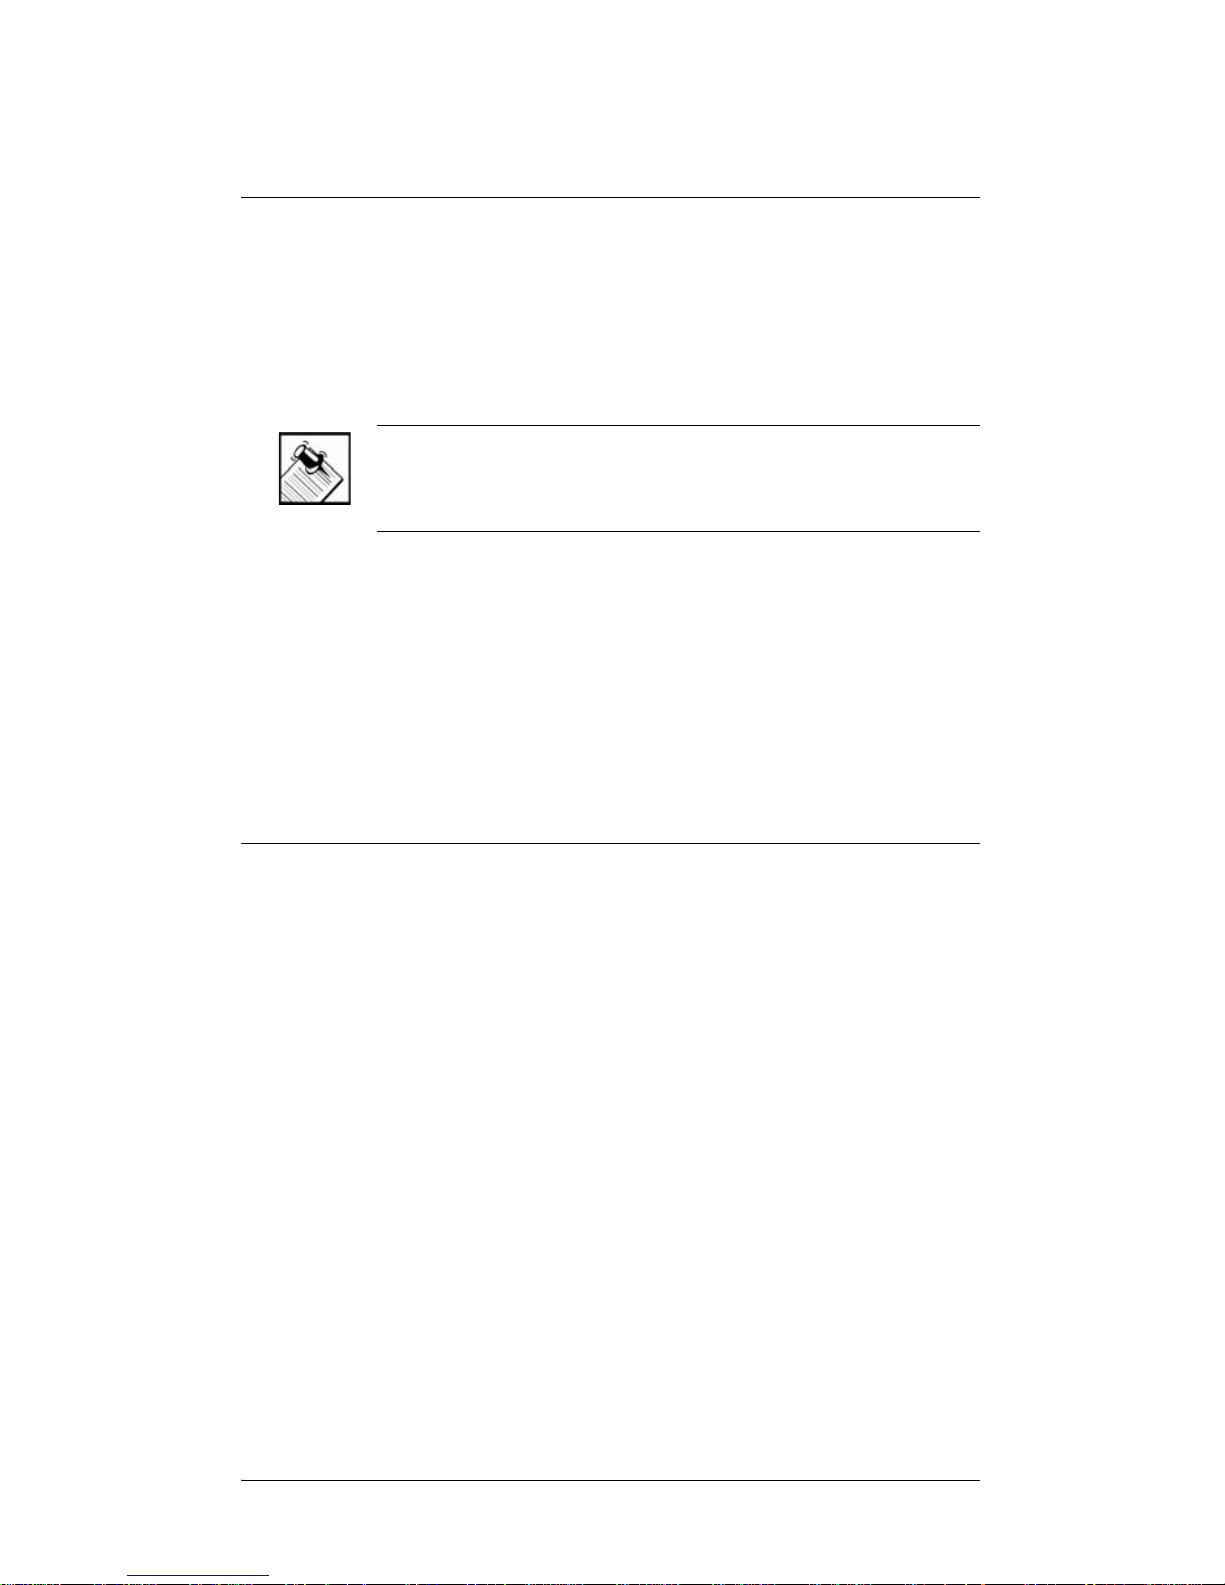
The Radio option bar provides access to a Channels page
and any radio device you have added to this location in
the system, such as a receiver or tuner.
Figure 2-1. Radio Channels Page
Channels Page
The Channels page displays a list of all radio stations
available to the current geographic area or radio network.
This page can be sorted by station call letters or numbers.
To change the sort option, press the Info button located in
the Navigation section of System Remote Control.
Radio Devices
If the current location has one or more radio devices
included in it, a corresponding button on the Radio option
bar provides access to each device, which sets this
device as the control target for the remote control.
Once you choose a Radio device button, you can begin
controlling that device with the remote control.
Page 19
13
Play a Radio Station
To play a radio station:
1. Highlight Channels, then press Select. The Radio
Channel page displays all available radio broadcast
channels for the current room.
NOTE: To change the sort option, press the Info button
located in the Navigation section of System Remote
Control.
2. On the Channels page, view all radio broadcast
stations available to the current room. Scroll through
the list as needed.
3. Choose a station. The chosen station begins to play.
4. Use the Remote Control, as needed, to control the
broadcast. For example, you can choose to mute the
radio or turn the volume up or down.
Control a Tuner
To control a tuner:
1. On the Radio option bar, choose a tuner device
button. The on-screen controls for that tuner display
in the display area. The control options depend on
what your tuner supports, but may include:
` Change sources: AM, FM, XM, or Digital Radio
stations.
` Scan all stations or choose a specific station.
` Control volume.
2. Choose an on-screen control option for this tuner.
Page 20

14
Control Other Radio Devices
To control a radio device other than a tuner:
1. On the Radio option bar, choose the radio device
button.
2. Use the System Remote Control buttons and LCD
Display to control the radio broadcast.
Page 21

15
CHAPTER
3 Play Music
Access the Music Options
To access the Music options:
1. Ensure the room you want to control is displayed.
2. Use the Remote Control arrows to move the cursor
until it highlights Music.
3. Press Select. The Music options bar is displayed.
Page 22

16
4.
Use the right arrow on the System Remote Control to
scroll and view the remaining items on the Music
option bar (such as the following example).
5. Highlight an option, then press Select.
TIP: Y ou can also press and hold the Music button on the
System Remote Control to have the Music option bar
display on the monitor or TV at any time.
About the Music Options
The Music options allow you to browse or play all music
stored in the system. They also provide access to each
device to choose it as the remote control target.
The Music options displayed may include:
` MP3 options (if you have stored digital media):
Browse, Now Playing, Playlist, and Audio Player.
` CD options (if you have at least one CD in a
connected device): Browse CD’s and any CD player
or disc changer .
` Shared option: Sessions (currently the only page
that applies to both MP3 and CD sources).
Page 23

17
Once you choose a CD player or changer device button,
you can control that device using th e System Remote
Control.
Browse
Choose the Browse Library option to display the Browse
Music Library page, which provides a variety of viewing
options for the MP3 music library, including filters.
Figure 3-1. Browse Music Library page
The next four figures (Figure 3-2 - Figure 3-5) provide
samples of these library browsing options.
Albums: List of all albums of MP3 files available from the
controller and any information available on the highlighted
item from your music database service. The default view
shows the cover art, but you can choose the Show As
List button to toggle to the text-only view.
Page 24

18
Figure 3-2. Browse > Albums page with and without cover art
Artist: List of artists and/or composers from which to
choose, then view the resulting list of works by that artist
or composer, including any information available on the
highlighted item from your music database service.
Figure 3-3. Browse> Artist page
Page 25

19
Genre:
List of genres (or categories) from which to
choose, then view the resulting list, including any
information available on the highlighted item from your
music database service.
Figure 3-4. Browse > Genre page
Alphabetical: List of alphanumeric ranges from which
to choose that allow you to jump to the area of interest.
Figure 3-5. Browse > Alphabetical page
Page 26

20
Now Playing
Choose the Now Playing page to display the current MP3
playlist along with the available playback options.
Figure 3-6. Now Playing page
Y ou can select a track in the list and start playing that song
immediately , or you can use the playback options: Shuffle,
Repeat, Save, Edit, Clear, Browse Library, or Back.
Shuffle: Choose this button to select
(check) or deselect (uncheck) the
Shuffle option for this playlist. When
selected, the Now Playing list is shuffled
randomly each time it is started.
Repeat: Choose this button to select
(check) or deselect (uncheck) the
Repeat option for this playlist. When
selected, the Now Playing list will continue to play and
repeat until you either clear this playlist or stop the
playback (for example, by pressing the Stop button on the
System Remote Control).
When Repeat and Shuffle are both selected, then the
playlist will play every song in the list before shuffling the
list and repeating any song in the list.
Save: Choose this to save the Now Playing list as a
Saved Playlist and to give it a name.
Page 27

21
CAUTION! If you save a playlist with the
same name as an existing playlist, you will
copy over the existing playlist without
warning. T ake care to give each playlist you
want to save a unique name.
Edit:
Choose this to edit this playlist. You can select and
remove individual tracks from the playlist or add individual
tracks to the playlist.
Clear: Choose this to empty the Now Playing list. If you
choose this while a song is playing, the list will clear and
the song currently playing will stop.
NOTE: To stop the current playback use the System
Remote Control control buttons or use the Audio Player
(see “Audio Player and Other Devices” on page 22).
Browse Library: Choose this to access a music
database browsing option or to return to your last location.
Back: Choose this to return to your last location.
Playlist
Choose the Playlist page to display the list of all saved
playlists for MP3 files and their supported options.
Figure 3-7. Playlist page
Page 28

22
Audio Player and Other Devices
If the current location has one or more audio playback
devices available to it, a corresponding button on the
Music option bar provides access to each audio device.
For example, if you have a Media Controller and a CD
changer available at this location, you will have two audio
device buttons available:
` Audio Player: Choose this to begin controlling the
Now Playing list (an MP3 playlist) with the Remote
Control. You can also choose any related menu item
that displays in the Remote Control LCD.
` CD Changer: Choose this to begin controlling the CD
Changer playback with the Remote Control. You can
also choose any related menu item that displays in
the Remote Control LCD.
You may need to scroll the option bar using the Remote
Control arrows in order to view all devices available for
control. (See the example provided in Step 4 on page 16.)
If you choose a device button, you can control that device
using the System Remote Control.
Browse CD’s
Choose the Browse CD’s page to display the CD Library
viewing options (such as “Artist”). Choose an option in the
list to immediately apply that option.
Sessions
Choose the Music Sessions page to view a list of all music
sessions available throughout the home. A music session
is one or more rooms playing a stored MP3 or CD source.
When no session is playing in the entire system, an empty
list displays with the message “[No Session]”.
Each time a music source is started within the system, it
becomes a session listed here (no matter what the current
room is). The session is named after the initial session
member—that is, the room that started the playback.
Page 29

23
The room that started the session and the rooms that
joined the session are all listed below the session name.
From the Music Sessions page, you can:
` Join the current room to a session (click on a session
name).
` Remove the current room from a session (“Remove
From Current Session”).
` Party rooms to play common stored music throughout
a home or on one floor.
` Clear the Now Playing list and stop the current
playback for all rooms connected to that session.
Each time a music source is started within the system,
that source is added to this list (no matter what the current
room is). The session is named after the initial session
member—that is, the room that started the playback. The
rooms that joined the session are listed below the session
name.
When the current room is not joined to any session, the
“[No Session]” text displays in the interface.
Play MP3s Stored in the System
If you want to play MP3 music files that have been added
to the system database (that is, music that has been
stored on a Control4 controller hard drive and then
scanned), see the following playback options.
“Play an MP3 Album or Song”
“Play a Saved MP3 Playlist”
“Control the MP3 Playback”
Play an MP3 Album or Song
To add an album or song to the Now Playing list:
1. From the Home page, choose Music > Browse.
2. From the Browse Music Library page, choose one of
these options and browse to a list of albums:
Page 30

24
` Albums:
Displays a scrollable list of all albums
available in the entire database.
` Artist: Displays a scrollable list of all artists and
composers in the database. When you choose a
name from the list, only the albums by that artist
or composer are displayed.
` Genre: Displays a scrollable list of available
genres (or categories). When you choose a
genre, only the albums categorized as that genre
are displayed.
` Alphabetical: Displays a scrollable list of
alphanumeric ranges. When you choose a
range, only the albums that fall into that
alphanumeric range are displayed.
3. Choose an album (move the cursor to an album and
then press Select) . The list of album songs along
with a Queue All option are displayed on the right
side of the page. From here you can choose to play
an entire album (Queue All) or select specific songs.
4. To play the en tire album:
4a. Choose Queue All. Notice that all of the songs
in the list are now highlighted.
4b. Choose the Now Playing button on the left of
the page to add this album to the Now Playing
list.
NOTE: Once a song is added to the Now Playing list,
that item will remain highlighted in the Library until it is
removed from the Now Playing list. One way to remove a
song from the playlist is to browse to it in the library and
unselect it.
5. To select one or more songs from the album:
5a. Move the cursor to a song and then press Select
to highlight the song. That song is added to the
Now Playing list. If you move the cursor to a new
location, this song will remain highlighted.
Page 31

25
5b.
Repeat the previous step as needed until you
have selected all of the songs you want to play.
5c. Choose the Now Playing button on the left of
the page to view the Now Playing list.
NOTE: When music is stopped, any addition to the Now
Playing list will start the music playing at the point of the
addition.
TIP: To choose most (but not all) of the songs on an
album, first choose Queue All to highlight (select) all of the
songs, then move the cursor to a song you want to
deselect and press Select. The song will no longer be
highlighted, indicating that it has been deselected.
6. To save the playlist, see “” on page 28.
7. To control the playback, refer to “Control the MP3
Playback” on page 26.
Play a Saved MP3 Playlist
NOTE: For instructions on creating your own playlist,
see “” on page 28.
To play a saved playlist:
1. From the Home page, choose Music > Playlists.
2. To select a playlist from the list:
2a. Move the cursor to a playlist and then press
Select to highlight the playlist.
2b. Choose the Load button on the lef t of the p age
to add the selected playlist to the Now Playing
list and view the Now Playing list.
3. To control the playback, refer to “Control the MP3
Playback” section that follows.
Page 32

26
Control the MP3 Playback
Once you start a playlist, you can control it from either the
System Remote Control buttons or On-Screen Navigator.
T o control the playback using the System Remote Control,
use the control buttons to stop or otherwise control the
playback or change to another audio source (such as TV
or Videos). (For more information, refer to the
System Remote Control User Guide.)
To control the playback using On-Screen Navigator,
choose one of these methods:
` Clear the Playlist: On the Now Playing page, press
Clear to erase all contents from the Now Playing list.
` Stop the Session: Press the Stop button on the
System Remote Control.
` Clear the Playlist and Stop the Session:
On the Music option bar, choose Sessions, highlight
the session playing in the current room, and then
choose Delete. This stops the digital playback for the
session.
` Choose Audio Player as the control target:
1. On the Home page, choose Music.
2. On the Music option Bar, scroll to and choose
Audio Player to activate the System Remote
Control controls for the MP3 playback.
3. Use the System Remote Control to Start, Stop,
Pause, or otherwise control the MP3 playback.
Create and Save an MP3 Playlist
To create and save a playlist:
1. Add albums, songs, or an existing playlist to the Now
Playing list, as described in:
` “Play an MP3 Album or Song” on page 23
` “Play a Saved MP3 Playlist” on page 25
2. On the Now Playing page, choose Save.
Page 33

27
3.
Using the on-screen keyboard, enter a name for this
playlist as you want it to appear in the Saved Playlists
and Recent Playlists pages, then choose Done.
Y our new playlist will now display on the Playlist page
as another list item.
Edit an MP3 Playlist
The way to “edit” a playlist is to load the playlist into
the Now Playing list, add or remove tracks as
needed, then save the new list with the old name.
Editing the playlist in the Now Playing list allows you
to select mutlple tracks for removal.
Play CDs Loaded in a Device
If you want to play CDs that have been loaded into an
audio device, then complete the following steps:
1. Load a music source (such as a CD) into an audio
device (such as a CD player).
2. Choose the device button located on the Music
option bar. Once you choose the device button, you
can control that device using the System Remote
Control or the On-Screen Navigator.
Page 34

28
3.
To control the playback using On-Screen Navigator:
3a. On the Home page, choose Music.
3b. On the Music option Bar, scroll to and choose
the music source (such as CD Player).
3c. Use the System Remote Control to Start, Stop,
Pause, or otherwise control the CD playback.
Page 35

29
CHAPTER
4 Watch TV
Access the TV Options
To access the TV options:
1. Ensure the room you want to control is displayed.
2. Use the Remote Control arrows to move the cursor
until it highlights TV .
3. Press Select. The TV options bar is displayed.
4. Highlight a page option, then press Select.
Page 36

30
TIP: You can press and hold the TV button on the
System Remote Control to have the TV option bar display
on the monitor or TV at any time.
About the TV Options
The TV option bar provides access to a Channels page
and any TV device you have added to this location in the
system, such as a television, cable, or satellite Dish.
Figure 4-1. Channels Page
Channels Page
The Channels page displays a list of all TV or other
broadcast channels, such as those available from cable or
a dish network. This page can be sorted by station name
or channel number. To change the sort option, press the
Info button located in the Navigation section of System
Remote Control.
TV Devices
If the current location has one or more TV devices
included in it, a corresponding button on the TV option bar
provides access to each device, which sets this device as
the control target for the remote control.
Page 37

31
For example, if you have a television and a cable/satellite
network available at this location, you will have two
additional buttons available: one to access television
controls and one to access cable/satellite network
controls.
Once you choose a TV device button, you can control that
device using the System Remote Control.
Choose a Channel Sort Option
The Channels page can be sorted by channel name or
number. To toggle between these sort options, press the
Info button located in the Navigation section of the System
Remote Control (shown below).
Choose a Channel
With the Channels page selected, choose a channel from
the list. The channel you choose is displayed on the
default video device for the current room.
Page 38

32
Page 39

33
CHAPTER
5 Watch a Video
Access the Video Options
To access the Video options:
1. Ensure the room you want to control is displayed.
2. Use the Remote Control arrows to move the cursor
until it highlights Videos.
3. Press Select. The Videos options bar is displayed.
4. Highlight a page option, then press Select.
Page 40

34
TIP: You can also press and hold the Videos button on
the System Remote Control to have the Video option bar
display on the monitor or TV at any time.
About the Video Options
The Video options include media pages and device
access buttons.
The media pages display all available videos (video tapes
or DVDs) for the selected zone, and they provide filter
options. The interface includes: Browse, Cover Art, and
any available video player (such as a DiscChanger in the
previous example).
Browse
All Movies: List of all videos available, includin g any
information available on the highlighted item from your
media database service (see Figure 5-1).
Genre: List of genres (or categories) from which to
choose, then view the resulting list, including any
information available on the highlighted item from your
media database service.
Director: List of directors from which to choose, then
view the resulting list, including any information available
on the highlighted item from your media database service.
Actor: List of actors from which to choose, then view the
resulting list, including any information available on the
highlighted item from your media database service (see
Figure 5-2).
Rating: List of ratings from which to choose (G, PG, PG-
13, etc.), then view the resulting list, including any
information available on the highlighted item from your
media database service.
Alphabetical: Alphabetical list of all vide os available,
including any information available on the highlighted item
from your media database service.
Page 41

35
Figure 5-1.
Browse > All Movies page
Figure 5-2. Browse > Actor page
Page 42

36
Cover Art
List of videos that have been enhanced with content from
a media database provider (see Figure 5-3).
Figure 5-3. Cover Art
Video Devices
If the current location has one or more video devices
included in it, a corresponding button on the Video option
bar provides access to each device, which sets that
device as the control target for the remote control.
For example, if you have a DVD player and a DVD
changer available at this location, you will have two
additional buttons available: one to access DVD player
controls and one to access DVD changer controls.
Once you choose a device button, you can control that
device using the System Remote Control.
Page 43

37
Play a Video Stored in a DVD Changer
If you want to access a DVD stored in a connected DVD
changer, choose the DVD from one of the video menus.
Choose from the Entire Database
To choose a video selecti on from the entire database,
choose one of these options:
` Choose Cover Art and then highlight a movie in the
list. On the remote control, press Select to view the
movie details. Press Select again to start the movie.
` Choose Browse > All Movies and then highlight the
movie in the list. On the cover art, choose Select
Movie and then choose Play Movie to start the movie.
Sort or Filter the Database
T o sort or filter the video database to narrow your choices,
choose one of these options:
` Genre: Press Browse > Genre > the chosen genre.
` Director: Press Browse > Director, then scroll to and
choose a name.
` Actor: Press Browse > Actor, then scroll to and
choose a name.
` Rating: Press Browse > Rating > the chosen rating.
` Alphabetical List of Titles: Press Browse >
Alpha, then scroll to and choose a group.
Play a Video Loaded in an Attached
Device
If you loaded a video source (such as a VCR tape or DVD)
into a system device (such as a VCR or DVD player), then
choose the device button located on the Videos page.
Once you choose the device button, you can control that
device using the System Remote Control.
Page 44

38
Page 45

39
CHAPTER
6 Control Comfort
Access the Comfort Page
To access the Comfort page:
1. Ensure the room you want to control is displayed.
2. Use the Remote Control arrows to move the cursor
until it highlights Comfort.
3. Press Select. The Comfort page is displayed.
4. Highlight an option, then press Select.
Page 46

40
TIP: You can also press and hold the Comfort button on
the Remote Control to have the Comfort optio n ba r
display on the monitor or TV at any time.
About the Comfort Page
The Comfort page provides access to all comfort-related
controls in the system that help to regulate the location
temperature, such as fans, fireplaces, or motorized blinds.
You may also see a Wakeup option on this page if your
installer included it, which provides room-specific
“Wakeup” option controls.
The Wakeup option can be used much like an alarm clock,
but with any additional options your installer has provided
for you, such as specific light settings.
Change Comfort Settings
To change a comfor t setting:
1. On the Comfort page, choose the Comfort Controls
button. The Comfort Controls page is displayed,
which includes the appropriate control button for
each applicable device. For example:
Fireplace can be set according to the variations the
fireplace supports. The current status is represented
Page 47

41
on the screen. The fireplace has On and Off modes,
so an On/Off switch is displayed on the screen.
Motorized Blinds can be set according to the
variations the blinds supports. The current status is
represented on the screen: Up/Down or Open/
Closed.
2. On the Comfort Controls page, choose an on-screen
control to change the current setting of a comfortrelated device.
Set Wakeup Options
If this option displays on your Comfort option bar, you can
set alarm clock-like settings:
To set a Wakeup option:
1. On the Comfort page, choose the Wakeup button.
2. Highlight the On/Off box and press Select on the
remote control to check the On box.
3. Set the wakeup time in the drop-down lists using the
remote control arrows and Select button.
4. Choose a Wakeup option in the Select Wakeup drop-
down list.
Page 48

42
Page 49

43
CHAPTER
7 Control Lights
Access the Lights Page
To access the Lights page:
1. Ensure the room you want to control is displayed.
2. Use the Remote Control arrows to move the cursor
until it highlights Lights.
3. Press Select. The Lights page is displayed.
About the Lights Page
The Lights page displays control options for all lighting
lighting loads and scenes.
Page 50

44
Lighting loads may be an individual light fixture or a group
of light fixtures that are controlled by one dimmer or
switch.
Scenes are a collection of preferred settings that have
been configured to set selected lights to selected levels.
Change a Light Setting
To change a Light setting:
1. On the Lights page, highlight the light or load you
want to control.
2. For Switches and Switch Loads: Press the Select
button to turn On of Off.
3. For Dimmers and Dimmable Loads: Press Select to
activate the slider, then:
` For incremental changes: Use the arrow keys to
move the slider up or down.
` For 100% On or Off: Use the Page Up and Page
Down to move the slider to 100% and 0%
respectively.
4. When finished, choose the on-screen Back button.
Activate a Lighting Scene
To activate a lighting scene:
1. On the Lights page, highlight the scene you want to
activate. The scene should be applied immediately.
2. When finished, choose the on-screen Back button.
Page 51

45
CHAPTER
8 View the House Status
Access the House Page
To access the House page:
1. Ensure the room you want to control is displayed.
2. Use the Remote Control arrows to move the cursor
until it highlights House.
3. Press Select. The House page is displayed.
About the House Page
The House Page provides a home for security and
communication-related features as they become
available. It displays status information on contact
switches (such as those found on doors, windows, motion
sensors, cameras, and sprinklers).
View Contact Switch Status
Choose House from the Home p a ge to vie w the st at us of
all contact switches for the home.
Page 52

46
Page 53

47
CHAPTER
9 View or Change
Information
Access the Info Pages
To access the Info pages:
1. Use the Remote Control arrows to move the cursor
until it highlights Info.
2. Press Select. The Info options bar is displayed.
3. Highlight a page option, then press Select.
Page 54

48
TIP: You can also press and hold the Info button on the
System Remote Control to have the Info option bar
display on the monitor or TV at any time.
About the Info Pages
The Info Pages display system information for this device,
including software versions, current Director IP address,
Network addresses, screensaver options, and themes.
About provides a home for system information, such as
Navigation version, Director IP, and Director version.
Director provides a list of all home network instances of
Director. Here you must choose the IP address for the
controller (such as Media Controller). Y our home network
may have just one controller or may have several to
choose from.
Network provides wireless network information, such as
the IP address, the MAC address, and the DNS server.
Themes provides “look & feel” options you can apply to
your On-Screen Navigator interface. The concepts and
features supported in the additional themes are consistent
with those documented in this manual. However, the
specific procedure steps will vary somewhat from theme
to theme. This document provides specific instructions for
using the default theme.
Config displays preference settings:
` Screensaver
` Default
` Disable View
Page 55

49
NOTE: The instructions in this manual are based on the
default theme. When you apply a different theme, your
process steps will deviate from the ones documented in
this manual. We recommend using the manual to
become familiar with the default user interface before
changing themes.
View Information “About” the System
To view the system information:
1. On the Info option bar, choose the About button.
The About page is displayed, including the current
Navigator version, Director’s IP address, Director
version, and any applicable media version.
2. To exit the About page, choose the Back button.
Connect to a Director
1. Use the Remote Control arrows to move the cursor
until it highlights Info
Page 56

50
2.
Press Select. The Info options bar is displayed.
3. On the Info option bar, ch oo se the Director button.
The Connect to a Director page is displayed and with
the current Director IP address in the upper-right of
the screen.
4. In the Connect to a Director list of IP addresses,
highlight your controller’s IP address. You may need
to manually enter your controller’s IP address. T o add
an IP address to the list:
4a. Choose Add.
NOTE: You can only choose to remove IP addresses
that you have manually added using this Add button.
Page 57

51
4b.
Use the On-Screen keyboard to enter the IP
address; then choose Done.
4c. Highlight the new entry in the list.
5. Choose Connect. First a “Connecting…” message is
displayed; then the page changes to display your
new IP address.
View or Change Network Settings
To view your networ k information:
1. On the Info option bar, choose the Network button.
The Network page is displayed.
2. On the Network page, choose the
IP Address button. The IP Settings
page is displayed.
3. On the IP Settings page:
3a. Either accept the DHCP default (for dynamic IP
addresses) or use the arrows and Select button
to choose Assigned (for static IP address).
Page 58

52
3b.
If you chose Assigned,
use the arrows and Select
button to enter the IP
Address for this device in
the keypad provided, and
then press OK.
3c. Choose OK to return to
the Network page.
4. To exit the Network page, choose the Back button.
Change Themes
NOTE: The instructions in this manual are based on the
default theme, Radiant Blue. When you apply a different
theme, your process steps will deviate from the ones
documented in this manual. We recommend using the
manual to become familiar with the default user interface
before changing themes.
1. On the Info option bar, choose Themes. The Themes
page is displayed, including a list of theme options.
The default theme is Radiant Blue.
2. Choose a theme, then choose Load Theme.
The screen will soon refresh with the theme you
chose to load.
Page 59

53
Change Configuration Preferences
The configuration preferences that you can modify from
this interface include:
` Screensaver options
` Default location and view
` Ability to change views
Set Screen Saver Options
To set screen saver options:
1. On the Info option bar, choose Config.
2. On the Config page, choose the Screen Saver
button. The Screen Saver page is displayed.
3. Choose the down arrow for Screen Saver options
and choose one from the list.
4. Choose the down arrow for “Turn on After...” and
choose a time setting from the list.
5. To preview the screen saver, choose Preview.
When finished previewing, press the Select button.
6. To exit the Screen Saver page, choose the Back
button.
Page 60

54
Set Default Location
1. On the Info option bar, choose Config.
2. On the Config page, choose the Default button.
The Default page is displayed.
3. Choose the down arrow for “Default Location and
View” and choose a default room for this device.
4. Choose the down arrow for “Reset to default:” and
choose a reset option from the list. Options include:
` “After Screensaver”
` “After Suspend”
` Specific times, ranging from
15 seconds to 1 hour
5. To exit the Default page, choose the Back button.
Page 61

55
Enable or Disable Viewing Options
When a view is locked, users cannot change that setting
unless they know the passcode.
TIP: Following system setup, we recommend you lock
the Director view.
1. On the Info option bar, choose Config.
2. On the Config page, choose Disable View.
3. If the Disable View setting is passcode-protected:
` If you need the passcode,
contact your authorized
Control4 reseller.
` If you have the passcode,
enter the passcode in the
keypad provided.
4. On the Disable View page, select one or more views
to lock (or unselect views to unlock), and then choose
Back.
Page 62

56
 Loading...