

Page 1

Control4 Mini Remote
User Guide
Introduction
The Control4® Mini Remote provides homeowners with an easyto-carry, simple-to-use, five button remote for their Control4
system. Small, battery-powered and water-resistant, the Mini
Remote fits on your keychain, clips to a car’s sun visor, sits on a
coee table or nightstand, or easily fits in your pocket or purse.
The Mini Remote has five programmable buttons that can be
customized for any Control4 task.
The Mini Remote extends Control4 accessibility with a simple,
pocket-sized remote, making it ideal for performing many
common functions in and around your home, including:
• A garage / home entry remote (as a garage door toggle,
an entry gate control, arriving home button, leaving home
button, and outdoor lighting remote)
• A simplified audio or even TV remote (with on/o, skip
forward, skip back, volume up, volume down controls)
• A personal “panic button” for the elderly (to create “callfor-help” events and/or send e-mail help requests to family
members)
Ask your Control4 installer about more uses for the Mini Remote!
The Mini Remote uses an integrated Light Emitting Diode (LED)
located near the top of the remote to provide you with feedback,
while a “hold” switch prevents accidental key presses in a pocket
or purse.
Using your Mini Remote
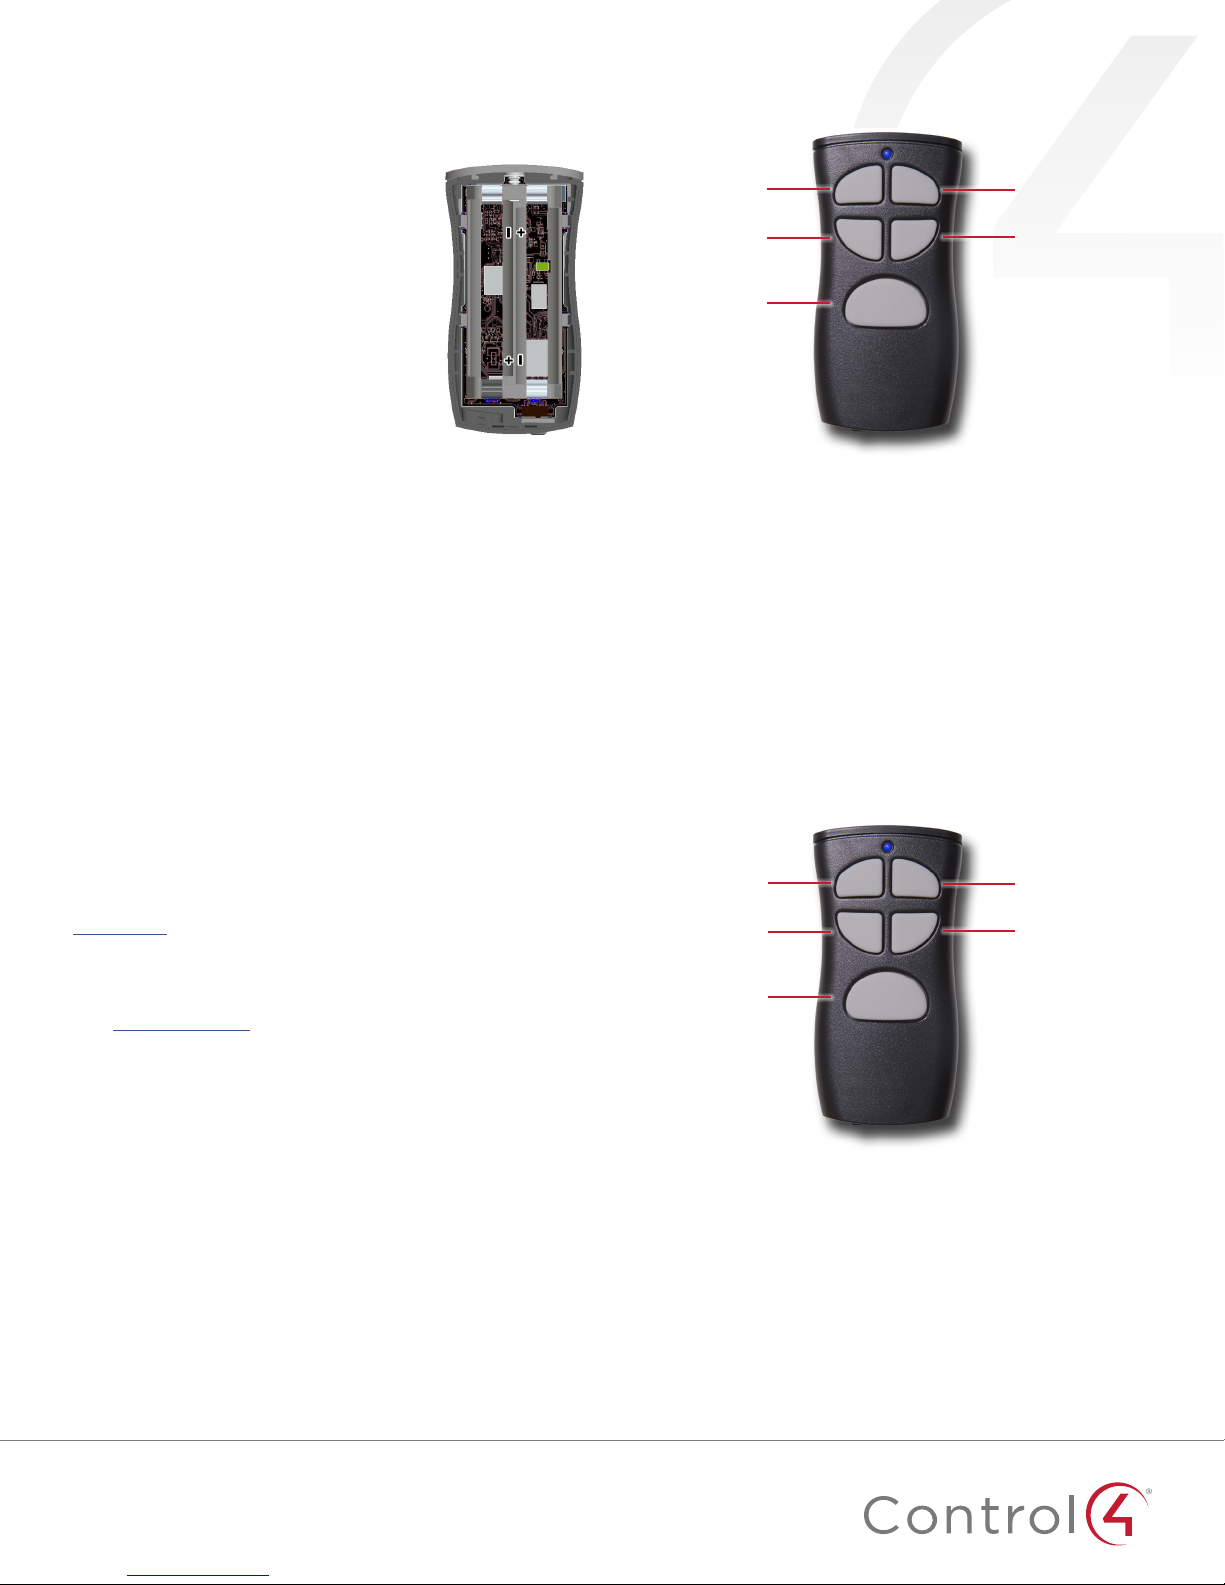
LED light
Button 1 Button 2
Button 3 Button 4
Button 5
Hold switch Lanyard ring
Buttons
The Mini Remote can be programmed to execute an event or
function by either pressing the button for less than 1/2 second
or holding the button for more than 1/2 second. Your Control4
installer can program dierent events for a button press versus
a button hold. On a button press, the LED blinks on then o as
you press and release the button. On a button hold, the LED will
turn on and then blink for the duration of the hold. This feature is
useful for functions such as dimming lights and volume control.
If the button is pressed for longer than 30 seconds, the LED will
stop blinking as a power-saving measure.
LED
The default LED color is blue. To customize your LED color,
contact your Control4 installer. This option may be helpful if you
have multiple Mini Remotes in your home or oce.
The LED will flash to indicate a low battery. When battery power
is reduced to 10% or less, the LED will blink yellow after each
button push. When the battery power is reduced to 5% or less,
the LED will blink red after each button push.
Hold slide switch
The Mini Remote uses a slide switch to disable buttons and
prevent accidental button pushes. If you want to disable the
buttons while the Mini Remote is in your purse or pocket, slide
the hold switch in (to the right), making the buttons inactive and
preventing accidental event execution. To activate the buttons,
slide the hold switch out (to the left).
1
Lanyard ring
The Mini Remote lanyard threads through the lanyard ring of the
Mini Remote, located on the remote bottom, and attaches to your
key ring.
Page 2
Maintenance
Battery installation
The Mini Remote is designed to maximize
the life of your batteries, though actual
battery life will depend on usage and
environment. The Mini Remote also includes
LED indicators for low battery levels. When
your Mini Remote LED blinks yellow or red
twice after a button push, your batteries are
low and it’s time for you to replace them.
In the event the LED remains red and the
buttons cease to respond, the batteries do
not have sucient power for the remote to
operate.
1 Remove the end cap by pulling
outward.
2 Remove the screw.
3 Open the case.
4 Replace the batteries.
Polarities (+ and -) are marked on the center divider.
Battery optimization and safety
• Keep the battery contacts and the compartment clean and
dry.
• Remove batteries if the remote is not expected to be used
for a long period of time.
• Avoid extreme temperatures, as they reduce battery
performance.
• Use only AAA alkaline or lithium batteries.
• Never dispose of a battery in a fire.
Left battery: positive (+) down
Right battery: positive (+) up
Remote name:
LED color:
Notes:
Remote name:
LED color:
Regulatory/Safety information
To review regulatory information for your particular Control4
products, see the information located on the Control4 website at
ctrl4.co/reg.
Warranty
Visit ctrl4.co/warranty for details.
Support
Contact your Control4 Installer for support questions.
Control4 Installer Name:
Control4 Installer Phone:
Control4 Installer Email:
Notes:
Copyright ©2016, Control4 Corporation. All rights reserved. Control4, the Control4 logo, the 4-ball logo, 4Store, 4Sight,
Control4 My Home, and Mockupancy are registered trademarks or trademarks of Control4 Corporation in the United
States and/or other countries. All other names and brands may be claimed as the property of their respective owners.
All specifications subject to change without notice. DOC-00220-A 2016-05-23 DH
 Loading...