

Page 1
EC-100
Energy Controller
User Guide
Congratulations on receiving your new EC-100 Energy Controller!
Supported Models
C4-EC100 Energy Controller
Associated SKUs:
• C4-EC100-BL — EC-100 Energy Controller, Black
• C4-EC100-WH — EC-100 Energy Controller, White
Introducing the EC-100 Energy Controller
The Control4® EC-100 Energy Controller (EC-100) wirelessly connects to your home’s
Smart Meter and gathers information about how much energy you are using and how much
that energy use is costing you. And if you know how much energy you’re using, the Energy
Controller can help you conserve energy and save money.
The EC-100 comes with a colorful touch screen on which you can view current and past
data about your home’s energy use in a clean, graphical format. Beyond that, the EC-100
provides an easy way to program and control your WT-100 Wireless Thermostat (sold
separately), check your weather forecast, review your power bills, view messages about
utility-driven energy savings events, and more!
EC-100 Features
• Sleek 4.7” Color Touch Screen: The EC-100’s touch screen puts your home’s energy management and control at your fi ngertips by allowing you to interact with data
and controls for the electricity-consuming devices in your home.
• Displays Your Home’s Electricity Use: Wirelessly communicates with your home’s
Smart Meter to gather information about your home’s electricity use. This display lets
you see your energy use over time, and shows you breakdowns of electricity use by
device: heating and cooling, refrigerator, and more.
• Broadband-Connected: The EC-100 connects to your home’s WiFi network to
provide additional information including power bills, messages from your utility
company and your local weather forecast.
• Easy Thermostat Programming and Control: The EC-100 makes it easy to
program your WT-100 Wireless Thermostat (sold separately), turn your heat or air
conditioner on or off, or change the temperature in your home. You can also easily
set your Wireless Thermostat into a special energy-saving ‘Vacation’ mode when you
leave town.
• Utility Bills: View and compare your monthly utility bills if available from your utility
company.
• Additional Resources: Refer to the EC-100 Energy Controller Setup Guide for
additional information about setting up and confi guring your new EC-100 Energy
Controller.
Terms
Term Defi nition
EC-100 The EC-100 Energy Controller is a table top or counter top display that
WT-100 Your WT-100 Wireless Thermostat controls the heating and air-condition-
Current Temp The current temperature indicated on the thermostat inside the home.
Set Temp Your set temperature is your desired temperature. You can program your
Hold When you manually adjust your set temperature, your selection will
Mode The WT-100 can operate in up to seven (7) modes (Heat + Fan Auto,
Energy Event A utility-driven Demand Response event which leads to a temporary
lets you view your home’s energy usage data and control your WT-100
Wireless Thermostat.
ing (HVAC) systems in your home.
desired temperatures for different times of day using the programming
feature on the EC-100 or manually adjust your set temperature on either
the EC-100 or WT-100 Wireless Thermostat.
automatically hold or maintain your new set temperature for two (2)
hours. All holds are two hours except for Vacation hold which will hold
your Vacation set temperature until you cancel the Vacation hold.
Heat + Fan On, Cool + Fan Auto, Cool + Fan On, Fan On, Emergency
Heat (Heat Pump only), and Off). In any mode that the Fan is selected as
On, the fan will run continuously. In Fan only mode, the fan will run
continuously without using your heating or air-conditioning. For more details and other modes, see “Changing the Thermostat Mode and Fan settings” section in the Control4 WT-100 Wireless Thermostat User Guide.
adjustment of your thermostat’s setting to reduce overall electricity
consumption during peak periods of energy consumption.
Install Batteries
Use a small Phillips screwdriver to remove the screws and cover. Insert the three (3) AA
Alkaline batteries (included with the product) into the bottom of the product (see fi gures
below). Note: Ensure that you insert them according to the diagram provided in the battery
compartment (with the + and - terminals aligned correctly).
Figure A. Insert Batteries
Figure B. Battery Cover
Battery Installation and Replacement Safety
Rules
WARNING! To prevent a battery short, leakage or rupture:
• Use typical AA Alkaline batteries only.
• Do not mix battery types, such as Alkaline and rechargeable NiMH batteries.
• Do not mix used batteries with fresh batteries.
• Do not attempt to recharge a battery unless the battery is specifi cally
marked “rechargeable.”
• Never dispose of batteries in a fi re.
ATTENTION! Pour empê cher court-circuiter, fuite ou rupture de batterie:
• Utilisez les accumulateurs alcalins typiques d’AA seulement.
• Ne mé langez pas les types de batterie, tels que les batteries alkalines et
rechargeables de NiMH.
• Ne mé langez pas des batterie frais avec des batterie ancien.
• N’essayez pas de recharger une batterie à moins que la batterie soit
spé cifi quement marqué « rechargeable ».
• Ne vous dé barassez jamais des batteries dans un feu.
Battery Use and Care Tips
• Keep the battery contacts and compartment clean.
• Remove the batteries from the product if it is not going to be used for several months.
• Extreme temperatures reduce battery performance. Avoid putting the EC-100 in very
warm places.
Control4 Main Menu and EC-100 Home Screen
• Main Menu. When you connect your EC-100 to an electrical outlet, the fi rst screen to
appear is the Control4 Main Menu. From this menu, you can access your thermostat,
your energy use, your utility bills, messages from your utility company, system settings, and energy events from your utility company, weather information, and more.
• EC-100 Home Screen. The Home screen lets you view all types of information about
your home’s electrical use, your cost, messages, time, weather, current temperature,
energy events, battery use, and more.
These two (2) screens are described in more detail next.
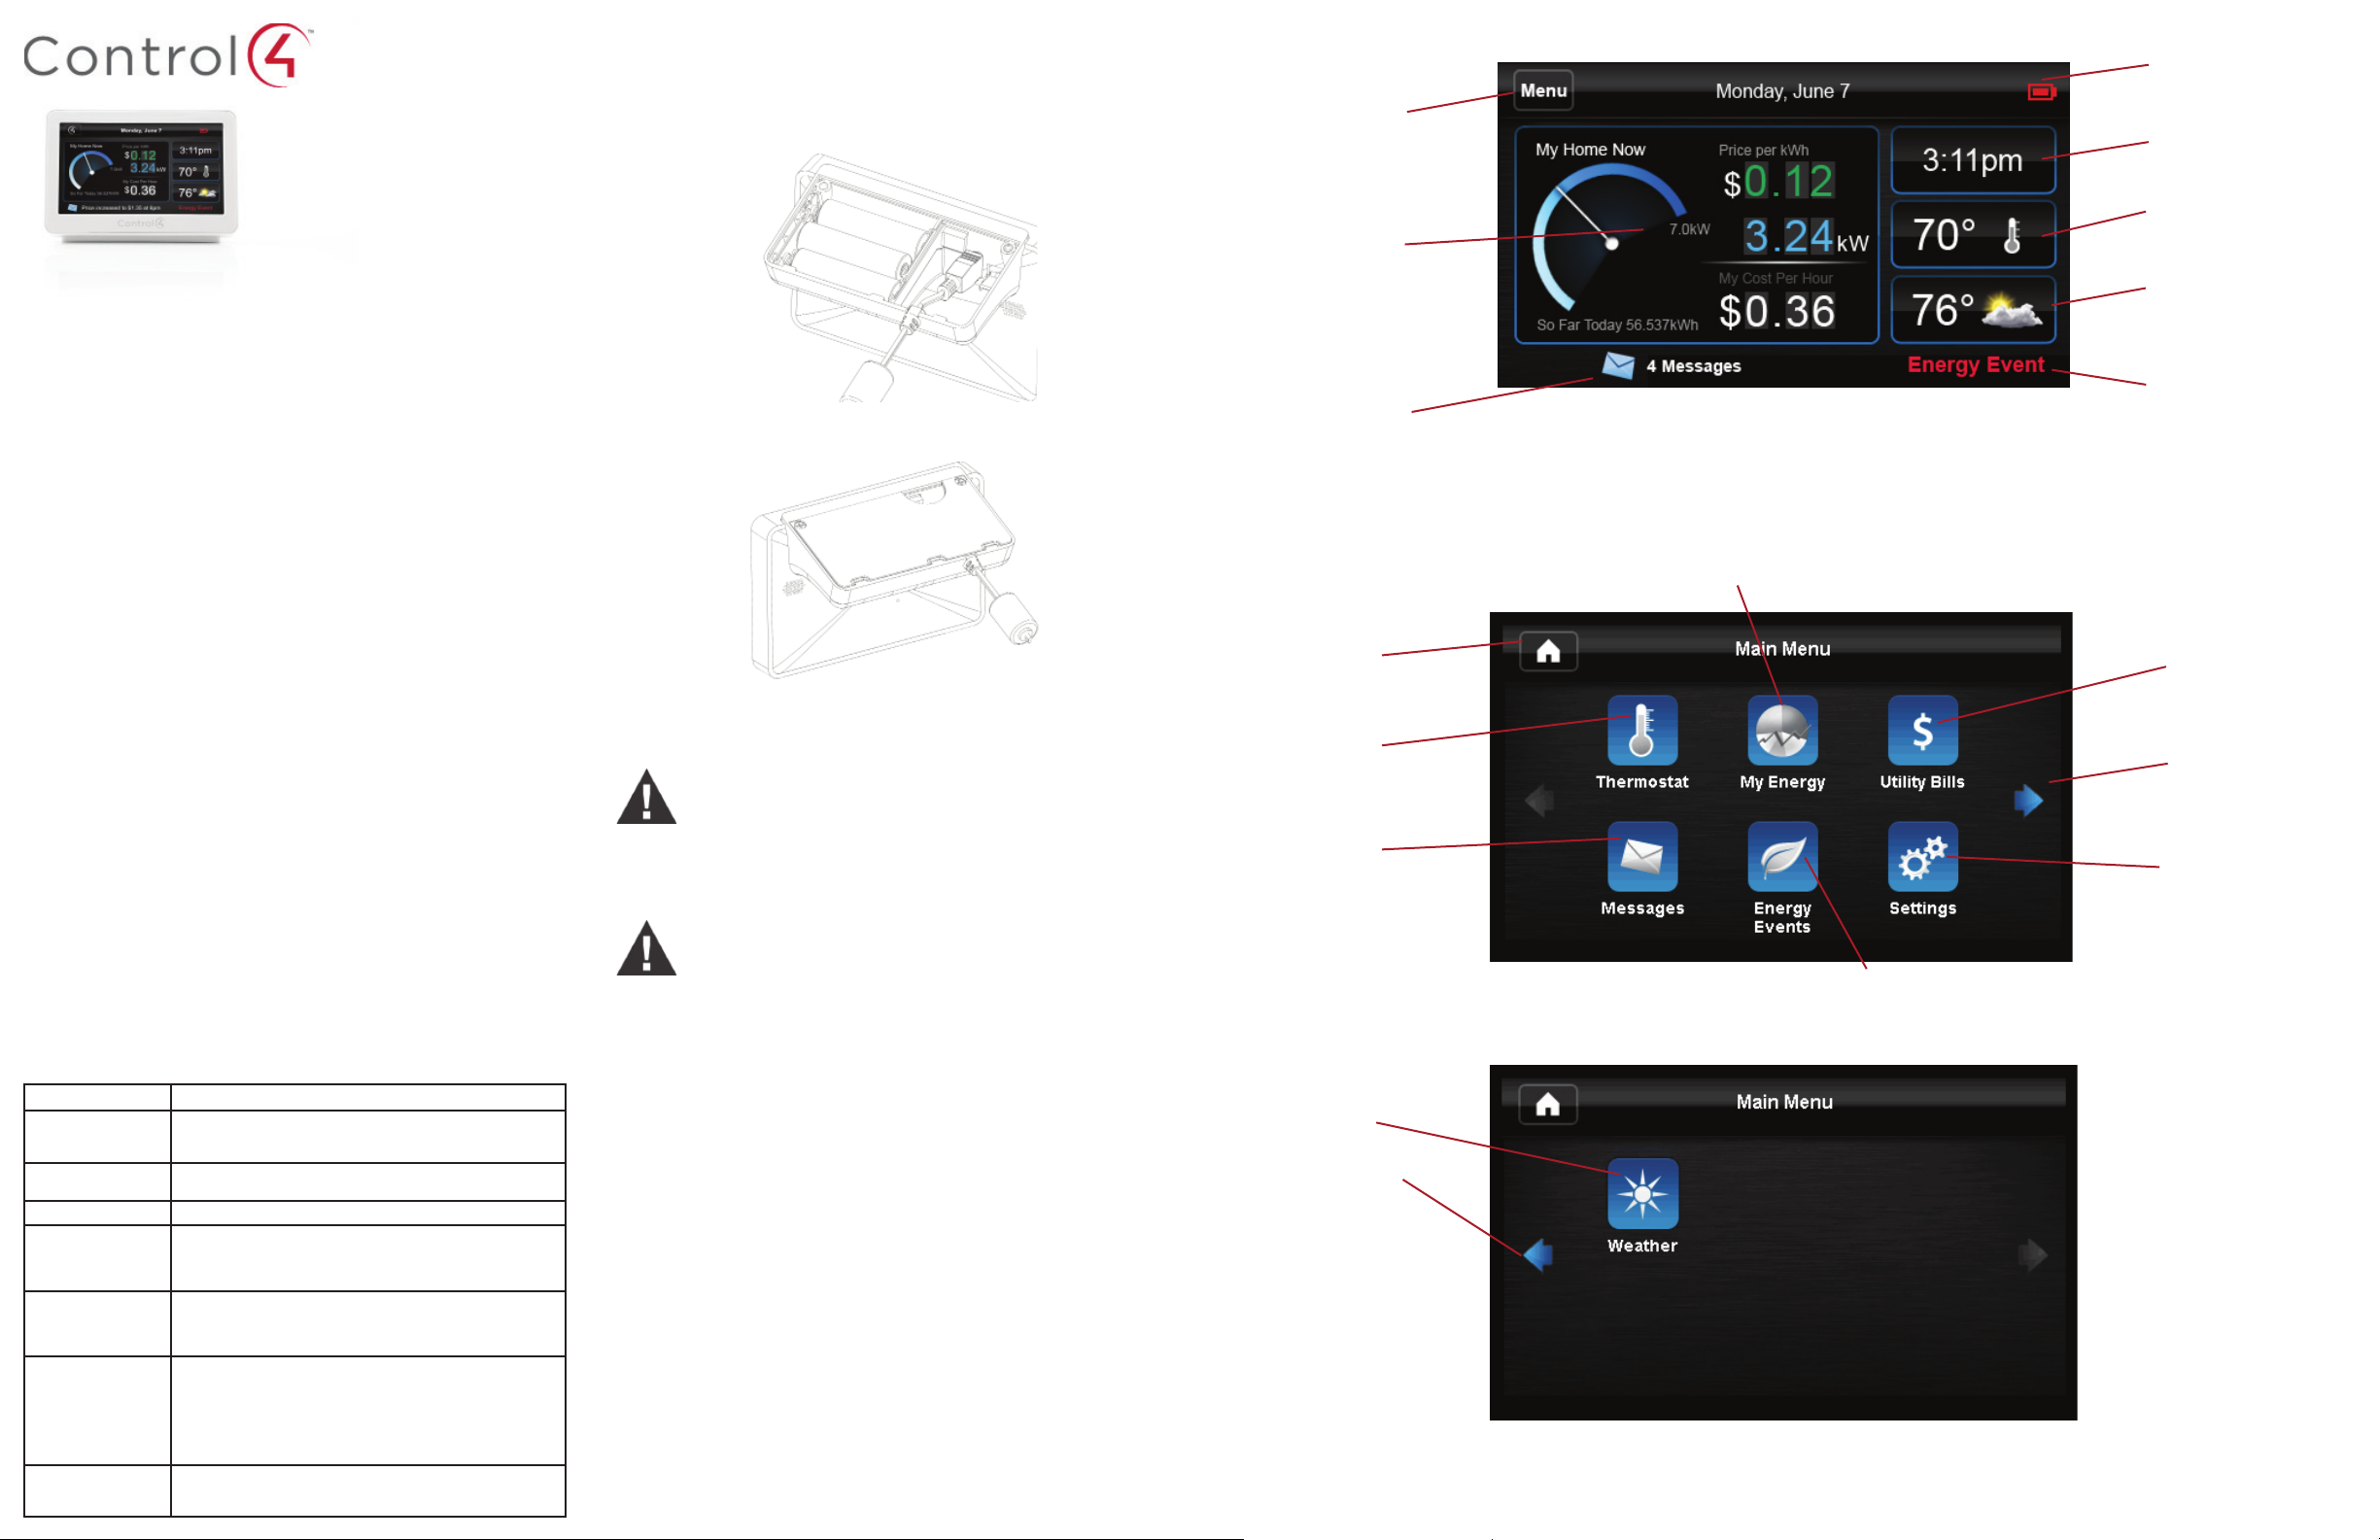
EC-100 Home Screen
Control4 Main Menu. Tap Menu
on most screens to access the
Main Menu screen.
My Home Now is the current
energy consumption in your
home. This corresponds with kW
currently being used.
Price per kWh. The current
energy cost per kWh.
kW. The current energy use in
kW. Corresponds with My Home
Now.
My Cost Per Hour. The cost
to you at the current energy
use.
Tip: Tap this area to see
more about your home’s energy
consumption.
Messages.
Tap to view a list of
messages from your power
company.
Tip: The touch screen responds to pressure instead of heat, so you can either apply pressure
with the tip of your fi nger, or simply tap on the screen using your fi ngernail. Most areas on the
Home screen take you to other screens in the system.
Control4 Main Menu Screen
Home Page button. Tap to
return to the Home screen.
Thermostat. Adjust the set
temperature or change the
thermostat program.
Messages. View a list of
messages from your utility
company.
Weather. View the current
weather conditions.
Arrow. Tap to return to the fi rst
screen.
Tip: As new features are added to the system, they will display on this screen.
My Energy. View real-time electricity use and
total home electricity use.
Energy Events. View information on future, current
and past Energy Savings Events, with the ability to opt
out of future events.
Notifi cation Area. View indicators
including when the unit is on
battery power.
Clock. View the current time.
Inside Temp. View the current
inside temp of the Main
Thermostat. Tap to change the
Thermostat Set Temp or program
your Thermostat.
Weather. View the current
weather. Tap to access the
Weather app.
Note: The Home profi le must be
confi gured for the Weather app
to work.
Energy Event Indicator.
Appears during Energy Savings
Events initiated by your utility
company.
Utility Bills. View bills
and compare/contrast
with past bills if available from
your utility company.
Arrows. Tap the right arrow to
move to the next page. Tap the
left arrow to return to this page.
Settings. View and modify
the device, display and
connectivity settings.
Page 2
Control4 Main Menu Buttons
• Thermostat: Adjust the set temperature or change the thermostat’s program.
• My Energy: View real-time and historic electricity use, total use, and device use.
• Utility Bills: View and compare your monthly utility bills if available from your utility
company.
• Messages: View messages from your utility company.
• Energy Events: View Energy Events from your utility company. Get notifi ed in ad-
vance of an event, when it starts and ends, and a history. View information on current,
past, or future Energy Savings Events. During an Energy Savings Event, the utility
company may control your Thermostat to reduce overall electricity consumption.
• Settings: Set up your EC-100 for optimal use. View messages sent by your utility
company, adjust your screen brightness, adjust sound, set up or change your WiFi
connection, and more.
• Weather: View the current weather conditions, 36-hour forecast, or 5-day forecast.
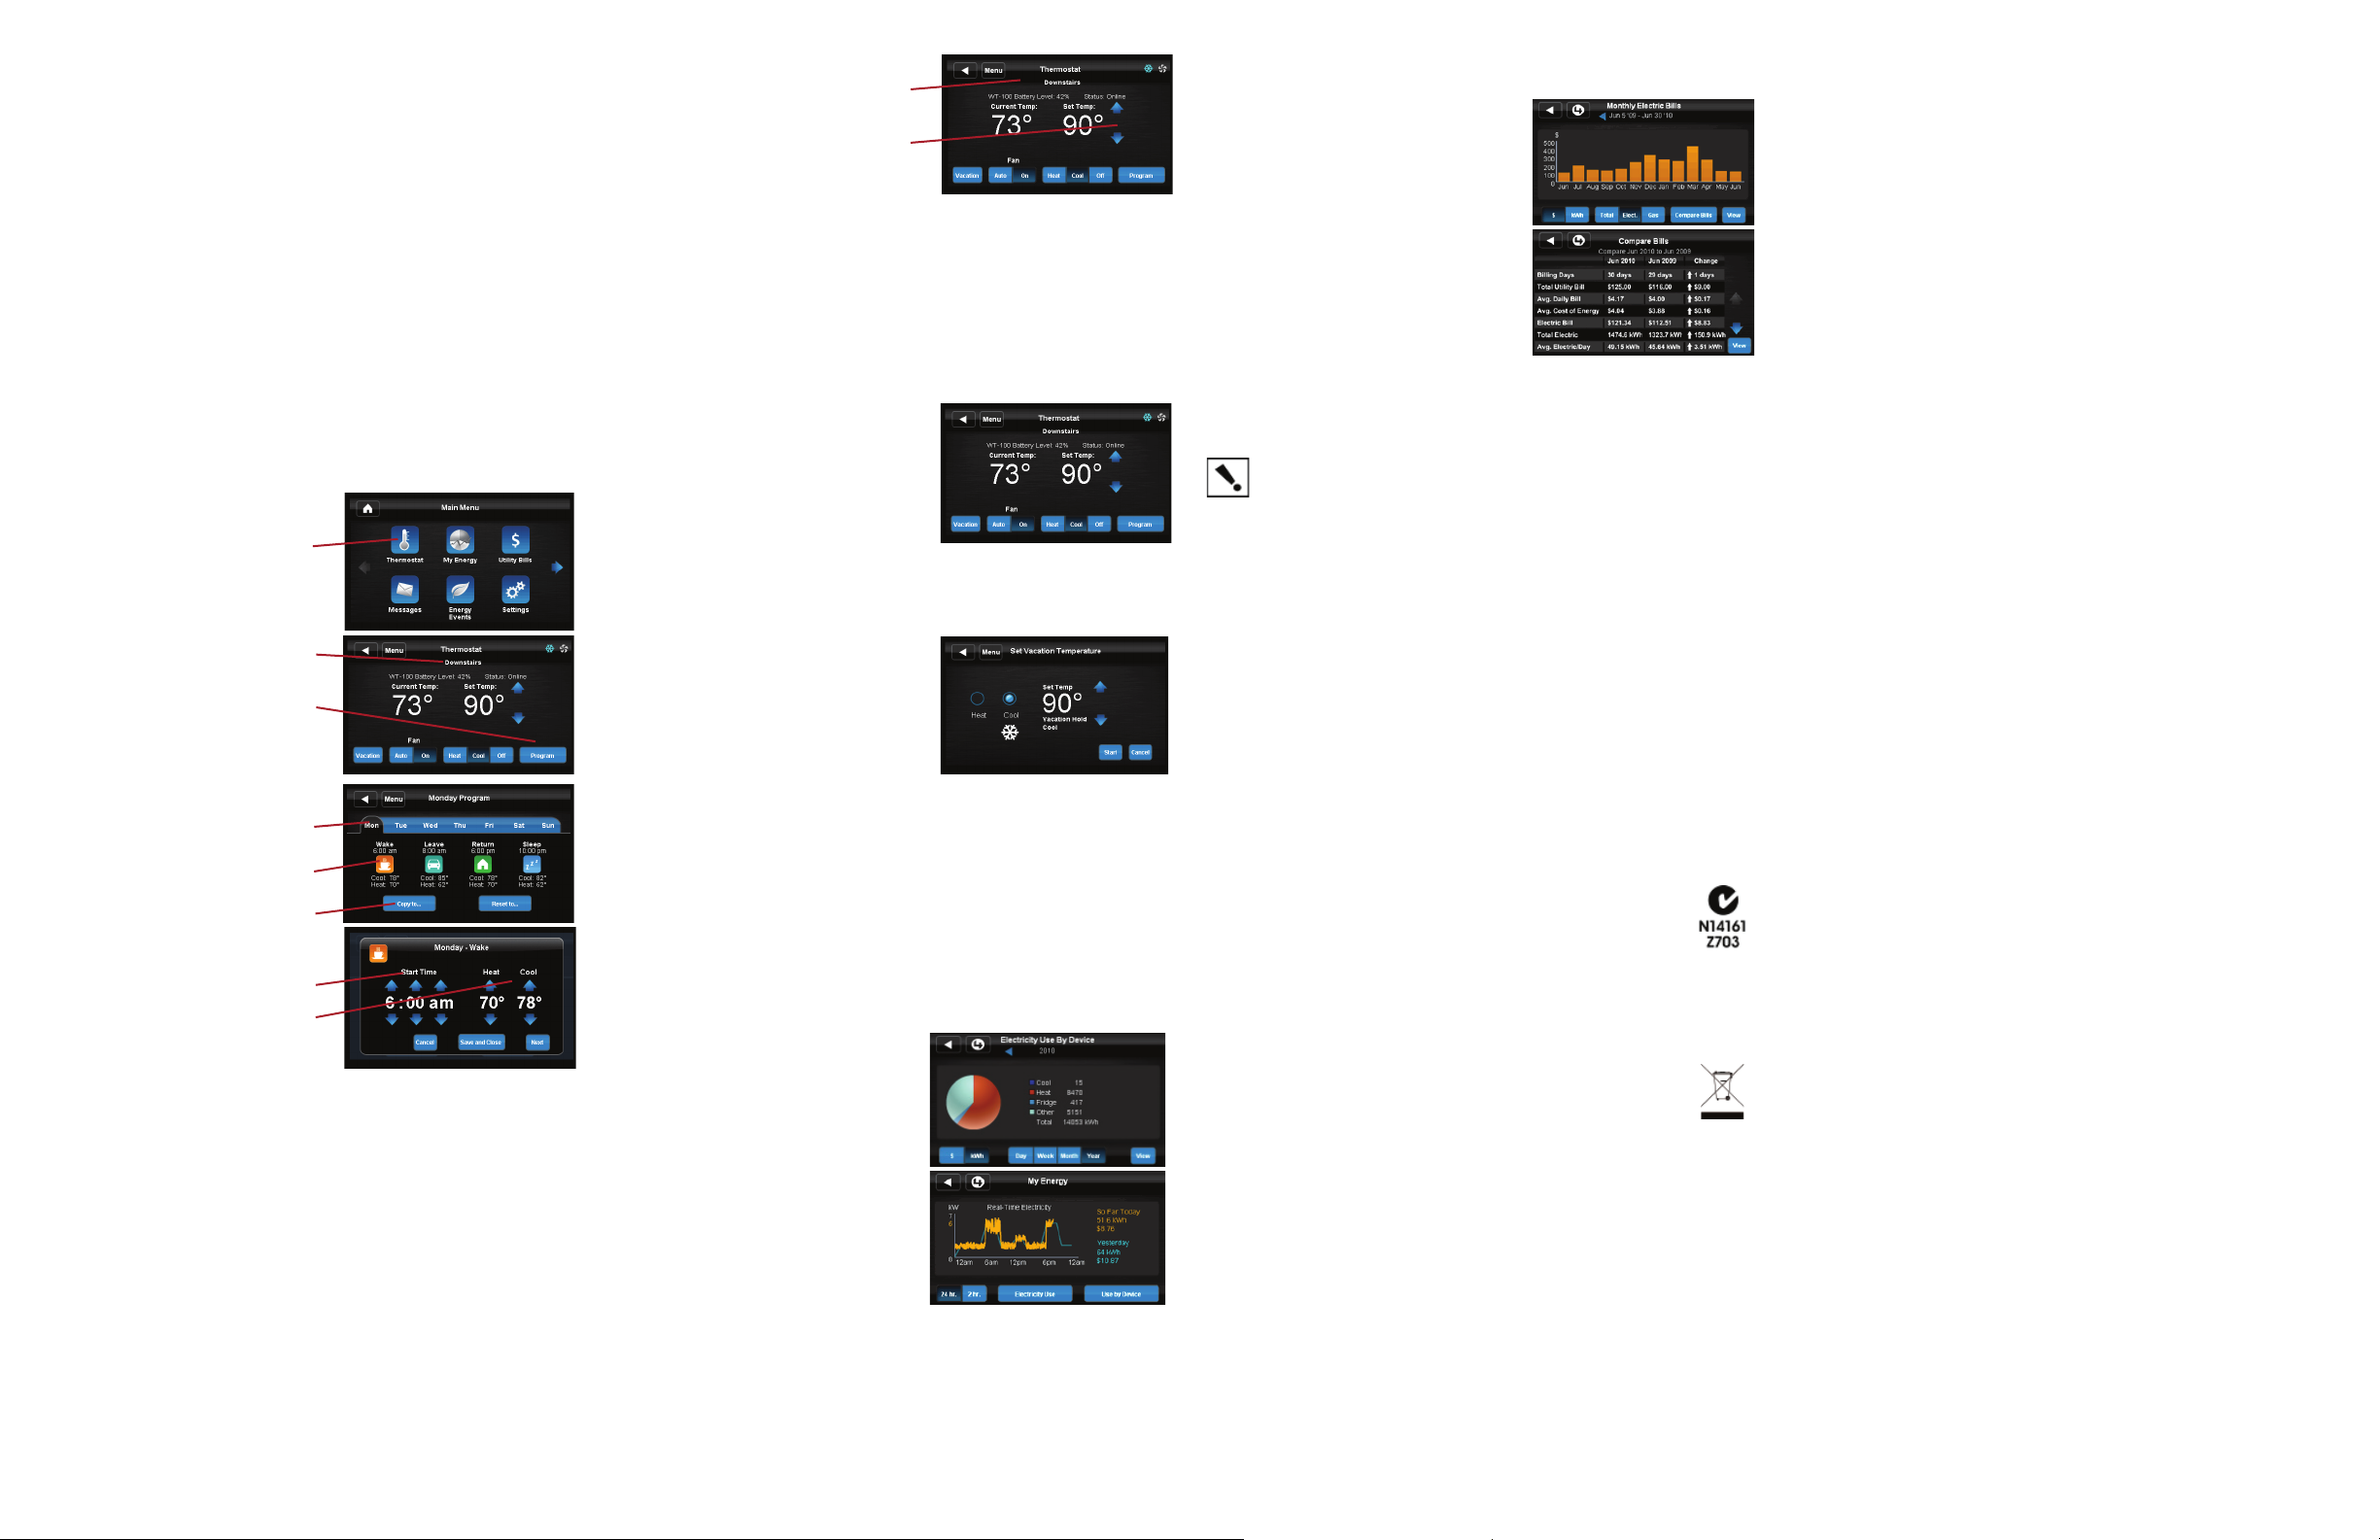
Programming Your WT-100 Wireless
Thermostat
Your WT-100 Wireless Thermostat comes pre-programmed with recommended heating and
air conditioning settings from Energy Star. To modify this program:
1
From the Main Menu, tap Thermostat.
2
If you have more than one thermostat,
select the one you want to adjust.
Tap Program.
3
page, you will notice that there are four
(4) Program Events (Wake, Leave,
Return, Sleep) for each day of the week.
You can set a different start time and
temperature for each Event for each day
of the week, or copy the same schedule
to all days of the week.
4
Select the day you want to adjust.
5
Select the Program Event that you want
to change (Wake, Leave, Return, Sleep).
Adjust the start time Event by tapping the
6
Up and Down arrows on the screen. An
Event ends when the next one begins.
7
Select your desired Heating and Cooling set temperatures for the Event.
• The Heat set temperature is used
• The Cool set temperature is used
8
Tap Next if you want to adjust the temperature or start time for the next Event (repeat
Steps 6 and 7 for any other Event you want to change), or tap Save and Close if you
are fi nished adjusting the Events for that day.
9
To copy the schedule you have created to other days, tap Copy To and choose the days
you want to copy the current schedule to.
Note: When you fi nish changing the program, the EC-100 will send the program
wirelessly to the WT-100 Wireless Thermostat. This process may take several minutes
to complete.
Tip: On the Program
when your thermostat is in Heat
mode.
when your thermostat is in Cool
mode.
1
2
3
4
5
9
6
7
Changing Your Set Temperature
1
From the Main Menu, tap Thermostat.
2
If you have more than one thermostat,
select the one you want to adjust.
Tap the Up and Down arrows to change
3
your set temperature. The thermostat
will automatically hold your new set
temperature for two (2) hours.
4
To return to your regularly-scheduled Thermostat Program Event before the end of the
two (2)-hour hold, tap Cancel. See “Programming Your WT-100 Wireless Thermostat” if
you want this to be a permanent change.
Note: By default, your set temperature and current temperature are displayed in
Fahrenheit. You may change to Celsius in the Settings screen (access from the Main
Menu).
2
3
Changing Your Thermostat Mode
If you want to change your mode: Heat, Cool, Fan, follow these steps.
1
From the Main Menu, tap Thermostat.
2
At the bottom of the thermostat screen, set the
Mode (Heat, Cool, or Off).
neither the furnace nor the air conditioner will
turn on regardless of the temperature of your
home.
3
Set the Fan state (Auto or On).
Tip: In the Off mode
Vacation Hold
If you’re going to be away from your home for an extended period of time, but you do not
want to turn your Thermostat off, you may set a ‘Vacation’ hold.
1
From the Main Menu, tap Thermostat.
2
If you have more than one thermostat, be sure
to select the one you want to adjust.
3
Tap Vacation.
Choose your Mode (Heat, Cool or Off), and
4
then specify your set temperature.
5
To apply Vacation hold, tap Start Now.
6
To end the Vacation hold, tap Cancel.
7
Repeat these steps for the other thermostats
in your home.
Viewing Your Electricity Use Information
Your EC-100 lets you see how much electricity your home uses, how much electricity major
systems in your home use (air conditioning, etc), and how this changes over time.
Note: It will take several days, weeks, and months for all charts to show valuable data, as
the EC-100 gathers data over time.
1
From the Main Menu, tap My Energy.
2
You can then view your current Real Time
Electricity, or select either Electricity Use or
Use by Device to see more detailed energy
consumption data.
• View the data in terms of cost ($) or
electricity consumption (kWh).
• Select the unit of time (Day, Week,
Month, Year), and review other time
periods by tapping the arrows next to the
displayed date range.
• Tap View to view different data and chart
your home’s electricity usage with other
homes like yours or with the outside
temperature, and more.
Viewing Your Utility Bill Information
Your EC-100 lets you view your utility bills. Note: This billing information may not be
available from your utility company.
12From the Main Menu, select Utility Bills.
View bill data over a specifi c time period, or
tap Compare Bills to compare detailed use
and billing.
Messages
From the Main Menu, tap Messages to view messages from your utility company.
Regulatory Compliance
IMPORTANT! Any changes or modifi cations not expressly approved by the party
responsible for compliance could void the user’s authority to operate this equipment.
FCC/Industry Canada
FCC ID: R33D1/Canadian IC : 7848A-D1
This device complies with Part 15 of the FCC Rules Sub-Part B and C and also with Canada ICES-003
and RSS-Gen. Operation is subject to the following two conditions: (1) this device may not cause harmful
interference, and (2) this device must accept any interference received, including interference that may
cause undesired operation.
This equipment has been tested and found to comply with the limits for a Class B and C digital device,
pursuant to Part 15 of the FCC Rules. These limits are designed to provide reasonable protection against
harmful interference in a residential installation. This equipment generates, uses, and can radiate radio
frequency energy and, if not installed and used in accordance with the instructions, may cause harmful
interference to radio communications. However, there is no guarantee that interference will not occur in a
particular installation. If this equipment does cause harmful interference to radio or television reception,
which can be determined by turning the equipment off and on, the user is encouraged to try to correct the
interference by one or more of the following measures:
• Reorient or relocate the receiving antenna.
• Increase the separation between the equipment and receiver.
• Connect the equipment into an outlet on a circuit different from that to which the receiver is connected.
• Consult the dealer or an experienced radio/TV technician for help.
This product has been tested to the requirements of, and shown to be in
compliance with, the following requisite standard:
Australia/New Zealand
• AS/NZS CISPR 22:2006/A1:2007.
Warranty
For complete warranty information, including details on consumer legal rights as well as warranty exclusions, visit www.control4.com/warranty.
Recycling
For information on recycling, please go to www.control4.com/recycling.
About this Document
Copyright ©2010 Control4. All rights reserved. Control4, the Control4 logo, the 4-ball logo, the Control4 Certifi ed logo, the Control4 iQ logo, Everyday Easy, and Infi nityEdge are registered trademarks or trademarks
of Control4 Corporation in the United States and/or other countries.
Part Number: 200-00197 Rev B 11/2/2010
 Loading...