

Page 1
™
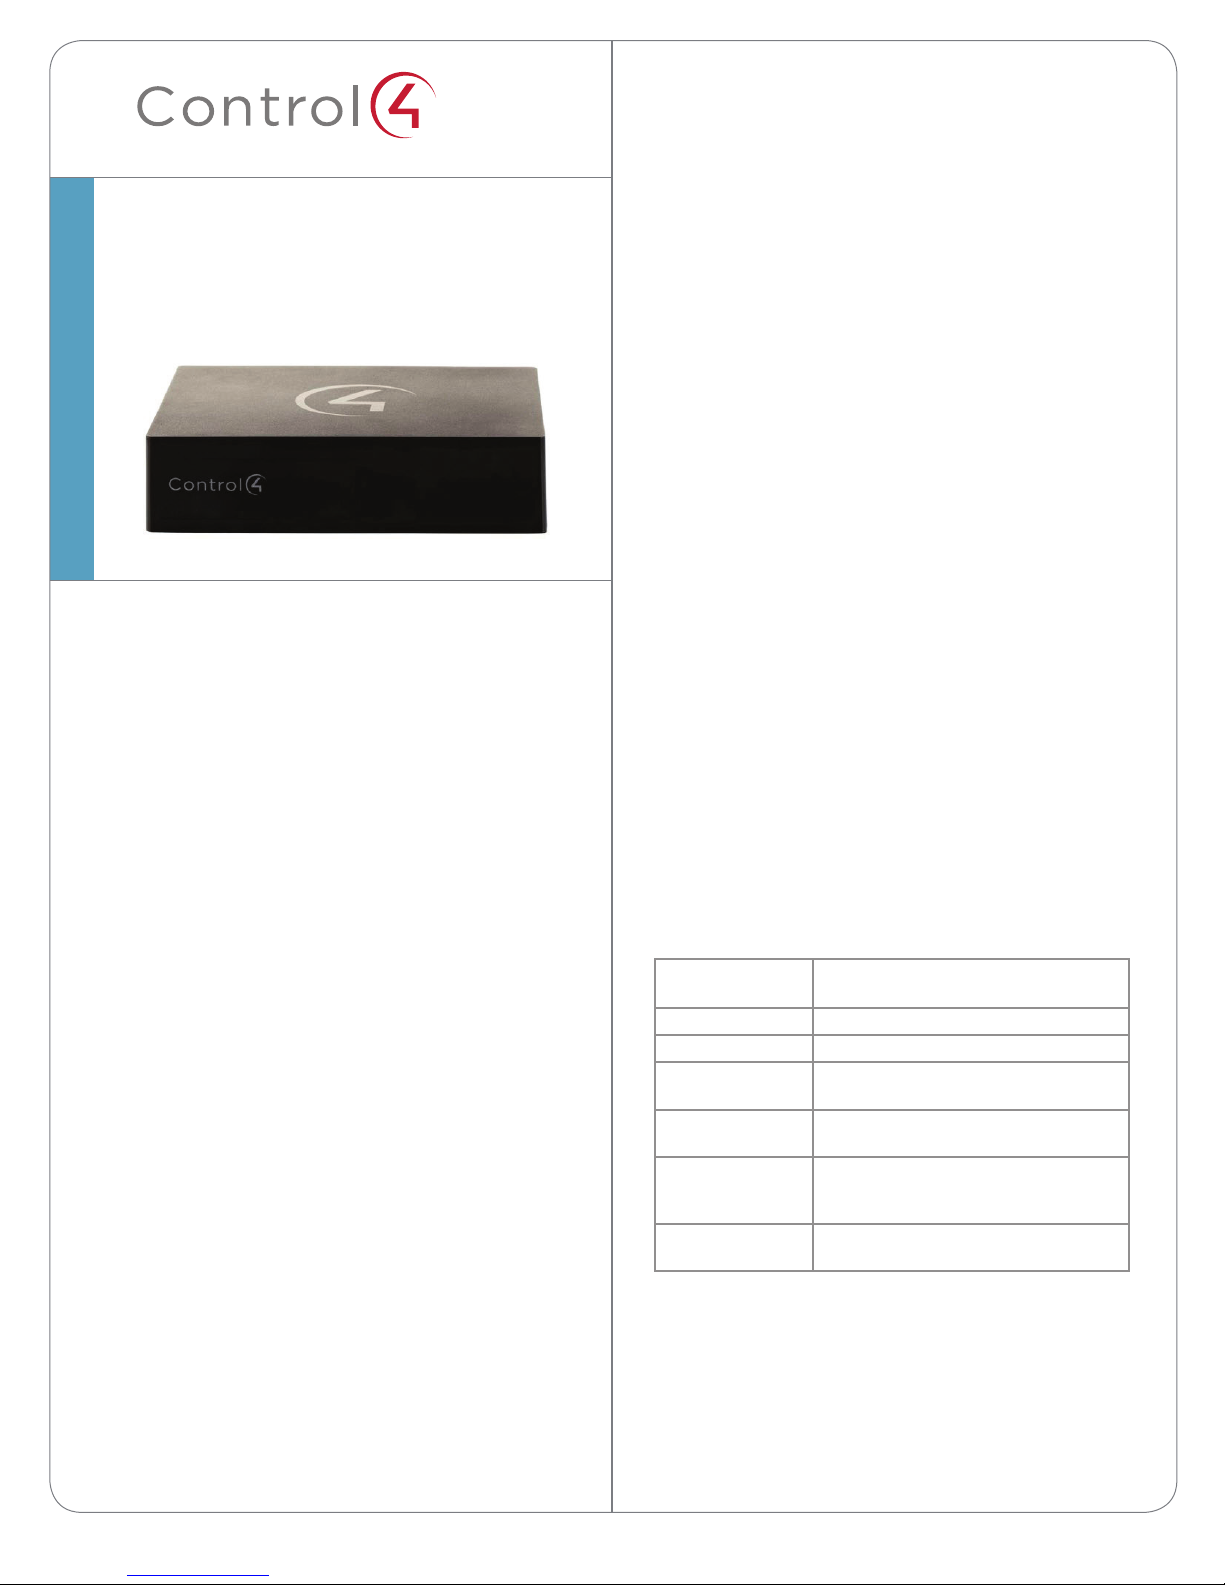
Wireless Music Bridge
Each Wireless Music Bridge can be given a unique
name that appears on their smartphone/tablet and
can be assigned to a specific room. It is also possible
to assign the Wireless Music Bridge to an individual,
so that the individual can listen to his/her music in
their room of choice.
Installation and
Setup Guide
Supported Model
C4-WMB-B Wireless Music Bridge
Introduction
The Control4® Wireless Music Bridge lets you
play music, Internet radio, and podcasts from
your smartphone devices through iOS (AirPlay®),
Bluetooth®, Android™ or Windows (using DLNA®).
Simply attach the Wireless Music Bridge cables to a
Control4 4-Zone Amplifier or Multi Channel Amplifier,
add the device to a room in Composer, and you’re
ready to go. This device supports OS 2.5.0 or later.
The Wireless Music Bridge makes it easy to stream
popular Internet music services, such as Pandora®
and Spotify®, to any room in a home, using your
smartphone. To enjoy separate streams of music,
connect one Wireless Music Bridge for each zone on
a 4-Zone Amplifier or Multi Channel Amplifier.
The Wireless Music Bridge allows one (1)
smartphone/tablet to be connected to the Control4
system at a time. It is possible for multiple phones
to connect to the Wireless Music Bridge, but only
one phone can output audio. More than one Wireless
Music Bridge can be used in a Control4 system
simultaneously, allowing individual users to connect
their phone to their room of choice.
This device uses Ethernet or WiFi connectivity to
communicate with the Control4 system.
Requirements
• Control4 OS 2.5.0 or later.
• Control4 controller fully installed and configured
with a Control4 project.
• Powered speakers or an available connection on
an amplifier or stereo.
Box Contents
Carefully unpack the contents from the box, and
make sure the following items are included:
• Wireless Music Bridge
• Power Supply
• Warranty Card
If any of these items is missing or damaged, please
contact Control4 immediately.
Specifications
Dimensions
(W x D x H)
Weight 1.05 lbs. (.47 kg)
Shipping Weight 1.5 lbs. (.69 kg)
Network 10/100 BaseT Ethernet RJ-45 (preferred)
Power Supply DC - 5V @ 1.0A
Connectivity 10/100 BaseT Ethernet RJ-45 (preferred)
Outputs Stereo Analog
6.29” (160 mm) x 4.72” (120 mm) x 1. 57”
(40 m m)
or WiFi (802.11 b/g)
WiFi (802.11b/g)
Bluetooth v1.2 A2DP
Digital SPDIF
1
Page 2
™
Wireless Music Bridge
Installation and Setup
Guide
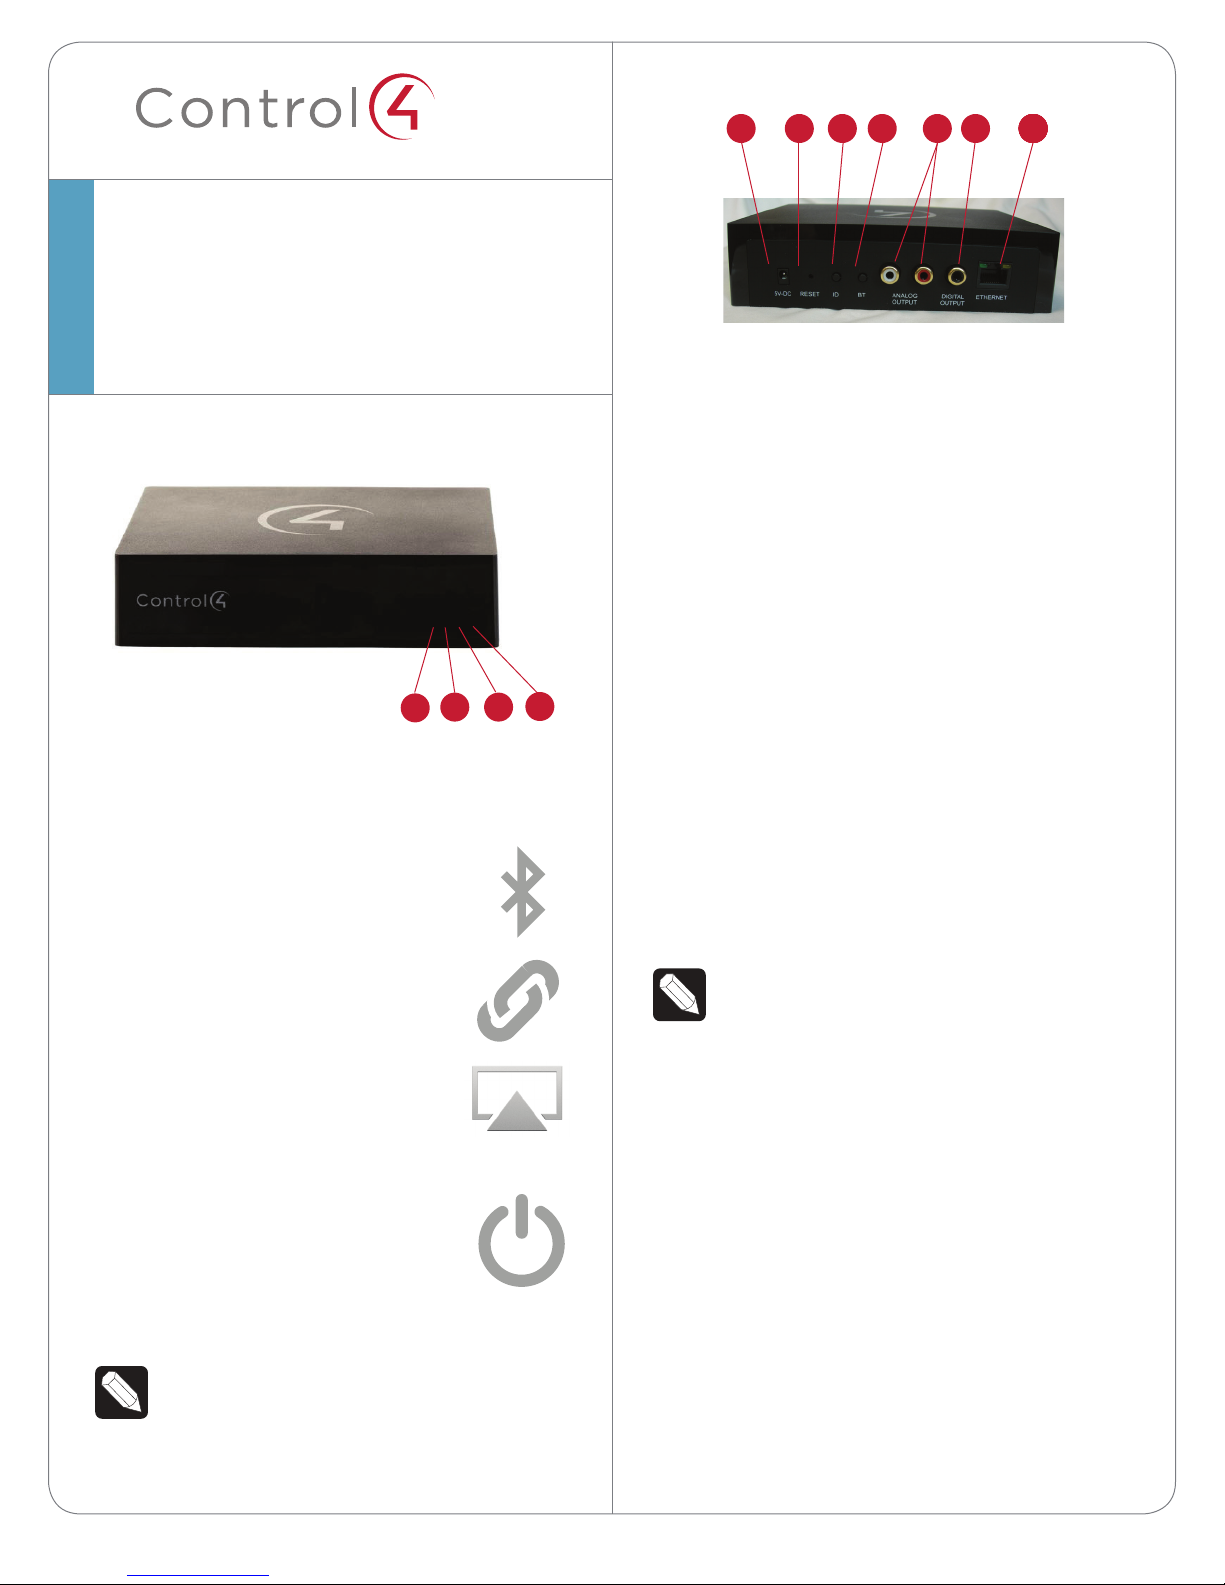
Front View
243
1
The following LED indicators appear, depending on
whether the device is powered on and which type of
device is connected to the Wireless Music Bridge.
1 Bluetooth—Displays the status
of a Bluetooth connection.
BLUE solid—Bluetooth is connected.
2 DLNA (Digital Living Network
Alliance)— Displays the status
of a DLNA connection.
BLUE solid—DLNA is connected.
3 AirPlay—Displays the status
of an AirPlay connection.
BLUE flashing—The device is booting.
BLUE solid—AirPlay is Ready/
Connected.
4 Power LED—Indicates that power
is present. The Wireless Music Bridge
turns on immediately after power
is applied to it.
BLUE solid—The power is on.
NOTE: DLNA and AirPlay LEDs flash every
second during a firmware update.
Back View
1 2 43 5 22262276
1 5V DC (power jack)—Only connect the provided
5V power supply.
2 Reset (button)—Press one time to reset the
Wireless Music Bridge but maintain its network
settings.
3 ID (button)—Press one time to identify the
Wireless Music Bridge in your Control4 system.
4 BT (button)—Manually disconnects Bluetooth
and places the Wireless Music Bridge in pairing
mode.
5 Analog Output (2 jacks)—Stereo analog output
jacks for speakers and amplifiers.
6 Digital Output (1 jack)—Coaxial digital output
jack for speakers and amplifiers.
7 Ethernet (port)—RJ-45 Ethernet jack for a 10/100
BaseT Ethernet connection.
Network Options
Connect the Wireless Music Bridge using one of these
network types:
NOTE: If you are using Ethernet, connect
the Ethernet cable before you power on
the Wireless Music Bridge. The device will
automatically go to WiFi mode if the power is
plugged in before the Ethernet cable.
• Standard Ethernet—For best results, this is the
preferred option. Connect the Wireless Music
Bridge to your network using a standard Ethernet
cable.
• WiFi—The Wireless Music Bridge is able to
connect to your local wireless network and
supports WEP, WPA, and WPA2 wireless
networks. If you have an available local wireless
network, no additional wiring is needed except
for power.
2
Page 3

IMPORTANT! Control4 recommends that you
use an Ethernet connection rather than WiFi
for the best communication with the Control4
system.
Pre-Installation Considerations
Before you decide where and how to install this
device, review the information below.
Location
spectrum and can interfere with each other, therefore,
it is recommended to install the system with a wired
connection.
Installation
To connect the Wireless Music Bridge:
1 Place the Wireless Music Bridge on a table
near a power outlet, an Ethernet connection,
and an amplifier or speakers. Plug the Ethernet
connector into the Ethernet jack on the back of
the Wireless Music Bridge.
The Wireless Music Bridge is designed to work with
AirPlay, DLNA and Bluetooth-enabled products.
AirPlay and DLNA leverage the wired/wireless
network in the home to bridge the smartphone/
tablets music into the Control4 system. If these
modes are used, the Wireless Music Bridge can be
mounted in a rack near the network switch and
amplifier. If the Wireless Music Bridge is used for
Bluetooth, then the Wireless Music Bridge must be
installed in the room where the Wireless Music Bridge
will be used.
The Bluetooth radio in the Wireless Music Bridge is a
Class 2 radio, which provides up to 10 meters lineof-sight. If obstructions, such as walls, electronics,
wiring, or other wireless communication devices are
near the Wireless Music Bridge, radio performance
is degraded. For best results, make sure the Wireless
Music Bridge is as close to the user as possible. The
installer has the option to disable the Bluetooth radio
in the driver Properties tab if Bluetooth will not be
used.
Network Connectivity
Although the Wireless Music Bridge can connect
to the Control4 System via 802.11b/g, it is strongly
encouraged to use the wired Ethernet connection
for communicating with the Wireless Music Bridge.
Bluetooth use and location of the Wireless Music
Bridge must be considered when installing this
device.
If Bluetooth functionality is used by your customer,
location must be decided early enough such that
CAT5/6 cable can be run for Ethernet connectivity.
Bluetooth and WiFi operate on the same 2.4GHz
NOTE: If you are using Ethernet, connect
the Ethernet cable before you power on the
Wireless Music Bridge.
2 Decide whether you want to set up the Wireless
Music Bridge for an analog or digital signal.
• Digital
a Connect an RCA cable (digital coaxial cable,
not provided) to the Digital Output port on
the Wireless Music Bridge.
b Connect the other end of the RCA cable
to locally-powered speakers or to the RCA
Digital Audio input on an amplifier.
• Analog
a Connect an RCA cable (stereo analog audio
cable, not provided) to the Analog Output
jacks on the Wireless Music Bridge.
b Connect the other end of the RCA cable to
the Audio Input jacks (RCA Stereo input) on
an amplifier or stereo speakers.
3 Connect the power adapter to the power jack on
the back of the Wireless Music Bridge.
4 Connect the power plug to an available power
outlet.
NOTE: Use only the Control4 5V DC power
adapter provided.
WiFi Setup
To use WiFi:
1 Follow the instructions in “Installation.”
IMPORTANT! An Ethernet connection to
the Wireless Music Bridge is required before
setting this product to WiFi.
3
Page 4

2 Open Composer Pro and click Tools > System
Manager to reconfigure the bridge for WiFi.
3 In the Devices pane, select the network address
for the Wireless Music Bridge, and then click
Configure. The default browser opens to the
Wireless Music Bridge home page.
For Bluetooth, the device-friendly name is appended
with a -BT. This allows devices, such as iPhone, to
uniquely distinguish between AirPlay and Bluetooth
connectivity. If Bluetooth is not used, the installer
should disable the Bluetooth radio in the Properties
tab of Composer Pro.
NOTE: The Wireless Music Bridge can also be
accessed by entering the device IP address in
a browser.
4 Under the Wireless LAN Settings, select the
Service Set Identification (SSID) to which you
want to connect the Wireless Music Bridge.
5 If the SSID is secure, enter the appropriate
password.
6 Click Apply at the bottom of the page.
7 Disconnect the Ethernet cable.
8 Reset or power cycle the Wireless Music Bridge.
NOTE: To return the Wireless Music Bridge to
wired mode, simply plug an Ethernet cable
into the Wireless Music Bridge and power
cycle the device.
Configure the Wireless Music Bridge
Naming the Wireless Music Bridge
The Wireless Music Bridge can be given a unique
name, called the device-friendly name. This name is
used by AirPlay, DLNA and Bluetooth to help the user
see the Wireless Music Bridge on their smartphone/
tablet. Each Wireless Music Bridge can be given a
unique device-friendly name to help associate it
with a given room or individual. The installer should
determine the appropriate name by discussing it
with their customer. Assign the device-friendly name
in the driver Properties tab in Composer Pro under
Device Name.
The Wireless Music Bridge device-friendly name is
unique and is not directly associated to the driver
name. The device-friendly name is used by the
AirPlay, DLNA and Bluetooth client, whereas the
driver name is used by the Control4 system. The
installer should consider naming the driver and the
device-friendly name in a similar manner so the user
is not confused when looking at their touch screens
and on-screen displays.
New Features
The Wireless Music Bridge has two new features that
enable the Wireless Music Bridge to Auto-start and
turn-o a room automatically.
• The Automatic Room(s) Selection property in
Composer Pro lets the installer select which
room(s) will start when a smartphone/tablet
connects and starts streaming music to the
Control4 System. The Auto-Start feature will
only start a room if a media source is NOT
already selected. If a media source is selected in
the desired room, the Wireless Music Bridge will
NOT overtake the source.
• The Automatic Room(s)-o will automatically
turn o the selected room(s) when the
smartphone/tablet stops streaming music to the
Wireless Music Bridge.
Both properties will cycle through the selected
room(s) and make sure a dierent media source is
not playing. After that, it will then start or turn o the
room(s) as appropriate.
Simple Device Discovery Protocol (SDDP)
1 This device uses SDDP (Simple Device Discovery
Protocol). After you connect the device and
power it on, start Composer Pro and add the
Wireless Music Bridge driver to a room in the
project.
2 Make the necessary connections in the
Connections view.
For information about SDDP, configuring the driver,
or making connections, see the Composer Pro User
Guide on the dealer portal for details. Also see Using
the Wireless Music Bridge to learn how to use the
device.
4
Page 5

™
NOTE: As with all WiFi products, Bluetooth
performance and range varies based on
environmental conditions. The Wireless
Music Bridge uses a Class 2 Bluetooth
transceiver which provides up to 10m of range.
Microwaves, other wireless signals such as
802.11 and ZigBee, and building structures can
adversely aect signal strength and distance
by which a wireless signal can be received.
Care should be taken when installing the
Wireless Music Bridge to make sure location
is taken into consideration for optimal
performance. The installer should work with
the customer to find a suitable location that
best fits the customer’s needs.
Troubleshooting
Resets
• Soft reset—Press and release the Reset button
one time.
• Factory Mode—Press and hold the Reset button
for more than five (5) seconds to set the device
name, network configuration, and WiFi settings
back to their default settings in factory mode.
Apple® Support
*The Wireless Music Bridge is made for iPod touch® 2nd generation,
3rd generation, 4th generation, and 5th generation; iPhone® 3GS,
iPhone 4, iPhone 4siPhone 5; iPad® , iPad 2, iPad 3rd generation, iPad
4th generation; and iPad mini®.
Factory Restore
There is no factory restore setting for this product.
See “Factory Mode” above.
Regulatory/Safety Information
To review regulatory information for your particular
Control4 products, see the information located on
the Control4 website at: http://www.control4.com/
regulatory/.
Warranty
Limited 2-year Warranty. Go to http://www.control4.
com/warranty for details.
*“Made for iPod,” “Made for iPhone,” and “Made for iPad” mean that an
electronic accessory has been designed to connect specifically to iPod, iPhone,
or iPad, respectively, and has been certified by the developer to meet Apple
performance standards. Apple is not responsible for the operation of this device
or its compliance with safety and regulatory standards. Please note that the use
of this accessory with iPod, iPhone, or iPad may aect wireless performance.
control4.com |
©2013 Control4. All rights reserved. Control4, the Control4 logo, the Control4 iQ logo and the Control4 certified logo are registered trademarks or trademarks of Control4 Corporation in
the United States and/or other countries. All other names and brands may be claimed as the property of their respective owners. #200-00326, Rev. B 5/09/13
5
 Loading...