

Page 1
T3 In-Wall Touch Screen
Adapter Kit for
7" Wall-Mount Touch
Screen
Installation Guide
Removing the original touch screen
Supported touch screen models
• C4-WALL7-xx 7" In-Wall Touch Screen
• C4-WALL10-xx 10" In-Wall Touch Screen
Supported adapter kit models
• C4-7ZTOT3 Adapter Kit for 7" Wall-Mount Touch Screen
(C4-TSWM7/Zykronix) to T3 Touch Screen
General description
This Control4® adapter kit provides an adapter plate to
accommodate the installation of a T3 In-Wall Touch Screen. The
kit is intended for an existing C4-TSWM7 (Zykronix) touch screen
to be replaced by a T3 In-Wall Touch Screen.
Optional
• Tools to modify the wall box, such as a tape measure, a
pencil, a Phillips screwdriver, a small saw to cut heavy plastic,
a utility knife, or a handheld rotary cutting tool.
What’s in the kit
• Back adapter plate
• Front adapter plate
• Two screws for power box installation
• T3 In-Wall Touch Screen Adapter Kit for 7" Wall-Mount Touch
Screen Installation Guide (this document)
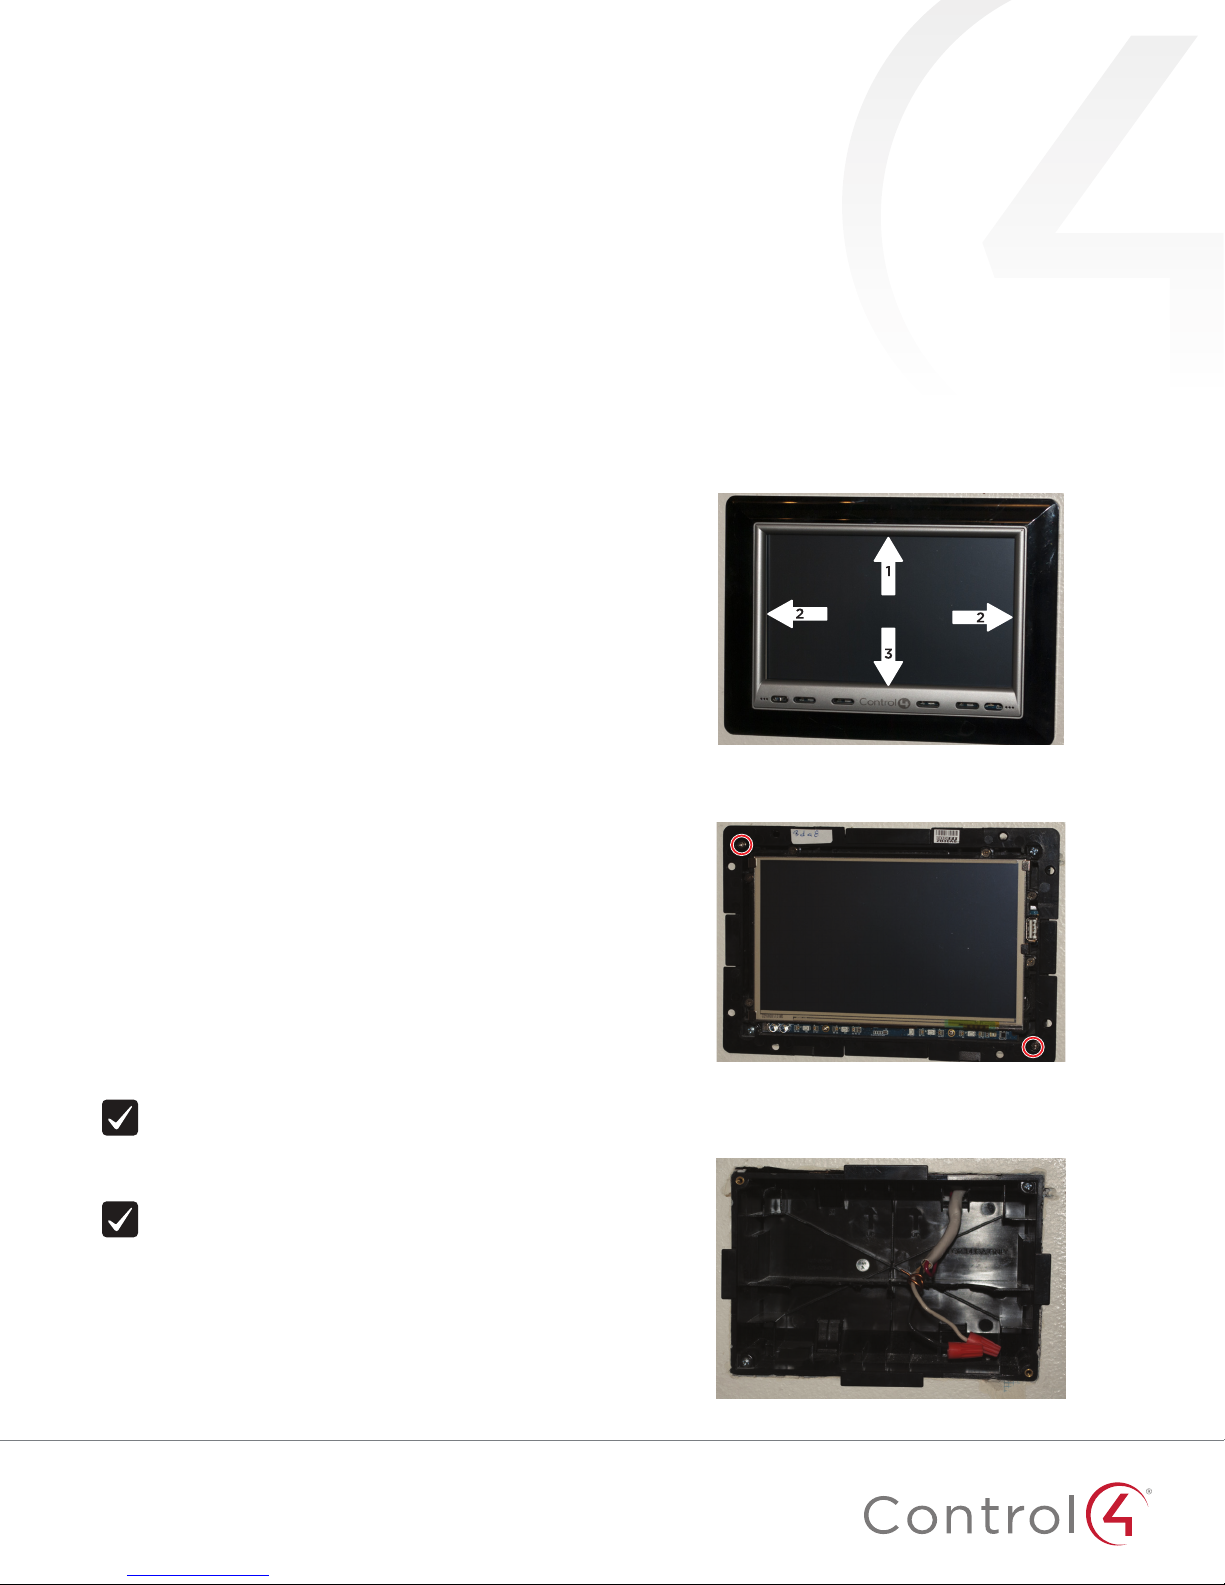
To remove the original touch screen:
1 Press up on the top center of the bezel until it unclips from
the touch screen.
2 Press outward on the two sides of the bezel until they unclip
from the touch screen, then unclip the bottom of the bezel.
3 Remove the two screws that hold the touch screen to the
wall box, and keep the screws for use later in the procedure.
Before starting
Important: Instead of using an adapter kit, we
recommend that, wherever possible, you entirely
remove the old touch screen’s wall box, repair the wall,
then install the T3 In-Wall Touch Screen’s wall box as
designed.
Important: The front adapter plate will be easily
visible with the 7" screen. For the most even finish, we
recommend painting the adapter plate to match the wall
before attaching it to the wall box.
11
4 Pull the touch screen away from the wall box, disconnect the
wires that connect to the touch screen (including Ethernet, if
present), then completely remove the touch screen.
Page 2

Installing the adapter kit
Note: If you are installing a 7” T3 touch screen, you must
install the back and the front adapter plates. If you are
installing a 10” T3 touch screen, the front adapter plate
is optional.
To attach the back adapter plate and power box:
1 If necessary, use a cutting tool to remove any plastic in the
wall box that may interfere with mounting the T3 touch
screen’s power box.
2 Place the back adapter plate on top of the wall box, then
attach it to the wall box using the two screws that were used
to hold the old touch screen in place.
Note: If you attach the front adapter plate, the wall box’s
top and bottom tabs will be concealed, but at the cost
of osetting the touch screen further from the wall.
4 To attach the front adapter plate (optional), place it over the
back adapter plate.
5 Follow the installation instructions in the T3 In-Wall Touch
Screen Installation Guide (
ctrl4.co/iw-ig
) to attach the AC
power or PoE connections to the T3 power box. The use of
AC power or PoE depends on your installation requirements.
6 Insert the power box into the adapter plate, then use the
screws that came with the T3 In-Wall Touch Screen to secure
the power box into the adapter plate(s).
3 Determine whether you need to attach the front adapter
plate.
If you are installing a 7" touch screen, you must install the
front adapter plate to conceal the wall box tabs.
If you are installing a 10" touch screen, install the front
adapter plate only if you want to conceal the wall box tabs
when viewing the screen from the side.
- OR -
Caution! Hand tighten the screws with very little torque.
Over-tightening the screws will drive the power box too
deep into the adapter plate and will either (1) break the
plastic tabs on the power box or (2) misalign the power
box such that the touch screen will not attach to the
power box correctly.
7 Attach the new T3 In-Wall Touch Screen to the power box.
10" touch screen
without front
adapter plate
2
10" touch screen
with front
adapter plate
Page 3

Additional resources
The following resources are available for additional support:
• Control4 Knowledgebase and forums
• Control4 Technical Support
• Control4 website:
• Composer documentation in online help or PDF format
available on the Dealer Portal under Support (
www.control4.com
ctrl4.co/docs
Regulatory and safety information
To review regulatory information for your particular Control4
products, see the information at
ctrl4.co/reg
.
Warranty
Visit
www.control4.com/warranty
for details.
More help
For the latest version of this document, open this URL or scan
the QR code on a device that can view PDFs.
MOST RECENT VERSION
).
ctrl4.co/t3-zykron
control4.com | 888.400.4070
Copyright ©2015, Control4 Corporation. All rights reserved. Control4, the Control4 logo, the 4-ball logo, 4Store, 4Sight, Control My Home, Everyday Easy, and
Mockupancy are registered trademarks or trademarks of Control4 Corporation in the United States and/or other countries. All other names and brands may be claimed as
the property of their respective owners. All specifications subject to change without notice.
A
200-00422-A
2015-07-30 MS
 Loading...