

Page 1
System Remote Control
Setup and User Guide
Supported Model
This user guide covers the remote control model:
RCZ-SRC1-B System Remote Control
Features
• Has bi-directional communication with associated components
• Includes Zigbee wireless mesh networking (no line-of-sight issues)
• Has back-lit graphical LCD (provides ease of use in dark rooms)
• Displays media playlists and provides playing options for stored media
• One-button push to access subsystem control options (such as lighting)
• Ergonomically designed for comfort
• TV functions include PIP and Menu
• Standard features for Satellite, VCR, DVD, Stereo, and more
General Description
The Control4 System Remote Control is the handheld remote control for a
Control4 system. It is included with the purchase of many Control4
controllers, but may also be purchased separately.
The System Remote Control plays an important role in Control4 system
navigation and input. Use the remote control to access on-screen menus
and to control associated devices. It goes beyond a typical "universal
remote" that simply learns IR codes from TVs, VCRs, CD players and DVD
players; It uses Zigbee for two-way wireless communication. The signal
travels through walls and does not require a direct line of site to the receiver.
The remote control is powered by four AAA batteries and features controls
for personal settings, DVR, DSS, numeric keypad, and four-line LCD screen
with backlight that displays remote status and system information.
About the System Remote Control
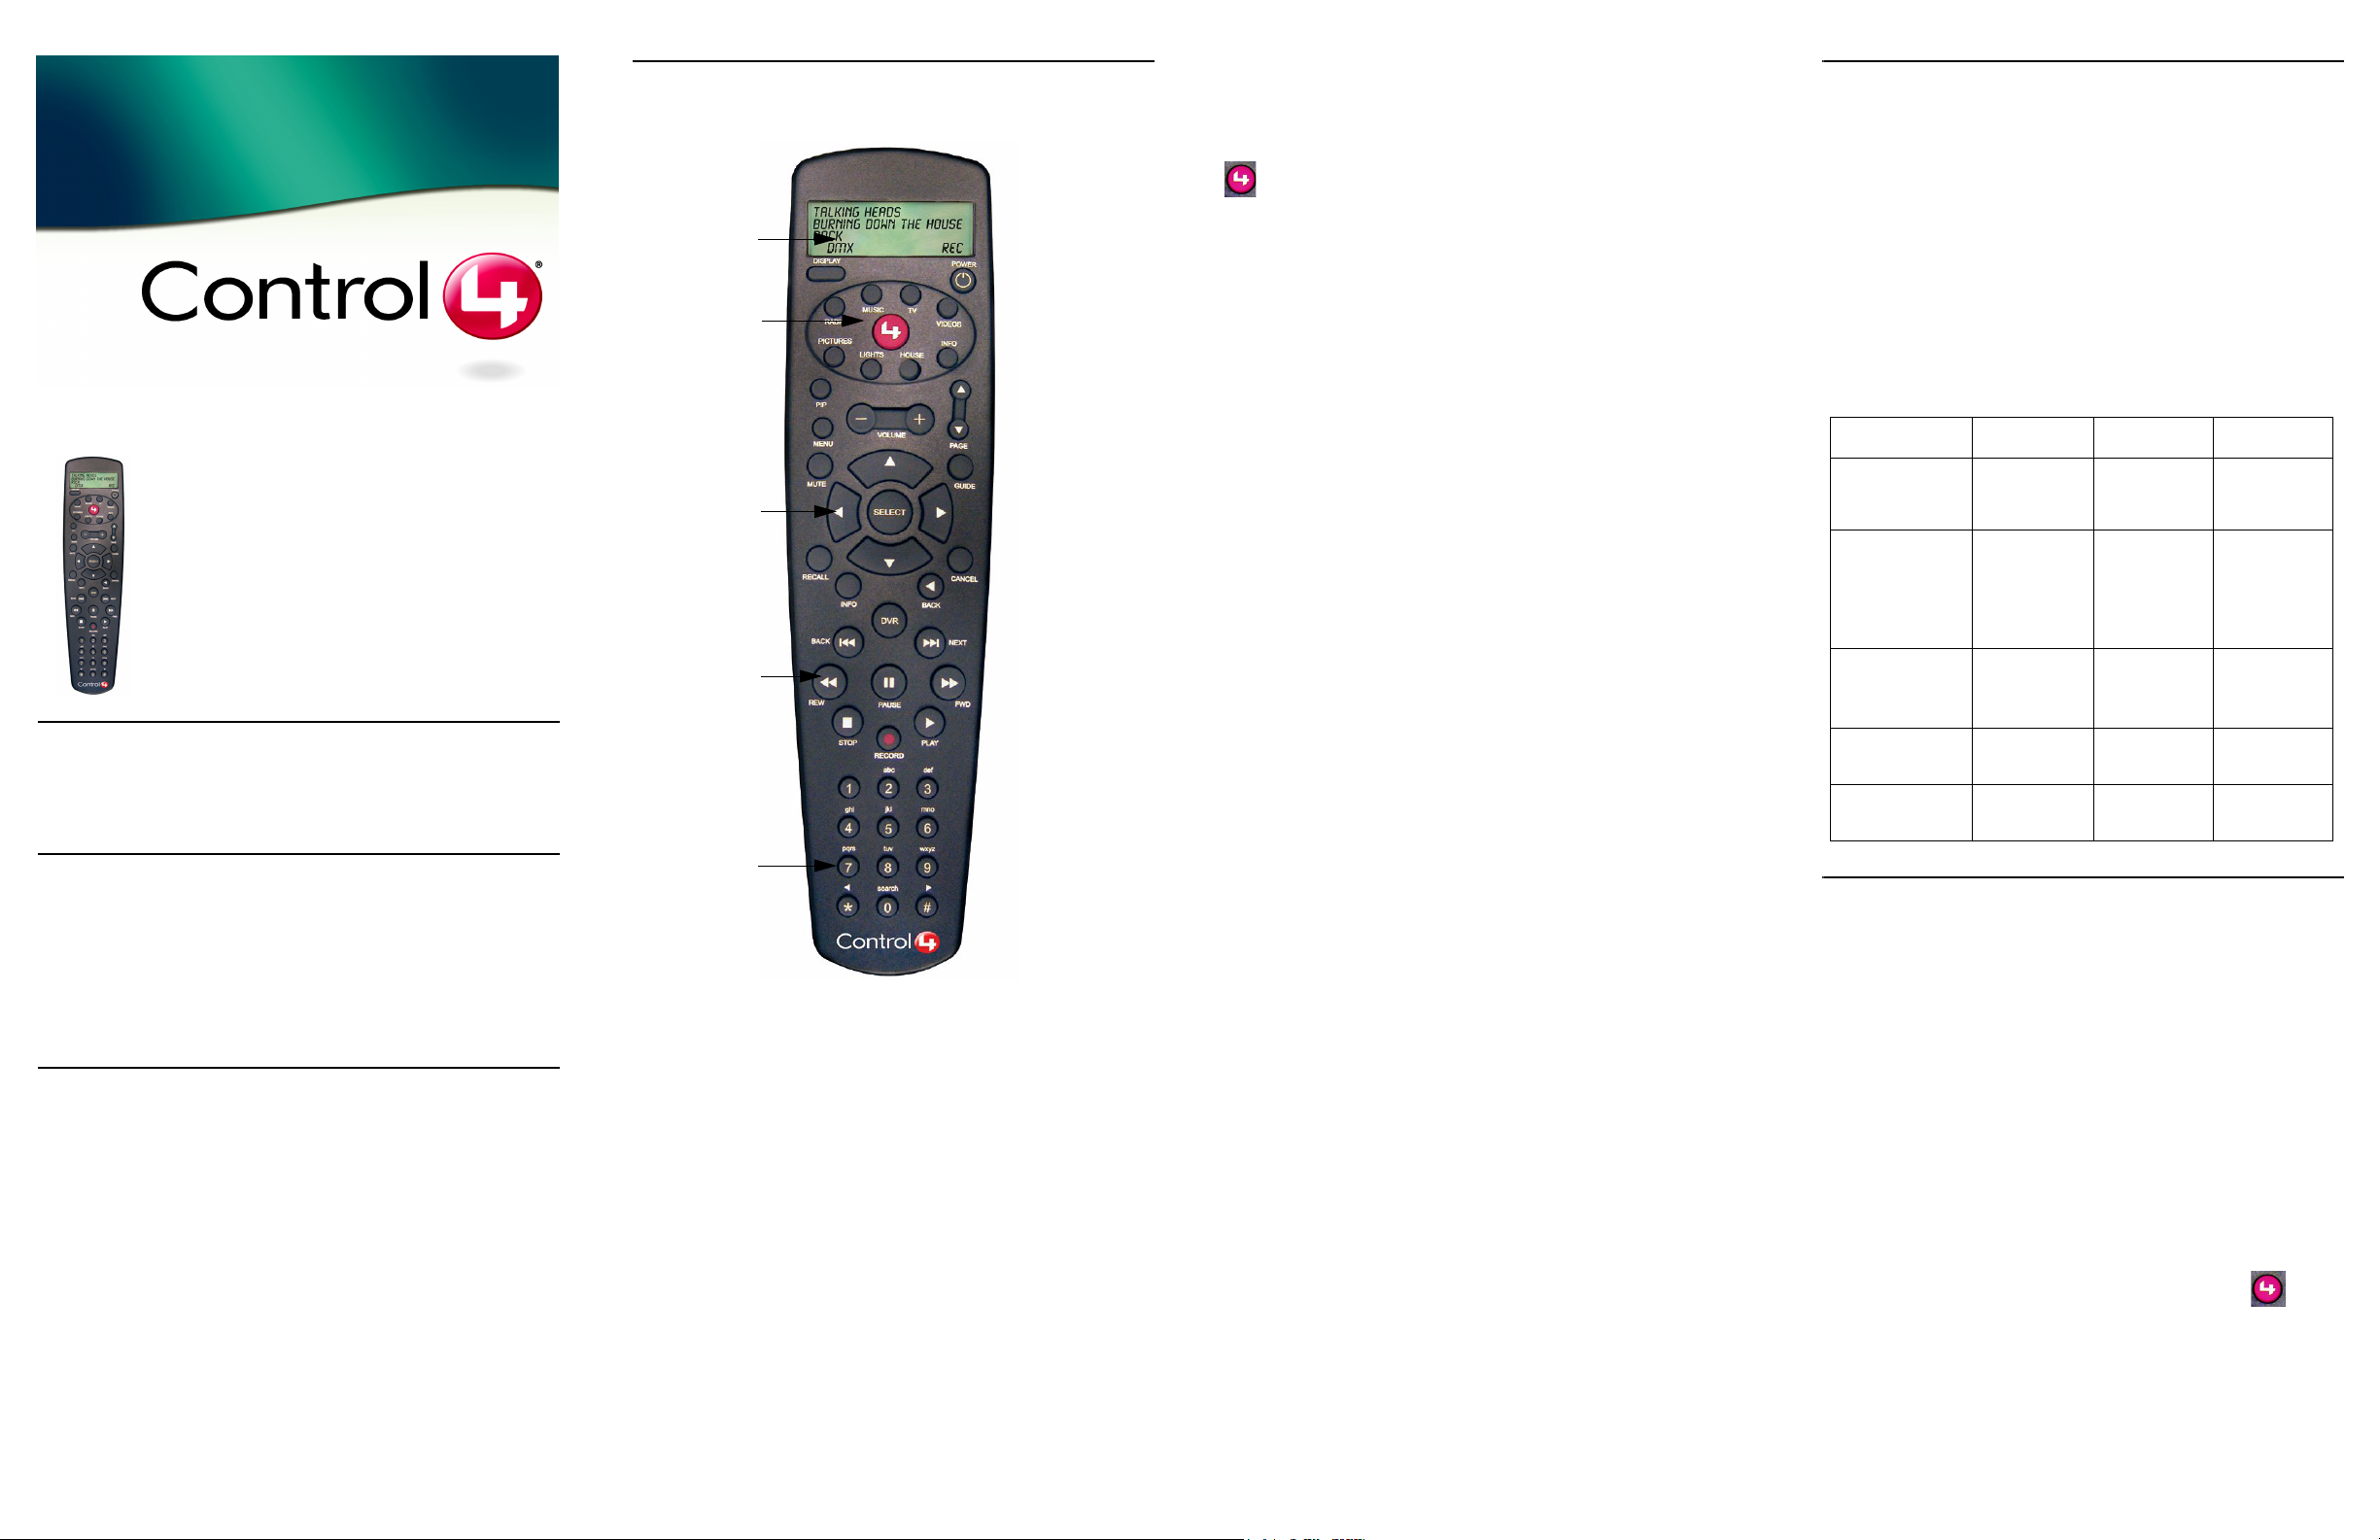
The System Remote Control is approximately 2.5 x 8.5 inches.
1
2
3
4
5
The remote control can be divided into these sections:
1. LCD with Display Button, and Power Button
2. Subsystem Buttons
3. Navigation Buttons
4. Control Buttons
5. Alpha-Numeric Keypad
LCD with Display Button, and Power Button
LCD—Provides display area for information related to system activity. It
uses reverse video to show a selected item. It includes a white backlight that
is triggered by any button press and stays lit for 15 seconds after inactivity.
Display button—Toggles the remote and its LCD display between
Control4 Menu (Setup mode) and Control4 Remote (On-Screen and
Controller modes).
Power button—Turns the power to the device currently being controlled
On or Off.
Subsystem Buttons
Subsystem buttons control the device or software you specify during the
controller setup process. The installer identifies the system components in a
a certain room and associates the remote control with the room.
—Displays the On-Screen Home page, which displays current location
with a drop-down list of other location options, and provides access to all
subsystem pages.
TV—Displays TV grid and sets current zone for TV. In Video mode this will
launch the Control4 GUI.
Movies—Displays your DVD collection from a DVD Changer or HDD
system. It should launch a Control4 GUI.
Radio—Displays Personal Radio Playlist for AM, FM, XM, Sirius or Net
Radio on the LCD. If the system is in a video mode the Control4 on-screen
user interface launches. This sets the current zone to tuner.
Music—Displays playlist for CD Changers or HDD storage systems on LCD
in video mode the Control4 GUI should launch. This will set the current zone
to listen to stored media on the hard drive.
Lights—Displays a list of lighting scenes and/or loads On-Screen or in the
LCD screen. It should also launch a Control4 GUI when in video mode.
Comfort—Displays temperature-related and lighting-related devices, such
as motorized blinds, curtains, or ceiling fans.
House—Displays a list of house scenes on then LCD screen. It should also
launch a Control4 GUI when in video mode.
Info—Displays personal information on the LCD screen and when in video
mode in should launch the Control4 GUI.
Navigation Buttons
The remaining buttons are familiar to users familiar with satellite or universal
remote controllers. These universal remote control buttons are used for
channel selection and device control. They include:
• PIP (Picture in Picture): Video or GUI modes
• MENU: All modes
• VOLUME (- +): All modes
• PAGE UP or DOWN: Menu mode only
• MUTE: All Modes
• SELECT arrows
• SELECT center button
• GUIDE: TV, Cable, DVD, CD, Cable, DSS, DVR, MP3
• RECALL: TV, VCR, DSS, Cable, DVR
• INFO: TV, DVD, CD, Cable, DSS, DVR
• BACK: Menu mode only to return to previous menu
• CANCEL: TV, Cable, DVD, CD, Cable, DSS, DVR, MP3
Control Buttons
• DVR: On push, launch DVR program menu
• BACK << (fast): Video mode only
• NEXT >> (fast): Video mode only
• REW << (fast): Video mode only
• PAUSE ll: Video mode only
• FWD >> (fast) << (fast): Video mode only
• STOP): Video mode only
• PLAY): Video mode only
• RECORD): Video mode only
Alpha-Numeric Keypad
This is a 10-button alpha-numeric keypad (0-9) with an asterisk * and pound
# key, just like the keys found on a telephone. Use these to directly choose a
TV channel or for data-entry. When using these for data-entry, you must
change one digit at a time:
1. Use the arrows to move the cursor where a change is needed.
2. Press a button repeatedly to toggle through its alpha-numeric options (for
example, #2 can be toggled to 2, a, b, or c).
3. Use the arrows to move on to the next digit.
About the Modes
This remote control has the following modes:
• Setup mode: Use for initially setting the remote up to work with your Control4
controller.
• On-Screen mode: Use to navigate the On-Screen menu in order to access or
control all system components.
• Controller mode: Use like a universal remote control for controlling all system
components, including audio playback and video controls. The devices and
software available for navigation and control may include: Control4 On-Screen
Navigation menus, its own LCD display, DSS, Cable, Tuner, DVR, DVD Player
or Changer, VCR, TV, MP3, or CD Player or Changer.
• Sleep mode: The remote LCD will “go to sleep” after a predetermined time of
inactivity (supported range is 5-60 seconds, with a default of 15 seconds).
Press any button to perform the button function and wake up the LCD with the
backlight activated.
Remote control features behave differently in different modes. Here is a
high-level summary of what each remote control section can be used for in
each of the remote control modes.
Remote Control
Section
LCD Display Control4 Menu View text
Subsystem Buttons NA Press once to
Navigation Buttons Move LCD cursor,
Control Buttons NA NA Control current
Numeric Keypad Enter alpha-
Setup mode
Control4 Menu
select sub-menus,
and change
channel settings.
numeric strings in
text-entry fields.
On-Screen mode
Control4Remote
description of
each button
pressed.
highlight a
subsystem in the
On-Screen display
or press twice to
jump to the
subsystem page.
Move On-Screen
cursor around OnScreen menus.
NA Change channels
Controller mode
Control4Remote
View text
description of
each button
pressed.
NA
Move On-Screen
cursor around OnScreen controls.
device or current
playback.
of current device.
Set Up the System Remote Control
1 Install the four AAA batteries provided into the back of the device.
2 To switch to Setup mode, press the Display button once or twice until
“Control4 Menu” displays in the LCD.
3 Choose a menu option to configure the remote control for your system:
• Configure Device: This is factory set. Should be set to the MAC address
displayed in the LCD of the controller.
• Set Remote Channel: This is factory set. Choose this to set channel to the
same channel as the controller. Arrow up or down to change the number
(supported range is 0-16, with a default of 0).
• Set Remote Gateway: This is factory set. Should be set to the Zigbee
address or the MAC address displayed in the LCD of the controller.
4 Add the remote control to the Control4 system so that it can
communicate with all applicable system components:
a. Use Control4 Composer software installed on a PC to add the
remote control to the system. (Refer to the Control4 Composer
User Guide for instructions on adding a device.)
b. When prompted to identify the remote control, press .
Page 2
Use the System Remote Control
Use with On-Screen Menus
1 To switch to On-Screen mode, press the Display button once or twice
until “Control4 Remote” displays in the LCD.
2 Access the On-Screen menu by pressing .
3 Choose a subsystem to navigate or control by pressing the subsystem’s
button or by scrolling to it with the arrows and pressing Select.
Refer to Control4 On-Screen Menu User Guide for user instructions.
Use to Control Audio and Video Devices
1 To switch to Controller mode, press the related subsytem button twice.
2 In the On-Screen menu, choose the device.
3 Use the supported Controller mode buttons as needed.
FCC and UL Information
FCC ID: R33050110011
This device complies with Part 15 of the FCC Rules. Operation is subject to
the following two conditions: (1) this device may not cause harmful
interfence, and (2) this device must accept any interference received,
including interference that may cause undesired operation.
Note: This equipment has been tested and found to comply with the
limits for a Class B digital device, pursuant to Part 15 of the FCC
Rules. These limits are designed to provide reasonable protection
against harmful interference in a residential installation. This equipment
generates, uses, and can radiate radio frequency energy and, if not installed
and used in accordance with the instructions, may cause harmful
interference to radio communications. However, there is no guarantee that
interference will not occur in a particular installation. If this equipment does
cause harmful interference to radio or television reception, which can be
determined by turning the equipment off and on, the user is encouraged to
try to correct the interference by one or more of the following measures:
• Reorient or relocate the receiving antenna.
• Increase the separation between the equipment and receiver.
• Connect the equipment into an outlet on a circuit different from that to which
the receiver is connected.
• Consult the dealer or an experienced radio/TV technician for help.
CAUTION! Changes or modifications not expressly approved by
Control4 could void the user’s authority to operate the equipment.
UL Control number: xxxx
CAUTION! To reduce the risk of overheating and possible damage to
other equipment, Do Not Install to control an Outlet Receptacle, a
Motor-Operated Appliance, a Fluorescent Lighting Fixture, or a
Transformer-Supplied Appliance.
WARNING! This product has NOT been approved for
use with Aluminum wiring.
CE information: (Placeholder...Content here).
Limited 1 Year Warranty
This device has a limited one (1) year warranty on parts from the date of
installation. Control4 will replace or repair any defective unit. Return unit to
the place of purchase for replacement. For any damages incurred, the
warranty will never exceed the purchase price of the device. This warranty
does not cover installation, removal, or reinstallation cost. The warranty is
not valid in cases where damage incurred due to misuse, abuse, incorrect
repair, or improper wiring or installation. It does not cover incidental or
consequential damage. This warranty gives you specific legal rights, and you
might also be entitled to other rights that vary from state to state. Some
states do not allow limitations on how long an implied warranty lasts or the
exclusion or limitation of incidental or conseqential damages. In these cases,
the above mentioned limitations might not apply to you. To automatically
receive notification of upgrades, register your device by returning the
enclosed registration card or by going to the MyControl4.com web site.
Control4 Technical Support
For help on the installation or operation of this product, email or call the
Control4 Technical Support Center. Please provide your exact model
number. Contact support@control4.com or see the web site
www.control4.com.
United States Patents
Pending.© 2004 Control4
Technologies.
Made and printed in the United
States.
Part Number: ??-???? Rev 1 Draft 3
 Loading...