

Continental Refrigerator CP42265 User Manual
Can Opener
User Manual
Model: CP42265
IMPORTANT SAFEGUARDS
IMPORTANT: W h en us ing el ec tric al appl ianc es , es pec ial l y wh en c h il d ren are pres ent,
b as ic s af ety prec autions s h oul d al ways b e f ol l owed , inc l ud ing th e f ol l owing:
1. RE AD ALL I N STRUCTI ON S
2. To protect against electrical hazards, do not immerse cord, plugs or case in water or other
liq uid.
3. Close supervision is necessary when any appliance is used by or near children.
4. Unplug from outlet when not in use, before putting on or taking off parts, and before
cleaning.
5. Avoid contact with moving parts.
6. Do not operate any appliance with a damaged cord or plug or after the appliance
malfunctions or has been damaged in any manner. Return appliance to the nearest
authorized service facility for ex amination, repair or adjustment.
7. Do not use outdoors.
8 . Do not let cord hang over the edge of table or counter; or touch hot surfaces.
9 . Do not open pressurized (aerosol-type) cans with this appliance.
10 .
11. Do not use appliance for other than intended used.
12. The use of attachments not recommended or sold by the appliance manufacturer may cause
this appliance.
FOR HOUSEHOLD USE ONLY
POLARIZ ED PLUG
This appliance has a polarized plug (one blade is wider than the other): To reduce the risk of
attempt to modify the plug in anyway.
SHORT CORD INSTRUCTIONS
A short power-supply cord is provided to reduce the risk of becoming entangled in or tripping
over a long cord.
Longer detachable power-supply cords or ex tension cords are available and may be used if care
is ex ercised in their use.
I f a longer detachable power-supply cord or ex tension cord is used, (1) the marked electrical
rating of the ex tension cord should be at least as great as the electrical rating of the app
and (2) the longer cord should be arranged so that it will not drape over the countertop or table
top where it can be pulled on by children or tripped over unintentionally.
liance,
SAVE THESE INSTRUCTIONS
7
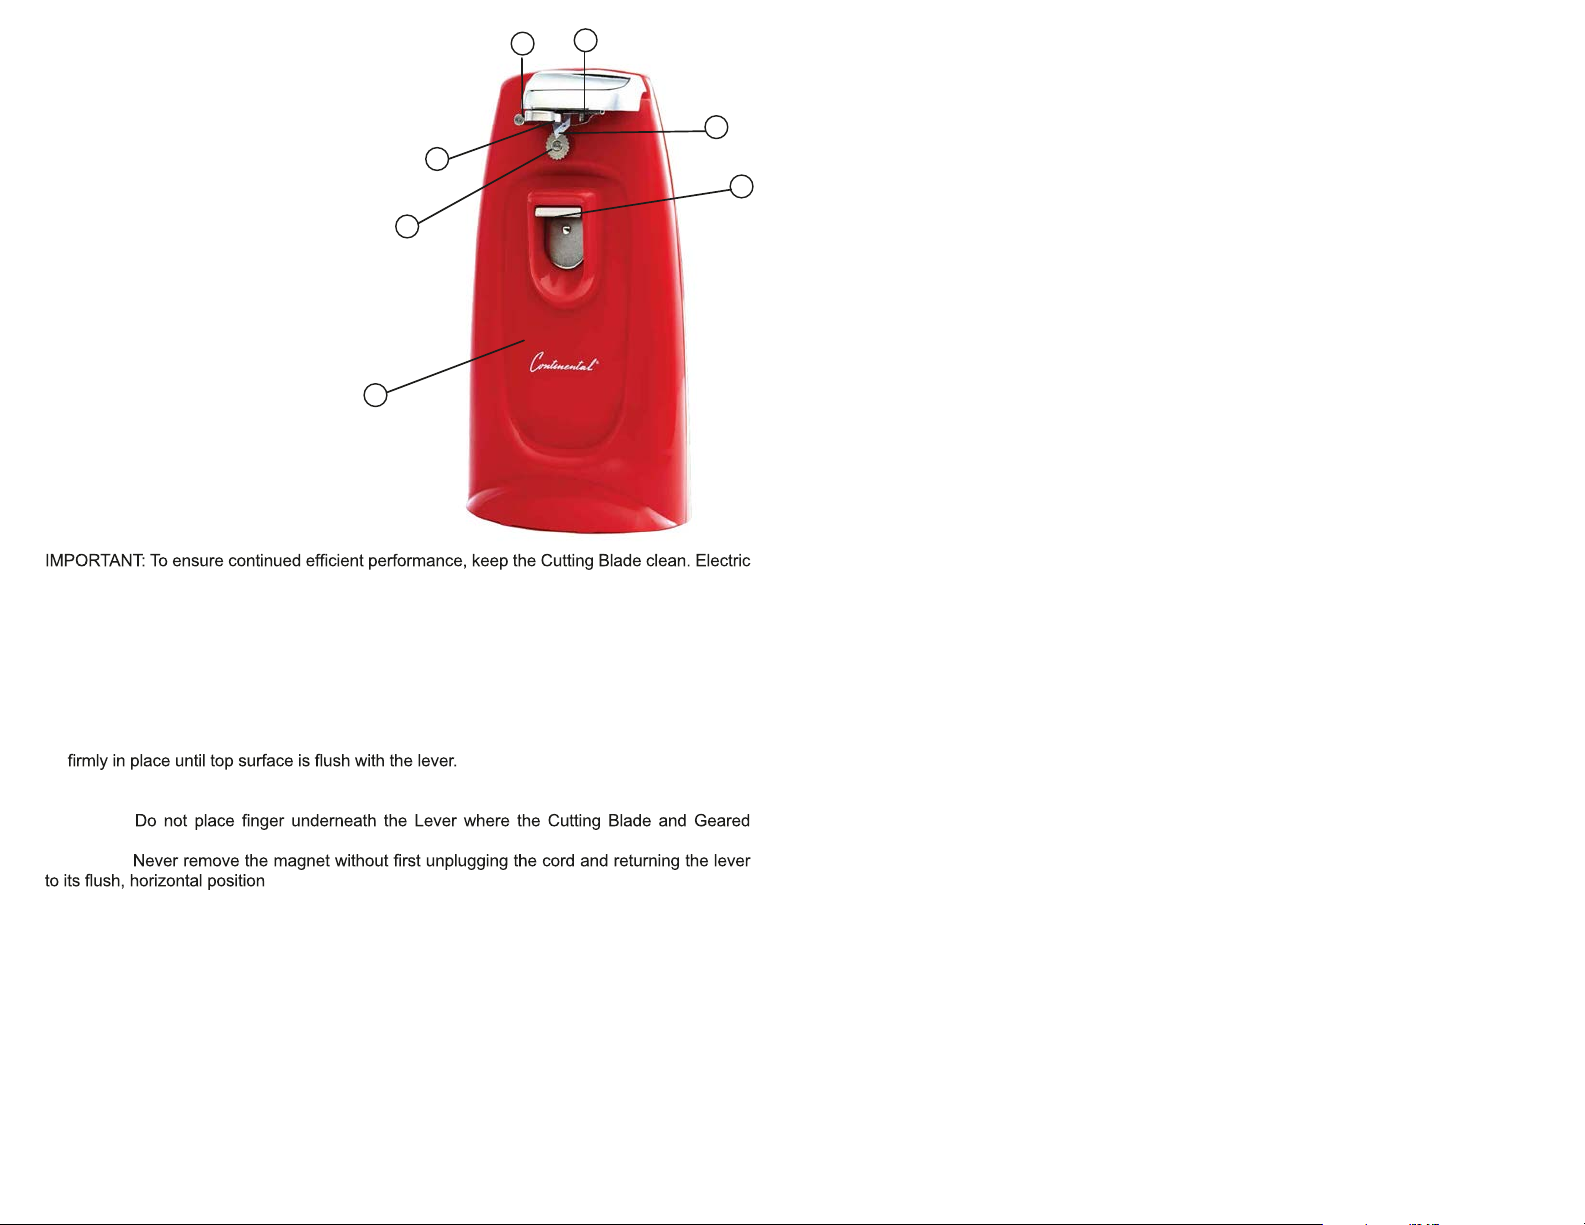
Getting to Know your Can Opener
1. Lever
2. Magnet
3. Geared Wheel
4. Base
5. Bottle Cap Opener
6. Cutting Blade
7. Guide Bar
1
2
3
4
OPERATING INSTRUCTIONS
Can Opener should be turned off for one minute after operating for 5 minutes.
An y other service should be performed by a n authorized service representative.
TO USE KNIFE/SCISSORS SHARPENER
1. Place Knife Blade lightly in either left or right groove. Draw Knife slowly toward you with a
slow, even motion.
6
5
2. Place Blade in other groove and do the same. Repeat this alternating action 4 or 5 times,
from one groove to the other until desired sharpness is achieved.
3. The Knife/Scissors Sharpener can also be used for sharpening scissors. A lar
the side of the Sharpener is designed especially for scissors. Place one blade of the scissors
in the groove, and then draw it toward you slowly and evenly. Repeat with the other blade.
ATTENTION: Blades to be sharpened should be clean. Do not sharpen knives that have serrated blades.
TO USE BOTTLE OPENER
1. Unplug appliance from electrical socket.
2. Place Can Opener on a level surface. To steady position one hand on top of the Can Opener.
3. Place bottle cap ed
4. Apply pressure on bottle downward until bottle cap pops off
NOTE: This bottle opener is not recommended for bottles having “Twist-Off” caps.
ge under Opener Flange.
ge groove at
BEFORE USING
1. Carefully unpack Can Opener.
2. Wipe with a soft cloth or sponge to remove small particles collected during packing and
handling.
3. Attach the magnetic part (used to hold the can in place when cutting) to the front panel of the
lever by sliding it down over the “hook”, with the circular surface facing do
4 . Plug Can Opener into electrical outlet, and press down on the Lever to make sure it is operat-
ing properly.
CAUTION:
Wheel are located; doing so may cause injury.
CAUTION:
TO USE CAN OPENER
1. Place Can Opener on level surface.
2. Raise Lever, place can under the Guide Bar and against the Geared Wheel. (See Figure 1 to
identify parts). Make sure the magnet sticks completely to the top of the can.
3. Have one hand poised to grasp the can. With the other, press down on the Lever to pierce lid
of can. This automatically starts the cutting action. The Can Opener will continue to cut until
the lid is completely severed from the can.
4. Grasp the can, then raise the Lever to rel
5. Carefully remove lid from the magnet.
USE CAUTION TO AVOID INJURY FROM EDGE OF LID.
ease the can.
wn. Press down
 Loading...