

Continental Hydraulics PVX Series, PVX-8, PVX-15, PVX-20, PVX-29 Repair Manual
...
REPAIR PROCEDURES
MANUAL
PVX Series Vane Pumps
“A” Design Series
Step-by-Step Guide to Troubleshooting and Repairing
PVX Series Vane Pumps
Form No. 264728 Rev. 11/08

Introduction
Thank you for choosing Continental
Hydraulics PVX Vane Pumps for your
application.
PVX Pumps are designed to provide reliable
performance, and to be easily repaired
should the need arise. The procedures in
this repair manual will show you how to
repair virtually any part of your pump.
To assure that your repaired PVX Pump
performs reliably, please follow all steps
carefully. It is also very important that your
work area be kept clean to prevent
introducing contaminants into the pump.
In many cases, dirt or contaminants in the
hydraulic system lead to pump wear and
failure. If your PVX pump failed due to dirt or
contamination, be sure to thouroughly clean
and flush all parts of the system, paying
special attention to power unit reservoirs.
You may want to provide additional filtering
to keep your pumps and system operating at
peak performance.
NOTE: All procedures in this manual are
to be performed on a service bench. Do
not disassemble, or attempt to repair a
pump that is connected to a hydraulic
system.
CAUTION – Before attempting to remove
the PVX Vane Pump, be sure that all
pressure has been relieved from BOTH
SIDES of the system.
CAUTION – Before attempting to remove
the PVX Vane Pump, disconnect or lock off
power supply.
CAUTION – Before manually actuating any
PVX Vane Pump, be sure that any resulting
machine function will not endanger persons
or equipment.
PRODUCT IDENTIFICATION
Each PVX Vane Pump has a Model Code stamped on
its nameplate. See Figure 1 for the location of the
Model Code.
DATE:
P/N:
V =
IN3/REV. CM3/U
MODEL
CODE:
PVX-
75B 00-00-P-00 00 00 00 00-A
Pmax = 3000 psi, 210 bar
This Repair Manual applies to products with Ordering
Codes like the sample in Figure 2.
PVX-75B-_ _ _ _-P-_ _ _ _ _ _ _ _ _ _-A
Basic Pump
GPM
Pressure
Rotation
Seal Type
Mounting
Shaft
Tandem
Control Option
Voltage
Design Letter
Figure 2
Model Code
Figure 1
i
Form No. 264728 Rev. 11/08

Table of Contents
Part Identification
Exploded View Drawing .................. 2
Parts List ......................................... 2
Disassembly Procedures – Pumps
General ............................................ 3
Getting Started ................................ 3
Disassembly Instructions ................ 3-6
Assembly Procedures – Pumps
General ........................................... 7
Getting Started - Kits ...................... 7
Getting Started - Tools ................... 8
Assembly instructions ..................... 8-13
Disassembly Procedure – Two-Stage
Compensator
General ........................................... 14
Disassembly Instructions ................ 14-15
Assembly Procedure – Two-Stage
Compensator
Assembly Instructions .................... 16-18
Disassembly Procedure – Single Stage
Compensator
General ........................................... 19
Disassembly Instructions ................ 19
Adjustment Procedure – Single Stage
Compensator
General ........................................... 23-24
Adjustment Procedure – Two-Stage
Compensator
General ........................................... 25
Multi-Pressure Compensator
General Information ........................ 26
Solenoid Two-Pressure Control ...... 26
Solenoid Vented ............................. 27
Load Sense .................................... 27-29
Torque Limiter ................................. 29-30
Setting the Maximum Deadhead
Pressure (Second Stage Setting) 31
Setting the Torque Limiter .............. 31
Application Notes ........................... 31
Maximum Flow Limiter ................... 31
Fluids, Filters and System Preparation
General Information ........................ 32
Fluid Recommendations ................. 32
Fluid Temperature .......................... 32
Filtration .......................................... 32
Pump Installation Procedure
Installation Instructions ................... 33
Assembly Procedure – Single Stage
Compensator
General ........................................... 20
Getting Started - Kits ...................... 20
Assembly Instructions .................... 20-21
Proper Setting of the Thrust Screw
Adjustment Instructions .................. 22
System Start-Up Procedure
Start-Up Instructions ....................... 34
Trouble Shooting
Trouble, Potential Cause, Remedy 35-37
Dimensions for Double Pumps
Dimension Drawing ........................ 38
Possible Size Combinations ........... 38
Form No. 264728 Rev. 11/08
1
22
4
3
2
8
9
10
15
14
16
17
6
18
1
21
20
19
PVX-20/36
Torque to 1800 lb/in
(Torque to 204 Nm)
Torque to 850 lb/in
(Torque to 96 Nm)
Torque to 850 lb/in
(Torque to 96 Nm)
Torque to 12 lb/in
(Torque to 1.4 Nm)
7
24
23
5
13
PVX-46/60/75
Torque to 4970 lb/in
(Torque to 562 Nm)
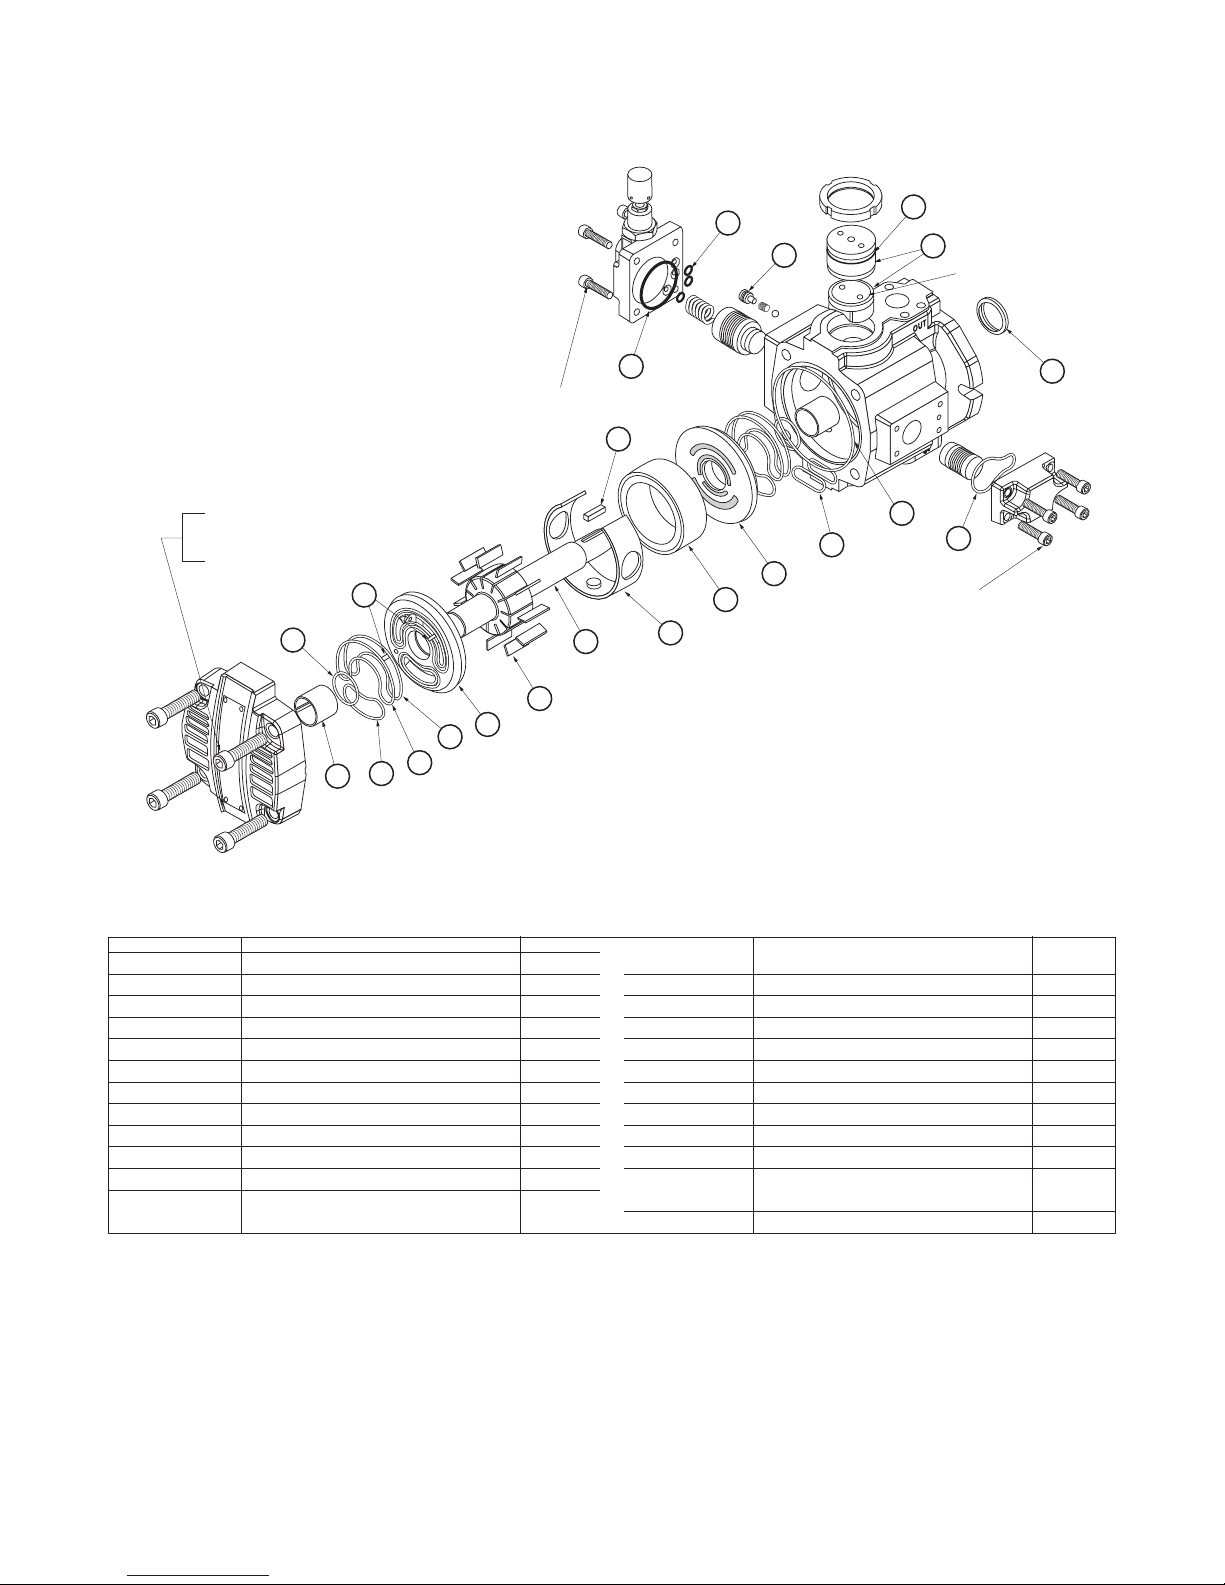
Part Identification
Exploded View Drawing
Parts List
REFERENCE DESCRIPTION QTY
1 Key 1
2 Rotor shaft 1
3 Vane kit 1
4 Port plate, cover side 1
5 Roll pin 4
6 Thrust block 1
7 Bearing 2
8 Spacer ring 1
9 Pressure ring 1
10 Port plate, body side 1
13 O-ring, ASA-031 / (ASA-035) 2
14 O-ring, ASA-162 / (ASA-265) 1
REFERENCE DESCRIPTION QTY
2
Form No. 264728 Rev. 11/08
15 O-ring, ASA-130 / (ASA-229) 1
16 O-ring, ASA-146 / (ASA-146) 1
17 Shaft seal 1
18 O-ring, ASA-332 / (ASA-340) 1
19 O-ring, ASA-110 / (ASA-110) 1
20 O-ring, ASA-111 / (ASA-111) 3
21 O-ring, ASA-143 / (ASA-143) 1
22 O-ring, ASA-157 / (ASA-160) 2
23 Back up ring 2
24 O-ring, ASA-139 / (ASA-152) 1
24 O-ring, ASA-237 / (ASA-237) 1
Disassembly Procedures – Pumps
General
The disassembly procedure shown on the following
pages covers the Continental Hydraulics PVX-8 thru
75 variable volume vane pumps. The complete
disassembly procedures are similar for all pumps.
Any differences between the pump models are
described in additional notes.
The step number corresponds to the photo or
illustration of the same number.
Any dimensions or values stated will have the English
value first followed by the metric equivelent in
parenthesis.
Figure 1.
Getting Started - Tools
PVX Model 8 11/15 20/29/36 46/60/75
Cover
Allen Wrench 8 mm 10 mm 14 mm 17mm
4 Soc. Cap Screws
Cover - Removal
Plates - Removal
Tweezers or
Vanes - Removal Pair of Long Needle Nose Pliers
11 Vanes 22 Vanes
Compensator &
Bias Cover
Allen Wrench
2 x 4 Soc. Cap Screws
PVX-8/11/15 - 8 mm Allen Wrench
Thrust Screw PVX-20/29/36/46/60/75 -
Non-Slip Spanner Wrench
Thrust Screw Lock Nut Adjustable Face Spanner Wrench
Bearing - Removal Blind Hole Bearing Puller
Shaft Seal - Removal Hammer & Round Head Punch
2 Flat Blade Screwdrivers
6 mm 8 mm
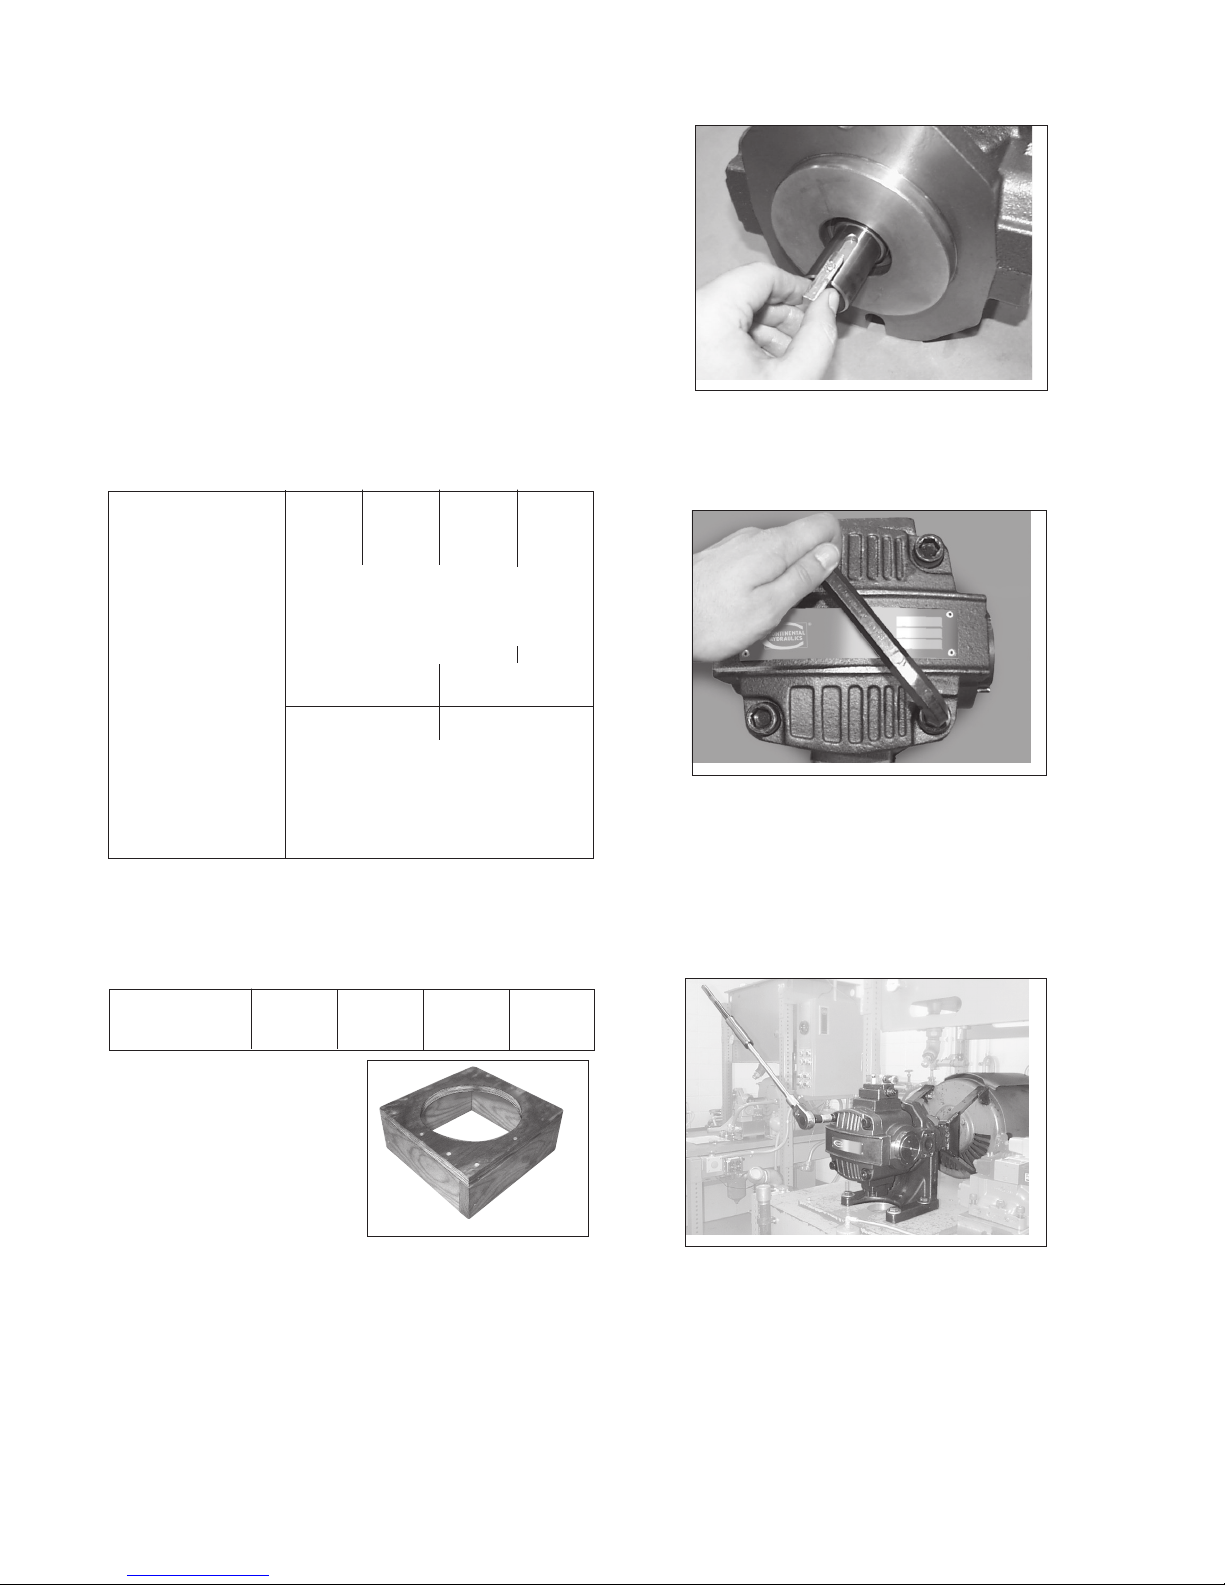
As an aid for repairing the PVX pump, we recommend
building a wooden fixture. Please see the different
inside diameters for each pump size in the chart
below.
PVX Model 8 11/15 20/29/36 46/60/75
Diameter 3.38 (86) 4.13 (105) 5.13 (131) 6.13 (156)
Min. Height 2 (51) 2.63 (67) 3 (77) 3.88 (99)
2. Remove the four (4) socket hd cap screws on the
cover by using the appropriate size Allen wrench.
Figure 2.
Note: For disassembling the larger pumps, a great
amount of torque will be needed to loosen the cover
bolts. Therefore, we recommend loosening the bolts
before removing the pump from the motor-unit. Use a
socket or extend the length of the allen wrench and
make sure to clamp the pump securely and safely.
Wooden Fixture.
Disassembly Instructions
1. Remove the straight key from the keyway of the
shaft and place the pump side down into the wooden
fixture. See above for details for the fixture.
Figure 2a.
Form No. 264728 Rev. 11/08
3
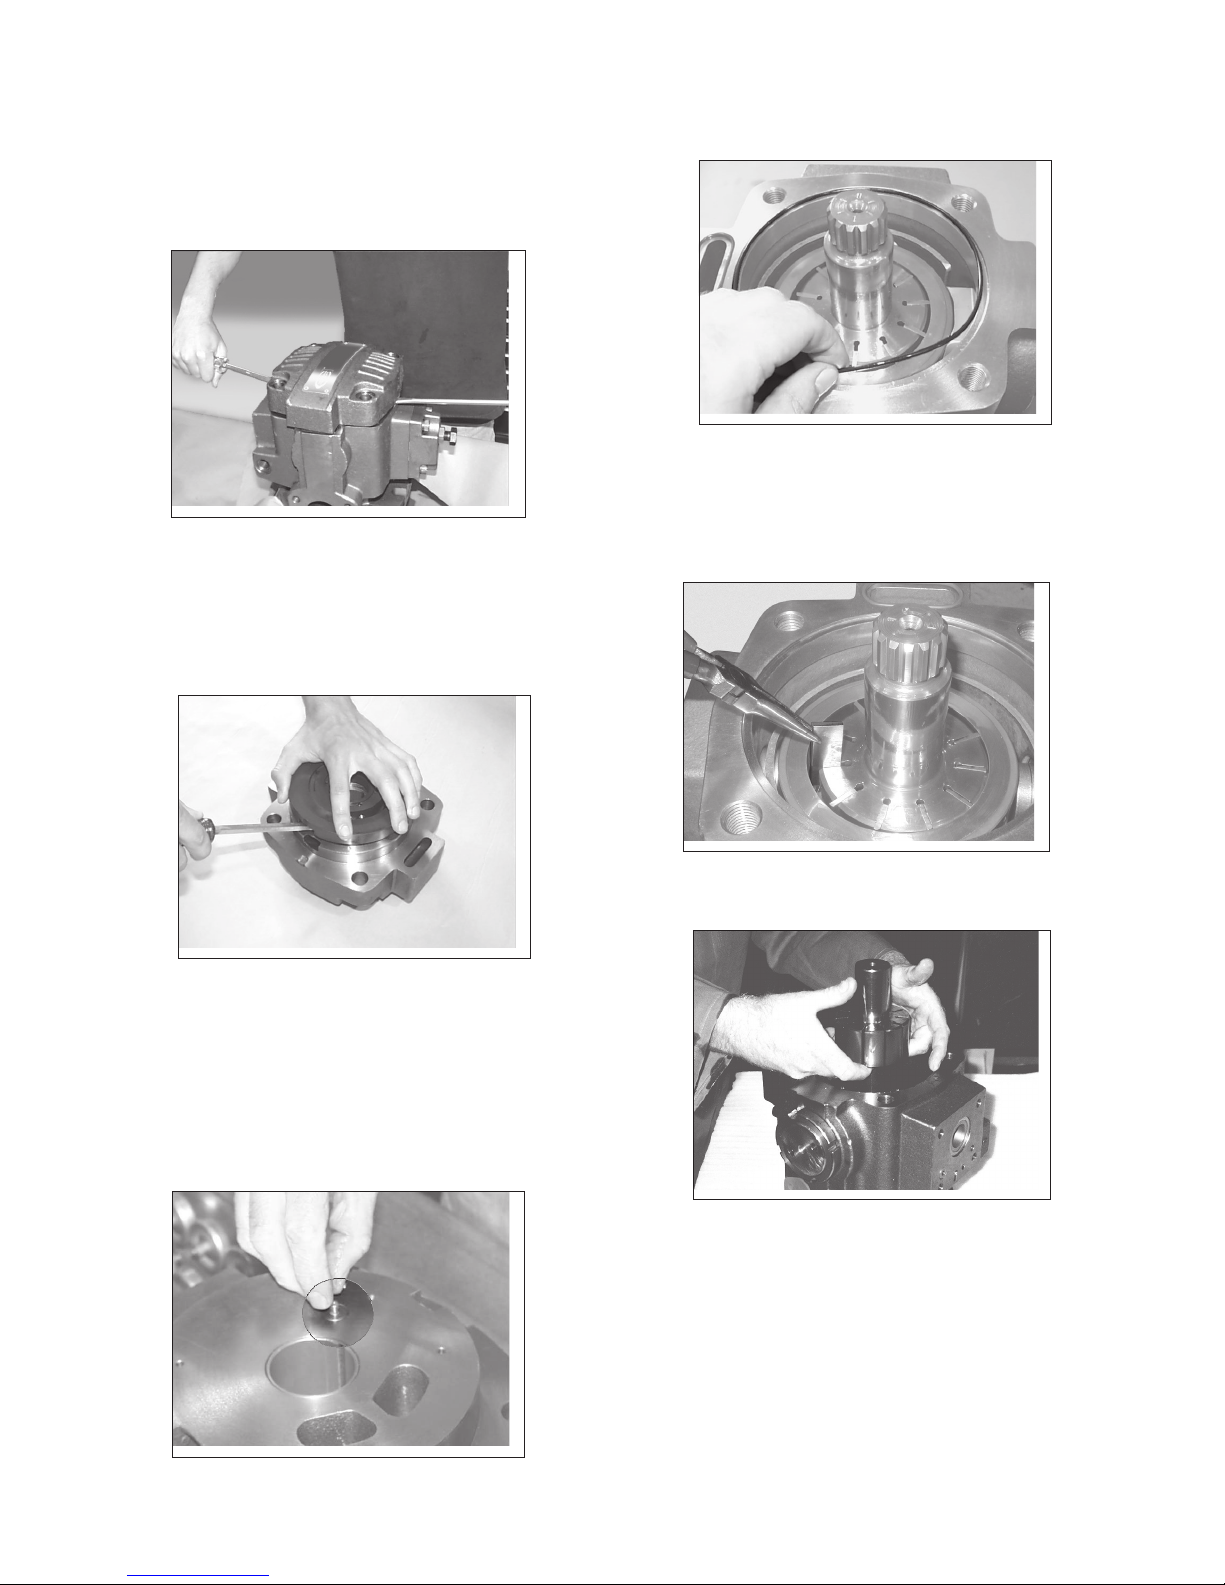
Disassembly Instructions – Pumps (continued)
3. Insert flat blade screwdriver into the slots provided
on each side of the cover. Pry the cover assembly
loose using equal force on each screwdriver. After
the cover is loose, carefully remove it by hand and set
aside in a clean area.
Figure 3.
4. In order to remove the port plate from the cover,
insert flat blade screwdriver into the slots between the
port plate and cover and pry the port plate loose.
After the port plate is loose, carefully remove it by
hand.
5. Remove the cover o-ring.
Figure 5.
6. Remove the vanes from the rotor by using a small
pair of tweezers or long needle nose pliers. Caution
should be taken not to nick or score the vanes,
pressure ring and rotor.
Figure 4.
NOTE: When disassembling a PVX-20 thru 75 pump,
please pay close attention not to loosen the ratio
valve cartridge that is located in the cover and the
ratio valve sealing assembly that is located on the
back of the cover port plate. The ratio valve cartridge
is as essential part of the pump and is not a wear
item, so it is not part of the repair kit.
Fig ure 6.
7. Remove the rotor shaft.
Figure 7.
Figure 4a.
4
Form No. 264728 Rev. 11/08
 Loading...