

Page 1
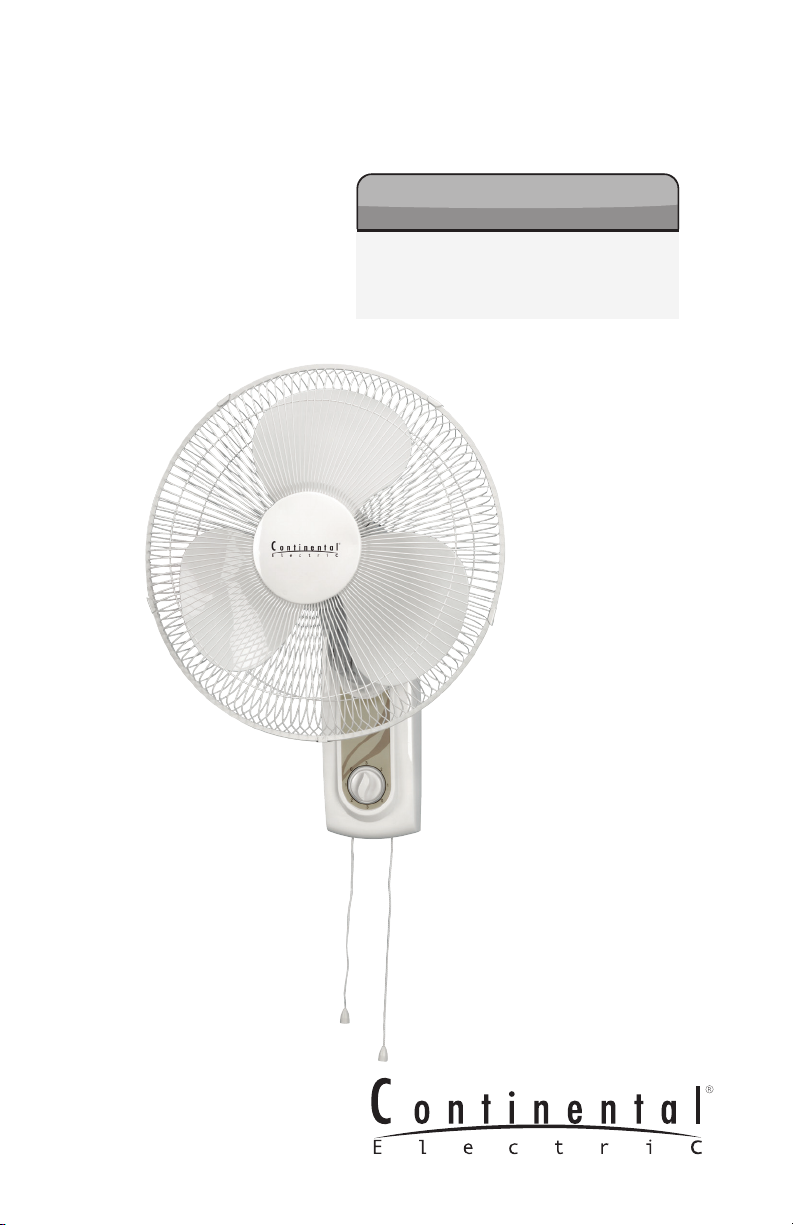
16” Wall Fan
User Manual
Model:
CE27616
Page 2
INTENDED USE
This product is intended only for indoor residential and ofce use; and is not intended for
industrial or other commercial use. Use your fan only with adequate wiring that is to the electrical code in your state. If you have any questions about the adequacy of your wiring, consult
a qualied electrician.
IMPORTANT OPERATING INSTRUCTIONS.
When using electrical appliances, basic safety precautions should always be taken including
the following:
Use the fan only for purposes described in the instruction manual. To protect against electrical
shock, do not immerse the fan plug or main cable in water or spay with liquids. Close supervision is necessary when any appliance is used by or near children. Unplug from the electrical
outlet when not in use, when moving the fan from one location to another, before putting on or
taking off parts and before cleaning. Avoid contact with any moving parts. Do not place the fan
or any parts near an open ame, cooking or other heating appliance. Do not operate any appliance with a damaged cord or plug or after the appliance malfunctions or has been dropped
damaged in any manner. The use of appliance cord is not recommended or sold by the appliance manufacturer to be used separately from the fan and may cause hazardous situations if
used apart or on other appliances. Do not let the power cord hang over the edge of a table or
counter or come into contact with hot surfaces. To disconnect from the electrical supply, grip
the plug and pull from the wall outlet. Do not pull on the cord only to remove from wall outlet
or damage could occur. Always use fan on a dry, level surface. Do not operate without the fan
grilles properly in place.
This product is intended for household use only and not for commercial or industrial applications.
Should the appliance stop working, rst check the fuse in the plug or fuse/circuit breaker in the
home/ofce, before contacting the manufacturer or service agent. If the supply cord or plug
is damaged, it must be replaced by the manufacturer or the service agent to avoid a hazard.
The appliance contains no user serviceable parts and should the product suffer damage or
breakdown it must be returned to the manufacturer or service agent. Do not use outdoors. Do
not run cord under carpeting. Do not cover cord with throw rugs, runners, or similar coverings.
Arrange cord away from trafc area and where it will not be tripped over.
ASSEMBLY INSTRUCTIONS
Tools required: Wrench or pliers and a Phillips head screw driver (not included).
Please assemble fan according to the illustration diagram.
CAUTION: NEVER REMOVE THE HICH HOLDS THE FAN HEAD IN PLACE.
1. Unscrew the plastic collar from the shaft en e motor housing by turning the collar COUNTER CLOCKWISE.
2. Remove the Rear Grill Mounting Nut. Place the Rear Grill onto the Motor Housing, make
sure the Handle on the Rear Grill is up.
3. Tighten the Rear Grill Mounting Nut CLOCKWISE. Secure the rear grill to the motor housing
with the plastic collar.
4. Insert the blade onto the motor shaft, matching the slot on the back of the blade with the
shaft pin, secure blade with blade cap, turning COUNTER·CLOCKWISE to tighten.
5. Test blade operation by rotating it with your hand. There should be no friction with the plastic
collar. If blade does not rotate freely, repeat Step 4.
6. Mount the front grill to the rear grill by positioning the clips on the front grill over the rear grill.
Secure the two grills with the clips attached to the rear grill.
7. Screw the wall Hang Hook on the desired wall rmly.
8. Attach the wall fan on the Hang Hook, making sure it is securely mounted before operation
CAUTION: To avoid the risk, make sure the Front and Rear Grilles are at
tached properly before operating.
Page 3
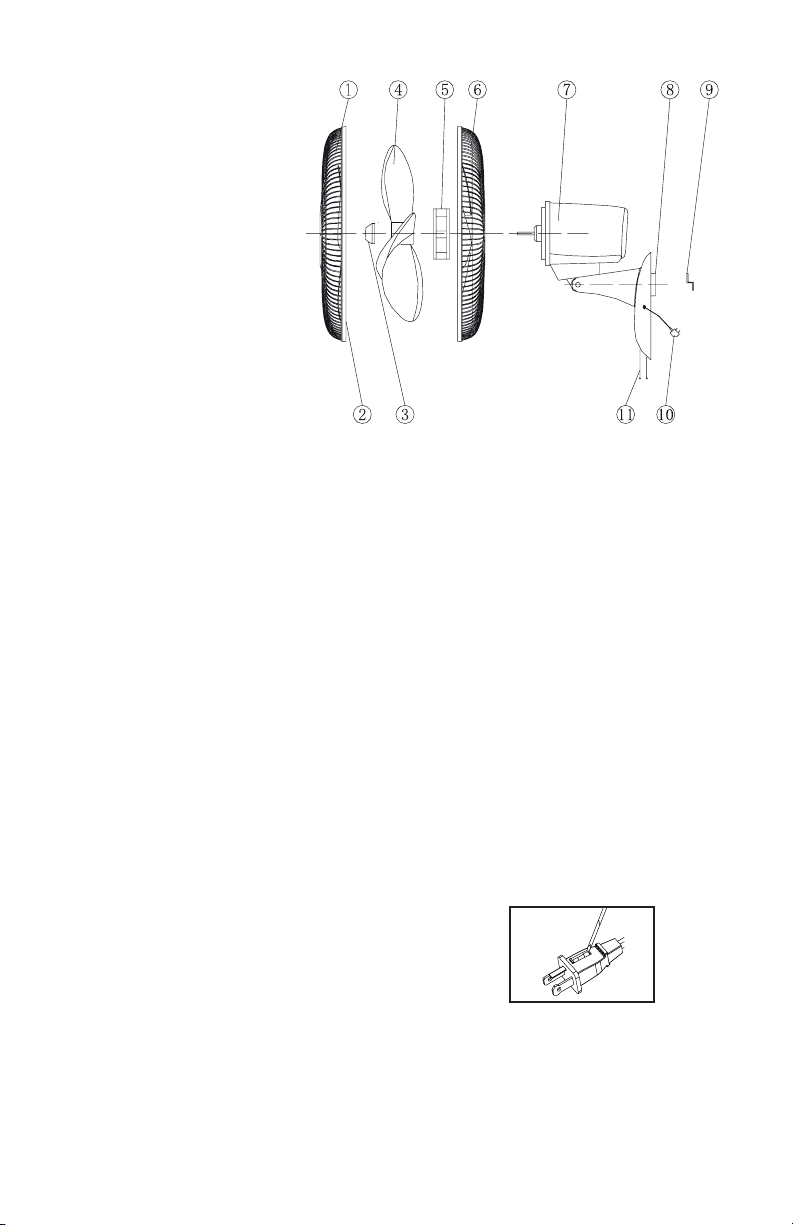
ITEM
COMPONENT
1
Front Grill
2
Crille Clips
3
Blade Knob
4
Blade
5
Rear Grill Mounting Nut
6
Rear Grill
7
Motor Housing
8
Hang Board
9
Hang Hook
10
Power Cord
11
Pull String
POLARIZED PLUG
NOTE: This appliance has a polarized plug (one blade is wider than the other). To reduce the
risk of electric shock, this plug is intended to t in a polarized outlet only one way. If the plug
does not t fully in the outlet, reverse the plug. If it still does not t, contact a qualied electri-
cian. Do not attempt to defeat this safety feature.
POWER CORD SAFETY TIPS
1. Never pull or yank on the cord or the appliance.
2. To insert plug, grasp it rmly and guide it into outlet.
3. To disconnect appliance, grasp plug and remove it from outlet.
4. Before each use, inspect the line cord for cuts and/or abrasion marks. If any are found, this
indicates that the appliance should be serviced and the line cord replaced. Please contact
our Service Department or an authorized service representative and follow instructions accordingly.
5. Never wrap the cord tightly around the appliance, as this could place undue stress on the
cord entry into the appliance and cause it to fray and break.
PLUG AND POWER CORD INSTRUCTIONS
This product employs overload protection (fuse). A blown fuse indicates an overload or shortcircuit situation. If the fuse blows, unplug the product from the outlet. Replace the fuse as per
the user servicing instructions (follow product marking for proper fuse rating) and check the
product. If the replacement fuse blows, a short-circuit may be present and the product should
be discarded or returned to an authorized service facility for examination and/or repair.
USER SERVICING INSTRUCTIONS:
a) Grasp plug and remove from the receptacle or other
outlet device. Do not unplug by pulling on cord.
b) If fuse cover located on top of attached plug
(applicable to plug type: YX-123, UE-238A)
towards blades as following picture,
taking following steps to replace incompetent fuse.
Step one: Push the fuse cover with straight screwdriver, make the fuse is exposed.
Step two: Pick up the incompetent fuse with straight screwdriver, clean up debris, load the
qualied fuse into the plug, and close the fuse cover.
Page 4

WARNING:
1. Properly handling the bad fuse including its broken glass & metal to avoid the harm on hu-
man body.
c) If fuse cover located between the two blades of attached plug (applicable to plug type: SL-
024) as following picture, taking following steps to replace incompetent fuse.
Step one: Select a suitable tool (the top of the tool should be tapering and at, for example,
travel scissors or small at screwdriver etc.), insert the tip of the tool into gap in the plug face.
Step two: Press the tool down, then prize the protection door of the fuse out.
Step three: Continue pull the protection door until you can’t draw it out, then you’ll nd the
whole fuse exhibited.
Step four: Insert the tip of your tool into fuse slot (close with the terminal), then prize the fuse
gradually and slowly, but not overexert. If you feel tight, you can try it at several times and
prize the fuse little by little.
Step ve: When one side of the fuse has been prized, then you can get the fuse out entirely.
Step six: Put a new fuse into the slot (the new fuse should near the end of the plug), then use
your tool to press fuse into slot, you shouldn’t press the glass tube of the fuse but the copper
cap at both sides, and not overexert, or else the fuse will be broke.
Step seven: Use your nger or a tool to push the protection door until the fuse be covered
completely, but sometimes the protection door will be tight or can’t be go forward, please make
sure the fuse have been xed at the right place. And you need push the protection door vertically, or else it will be broke probably.
DO NOT OPERATE APPLIANCE IF THE LINE CORD SHOWS ANY DAMAGE OR IF APPLIANCE WORKS INTERMITTENTLY OR STOPS WORKING ENTIRELY.
PLEASE NOTE: During the rst few minutes of initial use, you may notice a slight odor. This
is normal and will quickly disappear.
OPERATING INSTRUCTIONS
1. Plug fan into an electrical outlet.
2. To operate the fan, to control fan speed; on LOW, on MEDIUM and on HIGH or use dial
located on front of fan. Turn fan switch to desired level: 1 =LOW, 2=MEDIUM, 3=HIGH.
To turn off fan, pull the chain pull or use the switch and turn to O=OFF.
3. To make fan oscillate, pull down the chain for oscillation.
USER MAINTENANCE INSTRUCTIONS
This appliance requires little maintenance and contains no user serviceable parts.
Do not try to x it yourself. Refer it to qualied service personnel if servicing is needed.
This fan is permanently lubricated and will not require additional lubrication for the life of the
fan.
TO CLEAN: Before cleaning, turn fan off and unplug from electrical outlet. Wipe off excess
dust with a lint-free cloth.
To ensure adequate air circulation to the motor, keep vents located at the rear of the motor
housing free from dust accumulation. A vacuum cleaner hose can be used to clean these
vents. Do not submerge your fan in water or any other liquid. Disassemble grilles and blade.
Grilles and blade may be cleaned with mild soap and water. Use a soft, slightly damp cloth
to wipe the remaining fan parts. Do not allow water or any other liquid to get into the motor
housing or base. Reassemble fan after grilles and blade have dried completely. Do not plug
fan into electrical outlet until it has been fully reassembled.
Page 5

TO STORE: Make sure to disassemble and clean the fan before storing.
Retain the original packaging for the purpose of storing your fan. Always store fan in a dry
place. Never store it while it is still plugged in. Never wrap the cord tightly around the fan, and
Never wrap the cord tightly around the appliance, as this could place undue stress on the cord
entry into the fan and cause it to fray and break.
WARNING! To Reduce the Risk of Fire or Electrical Shock, Do Not Use This Fan With Any
Solid State Speed Control Device.
To Reduce the Risk of Fire Or electrical Shock, Do Not Expose To Water or Rain.
CAUTION: Read and follow all instructions before operating fan. Do not use fan if any part
are damaged or missing.
WARNING: “ THIS IS A FAN-NOT A TOYI”
TO REDUCE THE RISK OF PERSONAL INJURY AND ELECTRICSHOCK, IT SHOULD NOT
BE PLAYED WITH OR PLACED WHERE SMALL CHILDREN CAN REACH IT.
WARNING: To reduce the risk of the electrical shock and avoid injury to persons, do not use
your fan in the window.
Thank you for purchasing this product. We are committed to making products that are of high
quality and to making superior products that stand the test of time. We trust this product will
exceed your expectations of quality and reliability.
Page 6

Ventilador de
Pared de 40 cm
Manual de Uso
Modelo:
CE27616
Page 7

FINALIDAD DE USO
Este producto tiene como nalidad ser utilizado sólo en interiores y para nes residenciales
o en una ocina. No está diseñado para usos industriales o de otra índole comercial. Utilice
el ventilador con el cableado adecuado conforme al código de electricidad de su estado. Si
tuviera alguna duda con respecto a la conformidad del cableado, consulte con un electricista
calicado.
PAUTAS PARA UN FUNCIONAMIENTO SEGURO
Al momento de utilizar cualquier electrodoméstico, debe seguirse las siguientes precauciones
de seguridad básicas:
Utilice el ventilador sólo para los nes que ha sido fabricado tal como se describe en el man-
ual de instrucciones. Para evitar una descarga eléctrica, no sumerja el aparato, el enchufe ni
el cordón en agua ni le aplique líquidos en aerosol. Debe tenerse sumo cuidado si se utiliza
el electrodoméstico en la presencia de niños. Desconecte el electrodoméstico si no lo va a
utilizar, si lo traslada de un lugar a otro, antes de colocar o retirar piezas y antes de proceder
con la limpieza. Nunca inserte los dedos, lápices u otro tipo de objetos a través de las rejillas
mientras el ventilador se encuentre funcionando. Desconecte el ventilador antes de proceder
con la limpieza. No utilice el ventilador en una ventana ya que la lluvia podría causar algún
tipo de eventualidad eléctrica. No utilice el electrodoméstico en la presencia de explosivos y
/ o sustancias inamables. No coloque el ventilador ni ninguna de sus piezas cerca de una
llama viva o electrodomésticos de cocina o de calentamiento. No utilice el electrodoméstico si
el cordón o el enchufe se encuentran dañados, después de que el electrodoméstico presente
un desperfecto o haya sufrido algún tipo de caída o daño. Para desconectar, sujete el enchufe
y retire del tomacorriente. Nunca tire del cordón. Ese producto ha sido diseñado para uso do-
méstico solamente y no para usos comerciales o industriales. No utilice el ventilador cerca de
cortinas, plantas, accesorios de ventanas, etc. No coloque el cable debajo de la alfombra. No
cubra el cable con alfombras, tapetes o cubiertas similares. Coloque el cable lejos de zonas
transitadas y donde no se tropiece con ellos.
INSTRUCCIONES PARA EL ARMADO
Herramientas requeridas: Llave o alicate y un destornillador Phillips (no incluidos)
Proceda con el armado del ventilador de acuerdo al diagrama o ilustración.
PRECAUCIÓN: NUNCA RETIRE LA PERILLA SUEJETADORA QUE MANTIENE
LA CEBEZA DEL VENTILADOR EN SU LUGAR.
1. Desenrosque el collar de plástico del extremo del tubo principal de la base del motor girando el collar en el sentido contrario a las agujas del reloj.
2. Retire la tuerca de sujeción de la rejilla posterior. Coloque la rejilla posterior sobre la base
del motor. Asegúrese de que el mango en la rejilla posterior quede hacia arriba.
3. Ajuste la tuerca de la rejilla posterior en el sentido de las agujas del reloj. Asegure la rejilla
posterior a la base del motor utilizando el collar de plástico.
4. Inserte las aspas sobre el tubo principal del motor, encajando la ranura en la parte posterior
de las aspas con la clavija del tubo principal. Asegure las aspas con el tapón, girando en el
sentido contrario a las agujas del reloj para ajustar.
5. Para vericar el funcionamiento de las aspas, hágalas girar con la mano. No debe existir
ningún tipo de fricción con el collar de plástico. Si las aspas no giran libremente, repita el paso 4.
6. Coloque la rejilla delantera sobre la rejilla posterior colocando los ganchos de la rejilla
delantera sobre la rejilla posterior. Asegure las dos rejillas juntas con los ganchos acoplados
a la rejilla posterior.
7. Atornille el gancho para colgar de pared sobre la pared de su preferencia de manera que
quede bien asegurado.
8. Coloque el ventilador de pared sobre el gancho para colgar, asegurándose de que quede
rme antes de hacerlo funcionar.
PRECAUCIÓN: Para evitar riesgos, asegúrese de que la rejilla frontal y trasera
estén conectadas correctamente antes de operar.
Page 8

ITEM
COMPONENTE
1
Rejilla frontal
2
Gancho de rejillas
3
Tapa de aspas
4
Aspas
5
Tuerca de ajuste de rejilla posterior
6
Rejilla posterior
7
Motor
8
Panel de control
9
Gancho de colgar
10
Cordón de corriente
11
Cable de tirar
ENCHUFE POLARIZADO
NOTA: Este equipo tiene un enchufe polarizado (una extremidad más ancha que la otra).
Para reducir el riesgo de choque eléctrico, este enchufe está diseñado para encajar en un
toma corriente polarizado de una sola manera. Si el enchufe no encaja completamente en el
toma corriente, invierta el enchufe. Si aún así no encaja llame a un electricista calicado. No
trate de alterar esta medida de seguridad.
RECOMENDACIONES DE SEGURIDAD CON RESPECTO AL CORDÓN DE CORRIENTE
1. Nunca tire del cordón ni del electrodoméstico.
2. Para insertar el enchufe, sujételo rmemente y colóquelo en el tomacorriente.
3. Para desconectar el electrodoméstico, sujete el enchufe y retírelo del tomacorriente.
4. Antes de cada uso, verique que el cordón no tenga cortes o marcas de deterioro. Si
se encontrara algún desperfecto, esto es un indicativo de que el electrodoméstico necesita
mantenimiento y deberá remplazarse el cordón. Llévelo al servicio técnico o representante
de servicio autorizado.
5. Nunca enrolle el cordón alrededor del electrodoméstico ya que esto puede ejercer presión
especialmente en la parte donde éste ingresa al electrodoméstico, lo cual podría ocasionar
que se deteriore o se rompa.
INSTRUCCIONES DEL CORDÓN DE CORRIENTE
Este producto cuenta con protección de sobrecarga (fusibles). Un fusible quemado indica una
situación de sobrecarga o cortocircuito. Si se quema el fusible, desconecte el producto de la
toma. Reemplácelo de acuerdo con las instrucciones del manual de usuarios (seleccionando
el fusible adecuado para el producto) y compruebe el producto. Si se quema el fusible de recambio también, puede haber un cortocircuito presente en el equipo y debe ser solucionado o
devuelto el mismo a un centro de servicio autorizado para su revisión y / o reparación.
INSTRUCCIONES DE USO:
a) Sujete y retire el dispositivo de la toma de salida
o de otras tomas. No lo desenchufe tirando del cable.
b) Si la cubierta del fusible se encuentra en la parte
superior del enchufe (aplicable a enchufe: YX-123, UE-238A)
en dirección hacia las hojas, siga los siguientes pasos
para reemplazar el fusible dañado:
Primer paso: Empuje la tapa del fusible con un destornillador de paleta, hasta ver el fusible
expuesto.
Paso dos: Retire el fusible dañado con el destornillador de punta plana, elimine los restos y
limpia los escombros, coloque un fusible nuevo y cierre la tapa.
Page 9

ADVERTENCIA
1. Evite el mal manejo del fusible, incluido su vidrios rotos y metal para evitar el daño en el
cuerpo humano.
c) Si la cubierta del fusible esta situada entre las dos láminas del enchufe conectado (aplicable a enchufe: SL-204) siga los siguientes pasos para reemplazar el fusible dañado:
Primer paso: Seleccione la herramienta adecuada (la parte superior de la herramienta debe
estar alada y plana, (una tijera de viaje, o un destornillador plano pequeño, etc), inserte la
punta de la herramienta en el vacío en la cara de fusibles.
Segundo Paso: Pulse la herramienta hacia la puerta de protección de el fusible.
Tercer paso: Continuar abriendo la puerta de protección hasta que llegue al tope, a continu-
ación, usted encontrará el fusible.
Paso cuatro: Inserte la punta de la herramienta en la ranura del fusible (cerca del terminal),
entonces levante el fusible lentamente, pero sin excederse. Si el fusible se siente apretado,
puede intentar extraer el fusible poco a poco.
Quinto paso: Cuando un lado del fusible ha sido extraído, entonces puede extraer el fusible
por completo.
Sexto paso: Ponga un fusible nuevo en la ranura (el nuevo fusible debe estar cerca del
extremo del enchufe), a continuación, utilice la herramienta para presionar el fusible en la
ranura, no debe empujar el fusible por el tubo de vidrio, sino por la tapa de cobre de ambos
lados, y sin excederse, o bien el fusible se rompe.
Séptimo paso: Utilice el dedo o una herramienta para empujar la puerta de protección hasta
que el fusible quede cubierto por completo, si la puerta no cierra por completo, asegúrese
de que el fusible se ha jado bien en el lugar correcto. No es necesario empujar la puerta de
protección vertical, o de lo contrario se rompe probablemente el fusible.
NO UTILICE EL ELECTRODOMÉSTICO SI EL CORDÓN MUESTRA ALGÚN TIPO DE
DAÑO, SI EL ELECTRODOMÉSTICO FUNCIONA DE MANERA INTERMITENTE O DEJA
DE FUNCIONAR COMPLETAMENTE.
IMPORTANTE: Durante los primeros minutos de uso inicial, se podría producir un ligero olor.
Esto es normal y desaparecerá rápidamente.
INSTRUCCIONES DE OPERACIÓN
1. Enchufe el ventilador en una toma de corriente.
2. Para encender el ventilador, para controlar la velocidad del ventilador, en BAJA, en MEDIA
y en ALTA use el botón localizado en la parte frontal del ventilador. Gire el interruptor del
ventilador al nivel deseado: 1= BAJA, 2 =MEDIA, 3= ALTA. Para apagar el ventilador, tire de
la cadena de arrastre o utilice el interruptor y gire a O= OFF.
3. Para hacer oscilar el ventilador, tire de la cadena de oscilación.
INSTRUCCIONES DE MANTENIMIENTO PARA EL USUARIO
Este electrodoméstico requiere de poco mantenimiento y no contiene piezas útiles para el
usuario. No intente reparar el electrodoméstico usted mismo. Póngase en contacto con el
personal de servicio técnico calicado si se necesitara algún tipo de mantenimiento.
Este ventilador se encuentra permanentemente lubricado y no necesitará de ningún tipo de
lubricación adicional durante su vida útil.
PARA LIMPIAR: Antes de proceder a limpiar, apague el ventilador y desconéctelo del toma-
corriente. Retire el exceso de polvo con un paño libre de pelusas. Para asegurar una buena
circulación del aire hacia el motor, mantenga los agujeros de ventilación ubicados en la parte
posterior de la base del motor libre de cualquier acumulación de polvo. Se puede utilizar una
Page 10

aspiradora para limpiar estos agujeros de ventilación. No sumerja el ventilador en agua ni en
ningún otro tipo de líquido. Desarme las rejillas y las aspas y proceda a limpiarlas con agua y
jabón suave. Utilice un paño suave y ligeramente húmedo para limpiar el resto de las partes
del ventilador. No permita que agua ni ningún otro tipo de líquido ingresen a la base del mo-
tor. Vuelva a colocar las rejillas y las aspas una vez que hayan secado completamente. No
conecte el ventilador al tomacorriente hasta que haya quedado totalmente rearmado.
PARA GUARDAR: Asegúrese de desarmar y limpiar el ventilador antes de guardarlo. Guarde
los empaques originales para guardar su ventilador. Guarde el ventilador en un lugar seco.
Nunca lo guarde mientras se encuentre aún enchufado. Nunca enrolle el cordón alrededor
del ventilador ya que esto puede ejercer presión en la parte del cordón donde éste sale del
ventilador, lo que podría ocasionar que se deteriore o se rompa.
ADVERTENCIA: Para reducir el riesgo de incendio o choque eléctrico, no use este ventilador
con ningún dispositivo de control de velocidad de estado sólido.
Para reducir el riesgo de incendio o choque eléctrico, no exponga este ventilador al agua o
a la lluvia.
PRECAUCIÓN: Lea y siga todas las instrucciones antes de operar del ventilador. No use el
ventilador si falta alguna parte o está dañada.
ADVERTENCIA: “Este ventilador no es un juguete”
PARA REDUCIR EL RIESGO DE LESIONES PERSONALES Y O CHOQUE ELÉCTRICO,
NO DEBE COLOCARSE EN LUGARES QUE LOS NIÑOS PEQUEÑOS PUEDAN LLEGAR
A ELLOS.
ADVERTENCIA: Para reducir el riesgo de choque eléctrico y evitar lesiones a las personas,
no utilice el ventilador en la ventana.
Gracias por comprar este producto. Estamos comprometidos a hacer productos que sean de
alta calidad y productos de calidad superior que soporten el paso del tiempo. Conamos en
que este producto superará sus expectativas de calidad y abilidad.
 Loading...