

Page 1
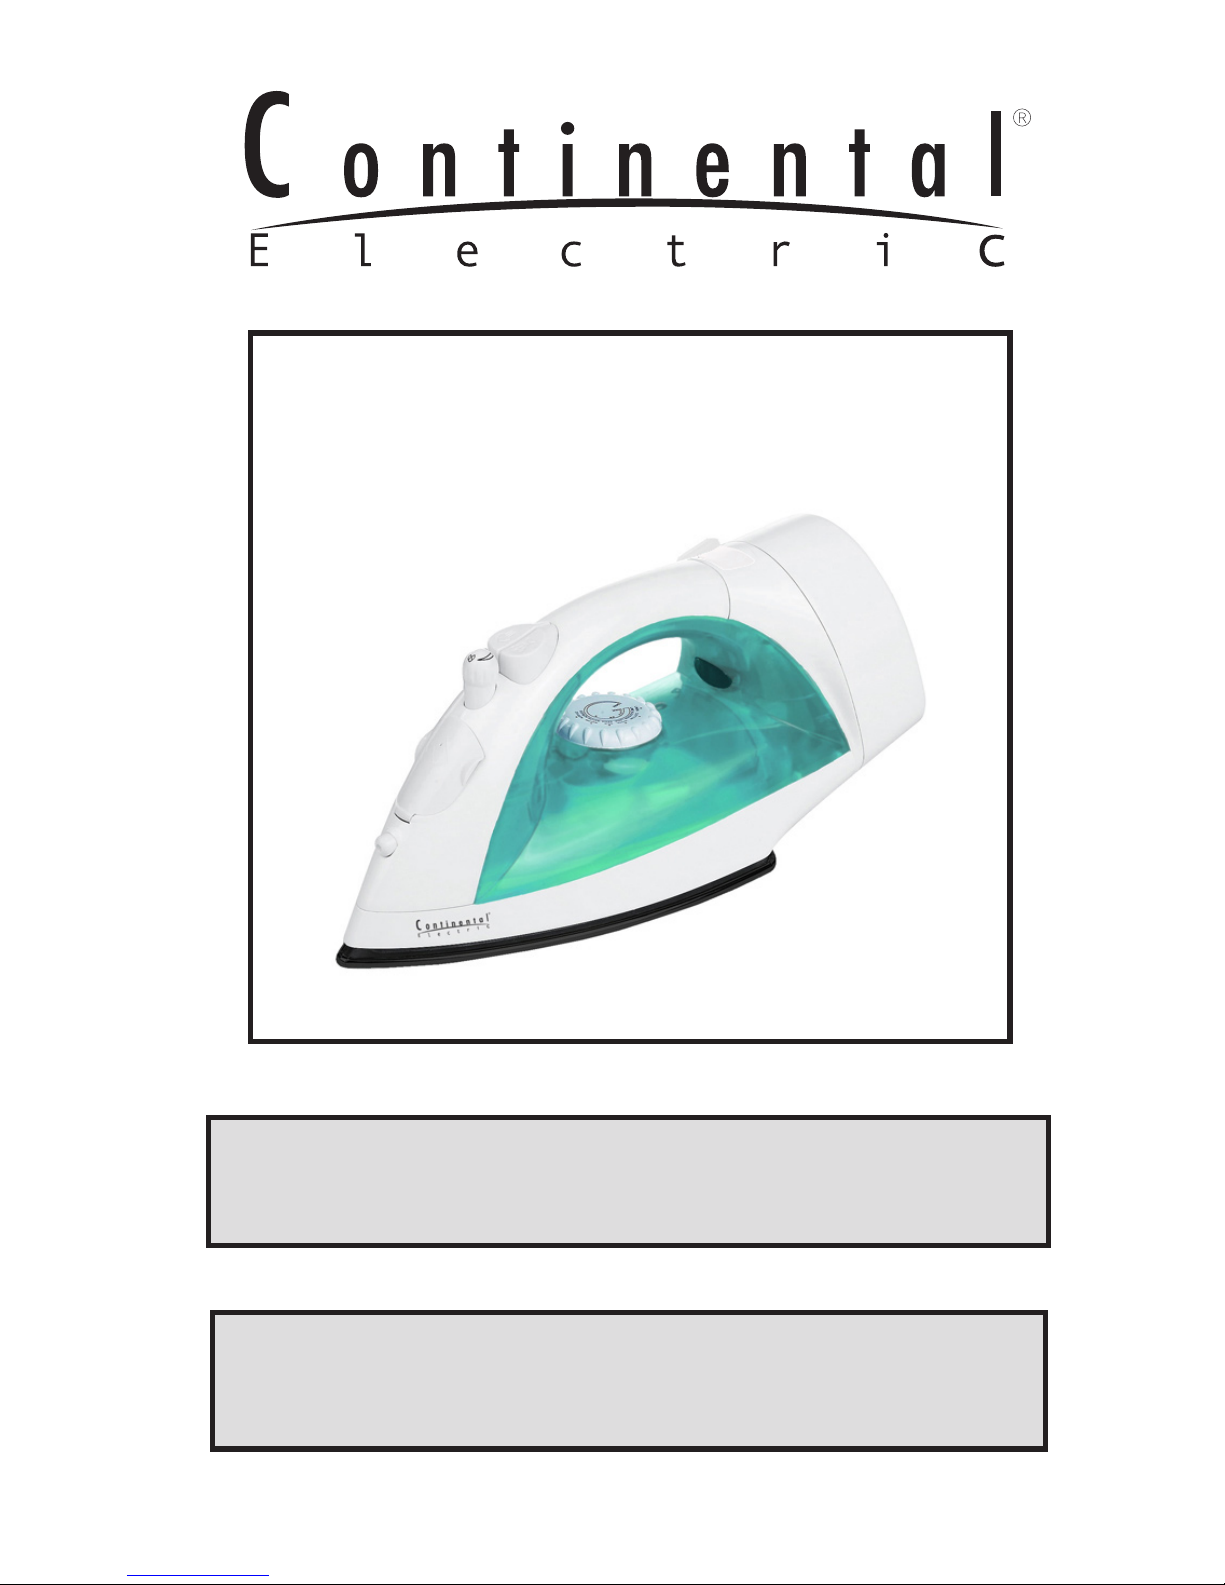
MODEL:
CE23191
INSTRUCTION MANUAL
RETRACTAbLE CORD
AUTO
ShUT-Off IRON
Page 2

IMPORTANT SAFEGUARDS
When using your at iron, basic safety precautions should always be followed, including
the following:
READ ALL INSTRUCTIONS BEFORE USING
1. Use iron only for Its intended use.
2. To protect against a risk of electric shock, do not immerse the iron in water or other
liquids.
3. The iron should always be turned to “Min” before plugging or unplugging from outlet.
Never yank cord to disconnect from outlet; instead, grasp plug and pull to disconnect.
4. Do not allow cord to touch hot surfaces. Let iron cool completely before putting away.
Loop cord loosely around iron when storing.
5. Always disconnect iron from electrical outlet when lling with water or emptying and
when not in use.
6. Do not operate iron with a damaged cord or if the iron has been dropped or damaged. To avoid the risk of electric shock, do not disassemble the iron take it to a qualied serviceman for examination and repair. Incorrect reassembly can cause a risk of
electric shock when the iron is used.
7. Close supervision is necessary for any appliance being used by or near children. Do
not leave iron unattended while connected or on an ironing board.
8. Burns can occur from touching hot metal parts, hot water, or steam. Use caution
when you turn a steam iron upside down – there may be hot water in the reservoir.
9. If the malfunction indicator goes on, the atiron is not operating normally. Disconnect
from the power supply and have the atiron serviced by qualied service personnel.
10. The iron must be used and rested on a stable surface.
11.When placing the iron on its stand, ensure that the surface on which the stand is
placed is stable.
12.The iron is not to be used if it has been dropped, if there are visible signs of damage
or if it is leaking.
SPECIAL INSTRUCTIONS
1. To avoid a circuit overload, do not operate another high wattage appliance on the
same circuit.
2. If an extension cord is absolutely necessary, a 10-ampere cord should be used.
Cords rated for less amperage may overheat. Care should be taken to arrange the cord
so that it cannot be pulled or tripped over.
DO NOT let children or untrained persons use the appliance without supervision.
NEVER immerse the iron, cable or plug in any liquid.
DO NOT leave the hot iron touching fabrics or very inammable surfaces.
DO NOT leave the appliance unnecessarily plugged in. Disconnect the plug from the
mains when the appliance is not being used.
NEVER touch the appliance with wet or damp hands.
DO NOT use the power cord or the appliance in order to pull the plug out of the socket.
DO NOT leave the appliance exposed to the weather (rain, sun, etc. ).
DO NOT leave the iron without supervision when it is connected to the power supply.
DO NOT ll the reservoir with water before removing the plug from the socket.
PLEASE NOTE!
Do not use chemical additive, scented substances or decalciers. Failure to comply with
the above-mentioned regulations leads to the loss of guarantee.
SAVE THESE INSTRUCTIONS
INSTRUCCIONES DE SEGURIDAD
Al momento de utilizar su plancha plana, debe seguir las precauciones de seguridad
que incluyen lo siguiente:
LEA TODAS LAS INSTRUCCIONES ANTES DE USAR
1.Utilice la plancha solo para los nes que fue diseñada.
2.Con el n de evitar una descarga eléctrica, no sumerja la plancha en agua u otros
líquidos.
3.Debe siempre colocarse la plancha en el nivel “Min” (mínimo) antes de enchufarla o
desenchufarla. Nunca tire del cordón para desconectarla del tomacorriente, sino que
más bien tire del enchufe mismo.
4.No permita que el cordón entre en contacto con supercies calientes. Deje enfriar
la plancha completamente antes de guardarla. Enrolle el cordón sin ajustar mucho alre-
dedor de la plancha.
5.Siempre desenchufe la plancha al momento de llenarla con agua o de vaciarla y
cuando no la este usando.
6.No utilice la plancha si tiene el cordón dañado o si la plancha ha sufrido una caída o
un desperfecto. Con el n de evitar una descarga eléctrica, no desarme la plancha sino
que llévela a un técnico calicado para que la examine o repare. Si se la arma incor-
rectamente, puede producirse una descarga eléctrica al momento de usar la plancha.
7.Si un electrodoméstico va a ser utilizado por un niño o en su presencia, debe su-
pervisársele constantemente. No deje la plancha desatendida mientras se encuentre
conectada o encima de un planchador.
8.Se puede producir quemaduras si se toca las partes calientes de metal, el agua
caliente o el vapor. Tenga cuidado al voltear la plancha de cabeza ya que puede haber
agua caliente en el tanque.
9.Si se enciende la luz indicadora de desperfectos, la plancha no esta funcionando nor-
malmente. Desenchúfela y hágala arreglar por parte del servicio técnico calicado.
10.Debe usarse la plancha sobre una supercie estable.
11.Al momento de colocar la plancha sobre su soporte, asegúrese de que la supercie
donde se ha colocado el soporte sea estable.
12.No utilice la plancha si ésta ha sufrido una caída, si hay señales visibles de daños o
si presenta una fuga o gotera.
INSTRUCCIONES ESPECIALES
1.Con el n de evitar la sobrecarga de un circuito, no conecte otro electrodoméstico de
alto consumo de voltaje al mismo circuito.
2.Si fuera absolutamente necesario usar una extensión, debe usarse un cordón de 10
amperios. Los cordones de menos amperaje pueden sobrecalentarse. Debe tenerse
cuidado al acomodar el cordón para que sea tirado pro alguien o que alguien se tro-
piece.
NO permita que los niños o que las personas no capacitadas usen el
electrodoméstico sin supervisión.
NUNCA sumerja la plancha, el cordón ni el enchufe en ningún tipo de líquido.
NO deje la plancha caliente en contacto con telas o supercies muy
inamables.
NO deje la plancha enchufada si no es necesario. Desenchúfela si no la va a utilizar.
NUNCA toque el electrodoméstico con las manos mojadas o húmedas.
NO utilice el cordón ni el electrodoméstico para desenchufarlo del tomacorriente.
NO deje el electrodoméstico expuesto a la intemperie (la lluvia, el sol, etc.)
NO deja la plancha sin supervisión mientras se encuentre conectada.
NO llene el tanque con agua sin antes haber desenchufado la plancha.
Page 3
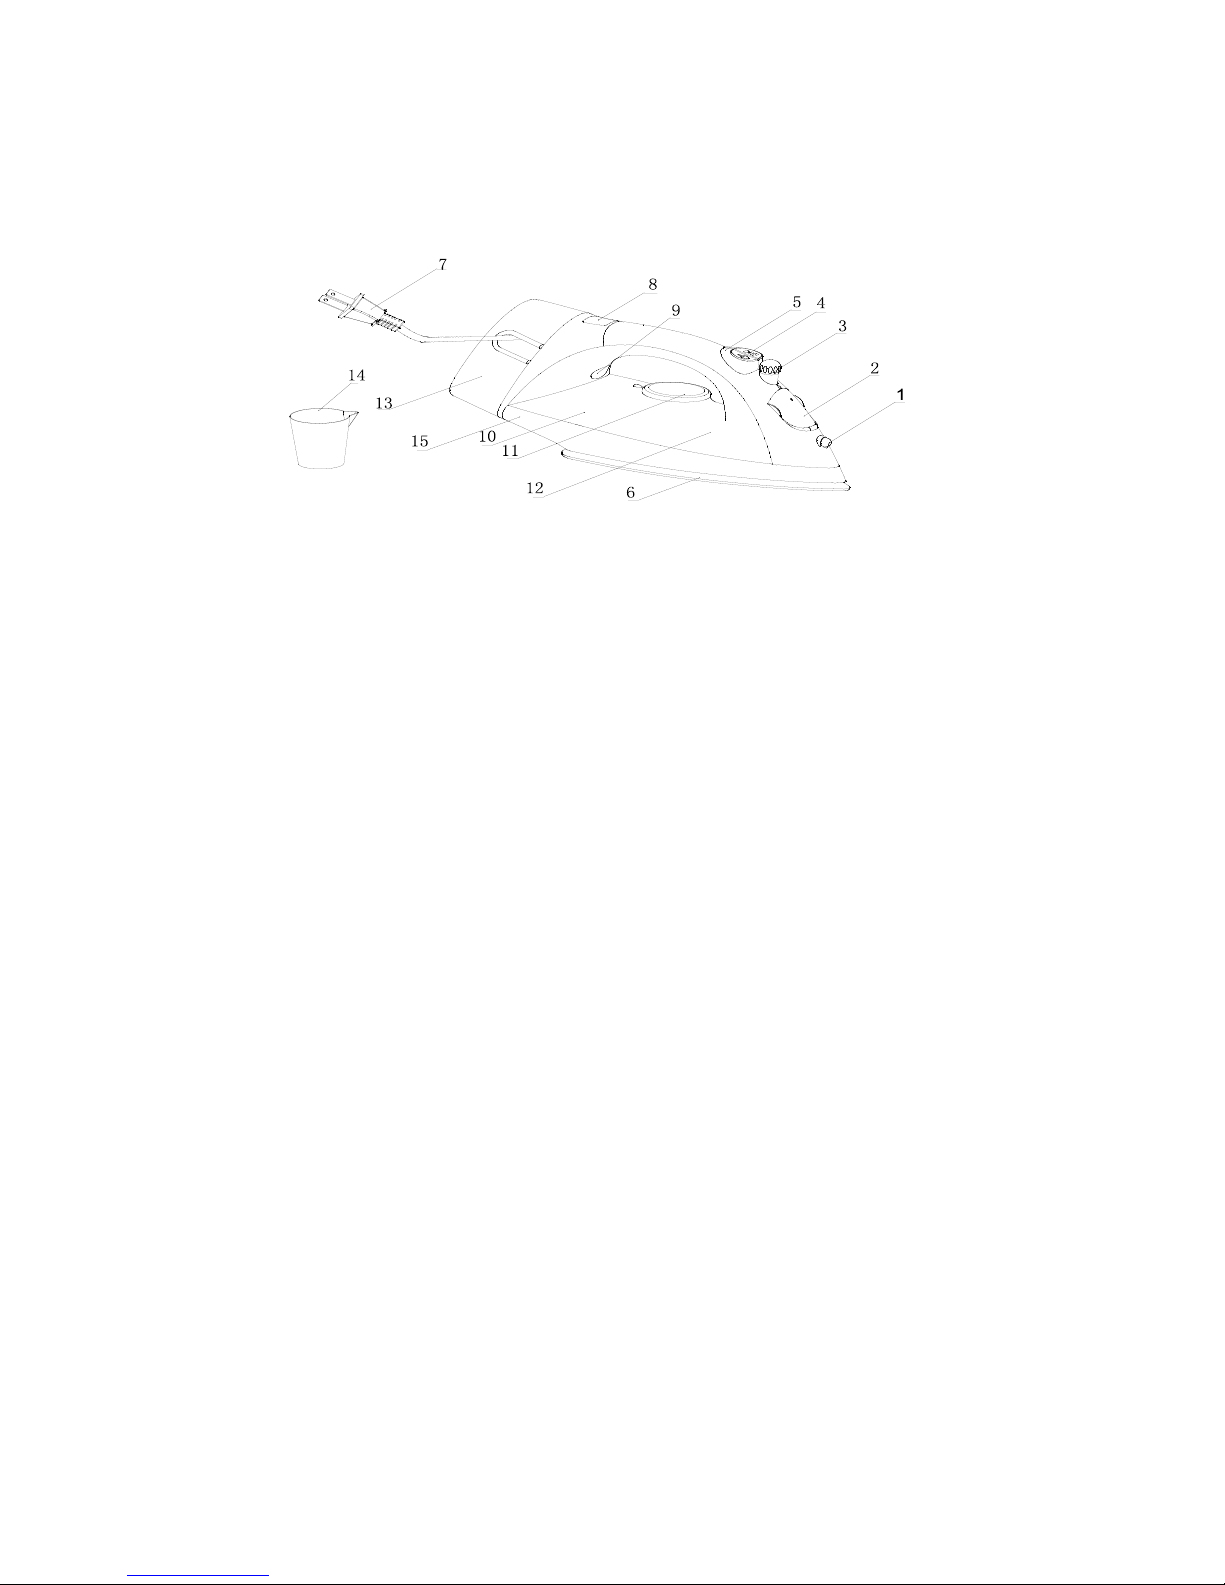
DESCRIPTION OF DEVICE
(1). Spray
(2). Filler
(3). Steam dial
(4). Spray button
(5). Shot-steam button
(6). Plate with steam vents
(7). Cord bushing
(8). Power supply cord
(9). Plate temperature control light
(10). Transparent water tank
(11). Thermostat knob for temperature regulation
(12) Maximum lling level
(13). Rear
(14). Water measure
(15). Skirt
(16). Handle cover
Page 4
GENERAL INSTRUCTIONS
When using the iron for the rst time, you may notice a slight emission of smoke and
hear some sounds made by the expanding plastics. This is quite normal and it stops
after a short time. We also recommend passing the iron over an ordinary cloth before
using it for the rst time.
PREPARATIONS
Soft the laundry to be ironed according to the international symbols on the garment
label, or if this is missing, according to the type of fabric.
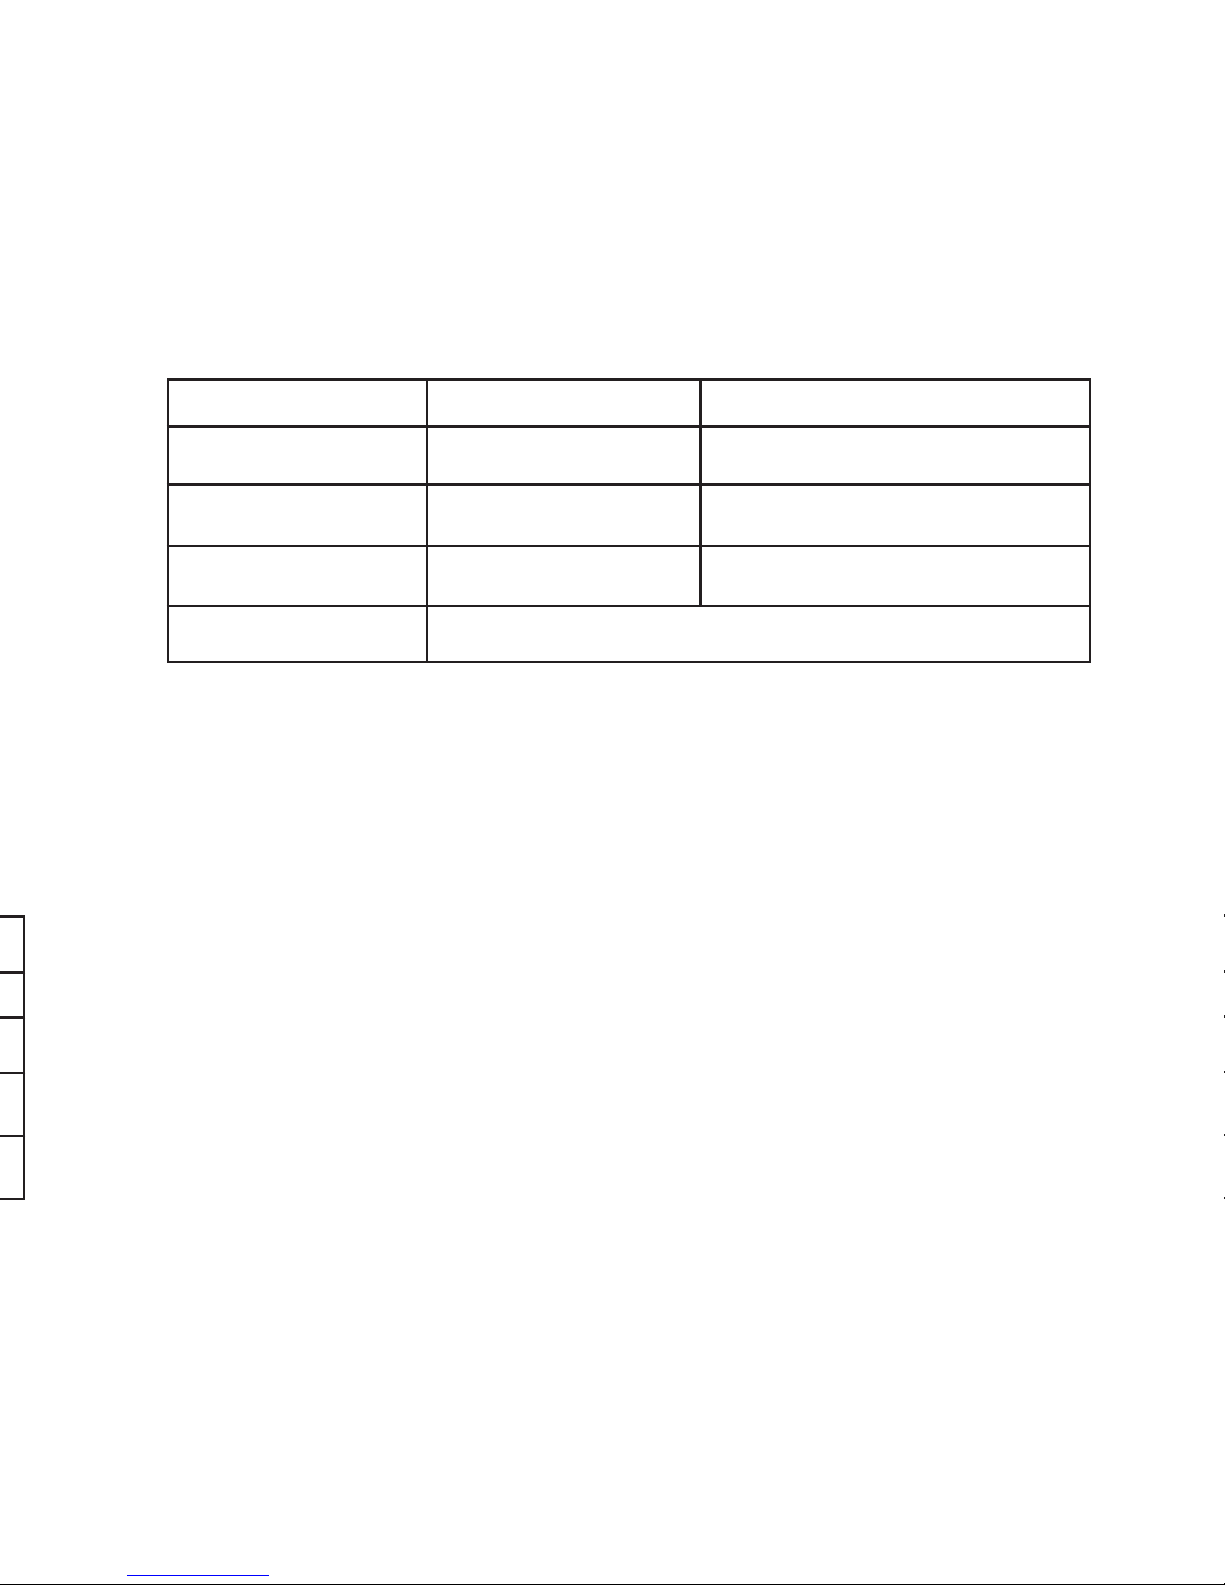
GARMENT LABEL FABRIC TYPE THERMOSTAT REGULATION
• synthetic low temperature
•• silk - wool medium temperature
••• Cotton - linen high temperature
Fabric not to be ironed
Start ironing the garments requiring a low temperature.
This reduces the waiting times (the iron takes less time to heat up than to cool down)
and eliminates the risk of scorching the fabric.
AUTOMATIC SHUT OFF
The automatic shut off device trips after the iron has been left for approx. eight
minutes in the upright position or unused for approx. Thirty seconds in the horizontal
position. The light comes on to indicate that shut off has tripped. As soon as you move
the iron, the device turns off and the iron starts working again.
STEAM IRONING
Filling the reservoir
- Check that the plug is disconnected from the socket.
- Move the steam selector (3) to “0” [Fig. 1].
- Open the lid (2).
- Raise the tip of the iron to help the water enter the opening without overowing.
- Slowly pour the water into the reservoir using the special measure (14) and taking care not to go over the maximum level (about 300ml) indicated by “MAX” on the
reservoir [Fig. 2].
- Close the lid (2).
INSTRUCCIONES GENERALES
Al momento de usar la plancha por primera vez, puede ser que se note una ligera
emisión de humo y que se oiga algunos sonidos producidos por la expansión del
plástico. Esto es normal y se detendrá después de un rato. Recomendamos pasar la
plancha por encima de una tela simple antes de usarla por primera vez.
PREPARACIÓN
Separe la ropa que se va a planchar de acuerdo a los símbolos internacionales que
vienen en las etiquetas de las prendas, o de lo contrario, de acuerdo al tipo de tela.
Etiqueta de la Tipo de Tela Regulación del
Prenda Termostato
• sintética temperatura baja
•• seda – lana temperatura media
••• algodón – lino temperatura alta
tela que no debe plancharse
Comience a planchar las prendas que requieran de temperatura baja.
Esto reduce el tiempo de espera (la plancha tomas menos tiempo para calentarse
que para enfriarse) y elimina el riesgo de quemar la tela.
APAGADO AUTOMÁTICO
El sistema de apagado automático se activa después de que la plancha se haya de-
jado unos ocho minutos en posición vertical o sin uso durantes unos treinta segundos
en posición horizontal. La luz indicadora se enciende para indicar que le sistema de
apagado automático se ha activado. Tan pronto como se mueva la plancha de nuevo,
el sistema se desactiva y la plancha comienza a funcionar otra vez.
PLANCHADO A VAPOR
Cómo llenar el tanque de agua
-Verique que el tapón no se encuentre en la abertura del alimentador.
-Mueva el selector de vapor (3) a 0º [Fig. 1].
-Abra la tapa (2)
-Levante la punta de la plancha para ayudar a que el agua ingrese por la abertura sin
que se reblase.
-Lentamente vierta el agua dentro del tanque utilizando el medidor especial (14) y
cuidando de no sobrepasar el nivel máximo (unos 300mm) que se indica con la marca
“MAX” en el tanque [Fig. 2]
-Cierre la tapa.
Page 5

Selecting the temperature.
- Put the iron in a vertical position.
- Put the plug in the socket.
- Adjust the thermostat knob (11) according to the international symbol on the garment
label [Fig. 3]. The plate temperature control light (9) indicates that the iron is heating
up. Wait until the plate temperature control light goes off before ironing.
Warning: during ironing, the plate temperature control light (9) comes on at intervals,
indicating that the selected temperature is maintained. If you lower the thermostat temperature after ironing at a high temperature, do not start ironing until the plate tempera-
ture control light comes on again.
Selecting the steam.
The quantity of steam is regulated by the steam selector (3).
- Move the steam selector to a position between minimum and maximum depending on
the quantity of steam required and the temperature selected [Fig. 1].
Warning: the iron gives off steam continuously only if you hold the iron horizontally. You
can stop the continuous steam by placing the iron in a vertical position or by moving
the steam selector to “0”. As indicated on the thermostat knob (11) and in the initial
table, you can only use steam at the highest temperatures. If the selected temperature
is too low, water may drip onto the plate.
Selecting Shot-steam and steam when ironing vertically.
Press the shot-steam button (5) to generate a powerful burst of steam that can
penetrate the fabrics and smooth the most difcult and tough creases. Wait for a few
seconds before pressing again [Fig. 4].
DRY IRONING
To iron without steam, follow the instructions in section “steam ironing”, leaving the
steam selector (3) on position “0”.
CLEANING
Please note: before cleaning the iron in any way, make sure that the appliance plug is
not connected to the socket.
Any deposits, starch residue or size left on the plate can be removed using a damp
cloth or an unabrasive liquid detergent.
Avoid scratching the plate with steel wool or metallic objects.
The plastic parts can be cleaned with a damp cloth then wiped over with a dry cloth.
Cord retractor
• The product is equipped with a retractable cord. Press the cord rewind button to
engage cord storage. If the cord does not fully retract, pull it out again and then press
on the cord rewind button. [Fig. 7]
Page 6

Page 7

HOW TO PUT IT AWAY
- At the end of the using ,regulate the steam dial to “0”point.
- When there is no steam ,regulate the temperature dialto “Min”point. Disconnect the
plug of the iron from the socket.
- Empty the reservoir by turning the iron upside down and gently shaking it.
- Leave the iron vertically to cool down completely.
- Roll up the power cord with the rewinder
- Always put the iron away in a vertical position.
ADVICE FOR GOOD IRONING
We recommend using the lowest temperatures with fabrics that have unusual nishes
(sequins, embroidery, ush, etc.).
If the fabric is mixed (e.g. 40% cotton 60% synthetics), set the thermostat to the temperature of the bre requiring the lower temperature.
If you don’t know the composition of the fabric, determine the suitable temperature
by testing on a hidden corner of the garment. Start with a low temperature and increase it gradually until it reaches the ideal temperature.
Never iron areas with traces of perspiration or other marks: the heat of the plate xes
the stains on the fabric, making them irremovable.
The size is more effective if you use a dry iron at a moderate temperature: excess
heat scorches it with the risk of forming a yellow mark.
To avoid marking silk, woolen or synthetic garments shiny, iron them inside out.
To avoid marking velvet garments shiny, iron in one direction (following the bre) and
do not press down on the iron.
The heavier the washing machine is loaded, the more garments come out creased.
This also happens when the spin drying revolutions are very high.
Many fabrics are easier to iron if they are not completely dry.
For example, silk should always be ironed damp.
Page 8

MANUAL DEL USUARIO
MODELO:
CE23191
pLANChA DE vApOR y ROCIADO
CON
CAbLE RETRACTIL
Page 9

Page 10

When using your at iron, basic safety precautions should always be followed, including
the following:
READ ALL INSTRUCTIONS BEFORE USING
1. Use iron only for Its intended use.
2. To protect against a risk of electric shock, do not immerse the iron in water or other
liquids.
3. The iron should always be turned to “Min” before plugging or unplugging from outlet.
Never yank cord to disconnect from outlet; instead, grasp plug and pull to disconnect.
4. Do not allow cord to touch hot surfaces. Let iron cool completely before putting away.
Loop cord loosely around iron when storing.
5. Always disconnect iron from electrical outlet when lling with water or emptying and
when not in use.
6. Do not operate iron with a damaged cord or if the iron has been dropped or dam-
aged. To avoid the risk of electric shock, do not disassemble the iron take it to a quali-
ed serviceman for examination and repair. Incorrect reassembly can cause a risk of
electric shock when the iron is used.
7. Close supervision is necessary for any appliance being used by or near children. Do
not leave iron unattended while connected or on an ironing board.
8. Burns can occur from touching hot metal parts, hot water, or steam. Use caution
when you turn a steam iron upside down – there may be hot water in the reservoir.
9. If the malfunction indicator goes on, the atiron is not operating normally. Disconnect
from the power supply and have the atiron serviced by qualied service personnel.
10. The iron must be used and rested on a stable surface.
11.When placing the iron on its stand, ensure that the surface on which the stand is
placed is stable.
12.The iron is not to be used if it has been dropped, if there are visible signs of damage
or if it is leaking.
SPECIAL INSTRUCTIONS
1. To avoid a circuit overload, do not operate another high wattage appliance on the
same circuit.
2. If an extension cord is absolutely necessary, a 10-ampere cord should be used.
Cords rated for less amperage may overheat. Care should be taken to arrange the cord
so that it cannot be pulled or tripped over.
DO NOT let children or untrained persons use the appliance without supervision.
NEVER immerse the iron, cable or plug in any liquid.
DO NOT leave the hot iron touching fabrics or very inammable surfaces.
DO NOT leave the appliance unnecessarily plugged in. Disconnect the plug from the
mains when the appliance is not being used.
NEVER touch the appliance with wet or damp hands.
DO NOT use the power cord or the appliance in order to pull the plug out of the socket.
DO NOT leave the appliance exposed to the weather (rain, sun, etc. ).
DO NOT leave the iron without supervision when it is connected to the power supply.
DO NOT ll the reservoir with water before removing the plug from the socket.
PLEASE NOTE!
Do not use chemical additive, scented substances or decalciers. Failure to comply with
the above-mentioned regulations leads to the loss of guarantee.
INSTRUCCIONES DE SEGURIDAD
Al momento de utilizar su plancha plana, debe seguir las precauciones de seguridad
que incluyen lo siguiente:
LEA TODAS LAS INSTRUCCIONES ANTES DE USAR
1.Utilice la plancha solo para los nes que fue diseñada.
2.Con el n de evitar una descarga eléctrica, no sumerja la plancha en agua u otros
líquidos.
3.Debe siempre colocarse la plancha en el nivel “Min” (mínimo) antes de enchufarla o
desenchufarla. Nunca tire del cordón para desconectarla del tomacorriente, sino que
más bien tire del enchufe mismo.
4.No permita que el cordón entre en contacto con supercies calientes. Deje enfriar
la plancha completamente antes de guardarla. Enrolle el cordón sin ajustar mucho alrededor de la plancha.
5.Siempre desenchufe la plancha al momento de llenarla con agua o de vaciarla y
cuando no la este usando.
6.No utilice la plancha si tiene el cordón dañado o si la plancha ha sufrido una caída o
un desperfecto. Con el n de evitar una descarga eléctrica, no desarme la plancha sino
que llévela a un técnico calicado para que la examine o repare. Si se la arma incorrectamente, puede producirse una descarga eléctrica al momento de usar la plancha.
7.Si un electrodoméstico va a ser utilizado por un niño o en su presencia, debe supervisársele constantemente. No deje la plancha desatendida mientras se encuentre
conectada o encima de un planchador.
8.Se puede producir quemaduras si se toca las partes calientes de metal, el agua
caliente o el vapor. Tenga cuidado al voltear la plancha de cabeza ya que puede haber
agua caliente en el tanque.
9.Si se enciende la luz indicadora de desperfectos, la plancha no esta funcionando normalmente. Desenchúfela y hágala arreglar por parte del servicio técnico calicado.
10.Debe usarse la plancha sobre una supercie estable.
11.Al momento de colocar la plancha sobre su soporte, asegúrese de que la supercie
donde se ha colocado el soporte sea estable.
12.No utilice la plancha si ésta ha sufrido una caída, si hay señales visibles de daños o
si presenta una fuga o gotera.
INSTRUCCIONES ESPECIALES
1.Con el n de evitar la sobrecarga de un circuito, no conecte otro electrodoméstico de
alto consumo de voltaje al mismo circuito.
2.Si fuera absolutamente necesario usar una extensión, debe usarse un cordón de 10
amperios. Los cordones de menos amperaje pueden sobrecalentarse. Debe tenerse
cuidado al acomodar el cordón para que sea tirado pro alguien o que alguien se tropiece.
NO permita que los niños o que las personas no capacitadas usen el
electrodoméstico sin supervisión.
NUNCA sumerja la plancha, el cordón ni el enchufe en ningún tipo de líquido.
NO deje la plancha caliente en contacto con telas o supercies muy
inamables.
NO deje la plancha enchufada si no es necesario. Desenchúfela si no la va a utilizar.
NUNCA toque el electrodoméstico con las manos mojadas o húmedas.
NO utilice el cordón ni el electrodoméstico para desenchufarlo del tomacorriente.
NO deje el electrodoméstico expuesto a la intemperie (la lluvia, el sol, etc.)
NO deja la plancha sin supervisión mientras se encuentre conectada.
NO llene el tanque con agua sin antes haber desenchufado la plancha.
Page 11

DESCRIPTION OF DEVICE
Page 12

GENERAL INSTRUCTIONS
When using the iron for the rst time, you may notice a slight emission of smoke and
hear some sounds made by the expanding plastics. This is quite normal and it stops
after a short time. We also recommend passing the iron over an ordinary cloth before
using it for the rst time.
PREPARATIONS
Soft the laundry to be ironed according to the international symbols on the garment
label, or if this is missing, according to the type of fabric.
GARMENT LABEL FABRIC TYPE THERMOSTAT REGULATION
• synthetic low temperature
•• silk - wool medium temperature
••• Cotton - linen high temperature
Fabric not to be ironed
Start ironing the garments requiring a low temperature.
This reduces the waiting times (the iron takes less time to heat up than to cool down)
and eliminates the risk of scorching the fabric.
AUTOMATIC SHUT OFF
The automatic shut off device trips after the iron has been left for approx. eight
minutes in the upright position or unused for approx. Thirty seconds in the horizontal
position. The light comes on to indicate that shut off has tripped. As soon as you move
the iron, the device turns off and the iron starts working again.
STEAM IRONING
Filling the reservoir
- Check that the plug is disconnected from the socket.
- Move the steam selector (3) to “0” [Fig. 1].
- Open the lid (2).
- Raise the tip of the iron to help the water enter the opening without overowing.
- Slowly pour the water into the reservoir using the special measure (14) and tak-
ing care not to go over the maximum level (about 300ml) indicated by “MAX” on the
reservoir [Fig. 2].
- Close the lid (2).
INSTRUCCIONES GENERALES
Al momento de usar la plancha por primera vez, puede ser que se note una ligera
emisión de humo y que se oiga algunos sonidos producidos por la expansión del
plástico. Esto es normal y se detendrá después de un rato. Recomendamos pasar la
plancha por encima de una tela simple antes de usarla por primera vez.
PREPARACIÓN
Separe la ropa que se va a planchar de acuerdo a los símbolos internacionales que
vienen en las etiquetas de las prendas, o de lo contrario, de acuerdo al tipo de tela.
Etiqueta de la Tipo de Tela Regulación del
Prenda Termostato
• sintética temperatura baja
•• seda – lana temperatura media
••• algodón – lino temperatura alta
tela que no debe plancharse
Comience a planchar las prendas que requieran de temperatura baja.
Esto reduce el tiempo de espera (la plancha tomas menos tiempo para calentarse
que para enfriarse) y elimina el riesgo de quemar la tela.
APAGADO AUTOMÁTICO
El sistema de apagado automático se activa después de que la plancha se haya dejado unos ocho minutos en posición vertical o sin uso durantes unos treinta segundos
en posición horizontal. La luz indicadora se enciende para indicar que le sistema de
apagado automático se ha activado. Tan pronto como se mueva la plancha de nuevo,
el sistema se desactiva y la plancha comienza a funcionar otra vez.
PLANCHADO A VAPOR
Cómo llenar el tanque de agua
-Verique que el tapón no se encuentre en la abertura del alimentador.
-Mueva el selector de vapor (3) a 0º [Fig. 1].
-Abra la tapa (2)
-Levante la punta de la plancha para ayudar a que el agua ingrese por la abertura sin
que se reblase.
-Lentamente vierta el agua dentro del tanque utilizando el medidor especial (14) y
cuidando de no sobrepasar el nivel máximo (unos 300mm) que se indica con la marca
“MAX” en el tanque [Fig. 2]
-Cierre la tapa.
Page 13

Selecting the temperature.
- Put the iron in a vertical position.
- Put the plug in the socket.
- Adjust the thermostat knob (11) according to the international symbol on the garment
label [Fig. 3]. The plate temperature control light (9) indicates that the iron is heating
up. Wait until the plate temperature control light goes off before ironing.
Warning: during ironing, the plate temperature control light (9) comes on at intervals,
indicating that the selected temperature is maintained. If you lower the thermostat tem-
perature after ironing at a high temperature, do not start ironing until the plate tempera-
ture control light comes on again.
Selecting the steam.
The quantity of steam is regulated by the steam selector (3).
- Move the steam selector to a position between minimum and maximum depending on
the quantity of steam required and the temperature selected [Fig. 1].
Warning: the iron gives off steam continuously only if you hold the iron horizontally. You
can stop the continuous steam by placing the iron in a vertical position or by moving
the steam selector to “0”. As indicated on the thermostat knob (11) and in the initial
table, you can only use steam at the highest temperatures. If the selected temperature
is too low, water may drip onto the plate.
Selecting Shot-steam and steam when ironing vertically.
Press the shot-steam button (5) to generate a powerful burst of steam that can
penetrate the fabrics and smooth the most difcult and tough creases. Wait for a few
seconds before pressing again [Fig. 4].
DRY IRONING
To iron without steam, follow the instructions in section “steam ironing”, leaving the
steam selector (3) on position “0”.
CLEANING
Please note: before cleaning the iron in any way, make sure that the appliance plug is
not connected to the socket.
Any deposits, starch residue or size left on the plate can be removed using a damp
cloth or an unabrasive liquid detergent.
Avoid scratching the plate with steel wool or metallic objects.
The plastic parts can be cleaned with a damp cloth then wiped over with a dry cloth.
Cord retractor
• The product is equipped with a retractable cord. Press the cord rewind button to
engage cord storage. If the cord does not fully retract, pull it out again and then press
on the cord rewind button. [Fig. 7]
Page 14

Page 15

HOW TO PUT IT AWAY
- At the end of the using ,regulate the steam dial to “0”point.
- When there is no steam ,regulate the temperature dialto “Min”point. Disconnect the
plug of the iron from the socket.
- Empty the reservoir by turning the iron upside down and gently shaking it.
- Leave the iron vertically to cool down completely.
- Roll up the power cord with the rewinder
- Always put the iron away in a vertical position.
ADVICE FOR GOOD IRONING
We recommend using the lowest temperatures with fabrics that have unusual nishes
(sequins, embroidery, ush, etc.).
If the fabric is mixed (e.g. 40% cotton 60% synthetics), set the thermostat to the tem-
perature of the bre requiring the lower temperature.
If you don’t know the composition of the fabric, determine the suitable temperature
by testing on a hidden corner of the garment. Start with a low temperature and in-
crease it gradually until it reaches the ideal temperature.
Never iron areas with traces of perspiration or other marks: the heat of the plate xes
the stains on the fabric, making them irremovable.
The size is more effective if you use a dry iron at a moderate temperature: excess
heat scorches it with the risk of forming a yellow mark.
To avoid marking silk, woolen or synthetic garments shiny, iron them inside out.
To avoid marking velvet garments shiny, iron in one direction (following the bre) and
do not press down on the iron.
The heavier the washing machine is loaded, the more garments come out creased.
This also happens when the spin drying revolutions are very high.
Many fabrics are easier to iron if they are not completely dry.
For example, silk should always be ironed damp.
 Loading...