

Page 1

CEMP838DIG2/CEMP838DIG2B
MACHINE A PAIN MULTIFONCTION /
MULTIFUNCTION BREAD MAKER
Page 2

GUIDE D'UTILISATION / User manual
Page 3

FR-2
Nous vous invitons à lire
attentivement et intégralementce
guide d'utilisation avant
d'installer et d'utiliser votre
appareil.
Il est important que ce guide
d'utilisation soit gardé avec l'appareil
pour toute nouvelle consultation. Si
cet appareil devait être transféré à
une autre personne, assurez-vous
que le guide d'utilisation suive
l'appareil de façon à ce que le
nouvel utilisateur puisse être
informé du fonctionnement de celuici.
Avant d'utiliser l'appareil électrique,
les précautions de base suivantes
doivent toujours être respectées:
1.
Lisez toutes les instructions.
AVERTISSEMENTS ET CONSEILS DE
SECURITE IMPORTANTS
Page 4

FR-3
2.
Avant utilisation, vérifiez que la
tension de la prise murale
correspond à celle indiquée sur
la plaque signalétique.
3.
N'utilisez aucun appareil avec un
cordonouuneprise endommagée
ou après un mauvais fonctionnement
de l'appareil, ou si vous l'avez
laissé tomber ou endommagé de
quelque manière que ce soit.
Retourner l'appareil au fabricant
ou à l'agent de service autorisé le
plus proche pour un examen, une
réparation ou un réglage
électrique ou mécanique.
4.
Ne touchez pas les surfaces
chaudes. Utilisez des poignées
ou des boutons.
5.
Pour vous protéger contre les
chocs électriques, ne plongez
pas le cordon, les fiches ou le
boîtier dans l'eau ou tout autre
liquide.
Page 5

FR-4
6.
Débranchez l'appareil de la prise
de courant lorsqu'il n'est pas
utilisé, avant de mettre ou
d'enlever des pièces et avant de
le nettoyer.
7.
Ne laissez pas le cordon pendre
sur le bord de la table ou sur une
surface chaude.
8.
L'utilisation d'accessoires non
recommandés par le fabricant de
l'appareil peut causer des
blessures.
9.
Cet appareil peut être utilisé par
des enfants à partir de 8 ans et
plus et par des personnes ayant
des capacités physiques,
sensorielles ou mentales
réduites ou un manque
d'expérience et de
connaissances à condition
qu'elles aient reçu une
supervision ou des instructions
concernant l'utilisation de
Page 6

FR-5
l'appareil en toute sécurité et
qu'elles comprennent les
dangers encourus.
10.
Lesenfantsdoivent être surveillés
pour s'assurer qu'ilsne jouent pas
avec l'appareil.
11.
Ne pas placer sur ou à proximité
d'un brûleur à gaz ou électrique
chaud, ou dans un four chauffé.
12.
Ne touchez aucune partie mobile
ou en rotation de la machine lors
de la cuisson.
13.
N'allumez jamais l'appareil sans les
ingrédients remplis correctement.
14.
Ne battez jamais la casserole de
pain sur le dessus ou le bord
pour enlever la casserole, ceci
pourrait endommager la casserole
de pain.
15.
Les feuilles de métal ou d'autres
matériaux ne doivent pas être
insérés dans la machine à pain
car cela peut entraîner un risque
Page 7

FR-6
d'incendie ou de court-circuit.
16.
Ne couvrez jamais la machine à
pain avec une serviette ou tout
autre matériel. La chaleur et la
vapeur doivent pouvoir s'échapper
librement. Un incendie peut être
causé s'il est recouvert ou entre
en contact avec des matériaux
combustibles.
17.
Le nettoyage et l’entretien par
l’usager ne doivent pas être
effectués par des enfants, sauf
s’ils ont plus de 8 ans et qu’ils
sont surveillés.
18.
Maintenir l’appareil et son cordon
hors de portée des enfants de
moins de 8 ans.
19.
N'utilisez pas l'appareil à d'autres
fins que celles pour lesquelles il
a été conçu.
20.
Ne pas utiliser à l'extérieur.
21.
Sauvegardez ces instructions.
22.
L’appareil n’est pas destiné à
Page 8

FR-7
être mis en fonctionnement au
moyen d’une minuterie extérieure
ou par un système de commande
à distance séparé.
Page 9

FR-8
Convient pour le contact
alimentaire.
Informations sur la signification du marquage de conformité
Le marquage indique que le produit répond aux principales exigences des Directives
Européenne 2014/35/EU (Basse Tension), 2014/30/EU (Compatibilité Electromagnétique),
2011/65/UE (Limitation d’utilisation de certaines substances dangereuses dans les équipements
électroniques).
Page 10

FR-9
SOMMAIRE
Avertissements et conseils de sécurité importants
I.
Description de l'appareil
II.
Caractéristiques techniques
III.
Avant la première utilisation
IV.
Utilisation
A.
Panneau de commande
B.
Mise en fonctionnement
C.
Ingrédients utiles aux préparations
D.
Programmes et recettes
V.
Nettoyage et entretien
VI.
Dépannage
VII.
Mise au rebut
VIII.
Garantie
-2-
-9-
-10-
-11-
-12-
-27-
-28-
-31-
-32-
Ce guide d’utilisation est disponible dans les langues suivantes :
- FR (version originale)
- EN (translated from the original)
Toute autre traduction serait une traduction de la version originale.
Ce guide d’utilisation, ses modifications éventuelles ou toute
nouvelle version, est disponible sur notre site web.
Page 11
FR-9
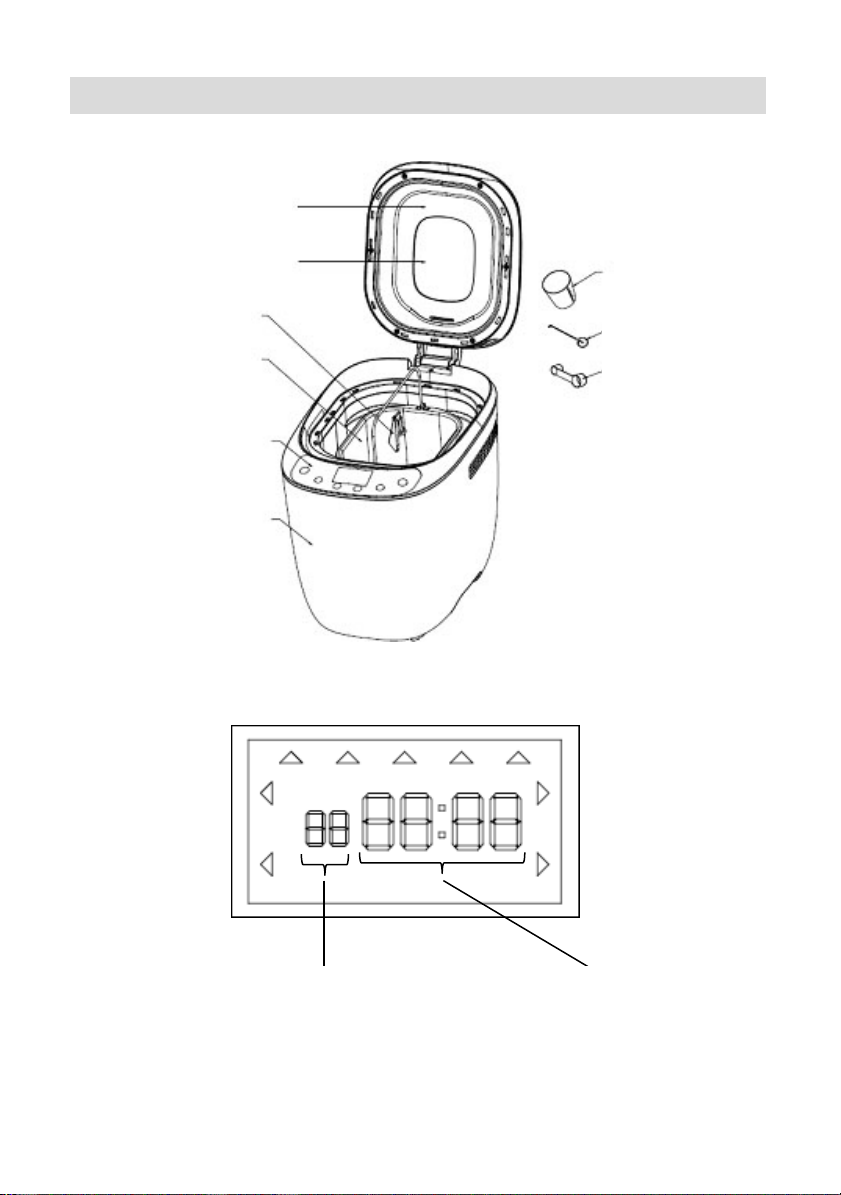
I. DESCRIPTION DE L’APPAREIL
Couvercle
Fenêtre d'observation
Pétrisseur
Cuve à pain
Panneau
de contrôle
Corps principal
Tasse graduée
Crochet
Cuillère de mesure
(petit : équivaut à 1
cuilllère à café /
grand : équivaut à
une cuillère à
soupe)
Affichage du programme Affichage de
1. Pain basique
2. Pain français
3. Pain complet
4. Rapide
5. Sucré
6. Cuisson rapide-I
7. Cuisson rapide-II
8. Pâte
9. Sans gluten
10. Gâteau
11. Sandwich
Page 12

FR-9
12. Cuisson
l'heure et de
l'avertissemen
t
Page 13

FR-10
II. CARACTERISTIQUESTECHNIQUES
Référence commerciale
CEMP838DIG2 /
CEMP838DIG2B
Modèle
BM4406AC-CE
Tension nominale
220-240V~
Fréquence
50Hz
Puissance
550W
(Moteur:50W Chauffage:500W)
Capacité alimentaire
700g - 900g
Quantités maximales de farine
560g
Quantités maximales de levure
chimique
Tous les programmes (sauf
Rapide, Cuisson rapide-I et II): 3g
Rapide, Cuisson rapide-I et II: 9 g
Matériau de la cuve à pain
Revêtement Anti adhésif
Page 14

FR-11
III. AVANT LA PREMIERE UTILISATION
A. Déballage de l’appareil et mise au rebut des éléments
d’emballage :
• Retirez tous les éléments d'emballage autour de
l'appareil, ainsi que les éléments de protection situés
à l'intérieur des compartiments de l'appareil.
• Le carton d’emballage et les feuilles de papier sont
recyclables. Ils doivent être jetés dans les bacs de
collecte prévus à cet effet.
• Les matériaux portant le symbole sont recyclables:
>PE< = polyéthylène ; >PS< = polystyrène ; >PP< = polypropylène
Cela signifie qu’ils peuvent être recyclés en les déposants dans des
conteneurs de collecte appropriés.
• Les autres éléments d’emballage (adhésif, attaches...) doivent être
jetés avec les déchets ménagers.
Pour en savoir plus : www.quefairedemesdechets.fr
B. Avant la première utilisation
• L'appareil doit être utilisé et placé sur une surface plane, stable et
sèche.
• Laver tous les accessoires avec une éponge imbibée de liquide et
rincer à l'eau tiède avant de les sécher avec un chiffon propre. (Voir
la section: Nettoyage de l'appareil).
• Retirez le cordon d'alimentation de sa boîte de rangement située au
bas de l'appareil et branchez-le à la prise secteur.
Page 15
FR-12
IV. UTILISATION
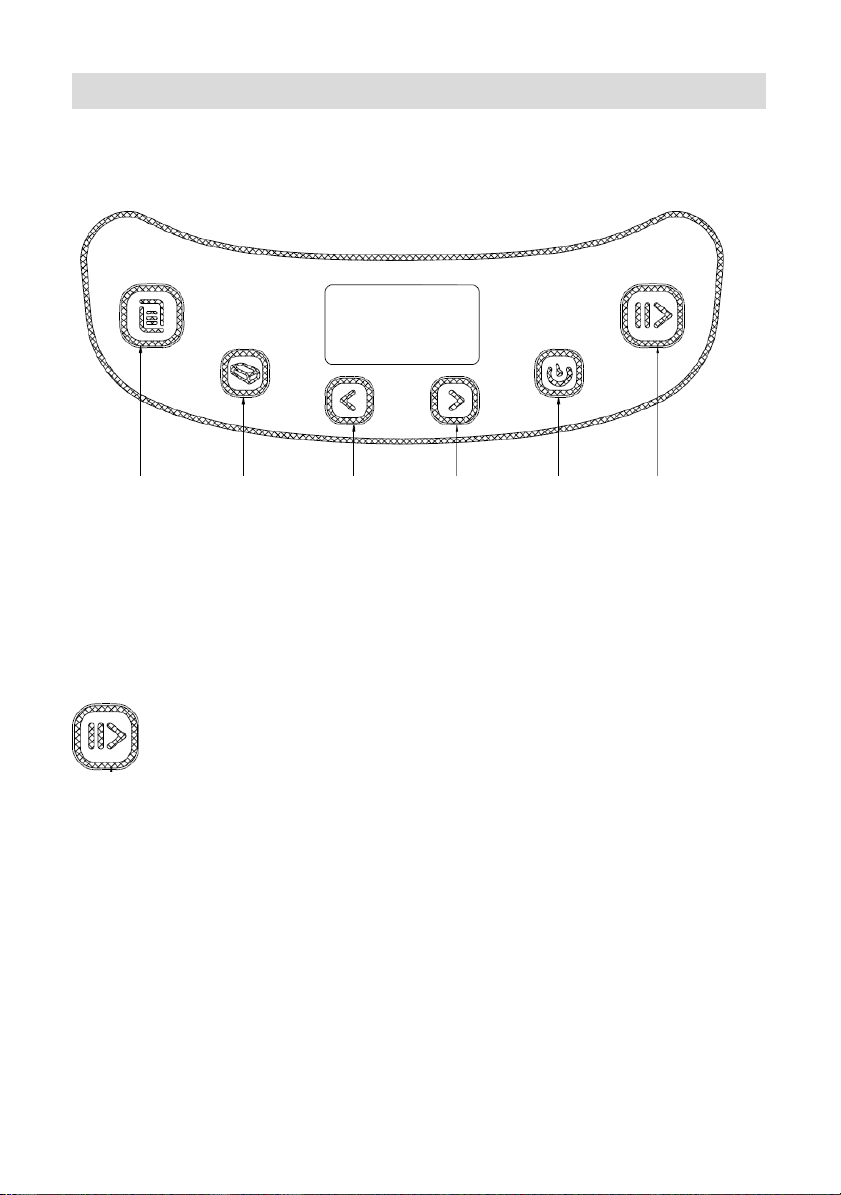
A. PANNEAU DE COMMANDE
MENU TAILLE DU PAIN TEMPS + TEMPS - COULEUR
COMMENCER
/ ARRÊTER
MISE EN MARCHE
Dès que la machine à pain est branchée, un signal sonore retentit et
"3:10" apparaît sur l'afficheur après un court instant. Mais les deux points
entre le "3" et "10" ne clignotent pas constamment. La flèche indique
900g et MOYENNE. C'est le réglage par défaut.
: COMMENCER / ARRÊTER
Pour démarrer et arrêter le programme de cuisson sélectionné.
Pour démarrer un programme, appuyez une fois sur le bouton
"COMMENCER / ARRÊTER". Un bip court retentit et les deux points de
l'affichage de l'heure commencent à clignoter, le programme démarre.
Après le début d'un programme, les autres boutons sont désactivés sauf
le bouton "COMMENCER / ARRÊTER".
Pour arrêter le programme, appuyez sur le bouton "COMMENCER /
ARRÊTER" pendant env. 3 secondes jusqu'à ce qu'un bip confirme que
le programme a été désactivé. La durée de 3 secondes nécessaire à
l’arrêt du programme, permet d’éviter que vous n’arrêtiez par
inadvertance la machine à pain avant la fin du programme.
CLAIRE MOYENNE FONCÉE 700g 900g
PÉTRIR
CUISSON
AUGMENTER
CHAUD
Page 16

FR-13
: MENU
Ce bouton est utilisé pour sélectionner les différents programmes.
Chaque fois que vous appuyez sur ce bouton (accompagné d'un bip
court), le programme change. Appuyez sur le bouton en continu pour
faire apparaître les 12 programmes sur l'écran LCD. Sélectionnez votre
programme désiré.
: COULEUR
Appuyer sur ce bouton pour sélectionner la couleur de la croûte du pain
: CLAIRE, MOYENNE ou FONCÉE.
: TAILLE DU PAIN
Appuyez sur ce bouton pour sélectionner la taille du pain. Veuillez noter
que le temps de fonctionnement total peut varier en fonction de la taille
du pain.
: DEPART DIFFERE (TEMPS+ ou TEMPS-)
Ces boutons servent à programmer un départ différé.
Avant de lancer le programme différé, il faut que votre pain soit prêt en
appuyant sur " TEMPS+ " ou " TEMPS- ". S'il vous plaît noter que le
départ différé doit inclure le temps de cuisson du programme. C'est àla
fin du départ différé, que le pain reste au chaud.
1. Sélectionnez le programme et la couleur de la croûte du pain et
la taille du pain.
2. Appuyez sur " TEMPS+ " ou " TEMPS- " pour augmenter ou
diminuer le temps. Chaque appui ajoute ou enlève 10 minutes.
Le délai maximum est de 13 heures (temps de cuisson + départ
différé = 13 heures).
Exemple: Il est 20h30, si vous souhaitez que votre pain soit prêt le
lendemain matin à 7 heures, c'est-à-dire dans 10 heures et 30 minutes.
Page 17

FR-14
- Sélectionnez votre menu, la couleur, la taille du pain,
- Puis appuyez sur TEMPS+ ou TEMPS- pour ajouter le temps
jusqu'à 10:30 apparaît sur l'écran LCD.
- Appuyez ensuite sur le bouton " COMMENCER / ARRÊTER "
pour activer le programme du départ différé. Vous pouvez voir le
point (situés entre les heures et les minutes) clignoter et
l'affichage du temps restant.
Vous obtiendrez du pain frais à 7h du matin. Si vous ne voulez pas sortir
le pain immédiatement, l’appareil passe automatiquement en mode
« Garder au chaud » pendant une heure.
Remarque: Pour une cuisson différée, n'utilisez pas d'ingrédients
périssables tels que des œufs, du lait frais, des fruits et légumes,
des oignons, etc.
GARDER AU CHAUD
Le pain est gardé au chaud automatiquement pendant 60 minutes après
la cuisson. Si vous souhaitez sortir le pain, désactivez le mode avec le
bouton " COMMENCER / ARRÊTER ".
EN CAS DE COUPURE DE COURANT
En cas de coupure de courant en cours de fonctionnement, si la coupure
ne dépasse pas les 10 minutes, le programme se poursuivra
automatiquement, même sans appuyer sur le bouton " COMMENCER /
ARRÊTER ". Si la coupure dépasse les 10 minutes, le programme ne
sera pas sauvegardé alors le programme devra être relancé.
ENVIRONNEMENT
La machine peut bien fonctionner dans une large gamme de
températures, mais il pourrait y avoir une différence de taille de pain
entre une pièce très chaude et une pièce très froide. Nous suggérons
que la température ambiante soit comprise entre 15 ° C et 34 ° C.
B. MISE EN FONCTIONNEMENT
1. Ouvrez le couvercle et retirez la cuve à pain en le tournant
légèrement dans le sens inverse des aiguilles d'une montre et en la
soulevant vers le haut. Fixez le pétrisseur sur l’axe d'entraînement
jusqu'à ce qu'il s'enclenche.
Page 18

FR-15
2. Placer les ingrédients dans la cuve à pain toujours en suivant l’ordre
mentionné ci-dessous. L'eau ou les liquides doivent être mise en
premier, puis ajouter le sucre, la farine et le sel. Ajouter la levure en
dernier dans un trou que vous aurez formé au milieu. (La levure ne
devra jamais être en contact avec les liquides ou le sel).
Levure
Farine
Eau ou liquide
3. Insérez la cuve à pain dans l’appareil et tournez la dans le sens des
aiguilles d’une montre pour la vérrouiller.
4. Fermez le couvercle doucement et branchez le cordon
d'alimentation dans une prise de courant.
5. Appuyez sur le bouton " MENU " jusqu'à ce que le programme
souhaité soit sélectionné.
6. Appuyez sur le bouton " COULEUR " pour sélectionner la couleur de
la croûte de pain désirée.
7. Appuyez sur le bouton " TAILLE DU PAIN " pour sélectionner la taille
désirée (700 gr ou 900 gr).
8. Réglez le départ différé en appuyant sur " TEMPS+ " ou " TEMPS- ".
Cette étape peut être supprimée si vous souhaitez que la machine à
pain commence à fonctionner immédiatement.
9. Appuyez sur le bouton " COMMENCER / ARRÊTER " pour lancer le
programme.
10. Pour le programme pain basique, pain français, pain complet, sucré,
sans gluten et sandwich, un long bip retentira pendant l'opération.
Vous pouvez ajouter des ingrédients dans votre préparation. Ouvrez
le couvercle et mettez les ingrédients. Il est possible que de la vapeur
s'échappe par les ouvertures d'aération du couvercle pendant la
cuisson, ce qui est normal.
11. Une fois le programme terminé, 10 bips retentissent. Votre machine
Page 19

FR-16
à pain se met automatiquement en mode « Maintien au chaud ».
Vous pouvez appuyer sur le bouton " COMMENCER / ARRÊTER "
pendant env. 3-5 secondes pour arrêter de mode et retirer le pain.
Ouvrez le couvercle et, tout en utilisant des gants de cuisine,
saisissez fermement la poignée de la cuve à pain. Tournez la
casserole dans le sens inverse des aiguilles d'une montre et tirez
doucement la casserole vers le haut.
12. Utilisez une spatule antiadhésive pour détacher délicatement le pain
des bords.
Attention : le moule à pain et le pain peuvent être très chauds !
Toujours manipuler avec précaution et utiliser des gants isolants.
1. Retourner le moule à pain à l'envers sur une surface de cuisson
propre et agiter doucement jusqu'à ce que le pain tombe sur la
grille.
2. Retirer le pain avec précaution du moule et laisser refroidir environ
20 minutes avant de le trancher.
3. Si vous êtes hors de la pièce ou si vous n'avez pas appuyé sur le
bouton « DEMARRER/ARRETER » à la fin de l'opération, le pain
sera maintenu au chaud automatiquement pendant 1 heure et
cessera ensuite de se réchauffer.
4. Si vous n'utilisez pas ou si vous ne l'utilisez pas complètement,
débranchez le cordon d'alimentation.
Remarque : Avant de trancher le pain, utilisez le crochet pour retirer la
lame de pétrissage cachée sur le fond du pain. Le pain est chaud ; ne
jamais utiliser la main pour enlever la lame de petrissage.
REMARQUES
Pour des pains rapides
Les pains rapides sont faits de levure chimique et de bicarbonate de
soude activés par l'humidité et la chaleur. Pour des pains rapides
parfaits, il est suggéré que tous les liquides soient placés dans le fond
du moule à pain, les ingrédients secs sur le dessus. Pendant le
mélange initial de pâte à pain rapide et les ingrédients secs peuvent
s'accumuler dans les coins de la casserole, il peut être nécessaire
d'aider la machine à mélanger pour éviter les grumeaux de farine. Si
c'est le cas, utiliser une spatule en caoutchouc.
Page 20

FR-17
A propos du programme Ultra rapide
La machine à pain peut cuire le pain en moins d'une heure avec le
programme ultra-rapide. Ces 2 réglages permettent de cuire le pain en
58 minutes ; le pain est un peu plus dense en texture. Ultra-rapide I
est pour la cuisson de 700 g pain tandis qu’Ultra-rapide II est pour900
g. Bien vouloir noter que l'ingrédient de l'eau doit être de l'eau chaude
dans la gamme de 48-50°C, vous devez utiliser un thermomètre de
cuisson pour mesurer la température. La température de l'eau est très
importante pour la performance de la cuisson. Si la température de
l'eau est trop basse, le pain n'atteindra pas la taille attendue ; si la
température de l'eau est trop élevée, elle tuera la levure avant la levée,
ce qui affectera aussi largement la performance de cuisson.
Page 21

FR-18
C. INGREDIENTS UTILES AUX PREPARATIONS
1. FARINE DE PAIN
La farine à pain a une haute teneur en gluten (on peut donc
l'appeler aussi farine à haute teneur en gluten qui contient
beaucoup de protéines), elle a une bonne élasticité et peut
empêcher la taille du pain de s'affaisser après le lever. Comme la
teneur en gluten est plus élevée que la farine commune, il peut être
utilisé pour faire du pain de grande taille et de meilleures fibres
internes. La farine à pain est l'ingrédient le plus important de la
fabrication du pain.
2. FARINE ORDINAIRE
La farine ordinaire est fabriquée en mélangeant du blé tendre et du
blé dur bien choisis et applicable pour la fabrication de pain ou de
gâteaux express.
3. FARINE DE BLÉ ENTIER
La farine de blé entier est fabriquée en broyant du blé entier, elle
contient de la peau de blé et la farine de gluten de blé entier est
plus lourde et plus nutritive que la farine ordinaire. Le pain fait de
farine de blé entier est généralement de petite taille. Tant de
recettes combinent généralement la farine de blé entier et la farine
de pain pour obtenir les meilleurs résultats.
4. FARINE DE BLÉ NOIR
La farine de blé noir, également appelée « farine brute », est une
sorte de farine à haute teneur en fibres qui est similaire à la farine
de blé entier. Pour obtenir la grande taille après le levage, il faut
l'utiliser en combinaison avec une forte proportion de farine à pain.
5. POUDRE DE GÂTEAU
La poudre à gâteau est fabriquée en broyant du blé tendre ou du
blé à faible teneur en protéines, qui est spécialement utilisé pour la
fabrication de gâteaux. Différentes farines semblent se ressembler.
En fait, les performances de levure ou la capacité d'absorption de
diverses farines diffèrent largement en fonction des zones de
culture, des raisons de croissance, du processus de broyage et de
la durée de conservation. Vous pouvez choisir de la farine avec
des marques différentes pour tester, goûter et comparer sur le
marché local, et choisir celle qui pourrait produire le meilleur
résultat en fonction de vos propres expériences et goûts.
Page 22

FR-19
6. FARINE DE MAÏS ET FARINE D'AVOINE
La farine de maïs et la farine d'avoine sont fabriquées en broyant le
maïs et la farine d'avoine respectivement, ils sont tous les deux les
ingrédients additifs de la fabrication du pain brut, qui sont utilisés
pour améliorer la saveur et la texture.
7. SUCRE
Le sucre est un ingrédient très important pour ajouter le goût sucré
et la couleur du pain. Tandis qu'il aide à levurer le pain comme
nourriture. Le sucre blanc est largement utilisé. Le sucre brun, le
sucre en poudre ou le sucre de coton peut être appelé par des
exigences spéciales.
8. LEVURE
La levure passe par le processus de levurage pâteux, puis produit
du dioxyde de carbone, ce qui fait que le pain prend de l'expansion
et que les fibres internes sont molles. Cependant, la levure à
reproduction rapide a besoin d'hydrates de carbone dans le sucre
et la farine comme nourriture.
1 cuillère à café de levure sèche active = 3/4 cuillère à café de
levure instantanée.
1,5 cuillère à café de levure sèche active = 1 cuillère à café de
levure instantanée
2 cuillère à café de levure sèche active = 1,5 cuillère à café de
levure instantanée.
La levure doit être conservée au réfrigérateur car elle sera tuée à
haute température, avant de l'utiliser, vérifier la date et la durée de
conservation de votre levure. Le ranger au réfrigérateur le plus tôt
possible après chaque utilisation. Habituellement, l'échec de la
levée du pain est causé par la levure morte.
Les méthodes décrites ci-dessous permettent de vérifier si votre
levure est fraîche et active ou non.
1) Verser 1/2 tasse d'eau chaude (45-50°C) dans une tasse à
mesurer.
2) Mettre 1 cuillère à café de sucre blanc dans la tasse et
remuer, puis saupoudrer 2 cuillère à café de levure surl'eau.
3) Placer la tasse à mesurer dans un endroit chaud pendant
environ 10 minutes. Ne pas remuer l'eau.
4) La mousse sera jusqu'à 1 tasse. Sinon, la levure est morte ou
inactive.
Page 23

FR-20
9. SEL
Le sel est nécessaire pour améliorer la saveur du pain et la couleur
de la croûte. Mais le sel peut aussi empêcher la levure de lever. Ne
jamais utiliser trop de sel dans une recette. Si vous ne voulez pas
utiliser de sel, omettez le sel. Et le pain serait plus gros s'il n'y avait
pas de sel.
10. OEUFS
Les œufs peuvent améliorer la texture du pain, rendre le pain plus
nourrissant et de plus grande taille, ajouter une saveur spéciale
d'œuf au pain. lorsqu'il est utilisé, il doit être pelé et mélangé
uniformément.
11. GRAISSE, BEURRE ET HUILE VÉGÉTALE
La graisse peut ramollir le pain et retarder la durée de conservation.
Le beurre devrait être fondu ou haché en petites particules avant
l'utilisation, de façon à être mélangé uniformément lorsque vous le
sortez du réfrigérateur.
12. POUDRE À CUIRE
La levure chimique est principalement utilisée pour lever le pain et
le gâteau Ultra-rapide. Comme il n'a pas besoin de temps de
montée et de produire du gaz qui va former des bulles ou ramollir la
texture du pain en utilisant le principe chimique.
13. EAU ET AUTRES LIQUIDES
L'eau est un ingrédient essentiel pour la fabrication du pain. En
général, la température de l'eau entre 20°C et 25°C est la plus
appropriée. Mais la température de l'eau devrait se situer entre 45
et 50°C pour atteindre une vitesse ascendante pour la fabrication
du pain ultra-rapide. L'eau peut être remplacée par du lait frais ou
de l'eau mélangée à de la poudre de lait 2 %, ce qui peut rehausser
la saveur du pain et améliorer la couleur de la croûte. Certaines
recettes peuvent faire appel à du jus pour rehausser la saveur du
pain, par exemple : jus de pomme, jus d'orange, jus de citron,etc.
Page 24

FR-21
REMARQUES
L'une des étapes importantes pour faire du bon pain est d'utiliser la
bonne quantité d'ingrédients.
Il est fortement conseillé d'utiliser une tasse à mesurer, une cuillère à mesurer
pour obtenir une quantité exacte, sinon le pain sera largement influencé.
1. Pesage d'ingrédients liquides
− L'eau, le lait frais ou la solution de lait en poudre doivent être
mesurés à l'aide de tasses à mesurer.
− Observer le niveau de la tasse à mesurer avec les yeux à
l'horizontale.
− Lorsque vous mesurez l'huile de cuisson ou d'autres ingrédients,
aspirez soigneusement la tasse à mesurer sans aucun autre
ingrédient.
2. Mesurer la poudre sèche
− La poudre sèche doit être conservée dans des conditions
naturelles et lâches, niveler doucement l'embouchure de la
tasse à l'aide d'une lame pour assurer une mesureprécise.
3. Séquence des ingrédients
La séquence de placement des ingrédients doit être observée,
généralement parlant, la séquence est la suivante : ingrédients
liquides, œufs, sel et lait en poudre, etc. Lors de la mise en place
des ingrédients, la farine ne peut pas être complètement mouillée
par le liquide. La levure ne peut être placée que sur la farine sèche.
Exclusivement, la levure ne peut pas toucher le sel. Après que la
farine a été malaxée pendant un certain temps et un bip vous
rappelle de mettre des ingrédients de fruits dans le mélange. Si les
ingrédients de fruits sont ajoutés trop tôt, la saveur sera diminuée
après un long temps de mélange. Lorsque vous utilisez la fonction
de retardement pendant une longue période, n'ajoutez jamais les
ingrédients périssables tels que les œufs ou les fruits.
Page 25

FR-22
D. PROGRAMMES et RECETTES
Programme
Description
Ingrédients
Ordre des
ingrédients
Durée du
cycle (env.)
1. Pain
basique
Pétrir, lever et
cuire du pain
classique.
Il correspond
à un
programme
général pour
du pain
blanc. La
plupart des
recettes
utilisent ce
programme.
Ce
programme
vous permet
de préparer
des pains de
700g ou de
900g.
Pour 700g de pain :
230ml d'eau,
2 c. à soupe d'huile,
1 c. à café de sel,
2 c.à soupe de sucre,
420g de farine
1 c. à café de levure
boulangère
Pour 900g de pain :
310ml d'eau,
3 c. à soupe d'huile,
1,5 c. à café de sel,
3 c.à soupe de sucre,
560g de farine
1,5 c. à café de levure
boulangère
Eau
Huile
Sucre
Farine
Sel
Levure
boulangère
Pour 700g :
3h03
Pour 900g :
3h10
2. Pain
Français
Pétrir, lever
et cuire, avec
un temps de
fermentation
plus long, la
croûte cuite
au four est
cassante. Ce
programme
vous permet
de préparer
des pains de
700g ou de
900g.
Pour 700g de pain :
230ml d'eau,
2 c. à soupe d'huile,
1 c. à café de sel,
2 c.à soupe de sucre,
420g de farine
1 c. à café de levure
boulangère
Pour 900g de pain :
310ml d'eau,
3 c. à soupe d'huile,
1,5 c. à café de sel,
3 c.à soupe de sucre,
560g de farine
1,5 c. à café de levure
boulangère
Eau
Huile
Sucre
Farine
Sel
Levure
boulangère
Pour 700g :
3h50
Pour 900g :
4h00
3. Pain
complet
Pétrir, lever et
cuire avec de
la farine
complète. Ce
programme a
un temps de
préchauffage
plus long pour
Pour 700g de pain
: 230ml d'eau,
2 c. à soupe
d'huile, 1 c. à café
de sel,
2 c.à soupe de
sucre, 110g de
farine de blé
complet,
280g de farine
Eau
Huile
Sucre
Sel
Farine de blé
Lait en
poudre
Pour 700g :
3h42
Pour 900g :
3h50
Page 26

FR-23
permettre
que la farine
s’imprègne
d’eau et
gonfle. Il est
déconseillé
d'utiliser la
fonction de
départ différé,
car cela peut
produire de
mauvais
résultats. Ce
programme
vous permet
de préparer
des pains de
700g ou de
900g.
blanche,
14g de poudre de lait
1 c. à café de levure
boulangère
Pour 900g de pain
: 270ml d'eau,
3 c. à soupe
d'huile, 1,5 c. à
café desel,
3 c.à soupe de
sucre, 220g de
farine de blé
complet,
280g de
farine
blanche,
21g de poudre de lait
1,5 c. à café de levure
boulangère
Levure
boulangère
4. Rapide
Lever le pain
avec du
bicarbonate
de soude ou
de la levure
chimique. Ce
programme
permet
d'obtenir un
pain cuit de
petite taille
avec une
texture
relativement
dense.
Ce
programme
vous permet
de préparer
des pains de
700g.
Pour 700g de pain:
230ml d'eau
chaude (40-50°C),
2 c. à soupe d'huile,
1 c. à café de sel,
3 c.à soupe desucre,
420g de farine
2 c. à café de levure
boulangère
Eau
Huile
Sucre
Farine
Sel
Levure
boulangère
1h50
5. Sucré
(brioche)
Pétrir, lever et
cuire du pain
légèrement
sucré. La
croûte est
cassante. Ce
Pour 700g de pain:
230ml d'eau,
2
c. à soupe d'huile,
1 c. à café de sel,
3
c.à soupe de sucre,
420g de farine
Eau
Huile
Sucre
Farine
Sel
Pour 700g :
3h00
Pour 900g :
3h05
Page 27

FR-24
programme
vous permet
de préparer
des pains de
700g ou de
900g.
2 c. à soupe de lait en
poudre,
1 c. à café de levure
boulangère
Pour 900g de pain:
310ml d'eau,
3
c. à soupe d'huile,
1,5 c. à café desel,
4
c.à soupe desucre,
560g de farine
2 c. à soupe de lait en
poudre,
1,5 c. à café de levure
boulangère
Lait en
poudre
Levure
boulangère
6. Cuisson
Pétrir, lever et
Pour 700g de pain:
Eau
1h08
rapide I
cuire 700g de
230ml d'eau chaude
Huile
pain. Ce
(40-50°C),
Sucre
menu est
2 c. à soupe d'huile,
Farine
généralement
1 c. à café de sel,
Sel
plus court que
3 c.à soupe de sucre,
Levure
le programme
420g de farine
boulangère
rapide.
2 à 3 c. à café de
levure
7. Cuisson
Pétrir, lever et
Pour 900g de pain:
Eau
1h08
rapide I
cuire 900g de
310ml d'eau chaude
Huile
pain. Ce
(40-50°C),
Sucre
menu est
3 c. à soupe d'huile,
Farine
généralement
1 c. à café de sel,
Sel
plus court que
3 c.à soupe de sucre,
Levure
le programme
560g de farine
boulangère
rapide.
2 à 3 c. à café de
levure boulangère
8. Pâte
Ce 310ml d'eau,
Eau
1h30
programme
2 c. à soupe d'huile,
Huile permet de
1,5c. à café de sel,
Sucre faire toutes
2 c.à soupe de sucre,
Farine
sortes de pâte
420g de farine
Sel levées
1 c. à café de levure
Levure
boulangère
boulangère
9. Sans
Lever et cuire
Pour 700g de pain:
Eau
Pour 700g :
gluten
du pain avec
300g d'eau,
Huile
3h25
des farines de
3 c. à soupe d'huile,
Sucre
Pour 900g :
blé, riz, maïs,
1 c. à café de sel,
Sel
3h30
pois chiches
3 c.à soupe de sucre,
Vinaigre
etc...sans
1 c. à café de vinaigre,
Œuf
Page 28

FR-25
gluten. Ce
programme
est plus long
pour
permettre
aux farines
d'absorber
l'eau et de
gonfler. Il
n'est pas
recommandé
d'utiliser la
fonction
départ différé
car cela peut
donner un
mauvais
résultat. Ce
programme
vous permet
de préparer
des pains de
700g ou de
900g.
2 oeufs,
2 c.à café de miel,
420g Farine de
maïs 1 c. à café de
levure boulangère
Pour 900g de
pain: 460g d'eau,
4 c. à soupe d'huile,
1 c. à café de sel,
4 c.à soupe de sucre,
1 c. à café de
vinaigre, 2 oeufs,
2 c.à café de miel,
560g Farine de maïs
1,5 c. à café de levure
boulangère
Miel
Farine de
maïs, ...
Levure
boulangère
10. Gâteau
Ce 2 c. à soupe d'huile,
Huile
3h00
programme
8 c. à soupe de sucre,
Sucre permet de
6 œufs,
Œuf
faire toutes
250g de farine,
Arôme
sortes de
1c à café d' arôme,
(vanille, etc..)
gâteaux,
1,5 c. de jus de citron,
Jus de citron
cakes etc.
1 c. à café de levure
Levure
boulangère
11.
Sandwich
Pétrir, lever
et cuire. Ce
programme
permet de
faire des
sandwichs
au pain à la
mie légère
Pour 700g de pain:
230ml d'eau,
18g de beurre,
1,5 c. à café de sel,
3 c.à soupe de
sucre, 1,5 c. à
soupe de lait, 420g
de farine
1 c. àcafé de
levure boulangère
Eau
Beurre
Sucre
Farine
Lait en
poudre
Sel
Levure
boulangère
Pour 700g :
3h05
Pour 900g :
3h10
Pour 900g de pain:
310ml d'eau,
24g de beurre,
2 c. à café de sel,
Page 29

FR-26
4 c.à soupe de sucre,
2 c. à soupe de lait,
560g de farine
1,5 c. à café de levure
boulangère
12. Cuisson
Cuisson
Confiture :
/
1h00
uniquement.
350g de fruits de votre
Ce choix coupés en petits
programme
morceaux, 350g de
permet de
sucre à confiture,
cuire des
2 c. à soupe de jus de
confitures,
citron
des pâtes
préparées, ou
pour cuire
d'avantage un
pain à la fin
d'un cycle.
Page 30

FR-27
V. NETTOYAGE ET ENTRETIEN
1. Débranchez le cordon de la prise secteur et laissez l’appareil refroidir
complètement avant de le nettoyer.
2. Immédiatement après avoir retiré le pain du plat, remplissez le plat
jusqu’à la moitié avec de l’eau chaude et une petite quantité de liquide
vaisselle. Laissez le plat tremper pendant 5 à 20 minutes ou jusqu’à ce
que la barre de pétrissage puisse être retirée de l’axe. Il est possible que
vous deviez tordre légèrement la barre pour la dégager. Il est possible
que la barre de pétrissage ait besoin de tremper dans l’eau avant de
pouvoir être retirée. Si la barre de pétrissage est difficile à retirer après
avoir trempé, fixez la barre transversale au-dessous du
plat tout en faisant pivoter la barre de pétrissage pour la dégager. Lavez
l’intérieur du plat et la barre de pétrissage avec un chiffon doux, rincez et
séchez. Utilisez un détergent de puissance moyenne. N’utilisez jamais
d’agents nettoyants chimiques, de nettoyants pour four, de tampons à
récurer abrasifs ou de détergents sur le moule à pain ou la barre de
pétrissage car cela risquerait de détériorer le revêtement ou la finition.
Replacez la barre de pétrissage sur l’axe.
3. Ne plongez jamais le moule à pain dans de l’eau ou ne le lavez
jamais au lave-vaisselle automatique car cela risquerait de détériorer les
roulements qui entraînent la barre de pétrissage. Essuyez l’intérieur du
compartiment du four et les surfaces externes de la machine à pain à
l’aide d’un torchon humide si nécessaire. Ne trempez jamais l’appareil
dans l’eau ou ne remplissez jamais le compartiment de cuisson avec de
l’eau! Le couvercle ne peut pas être retiré pour le nettoyage.
REMARQUE: Le revêtement à l’intérieur du moule à pain peut
changer de couleur au fil du temps; ceci est normal et n’affecte pas
le pain.
Page 31

FR-28
VI. DÉPANNAGE
Problème
Cours
Solution
Fumée
Certains ingrédients adhèrent à
Débrancher la machine à pain et
provenant du
l'élément chauffant ou à proximité,
aspirer l'élément chauffant, mais
trou d'aération
pour la première utilisation, huile est
veiller à ne pas vous brûler, lors
lors de la
restée à la surface de l'élément
de la première utilisation, faire
cuisson.
chauffant
sécher et ouvrir le couvercle.
La croûte du
fond du pain est
trop épaisse.
Garder le pain au chaud et laisser le
pain dans le moule à pain pendant
une longue période afin que l'eau
perde trop d'eau.
Sortir rapidement le pain sans le
garder au chaud.
Il est très difficile
de sortir le pain.
Le malaxeur adhère fermement à
l'arbre dans le moule à pain.
Après avoir sorti le pain, mettre de
l'eau chaude dans le moule à pain
et immerger le pétrin pendant 10
minutes, puis le sortir et l’aspirer.
Mélanger les
Lemenu programme sélectionné est
Sélectionner le menu de
ingrédients de
inapproprié
programme approprié
façon inégale et
cuire mal au
four.
Après l'opération, ouvrez le
couvercle plusieurs fois et le pain
est sec, sans croûte brune.
Ne pas ouvrir le couvercle lors de
la dernière montée.
La résistance à l'agitation est trop
Vérifier le trou du pétrin, puis
grande pour que le malaxeur ne
retirer le moule à pain et le faire
puisse presque pas tourner et
fonctionner sans charge, si ce
remuer adéquatement.
n'est pas normal, contacter le
centre de service autorisé.
Affichage
La température dans la machine à
Appuyer sur le bouton
« HHH » après
pain est trop élevée pour faire du
« DEMARRER/ARRETER » et
avoir appuyé sur
pain.
débrancher la machine à pain,
la touche
puis retirer le moule à pain et
« DEMARRER/
ouvrir le couvercle jusqu'à ce que
ARRETER »
la machine à pain refroidisse.
Entendre les
Le moule à pain est mal fixé ou la
Vérifier si le moule à pain est bien
bruits du
pâte est trop grande pour être
fixé, si la pâte est préparée selon
moteur, mais la
remuée.
la recette et si les ingrédients sont
pâte n'est pas
pesés avec précision.
remuée.
La taille du pain
La levure est trop grande ou la
Cocher les facteurs ci-dessus,
est si grande
farine est excessive ou l'eau est trop
réduire correctement le montant
qu'il faut
grande ou la température ambiante
selon les vraies raisons.
pousser le
est trop élevée.
couvercle.
Page 32

FR-29
La taille du pain
est trop petite ou
le pain n'a pas
de hausse.
Aucune levure ou la quantité de
levure n'est pas suffisante, de plus,
la levure peut avoir une mauvaise
activité car la température de l'eau
est trop élevée ou la levure est
mélangée avec du sel, ou la
température de l'environnement est
plus basse.
Vérifier la quantité et la
performance de la levure,
augmenter la température de
l'environnement correctement.
La pâte est si
grande qu'elle
déborde du
moule à pain.
La quantité de liquides est telle
qu'elle rend la pâte molle et la
levure est également excessive.
Réduire la quantité de liquides et
améliorer la rigidité de la pâte.
Le pain
s'effondre dans
les parties
centrales lors de
la cuisson de la
pâte.
La farine usagée n'est pas une
poudre forte et ne peut pas faire
lever la pâte.
Utiliser de la farine à pain ou de la
poudre forte.
Le taux de levure est trop rapide ou
la température de levure est trop
élevée.
La levure est utilisée à
température ambiante.
L'excès d'eau rend la pâte trop
mouillée et trop molle.
Selon la capacité d'absorption de
l'eau, ajuster l'eau selon la
recette.
Le poids du pain
est très
important et
l'organisation
est trop dense.
Trop de farine ou manque d'eau
Réduire la farine ou augmenter
l'eau
Trop de fruits ou trop de farine de
blé entier.
Réduire la quantité d'ingrédients
correspondants et augmenter la
levure.
Les parties
centrales sont
creuses après la
coupe du pain.
Excès d'eau ou de levure ou pas de
sel.
Réduire correctement l'eau ou la
levure et vérifier le sel.
La température de l'eau est trop
élevée
Vérifier la température de l'eau
La surface du
pain est collée à
la poudre sèche.
Il y a de forts ingrédients de
glutinosité dans le pain comme le
beurre et les bananes etc.
Ne pas ajouter d'ingrédients
glutineux forts dans le pain.
Mélange insuffisant en cas de
manque d'eau.
Vérifier l'eau et la construction
mécanique de la machine à pain.
La croûte est
trop épaisse et
la couleur de
cuisson est trop
foncée lorsque
vous faites des
gâteaux ou des
aliments trop
sucrés.
Différentes recettes ou ingrédients
ont un grand effet sur la fabrication
du pain, la couleur de cuisson
deviendra très foncée à cause de
beaucoup de sucre.
Si la couleur de cuisson est trop
foncée pour la recette avec trop
de sucre, appuyez
sur « DEMARRER/ARRETER »
pour interrompre le programme
avant 5-10min du temps de finition
prévu. Avant de retirer le pain,
vous devriez garder le pain ou le
gâteau dans le moule à pain
pendant environ 20 minutes avec
couvercle fermé.
Page 33

FR-30
CODES ERREUR
1. Si l'écran affiche " HHH " après le démarrage d’un programme (voir la
figure 1 ci-dessous),la température dans l’appareil est trop élevée. Il
faut arrêter le programme. Ouvrez le couvercle et laissez l’appareil
refroidir pendant 10 à 20 minutes.
2. Si l'écran affiche " Err " après avoir appuyé sur " COMMENCER /
ARRÊTER " (voir ci-dessous Figure 2), le capteur de température est
déconnecté. Faites vérifier le capteur par un technicien agréé.
3. Si l'écran affiche " LLL " après avoir appuyé sur le bouton "
COMMENCER / ARRÊTER " (sauf pour le programme Cuisson),
cela signifie que la température intérieure est trop basse (5 bips
sonores retentiront), arrêtez le son en appuyant sur "
COMMENCER / ARRÊTER ", ouvrez le couvercle et laissez
l’appareil reposer pendant 10 à 20 minutes pour revenir à
température ambiante.
REMARQUE: La température à l’intérieur de la machine à pain est
inférieure à la température ambiante si vous placez la machine à pain
dans un endroit plus frais (tel qu'une pièce de réfrigération) après un
certain temps et que vous la ramenez immédiatement à la température
ambiante.
Figure 1 Figure 2 Figure 3
Page 34

FR-31
VII. MISE AU REBUT
Ce logo apposé sur le produit signifie qu’il s’agit d’un
appareil dont le traitement en tant que déchet rentre dans
le cadre de la directive 2012/19/UE du 4 juillet 2012, relative
aux déchets d’équipements électriques et électroniques
(DEEE). Cela signifie que ce produit doit être pris en charge
par un système de collecte sélectif
conformément à la directive européenne citée ci-dessus afin de pouvoir
soit être recyclé soit démantelé afin de réduire tout impact sur
l’environnement
Les substances dangereuses contenues dans les équipements
électriques et électroniques peuvent avoir des effets potentiellement
dangereux pour l’environnement et la santé humaine.
Ainsi, lors de la fin de vie de cet appareil, celui-ci ne doit pas être
débarrassé avec les déchets municipaux non triés. Des systèmes de
reprise et de collecte sont mis à votre disposition par les collectivités
locales (déchetteries) et les distributeurs.
Cet appareil ne doit pas être jeté sur la voie publique. Vous avez
l’obligation d’utiliser les systèmes de collecte sélective mise à votre
disposition.
Page 35

FR-32
VIII. GARANTIE
La garantie ne couvre pas les pièces d’usure du produit, ni les problèmes
ou les dommages résultant de:
(1) détériorations superficielles dues à l'usure normale du produit ;
(2) défauts ou détériorations dus au contact du produit avec des liquides
et dus à la corrosion provoquée par la rouille ou de presence
d'insectes;
(3) tout incident, abus, utilisation impropre, modification, démontage ou
réparation non autorisés;
(4) toute opération impropre d'entretien, utilisation non conforme aux
instructions
concernant le produit ou le branchement à une tension incorrecte ;
(5) toute utilisation d'accessoires non fournis ou non approuvés par le
fabricant.
La garantie sera annulée en cas d'élimination de la plaque
signalétique et/ou du numéro de série du produit.
Continental Edison – 120-126 Quai de Bacalan – CS 11584 – 33000 Bordeaux
Importé par SCHNEIDER CONSUMER GROUP,
12, rue Jules Ferry, 93110 Rosny-sous-Bois, FRANCE
Page 36

EN-1
We invite you to read carefully
and thoroughly this user guide
before installing and using your
device.
It is important that this manual be
kept with the appliance for further
consultation. If this unit was to be
transferred to another person,make
sure that the manual follow the so
that the new user device to be
informed of the functioning of it.
Before using the electrical appliance,
the following basic precautions
should always be followed:
1.
Read all instructions.
2.
Before use, check that the
voltage of the outlet corresponds
to that shown on the nameplate.
3.
Do not use any appliance with a
damaged cord or plug or after a
IMPORTANT WARNINGS AND
SAFETY ADVICE
Page 37

EN-2
malfunction of the device, or if you
dropped or damaged in any way
whatsoever. Return appliance to
manufacturer or the authorized
service agent nearest to an
examination, repair or electrical or
mechanical adjustment.
4.
Do not touch hot surfaces. Use
handles or knobs.
5.
To protect against electric shock,
do not immerse cord, plugs or
housing in water or any other
liquid.
6.
Unplug from the socket when not
in use, before putting on or taking
off parts and before cleaning.
7.
Do not let cord hang over the
edge of the table or on a hot
surface.
8.
The use not recommended by
the appliance manufacturer may
cause injuries.
9.
This device may be used by
children 8 years of age and older
Page 38

EN-3
and by persons with reduced
physical, sensory or mental abilities
or lack of experience and
knowledge, if they have received
supervision or instructions on how
to use the device safely and that
they understand the dangers
involved.
10.
Children should be supervised to
ensure they do not play with the
device.
11.
Do not place on or near a hot gas
or electric burner or in a heated
oven.
12.
Do not touch any moving parts or
rotating machine when cooking.
13.
Never turn on the device without
the ingredients properly completed.
14.
Never beat the bread pan on the
top or edge to remove the pan,
this may damage the bread pan.
15.
Metal sheets or other materials
must not be inserted into the
bread maker as this can result in
fire or short circuit.
Page 39

EN-4
16.
Never cover the bread maker
with a towel or other material.
The heat and steam must be able
to escape freely. A fire can be
caused if it is covered or comes
into contact with combustible
materials.
17.
The cleaning and maintenance
by the user should not be
performed by children, unless
they have more than 8 years and
they are being watched.
18.
Keep the appliance and its cord
out of reach of children under 8
years.
19.
Do not use the device for
purposes other than those for
which it was designed.
20.
Do not use outdoors.
21.
Save these instructions.
22.
The device is not intended to be
operated by means of an external
timer or a separate remote
control system.
Page 40

EN-5
Suitable for food contact.
Information on the meaning of conformity marking
Marking indicates that the product meets the essential requirements of the
European Directives 2014/35 / EU (Low Voltage), 2014/30 / EU (electromagnetic
compatibility), 2011/65 / EU (Restriction of use of certain hazardous substances in
electronic equipment) .
Page 41

EN-6
SUMMARY
Important Safety Instructions
I.
Description of the device
II.
Technical characteristics
III.
Before first use
IV.
Use of instructions
A.
Control panel
B.
Function
C.
Ingredients and preparations
D.
Programs and recipes
V.
Cleaning and Maintenance
VI.
Trouble Shooting
VII.
Disposal
VIII.
Warranty
-1-
-7-
-8-
-9-
-10-
-23-
-24-
-27-
-28-
This user guide is available in the following languages:
- FR (original version)
- EN (translated from the original)
Any other translation would be a translation of the original version.
This user guide, any modifications or any new version, is available
on our website.
Page 42

EN-7
I. DESCRIPTION OF THE DEVICE
Lid
Observation Window
kneader
Bread pan
Control
panel
main body
measuring cup
Hook
Measuring spoon
(Small: equals 1
cuilllère Coffee /
large: equivalent to
one tablespoon)
Display of program
1. basic bread
2. French bread
3. Whole wheat bread
4. Fast
5. Sugar
6. Ultra Fast I
7. Ultra Fast II
8. Dough
9. Gluten free
10. Cake
11. Sandwich
12. Baking
Time display
and warning
Page 43

EN-8
II. TECHNICAL CHARACTERISTICS
Commercial reference
CEMP838DIG2 /
CEMP838DIG2B
Model
BM4406AC-CE
Nominal voltage
220-240V ~
Frequency
50 Hz
Power
550 W
(Motor:50W Heating:500W)
Food capacity
700g - 900g
Maximum Flour capacity
560g
Maximum Raising agent capacity
All Program (except
Fast, Ultra Fast I & II ) :
3g
Fast, Ultra Fast I & II
Program: 9g
Material bread pan
Anti adhesive coating
Page 44

EN-9
III. BEFORE FIRST USE
A. Unpacking and disposal of packaging elements:
• Remove all the packaging elements around the unit,
and the protective elements located within the
compartments of the unit.
• The carton and the paper is recycled. They must be
thrown into the collection bins provided for this
purpose.
• The materials marked with the symbol are recyclable:
> PE <= polyethylene; > PS <= polystyrene; > PP <= polypropylene
This means they can be recycled by depositors in appropriate
collection containers.
•
The other packaging elements (adhesive fasteners ...) must be
disposed of with household waste.
To know more : www.quefairedemesdechets.fr
B. Before first use
• The device must be used and placed on a flat, stable surface and
dry.
• Wash all accessories with a liquid-soaked sponge and rinse with
warm water before drying with a clean cloth. (See: Cleaning the unit).
• Remove the power cord from the storage box at the bottom of the
device and connect it to the power outlet.
Page 45

EN-10
IV. USE OF INSTRUCTIONS
A. CONTROL PANEL
MENU SIZE OF BREAD TIME + TIME -
COLOR
START / STOP
START
As soon as the bread maker is connected, a beep sounds and "3:10"
appears on the display after a short time. But the two dots between the
"3" and "10" are not constantly flash. The arrow indicates 900g and
AVERAGE. This is the default setting.
: START / STOP
To start and stop the selected baking program.
To start a program, press once on the "START / STOP". A short beep
sounds and the colon of the time display begin to flash, the program
starts. After the start of a program, the other buttons are disabled except
the "START / STOP" button.
To stop the program, press the "START / STOP" button for approx. 3
seconds until a beep confirms that the program has been deactivated.
The duration of 3 seconds required to shutdown the program prevents
you stop inadvertently bread maker before the end of the program.
CLEAR MEDIUM DARK 700g 900g
KNEAD
COOKING
INCREASE
HOT
Page 46

EN-11
MENU
This button is used to select the different programs. Each time you press
this button (accompanied by a short beep) the program changes. Press
the continuous button to show the 12 programs on the LCD screen.
Select your desired program.
: COLOR
Press this button to select the color of the bread crust: LIGHT, MEDIUM
or DARK.
: BREAD SIZE
Press to select the size of the bread. Please note that the total operation
time may vary depending on the size of the bread.
: DELAY (TIME + or time-)
These buttons are used to program a delayed start.
Before the timer program requires that your bread is ready by pressing
"TIME +" or "time-". Please note that the delay time should include the
baking time of the program. It's the end of the delayed start, the bread is
still warm.
1. Select the program and the color of the bread crust and loaf size.
2. Press "TIME +" or "time-" to increase or decrease the time. Each
press adds or removes 10 minutes. The maximum time is 13
hours (cooking time + delay time = 13 hours).
Example: It is 20:30, if you want your bread to be ready the next morning
at 7 am, that is to say, in 10 hours and 30minutes.
- Select your menu, color, loaf size,
- Then press TIME + or time- to add the time until 10:30 appears
on the LCD screen.
- Then press the "START / STOP" button to activate the delay start
program. You can see (located between the hours and minutes)
flash and the time remaining display.
You will get fresh bread at 7am. If you do not want to get out the bread
Page 47

EN-12
immediately, the unit automatically switches to "keep warm" for an hour.
Note: For a delayed baking, do not use perishable ingredients such
as eggs, fresh milk, fruits and vegetables, onions, etc.
KEEP WARM
Bread is automatically kept warm for 60 minutes after cooking. If you
want to get the bread, turn the mode with the "START / STOP".
Page 48

EN-13
Yeast
Flour
Water and liquid
IN CASE OF POWER FAILURE
In case of power failure during operation, if the cut does not exceed 10
minutes, the program will continue automatically even without pressing
the "START / STOP" button. If the cut exceeds 10 minutes, the program
will not be saved when the program will be restarted.
ENVIRONMENT
The machine can work well in a wide range of temperatures, but there
could be a difference in loaf size between a very warm room and a very
cold room. We suggest that the ambient temperature is between 15 ° C
and 34 ° C.
B. FUNCTION
1. Open the lid and remove the bread pan by slightly turning it in the
opposite direction of the clockwise and lifting upwards. Attach the
dough on the drive shaft until it clicks.
2. Place the ingredients in the bread pan still in the order mentioned
below. Water or liquid must be put first, then add sugar, flour and salt.
Add the last yeast into a hole that you made in the middle. (Yeast
should never be in contact with the liquid or salt)
Yeast
Flour
Water and liquid
Page 49

EN-14
3. Insert the bread pan in the unit and turn in the direction of
clockwise to lock it.
4. Close the lid gently and plug the power cord into an outlet.
5. Press the "MENU" button until the desired program isselected.
6. Press "COLOR" button to select the color of the desired bread crust.
7. Press the "BREAD SIZE" button to select the desired size (700 g or
900 g).
8. Set the delayed start by pressing "TIME +" or "time-". This step can
be omitted if you want the bread maker begins to work
immediately.
9. Press the "START / STOP" button to start the program.
10. For the basic bread program, French bread, wholemeal bread,
sweet, gluten-free and sandwich, a long beep will sound during
the operation. You can add ingredients in your preparation. Open
the lid and put the ingredients. It is possible that steam escapes
through the ventilation openings of the lid during cooking, which is
normal.
11. Once the program is completed, 10 beeps. Your bread maker will
automatically "Keep Warm" mode. You can press the "START /
STOP" button for approx. 3-5 seconds to stop mode and remove the
bread. Open the lid and while using oven mitts, firmly grasp the
handle of the bread pan. Turn the pan in the opposite direction of the
clockwise and gently pull the pan upward.
12. Use a nonstick spatula to gently loosen the edges of bread.
Page 50

EN-15
Warning: the bread pan and bread may be very hot! Always
handle with care and use oven gloves.
1. Turn the bread pan upside down onto a clean cooking surface and
gently shake until bread falls on the grid.
2. Remove the bread carefully from the pan and let cool about 20
minutes before slicing.
3. If you are out of the room or if you have not pressed the "START /
STOP" at the end of the operation, the bread will be kept warm
automatically for 1 hour and then cease to warm up.
4. If you do not use or do not use it completely, unplug the
power cord.
Note: Before slicing the loaf, use the hook to remove the kneading
blade hidden on the bottom of the bread. The bread is hot; never use
the hand to remove the kneading blade.
Note:
For quick breads
Quick breads are made of baking powder and baking soda activated by
moisture and heat. For perfect quick breads, it is suggested that all
liquids be placed in the bottom of the bread pan, dry ingredients on top.
During the initial mixing of quick bread batter and dry ingredients may
collect in the corners of the pan, it may be necessary to help machine
mix to avoid flour clumps. If this is the case, use a rubber spatula.
About the Ultra Fast program
The bread maker can bake bread in less than an hour with the ultraquick program. These two settings allow you to bake bread in 58
minutes; the bread is a little denser in texture. Ultra fast I is for baking
bread 700g while that Ultra-fast II is 900g. Kindly note that the
ingredient of water should be hot water in the range of 48-50 ° C, you
must use a cooking thermometer to measure the temperature. The
water temperature is very important to the performance of baking. If the
water temperature is too low, the bread will not achieve the expected
size; if the water temperature is too high it will kill the yeast before the
exercise, which will also affect greatly the cooking performance.
Page 51

EN-16
C. INGREDIENTS AND PREPARATIONS
1. FLOUR BREAD
Bread flour has a high gluten (so it can be called high-gluten flour
that also contains a lot of protein), it has good elasticity and can
prevent the size of the bread from collapsing after sunrise . As the
gluten content is higher than the common flour, it can be used to
make bread large and better internal fibers. Bread flour is the most
important bread-making ingredient.
2. ORDINARY FLOUR
Ordinary flour is made by mixing wheat and durum well chosen and
applicable for making express bread or cakes.
3. WHOLE WHEAT FLOUR
The whole wheat flour is made by grinding whole wheat, it contains
wheat skin and whole wheat gluten flour is heavier and more
nutritious than regular flour. Bread made from whole wheat flour is
usually small. So many recipes usually combine the whole wheat
flour and bread flour to achieve the best results.
4. BLACK WHEAT FLOUR
The buckwheat flour, also called "raw meal", is a kind of flour high
fiber content which is similar to the whole wheat flour. To obtain the
large size after lifting, it must be used in combination with a high
proportion of bread flour.
5. POWDER CAKE
The cake powder is made by grinding soft wheat or wheat with low
protein content, which is specially used for making cakes. Different
flours seem to look like. Actually yeast performance or various
flours absorption capacity differ widely depending on the growing
areas, growth reasons, grinding process and storage life. You can
choose flour with different trademark to test, taste and compare the
local market, and choose the one that could produce the best
results based on your own experiences and tastes.
6. CORN AND OATMEAL
The corn flour and oat flour are made by grinding corn and oatmeal
respectively, they are both the additive ingredients in the
manufacture of raw bread, which are used to improve the flavor and
texture.
Page 52

EN-17
7. SUGAR
Sugar is a very important ingredient to add sweet taste and color of
bread. While it helps to be inoculated bread as food. White sugar is
widely used. Brown sugar, powdered sugar or cotton sugar may be
called by special requirements.
8. YEAST
Yeast goes through the process of pasty yeast addition and
produces carbon dioxide, so that the bread expands and that the
internal fibers are soft. However, fast reproduction yeast needs
carbohydrates in the sugar and flour as food.
1 teaspoon of active dry yeast = 3/4 teaspoon of instant yeast
1.5 teaspoon of active dry yeast = 1 teaspoon of instant yeast
2 teaspoon of active dry yeast = 1.5 teaspoon of instant yeast
Yeast must be stored in the refrigerator because it will be killed at
high temperature, before using it, check the date of your yeast and
shelf life. The store in the refrigerator as soon as possible after
each use. Usually, failure of lifting the bread is caused by dead
yeast.
The methods described below will check whether your yeast is
fresh and active or not.
1) Pour 1/2 cup of hot water (45-50 °C) in a measuring cup.
2) To 1 teaspoon of white sugar in the cup and stir, then sprinkle
2 teaspoon of yeast tea on the water.
3) Place the measuring cup in a warm location for about 10
minutes. Do not stir the water.
4) The foam will be up to 1 cup. Otherwise the yeast is dead or
inactive.
9. SALT
Salt is necessary to improve bread flavor and crust color. But salt
can also prevent yeast from rising. Never use too much salt in a
recipe. If you do not want to use salt, omit the salt. And bread
would be larger if there were no salt.
10. EGGS
Eggs can improve bread texture, make the bread more nutritious
and larger size, add special egg flavor to bread. when used, it must
be peeled and mixed uniformly.
11. FAT, BUTTER AND VEGETABLE OIL
The fat can soften the bread and delay storage life. Butter should
be melted or chopped into small particles before use, so as to be
uniformly mixed when you take it out of the refrigerator.
Page 53

EN-18
12. BAKING POWDER
Baking powder is mainly used to lift the bread and Ultra-Fast cake.
As it does not need rise time and produce gas which will form
bubble or soften the texture of bread utilizing chemical principle.
13. WATER AND OTHER LIQUIDS
Water is an essential ingredient for making bread. In general, the
water temperature between 20 °C and 25 °C is most suitable. But
the water temperature should be between 45 and 50 ° C to achieve
an upward velocity for the manufacture of ultra-fast bread. Water
can be replaced by fresh milk or water mixed with 2% milk powder,
which may enhance bread flavor and improve crust color. Some
recipes may call for juice to enhance the flavor of the bread, eg
apple juice, orange juice, lemon juice, etc.
WEIGHT OF INGREDIENTS
One of the important steps to make good bread is to use the right
amount of ingredients.
It is strongly recommended to use a measuring cup, measuring spoon to get
an accurate amount, otherwise the bread will be largely influenced.
1. Weighing liquid ingredients
− Water, fresh milk or milk powder solution should be measured
with measuring cups.
− Observe the level of the measuring cup with your
eyes horizontally.
− When you measure cooking oil or other ingredients, carefully
vacuum the measuring cup without any other ingredient.
2. Measuring the dry powder
− The dry powder should be stored in natural conditions and
loose, gently level the mouth of the cup with a blade for accurate
measurement.
3. Sequence of ingredients
The investment sequence of ingredients must be observed,
generally speaking, the sequence is: liquid ingredients, eggs, salt
and milk powder etc. During the establishment of the ingredients,
the flour can not be completely wetted by liquid. The yeast may
only be placed on the dry flour. Exclusively, yeast cannot touch the
salt. After the flour has been kneaded for some time and a beep
reminds you to put fruit ingredients into the mixture. If the fruit
ingredients are added too early, the flavor will be diminished after
long mixing time. When using the delay function for a long time,
never add the perishable ingredients such as eggs or fruit.
Page 54

EN-19
D. PROGRAMME AND RECIPES
Program
Description
Ingredient
Order of
ingredients
Cycle
duration
1. Basic
bread
Knead, rise
and bake
classic bread.
It
corresponds
to a general
program for
white bread.
Most recipes
use this
program. This
program
allows you to
prepare 700g
or 900g
breads.
For 700g of bread:
230ml of water,
2 tablespoons of oil,
1 teaspoon of salt,
2 tablespoons of sugar,
420g of flour
1 teaspoon of baker's
yeast
For 900g of bread:
310ml of water,
3 tablespoons of oil,
1.5 teaspoons of
salt, 3 teaspoons of
sugar, 560g of flour
1.5 teaspoon of baker's
yeast
Water
Oil
Sugar
Flour
Salt
Baker's yeast
For 700g :
3h03
For 900g :
3h10
2. French
Bread
Knead, rise
and bake,
with a longer
fermentation
time, the
baked crust
is brittle. This
program
allows you to
prepare 700g
or 900g
breads.
For 700g of bread:
230ml of water,
2 tablespoons of oil,
1 teaspoon of salt,
2 tablespoons of sugar,
420g of flour
1 teaspoon of baker's
yeast
For 900g of bread:
310ml of water,
3 tablespoons of oil,
1.5 teaspoons of
salt, 3 teaspoons of
sugar, 560g of flour
1.5 teaspoon of baker's
yeast
Water
Oil
Sugar
Flour
Salt
Baker's yeast
For 700g :
3h50
For 900g :
4h00
3.
Wholemeal
bread
Knead, rise
and cook with
wholemeal
flour. This
program has
a longer
preheating
time to allow
the flour to
soak in water
and
For 700g of bread:
230ml of water,
2 tablespoons of
oil,
1
teaspoon of salt,
2
tablespoons of sugar,
110g of whole wheat
flour, 280g of white
flour, 14g of milk
powder
1 teaspoon of baking
powder
Water
Oil
Sugar
Salt
Wheat flour
Milk powder
Baker's yeast
For 700g :
3h42
For 900g :
3h50
Page 55

EN-20
swell. It is not
recommended
For 900g of bread:
to use the
270ml of water,
delayed start
3 tablespoons of oil,
function, as
this
1.5 teaspoons of salt,
may produce
3 tablespoons of sugar,
poor results.
220g of whole wheat
This program
flour, 280g of white
flour,
allows you to
21g of milk powder
prepare 700g
1.5 teaspoon of baker's
or 900g
breads.
yeast
4. Fast
Raise the
bread
For 700g of bread:
Water
Oil
1h50
with baking
230ml of hot water (40-
Sugar
soda or
baking
50°C), 2 tablespoons of
oil,
Flour
Salt
powder. This
Baker's yeast
program
1 teaspoon of salt,
produces a
3 tablespoons of sugar,
small size
420g of flour
baked bread
2 teaspoons of baker's
with a
relatively
yeast
dense texture.
This program
allows you to
prepare 700g
loaves of
bread.
5.
Sweetened
(Brioche)
Knead, rise
and bake
lightly
sweetened
bread. The
crust is
brittle. This
program
allows you to
prepare 700g
or 900g
breads.
For 700g of bread:
230ml of water,
2
tablespoons of oil,
1 teaspoon of salt,
3
tablespoonsof sugar,
420g of flour
2 tablespoons of milk
powder,
1 teaspoon of yeast
Water
Oil
Sugar
Flour
Milk powder
Salt
Baker's
yeast
For 700g :
3h00
For 900g :
3h05
For 900g of bread:
310ml of water,
3 tablespoons of oil,
1.5 teaspoons of salt,
4 tablespoons of sugar,
560g of flour
2 tablespoons of milk
powder,
1.5 teaspoons of yeast
Page 56

EN-21
6. Fast
cooking
Knead, rise and
bake 700g of
bread. This
menu is
generally
shorter than the
fast program.
For 700g of bread:
230ml of hot water (4050°C), 2 tablespoons of
oil,
1 teaspoon of salt,
3 tablespoons of sugar,
420g of flour
2 to 3 teaspoons of
yeast
Water
Oil
Sugar
Flour
Salt
Baker's yeast
1h08
7 Fast
cooking
Knead, rise and
bake 900g of
bread. This
menu is
generally
shorter than the
fast program.
For 900g of bread:
310ml of hot water (4050°C), 3 tablespoons of
oil,
1 teaspoon of salt,
3 tablespoons of sugar,
560g of flour
2 to 3 teaspoon of
baker's yeast
Water
Oil
Sugar
Flour
Salt
Baker's yeast
1h08
8. Dough
This program
allows you to
make all kinds
of leavened
dough
310ml water,
2 tablespoons oil,
1.5 teaspoons salt,
2 tablespoons sugar,
420g flour
1 teaspoon of baker's
yeast
Water
Oil
Sugar
Flour
Salt
Baker's yeast
1h30
9. Glutenfree
Raising and
baking bread
with wheat
flour, rice, corn,
chickpeas etc...
gluten-free.
This program is
longer to allow
the flours to
absorb water
and swell. It is
not
recommended
to use the
delayed start
function as it
may give a bad
result. This
program allows
you to prepare
700g or 900g
breads
For 700g of bread:
300g of water,
3 tablespoons of oil,
1 teaspoon of salt,
3 tablespoons of
sugar, 1 teaspoon of
vinegar, 2 eggs,
2 teaspoons of honey,
420g of corn flour
1 teaspoon of baker's
yeast
For 900g of bread:
460g of water,
4 tablespoons of oil,
1 teaspoon of salt,
4 tablespoons of
sugar, 1 teaspoon of
vinegar, 2 eggs,
2 teaspoons of honey,
560g of corn flour
1.5 teaspoon of baker's
yeast
Water
Oil
Sugar
Salt
Vinegar
Egg
Honey
Corn flour, …
Baker's yeast
For 700g :
3h25
For 900g :
3h30
Page 57

EN-22
10. Cake
This program
makes it
possible to
make all kinds
of cakes.
2 tablespoons oil,
8 tablespoons sugar
6 eggs
250g flour
1 teaspoon flavouring
1.5 tablespoons lemon
juice, 1 teaspoon of
baker's yeast
Oil Sugar
Egg
Flavour
(vanilla, etc.)
Lemon juice
Baker's yeast
3h00
11.
Sandwich
Rub,
fermentation,
baking bread
sandwiches. A
light texture for
baking bread
For 700g of
bread: 230ml of
water, 18g of
butter,
1.5 teaspoons of salt,
3 tablespoons of sugar,
1.5 tablespoons of milk,
420g of flour
1 teaspoon of baker's
yeast
Water
Butter
Sugar
Flour
Milk powder
Salt
Baker's
yeast
For
700g :
3h05
For
900g :
3h10
For 900g of
bread: 310ml of
water, 24g of
butter,
2 teaspoons of salt,
4 tablespoons of sugar,
2 tablespoons of milk,
560g of flour
1.5 teaspoon of baker's
yeast
12. Cooking
Jam: 350g of fruit of
/
1h00
Cooking
process only.
your choice cut into
process
This program
small pieces, 350g of
allows you to
jam sugar,
bake jams,
2 tablespoons of lemon
prepared
juice
dough, or to
bake more
bread at the
end of a cycle.
Page 58

EN-23
V. CLEANING & MAINTENANCE
1. Unplug the power cord from the wall socket and let
the unit cool completely before cleaning.
2. Immediately after removing the bread dish, fill the dish until
halfway with warm water and a small amount of dishwashing
liquid. Allow the dish to soak for 5 to 20 minutes or until knead
bar can be removed from the shaft. It is possible that you
were slightly twist the bar to release it. It is possible that the
kneading bar having to soak in water before being removed.
If the kneading bar is difficult to remove after soaking, attach
the crossbar below the flat while rotating knead bar to loosen.
Wash the inside of the dish and the kneading bar with a soft
cloth, rinse and dry. Use a medium power detergent. Never
use chemical cleaners, oven cleaners, scouring pads or
abrasive detergents on the bread pan or knead bar as this
may damage the finish or finish. Place the kneading bar on
the axle.
3. Do not immerse the bread pan in water or wash
never automatic dishwasher as this may damage the bearings
that drive the kneading bar. Wipe the inside of the oven
compartment and the outer surfaces of the bread maker with a
damp cloth if necessary. Never immerse the device in water or
never fill the baking compartment with water! The cover cannot
be removed for cleaning.
NOTE: The coating on the inside of the bread pan may
change color over time; This is normal and does not
affect the bread making.
Page 59

EN-24
VI. TROUBLE SHOOTING
Problem
Course
Solution
Smoke from
ventilation hole
when baking.
Some ingredients adhere to the
heating element or close to the first
use, oil remained on the surface of
the heating element
Unplug the bread maker and
vacuum the heating element, but
be careful not to burn yourself
during the first use, dry and open
the lid.
The bottom
crust of bread is
too thick.
Keep the bread warm and leave the
bread in the bread pan for a long
time, the crust will be getting dry.
Quickly take out the
bread to keep warm.
It is very difficult
to get out the
bread.
The concrete adheres firmly to the
shaft in the bread pan.
After removing the bread, pour
hot water into the bread pan and
immersing the kneader for 10
minutes, then remove it and
relocate it.
Mix the
ingredients and
cook unevenly
wrong dish.
Thee selected program
menu inappropriate
Select the proper program menu
After the operation, open the cover
several times and bread is dry, no
brown crust.
Do not open the lid during the last
climb.
Resistance to agitation is too high
so that the mixer does not have to
can hardly turn and stir properly.
Check the hole in the mixer,
then remove the bread mold
and do it operate without
load, if this is not normal,
contact the authorized service
center.
Display "HHH"
after pressing
the "START /
STOP"
The temperature in bread maker is
too high to make bread.
Press the "START / STOP" and
unplug the bread maker and
remove the bread pan and open
the cover until the bread maker
cools.
Hear the sounds
of the engine,
but the dough is
not stirred.
The bread pan is loose or dough is
too large to be stirred.
Check the bread pan is fixed, if
the dough is prepared according
to the recipe and if the ingredients
are weighed accurately.
The size of the
bread is so big
that it will push
the lid.
Yeast is too much or flour is
excessive or water is too much or
the ambient temperature is too high.
Check the above factors, properly
reduce the amount according to
the real reasons.
Page 60

EN-25
The size of the
bread is too
small or bread
did not rise.
No yeast or the amount of yeast is
not enough, moreover, yeast may
have a poor activity as the water
temperature is too high or yeast is
mixed with salt, or temperature of
the environment is low.
Check the amount and
performance of yeast, increase
the environment temperature
properly.
The dough is so
large that it
overflows the
bread pan.
The amount of liquid is such that it
makes the soft dough and the yeast
is also excessive.
Reduce the amount of liquids and
improve the rigidity of the dough.
Bread collapses
in the central
parts when
baking dough.
The used flour is not strong bread
flour and cannot make dough rise.
Use bread flour or strong bread
flour.
The yeast raises too fast or yeast
temperature is too high.
Yeast is used at room
temperature.
Excess water makes dough too wet
and too soft.
Depending on the capacity of
absorption of water, adjust the
water according to the recipe.
The bread
weight is very
important and
the organization
is too dense.
Too much flour or water shortage
Reduce flour or increase water
Too much fruit or too much whole
wheat flour.
Reduce the amount of
corresponding ingredients and
increase yeast.
The central
parts are hollow
after cutting
bread.
Excess water or yeast or no salt.
Reduce properly water or yeast
and check the salt.
The water temperature is too high
Check the water temperature
The bar surface
is adhered to the
dry powder.
There are strong tackiness
ingredients in bread such as butter
and bananas etc.
Do not add strong glutinous
ingredients in bread.
Insufficient mixing in case of lack of
water.
Check water and mechanical
engineering from the bread
maker.
The crust is too
thick and baking
color is too dark
when making
cakes or sugary
foods too.
Different recipes or ingredients have
a great effect on making bread,
baking color will become very dark
because of much sugar.
If baking color is too dark for the
recipe with too much sugar, press
"START / STOP" to pause the
program before 5-10min the
expected finishing time. Before
removing the bread you should
keep the bread or cake in bread
pan for about 20 minutes with the
lid closed.
Page 61

EN-26
ERROR CODES
1. If the display shows "HHH" after starting a program (see Figure 1
below), the temperature in the appliance is too high. We must stop
the program. Open the lid and let the unit cool for 10 to 20 minutes.
2. If the display shows "Err" after pressing "START / STOP" (see below
Figure 2), the temperature sensor is disconnected. Have your sensor
by an authorized technician.
3. If the display shows "LLL" after pressing the button "START /
STOP" (except for the cooking program), it means that the indoor
temperature is too low (5 beeps will sound), stop the sound by
pressing "START / STOP", open the lid and let the camera rest for 10
to 20 minutes to return to ambienttemperature.
NOTE: The temperature inside the bread maker is less than the ambient
temperature if you place the bread maker in a cool place (such as a room
cooling) after a while and you immediately bring the at room temperature.
Figure 1 Figure 2 Figure 3
Page 62

EN-27
VII. DISPOSAL
The logo on the product means that it is a device whose
treatment as waste within the scope of Directive 2012/19 /
EU of 4 July 2012 on electrical and electronic waste
(WEEE). This means that this product should besupported
by a selective collection system in accordance with the
European directive mentioned above in order to be either
recycled or dismantled in order to reduce any impact on the environment
Hazardous substances in electrical and electronic equipment can have
potentially dangerous effects on the environment and human health.
Thus, at the end of life of this product, it should not be rid of as unsorted
municipal waste. return and collection systems are made available by
local authorities (waste disposal) and distributors.
This product should not be thrown on the street. You have an obligation
to use the collection systems available to you.
Page 63

EN-28
VIII. WARRANTY
The warranty does not cover product wear parts, no problems or damage
resulting from:
(1) surface damage due to normal wear and tear;
(2) defects or damage due to contact of the product with liquid and due
to corrosion caused by rust or the presence of insects;
(3) any incident, abuse, misuse, modification, disassembly or
unauthorized repair;
(4) any improper maintenance operation, non-compliance with the
instructions
about the product or connection to incorrect voltage;
(5) any use of accessories not supplied or approved by the manufacturer.
The warranty is void if the elimination of plate and / or the product
serial number.
Continental Edison – 120-126 Quai de Bacalan – CS 11584 – 33000 Bordeaux
Imported by SCHNEIDER CONSUMER GROUP,
12, rue Jules Ferry, 93110 Rosny-sous-Bois, FRANCE
Page 64

www.continentaledison.fr
CEMP838DIG2 IM_FR_V.2
 Loading...