

Page 1
CEMOAC930S
MICROWAVE OVEN WITH GRILL & CONVECTION
FOUR MICRO-ONDES & GRILL & CONVECTION
Convection
Grill
Combi.
Menu Automatique
Micro-ondes
Horloge/
Preselection
Decongelation
Poids/Temps
Auto Rechauffe
Demarre
/Cuisson Express
/Confirmation
Arret/Annulation
FOUR MICRO-ONDES
FR
FR
MICROWAVE OVEN
GB
GB
Page 2

FR
MODE D’EMPLOI
FOUR A MICRO-ONDES
Lire attentivement ce mode d’emploi et le conserver pour une éventuelle
consultation
CARACTERISTIQUES
Référence: CEMOAC930S
Tension: 230V~50Hz
Puissance de consommation: 1450W
Puissance restituée: 900W
Fréquence: 2450MHz
Puissance Grill: 1100W
Puissance de chaleur tournante: 2500W
ultérieure
1
Page 3
2
FR
DESCRIPTION DE L’APPAREIL
A
F
G
A. Panneau de contrôle
E
D
B
C
B. Axe tournant
C. Anneau de rotation
D. Plateau tournant
E. Fenêtre
F. Porte
G. Mécanisme de fermeture de la porte
POINTS DE SECURITE
INSTRUCTIONS DE SÉCURITÉ IMPORTANTES
LIRE AVEC ATTENTION ET GARDER POUR DE FUTURES UTILISATIONS
Appareil de groupe 2 Classe B
Cet appareil est un appareil de Groupe 2 car il produit intentionnellement de l' énergie à
fréquence radioélectrique pour le traitement de la matière et il est destiné à être utilisé
dans un local domestique ou un établissement raccordé directement au réseau de
distribution d'électricité à basse tension alimentant des bâtiments à usage domestique
(Classe B).
Si le cordon d’alimentation est endommagé, le faire réparer par le fabricant, son service
après-vente ou une personne de qualification similaire afin d’éviter un danger.
Cet appareil n’est pas prévu pour être utilisé par des personnes (y compris les enfants)
dont les capacités physiques, sensorielles ou mentales sont réduites ou des personnes
dénuées d’expérience ou de connaissance, sauf si elles ont pu bénéficier, par
l’intermédiaire d’une personne responsable de leur sécurité, d’une surveillance ou
d’instructions préalables concernant l’utilisation de l’appareil.
Il convient de surveiller les enfants pour s’assurer qu’ils ne jouent pas avec l’appareil.
MISE EN GARDE: Si la porte ou le joint de porte est endommagé, le four ne doit pas être mis en
fonctionnement avant d’avoir été réparé par une personne compétente;
MISE EN GARDE: Il est dangereux pour quiconque autre qu’une personne compétente
d’effectuer des opérations de maintenance ou de réparation entraînant le retrait d’un couvercle
qui protège de l’exposition à l’énergie micro-ondes;
MISE EN GARDE: Les liquides et autres aliments ne doivent pas être chauffés dans des
contenants fermés hermétiquement car ils risquent d’exploser;
MISE EN GARDE: N’autorisez les enfants à utiliser le four sans surveillance que si des
instructions appropriées leur ont été données, permettant à l’enfant d’utiliser le four de façon sûre
et de comprendre les dangers d’une utilisation incorrecte;
- N’utiliser que des ustensiles appropriés à l’usage dans les fours micro-ondes;
Page 4

3
FR
- Pendant le chauffage de denrées alimentaires dans des contenants en plastique ou en papier,
garder un oeil sur le four en raison de la possibilité d’inflammation;
- Si de la fumée apparaît, arrêter ou débrancher le four et garder la porte fermée pour étouffer les
flammes éventuelles;
- Le chauffage des boissons par micro-ondes peut provoquer un jaillissement brusque et différé
de liquide en ébullition, aussi des précautions doivent elles être prises lors de la manipulation du
récipient;
- Le contenu des biberons et des pots d’aliments pour bébé doit être remué ou agité et la
température doit en être vérifiée avant consommation, de façon à éviter les brûlures;
- Il n’est pas recommandé de chauffer les oeufs dans leur coquille et les oeufs durs entiers dans
un four micro-ondes car ils risquent d’exploser, même après la fin de cuisson;
- Il est recommandé de nettoyer le four régulièrement et d’enlever tout dépôt alimentaire;
- Si l’appareil n’est pas maintenu dans un bon état de propreté, sa surface pourrait se dégrader et
affecter de façon inexorable la durée de vie de l’appareil et conduire à une situation dangereuse;
- N’utiliser que la sonde thermique prévue pour cet appareil.
- Le four à micro-ondes ne doit pas être placé dans un meuble.
Les surfaces sont susceptibles de devenir chaudes au cours de l'utilisation.
Les appareils ne sont pas destinés à être mis en fonctionnement au moyen d'une minuterie
extérieure ou par un système de commande à distance séparé.
Cet appareil est destiné à être utilisé dans des applications domestiques et analogues telles que:
– les coins cuisines réservés au personnel des magasins, bureaux et autres environnements
professionnels;
– les fermes;
– l’utilisation par les clients des hôtels, motels et autres environnements à caractère résidentiel;
– les environnements de type chambres d’hôtes.
Lors de son utilisation, l'appareil devient chaud. Faire attention à ne pas toucher les éléments
chauffants situés à l'intérieur du four.
MISE EN GARDE: Les parties accessibles peuvent devenir chaudes au cours de l'utilisation.
Il est recommandé d’éloigner les jeunes enfants.
Ne pas utiliser de produits d'entretien abrasifs ou de grattoirs métalliques durs pour nettoyer la
porte en verre du four, ce qui pourrait érafler la surface et entraîner l’éclatement du verre.
Ne pas utiliser d’appareil de nettoyage à la vapeur.
MISE EN GARDE
ATTENTION
RAYONNEMENT DE MICRO-ONDES
NE PAS S'EXPOSER AU RAYONNEMENT DU GENERATEUR
DE MICRO-ONDES OU AUTRES PARTIES
CONDUISANT L'ENERGIE
ATTENTION A LA RADIATION DE CHALEUR ET AUX RISQUES DE
BRULURES LORSQUE LES FONCTIONS CHALEUR TOURNANTE,
COMBINAISON ET CUISSON ALTERNEE SONT ACTIVEES.
USTENSILES
Ce four est un four combiné, à micro-ondes et à chaleur tournante. Cela pose certaines
contraintes quant aux types d'ustensiles pouvant être utilisés. Il convient donc, avant toute
utilisation, de bien vérifier que les ustensiles sont appropriés à la cuisson dans un tel four.
Les récipients qui conviennent le mieux et dans tous les cas sont des récipients en verre ou
céramique résistant à la chaleur. Tous les récipients et ustensiles métalliques sont à
proscrire. En effet, les micro-ondes ne peuvent pas pénétrer les métaux. En cas d'utilisation de
tels ustensiles, il peut y avoir apparition d'étincelles ou flash qui peuvent entraîner des dangers
pour l'utilisateur et de sérieux dommages pour votre appareil. Egalement, ne pas mettre les
aliments dans des boîtes ou sous papier aluminium.
Page 5
4
FR
De manière générale, ne jamais mettre des récipients fermés hermétiquement qui pourraient
exploser à cause de la chaleur. Veillez donc à enlever le couvercle ou à laisser des ouvertures
pour permettre à la vapeur de se dégager.
L'utilisateur est vivement conseillé de surveiller régulièrement et attentivement la cuisson.
Utiliser des récipients en verre ou céramique.
Pour des temps de cuisson courts et sans la fonction grill, des récipients en plastique ou carton
peuvent être utilisés, ainsi que plats surgelés sous films plastiques, sous réserve que ces films
aient été percés avec une fourchette au préalable pour permettre à la vapeur de s'échapper.
Avant l'utilisation, vérifier que les ustensiles sont bien appropriés à la cuisson dans un four à
micro-ondes. Tout ustensile métallique est à proscrire. En effet, les objets métalliques
provoquent des étincelles ou flash qui peuvent conduire à de sérieux dommages sur votre
appareil. Egalement, ne pas mettre les aliments dans des boîtes ou sous film en aluminium.
Ne pas utiliser de récipients en bois, ils pourraient se consumer.
Ne pas utiliser de vaisselle en métal, fonte, ou en faïence ayant des parties même minimes en
métal (y compris argent ou or), votre appareil tomberait en panne.
De manière générale, ne jamais mettre de récipients fermés qui peuvent exploser par la chaleur
faute d'enlever le couvercle, ou par absence d'ouverture.
Il est conseillé à l'utilisateur de surveiller de temps en temps le four lorsque de la nourriture est
chauffée ou cuite dans des récipients jetables en matière plastique, papier ou autres matériaux
combustibles.
Lorsque des aliments sont chauffés dans des récipients en matière plastique ou en papier,
surveiller le four fréquemment à cause des risques d’incendie.
Ne pas ranger d'ustensiles de cuisine ou de papier dans ce four.
La liste ci-dessous constitue un guide indicatif pour vous aider à sélectionner les ustensiles et
récipients adéquates pour une cuisson sans danger.
INSTALLATION
Après avoir déballé votre appareil, examinez-le avec soin pour savoir s'il n'a pas subi de
dommages visibles durant le transport;
Déballez complètement l'appareil en enlevant toutes les protections situées à l'intérieur du four.
Placez le four sur une surface plate. Laissez au moins 30 cm au-dessus de l'appareil, et 7.5 cm
sur les côtés et à l'arrière, pour permettre une bonne ventilation. Assurez-vous qu'il n'y a rien qui
obstrue les bouches de ventilation sur les côtés, le dessus et à l'arrière de l'appareil. Evitez de
placer le four près de tout autre appareil générant une source de chaleur. Ne pas installer ce four
à l'air libre ni dans des locaux très humides ou excessivement chauds. Ne pas encastrer ce four.
Il est également recommandé de ne pas placer ce four près d'un poste radio ou de télévision, le
champs magnétique du four pouvant créer des interférences et parasites.
Enlevez tout emballage à l'intérieur du four.
Avant d'utiliser le four, nettoyez l'intérieur avec un chiffon humide.
Branchez l'appareil sur une prise domestique du secteur 230V ~ 50Hz, équipée d'une terre.
Vérifiez ensuite que le four fonctionne correctement
- Placez dans le four l'anneau plastique avec ses roulettes, puis posez le plateau en verre sur
l'axe central d'entraînement. Attention: ce plateau en verre est fragile.
- Placez un verre d'eau dans l'appareil sur le plateau en verre.
- Fermez la porte correctement.
Page 6
5
FR
- Appuyez une fois sur la touche . La lampe interne
alors, le plateau
pendant 30 secondes,
- En fin de cuisson, 5 signaux sonores se font entendre, et le four s'arrête.
- Si le four fonctionne bien, l'eau doit être chaude.
- Si le four ne fonctionne pas, n'essayez pas de réparer vous-même cet appareil, mais retournez-
le au Service Après-Vente du magasin où vous l'avez acheté.
UTILISATION
HORLOGE
En appuyant une fois sur la touche «Horloge/Présélection», l’affichage apparaît en format «12H».
Appuyez une seconde fois et l’affichage apparaît en format «24H». Appuyer sur les touches Ÿź
pour régler les heures. En appuyant une seconde fois sur la touche «Horloge/Présélection» puis
en appuyant sur les touches Ÿź, vous réglez les minutes. En appuyant une troisième fois sur
«Horloge/Présélection» vous sauvegardez votre sélection.
.
MICRO-ONDES
1) Appuyez une fois sur la touche «Micro-ondes» pour sélectionner la puissance maximale
100%.
2) En appuyant de nouveau, vous pouvez régler d'autres niveaux de puissance :
3) Réglez ensuite le temps de cuisson par les touches Ÿź. La durée maximale de cuisson
est de 95 minutes
4)
Appuyez ensuite sur la touche « ».
CHALEUR TOURNANTE avec préchauffage
1) Appuyer sur « Convection/Grill/Combi. », les icônes ºC et
température 140 affiche sur l’écran. Sélectionnez la température de 140ºC à 230ºC par
les touches Ÿź.
2)
Appuyer sur « » pour confirmer.
3)
Appuyer à nouveau sur « » pour démarrer la
cuisson. Lorsque le four
pouvez enfourner votre plat.
4) Appuyer sur Ÿź pour régler la durée de cuisson.
5)
Appuyer sur « » pour commencer la cuisson.
CHALEUR TOURNANTE sans préchauffage
1) Appuyer sur « Convection/Grill/Combi. », les icônes ºC et
température 140 affiche sur l’écran. Sélectionnez la température de 140ºC à 230ºC par
les touches Ÿź.
2)
Appuyer sur « » pour confirmer.
3) Appuyer sur Ÿź pour régler la durée de cuisson.
4)
Appuyer sur « » pour commencer la cuisson.
GRILL
1) Appuyer sur « Convection/Grill/Combi. », l’icônes
fonction grill par les touchesŸź, l’écran affiche « G-1 » et .
2)
Appuyer sur « » pour confirmer.
Appuyer sur Ÿź pour régler la durée de cuisson.
3)
Appuyer sur « » pour commencer la cuisson.
4)
COMBINAISON
1) Appuyer sur « Convection/Grill/Combi. », l’icônes
fonction grill par les touchesŸź, l’écran affiche « C-1, C-2, C-3 ou C-4 »
se met à tourner, et les ondes internes réchauffent alors le verre d’eau
Affichage
écran
Puissance : P100 P80 P50 P30 P10
Demarre
Demarre
Demarre
Demarre
Demarre
Demarre
Demarre
/Cuisson Express
tandis que le décompte du temps apparaît sur l’affichage.
100% 80% 50% 30% 10%
Demarre
/Cuisson Express
Demarre
atteint la température choisie, un bip vous indique que vous
/Cuisson Express
/Cuisson Express
/Cuisson Express
/Cuisson Express
/Cuisson Express
/Confirmation
/Cuisson Express
/Confirmation
/Confirmation
/Confirmation
/Confirmation
/Confirmation
/Confirmation
/Cuisson Express
/Confirmation
/Confirmation
et 140 affichent. Sélectionner la
et 140 affichent. Sélectionner la
apparaissent et la
apparaissent et la
s’allume
Page 7

6
FR
2)
Appuyer sur « » pour confirmer.
Demarre
/Cuisson Express
/Confirmation
3) Appuyer sur Ÿź pour régler la durée de cuisson.
4)
Appuyer sur « » pour commencer la cuisson.
Function Ecran Micro-ondes Gril Convection
Combi. 1 C-1
Combi. 2 C-2
Combi. 3 C-3
Combi. 4 C-4
Demarre
/Cuisson Express
/Confirmation
ƽƽ
ƽƽ
ƽƽ
ƽƽƽ
CUISSON EXPRESS
Utilisez cette fonction pour démarrer très vite votre four en cuisson micro-ondes (puissance
maximum). A chaque pression sur la touche« », vous
augmentez le temps de
cuisson. Le four à micro-ondes se met en marche automatiquement.
Demarre
/Cuisson Express
/Confirmation
DECONGELATION PAR LE POIDS
1)
Appuyer sur la touche « », l’écran affiche « d-1 ».
Decongelation
Poids/Temps
2) Appuyer sur Ÿź pour régler le poids de l’aliment.
3)
Appuyer sur « » pour commencer la décongélation.
Demarre
/Cuisson Express
/Confirmation
DECONGELATION PAR LE TEMPS
1)
Appuyer 2 fois sur la touche « », l’écran affiche « d-2 »
Decongelation
Poids/Temps
2) Appuyer sur Ÿź pour régler le temps de cuisson.
3)
Appuyer sur « » pour commencer la décongélation.
Demarre
/Cuisson Express
/Confirmation
CUISSON MULTI-PUISSANCE
3 modes de cuisson au maximum peuvent être sélectionnés. Si l’un des modes de cuisson est la
décongélation celui-ci doit être placé en premier. Le passage d’un mode de cuisson à un autre
est annoncé par un « bip ».
Remarque : les menus automatiques ne font pas partie de la cuisson combinée.
Exemple : Vous souhaitez utiliser la fonction « micro » à une puissance de 100% pendant 20
minutes + la fonction « micro » à une puissance de 80% pendant 5 minutes :
1) Appuyez sur la touche «Micro-ondes» l’écran affiche « P100 »
2) Appuyer sur Ÿź pour régler la durée de cuisson de 20 minutes.
3) Appuyez sur «Micro-ondes», P80 affiche sur l’écran.
4) Appuyer sur Ÿź pour régler la durée de cuisson de 5 minutes.
5)
Appuyer sur « » pour commencer la cuisson.
Demarre
/Cuisson Express
/Confirmation
CUISSON PRE-PROGRAMME
*L’horloge doit être réglée avant d’utiliser cette fonction
1) Vous pouvez choisir 3 modes de cuissons au maximum, la fonction décongélation ne
peut pas être sélectionnée.
2) Appuyer sur «Horloge/Présélection».
3) Appuyer sur Ÿź pour régler les heures.
4) Répéter les étapes 2 et 3 pour régler les minutes.
5)
Appuyer sur « » pour enregistrer le réglage. A
l’heure enregistrée un «
Demarre
/Cuisson Express
bip » annoncera le début de la cuisson automatique.
/Confirmation
RECHAUFFE
1)
Appuyer sur « » pour sélectionner le type d’aliment. « h-1 », « h-2 », « h-
Auto Rechauffe
3 », « h-4 » affichent.
2) Appuyer sur Ÿź pour sélectionner le poids.
3)
Appuyer sur « » pour commencer.
Demarre
/Cuisson Express
/Confirmation
Page 8
7
FR
VERROUILLAGE ENFANTS
Appuyez sur la touche « » pendant 3 secondes jusqu'à ce qu'un bip sonore
retentisse
Pour annuler la fonction, appuyez sur la touche « » pendant 3 secondes, un « bip »
indique que le verrouillage enfant est désactivé.
MENU AUTOMATIQUE
VERIFICATION DU MODE
FONCTIONNEMENT
et que l'indication affiche sur l'écran.
1)
Ce programme automatique a été conçu pour vous faciliter la cuisson de certains
aliments familiers et souvent utilisés.
2) Supposons que vous voulez cuire des pâtes de 150g :
3) Appuyer sur la touche «menu automatique», l’écran affiche «A7».
Appuyer sur « » pour confirmer.
4)
5) Appuyer sur Ÿź pour régler le poids de l’aliment. L’écran affiche «g» et «150»
6)
Appuyer sur « » pour commencer.
1) Appuyer sur Micro-ondes pendant la cuisson. La puissance des micro-ondes s’affiche, 3
secondes plus tard le four revient au mode précédent.
2) En mode cuisson pré-progamme vous pouvez connaître le temps restant avant le
démarrage en appuyant sur Horloge / Présélection
3) Au cours de la cuisson vous pouvez connaître le temps restant en appuyant sur
Horloge /
«»
- 5 bip annoncent la fin de chaque opération.
- Lorsque la porte est ouverte pendant le fonctionnement, il faut appuyer sur
Demarre
- Un bip annonce que la pression sur une touche n’est pas suffisante.
Arret/Annulation
Demarre
/Cuisson Express
Demarre
/Cuisson Express
«
Présélection
/Cuisson Express
.
/Confirmation
Arret/Annulation
/Confirmation
/Confirmation
»
«
. pour reprendre la cuisson.
»
Page 9
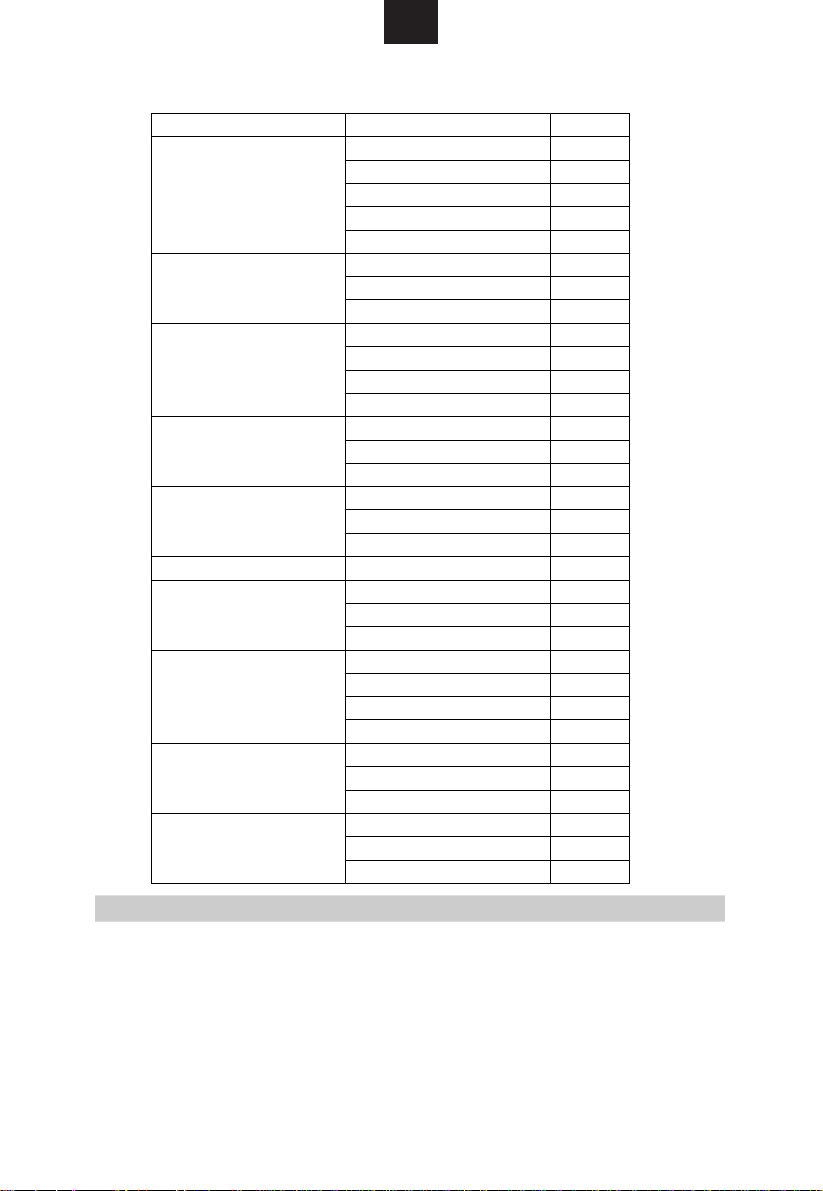
Menu Automatique :
8
FISH / POISSON
SOUP / SOUPE
MEAT / VIANDE
BREAD / PAIN
PIZZA / PIZZA
A6 CAKE / GATEAUX 475g 475
PASTA / PATES
A8 CHICKEN / POULET
VEGETABLE / LEGUMES
POTATO / POMME DE TERRE
FR
Menu Poids Affichage
150 g 150
A1
A2
A3
A4
A5
A7
A9
A10
50g(avec 450 ml d’eau froide)
100g(avec 800 ml d’eau froide)
150g(avec1200 ml d’eau froide)
250 g 250
350 g 350
450 g 450
650 g 650
200ml 200
400ml 400
600ml 600
150 g 150
300 g 300
450 g 450
600 g 600
50 g 50
100 g 100
150 g 150
200 g 200
300 g 300
400 g 400
50
100
150
500 g 500
750 g 750
1000 g 1000
1200 g 1200
150 g 150
350 g 350
500 g 500
230 g
460 g
690 g
1
2
3
EN CAS DE PANNE
En cas de problème, s'assurer que:
1- La prise de courant est correctement enfoncée et alimentée par le courant du secteur (fusible
en état), ce qui est vérifiable par le branchement d'un autre appareil en état de marche.
2- La porte de votre four est correctement fermée.
3- Le four n'est pas trop chaud. (En effet, cet appareil est équipé d'une sécurité thermique qui
suspend son fonctionnement tant que la température interne est trop élevée pour une cuisson
sans danger). Dans ce cas, attendre le refroidissement.
4- Que rien ne bloque la rotation du plateau tournant.
Page 10

9
FR
NETTOYAGE
Assurez-vous toujours que votre four est bien arrêté avant de le nettoyer en enlevant la prise de
courant.
Il est recommandé de nettoyer le four régulièrement et d’enlever tout dépôt alimentaire.
Si l’appareil n’est pas maintenu dans un bon état de propreté, sa surface pourrait se
dégrader et affecter de façon inexorable la durée de vie de l’appareil et conduire à une
situation dangereuse.
Les éclaboussures sur la face intérieure de la porte, ainsi que sur les joints de porte et les
parties avoisinantes doivent être nettoyées quotidiennement avec de l'eau chaude
savonneuse.
En cas de détérioration des joints de porte ou des parties avoisinantes, le four ne devra
pas fonctionner jusqu'à sa remise en état par un technicien qualifié du Service AprèsVente.
Ne jamais verser d'eau dans le four
Ne pas mettre d'eau dans les bouches de ventilation situées sur l'appareil, sur les côtés
ou à l'arrière.
Assurez-vous toujours que votre four est bien arrêté avant de le nettoyer en enlevant la prise de
courant.
Gardez la cavité interne du four toujours propre et sèche, en la nettoyant régulièrement avec un
chiffon doux. Ne pas utiliser d'éléments abrasifs car vous risquez de rayer ou d'endommager la
peinture.
Rincez et séchez avec soin. Il est préférable d'entretenir les parties métalliques de la porte avec
un chiffon humide. Ne pas utiliser de brosse, d'éponge à récurer ou de chiffon abrasif ou tout
autre liquide susceptible d'endommager en particulier le moteur d'entraînement du plateau en
verre.
L'extérieur du four est en métal. Nettoyez-le avec un chiffon humidifié d'eau chaude savonneuse.
Rincez et séchez avec un chiffon doux.
En application de la directive DEEE 2002/96/CE concernant l’environnement, il
est interdit d’éliminer les appareils électriques ou électroniques usagés dans
la nature ou dans une simple décharge publique. Il est demande de les porter
dans un dépôt prévu a cet effet pour recyclage.
Page 11

GB
Microwave Oven
INSTRUCTION MANUAL
MODEL:CEMOAC930S
Read these instructions carefully before using your
microwave oven, and keep it carefully.
If you follow the instructions, your oven will provide you with
many years of good service.
SAVE THESE INSTRUCTIONS CAREFULLY
10
Page 12

GB
PRECAUTIONS TO AVOID POSSIBLE EXPOSURE
TO EXCESSIVE MICROWAVE ENERGY
(a) Do not attempt to operate this oven with the door open since this can
result in harmful exposure to microwave energy. It is important not to
break or tamper with the safety interlocks.
(b) Do not place any object between the oven front face and the door or allow
soil or cleaner residue to accumulate on sealing surfaces.
(c) WARNING: If the door or door seals are damaged, the oven must not
be operated until it has been repaired by a competent person.
ADDENDUM
If the apparatus is not maintained in a good state of cleanliness, its surface could
be degraded and affect the lifespan of the apparatus and lead to a dangerous
situation.
Specifications
Model:
Rated Voltage:
Rated Input Power(Microwave):
Rated Output Power(Microwave):
Rated Input Power(Grill):
Rated Input Power(Convection):
Oven Capacity:
Turntable Diameter:
External Dimensions(LxWxH):
Net Weight:
CEMOAC930S
230V~50Hz
1450W
900W
1100W
2500W
30L
315mm
520 480 335mm
Approx. 19.3kg
11
Page 13

GB
IMPORTANT SAFETY INSTRUCTIONS
WARNING
To reduce the risk of fire, electric shock, injury to persons
or exposure to excessive microwave oven energy when
using your appliance, follow basic precautions, including
the following:
1. Warning: Liquids and other foods must
not be heated in sealed containers since
they are liable to explode.
2. Warning: It is hazardous for anyone other
than a competent person to remove a
cover which gives protection against
exposure to microwave energy.
3. Warning: Only allow children to use the
oven without supervision when adequate
instructions have been given so that the
child is able to use the oven in a safe way
and understand the hazards of improper
use.
4. Warning: When the appliance is operated
in the combination mode, children should
only use the oven under adult supervision
due to the temperatures generated.
(only for grill series)
5. Only use utensils suitable for use in
microwave ovens.
6. The oven should be cleaned regularly and
any food deposits should be removed.
7. Read and follow the specific:"PRECAU TIONS TO AVOID POSSIBLE EXPOSURE
TO EXCESSIVE MICROWAVE ENERGY".
8. When heating food in plastic or paper
containers, keep an eye on the oven due
to the possibility of ignition.
9. If smoke is observed, switch off or unplug
the appliance and keep the door closed
in order to stifle any flames.
10. Do not overcook food.
11. Do not use the oven cavity for storage
purposes. Do not store items,
such as bread, cookies, etc. inside the
oven.
12. Remove wire twist-ties and metal handles
from paper or plastic containers/bags
before placing them in the oven.
13. Install or locate this oven only in
accordance with the installation
instructions provided.
14. Eggs in the shell and whole hard-boiled
eggs should not be heated in microwave
ovens since they may explode, even
after microwave heating has ended.
15. Use this appliance only for its intended
uses as described in manual. Do not
use corrosive chemicals or vapors
in this appliance. This oven is especially
designed to heat. It is not designed for
industrial or laboratory use.
16. If the supply cord is damaged, it must
be replaced by the manufacturer, its
service agent or similarly qualified
persons in order to avoid a hazard.
17. Do not store or use this appliance
outdoors.
18. Do not use this oven near water, in a
wet basement or near a swimming
pool.
19. The temperature of accessible surfaces
may be high when the appliance is
operating.
hot during use.
heated surface, and do not cover any
vents on the oven.
20. Do not let cord hang over edge of table
or counter.
21. Failure to maintain the oven in a clean
condition could lead to deterioration
of the surface that could adversely
affect the life of the appliance and
possibly result in a hazardous situation.
22. The contents of feeding bottles and
baby food jars shall be stirred or shaken
and the temperature checked before
consumption, in order to avoid burns.
The surfaces are liable to get
Keep cord away from
12
Page 14

GB
23. Microwave heating of beverages can result in delayed eruptive boiling, therefore
take care when handling the container.
24.The appliance is not intended for use by persons (including children) with reduced
physical , sensory or mental capabilities, or lack of experience and knowledge,
unless they have been given supervision or instruction concerning use of the appliance
by a person responsible for their safety.
25.Children should be supervised to ensure that they do not play with the appliance.
26.The microwave oven shall not be placed in a cabinet unless it has been tested in a cabinet.
27.The appliances are not intended to be operated by means of an external timer or
separate remote-control system.
28. WARNING: Ensure that the appliance is switched off before replacing the lamp to avoid
the possibility of electric shock.
29. Accessible parts may become hot during use. Young children should be kept away
steam cleaner is not to be used.
30. Surface of a storage drawer can get hot.
31. Do not use harsh abrasive cleaners or sharp metal scrapers to clean the oven door
glass since they can scratch the surface, which may result in shattering of the glass.
32. During use the appliance becomes hot. Care should be taken to avoid touching heating
elements inside the oven.
33. Only use the temperature probe recommended for this oven.(for ovens provided with a
facility to use a temperature-sensing probe.)
34.The rear surface of appliance shall be placed against a wall.
13
Page 15

GB
To Reduce the Risk of Injury to Persons
Grounding Installation
DANGER
Electric Shock Hazard
Touching some of the internal
components can cause serious
personal injury or death. Do not
disassemble this appliance.
WARNING
Electric Shock Hazard
Improper use of the grounding
can result in electric shock. Do
not plug into an outlet until
appliance is properly installed
and grounded.
This appliance must be grounded. In the event of
an electrical short circuit, grounding reduces the
risk of electric shock by providing an escape wire
for the electric current. This appliance is equipped
with a cord having a grounding wire with a
grounding plug. The plug must be plugged into an
outlet that is properly installed and grounded.
Consult a qualified electrician or serviceman if the
grounding instructions are not completely
understood or if doubt exists as to whether the
appliance is properly grounded. If it is necessary
to use an extension cord , use only a 3-wire
extension cord.
CLEANING
Be sure to unplug the appliance
from the power supply.
1. Clean the inside of the oven after using
with a slightly damp cloth.
2. Clean the accessories in the usual way
in soapy water.
3. The door frame and seal and
neighbouring parts must be cleaned
carefully with a damp cloth when they
are dirty.
Two-round-pin plug
1. A short power-supply cord is provided to
reduce the risks resulting from becoming
entangled in or tripping over a longer cord.
2. If a long cord set or extension cord is used:
1)The marked electrical rating of the cord set
or extension cord should be at least as great
as the electrical rating of the appliance.
2)The extension cord must be a grounding type 3-wire cord.
3)The long cord should be arranged so that it
will not drape over the counter top or tabletop
where it can be pulled on by children or tripped
over unintentionally.
14
Page 16

GB
UTENSILS
CAUTION
Personal Injury Hazard
It is hazardous for anyone
other than a compentent person
to carry out any service or repair
operation that involves the removal
of a cover which gives protection
against exposure to microwave
energy.
See the instructions on "Materials you can use in
microwave oven or to be avoided in microwave oven."
There may be certain non-metallic utensils that are not
safe to use for microwaving. If in doubt, you can test the
utensil in question following the procedure below.
Utensil Test:
1. Fill a microwave-safe container with 1 cup of cold
water (250ml) along with the utensil in question.
2. Cook on maximum power for 1 minute.
3. Carefully feel the utensil. If the empty utensil is
warm, do not use it for microwave cooking.
4. Do not exceed 1 minute cooking time.
Materials you can use in microwave oven
Utensils Remarks
Aluminum foil Shielding only. Small smooth pieces can be used to cover thin parts of
meat or poultry to prevent overcooking. Arcing can occur if foil is too
close to oven walls. The foil should be at least 1 inch (2.5cm) away from
oven walls.
Browning dish
Dinnerware
Glass jars
Glassware
Oven cooking
bags
Paper plates
and cups
Paper towels
Parchment
paper
Plastic
Plastic wrap
Thermometers Microwave-safe only (meat and candy thermometers).
Wax paper Use as a cover to prevent splattering and retain moisture.
Follow manufacturer’s instructions. The bottom of browning dish must be
at least 3/16 inch (5mm) above the turntable. Incorrect usage may cause
the turntable to break.
Microwave-safe only. Follow manufacturer's instructions. Do not use
cracked or chipped dishes.
Always remove lid. Use only to heat food until just warm. Most glass jars
are not heat resistant and may break.
Heat-resistant oven glassware only. Make sure there is no metallic trim.
Do not use cracked or chipped dishes.
Follow manufacturer’s instructions. Do not close with metal tie. Make
slits to allow steam to escape.
Use for short–term cooking/warming only. Do not leave oven unattended
while cooking.
Use to cover food for reheating and absorbing fat. Use with supervision
for a short-term cooking only.
Use as a cover to prevent splattering or a wrap for steaming.
Microwave-safe only. Follow the manufacturer’s instructions. Should be
labeled "Microwave Safe". Some plastic containers soften, as the food
inside gets hot. "Boiling bags" and tightly closed plastic bags should be
slit, pierced or vented as directed by package.
Microwave-safe only. Use to cover food during cooking to retain
moisture. Do not allow plastic wrap to touch food.
15
Page 17

16
GB
Materials to be avoided in microwave oven
Utensils
Aluminum tray
Food carton with
metal handle
Metal or metaltrimmed utensils
Metal twist ties
Paper bags
Plastic foam
Wood
Remarks
May cause arcing. Transfer food into microwave-safe dish.
May cause arcing. Transfer food into microwave-safe dish.
Metal shields the food from microwave energy. Metal trim may
cause arcing.
May cause arcing and could cause a fire in the oven.
May cause a fire in the oven.
Plastic foam may melt or contaminate the liquid inside when exposed
to high temperature.
Wood will dry out when used in the microwave oven and may split
or crack.
SETTING UP YOUR OVEN
Names of Oven Parts and Accessories
Remove the oven and all materials from the carton and oven cavity.
Your oven comes with the following accessories:
Glass tray 1
Turntable ring assembly 1
Instruction Manual 1
F
A
G
Grill Rack ( Only for Grill series )
E
CB
D
A) Control panel
B) Turntable shaft
C) Turntable ring assembly
D) Glass tray
E) Observation window
F) Door assembly
G) Safety interlock system
Page 18

Turntable Installation
17
Hub (underside)
Glass tray
Turntable shaft
Turntable ring assembly
a. Never place the
tray should never be restricted.
b. Both
always be used during cooking.
c. All food and containers of food are always placed
on the
d. If
glass tray
breaks, contact your nearest authorized service
center.
Countertop Installation
Remove all packing material and accessories.
Examine the oven for any damage such as
dents or broken door. Do not install if oven is
damaged.
Installation
1. Select a level surface that provide
enough open space for the intake
and/or outlet vents.
12 inch(30cm)
3.0 inch(7.5cm)
3.0 inch(7.5cm)
OPEN
GB
glass tray
glass tray
glass tray
and
for cooking.
or
turntable ring assembly
Cabinet: Remove any protective film found
on the microwave oven cabinet surface.
Do not remove the light brown Mica cover
that is attached to the oven cavity to
protect the magnetron.
(3) Blocking the intake and/or outlet openings
can damage the oven.
(4) Place the oven as far away from
radios and TV as possible.
Operation of microwave oven may
cause interference to your radio or TV
reception.
2. Plug your oven into a standard household
outlet. Be sure the voltage and the
frequency is the same as the voltage
and the frequency on the rating label.
upside down. The glass
turntable ring assembly
cracks or
must
A minimum clearance of 3.0 inches
(7.5cm) is required between the oven and
any adjacent walls. One side must be open.
(1) Leave a minimum clearance of 12
inches (30cm) above the oven.
(2) Do not remove the legs from the
bottom of the oven.
WARNING: Do not install oven over a
range cooktop or other heat-producing
appliance. If installed near or over a heat
source, the oven could be damaged and
the warranty would be void.
The accessible surface
may be hot during
operation.
Page 19

Control Panel
GB
English
CLOCK/
PRE-SET
DEFROST
BY W.T./BY TIME
AUTO REHEAT
French
Horloge/
Preselection
Decongelation
Poids/Temps
Auto Rechauffe
CONVECTION
GRILL
COMBI.
AUTO MENU
MICROWAVE
START
/+30SEC.
/CONFIRM
STOP/CLEAR
18
Convection
Grill
Combi.
Menu Automatique
Micro-ondes
Demarre
/Cuisson Express
/Confirmation
Arret/Annulation
Page 20

GB
Operation Instructions
This microwave oven applies modern electronic control to adjust cooking parameters
to meet your needs better for cooking.
1. Clock Setting
When the microwave oven is electrified, the LED will display "0:00", buzzer will ring once.
1) Press "
and 24H
2) Press " " or " " to adjust the hour figures, the input time should be
within 0--23(for 24H) or 1--12(for 12H).
Horloge/
or 12H will be displayed.
Preselection
" once or twice to choose 24 hours or 12 hours system,
3) Press "
4) Press " " or " " to adjust the minute figures, the input time should
be within 0--59.
5) Press "
6) If you want to reset the clock, just to follow the above steps. If the "
is not pressed to confirm, press "Stop/ Clear" or no operation within 1 minute,the
clock that has been set will be canceled.
Note: 1. When power is supplied,time will not count (show 0:00) if clock is not set.
2. During setting the clock, if you press " Stop/Clear " key, the clock
setting will be exit .
Horloge/
Horloge/
Preselection
Preselection
", the minute figures will flash.
" to finish clock setting. ":" will flash and the time will light.
Horloge/
Preselection
2. Microwave Cooking
Press " " different times to choose different microwave power,
Micro-ondes
and "P100, P80,P50, P30, P10" will be displayed in cycle. Then press
" " or " " to adjust the cooking time(up to 95 minutes). Press
" " to start cooking.
Demarre
Example:
the oven as the following steps.
1) Keep pressing " " till "P50" displays. And " " will light.
2) Press " " or " " to adjust the cooking time till the oven displays "20:00".
/Cuisson Express
If you want to use 50% power to cook for 20 minutes, you can operate
/Confirmation
Micro-ondes
"
3)
Press " " to start cooking. ":" will light and
Demarre
/Cuisson Express
/Confirmation
" " will flash. Five beep will sound when cooking finishes.
Power
Display
100% 80% 50% 30% 10%
P100 P80 P50 P30 P10
19
Page 21

GB
Note:
the step amount of the pressing of " " and " " keys are:
0----1 min : step 5 seconds
1----5 min : step 10 seconds
5----10 min : step 30 seconds
10----30 min : step 1 Minute
30----95 min : step 5 Minutes
3. Convection Cooking(with preheating function)
The convection cooking can let you to cook the food as a traditional oven. Microwave is not
used. It is recommended that you should preheat the oven to the appropriate temperature
before placing the food in the oven.
1) Press " Convection/ Grill/ Combi.", "140"," " will flash in the display, and " "
will light. Choose different temperature by pressing " " or " " from 140 to 230 .
2) Press "
3) Press " " again to start preheating.
4) The temperature figure will flash when temperature arrives in advance and buzzer
will ring twice reminding you to put food in, then close the door.
5) Press " " or " " to adjust the cooking time, the maximum time that can
be set is 95 minutes.
6) Press "
time counts
Note: a. Cooking time cannot be input until the preheating temperature arrives.
If the temperature arrives, door must be opened to input the cooking time.
b. If the time not input in 5 minutes, the oven will stop preheating. The
buzzer sound five times and turn back to waiting states.
Demarre
Demarre
Demarre
/Cuisson Express
/Cuisson Express
/Cuisson Express
down. At the same time, ":"will light, " " will flash.
/Confirmation
/Confirmation
/Confirmation
" to confirm the temperature.
" to start cooking, and the cooking
4. Convection Cooking(without preheating function)
1) Press " Convection/ Grill/ Combi.", "140" will flash in the display, and " "
will light. Choose different temperature by pressing " " or " " from 140 to 230 .
2) Press "
3) Press " " or " " to adjust the cooking time, the maximum time that can
be set is 95 minutes.
4) Press "
time counts
Demarre
Demarre
/Cuisson Express
/Cuisson Express
down. At the same time, ":"will light, " " will flash.
/Confirmation
/Confirmation
" to confirm the tempetature.
" to start cooking, and the cooking
20
Page 22

GB
5. Grill Cooking
1) Press " Convection/ Grill/ Combi.", "140" will flash in the display, and " "
will light. Choose grill function by pressing " " or " ", and "G-1" will flash
" "
will display.
2) Press "
3) Press " " or " " to adjust the cooking time, the maximum time that can
be set is 95 minutes.
4) Press "
time counts
Note:If half the grill time passes, the oven sounds twice, and this is normal. You can
just press"
Demarre
Demarre
order to have
close the door,
cooking. If there
/Cuisson Express
/Cuisson Express
down. At the same time, ":"will light, " " will flash.
Demarre
a better effect of grilling food, you should turn the food over,
/Cuisson Express
and then press"
is no operation, the oven will not pause and continue working.
/Confirmation
/Confirmation
/Confirmation
Demarre
/Cuisson Express
" to confirm the grill function.
" to start cooking, and the cooking
" to continue cooking. But in
/Confirmation
" to continue
6. Combination Cooking
1) Press " Convection/ Grill/ Combi.", "140" will flash in the display, and " "
will light. Choose combination function by pressing " " or " ", and "C-1, C-2,
C-3, or C-4" will flash under this function. The related indicators will light.
2) Press "
3) Press " " or " " to adjust the cooking time, the maximum time that can
be set is 95 minutes.
Demarre
/Cuisson Express
/Confirmation
" to confirm the combination function.
4) Press "
time counts
flash.
Demarre
/Cuisson Express
down. At the same time, ":"will light, and the related indicator will
Function Display
Combi.1 C-1
Combi.2 C-2
Combi.3
Combi.4
C-3
C-4
/Confirmation
Microwave
21
" to start cooking, and the cooking
Grill
Convection
Page 23

GB
7. Defrost By Weight
1) Press " " once. "d-1" will be displayed.
2) Press " " or " " to adjust defrost weight. The "g" indicator will light,
" " and " " indicators light.
Decongelation
Poids/Temps
.
And the weight input should be 100-2000g.
3) Press "
once, and
Demarre
" ", " " indicators will flash.
/Cuisson Express
/Confirmation
" to start defrosting. The buzzer sounds
8 Defrost By Time
1) Press " " twice . "d-2" will be displayed.
2) Turn " " or " " to select the cooking time.
The time input should be 00:05-95:00.
3) Press "
once, and
Decongelation
Demarre
" ", " " will flash.
Poids/Temps
/Cuisson Express
/Confirmation
.
" " and " " will light.
" to start defrosting. Buzzer sounds
9. Multi-section cooking
At most 3 sections can be input for cooking. In multi-section cooking, if one section is
defrosting, thendefrosting shall be placed in the first section. When one stage
finish,buzzer sounds once and the next stage begins.
Note: Auto menu cooking cannot work in the multi-section cooking.
Example: If you want to use "20 minutes of 100% microwave power + 5 minutes of 80%
microwave power " to cook.
1) Press " " once, the screen display "P100".
2) Press " " or " " to choose the cooking time of 20 minutes.
3) Keep on pressing" " pad till "P80" is displayed.
Micro-ondes
Micro-ondes
4) Press " " or " " to choose the cooking time of 5 minutes.
5) Press "
Demarre
/Cuisson Express
/Confirmation
" to start cooking.
10. Pre-set Function
1) Set the clock first. (Consult the instruction of clock setting.)
2) Input the cooking program. Three stages can be set at most. Defrosting should not
be set under this function. Please do not press "
to start
cooking at the last step.
3) Press " ", the current time is displayed, and the hour figures will flash.
Horloge/
Preselection
Demarre
/Cuisson Express
/Confirmation
"
22
Page 24

GB
4) Press " " or " " to adjust the hour figures, the input time should be
within 0--23(for 24H) or 1--12(for 12H).
5) Press "
6) Press " " or " " to adjust the minute figures, the input time should
be within 0--59.
7) Press "
be displayed,
8) Buzzer sounds twice when time arrives. If the door is not closed well, the unit will wait.
Note: 1. Clock must be set first. Otherwice, preset cooking will not work.
2. Auto menu cooking and memory cooking can be set as one stage cooking only, but
not multi-section cooking.
Horloge/
Demarre
Preselection
/Cuisson Express
":" will not flash.
", the minute figures will flash.
/Confirmation
" to finish setting, and the current time will
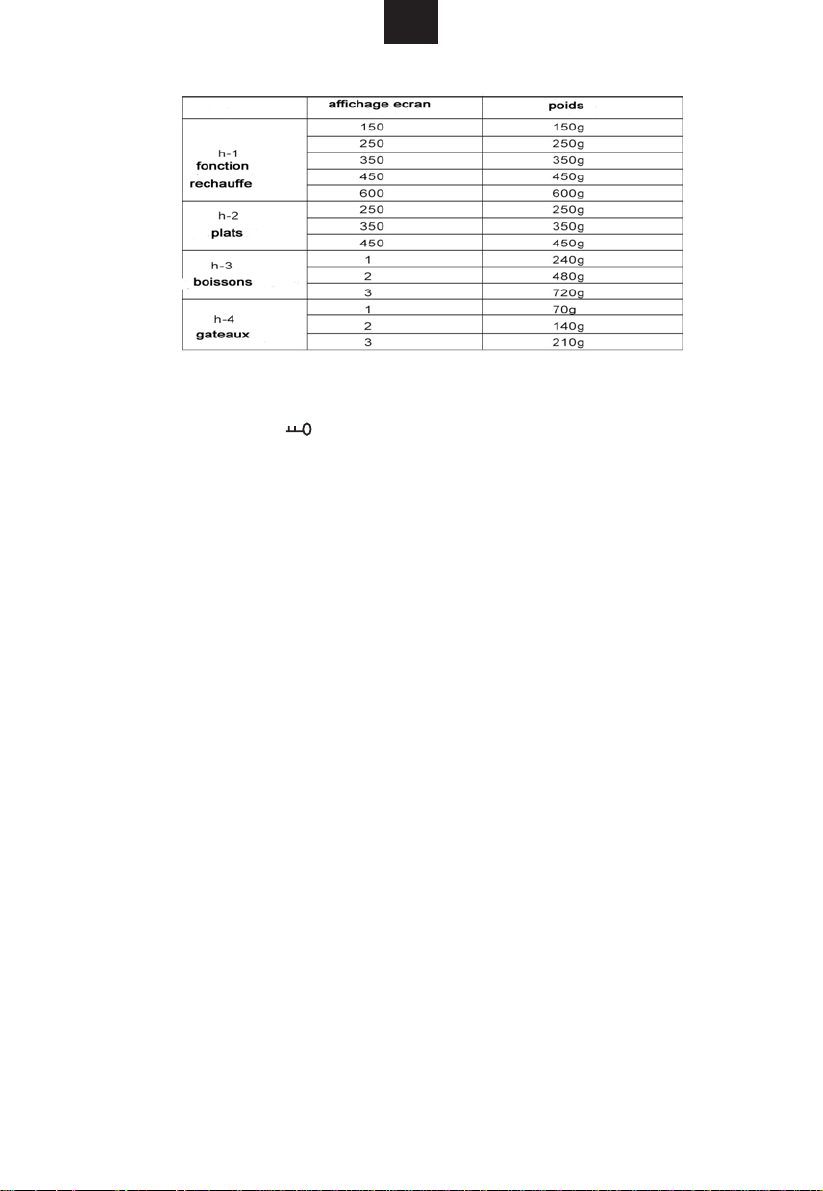
11. Auto Reheat
1) Press " " for times to choose the kind of food refered to the auto reheat
chart, and "h-1", "h-2" ,"h-3" or "h-4" will display in cycle for each added press.
2) Press " " or " " to choose the weight or portions, and "AUTO", " "
will light.
3) Press "
down, and
Auto Rechauffe
Demarre
"AUTO" and " " will flash.
/Cuisson Express
/Confirmation
" to start cooking, cooking time counts
Auto Reheat Chart
Kind
h-1
Auto Reheat
h-2
Dinner Plate
h-3
Beverage/Cooffee
h-4
Roll/Muffin
Weight(g)
150
250
350
450
600
250
350
450
1(about 240g)
2(about 480g)
3(about 720)
1(about 70g)
2(about 140g)
3(about 210g)
Display
150
250
350
450
600
250
350
450
1
2
3
1
2
3
23
Page 25

GB
12. Speedy cooking
In waiting state, start operation at 100% microwave power for 30 seconds by pressing
Demarre
the "
by each
Note: in defrost, auto menu cooking,and multi-section cooking, time cannot be increased
by pressing " ".
/Cuisson Express
pressing. The maximum cooking time is 95 minutes.
Demarre
/Confirmation
/Cuisson Express
/Confirmation
" key. And 30 seconds will be increased
13. Child Lock Function
Lock: Press " Stop/Clear " key 3 seconds, after a long "deep". it shows the current time
or "0:00", and " " will be displayed.
Unlock: Press "Stop/Clear" key 3 seconds, " " disappears and machine returns
to normal status.
14. Auto Menu Cooking
1) Press "
"A1" will flash,
"FISH" indicator will light. Continue pressing " " or " " to
choose the kind
Menu Automatique
of food in the display. "AUTO" and the related indicator will light.
( )" once to choose auto menu function, and
2) Press" " to confirm.
3) Press " " or " " to choose the food weight or portion.
4) Press "
Example: If you want to use "
1) Press " ( )" till "A7" flash, and "PASTA" indicator will light.
2) Press"
3) Press " " or " " till "150" display, at the same time, "g" will light.
4) Press "
Demarre
Demarre
Demarre
Demarre
/Cuisson Express
/Cuisson Express
Menu Automatique
/Cuisson Express
/Cuisson Express
/Confirmation
/Confirmation
Menu Automatique
/Confirmation
/Confirmation
" to start cooking.
" to confirm.
" to start cooking, and "g" will disappear.
" to cook pasta of 150g.
15. Inquiring Function
(1) In cooking state, press " " or "Convection/Grill/Combi." to check the
microwave power or cooking type.
(2) In pre-set state, press " " to inquire the time for delay start cooking.
(3) In cooking state, press " " to check the current time.
Micro-ondes
Horloge/
Horloge/
Preselection
Preselection
16. Specification
(1) Buzzer will sound five times when operation finish;
(2) "
Demarre
door is opened
(3) Once the cooking state has been set, "
within 5 minutes, LED displayes the current clock, the setting
key is not pressed
procedure will not work.
(4) Buzzer sounds once by efficient pressing and no response by inefficient pressing.
/Cuisson Express
during cooking process;
/Confirmation
" must be pressed to continue cooking if the
Demarre
/Cuisson Express
/Confirmation
"
24
Page 26

Automatic Menu
GB
Menu
A1
Fish
A2
Soup
A3
Meat
A4
Bread
A5
Pizza
A6 Cake
A7
Pasta
A8
Chicken
A9
Vegetable
A10
Potato
Weight
150 g
250 g
350 g
450 g
650 g
200ml
400ml
600ml
150 g
300 g
450 g
600 g
50 g
100 g
150g
200g
300g
400g
475g
50g(with cold water 450ml)
100g(with cold water 800ml)
500 g
750 g
1000g
1200 g
150 g
350 g
500g
230g
460g
690g
Display
150
250
350
450
650
200
400
600
150
300
450
600
50
100
150
200
300
400
475
50
100
150
500
750
1000
1200
150
350
500
1
2
3
Note: Cake menu is under convection cooking with 160 -warm-up function,
and you should preheat first following the auto menu operation, when the oven
reaches the temperature, it will stop working and sound to remind opening
the door to put cake in, then press "
Demarre
/Cuisson Express
/Confirmation
"
to start cooking.
25
25
Page 27

Trouble shooting
GB
It is forbidden to run the unit without any food inside.
It is very dangerous.
According to Waste of Electrical and Electronic Equipment
(WEEE) directive, WEEE should be separately collected and
treated. If at any time in future you need to dispose of this
product please do NOT dispose of this product with household
waste. Please send this product to WEEE collecting points
where available.
26
 Loading...