

Page 1
Page 2
Utilisation du lecteur DVD........................................................15-18
7 DVD......................................................................19
208
-1-
Page 3
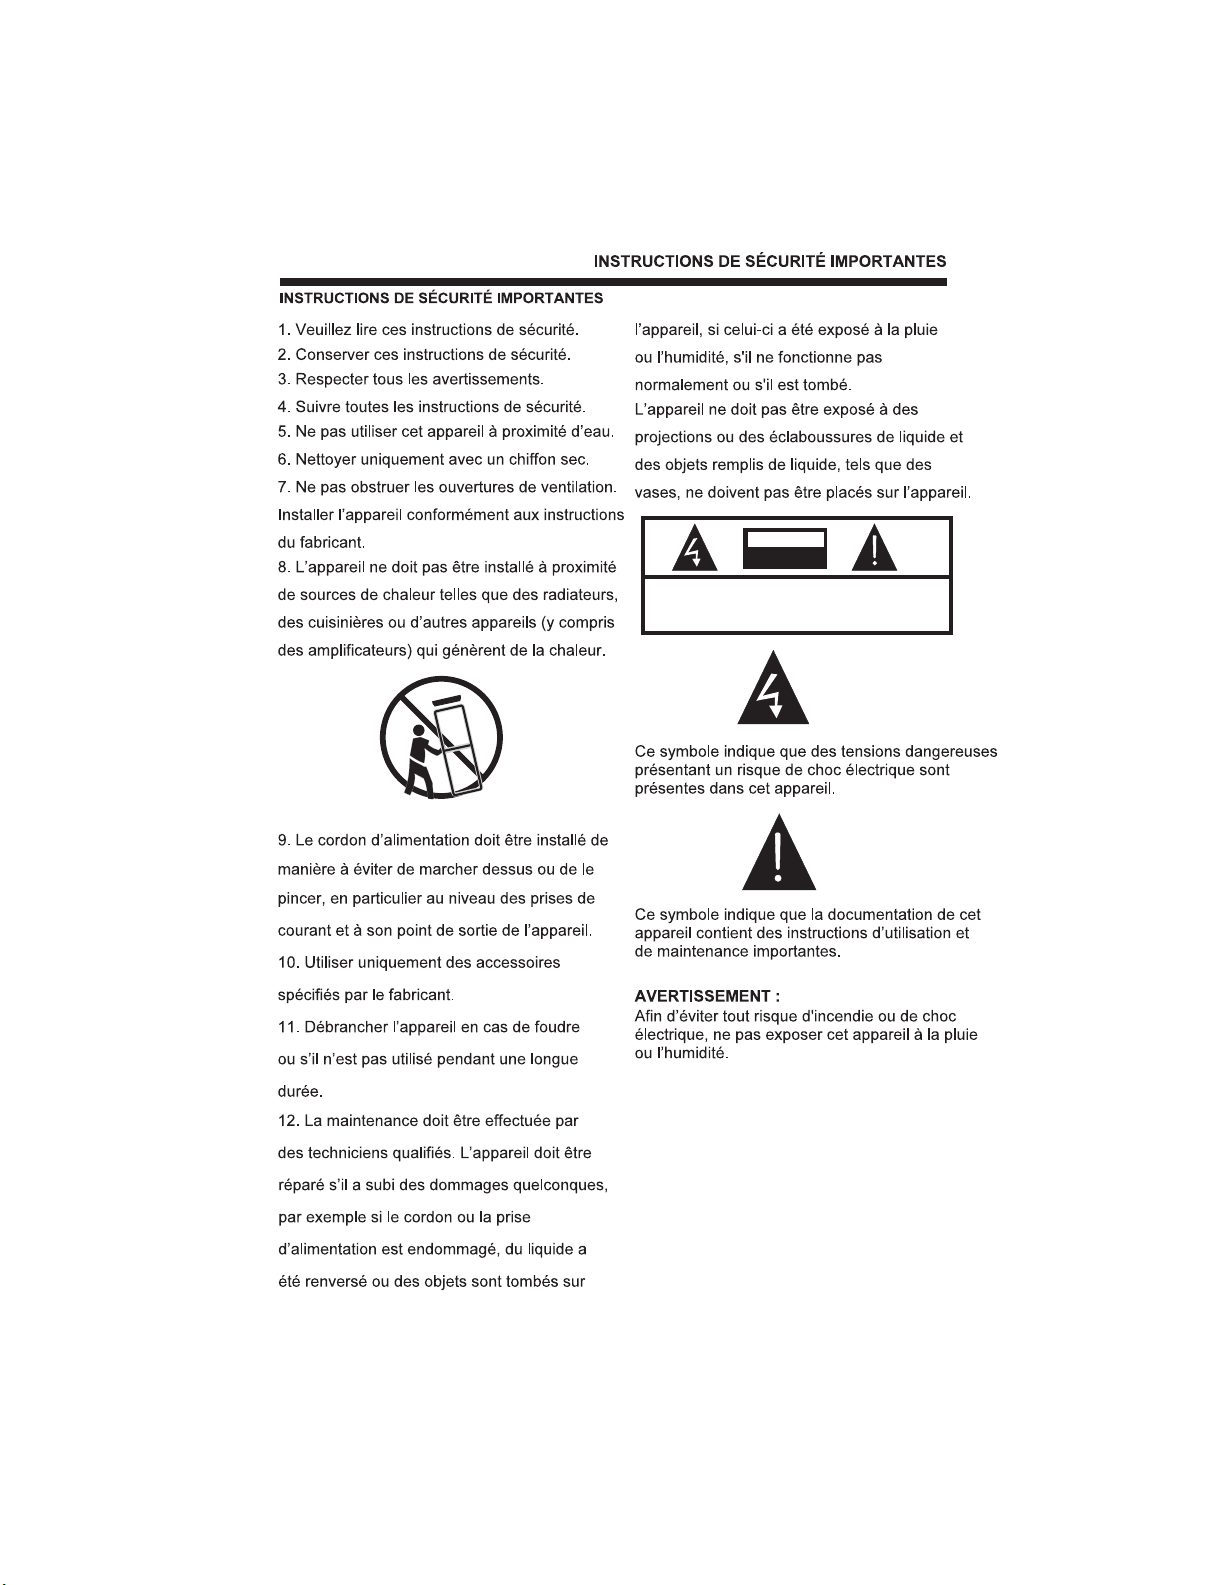
CAUTION
RISK OFELECTRIC SHOCK
DO NOTOPEN!
CAUTION
TO REDUCE THE RISKOF ELECTRIC SHOCK, DO NOT
REMOVE COVER(OR BACK).NO USER SERVICEABLE
PARTSINSIDE. REFER SERVICING TO QUALIFIED
SERVICE PERSONNEL.
-2-
Page 4
-3-
Dim:515*320mm(
Page 5

-4-
21.6
65
Page 6
30 30
SOURCE
MENU
CH+
SOURCE
MENU
CH+
CH-
VOL+
VOL-
12
STAND-BY
CH-
VOL+
VOL-
STAND-BY
1
2
3
4
5
6
4
AC-INPUT
100-240V~ 50/60Hz
1 2
HDMI
10
Pr
CVBS
L
RPbY
7
89
SCART
6
AUDIO
VGAINPUT
5
COMMONINTERFACE (CI)
VGAINPUT
3
-5-
ANT
Page 7
8
AC-INPUT
100-240V~ 50/60Hz
HDMI
CVBS
SCART
RPbY
L
Pr
VGAINPUT
AUDIO
COMMONINTERFACE(CI)
VGAINPUT
ANT
-6-
Page 8
1
800*600
60
37.88
2
3
1024*768
1280*768
60
60
48.36
47.39
-7-
Page 9
with
terminal
VIDEO EQUIPM ENT
R
Red(Pr)
B
Blue(Pb)
G
Green(Y)
R
B
Y
To YPbPr output
R
SCART
B
Y
AC-INPUT
100-240V~ 50/60Hz
with S-video
terminal
VIDEO EQUIPMENT
W R
HDMI
To CVBS output
Pr
CVBS
L
RPbY
W R
-8-
SCART
AUDIO
VGAINPUT
COMMONINTERFACE (CI)
VGAINPUT
ANT
Page 10
-9-
Page 11
-10-
Page 12
-11-
Page 13
PC Setup
Auto Adjust
H-Offset
V-Offset
Size
Phase
50
50
0
60
ColourTemp
0
-12-
Page 14

SETUP
Language English
Audio Languages English
Subtitle Languages English
PVR FileSystem
MENU
EXIT
Hotel Mode Off
On Source Off
Menu Lock Off
Lock Keypad Off
Max Volume 100
OK
PVR FileSystem
Select Disk C:
Check PVRFile System Start
USB DiskConnection
Format
TimeShift Size
Speed
MENU
EXIT
OK
Lock System Off
Change Password
Block programme
Parental Guidance Off
Restore Setting
Hotel Mode
PVR FileSystem
Max recordtime 6Hr.
MENU
EXIT
OK
Record
Date
-13-
Page 15

Schedule
Recorder
Mode Auto
Start Date 2000/1/1
Start Time 00:20
End Date 2000/1/1
End Time 00:50
Schedule
PHOTO MUSIC MOVIE TEXT
200751~.jpg
200752~.jpg
200753~.jpg
EXIT
EXIT
SIZE:10956K Bytes
ENTER
OK
SELECT
-14-
Page 16

USB
Disc dataside
NEXT
PREV
STOP
PLAY/PAUSE
OPEN/CLOSE
Disc l facingyouabel side
-15-
Page 17

-16-
Page 18

-17-
Page 19

-18-
Page 20

-19-
Page 21

-20-
Page 22

Contents
1 Safety and warnings.............................................................2-3
2 Introduction........................................................................... 4
3 Installation........................................................................ ..5-8
4 Remote Control.................................................................9-10
5 Operation........................................................................ 11-14
6 DVD Operation.................................................................15-18
7
DVD Trouble shooting............................................................19
8 TV Trouble Shooting..............................................................20
-1-
Page 23

IMPORTANT SAFETY INSTRUCTION
1.Read these safety instructions.
2.Keep these safety instructions.
3.Heed all warnings.
4.Follow all safety instructions.
5.Do not use this apparatus near water.
IMPORTANT SAFETY INSTRUCTIONS
12.Refer all servicing to qualified service
personnel. Servicing is required when the
apparatus has been damaged in any way,
such as the power-supply cord or plug is
damaged, liquid has been spilled or
objects have fallen into the apparatus,
the apparatus has been exposed to rain
or moisture , does not operate normally,
or has been dropped.
6.Clean only with dry cloth.
7.Do not block any ventilation openings.
Install in accordance with the
manufacturers instructions.
8.Do not install near any heat sources
such as radiators,,stoves, or other
apparatus (including
amplifiers)that
produce heat.
9.Protect the power cord from being
walked on or pinched particularly at
power outlets, and the point where they
exit from the apparatus.
10.Only use attachments/accessories
specified by the manufacturer.
11.Unplug this apparatus during lightning
storms or when unused for long periods
of time.
13.Apparatus must not be exposed to
dripping or splashing and no objects
filled with liquids, such as vases, should
be placed on the apparatus.
CAUTION
RISK OFELECTRIC SHOCK
DO NOTOPEN!
CAUTION
TO REDUCE THE RISKOF ELECTRIC SHOCK, DO NOT
REMOVE COVER(OR BACK).NO USER SERVICEABLE
PARTSINSIDE. REFER SERVICING TO QUALIFIED
SERVICE PERSONNEL.
The symbol indicates that dangerous
voltages constituting a risk of electric
shock are present within this unit.
The symbol indicates that there are
important operating and maintenance
instructions in the literature
accompanying this unit.
WARNING:
To prevent fire or shock hazard, do not
expose this appliance to rain or
moisture.
-2-
Page 24

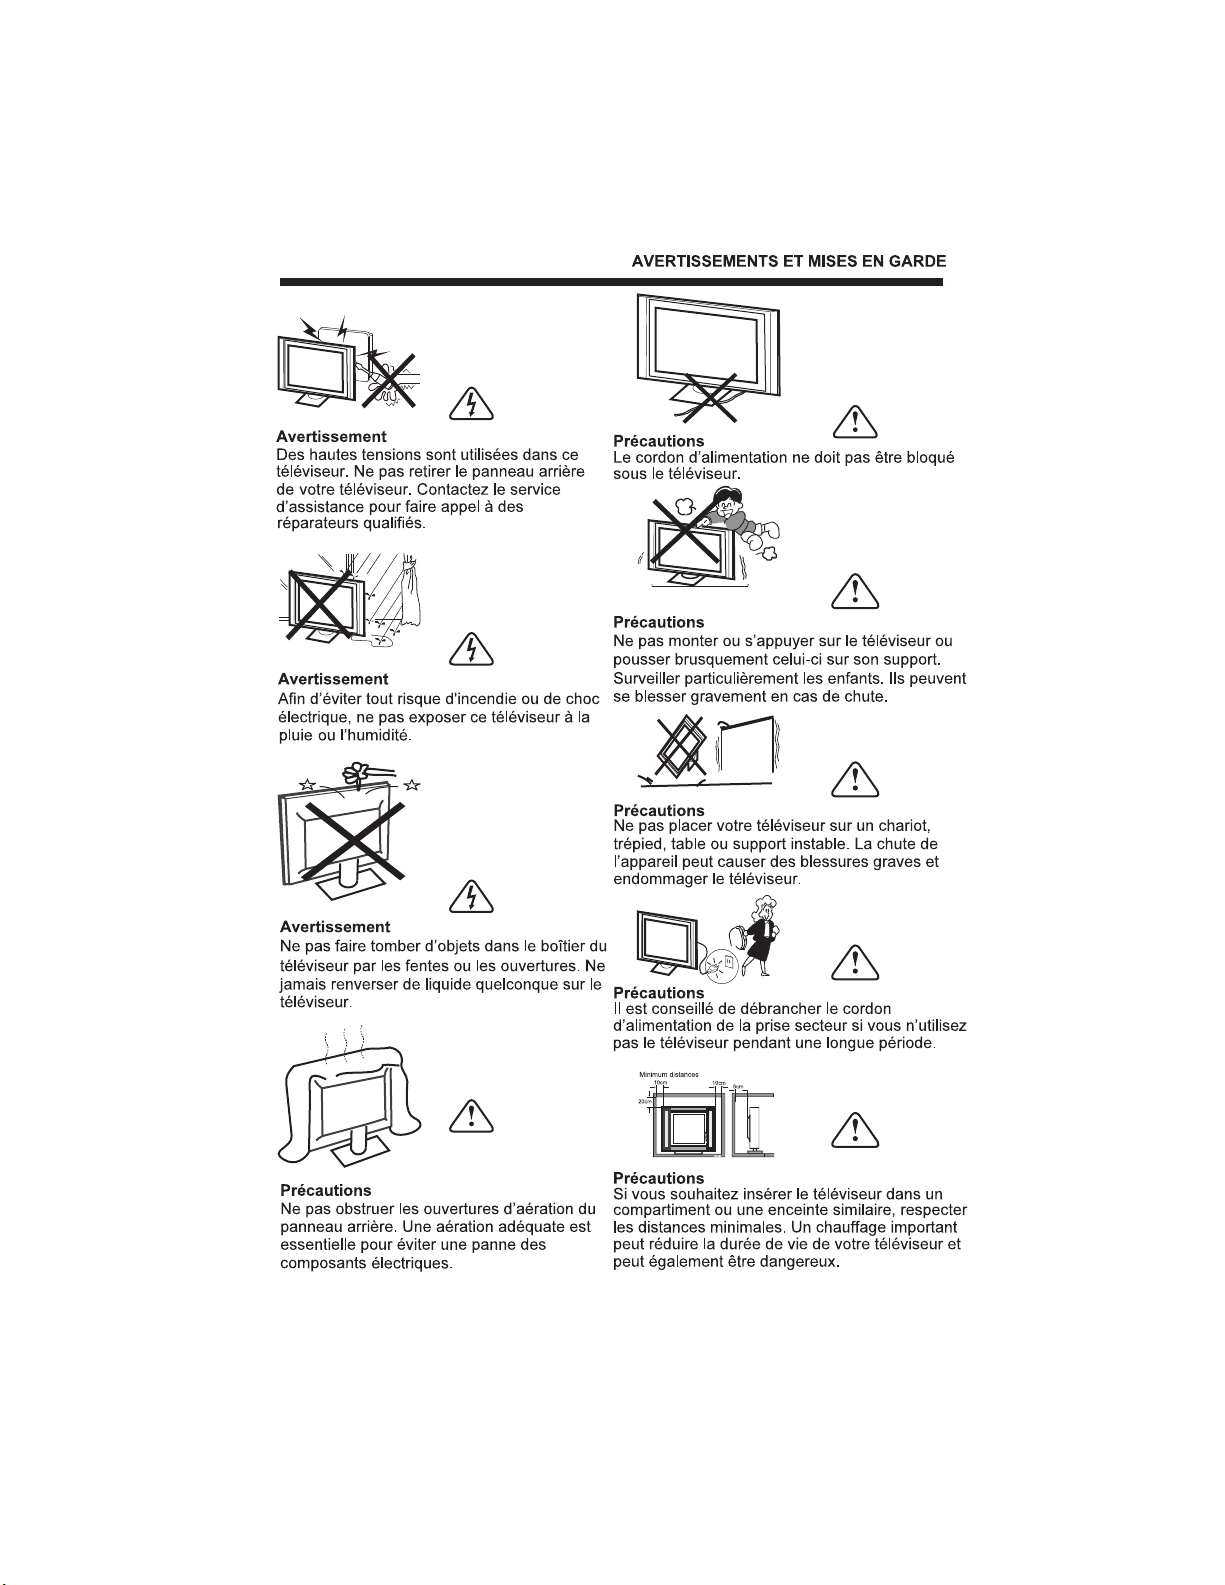
WARNINGS AND CAUTIONS
High voltages are used in the operation
Warning
of this television receiver. Do not remove
the cabinet back from your set. Refer
servicing to qualified service personnel.
Warning
To prevent fire or electrical shock
hazard, do not expose the television
receiver to rain or moisture.
Warning
Do not drop or push objects into the
television cabinet slots or openings.
Never spill any kind of liquid on the
television receiver.
Do not trap the power supply cord under
Caution
the television receiver.
Caution
Never stand on, lean on, or suddenly push
the television or its stand. You should pay
special attention to children. Serious injury
may result if it should fall.
Caution
Do not place your television on an unstable
cart, stand, shelf or table. Serious injury to
an individual , and damage to the television,
may result if it should fall.
Caution
Do not block the ventilation holes in the
back cover. Adequate ventilation is
essential to prevent failure of electrical
components.
When the television receiver is not
Caution
used for an extended period of time, it
is advisable to disconnect theAC power
cord from theAC outlet.
Dim:515*320mm(
Caution
If the television is to be built into a
compartment or similar enclosure, the
minimum distances must be maintained.
Heat build-up can reduce the service life of
your television, and can also be dangerous.
-3-
Page 25

Thank you very much for purchasing this
TV. To enjoy your product from the very
beginning, read this manual carefully and
keep it handy for easy reference.
CAUTION
Never tamper with any components inside
the TV, or any other adjustment controls
not mentioned in this manual. All LCD-TVs
are high voltage instruments. When you
clean up dust or water drops on the LCD
PANEL or CABINET, the power cord should
be pulled out from the receptacle, then
wipe the TV with a dry soft cloth. During
thunder and lighting, unplug the power cord
and antenna cord to prevent damage to
your TV. All repairs to this TV should only
be performed by qualified TV service
personnel.
Main features
Used as Television, display terminal,
PC display
High luminance, wide viewing
Angle
INTRODUCTION
INSTALLATION
*Locate the TV in the room where light
does not strike the screen .
*Total darkness or a reflection on the
picture screen can cause eyestrain. Soft
and indirect lighting is recommended for
comfortable viewing.
*Allow enough space between the TV and
the wall to permit ventilation.
*Avoid excessively warm locations to
prevent possible damage to the cabinet or
premature component failure.
*This TV can be connected to AC 100-240
Volts. 50/60 Hz. Never connect to a DC
supply or any other power supply.
*Do not cover the ventilation openings
when using theTV.
3 HDMI interface and SCART
Interface
4NICAM
directly
Main parameter
Panel
TV System
Video Signal System PAL/NTSC/SECAM
I
nput Power Voltage AC 100V-240V 50/60Hz
Power consumption
Output Power THD 7%
Audio
Signal Input
Horizontal definition
TV line
21.6
PAL-B/G I D/K
SECAM- B/G
65W
2x3W
Analog RGB(PC)x1
High-Definition Multimedia Interface (HDMI)x1
CVBS Input X1
Audio Input x2
Y
Cb (Pb) Cr (PR)x1
SCARTx1
Composite Video input >=350
Super Video Input >=400
Y Cb(Pb) Cr(Pr) >=400
-4-
D/K L LL
Page 26

INSTALLATION
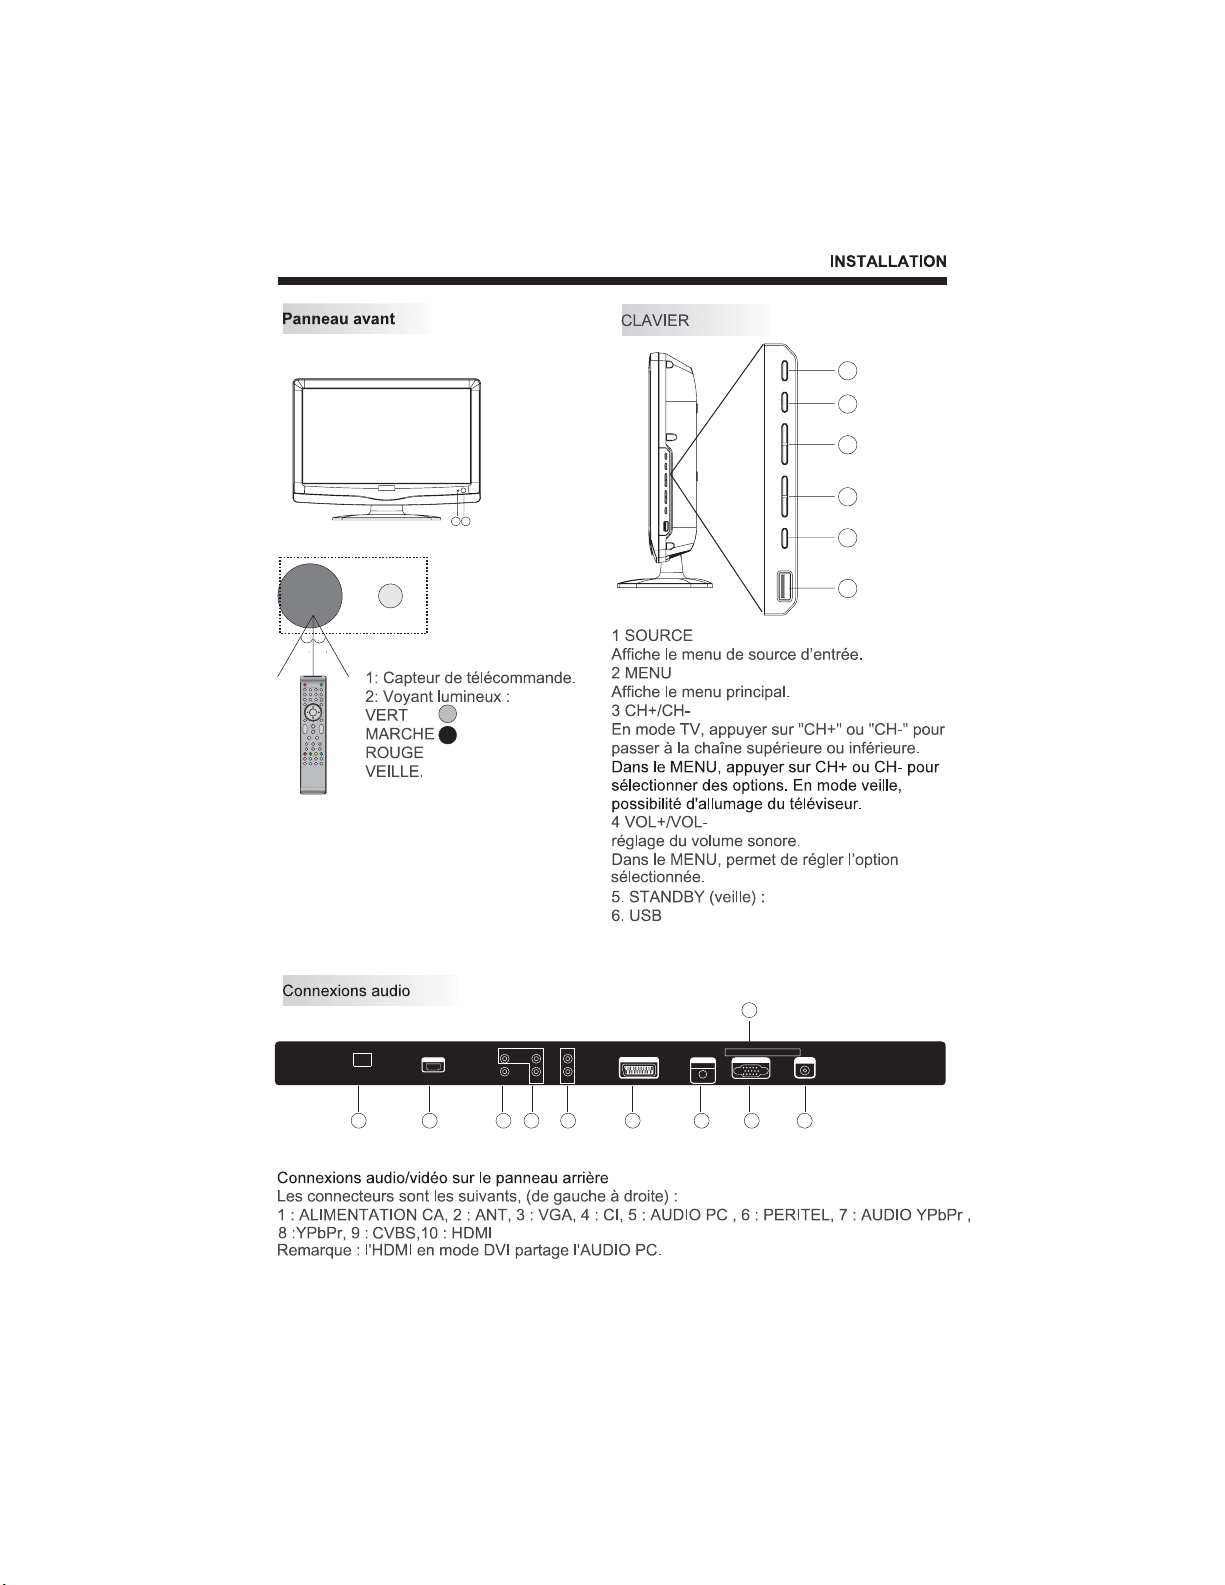
Front panel
12
30 30
1: Remote control sensor.
2: Indicator LED:
GREEN POWER ON.
RED STAND BY.
KEYBOARD
SOURCE
MENU
CH+
SOURCE
MENU
CH+
CH-
VOL+
VOL-
STAND-BY
CH-
VOL+
VOL-
STAND-BY
1 SOURCE
Display the input source menu.
2 MENU
Display main MENU.
3 CH+/CH-
In TV mode press CH+ or CHto change the channel up and down.
In MENU, press CH+ or CH- to
select items .In standby mode, it can
Turn on the TV.
4 VOL+/VOL-
Adjust sound level.
In MENU,adjust the item that you
Selected.
5. STANDBY
6. USB
1
2
3
4
5
6
REAR AV Connections
4
AC-INPUT
100-240V~ 50/60Hz
1 2
HDMI
10
Pr
CVBS
L
RPbY
7
89
SCART
6
All the terminals are(from left to right):
1:AC POWER,2: VGA,4: 7:YPbPr AUDIO,8
ANT,3: CI,5:PC AUDIO,6:SCART, :YPbPr,
9:CVBS,10:HDMI
Note:HDMI in DVI mode share PC AUDIO.
-5-
AUDIO
VGAINPUT
5
COMMONINTERFACE (CI)
VGAINPUT
3
ANT
Page 27

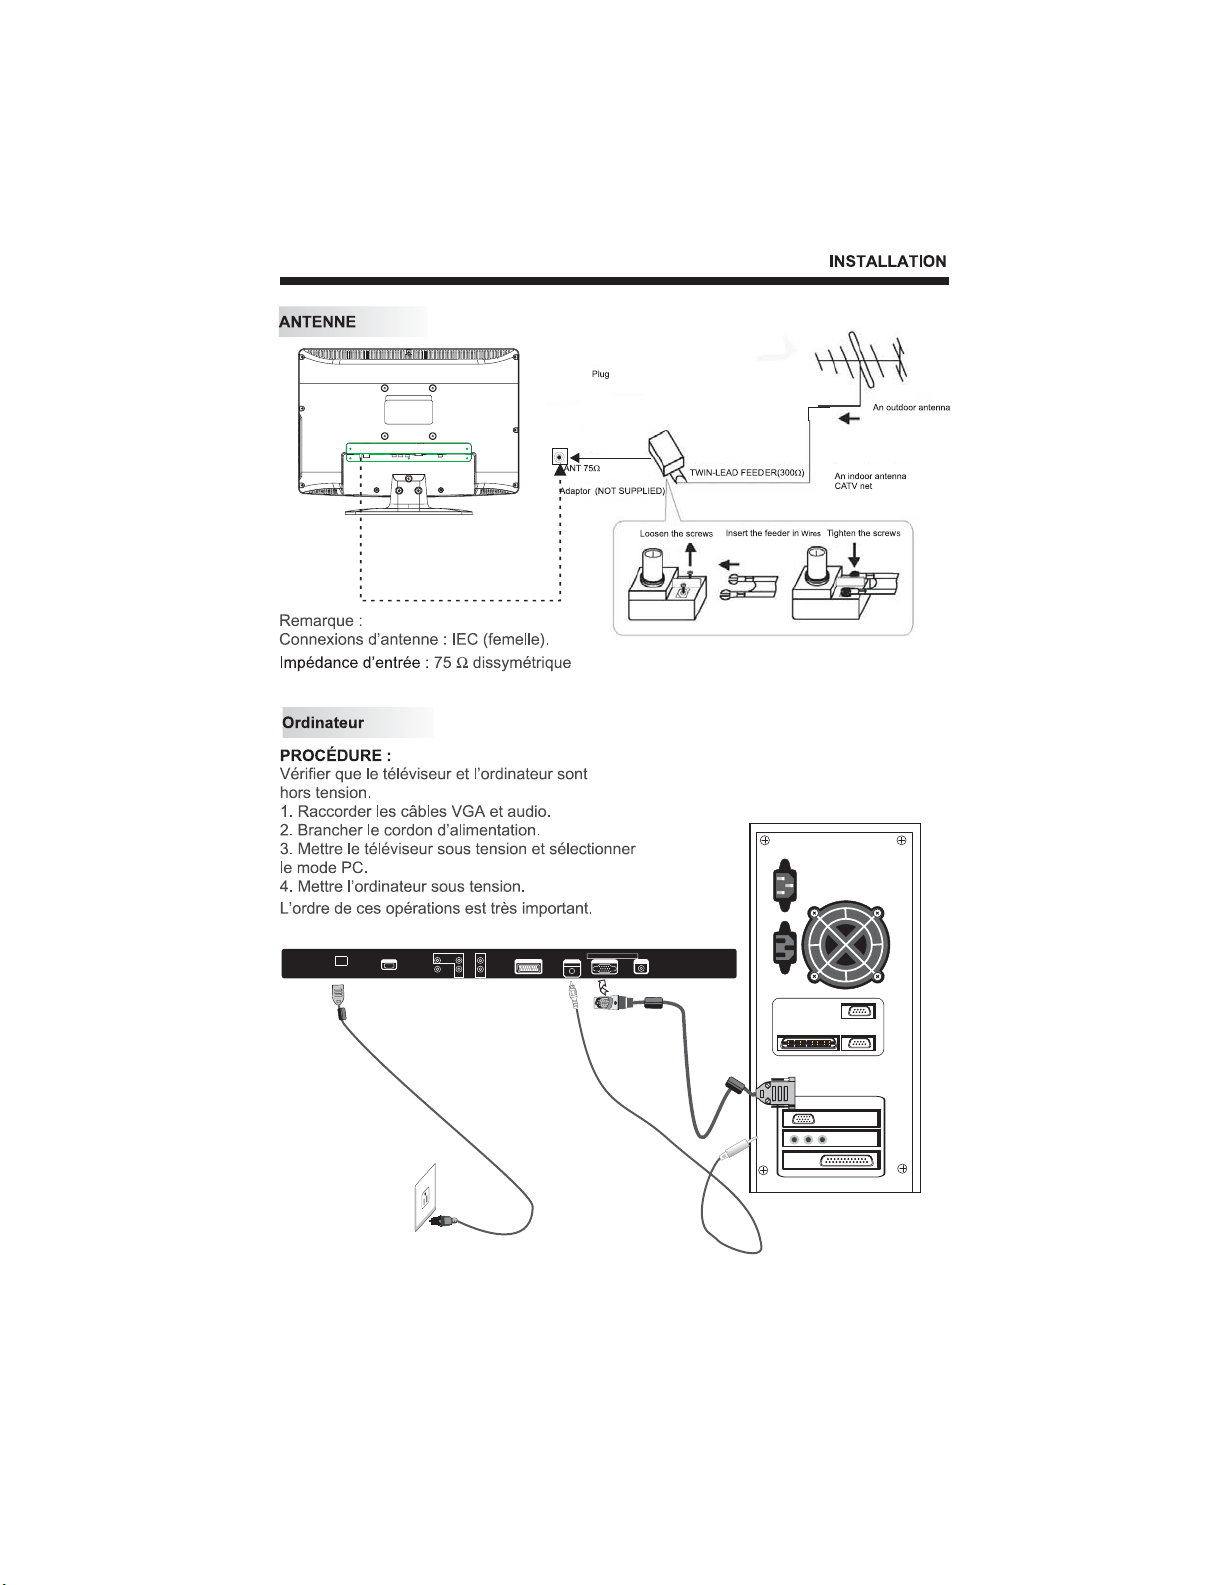
ANTENNA
Note:
Aerial connections:IEC(female).
Input impendance:75 unbalanced.
PC
STEPS:
Be sure both the TV and computer are
set to Power off.
1.Connect VGA and audio cable.
2.Connect the power cord.
3.Power on the TV, switch to PC mode.
4.Power on the PC.
This sequence is very important.
INSTALLATION
8
8
AC-INPUT
100-240V~ 50/60Hz
HDMI
CVBS
SCART
RPbY
L
Pr
VGAINPUT
AUDIO
COMMONINTERFACE(CI)
VGAINPUT
ANT
-6-
Page 28

PC
PRESET MODE
RESOLUTION
1
2
3
800*600
1024*768
1280*768
V.Freq.(Hz) H.Freq.(KHz)
60
60
60
37.88
48.36
47.39
-7-
Page 29

INSTALLATION
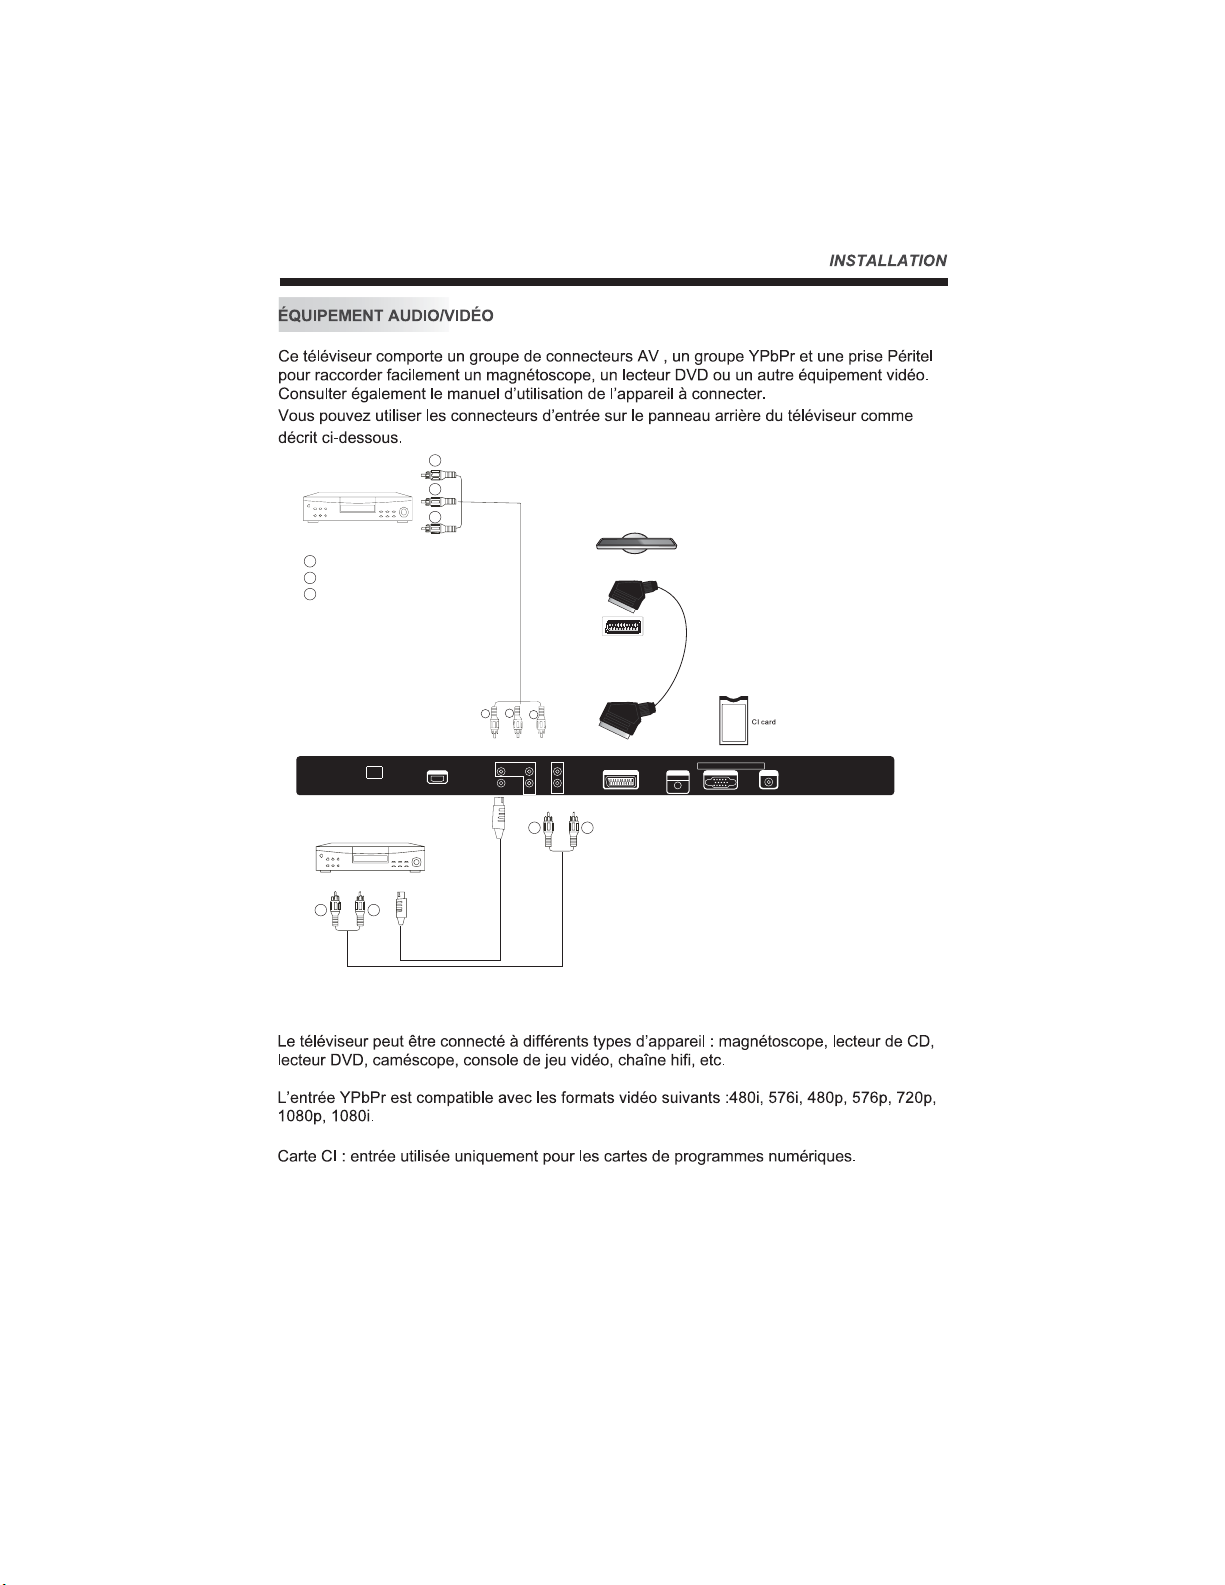
AV EQUIPMENT
This TV provides one group of AV ,one group of YPbPr and one SCART for convenient
connection to VCR,DVD or other video equipment. Please refer to the owners manual of
the equipment to be connected as well.
You can use the input terminals on TV set rear as follows.
with
terminal
R
B
Y
VIDEO EQUIPM ENT
R
Red(Pr)
B
Blue(Pb)
G
Green(Y)
with S-video
terminal
AC-INPUT
100-240V~ 50/60Hz
To YPbPr output
R
HDMI
Pr
CVBS
B
Y
L
RPbY
W R
SCART
SCART
COMMONINTERFACE (CI)
VGAINPUT
AUDIO
VGAINPUT
ANT
VIDEO EQUIPMENT
W R
To CVBS output
It can be connected to the following appliances: VCR, multi disc player, DVD, camcorder,
video game or stereo system, etc.....
YPbPr can support these video fomats:480i,576i,480p,576p,720p,1080p,1080i.
CI Card: It only for digital TV programs card .
-8-
Page 30

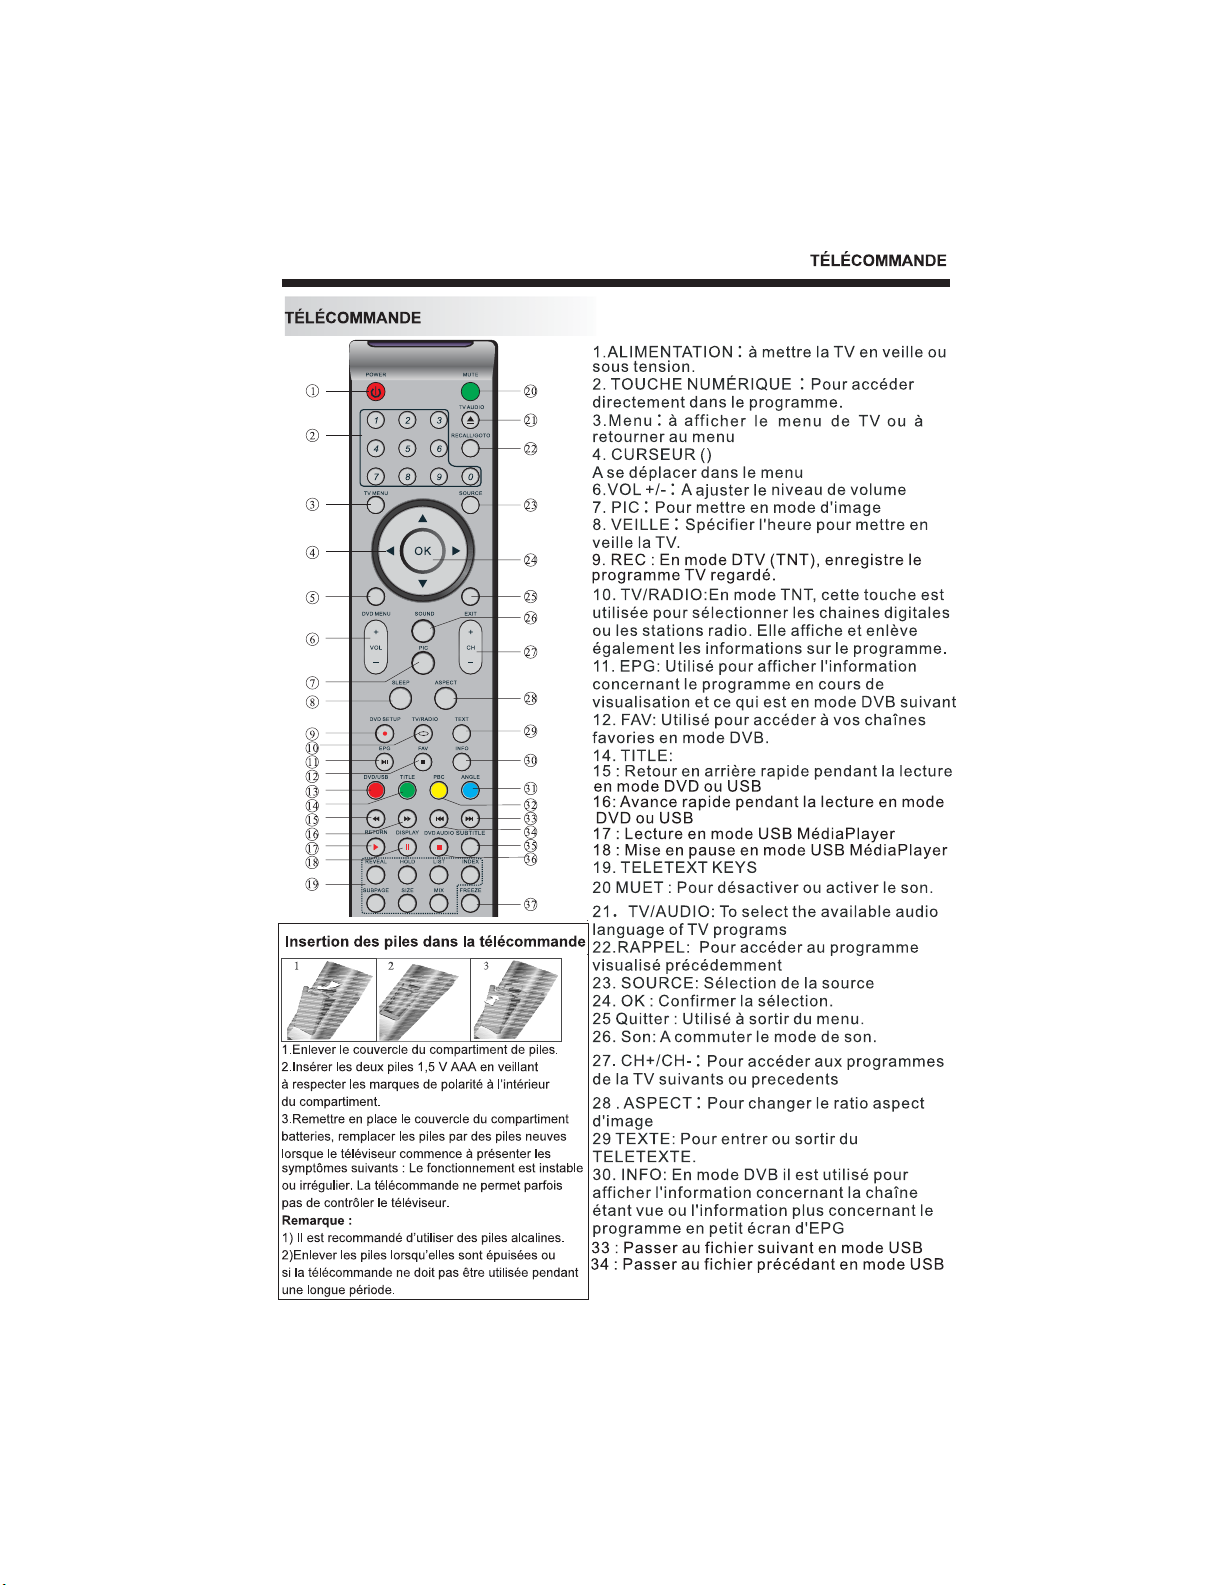
REMOTE CONTROLREMOTE CONTROL
REMOTE CONTROL
POWER
1: :To set the TV to standby or power on.
NUMERIC KEY
2: :For direct access to channels.
TV MENU
3: :To display TV menu.
CURSOR
4: :To move within the menu.
VOL+/-
6: :To adjust sound level.
PIC
7: :To switch picture mode.
SLEEP
8: :Set timer to turn off the TV.
9.REC.In DTV mode ,record the TV
programme.
TV/RADIO
10: :In DVB mode, it is used to switch
between digital TV channels and radio
stations. Display/remove the programme
information.
EPG
11: :To display information about the
program being viewed and what's on next in
DTV mode.
FAV
12: :To access your favourite channels list
in TV or DTV mode.
14:TITLE:
15:To scan in reverse, during USB, DVD playback
16:To scan in forward, during USB, DVD playback.
17:Play the media player in USB mode.
18:Pause the media player in USB mode.
TELETEXT KEYS
19: :
MUTE
20: :To disable or enable the sound output.
TV/AUDIO
21: :To select the available audio
language of TV programs .
RECALL/GOTO
22: : To access the previously
Viewed channel.
SOURCE
23: : To select input source.
OK
24: :To confirm selection.
EXIT
25: :To return to the previous menu
or exit menu.
SOUND
26: :To switch sound mode.
CH+/CH-
27: :To access the next or previous
channels.
ASPECT
28: : To change picture aspect ratio.
TEXT
29: :To enter or exit TELETEXT.
INFO
30: :To display information about the
channel being viewed or further information
about the program when in small EPG
screen in DTV mode.
33:To skip to the next file in USB mode.
34:To skip to the previous file in USB mode.
SUBTITLE
35: :To switch between different
subtitles in DTV mode.
36:Stop the media player in USB mode.
37:FREEZE:To freeze the picture.
NOTE: For the function of DVD button ,please
refer to the DVD part at the back of this
instruction book.
-9--9-
Page 31

REMOTE CONTROL
TELETEXT
Teletext is an information system broadcast by certain channels which can be
consulted like a newspaper. It also offers access to subtitles for viewers with hearing
problems or who are not familiar with the transmission language(cable networks,
satellite channels, etc.)
Press:
T
EXT
SELECTING A PAGE
You will obtain:
This is used to call or exit teletext modes. The summary appears with
a list of items that can be accessed. Each item has a corresponding
3 digit page number. If the channel selected does not broadcast
teletext, theindication 100 will be displayed and the screen will
remain blank (in this case, exit teletext and select another channel).
Enter the number of the page required using the 0 to 9 up/down.
Example: page 120, enter 120. The number is displayed top left, the
counter turns and then the page is displayed. Repeat this operation to
view another page. If the counter continues to search, this means
that the page is not transmitted. Select another number.
E
DIRECT ACCESS
TO THE ITEMS
INDEX
SUB PAGE
HOLD
REVEAL
LIST
Coloured are as are displayed at the bottom of the screen. The 4
coloured keys are used to access the items or corresponding pages.
The coloured areas flash when the item or the page is not yet
available.
This returns to the contents page (usually page 100).
Certain pages contain sub-pages which are automatically
displayed successively. This key is used to stop or resume subpage acquisition. The indication appears top left.
To freeze the page.
To display or hide the concealed information (games solutions).
The user can set four favorite pages to be directly linked to the four
color keys. While list mode is activated, it is not possibility to use TOP
or FLOF navigation with the colorkeys. The favorite page numbers
should be stored and restored to/from nonvolatile memory for each
channel by the system software.
-10-
Page 32

OPERATION
Installation Guide
This screen only appear when the TV first time
turn on or reset to factory set.You can choose
language, auto turning programs . And after
turning the screen will skip to the DTV
program.
first
1.CHANNEL MENU
The first item of the MENU is channel menu( for
TV or DTV source only).
You can search channels and edit programs here.
1).Auto tuning:
Search all the channels automatically(ATV,DTV
&Radio)
All the stored channels will be disappear after
auto tuning .
After auto tuning , the channel will skip to
the first DTV channel.
2).DTV Manual tuning:
You can select a DTV channel then find the
program in this channel.
Pls press to select the channel , then press
OK to search the programs .
NOTE:
Bad Normal Good means signal intensity.
3). ATV Manual tuning :
You can change the sound system to search
the analog TV channels and fine tune the
channels , then storage the channels you
selected.
Pls press to select country at first ,press
to select start or cancel, then press OK button
to start or exit auto tuning .
NOTE:
All the channels including ATV, DTV and Radio
can be tuning by one time .
NOTE:
Press teletext red button to storage to channels
after manual tuning .
Program edit:
4).
You can Delete ,Rename ,Move, Skip , FAV any
programs.
Delete
Press teletext red button , it will shows red delete
cursor.
Press to choose the program.
Press red button again , the program will delete.
-11-
Page 33

OPERATION
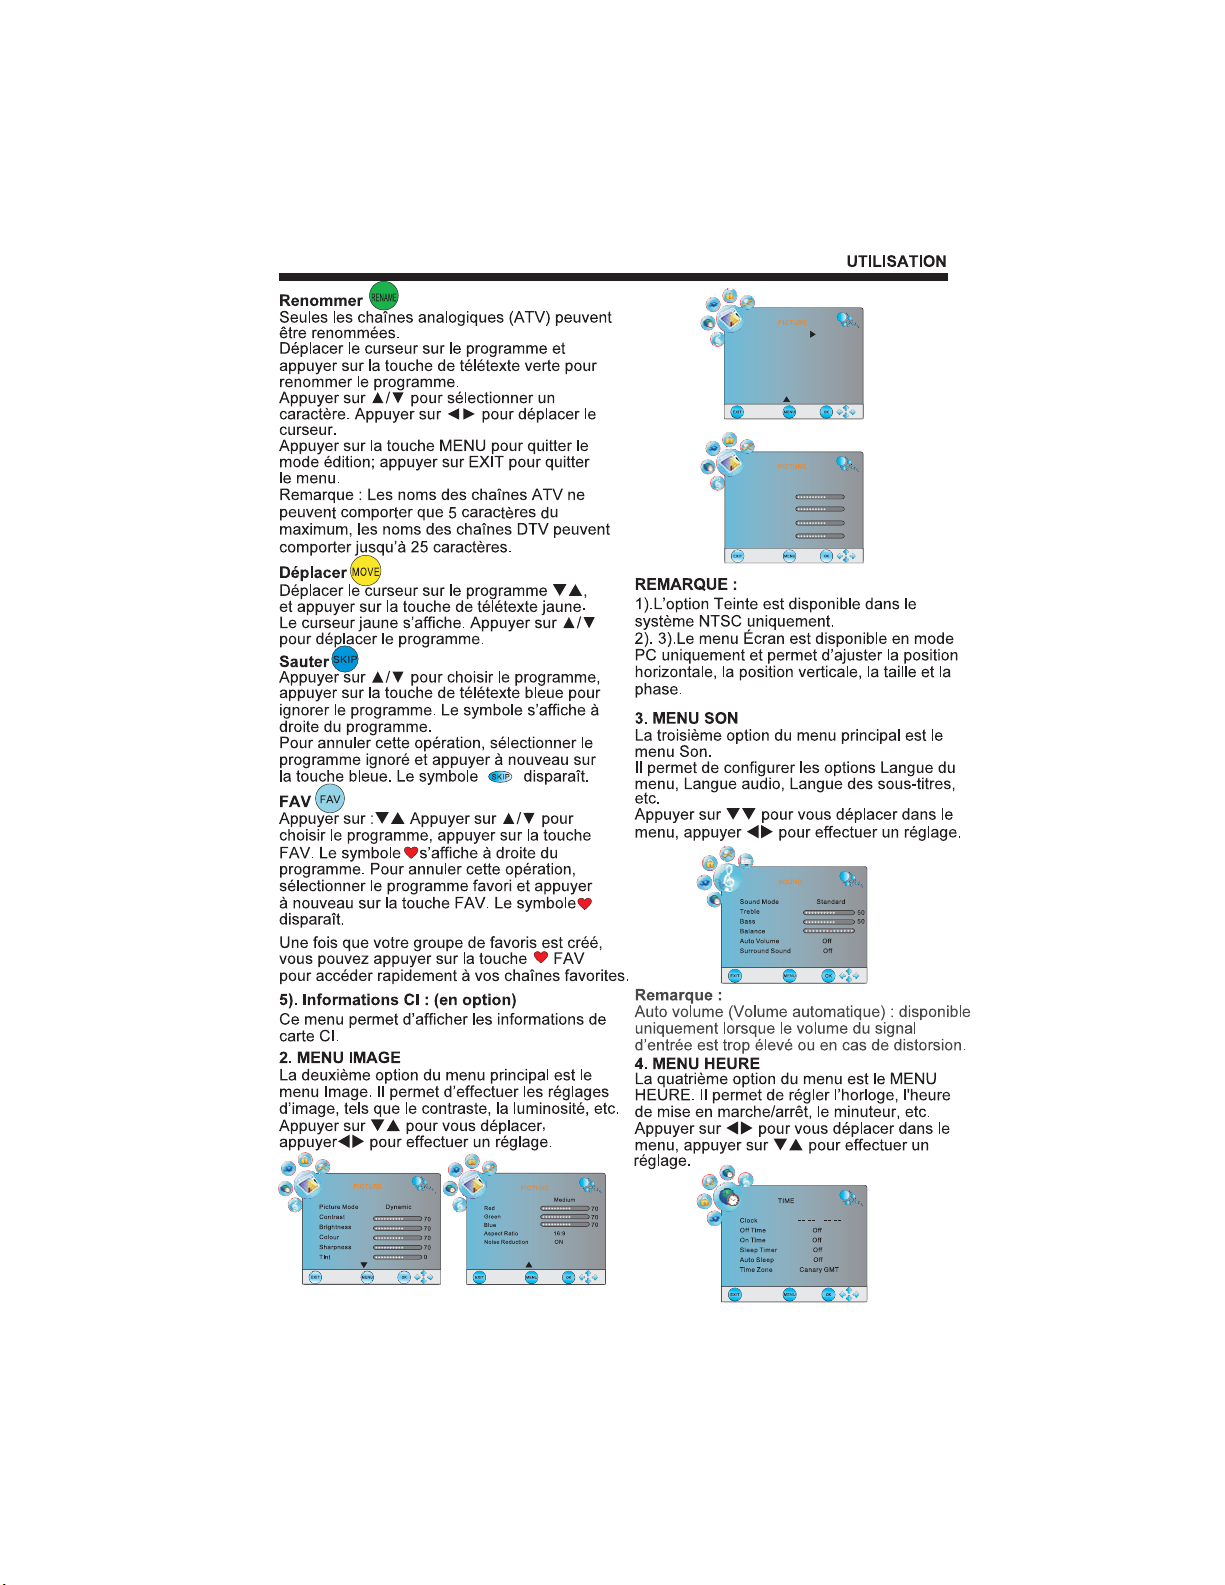
Rename:
Only can rename ATV programs .
Move the cursor to the program, press teletext
green button to rename the program.
Press to choose the character. Press to
move the cursor .
Press MENU button to exit edit , Press EXIT to
exit the menu.
Note: ATV programs name only can be 5 character,
DTV programs name can be 25 character.
Move the cursor to the program , press teletext
yellow button , it will show yellow cursor , Press
to move the program.
Press to choose the program , press teletext
blue button to skip this program, The will
show on the right side of the program .
Choose the skipped program, press blue button
again , you can cancel the skip ,The will
disappear .
FAV
Press to choose the program , press FAV
button , it will show on the right side of the
program.Choose the FAV program , press
FAVbuttonagain,youcancanceltheFAV,
the will disappear .
Once your favorite group is created, you can
press the FAV key to quickly access your favorite
channel.
5). CI information: (optional)
This menu can display the CI card' s information.
2. PICTURE MENU
TheseconditemoftheMENUisPICTUREMENU.
You can adjust picture effect here, such as
contrast, brightness, etc.
Press to move, press to adjust.
PC Setup
Auto Adjust
H-Offset
V-Offset
Size
Phase
NOTE:
1).Tint is available in NTSC system only.
2).PC setup is available in PC mode only which,
can adjust Horizontal position, vertical
position, size and phase.
50
50
0
60
3.SOUND MENU
The third item of the MENU is the SOUND
MENU.
Youcanadjustthesoundeffecthere suchas
treble, bass, balance etc.
Press to move, press to adjust.
0
Note:
Auto volume: only available when the input
signal volume is too large or distortion.
4.TIME MENU
The forth item of the menu is the TIME MENU
You can adjust the clock, power on/off time,
sleep time etc Press to move, press to
adjust
ColourTemp
-12-
Page 34

NOTE:
Within 15 minutes there is no signal, the TV
will auto sleep , if Auto Sleep is set ON. The
clock time can get from the DTV system auto.
5.SETUPMENU
The fifth item of the MENU is the SETUP
MENU. You can adjust the Menu language,
Audio language,Subtitle language etc.
SETUP
Language English
Audio Languages English
Subtitle Languages English
PVR FileSystem
MENU
NOTE:
PVR File system is only available in DVT mode .
NOTE:
New disk require formatting in this Menu.
6.LOCK MENU
The sixth item of the menu is the LOCK MENU
You can lock system, set password, block program
and set parental guidance Once you set the lock
system on you can not search the channels or
change any programs.
EXIT
Select Disk C:
Check PVRFile System Start
USB DiskConnection
Format
TimeShift Size
Speed
EXIT
Max recordtime 6Hr.
EXIT
PVR FileSystem
MENU
PVR FileSystem
MENU
OK
OK
OK
OPERATION
Hotel Mode Off
On Source Off
Menu Lock Off
Lock Keypad Off
Max Volume 100
Hotel Mode menu:
Hotel Mode: To set Hotel Mode on or off.
OnSource:TofixtheTVturnonsource.Ifsetoff,
turn on source will be the last source when you
turnoffTV.Ifseton,theturnonTVsourcewillbe
the source that you set.
Menu Lock: If set on, main menu will be locked
except the Lock menu.
Lock Keypad: if set on, keypad will be locked.
Max Volume: To set the max volume.
7.EPG Menu(Electronic Program
Guide).
The EPG menu is used to look at what is being
broadcasted on DTV or Radio channel in the day.
To access the EPG menu, press the EPG
botton,the following menu will be displayed:
Record
INFO
1. Use to choose the programs , Press
INFO key, you can display the highlight program's
information.
Schedule
2. Press the teletext green key, It can list
all the reminder schedule, press to choose
the list, press red key to delete the schedule
list, Press EPG to return to EPG menu.
Date
DELETE
Lock System Off
Change Password
Block programme
Parental Guidance Off
Restore Setting
NOTE:
1).The default pass word is 6666.
2).Block program: Press to choose the
program ,press teletext green button to block
the program. If you want unblock the program,
pls enter the main menu , input the password,
then press green button again.
3).Hotel Mode is optional. If the item of Hotel
Mode exist, see the description below; otherwise
ignore the description about Hotel Mode.
Hotel Mode
-13-
Page 35

Reminder
3. Press the blue key to choose one program
and set up one reminder time, the TV screen will
skip to the choosed program in the reminder time
automatically.
Schedule
DATE
4. Press the yellow key ,then press to
display the next 7 days programs information.
Record
5. Press the REC/REP key to choose one
program and set up one record time, the TV
screen will skip to the choosed program in the
record time automatically.
Recorder
Mode Auto
Start Date 2000/1/1
Start Time 00:20
End Date 2000/1/1
End Time 00:50
Schedule
OPERATION
If you select the source: storage, this page will
display on the screen(optional).
PHOTO MUSIC MOVIE TEXT
200751~.jpg
200752~.jpg
200753~.jpg
OK
EXIT
EXIT
You can use the USB information, like play the
Mp3, JPEG and TEXT.
Use select PHOTO, MUSIC, MOVIE and
TEXT, then press ENTER to select.
Use select the item. Press ENTER to add to
the play list, then press to play or pause.
Press to skip to the next chapter or track.
Press to skip to previous chapter or track.
Press EXIT to exit the selection.
Press and holp to scan in reverse.
Press and holp to scan forward.
Under TEXT mode, press CH+/CH- for page
UP/down;
Under MOVIE or PHOTO mode, press CH+
/CH- for Zoom Out/Zoom In.
PHOTO support the JPG/BMP/PNG files.
MP3 play the MP3/WMAfiles.
MOVIE support TS/AVI/MPG/VOB/DAT/TRP files.
TEXT support English text document.only
ENTER
SIZE:10956K Bytes
SELECT
-14-
Page 36

DVD SIDE PANEL
USB
Disc dataside
NEXT
PREV
STOP
PLAY/PAUSE
OPEN/CLOSE
Disc l facingyouabel side
USB
In DVD mode, press DVD/USB button
on the Remote control, insert a USB or
a MP3 player with USB interface to play
the MP3, JPEG and MPEG4 files.
MPEG4 files on discs
Dolby Digital
KODAK picture CD
MP3 files on
CD-R/CD-RW
DVD OPERATION
9
Multi-angle
32
Subtitle choices
8
Audio choices
LB
16:9
TV Aspect
Ratio modes
3 in 1 Card Reader
In DVD mode, press DVD/USB button
on the Remote control, you can
insert three kinds of card (SD ,MMC,
MS) to play the mp3 music or MPEG4
movie and JPEG files. All the function
is the same to playing a disc.
When the disc is playing, please stop playing
first and insert a USB/CARD, enjoying
USB/CARD by press DVD/USB key on
the remote controller ,and then press /
key to select DISC/USB/CARD,and
press ENTER/OK to comfirm.
Caution:
When using USB/3 in 1 Card Reader
function, please do not insert in the wrong
direction, or else it will damage the unit.
Caution
This DVD Player has a Class 1 laser which
may be harmful to your eyes. Do not
attempt to disassemble the cabinet or make
And adjustments.
Refer all servicing to a qualified
prefessional.
Features
Disc formats supported by this player:
-15-
RESTRICTED
R
DVD video
Parental Lock
This product incorporates copyright
protection technology that is protected
by method claims of certain
U.S.patents and other intellectual
property rights owned by Macro vision
Corporation and other rights owners.
Use of this copyright protection
technology must be authorized by
Macro vision Corporation, and is
intended for home and other limited
viewing uses only. Unless otherwise
authorized by Macro vision Corporation.
Reverse engineering or disassembly is
prohibited.
The product complies with the KODAK
Picture CD format and will display
KODAK Picture CDs. The "KODAK
Picture CD Compatible" logo is a
trademark of Eastman Kodak Company
and is used with permission.
Manufactured under license from Dolby
Laboratories."Dolby" and the double-D
symbol are trademarks of Dolby
Laboratories. Confidential Unpublished
Works. 1992-1997 Dolby Laboratories, Inc.
All rights reserved.
Page 37

MENU OPERATION
Press the SETUP button on the remote control,
the SETUP MENU will be displayed.After
accessing the setup menu, press the direction
buttons for up and down movement to select an
item desired, and press RIGHT direction button
to select the SUBMENU item. Then press the
ENTER/OK button to confirm. Press LEFT
direction button return to the menu of upper level.
To exit the setup, press the SETUP button again.
In the SETUP MENU, you may choose any of the
following options as you like.
LANGUAGE SETUP
Select Language in the setup menu, and display
the Language submenu:
OSD Language
Use this item to select the language of the setup
menu and screen display.
Subtitle
This option provides the preset subtitle
language.
MPEG4 Subtitle(optional)
Select different MPEG4 subtitle encoding
option.
Note: Not all players support this item.
Audio
Select the built-in disc dubbing language
options.
DVD Menu
This option provides the film's menu language
options.
VIDEO SETUP
Video
Select in the setup menu, and display the
Video
submenu:
DVD OPERATION
SYSTEM SETUP
Aspect Ratio
Select the aspect ratio.
Notes:
The image display ratio is related to the
recorded disc format. Some disc can not display
images in the aspect ratio you choose. If you
play a disc recorded in 4:3 format on a wide
screen TV, black bars will appear on the left and
right side of the screen. You must adjust the
screen setting depending on the type of the
television you have.
TV System
Select the different TV system.
Note: The DVD player setting should be
matched to your TV set.
output format, refer to the instructions or your
TV set.
For more information of
RATING SETUP
RatingSelect in the setup menu, and
display the Rating submenu:
Parental Control
Set the parental control feature of the player
:
Password is needed before setting
Note
Parental Control.
Set Password
Input four digits (password), then press
/Ok
to confirm.
If you forget your password, please use
Note:
the universal password 6666 to unlock.
ENTER
MISC SETUP
Select in the setup menu, and
MISC
display the submenu:
Use Default Settings
Reset setup data to factory default value.
-16-
Page 38

MP3/WMA/JPEG/MPEG4 PLAYBACK
The MP3/WMA/MPEG4 disc has such a
directory structure as shown picture above.
Press to choose the root directory
Direction key
and then press ENTER/OK button to enter into
the sub directory. Press to
choose the desired track and then press
ENTER/OK PLAY
If you want to return to the upper menu, press
Direction key
ENTER/OK
Filter: Allows selecting the categories of files
displayed in the browser list.
Repeat: To switch different repeat playing mode
Mode: Select different playing mode as follows:
Normal: Shuffle mode is cancelled.
Shuffle: Shuffle mode enabled. When playback
reaches the end of the currentchapter/track,
playback jumps to a random chapter/track. As
the end of each chapter/track is reached,
another random chapter/track will be played
until all tracks/chapters have been played or the
Shuffle mode is cancelled by toggling to a
different Option.
Edit Mode:
mode. When you select the mode, press
Direction to directory and press
to choose the desired track and press
program Program view
the to cancel the edit mode. At last
press to display program track and
press to start program playback.
Program view:
Brower view
Add to program: Choice the track press
program
directory.
Clear program
state(press the button twice), First press
Edit mode to enable the edit mode. Press Left
key to program track and press ENTER/OK to
cancel the desired track. press
to delete the track of the program play directory.
or to enjoy the music or movie.
to choose the icon and press
button.
Mode
To enable programmed playback
key ENTER/OK
and press and press
Edit mode
Left key
ENTER/OK
: Display track directory.
to add the track of the program play
Direction key
Display program track.
: In the complete stop
STOP
Clear program
LEFT
Add to
Add to
DVD OPERATION
PICTURE CD PLAYBACK
The PICTURE CD disc has such a directory
structure structure as shown in the following
Direction key
Press to choose the root
directory and then press ENTER/OK
button to enter into the sub directory.
Direction key
Press to choose the desired
picture and then press or
PLAY
to enjoy the picture. If you want to
return to the upper menu, press
key
to choose the icon and press
ENTER/OK
button.
Image rotation
In picture play state, press
to rotate the picture.
CARD READER ,USB
3 In 1 Card Reader
If the player hasa3in1cardjackand it's
NOT in " disc playing" status, you can
insert three kinds of card (MMC, SD , MS)
to play the mp3 music or MPEG4 movie
and JPEG files.All the function is the
same to playing a disc.
USB
If the player has a USB slot and it's NOTin " disc
playing" status, you can insert a USB device or
aMp3
Player with USB Interface to play the MP3 music
or and JPEG files.All the function is the same to
play a disc.
When the disc is playing, please stop playing
first and insert a USB/CARD, enjoying
USB/CARD by press
DVD/USB
press / key to select DISC/USB/CARD,and
press ENTER/OK to confirm.
Not all USB/CARD device can be supported by
this system.
Note:
function, please do not insert in the wrong
direction,
or else it will damage the unit.
-17-
key on the remote controller ,and then
When using USB/3 in 1 Card Reader
ENTER/OK
Direction key
Direction
Page 39

Function Buttons
OPEN/CLOSE
To open the disc tray, press OPEN/CLOSE; To
close the disc tray, press OPEN/CLOSE again.
SUBTITLE
Press the button to choose different
captions(Requires support from disc)
GOTO
For DVD discs, press the button to choose the
desired title and chapter andsearch the
desired title time and chapter time.For Super
VCD,VCD,CD discs, press this button to
search the desired disc time and track time
and choose the desired track.
Note: During VCD playback, the PBC mode
must be set to OFF.
0-9 keys
These keys are used to input the time, as well
as title, chapter and track numbers.When a
numeric item is displayed on the screen, press
the 0-9 keys to select the desired entry, and
press ENTER/OK to confirm.
When a VCD is playing(with PBC off), press
the 0-9 keys to select a track
directly.
MENU
During DVD playback, press MENU to display
the disc menu of the current title.
PBC
During VCD/SVCD playback, press PBC to
control PBC ON/OFF.
SETUP
Press the button to enter the system setting
menu. Press the button again to
exit the menu.
RETURN
When DVD/SVCD/VCD displaying, press
RETURN button to the menu(PBC ON only).
DVD OPERATION
DISPLAY
Press the button to show the information of the
current playing disc.
ENTER/OK
Press the button to confirm your choice on
screen.
REV:
During DVD, CD Mp3 or VCD playback, press
REVtoscaninreverse.
The player will review the disc at different times
speed. Press PLAY/PAUSE
to resume normal playback.
FWD
During DVD, CD,MP3, or VCD playback, press
FWD to scan forward.The player will cue the
disc at different speed. Press PLAY/PAUSE to
resume normal playback.
PREV
During DVD, CD,MP3, or VCD playback, press
PREV
to play the previous chapter, title or track.
NEXT
During DVD,CD,MP3, or VCD playback, press
NEXT
toplay the next chapter, title or track.
STOP
Press the button once and the player will be in
memory stop state. Continuously press this
button twice and the player will be in complete
stop state.
Play/Pause
In pause state or stop state, press the button,
the player will be in playing state.
In play state, press the button the player will be
in pause state.
ANGLE
Press the button to view scenes shot from
ANGLE
DIFFERENCE ANGLES.
(Disc support is required)
-18-
Page 40

DVD Trouble shooting
If you have any questions, please consult the troubleshooting guide below:
NO PICTURE OR SOUND
Ensure the power button is on.
Ensure the power outlet is operational.
Ensure the power cord is not damaged.
Ensure the power plug is connected
firmly to the outlet.
PICTURE BUT NO SOUND
Ensure the audio is not set to mute.
Ensure you have set the player s AUDIO
settings correctly.
POOR PICTURE OR SOUND
Ensure you have set the player s AUDIO
settings correctly
Ensure the disc is not scratched or stained.
BAD DISC DISPLAYED
Ensure the disc is not warped, damaged or deformed.
Ensure the disc is not badly stained or damaged.
Ensure the disc format is compatible with the player.
Please check whether you have tried to play a software
CD. If so, please restart the player.
REMOTE NOT WORKING
MakesuretheMainunitsPOWERbuttonison
Ensure the remote batteries are working.
Point the remote control directly at the player s IR
sensor.
Remove any obstacles between the remote and the
IR sensor.
UNIT NOT WORKING
Turn off the power, and then turn it on again.
NO DISC DISPLAYED
Ensure you have put the disc on the tray.
Ensure the disc is not upside down.
Ensure the disc is not distorted, stained or
scratched.
-19-
Page 41

Trouble shooting
Trouble phenomenon Symptom
Picture Audio
Snow Noise
Ghost
Interference
Normal Picture
No picture Mute
No colour Normal audio Colour control
Normal audio
Noise
Mute
Inspection Check
antenna position, direction
or connection
antenna position, direction
or connection
electronic equipment,car/
motorcycle,fluorescent light
Volume(check if mute is
activated or if the audio system
connections are not correct)
Power cord is not inserted
Power switch is not opened
Contrast and brightness/volume
setup
Press standby key on the remote
control for inspecting
Picture
breaking up
No colour
Normal audio
or weak
Noise
-20-
retune channel
TVsystem
Page 42

 Loading...