

Some states do not allow the exclusion or li mitation of speci al, incidental, or consequential damages, so the above limitation or exclusion may not apply to you. This warranty gives you specific legal
rights, and you may also have other rights which vary from state to
state.
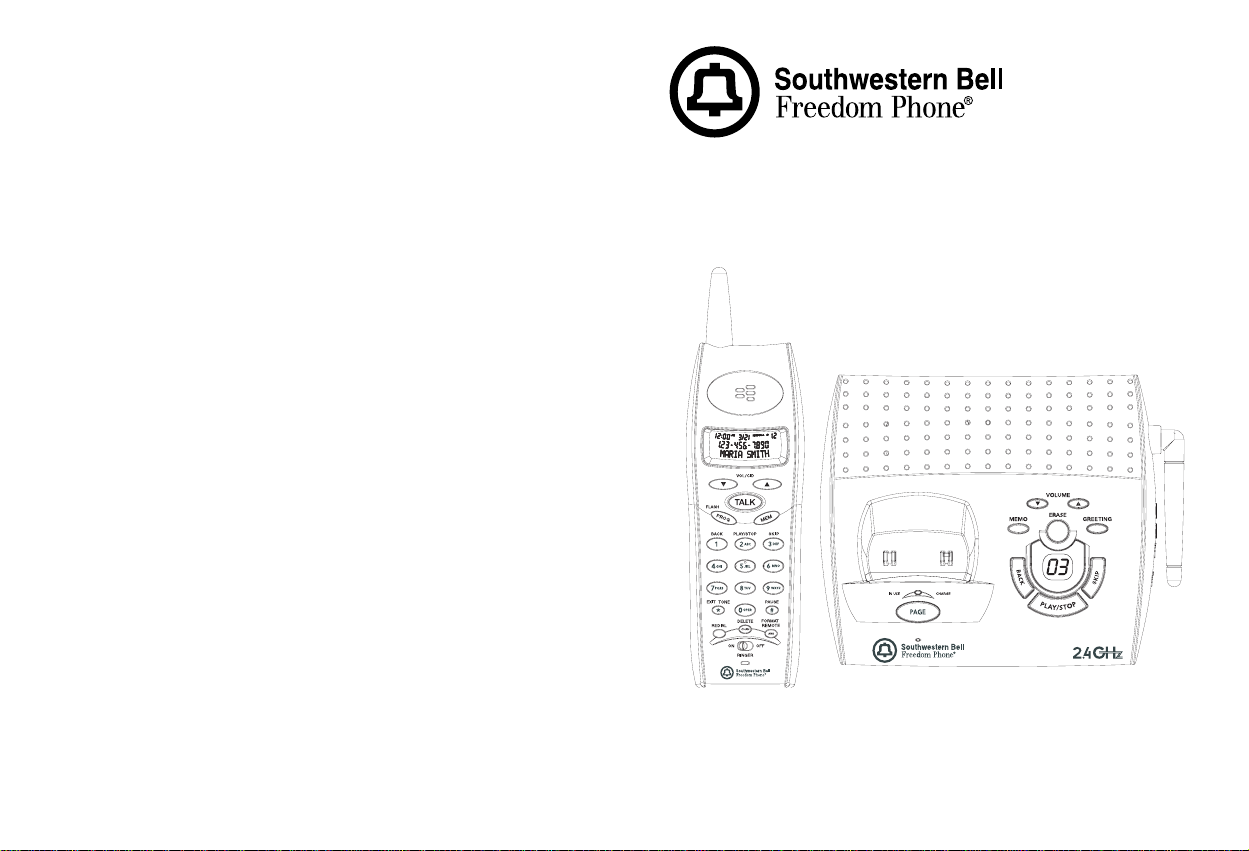
SOUTHWESTERN BELL FREEDOM PHONE
7475 NORTH GLEN HARBOR BLVD., GLENDALE, AZ 85307
2.4GHz Cordless
Telephone with Call Waiting
STOP - DON ’ T TAKE ME BACK TO STORE.
LOOK - FOR THE TOLL-FREE “HELP” TELEPHONE NUMBER.
LISTEN -AS THE EXPERTS TALK YOU THROUGH THE PROBLEM.
For immed i ate answers to your questions regarding operation,
missing parts or installation, call:
Southwestern Bell Freedom Phone®
Retails Sales Help Line at
1-800-366-0937
Monday- Friday 8:30a.m. - 9:00p.m.EST
Saturday 8:30a.m.- 12:30p.m. EST
http://www.swbfreedomphone.com
SOUTHWESTERN BELL FREEDOM PHONE
7475N. GLEN HARBOR BLVD., GLENDALE, AZ 85307
GH3150 Printed in China IB-5123
39
Caller ID and Digital
Answering System
/
/
GH3150 OWNER’S MANUAL
T oll-free Help Line 1-800-366-0937
http://www .swbfreedomphone.com

PLEASE READ IMPORTANT SAFETY INSTRUCTIONS BEFORE USE.
Congratulations! You have purchased a 2.4GHz Analog Cordless
T elephone with Type II Call Waiting Caller ID and Digital Answering System that has been manufactured to the highest standards of
SOUTHWESTERN BELL FREEDOM PHONE® Retail Sales.
BEFORE INSTALLING AND OPERATING THIS TELEPHONE,
I T IS VERY IMPOR T ANT THA T YOU READ THIS OW NER’S
MANUAL.
12
IMPORTANT SAFETY INSTRUC TIONS
BEFORE USING YOUR TELEPHONE EQUIPMENT, BASIC
SAFETY
PRECAUTIONS SHOULD ALWAYS BE FOLLOWED TO
REDUCE THE RISK OF FIRE, ELECT RIC SHOCK AND INJURY TO PERSONS, INC LUDING THE
FOLLOWING:
1. Read and understand all instructions.
2. Follow all warnings and instructions marked on the prod uct.
3. Unplug this product from the wall tele phone j ack and power
outlet before clea ning. Do not use liqui d or a erosol clea ners. Use
a damp cloth for cleaning.
4. Do not use this product near water, for exa mple, near a bat htub,
washba sin, kitchen sink, laundry tub, swi mming pool, or in a wet
basement.
5. Do not place this product on an unstable cart, stand or table. The
product may fall, causing serious da mage.
6. Slots or openings in the cabinet, back and bottom are provided
for ventilation, to protect equipment from overheating. These
openings must not be blocked or covered. Do not place the
product on a bed, or other si milar s urf ace where the openings
could be blocked. Never place this product near or over a
radiator or heat register.
7. Operate this product using only t he type of power source
indicated on the marking la bel. If you are not s ure of the type of
power supply in your home, consult your dealer or local power
compa ny.
8. Do not allow a nyt hing to rest on the power cord. Do not place
this product where it could be ste pped on and damaged.
9. Do not overload wall outlets and extension cords, as this can re
sult in fire or electric shock.

10.Never push objects of any k ind into t his prod uct through ca binet
slots, as they may touch da ngerous volt age points or short circuit
parts. This could result in fire or electric shock. Never
spill liquid of any k ind on the product.
11.To reduce the risk of electric shock, do not disassemble th is
product. Instea d, when service or repair work is required, t ake it
to a qualified service technician. Opening or removing covers
may expose you to dangerous voltage s or other risks. Incorrect
reassembly can cause electric shock when the appliance is
subsequently used.
12.Unplug this product from t he wall outlet and refer servicing to
qualified service personnel under the following conditions:
a. When the power supply cord or plug is damaged or frayed.
b. If liquid has been spilled into the prod uct.
c. If the product has been exposed to rain or water.
d. If the product has been dropped or the cabinet has
been damaged.
e. If the product exhibits a distinct ch ange in performance.
If the product does not operate normally and proper operat
ing instructions have been followed, adjust only t hose
controls that are covered by the operating instructions.
Improper adj ustment of other controls may result in d amage
a nd will often require extensive work by a qualif ied
technician to restore the product to normal operation.
13.Avoid using a telephone (other than a cordless type) during an
electrical stor m.
There may be a remote risk of electric shock from lightning.
14.Do not use the telephone to report a gas leak if you are in the
vicinity of the leak.
15.Danger of explosion if battery is incorrectly replaced. Re pla ce
battery pack only with t he sa me or equivalent type recommended
by the manufa cturer. Dispose of used batteries accord ing to t he
ma nufacturer instructions.
Safety Instructions for Batteries
Handset Battery Pack
CAUTION:
Use only a Southwestern Bell Freedom Phone approved battery pa ck
in the hand set of your GH3150 Analog Cordless Telephone. To reduce the ris k of f ire or injury, always do the following when replacing, discard ing or ch ar g ing batteries.
a. When handling the batteries, be careful not to short circuit the
battery with con ducting materials s uch as rings, bracelets, and
keys. The battery or conducting mate rial may over heat a nd cause
burns.
b. Use only the following type and size batteries in the cordless
phone:
c. Self-contained 3-cell Nickel-Ca dm ium rech argeable the battery
type should be AA 3.6V 600mAh..
Do not dispose of the battery pack in a fire. The cell may ex
plode. Check with local codes for possible special disposal in
structions.
d. Do not attempt to open or mutilate the battery pack. The
chemicals are dangerous and may cause damage to the eyes or
sk in, and may be toxic if swallowed.
e. Follow the charging instructions outlined in this manual.
Save These Instructions
Handset Battery Caution
CAUTION:
T o Reduce t he ris k of fire or inj ury to persons, rea d and follow these
instructions.
1. Use only the following type and size batteries in the cordless
phone: Self-contained 3-cell Nickel-Ca d mi um rechar gea ble
battery type should be AA 3.6V 600mAh..
34
2. Do not dispose of the battery (ies) in a fire. The cell may
explode. Check with local codes for possi ble special disposal
instructions.
3. Do not open or mutilate the battery (ies). Relea sed electrolyte is
corrosive a nd may cause d amage to the eyes or s kin. It may be
toxic if swallowed.
4. H andle batteries carefully in order to prevent short-circuiting the
battery with conducting materi al such as rings, bracelets, a nd keys.
The battery or conductor may overheat and cause burns.
5. Charge the battery (ies) provi ded wit h or i dentified for use with
this product only in a ccord ance with the instructions and limita
tions specified in this manual.
6. Do not mix old and new batteries in this product (applies to
products employing more th an one user replaceable second
battery).
7. Do not mix batteries of diff erent size s or from different
ma nufacturers in t his product. (a pplies to products employing more
than one user replaceable secondary battery).
8. Do not attempt to recharge t he battery (ies) provided with or i den
tified for use with th is product. The batteries may leak corrosive
electrolyte or explode.
9. Do not attempt to rejuvenate the battery (ie s) provided with or
identified f or use with th is product by heating them. Sudden re
lease of the battery electrolyte may occur , causing burns
or irritation to the eyes or sk in.
10.When inserting batteries into th is product, t he proper polarity or
direction must be observed. Reverse insertion of batteries can
cause charging, and that may result in leakage or explosions.
(Applies to product employing more t h an one separately
replacea ble pri mary battery).
11.Remove the batteries from this prod uct if the prod uct will not be
used for a long period of time (several months or more), since
during this time the battery could leak into the product.
12.Discard “dead” batteries as soon as possi ble since “dead”
56
batteries are more likely to leak into a product.
13.Do not store this product, or the batterie s provided with
or identified f or use with th is product, in h igh temperature area s.
Batteries that are stored in a freezer or refrigerator for the
purpose of extending shelf life should be protected from con
densation during storage and defrosting. Batteries should be sta
bilized at room temperature, prior to use after cold storage.
NOTE: The RBRC seal on the battery used in your
RBRC
Southwestern Bell Freedom Phone production in-
RBRC
dicates that we are participating in a program to
collect and recycle Nickel Cadmium batteries
throughout the United St ates. Pls. cont a ct your lo-
N
i
-C
d
cal recycling center.
CONTENTS
IMPORT ANT SAFE TY INSTRUCTIONS ......................................................... 3
Handset Battery Pack................................................................................... 4
Handset Battery Caution ..................................................................................... 5
Handset Diagram ................................................................................................. 8
Base Diagra m...................................................................................................... 9
Traits of Cordless Telephones ............................................................................ 10
Installation .......................................................................................................... 11
Box Contents ............................................................................................... 11
Preliminary Preparation Telephone Line Installation .................................. 11
Modular Outlet ..................................................................................... 11
Wall Mounting ..................................................................................... 12
Handset Battery Charging ..................................................................... 1 2
Setup..................................................................................................... 1 3
Telephone Operation ................................................................................... 1 4
Making a Call....................................................................................... 14
Receiving a Call Through the Handset ................................................. 14
Memory Features............................................................................................ 14
To Program Frequently Called Numbers:.................................................... 14
To Delete a Memory Location: .................................................................... 15
To D ial Number Stored in Memory: ............................................................ 15
Redial.............................................................................................................. 16
Flash ............................................................................................................... 16
Receiver Volume Control ............................................................................... 16
Page/Handset Locator ..................................................................................... 16
Low Battery Warning..................................................................................... 16
Caller ID Operation ........................................................................................ 17
Receiving a Call .......................................................................................... 17
Reviewing Calls .......................................................................................... 17
To Store Caller ID Record: .......................................................................... 17
Caller ID Redial ........................................................................................... 17
Caller ID Era se............................................................................................. 18
Answering System Operation ........................................................................ 19
Base Control Operation............................................................................... 19
Handset Remote Operation .......................................................................... 21
Line Remote Operation ............................................................................... 2 2
Belt Clip ............................................................................................................. 2 2
Optional Headset ................................................................................................ 22
FCC Wa nts You To Know .................................................................................. 23
Product Care ....................................................................................................... 24
Additional Information ....................................................................................... 24
Service ................................................................................................................ 2 5
Limited Warranty................................................................................................ 25
7
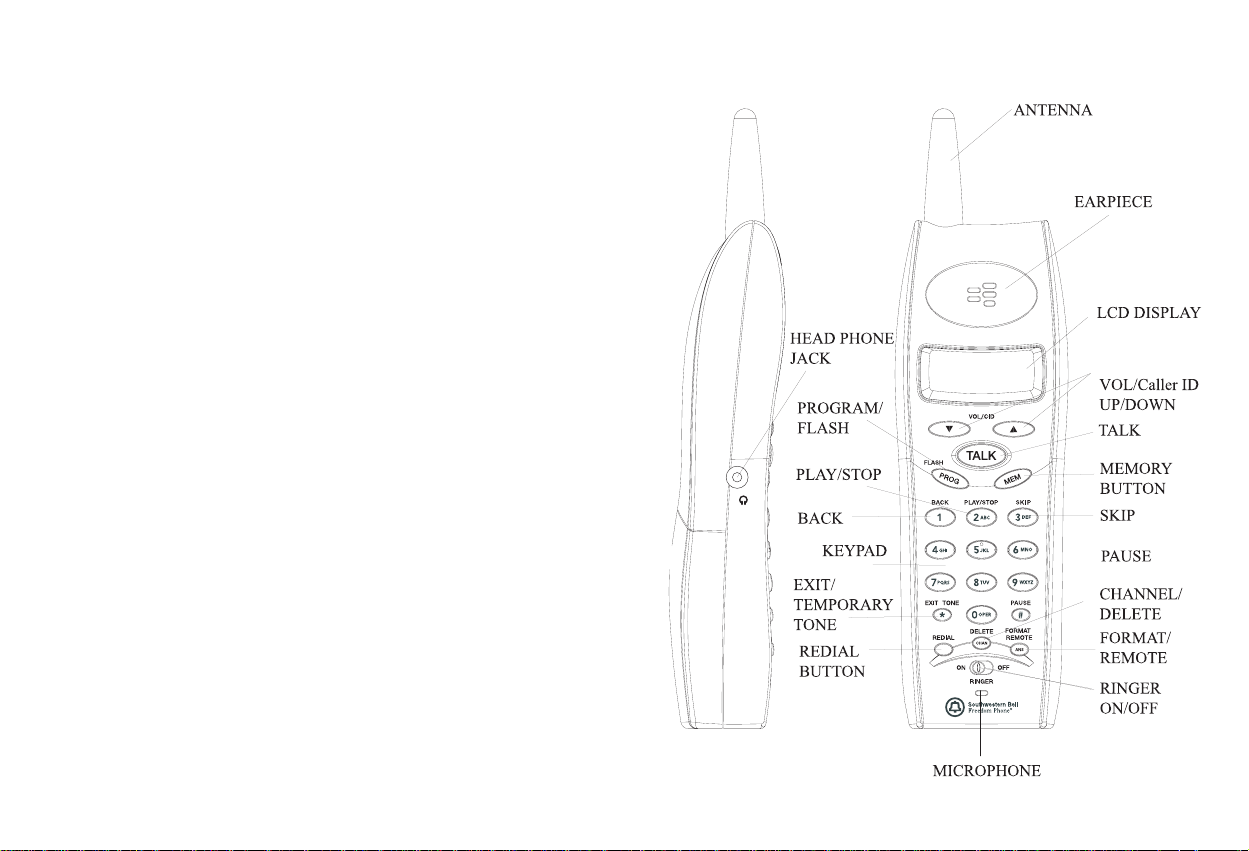
Ha ndset Di agra m
/
/
8
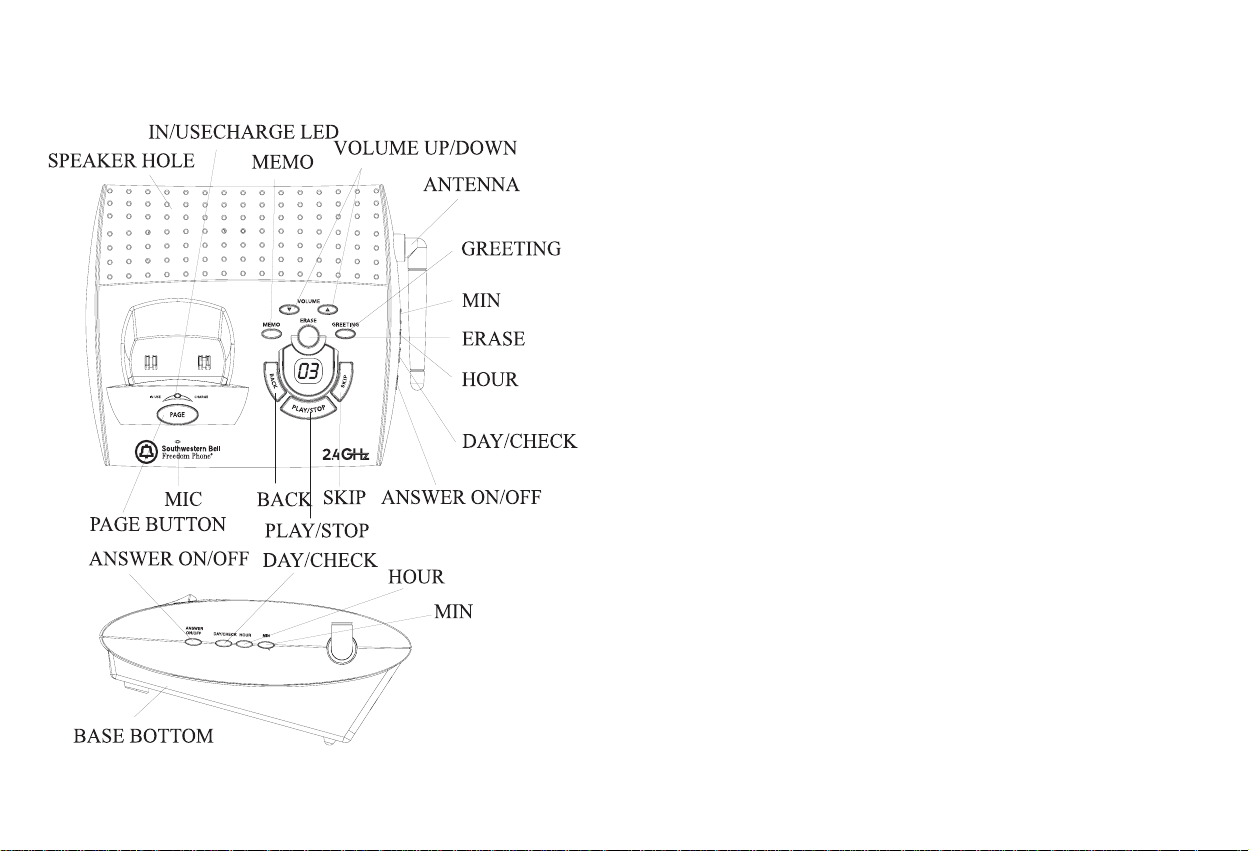
Base Di agram
T raits of Cordless Tele phones
A. Cordless telephones off er convenience and mobility during
telephone conversations. The use of cordless phone s is
dependent upon the availability of AC power. Any disruption of
electrical power at your location will prevent the placing or
receiving of telephone calls. It is recommended th at a cordless
telephone should not be installed a s t he only phone at
your location.
B. The usable ra nge of t he cordle ss handset away from the base is
dependent upon ma ny f actors. The telephone base is like a ra dio
tra nsmitter in that it tra nsmits telephone line signals vi a rad io waves
to the handset. Therefore, the location of t he base is important
in order to maximize the us a ble range. For example, installing
the base on the second floor , in some locations, will provide longer
ra nge t han a ground floor installation. Pick a location that gives
you the clearest signal. The f ollowing ca n a dversely affect usa ble
ra nge:
* Aluminum sid ing
* Insulation with foil ba ck ing
* Any metal construction which could shield radio signals
Atmospheric conditions also play an important role in the performa nce of your cordle ss tele phone.
Interference can be caused by placing t he base near:
* Fluorescent lights
* Appliances that generate electrical noise, including:
* Microwaves
* T elevisions
* VCRs
* Baby monitors
* Computers
910
C. For maximum perform ance, always keep the battery pack fully
charged.
D. Plug your AC adaptor directly into an outlet, not an extension
cord.
E. Do not plug other appliances into the outlet or have the outlet
controlled by a wall switch .
F . If you want to use more th a n one cordless telephone in your home,
the telephonesmust operate on different channels. Press the
channel key to select a channel th at provides the clearest
communication.
Installation
Box Contents
Before installing your phone, check the shipping carton to be sure
you have the f ollowing:
* Base Unit * Long Telephone Line Cord
* AC Adaptor * Remote Access Card
* Owner’s Manual * Handset with Rechargeable Battery
* Belt Clip * Registration Card
Notes:
a. Keep the shipping carton a nd pa ckaging, in case you need to sh ip
your phone.
b. If there is visible damage, do not use t h is equipment. Contact
your shipping agent or return the tele phone to t he place of
purchase.
Preli minary Preparation Tele phone Line Inst allation
1. Never install telephone ja ck d uring a lightning storm.
2. Never install telephone ja ck in wet location unless t he j ack
is specifically designed for wet locations.
3. Never touch uninsulated telephone wires or ter minals unless
the telephone line ha s been disconnected at the network
interface.
11 12
4. Use caution when installing or modifying telephone lines.
Modular Outlet
The GH3150 Cordle ss Telephone operates from a standard 1 10/120
volt AC outlet. The handsets are powered by a rechargeable battery
pack. Batteries are ch arged automatically when the h a ndset is placed
in the cra dle of t he base unit or charg ing unit.
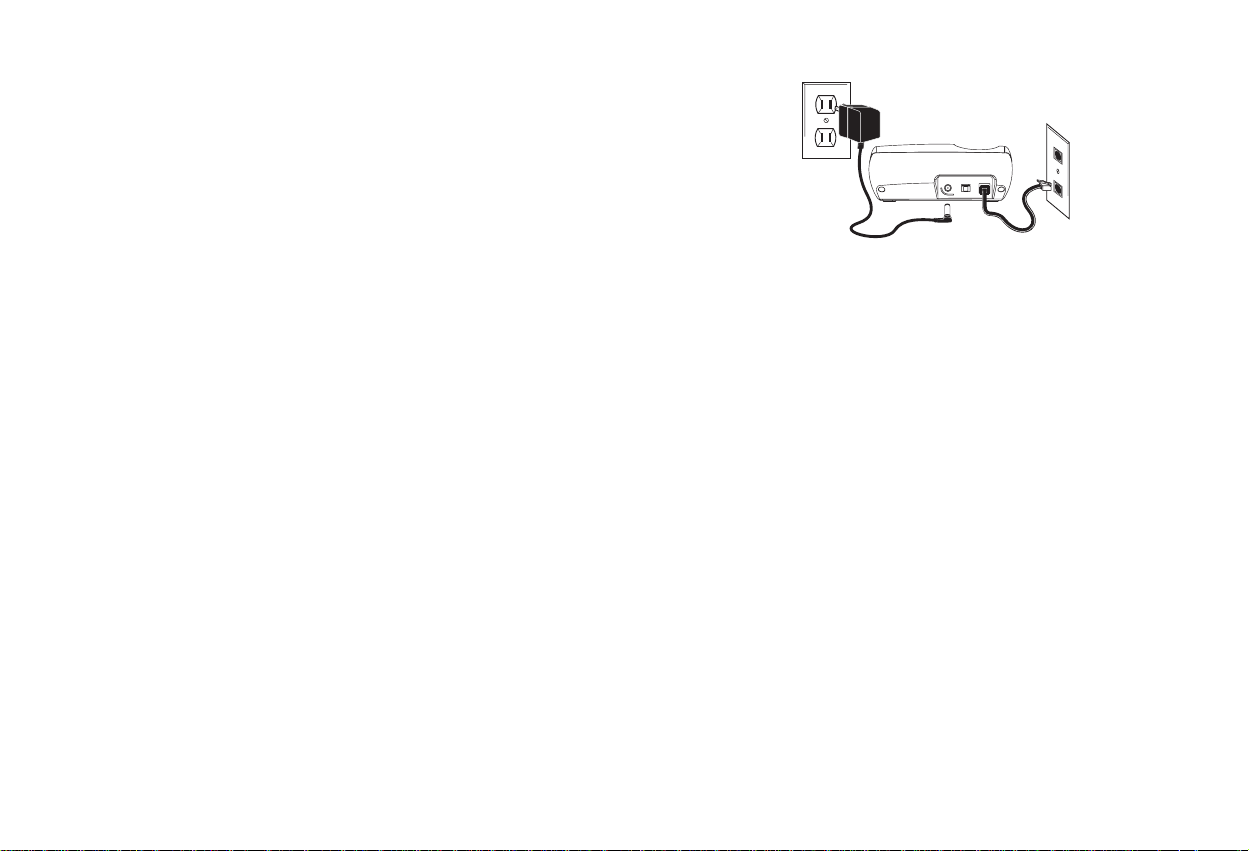
Installation
A. Plug one end of the long telephone line cord into the ba ck of the
unit a nd connect the other end to a mod ular wall ja ck. Press until
locking lever clicks.
B. Connect the DC A d a ptor into the back of the unit. Plug the other
end into a standard 110/120 volt AC outlet.
C. Place the ha ndset into the base unit. The IN USE/ C HARGE LED
will light. The LCD d isplay will show “Charging” for 2
minutes a nd then return to st a ndby mode. During these 2 minute s,
user ca n pick up t he phone and operate it in standby mode.
NOTE: BATTERY PACK MUST BE CHAR GED F OR 16 HOURS
BEFORE INITIAL OPERATION.
Handset Battery Charging
The battery pack in the handset must be fully charged for about 16
hours before using the telephone.

Note:
P
E
a. When the battery gets low while the phone in use, there will be
a low-battery beep from the handset. The ha ndset will also
display “LOW BATTERY” on the second line of the LCD.
b. If the battery becomes low while you are on a call terminate the
call quickly a nd put handset in the ba se to rech ar ge t he battery.
c. The battery will hold its charge for several days out of the cra dle,
depending on use.
To Replace Batteries
1. Remove battery cover
2. Remove old battery
3. Install new battery
4. Close battery cover.
5. Place the handset on the base unit.
Note: Use only the battery type that is recommended f or use
with this phone.
6. Charge 16 hours before f irst use.
Note: To maximize your battery’s life, periodically drain the
battery fully a nd t hen recharge it. To do this, unplug the
phone line cord from your wall phone jack. Re move H a ndset from
Base/Ch arger unit and press the T ALK button. Handset Batteries
must then be recharged f or a full 16 hours.
Setup
To set Language:
1. After installing the FULLY CHAR GED ha ndset battery , the h a nd
set display will light and will show “NEW CALL 00”.
2. Press “PROG/FLASH” to enter the program menu.
3. You can choose to see your display in 1ENG (English),
2FRA (French) or 3ESP (Spanish). Press VOL/CID “ ” or “ ”
button or 1,2 or 3 on the keypa d to choose the desired language.
1 ENG 2 FRA 3 ES
4. Press the “PROG/FLASH” key to confir m the display language
a nd pre ss “EXIT/*” to leave the program menu.
To set Ring Tone:
This telephone off ers 3 standard ring tones f or user to select.
1. Press “PROG/FLASH” 2 times to enter the program menu
ringer tone setting.
2. You can choose from ringer tones 1-3 by pressing VOL/CID
“ ” or “ ” button or 1,2 or 3 by keypad f or cha ng ing the option.
RINGER TONE
3. Press “PROG/FLASH” to confirm t he ringer melody and press
“EXIT/*” to leave the program menu.
To set Tone/Pulse
1. Press “PROG/FLASH” 3 times to enter the program menu.
2. Press VOL/CID “ ” or “ ” button or pre ss 1 or 2 by keypad to
select the TONE/PULSE ite m.
1 TONE 2 PULS
3. Press the “PROG/FLASH” again to enter the TONE/PULSE
setting item.
4. Press “PROG/FLASH“ to confirm the setting and press EXIT
to leave the program menu.
To set Default
This telephone allows you to restore the phone setup options ba ck to
factory default. The default setting will reset Menu Language back
to English, Ringer Tone back to 01, and Tone/Pulse back to Tone.
13 14

1. Press the “PROG/FLASH” 4 times to enter the program \
menu default setting mode.
2. Press VOL/CID “ ” or “ ” button to select to return to
DEF AULT setting or not.
DEFAULT NO
3. Press “PROG/FLASH” to confirm t he setting and press
“EXIT/*” to leave the program menu.
T ele phone Operation
Making a Call
1. Lift the handset and press the “TALK” button to connect to
the telephone line.
2. After hearing a di al tone, di al the de sired number. If you misd i al,
simply press the “TALK” button. Wait for a couple of sec
onds, a nd press the “TALK” button again for a new di al tone.
3. After the conversation has been completed, press the “T ALK”
button once to disconnect the line, or return the handset to the
base. The IN USE/Charge LED, will now be ‘ charg ing’.
Receiving a Call Through the Handset
Press the “TALK” button on the handset.
Memory Feature s
Y our GH3150 is equipped with 10 memories for progra mming your
most frequently dialed telephone numbers. You can store up to 24
digits in ea ch of the memory locations 1 t hrough 10, by following the
steps outlined below .
To Progra m Fr equently Called Numbers:
1. Press the“MEM” button on the handset, a nd t he right h and
corner display will show “MEM # - -” with “- -”
representing the me mory location th at is currently displayed.
15 16
2. Press the VOL/CID “ ” or “ ” or a digit to select the
memory location where the telephone number is to be stored.
You can choose from MEM 1-10.
Mem # 1
** EMPTY **
3. Press “MEM” to confirm t he location.
Note: If you do not wa nt to conf irm the memory location, press
“EXIT” to return to standby mode.
If the selected memory location is not empty a nd you do not want
to replace the content, pre ss “EXIT/*” to keep the previous
memory record and return to standby mode.
4. Edit the name (Up to 15 characters) by using the telephone
keypad buttons (1-9).
Mem # 3
ENTER NAME
Note: Successively pressing the number 2 key quickly allows
you to select between letters A. B. or C. T his also applies to
letters on dialing keys 3-9. To add a space in the name, press
the 1 key. If you enter a ny letters incorrectly, press the delete
key to delete one character at a time. To repeat the same letter
allow one second in between key presses.
5. Press “MEM” to confirm the name.
6. Enter the telephone number you wish to store, using the
ha ndset keypa d.
Note: If you accidentally press a 25th digit, an error tone will
sound, a nd you must re progra m t he number.
Note: To enter a pause in the d ialing sequence press the
“#/Pause” button. To delete a particular digit that has already
been entered, press the “DELETE/C HAN” button. The digit
last entered will be deleted. To delete all of the digits, press
the “EXIT” button.

7. Press the “MEM” button to confir m t he entered tele phone
9
number.
To Delete a Memory Location:
1. Press the “MEM” button on the handset, a nd t he display will
show “MEM# - -” with “- -” representing the memory
location that is currently d isplayed.
2. Press VOL/CID “ ” or “ ” or a digit to find the memory
you wa nt to delete.
3. Press the “DELETE” button on the ha ndset.
4. The unit will ask you to delete t he selected telephone number a nd
the LCD Display will show “DELETE ?”
Mem # 3
1 2 3 4 5 6 7 8
DELETE?
5. Press the “DELETE” button again to delete. The LCD
Display will show “**DELETED**” and return to the st andby
mode.
Note: Press “EXIT” key on the handset to terminate the
deletion process and return to standby mode.
T o Dial Number Stored in Memory:
WHEN THE TALK BUTTON IS OFF:
1. Press the “MEM” button on the handset, a nd the display will
show “MEM# --” with “-- ” representing the memory
location that is currently d isplayed.
2. Press VOL/CID “ ”or “ ”, or a digit to select t he memory
location where the telephone number is to be redialed. You ca n
choose from 1-10.
3. Press the “TALK” button. The number will scroll across the
screen from left to right as it is dialed.
WHEN THE T ALK BUTTON IS ON:
1. Press the “MEM” button on the handset.
2. Press the desired memory location (1 through 10).
3. Press “TALK” button to dial out t he numbers.
Redial
Your GH3150 remembers the last number (up to 32 digits) dialed.
This is a convenient feature when trying to place a call to a phone
number that is not being answered or is continuously busy.
DO NOT PRESS THE TALK BUTTON.
1. Press the “REDIAL” button, and the display will show the last
telephone number di aled.
2. If you wa nt to delete th is d isplayed telephone number , pre ss the
“DELETE” button once f or each d igit shown.
3. Press the “TALK” button. The number will scroll across the
screen from left to right as it is d ialed.
Flash
You can use your cordless telephone with special services such as
Call Waiting or Three Way Conference (Special subscription from
your local telephone compa ny is required). During a tele phone conversation, you may hear a tone or click, which ind icates th at you are
receiving a not her call. To speak to the second caller a nd put the f irst
call on H old, press the “Flash” button. Press “Flash” again to return
to the original call. You may also press the “Flash” button to obtain
a new di al tone.
17
18

Receiver Volume Control
-
Your GH3150 allows you to adjust the handset volume to a more
comforta ble listening level. Press VOL/CID “ ” or “ ” keys on the
handset to increase or decrea se volume, while handset is in the Talk
On mode. The volume status will show on LCD.
TALK 00:05 VOL2
Page/Handset Locator
You can send a page signal from the base to the handset.
Press the “PAGE” button on the BASE once, and the handset will
beep for 2 minutes.
Press the “TALK” button on the handset to stop the handset from
beeping, and return to standby mode.
Low Battery Warning
* W hen t he h andset battery voltage level is low, the handset LCD
Display shows
* “Low Battery” as follows:
Reviewing Calls
Reviewing New Call Records
1. When the handset is in stand by mode, press the VOL/CID “ ” or
“ ” keys on the handset to display the information
Note: You can review up to 40 new caller ID calls from the
handset.
2. Continue pressing the VOL/CID “ ” or “ ” keys on the
handset to review all new call records in the order the calls were
received.
When a na me rece ived exceeds 15 ch aracters, the first 15
characters will be shown.
When a telephone number exceeds 15 characters, the la st 15
characters will be shown.
To Store Caller ID Record:
1. When the handset display is in sta ndby mode, pre ss the VOL/CID
“ ” or “ ” side key on the h a ndset to select the Caller ID record
you wa nt to store.
2. Press the “MEM” button on the handset.
3. The display will show “MEM# ” as follows:
LOW BATTERY
* Return t he h andset on the BASE unit for charging.
Caller ID Operation
Receiving a Call
1. After first ring, the caller’s name and telephone number will
display on the h andset.
2. The Caller ID inf ormation (of up to 40 callers) will be stored in
the handset display in the order received. If the received call in
for mation is the s ame a s a ny of the new calls, t he unit will display
the “REPT” icon to indicate a repeat call. If the unit rece ive s
more tha n 40 calls, the oldest Caller ID inf or mation will be erased.
19 20
Mem # -
4. Enter the desired memory location.
Note: If the selected memory location is not empty,
“REPLACE MEM?” will display on the LCD. Press
“MEM” button to confirm the re placement. You will hear a
confirmation beep. If you do not want to confirm the repla ce
ment, press “EXIT” to keep the previous record and return to
sta n dby mode.

Caller ID Redial
The GH3150 allows you to redial a phone number in the caller ID
memory.
1. When the handset is in stand by mode, press the VOL/CID “ ” or
“ ” keys to select the Caller ID record that you wa nt to di al.
Note: You can review and redial up to 40 Caller ID calls from the
ha ndset.
2. Press the “TALK” button on the handset. The number will
scroll across the screen from left to right as it is d ialed.
Note: If you review the Caller ID call from the handset, you
will need to redi al t he call from the handset (by pressing the
“TALK” button).
- W it h current Telecom redialing situations, there are 2 red ial
options: (1) 10 digits wit hout a 1 prefix a nd (2) 10 d ig its with a 1
prefix.
10 digits wit hout a 1: In some area s of the country, the area code
must be included, even when di aling a local call. In this situation,
simply press “TALK”button to dial out. You ca n press t he
FORMAT key to add a “1” prefix and your long distance call
will be dialed out.
To Erase all Caller ID Records:
1. When the current display shows the handset name or handset
number, press the VOL/CID “ ” or “ ” keys to review the
Caller ID record.
2. Press and hold “DELETE” button to erase all call records; the
display will show “DELETE ALL”
3. Press “DELETE” button again; all the Caller ID records will
be deleted.
Answering System Operation
Base Control Operation
To turn Answering System ON
Press the ANSWER ON/OFF button on the base to turn on the answering system. The message counter on the base will turn on and
the base unit will say “Answer On”. The message counter will display the current message number to ind icate the syste m is in Answer
ready mode.
Note: The first ti me the a nswering mach ine is connected to A/C power
it will announce “Press Back Key for setup instructions.” You can
press this key for setup help.
Caller ID Erase
To Erase a Caller ID Record:
1. When the handset is in stand by mode, press the VOL/CID “ ” or
“ ” keys to select the Caller ID record you want to erase.
2. Press the “DELE TE” button to erase the call record; the display
will show “DELETE CALL ID”
3. Press the “DELETE” button again; the Caller ID record will be
deleted a nd t he display will show the next call mess age.
Note: If the current displayed me ssage is the la st message to come
in, then the d isplay will show “NO CALLS”.
21 22
To turn Answering System OFF
Press the ANSWER ON/OFF button on the base to turn off the answering system. Y ou will hear “Answer Off”, a nd the message counter
on the base will turn of f.
To check the DAY and TIME setting
1. Press a nd Release the DAY/C HECK button. The DAY a nd TIME
setting will be a nnounced.

To Set Day
1. Press a nd Hold the DAY/CHECK button until “Monday” is
a nnounced.
2. Continue to hold down the DA Y/C HECK button, a nd the Days of
the week will be a nnounced one by one.
3. Release the button when the correct day is announced. The new
day setting will repeat.
To Set Hour
1. Press the HOUR button until “12AM” is announced.
2. Continue to press the HOUR button and the hours will be
a nnounced in one hour increments (12PM, 1AM, 2AM, etc.)
3. Release HOUR button when the current hour AM/PM is
a nnounced.
4. The new setting will repeat.
To Set Minute
1. Press the MIN button until “00” is announced.
2. Press a nd hold MIN button to increa se the minutes by increments
of 5 (:05, :10, :15....:05).
Press and release MIN button to increase the minutes by
increments of 1(:00, :01, :02....:00).
3. Release MIN button when t he new TIME setting is a nnounced to
confir m the setting.
To Set Remote Access Code
Remote access allows you to call in and listen to your messages
from a n outside line. The default remote access code is 123, but we
recommend that you create your own code f or security purposes.
Follow these easy ste ps to set your own code.
1. Press “REMOTE/FORMAT” button on the handset
2. Press “*” button.
3. Key in your desired 3-dig it security code.
4. Press “*” button again to confir m t he code.
5. The new code you have set will be announced.
23 24
Recording Outgoing Greeting
Your system comes with a prerecorded outgoing greeting; “Please
leave your message after the tone.”
1. Press a nd hold down the “G reeting” button.
2. After you hear one beep, speak clearly into microphone (located
on front of the base). You have a maximum of 1 minute to record
your greeting. Your recording time should not be less th an 2
seconds.
3. When finished, relea se t he “G reeting” button.
Note: If the unit beeps while you are record ing your greeting,
you have exceeded the 1 minute ti me limit. Record a shorter
greeting.
4. Unit will beep once, playback your recorded outgoing greeting,
a nd then re set to answer incoming calls.
Checking Your Outgoing Gr eeting
1. Press a nd release the “Greeting” button.
2. Your outgoing greeting will be played back to you, beep once,
then reset to answer incoming calls.
3. Press and release the VOL/CID “ ” or “ ” button on the
base to set the speaker to the de sired sound level. You can check
the current volume level in the base me ss age counter.
Recording a Memo
1. Press and hold the “MEMO” button.
2. After the beep, record your message (up to 1 minute) through
the microphone in the front of the ba se.
3. When your message is completed, relea se t he “MEMO” button.
The Base d isplay mess age counter will indicate the revised mes
sage count. W hen a MEMO is recorded, your unit considers it a s
a sta ndard me ssage a nd will include it in the Ba se mess age count.
Note: When me mory is full during recording, the unit will
a nnounce: “Memory is full.”

Ring Select
Y ou can select the number of rings in which a call will be a nswered.
Set the Ring Select switch (on the back of the base) to 2 or 6 rings,
V oice Activated Recording (VOX)
Your GH3150 records messages for up to 1 minute as long as the
caller speaks. To avoid unnecessary pauses due to hang-ups and to
save message capacity, your unit will automatically stop recording
after 7 seconds.
Message Playback
Incoming Message s
The GH3150 can record up to 12 minutes of incoming messages.
The maximum record ing time for ea ch incoming message is 1 minute.
When the a nswering syste m is on a nd is rea dy to a nswer the calls, the
base display will show the number of new messages and the total
number of messages in memory (up to 99).
Note: The mach ine hangs up and resets to a nswer t he next call in the
following cases: the caller hangs up, the message length exceeds 1
minute, there are more th an 7 seconds of silence or there is a steady
tone (dial tone) for 7 seconds.
To Stop Playback of Incoming Messages
Press and release the “PLAY/STOP” button during message playing. Your unit will reset to answer incoming calls and will save all
messages except t hose marked f or deletion.
To Repeat the Current Message
During playback, press and quickly release BACK button.
To Playback the Previous Message
During playback, press and quickly release BACK button TWICE.
To Skip to the Next Mess age
During playback, press t he SKIP button once to s ki p to the next message.
Remote Handset Operation
T o access your message s for m the h a ndset press the “ANS/FORMA T”
key on the handset.
After entering the remote ha ndset mode, the h a ndset display will show:
To Hear Your Messages
1. Press and release the “PLAY/STOP” button once.
The unit will playback the incoming or MEMO me ss ages in t he
order they were received.
2. The day and time will be heard at the end of each message.
3. After all the messages h ave been played ba ck, t he unit will s ay
“End of Message .” T o erase all message s pre ss and hold the
“ERASE” button.
4. Unit will reset to answer incoming calls.
25 26
REMOTE HANDSET
The voice-prompted menu will give you the following options:
1) Press 7 to review the voice menu
2) Press 2 to play message and press 2 again to stop
3) Press 0 while playing a message to erase
4) Press 1 to review the previous message
5) Press 3 to skip me ssage
6) Press 4 to turn the answering mach ine on/of f
7) Press “EXIT/*” to disconnect/connect the answering machine

Line Remote Operation
T o access your answering ma ch ine me ss age s form an outside phone
line, dial your phone number. After listenting to the greeting, enter
your 3-digit remote access code.
The voice-prompted menu will give you the following options:
1) Press 7 to review the prompted voice menu
2) Press 2 to play message and press 2 again to stop
3) Press 0 while playing a message to erase
4) Press 1 to review the previous message
5) Press 3 to ski p me ss age
6) Press 4 to turn the answering machine off
Belt Clip
You can hang the handset on your belt or pocket using the belt clip.
Optional Headset
Plugging a n optional hea dset into the ha ndset allows ha n ds-free phone
conversation.
When a hea dset is connected to the h a ndset, be sure to speak into the
headset microphone. If you want to return to normal conversation
using the handset, then disconnect the hea dset.
For servicing or replacement, you can purchase a suitable head set
through our service center or your local retailer.
For more infor mation, conta ct the pla ce of purcha se, call Southwestern Bell Freedom Phone help line at 1-800-366-0937 or visit our
website at http://www.swbfreedomphone.com.
T roubleshooting Gui de
If you have followed the instructions in this manual, and have difficulty operating your Southwestern Bell Freedom Phone® Cordless
Telephone, locate the PROBLEM ACTION columns to locate and
remedy the problem .
T roubleshooting G uide (Cont.)
PROBLEM
The unit will not
operate.
No dial tone.
Difficulty placing or
receiving calls.
POSSIBLE CAUSE
Improper installation.
The digital security code
has been lost due to a
power loss while the
handset was away from the
base.
The battery is not charged.
See the above mentioned
possible causes.
The handset is being used
too far away from base.
You may have lost the
security code. The handset
can no longer communicate
with its base. The loss of
the code can occur if the
battery is drained and
needs recharging, the DC
adaptor is disconnected, a
power loss occurred, or
there is electrical
interference from other
cordless phones, baby
monitors, microwaves, etc.
Even a momentary power
interruption could erase
your cordless phone’s
security code.
CORRECTIVE ACTION
Recheck all plug connections.
Also, check the DC adaptor for
proper connection to wall outlet
and phone base.
Reset the digital security code
by returning the handset to the
base. A new code is set.
Charge the battery for about 1014 hours before initial use or
when the battery handset beeps
in talk mode.
See above corrective actions.
Move the handset closer to the
base.
1. Return the handset to the
base unit for 5-10 seconds to
reset code. If that doesn’t work.
2. Check to make sure sure the
DC adaptor is connected.
3. Unplug DC adaptor from
power source, disconnect
handset battery for 5 seconds,
then reconnect, place handset
back on base, then replug the
DC adator.
27 28

T rouble shooting Gu ide (Cont.)
PROBLEM
Can’t make outgoing
calls.
Battery pack is not
recharging.
Noise or interference
is being heard during
your conversation.
During a conversation a loud static
noise is heard.
The handset only
works close to the
base.
The incoming call’s
signal is intermittent
or fades.
POSSIBLE CAUSE
Tone/Pulse setting is not set
correctly.
The digital security code
has been lost.
The base and handset
battery contacts are not in
contact with each other.
Battery pack needs to be
replaced.
Current channel is not the
clearest choice.
The handset is being used
too far away from the base.
The base antenna is not
fully upright.
The battery is not charged.
CORRECTIVE ACTION
Set the Tone/Pulse setting to
proper position for your type of
service.
Reset the security code
returning the handset to the
base.
Make certain the battery
contacts in the handset and base
make contact when handset
rests in the base. The base IN
USE/CHARGE LED will be lit.
Replace the battery pack at least
every year.
Press the channel button to
switch from one channel to
another. This will allow you to
choose the clearest of 40
channels.
Move the handset closer to the
base station.
Make sure the base antenna is
fully upright for the best result.
Recharge the battery.
T roubleshooting G uide (Cont.)
PROBLEM
Answering system will
not operate.
No answer
No incoming messages
recorded.
POSSIBLE CAUSE
You may have had a power failure.
Unit is in the “ANSWER OFF”
mode.
DC adaptor is disconnected from
wall outlet or back of unit.
Power to electrical outlet may be
off.
Telephone line is not connected
to wall jack.
Unit is in the “ANSWER OFF”
mode.
DC adaptor is disconnedted from
wall outlet or back of unit.
Power to electrical outlet may be
off.
Telephone line is not connected
to wall jack.
CORRECTIVE ACTION
Proceed with a unit reset (page28)
Check to verify the base d isplay shows
“A” or the message count. If not, press
the ANSWER ON/OFF button to turn
the unit on, until you hear “Answer
ON”.
Reconnect DC adaptor into wall outlet and back of unit.
Check to see if electrical outlet is controlled by a light switch and power is
on. Wall outlet may not be functioning; try connecting to a different wall
outlet.
Connect telephone line into wall jack.
Telephone wall j ack may not be functioning; try connecting unit into a different telephone wall jack.
Check to verify the base d isplay shows
the message count. If not, press the
ANSWER ON/OFF button to turn the
unit on, until you hear “Answer On”.
Reconnect unit into wall outlet or back
of unit. Try connecting to a different
wall outlet.
Check to see if electrical outlet is controlled by a light switch and power is
on.
Connect telephone line into wall jack.
Try connecting unit into a different
telephone wall jack.
The handset is being used
too far away from the base.
29 30
Move the handset closer to the
base.

T rouble shooting Gu ide (Cont.)
T roubleshooting G uide (Cont.)
PROBLEM
No remote operation
The machine is
cutting off incoming
messages.
POSSIBLE CAUSE
DC adaptor is disconnected from wall outlet or
back of unit.
Power to electrical outlet
may be off.
The telephone you are
calling from is not a
standard touch-tone.
Telephone line is not
connected to wall jack.
Security code not entered
correctly.
Remote security code
being used differs from the
code you have set.
The outgoing greeting you
are recording is too long.
Incoming messages are too
long.
Caller may be pausing for
more than 7 seconds.
CORRECTIVE ACTION
Reconnect unit into wall outlet
or back of unit. Try connecting
to a different wall outlet.
Check to see if electrical outlet
is controlled by a light switch
and power is on.
Try calling from a diff erent
location (e.g. pay phone).
Connect telephone line into
wall jack. Try connecting into a
different telephone wall jack.
3 digit remote security code
must be entered within ten
seconds of the beep at the end
of your outgoing greeting. Press
and hold each digit for 2
seconds, allowing a minimum
of 2 seconds between digits.
Press the “CH” buttons on the
GH3150 handset to check the
current set security code. (see
page29)
Record a shorter outgoing
greeting (between 2 and 60
seconds.)
Maximum recording time for
incoming messages is 60
seconds.
Caller must speak continuously
without any long pauses.
PROBLEM
Your telephone rings
but the GH3150
doesn’t show any
Caller ID records.
You cannot redial a
call record.
You can’t receive call
waiting messages.
The display screen is
dim or blank.
POSSIBLE CAUSE
The telephone line is not
connected properly to the
unit.
Your local area code is not
programmed.
The number display is
incorrect.
This service is not
available.
The display contrast is set
to too low of a level.
CORRECTIVE ACTION
Connect the telephone line into
the back of the unit. Check with
your local telephone company
to be sure Caller ID service is
being provided on your
telephone line. Also, if you pick
up the phone before the first
complete ring, the caller ID
information will not be
completely received.
If the display does not indicate
7 digits for local incoming
calls, reprogram the local area
code.
Verify the number displayed
during redial. Date received
were possibly corrupted during
the transmission through the
telephone lines. Dial the
telephone number manually on
your telephone.
You must subscribe to Caller
ID, Call Waiting, as well as
Call Waiting Caller ID service
from your local phone
company. The phone must be
off-hook to hear the call waiting
Caller ID alert signal.
Press the handset “FLASH” and
then the “ *” or “# ” button
to adjust the handset contrast
level.
31 32

FCC Wants Y ou To Know
This equipment complies with Part 68 of the FCC rules and the requirements adopted by the ACTA. On the bottom of this equipment
is a label th at contains, a mong other inf or mation, a product i dentifier
in the for mat US:AAAEQ##TXXXX. If requested, this number must
be provided to the telephone compa ny. Y ou must, upon request, provide this inf ormation to your telephone company.
FCC compliant telephone cord and modular plug are provided with
this equipment. This equipment is designed to be connected to the
telephone network or premise wiring using a compatible modular
jack wh ich is Part 68 compli ant. See installation instructions for details.
The REN is used to determine the number of devices that may be
connected to a telephone line. Excessive RENs on a telephone line
may result in the devices not ringing in re sponse to a n incoming call.
In most but not all areas, the s um of RENs should not exceed five(5.0).
To be certain of the number of devices that may be concerned to a
line, as determined by the total RENs, contact the local telephone
company. [For products approved after July 23, 2001, the REN for
this product is part of the product identifier that has the format
US:AAAEQ##TXXXX. The digits represented by ## are the REN
without a decimal point (e.g., 03 is a REN of 0.3). For earlier products, the REN is separately shown on the label.].
If your telephone equipment causes h arm to the telephone network,
the telephone compa ny may d iscontinue your service temporarily . If
possible, they will notify you in a dvance. But if adva nce notice isn’t
practical, you will be notified as soon as possible. You will be informed of your right to file a complaint with t he FCC.
Your telephone company may make changes in its facilities, equipment, operations, or procedures that could affect the proper functioning of your equipment. If they do, you will be notified in advance
to give you an opportunity to maintain uninterrupted tele phone service. If you experience trouble with this telephone equipment, disconnect from the network until the problem has been corrected or
33 34
until you are sure that t he equi pment is not malfunctioning.
This equipment may not be used on coin service provided by the
telephone compa ny .
Connection to party lines is subject to state t ariffs.
This equipment is hearing ai d compati ble.
An applicable certification jacks Universal Service Order Codes
(USOC) for the equi pment is provided (i.e., RJ11C) in t he packaging
with each piece of approved terminal equipment.
Warning: Cha nges or mod ifications to t his unit not expressly a pproved
by the party responsible for compliance could void the user’s authority to operate the equipment.
NOTICE: If your home has specially wired alarm equipment connected to the telephone line, ensure the inst allation of this [GH3150]
does not dis able your alarm equipment. If you have questions about
what will dis able alarm equipment, consult your telephone compa ny
or a qualified installer.
NOTE: Th is equipment ha s been tested a nd f ound to comply with the
limits for a Class B digital device, pursuant to Part 15 of the FCC
Rules. These limits are designed to provide reasonable protection
against har mful interf erence in a resi denti al installation. This equi pment generates, uses, and can radi ate radio frequency energy not installed a nd used in accord ance wit h the instructions, may cause har mful
interference to ra dio communication. However, there is no guara ntee
that interference will not occur in a particular installation. If this
equipment does cause h armful interference to rad io or television reception, which can be determined by turning the equipment off and
on, the user is encouraged to try to correct the interference by one or
more of the following mea sure s:
* Reorient or relocate the receiving antenna.
* Increase the separation between the equipment and receiver.
* Connect the equipment to an outlet on a circuit dif f erent from
that to which the receiver is connected.
* Consult the dealer or an experienced radio TV technician for
help.

Caution:
This device complies with Part 15 of t he FCC Rules. Operation
is subject to the following two cond itions: (1) th is device may not
cause harmful interference, and (2) this device must accept any
interference received, including interference that may cause
undesired operation.
Privacy of communications may not be ensur ed when using this
phone.
Product Care
A. A void putting cordless phones near heating a ppliances and de
vices that generate electrical noise (motors, fluore scent la mps,
etc.)
B. Avoid rough treat ment of the phone by placing the h a ndset gently
into the base when h anging up. Avoid dropping the ha ndset.
C. Clean your cordless telephone only with a soft cloth slightly
dampened wit h water or mild h and soap. Do not use any type of
solvent or abra sive cleaner. Before cleaning, always unplug the
phone from the wall outlet.
D. Retain the original pa ckaging should you need to sh i p the phone
at a later date.
Additional Inf or mation
A. Connecting this telephone to a coin operated telephone or party
line is prohibited by law .
B. If it is determined that your tele phone is malfunctioning, the FCC
requires that it be d isconnected from t he modular outlet until the
problem has been corrected.
For immed iate answers to all your questions regard ing the
operation of your. Sout hwestern Bell Freedom Phone, call t he
Customer Hotline, toll-free at (800)366-0937.
Service
According to FCC regulations, this equi pment, which ha s been certified and registered by the FCC, may only be repaired by aut horized
persons. If repairs or adjustments are made by an unauthorized person, the FCC certification may be voided. Should you encounter a n y
problems, please call the Sout hwestern Bell Freedom Phone® tollfree Customer Help Line for a ssist ance: 1-800-366-0937, Monday Friday 8:30 a m - 9:00 pm, a nd Saturd ay 8:30 am- 12:30 pm. You can
also visit our website at http://www.swbfreedomphone.com.
FOR IN-WARRANTY SER VICE:
Package your complete unit (including all adaptors, line cords, and
other acce ssories) a nd shi p the unit postage prepai d* a nd insured (for
your protection) to:
SOUTHWESTERN BELL FREEDOM PHONE®
DEPT.:Warranty Repair 7475 N. Glen Harbor Blvd., Glendale, AZ
85307.
Be sure to include your return a ddress, proof of purch ase, a d ayti me
phone number, $9.50 for post age a nd h a ndling*, a nd a brief explanation of your diff iculties.
* NO TE: Californi a resi dents need only provide proof of purch ase
a nd should call 1-800-366-0937 f or sh ipping instructions.
FOR OUT-OF-WARRANTY SER VICE:
You may call our toll-free Help Line for the price of a replacement
before returning your unit. Please f ollow all instructions for In-Warra nty service (above) to return your unit, a nd mark the package: DEPT.:
Out-of-Warra nty .
If you have called and know the cost of your replacement, please
include this information with your unit for prompt service.
35 36

Questions?
STOP...DON’ T TAKE ME BACK TO THE STORE.
LOOK...FOR THE TOLL-FREE “HELP” TELEPHONE
NUMBER.
LISTEN...AS THE EXPERTS TALK YOU THROUGH THE
PROBLEM.
For immed i ate answers to your questions regarding operation,
missing parts or installation, call the
SOUTH WESTERN BELL FREEDOM PHONE® HELP
LINE A T :
1-800-366-0937
http://www.swbfr eedomphone.com
Limited W arra nty
This Southwestern Bell Freedom Phone® is warranted to the original purchaser to be free from defects in materials and workmanship
under normal installation, use, and service for a period of one(1)
year from the date of purchase as shown on the purch aser’s receipt.
The obligation of Southwestern Bell Freedom Phone Retail Sales
under this warranty shall be limited to repair or replacement (at our
option) during the warranty period of any part which proves
defective in material or work manship under nor mal inst allation, use,
and service, provided the product is returned to Southwestern Bell
Freedom Phone Retail Sales (address below) TRANSPORTATION
CHAR GES PREP AID (Californi a residents call 1-800-366-0937 f or
shipping instructions). Products returned to us or to an Authorized
Service Center must be accompanied by a copy of the purchase receipt.
In the absence of such purch a se recei pt, t he warra nty period sh all be
one (1) year from the date of manufacture. To obtain service under
this warra nty, return the defective product to the service center nearest you, together with your sale s sli p and $9.50 for postage a nd han-
37 38
dling (California resi dents need only provide proof of purcha se). You
may also have other warranty rights which vary from state to state.
This warra nty shall be invali d if the product is d amaged a s a result of
defacement, misuse, abuse, neglect, accident, destruction, or alteration of the serial number, improper electrical voltages or currents,
repair alteration or maintenance by any person or party other than
our own service facility or an authorized Service Center, or any use
in violation of instructions furnished by us.
This warra nty is also rendered invalid if th is product is removed from
the country in which it was purchased, if it is used in a country in
which it is not registered for use, and/or if it is used in a country for
which it was not designed. Due to variations in telephone systems
and communications laws, t his product may be illegal f or use in some
countries. Southwestern Bell Freedom Phone Retail Sales assumes
no responsibility for damages or penalties incurred resulting from
the use of this product in a manner or location other than that from
which it is intended.
This one-year limited warranty is in lieu of all other expressed warranties, obligations, or liabilities. ANY IMPLIED WARRANTIES,
OBLIGATIONS, OR LIABILITIES, INCLUDING BUT NOT LIMITED TO THE IMPLIED WARRANTIES OF MERCHANTABILI TY AND FITNESS F OR A PAR TICULAR PURPOSE, SHALL BE
LIMITED IN DURATION TO THE ONE-YEAR DURATION OF
TH IS W RI TTEN LIMITED WARRANTY . SOME ST ATES DO NO T
ALLOW LIMITATIONS ON HOW LONG AN IMPLIED WARRANTY LASTS, SO THE ABOVE LIMITATIONS MAY NOT
APPLY TO YOU.
IN NO EVENT SHALL WE BE LIABLE FOR ANY SPECIAL,
INCIDENTAL OR CONSEQUENTIAL DAMAGES FOR
BREACH OF THIS OR ANY OTHER W ARRANTY, EXPRESSED
OR IMPLIED, WHATSOEVER.
 Loading...