

Page 1

Control systems
COMAND operating safety
COMAND introduction
COMAND FM/AM radio
COMAND satellite radio* (USA only)
COMAND
audio CD/audio DVD/MP3
COMAND video DVD (USA only)
COMAND telephone*
COMAND navigation
COMAND address book
COMAND system settings
COMAND vehicle menu
COMAND automatic climate control
COMAND seats
Instrument cluster control system
Voice Control*
83
Page 2

Control systems
COMAND operating safety
Warning! G
Any alteration of electronic components or
software can cause malfunctions.
Radio, satellite radio* (USA only), amplifier,
CD/DVD changer, navigation module, telephone and Voice Control Systems* are interconnected. Therefore, if one of the
components is not operational, or has not
been removed/ replaced properly, the function of other components could be impaired.
Such conditions might seriously impair the
operating safety of your vehicle.
We recommend to have any service work on
electronic components carried out by an authorized Mercedes-Benz Center.
Warning! G
In order to avoid distraction which could
lead to an accident, the driver should enter
system settings while the vehicle is at a
standstill, and operate the system only
when permitted by road, weather and traffic
conditions.
Bear in mind that at a speed of just 30 mph
(approximately 50 km/ h), your car covers a
distance of 44 feet (approximately 14 m) every second.
COMAND supplies you with information to
help you select your route more easily and
guide you conveniently and safely to your
destination. For safety reasons, we encourage the driver to stop the vehicle in a safe
place before answering or placing a call, or
consulting the COMAND screen to read navigational maps, instructions, or downloaded
information.
Warning! G
While the navigation system provides directional assistance, the driver must remain focused on safe driving behavior, especially
attention to traffic and street signs, and
should utilize the system’s audio cues while
driving.
The navigation system does not supply any
information on stop signs, yield signs, traffic
regulations or traffic safety rules. Their observance always remains in the driver’s personal responsibility. DVD maps do not cover
all areas nor all routes within an area.
84
Page 3

왔 COMAND introduction
COMAND (Cockpit Management and Data
System) is an information and operating
center for vehicle sound and communications systems, including the radio and navigation system, as well as other optional
equipment (satellite radio*, telephone*,
etc.).
Availability of functions while the vehicle is in motion
For safety reasons, certain COMAND functions are not available while the vehicle is
in motion or they are only available to a
limited extent. You will notice this, for example, by the fact that certain menu items
cannot be selected or that the COMAND
display shows a corresponding message.
Switching COMAND on or off
왘 Press the o shortcut button in the
center console (
컄 page 86).
COMAND calls up the menu last selected.
When you switch off COMAND, you also
i
switch off the currently playing audio source.
During a telephone call, you cannot switch off
COMAND.
Control systems
COMAND introduction
COMAND components
In your vehicle, COMAND can be used to
operate:
앫 audio functions
앫 the navigation system
앫 the telephone* and communication
functions (SMS*)
앫 Video DVD (USA only)
앫 various vehicle settings
COMAND consists of the following:
앫 COMAND shortcut buttons
앫 COMAND display
앫 telephone* keypad
앫 COMAND controller
85
Page 4
Control systems
COMAND introduction
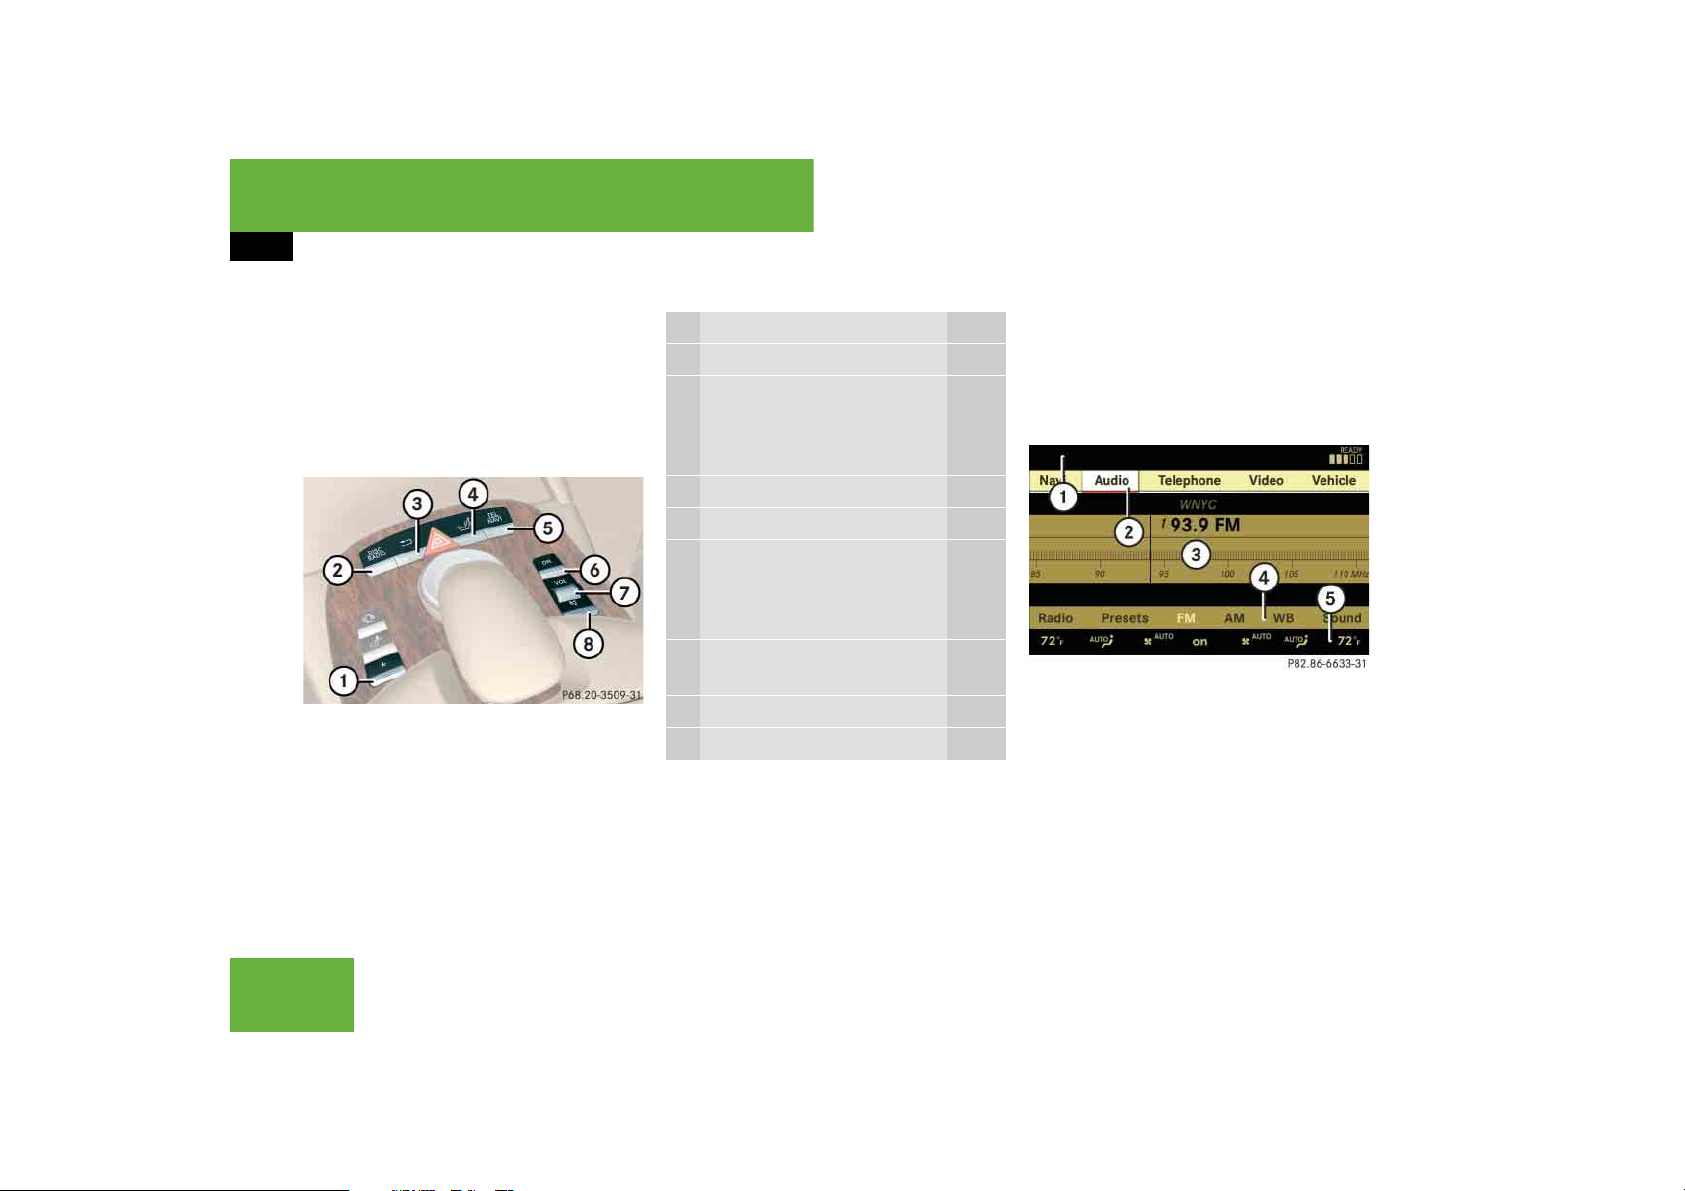
COMAND shortcut buttons
During Dynamic Rear View Monitor* opera-
i
컄 page 453) it is not possible to operate
tion (
the COMAND shortcut buttons.
Use the COMAND shortcut buttons to select main functions directly.
Function Page
1 P Favorite button 240
2 M Shortcut button for:
앫 CD/DVD
앫 radio
120
101
3 L Back button 94
4 O Seat menu 261
5 N Shortcut button for:
앫 telephone*
앫 navigation
132
167
6 o COMAND on/off
button
7 , Volume control 96
8 F Mute button 96
Example:
왘 Switching directly to Radio or CD
menu: Press M once or twice.
COMAND display
In the COMAND display, you will find the
function currently selected and the corresponding menus. The COMAND display is
divided into several areas.
85
1 Status line
2 Main functions
3 Main area
4 Submenus
5 Climate control settings
A white bar under the main functions 2 indicates the active area.
Once you have selected a main
function 2, the main area 3 is active.
86
Page 5

Control systems
COMAND introduction
The layout of the menus may vary depending
i
on your vehicle’s equipment. This manual shows
the menus for a fully equipped vehicle.
Instrument cluster multifunction
display
This section describes features and controls via the COMAND controller, display
and shortcut buttons only.
Please refer to the “Instrument cluster
control system” section of this manual
(
컄 page 266) for function descriptions and
operation of the instrument cluster multifunction display and multifunction steering
wheel buttons as they relate to COMAND
features described in this section.
Adjusting COMAND display
illumination
1 Knob
왘 Brightening illumination: Turn
knob 1 clockwise.
왘 Dimming illumination: Turn knob 1
counterclockwise.
Swiveling COMAND display
1 Button for swiveling display to the left
2 Button for swiveling display to the right
You can swivel the COMAND display to the
left or right. The buttons are on the
right-hand side of the instrument cluster.
87
Page 6
Control systems
COMAND introduction
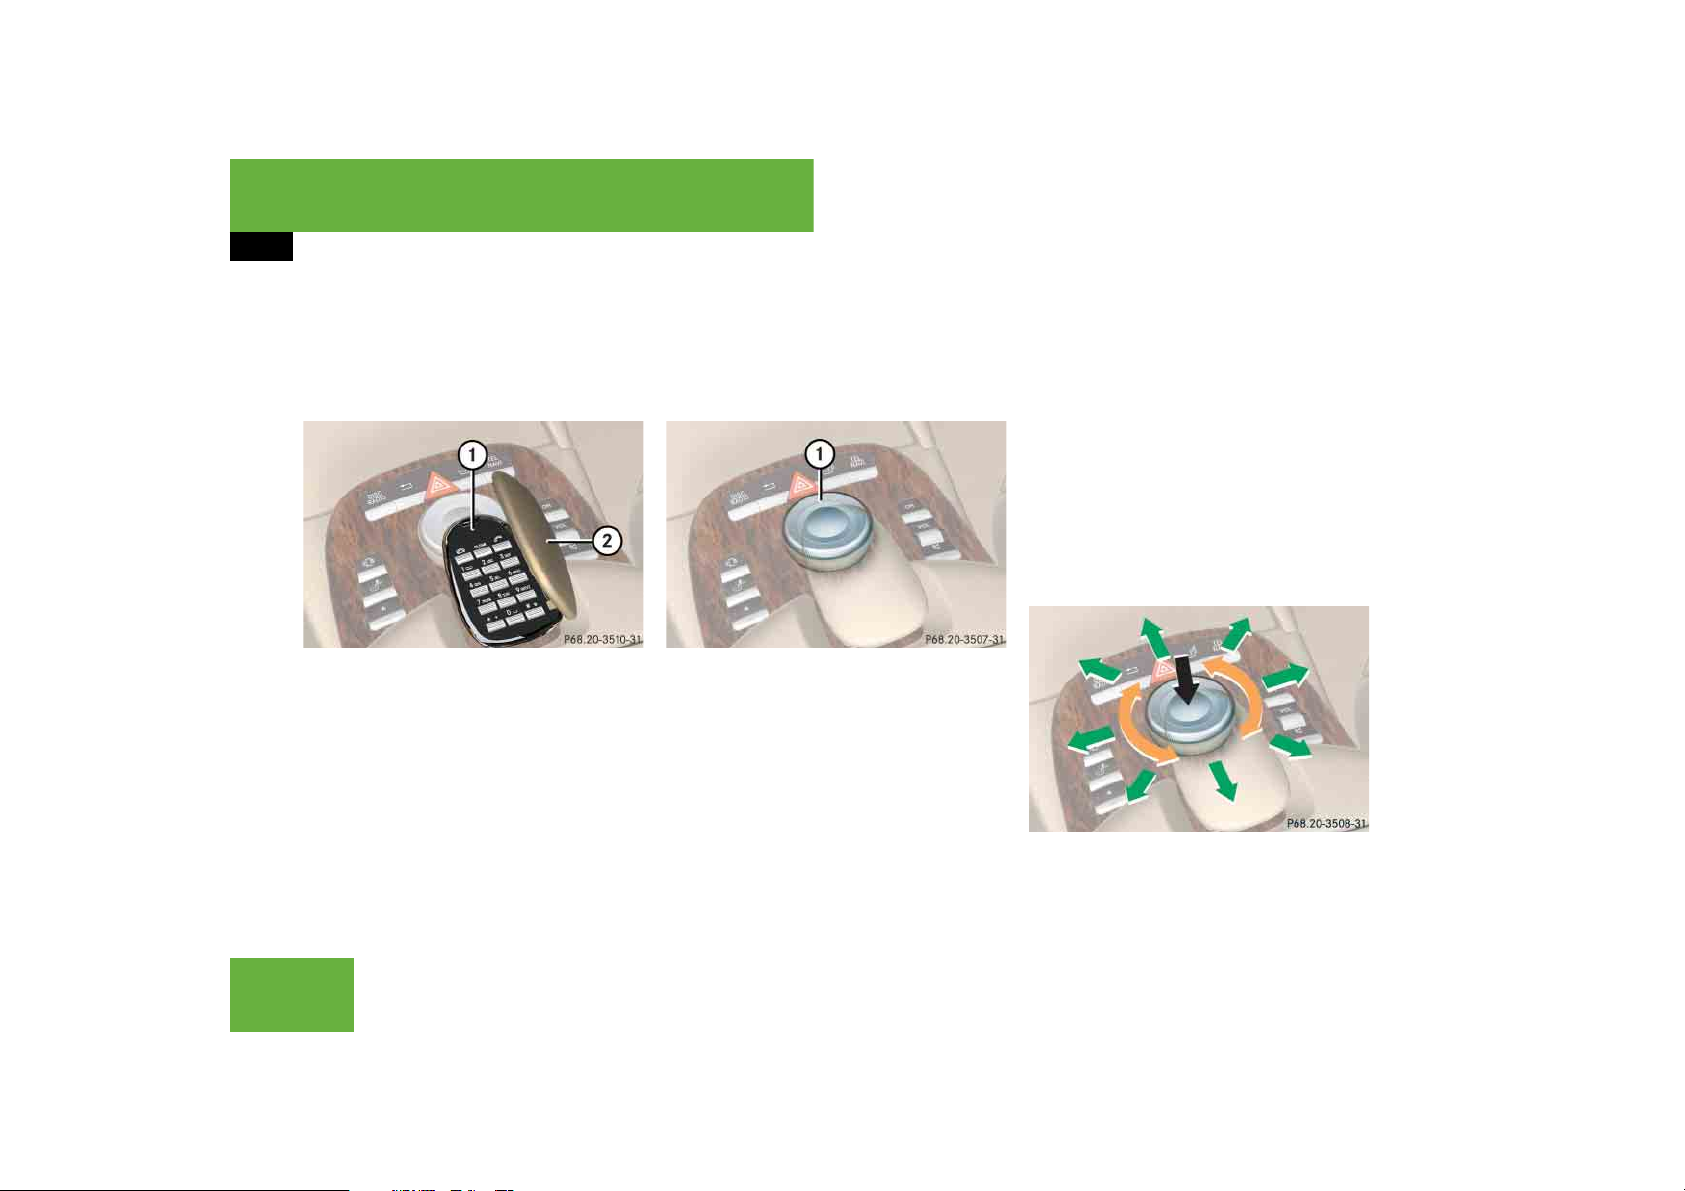
Telephone keypad*
With the help of the telephone keypad, you
can use your mobile phone if it is inserted
in the cradle.
1 Telephone keypad
2 Folding cover
COMAND controller
Use the COMAND controller to select
menu functions shown on the COMAND
display.
1 COMAND controller
You can operate the COMAND controller
as follows:
앫 press briefly or press and hold
앫 rotate to the left or right
앫 slide to the left, right, up, down or
diagonally
In this way, you can move through the
menus, select menu items or exit menus.
You can move through the menus either by
rotating or sliding the controller.
Operating COMAND controller
88
Page 7

Symbol How to use the COMAND controller Function
왘 Press briefly. 앫 Select menu item.
n
왘 Press and hold until the selected ac-
tion has been carried out.
왘 Rotate. 앫 Move through vertical or horizontal menus.
ymz
왘 Slide. 앫 Move through vertical menus.
qmr
왘 Slide and hold. 앫 Move through a navigation map.
왘 Slide. 앫 Move through horizontal menus.
omp
왘 Slide and hold. 앫 Fast forward or reverse for audio CD or audio DVD playback.
왘 Slide and hold. 앫 Move through a navigation map.
앫 Exit full-screen image with Navi.
앫 Save a station.
앫 Accept a destination for navigation.
앫 Move through text.
앫 Program settings.
앫 Exit horizontal menus.
앫 Exit vertical menus.
앫 Move through a navigation map.
wmx
Control systems
COMAND introduction
89
Page 8

Control systems
COMAND introduction
Operating COMAND
Menu overview
The illustration below shows the structure
of the main functions and their main
menus.
Navi Page Audio Page Telephone* Page
Map Display 169 FM/AM Radio 100 Telephone* 132
Mode 172 Sat Radio* (USA only) 105 Address Book* 226
Commands/menus
Each main function has a main menu. Each
menu item in the main menu in turn has
several submenu items.
CD 112 Telephone OFF* 134
DVD-Audio 112
MP3 112
Audio OFF 99
90
Page 9

Control systems
COMAND introduction
Video DVD (USA only)
1
Page Vehicle Page
Video DVD 124 Exterior Lighting Delayed Switch-off 244
Submenu overview 126 Locator Lighting 245
Switching to video DVD mode 126 Exterior Mirror Convenience Settings 246
Pause playback 128 Automatic Locking 247
DVD menu 129 Easy Entry/Exit Feature 248
Interior Lighting Delayed Switch-off 250
Commands/menus
Interior Ambient Light 249
Rear Window Sunshade* 251
Trunk Opening-height Restriction* 251
1
Depending on your vehicle’s production date the video DVD function may be not available.
91
Page 10
Control systems
COMAND introduction
Calling up the main menu
Illustration: audio main menu
You can call up the main menu of a main
function in the following manner:
왘 Moving to the main function line:
Slide qm.
왘 Selecting a main function: Slide omp
or rotate ymz.
왘 Confirming selection: Press n.
Vertical menus
왘 Moving through the menu:
Slide rmq or rotate ymz.
왘 Selecting a menu item: Press n.
왘 Exiting a menu without making a se-
lection: Slide omp in the opposite direction of the list orientation or press
back button L.
Horizontal menus
왘 Moving through the menu:
Slide omp or rotate ymz.
왘 Selecting a menu item: Press n.
왘 Exiting a menu without making a se-
lection: Slide rmq in the opposite direction of the list orientation or press
back button L.
92
Page 11
Control systems
COMAND introduction
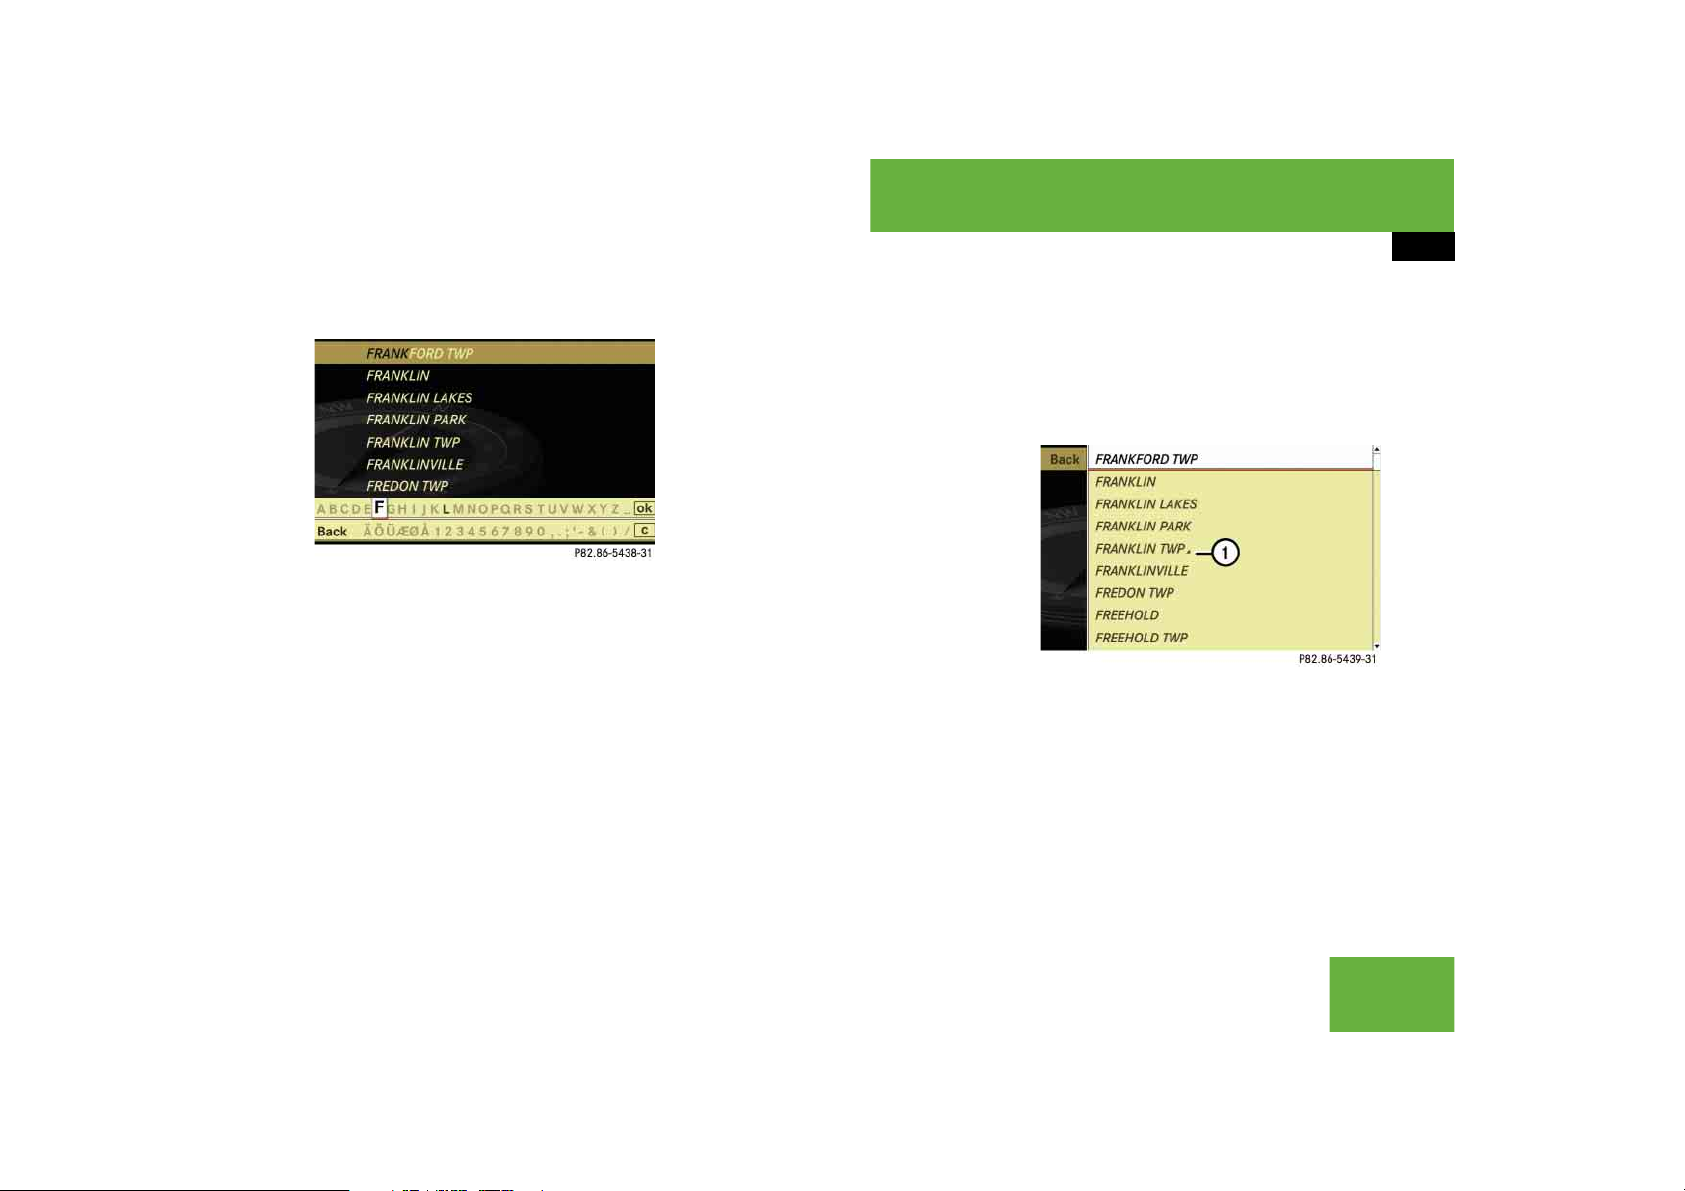
Entering characters
Illustration: entering a navigation destination
Selecting characters
왘 Slide omp or rotate ymz.
왘 Confirming selection: Press n.
COMAND completes your entry as
soon as it can be clearly identified. In
this case, you do not need to switch to
the list.
Deleting individual characters
왘 Select and press ) repeatedly in the
bottom line.
Deleting entire words or numbers
왘 Press and hold ) in the bottom line
until the word or number is deleted.
Exiting character entry
왘 Select and press “Back” in the bottom
line.
or
왘 Press back button L in the center
console (
컄 page 86).
Switching to the list
왘 Slide qm.
or
왘 Select and press ? in the second line
from the bottom.
왘 Exiting list: Slide om to select “Back”.
Accepting first entry
왘 Press n until you exit the character
entry window.
Selecting list item
Illustration: list of towns and cities for navigation
1 Symbol for other selection options
(e.g. county)
왘 Selecting a line: Slide rmq or
rotate ymz.
컄컄
93
Page 12

Control systems
COMAND introduction
왘 Confirming selection: Press n.
컄컄
Additional selection options are available for list entries featuring
symbol 1. For example, cities marked
with symbol 1 indicate that the selected country has more than one city featuring that name. Confirming such a list
entry opens up another submenu.
Back button
1 Back button
왘 Switching to the next highest menu:
Press L briefly.
COMAND switches to the next highest
menu level within the currently active
operating mode.
왘 Switching to the main menu: Press
and hold L.
You will hear a signal, and COMAND
switches to the main menu of the currently active operating mode.
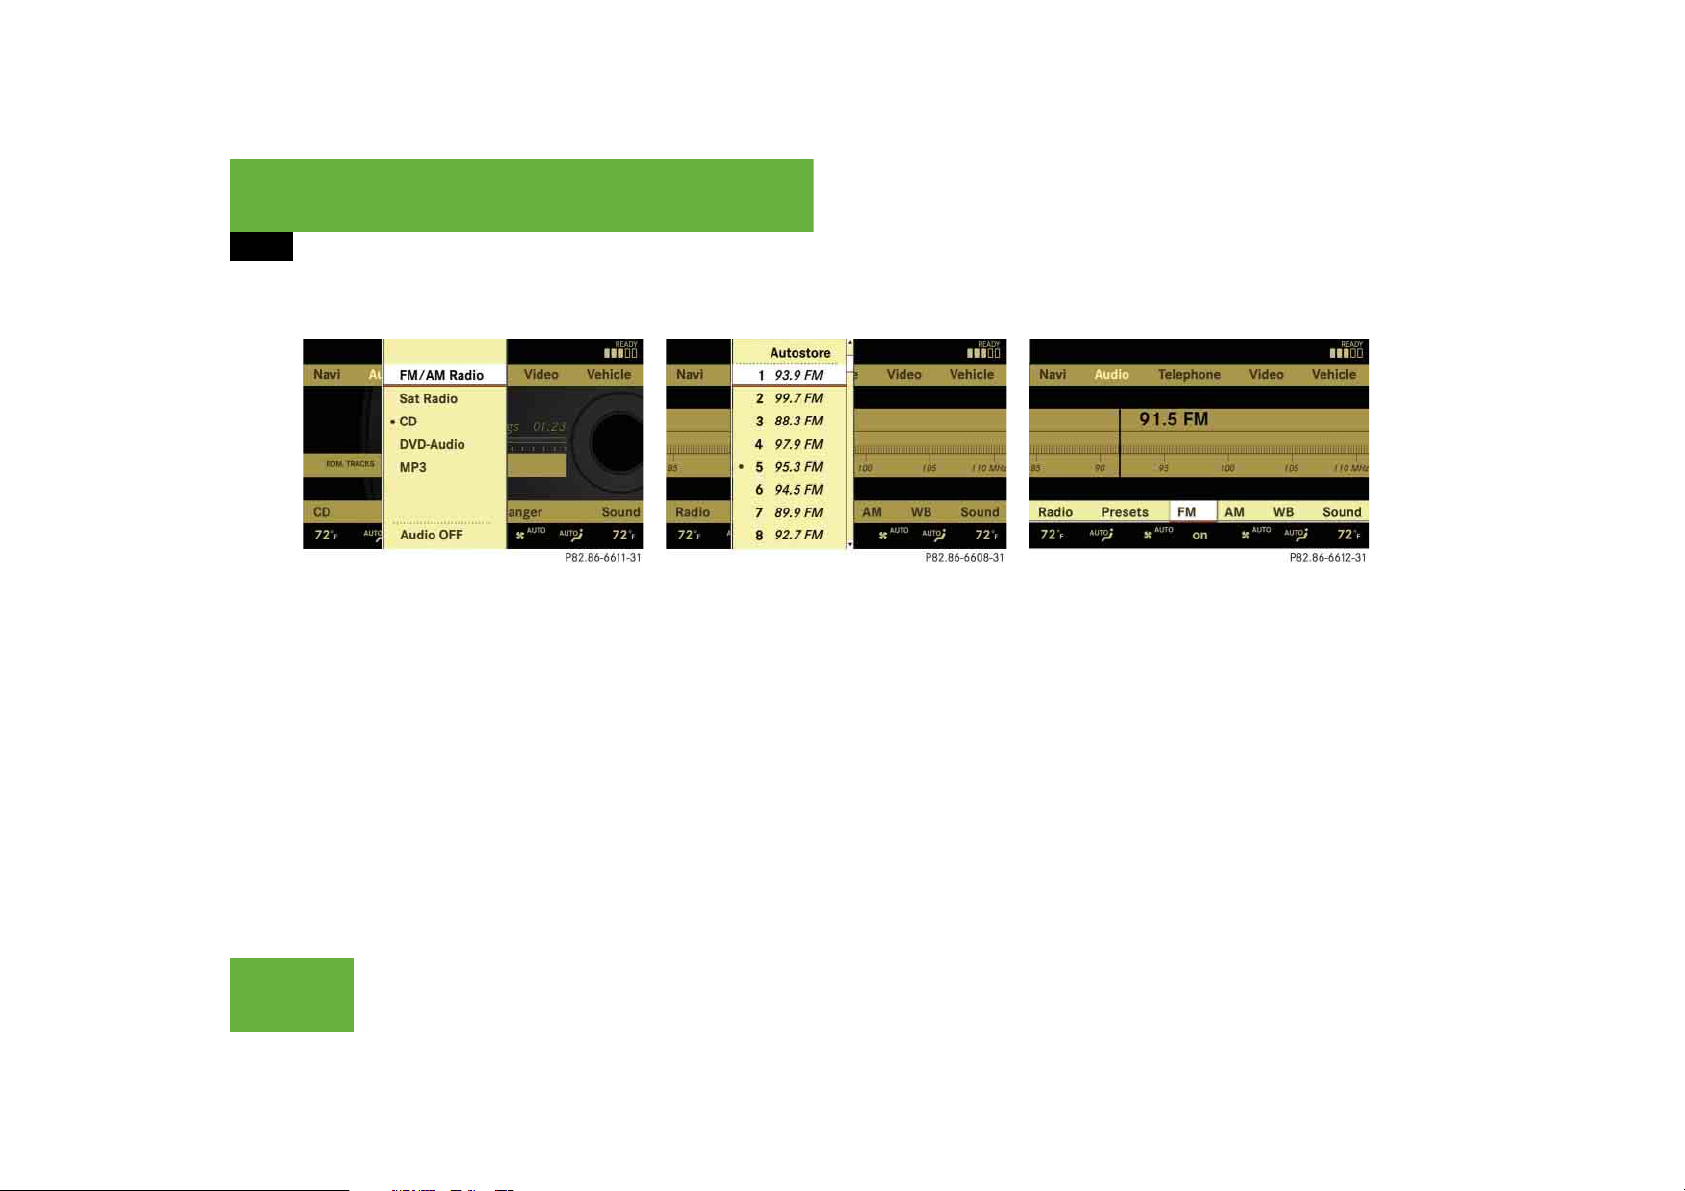
Example of how to use COMAND
In the descriptions below, the main functions always serve as the starting point for
locating the individual menu items.
Example:
“Audio” “Audio” “FM/AM Radio”
“Radio” “Save Station”
In the COMAND display, you will see the
i
submenu previously called up for each main
menu.
If you already see one of the submenus on
the screen (e.g. the “Audio” “Audio”
“Radio” submenu), it is not necessary to
perform the first steps.
The individual steps for the above-mentioned example are described below.
왘 Switching to the main function line:
Slide qm.
왘 Selecting “Audio” main function:
Slide omp or rotate ymz.
왘 Confirming selection: Press n.
The audio operating mode last selected
appears.
94
Page 13

Control systems
COMAND introduction
왘 Selecting “Audio” in the main menu:
Slide qm.
왘 Confirming selection: Press n.
A selection list with the functions of the
“Audio” main menu appears.
왘 Selecting “FM/AM Radio”:
Slide qm or rotate ymz.
왘 Confirming selection: Press n.
The FM/AM Radio menu appears.
왘 Selecting “Radio”: Slide mr or
rotate ymz.
왘 Confirming selection: Press n.
The Radio submenu appears.
왘 Select “Save Station” from selection
list by rotating ymz or sliding rmq.
왘 Select desired position.
왘 Confirming selection: Press n.
The selected station is saved at the
designated position. The display
switches back to the Radio display.
95
Page 14

Control systems
COMAND introduction
Main menus of COMAND
The components and operating principles of
i
COMAND can be found on (
컄 page 85).
Sound
왘 Muting: Press the F shortcut but-
ton in the center console (
컄 page 86).
The sound of the current audio source
is switched on or is muted.
When the sound is muted, you will see the
i
F in the status line. When you
symbol
change the audio source, the sound is automatically switched on. You will be able to hear announcements from the navigation system even
when the sound is muted.
Switching off navigation announcements entirely
왘 Canceling navigation message:
Briefly press F shortcut button during an announcement.
왘 Switching off navigation messages:
Press and hold F during an announcement until the announcement is
switched off.
You will see the message “The driving
instructions have been muted.” for a
short while.
The announcements remain switched off
i
even if you start a new route guidance or if
COMAND is switched off/on with the o button.
If you switch COMAND off by removing the
SmartKey from the starter switch and then
switch the ignition back on after more than
3 minutes, the announcements are automatically switched back on.
Adjusting volume
1 Thumbwheel
왘 Adjusting: Turn , thumbwheel.
The volume of the currently selected
audio source changes.
96
Page 15

Control systems
COMAND introduction
Volume of navigation announcements
You can adjust the volume of the navigation announcements independently from
the volume of the respective audio source.
During a navigation announcement:
왘 turn thumbwheel ,
or
왘 press æ or ç on the multifunc-
tion steering wheel.
Adjusting volume for telephone calls
In hands-free mode, you can adjust the volume of a telephone call while the call is
currently active.
During a telephone call:
왘 turn thumbwheel ,
or
왘 press æ or ç on the multifunc-
tion steering wheel.
Selecting sound settings
You can select different sound settings for
each individual audio source. The respective sound menu can be found via the submenu for which you wish to make settings.
Example:
“Audio” “Audio” “FM/AM Radio”
“Sound”
Adjusting treble or bass
왘 Select “Sound” “Treble” or “Bass”.
The setting last selected is indicated by
an outlined bar.
Adjusting treble and bass
1 Setting last selected
2 Current setting
왘 Changing setting: Slide rmq or
rotate ymz until desired treble or bass
setting is reached.
왘 Exiting menu: Press n, L or
slide omp.
The setting is saved.
97
Page 16

Control systems
COMAND introduction
Adjusting balance or fader
Balance is used to determine whether the
sound focus should be shifted toward the
driver’s side or the passenger’s side.
Fader is used to determine whether the
sound focus should be shifted toward the
front or rear of the vehicle
왘 Select “Sound” “Balance/Fader”.
The setting last selected is indicated by
an outlined bar.
Adjusting balance and fader
1 Current setting indicated by orange
cross-hair symbol
왘 Changing setting: Slide rmq or omp
until desired balance/fader setting is
reached.
왘 Exiting menu: Press n or L.
The setting is saved.
Surround sound
With surround sound, you can choose between “LOGIC7
Harman/kardon LOGIC7
®
ON” and “LOGIC7® OFF”.
®
surround sound
is available for the following operating
modes:
앫 Audio DVD (MLP, DTS, PCM, and Dolby
Digital audio formats)
앫 Video DVD (DTS, PCM, and Dolby Digi-
tal audio formats) (USA only)
앫 Audio CD
앫 MP3
앫 Radio (FM, AM, WB,
Satellite* (USA only))
앫 PCMCIA
Since some DVDs contain both stereo as
i
well as multi-channel audio formats, it may be
necessary to adapt the audio format
컄 page 123).
(
The “LOGIC7® ON” function of the har-
i
man/kardon LOGIC7
makes it possible to play discrete 5.1 and stereo
recordings with optimal surround sound for every passenger. Music on CDs or audio DVDs with
high-resolution surround formats such as MLP,
DTS or Dolby Digital is played back optimally.
For an ideal sound experience on all seats,
®
LOGIC7
via the 13-channel system architecture. The result is a sound as intended by the sound engineers during the original recording.
harman/kardon LOGIC7
nel stereo sound material into multi-channel surround sound. With the help of LOGIC7
surround information stored during the original
recording are read out and distributed through
the 13 channels. No effects are created during
this process; only that which was already there
becomes audible.
In addition, harman/kardon LOGIC7
perceived sound source away from the individual
loudspeakers, thus generating a natural 360°
sound experience for every passenger.
distributes 5.1 surround information
®
surround sound system
®
converts all two-chan-
®
,
®
moves the
98
Page 17

Control systems
COMAND introduction
By selecting “LOGIC7® OFF”, all compatible
i
formats as they are present on the medium are
played back. Due to the vehicle’s spatial characteristics, an optimal sound experience is not ensured on all seats.
Adjusting surround sound
With surround sound, you can choose between “LOGIC7
왘 Select “Sound” “3D Sound”.
Adjusting surround sound
®
ON” and “LOGIC7® OFF”.
1 Current setting
왘 Selecting a setting: Slide rmq or
rotate ymz.
왘 Saving setting: Press n.
The setting is saved and the menu is
closed.
왘 Exiting menu without saving
changes: Press L or slide omp.
Please note the following:
i
앫 For an ideal sound experience at all seats,
the balance and fader should be adjusted to
the center of the passenger compartment
with LOGIC7
앫 The best sound results are achieved by play-
ing high-quality audio CDs and audio DVDs.
앫 For MP3 tracks, the bit rate should be at
least 128 kbit/s.
앫 Surround sound does not function for
mono-signal sources.
앫 In the event of poor radio reception quality,
e.g. inside a tunnel, you should switch off
LOGIC7
to Mono could occur, resulting in temporary
sound distortion.
®
switched on.
®
, as a dynamic switch from Stereo
앫 With some stereo recordings, the resulting
sound may deviate from conventional stereo
playback.
Switching off/on the audio source
When you insert an audio CD or audio DVD,
i
it automatically becomes the active audio
source.
왘 Switching off: Select “Audio” “Au-
dio” “Audio OFF”.
The audio source is switched off; “Audio OFF” appears in the display.
왘 Switching on: Select “Audio”, then the
desired audio source.
or
왘 Load CD/DVD (컄 page 115) or a
PCMCIA card (
컄 page 117).
99
Page 18

Control systems
COMAND FM/AM radio
Warning! G
Please devote your attention first and foremost to the traffic situation you are in.
Before your journey, please familiarize yourself with the radio functions.
Only use the COMAND when road and traffic
conditions permit you to do so. Otherwise
you could be involved in an accident in
which you or others could be injured.
Submenu overview
The components and operating principles of
i
COMAND can be found on (
Radio
(except Weather Band)
Station List
컄 page 85).
Presets
(except Weather Band)
Channel
(only Weather Band)
FM or AM or WB Sound
Autostore Channel list Switch to FM waveband Treble
(in FM waveband only)
Save Station Preset station list Switch to AM waveband Bass
Frequency Entry Switch to Weather Band Balance/Fader
Show Station Info
3D Sound
(in FM waveband only)
100
Page 19

Control systems
COMAND FM/AM radio
Switching to radio mode
왘 Select “Audio” “Audio” “FM/AM
Radio”.
or
왘 Press the M shortcut button once or
twice.
The radio display appears once you
have switched to radio mode. You will
hear the station/channel last tuned in
in the previously selected waveband,
provided that the station/channel can
be received.
The number of times you have to press the
i
M shortcut button depends on the operating
mode currently selected.
Illustration: radio mode in FM waveband
1 Main area with frequency display
2 Preset position of selected station
3 Frequency of selected station
4 Name of selected station
5 Sound settings
6 To switch to Weather Band
7 To switch to AM waveband
8 Selected waveband
9 Preset options
a Radio options
Station name display 4 is available for the
i
FM waveband and can only be seen when it is
switched on (
transmits a name.
컄 page 104) and if the station
Switching wavebands
You can switch between the FM, AM and
WB (Weather Band) wavebands.
왘 Select “Audio” “Audio” “FM/AM
Radio” “FM” or “AM” or “WB”.
You will hear the station last tuned in
on the selected waveband.
Selecting stations/channels
You have the following selection options:
앫 The station list
앫 The search function
앫 The station presets
앫 The manual frequency entry
앫 The channel list
101
Page 20

Control systems
COMAND FM/AM radio
Selecting stations using the station list
The station list is only available for the FM
i
waveband. It contains all the stations that can be
currently received and is sorted by station frequencies.
왘 Select “Audio” “Audio” “FM/AM
Radio” “FM”.
왘 Select “Radio” “Station List”.
The station list appears. The dot R in
front of a list entry indicates the currently selected station. A number in
front of the list entry indicates the preset position in the station preset memory.
왘 Select a station by rotating ymz or
sliding qmr and press n.
Selecting stations/channels using the
search function
왘 Slide omp or rotate ymz when the
main area is selected.
Depending on the direction in which
the controller is being slid or rotated,
the system searches upward or downward and stops at the next receivable
station/channel.
Selecting stations using station
presets
This function is not available for Weather
i
Band.
왘 Select “Audio” “Audio” “FM/AM
Radio” “FM” or “AM”.
왘 Select “Presets”.
or
왘 Press n when the main area is select-
ed.
The preset menu appears. The dot R
in front of a preset position indicates
that the currently selected station is
saved there.
왘 Select station preset by rotating ymz
or sliding qmr and press n.
Selecting stations by entering the frequency manually
This function is not available for Weather
i
Band.
왘 Select “Audio”“Audio”“FM/AM
Radio”“FM” or “AM”.
왘 Select “Radio”“Frequency Entry”.
The menu for manual frequency entry
appears.
왘 Exiting menu without making an
entry: Press L back button in the
center console (
왘 Increasing or decreasing number:
컄 page 86).
Slide qmr or rotate ymz.
You can only select currently permitted
i
numbers.
왘 Selecting the next number:
Slide mp.
왘 Confirming frequency entry:
Press n.
COMAND tunes in to the frequency
entered.
102
Page 21

Control systems
COMAND FM/AM radio
If you enter a frequency in the AM waveband
i
which is outside the frequency range, COMAND
tunes in to the next lowest frequency.
Selecting channels using the channel
list
This function is only available for Weather
i
Band.
왘 Select “Audio” “Audio” “FM/AM
Radio” “WB” “Channel”.
or
왘 Press n when the main area is select-
ed.
The channel list appears. The dot R in
front of a list entry indicates the currently selected channel.
왘 Select channel by rotating ymz or
sliding qmr and press n.
Saving stations
Twenty stations can be saved in each wave-
i
band except for Weather Band.
You have the following options:
앫 Saving stations manually
앫 Saving stations using Autostore
Saving stations manually
Option 1
왘 Select “Audio” “Audio” “FM/AM
Radio” “FM” or “AM”.
왘 Select “Radio ” “Save Station”.
Option 2
왘 Press n when the main area is select-
ed.
Option 3
왘 Select “Audio” “Audio” “FM/AM
Radio” “FM” or “AM”.
All three of these will call up a station preset screen. The dot R in front of a preset
position indicates that the currently selected station is saved there.
왘 Selecting a preset position:
Slide qmr or rotate ymz.
Saving a station to a selected preset position
If you have called up the station preset
screen using option 1:
왘 Press n briefly.
In options 2 and 3:
왘 Select “Presets”.
103
Page 22

Control systems
COMAND FM/AM radio
왘 Press and hold n until you hear a sig-
nal.
The station is saved.
Saving using autostore
This function is not available for Weather
i
Band. The Autostore function saves receivable
stations as presets in order of their reception
quality. All stations saved manually in the preset
memory will be lost if COMAND finds 20 stations. If COMAND finds less than 20 stations, for
example 9, then the stations saved in preset positions 1 – 9 will be over written.
Option 1
왘 Press n when the main area is select-
ed.
왘 Select “Autostore”.
Option 2
왘 Select “Audio” “Audio” “FM/AM
Radio” “FM” or “AM”.
왘 Select “Presets” “Autostore”.
Option 3
왘 Select “Audio” “Audio” “FM/AM
Radio” “Radio” “Save Station”
“Autostore”.
Station name display
In the FM waveband, COMAND can show
i
the name of the station currently tuned in. Station name display 1 can only be seen when it is
switched on and if the station transmits a name.
1 Station name display
왘 Switching the station name display
on/off: Select “Audio” “Audio”
“FM/AM Radio” “FM” “Radio”
“Show Station Info”.
The display is switched on or off, depending on the previous setting. When
the display is switched on, a checkmark appears in front of the
“Show Station Info” menu item.
104
Page 23

왔 COMAND satellite radio* (USA only)
Control systems
COMAND satellite radio* (USA only)
Warning! G
Please devote your attention first and foremost to the traffic situation you are in.
Before your journey, please familiarize yourself with the radio functions.
Only use the COMAND when road and traffic
conditions permit you to do so. Otherwise
you could be involved in an accident in
which you or others could be injured.
Submenu overview
The components and operating principles of
i
COMAND can be found on (
컄 page 85).
Sat Radio Presets Info Category Sound
Channel List Station presets Show program info Select category Treble
Save Channel Bass
Channel Entry Balance/Fader
Service 3D Sound
105
Page 24

Control systems
COMAND satellite radio* (USA only)
Introduction to Satellite radio
A subscription to SIRIUS satellite radio ser-
i
vice provider is required for the satellite radio operation described in this chapter. Contact an
authorized Mercedes-Benz Center for details
and availability for your vehicle.
SIRIUS Satellite Radio provides 100 channels, so called streams, of digital-quality
radio, among others music, sports, news,
and entertainment free of commercials.
SIRIUS Satellite Radio uses a fleet of
high-power satellites to broadcast
24 hours per day, coast-to-coast, in the
contiguous US.
This diverse, satellite-delivered programming is available for a monthly subscription fee.
For more information and service availability call the SIRIUS Service Center
(
컄 page 111), or go to
www.siriusradio.com.
Satellite radio service may be unavailable or
i
interrupted from time to time for a variety of reasons, such as environmental or topographic conditions and other things we can’t control. Service
might also not be available in certain places
(e.g., in tunnels, parking garages, or within or
next to buildings) or near other technologies. In
such situations, the satellite radio’s main menu
shows the “Acquiring signal...” screen. At this
point, the radio’s functions are restricted to
manual channel number entry (
service info display (
컄 page 111).
컄 page 109) and
Switching to satellite radio
왘 Select “Audio” “Audio” “Sat Ra-
dio”.
or
왘 Press the M shortcut button once or
twice. The Satellite radio menu appears
if it was the last active radio mode.
The screen which then appears depends on the activation status of the
satellite radio service.
The following options are possible:
앫 Satellite radio service is not activat-
ed
앫 Only the preview channel is activat-
ed
앫 Satellite radio service is fully acti-
vated
106
Page 25
Control systems
COMAND satellite radio* (USA only)
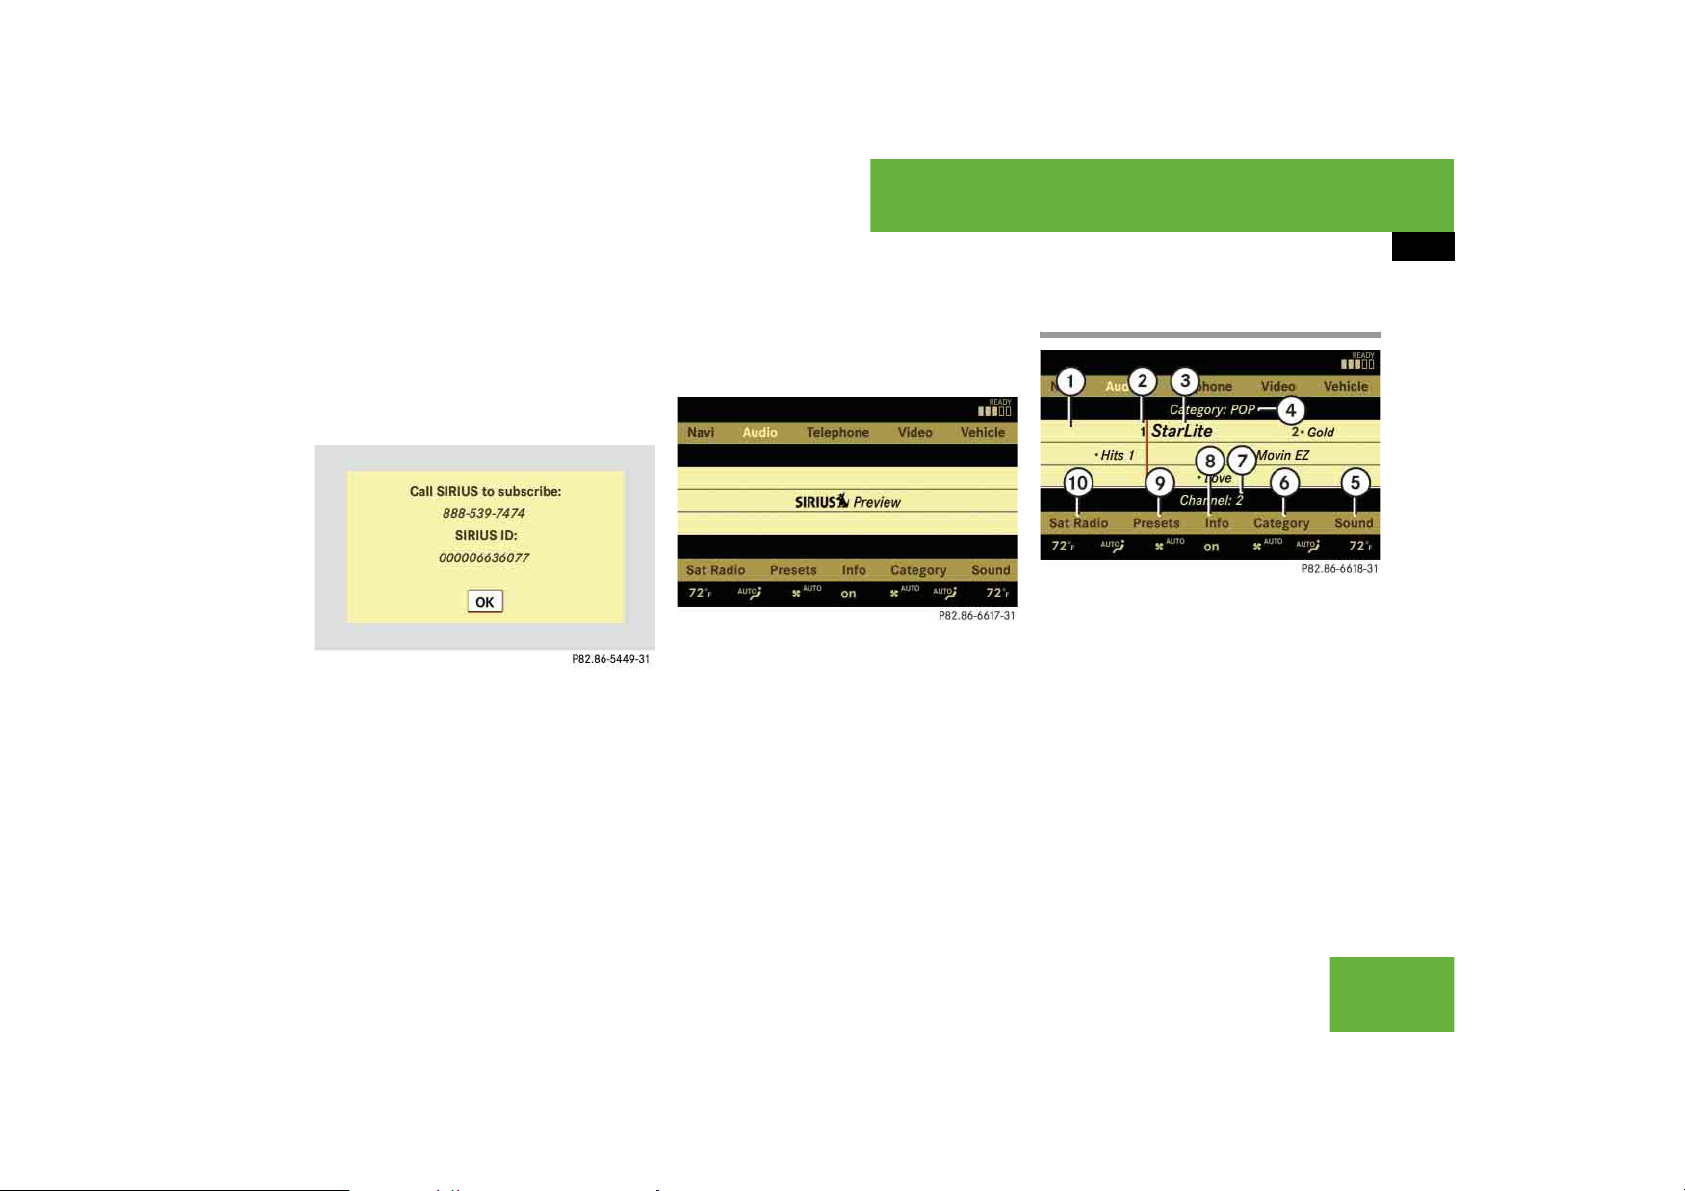
Satellite radio service is not activated
The telephone number of the SIRIUS Service Center and the twelve-digit electronic
serial number (SIRIUS-ID) of the particular
receiver are displayed.
This information is required when calling
the SIRIUS Service Center for an activation
request.
Credit card information is also required for
i
your application. The activation process takes
approximately 5 to 10 minutes after calling the
SIRIUS Service Center.
왘 Closing screen: Press n.
Only the preview channel is activated
The satellite radio preview channel appears.
If only the preview channel is activated, you
i
cannot tune in another channel. If you try to do
this, you will see the screen described in the section “Satellite radio service is not activated”
컄 page 107).
(
Satellite radio service is fully activated
The main satellite radio menu appears. You
will hear the channel last tuned in, provided that it can be received.
Main satellite radio menu
1 Main area with channel display
2 Preset position of selected channel
3 Selected channel
4 Selected program category
5 Sound settings
6 To select program category
7 Channel number of selected channel
8 Other channel information
9 Preset options
a Satellite radio options
107
Page 26

Control systems
COMAND satellite radio* (USA only)
Main area 1 can show all channels includ-
i
ed in your subscription. Which channels are
shown depends on the selected program category 4.
Note that categories and channels shown in illustrations are dependent on programming content
delivered by the service provider. Programming
content is subject to change.
Therefore, channel and categories shown in illustrations and descriptions contained in this manual may differ from the channels and categories
delivered by the service provider.
Selecting program category
The channels are categorized. Categories al-
i
low you to tune to stations broadcasting a certain type of program.
왘 Select “Audio” “Audio” “Sat Ra-
dio” “Category”.
The category list appears.
If only the preview channel is activated, only
i
certain categories are available on the list. Which
categories these are depend on the service provider.
왘 Select category by rotating ymz or
sliding qmr and press n.
When selecting a channel using the
channel search function or the channel
list, you have access to the channels
you subscribe to and which are included in the selected category.
When you select the category “All Chan-
i
nels”, you have access to all the channels you
subscribe to, regardless of category, when you
are tuning in a channel using the channel search
function or the channel list.
Tuning in channels
You have the following selection options:
앫 The channel search function
앫 The channel presets
앫 The manual channel number entry
앫 The channel list
Tuning in channels using channel
search function
This function is not possible when only the
i
preview channel is activated. If you try to tune in
a channel in this instance, you will see the
screen described in the section “Satellite radio
service is not activated” (
왘 Slide omp or rotate ymz when the
컄 page 107).
main area is selected.
Depending on the direction in which
the controller is being pressed or rotated, the system searches upward or
downward and stops at the next receivable channel.
Which channels are found by the channel
i
search function depends on which channels you
have subscribed to and the program category
you have selected (
컄 page 108).
Tuning in channels using channel
presets
왘 Select “Audio” “Audio” “Sat Ra-
dio” “Presets”.
or
108
Page 27

Control systems
COMAND satellite radio* (USA only)
왘 Press n when the main area is select-
ed.
The preset menu appears. The dot R
in front of a preset position indicates
that this is the channel currently selected and being listened to.
왘 Select station preset and briefly
press n.
COMAND tunes in the corresponding
channel as long as it is included in your
subscription and is still available.
If the channel is not included in your
subscription, you will see the message
described in the section “Satellite radio
service is not activated” (
컄 page 107).
If the channel is no longer available or
only the preview channel is activated,
you will see the message “Invalid Chan-
nel”.
왘 Closing message: Press n.
Tuning in channels using manual channel number entry
This function is not possible when only the
i
preview channel is activated. If you try to tune in
a channel in this instance, you will see the
screen described in the section “Satellite radio
service is not activated” (
왘 Select “Audio” “Audio” “Sat Ra-
컄 page 107).
dio” “Sat Radio” “Channel Entry”.
The menu for manual channel number
entry appears.
왘 Exiting menu without making an
entry: Press L back button in the
center console (
왘 Increase or decreasing number:
컄 page 86).
Slide qmr or rotate ymz.
왘 Selecting next number: Slide omp.
왘 Confirming channel entry: Press n.
Further operation depends on whether
the selected channel number is valid or
if the channel is included in your subscription.
Channel number is valid and channel is
included in subscription
COMAND tunes in the channel entered.
Channel number is invalid
You will see the message “Invalid Channel”.
왘 Closing message: Press n.
Channel number is valid but channel is
not included in subscription
You will see the screen described in the
section “Satellite radio service is not activated” (
왘 Closing display: Press n.
컄 page 107).
109
Page 28
Control systems
COMAND satellite radio* (USA only)
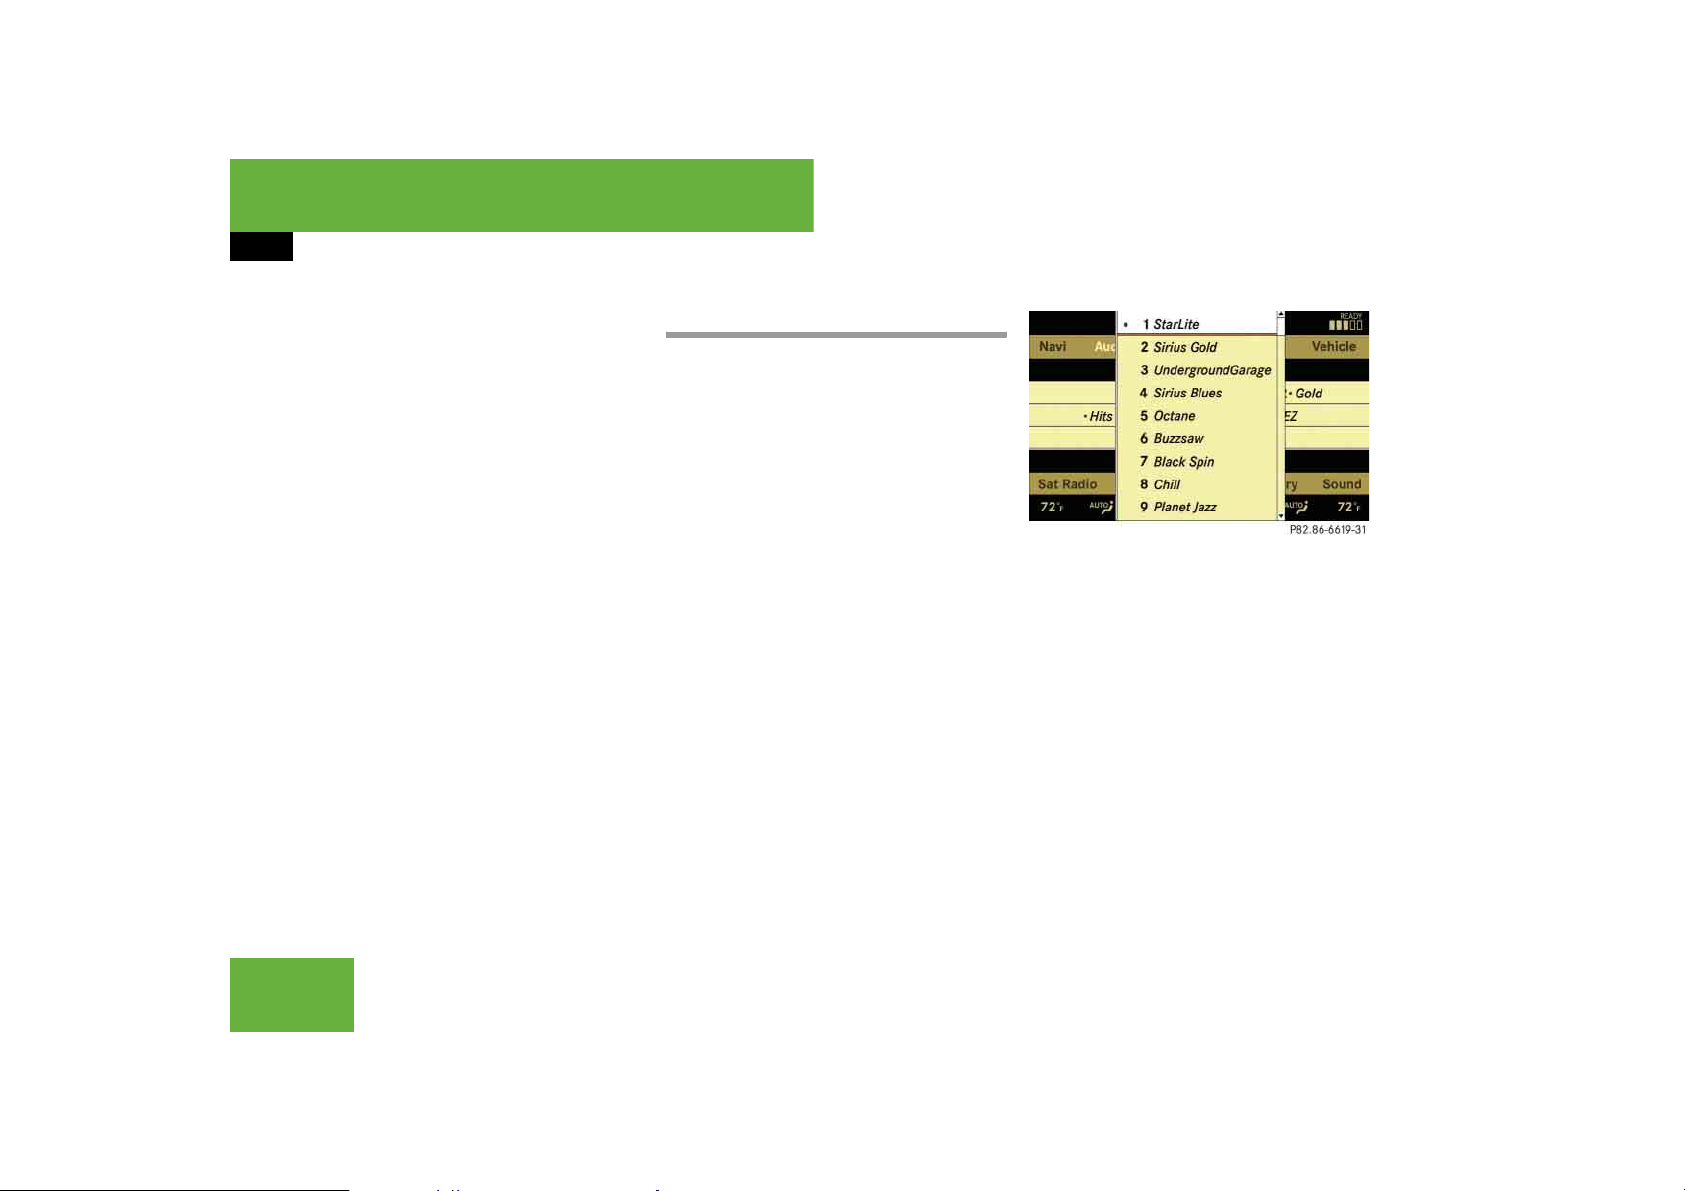
Tuning in channels using the channel
list
왘 Select “Audio” “Audio” “Sat Ra-
dio” “Sat Radio” “Channel List”.
The channel list appears. The dot R in
front of a list entry indicates the currently selected channel.
왘 Select channel by rotating ymz or
sliding qmr and press n.
The contents of the channel list depends on
i
which channels are included in your subscription
and which program category you have selected
컄 page 108). If only the preview channel is acti-
(
vated, the channel list contains only the preview
channel.
Saving channels
There are twenty preset positions available.
i
Option 1
왘 Select “Audio” “Audio” “Sat Ra-
dio” “Sat Radio” “Save Channel”.
Option 2
왘 Press n when the main area is select-
ed.
Option 3
왘 Select “Audio” “Audio” “Sat Ra-
dio” “Presets”.
All three of these will call up a preset
menu. The dot R in front of a preset position indicates that this is the channel currently selected and being listened to.
왘 Selecting a preset position:
Slide qmr or rotate ymz.
Saving a channel to a selected preset
position
If you have called up the channel preset
screen using option 1:
왘 Press n briefly.
In options 2 and 3:
왘 Press and hold n until you hear a sig-
nal.
The channel is saved.
110
Page 29

Control systems
COMAND satellite radio* (USA only)
Show program info
왘 Select “Audio” “Audio” “Sat Ra-
dio” “Info”.
If the program provider does not offer any in-
i
formation, the “Info” menu item cannot be selected.
You will see a screen that may contain the
following information:
앫 Selected program category
앫 Selected channel
앫 Artist of the track currently being
played
앫 Name of current track
The program provider determines what in-
i
formation is displayed on the screen. COMAND
shows no more than two lines per item of information. If an item of information is too long,
COMAND shortens it.
왘 Closing screen: Slide omp or
press n.
Channel update
The service provider may conduct a channel update.
During the update, the message “Updating
channels...” will appear on the display.
No functions can be operated in satellite
radio mode during the update.
Calling SIRIUS Service Center
It may be necessary to call the SIRIUS Ser-
i
vice Center if, for example:
앫 You want to cancel the subscription or
re-subscribe at a later date.
앫 You forget to pay the bill.
앫 You sell the car to another person.
왘 Select “Audio” “Audio” “Sat Ra-
dio” “Sat Radio” “Service”.
The telephone number of the SIRIUS
Service Center and the twelve-digit
electronic serial number (SIRIUS-ID) of
the particular receiver are displayed.
왘 Closing screen: Slide omp or
press n.
111
Page 30

Control systems
COMAND audio CD/audio DVD/MP3
Safety precautions
Warning! G
COMAND is classified as a Class 1 laser
product. You must not open the casing.
There is a risk of exposure to invisible laser
radiation if you open the casing, or if the
casing is faulty or damaged.
COMAND does not contain any parts that
you are able to maintain yourself. For safety
reasons, all maintenance work must be carried out by qualified technicians.
Bear in mind that at a speed of just 30 mph
(approximately 50 km/h), your vehicle is
covering a distance of 44 feet (approximately 14 m) every second.
Warning! G
Only carry out the following when the vehicle is stationary:
앫 Inserting a disc
앫 Ejecting a disc
There is a risk of accident by being distracted from road and traffic conditions if you
load a CD/DVD while the vehicle is in motion.
Notes about MP3 mode
Permissible media for MP3 files
앫 CD-R and CD-RW
앫 DVD-R and DVD-RW
앫 PCMCIA card (컄 page 117)
Permissible file systems
앫 ISO9660/Joliet for CDs
앫 UDF for DVDs
앫 FAT16 or FAT32 for PCMCIA cards with
storage medium
Multisession CDs
For multisession CDs, the first session
type of the CD determines how COMAND
will process the CD.
For example, if the first session type is according to the audio CD standard and the
second session type is according to the
data CD standard containing MP3 tracks,
COMAND will treat the CD as a conventional audio CD. This means that it is only
possible to access the audio CD tracks.
Access to the MP3 tracks is not possible.
Similarly, if the first session type is according to the data CD standard containing
MP3 tracks and the second session type is
according to the audio CD standard,
COMAND will treat the CD as a data CD.
112
Page 31

Control systems
COMAND audio CD/audio DVD/MP3
This means that it is only possible to access the MP3 tracks. Access to the audio
CD tracks is not possible.
File structure on a disc
When you create an MP3 disc, the MP3
tracks can be organized in folders. A folder
can also contain other folders. A disc can
contain a maximum of 255 folders. Each
folder can contain a maximum of
255 tracks and 255 folders. A disc can
contain a maximum of 4000 tracks. Usually this number will not be reached because
each minute of an MP3 track requires approximately 1 MB of storage space.
Track and folder names
When you create an MP3 disc, you can assign names to the MP3 tracks and folders.
COMAND uses these names for the corresponding display in MP3 mode. Empty folders or folders which contain data other
than MP3 tracks are not displayed by
COMAND.
If MP3 files are saved in the root directory
itself (uppermost directory on storage medium), the root directory will also be treated as a folder. COMAND will then show the
name of the root directory as the folder
name.
You must observe the following when assigning track names:
앫 Track names must have at least one
character.
앫 Track names must have the extension
“mp3”.
앫 There must be a period between the
track name and the extension.
Example of a correct track name:
Track1.mp3
COMAND is unable to recognize an MP3
track if:
앫 there is no period between the track ti-
tle and the extension
앫 there is no extension
COMAND does not support ID3 tags.
i
Permissible MP3 formats
COMAND supports the MPEG1 Audio Layer 3 format.
This format is generally known as “MP3”.
i
Permissible bit and sampling rates
앫 Fixed and variable bit rates up to
320 kbit/s
앫 Sampling rates of 24 kHz – 48 kHz
Only use MP3 tracks with a bit rate of at
i
least 128 kbit/s and a sampling rate of at least
44.1 kHz. Smaller rates can cause a noticeable
deterioration in sound quality. This is especially
the case if you have activated a surround sound
function.
Notes on copyright
The music tracks that you create for MP3
mode and can play back in MP3 mode are
generally subject to copyright protection in
accordance with the applicable international and national regulations.
113
Page 32

Control systems
COMAND audio CD/audio DVD/MP3
In many countries, reproductions are not
permitted without the prior consent of the
copyright holder, not even for private use.
Make sure that you know the applicable
copyright regulations and that you comply
with these.
If you own these rights yourself, e.g. for
your own compositions and recordings, or
the copyright holder has granted you permission, these restrictions do not apply.
Notes about audio DVD operation
COMAND can playback commercially
available, prerecorded audio DVDs that
bear the following label. You will usually
find the label on the DVD booklet, the inlay,
or the DVD itself.
Audio DVDs differ from recordable DVD-R
i
and DVD-RW discs.
Data on audio DVDs are stored either in
uncompressed format or in lossless compressed format. The sound quality on audio DVDs is therefore better than on
recordable DVDs that contain MP3 data
because the MP3 format uses a lossy type
of compression.
You cannot delete data from or record
additional data to commercially available,
prerecorded audio DVDs.
Please note the following information
about CDs/DVDs and pay special attention to the notes on copied and/or
self-written CDs/DVDs.
Notes about CDs/DVDs
Audio CDs with copy protection are not
i
compatible with the CD audio standard and
therefore may not be able to be played by
COMAND.
There may be playback problems when playing
copied discs.
There is a large variety of discs, disc-writing software and writers available. This variety means
that there is no guarantee that the system will be
able to play discs that you have written/copied
yourself.
There may be playback problems if you use CD-R
or CD-RW type discs you have copied yourself
with a storage capacity of more than 700 MB.
These CDs are not compatible with currently applicable standards.
114
Page 33

Control systems
COMAND audio CD/audio DVD/MP3
Do not affix stickers or labels to the discs.
!
These could peel away and damage COMAND.
COMAND is designed to hold discs which comply with the IEC 60908 standard. You can therefore only use discs with a maximum thickness of
1.3 mm.
If you insert thicker discs, e.g. those that contain
data on both sides (DVD on one side and audio
data on the other), they cannot be ejected and
can damage COMAND.
Do not use discs with an 8-cm diameter, even if
they have an adapter.
Only use round discs with a 12-cm diameter.
Notes about handling CDs/DVDs
앫 Only hold discs by the edge.
앫 Handle discs carefully to prevent play-
back problems.
앫 Avoid getting scratches, fingerprints
and dust on discs.
앫 Clean discs from time to time with a
commercially-available cleaning cloth.
Do not wipe them with a circular motion, but only in straight lines from the
center outwards.
앫 Only use a pen designed for such a pur-
pose to label discs.
앫 Place discs back in their boxes after
use.
앫 Protect discs from heat and direct sun-
light.
Inserting CDs and DVDs
Warning! G
Only insert a CD or DVD when the vehicle is
stationary. There is a risk of accident by being distracted from road and traffic conditions if you load a CD/DVD while the vehicle
is in motion.
Bear in mind that at a speed of just 30 mph
(approximately 50 km/h), your vehicle is
covering a distance of 44 feet (approximately 14 m) every second.
If the CD/DVD has a printed side, this must
i
face upwards when the CD/DVD is inserted. If
neither side is printed, the side to be played
should face downwards.
115
Page 34

Control systems
COMAND audio CD/audio DVD/MP3
Loading the CD/DVD changer
The CD/DVD changer can hold up to a total of 6 audio CDs or DVDs.
1 Disc slot
2 Load button (all magazine trays)
3 Magazine tray buttons 1 – 6
Each magazine tray button 3 indicates the
i
status of the corresponding magazine tray by
means of an LED.
앫 LED off = magazine tray is empty
앫 LED constantly lit = magazine tray is loaded
앫 LED flashes = CD/DVD changer requesting
disc to be loaded
Loading an individual magazine tray
왘 Press desired magazine tray button 3.
If a disc is loaded, it will be ejected.
왘 Take disc out of slot 1.
왘 Wait until LED for magazine tray
button 3 which you pressed flashes
quickly.
왘 Insert disc into slot 1.
The DVD changer draws the disc in and
begins playback if:
앫 it has been loaded correctly
앫 it is a permissible type of disc
Loading all six magazine trays
왘 Press load button 2.
The DVD changer checks the load status of all magazine trays and switches
to the first empty tray.
왘 Wait until LED for corresponding maga-
zine tray button 3 flashes quickly.
왘 Insert disc into slot 1.
The DVD changer switches to the next
empty magazine tray.
If a disc is not inserted within approximately
i
15 seconds COMAND resumes playback of the
last disc.
왘 Repeat last two steps until all trays are
loaded.
The DVD changer will play the last disc
you loaded if:
앫 it has been loaded correctly
앫 it is a permissible type of disc
116
Page 35

Control systems
COMAND audio CD/audio DVD/MP3
Inserting a PCMCIA card
COMAND supports commercially available
i
PCMCIA cards or PCMCIA card adapters with
storage media that may not be designed for the
temperatures which occur in the vehicle. You
should therefore remove the PCMCIA card from
the vehicle when not in use since extreme temperatures could damage these devices.
1 Slot for PCMCIA card
왘 Insert PCMCIA card into slot 1.
The side with the contact must point
towards the slot.
If the PCMCIA card contains a storage
medium with MP3 tracks, COMAND
switches to MP3 mode.
Ejecting CDs and DVDs
Warning! G
Only eject a disc when the vehicle is stationary. You may otherwise be distracted from
the traffic conditions and could cause an accident.
Ejecting from the DVD changer
1 Disc slot
2 Magazine tray buttons 1 – 6
3 Eject button (all discs)
If you eject one disc while playing another
i
disc, the DVD changer interrupts playback. Playback continues once the disc has been ejected.
왘 Ejecting one disc: Press desired mag-
azine tray button 2.
왘 Take disc out of slot 1.
If you do not take the disc out of
slot 1, the DVD changer will draw it
back automatically in approximately
15 seconds.
컄컄
117
Page 36

Control systems
COMAND audio CD/audio DVD/MP3
왘 Ejecting all discs: Press eject
컄컄
button 3.
The DVD changer switches to the first
loaded tray and ejects the disc.
왘 Take disc out of slot 1.
The DVD changer switches to the next
loaded magazine tray and ejects the
disc.
왘 Repeat last step until magazine is
empty.
Ejecting a PCMCIA card
1 Eject button
2 Slot for PCMCIA card
왘 Press eject button 1 twice.
The PCMCIA card is ejected.
왘 Take PCMCIA card out of slot 2.
118
Page 37

Submenu overview
The components and operating principles of
i
COMAND can be found on (
컄 page 85).
Control systems
COMAND audio CD/audio DVD/MP3
CD or DVD-A or MP3 Pause/Stop/Play
(audio DVD mode only)
Normal Track Sequence Pause playback Show track list
Random Tracks Stop playback Display alphabetical
Random folder
(MP3 mode only)
Repeat folder
(MP3 mode only)
Group
(DVD-Audio mode only)
Restart playback Balance/Fader
Tracks/Track
List/Tracks A-Z
(audio CD mode and
audio DVD mode)
track listing
(MP3 mode only)
Folders
(MP3 mode only)
Select folder Select medium Treble
Changer Sound
Bass
3D Sound
119
Page 38

Control systems
COMAND audio CD/audio DVD/MP3
Switching to audio CD, audio DVD or
MP3 mode
왘 Load CD/DVD (컄 page 115) or
PCMCIA card (
컄 page 117).
or
왘 Select “Audio” “Audio”, then “CD”,
“DVD-Audio” or “MP3”.
or
왘 Press the M shortcut button once or
twice.
The M shortcut button takes you directly
i
to the previously set disc mode (audio CD,
audio DVD or MP3-CD/DVD). The number of
times you have to press the shortcut button depends on the previously set mode.
Example display in audio CD mode
1 Current playback option
2 Track number
3 Disc number
4 Disc name (only if saved on the disc)
5 Track name (only if saved on the disc)
6 Track time
7 Graphic time and track display
8 Sound settings
9 Medium selection
a To call up track listing
b Disc type
c Playback options
Example display in audio DVD mode
1 Current playback option
2 Track number
3 Disc number
4 Disc name (only if saved on the disc)
5 Track name (only if saved on the disc)
6 Track time
7 Graphic time and track display
8 Sound settings
9 Medium selection
a To call up track listing
b Stop function
c Pause (“Play” appears if paused)
d Disc type
e Playback options
120
Page 39

Control systems
COMAND audio CD/audio DVD/MP3
Example display in MP3 mode
1 Current playback option
2 Medium type
3 Disc number (not on PCMCIA card)
4 Track name
5 Current folder path
6 Current folder
7 Track time
8 Graphic time and track display
9 Sound settings
a Medium selection
b Folder listing
c Track listing
d Playback options
Stop function
This function is only available in audio DVD
i
mode.
왘 Stopping playback: Select “Audio”
“Audio” “DVD-Audio” “Stop”.
왘 Restarting playback: Select “Audio”
“Audio” “DVD-Audio” “Play”.
Playback starts at the beginning of the
DVD.
Pause function
In audio CD, audio DVD and MP3 mode
왘 Pausing playback:
Press F briefly.
왘 Continuing playback: Press F
again briefly.
Only in audio DVD mode
왘 Pausing playback:
Select “Audio” “Audio” “DVD-Au-
dio” “Pause”.
The “Pause” screen changes to “Play”.
왘 Continuing playback: Select “Audio”
“Audio” “DVD-Audio” “Play”.
The “Play” screen changes to “Pause”.
Selecting CD/DVD/MP3 media
왘 Select “Audio” “Audio”.
왘 Select “CD”, “DVD-Audio” or “MP3”.
COMAND begins playback.
왘 In audio CD, audio DVD and MP3
mode: Select “Changer”.
or
왘 In audio CD and audio DVD mode
only: Press n when the main area is
selected.
The media list appears. The dot R indicates the current medium.
왘 Select a medium or folder.
COMAND changes the medium.
121
Page 40

Control systems
COMAND audio CD/audio DVD/MP3
Selecting a track
Selecting by skipping to tracks
왘 Skipping forwards or backwards to
a track (in CD or DVD mode only):
Rotate ymz.
Skipping forwards through the tracks skips
i
to the next track. Skipping backwards through
the tracks skips to the beginning of the current
track if the track has been playing for more than
8 seconds. If the track has been playing for less
than 8 seconds, it skips to the start of the previous track.
If you have switched on the “Random Tracks”
playback option, the order of the tracks is random.
Selecting from the track list
왘 Select “Audio” “Audio”.
왘 Select “CD”, “DVD-Audio” or “MP3”.
왘 Select “Tracks”, “Tracks A-Z” or “Track
list”.
or
왘 Only in MP3 mode: Press n when the
main area is selected.
The track list of the current folder appears. The dotR indicates the current
track.
왘 Select a track by rotating ymz or slid-
ing qmr.
In MP3 mode, the list shows all the tracks in
i
alphabetical order.
Fast forward/rewind
왘 Select main area.
왘 Slide and hold omp until desired place
is reached.
Selecting a folder
This function is only available in audio MP3
i
mode.
왘 Select “Audio” “Audio” “MP3”
“Folder”.
or
왘 Press n when main area is selected.
The track list of the current folder appears.
This is what the illustration in the right
column is showing as well.
1 Back folder symbol
2 Current track symbol
3 Track symbol
왘 Selecting one folder higher: Select
the Q symbol.
The display changes to the next folder
up in the folder structure on the disc.
122
Page 41

Control systems
COMAND audio CD/audio DVD/MP3
1 Back folder symbol
2 Current folder symbol
3 Folder symbol containing tracks
왘 Selecting a folder: Select desired fold-
er.
You will see the tracks in the folder.
왘 Select a track.
The track is played and the corresponding folder is now the active folder.
Setting the audio format
This function lets you choose the audio format that you would like COMAND to play
and is only available in DVD-Audio mode.
The tracks on an audio DVD can be stored in
i
various audio formats. The number of audio formats depends on the audio DVD.
왘 Select “Audio” “Audio” “DVD-Au-
dio” “Group”.
The “Group” menu item cannot be selected
i
if only one audio format is saved on the DVD.
The list of available audio formats appears.
A dot R indicates the format currently selected.
왘 Changing setting: Slide qmr or
rotate ymz.
왘 Exiting menu: Slide omp.
Playback options
The following options are available:
앫 “Normal Track Sequence”
Tracks playback in the order on the
disc (e.g. track 1, 2, 3, etc.).
앫 “Random Tracks”
Tracks playback in a random order
(e.g. track 3, 8, 5, etc.).
앫 “Random Folder” (in MP3 mode only)
Tracks in the active folder and any subfolders playback in random order.
앫 “Repeat Folder” (in MP3 mode only)
Tracks in the active folder will be repeated until you switch the function
off.
왘 Selecting an option: Select “Audio”
“Audio”.
왘 Select “CD”, “DVD-Audio” or “MP3”.
The option list appears. A dot R indicates which option is switched on.
왘 Select an option and press n.
The option is switched on. For all options except “Normal Track Sequence”,
you will see a corresponding indicator
in the main area.
The “Normal Track Sequence” option is au-
i
tomatically activated when you select a different
medium. If an option is activated, it remains activated after COMAND is switched on/off.
123
Page 42

Control systems
COMAND video DVD (USA only)
Depending on your vehicle’s production
date the COMAND video DVD function may
not be available.
Warning! G
COMAND is classified as a Class 1 laser
product. You must not open the casing.
There is a risk of exposure to invisible laser
radiation if you open the casing, or if the
casing is faulty or damaged.
COMAND does not contain any parts that
you are able to maintain yourself. For safety
reasons, all maintenance work must be carried out by qualified technicians.
Automatic picture fade-out
If a video DVD is playing when the vehicle
is shifted from position P into N, D or R the
picture is faded out automatically and the
following message appears in the display:
“In order not to distract driver, picture is
faded out while the vehicle is in motion”.
When the vehicle is shifted back into P, the
picture comes on again.
Notes about video DVD operation
COMAND can playback commercially
available, prerecorded video DVDs that
bear the following label. You will usually
find the label on the DVD booklet, the inlay,
or the DVD itself.
Video DVDs differ from recordable DVD-R
i
and DVD-RW discs.
There may be playback problems when play-
i
ing copied DVDs.
There is a large variety of discs, disc-writing software and writers available. This variety means
that there is no guarantee that the system will be
able to play discs that you have written/copied
yourself.
Some DVDs may not comply with the
NTSC or PAL TV playback standards.
Sound, picture and other playback problems may occur when you play such DVDs.
COMAND can playback video DVDs meeting the following requirements:
앫 Correct regional code
앫 NTSC or PAL TV standard
The appropriate information is usually given either on the DVD or the DVD box. The
factory setting of COMAND is regional
code 1. The setting can be changed at an
authorized Mercedes-Benz Center. This
will allow you to playback video DVDs with
other regional codes, as long as they comply with the NTSC or PAL TV standard.
124
Page 43

Control systems
COMAND video DVD (USA only)
Notes about handling DVDs
Do not affix stickers or labels to the discs.
!
These could peel away and damage COMAND.
COMAND is designed to hold discs which comply with the IEC 60908 standard. You can therefore only use discs with a maximum thickness of
1.3 mm.
If you insert thicker discs, e.g. those that contain
data on both sides (DVD on one side and audio
data on the other), they cannot be ejected and
can damage COMAND.
Do not use discs with an 8 cm diameter, even if
they have an adapter.
Only use round discs with a 12 cm diameter.
앫 Only hold discs by the edge.
앫 Handle discs carefully to prevent play-
back problems.
앫 Avoid getting scratches, fingerprints
and dust on discs.
앫 Clean discs from time to time with a
commercially-available cleaning cloth.
Do not wipe them with a circular motion, but only in straight lines from the
center outwards.
앫 Only use a pen designed for such a pur-
pose to label discs.
앫 Place discs back in their boxes after
use.
앫 Protect discs from heat and direct sun-
light.
Functional limitations
Depending on the DVD, it is possible that
certain functions or actions may be temporarily or permanently unavailable. If you try
to utilize such functions or carry out such
actions, you will see the 7 symbol in the
display.
Inserting or ejecting DVDs
Warning! G
Only insert or eject a DVD when the vehicle
is stationary. There is a risk of accident by
being distracted from road and traffic conditions if you load a DVD while the vehicle is in
motion.
Bear in mind that at a speed of just 30 mph
(approximately 50 km/h), your vehicle is
covering a distance of 44 feet (approximately 14 m) every second.
왘 Inserting a DVD (컄 page 115).
or
왘 Ejecting a DVD (컄 page 117).
125
Page 44

Control systems
COMAND video DVD (USA only)
Submenu overview of video DVD
DVD-V Pause/Play Stop Changer Sound
DVD Functions Pause playback Pause Playback Select medium Treble
Brightness Continue playback Stop playback Bass
Contrast Restart playback Balance/Fader
Color 3D Sound
16:9 Optimized
4:3
Widescreen
Switching to video DVD mode
왘 Insert a DVD (컄 page 115).
or
왘 Select “Video” “Video” “Video
DVD”.
or
왘 Press the M shortcut button once or
twice.
126
The M shortcut button takes you directly
i
to the previously set disc mode (audio CD/DVD,
MP3-CD/DVD or video DVD). The number of
times you have to press the shortcut button depends on the previously set mode.
Page 45

Control systems
COMAND video DVD (USA only)
Hiding/showing the DVD control menu
왘 Hiding the menu: Slide qmr.
왘 Showing the menu: Slide qmr.
or
왘 Wait for approximately 8 seconds.
Control menu
1 Disc type
2 Current track
3 Current scene
4 Elapsed track time
5 Show the menu system
Hiding/showing the menu system
왘 Showing the menu: Press n.
왘 Hiding the menu: Press n when the
main menu area is selected.
Menu system
1 Video DVD options
2 Pause
3 Stop
4 Medium selection
5 Sound settings
Fast forward/rewind
왘 Slide omp and hold until you get to the
desired scene.
Selecting the DVD medium
왘 Select “Video” “Video” “Video
DVD”.
왘 Show the menu system, if necessary
(
컄 page 127).
왘 Select “Changer”.
The media list appears. The dotR indicates the current medium.
왘 Select a medium.
COMAND changes the medium.
127
Page 46

Control systems
COMAND video DVD (USA only)
Stop playback
왘 Select “Video” “Video” “Video
DVD”.
왘 Show the menu system, if necessary
(
컄 page 127).
왘 Stop play: Select “Stop”.
In the display, “Pause” changes to
“Play”.
왘 Continue playback: Select “Play”.
Play is continued from the point at
which it was stopped.
왘 Stop playback: Select “Stop” again
while playback is stopped.
or
왘 Select “Stop” twice in quick succession
during playback.
왘 Resume playback: Select “Play”.
Playbacks starts again from the beginning.
Pause playback
왘 Select “Video” “Video” “Video
DVD”.
왘 Show the menu system, if necessary
(
컄 page 127).
왘 Pause playback: Select “Pause”.
In the display, “Pause” changes to
“Play”.
왘 Continue playback: Select “Play”.
Play is continued from the point at
which it was stopped.
Selecting scene/chapter
왘 Make sure that the control menu is
shown (
왘 Skipping forwards or back: Slide
컄 page 127).
omp or turn ymz.
Selecting film/track
This function is only available if the DVD is
i
comprised of several film/tracks.
왘 Select “Video” “Video” “Video
DVD”.
왘 Show the menu system, if necessary
(
컄 page 127).
왘 Select “DVD-V” “DVD Functions”
“Title selection”.
A selection list appears.
왘 Select a film/track.
Screen settings
Setting brightness, contrast and color
왘 Select “Video” “Video” “Video
DVD”.
왘 Show the menu system, if necessary
(
컄 page 127).
왘 Select “DVD-V” “Brightness”
“Contrast”or “Color”.
128
Page 47

Control systems
COMAND video DVD (USA only)
왘 Changing settings: Slide qmr or turn
ymz until you reach the desired set-
ting.
왘 Saving settings: Press n.
Changing the picture format
왘 Select “Video” “Video” “Video
DVD”.
왘 Show the menu system, if necessary
(
컄 page 127).
왘 Select “DVD-V”.
The DVD-V menu appears. The dotRin
front of a menu item “16:9 Optimized”, “4:3” or “Wide-
screen” indicates the current format.
왘 Changing the format: Slide qmr or
turn ymz, until you reach the desired
setting.
왘 Saving the format: Press n.
DVD menu
The DVD menu is the menu stored on the
DVD itself. It is structured in various ways
according to the individual DVD and permits certain actions and settings.
Calling up the DVD menu
왘 Select “Video” “Video” “Video
DVD”.
왘 Show the menu system, if necessary
(
컄 page 127).
왘 Select “DVD-V” “DVD Func-
tions”“Menu”.
The DVD menu appears.
Selecting menu items in the DVD menu
왘 Slide qmr or omp.
왘 Confirming the selection: Press n.
The selection menu appears.
왘 Reconfirming the selection: Select
“Select”.
COMAND carries out the action defined by the selected DVD menu item.
Depending on the DVD, it is possible the
i
menu item “Play” either has no function or has
no function in certain parts of the DVD menu.
129
Page 48

Control systems
COMAND video DVD (USA only)
Stopping the film or skipping to the
beginning/end of a scene
왘 Select a menu item of your choice from
the DVD menu.
The selection menu appears.
1 Stop film
2 Skip to the end of a scene
3 Skip to the beginning of a scene
왘 Stopping the film: Select “Stop”.
왘 Skipping to the end of a scene:
Select H.
왘 Skipping to the beginning of a
scene: Select G.
Depending on the DVD, it is possible the
i
menu items H and G either have no function or have no function in certain parts of the
DVD menu.
Switching to the next highest DVD
menu level
왘 Press the L back button in the cen-
ter console.
or
왘 Select the corresponding menu item in
the DVD menu.
or
왘 Select a menu item of your choice from
the DVD menu.
왘 Select the menu item “Go up” in the se-
lection menu.
Depending on the DVD, it is possible the
i
menu item “Go up” either has no function or has
no function in certain parts of the DVD menu.
Back to the film
왘 Press the L back button until you
can see the film.
or
왘 Select the corresponding menu item in
the DVD menu.
or
왘 Select a menu item of your choice from
the DVD menu.
왘 Select the menu item “Back (to the
film)” in the selection menu.
Depending on the DVD, it is possible the
i
menu item “Back (to the film)” either has no
function or has no function in certain parts of the
DVD menu.
130
Page 49

Control systems
COMAND video DVD (USA only)
Setting the language and audio format
This function is not available for all DVDs. If
i
it is available, you can set the language for the
DVD menu and the audio language and/or the
audio format. The number of settings you can
make is determined by the content of the DVD. It
may also be possible to make the settings in the
DVD menu (
왘 Select “Video” “Video” “Video
컄 page 129).
DVD”.
왘 Show the menu system, if necessary
(
컄 page 127).
왘 Select “DVD-V” “DVD Functions”.
왘 Select “Menu Language” or “Audio Lan-
guage”.
In both cases a selection list will appear. The dotRin front of an entry
indicates the current language.
왘 Changing the setting: Slide qmr or
turn ymz, until you reach the desired
setting.
왘 Saving a setting: Press n.
왘 Exiting the menu: Slide omp.
Subtitles and camera angles
This function is not available for all DVDs.
i
The number of settings you can make is determined by the content of the DVD. It may also be
possible to make the settings in the DVD menu
컄 page 129).
(
왘 Select “Video” “Video” “Video
DVD”.
왘 Show the menu system, if necessary
(
컄 page 127).
왘 Select “DVD-V” “DVD Functions”.
왘 Select “Subtitles” or “Camera angle”.
In both cases a selection list will appear. The dotRin front of an entry
indicates the current language.
왘 Changing the setting: Slide qmr or
turn ymz, until you reach the desired
setting.
왘 Saving a setting: Press n.
왘 Exiting the menu: Slide omp.
Interactive content
DVDs may include interactive content (e.g. a
i
video game). In a video game you can control the
play by selecting and initiating actions. The type
and number of actions depends on the DVD.
왘 Selecting an action: Slide qmr or
omp, or turn ymz, until you reach the
desired setting.
왘 Initiating an action: Press n.
A menu appears, the first entry “Se-
lect” is highlighted.
왘 Press n.
131
Page 50

Control systems
COMAND telephone*
Safety precautions
Warning! G
Some jurisdictions prohibit the driver from
using a cellular telephone while driving.
Whether or not prohibited by law, for safety
reasons, the driver should not use the cellular telephone while the vehicle is in motion.
Stop the vehicle in a safe location before
placing or answering a call.
If you nonetheless choose to use the mobile
1
phone
while driving, please use the handsfree feature and be sure to pay attention to
the traffic situation at all times. Use the mobile phone only when road, weather and traffic conditions permit. Otherwise, you may
not be able to observe traffic conditions and
could endanger yourself and others.
Bear in mind that at a speed of just 30 mph
(approximately 50 km/h), your vehicle is
covering a distance of 44 feet (approximately 14 m) every second.
1
Observe all legal requirements.
Warning! G
Never operate radio transmitters equipped
with a built-in or attached antenna (i.e. without being connected to an external antenna)
from inside the vehicle while the engine is
running. Doing so could lead to a malfunction of the vehicle’s electronic system, possibly resulting in an accident and/or
personal injury.
General notes
USA only:
i
This device complies with Part 15 of the FCC
Rules. Operation is subject to the following two
conditions:
(1) This device may not cause harmful interfer-
ence, and
(2) this device must accept any interference re-
ceived, including interference that may
cause undesired operation.
Any unauthorized modification to this device
could void the user’s authority to operate the
equipment.
Canada only:
i
This device complies with RSS-210 of Industry
Canada. Operation is subject to the following
two conditions:
(1) This device may not cause interference, and
(2) this device must accept any interference re-
ceived, including interference that may
cause undesired operation of the device.
Any unauthorized modification to this device
could void the user’s authority to operate the
equipment.
Calls disconnected while the vehicle is
in motion
A call may be disconnected if:
앫 there is insufficient network coverage
앫 you move from one transmitter/receiv-
er area (cell) into another and no channels are free or the cell is full
132
Page 51

Control systems
COMAND telephone*
Operating options
The components and operating principles of
i
COMAND can be found on (
컄 page 94).
(
Various mobile phone cradles can be in-
i
stalled in the front center armrest, see separate
installation instructions for the mobile phone
cradle. These mobile phone cradles can be obtained from an authorized Mercedes-Benz Center. For more information about telephone
컄 page 507).
(
컄 page 85) and
When the mobile phone is inserted in the
cradle, you can operate the telephone using the following devices:
앫 mobile phone keypad
앫 COMAND telephone keypad
앫 buttons s and t on the multi-
function steering wheel (
앫 Voice Control* (컄 page 291)
앫 Bluetooth
®
headset (컄 page 147)
컄 page 267)
Please note that these functions are only
available with Mercedes-Benz approved
mobile phones. Please contact an authorized Mercedes-Benz Center for information on features available for your mobile
phone of choice.
You can control other functions of the mobile phone via the COMAND, instrument
cluster control system (
컄 page 278) or
Voice Control*.
In order for the functions described in this
i
section to work correctly, the Bluetooth
set must be linked to COMAND (
Please make sure any Bluetooth
with the mobile phone is switched off or that the
headset is linked with COMAND before you insert the mobile phone in the cradle (
and use the telephone functions with COMAND.
®
head-
컄 page 241).
®
headset linked
컄 page 507)
The descriptions in this section assume
that the mobile phone is inserted in the
cradle. Exceptions to this are clearly stated.
Unless otherwise indicated, the descriptions and illustrations in this section refer
to COMAND and the telephone keypad.
Operation using the mobile phone and
Bluetooth
®
headset is described in the re-
spective separate Operating Instructions.
Caller ID
COMAND can display the telephone number and the name of the caller, e.g. for an
incoming call and also in other menus or
displays.
For the telephone number to be displayed,
the caller must transmit their telephone
number.
This is also the case for name displays. For
this, the telephone number and the name
of the caller must also be saved in the mobile phone book.
133
Page 52

Control systems
COMAND telephone*
Functional restrictions
You will not be able to use the telephone,
or you may have to wait a while, in the following situations:
앫 If the telephone has not yet logged into
the network.
The telephone automatically tries to
log into a network. If no network is
available, you will also not be able to
make a “911” emergency call.
If you attempt to make an outgoing call,
the “No Service” message will appear
for a short while.
앫 If the mobile phone is not inserted in
the cradle.
앫 SIM card is not inserted in GSM type
phone.
The roof cargo container* may impair mo-
i
bile phone reception. In an emergency, remove
the mobile phone from the mobile phone cradle
컄 page 507) to make a call.
(
Notes about COMAND telephone features using a Bluetooth
®
connection
Many of the Mercedes-Benz approved mobile phones, cradles and adaptors available for use in your vehicle utilize
Bluetooth
®
technology to communicate
with each other and the vehicle. Depending on your phone brand and model, the
number of in-vehicle or on-display
COMAND telephone features supported
via Bluetooth
®
communication, and thus
available for your use, may vary.
The descriptions and illustrations in this
section are based on the use of fully compatible Mercedes-Benz approved mobile
phones and cradles that do not utilize Blue-
®
tooth
technology to communicate with
ea ch other. If your vehicle is equipped with
integrated Bluetooth
Bluetooth
®
capable mobile phone, head-
®
functionality than a
set, Laptop, PDA, etc. is required to utilize
those features.
For additional information about
Mercedes-Benz approved Bluetooth
®
mo-
bile phones and related accessories please
contact the Mercedes-Benz Customer Assistance Center at 1-800-FOR-MERCedes
or your nearest authorized Mercedes-Benz
Center.
Switching telephone on or off
왘 Switching on: Insert mobile phone
into cradle when COMAND is switched
on.
or
왘 Switch on the mobile phone
(see mobile phone operating instructions).
왘 Switching off: Select “Telephone”
“Telephone” “Telephone OFF”.
or
왘 Switch off mobile phone (see mobile
phone operating instructions).
134
Page 53

Control systems
COMAND telephone*
Activating telephone mode
왘 Select “Telephone” “Telephone”
“Telephone”.
or
왘 Press s on telephone keypad.
Telephone keypad
1 Telephone keypad
2 Folding cover
With the telephone keypad you can:
앫 Enter and clear numbers and special
characters
앫 Reject, accept, connect and end calls
왘 Entering characters: Select “Tele-
phone” “Telephone” “Telephone”.
왘 Fold up cover 2.
왘 Enter characters using A - #.
You can enter the * character by
i
pressing > once. Pressing this button again
within 1.5 seconds enters the + character.
왘 Deleting individual characters:
Press *.
왘 Deleting an entire word or number:
Press and hold * until the word or
number is deleted.
“911” emergency call
The “911” emergency call system is a public
i
service. Using it without due cause is a criminal
offense.
This function places a call to the local 911
i
provider. It does not initiate a Tele Aid call.
The following conditions must be fulfilled
in order to make a “911” emergency call:
앫 The phone is switched on.
앫 A mobile network is available.
앫 There is a valid SIM card in the phone
(not necessary in all mobile networks).
If no SIM card is inserted in the mobile
i
phone, you can only initiate a “911” emergency
call by using COMAND and the mobile phone.
If you cannot make an emergency call, you
must initiate rescue measures yourself.
The “911” emergency call is a public service. Any misuse is punishable by law.
135
Page 54

Control systems
COMAND telephone*
The roof cargo container* may impair mo-
i
bile phone reception. In an emergency, remove
the mobile phone from the mobile phone cradle
컄 page 507) to make a call.
(
Placing a “911” emergency call before
entering PIN/PIN2, PUK/PUK2 or unlock code
Entering the number using the COMAND
controller
왘 Select “Telephone” “Telephone”
“Telephone” “Dial 911”.
Entering the number using the telephone keypad
왘 Enter digits 9-1-1 (컄 page 135).
왘 Press s.
Placing a “911” emergency call after
entering PIN/PIN2, PUK/PUK2 or unlock code
Entering the number using the COMAND
controller
왘 Select “Telephone” “Telephone”
“Telephone”.
왘 Select all the digits in sequence.
왘 Select “S”.
Entering the number using the telephone keypad
왘 Enter digits 9-1-1 (컄 page 135).
왘 Press s.
Confirming the emergency call
After the digits have been entered, you will
see the question “Do you want to dial the
911 emergency number?”.
왘 Use COMAND controller to select
“Yes”.
The telephone makes the connection.
왘 Wait until the emergency call center
answers and describe the emergency
situation.
136
Page 55

Control systems
COMAND telephone*
Entering the PIN
Your PIN code (Personal Identification Num-
i
ber code) prevents unauthorized persons from
using your GSM mobile phone. The PIN code is a
number string, which you have to enter when
switching on the telephone.
The PIN entry applies only to GSM mobile
phones.
Entering using the COMAND controller
왘 Select “Telephone” “Telephone”
“Telephone”.
왘 Entering: Select all the digits in se-
quence.
왘 Deleting a digit: Select ) and briefly
press n.
왘 Deleting an entire number: Select )
and press and hold n until the number
is deleted.
왘 Confirming an entry: Press n.
Entering using the telephone keypad
왘 Entering: Enter digits (컄 page 135).
왘 Confirming an entry: Press n or
press s.
Entering the PIN2
The PIN2 entry applies only to GSM mobile
i
phones.
The phone may request the PIN2 in order
to use certain functions. A corresponding
message appears in the display.
왘 Enter PIN2 digits into mobile phone.
Entering the PUK/PUK2
The PUK/PUK2 entry (Personal Unblocking
i
ey) applies only to GSM mobile phones.
K
If you enter the PIN or PIN2 incorrectly
three times, the SIM card will be locked.
A corresponding message appears in the
display. It is necessary to enter the
PUK/PUK2 to unlock it. The PUK and/or
PUK2 are provided by your telephone service provider.
왘 Enter PUK/PUK2 digits into mobile
phone.
137
Page 56

Control systems
COMAND telephone*
Entering the unlock code
Many mobile phones can be protected
from unauthorized use with an unlock code
(see mobile phone operating instructions).
If you wish to use the phone functions
when the unlock code is active, a screen
appears requesting that you enter the unlock code. You cannot use the phone functions (except “911” emergency call) until
you have entered the unlock code.
왘 Proceed in the same way as entering
the PIN (
컄 page 137).
138
Page 57

Telephone submenu overview
The components and operating principles of
i
COMAND can be found on (
컄 page 85).
Control systems
COMAND telephone*
Name
(only when the mobile
phone is inserted in the
cradle)
Display COMAND phone
book
Call lists
(not during a call)
Display call list selection:
앫 Calls received
앫 Calls dialed
DTMF
(only during a call)
Send numerical sequence
Mic OFF/ON
(only during a call)
Switch hands-free microphone on/off
Text message
(not during a call)
Call up SMS inbox
139
Page 58

Control systems
COMAND telephone*
Main telephone menu
왘 Calling up main menu: Select “Tele-
phone” “Telephone” “Telephone”.
or
왘 Press s on the telephone keypad
(
컄 page 135).
If you press s when the main telephone
i
menu has already been called up, the “Calls Dialed” list will appear (
컄 page 141).
1 Numbers/characters to enter tele-
phone number
2 Symbol for new voice message in
mailbox
3 Symbol for unread SMS messag-
es in SMS inbox (
컄 page 156)
4 Signal strength and network status
display
앫 Network status “READY” = mobile
phone is logged in with its own
provider’s network
앫 Network status “READY ROAM” =
mobile phone is logged in with another provider’s network
앫 Network status “No Service” = No
network available
5 To show COMAND phone book
(“Name”) (
컄 page 148)
6 To call up text message (SMS)
(
컄 page 156)
7 To display call list selection
(
컄 page 141)
Mailbox
The symbol in the example illustration
above indicates that your mailbox contains
new voice messages. You will have to call
the mailbox in order to retrieve the messages.
You can call your mailbox by:
앫 Speed dialing (컄 page 145)
앫 Entering a telephone number using the
telephone keypad (
앫 Entering the telephone number using
the COMAND controller (
Once connection with your mailbox has
i
been established, the mailbox system will guide
you through the next steps.
컄 page 144)
컄 page 144)
140
Page 59

Control systems
COMAND telephone*
Call lists
COMAND can display the following calls in
separate lists:
앫 Calls received
앫 Calls dialed
The list of incoming calls contains received
i
calls as well as missed calls.
Calling up a list
왘 Select “Call List” from main telephone
menu.
왘 Select “Calls Received” or “Calls Di-
aled”.
The corresponding list appears.
The “Calls Received” and “Calls Dialed”
i
menu items do not function if the respective list
has no entries.
The “Call List” menu item does not function if
neither list has any entries.
Illustration: list of incoming calls
1 To close list
2 To switch list display (“123” or “ABC”)
3 To call up options
4 Name or telephone number of a caller
5 Unknown caller
6 Telephone number of a caller
In the list of calls received, you will see the
i
name of caller 4 if
앫 the caller transmitted the telephone number
앫 the name and telephone number are saved
in the COMAND address book or in the
phone book on the mobile phone
앫 the telephone number is saved in the same
way in which the caller transmits it
You will see the telephone number of caller 6 if
앫 the caller transmitted the telephone number
앫 no caller data is saved in either the COMAND
address book or the phone book on the mobile phone
An unknown caller 5 has not transmitted his or
her telephone number.
In the list of dialed calls, you will see the
i
name of the person called if you have saved his
or her telephone number and name in the
COMAND address book or in the phone book on
the mobile phone. If no data has been saved, you
will see the telephone number.
왘 Switching to list display: Select
“123” or “ABC”.
The display changes to telephone number or name display.
왘 Closing list: Slide omp and
select “Back”.
왘 Selecting a list entry: Slide qmr or
rotate ymz and select entry.
컄컄
141
Page 60

Control systems
COMAND telephone*
Displaying details of a list entry
컄컄
COMAND can also show a shortened list
entry in its entirety.
왘 Select list entry (컄 page 141).
왘 Slide omp and select “Options”
“Details”.
The detailed view appears.
왘 Closing detailed view: Slide qmr or
omp or press n.
Saving a list entry in the address book
List entries that show a telephone number
i
are neither saved in the COMAND address book,
nor in the phone book on the mobile phone. You
can save such entries in the COMAND address
book. You can also save list entries in the
COMAND address book which have already been
saved in the phone book on the mobile phone.
Saving as a new entry in the COMAND
address book
왘 Slide omp or rotate ymz and select
list entry (
왘 Select “Options” “Save” “New En-
컄 page 141).
try”.
“Save” does not function if the selected list
i
entry is already saved in the COMAND address
book.
왘 Select a number category, e.g. “Home”.
왘 Select a telephone category, e.g. “Land
Line”.
왘 Select “Save”.
The input menu appears with the data
fields. The data field for the telephone
number is filled in automatically. The
data field for the last name is also filled
in automatically if the entry to be saved
contains a name.
왘 If you would like to save the entry
now: Select ?.
1 Data field
2 Input mark (cursor)
3 Input characters
왘 If you want to change the available
characters: Proceed as described in
the “Changing data field” paragraph in
the “Assigning a New Entry in the Address Book” section (
컄 page 152).
Adding to an existing entry in the
COMAND address book
왘 Slide omp or rotate ymz and select
list entry (
왘 Select “Options” “Save” “Add”.
컄 page 141).
142
Page 61

Control systems
COMAND telephone*
“Save” does not function if the selected list
i
entry is already saved in the COMAND address
book.
왘 Select a number category to add,
e.g. “Home”.
왘 Select a telephone category to add,
e.g. “Land Line”.
왘 Select “Save”.
The search menu for COMAND address
book entries appears.
왘 Search for desired entry.
There is a detailed description of searching
i
for an COMAND address book entry in the
“Searching for an address book entry” section
컄 page 228).
(
왘 Press n when you have finished
searching.
COMAND saves the data if there are
fewer than four numbers assigned to
the entry you are searching for in the
selected number category.
If four numbers are saved for the entry
you are searching for, a prompt will appear asking whether you want to overwrite one of the existing numbers.
왘 Select “Yes” or “No”.
If you select “Yes”, a selection list will
appear containing the four existing
numbers.
왘 Select the number to be overwritten.
COMAND overwrites the selected number with the new data.
Incoming call
Rejecting or accepting the call
왘 Rejecting: Select “Reject”.
or
왘 Press t on the telephone keypad or
on the multifunction steering wheel.
If you have a CDMA/TDMA mobile phone
i
and reject a call, only the ring tone will stop. The
call itself can only be ended by the caller.
왘 Accepting: Select “Accept”.
or
왘 Press s on the telephone keypad or
on the multifunction steering wheel.
or
왘 Press 0 on the multifunction steer-
ing wheel.
왘 Use the mobile phone (see mobile
phone operating instructions).
or
왘 Use the Bluetooth
®
headset
(see headset operating instructions).
The use of a Bluetooth® headset requires
i
Bluetooth
headset to be authorized (
®
to be activated and the Bluetooth®
컄 page 241).
If you have accepted the call using
COMAND, the telephone keypad, the multifunction steering wheel or the mobile
phone, the call will be conducted via the
hands-free system. The volume of the call
can be adjusted (
컄 page 96).
143
Page 62

Control systems
COMAND telephone*
If you have accepted the call using the
Bluetooth
®
headset, the call will be conducted via the headset.
Further operating functions can be found
in the “Functions during a single-call connection” section (
컄 page 146).
You can also accept a call if the
COMAND display is showing a screen other than the telephone mode screen. After
accepting the call, you will see the caller’s
data in a window.
왘 Closing window: Slide qmr or omp
or press n.
Making an outgoing call
If you place an outgoing call and receive a
i
busy signal, the telephone automatically starts
to redial as long as the provider and the mobile
phone support this function (see mobile phone
operating instructions).
While the call is connecting, you can also send
character strings (
컄 page 146).
Entering the telephone number using
the COMAND controller
왘 Switching screen to telephone
mode: Call up main telephone menu
(
컄 page 140).
왘 Entering digits: Select desired digits
by rotating ymz or sliding omp and
press n.
왘 Deleting individual digits: Select )
and briefly press n.
왘 Deleting an entire telephone num-
ber: Select ) and press and hold n
until the telephone number is deleted.
왘 Connecting a call: Select “S”.
Entering a telephone number using the
telephone keypad
왘 Switching screen to telephone
mode: Call up main telephone menu
(
컄 page 140).
왘 Use telephone keypad to enter digits.
A detailed description of how to enter digits
i
using the telephone keypad can be found on
컄 page 88).
(
왘 Connecting a call: Press s.
Redial
왘 Switching screen to telephone
mode: Call up main telephone menu
(
컄 page 140).
왘 Use COMAND controller to select
“S”.
or
왘 Press s on the telephone keypad
(
컄 page 88).
The list of dialed numbers appears. The
most recently dialed number is at the
top.
왘 Select desired entry.
왘 Connecting a call: Press n.
If the list of dialed calls contains no entries,
i
the “S” menu item cannot be selected and the
s button on the telephone keypad does not
function.
144
Page 63

Control systems
COMAND telephone*
Placing a call to a call list entry or
COMAND phone book entry
왘 Call up a call list and select an entry
(
컄 page 141).
or
왘 Call up COMAND phone book and se-
lect an entry (
왘 Connecting a call: Press n.
컄 page 148).
Speed dialing
You can save telephone numbers in the
speed-dial preset locations on the mobile
phone and call up the speed-dial presets
(see mobile phone operating instructions).
By default, the mailbox number is preset in
i
the speed dial memory unless you have modified
it. For more information on the mailbox
컄 page 140).
(
You can also call up speed-dial numbers
using COMAND.
Operation during call connection depends
i
on the speed-dial preset position called up.
Calling up speed-dial presets using the
COMAND controller
왘 Switching screen to telephone
mode: Call up main telephone menu
(
컄 page 140).
왘 Entering number of a speed-dial pre-
set: Select all the digits in sequence.
왘 Deleting individual digits:
Select ) and briefly press n.
왘 Deleting entire number:
Select ) and press n until the
number is deleted.
왘 Connecting a call (speed-dial pre-
sets 1 -99): Select “S”.
or
왘 Connecting a call (speed-dial pre-
sets 100 - 999): Select “#” after the
digits “S”.
In both cases, the telephone connects
the call to the saved telephone number. If the speed-dial memory contains
no telephone numbers, you will see a
corresponding message.
왘 Deleting message: Press n.
Calling up speed-dial numbers using the
telephone keypad
왘 Switching screen to telephone
mode: Call up main telephone menu
(
컄 page 140).
왘 Single-digit numbers: Press and hold
A - 9 buttons.
or
왘 Single- and two-digit numbers: Enter
number using the A - 9 buttons.
왘 Press s.
or
왘 Three-digit numbers: Enter number
using the A - 9 buttons.
왘 Press #, and then s.
In all three cases, COMAND connects
the call to the saved telephone number. If the speed-dial memory contains
no telephone numbers, you will see a
corresponding message.
컄컄
145
Page 64

Control systems
COMAND telephone*
왘 Deleting message: Press n.
컄컄
Functions during a single-call
connection
Illustration: telephone mode during a call
1 Symbol for active telephone con-
nection (also visible in other operating
modes)
2 Signal strength display
3 To switch hands-free microphone on or
off
4 Length of call display
5 To send character strings
6 To end a call
7 Person you are calling
The name of the person you are speaking
i
with can only be seen in display 7 if his or her
telephone number and name have been saved in
the COMAND address book or phone book on
the mobile phone. The telephone number must
also be saved in the same way in which the person you are talking to transmits it.
Switching the hands-free microphone
on or off
왘 Switching screen to telephone
mode: Call up main telephone menu
(
컄 page 140).
왘 Switching off microphone:
Select “Mic OFF” and press n.
or
왘 Press F shortcut button.
If the microphone is switched off,
the > symbol appears in the main area.
왘 Switching on microphone:
Select “Mic ON”.
or
왘 Press F shortcut button.
The > symbol disappears.
Sending a character string via DTMF
This function is not possible with every mo-
i
bile phone. If the mobile phone supports the
function, you can use it during the call connection and also during a call.
Answering machines or other devices can
be controlled by character strings (e.g. for
remote query functions).
Sending character strings via the DTMF
menu
왘 During a call, select “DTMF”.
The DTMF dialing display appears.
146
Page 65

Control systems
COMAND telephone*
1 Back to the call display
2 Character entry
3 To call up the phone book
왘 Sending individual characters:
Rotate ymz or slide omp and select
desired character.
Each character you select can be seen
in the main area and is sent immediately.
왘 Sending a phone book entry as a
character string: Select “Name”.
왘 Select desired phone book entry.
The entry is immediately sent as a character string.
Telephone numbers containing the + char-
i
acter may impair the function.
왘 Switching back to the call display:
Select “Y”.
Sending character strings via the telephone keypad
왘 Press corresponding button on tele-
phone keypad.
Each character you select is immediately sent.
The + character may impair the function.
i
Ending an active call
왘 Ending a call: Select “4 END” in the
call display.
or
왘 Press t on the telephone keypad or
on the multifunction steering wheel.
The COMAND display will change to
the previously selected display, if applicable.
Transferring a call
From the hands-free system to the
Bluetooth
i
Bluetooth
headset to be authorized (
®
headset
The use of a Bluetooth® headset requires
®
to be activated and the Bluetooth®
컄 page 241).
The call transfer is controlled by pressing
®
the PTT button on the Bluetooth
headset
(see headset operating instructions). Normally, it is sufficient to press the PTT button once, but under certain circumstances
you may have to press it a second time.
Once the call has been transferred to the
Bluetooth
®
headset, all the functions will
be available to you which are described in
the “Functions during a single-call connection” section (
컄 page 146).
Exception: “Switching the hands-free microphone on or off” function (
컄 page 146).
컄컄
147
Page 66

Control systems
COMAND telephone*
From the Bluetooth® headset to the
컄컄
hands-free system
On most Bluetooth
®
headsets, you press
the PTT button on the headset twice quickly to transfer the call (see headset operating instructions).
From the hands-free system to the mobile phone
왘 If the mobile phone has a folding up-
per section: Flip upper section open.
왘 Take mobile phone out of cradle.
The “No telephone inserted” message
appears on the COMAND display. Subsequent operation is only possible using the mobile phone.
From the mobile phone to the
hands-free system
왘 Insert mobile phone into cradle.
Once the call has been transferred to
the hands-free feature, all the functions
will be available to you which are described in the “Functions during a single-call connection” section
(
컄 page 146).
COMAND phone book
The COMAND phone book contains both
the COMAND address book entries and
mobile phone entries that have at least
one telephone number.
The COMAND address book entries are
permanently available even when a mobile
phone is not inserted in the cradle.
When the mobile phone is inserted in the
cradle, COMAND will read the phone book
entries in the mobile phone and compares
them with the COMAND address book entries.
If any of the telephone numbers of a phone
book entry in the mobile phone are the
same as an address book entry, COMAND
will only display the address book entry.
If the entries are not the same, the COMAND phone book will show the phone
book entry in the mobile phone.
Calling up the COMAND phone book
왘 Select “Telephone” “Telephone”
“Telephone” “Name”.
The COMAND phone book appears.
148
Page 67

Control systems
COMAND telephone*
Illustration: a phone book with name display and smart speller activated
1 Category symbol
2 Upper entry from address book (with-
out category symbol)
3 Symbol + for several telephone num-
bers (subentries) under the main entry
4 Symbol for summarized entries
from the mobile phone with the same
name but different telephone numbers
5 Smart speller
6 Voice entry symbol
7 To close the phone book
Entries with category symbol 1 come
from the mobile phone. The following category symbols are possible:
앫 = symbol for “Mobile” category
앫 = symbol for “Home” category
앫 = symbol for “Work” category
앫 = symbol for “Fax” category
앫 = symbol for “Pager” category
앫 = symbol for “Main” category or for
unknown category or for phone entries
that are saved on the SIM card of a
GSM mobile phone
Entries without a category symbol or with
the symbol come from the COMAND
address book.
Entries with the symbol contain a voice
entry. Voice entries can be added to the
address book (
컄 page 234). This function
is available in vehicles with Voice Control*.
Switching between the smart speller
and the list
왘 Switching from the smart speller to
the list: Slide mq repeatedly or press
n until the smart speller is hidden.
or
왘 Rotate ymz or slide omp and
select ?.
The smart speller is hidden.
컄컄
149
Page 68

Control systems
COMAND telephone*
컄컄
Illustration: list of phone book entries with
name display and hidden smart speller
1 Back to smart speller
2 To switch phone book display (“123” or
“ABC”)
3 Symbol + for several telephone num-
bers (subentries) under the main entry,
subentry list is closed
4 To call up options
5 Symbol / for open subentry list
6 List of phone book entries
7 Subentry list with category symbols
and telephone numbers
The following options are available under
i
“Options” menu item 4:
앫 Displaying details about an entry
컄 page 151)
(
앫 Creating a new entry in the address book
컄 page 152)
(
앫 Deleting an entry (컄 page 153)
앫 Saving a phone book entry from mobile
phone in the address book (
앫 Adding a telephone number to an address
book entry (
왘 Switching from the list to the smart
컄 page 155)
컄 page 153)
speller: Select “Back” from the list.
or
왘 Press back button L in the center
console (
왘 Changing phone book display in the
컄 page 86).
list: Select “123” or “ABC”.
The screen changes to telephone number or name display.
Closing the COMAND phone book
왘 In the smart speller, select “Back”.
or
왘 Press back button L in the center
console (
컄 page 86).
Selecting an entry in the COMAND
phone book
Selecting entries using the smart speller
왘 Switch from the list to the smart speller
if necessary.
왘 Changing smart speller language:
Select !.
왘 Select desired language.
150
Page 69

Control systems
COMAND telephone*
왘 Changing smart speller character
set: Select #.
Depending on the previous setting, you
will change to letters with special characters or to numbers with special characters.
왘 Entering characters: Select the char-
acters of the entry you are searching
for one by one.
왘 Deleting individual characters: Se-
lect ) and briefly press n.
Each time you enter or delete a character, the closest match will be displayed
at the top of the list.
왘 Deleting an entire entry: Select )
and press and hold n until the entry is
deleted.
왘 Canceling search: Switch from the
smart speller to the list.
The entry at the top of the list is automatically highlighted.
Selecting using the list
왘 If necessary, switch from the smart
speller to the list.
왘 Rotate ymz or slide qmr until the de-
sired entry is highlighted.
Selecting subentries
왘 Select an entry with the + symbol and
press n.
The + symbol changes to / and the
subentries are displayed.
왘 Rotate ymz or slide qmr until the de-
sired subentry is highlighted.
Displaying details of an entry
COMAND can also show a shortened entry
in its entirety. For entries featuring subentries, the detailed view is only available for
the subentries and not for the main entry.
왘 Select entry (컄 page 150).
왘 Select “Options” “Details”.
왘 Closing detailed view: Slide qmr or
omp or press n or back button L
in the center console (
컄 page 86).
Starting to dial the number of an entry
왘 Select entry (컄 page 150).
왘 Press n.
or
왘 Press s on the telephone keypad.
A list appears if the entry contains subentries.
왘 Select desired subentry.
왘 Press n again.
or
왘 Press s on the telephone key-
pad.
컄컄
The detailed view appears.
151
Page 70

Control systems
COMAND telephone*
Assigning a New Entry in the Address
컄컄
Book
Th is func tio n is use d to create a ne w entry in
i
the address book and to enter the data (first
name, last name and telephone number) manually.
왘 Select “Options” “New Entry” in the
COMAND phone book list.
왘 Selecting a number category:
Select a category, e.g. “Home”.
왘 Selecting a telephone category:
Select a category, e.g. “Land Line”.
왘 Confirming selection: Select “Save”.
The input menu appears with the data
fields.
1 Data field
2 Input mark (cursor)
3 Input characters
왘 Changing data field: Slide qmr re-
peatedly until desired data field is highlighted.
or
왘 Select [ or ] repeatedly until de-
sired data field is highlighted.
왘 Entering data into a field: Select all
characters one by one from the input
characters line 3.
왘 Toggling upper and lower case for
the input characters: Select & or
(.
왘 Changing language for the input
characters: Select !.
왘 Select desired language.
왘 Changing character set for the input
characters: Select #.
Depending on the previous setting, you
will change to letters with special characters or to numbers with special characters.
왘 Displaying special characters as in-
put characters: Select ! “Symbols”.
왘 Returning input characters to nor-
mal characters: Select ! the
desired language.
왘 Moving cursor in the data field:
Select Y or Z.
152
Page 71

Control systems
COMAND telephone*
왘 Deleting individual characters:
Select ) and briefly press n.
The character to the left of the cursor is
deleted.
왘 Deleting an entire entry: Select )
and press and hold n until the entry is
deleted.
왘 Saving an entry: Select ?.
왘 Canceling an entry: Select “Back”.
If one of the data fields contains data, a
prompt will appear asking whether you
want to save the entry.
왘 Select “Yes” or “No”.
The entry will either be saved or
not, depending on your selection.
Deleting an entry
It is not possible to delete a phone book en-
i
try from the mobile phone using the COMAND
phone book.
The deletion rules may vary, depending on
the entry selected:
앫 Upper entry selected from the address
book:
the entry is deleted from the COMAND
phone book and also from the address
book, if the address book entry only
contains telephone numbers.
앫 Subentry of an address book entry se-
lected:
the subentry is deleted from the
COMAND phone book and from the address book.
왘 Deleting: Select entry (컄 page 150).
왘 Select “Options” “Delete”.
A prompt appears asking whether the
entry should be deleted.
왘 Select “Yes” or “No”.
Once “Yes” has been selected, the entry will be deleted according to the
rules mentioned above.
Saving a phone book entry from the
mobile phone in the address book
This function is used to save an existing
i
phone book entry from the mobile phone in the
address book. The following options are available:
앫 Saving as a new address book entry
앫 Adding a telephone number to an existing
address book entry
Saving as a new address book entry
왘 Select phone book entry from mobile
phone (
컄 page 150).
All entries with the following category sym-
i
bols are phone book entries in the mobile phone.
앫 = symbol for “Mobile” category
앫 = symbol for “Home” category
앫 = symbol for “Work” category
앫 = symbol for “Fax” category
앫 = symbol for “Pager” category
앫 = symbol for “Main” category
왘 Select “Options” “Save” “New En-
try”.
컄컄
153
Page 72

Control systems
COMAND telephone*
왘 Selecting a number category:
컄컄
Select a category, e.g. “Home”.
왘 Selecting a telephone category:
Select a category, e.g. “Land Line”.
왘 Confirming selection: Select “Save”.
The input menu appears with the data
fields. The data field for the telephone
number is filled in automatically. The
data field for the last name is also filled
when the entry to be saved contains a
name.
1 Data field
2 Input mark (cursor)
3 Input characters
왘 Proceed as described in the “Changing
data field” paragraph in the “Assigning
a New Entry in the Address Book” section (
컄 page 152).
Adding a telephone number to an existing address book entry
왘 Select phone book entry from mobile
phone (
컄 page 150).
All entries with the following category sym-
i
bols are phone book entries in the mobile phone.
앫 = symbol for “Mobile” category
앫 = symbol for “Home” category
앫 = symbol for “Work” category
앫 = symbol for “Fax” category
앫 = symbol for “Pager” category
앫 = symbol for “Main” category
왘 Select “Options” “Save” “Add”.
왘 Selecting a number category:
Select a category, e.g. “Home”.
왘 Selecting a telephone category:
Select a category, e.g. “Land Line”.
왘 Confirming selection: Select “Save”.
The search menu for address book entries appears.
왘 Search for desired entry using smart
speller function.
There is a detailed description of how to
i
search for an address book entry in the “Searching for an address book entry” section
컄 page 228).
(
왘 After selecting an entry, press n.
If there are fewer than four numbers
assigned to the selected entry in the
selected number category, COMAND
will save the data.
If four numbers are saved for the selected entry, a prompt will appear asking whether you want to overwrite one
of the existing numbers.
왘 Select “Yes” or “No”.
If you select “Yes”, a selection list will
appear containing the four existing
numbers.
154
Page 73

Control systems
COMAND telephone*
왘 Select number to be overwritten.
COMAND overwrites the selected number with the new data.
Adding a telephone number to an address book entry
This function is used to add a telephone
i
number to an existing address book entry. The
telephone number can be entered manually.
왘 Select address book entry
(
컄 page 150).
All entries with the symbol or without a
i
symbol are address book entries.
왘 Select “Options” “Add Number”.
“Add Number” does not function if you have
i
selected the main entry for an address book entry with subentries.
왘 Selecting a number category:
Select a category, e.g. “Home”.
왘 Selecting a telephone category:
Select a category, e.g. “Land Line”.
왘 Confirming selection: Select “Save”.
If four numbers are saved for the entry
in the selected number category, a
prompt will appear asking whether one
of the existing numbers should be overwritten.
왘 Select “Yes” or “No”.
If you select “Yes”, a selection list
will appear containing the four existing numbers.
왘 Select number to be overwritten.
The input menu appears with the
data field for entering the new telephone number.
왘 Entering digits: Select all digits one
by one from the input characters.
왘 Moving cursor in the data field:
Select Y or Z.
왘 Deleting individual digits: Select )
and briefly press n.
The digit to the left of the cursor is deleted.
왘 Deleting an entire number:
Select ) and press and hold n until
the number is deleted.
왘 Saving entry: Select ?.
왘 Canceling an entry: Select “Back”.
If you have already entered data, a
prompt will appear asking whether the
entry should be saved.
왘 Select “Yes” or “No”.
The entry will either be saved or
not, depending on your selection.
155
Page 74

Control systems
COMAND telephone*
SMS messages (Short Message
Service)
SMS functions
The following functions are available:
앫 Receive
앫 Read
The following conditions must be fulfilled
in order to use the functions:
앫 The mobile phone is inserted in the cra-
dle and switched on.
앫 The PIN has been entered (only GSM
mobile phones).
앫 The mobile phone is logged into a mo-
bile network.
앫 Mobile phone book must be download-
ed and available in COMAND.
Inbox
Calling up the SMS inbox
왘 Select “Telephone” “Telephone”.
The main telephone menu appears.
1 Symbol for unread messages in the
SMS inbox
The symbol only appears for those mes-
i
sages which are received while the mobile phone
is inserted in the cradle.
왘 Select “Text Message”.
The SMS inbox appears.
“Text Message” does not function if the
i
SMS inbox contains no SMS messages. The SMS
inbox only shows the messages which are received while the mobile phone is inserted in the
cradle.
1 Date and time the highlighted SMS
message was received
2 To call up options
3 Highlighted SMS message
4 Symbol for unread SMS message
5 Back to main telephone menu
156
Page 75

Control systems
COMAND telephone*
The SMS messages are sorted by the date
i
and time they were received. The most recent
message is at the top of the list.
If the name and telephone number of the sender
is saved in the address book or phone book of
the mobile phone, you will see the name of the
sender in the SMS inbox. Otherwise, you will see
the telephone number of the sender.
Selecting an SMS message
왘 Rotate ymz or slide qmr and then
press n.
Showing abbreviated sender display in
full
왘 Select SMS message “Options”
“Details”.
The detailed view appears.
왘 Closing detailed view: Slide qmr or
press n.
Calling an SMS sender
왘 Select SMS message “Options”
“Call”.
The telephone connects the call.
Saving SMS sender as new COMAND
address book entry
왘 Selecting an SMS message: In the
SMS inbox, select a message “Op-
tions” “Save Number” “New Entry”.
왘 Selecting a number category:
Select a category, e.g. “Home”.
왘 Selecting a telephone category:
Select a category, e.g. “Land Line”.
왘 Saving: Select “Save”.
The input menu appears with the data
fields. The data field for the telephone
number is filled in automatically.
1 Data field
2 Input mark (cursor)
3 Input characters
왘 Proceed as described in the “Changing
data field” paragraph in the “Assigning
a New Entry in the Address Book” section (
컄 page 152).
Adding an SMS sender’s telephone number to an existing address book entry
왘 Selecting an SMS message: In the
SMS inbox, select a message “Op-
tions” “Save Number” “Add”.
157
Page 76

Control systems
왘 Proceed as described in the “Selecting a number category” paragraph in the “Adding a telephone number to an existing address
book entry” section (
컄 page 154).
Exiting the SMS inbox
왘 Select “Back”.
The main telephone menu appears.
Reading an SMS message
왘 In the SMS inbox, select an SMS mes-
sage and press n.
The SMS message appears.
Using data in a text message
If the SMS message contains telephone
i
numbers or navigable address data, you can select this data and place a telephone call or transfer the address data to the navigation system.
왘 Selecting data from the text:
Rotate ymz or slide qmr.
왘 Using data: Press n “Use”.
If you have selected a telephone number, the telephone connects the call.
If you have selected a navigable address, it is transferred to the navigation
system.
Calling an SMS sender
왘 Press n “Call”.
The telephone connects the call.
This function is not possible with all SMS
i
senders.
Saving SMS sender as new address book
entry
This function is not possible with all SMS
i
senders.
왘 Press n “Save Number” “New
Entry”.
왘 Proceed as described in the “Selecting
a number category” paragraph in the
“Saving SMS sender as new address
book entry” section (
컄 page 157).
Adding an SMS sender’s telephone number to an existing address book entry
왘 Press n “Save Number” “Add”.
왘 Proceed as described in the “Selecting
a number category” paragraph in the
“Adding a telephone number to an existing address book entry” section
(
컄 page 154).
Closing an SMS message and returning
to SMS inbox
왘 Press n “Back”.
158
Page 77

왔 COMAND navigation
Safety precautions
Warning! G
For safety reasons, only enter a destination
when the vehicle is stationary. When the vehicle is in motion, a passenger should enter
the destination. Study manual and select
route before driving.
Bear in mind that at a speed of just 30 mph
(approximately 50 km/h), your vehicle is
covering a distance of 44 feet (approximately 14 m) every second.
COMAND calculates the route to the destination without taking account of the following, for example:
앫 Traffic lights
앫 Stop and right-of-way signs
앫 Parking or stopping prohibited areas
앫 Lane merging
앫 Other road and traffic rules and regula-
tions
앫 Narrow bridges
COMAND may give incorrect navigation
commands if the data in the digital map
does not correspond with the actual
road/traffic situation. DVD maps do not
cover all areas nor all routes within an area.
For example, if the traffic routing has been
changed or the direction of a one-way road
has been reversed.
For this reason, you must always observe
applicable road and traffic rules and regulations during your journey. Road and traffic
rules and regulations always have priority
over the navigation commands generated by
the system.
Control systems
COMAND navigation
Warning! G
Navigation announcements are intended to
direct you while driving without diverting
your attention from the road and driving.
Please always use this feature instead of
consulting the map display for directions.
Consulting the symbols or map display for
directions may cause you to divert your attention from driving and increase your risk
of an accident.
159
Page 78

Control systems
COMAND navigation (introduction)
COMAND navigation (introduction)
Map software
The digital maps generated by the map
software become outdated in the same
way as conventional road maps. Optimum
route guidance can only be provided by the
navigation system in conjunction with the
most up-to-date map software.
Information about new map software versions can be obtained from an authorized
Mercedes-Benz Center.
Updating the map software
You can update the map software yourself
using a DVD.
Notes about handling DVDs
앫 Only hold discs by the edge.
앫 Handle discs carefully to prevent read
problems.
앫 Avoid getting scratches, fingerprints
and dust on discs.
앫 Use a commercially-available cleaning
cloth to clean discs. Do not wipe them
with a circular motion, but only in
straight lines from the center outwards.
앫 Place discs back in their boxes after
use.
앫 Protect discs from heat and direct sun-
light.
Updating process
The updating process has the following
phases:
앫 Loading a DVD into the DVD changer
(
컄 page 161)
앫 Updating process (컄 page 161)
The updating process can take between
i
10 and 60 minutes, depending on the size of the
map software. If the radio was switched on before you started the updating process, you can
still adjust the volume. You can also use
COMAND to operate the automatic air conditioning and to cancel the process. Other functions
are not operational.
If possible, carry out the update when the vehicle
is stationary.
If you carry out the update with the engine
i
switched off and the vehicle battery has insufficient power, COMAND may automatically switch
off during the process in order to protect the battery. If this occurs, restart the update with the
engine running period. Similarly, if the SmartKey
position is unintentionally switched to 0, restart
the update.
Warning! G
Never leave the engine running in an enclosed space. The exhaust gases contain
carbon monoxide. Inhaling exhaust gases
constitutes a health hazard and could lead
to loss of consciousness or even death.
160
Page 79

Control systems
COMAND navigation (introduction)
Loading a DVD into the DVD changer
1 Disc slot
2 Magazine tray buttons 1 – 6
Each magazine tray button 2 indicates the
i
status of the corresponding magazine tray by
means of an LED.
앫 LED off = magazine tray is empty
앫 LED constantly lit = magazine tray is loaded
앫 LED flashes = CD/DVD changer requesting
disc to be loaded
왘 Switch on COMAND (컄 page 85).
왘 Press one of the magazine tray
buttons 2.
If a disc is loaded, it will be ejected.
왘 Take disc out of slot 1.
왘 Wait until LED for magazine button 2
which you pressed flashes quickly.
왘 Slide DVD into slot 1 with printed side
facing upwards.
COMAND loads the DVD.
Updating
After you have loaded the DVD, you will
see a message to the effect that the disc
does not contain a recognizable audio format.
왘 Confirming message: Press n.
COMAND checks whether the map
software on the DVD is compatible with
the vehicle’s navigation system and
whether it is compatible with the current system software.
Map software is compatible with the
navigation system and the current system software
COMAND now checks whether the map
data on the DVD is already installed.
Map data is not yet installed
You will see a comparison of the version
statuses in the display and a prompt will
appear asking whether you want to continue with the update.
왘 Select “Yes” or “No”.
If you select “No”, COMAND automatically ejects the DVD and the map data
is not updated.
왘 Take DVD out of the slot.
If you select “Yes”, the map data is updated.
161
Page 80

Control systems
COMAND navigation (introduction)
Map data is already installed
You will see a message that the map data
is already installed and a prompt will appear asking you whether you want to continue with the update.
왘 Select “Yes” or “No”.
If you select “No”, COMAND automatically ejects the DVD and the map data
is not updated.
왘 Take DVD out of slot.
If you select “Yes”, the existing map
data is saved again.
Updating the map data
While the update is running, you will see a
message to this effect and a progress bar.
The progress bars fills up from left to right
during the update.
1 Progress bar
You can either cancel the update or allow
it to run to the end without canceling.
왘 Canceling an update on the DVD
changer: Press corresponding magazine tray button 2 (
컄 page 161).
The DVD will be ejected in both cases.
왘 Take DVD out of slot.
If the update is canceled, the navigation sys-
i
tem remains fully operational with the previous
map data. You can restart the update at a later
date. It will then continue from the point where it
was canceled.
왘 To allow the update to run to the
end without canceling: Take no further action.
If the update is successfully completed, you will see a message to this effect.
왘 Confirming message: Press n.
COMAND ejects the DVD.
왘 Take DVD out of slot.
The update is complete.
If the update is not successfully completed, you will see a message that the map
update is not possible.
왘 Confirming message: Press n.
COMAND ejects the DVD.
왘 Take DVD out of slot.
The navigation system remains fully opera-
i
tional with the previous map data.
The update may not be successfully completed for the following reasons:
앫 DVD dirty or scratched
162
Page 81

Control systems
COMAND navigation (introduction)
왘 Clean DVD.
See the “Notes about handling
DVDs” section (
왘 Restart update.
앫 Overheating due to excessive tempera-
컄 page 160).
tures in the vehicle interior
왘 Wait until vehicle interior has
cooled down.
왘 Restart update.
앫 The storage medium (hard disk) inte-
grated in COMAND is defective.
왘 Consult an authorized
Mercedes-Benz Center.
Map software is not compatible with
the navigation system
You will see a message that the update is
not possible.
왘 Confirming message: Press n.
COMAND ejects the DVD.
왘 Take DVD out of slot.
왘 Load a DVD which is compatible with
the vehicle’s navigation system.
Map software is not compatible with
the current system software
You will see a message that the system
software and the map software are not
compatible.
왘 Confirming message: Press n.
COMAND ejects the DVD.
왘 Take DVD out of slot.
왘 Have the system software updated at
an authorized Mercedes-Benz Center.
The map software cannot be updated until
i
the system software has been updated.
163
Page 82

Control systems
COMAND navigation (introduction)
General notes
Operational readiness of the navigation
system following a system software
update by an authorized
Mercedes-Benz Center
After a system software update by an authorized Mercedes-Benz Center, the installed map software may no longer be
compatible. If this is the case, the navigation system will not be operational.
You will know if this is the case, when the
following message will appear when you
switch to navigation mode: “The system
software has been updated. The map software must be updated now. Please insert
the DVD with the map software.”
왘 Updating map software: Proceed as
described in the “Updating the map
software” section (
컄 page 160). Use
map software which is compatible with
the system software.
Please note that the update must be allowed
i
to run to the end in this case. If you interrupt it,
the navigation system will continue to be non-operational.
Initial use or use following a system
software update
In both these cases, the navigation system
must determine the position of the vehicle.
You may have to drive for a while before
precise route guidance is possible.
GPS reception
Correct functioning of the navigation system depends on GPS reception, among
other things. In certain situations, GPS reception may be impaired, there may be interference or there may be no reception at
all, e.g. in tunnels, in multistory parking garage or due to snow on the GPS antenna. If
there is snow on the GPS antenna, you
should remove it. The GPS antenna is at
the back of the vehicle roof.
The roof cargo container* may also impair
mobile phone reception and GPS coverage.
Route guidance after vehicle transportation
COMAND has to redetermine the position
of the vehicle if the vehicle has been transported (e.g. by ferry, by train or after towing).
Positioning takes place automatically even
when COMAND is switched off. The duration varies from one case to another.
Route guidance may be restricted as follows during vehicle positioning:
앫 Navigation announcements, route
guidance displays and displayed street
names are not consistent with the actual location of the vehicle.
앫 COMAND does not generate navigation
announcements.
164
Page 83

Control systems
COMAND navigation (introduction)
앫 Instead of the route guidance displays,
you see the “Off Road” display and a direction arrow. The direction arrow
shows the compass heading to the destination.
When positioning is complete, route guidance is once again possible using navigation announcements and route guidance
displays.
Interrupting the journey during route
guidance
The following applies if you interrupt the
journey during route guidance and continue the journey later:
앫 COMAND resumes route guidance au-
tomatically if you continue the journey
within 2 hours.
앫 Route guidance is canceled if you con-
tinue the journey after more than
2 hours. It will be necessary to resume
the canceled route guidance manually
(
컄 page 216).
The journey is interrupted if you park the ve-
i
hicle and switch off COMAND.
The journey is continued when you switch
COMAND back on and start driving on.
Hard disk errors
COMAND has an integrated hard disk on
which the map software is saved.
If an area of the hard disk has an error,
COMAND can no longer access the map
data in this area, for example, when calculating a route.
The message “Navigation Unavailable.
Please refer to the operating instructions.”
appears.
왘 Deleting message: Switch COMAND
off and back on.
If you switch the navigation system off/on,
i
it will be operational again until it has to access
the faulty area of the hard disk again. The message will then appear again. Consult an authorized Mercedes-Benz Center.
Units of measurement
The units of measurement in navigation
mode are identical to those set in the instrument cluster.
Input restrictions
The input restrictions are imposed starting
at a particular vehicle speed. The restrictions are canceled as soon as the speed
drops below a certain value.
When the restriction is active, certain operations or entries are not possible.
You will notice this by the fact that some
menu items cannot be selected or certain
operations will not be possible.
165
Page 84

Control systems
COMAND navigation (introduction)
Navigation system menu overview
The components and operating principles of
i
COMAND can be found on (
컄 page 85).
Guide Route
Position 6
(only with route
guidance active)
Select a special destination from the current map view
앫 Call up route info
앫 Call up route
browser
앫 Call up the de-
tour function
앫 Call up the save
position memory
function
앫 Center the map
on the vehicle’s
position
앫 Center the map
on the destination position
1
Depending on your vehicle’s production date the traffic menu may not be available.
166
(only with route
guidance active)
Repeat the current
navigation announcement
Destination Traffic (USA only)
Select:
앫 a destination
앫 stopover
앫 save destination
앫 cancel route
Call up real-time traffic messages
guidance
1
Page 85

Calling up the map display and switching to navigation mode
왘 Press the N shortcut button once or
twice.
The number of times you have to press the
i
N shortcut button depends on the operating
mode currently selected.
or
왘 In the main function line, select “Navi”.
Both of these will call up the map display.
You will see the map with the menu system
either shown or hidden.
Illustration: map with route guidance inactive and with the menu system shown
1 Current vehicle position
Control systems
COMAND navigation (introduction)
Illustration: map with route guidance inactive and with the menu system hidden
(full screen mode)
1 Current vehicle position
2 Set map orientation (
3 Map scale selected (
Hiding or showing the menu system
왘 Hiding: Slide qm.
The “Full Screen” menu item appears in
the main area of the display; it is automatically selected.
왘 Press n.
컄 page 170)
컄 page 168)
The menu system is hidden. The map
can be seen in the full screen.
167
Page 86

Control systems
COMAND navigation (introduction)
왘 Showing: Press n in the full-screen
map display.
Adjusting the map scale
It is only possible to adjust the map scale
i
with the menu system hidden (full-screen map
display).
왘 Rotate ymz until the desired map
scale is set.
1 Currently set map scale as number
2 Scale
3 Currently set map scale as a needle on
the scale
4 Previously set value before calling up
the scale
As soon as you rotate ymz, scale 2
appears. Rotating clockwise zooms in,
rotating counterclockwise zooms out.
Saving current vehicle position as destination in last destinations list
왘 Showing menu system, if neces-
sary: Press n.
왘 Saving: Select “Position” “Save Po-
sition”.
COMAND saves the current vehicle position as a destination in the last destinations (
컄 page 225).
Moving the map
It is only possible to move the map with the
i
menu system hidden.
왘 Slide qmr, omp or wmx.
A crosshair appears on the map.
1 Crosshair
2 Details of the crosshair position
3 Map scale
Display 2 may be the name of a road, for
i
example, provided the digital map contains the
necessary data.
If no data is available, display 2 shows:
앫 the coordinates of the crosshair if the
geo-coordinate display is switched on
컄 page 171) and the GPS signal is strong
(
enough
앫 no display if the geo-coordinate display is
switched off (
컄 page 171)
168
Page 87

Control systems
COMAND navigation (introduction)
Adjusting the map scale
왘 Rotate ymz.
Rotating clockwise zooms in, rotating
counterclockwise zooms out.
Saving crosshair position as destination
in last destinations list
왘 Showing menu system, if neces-
sary: Press n.
왘 Saving: Select “Position” “Save Po-
sition”.
COMAND saves the crosshair position
as a destination in the last destinations
list (
컄 page 225).
Hiding the crosshair
왘 Press back button L in the center
console (
컄 page 86).
The crosshair disappears and the map
is centered on the vehicle position.
or
왘 Set the map to the vehicle or destina-
tion position, see the explanation below.
Centering the map on the vehicle or
destination position
If you have moved the map, you can use this
i
function to rapidly return the map to the position
of the vehicle or destination. It is only possible to
center the map on the destination position when
route guidance is active.
왘 Centering on the vehicle’s position:
Select “Navi” “Position” “Vehicle
Position Map”.
or
왘 Press back button L when the
crosshair is displayed.
왘 Centering on the destination:
Select “Navi” “Position” “Destina-
tion Position Map”.
Basic settings
You can make the following settings regard-
i
less of whether route guidance is active or inactive.
Map perspective (USA only)
Depending on your vehicle’s production
date the map perspective function may not
be available.
COMAND can display the map from a
bird's eye view or in the normal map view.
왘 Select map perspective:
Select “Navi” “Navi” “Map Display”.
The map display list appears. A dot R
indicates the current setting.
왘 Select “Bird’s-eye view”.
The bird's eye view is switched on or
off, depending on the previous status.
If you scroll the map in the bird's eye view,
i
COMAND switches back to the normal map view.
169
Page 88

Control systems
COMAND navigation (introduction)
Map orientation
1 Current map orientation
The following may be displayed:
앫 8 = “Heading Up” (the map is dis-
played so that the direction of travel is
always up; the orange point of the icon
points north)
앫 9 = “North Up” (the map view is dis-
played so that north is always up)
왘 Setting map orientation:
Select “Navi” “Navi” “Map Display”.
The map display list appears. A dot R
indicates the current setting.
왘 Select “North Up” or “Heading Up”.
왘 Exiting menu: Slide omp.
The map orientation changes accordingly.
Setting POI symbols
You can set which points of interest (POIs)
should be displayed as symbols in the
map. POIs are garages, hotels, movie theaters or restaurants, for example.
Depending on the map scale on the map,
i
POI symbols may not be visible on the map although their display is activated. In addition, POI
symbols may be covered by the map’s labels.
The following settings are possible:
앫 “Standard symbols” (symbol deter-
mined by the factory settings)
앫 “Personal symbols” (you can determine
the symbols yourself)
앫 “No symbols”
왘 Adjusting: Select “Navi” “Navi”
“Map Display”.
The map display list appears. A dot R
indicates the current setting.
왘 Select “Standard symbols”, “Personal
symbols” or “No symbols”.
If you select “Personal symbols”, the
list of POIs appears.
왘 Switching POI symbol display on
or off: Select the desired POI.
The corresponding symbol displays
are switched on or off, depending
on the previous status. A checkmark indicates which status is active. You can switch on the symbol
displays for more than one POI.
170
Page 89

Control systems
COMAND navigation (introduction)
The list shows all symbols that are contained
i
in the digital map across all states (USA) and/or
provinces (CDN). Not all POIs in all states (USA)
or in all provinces (CDN) are available, however.
Certain POI symbols may not be displayed on the
map, even if the symbol display is switched on.
왘 Exiting menu: Slide omp or press
back button L in the center console
(
컄 page 86).
Geo-coordinate display
Illustration: map with geo-coordinate display switched on
1 Current height above sea level
2 Number of GPS satellites from which
signals for positioning can be received
3 Coordinate display
There must be sufficient GPS reception for
i
displays 1, 2 and 3 to be shown. Height display 1 is an approximation because the navigation system uses the GPS signals for the
calculation.
Display options with geo-coordinate display switched on
If the crosshair is displayed on the map
view (map was moved manually), only display 3 is visible.
It shows either the coordinates of the
crosshair or other data on the crosshair
position, e.g. a street name. The digital
map must contain relevant data in order
for this other data to be displayed.
If there is no crosshair on the map view, dis-
i
plays 1, 2 and 3 are visible. Display 3
shows the coordinates of the current vehicle position.
Switching the geo-coordinate display on
or off
왘 Select “Navi” “Navi” “Map Dis-
play”.
The map display list appears.
왘 Select “Coordinates”.
The geo-coordinate display is switched
on or off, depending on the previous
status. A checkmark indicates which
status is active.
왘 Exiting menu: Slide omp or press
back button L in the center console
(
컄 page 86).
Setting route type (USA only)
Depending on your vehicle’s production
date the route type function may not be
available.
You can set the following route types:
앫 “Fast Route”: COMAND calculates a
route with the shortest possible (minimized) driving time.
171
Page 90

Control systems
앫 “Short Route”: COMAND calculates a route with the shortest possible (minimized) distance taking distance and driving time into
account.
왘 Select “Navi” “Navi” “Mode”.
The mode list appears. A square 쐍 indicates the current setting.
왘 Select route type: “Fast Route” or
“Short Route”.
왘 Exit menu: Slide omp or press back
button L in the center console
(
컄 page 86).
If you change the route type setting during
i
active route guidance, COMAND calculates a
new route. If you change the setting when route
guidance is inactive, COMAND uses the new setting for the next route guidance.
Setting route mode
This function allows you to set the following
i
options for route guidance:
앫 “Minimize Highways”
앫 “Minimize Toll Roads”
앫 “Minimize Tunnels”
앫 “Minimize Ferries/Motorail”
왘 Select “Navi” “Navi” “Mode”.
The mode list appears.
왘 Switching mode on or off:
Select desired modes.
Depending on the previous status, the
mode is switched on or off. A checkmark indicates that the mode is
switched on. It is possible to switch on
more than one mode.
왘 Exiting menu: Slide omp or press
back button L in the center console
(
컄 page 86).
COMAND will verify whether it can incorporate the modes if you select them
with route guidance active.
If it can, COMAND calculates a new
route while incorporating the modes
selected.
If it cannot, you will see and hear a corresponding message.
왘 Select “OK”.
COMAND calculates a new route.
Only those modes which can be incorporated are used.
172
Page 91

Control systems
COMAND navigation system (entering a destination)
COMAND navigation system
(entering a destination)
Warning! G
For safety reasons, only enter a new destination when the vehicle is stationary.
It is possible to enter a destination regard-
i
less of whether route guidance is active or inactive.
The following destination entry options are
available:
앫 Entering a destination by address
앫 Entering a destination from the desti-
nation memory
앫 Entering a destination from the list of
last destinations
앫 Entering a destination from the map
앫 Entering a stopover
앫 Entering a POI
Entering a destination by the address
It is not possible to enter an address when
i
the vehicle has exceeded a certain speed. As
soon as the vehicle speed drops below a certain
value, the function is available again.
If Russian or Chinese is set as the system
i
language, the address must be entered using
Latin letters. Setting the system language
컄 page 240).
(
To enter an address you may proceed as
follows:
앫 Enter state (USA) or province (CDN),
street and town/city
앫 Enter state (USA) or province (CDN),
town/city and street
앫 Enter state (USA) or province (CDN),
town/city and center
앫 Enter state (USA) or province (CDN),
zip code and center
앫 Enter state (USA) or province (CDN),
zip code and street
As additional information to the street entry,
i
you can enter either a house number or an intersection.
A zip code entry replaces the town/city entry.
Calling up the address input menu
왘 Select “Navi” “Destination” “Ad-
dress Entry”.
The address input menu appears. It
shows a state (USA) or a province
(CDN). Which state or province is
shown depends on the vehicle’s location.
1 State (USA) or province (CDN)
컄컄
173
Page 92

Control systems
COMAND navigation system (entering a destination)
Menu items in the address input menu
컄컄
Some menu items will not or not yet be
available, depending on the sequence in
which you enter the address and the data
version.
Example: If you have not made any entries,
menu items “House No.”, “Center”, “Inter-
section”, “POI”, “Start” and “Save” will not
yet be available. And the “Zip Code” menu
item will not be available if the digital map
does not contain any zip codes.
Entering a state (USA)
You can only enter those states which are
i
saved on the digital map.
왘 In the address input menu, select
“State/Prov” “States (U.S.)”.
A list of states appears with input characters; the input characters are automatically activated.
List of states with input characters
1 Top list entry based on the input data
up to that point
2 Characters entered by the user
3 Characters automatically added by the
system
4 Clear last character entry
5 Currently selectable characters
6 Currently non-selectable characters
7 Input characters
8 List of states
9 Currently selected characters
In the list of input characters 7, you can
i
only select currently selectable characters.
Which characters are included depends on the
sequence in which you have entered your destination and the data version of the digital map.
While the numbers are being selected as
described below, the top list entry 1 always shows the state which best corresponds to the input data as it has been
entered up to that point.
At the same time, COMAND automatically
supplements characters 2 entered by the
user with other likely input characters 3.
왘 Selecting characters: Slide omp or
rotate ymz.
왘 Confirming character selection:
Press n.
왘 Deleting individual characters:
Select ) in the bottom line and
press n.
왘 Deleting an entire entry: Select ) in
the bottom line and press n until the
entire entry is deleted.
174
Page 93

Control systems
COMAND navigation system (entering a destination)
왘 Canceling an entry: Select “Back” in
the bottom line and press n.
or
왘 Press back button L in the center
console (
컄 page 86).
As soon as COMAND can clearly attribute
the characters entered to a state, the input
characters 7 disappear automatically.
You see the list of states without the input
characters. Here you can confirm the current entry or make another selection.
During character entry, you can also manually switch to the list of states without input characters at any time.
왘 Switching manually to list of states
without input characters: Slide qm.
or
왘 Select ? in the second line from the
bottom and press n.
List of states without input characters
왘 Selecting a state: Slide qmr or
rotate ymz.
왘 Canceling selection: Select “Back” by
sliding om and press n.
or
왘 Press back button L in the center
console (
왘 Confirming selection: Press n.
컄 page 86).
The address input menu appears again.
It shows the abbreviation for the selected state.
The following menu items are now available:
앫 “Map”: Entering a destination from the
map (
컄 page 194)
앫 “State/Prov”: Re-enter state (USA) or
province (CDN)
앫 “Town”: Entering a town or city
(
컄 page 179)
앫 “Street”: Entering a street
(
컄 page 181)
앫 “Zip Code”: Entering the zip code
(
컄 page 177)
It is not possible to enter zip codes if the dig-
i
ital map does not contain any zip codes for the
selected state.
왘 Continuing destination entry:
Select one of the menu items mentioned above.
175
Page 94

Control systems
COMAND navigation system (entering a destination)
Entering a province (Canada)
왘 In the address input menu, select
“State/Prov” “Provinces (Canada)”.
A list of provinces appears.
왘 Select desired province.
The address input menu appears again.
It shows the abbreviation for the selected province.
The following menu items are now available:
앫 “Map”: Entering a destination from the
map (
컄 page 194)
앫 “State/Prov”: Re-enter state (USA) or
province (CDN)
앫 “Town”: Entering a town or city
(
컄 page 179)
앫 “Street”: Entering a street
(
컄 page 181)
앫 “Zip Code”: Entering the zip code
(
컄 page 177)
It is not possible to enter a zip code if the
i
digital map does not contain any zip codes for
the selected province (CDN).
왘 Continuing destination entry:
Select one of the menu items mentioned above.
Quick access to most recently entered
states (USA) or provinces (CDN)
왘 In the address input menu, select
“State/Prov” “Last States/Provinces”.
The list of most recently entered states
(USA) or provinces (CDN) appears. The
last entry is at the top of the list.
왘 Select desired state (USA) or desired
province (CDN).
The address input menu appears again.
It shows the abbreviation for the selected state (USA) or province (CDN).
The following menu items are now available:
앫 “Map”: Entering a destination from the
map (
컄 page 194)
앫 “State/Prov”: Re-enter state (USA) or
province (CDN)
앫 “Town”: Entering a town or city
(
컄 page 179)
앫 “Street”: Entering a street
(
컄 page 181)
앫 “Zip Code”: Entering the zip code
(
컄 page 177)
It is not possible to enter a zip code if the
i
digital map does not contain any zip codes for
the selected state (USA) or province (CDN).
왘 Continuing destination entry:
Select one of the menu items mentioned above.
176
Page 95

Control systems
COMAND navigation system (entering a destination)
Entering the zip code
It is not possible to enter a zip code if you
i
have already entered other address data aside
from the state (USA) or province (CDN).
You can only enter those zip codes which are
saved on the digital map.
The available zip codes depend on the state
(USA) or province (CDN) most recently entered.
왘 In the address input menu, select “Zip
Code”. A list of zip codes appears with
input characters; the input
characters 4 are automatically activated.
List of zip codes with input characters
1 Top list entry based on the input data
up to that point
2 Numbers entered by the user
3 Numbers automatically added by the
system
4 Input characters
5 Currently selectable numbers
6 Currently selected numbers
7 Currently non-selectable numbers
8 List of zip codes
In the list of input characters 4, you can
i
only select numbers which can be currently entered. Which characters are included depends
on the sequence in which you have entered your
destination and the data version of the digital
map.
While the numbers are being selected as
described below, the top list entry 1 always shows the zip code which best corresponds to the input data as it has been
entered up to that point.
At the same time, COMAND automatically
supplements numbers 2 entered by the
user with other likely numbers 3.
왘 Selecting numbers: Slide omp or
rotate ymz.
왘 Confirming number selection:
Press n.
왘 Deleting individual numbers:
Select ) in the bottom line and
press n.
왘 Deleting an entire entry: Select ) in
the bottom line and press n until the
entire entry is deleted.
177
Page 96

Control systems
COMAND navigation system (entering a destination)
왘 Canceling an entry: Select “Back” in
the bottom line and press n.
or
왘 Press back button L in the center
console (
컄 page 86).
As soon as COMAND can clearly attribute
the numbers entered to a zip code, input
characters 4 disappear. You see the list
of zip codes without the input characters.
Here you can confirm the current entry or
make another selection.
During character entry, you can also manually switch to the list of zip codes without
input characters at any time.
왘 Switching manually to list of zip
codes without input characters:
Slide qm.
or
왘 Select ? in the second line from the
bottom and press n.
List of zip codes without input
characters
왘 Selecting a zip code: Slide qmr or ro-
tate ymz.
왘 Canceling selection: Select “Back”
and press n.
or
왘 Press back button L in the center
console (
왘 Confirming selection: Press n.
컄 page 86).
You will see the address input menu
again.
It shows one of the following items of information:
앫 Street and if necessary, house number,
town/city, state (USA) or province
(CDN)
앫 Town/city, state (USA) or province
(CDN) and zip code
앫 State (USA) or province (CDN) and zip
code
The street and, if necessary, the house num-
i
ber, will then appear as soon as COMAND can attribute the zip code to an appropriate address.
Which of the following menu items are now
available depends on the situation, or may
depend on the data version of the digital
map. The menu items which are not available cannot be selected.
앫 “Map”: Using the map to enter a desti-
nation (
i
entry is based on the town or city seen in the address input menu.
컄 page 194)
In this case, using the map for destination
178
Page 97

Control systems
COMAND navigation system (entering a destination)
앫 “Street”: entering a street
(
컄 page 181)
앫 “Center”: entering a center
(
컄 page 184)
앫 “POI”: entering a point of interest
(
컄 page 197)
In this case, entering a POI is based on the
i
town or city seen in the address input menu.
앫 “Save”: saving a destination in the des-
tination memory (
앫 “Start”: starting the route calculation
(
컄 page 191)
왘 Continuing or completing destina-
컄 page 219)
tion entry: Select one of the menu
items mentioned above.
Entering a town or city
You can only enter those towns or cities
i
which are saved on the digital map.
It is not possible to enter a town or city when you
have already entered a street which COMAND
can clearly attribute to a town or city.
If COMAND cannot clearly attribute a previously
entered street to a town/city, only those towns
or cities are available which have a street of that
name.
If you have not yet entered a street before entering the town or city, towns or cities within the
state (USA) or province (CDN) previously entered are available.
왘 In the address input menu, select
“Town”.
The list of towns/cities appears either
with or without the input characters
(
컄 page 180).
Whether or not the input characters appear depends on how many towns or
cities are available for the desired state
(USA) or province (CDN).
List of towns or cities with input
characters
When this list appears, the input characters 4 are automatically activated.
1 Top list entry based on the input data
up to that point
2 Characters entered by the user
3 Characters automatically added by the
system
4 Input characters
5 Currently non-selectable characters
6 Currently selectable character
7 List of towns/cities
8 Currently selected character
179
Page 98

Control systems
COMAND navigation system (entering a destination)
In the list of input characters 4, you can
i
only select currently selectable characters.
Which characters are included depends on the
sequence in which you have entered your destination and the data version of the digital map.
The top list entry 1 at first shows either
the town or city in which the vehicle is currently located or the town or city which
best corresponds to the input data as it
has been entered up to that point.
The current town or city is shown if:
i
앫 you have accepted the current state (USA) or
province (CDN) when entering the state
(USA) or province (CDN)
앫 and if you select town/city entry immediate-
ly afterward
As soon as you enter a character from input characters 4, the top list entry 1
shows the town or city that best corresponds to the input data as it has been entered up to that point.
At the same time, COMAND automatically
supplements characters 2 entered by the
user with appropriate characters 3.
왘 Selecting characters: Slide omp or
rotate ymz.
왘 Confirming character selection:
Press n.
왘 Deleting individual characters:
Select ) in the bottom line and
press n.
왘 Deleting an entire entry: Select ) in
the bottom line and press n until the
entire entry is deleted.
왘 Canceling an entry: Select “Back” in
the bottom line and press n.
or
왘 Press back button L in the center
console (
컄 page 86).
As soon as COMAND can clearly attribute
the characters entered to a town or city,
the input characters 4 disappear automatically. You see the list of towns or cities
without the input characters. Here you can
confirm the current entry or make another
selection.
During character entry, you can also manually switch to the list of towns/cities without input characters at any time.
왘 Switching manually to the list of
towns/cities without input characters: Slide qm.
or
왘 Select ? in the second line from the
bottom and press n.
List of towns/cities without input
characters
1 Symbol for more selection options
180
Page 99

Control systems
COMAND navigation system (entering a destination)
왘 Selecting a town or city: Slide qmr
or rotate ymz.
왘 Canceling selection: Select “Back”
and press n.
or
왘 Press back button L in the center
console (
왘 Confirming selection: Press n.
컄 page 86).
Towns/cities with symbol 1 mean
that there is more than one in the selected state (USA) or province (CDN).
Confirming one of these towns/cities
will take you to a further sub-selection.
If there are no other selection options,
the address input menu appears again.
It shows one of the following items of information:
앫 Town/city and state (USA) or province
(CDN)
앫 Street, town/city and state (USA) or
province (CDN)
The street is visible if you have entered it be-
i
fore entering the town or city.
Which of the following menu items are now
available depends on the situation, or may
depend on the data version of the digital
map. The menu items which are not available cannot be selected.
앫 “Map”: using the map to enter a desti-
nation (
i
entry is based on the town or city seen in the address input menu.
앫 “Street”: entering the street
(
앫 “House No.”: entering the house num-
ber (
앫 “Center”: entering the center
(
앫 “Intersection”: entering the intersec-
tion (
앫 “POI”: entering a point of interest
(
컄 page 194)
In this case, using the map for destination
컄 page 181)
컄 page 186)
컄 page 184)
컄 page 189)
컄 page 197)
In this case, entering a POI is based on the
i
town or city seen in the address input menu.
앫 “Save”: saving a destination in the des-
tination memory (
앫 “Start”: starting the route calculation
(
컄 page 191)
왘 Continuing or completing destina-
컄 page 219)
tion entry: Select one of the menu
items mentioned above.
Entering a street
It is not possible to enter a street if:
i
앫 you have already entered a center
앫 you have already entered a zip code that
COMAND can clearly attribute to a street
컄컄
181
Page 100

Control systems
COMAND navigation system (entering a destination)
컄컄
You can only enter those streets which are
i
saved on the digital map.
If you have not entered a town or city before entering the street, only those streets within the
state (USA) or province (CDN) previously entered are available. If you have already entered a
town or city, streets within that town or city are
available.
If you have entered a zip code before entering
the street, only those streets within the zip code
area are available.
왘 In the address input menu, select
“Street”.
The list of streets appears either with
or without the input characters
(
컄 page 183). Whether or not the input
characters appear depends on how
many streets are available for the selected town or city.
Street list with input characters
When this list appears, the input characters 6 are automatically activated.
1 Top list entry based on the input data
up to that point
2 Characters entered by the user
3 Characters automatically added by the
system
4 Currently non-selectable characters
5 Currently selectable character
6 Input characters
7 Street list
8 Currently selected character
In the list of input characters 6, you can
i
only select currently selectable characters.
Which characters are included depends on the
sequence in which you have entered your destination and the data version of the digital map.
The top list entry 1 first shows the street
first alphabetically and best corresponds
to the input data as it has been entered up
to that point.
As soon as you enter a character from input characters 6, the top list entry 1
shows the street which best corresponds
to the input data as it has been entered up
to that point.
At the same time, COMAND automatically
supplements characters 2 entered by the
user with appropriate characters 3.
왘 Selecting characters: Slide omp or
rotate ymz.
왘 Confirming character selection:
Press n.
왘 Deleting individual characters:
Select ) in the bottom line and
press n.
182
 Loading...