

Page 1

JOBNAME: No Job Name PAGE: 1 SESS: 6 OUTPUT: Tue Feb 27 16:38:35 2007
/ford_pdm/ford/supplement/mgm/doc
Table of Contents
Introduction
What is SYNC? 3
How to use this supplement 4
How to get going 5
Pairing your phone for the first time 5
System interaction
Phone features
Accessing your phone book 15
Text messaging 16
Phone settings 20
Setting a ring tone 21
System settings 24
Pairing other phones 25
Turning voice prompts on/off 28
Changing the language setting 28
Returning to system defaults 29
Performing a master reset 30
Installing new vehicle applications 30
Making a call 31
Receiving a call 32
Using the quick dial feature 33
Privacy mode 34
Putting a call on hold 34
3
8
14
Media features
Pairing your media devices 38
Changing source listing 41
Using your USB port 41
Streaming music from your phone 43
Using the Auxiliary input jack (Line in) 43
Choosing an artist 48
Selecting genre type 51
Accessing your playlists 52
Playing a specific track 53
Playing similar music 55
PAGE: 1 OP: root EDIT SESSION: 6 DATE: FEB 27 2007 at 16:38
JOB: @ibm2/ford_pdm/CLS_ford/GRP_supplement/JOB_mgm/DIV_doc
REVIEW COPY ——
2008 (mgm), Supplement (supplement), Market: USA (fus)
38
1
Page 2

JOBNAME: No Job Name PAGE: 2 SESS: 8 OUTPUT: Tue Feb 27 16:38:35 2007
/ford_pdm/ford/supplement/mgm/doc
Table of Contents
Voice recognition
How to use voice commands 58
Navigation interaction
First time pairing with your navigation system 68
Phone features with the navigation system 70
Quick dial feature 71
Advanced settings 77
Text messaging with your navigation system 85
Accessing media features 88
Accessing USB port and auxiliary input jack 88
DVD interaction
Frequently asked questions
End user license agreement 104
General information 109
Index
57
67
93
98
112
All rights reserved. Reproduction by any means, electronic or mechanical
including photocopying, recording or by any information storage and retrieval
system or translation in whole or part is not permitted without written
authorization from Ford Motor Company. Ford may change the contents without
notice and without incurring obligation.
Copyright © 2007 Ford Motor Company
2
PAGE: 2 OP: root EDIT SESSION: 8 DATE: FEB 27 2007 at 16:38
JOB: @ibm2/ford_pdm/CLS_ford/GRP_supplement/JOB_mgm/DIV_doc
REVIEW COPY ——
2008 (mgm), Supplement (supplement), Market: USA (fus)
Page 3
JOBNAME: No Job Name PAGE: 3 SESS: 10 OUTPUT: Tue Feb 27 16:38:35 2007
/ford_pdm/ford/supplement/mgm/doc
Introduction
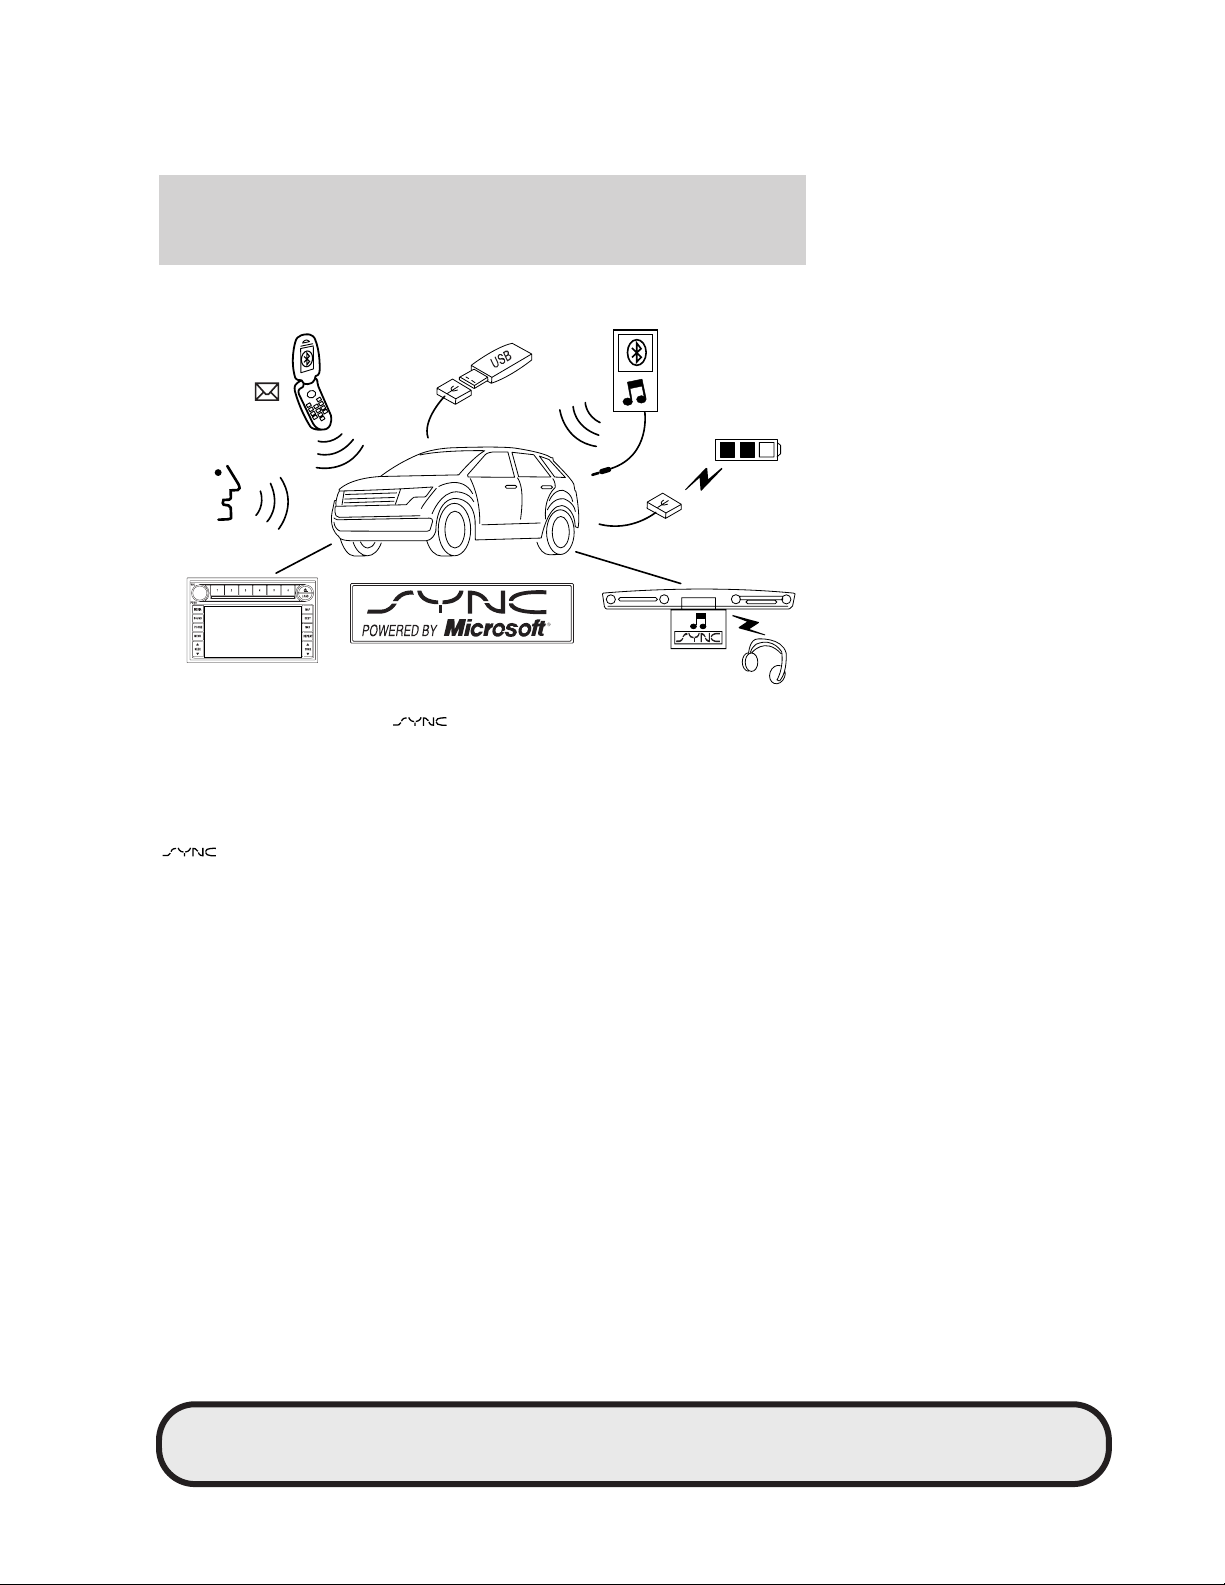
WHAT IS SYNC™?
Thank you for purchasing
; a hands-free communications and
entertainment system which allows you to send and receive phone calls
and text messages as well as to connect to your media devices such as
an iPodt, USB flash devices (memory sticks), Bluetootht audio devices
and more. This technology allows you to be fully connected and
completely mobile at the same time.
literally ’syncs’ up with all other multimedia systems in your
vehicle. Devices must be Bluetootht enabled and be connected to the
vehicle’s system. Your cell phone must simply be on and need not be in a
cradle or connected to anything. You can also use a headset which came
with your cell phone. These features allow you to have ’hands free’
conversations while enabling you to focus your attention on the road.
Please feel free to visit our web site at www.SyncMyRide.com.
SYSTEM FEATURES
• Automatic connection to your Bluetootht enabled cellular phone to
use as a hands free system
• Send and receive calls and text messages
• Easy to use Voice Recognition (VR) which allows you to interact with
the system, providing real hands free access
CIMS # com_mgm-overview
itdseq=1
art=expec061_c
CIMS #1613699
com_mgm-features
itdseq=2
PAGE: 3 OP: root EDIT SESSION: 10 DATE: FEB 27 2007 at 16:38
REVIEW COPY ——
2008 (mgm), Supplement (supplement), Market: USA (fus)
3
JOB: @ibm2/ford_pdm/CLS_ford/GRP_supplement/JOB_mgm/DIV_doc
Page 4

JOBNAME: No Job Name PAGE: 4 SESS: 12 OUTPUT: Tue Feb 27 16:38:35 2007
/ford_pdm/ford/supplement/mgm/doc
Introduction
• Pair up to 12 Bluetootht enabled devices to the system and easily
switch between devices
• Allows you to search for and play specific artists, genres, albums and
tracks
• Sophisticated digital noise reduction for quiet phone calls, even during
highway-speed driving
• Audio is played through your vehicle audio system for high quality
sound and automatically mutes and pauses the playing media during
incoming and outgoing calls
• Choose from three unique ring tones
• Call waiting, call forwarding, multiparty calls, privacy mode and call
hold
• Select from multiple languages — English, French, Spanish
• Use in conjunction with your audio, steering wheel controls, navigation
system (if equipped) and DVD system (if equipped)
• Security stowage inside console
• Allows you to charge any devices using your USB port
HOW TO USE THIS SUPPLEMENT
In familiarizing yourself with this system, some notes that may be helpful
while using this supplement:
• Pairing: Throughout this supplement, you will see the word ’Pair’ and
’Pairing’ often. This is a term many cellular phones and playing devices
use to refer to the procedure they must go through to wirelessly
communicate with another system. This typically includes a PIN
number to ensure that they are connecting to the correct device.
Your
musical device to allow them to communicate with each other. This
pairing process should be covered in the Owner’s manual of your
cellular phone or other device. Please ensure that you refer to those
specific instructions as each phone and device will vary in specific
steps.
• Voice recognition: Your
interactive Voice Recognition system capable of communicating
through prompts, audible tones as well as clarification questions and
confirmations. For a more complete listing of Voice Recognition
commands, please refer to the Voice recognition chapter.
• System differences: Your vehicle may have a variety of different
option packages. Due to this, you may notice slight differences in
system will ’Pair’ with your cellular phone and any other
system is equipped with an
CIMS #1615505
com_howtouse itdseq=3
4
PAGE: 4 OP: root EDIT SESSION: 12 DATE: FEB 27 2007 at 16:38
REVIEW COPY ——
2008 (mgm), Supplement (supplement), Market: USA (fus)
JOB: @ibm2/ford_pdm/CLS_ford/GRP_supplement/JOB_mgm/DIV_doc
Page 5

JOBNAME: No Job Name PAGE: 5 SESS: 1 OUTPUT: Tue Feb 27 16:38:35 2007
/ford_pdm/ford/supplement/mgm/doc
Introduction
menu listings or displays. (For example, a text message or menu
listing could display in slightly different ways on different systems)
This is normal.
• Return: Every nested menu in the
option. You can select this option at any time to take you back to the
previous menu. This listing will not be addressed in every procedure.
• Text advancing: Your
system will automatically advance the
display by 12 characters when you push the TEXT button on the
audio system.
• Long list browsing: Your
system has a long list browsing
feature which means the system will categorize large groups of data
from your phone book or media device into alphabetical categories.
The number of categories will vary depending on the number of
entries. When there are only 25 listings, the system will display the
information in a flat file mode (no categories).
• Phone dependent features: While your
of features, many of them are dependent on your cellular phone’s
functionality. If the cellular phone you have paired and are using with
your
system does not support these features, they will not
work. Some of these features include: text messaging, automatic
phone book download, disengaging privacy mode and transferring back
to
, putting a call on hold, accessing call history and in —band
ringing.
• Speed dependent features: For your safety, some
cannot be completed when the vehicle is traveling at speeds greater
than 3 mph.
QUICK START — HOW TO GET GOING
This section will give you a brief summary on how to start using
your
system. For further information, please refer to the
appropriate chapters.
Pairing your phone for the first time using your audio system
For directions on pairing your phone for the first time using your
navigation system, refer to the Navigation interaction chapter.
Note: For your safety, this procedure cannot be completed when the
vehicle is traveling at speeds greater than 3 mph. Please read all safety
information prior to operating the system.
system has a RETURN
system has a variety
functions
CIMS #1615006
com_qck-st.mgm itdseq=4
CIMS #1625052
com_firstpairing itdseq=5
PAGE: 5 OP: root EDIT SESSION: 1 DATE: FEB 27 2007 at 16:38
REVIEW COPY ——
2008 (mgm), Supplement (supplement), Market: USA (fus)
5
JOB: @ibm2/ford_pdm/CLS_ford/GRP_supplement/JOB_mgm/DIV_doc
Page 6

JOBNAME: No Job Name PAGE: 6 SESS: 1 OUTPUT: Tue Feb 27 16:38:35 2007
/ford_pdm/ford/supplement/mgm/doc
Introduction
The first thing you must do to use the system is to ’pair’ your Bluetootht
enabled phone with your vehicle’s
your phone to wirelessly communicate with the hands-free
system and ensures that other phones cannot inadvertently do so. To
pair your phone for the first time:
1. Ensure that the vehicle ignition and audio system are ON.
2. Press
to enter the phone menu. The system will attempt to
connect and the display will indicate no phone is paired.
3. Press OK. ADD DEVICES will appear in the menu.
4. Press OK to confirm your selection and enter the ADD DEVICES
menu. The system will aide you with voice prompts to complete the
process.
5. When FIND SYNC appears in the display, press OK. The system will
’look’ for your device and the display will show SYNC FOUND. A six digit
PIN will appear in the display.
6. Enter that PIN in your phone when prompted (if your phone supports
this function).
7. If the pairing goes through, the display will read the PHONE NAME
and then CONNECTING. If the connection is successful, the display will
read CONNECTED and then ask you if you want to set this phone as a
PRIMARY phone. (Setting your phone as a primary means the system
will automatically attempt to connect to this phone every time the
ignition is turned on). Press OK to enter the menu.
8. The display will ask you to verify you want to set the phone as a
primary. Press OK for yes.
9. If you selected this as your primary phone, the system will ask if you
would like to DOWNLOAD your cellular phone’s phone book and call
history.
10. Press OK for yes.
11. If you choose YES, the display will indicate the information is
downloading. The display will then either read PHONBOOK ERROR (if
there was an error found), PHONEBOOK FULL, PHONEBOOK
DOWNLOADED or PHONEBOOK NO ENTRIES. The system will then
take you back to the main menu.
Note: Your setting for the phone book will be saved in the system. If you
choose to download the phone book, the phone book will downloaded
each time your phone is reconnected to the system (upon each ignition
cycle).
system. This process allows
6
PAGE: 6 OP: root EDIT SESSION: 1 DATE: FEB 27 2007 at 16:38
REVIEW COPY ——
2008 (mgm), Supplement (supplement), Market: USA (fus)
JOB: @ibm2/ford_pdm/CLS_ford/GRP_supplement/JOB_mgm/DIV_doc
Page 7

JOBNAME: No Job Name PAGE: 7 SESS: 1 OUTPUT: Tue Feb 27 16:38:35 2007
/ford_pdm/ford/supplement/mgm/doc
Introduction
Note: Depending on the size of your phone book, it may take a few
moments for the system to fully download the entire phone book.
You may pair up to 12 phones with your
vehicle ignition is turned ON, the
system will automatically begin
to search for the primary paired phone, and, if present, will attempt to
reconnect to that phone. If this phone is not available, the system will
attempt to connect to the most previously paired phone. If no phones
have been paired to the system or if none of the paired phones are
available, the display will read NO PHONE when PHONE is pressed.
Phone book entries: Once the
system connects to your
Bluetootht enabled phone, you can download your cellular phone book
and call history (if your phone supports these functions). The system
can support up to 2,000 entries per each paired phone.
Note: Phone book and call history information are not available to view
through the multimedia system unless the phone is connected.
SAFETY INFORMATION
system. When the
CIMS #1619108
com_safety-info itdseq=6
Driving while distracted can result in loss of vehicle control,
accident and injury. Ford strongly recommends that drivers use
extreme caution when using any device that may take their focus off
the road. The driver’s primary responsibility is the safe operation of
their vehicle. Only use cell phones and other devices not essential to
the driving task when it is safe to do so.
Read all of the safety and operating instructions before operating the
system and retain for future reference.
Do not attempt to service, repair or modify your
system. See
your authorized dealer.
Ensure that you review User Manuals for your cellular phones, iPodt,
memory sticks, etc. before using with your
system.
Do not operate playing devices if the power cords and/or cables are
broken, split or damaged. Carefully place cords and/or cables where they
will not be stepped on or interfere with the operation of seats and/or
compartments.
Do not leave playing devices in the vehicle in extreme conditions as it
could cause damage. Refer to the Owner Manuals for further information.
For your safety, some
functions are speed dependent and cannot
be performed when the vehicle is traveling at speeds greater than 3 mph.
7
PAGE: 7 OP: root EDIT SESSION: 1 DATE: FEB 27 2007 at 16:38
REVIEW COPY ——
2008 (mgm), Supplement (supplement), Market: USA (fus)
JOB: @ibm2/ford_pdm/CLS_ford/GRP_supplement/JOB_mgm/DIV_doc
Page 8
JOBNAME: No Job Name PAGE: 8 SESS: 1 OUTPUT: Tue Feb 27 16:38:35 2007
/ford_pdm/ford/supplement/mgm/doc
System interaction
HOW SYNC™ INTERACTS WITH OTHER SYSTEMS IN YOUR
VEHICLE
Your vehicle is equipped with
the
the
system. The location of
badge may vary from
vehicle to vehicle.
Your
system will interact
with your audio system, steering wheel controls, DVD system (if
equipped) and navigation system (if equipped).
allows you to
make hands free calls and search for your favorite music, among many
other features. You may have any of the following audio systems or
steering wheel controls, depending on the option package on your
vehicle. The Navigation and DVD systems are covered in separate
chapters as they are optional features.
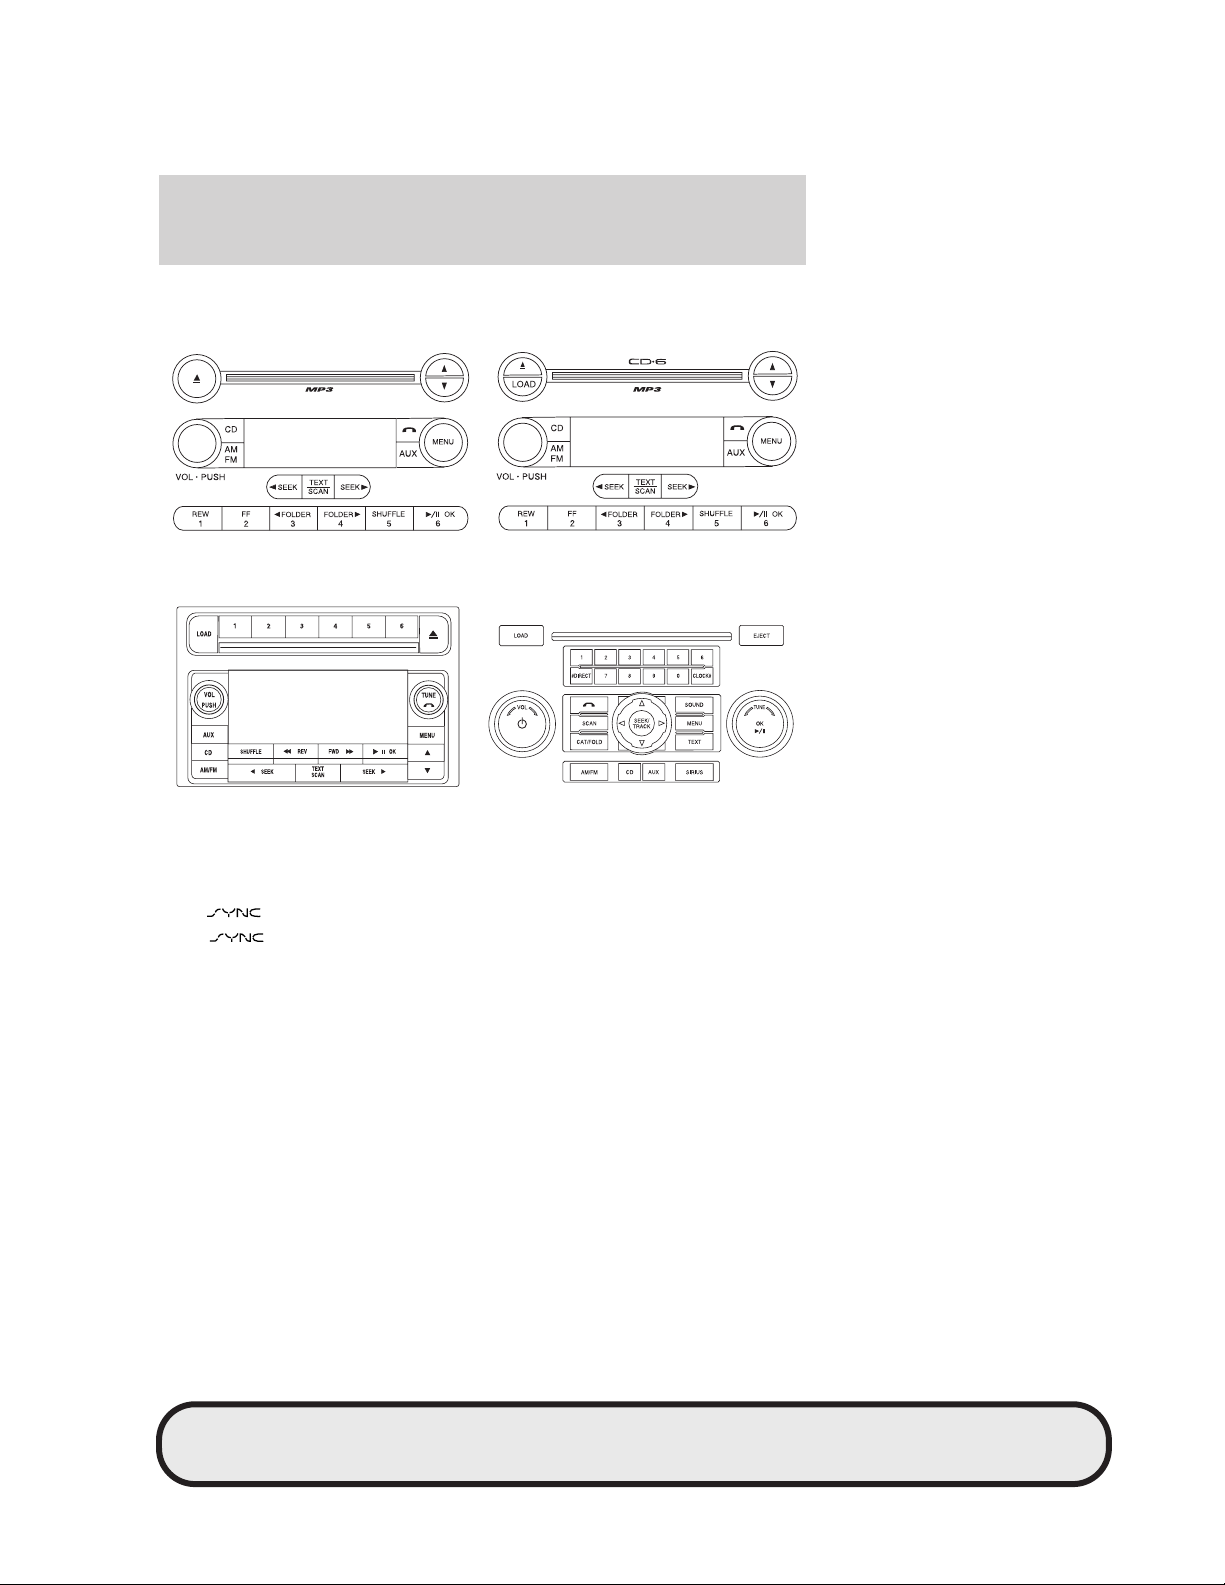
Audio systems
One way to access and operate your new
system is through the
audio system. Through a series of menus and selections you can connect
your phone to the system, send and receive calls, download your cellular
phone book, as well as using the many other phone and media features
of the system. As the option package in your vehicle may vary, so may
certain button presses, displays and / or menu options. For example,
depending on your audio system, you may need to ’speak’ certain digits
to the system when placing a call.
CIMS # com_mgmaudio.fm
itdseq=7
art=expec104_c
CIMS #1623875
com_audio-info itdseq=8
8
PAGE: 8 OP: root EDIT SESSION: 1 DATE: FEB 27 2007 at 16:38
REVIEW COPY ——
2008 (mgm), Supplement (supplement), Market: USA (fus)
JOB: @ibm2/ford_pdm/CLS_ford/GRP_supplement/JOB_mgm/DIV_doc
Page 9
JOBNAME: No Job Name PAGE: 9 SESS: 1 OUTPUT: Tue Feb 27 16:38:35 2007
/ford_pdm/ford/supplement/mgm/doc
System interaction
You may have one of the following systems:
art=expec109_a
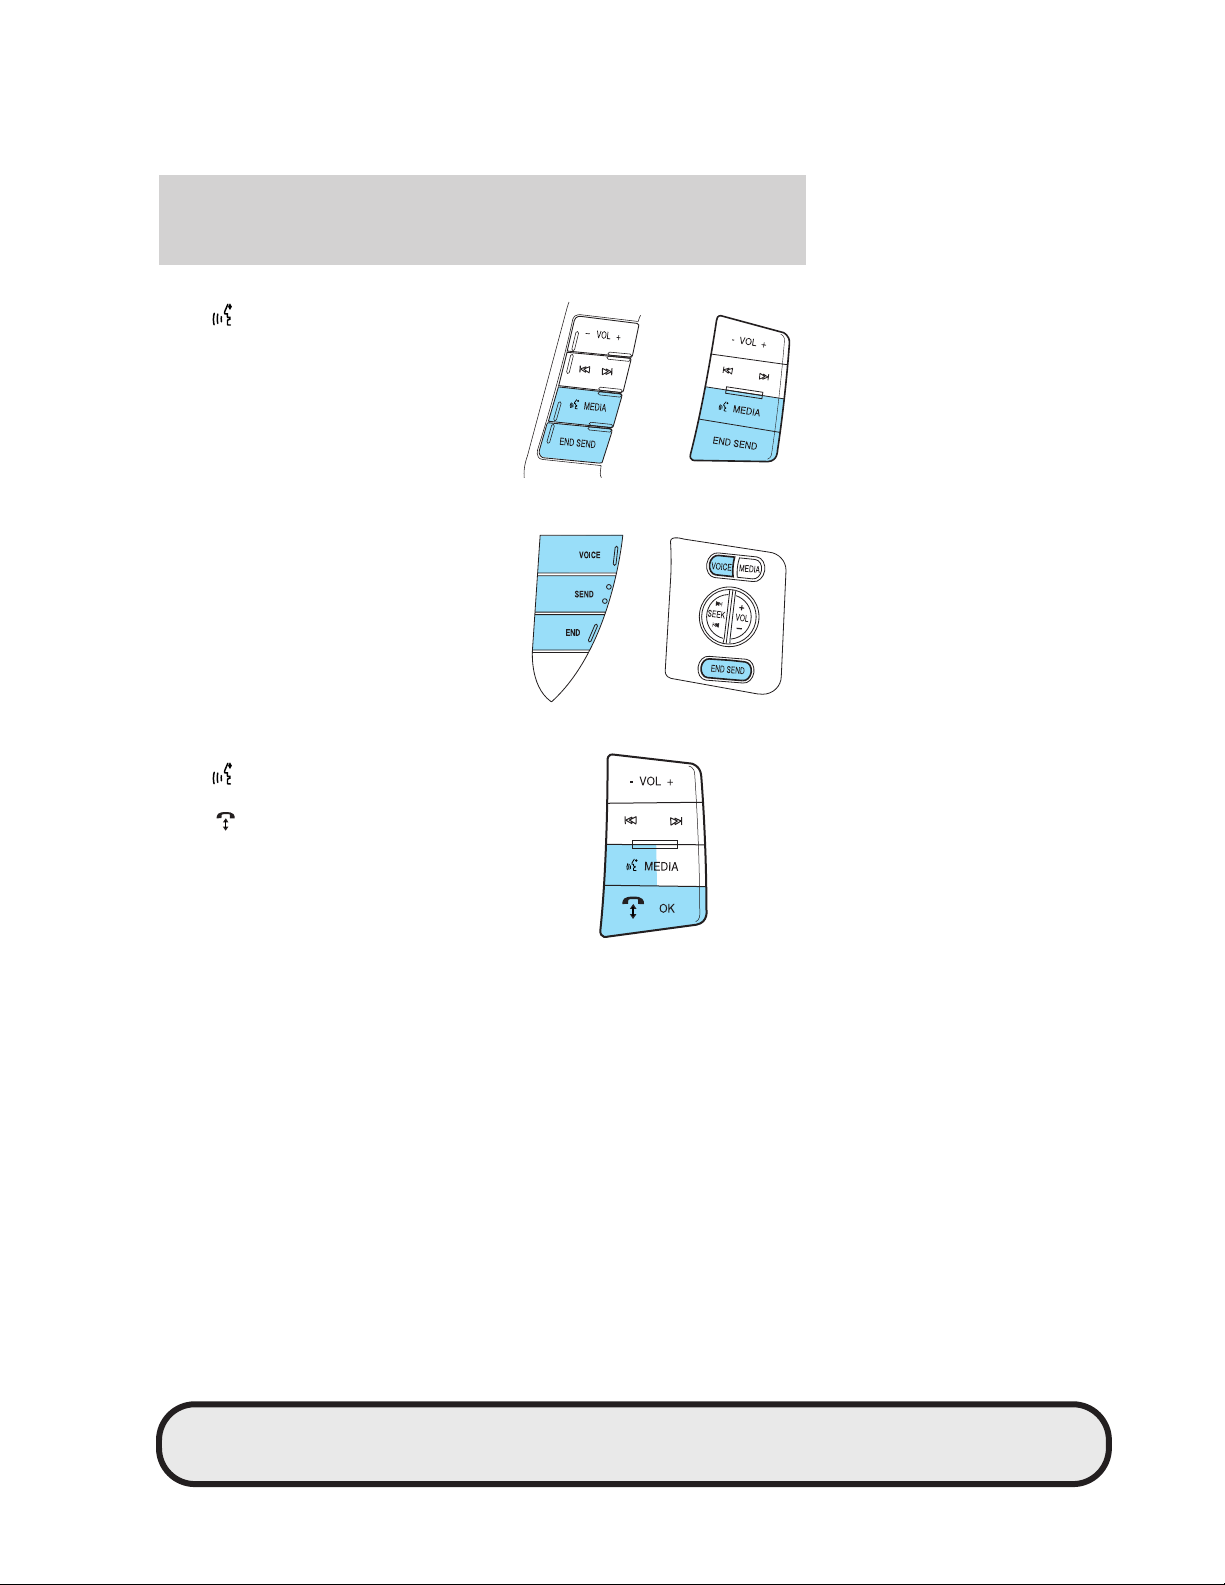
STEERING WHEEL CONTROLS
Your vehicle is equipped with special steering wheel controls which will
further assist you in navigating through menus and selections in
your
most
system. You can use your steering wheel controls to access
features.
art=expec108_b
CIMS #1618417 com_swc-title
itdseq=9
9
PAGE: 9 OP: root EDIT SESSION: 1 DATE: FEB 27 2007 at 16:38
REVIEW COPY ——
2008 (mgm), Supplement (supplement), Market: USA (fus)
JOB: @ibm2/ford_pdm/CLS_ford/GRP_supplement/JOB_mgm/DIV_doc
Page 10
JOBNAME: No Job Name PAGE: 10 SESS: 1 OUTPUT: Tue Feb 27 16:38:35 2007
/ford_pdm/ford/supplement/mgm/doc
System interaction
With these steering wheel controls,
press
to activate the voice
recognition feature.
Press SEND to send a call and END
to end a call.
With these steering wheel controls,
press VOICE to activate the voice
recognition feature.
Press SEND to send a call and END
to end a call.
With these steering wheel controls,
press
to activate the voice
recognition feature.
Press
to send a call or text
message. Press and hold to hang up
a call or end a text message.
CIMS #1618418
com_swc-options
itdseq=10
art=expec110_a
art=expec111_a
art=foccf338_b
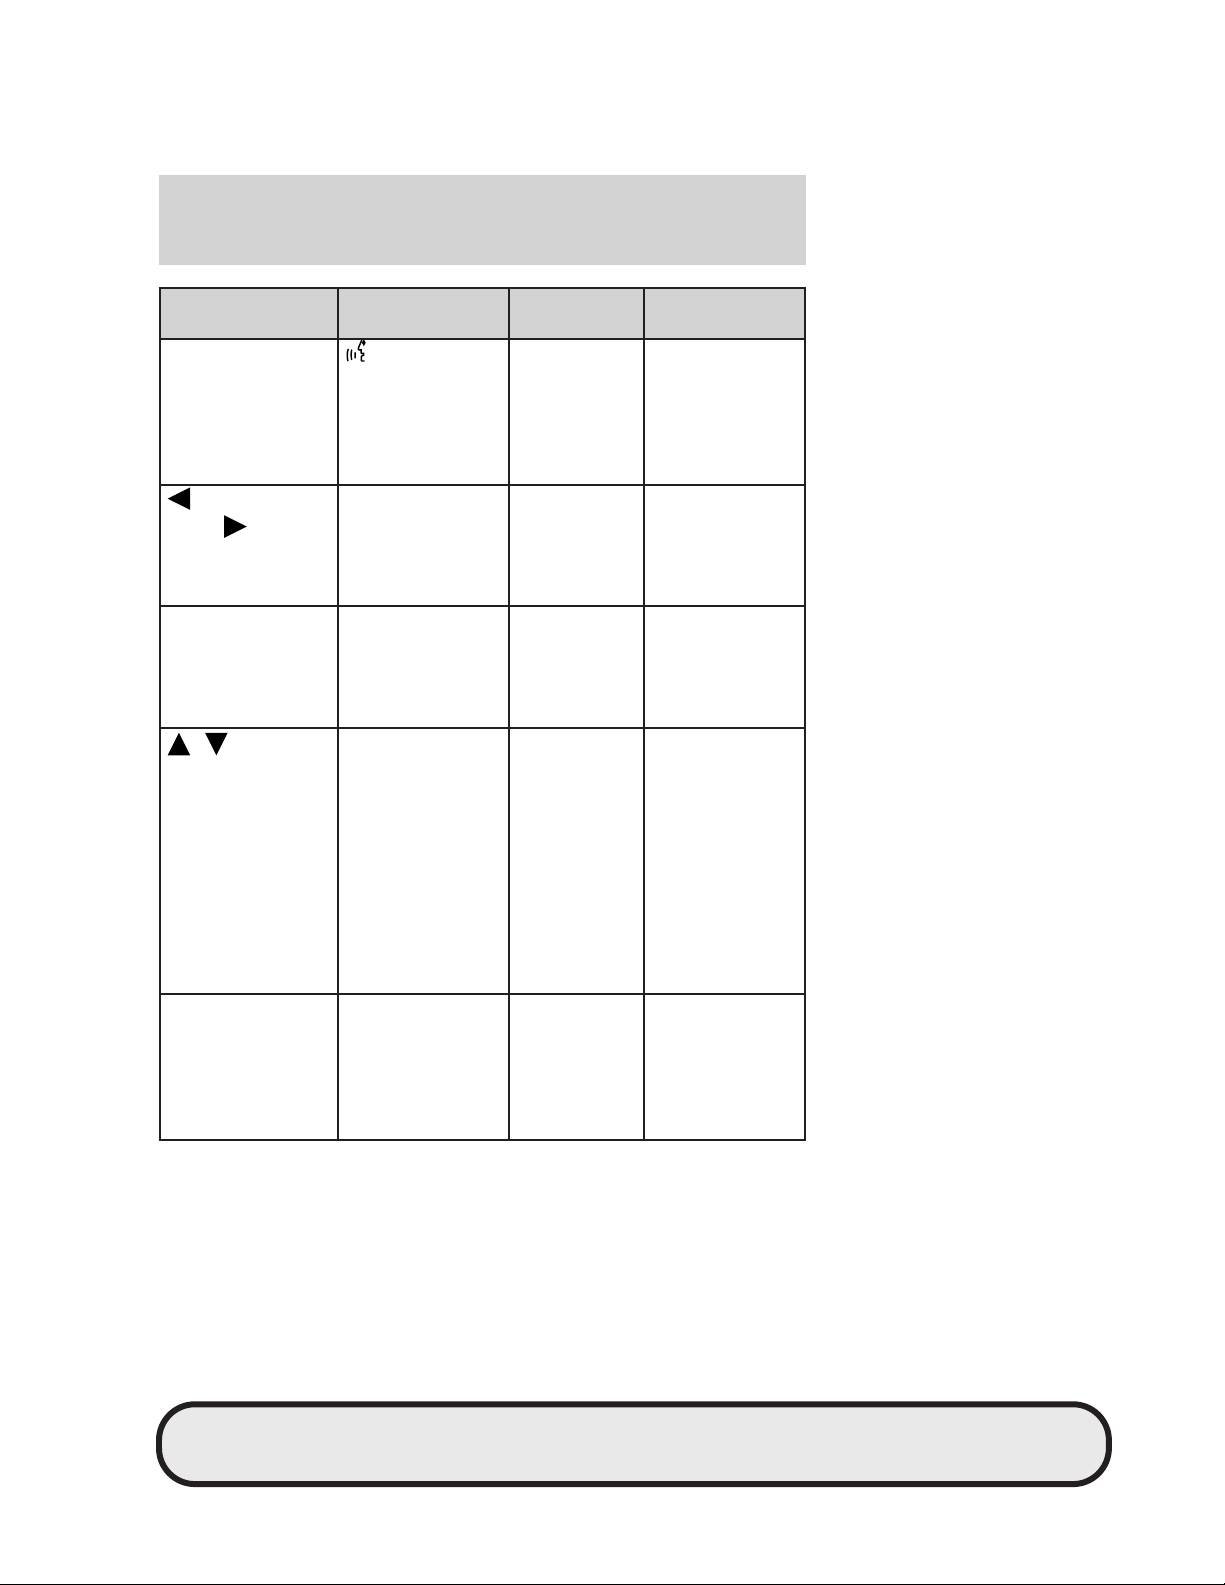
The following chart is a quick summary of your radio and steering wheel
controls as well as their function. Please refer to the main chapters for
further information.
10
PAGE: 10 OP: root EDIT SESSION: 1 DATE: FEB 27 2007 at 16:38
JOB: @ibm2/ford_pdm/CLS_ford/GRP_supplement/JOB_mgm/DIV_doc
REVIEW COPY ——
2008 (mgm), Supplement (supplement), Market: USA (fus)
CIMS #1619106
com_interact-chart
itdseq=11
Page 11

JOBNAME: No Job Name PAGE: 11 SESS: 1 OUTPUT: Tue Feb 27 16:38:35 2007
/ford_pdm/ford/supplement/mgm/doc
System interaction
Radio control
Steering wheel
control
Function Notes
Press to
activate SYNC
hands free
calling.
Press to
answer an
incoming call.
— SEND Press to send
a call, text
message, to
put a call on
hold and
answer
another call,
or to initiate
a multi-party
call.
— END Press to end
a call or
action.
— VOICE Press to
activate Voice
Recognition.
Press and hold
to hang up on
an active call.
Press while in
phone mode,
but not in an
active call to
exit phone
mode.
Refer to the
Voice
recognition
chapter for
further
information.
PAGE: 11 OP: root EDIT SESSION: 1 DATE: FEB 27 2007 at 16:38
REVIEW COPY ——
2008 (mgm), Supplement (supplement), Market: USA (fus)
11
JOB: @ibm2/ford_pdm/CLS_ford/GRP_supplement/JOB_mgm/DIV_doc
Page 12
JOBNAME: No Job Name PAGE: 12 SESS: 1 OUTPUT: Tue Feb 27 16:38:35 2007
/ford_pdm/ford/supplement/mgm/doc
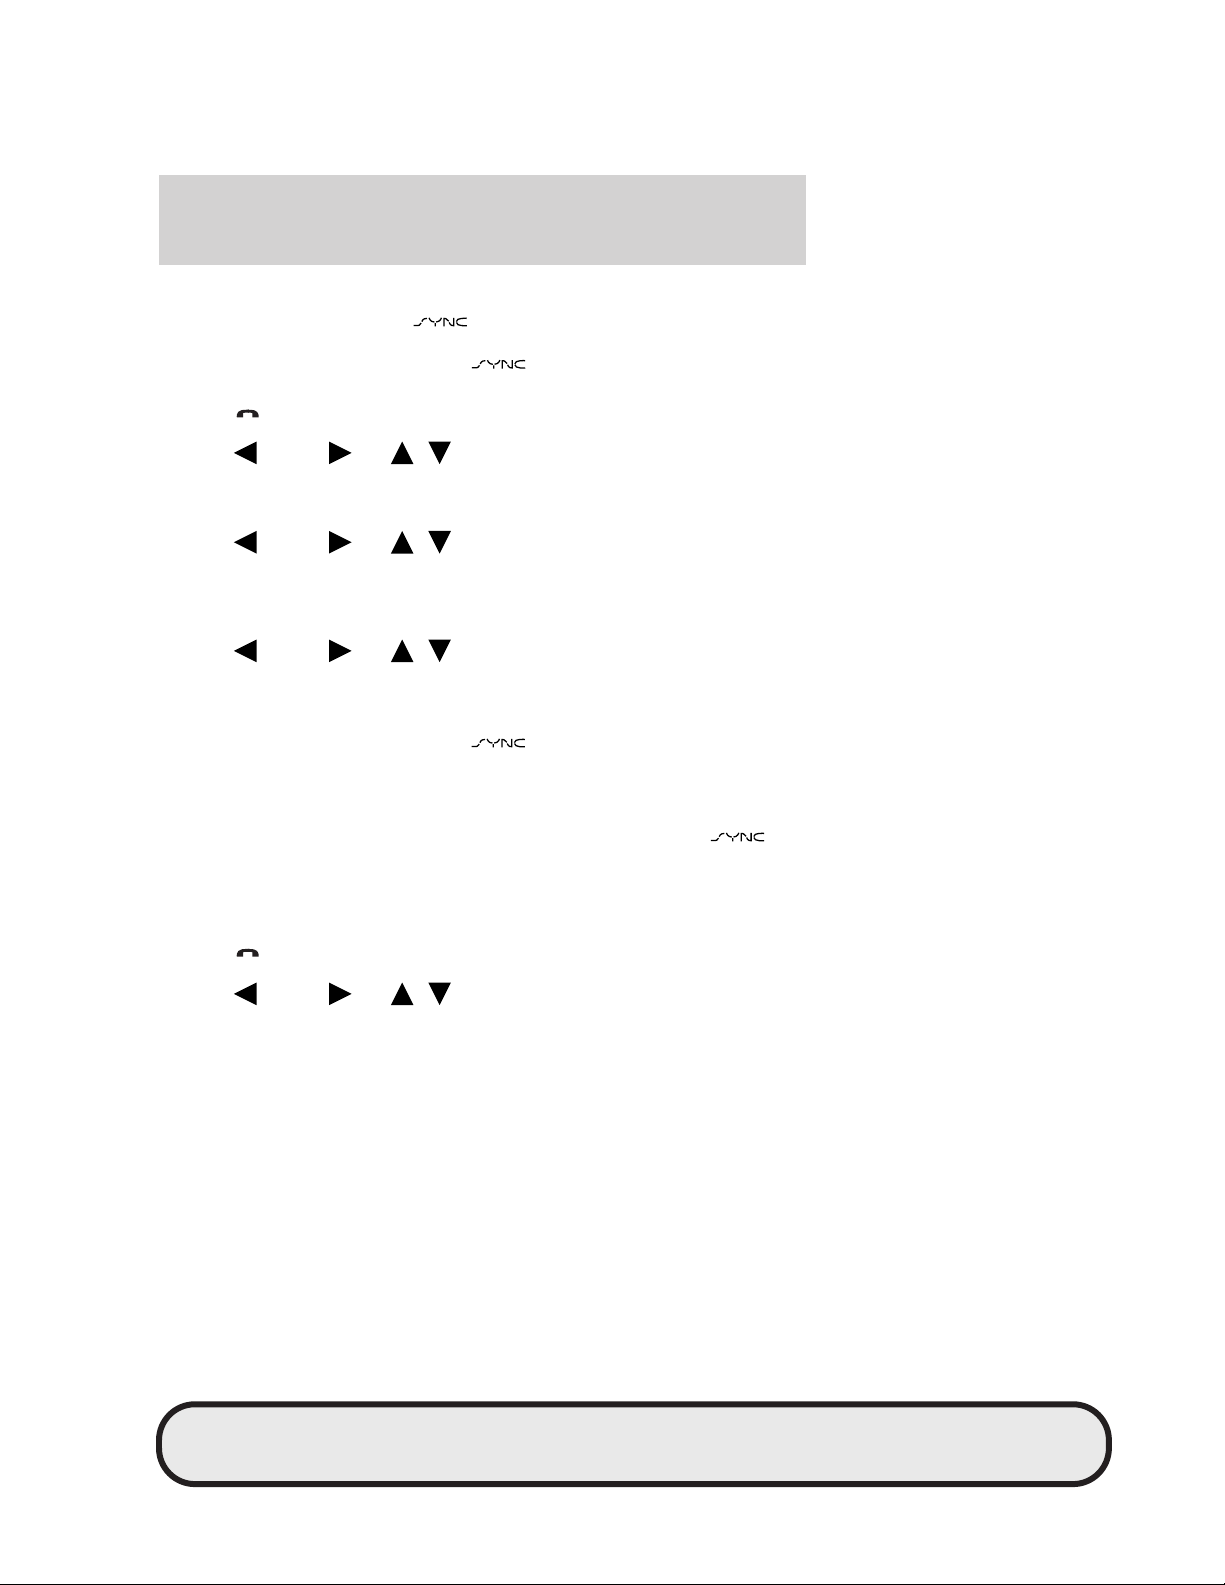
System interaction
Radio control
—
Steering wheel
control
Function Notes
Press to
activate Voice
Recognition.
SEEK,
SEEK
— Press to
scroll through
various
menus and
selections.
OK — Press to
confirm your
selection and
enter various
menus.
/
TUNE knob
— Press to
scroll through
various
menus and
selections.
Turn the tune
knob to scroll
through
various
menus and
selections
AUX MEDIA Press
repeatedly to
access SYNC
phone or
SYNC media
modes.
Refer to the
Voice
recognition
chapter for
further
information.
12
PAGE: 12 OP: root EDIT SESSION: 1 DATE: FEB 27 2007 at 16:38
REVIEW COPY ——
2008 (mgm), Supplement (supplement), Market: USA (fus)
JOB: @ibm2/ford_pdm/CLS_ford/GRP_supplement/JOB_mgm/DIV_doc
Page 13

JOBNAME: No Job Name PAGE: 13 SESS: 1 OUTPUT: Tue Feb 27 16:38:35 2007
/ford_pdm/ford/supplement/mgm/doc
System interaction
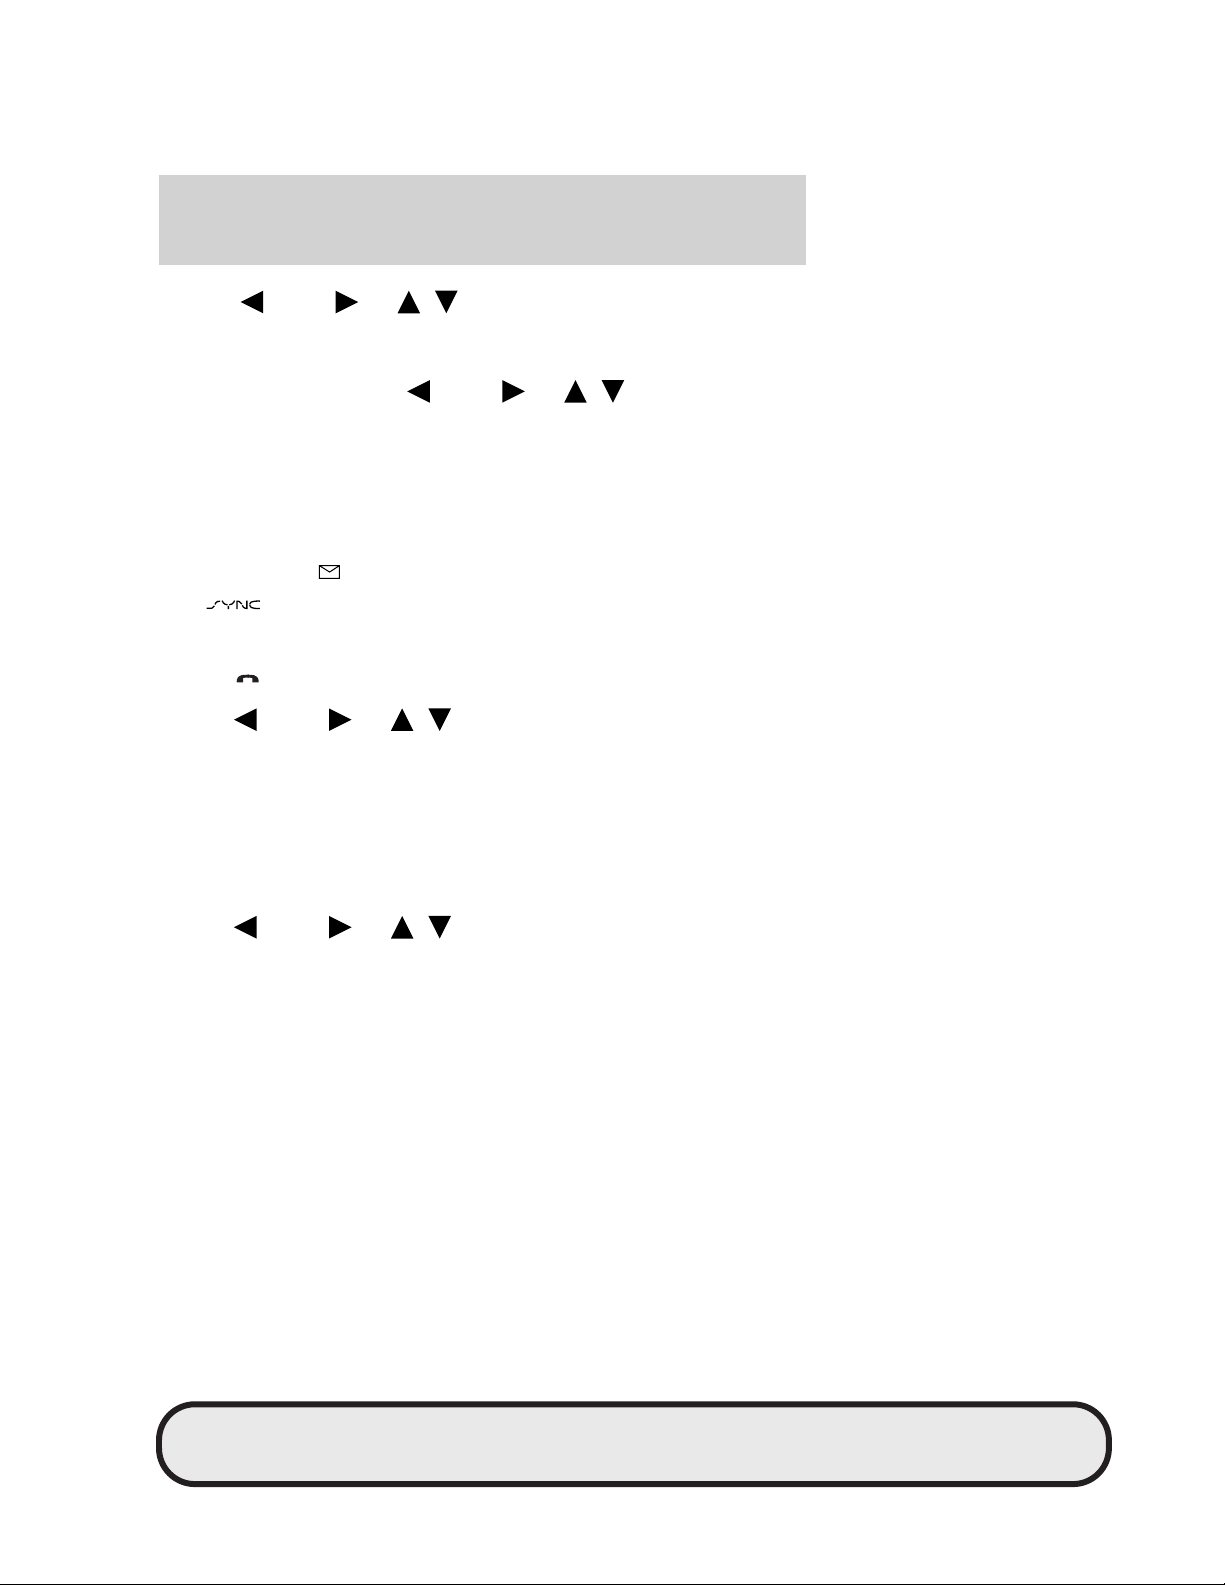
Radio control
Steering wheel
control
TEXT — ?
Function Notes
PAGE: 13 OP: root EDIT SESSION: 1 DATE: FEB 27 2007 at 16:38
REVIEW COPY ——
2008 (mgm), Supplement (supplement), Market: USA (fus)
13
JOB: @ibm2/ford_pdm/CLS_ford/GRP_supplement/JOB_mgm/DIV_doc
Page 14

JOBNAME: No Job Name PAGE: 14 SESS: 1 OUTPUT: Tue Feb 27 16:38:35 2007
/ford_pdm/ford/supplement/mgm/doc
Phone features
HOW SYNC™ INTERACTS WITH YOUR CELLULAR PHONE
Hands free calling is one of the main features of your
system. works in conjunction with your cellular phone to offer
many options within your phone menu.
To access your phone menu:
1. Press
2. When one of the selections appear in the display, press
on your audio system.
SEEK
or / to access the next selection.
• PHONE MENU
• PHONE REDIAL
• CALL HISTORY
• PHONE BOOK
• TEXT MESSAGE
• PHONE SETTINGS
• APPLICATIONS
• SYSTEM SETTINGS
Note: PHONE MENU will appear as a temporary display to show you are
in the phone menu.
Phone redial
Phone redial will prompt your Bluetootht enabled cellular phone to
redial the last number called.
1. Press
on your audio system to enter phone mode.
CIMS # com_phonemgm-title
itdseq=12
CIMS #1615497
com_phone-layout
itdseq=13
CIMS #1615499
com_phone-redial
itdseq=14
2. Press
SEEK or / repeatedly until PHONE REDIAL
appears in the display.
3. Press OK on your audio system to confirm the selection.
4. The display will read REDIAL?. Press OK to confirm. The display will
read REDIALING....asitisplacing the call.
Once connected, the system will display either the NAME of the person
you are calling, the # of the preset in which the number is stored or
UNKNOWN if no information is known. For further information on calling
options such as Privacy, hold, and Multicalls, please refer to Active
calling options later in this section.
14
PAGE: 14 OP: root EDIT SESSION: 1 DATE: FEB 27 2007 at 16:38
JOB: @ibm2/ford_pdm/CLS_ford/GRP_supplement/JOB_mgm/DIV_doc
REVIEW COPY ——
2008 (mgm), Supplement (supplement), Market: USA (fus)
Page 15
JOBNAME: No Job Name PAGE: 15 SESS: 1 OUTPUT: Tue Feb 27 16:38:35 2007
/ford_pdm/ford/supplement/mgm/doc
Phone features
Call history
While using your hands free
system, you can access any
previously dialed, received or missed calls while your Bluetootht enabled
phone has been connected to your
system. Your call history will
hold five entries in each folder, incoming, outgoing and missed.
1. Press
2. Press
on your audio system to enter phone mode.
SEEK or / repeatedly until CALL HISTORY
appears in the display.
3. Press OK on your audio system to confirm the selection.
4. Press
SEEK or / repeatedly to cycle through
INCOMING CALLS, OUTGOING CALLS or MISSED CALLS.
5. Press OK on your audio system when the desired selection appears in
the display.
6. Press
SEEK or / repeatedly to cycle through the
desired calls.
Accessing your phone book
When you pair your phone to your
system, you can choose to
download your cellular phone book. The system can support up to 2,000
entries.
Once you download your Bluetootht enabled cellular phone book, the
system will retain the information and allow you to build your
information from there. (If you select to download your cellular phone
book again, it will delete all previously held information.) You can also
choose to delete a contact or the entire phone book. Refer to Modifying
your phone book and call history for further information.
1. Press
on your audio system to enter phone mode.
CIMS #1615500
com_call-history
itdseq=15
CIMS #1615501
com_phonebook
itdseq=16
2. Press
SEEK or / repeatedly until PHONE BOOK
appears in the display.
3. Press OK on your audio system to confirm the selection. If there are
fewer than 25 listings, the system will list them in flat file mode and they
will not be put into categories. If there are more than 25 entries listed,
the system will break them out into categories of AAAAA-MMMMM
through MMMMN — ZZZZZ. The number of categories will vary
depending on the number of entries.
15
PAGE: 15 OP: root EDIT SESSION: 1 DATE: FEB 27 2007 at 16:38
JOB: @ibm2/ford_pdm/CLS_ford/GRP_supplement/JOB_mgm/DIV_doc
REVIEW COPY ——
2008 (mgm), Supplement (supplement), Market: USA (fus)
Page 16
JOBNAME: No Job Name PAGE: 16 SESS: 1 OUTPUT: Tue Feb 27 16:38:35 2007
/ford_pdm/ford/supplement/mgm/doc
Phone features
4. . Press SEEK or / repeatedly to cycle through these
categories until the desired category appears in the display.
5. Press OK to confirm.
6. Repeat the process using
SEEK or / to cycle through
to the chosen listing.
7. Press OK to confirm.
8. Once the desired entry is reached, you can choose to call (using your
audio controls, steering wheel controls or voice commands) or to delete
the entry. For further information on deleting an entry, refer to
Modifying your phone book and call history.
Text messaging
Your system will allow you to text message providing that your
cellular phone supports text messaging. The system will hold up to 99
messages. To access the text messaging menu:
1. Press
2. Press
on your audio system to enter phone mode.
SEEK or / repeatedly until TEXT MESSAGE
appears in the display.
3. Press OK on your audio system to confirm the selection. If the system
senses that your cellular phone does not support text messaging, NO
TEXT PHONE will appear in the display and the system will return you
to the main menu.
4. INBOX XX will appear in the display showing the number of messages
in your inbox.
5. Press
SEEK or / repeatedly to cycle through :
• SEND NEW TEXT: Allows you to send new text messages.
Note: This is a speed dependent feature. The vehicle must be
traveling no faster than 3 mph to use this feature.
• DOWNLOAD UNREAD: Allows you to download your unread text
messages. Once the messages are downloaded, they will be noted as
’read’ in your Bluetootht enabled phone.
• DELETE ALL: Allows you to delete all current text messages from
the system.
• RETURN: Select to return to the previous menu.
CIMS #1615502
com_text-message
itdseq=17
16
PAGE: 16 OP: root EDIT SESSION: 1 DATE: FEB 27 2007 at 16:38
REVIEW COPY ——
2008 (mgm), Supplement (supplement), Market: USA (fus)
JOB: @ibm2/ford_pdm/CLS_ford/GRP_supplement/JOB_mgm/DIV_doc
Page 17
JOBNAME: No Job Name PAGE: 17 SESS: 1 OUTPUT: Tue Feb 27 16:38:35 2007
/ford_pdm/ford/supplement/mgm/doc
Phone features
6. Once your desired selection appears on the screen, press OK to
confirm your selection.
Refer to the specific section below for further details on these options.
Sending new text messages
Your system has a set of 15 predefined text messages. (Text
messaging is only operational if supported by your Bluetootht enabled
phone.)
Note: This is a speed dependent feature. The vehicle must be moving
less than 3 mph to use this feature.
To access and choose from these messages:
1. Press
on your audio system to enter phone mode.
CIMS #1623876
com_send-txtmsg
itdseq=18
2. Press
SEEK or / repeatedly until TEXT MESSAGE
appears in the display.
3. Press OK on your audio system to confirm the selection. If the system
senses that your cellular phone does not support text messaging, NO
TEXT PHONE will appear in the display and the system will return you
to the main menu.
4. INBOX XX will appear in the display showing the number of messages
in your inbox.
5. Press
SEEK or / repeatedly until SEND NEW TEXT
appears in the display.
6. Press OK to confirm. The system will now allow you to cycle through
the list of 15 possible text messages.
7. Press
SEEK or / repeatedly to cycle through the
following messages:
•Can’t talk right now • Call me
• Where are you? • I need more directions
• Thanks • I’m stuck in traffic
• Can’t wait to see you • B there in 10 minutes
• B there in 30 minutes • I love you
• Too funny • Yes
• Call U later • No
PAGE: 17 OP: root EDIT SESSION: 1 DATE: FEB 27 2007 at 16:38
REVIEW COPY ——
2008 (mgm), Supplement (supplement), Market: USA (fus)
17
JOB: @ibm2/ford_pdm/CLS_ford/GRP_supplement/JOB_mgm/DIV_doc
Page 18

JOBNAME: No Job Name PAGE: 18 SESS: 1 OUTPUT: Tue Feb 27 16:38:35 2007
/ford_pdm/ford/supplement/mgm/doc
Phone features
• Why?
Note: Your text messages may vary somewhat from system to system.
For example, your system may have the text message ’C U in 5 minutes’
instead of ’B there in 5 minutes’. This is normal and should not be cause
for concern.
8. When the desired listing appears on the screen, press OK to confirm
the selection. Once you know the message you want to send, you will
now tell to whom you are sending the message.
9. Press
SEEK or / repeatedly to cycle through:
PHONE BOOK : Allows you to select a name within your phone book to
send the message.
CALL HISTORY: Allows you to select from your recent calls.
ENTER NUMBER: Allows you to manually enter the phone numbers
with audio systems with 10 memory present (Focus only).
10. When the desired selection appears in the display, press OK to
confirm and use
SEEK or / to cycle through the
selections to reach the desired phone number.
11. The display will read SEND MESSAGE? Press SEND on the steering
wheel controls to confirm. The display will read MESSAGE SENT if the
message was sent. The display will read SEND ERROR if there was an
error and the message was not sent.
12. The system will take you back to your inbox.
Each text message sent by your
system will be followed by the
phrase, “This message was sent from my __”. The message will say either
Ford, Lincoln or Mercury, depending on your vehicle.
Downloading your unread text messages
1. Press on your audio system to enter phone mode.
2. Press
SEEK or / repeatedly until TEXT MESSAGE
appears in the display.
3. Press OK on your audio system to confirm the selection. INBOX XX
will appear in the display showing the number of messages in your inbox.
CIMS #1623877
com_dwnld-msg
itdseq=19
4. Press
SEEK or / repeatedly until DOWNLOAD
UNREAD appears in the display.
18
PAGE: 18 OP: root EDIT SESSION: 1 DATE: FEB 27 2007 at 16:38
REVIEW COPY ——
2008 (mgm), Supplement (supplement), Market: USA (fus)
JOB: @ibm2/ford_pdm/CLS_ford/GRP_supplement/JOB_mgm/DIV_doc
Page 19

JOBNAME: No Job Name PAGE: 19 SESS: 1 OUTPUT: Tue Feb 27 16:38:35 2007
/ford_pdm/ford/supplement/mgm/doc
Phone features
5. Press OK to confirm your selection. The display will read
RETRIEVING SMS. If the download was not successful, the display will
read DOWNLOAD FAILED.
6. Once the messages have been retrieved, the system will take you into
your inbox to allow you to view your messages.
7. Use
SEEK or / to cycle through the messages.
Deleting all your text messages
1. Press on your audio system to enter phone mode.
2. Press
SEEK or / repeatedly until TEXT MESSAGE
appears in the display.
3. Press OK on your audio system to confirm the selection. INBOX XX
will appear in the display showing the number of messages in your inbox.
4. Press
SEEK or / repeatedly until DELETE ALL
appears in the display.
5. Press OK to confirm your selection. The display will read ALL TEXT
DELETED and the system will return you to your TEXT MESSAGE
menu.
Incoming new text message
You can, at any time, receive an incoming text message. When you are
being sent a text message, an audible tone will sound and NEW
MESSAGE will appear in the display.
1. Press OK to receive and open the text message or do nothing and the
message will go into your missed calls folder. The display will show the
NAME of the sender and the DATE it arrived. Press OK again and the
system will ’read’ you the message as you are not able to view the
message. You can then choose whether you’d like to reply or forward the
message.
Note: Forwarding a text message is a speed dependent feature and can
only be done when the vehicle is traveling at 3 mph or less.
CIMS #1623878
com_delete-txtmsg
itdseq=20
CIMS #1623879
com_incoming-txt
itdseq=21
2. Use
SEEK or / to cycle through and select from REPLY
TO MESSAGE or FORWARD MESSAGE.
3. When the desired selection appears in the display, press OK.
If you choose REPLY TO MSG, the system will take you back to the
text messaging menu and allow you to again cycle through the 15
preselected messages to send.
PAGE: 19 OP: root EDIT SESSION: 1 DATE: FEB 27 2007 at 16:38
JOB: @ibm2/ford_pdm/CLS_ford/GRP_supplement/JOB_mgm/DIV_doc
REVIEW COPY ——
2008 (mgm), Supplement (supplement), Market: USA (fus)
19
Page 20

JOBNAME: No Job Name PAGE: 20 SESS: 1 OUTPUT: Tue Feb 27 16:38:35 2007
/ford_pdm/ford/supplement/mgm/doc
Phone features
If you choose FORWARD MSG, the system will take you to your
calling options and allow you to select to forward the message to anyone
in your PHONE BOOK, CALL HISTORY, or you can ENTER NUMBER to
send to someone not listed in either section.
Note: Forwarding a text message is a speed dependent feature and can
only be done when the vehicle is traveling at 3mph or less.
Phone settings
Under the phone settings menu on your
the status of your paired phone, select from various ring tones, select
message notification, change phone book entries and auto download your
cellular phone book among other features. To access the phone settings
menu:
1. Press
on your audio system.
system, you can view
CIMS #1615503
com_phn-settings
itdseq=22
2. Press
SEEK or / repeatedly until PHONE SETTINGS
appears in the display.
3. Press
SEEK or / repeatedly to cycle through the
following selections:
• PHONE STATUS: Shows you the provider, name, signal power,
battery power and roaming status of the connected phone.
• SET RINGER: Select from three ring tones or your own cellular
phone ring tone.
• MESSAGE NOTIFY: Choose whether to be notified when a new text
message arrives.
• MODIFY PHONEBOOK/CALL HISTORY: Allows you to add
contacts, delete contacts, delete phone book, delete call history, or
download your cellular phone’s phone book.
Note: Modifying the phone book and/or call history are both speed
dependent features and cannot be operated when the vehicle is
traveling at speeds greater than 3 mph.
• AUTO DOWNLOAD: Choose whether to have the
system
automatically download your cellular phone book every time your
phone connects to the system.
Note: If you choose to auto download your phone book, this will erase
any changes or additions you’ve made to the
phone book.
20
PAGE: 20 OP: root EDIT SESSION: 1 DATE: FEB 27 2007 at 16:38
REVIEW COPY ——
2008 (mgm), Supplement (supplement), Market: USA (fus)
JOB: @ibm2/ford_pdm/CLS_ford/GRP_supplement/JOB_mgm/DIV_doc
Page 21
JOBNAME: No Job Name PAGE: 21 SESS: 1 OUTPUT: Tue Feb 27 16:38:35 2007
/ford_pdm/ford/supplement/mgm/doc
Phone features
Phone status
This feature allows you to view the name of your paired phone, the
provider, signal strength and battery strength and roaming status. To
view your phone’s status:
1. Access the phone status menu by pressing
2. Press
SEEK or / repeatedly until PHONE SETTINGS
on your audio system.
appears in the display.
3. Press OK to confirm selection. This will take you into the Phone
settings menu.
4. Press
SEEK or / repeatedly until PHONE STATUS
appears in the display.
5. Press OK to confirm and enter the Phone status menu.
After viewing any of these selections, press OK to return to the Phone
Status (PHONE STATUS) menu.
Setting a ring tone
You can select from three saved ring tones or from your cellular phone’s
ring tones. Depending on your phone, you may be able to have a ringer
set on your
system to notify you of an incoming call as well as
having your cell phone’s ringer activated. Please refer to your individual
phone manual for further instructions. To access your ringer options:
1. Press
on your audio system.
CIMS #1623880
com_phone-status
itdseq=23
CIMS #1623881
com_ring-tone itdseq=24
2. Press
SEEK or / repeatedly until PHONE SETTINGS
appears in the display.
3. Press OK to confirm selection. This will take you into the Phone
settings menu.
4. Press
SEEK or / repeatedly until SET RINGER appears
in the display.
5. Press OK to confirm and take you into the ringer menu.
6. Press
SEEK or / repeatedly to cycle through RINGER
1, RINGER 2, RINGER 3 and PHONE RINGER. As you cycle through the
ring tones, the system will audibly play them.
PAGE: 21 OP: root EDIT SESSION: 1 DATE: FEB 27 2007 at 16:38
JOB: @ibm2/ford_pdm/CLS_ford/GRP_supplement/JOB_mgm/DIV_doc
REVIEW COPY ——
2008 (mgm), Supplement (supplement), Market: USA (fus)
21
Page 22

JOBNAME: No Job Name PAGE: 22 SESS: 1 OUTPUT: Tue Feb 27 16:38:35 2007
/ford_pdm/ford/supplement/mgm/doc
Phone features
Message notification
Your system gives you the option of choosing if you’d like to
hear an audible tone to notify you of an incoming message. To turn this
feature on /off:
1. Access the phone menu by pressing
2. Press
SEEK or / repeatedly until PHONE SETTINGS
on your audio system.
appears in the display.
3. Press OK to confirm selection. This will take you into the Phone
settings menu.
4. Press
SEEK or / repeatedly until MESSAGE NOTIFY
appears in the display.
5. Press OK to confirm and enter the menu. The
system will
automatically check to see if your connected phone is equipped with text
messaging. If it is not, it will display NON TEXT PHONE and it will take
you back to the MESSAGE NOTIFY. If your phone is equipped for text
messaging, the system will then ask you if you would like to be notified
when new messages are received.
6. Press
SEEK or / to select MESSAGE NOTIFY ON or
MESSAGE NOTIFY OFF.
7. Press OK to confirm your selection. NOTIFY SET ON or NOTIFY SET
OFF will appear on the screen. The system will then automatically take
you back to the PHONE SETTINGS menu.
Modifying your phone book and call history
Your system allows you to download the contents of your
Bluetootht enabled cell phone book. You can also delete individual
contacts, the entire phone book, or your call history. You can also choose
to set your system to download your cellular phone’s phone book and
call history.
Note: Modifying your phone book and call history are both speed
dependent features and cannot be operated if the vehicle is traveling at
speeds greater than 3 mph (4.82 kmh).
1. Access the phone menu by pressing
on your audio system.
CIMS #1623882
com_msg-notify
itdseq=25
CIMS #1623883
com_modify-phnbk
itdseq=26
2. Press
SEEK or / repeatedly until PHONE SETTINGS
appears in the display.
22
PAGE: 22 OP: root EDIT SESSION: 1 DATE: FEB 27 2007 at 16:38
REVIEW COPY ——
2008 (mgm), Supplement (supplement), Market: USA (fus)
JOB: @ibm2/ford_pdm/CLS_ford/GRP_supplement/JOB_mgm/DIV_doc
Page 23

JOBNAME: No Job Name PAGE: 23 SESS: 1 OUTPUT: Tue Feb 27 16:38:35 2007
/ford_pdm/ford/supplement/mgm/doc
Phone features
3. Press OK to confirm selection. This will take you into the Phone
settings menu.
4. Press
SEEK or / repeatedly until MODIFY
PHONEBOOK/CALL HISTORY appears in the display.
5. Press OK to confirm selection.
6. Press
SEEK or / repeatedly to cycle through:
ADD CONTACTS: Press OK when ADD CONTACTS appears in the
display to add more contacts from your phone book. Push the desired
contact on your cellular phone. The display will read SEND. If the phone
book is full, PHONE BOOK FULL will be displayed. If the phone book is
not full, the new contact will be added and the display will read XXXX
ADDED. Press OK to return to the ADD CONTACTS menu.
Note: Your cellular phone must be equipped for Object Exchange. Please
refer to your cellular phone Owner’s Manual for further instructions on
how to set up your individual phone for Object exchange.
DELETE PHONE BOOK/CALL HISTORY: Press OK to select when
DELETE PHONE BOOK /CALL HISTORY appears in the display to delete
the current phone book and call history. When DELETE? appears in the
display, press OK. The display will read DELETED and the system will
take you back to the PHONE SETTINGS menu.
DOWNLOAD PHONE BOOK/CALL HISTORY: When DOWNLOAD
PHONE BOOK /CALL HISTORY appears in the display, press OK to
download your cellular phone’s phone book and call history.
DOWNLOAD? will appear in the display. Press OK. If your cellular phone
supports this feature, the display will read DOWNLOADING. It will then
read DOWNLOADED when complete or PHONE BOOK FULL (if you
have filled your phone book) or DOWNLOAD ERROR if there has been
an error downloading this information.
If your cellular phone does not support this feature, the display will read
UNSUPPORTED and the system will take you back to the PHONE
SETTINGS menu.
DELETE CONTACT: When DELETE CONTACT appears in the display,
press OK to delete a specific contact. SELECT CONTACT will appear in
the display. Press OK and use
SEEK or / to cycle through
all phone books listings. When the desired name appears on the screen,
press OK to select. DELETE CONTACT? will appear on the screen. Press
OK to confirm and DELETED will appear on the screen.
7. Press OK to confirm when the desired selection appears in the display.
PAGE: 23 OP: root EDIT SESSION: 1 DATE: FEB 27 2007 at 16:38
REVIEW COPY ——
2008 (mgm), Supplement (supplement), Market: USA (fus)
23
JOB: @ibm2/ford_pdm/CLS_ford/GRP_supplement/JOB_mgm/DIV_doc
Page 24
JOBNAME: No Job Name PAGE: 24 SESS: 1 OUTPUT: Tue Feb 27 16:38:35 2007
/ford_pdm/ford/supplement/mgm/doc
Phone features
Automatically downloading your phone book
Your system allows you to delete individual contacts, delete your
entire phone book, delete your call history or set your system to
download your cellular phone’s phone book when your Bluetootht
enabled phone reconnects with the system.
Note: If you choose to automatically download your cellular phone’s
phone book every time your Bluetootht enabled phone reconnects to
your
system, any changes, additions or deletions that have been
saved since your last download will be deleted.
1. Access the phone menu by pressing
2. Press
SEEK or / repeatedly until PHONE SETTINGS
on your audio system.
appears in the display.
3. Press OK to confirm selection. This will take you into the Phone
settings menu.
4. Press
SEEK or / repeatedly until AUTO DOWNLOAD
appears in the display.
5. Press OK to select when the appropriate option is in the display. The
system will then show you a confirmation that the AUTO SET is ON or
OFF. The system will then take you back to the PHONE SETTINGS
menu.
System settings
You can also access SYSTEM SETTINGS through your audio system,
such as Bluetootht Devices (BT DEVICES) and Advanced settings. To
access these:
1. Press
2. Press SEEK
on your audio system to enter phone mode.
or repeatedly until SYSTEM SETTINGS appears
in the display.
3. Press OK on your audio system to confirm the selection. This will take
you into the System settings menu.
4. Press SEEK
or repeatedly to toggle between:
BT DEVICES: Allows you to add a device, connect a device, set certain
devices as primary, turn Bluetootht on and off, delete individual devices
or delete all paired devices.
ADVANCED: Allows you to access and adjust the advanced settings of
your
system such as prompts, languages, defaults, installing
applications or by performing a master reset of the system.
CIMS #1623884
com_auto-dwnld
itdseq=27
CIMS #1615881
com_system-settings
itdseq=28
24
PAGE: 24 OP: root EDIT SESSION: 1 DATE: FEB 27 2007 at 16:38
REVIEW COPY ——
2008 (mgm), Supplement (supplement), Market: USA (fus)
JOB: @ibm2/ford_pdm/CLS_ford/GRP_supplement/JOB_mgm/DIV_doc
Page 25
JOBNAME: No Job Name PAGE: 25 SESS: 1 OUTPUT: Tue Feb 27 16:38:35 2007
/ford_pdm/ford/supplement/mgm/doc
Phone features
Connecting Bluetooth (BT) devices
The Bluetootht devices menu will allow you to add a device, connect a
device, set a phone as primary, turn Bluetootth on / off, delete individual
devices or delete all previously paired devices.
You can also access system settings through your audio system, such as
Bluetootht Devices (BT DEVICES) and Advanced settings. To access
these:
1. Press
2. Press
on your audio system to enter phone mode.
SEEK or / repeatedly until SYSTEM SETTINGS
appears in the display.
3. Press OK on your audio system to confirm the selection. This will take
you into the SYSTEM SETTINGS menu.
4. Press
SEEK or / repeatedly until BT DEVICES appears
in the display.
5. Press OK to confirm the selection. This will take you into the
Bluetootht devices menu.
6. Press
SEEK or / repeatedly to cycle through:
ADD DEVICE: Allows you to add/pair another Bluetootht enabled
device to your
system.
CONNECT DEVICE: Allows you to connect a previously paired device
to your
system. (Only one Bluetootht device can be connected
at a time).
SET PRIMARY: Allows you to set the device as a primary device. Every
time the ignition is started, the
system will automatically search
for that device and attempt to reconnect.
BLUETOOTH (BT) ON/OFF: Allows you to turn the Bluetooth feature
on your
system on or off.
Note: Turning Bluetootht OFF will turn off your hands free calling
feature as well as your Bluetootht audio feature.
DELETE DEVICE: Allows you to delete any paired device.
DELETE ALL: Allows you to delete all previously paired devices.
Pairing other phones to your SYNC™ system
Note: For your safety, this procedure cannot be completed when the
vehicle is traveling at speeds greater than 3 mph. Please read all safety
information prior to operating the system.
CIMS #1615882
com_bt-devices itdseq=29
CIMS #1615883
com_pairphdev itdseq=30
PAGE: 25 OP: root EDIT SESSION: 1 DATE: FEB 27 2007 at 16:38
REVIEW COPY ——
2008 (mgm), Supplement (supplement), Market: USA (fus)
25
JOB: @ibm2/ford_pdm/CLS_ford/GRP_supplement/JOB_mgm/DIV_doc
Page 26
JOBNAME: No Job Name PAGE: 26 SESS: 1 OUTPUT: Tue Feb 27 16:38:35 2007
/ford_pdm/ford/supplement/mgm/doc
Phone features
You can pair up to 12 Bluetootht enabled phones to your
system. To pair subsequent phones to the system:
1. Press
on your audio system to enter phone mode.
2. Press
SEEK or / repeatedly until SYSTEM SETTINGS
appears in the display.
3. Press OK on your audio system to confirm the selection. This will take
you into the SYSTEM SETTINGS menu.
4. Press
SEEK or / repeatedly until BLUETOOTH (BT)
DEVICES appears in the display.
5. Press OK to confirm the selection. This will take you into the
Bluetootht devices menu.
6. Press
SEEK or / repeatedly until ADD DEVICES
appears in the display.
7. Press OK to confirm your selection and enter the ADD DEVICES
menu.
8. When FIND SYNC appears in the display, press OK. The system will
’look’ for your device and the display will show SYNC FOUND. A six digit
PIN will appear in the display.
9. When FIND SYNC appears in the display, press OK. The system will
’look’ for your device and the display will show SYNC FOUND. A six digit
PIN will appear in the display.
10. Enter that PIN in your phone when prompted (if your phone
supports this function).
11. If the pairing goes through, the display will read the DEVICE NAME
and then CONNECTING. If the connection is successful, the display will
read CONNECTED and then ask you if you want to set this phone as a
PRIMARY? phone. This means that the system will automatically attempt
to connect to this phone every time the ignition is turned on. Press OK
to enter the menu.
12. Press
SEEK or / to toggle between YES and NO.
When the appropriate response is in the display, press OK. If you choose
YES, PRIMARY SET will appear in the display. If you choose NO, NOT
PRIMARY will appear in the display.
13. If you selected this as your primary phone, the system will ask if you
would like to DOWNLOAD? your cellular phone’s phone book.
26
PAGE: 26 OP: root EDIT SESSION: 1 DATE: FEB 27 2007 at 16:38
JOB: @ibm2/ford_pdm/CLS_ford/GRP_supplement/JOB_mgm/DIV_doc
REVIEW COPY ——
2008 (mgm), Supplement (supplement), Market: USA (fus)
Page 27

JOBNAME: No Job Name PAGE: 27 SESS: 1 OUTPUT: Tue Feb 27 16:38:35 2007
/ford_pdm/ford/supplement/mgm/doc
Phone features
14. Press SEEK or / to toggle between YES and NO.
When the appropriate response is in the display, press OK.
15. If you choose YES, the display will read DOWNLOADING. The display
will then either read PHONE BOOK ERROR (if an error was found),
PHONE BOOK FULL, PHONE BOOK DOWNLOADED or PHONE BOOK
NO ENTRIES. The system will then take you back to the main menu.
ADVANCED SETTINGS
Through the advanced settings menu, you have the ability to turn voice
prompts on or off, as well as select the desired language, perform a
master reset of the vehicle system as well as install new applications. To
access the Advanced settings menu:
1. Press
to enter the phone menu.
CIMS #1617556
com_advanced itdseq=31
2. Press
SEEK or / repeatedly until SYSTEM SETTINGS
appears in the display.
3. Press OK on your audio system to confirm the selection. This will take
you into the System settings menu.
4. Press
SEEK or / repeatedly until ADVANCED appears
in the display.
5. Press OK to confirm the selection. This will take you into the
Advanced menu.
6. Press
PROMPTS: This feature allows you to turn on/off the
SEEK or / repeatedly to cycle through:
voice
prompts. The default setting is on. The prompts allow the system to
actually ’speak’ to you to ask for clarification, give helpful hints or ask
you for a specific action. These prompts can help guide you through the
necessary steps to complete your desired outcome.
LANGUAGES: This feature allows you to select from English, French
and Spanish language settings. The default setting is English.
DEFAULTS: This feature will allow you to do a light default settings
reset.
MASTER RESET: This feature will allow you do a full reset and wipe
out all information stored in the
system, including all phone
book information, paired phones, etc. This feature is especially helpful if
you are selling your car.
PAGE: 27 OP: root EDIT SESSION: 1 DATE: FEB 27 2007 at 16:38
REVIEW COPY ——
2008 (mgm), Supplement (supplement), Market: USA (fus)
27
JOB: @ibm2/ford_pdm/CLS_ford/GRP_supplement/JOB_mgm/DIV_doc
Page 28
JOBNAME: No Job Name PAGE: 28 SESS: 1 OUTPUT: Tue Feb 27 16:38:35 2007
/ford_pdm/ford/supplement/mgm/doc
Phone features
INSTALL APPLICATIONS: This feature allows you to install new
vehicle applications which you have downloaded onto your pin drive (if
available).
Turning voice prompts on/off
Your
The default setting is on. The prompts allow the system to actually
’speak’ to you to ask for clarification, give helpful hints or ask you for a
specific action. These prompts can help guide you through the necessary
steps to complete your desired outcome. To access the voice prompts
menu:
1. Press
system allows you to turn on/off the system voice prompts.
to enter the phone menu.
CIMS #1617557 com_prompts
itdseq=32
2. Press
SEEK or / repeatedly until SYSTEM SETTINGS
appears in the display.
3. Press OK on your audio system to confirm the selection. This will take
you into the System settings menu.
4. Press
SEEK or / repeatedly until ADVANCED appears
in the display.
5. Press OK to confirm the selection. This will take you into the
Advanced menu.
6. Press
SEEK or / repeatedly until PROMPTS appears in
the menu.
7. Press OK to enter the prompts menu.
8. Press
SEEK or / to toggle between PROMPTS ON or
PROMPTS OFF. The default setting is ON.
9. Press OK when the desired selection appears in the display. SET ON
or SET OFF will appear in the display as a confirmation. The system will
then take you back to the Advanced menu.
Changing the language setting
Your
system allows you to select from three languages: English,
French and Spanish. The default setting is English. All display messages
and voice prompts will be in the selected language. To access the
language menu:
1. Press
to enter the phone menu.
CIMS #1617558
com_language itdseq=33
28
PAGE: 28 OP: root EDIT SESSION: 1 DATE: FEB 27 2007 at 16:38
REVIEW COPY ——
2008 (mgm), Supplement (supplement), Market: USA (fus)
JOB: @ibm2/ford_pdm/CLS_ford/GRP_supplement/JOB_mgm/DIV_doc
Page 29
JOBNAME: No Job Name PAGE: 29 SESS: 1 OUTPUT: Tue Feb 27 16:38:35 2007
/ford_pdm/ford/supplement/mgm/doc
Phone features
2. Press SEEK or / repeatedly until SYSTEM SETTINGS
appears in the display.
3. Press OK on your audio system to confirm the selection. This will take
you into the System settings menu.
4. Press
SEEK or / repeatedly until ADVANCED appears
in the display.
5. Press OK to confirm the selection. This will take you into the
Advanced menu.
6. Press
SEEK or / repeatedly until LANGUAGE appears
in the menu.
7. Press OK to enter the language menu.
8. Press
SEEK or / to cycle through ENGLISH, FRENCH
and SPANISH.
9. Press OK when the desired selection appears in the display. If you
have changed the language setting, the display will read UPDATING.
Once the change is complete, the system will say: “French/Spanish is
now set”. The display will then confirm FRENCH/SPANISH SET. The
system will then take you back to the advanced menu.
Returning to the system defaults
Your
system allows you to erase system settings which have
already been made and restart from scratch. Selecting this option will
erase any system preferences, such as a different language, autoplay
on/off, etc. and will return you to the system defaults. This selection will
not erase your downloaded phone book, call history, etc. If you wish to
fully erase all information, please refer to Performing a master reset
later in this chapter.
1. Press
to enter the phone menu.
CIMS #1617559 com_defaults
itdseq=34
2. Press
SEEK or / repeatedly until SYSTEM SETTINGS
appears in the display.
3. Press OK on your audio system to confirm the selection. This will take
you into the System settings menu.
4. Press
SEEK or / repeatedly until ADVANCED appears
in the display.
29
PAGE: 29 OP: root EDIT SESSION: 1 DATE: FEB 27 2007 at 16:38
JOB: @ibm2/ford_pdm/CLS_ford/GRP_supplement/JOB_mgm/DIV_doc
REVIEW COPY ——
2008 (mgm), Supplement (supplement), Market: USA (fus)
Page 30
JOBNAME: No Job Name PAGE: 30 SESS: 1 OUTPUT: Tue Feb 27 16:38:35 2007
/ford_pdm/ford/supplement/mgm/doc
Phone features
5. Press OK to confirm the selection. This will take you into the
Advanced menu.
6. Press
SEEK or / repeatedly until DEFAULTS appears in
the menu.
7. Press OK. The display will read RESET DEFAULTS?
8. Press OK to confirm. The display will read DEFAULTS SET. The
system will take you back to the Advanced settings menu.
Performing a master reset
There may be times when you wish to fully erase all media settings as
well as all phone contacts, call history, text messages, etc. from
your
system. The Master reset feature allows you to fully erase
everything present in the system and simultaneously return all settings
to the default settings. To perform a master reset:
1. Press
2. Press
to enter the phone menu.
SEEK or / repeatedly until SYSTEM SETTINGS
appears in the display.
3. Press OK on your audio system to confirm the selection. This will take
you into the System settings menu.
4. Press
SEEK or / repeatedly until ADVANCED appears
in the display.
5. Press
SEEK or / repeatedly until MASTER RESET
appears in the display
6. Press OK. The display will read MASTER RESET?
7. Press OK to confirm. The display will read ALL RESET. The system
will take you back to the Advanced settings menu.
Note: Once you have performed a master reset, all erased information is
gone and cannot be retrieved through the system.
Installing new vehicle applications
You have the option of downloading new software applications (if
available) from the internet onto your memory stick and then loading the
desired applications onto your
system. Please refer to
www.SyncMyRide.com for further information on the available features as
well as downloading instructions. To install new vehicle applications on
your vehicle:
CIMS #1617560
com_master-reset
itdseq=35
CIMS #1617566
com_install-aps itdseq=36
30
PAGE: 30 OP: root EDIT SESSION: 1 DATE: FEB 27 2007 at 16:38
REVIEW COPY ——
2008 (mgm), Supplement (supplement), Market: USA (fus)
JOB: @ibm2/ford_pdm/CLS_ford/GRP_supplement/JOB_mgm/DIV_doc
Page 31

JOBNAME: No Job Name PAGE: 31 SESS: 1 OUTPUT: Tue Feb 27 16:38:35 2007
/ford_pdm/ford/supplement/mgm/doc
Phone features
1. Press to enter the phone menu.
2. Press
SEEK or / repeatedly until SYSTEM SETTINGS
appears in the display.
3. Press OK on your audio system to confirm the selection. This will take
you into the System settings menu.
4. Press
SEEK or / repeatedly until ADVANCED appears
in the display.
5. Press OK to confirm the selection. This will take you into the
Advanced menu.
6. Press
SEEK or / repeatedly until INSTALL
APPLICATIONS appears in the display.
7. Press OK. The display will read INSTALL?
8. Press OK to confirm. The system will search the device connected to
the USB for the desired application. If there are any problems, the
display will read either BAD FILE, INVALID FILE or INSTALL FAIL.
INSTALL DONE will appear if the application was installed correctly. The
system will take you back to the Advanced settings menu.
ACTIVE CALL OPTIONS
You have many calling options on your
systems. Some options
include:
• Making a call
• Receiving a call
• Using the quick dial feature
• Putting a call on hold
• Using the privacy feature
• Joining two calls
• Caller ID and call waiting
Making a call
Making a hands free phone call using your
1. Press
or VOICE on your steering wheel controls.
system is easy.
2. Say ’DIAL’ when prompted. The display will read DIAL.
CIMS #1617579
com_active-title itdseq=37
CIMS #1617576
com_making-call
itdseq=38
PAGE: 31 OP: root EDIT SESSION: 1 DATE: FEB 27 2007 at 16:38
REVIEW COPY ——
2008 (mgm), Supplement (supplement), Market: USA (fus)
31
JOB: @ibm2/ford_pdm/CLS_ford/GRP_supplement/JOB_mgm/DIV_doc
Page 32

JOBNAME: No Job Name PAGE: 32 SESS: 1 OUTPUT: Tue Feb 27 16:38:35 2007
/ford_pdm/ford/supplement/mgm/doc
Phone features
3. Select from the following options:
• Speak the name of the person you wish to call if already saved in the
system as that name.
• Speak the digits of the phone number you wish the system to dial.
• Enter the digits individually using the memory presets if your audio
system has all ten memory presets on the face.
To erase the last entered/spoken digit, press and release
To erase all entered/spoken digits, press and hold
SEEK.
Note: The system will accept up to 22 numbers when dialing. If a 23rd
number is entered, it will not appear on the display and there will be an
audible tone from the system.
4. Once the desired number/contact is on the screen, either press
PHONE/
on the audio system, press SEND on the steering wheel
controls or say ’SEND’.
5. The display will read DIALING. If there is an error, the display will
read CALL ENDED. If the system connects, but the signal strength is
very weak, the display will read NO SERVICE.
6. The system will connect to the desired number.
Ending a call
At any time, you can end a phone call by pressing END on your steering
wheel controls, or by pressing and holding PHONE /
on the audio
system.
Receiving a call
An incoming call will react with your
system much the same way
it interacts with your cellular phone. During an incoming call:
1. An audible ring tone will sound signifying an incoming call. If there is
no caller ID information available, the display will read INCOMING.
2. If the incoming call is saved in the system, the NAME of the contact
will appear in the display. If not, the display will display the phone
number of the incoming call.
3. Select from the following options:
Accept the call by pressing SEND on the steering wheel controls. The
call will go over the vehicle speakers and you will be able to speak to the
caller.
Ignore the call by doing nothing. The display will read MISSED CALL
and the system will log the call as a missed call.
SEEK.
CIMS #1623885 com_end-call
itdseq=39
CIMS #1617577
com_receiving-call
itdseq=40
32
PAGE: 32 OP: root EDIT SESSION: 1 DATE: FEB 27 2007 at 16:38
REVIEW COPY ——
2008 (mgm), Supplement (supplement), Market: USA (fus)
JOB: @ibm2/ford_pdm/CLS_ford/GRP_supplement/JOB_mgm/DIV_doc
Page 33

JOBNAME: No Job Name PAGE: 33 SESS: 1 OUTPUT: Tue Feb 27 16:38:35 2007
/ford_pdm/ford/supplement/mgm/doc
Phone features
Reject the call by pressing END on the steering wheel controls. The
display will read REJECTED and the system will log the call.
Using the Quick Dial feature
Your
speed dialing feature on your cellular phone. It allows you to store
frequently used phone numbers in the memory presets of the audio
system for quick access and quick dialing.
Note: This feature is not available if your audio system has 10 (1–0)
memory presets.
To store a number as a Quick Dial in the memory presets: press
and hold a memory preset until an audible tone is heard (to signify the
contact is saved), when the phone number or contact name is in the
display,
To access /call numbers stored in the Quick Dial:
1. Press PHONE /
2. Press the memory preset containing the desired contact information.
The information will appear in the display.
3. Press OK on the audio system or SEND on the steering wheel controls
to confirm and attempt to call the desired contact.
4. DIALING will appear in the display. If there is an error, the display will
read CALL ENDED. If the system connects but the signal strength is
very weak, the display will read NO SERVICE.
5. The system will connect to the desired number.
Calling options during active calls
Once a call is active within the
call on hold, join two calls, activate privacy mode or access digit entry,
your phone book or call history. To access these features during an
active call:
1. Press
system has a ’Quick Dial’ feature which is similar to the
to enter phone mode.
system, you are able to put the
. The display will read ACTIVE PHONE MENU.
CIMS #1617578
com_quick-dial itdseq=41
CIMS #1617622
com_activephnmenu
itdseq=42
2. Press
SEEK or / repeatedly to cycle through:
• PRIVACY
• HOLD
• JOIN
• DIGIT ENTRY
PAGE: 33 OP: root EDIT SESSION: 1 DATE: FEB 27 2007 at 16:38
REVIEW COPY ——
2008 (mgm), Supplement (supplement), Market: USA (fus)
33
JOB: @ibm2/ford_pdm/CLS_ford/GRP_supplement/JOB_mgm/DIV_doc
Page 34

JOBNAME: No Job Name PAGE: 34 SESS: 1 OUTPUT: Tue Feb 27 16:38:35 2007
/ford_pdm/ford/supplement/mgm/doc
Phone features
• PHONE BOOK
• CALL HISTORY
Refer to the following sections for further information.
Using privacy mode
Privacy mode allows you to move a phone call from the
hands-free
conversation. To activate privacy mode during an active phone call:
1. Press
. The display will read ACTIVE PHONE MENU.
system to your cellular phone for a more private
CIMS #1617623 com_privacy
itdseq=43
2. Press
SEEK or / repeatedly until PRIVACY appears in
the display.
3. Press OK. The display will read PRIVACY ON?
4. Press OK to activate privacy mode. The display will read IN PRIVACY
and the system will transfer the call to your cellular phone. BLUETOOTH
DISCONNECTED (BT DISCONN) will appear in the display signifying
that your call has disconnected from the system and is active on your
cellular phone.
To view all available call information, press TEXT.
Disengaging privacy mode and transferring a call back to the
SYNC™ system
1. Press . The display will read ACTIVE PHONE MENU.
2. Press
SEEK or / repeatedly until PRIVACY appears in
the display.
3. Press OK. The display will read PRIVACY OFF?
4. Press OK to confirm. The call will transfer back and will again be
audible over the vehicle’s speakers.
Putting a call on hold
You can choose to put an active phone call on hold. This allows you to
have a private conversation within the vehicle cabin without the person
on the call hearing or to answer another incoming call. To put an active
call on hold:
1. Press
. The display will read ACTIVE PHONE MENU.
CIMS #1623917
com_privacyoff itdseq=44
CIMS #1617624 com_hold
itdseq=45
2. Press
SEEK or / repeatedly until HOLD appears in the
display.
34
PAGE: 34 OP: root EDIT SESSION: 1 DATE: FEB 27 2007 at 16:38
REVIEW COPY ——
2008 (mgm), Supplement (supplement), Market: USA (fus)
JOB: @ibm2/ford_pdm/CLS_ford/GRP_supplement/JOB_mgm/DIV_doc
Page 35

JOBNAME: No Job Name PAGE: 35 SESS: 1 OUTPUT: Tue Feb 27 16:38:35 2007
/ford_pdm/ford/supplement/mgm/doc
Phone features
3. Press OK. The display will read HOLD ON?
4. Press OK again to confirm. CALL ON HOLD will appear in the display.
If you are putting the current call on hold to answer another call, press
SEND or PHONE to answer the incoming call. Each subsequent press of
SEND/PHONE will put the active call on hold and reactivate the call on
hold.
To view all available call information, press TEXT.
Taking a call off hold
1. Press . The display will read ACTIVE PHONE MENU.
CIMS #1623918 com_holdoff
itdseq=46
2. Press
SEEK or / repeatedly until HOLD appears in the
display.
3. Press OK. The display will read HOLD OFF?
4. Press OK to confirm. The call will again be active over the vehicle
speakers.
Joining two calls
To join two separate calls with your
system and speak to both
through the in-vehicle communication system:
1. Press
2. Press
. The display will read ACTIVE PHONE MENU.
SEEK or / repeatedly until JOIN appears in the
display.
3. Press OK. The display will read JOIN?
4. Press OK to confirm. The system will join both calls into one and you
will be able to speak to both parties at the same time through the
hands-free voice feature.
Note: When you hang up, you will disconnect both calls. Once the calls
are ’joined’ they cannot be separated again.
Using digit entry (only available on audio systems with 10 memory
presets)
You may manually enter numbers in order to place another call while on
an active call. To access the digit entry menu during an active call:
1. Press
. The display will read ACTIVE PHONE MENU.
CIMS #1617625
com_join-calls itdseq=47
CIMS #1617666 com_callhst
itdseq=48
2. Press
SEEK or / repeatedly until DIGIT ENTRY
appears in the display.
PAGE: 35 OP: root EDIT SESSION: 1 DATE: FEB 27 2007 at 16:38
REVIEW COPY ——
2008 (mgm), Supplement (supplement), Market: USA (fus)
35
JOB: @ibm2/ford_pdm/CLS_ford/GRP_supplement/JOB_mgm/DIV_doc
Page 36

JOBNAME: No Job Name PAGE: 36 SESS: 1 OUTPUT: Tue Feb 27 16:38:35 2007
/ford_pdm/ford/supplement/mgm/doc
Phone features
3. Press OK.
4. Press
SEEK or / repeatedly to scroll through 1–0
numbers, * STAR, # POUND or + PLUS.
5. Press OK when the desired character is in the display. The system will
audibly repeat the selection. When the selection is complete, press SEND
or PHONE/
or say ’CALL’. Your first call will automatically be put on
hold while the second attempts to connect. Once the second call
connects, you may then choose to join the calls, put one on hold or
activate privacy mode.
Accessing your call history during an active call
You can access your call history to select another phone number while
on an active call. To access your call history:
1. Press
2. Press
. The display will read ACTIVE PHONE MENU.
SEEK or / repeatedly until CALL HISTORY
appears in the display.
3. Press OK. If there are entries present in your call history, the system
will take you to the call history menu.
4. Press
SEEK or / repeatedly to scroll through
INCOMING, OUTGOING or MISSED calls.
Note: The system will not store unknown numbers in your call history.
Only entries familiar to the SYNC system will be stored.
5. Press OK when the desired category appears in the display. Depending
on the amount of entries, the system may separate the calls into
categories.
CIMS #1617667 com_phnbk
itdseq=49
6. Press
SEEK or / repeatedly to scroll through the
categories.
7. Press OK when the desired category or listing appears in the display.
8. Press
SEEK or / repeatedly to scroll through the
individual listings (if applicable).
9. Press OK when the desired listing appears in the display.
10. Press SEND or
or say ’CALL’ to place the second call. Your first
call will automatically be put on hold while the second attempts to
36
PAGE: 36 OP: root EDIT SESSION: 1 DATE: FEB 27 2007 at 16:38
JOB: @ibm2/ford_pdm/CLS_ford/GRP_supplement/JOB_mgm/DIV_doc
REVIEW COPY ——
2008 (mgm), Supplement (supplement), Market: USA (fus)
Page 37

JOBNAME: No Job Name PAGE: 37 SESS: 1 OUTPUT: Tue Feb 27 16:38:35 2007
/ford_pdm/ford/supplement/mgm/doc
Phone features
connect. Once the second call connects, you may then choose to join the
calls, put one on hold or activate privacy mode.
Some notes on call history:
• Call histories are sorted by a timestamp and placed in either the
incoming, outgoing, or missed call groups.
• The
missed calls from your Bluetootht enabled cellular phone. This
number may vary depending on your phone. Initially, the call history
will be downloaded as part of the automatic phone book download.
• A new call history will be downloaded each time the phone connects
to the
• New call history entries are always added to the top of the list when a
call is received. The maximum storage capacity for each category is
five calls. As new calls fill the call history, details about the last call
will be dropped.
• On some phones, the call history will only reflect those calls that are
received while the phone is connected to the
• If you choose to delete your phone book or paired device, the call
history will also be deleted.
• A maximum of 31 characters is allowed to store a name and number.
system will download up to five incoming, outgoing and
system. This will overwrite the previously stored copy.
system.
PAGE: 37 OP: root EDIT SESSION: 1 DATE: FEB 27 2007 at 16:38
REVIEW COPY ——
2008 (mgm), Supplement (supplement), Market: USA (fus)
37
JOB: @ibm2/ford_pdm/CLS_ford/GRP_supplement/JOB_mgm/DIV_doc
Page 38

JOBNAME: No Job Name PAGE: 38 SESS: 1 OUTPUT: Tue Feb 27 16:38:35 2007
/ford_pdm/ford/supplement/mgm/doc
Media features
PAIRING MEDIA DEVICES TO YOUR SYNC™ SYSTEM
Note: For your safety, this procedure cannot be completed when the
vehicle is traveling at speeds greater than 3 mph. Please read all safety
information prior to operating the system.
Your
system allows you to wirelessly connect and use playing
devices, such as an iPod. To pair your playing devices to the
system:
1. Press
2. Press
on your audio system to enter phone mode.
SEEK or / repeatedly until SYSTEM SETTINGS
appears in the display.
3. Press OK on your audio system to confirm the selection. This will take
you into the SYSTEM SETTINGS menu.
4. Press
SEEK or / repeatedly until BLUETOOTH (BT)
DEVICES appears in the display.
5. Press OK to confirm the selection. This will take you into the
Bluetootht devices menu.
6. Press
SEEK or / repeatedly until ADD DEVICES
appears in the display.
7. Press OK to confirm your selection and enter the ADD DEVICES
menu.
8. When FIND SYNC appears in the display, press OK. The system will
’look’ for your device and the display will show SYNC FOUND. A six digit
PIN will appear in the display.
9. When FIND SYNC appears in the display, press OK. The system will
’look’ for your device and the display will show SYNC FOUND. A six digit
PIN will appear in the display.
10. Enter that PIN in your phone when prompted (if your phone
supports this function).
11. If the pairing goes through, the display will read the DEVICE NAME
and then CONNECTING. If the connection is successful, the display will
read CONNECTED and then ask you if you want to set this phone as a
PRIMARY? phone. This means that the system will automatically attempt
to connect to this phone every time the ignition is turned on. Press OK
to enter the menu.
CIMS # com_mediapair
itdseq=50
12. Press
SEEK or / to toggle between YES and NO. When
the appropriate response is in the display, press OK. If you choose YES,
38
PAGE: 38 OP: root EDIT SESSION: 1 DATE: FEB 27 2007 at 16:38
JOB: @ibm2/ford_pdm/CLS_ford/GRP_supplement/JOB_mgm/DIV_doc
REVIEW COPY ——
2008 (mgm), Supplement (supplement), Market: USA (fus)
Page 39

JOBNAME: No Job Name PAGE: 39 SESS: 1 OUTPUT: Tue Feb 27 16:38:35 2007
/ford_pdm/ford/supplement/mgm/doc
Media features
PRIMARY SET will appear in the display. If you choose NO, NOT
PRIMARY will appear in the display.
13. If you selected this as your primary phone, the system will ask if you
would like to DOWNLOAD? your cellular phone’s phone book.
14. Press
SEEK or / to toggle between YES and NO. When
the appropriate response is in the display, press OK.
15. If you choose YES, the display will read DOWNLOADING. The system
will then take you back to the main menu.
Connecting a memory stick or iPodR to the
You can use your iPod or USB stick with your
system
system without
going through the pairing process.
1. Plug the device into the USB port inside your center console.
2. Press AUX repeatedly until SYNC USB appears in the display.
3. Press OK.
4. Press MENU repeatedly to access the menu features.
5. Press OK.
6. Press
/ to cycle through selections of: Artists, Genres, Play all
and Playlists.
7. When the desired selection appears in the display, press OK.
Refer to the Media chapter for further information on the media features.
ACCESSING YOUR SYNC™ MEDIA MENU FEATURES
Your
system has two main media menus. One allows you to
select the desired media source (USB, LINE IN, BT STEREO) and one
allows you to then access the music on those sources, such as playlists,
saved music, etc.
To access your media menu features:
1. Press AUX on the audio system repeatedly until SYNC MEDIA
appears. The menu selection will time out and automatically move you
into the media menu.
Note: The system will automatically reactivate the last known playing
source. For example, if you had been playing a device connected to the
USB port, the system will automatically display SYNC™ USB1 and will
allow you to begin play and make and desired adjustments. If another
source was not activated, the system will automatically default to LINE
IN.
CIMS #1625053
com_usingipod itdseq=51
CIMS #1616537
com_media-menu
itdseq=52
PAGE: 39 OP: root EDIT SESSION: 1 DATE: FEB 27 2007 at 16:38
REVIEW COPY ——
2008 (mgm), Supplement (supplement), Market: USA (fus)
39
JOB: @ibm2/ford_pdm/CLS_ford/GRP_supplement/JOB_mgm/DIV_doc
Page 40

JOBNAME: No Job Name PAGE: 40 SESS: 1 OUTPUT: Tue Feb 27 16:38:35 2007
/ford_pdm/ford/supplement/mgm/doc
Media features
2. Press MENU on the audio system to access the media menu.
3. If your
display. Press SEEK
SELECT SRC (Select Source).
SELECT SRC (Select Source): This menu will allow you to select
from which media source you wish to access. You can select from USB,
BT STEREO or LINE IN (Auxiliary Input jack). (The Play Menu will then
help you select how you would like to play your selected source.)
PLAY MENU: This menu will allow you to play your music by playing all
selections, by artist listing, album listing, genre listing , playlists, tracks,
or by selecting similar music to what is currently playing. You can also
choose to ’Explore USB’ which will allow you to explore your music
listings.
USING YOUR SOURCE MENU
The source menu will allow you to select from various possible media
sources, such as: USB, BT STEREO or LINE IN (Auxiliary Input jack).
Once you have your sources selected, the Play Menu will then help you
select how you would like to play your selected source.
To access the source menu within the Media section of your
system:
1. Press AUX on your audio system repeatedly until SYNC MEDIA
appears. The system will automatically take you into the media menu.
2. Press MENU on the audio system to access the media menu.
3. If your
display. Press SEEK
system is active, MEDIA MENU will appear in the
, or OK to access the PLAY MENU or
system is active, MEDIA MENU will appear in the
, or OK.
CIMS #1616538
com_select-source
itdseq=53
4. Press
SEEK or / repeatedly to cycle through:
SELECT SRC (Select source): This allows you to select from which
media source you wish to access. You can select from USB, BT STEREO
or LINE IN (Auxiliary Input jack).
MEDIA SETTINGS: This allows you to turn Shuffle, Repeat and
Autoplay on or off for music playing through your media player.
APPLICATION: Allows you to view any new applications you have
downloaded into your vehicle.
SYSTEM SETTINGS: This allows you to select from BT DEVICES
(adding or selecting an already paired phone/device) or ADVANCED
(setting system prompts and languages).
40
PAGE: 40 OP: root EDIT SESSION: 1 DATE: FEB 27 2007 at 16:38
JOB: @ibm2/ford_pdm/CLS_ford/GRP_supplement/JOB_mgm/DIV_doc
REVIEW COPY ——
2008 (mgm), Supplement (supplement), Market: USA (fus)
Page 41

JOBNAME: No Job Name PAGE: 41 SESS: 1 OUTPUT: Tue Feb 27 16:38:35 2007
/ford_pdm/ford/supplement/mgm/doc
Media features
5. When the desired selection appears in the display, press OK to
confirm. Refer to the following sections for further information on these
selections.
Selecting different media sources
The media menu in your
music from different media sources. For example, if you have an iPodt
plugged into the USB port, you can select the USB port media to access
that playing device. Once accessed, you can then play music, shuffle,
access your playlists, etc. You can select from USB, BT STEREO or LINE
IN (Auxiliary Input jack). To access this menu:
1. Press MENU on the audio system to access the media menu.
2. If your
display. Press SEEK
system is active, MEDIA MENU will appear in the
, or OK.
system allows you to select and play
CIMS #1616591
com_sourcemenu
itdseq=54
3. Press
SEEK or / repeatedly until SELECT SRC (Select
source) appears in the display.
4. Press OK to confirm selection. This will take you into the source
menu.
5. Press
SEEK or / repeatedly to cycle through:
USB: Select USB to access any media device that you have plugged into
the USB port.
BT STEREO: This feature allows you to stream audio music from your
paired phone through the system.
Accessing and using your USB port
Your vehicle is equipped with a USB port in the center console. (For
exact location, refer to your Owner’s guide.) You can use the USB port
to plug in and access any media playing device, to power up your
computer or any other device with the correct connection, or to plug in
a memory stick and download vehicle application upgrades (if available).
Note: Since your USB port has the unique feature which allows you to
plug in many devices solely to recharge them, the
system will not
automatically change media modes when something is plugged into the
USB port. If you desire to access what is plugged into the USB port, you
must select the USB port listing in the media menu in your
system.
To access the USB port through your
system:
CIMS #1616607 com_usbport
itdseq=55
PAGE: 41 OP: root EDIT SESSION: 1 DATE: FEB 27 2007 at 16:38
REVIEW COPY ——
2008 (mgm), Supplement (supplement), Market: USA (fus)
41
JOB: @ibm2/ford_pdm/CLS_ford/GRP_supplement/JOB_mgm/DIV_doc
Page 42

JOBNAME: No Job Name PAGE: 42 SESS: 1 OUTPUT: Tue Feb 27 16:38:35 2007
/ford_pdm/ford/supplement/mgm/doc
Media features
1. Press AUX on your audio system repeatedly until SYNC MEDIA
appears. The system will automatically take you into the media menu.
2. Press MENU on the audio system to access the media menu.
3. If your
display. Press SEEK
system is active, MEDIA MENU will appear in the
, or OK.
4. Press
SEEK or / repeatedly until SELECT SRC (Select
source) appears in the display.
5. Press OK to confirm selection. This will take you into the source
menu.
6. Press
SEEK or / repeatedly until USB appears.
7. Press OK to confirm selection. The display will read USB CHOSEN. If
the connected device is not supported by the system, the display
will read NO DEVICE SUPPORT and the system will take you back to
the main menu.
If the connected device is supported by the
system, the system
will begin downloading the information. If there are not any readable
media files for the system to play, the display will read NO MEDIA. If
there are readable media files present, INDEX will appear in the display.
If Autoplay has been set to ON, the
system will automatically
begin to play the first track of music as the indexing finishes. If Autoplay
is set to OFF, the music will not play until the
system has fully
downloaded the entire music selection. After everything is complete, the
display will read INDEXED and the system will take you back to the play
menu to allow you to select from various loaded artists, albums, genres,
playlists or tracks.
Note: The indexing process may take a few minutes to complete,
depending on the size of material being downloaded. This is normal.
Note: The system can only handle number of index entries. If your
device has more, the display will read INDEX FULL after it reaches the
maximum number.
If your playing device becomes disconnected from the USB port at
any time, the display will read BT DISCONNTED. Plug the playing
device back into the USB port and the system will reconnect to
the device. USB1 will appear in the display once the system has
reconnected and then will begin indexing the media again.
42
PAGE: 42 OP: root EDIT SESSION: 1 DATE: FEB 27 2007 at 16:38
REVIEW COPY ——
2008 (mgm), Supplement (supplement), Market: USA (fus)
JOB: @ibm2/ford_pdm/CLS_ford/GRP_supplement/JOB_mgm/DIV_doc
Page 43

JOBNAME: No Job Name PAGE: 43 SESS: 1 OUTPUT: Tue Feb 27 16:38:35 2007
/ford_pdm/ford/supplement/mgm/doc
Media features
Streaming music from your Bluetooth phone
Your system allows you to stream music from your Bluetooth
enabled cellular phone to play through your audio system. The music
must be on your paired phone and be in a format that is accessible to
the
system.
To access this feature:
1. Press AUX on your audio system repeatedly until SYNC MEDIA
appears. The system will automatically take you into the media menu.
2. Press MENU on the audio system to access the media menu.
3. If your
display. Press SEEK
4. Press
system is active, MEDIA MENU will appear in the
, or OK to enter the main menu.
SEEK or / repeatedly until SELECT SRC (Select
source) appears in the display.
5. Press OK to confirm selection. This will take you into the media
source menu.
6. Press
SEEK or / repeatedly until BT STEREO appears.
7. Press OK to confirm selection. The display will show the name of the
Bluetooth enabled cellular phone if Bluetooth is turned ON and if the
phone is currently connected to the system. MEDIA STREAM will appear
in the display.
While the music is streaming through your audio system you can also use
the following functions:
Press
SEEK to access the previous/next track. PREVIOUS or
NEXT will appear in the display.
Press to PLAY or PAUSE the currently playing song.
If your phone becomes disconnected from the system at any time,
the display will read BT STEREO DISCONNECTED. Reconnect the
phone and BT STEREO will appear in the display.
Using the Line in feature (auxiliary input jack) with your SYNC™
system
Your vehicle is equipped with an auxiliary input jack which provides a
way to connect your portable music player to the in-vehicle audio
system. This allows the audio from a portable music player to be played
through the vehicle speakers with high fidelity. To achieve optimal
CIMS #1616608 com_btstereo
itdseq=56
CIMS #1616609 com_line-in
itdseq=57
PAGE: 43 OP: root EDIT SESSION: 1 DATE: FEB 27 2007 at 16:38
REVIEW COPY ——
2008 (mgm), Supplement (supplement), Market: USA (fus)
43
JOB: @ibm2/ford_pdm/CLS_ford/GRP_supplement/JOB_mgm/DIV_doc
Page 44

JOBNAME: No Job Name PAGE: 44 SESS: 1 OUTPUT: Tue Feb 27 16:38:35 2007
/ford_pdm/ford/supplement/mgm/doc
Media features
performance, please observe the following instructions when attaching
your portable music device to the audio system. For auxiliary input jack
location and further information, refer to Auxiliary input jack (Line
in) in the Entertainment chapter of your Owner’s Guide.
To access the Line in feature through your
1. Press AUX on your audio system repeatedly until SYNC MEDIA
appears. The system will automatically take you into the media menu.
2. Press MENU on the audio system to access the media menu.
3. If your
display. Press SEEK
system is active, MEDIA MENU will appear in the
, or OK to enter the main menu.
system:
4. Press
SEEK or / repeatedly until SELECT SRC (Select
source) appears in the display.
5. Press OK to confirm selection. This will take you into the media
source menu.
6. Press
SEEK or / repeatedly until LINE IN appears.
7. Press OK to confirm selection. Ensure that your playing device is
plugged into the auxiliary input jack. The display will confirm LINE IN
CHOSEN and then LINE IN.
Note: If you already have a playing device connected to the USB port,
you cannot access the LINE IN feature. The display will read NOT
AVAILABLE and the system will take you back to the previous menu.
When the music is playing through your audio system you can use the
volume control on the playing media and on the audio system to increase
or decrease the volume levels.
If your playing device becomes disconnected from the Auxiliary
input jack at any time, the display will read LINE IN
DISCONNECTED. Plug the playing device back into the Auxiliary input
jack and the
system will reconnect to the device. LINE IN will
appear in the display once the system has reconnected and then will
begin indexing the media again.
Using the media settings in your select source menu
With your
system, you can make adjustments to the playing
media. Through the media settings menu, you can Shuffle music, Repeat
any song, and also decide if you would like music to begin playing as
soon indexing (downloading) beings (Autoplay on) or not until all music
has been indexed (Autoplay off). To access these settings:
CIMS #1616592
com_media-settings
itdseq=58
44
PAGE: 44 OP: root EDIT SESSION: 1 DATE: FEB 27 2007 at 16:38
REVIEW COPY ——
2008 (mgm), Supplement (supplement), Market: USA (fus)
JOB: @ibm2/ford_pdm/CLS_ford/GRP_supplement/JOB_mgm/DIV_doc
Page 45

JOBNAME: No Job Name PAGE: 45 SESS: 1 OUTPUT: Tue Feb 27 16:38:35 2007
/ford_pdm/ford/supplement/mgm/doc
Media features
1. Press MENU on the audio system to access the media menu.
2. If your
display. Press SEEK
system is active, MEDIA MENU will appear in the
, or OK.
3. Press
SEEK or / repeatedly until SELECT SRC (Select
source) appears in the display.
4. When SELECT SRC appears in the display, press
SEEK
or / again repeatedly until MEDIA SETTINGS appears in the
display.
5. Press OK to confirm selection. This will take you into the source
menu.
6. Press
SEEK or / repeatedly to scroll through:
SHUFFLE: Allows you to shuffle all available media files.
REPEAT: Allows you to repeat any song.
AUTOPLAY: Allows you to choose to have music begin playing as soon
as possible when indexing (downloading) from your playing device (on)
or not until all music has been indexed (off).
Note: Depending on the amount of files on your playing device, the
system may take a few minutes to download all the information. This is
normal and should not be cause for concern.
7. When the desired selection appears in the display, press OK. The
system will then confirm by displaying SHUFFLE ON, REPEAT ON or
AUTOPLAY ON.
Note: These selections will remain on until they are turned off in this
menu.
Accessing your vehicle applications
Your SYNC™ system allows you to view any vehicle applications which
have been downloaded via the USB port. To view any saved vehicle
applications:
1. Press MENU on the audio system to access the media menu.
2. If your
display. Press SEEK
system is active, MEDIA MENU will appear in the
, or OK.
CIMS #1616593
com_vehicle-aps
itdseq=59
3. Press
SEEK or / repeatedly until SELECT SRC (Select
source) appears in the display. This will take you into the source menu.
PAGE: 45 OP: root EDIT SESSION: 1 DATE: FEB 27 2007 at 16:38
JOB: @ibm2/ford_pdm/CLS_ford/GRP_supplement/JOB_mgm/DIV_doc
REVIEW COPY ——
2008 (mgm), Supplement (supplement), Market: USA (fus)
45
Page 46

JOBNAME: No Job Name PAGE: 46 SESS: 1 OUTPUT: Tue Feb 27 16:38:35 2007
/ford_pdm/ford/supplement/mgm/doc
Media features
4. Once in the source menu, press SEEK or / repeatedly
until the applications appear in the display (i.e. APPLICATION 1,
APPLICATION 2).
For further information on downloading and deleting vehicle applications,
refer to:
Accessing your system settings
Through this menu in your
adjustments to your Bluetooth devices (BT DEVICES) as well as setting
the system prompts and language. To access:
1. Press MENU on the audio system to access the media menu.
2. If your
display. Press SEEK
system is active, MEDIA MENU will appear in the
, or OK.
system, you can access and make
CIMS #1616594
com_system-settings
itdseq=60
3. Press
SEEK or / repeatedly until SELECT SRC (Select
source) appears in the display.
4. Press OK to confirm selection. This will take you into the source
menu.
5. Press
SEEK or / repeatedly until SYSTEM SETTINGS
appears in the display.
6. Press OK to confirm selection. This will take you into the source
menu.
7. Press
SEEK or / repeatedly to toggle between BT
DEVICES and ADVANCED.
USING YOUR PLAY MENU
Your media ’play menu’ allows you to play your music by playing all
selections, by artist listing, album listing, genre listing , playlists, tracks,
or by selecting similar music to what is currently playing. You can also
choose to ’Explore USB’ which will allow you to explore your music
listings.
To access the Play menu within the Media section of your
system:
1. Press AUX on your audio system repeatedly until SYNC MEDIA
appears. The system will automatically take you into the media menu.
46
CIMS #1616539
com_playmenu itdseq=61
PAGE: 46 OP: root EDIT SESSION: 1 DATE: FEB 27 2007 at 16:38
REVIEW COPY ——
2008 (mgm), Supplement (supplement), Market: USA (fus)
JOB: @ibm2/ford_pdm/CLS_ford/GRP_supplement/JOB_mgm/DIV_doc
Page 47

JOBNAME: No Job Name PAGE: 47 SESS: 1 OUTPUT: Tue Feb 27 16:38:35 2007
/ford_pdm/ford/supplement/mgm/doc
Media features
2. Press MENU on the audio system to access the media menu. MEDIA
MENU will appear in the display.
3. Press SEEK
4. Press OK. If there are no media files to access, the display will read
NO MEDIA. If the system cannot index the media files, the display will
read NOT AVAILABLE. If there are files which can be indexed, the
system will then put you into the PLAY ALL menu.
, or OK to access the PLAY MENU.
5. In this menu, press
SEEK or / repeatedly to select
from the following options:
• PLAY ALL
• ARTISTS
• ALBUMS
• GENRES
• PLAY LISTS
• TRACKS
• EXPLORE USB
• SIMILAR
Refer to the following sections for further explanation on these features.
Using the Play all feature
The PLAY ALL feature in your
media system will play all
indexed media (songs) in flat file mode, one at a time in numerical order.
To use this feature:
1. Press AUX on your audio system repeatedly until SYNC MEDIA
appears. The system will automatically take you into the media menu.
2. Press MENU on the audio system to access the media menu.
3. MEDIA MENU will appear in the display. Press SEEK
4. Press
SEEK or / repeatedly until PLAY MENU appears
, or OK.
in the display.
5. Press OK. If there are not any media files to access, the display will
read NO MEDIA. If the system cannot index the media files, the display
will read NOT AVAILABLE. If there are files which can be indexed, the
system will then put you into the PLAY ALL menu.
CIMS #1623658 com_play-all
itdseq=62
PAGE: 47 OP: root EDIT SESSION: 1 DATE: FEB 27 2007 at 16:38
REVIEW COPY ——
2008 (mgm), Supplement (supplement), Market: USA (fus)
47
JOB: @ibm2/ford_pdm/CLS_ford/GRP_supplement/JOB_mgm/DIV_doc
Page 48

JOBNAME: No Job Name PAGE: 48 SESS: 1 OUTPUT: Tue Feb 27 16:38:35 2007
/ford_pdm/ford/supplement/mgm/doc
Media features
6. When PLAY ALL appears in the display, press OK. The system will
begin to play all the indexed media. The first song title will appear in the
display if available.
You can now use any of the controls on your audio face to make
adjustments to your playing music.
Press
SEEK to advance to the previous/next track.
Press SHUFFLE (if available on your audio system) to engage Shuffle
mode and shuffle all music in the current folder, playlist, etc. Press again
to disengage.
Press REPEAT (if available on your audio system) to repeat the current
song. REPEAT ON will appear in the display. Press again to disengage.
REPEAT OFF will appear in the display.
Press
FOLDER (if available on your audio system) to advance to
the previous/next folder. The name of the folder will appear in the
display.
Selecting and playing specific artists
One feature in your
system is that you can choose to play ALL
ARTISTS. Once selected, the system will list and then play all artists and
tracks alphabetically. To access this feature:
CIMS #1623660
com_specific-artists
itdseq=63
48
PAGE: 48 OP: root EDIT SESSION: 1 DATE: FEB 27 2007 at 16:38
REVIEW COPY ——
2008 (mgm), Supplement (supplement), Market: USA (fus)
JOB: @ibm2/ford_pdm/CLS_ford/GRP_supplement/JOB_mgm/DIV_doc
Page 49

JOBNAME: No Job Name PAGE: 49 SESS: 1 OUTPUT: Tue Feb 27 16:38:35 2007
/ford_pdm/ford/supplement/mgm/doc
Media features
1. Press AUX on your audio system
repeatedly until SYNC MEDIA
appears. The system will
automatically take you into the media menu.
2. Press MENU on the audio system to access the media menu.
3. Press SEEK
display.
4. Press
in the display.
5. Press OK. If there are no media files to access, the display will read
NO MEDIA. If the system cannot index the media files, the display will
read NOT AVAILABLE. If there are files which can be indexed, the
system will then put you into the PLAY ALL menu.
6. Once PLAY ALL appears in the display, press
or / repeatedly until ARTISTS appears in the display.
7. Press OK. You can now select from playing ALL ARTISTS, or from any
listed/saved artist.
8. Press
artists.
9. Press OK when the desired artist appears in the display. If there are
multiple albums by the same artist loaded in the system, it will then ask
you to select from the various loaded albums by that artist.
10. When ALL ALBUMS appears in the display, press
or / repeatedly until the desired album appears.
11. Press OK to confirm and begin to play the first track of the selected
album. The first track of the album will begin to play and illuminate in
the display.
You can now use any of the controls on your audio face to make
adjustments to your playing music.
Press
SEEK to advance to the previous/next track.
Press SHUFFLE (if available on your audio system) to engage Shuffle
mode. SHUFFLE ON will appear in the display. Press again to disengage.
SHUFFLE OFF will appear in the display.
Press REPEAT (if available on your audio system) to repeat the current
song. REPEAT ON will appear in the display. Press again to disengage.
REPEAT OFF will appear in the display.
, or OK when MEDIA MENU appears in the
SEEK or / repeatedly until PLAY MENU appears
SEEK
SEEK or / repeatedly to scroll through all loaded
SEEK
art=221cf816_a
PAGE: 49 OP: root EDIT SESSION: 1 DATE: FEB 27 2007 at 16:38
REVIEW COPY ——
2008 (mgm), Supplement (supplement), Market: USA (fus)
49
JOB: @ibm2/ford_pdm/CLS_ford/GRP_supplement/JOB_mgm/DIV_doc
Page 50

JOBNAME: No Job Name PAGE: 50 SESS: 1 OUTPUT: Tue Feb 27 16:38:35 2007
/ford_pdm/ford/supplement/mgm/doc
Media features
Press FOLDER (if available on your audio system) to advance to
the previous/next folder. The name of the folder will appear in the
display.
Selecting and playing specific albums
Your
ALBUMS loaded to your system. To access this feature:
1. Press MENU on the audio system to access the media menu.
2. Press SEEK
display.
system allows you to cycle through, view and play ALL
, or OK when MEDIA MENU appears in the
CIMS #1623677
com_specific-albums
itdseq=64
3. Press
SEEK or / repeatedly until PLAY MENU appears
in the display.
4. Press OK. If there are no media files to access, the display will read
NO MEDIA. If the system cannot index the media files, the display will
read NOT AVAILABLE. If there are files which can be indexed, the
system will then put you into the PLAY ALL menu.
5. Once PLAY ALL appears in the display, press
SEEK
or / repeatedly to until ALBUMS appears in the display.
6. Press OK to enter the album menu and select from playing ALL
ALBUMS or from any individual loaded album.
7. Press
SEEK or / repeatedly to scroll through all loaded
albums.
8. Press OK when the desired album appears in the display.
9. When ALL ALBUMS appears in the display, press
SEEK
or / repeatedly until the desired album appears.
10. Press OK to confirm and begin to play the first track of the selected
album. The first track of the album will begin to play and illuminate in
the display.
You can now use any of the controls on your audio face to make
adjustments to your playing music.
Press
SEEK to advance to the previous/next track.
Press SHUFFLE (if available on your audio system) to engage Shuffle
mode. SHUFFLE ON will appear in the display. Press again to disengage.
SHUFFLE OFF will appear in the display.
50
PAGE: 50 OP: root EDIT SESSION: 1 DATE: FEB 27 2007 at 16:38
REVIEW COPY ——
2008 (mgm), Supplement (supplement), Market: USA (fus)
JOB: @ibm2/ford_pdm/CLS_ford/GRP_supplement/JOB_mgm/DIV_doc
Page 51

JOBNAME: No Job Name PAGE: 51 SESS: 1 OUTPUT: Tue Feb 27 16:38:35 2007
/ford_pdm/ford/supplement/mgm/doc
Media features
Press REPEAT (if available on your audio system) to repeat the current
song. REPEAT ON will appear in the display. Press again to disengage.
REPEAT OFF will appear in the display.
Press
the previous/next folder. The name of the folder will appear in the
display.
Selecting from different genres
Your
(category) type. The system will automatically recategorize your saved
music according to the available genres. For example, the system will
categorize all ’Country’ music and then list the music alphabetically by
artist name and then alphabetically by track name. Once this music has
been compiled, it will begin to play. To access this feature:
1. Press AUX on your audio system repeatedly until SYNC MEDIA
appears. The system will automatically take you into the media menu.
2. Press MENU on the audio system to access the media menu.
3. Press SEEK
display.
FOLDER (if available on your audio system) to advance to
system allows you to sort all loaded music by genre
, or OK when MEDIA MENU appears in the
CIMS #1623680 com_genres
itdseq=65
4. Press
SEEK or / repeatedly until PLAY MENU appears
in the display.
5. Press OK. If there are no media files to access, the display will read
NO MEDIA. If the system cannot index the media files, the display will
read NOT AVAILABLE. If there are files which can be indexed, the
system will then put you into the PLAY ALL menu.
6. Once PLAY ALL appears in the display, press
SEEK or /
repeatedly to until GENRES appears in the display.
7. Press OK to enter the Genre menu and select from playing all possible
GENRES.
8. Press
SEEK or / repeatedly to scroll through all loaded
albums.
9. Press OK when the desired genre appears in the display. The system
will then take you back to the ALBUM menu to define whether you’d like
the system to search for that genre of music in ALL ARTISTS or if you’d
like to play only that genre of music by a specific ARTIST.
51
PAGE: 51 OP: root EDIT SESSION: 1 DATE: FEB 27 2007 at 16:38
REVIEW COPY ——
2008 (mgm), Supplement (supplement), Market: USA (fus)
JOB: @ibm2/ford_pdm/CLS_ford/GRP_supplement/JOB_mgm/DIV_doc
Page 52

JOBNAME: No Job Name PAGE: 52 SESS: 1 OUTPUT: Tue Feb 27 16:38:35 2007
/ford_pdm/ford/supplement/mgm/doc
Media features
10. Press SEEK or / repeatedly until the desired selection
appears.
11. Press OK to confirm and begin to play the first track of the selected
album. The first track of the album will begin to play and illuminate in
the display.
You can now use any of the controls on your audio face to make
adjustments to your playing music.
Press
Press SHUFFLE (if available on your audio system) to engage Shuffle
mode. SHUFFLE ON will appear in the display. Press again to disengage.
SHUFFLE OFF will appear in the display.
Press REPEAT (if available on your audio system) to repeat the current
song. REPEAT ON will appear in the display. Press again to disengage.
REPEAT OFF will appear in the display.
Accessing your play lists
Your
providing the type of play list is supported by your
access your playlists:
1. Press AUX on your audio system repeatedly until SYNC MEDIA
appears. The system will automatically take you into the media menu.
2. Press MENU on the audio system to access the media menu.
3. Press SEEK
display.
SEEK to advance to the previous/next track.
system allows you to play previously created play lists,
system. To
, or OK when MEDIA MENU appears in the
CIMS #1623682 com_playlists
itdseq=66
4. Press
SEEK or / repeatedly until PLAY MENU appears
in the display.
5. Press OK. If there are no media files to access, the display will read
NO MEDIA. If the system cannot index the media files, the display will
read NOT AVAILABLE. If there are files which can be indexed, the
system will then put you into the PLAY ALL menu.
6. Once PLAY ALL appears in the display, press
SEEK
or / repeatedly until PLAYLISTS appears in the display.
7. Press OK to enter the playlist menu.
8. Press SEEK or / repeatedly to scroll through all loaded
playlists.
52
PAGE: 52 OP: root EDIT SESSION: 1 DATE: FEB 27 2007 at 16:38
JOB: @ibm2/ford_pdm/CLS_ford/GRP_supplement/JOB_mgm/DIV_doc
REVIEW COPY ——
2008 (mgm), Supplement (supplement), Market: USA (fus)
Page 53

JOBNAME: No Job Name PAGE: 53 SESS: 1 OUTPUT: Tue Feb 27 16:38:35 2007
/ford_pdm/ford/supplement/mgm/doc
Media features
9. Press OK when the desired playlist appears in the display. If the
playlist is empty, too large or contains bad files, PLAYLIST ERROR will
appear in the display. Otherwise, the first track of the selected playlist
will begin to play and illuminate in the display.
You can now use any of the controls on your audio face to make
adjustments to your playing music.
Press
Press SHUFFLE (if available on your audio system) to engage Shuffle
mode. SHUFFLE ON will appear in the display. Press again to disengage.
SHUFFLE OFF will appear in the display.
Press REPEAT (if available on your audio system) to repeat the current
song. REPEAT ON will appear in the display. Press again to disengage.
REPEAT OFF will appear in the display.
Playing a specific track
Your
track. To access this feature:
1. Press AUX on your audio system repeatedly until SYNC MEDIA
appears. The system will automatically take you into the media menu.
2. Press MENU on the audio system to access the media menu.
3. Press SEEK
display.
SEEK to advance to the previous/next track.
system will also allow you to search for and play a specific
, or OK when MEDIA MENU appears in the
CIMS #1623684 com_track
itdseq=67
4. Press
SEEK or / repeatedly until PLAY MENU appears
in the display.
5. Press OK. If there are no media files to access, the display will read
NO MEDIA. If the system cannot index the media files, the display will
read NOT AVAILABLE. If there are files which can be indexed, the
system will then put you into the PLAY ALL menu.
6. Once PLAY ALL appears in the display, press
SEEK
or / repeatedly to until TRACKS appears in the display.
7. Press OK to enter the track menu.
8. Press SEEK or / repeatedly to scroll through all loaded
tracks.
9. Press OK when the desired track appears in the display. The track will
begin to play and illuminate in the display.
53
PAGE: 53 OP: root EDIT SESSION: 1 DATE: FEB 27 2007 at 16:38
JOB: @ibm2/ford_pdm/CLS_ford/GRP_supplement/JOB_mgm/DIV_doc
REVIEW COPY ——
2008 (mgm), Supplement (supplement), Market: USA (fus)
Page 54

JOBNAME: No Job Name PAGE: 54 SESS: 1 OUTPUT: Tue Feb 27 16:38:35 2007
/ford_pdm/ford/supplement/mgm/doc
Media features
You can now use any of the controls on your audio face to make
adjustments to your playing music.
Press
Press SHUFFLE (if available on your audio system) to engage Shuffle
mode. SHUFFLE ON will appear in the display. Press again to disengage.
SHUFFLE OFF will appear in the display.
Press REPEAT (if available on your audio system) to repeat the current
song. REPEAT ON will appear in the display. Press again to disengage.
REPEAT OFF will appear in the display.
Exploring the USB
Your
through all saved music on your media device connected through the
USB port.
Note: When searching through various folders, you will only be able to
view media content which is compatible with the
wave files, mp3 files, etc. You may have other files saved with various
extensions, power point presentations for example, but they will not be
visible to the system.
To access this feature:
1. Press AUX on your audio system repeatedly until SYNC MEDIA
appears. The system will automatically take you into the media menu.
2. Press MENU on the audio system to access the media menu.
3. Press SEEK
display.
SEEK to advance to the previous/next track.
system allows you to go exploring and manually look
system, such as
, or OK when MEDIA MENU appears in the
CIMS #1623685
com_explore-usb
itdseq=68
4. Press
SEEK or / repeatedly until PLAY MENU appears
in the display.
5. Press OK. If there are no media files to access, the display will read
NO MEDIA. If the system cannot index the media files, the display will
read NOT AVAILABLE. If there are files which can be indexed, the
system will then put you into the PLAY ALL menu.
6. Once PLAY ALL appears in the display, press
SEEK
or / repeatedly until EXPLORE USB appears in the display.
7. Press OK.
8. Press SEEK or / repeatedly to scroll through all
available folders on your media device.
54
PAGE: 54 OP: root EDIT SESSION: 1 DATE: FEB 27 2007 at 16:38
JOB: @ibm2/ford_pdm/CLS_ford/GRP_supplement/JOB_mgm/DIV_doc
REVIEW COPY ——
2008 (mgm), Supplement (supplement), Market: USA (fus)
Page 55

JOBNAME: No Job Name PAGE: 55 SESS: 1 OUTPUT: Tue Feb 27 16:38:35 2007
/ford_pdm/ford/supplement/mgm/doc
Media features
9. Press OK when the desired folder appears in the display.
10. Press
SEEK or / repeatedly to scroll through all
subfolders and/or tracks in the selected folder.
Once the desired selection is in the display, you can use any of the
controls on your audio face to make adjustments to your playing music.
Press
SEEK to advance to the previous/next track.
Press SHUFFLE (if available on your audio system) to engage Shuffle
mode. SHUFFLE ON will appear in the display. Press again to disengage.
SHUFFLE OFF will appear in the display.
Press REPEAT (if available on your audio system) to repeat the current
song. REPEAT ON will appear in the display. Press again to disengage.
REPEAT OFF will appear in the display.
Press
FOLDER (if available on your audio system) at any time
to advance to the previous/next folder. The name of the folder will
appear in the display. Press OK to select a folder and then press
SEEK or / repeatedly to scroll through all subfolders and/or
tracks in the selected folder.
Playing similar music
Your
system allows you to search the system for music similar to
what is currently playing. For example, if you are currently listening to a
specific artist, the system will then search the media system for more
music by that artist. To activate this feature:
1. Press AUX on your audio system repeatedly until SYNC MEDIA
appears. The system will automatically take you into the media menu.
2. Press MENU on the audio system to access the media menu.
3. Press SEEK
, or OK when MEDIA MENU appears in the
display.
CIMS #1623687 com_similar
itdseq=69
4. Press
SEEK or / repeatedly until PLAY MENU appears
in the display.
5. Press OK. If there are no media files to access, the display will read
NO MEDIA. If the system cannot index the media files, the display will
read NOT AVAILABLE. If there are files which can be indexed, the
system will then put you into the PLAY ALL menu.
6. Once PLAY ALL appears in the display, press
SEEK
or / repeatedly until SIMILAR appears in the display.
PAGE: 55 OP: root EDIT SESSION: 1 DATE: FEB 27 2007 at 16:38
JOB: @ibm2/ford_pdm/CLS_ford/GRP_supplement/JOB_mgm/DIV_doc
REVIEW COPY ——
2008 (mgm), Supplement (supplement), Market: USA (fus)
55
Page 56

JOBNAME: No Job Name PAGE: 56 SESS: 1 OUTPUT: Tue Feb 27 16:38:35 2007
/ford_pdm/ford/supplement/mgm/doc
Media features
7. Press OK. If available, the system will create a new list of similar songs
and begin playing. If not available, NOT AVAILABLE will appear in the
display.
8. The new list will begin play with the first similar song.
You can now use any of the controls on your audio face to make
adjustments to your playing music.
Press
Press SHUFFLE (if available on your audio system) to engage Shuffle
mode. SHUFFLE ON will appear in the display. Press again to disengage.
SHUFFLE OFF will appear in the display.
Press REPEAT (if available on your audio system) to repeat the current
song. REPEAT ON will appear in the display. Press again to disengage.
REPEAT OFF will appear in the display.
SEEK to advance to the previous/next track.
56
PAGE: 56 OP: root EDIT SESSION: 1 DATE: FEB 27 2007 at 16:38
REVIEW COPY ——
2008 (mgm), Supplement (supplement), Market: USA (fus)
JOB: @ibm2/ford_pdm/CLS_ford/GRP_supplement/JOB_mgm/DIV_doc
Page 57

JOBNAME: No Job Name PAGE: 57 SESS: 1 OUTPUT: Tue Feb 27 16:38:35 2007
/ford_pdm/ford/supplement/mgm/doc
Voice recognition
HOW TO USE YOUR THE SYNC™ VOICE RECOGNITION FEATURE
Your
system is equipped with an advanced interactive Voice
Recognition (VR) system. This system allows you to perform many
operations by “speaking” certain commands to the system. The system
will respond with a series of audible tones, confirmation prompts,
questions and spoken confirmations depending on the situation and the
chosen level of dialogue interaction.
Feedback through audible tones
Your VR system will respond through various audible tones. You may
hear a tone at the following times:
• When you press VOICE or
on your steering wheel controls.
• When you access the ’help’ feature.
• When the VR system does not understand your request
• When a VR session is completed successfully
• When a VR session is ended unsuccessfully
The SYNC system has five different audible tones which will play
depending on the circumstance.
• Initial: Sounds when you are entering a new mode.
• Positive: Sounds for a positive recognition or a successful VR session
completion.
• Negative: Sounds for a negative recognition or an unsuccessful VR
session.
• Listening: Sounds when the system is ready.
• Help: Sounds when you ask for ’Help’.
Confirmation prompts
Confirmation prompts are short questions asked by the system when the
system has not clearly understood your request or when there are many
possible responses to your request. For example, if you have
Confirmation prompts ON, the system may say, “Phone, is that correct?”.
The system will then listen for a ’Yes’ or ’No’ confirmation from you. If
you say ’Yes’, the system will proceed. If you say ’No’, the system will ask
you to say the command again. If you have Confirmation prompts OFF,
the system will simply make a best guess at what you requested. If the
system has a low confidence level of what was asked, it will prompt you
to try again or ask for help.
Note: Even with Confirmation prompts turned OFF, you may be asked to
confirm settings occasionally.
CIMS # com_voice-intro
itdseq=70
CIMS #1623886 com_tones
itdseq=71
CIMS #1623887 com_prompts
itdseq=72
PAGE: 57 OP: root EDIT SESSION: 1 DATE: FEB 27 2007 at 16:38
REVIEW COPY ——
2008 (mgm), Supplement (supplement), Market: USA (fus)
57
JOB: @ibm2/ford_pdm/CLS_ford/GRP_supplement/JOB_mgm/DIV_doc
Page 58

JOBNAME: No Job Name PAGE: 58 SESS: 1 OUTPUT: Tue Feb 27 16:38:35 2007
/ford_pdm/ford/supplement/mgm/doc
Voice recognition
Clarification through candidate lists
Candidate lists are created when the system has several possible options
of similar level of confidence as a result of your request. The system will
submit back to you as many as four possibilities for your clarification.
This may happen either with your phone book and/or music selections.
Example #1:
You want to call John Doe at home, so you say, “Call John Doe on home”.
If the system has a similar confidence level for a few items to it may
respond with:
• (initial tone) “To call John Doe on home, say 1. To call Johnny Doe on
mobile, say 2. To call Jane Doe on home, say 3.
Example #2:
You want to listen to a certain artist, so you say, “Search Artist Eddie”. If
the system has a similar confidence level for two possible options, it may
respond with:
• (initial tone) ”To search Eddie Money, say 1. To search Eddie Murphy,
say 2.” (listen tone)
Using voice commands with your SYNC™ system
There is a push to talk button on your steering wheel controls labeled
either VOICE or
. Press to activate Voice Recognition. You will hear a
beep, signaling that the system is ready to take your command. Any
command spoken prior to the beep will not register with the system.
Speak the command clearly to ensure that the system is able to
recognize and perform the desired function.
For the best system performance:
• Ensure that the interior of the vehicle is as quiet as possible. Wind
noise from open windows, road vibrations, and radio volume may
prevent the system from correctly recognizing voice commands.
• Wait until the tone sounds after pressing the push to talk button
before speaking a command.
• Speak naturally without large pauses in between words.
• Voice recognition performance is not 100% and is meant to be a
secondary convenience control. Your SYNC system can always be
operated through the audio and steering wheel controls.
At any time, you may say these commands to change modes:
CIMS #1623888
com_cand-lists itdseq=73
CIMS #1617812
com_voice-modes
itdseq=74
58
PAGE: 58 OP: root EDIT SESSION: 1 DATE: FEB 27 2007 at 16:38
REVIEW COPY ——
2008 (mgm), Supplement (supplement), Market: USA (fus)
JOB: @ibm2/ford_pdm/CLS_ford/GRP_supplement/JOB_mgm/DIV_doc
Page 59

JOBNAME: No Job Name PAGE: 59 SESS: 1 OUTPUT: Tue Feb 27 16:38:35 2007
/ford_pdm/ford/supplement/mgm/doc
Voice recognition
• User device • USB
• Help • Bluetooth Audio
• Line in • Phone
• Voice settings OR
Voice preferences
• Cancel • System prompts on
• System prompts off • SYNC
Commands for voice settings
In voice settings, you can customize the level of system interaction, help
and feedback. The system default settings include standard interaction as
well as candidate lists and confirmation prompts as all provide the most
guidance and feedback.
At any time, while in voice settings, you may say these commands
to adjust the voice settings:
• Help • Cancel
• Interaction mode advanced • Interaction mode standard
• Confirmation prompts off • Confirmation prompts on
• Media candidate lists on • Media candidate lists off
• Phone candidate lists on • Phone candidate lists off
Help: Say at any time for options in a specific mode. The system will list
various options for you audibly. The ’help’ request is always available.
Cancel: Say to cancel the requested action.
Interaction mode standard/advanced: This is the mode which will
determine how much the system ’talks’ to you. The default setting is
’standard’ which provides more detailed interaction and guidance. The
advanced setting speaks less and works more with the audible tones,
assuming you are familiar with the necessary steps.
Confirmation prompts on/off: Confirmation prompts are short
questions asked by the system when the system has not clearly heard or
understood your request. The system will attempt to clarify and then
listen for a ’Yes’ or ’No’ confirmation. If you have Confirmation prompts
OFF, the system will simply make a best guess at what you requested. If
the system has a low confidence level of what was asked, it will prompt
you to try again or ask for help.
Note: Even with Confirmation prompts turned OFF, you may be asked to
confirm settings occasionally.
• Read message
CIMS #1617813 com_voicevr
itdseq=75
PAGE: 59 OP: root EDIT SESSION: 1 DATE: FEB 27 2007 at 16:38
REVIEW COPY ——
2008 (mgm), Supplement (supplement), Market: USA (fus)
59
JOB: @ibm2/ford_pdm/CLS_ford/GRP_supplement/JOB_mgm/DIV_doc
Page 60

JOBNAME: No Job Name PAGE: 60 SESS: 1 OUTPUT: Tue Feb 27 16:38:35 2007
/ford_pdm/ford/supplement/mgm/doc
Voice recognition
Phone/media candidate lists on/off: Candidate lists are when the
system has an equal confidence level of several possibilities as a result of
your voice command. The system will audibly relay up to four
possibilities to you and ask you to choose. This is possible with your
phone listings or your music (media) listings.
Voice commands in phone mode
In phone mode, you may say any of the following commands:
• User Device • USB
• Bluetooth Audio • Line in
• Read message • Cancel
• Voice settings OR
Voice preferences
• System prompts off • SYNC
• Help • Call name
• Call name at home • Call name at home OR cell
• Call name at work OR call
name in office
• Dial • Phone book name
• Phone book name at home
• Phone book name on mobile OR
12
cell
• Phone book name on other
• Call history outgoing
• Phone menu OR menu
• Phone connections OR Bluetooth
connections
1
Voice commands are not available until indexing is complete.
2
These commands are not available if your vehicle has a navigation
12
12
12
12
12
system and SYNC™.
Phone book commands: When you ask the system to access a phone
book name, number, etc., the requested information will appear in the
display to view. You must then tell press SEND on your steering wheel
controls to make a call.
Read message: This selection will tell the system to ’read’ the most
recent text message sent to you.
• System prompts on
• Call name on other
12
• Phone book name at home
• Phone book name at work OR
Phone book name in office
• Call history incoming
• Call history missed
12
12
12
12
• Go to privacy
CIMS #1617814 com_phonevr
itdseq=76
60
PAGE: 60 OP: root EDIT SESSION: 1 DATE: FEB 27 2007 at 16:38
REVIEW COPY ——
2008 (mgm), Supplement (supplement), Market: USA (fus)
JOB: @ibm2/ford_pdm/CLS_ford/GRP_supplement/JOB_mgm/DIV_doc
Page 61

JOBNAME: No Job Name PAGE: 61 SESS: 1 OUTPUT: Tue Feb 27 16:38:35 2007
/ford_pdm/ford/supplement/mgm/doc
Voice recognition
Note: In the above possible commands, “name” is a dynamic listing in
that it could be any desired name from your phone book, call history,
etc.
While in phone mode, you may also say “Menu” and then any of
the following commands:
• Help • Cancel
• (Phone) settings (message)
notification on
• (Phone) connections • Phone name
• Signal • Battery
• Text message inbox • (Phone) settings (set) ringer 1
• (Phone) settings (set) ringer 2 • (Phone) settings (set) ringer 3
• (Phone) settings (set) phone
ringer
Note: With the above commands, words in ( ) are optional and do not
have to be spoken for the system to understand the command.
You may also say “Dial” to dial a number by voice and also access
any of the following commands:
• Help • Cancel
• Number 0–9 • Dial
• Delete (deletes one digit) • Clear (deletes all entered digits)
• Plus • Star
• Asterisk (*) • 800 (eight hundred)
• 700 (seven hundred) • 900 (nine hundred)
• 411, 911, (etc.) • # / (pound, hash)
Voice commands when connecting devices
When attempting to connect a phone or any other device to your
system, you may say the following commands:
• Help • Cancel
• Connect device name • Bluetooth ON
• Bluetooth OFF • Delete device name
Note: You can only ’connect’ a device to the
gone through the pairing process. If your phone/device has not been
• (Phone) settings (message)
notification off
• (Phone) settings (set) ringer off
system after it has
CIMS #1617815
com_connectvr itdseq=77
PAGE: 61 OP: root EDIT SESSION: 1 DATE: FEB 27 2007 at 16:38
REVIEW COPY ——
2008 (mgm), Supplement (supplement), Market: USA (fus)
61
JOB: @ibm2/ford_pdm/CLS_ford/GRP_supplement/JOB_mgm/DIV_doc
Page 62

JOBNAME: No Job Name PAGE: 62 SESS: 1 OUTPUT: Tue Feb 27 16:38:35 2007
/ford_pdm/ford/supplement/mgm/doc
Voice recognition
paired to the system, please refer to Pairing your phone for the fist
time in the Introduction chapter or Pairing other devices in the Phone
chapter.
Note: In the above possible commands, “name” is a dynamic listing in
that it could be the name of any previously paired device.
Voice commands when using the USB port
When using the USB port, you may say any of the following
commands:
• User Device •Line in
• Bluetooth Audio • Cancel
• Phone • Read message
• Voice settings OR voice
preferences
• System prompts on • Help
• SYNC • Play
• Play all
• Pause
• Media connections OR Bluetooth
connections
2
• Play previous track OR
Previous track
• Folder • Repeat on OR repeat
• Shuffle on OR Shuffle • Autoplay on
• Repeat off • Play playlist name
• Autoplay off • Play artist name
• Play genre name
1
• Play album name* • Search genre name
• Similar music • Search album name
• Search artist name
• Search track name
• Refine album name
1
Voice commands are not available until indexing is complete.
12
12
12
• System prompts off
• What’s this? OR
What is playing?
• Play next track OR
Next track
• Play next folder OR
Next folder
• Play previous folder OR
Previous folder
1
1
• Play track name
• Refine artist name
• Refine track name
1
12
12
12
12
CIMS #1617816 com_usb-vr
itdseq=78
62
PAGE: 62 OP: root EDIT SESSION: 1 DATE: FEB 27 2007 at 16:38
REVIEW COPY ——
2008 (mgm), Supplement (supplement), Market: USA (fus)
JOB: @ibm2/ford_pdm/CLS_ford/GRP_supplement/JOB_mgm/DIV_doc
Page 63

JOBNAME: No Job Name PAGE: 63 SESS: 1 OUTPUT: Tue Feb 27 16:38:35 2007
/ford_pdm/ford/supplement/mgm/doc
Voice recognition
2
These commands are not available if your vehicle has a navigation
system and SYNC™.
Note: In the above possible commands, “name” is a dynamic listing in
that it could be the name of any desired group, artist, etc.
Autoplay: With this feature ON, your
begin to play your music as it is being indexed. As the system is finishing
indexing all of your songs, you can listen to music. With this feature OFF,
the system will not begin to play any of your music until it has all been
indexed.
Note: The larger the number of songs the system has to index, the
longer it will take.
Search/Play Genre: You can search for and play a specific genre (type)
of music. The system will read all the data from your downloaded music
and, if available, will begin to play that type of music.
Note: You can only play genres of music which are present in the music
you have downloaded to your system.
Similar music: You can tell the system to play music ’similar’ to what
you are currently playing.
Search artist/track/album: You can have the system search for a
specific artist/track or album in the music you have downloaded.
Refine: This allows you to ’refine’ your previous commands. For
example, if you told the system to search and play all music by a certain
artist, you could then tell the system to ’refine album’ and choose a
specific album from the list to view. If you then select ’Play’, the system
would then only play music from that specific album.
Voice commands when in Bluetooth audio mode
When in Bluetooth audio mode, you may use the following
commands:
• User Device • Line in
• Bluetooth Audio • Cancel
• Phone • Read message
• Voice settings OR voice
preferences
• System prompts off
• System prompts on • USB
• SYNC • Help
• Play all • Play
system will automatically
CIMS #1617817 com_btaud-vr
itdseq=79
PAGE: 63 OP: root EDIT SESSION: 1 DATE: FEB 27 2007 at 16:38
REVIEW COPY ——
2008 (mgm), Supplement (supplement), Market: USA (fus)
63
JOB: @ibm2/ford_pdm/CLS_ford/GRP_supplement/JOB_mgm/DIV_doc
Page 64

JOBNAME: No Job Name PAGE: 64 SESS: 1 OUTPUT: Tue Feb 27 16:38:35 2007
/ford_pdm/ford/supplement/mgm/doc
Voice recognition
• Pause
• Phone connections OR media
connections OR Bluetooth
connections
• What’s this? OR
What is playing?
• Play next track OR
Next track
• Play previous track OR
Previous track
Voice commands while using Line in
While using the Line in feature (Auxiliary input jack), you may
speak the following commands:
• User Device • Line in
• Bluetooth Audio • Cancel
• Phone • Read message
• Voice settings OR voice
preferences
• System prompts off
• System prompts on • Help
• SYNC
VOICE RECOGNITION VISUAL FEEDBACK (NAVIGATION STATUS
BAR)
CIMS #1617818 com_linein-vr
itdseq=80
CIMS #1617811
com_voicewnav itdseq=81
art=222cf904_b
If your vehicle is equipped with a navigation system and
, you
have two voice recognition engines in your vehicle. These two engines
will vary depending on your commands. For example, if you are using
the voice feature for navigation guidance and you want to make a
hands-free call, say, “Phone”. The system will change and will ask you for
a command. You may also say “user device” to access your playing device
through the USB port or auxiliary input jack.
When Voice recognition (VR) is activated, the following icons will appear
on the screen in the status bar.
64
PAGE: 64 OP: root EDIT SESSION: 1 DATE: FEB 27 2007 at 16:38
JOB: @ibm2/ford_pdm/CLS_ford/GRP_supplement/JOB_mgm/DIV_doc
REVIEW COPY ——
2008 (mgm), Supplement (supplement), Market: USA (fus)
Page 65

JOBNAME: No Job Name PAGE: 65 SESS: 1 OUTPUT: Tue Feb 27 16:38:35 2007
/ford_pdm/ford/supplement/mgm/doc
Voice recognition
VR State VR Icon
Main Menu
Audio system
Navigation
Voice Preferences
Display
VR Recognition Failure
VR Session Successful Completion
VR Session Unsuccessful Termination
Listening
For the best system performance, please adhere to the following:
• The interior of the vehicle needs to be as quiet as possible. Wind noise
from open windows, road vibrations, and radio volume may prevent
the system from correctly recognizing voice commands.
• Wait until the tone sounds after pressing the push to talk button
before speaking a command.
• Speak naturally without large pauses in between words.
• Please realize voice recognition performance is not 100% and varies by
user. The voice recognition system is meant to be a secondary
convenience control and if it doesn’t operate optimally, users can still
operate their navigation system via the touch screen and hard buttons.
To speak voice commands:
1. Push the VOICE or
sound.
2. The system will say, “Voice active” and
bar.
3. The system will speak “Main menu. Please say a command”. A tone
will sound signifying the system is ready for your response.
4. ’Listening’ and
waits for your response.
5. If the system is not confident that it recognized your command, it will
ask for a confirmation of yes or no.
6. If the system does not recognize your command, the voice failed
icon
will be displayed in the status bar. The system will give you a
button on the steering wheel. A tone will
will appear in the status
will appear in the status bar and the system
PAGE: 65 OP: root EDIT SESSION: 1 DATE: FEB 27 2007 at 16:38
REVIEW COPY ——
2008 (mgm), Supplement (supplement), Market: USA (fus)
65
JOB: @ibm2/ford_pdm/CLS_ford/GRP_supplement/JOB_mgm/DIV_doc
Page 66

JOBNAME: No Job Name PAGE: 66 SESS: 1 OUTPUT: Tue Feb 27 16:38:35 2007
/ford_pdm/ford/supplement/mgm/doc
Voice recognition
short list of commands you can say. Say the command again. If the
system doesn’t recognize the repeated command, the system will say,
“Please say a command, help or cancel”.
7. If the system does not recognize your command a second time, the
system will say, “I didn’t understand you, please try again.”
8. Once confirmation / recognition takes place, the voice success
icon
commands, a tone will sound, and the appropriate voice menu name and
icon will be displayed.
9. If the voice session is not complete, the system will then speak the
next set of available voice commands, a tone will sound, and the system
will display ’listening’
10. This sequence of events occurs until the voice recognition session is
complete.
is displayed, the system will speak the next level of available
and again, waits for a response.
66
PAGE: 66 OP: root EDIT SESSION: 1 DATE: FEB 27 2007 at 16:38
REVIEW COPY ——
2008 (mgm), Supplement (supplement), Market: USA (fus)
JOB: @ibm2/ford_pdm/CLS_ford/GRP_supplement/JOB_mgm/DIV_doc
Page 67

JOBNAME: No Job Name PAGE: 67 SESS: 1 OUTPUT: Tue Feb 27 16:38:35 2007
/ford_pdm/ford/supplement/mgm/doc
Navigation interaction
HOW SYNC™ INTERACTS WITH YOUR NAVIGATION SYSTEM (IF
EQUIPPED)
Ford and Mercury systems
Lincoln system
CIMS # com_nav-mgm-oview
itdseq=82
CIMS #1613690
com_navigation-mgm
itdseq=83
art=expec001_a
CIMS #1623890
com_nav-mgm2 itdseq=84
art=expec002_a
works through your navigation system to provide voice-activated
wireless calling and text paging as well as a fully integrated media
entertainment system for use with your mobile phone and digital media
player.
PAGE: 67 OP: root EDIT SESSION: 1 DATE: FEB 27 2007 at 16:38
JOB: @ibm2/ford_pdm/CLS_ford/GRP_supplement/JOB_mgm/DIV_doc
REVIEW COPY ——
2008 (mgm), Supplement (supplement), Market: USA (fus)
67
Page 68

JOBNAME: No Job Name PAGE: 68 SESS: 1 OUTPUT: Tue Feb 27 16:38:35 2007
/ford_pdm/ford/supplement/mgm/doc
Navigation interaction
Pairing your phone for the first time through your navigation
system
The first thing you will need to do is to pair your Bluetootht enabled
cellular phone with your
system.
1. Press PHONE to enter
the
phone mode.
2. The screen will read NO PHONE
CONNECTED. Press SETTINGS to
go to the set up menu.
3. Press ADD.
The system will check to ensure
that Bluetootht is turned on. If
Bluetootht is not turned on, the
display will ask you if you would like
to turn it on. Press YES. (The
system default is on).
CIMS #1617717
com_navfirst-time
itdseq=85
art=ehvec013_a
art=expec095_a
art=expec038_a
art=expec093_a
Note: If Bluetootht is turned off, the
system is turned off and
you will not be able to use the phone or media features of the system.
68
PAGE: 68 OP: root EDIT SESSION: 1 DATE: FEB 27 2007 at 16:38
JOB: @ibm2/ford_pdm/CLS_ford/GRP_supplement/JOB_mgm/DIV_doc
REVIEW COPY ——
2008 (mgm), Supplement (supplement), Market: USA (fus)
Page 69

JOBNAME: No Job Name PAGE: 69 SESS: 1 OUTPUT: Tue Feb 27 16:38:35 2007
/ford_pdm/ford/supplement/mgm/doc
Navigation interaction
4. If Bluetootht is on, the system
will begin the pairing process with
your Bluetootht enabled phone or
device and the
Note: As each cellular phone is different, please refer to your Owner’s
manual for pairing instructions.
5. The system will give you a Pass-key (PIN) that you will need to enter
into your phone/device when prompted.
The pairing may take up to three minutes.
If the pairing is not successful, the display will PAIRING FAILED.
If the pairing is successful, the display will read PAIRING SUCCESSFUL
and then DEVICE NAME CONNECTED.
6. Press YES of NO when the system asks you if you would like to set
this phone/device as the primary.
As a Primary device, this is the phone/device the system will search for
upon ignition and automatically re-connect to the
phone/device is not set as a primary, it will still be stored in the device
listing to enable you to reconnect to it at any time.
7. Press YES or NO when the system then asks you if you would like to
download your phone book and call history.
If you select yes, the system will automatically download the information
from your Bluetooth enabled cellular phone.
Note: Selecting YES will tell the
phone book and call history EVERY time your phone reconnects (each
ignition cycle) to the system. If you have made any changes to your
phone book/call history in the
new download. You can choose to download your information initially and
then change the setting to Bluetootht OFF in the Advanced Settings —
Bluetootht screen in the SETTINGS tab.
The system will confirm when the phone book and call history are
downloaded.
Connecting previously paired phones and playing devices
Your The system allows you adjust your settings and select other
previously paired phones and playing devices as primary connections. To
adjust your settings:
system.
system. If a
system to re-download your
system, it will be erased with the
art=expec105_a
CIMS #1621538
com_connectdevices
itdseq=86
PAGE: 69 OP: root EDIT SESSION: 1 DATE: FEB 27 2007 at 16:38
REVIEW COPY ——
2008 (mgm), Supplement (supplement), Market: USA (fus)
69
JOB: @ibm2/ford_pdm/CLS_ford/GRP_supplement/JOB_mgm/DIV_doc
Page 70

JOBNAME: No Job Name PAGE: 70 SESS: 1 OUTPUT: Tue Feb 27 16:38:35 2007
/ford_pdm/ford/supplement/mgm/doc
Navigation interaction
1. Press PHONE to enter
the
2. Press the SETTINGS tab and
select the desired phone/device.
3. Press CONNECT.
The system will check to ensure
that Bluetootht is turned on. If
Bluetootht is not turned on, the
display will ask you if you would like
to turn it on. Press YES. (The
system default is on.)
phone mode.
art=ehvec013_a
art=expec038_a
art=expec093_a
Note: If Bluetootht is turned off, the
system is turned off and
you will not be able to use the phone or media features of the system.
4. The display will read CONNECTING DEVICE NAME and then DEVICE
NAME CONNECTED when the process is finished.
USING PHONE FEATURES WITH YOUR NAVIGATION SYSTEM
Your navigation system works with
to enable you to use the
hands-free calling feature.
1. Press PHONE on the navigation
system. This will take you to the
phone screen.
70
CIMS #1617716
com_phone-scrn
itdseq=87
art=ehvec013_a
PAGE: 70 OP: root EDIT SESSION: 1 DATE: FEB 27 2007 at 16:38
REVIEW COPY ——
2008 (mgm), Supplement (supplement), Market: USA (fus)
JOB: @ibm2/ford_pdm/CLS_ford/GRP_supplement/JOB_mgm/DIV_doc
Page 71

JOBNAME: No Job Name PAGE: 71 SESS: 1 OUTPUT: Tue Feb 27 16:38:35 2007
/ford_pdm/ford/supplement/mgm/doc
Navigation interaction
2. On the phone screen you can
choose from:
• SEND: Press to receive an
incoming call, make an outgoing
call, or put one call on hold to
answer another incoming call.
• END: Press to end a call.
• PRIVACY MODE: Press to activate privacy mode. During an active
phone call over the SYNC system, you can choose to transfer the call
to your cellular for a more personal conversation.
• HOLD CALL: Press to put an active call on hold. Press again to take
off hold.
• JOIN CALLS: Press to join to active calls
• Digit entry: Press the numbers to manually enter a phone number to
call.
• Signal/battery strength and Roaming status
USING THE QUICK DIAL SCREEN
Your
for quick access.
1. Press PHONE on the navigation
system.
system enables you to save 10 frequently dialed numbers
art=expec032_a
CIMS #1617718
com_navqkdial itdseq=88
art=ehvec013_a
2. Select the ’QUICK DIAL’ tab. This
screen allows you to have quick
access to frequently called numbers.
The icon next to the contact’s name
will tell you if the number is the
person’s cell phone, work phone or
home phone.
PAGE: 71 OP: root EDIT SESSION: 1 DATE: FEB 27 2007 at 16:38
REVIEW COPY ——
2008 (mgm), Supplement (supplement), Market: USA (fus)
art=expec073_a
71
JOB: @ibm2/ford_pdm/CLS_ford/GRP_supplement/JOB_mgm/DIV_doc
Page 72

JOBNAME: No Job Name PAGE: 72 SESS: 1 OUTPUT: Tue Feb 27 16:38:35 2007
/ford_pdm/ford/supplement/mgm/doc
Navigation interaction
Press / to toggle between a
contact’s name and the phone
number.
3. Select the desired contact.
4. Press
DIAL to place the call.
Saving a contact in your Quick Dial section
After you have connected your phone and downloaded your phone book,
you may choose to save certain contacts into your Quick Dial screen for
quick access.
1. Press the PHONE BOOK tab.
2. Select the contact you wish to
save to the Quick Dial screen.
3. Press SAVE.
art=expec092_a
art=expec084_a
CIMS #1623892
com_save-qckdial
itdseq=89
art=expec085_a
4. Select the Quick Dial location in
which you wish to store the contact.
5. Press SET at the bottom of the
screen to save the contact’s
information to the chosen Quick
Dial position.
72
PAGE: 72 OP: root EDIT SESSION: 1 DATE: FEB 27 2007 at 16:38
REVIEW COPY ——
2008 (mgm), Supplement (supplement), Market: USA (fus)
art=expec089_a
JOB: @ibm2/ford_pdm/CLS_ford/GRP_supplement/JOB_mgm/DIV_doc
Page 73

JOBNAME: No Job Name PAGE: 73 SESS: 1 OUTPUT: Tue Feb 27 16:38:35 2007
/ford_pdm/ford/supplement/mgm/doc
Navigation interaction
The system will confirm when the
contact is successfully stored.
art=expec102_a
Replacing contacts in your Quick Dial section
You can replace contacts in your Quick Dial section.
1. Press the PHONE BOOK tab.
2. Select the contact you wish to
save to the Quick Dial screen.
3. Press SAVE.
4. Select the contact you wish to
replace and press REPLACE at the
bottom of the screen.
5. Select the contact with which you
wish to replace the current one.
The system will ask you to confirm
the change.
USING THE PHONE BOOK FEATURE
Your
system enables you to view the contacts downloaded from
your Bluetooth enabled cellular phone. To access your phone book:
CIMS #1623893 com_replace
itdseq=90
art=expec085_a
art=expec086_a
art=expec087_a
CIMS #1617794
com_mgmphnbk
itdseq=91
PAGE: 73 OP: root EDIT SESSION: 1 DATE: FEB 27 2007 at 16:38
REVIEW COPY ——
2008 (mgm), Supplement (supplement), Market: USA (fus)
73
JOB: @ibm2/ford_pdm/CLS_ford/GRP_supplement/JOB_mgm/DIV_doc
Page 74
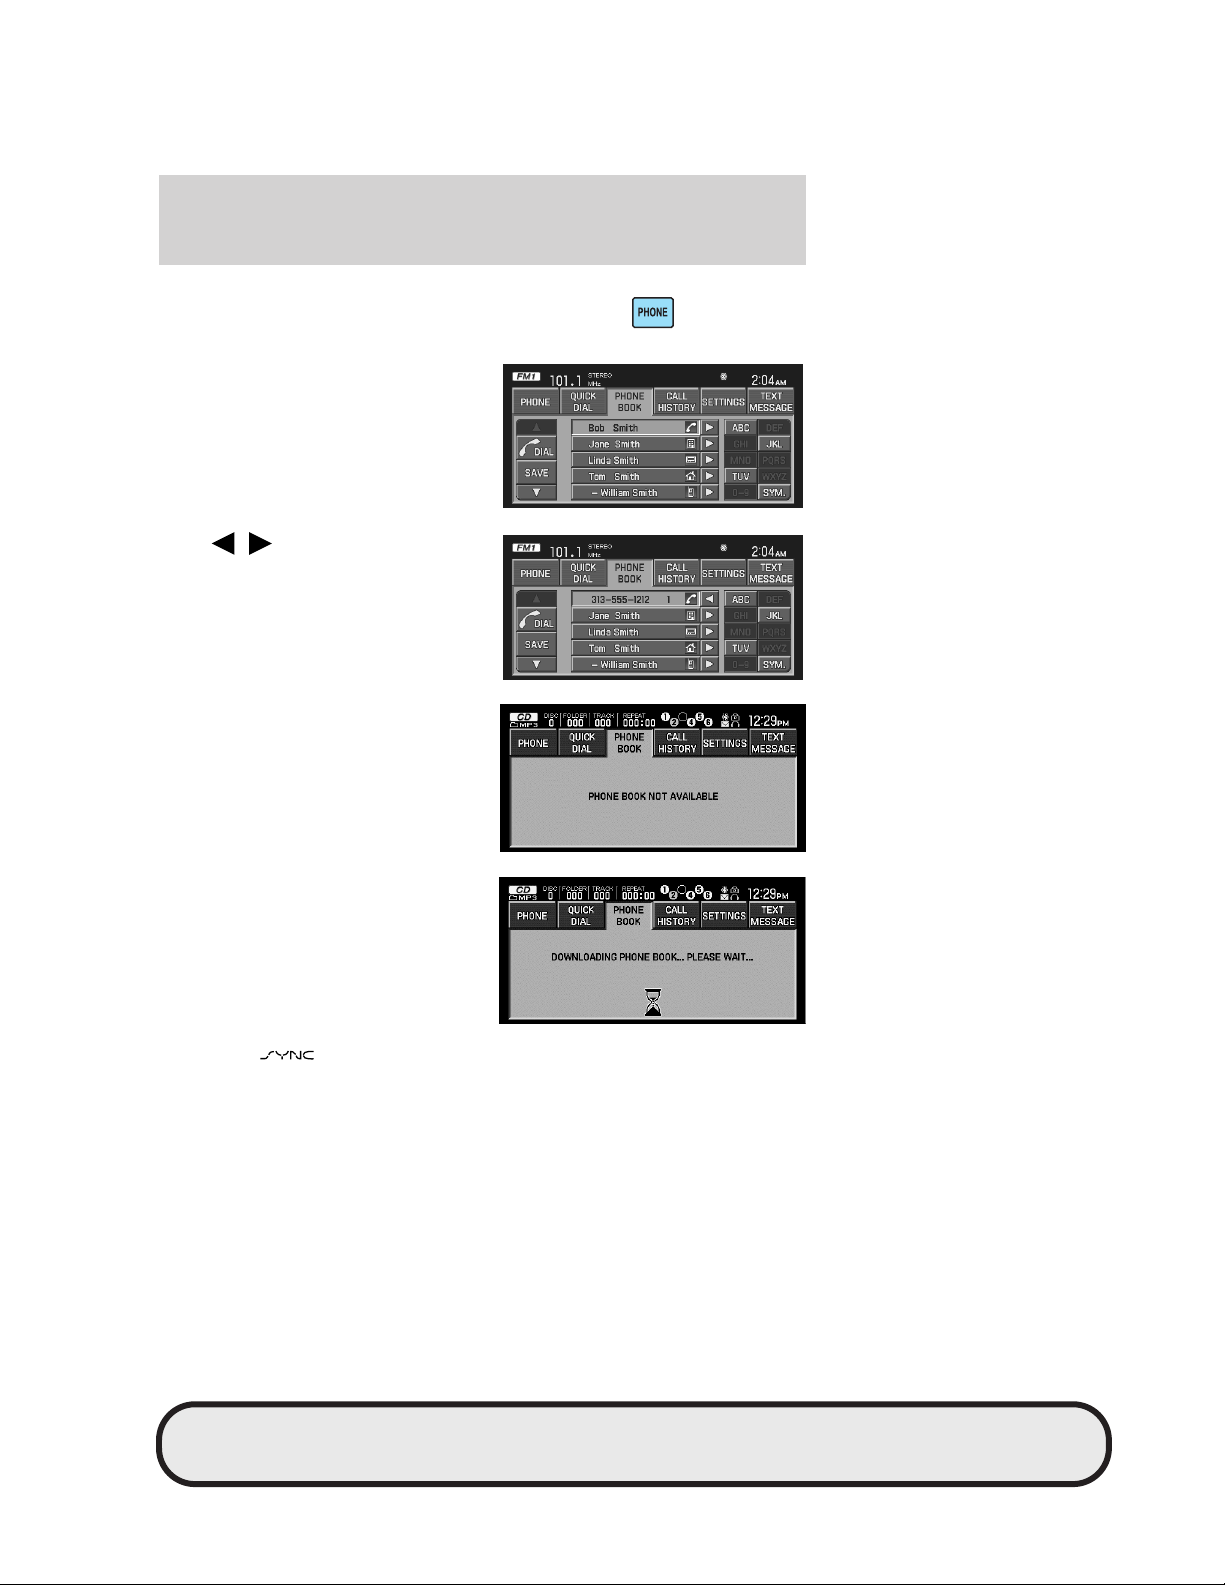
JOBNAME: No Job Name PAGE: 74 SESS: 1 OUTPUT: Tue Feb 27 16:38:35 2007
/ford_pdm/ford/supplement/mgm/doc
Navigation interaction
1. Press PHONE on the navigation
system
2. Select the ’PHONE BOOK’ tab to
access the contacts and phone
numbers previously downloaded
from your Bluetooth enabled cellular
phone.
art=ehvec013_a
art=expec085_a
Press
/ to toggle between
displaying the phone number or the
name of the contact.
If your phone book is not available,
the screen will display PHONE
BOOK NOT AVAILABLE.
If your phone book is available, the
system will download the
information.
Note: The
system will assign icons for the numbers (cellular
number, home number, etc.) Once downloaded, the phone book cannot
be deleted or edited.
ACCESSING YOUR CALL HISTORY
Once you have downloaded your call history, you can view the calls.
art=expec092_a
art=expec034_a
art=expec040_a
CIMS #1617719
com_nav-calhist
itdseq=92
74
PAGE: 74 OP: root EDIT SESSION: 1 DATE: FEB 27 2007 at 16:38
REVIEW COPY ——
2008 (mgm), Supplement (supplement), Market: USA (fus)
JOB: @ibm2/ford_pdm/CLS_ford/GRP_supplement/JOB_mgm/DIV_doc
Page 75
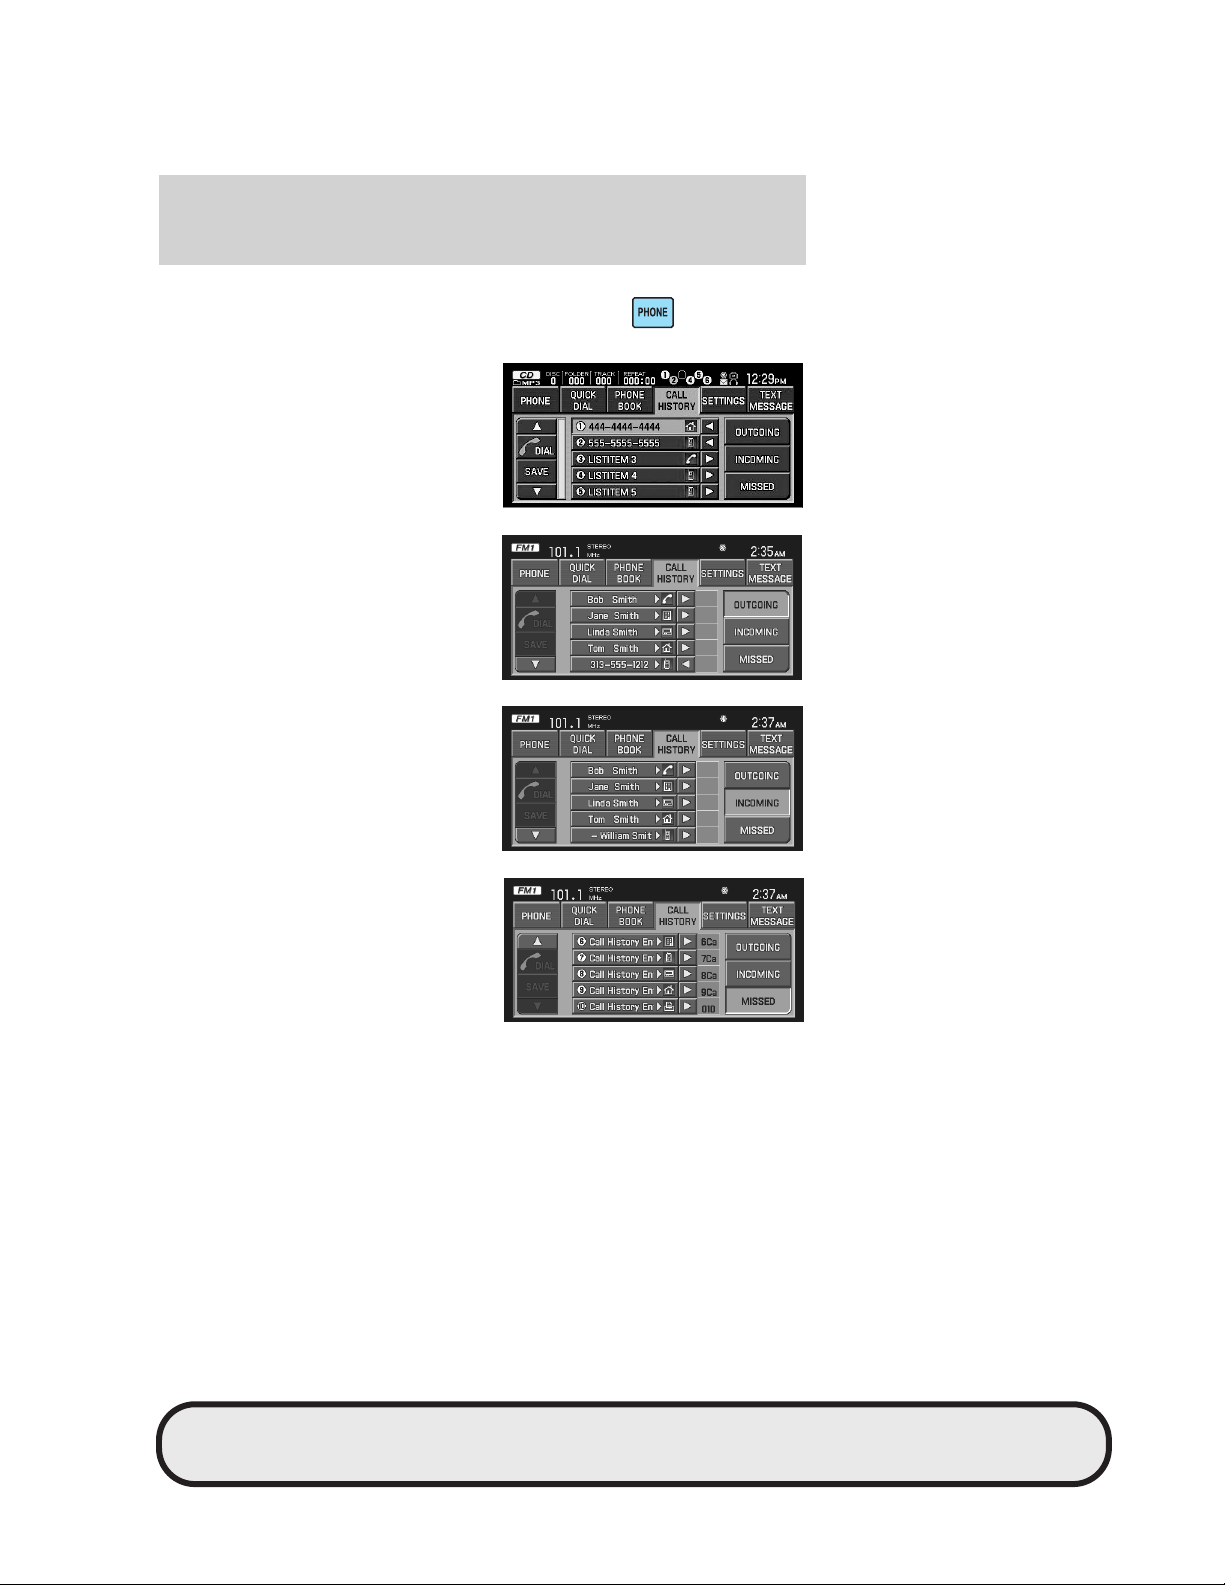
JOBNAME: No Job Name PAGE: 75 SESS: 1 OUTPUT: Tue Feb 27 16:38:35 2007
/ford_pdm/ford/supplement/mgm/doc
Navigation interaction
1. Press PHONE on the navigation
system. Select the ’CALL HISTORY’
tab.
2. The Call History screen allows
you to have quick access to
frequently called numbers.
Press OUTGOING to view your
outgoing calls. The system will save
up to 25 entries.
art=ehvec013_a
art=expec037_a
art=expec099_a
Press INCOMING to view your
incoming calls. The system will save
up to 25 entries.
Press MISSED to view your missed
calls. The system will save up to 25
entries.
SYSTEM SETTINGS
You can choose to connect, add, delete or set specified phones or other
media devices as a favorite as well as access the advanced settings such
as Bluetooth. To access:
75
art=expec096_a
art=expec098_a
CIMS #1618386 com_settings
itdseq=93
PAGE: 75 OP: root EDIT SESSION: 1 DATE: FEB 27 2007 at 16:38
REVIEW COPY ——
2008 (mgm), Supplement (supplement), Market: USA (fus)
JOB: @ibm2/ford_pdm/CLS_ford/GRP_supplement/JOB_mgm/DIV_doc
Page 76

JOBNAME: No Job Name PAGE: 76 SESS: 1 OUTPUT: Tue Feb 27 16:38:35 2007
/ford_pdm/ford/supplement/mgm/doc
Navigation interaction
1. Press PHONE on the navigation
system. Select the ’SETTINGS’ tab.
2. Once in the Settings screen, you
may not only view your devices, you
may also select from the following
options:
CONNECT: Choose to connect a new phone or playing device.
ADD: Choose to add another phone or playing device.
DELETE: Choose to delete a phone or playing device.
SET AS FAV: Choose to set a phone or playing device as your favorite.
This will then be the primary phone that the
to after each ignition cycle.
ADVANCED: Choose to access the advanced menu settings.
Connecting a new device to your SYNC™ system
Select to connect an already paired phone/device to the system.
Adding a new device to your SYNC™ system
Select to add/pair a new device to
the system. The screens will walk
you through the pairing process.
system re-connects
art=ehvec013_a
art=expec038_a
CIMS #1623898 com_devices
itdseq=94
CIMS #1623899
com_addnewdev
itdseq=95
art=expec062_a
Deleting a device from your SYNC™ system
Select to delete a device from your previously paired list.
Selecting a favorite
This feature allows you to set a device as your favorite. This means the
system will set this phone as your primary contact and will attempt to
reconnect to that phone when the vehicle ignition is turned on.
76
PAGE: 76 OP: root EDIT SESSION: 1 DATE: FEB 27 2007 at 16:38
JOB: @ibm2/ford_pdm/CLS_ford/GRP_supplement/JOB_mgm/DIV_doc
REVIEW COPY ——
2008 (mgm), Supplement (supplement), Market: USA (fus)
CIMS #1623900
com_deletedevice
itdseq=96
CIMS #1623901 com_setasfav
itdseq=97
Page 77
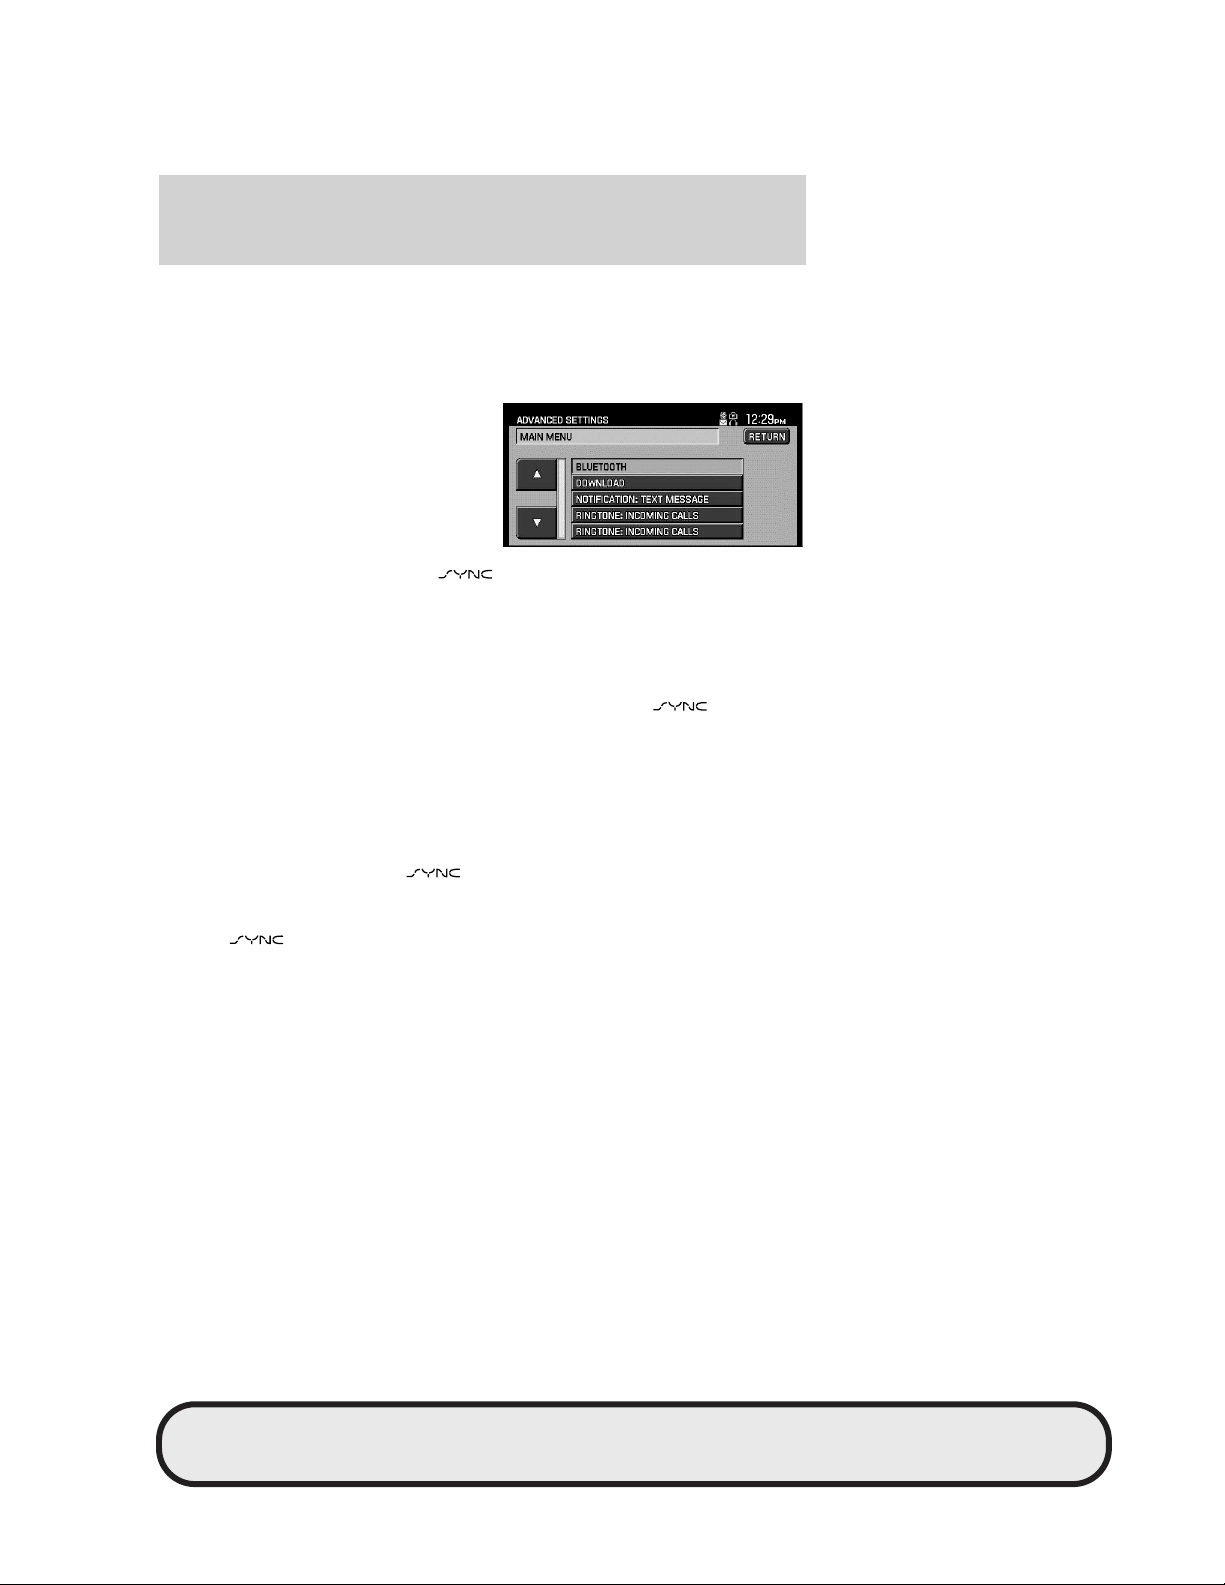
JOBNAME: No Job Name PAGE: 77 SESS: 1 OUTPUT: Tue Feb 27 16:38:35 2007
/ford_pdm/ford/supplement/mgm/doc
Navigation interaction
Advanced settings
The Advanced Settings screen allows you access to Bluetootht,
automatic downloads, your phone book / call history information, ring
tones, text messaging, prompts, reseting information as well as viewing
your phone information.
BLUETOOTH ON/OFF: Turning
Bluetootht ON will enable you to
stream audio from your Bluetootht
enabled cellular phone or playing
device as well as use the
voice-activated in-vehicle
communications and text messaging.
Turning Bluetootht OFF will turn
off access to all features of the
system.
DOWNLOAD ON/OFF: Select ON to download your Bluetootht enabled
cellular phone’s phone book and call history.
Note: This selection will automatically re-download your phone book and
call history every time your phone reconnect to the system during
ignition. This automatic download will erase any edits you may have
made to the phone book and call history stored in your
system.
After initial download, you may select to turn this feature OFF to avoid
erasing any changes to the information in your system.
RING TONE INCOMING CALLS: Select to choose the ring tone for all
incoming calls.
MODIFY PHONE BOOK/CALL HISTORY: Select to make
modifications to your phone book and call history information which has
been downloaded into your
system. You can choose to delete
individual entries or the entire phone book or call history.
Note: Erasing a contact or all contacts in your phone book /call history
in your
system will NOT erase any information in your cellular
phone.
TEXT MESSAGING NOTIFICATION ON/OFF : Select if you would
like your navigation system to display any incoming text message. This
will be preceded by an audible tone.
PROMPTS: Select if you would like more advanced voice prompts for
guidance or more simple prompts.
PROVIDER / SERIVCE / NO SERVICE: This will display the provider
and service status of the currently connected Bluetootht enabled cellular
phone.
CIMS #1623902
com_advanced itdseq=98
art=expec039_a
PAGE: 77 OP: root EDIT SESSION: 1 DATE: FEB 27 2007 at 16:38
REVIEW COPY ——
2008 (mgm), Supplement (supplement), Market: USA (fus)
77
JOB: @ibm2/ford_pdm/CLS_ford/GRP_supplement/JOB_mgm/DIV_doc
Page 78
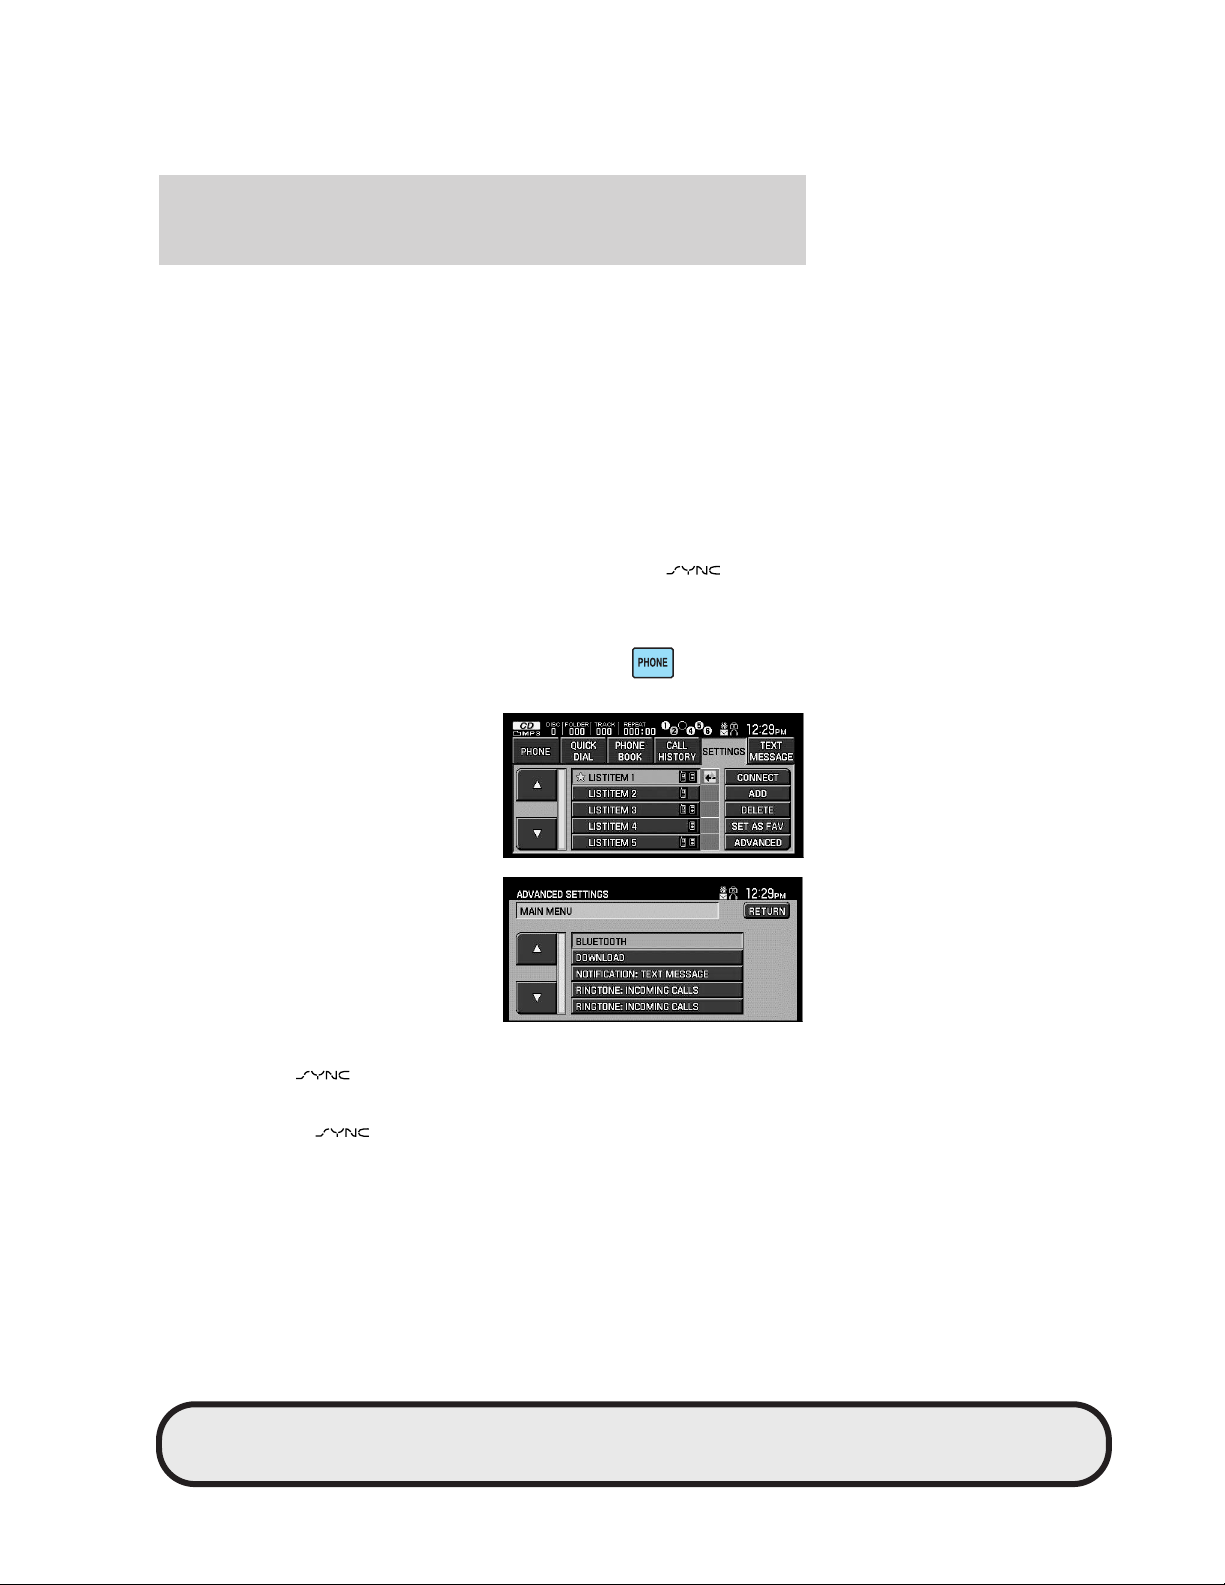
JOBNAME: No Job Name PAGE: 78 SESS: 1 OUTPUT: Tue Feb 27 16:38:35 2007
/ford_pdm/ford/supplement/mgm/doc
Navigation interaction
FACTORY DEFAULTS: This selection allows you to erase any settings
someone else may have set and will return you to the factory defaults,
such as Bluetooth ON and more advanced guidance. This will not erase
your downloaded phone book and all history.
MASTER RESET: This selection allows you to erase all settings but also
all phone book and call history settings.
INSTALL: This selection allows you to install new software upgrades or
additions which you have downloaded from the Ford web site.
Turning BluetoothT on/off
Turning Bluetootht ON will enable you to stream audio from your
Bluetootht enabled cellular phone or playing device as well as use the
voice-activated in-vehicle communications and text messaging. Turning
Bluetootht OFF will turn off access to all features of the
Any incoming text or phone messages will go into their respective
missed folders. To access:
1. Press PHONE on the navigation
system. Select the ’SETTINGS’ tab.
system.
CIMS #1621571
com_navbluth itdseq=99
art=ehvec013_a
2. Press ADVANCED.
3. Press BLUETOOTH. Turn ON or
OFF. System default is ON.
Note: With Bluetooth off, you will not be able to use the phone or media
features of the
system.
Selecting automatic downloading
You can tell your
system to automatically download the phone
book and call history from the connected Bluetootht enabled cellular
78
art=expec038_a
art=expec039_a
CIMS #1621572
com_navdownload
itdseq=100
PAGE: 78 OP: root EDIT SESSION: 1 DATE: FEB 27 2007 at 16:38
REVIEW COPY ——
2008 (mgm), Supplement (supplement), Market: USA (fus)
JOB: @ibm2/ford_pdm/CLS_ford/GRP_supplement/JOB_mgm/DIV_doc
Page 79
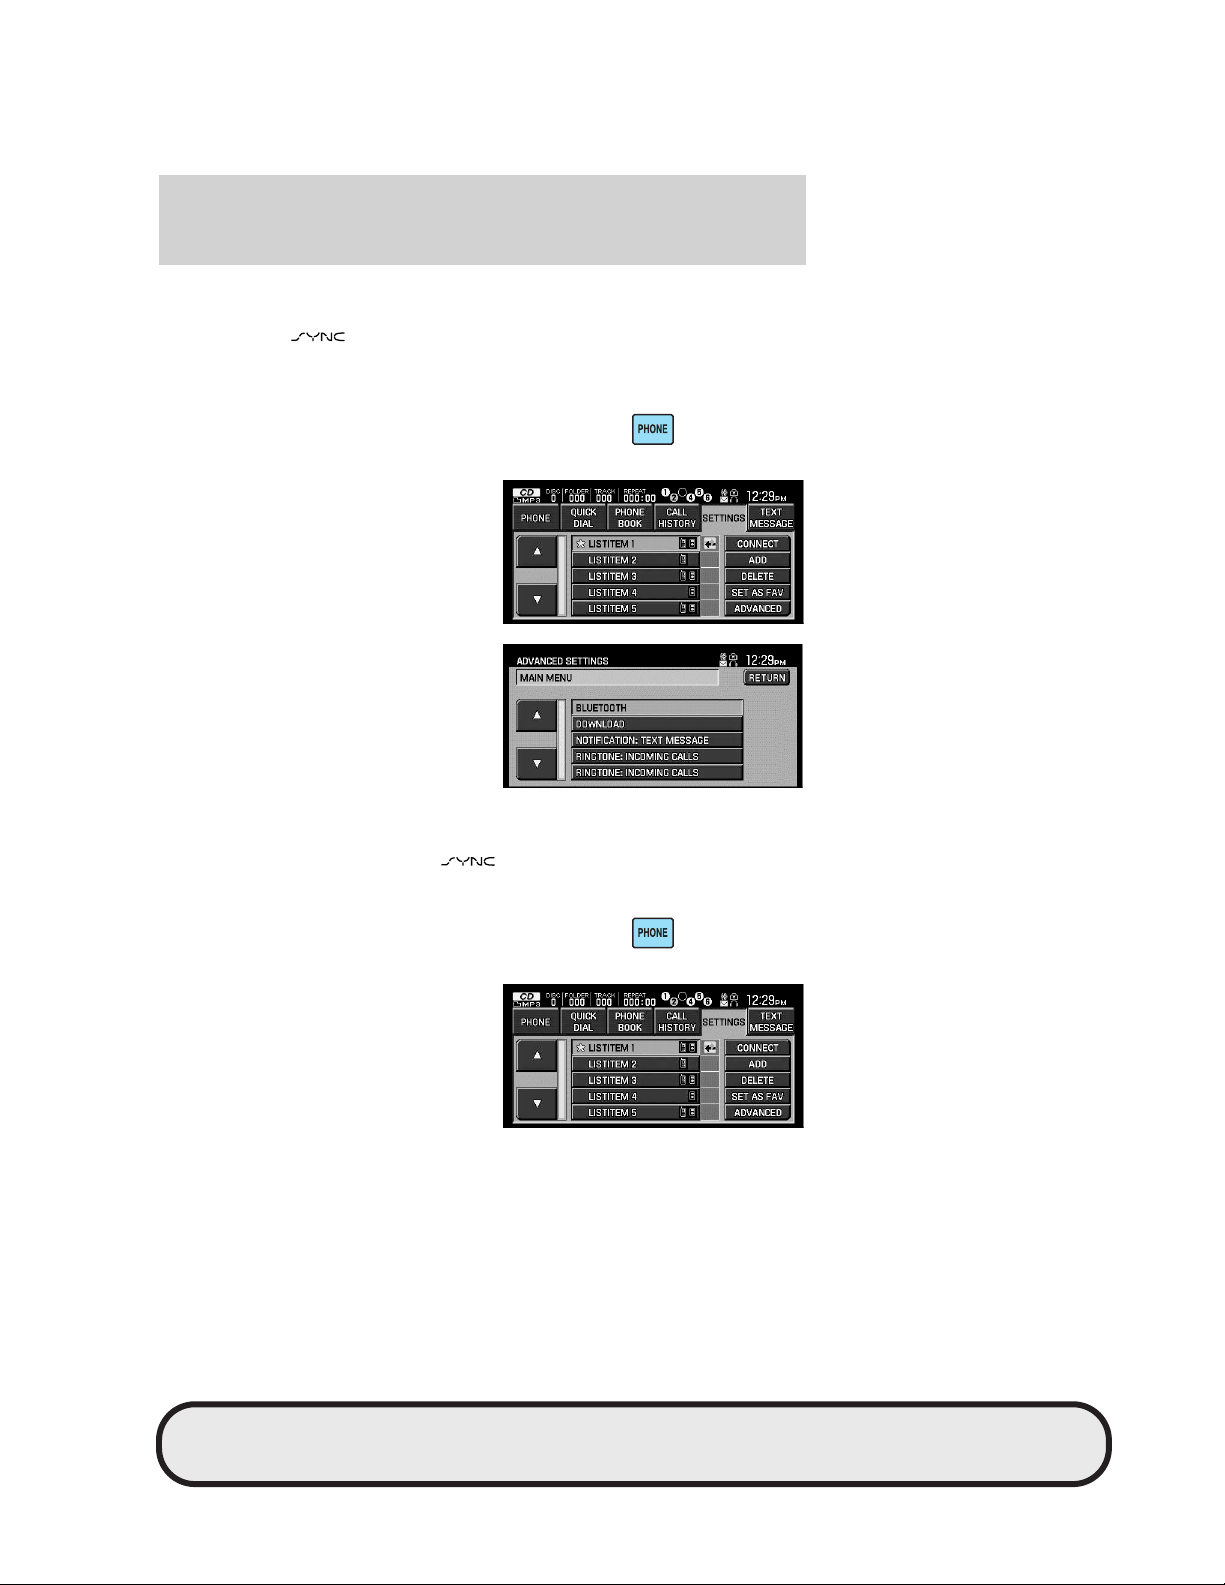
JOBNAME: No Job Name PAGE: 79 SESS: 1 OUTPUT: Tue Feb 27 16:38:35 2007
/ford_pdm/ford/supplement/mgm/doc
Navigation interaction
phone with every new ignition cycle. This automatic download will erase
any changes you may have made to the phone book and call history
stored in your
turn this feature OFF to avoid erasing any changes to the information in
your system. To access this setting:
1. Press PHONE on the navigation
system. Select the ’SETTINGS’ tab.
2. Press ADVANCED.
system. After initial download, you may select to
art=ehvec013_a
art=expec038_a
3. Press DOWNLOAD. Turn ON or
OFF. System default is ON.
Selecting your ringtone
You can select the ringtone the
incoming call. To access this setting:
1. Press PHONE on the navigation
system. Select the ’SETTINGS’ tab.
2. Press ADVANCED.
system will play during an
79
art=expec039_a
CIMS #1621573
com_navringtone
itdseq=101
art=ehvec013_a
art=expec038_a
PAGE: 79 OP: root EDIT SESSION: 1 DATE: FEB 27 2007 at 16:38
REVIEW COPY ——
2008 (mgm), Supplement (supplement), Market: USA (fus)
JOB: @ibm2/ford_pdm/CLS_ford/GRP_supplement/JOB_mgm/DIV_doc
Page 80

JOBNAME: No Job Name PAGE: 80 SESS: 1 OUTPUT: Tue Feb 27 16:38:35 2007
/ford_pdm/ford/supplement/mgm/doc
Navigation interaction
3. Press RINGTONE: INCOMING
CALLS. Select from three ringtones,
using your cellular phone’s ring tone
or turning the ring tone off.
art=expec039_a
Modifying your phone book and call history
You can modify contacts in your
phone book and call history. You
can choose to delete individual entries or the entire phone book and call
history.
Note: Erasing a contact or all contacts in your phone book /call history
in your
system will NOT erase any information in your cellular
phone. However, if the automatic downloading feature is turned on, when
the system downloads the phone book and call history upon ignition, any
changes will be erased.
1. Press PHONE on the navigation
system. Select the ’SETTINGS’ tab.
2. Press ADVANCED.
3. Press MODIFY PHONE
BOOK/CALL HISTORY.
CIMS #1621574
com_navphmodify
itdseq=102
art=ehvec013_a
art=expec038_a
art=expec039_a
You may then select from:
ADD CONTACT: Select to ’push’ a new contact from your Bluetootht
enabled cellular phone which is currently set as the primary (favorite)
phone. Your phone must support OBEX to perform this function. The
80
PAGE: 80 OP: root EDIT SESSION: 1 DATE: FEB 27 2007 at 16:38
JOB: @ibm2/ford_pdm/CLS_ford/GRP_supplement/JOB_mgm/DIV_doc
REVIEW COPY ——
2008 (mgm), Supplement (supplement), Market: USA (fus)
Page 81

JOBNAME: No Job Name PAGE: 81 SESS: 1 OUTPUT: Tue Feb 27 16:38:35 2007
/ford_pdm/ford/supplement/mgm/doc
Navigation interaction
system will tell you to send the contacts from your phone. Refer to your
Owner’s manual for instructions. When successfully sent, the display will
read XXX CONTACTS RECEIVED. DONE? Press YES if you are finished
or press NO if you wish to send more contacts to the system.
DOWNLOAD PHONE BOOK / CALL HISTORY: Select YES to
automatically download the phone book and call history from your
Bluetootht enabled cellular phone which is currently set as the primary
(favorite) phone upon every ignition. Select NO and the system will not
perform this function at every ignition cycle.
DELETE PHONE BOOK / CALL HISTORY: Select YES to delete the
entire phone book and call history from the
function will NOT delete any information from your cellular phone.)
Turning the text message notification on/off
You can chose to receive or not to receive notification that you have
received a text message. With notifications turned on, you will hear an
audible tone when a text message is arriving along with a display on the
screen that will allow you to view the message, listen to the system read
the message, to dial the person sending the message or to cancel the
screen. With notifications turned off, you will not be notified by a tone or
prompt and the message will not appear on screen. The text message
will be placed in the MISSED folder.
To access this setting”
1. Press PHONE on the navigation
system. Select the ’SETTINGS’ tab.
system. (This
CIMS #1621575
com_navtextmsg
itdseq=103
art=ehvec013_a
2. Press ADVANCED.
PAGE: 81 OP: root EDIT SESSION: 1 DATE: FEB 27 2007 at 16:38
REVIEW COPY ——
2008 (mgm), Supplement (supplement), Market: USA (fus)
art=expec038_a
81
JOB: @ibm2/ford_pdm/CLS_ford/GRP_supplement/JOB_mgm/DIV_doc
Page 82

JOBNAME: No Job Name PAGE: 82 SESS: 1 OUTPUT: Tue Feb 27 16:38:35 2007
/ford_pdm/ford/supplement/mgm/doc
Navigation interaction
3. Press TEXT MESSAGE
NOTIFICATION.
4. Press YES for the system to alert
you audibly of an incoming text
message. Press NO if you do not
wish to have the audible tone alert
you.
art=expec039_a
Choosing voice prompts
Your
system is equipped with an advanced voice recognition
system which can perform a multitude of tasks. The system will perform
desired tasks such as calling someone in your phone book or searching
for a particular genre of music on your playing device. The system will
also ask for clarification if it does not have a high level of confidence of
what was spoken. The level of help the system provides is up to you. You
can choose more interaction with a higher level of verbal prompts for
guidance and help or you can choose to simply hear the prompts when
the system needs direction.
To access this setting:
1. Press PHONE on the navigation
system. Select the ’SETTINGS’ tab.
2. Press ADVANCED.
3. Press PROMPTS.
4. Press YES for the prompts. Press
NO if you do not wish to hear them.
CIMS #1621576
com_navprompts
itdseq=104
art=ehvec013_a
art=expec038_a
art=expec039_a
82
PAGE: 82 OP: root EDIT SESSION: 1 DATE: FEB 27 2007 at 16:38
REVIEW COPY ——
2008 (mgm), Supplement (supplement), Market: USA (fus)
JOB: @ibm2/ford_pdm/CLS_ford/GRP_supplement/JOB_mgm/DIV_doc
Page 83

JOBNAME: No Job Name PAGE: 83 SESS: 1 OUTPUT: Tue Feb 27 16:38:35 2007
/ford_pdm/ford/supplement/mgm/doc
Navigation interaction
Viewing your phone provider and service status
To view your phone’s provider’s name and your service status through
your
system:
1. Press PHONE on the navigation
system. Select the ’SETTINGS’ tab.
2. Press ADVANCED.
3. Scroll through the list by
pressing
/ arrows until the
listing showing your provider name
and service status appears.
Returning to the factory default settings
This feature will allow you to erase all the preference settings in
your
system and return them to the system defaults. This will
NOT erase the phone book and call history information stored in the
system.
To access this setting:
1. Press PHONE on the navigation
system. Select the ’SETTINGS’ tab.
2. Press ADVANCED.
CIMS #1621577
com_providerserv
itdseq=105
art=ehvec013_a
art=expec038_a
CIMS #1621578
com_nav-factorydef
itdseq=106
art=ehvec013_a
art=expec038_a
3. Press FACTORY DEFAULTS.
4. The system will ask you confirm
with RESET TO FACTORY
DEFAULTS? YES NO. Press YES
and the system will then confirm,
FACTORY DEFAULTS RESET.
PAGE: 83 OP: root EDIT SESSION: 1 DATE: FEB 27 2007 at 16:38
REVIEW COPY ——
2008 (mgm), Supplement (supplement), Market: USA (fus)
art=expec039_a
83
JOB: @ibm2/ford_pdm/CLS_ford/GRP_supplement/JOB_mgm/DIV_doc
Page 84

JOBNAME: No Job Name PAGE: 84 SESS: 1 OUTPUT: Tue Feb 27 16:38:35 2007
/ford_pdm/ford/supplement/mgm/doc
Navigation interaction
Performing a master reset
You can also perform a master rest of your
system which will not
only remove all preference settings and return them to the factory
defaults, but it will also completely erase all phone book and call history
listings in the system. To access this setting:
1. Press PHONE on the navigation
system. Select the ’SETTINGS’ tab.
2. Press ADVANCED.
3. Press MASTER RESET?
4. The system will ask you MASTER
RESET? Press YES.
5. The system will then confirm the
task was completed by displaying
MASTER RESET COMPLETED.
Installing new software
Your
system is
To access this setting:
1. Press PHONE on the navigation
system. Select the ’SETTINGS’ tab.
CIMS #1621579
com_nav-mstreset
itdseq=107
art=ehvec013_a
art=expec038_a
art=expec039_a
CIMS #1621580
com_nav-install
itdseq=108
art=ehvec013_a
84
PAGE: 84 OP: root EDIT SESSION: 1 DATE: FEB 27 2007 at 16:38
REVIEW COPY ——
2008 (mgm), Supplement (supplement), Market: USA (fus)
JOB: @ibm2/ford_pdm/CLS_ford/GRP_supplement/JOB_mgm/DIV_doc
Page 85

JOBNAME: No Job Name PAGE: 85 SESS: 1 OUTPUT: Tue Feb 27 16:38:35 2007
/ford_pdm/ford/supplement/mgm/doc
Navigation interaction
2. Press ADVANCED.
3. Press INSTALL.
art=expec038_a
art=expec039_a
TEXT MESSAGING
Your system not only enables you to send and receive text
messages, it will also read them to you as well as translate over 1,000
popularly used acronyms (i.e., lol, btw, etc.). To access text messaging:
1. Press PHONE on the navigation
system.
2. Select the ’TEXT MESSAGE’ tab.
The system will automatically check
to see if your paired (connected)
phone is equipped for text
messaging. If it is not, this screen
will display.
3. If your phone is equipped for text
messaging, the system will take you
to the text messaging screen. From
this screen you will be able to select
from the following options:
85
CIMS #1618388
com_text-messaging
itdseq=109
art=ehvec013_a
art=expec043_a
art=expec107_a
PAGE: 85 OP: root EDIT SESSION: 1 DATE: FEB 27 2007 at 16:38
REVIEW COPY ——
2008 (mgm), Supplement (supplement), Market: USA (fus)
JOB: @ibm2/ford_pdm/CLS_ford/GRP_supplement/JOB_mgm/DIV_doc
Page 86

JOBNAME: No Job Name PAGE: 86 SESS: 1 OUTPUT: Tue Feb 27 16:38:35 2007
/ford_pdm/ford/supplement/mgm/doc
Navigation interaction
VIEW: Select the desired message and press VIEW to view the text
message.
LISTEN: Select desired message and press LISTEN to have the system
read the text messages to you.
COMPOSE: Select to compose a text message.
DELETE ALL: Select to delete all text messages from the
system.
DOWNLOAD: Select to download your text messages from your
connected phone.
Receiving a text message
When there is an incoming text
message, an audible tone will sound
and the screen will display the caller
name and ID if the caller is saved in
your phone book.
CIMS #1621586
com_receive-txtmsg
itdseq=110
art=expec076_a
Press VIEW to view the text
message.
Press LISTEN for the system to read the message to you.
Press REPLY to send a text message to the same contact.
Press
DIAL to call the contact.
Press FORWARD to forward the text message to another contact.
Press CANCEL to exit the screen.
86
art=expec066_a
PAGE: 86 OP: root EDIT SESSION: 1 DATE: FEB 27 2007 at 16:38
REVIEW COPY ——
2008 (mgm), Supplement (supplement), Market: USA (fus)
JOB: @ibm2/ford_pdm/CLS_ford/GRP_supplement/JOB_mgm/DIV_doc
Page 87

JOBNAME: No Job Name PAGE: 87 SESS: 1 OUTPUT: Tue Feb 27 16:38:35 2007
/ford_pdm/ford/supplement/mgm/doc
Navigation interaction
Sending a text message
1. Press PHONE.
2. Select the TEXT MESSAGE tab.
3. Press COMPOSE.
Your
system has 25 possible
text messages you can send.
4. Press /
to scroll through the
following 25 possible text messages
you can send from your
system.
• I will be late • Meeting cancelled
• Can’t talk right now • Call me
• Where are you? • I need more directions
• Thanks • I agree
• I disagree • I’m stuck in traffic
• B there n 5 minutes • B there n 10 minutes
• B there n 15 minutes • B there n 30 minutes
• Can’t wait to see you • I love you
• Too funny • What do you think?
• On my way • U R the best
• Call U later • Yes
• No • Why?
• Tell me more
5. Select the desired text message and press SEND. Your text message
will have a signature of “This message was sent from my Ford, Lincoln
or Mercury vehicle.”
CIMS #1621589
com_send-txtmsg
itdseq=111
art=ehvec013_a
art=expec107_a
art=expec065_a
PAGE: 87 OP: root EDIT SESSION: 1 DATE: FEB 27 2007 at 16:38
REVIEW COPY ——
2008 (mgm), Supplement (supplement), Market: USA (fus)
87
JOB: @ibm2/ford_pdm/CLS_ford/GRP_supplement/JOB_mgm/DIV_doc
Page 88

JOBNAME: No Job Name PAGE: 88 SESS: 1 OUTPUT: Tue Feb 27 16:38:35 2007
/ford_pdm/ford/supplement/mgm/doc
Navigation interaction
ACCESSING YOUR SYNC™ MEDIA FEATURES THROUGH YOUR
NAVIGATION SYSTEM
To can access your
media features through your navigation
system:
1. Press MEDIA on your navigation system.
2. Select the ’USERS DEVICE’ tab to choose to which source you would
like to listen (Auxiliary input jack or USB port). The system will list all
paired devices. You can choose to connect to a device, delete the device,
add a device, or access the advanced settings.
3. After selecting to connect to either your USB port or your Auxiliary
Input Jack, you will be able to play your music. You can also access the
following options:
Media Library: Select to enter
the
media library and
access all available playlists, artists,
albums and tracks.
Similar music: Select to have
the
system create a list of
music similar to what you are
currently playing.
Shuffle: Select to shuffle your current music.
Settings: Select to turn Autoplay and system prompts ON/off.
Text: Select to view all available information for the music currently
playing.
ACCESSING THE USB PORT AND AUXILIARY INPUT JACK
THROUGH THE NAVIGATION SYSTEM
You can access any digital player device plugged into the USB port or
auxiliary input jack (Line in) through your navigation system. You can
then search for and play specific artists, genres, songs, etc. Ensure that
your digital playing device is plugged into either the USB port or the
auxiliary input jack. To access:
1. Press MEDIA.
CIMS #1619126
com_nav-media
itdseq=112
art=expec100_a
CIMS #1621592
com_nav-userdevice
itdseq=113
art=expad803_a
88
PAGE: 88 OP: root EDIT SESSION: 1 DATE: FEB 27 2007 at 16:38
REVIEW COPY ——
2008 (mgm), Supplement (supplement), Market: USA (fus)
JOB: @ibm2/ford_pdm/CLS_ford/GRP_supplement/JOB_mgm/DIV_doc
Page 89

JOBNAME: No Job Name PAGE: 89 SESS: 1 OUTPUT: Tue Feb 27 16:38:35 2007
/ford_pdm/ford/supplement/mgm/doc
Navigation interaction
2. Select the USER DEVICE tab.
LINE will appear above the
SOURCE button. If you wish to
change the media source, press
SOURCE repeatedly to cycle
through USB which will access any
digital playing media plugged into
the USB port, BTST (Bluetooth
stereo, music streamed from your connected cellular phone) and LINE
which will access any digital playing media plugged into the auxiliary
input jack.
If there is a digital playing device
plugged into the USB port or the
auxiliary input jack, once the system
connects to the source, it will begin
to index all of the music.
Note: Depending on the amount of
music, it may take a few minutes for
the system to download all the
music.
After the music has been indexed, you can select from the following
options:
MUSIC LIBRARY: Press to access play settings such as playlists, play
tracks, etc.
SIMILAR MUSIC: Press to play music similar to the music currently
playing.
SHUFFLE: Press to shuffle the songs.
REPEAT: Press to repeat the currently playing song.
SETTINGS: Press to access the User device settings.
TEXT: Press to view additional information about the currently playing
song.
Using the media music library
You can access many media features using the music library. To access:
1. Press MEDIA.
art=expec090_a
art=expec074_a
CIMS #1621593
com_med-muslibrary
itdseq=114
art=expad803_a
PAGE: 89 OP: root EDIT SESSION: 1 DATE: FEB 27 2007 at 16:38
REVIEW COPY ——
2008 (mgm), Supplement (supplement), Market: USA (fus)
89
JOB: @ibm2/ford_pdm/CLS_ford/GRP_supplement/JOB_mgm/DIV_doc
Page 90
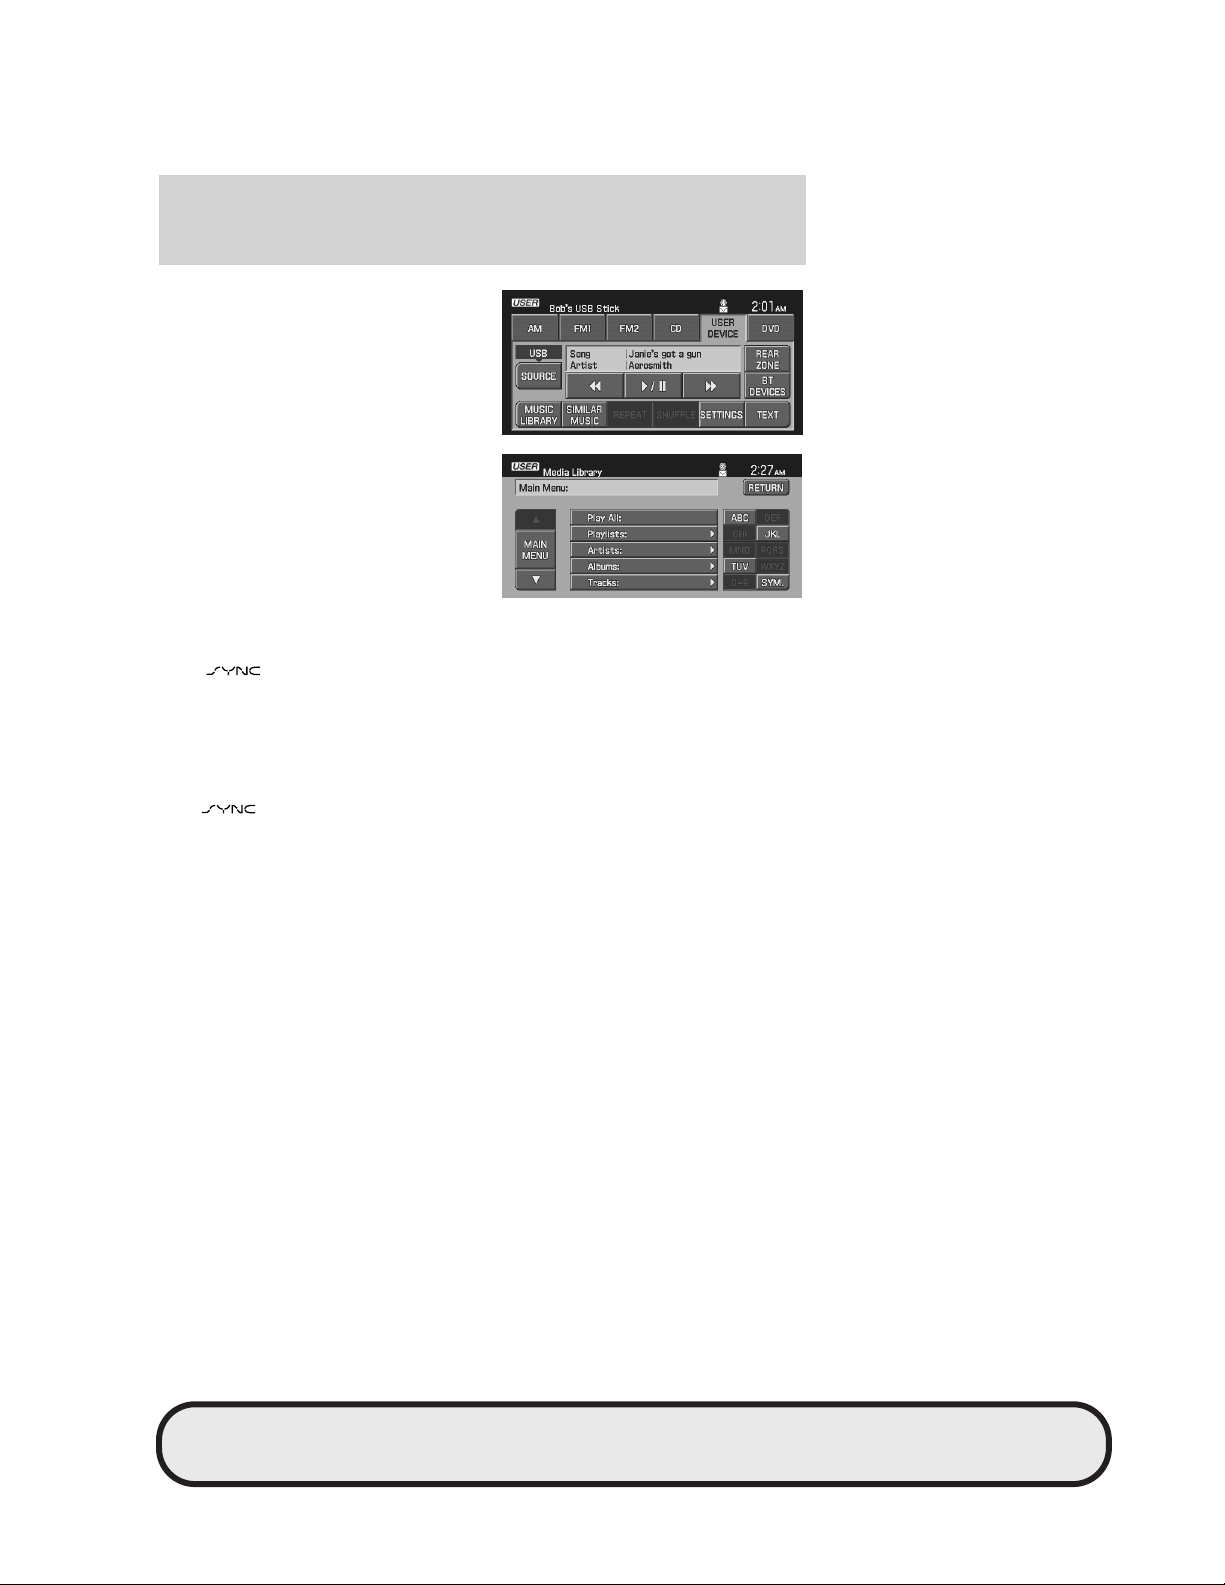
JOBNAME: No Job Name PAGE: 90 SESS: 1 OUTPUT: Tue Feb 27 16:38:35 2007
/ford_pdm/ford/supplement/mgm/doc
Navigation interaction
2. Select the USER DEVICE tab. If
you wish to change the media
source, press SOURCE repeatedly to
cycle through the options.
3. Press MEDIA LIBRARY.
From this screen, you can choose to
play all songs, playlists, as well as
any desired artists, albums and
tracks.
art=expec074_a
art=expec100_a
CALLING CONTACTS STORED IN YOUR NAVIGATION SYSTEM
Your
system gives you the option to call contacts stored in your
navigation system, such as those in your address book or POI (Point of
Interest) contacts.
Calling someone in your address book
To call someone in your navigation address book using the hands
free
system:
90
CIMS #1618409
com_adpoi-intro
itdseq=115
CIMS #1618390
com_nav-addressbk
itdseq=116
PAGE: 90 OP: root EDIT SESSION: 1 DATE: FEB 27 2007 at 16:38
REVIEW COPY ——
2008 (mgm), Supplement (supplement), Market: USA (fus)
JOB: @ibm2/ford_pdm/CLS_ford/GRP_supplement/JOB_mgm/DIV_doc
Page 91

JOBNAME: No Job Name PAGE: 91 SESS: 1 OUTPUT: Tue Feb 27 16:38:35 2007
/ford_pdm/ford/supplement/mgm/doc
Navigation interaction
art=251cf781_b
1. Press DEST.
2. Select the ADDRESS BOOK tab.
Select the desired address.
3. Press the VIEW/EDIT selection at
the right.
4. Press the
DIAL icon to
initiate hands free calling.
Calling a POI (Point of interest)
To call a Point of Interest contact stored in your navigation system using
the hands free
feature:
91
art=expad789_a
art=expec031_a
CIMS #1618406 com_poi-dial
itdseq=117
PAGE: 91 OP: root EDIT SESSION: 1 DATE: FEB 27 2007 at 16:38
REVIEW COPY ——
2008 (mgm), Supplement (supplement), Market: USA (fus)
JOB: @ibm2/ford_pdm/CLS_ford/GRP_supplement/JOB_mgm/DIV_doc
Page 92

JOBNAME: No Job Name PAGE: 92 SESS: 1 OUTPUT: Tue Feb 27 16:38:35 2007
/ford_pdm/ford/supplement/mgm/doc
Navigation interaction
art=251cf781_b
1. Press DEST.
2. Select the POI tab.
3. Press the
DIAL icon to
initiate hands free calling.
92
art=expad758_a
art=expec035_a
PAGE: 92 OP: root EDIT SESSION: 1 DATE: FEB 27 2007 at 16:38
REVIEW COPY ——
2008 (mgm), Supplement (supplement), Market: USA (fus)
JOB: @ibm2/ford_pdm/CLS_ford/GRP_supplement/JOB_mgm/DIV_doc
Page 93
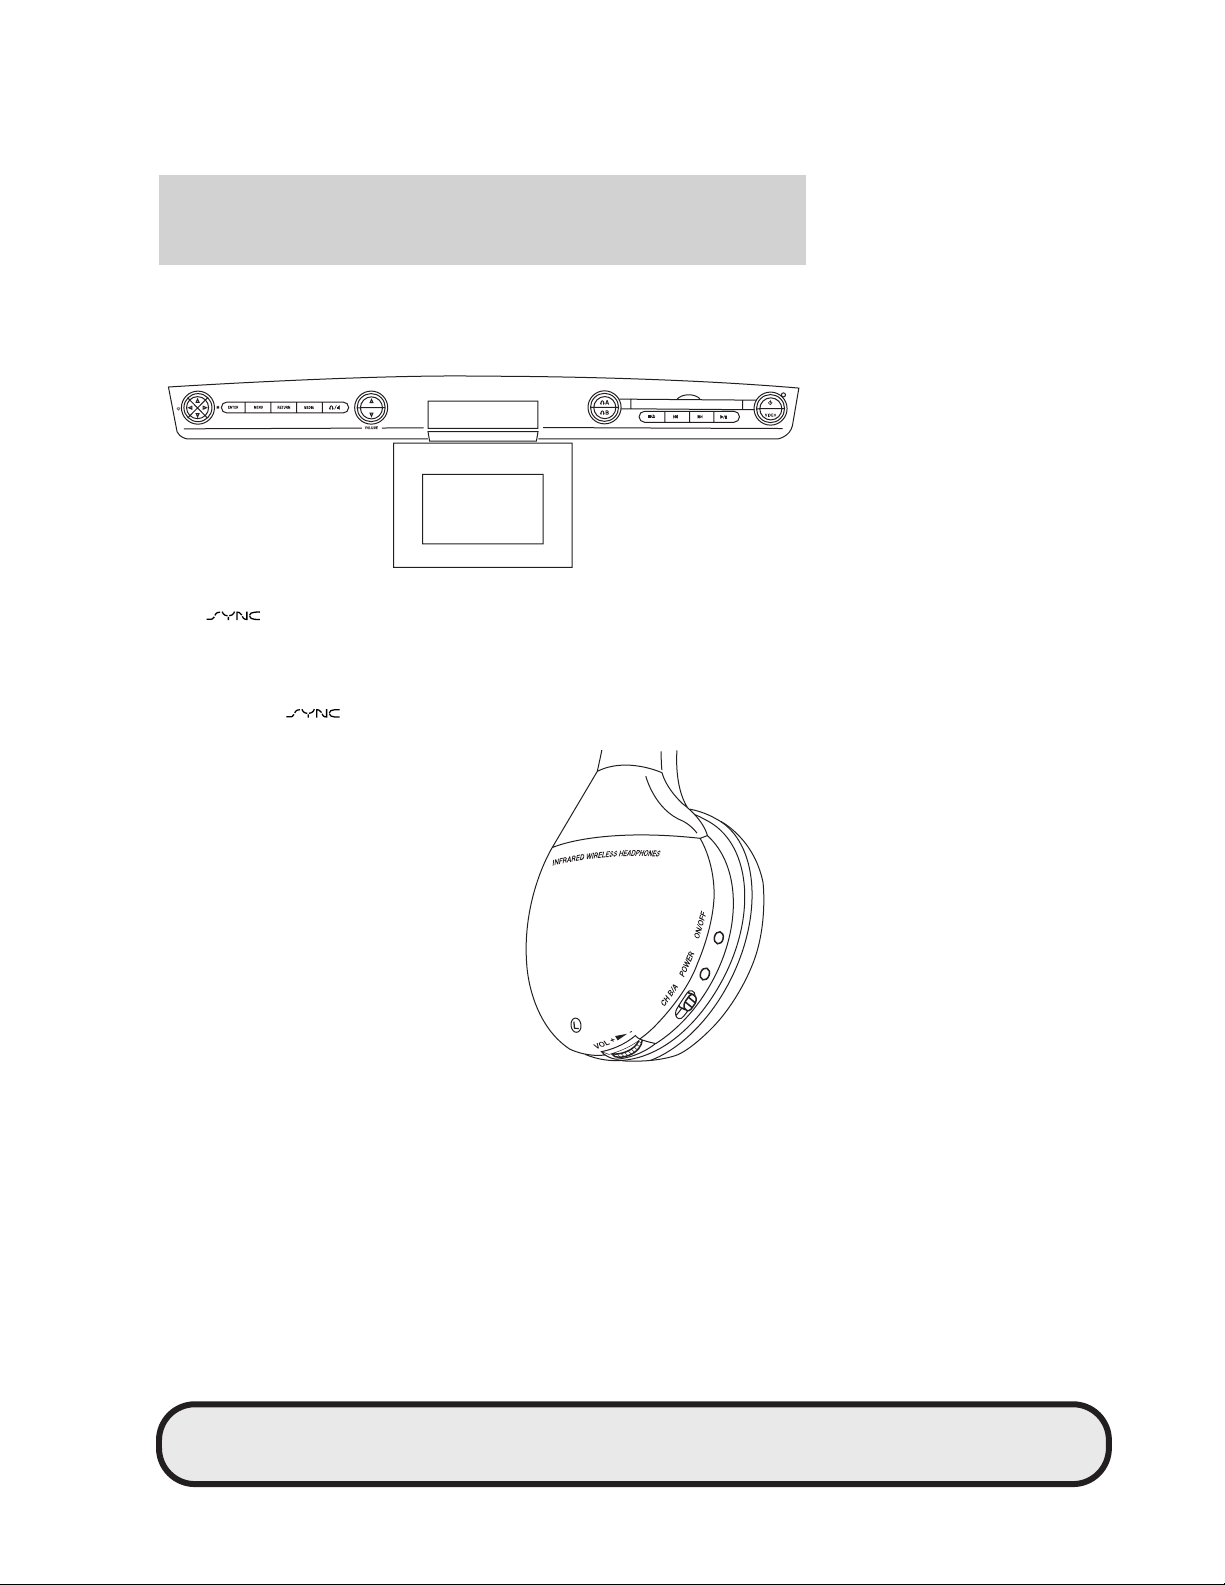
JOBNAME: No Job Name PAGE: 93 SESS: 1 OUTPUT: Tue Feb 27 16:38:35 2007
/ford_pdm/ford/supplement/mgm/doc
DVD interaction
HOW SYNC™ INTERACTS WITH YOUR DVD SYSTEM (IF
EQUIPPED)
Your
system interacts with your DVD system (if equipped) by
allowing you to access the many media features. Your DVD system (if
equipped) comes with two set of infrared red wireless headphones which
you can use to access various playing medias.
To access the
media features with your DVD system:
1. Ensure that your wireless
headphones are set to either
Channel A or Channel B. Channel A
can access any possible media
source (AM, FM1, FM2, SAT
(satellite radio, if equipped), CD,
DVD, AUX, SYNC.) Channel B can
only access DVD and AUX sources.
CIMS # com_dvd-sysover
itdseq=118
art=expec006_a
art=expad822_a
PAGE: 93 OP: root EDIT SESSION: 1 DATE: FEB 27 2007 at 16:38
REVIEW COPY ——
2008 (mgm), Supplement (supplement), Market: USA (fus)
93
JOB: @ibm2/ford_pdm/CLS_ford/GRP_supplement/JOB_mgm/DIV_doc
Page 94
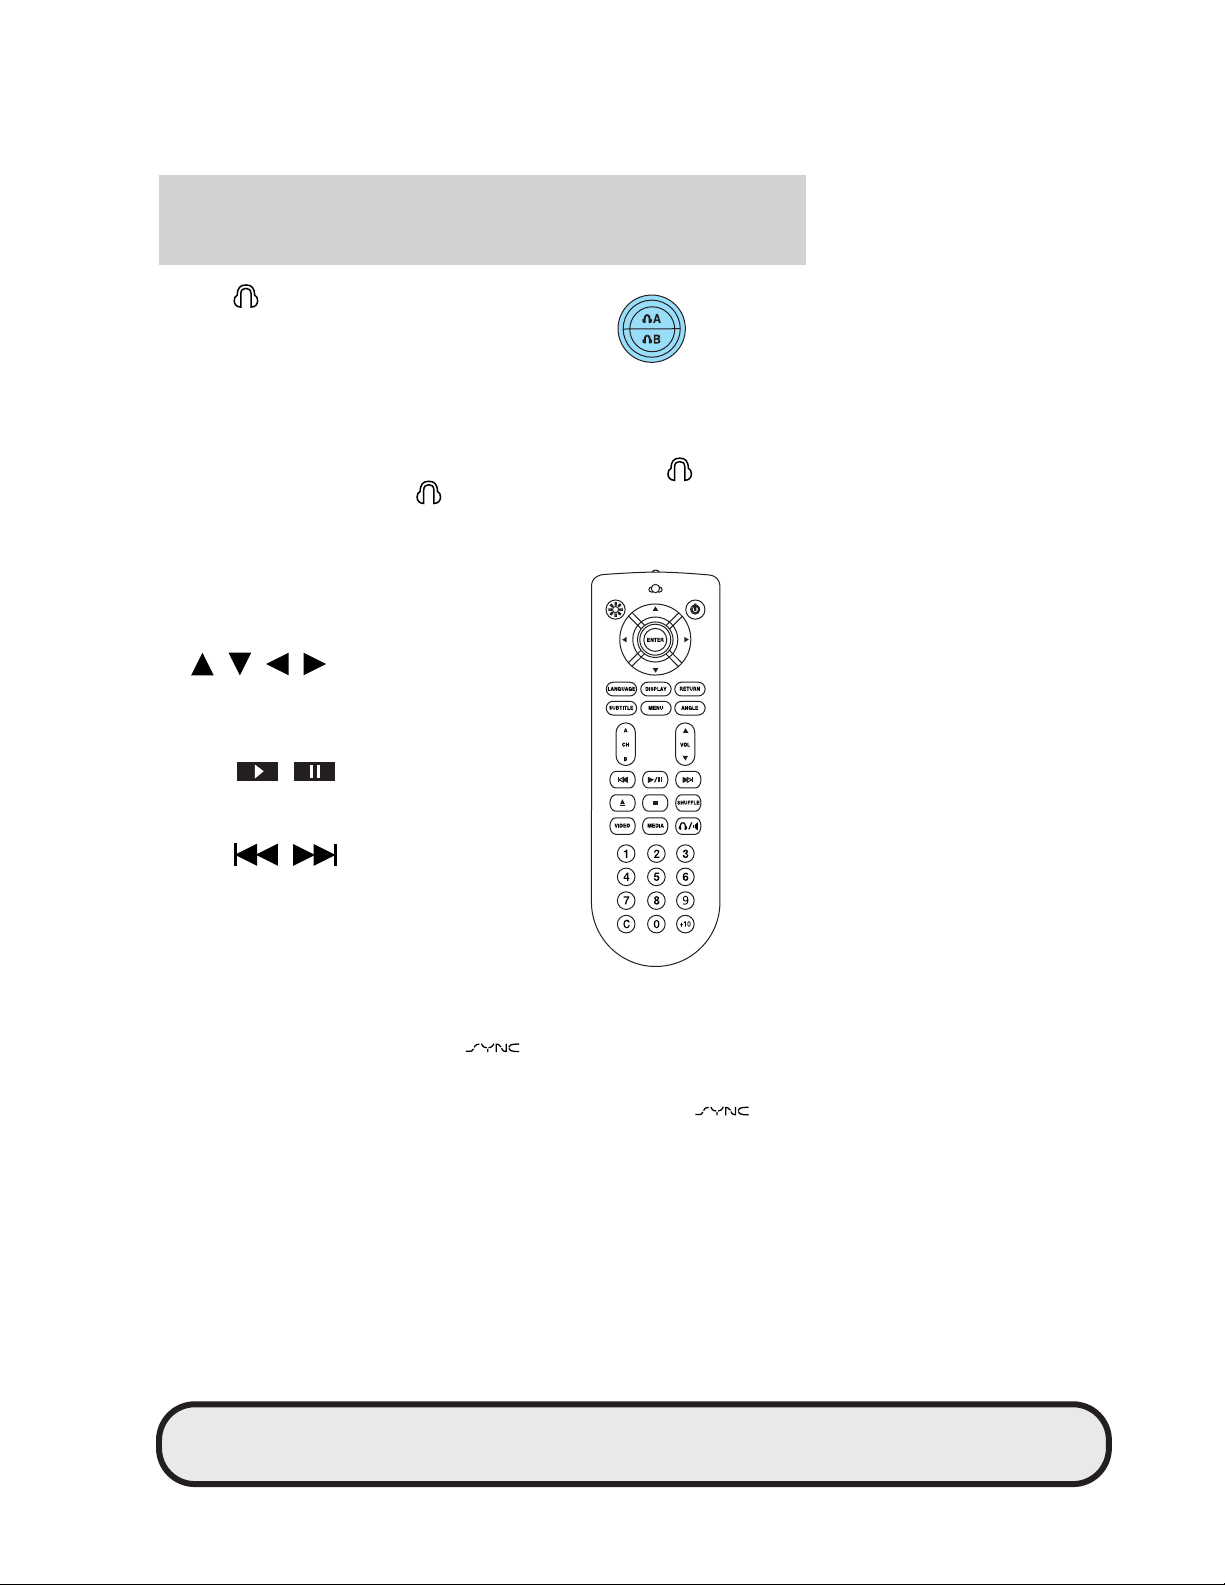
JOBNAME: No Job Name PAGE: 94 SESS: 1 OUTPUT: Tue Feb 27 16:38:35 2007
/ford_pdm/ford/supplement/mgm/doc
DVD interaction
2. Press A on the DVD system
to gain access to your possible
media selections.
3. Press MEDIA repeatedly to
change the media source. The selections will appear on the screen.
4. Once you have selected your desired media source for your
headphones, press the cursor controls on the DVD face or on the remote
control until you highlight the MEDIA button on the screen. Press
MEDIA repeatedly until SYNC is shown on the screen for
cannot access SYNC through
B.)
A.(You
5. Once you have accessed the Media screen, you may now choose from
your playlists, from playing certain artists, tracks or similar music.
You can use the following remote
controls to help make menu
selections:
• Use the cursor controls
(
/ / / ) to make menu
selections.
• Press ENTER to confirm a
selection.
• Press
/ (Play/pause)
to play and pause the currently
playing media.
• Press
/ to
reverse/advance to the next track.
• Press MENU to select the desired
source: USB, LINE IN, BT
AUDIO.
art=expad902_a
art=expec064_a
Accessing the SYNC™ media features through your DVD system
Rear seat passengers can listen to
media through the DVD
system (if equipped). To do so, you must first choose which source you
would like to listen to: USB, BT AUDIO (streaming audio from your
cellular phone) or LINE IN (Auxiliary input jack). To access
media through the DVD system (if equipped) and to choose the desired
source:
94
PAGE: 94 OP: root EDIT SESSION: 1 DATE: FEB 27 2007 at 16:38
JOB: @ibm2/ford_pdm/CLS_ford/GRP_supplement/JOB_mgm/DIV_doc
REVIEW COPY ——
2008 (mgm), Supplement (supplement), Market: USA (fus)
CIMS #1623872
com_dvd-media
itdseq=119
Page 95

JOBNAME: No Job Name PAGE: 95 SESS: 1 OUTPUT: Tue Feb 27 16:38:35 2007
/ford_pdm/ford/supplement/mgm/doc
DVD interaction
1. Ensure that the DVD and audio system are ON. Also ensure that your
auxiliary playing device is plugged into either the USB port or the
Auxiliary input jack (LINE IN).
2. Press MEDIA (on the DVD system or on the remote control)
repeatedly until the desired media source (USB, BT AUDIO or LINE IN)
appears on the DVD screen in the
3. When the desired media source appears on the screen, either press
ENTER or wait until the system times out.
4. Ensure that the headphones are turned to
using Dual Play mode.
After choosing the media source, you can then choose to from the media
settings (Shuffle, Repeat, Autoplay) as well as choosing from options of :
Play All music, Play Artists, Play Albums, Play Genres or
accessing/playing your Playlists.
Note: Once the media source is chosen, the
indexing your media information. Depending on how much music there
is, this process may take a few minutes. You can, however, choose to
activate the ’Autoplay’ feature which will begin playing the first song as
soon as possible so that you will not have to wait until all of the music is
indexed prior to playing.
Media menu
Once you have chosen a media source from which to play, you can then
make playing selections through the Media Menu.
1. From the main screen, select MENU to enter the Media Menu.
2. From the Media Menu, you can then choose from:
Play Menu: Choose how to play your selected media. Access Play All,
Artists, Albums, Genres and Playlists.
Select Source: Choose another media source (USB, Bluetooth Stereo,
LINE IN).
Media Settings: Choose to activate/deactivate Shuffle, Repeat or
Autoplay.
Tracks: Choose which tracks to play on the selected
Explore USB: Choose to explore all the music in the playing device
accessed through the USB port.
Similar Music: Choose this to have the system find and play music
similar to that currently playing.
A line.
A to receive the audio if
system will begin
CIMS #1623874
com_media-menu
itdseq=120
PAGE: 95 OP: root EDIT SESSION: 1 DATE: FEB 27 2007 at 16:38
REVIEW COPY ——
2008 (mgm), Supplement (supplement), Market: USA (fus)
95
JOB: @ibm2/ford_pdm/CLS_ford/GRP_supplement/JOB_mgm/DIV_doc
Page 96

JOBNAME: No Job Name PAGE: 96 SESS: 1 OUTPUT: Tue Feb 27 16:38:35 2007
/ford_pdm/ford/supplement/mgm/doc
DVD interaction
Play menu
The Play Menu gives the choice of how to play music from your media
source. To access:
Once the media source is selected, press Menu.
You can now choose from: Play All, Artists, Albums, Genres, Playlists,
Tracks, Explore USB and Similar Music.
Play All
Play All will play all music on your playing device alphabetically.
Artists
In the Artists screen, you can select to play All Artists, or you can select
any available artist. (The system will also list the genre of the Artist.)
Press to select.
Albums
The Albums screen will list all loaded albums alphabetically. Press to
select.
Genres
The Genre screen will list all available genres and the artists associated
with those genres. Press to select.
Playlists
The Playlist screen will allow you to view and select from any previously
saved playlists on your playing device. Press to select.
Tracks
The Track screen will list all tracks in your playing device alphabetically.
Use the scroll bar to advance/reverse in the list. Select to begin play.
Explore USB
The Explore USB screen will allow you to scroll through all music stored
on your playing device.
Similar Music
The Similar Music screen allows you to play music similar to what is
currently playing. The system will use the metadata information of each
song to compile a playlist for you.
Select source menu
The select source menu screen allows you to choose which media source
to access.
CIMS #1625446
com_play-menu
itdseq=121
CIMS #1625466
com_selectsource
itdseq=122
96
PAGE: 96 OP: root EDIT SESSION: 1 DATE: FEB 27 2007 at 16:38
REVIEW COPY ——
2008 (mgm), Supplement (supplement), Market: USA (fus)
JOB: @ibm2/ford_pdm/CLS_ford/GRP_supplement/JOB_mgm/DIV_doc
Page 97

JOBNAME: No Job Name PAGE: 97 SESS: 1 OUTPUT: Tue Feb 27 16:38:35 2007
/ford_pdm/ford/supplement/mgm/doc
DVD interaction
1. From the main screen, select Menu.
2. Choose ’Select Source’ to access:
• USB: Select to access any playing device plugged into the USB port.
• Bluetooth Stereo: Select to stream audio from your Bluetooth
enabled cellular phone over the vehicle’s speakers.
• Line In: Select to access any playing device plugged into the
Auxiliary input jack (Line in).
Media settings
The Media Settings screen allows you to turn Shuffle, Repeat and
Autoplay on/off. To access:
1. From the main screen, press ’Menu’.
2. Select ’Media Settings’. You can now access:
Shuffle: Select to turn Shuffle on/off. Shuffle will randomly shuffle all
selected music.
Repeat: Select to turn repeat on/off. The repeat feature will repeat the
currently chosen track until turned off.
Autoplay: Select to being playing music as soon as possible during the
indexing process. With Autoplay turned off, the chosen music will not
begin to play until all of the music has been indexed in the system.
Depending on the size of the material, this may take a few minutes.
CIMS #1625467
com_media-settings
itdseq=123
PAGE: 97 OP: root EDIT SESSION: 1 DATE: FEB 27 2007 at 16:38
REVIEW COPY ——
2008 (mgm), Supplement (supplement), Market: USA (fus)
97
JOB: @ibm2/ford_pdm/CLS_ford/GRP_supplement/JOB_mgm/DIV_doc
Page 98

JOBNAME: No Job Name PAGE: 98 SESS: 1 OUTPUT: Tue Feb 27 16:38:35 2007
/ford_pdm/ford/supplement/mgm/doc
Frequently asked questions
FREQUENTLY ASKED QUESTIONS
Below are some frequently asked questions regarding your
system.
For further information, please refer to www.SyncMyRide.com.
General information
What is SYNC™?
is a fully integrated, in-car communications and entertainment
system that gives you hands-free voice-activated control over your
mobile phones and digital music players. After an initial one-time set
up,
automatically pairs your phones and music players with the
vehicle’s in-car microphone and sound system.
What are the hands-free advantages of SYNC™?
Voice-activated, hands-free functionality means less distraction while
driving. As both your mobile phone and music player are fully integrated,
you’re able to concentrate on the road. This is an especially smart
solution as more and more states and jurisdictions outlaw driving while
talking on a handheld phone.
What languages does SYNC™ understand?
has an advanced voice recognition system which can be set to
speak and respond to American English, Canadian French and North
American Spanish.
Does SYNC’s voice recognition system need to ’learn’ my voice?
has an intelligent voice-recognition technology which, for most
people, needs no ’training’ to recognize voices, regardless of who is
talking.
Are voice commands the only way to operate my mobile phone
and portable music player?
No.
also gives you the option to operate your phone and music
player via simple controls on the steering wheel and radio.
Do I need to specially configure my car’s sound system to work
with SYNC™?
No.
and your vehicle’s cabin have been specifically tuned by
professional acoustic engineers for optimum performance and sound
reproduction. The audio playback environment inside a
equipped
vehicle just may be the best you’ll ever experience.
CIMS # com_faqs
itdseq=124
CIMS #1623903
com_general-info
itdseq=125
98
PAGE: 98 OP: root EDIT SESSION: 1 DATE: FEB 27 2007 at 16:38
REVIEW COPY ——
2008 (mgm), Supplement (supplement), Market: USA (fus)
JOB: @ibm2/ford_pdm/CLS_ford/GRP_supplement/JOB_mgm/DIV_doc
Page 99

JOBNAME: No Job Name PAGE: 99 SESS: 1 OUTPUT: Tue Feb 27 16:38:35 2007
/ford_pdm/ford/supplement/mgm/doc
Frequently asked questions
What happens if I receive a call while listening to music on my
SYNC™ connected digital music player?
will identify the caller and pause the music so you can hear and
take the call.
Do I have to sign up with a specific wireless carrier or need a
special phone to use SYNC™?
You can use
country. The system will work with the vast majority of popular
Bluetooth enabled phones on the market today.
Is there a monthly fee to use SYNC™?
There are no monthly fees to use
already pay your wireless phone provider for your particular calling plan.
What music players and formats does SYNC support?
is compatible with Apple iPodt, Microsoft Zune™,
“Play-for-sure” portable music devices, most combination mobile
phone/digital music players, as well as most USB drives. Supported audio
formats include MP3, WMA, WAV and PCM.
How do I recharge my music player’s battery while in the car?
On most music players, the battery will start recharging any time it is
connected to the system’s USB port wile the vehicle is running. No
separate charger is necessary.
How do I upgrade or enhance the system?
As new versions of software for
download updates from either the web or your Ford, Lincoln, Mercury
dealer.
What information from the PDA, digital media player or cellular
phone will be stored in the vehicle?
As soon as a phone is paired with the system, the phone’s personal
features (such as the contact list or ring tones) are downloaded and
saved to the car. Every time they enter the car these personal features
are updated. To protect privacy concerns, phone books and ring tones
are active only for the phone to which they belong.
Can I copy files directly from my computer to SYNC™?
Yes, you can transfer the files through a USB flash memory device.
Will two people be able to use the device at the same time? (For
example, two phones or a phone and PDA)
with a wide range of carriers throughout the
aside form the regular fees you
are rolled out, you’ll be able to
PAGE: 99 OP: root EDIT SESSION: 1 DATE: FEB 27 2007 at 16:38
REVIEW COPY ——
2008 (mgm), Supplement (supplement), Market: USA (fus)
99
JOB: @ibm2/ford_pdm/CLS_ford/GRP_supplement/JOB_mgm/DIV_doc
Page 100

JOBNAME: No Job Name PAGE: 100 SESS: 1 OUTPUT: Tue Feb 27 16:38:35 2007
/ford_pdm/ford/supplement/mgm/doc
Frequently asked questions
Only one mobile communications device can be connected at a time to
the vehicle sound system. Passengers can enjoy Bluetooth-enabled
wireless connectivity and digital music connected through the USB port.
What kind of service and support options are provided?
For minor issues, error messages will tell users what is wrong such as
the device is not connected properly. Additionally, Ford Motor Company
will offer online, dealer network and call center support.
Are there other technology partners involved with SYNC™
besides Microsoft?
Ford has a special relationship with both Microsoft and Apple to allow
our customers the benefit of enjoying their music, on their players, in
their vehicles.
formats to deliver an industry leading experience.
What was Microsoft’s contribution to SYNC™ ? What did Ford
contribute to the development of SYNC™ ?
Ford is proud to be the first and only automotive company to market
this product in North America. Ford and Microsoft worked closely
together to design and engineer
art Microsoft Auto software. Ford further developed and customized this
technology to deliver in-car solutions that help drivers conveniently and
reliably enjoy digital entertainment and communications while on the
road.
Does Ford plan on re-licensing SYNC™ to other manufacturers?
Ford considers this a competitive advantage for all its brands and has an
exclusive relationship with Microsoft.
Will Ford use SYNC™ to collect vehicle data? For example,
collecting driver speed and brake timing information to
determine accident causes? If yes, what type of data will you
collect and how will it be used?
Ford Motor Company is committed to consumer privacy. Currently, we
do not have plans to collect user data and would not do so without first
asking the consumer for permission.
If you compare SYNC™ to Trip Tunes II, what are SYNC™’s
advantages?
The voice recognition features are more robust. For example,
with
, you can say 9Play Similar9 and will play a shuffle
list of similar music as the current song. The advanced features also
supports nearly all popular media players and
, which is based on state-of-the
100
PAGE: 100 OP: root EDIT SESSION: 1 DATE: FEB 27 2007 at 16:38
REVIEW COPY ——
2008 (mgm), Supplement (supplement), Market: USA (fus)
JOB: @ibm2/ford_pdm/CLS_ford/GRP_supplement/JOB_mgm/DIV_doc
 Loading...