

Page 1

UMMARY
S
INTRODUCTION...................................................................275
TIPS, CONTROLS AND GENERAL INFORMATION ...276
TIPS ...........................................................................................276
MULTIMEDIA DEVICES: SUPPORTED AUDIO FILES
AND FORMATS.....................................................................278
NOTES ON TRADEMARKS...............................................279
EXTERNAL AUDIO SOURCES.........................................279
TECHNICAL SPECIFICATIONS........................................280
QUICK GUIDE.........................................................................281
CONTROLS ON FRONT PANEL ....................................281
FRONT PANEL CONTROL SUMMARY TABLE............282
STEERING WHEEL CONTROLS........................................283
DESCRIPTION.......................................................................283
STEERING WHEEL CONTROL SUMMARY TABLE....284
SWITCHING THE SYSTEM ON/OFF ................................285
RADIO (TUNER) MODE....................................................285
RADIO MODE SELECTION ..............................................285
FREQUENCY BAND SELECTION...................................285
DISPLAYED INFORMATION.............................................286
RADIO STATION SELECTION .........................................286
PREVIOUS/NEXT RADIO STATION SEARCH ............287
PREVIOUS/NEXT RADIO STATION FAST SEARCH..287
AM/FM RADIO STATION TUNING ................................287
DAB RADIO ...........................................................................288
SETTING THE PRESELECTIONS .....................................289
AUDIO.....................................................................................289
MEDIA MODE ..........................................................................292
TRACK CHANGE (previous/next)...................................292
TRACK FAST FORWARD/REWIND...............................292
TRACK SELECTION (Browse)..........................................292
AUDIO SOURCE SELECTION..........................................293
TRACK INFORMATION DISPLAY...................................293
RANDOM TRACK REPRODUCTION ...........................293
TRACK REPETITION...........................................................293
CD PLAYER ........................................................................ .... 294.
LOADING/EJECTING A CD........................................... 294
Bluetooth ® SOURCE .......................................................295
PAIRING A
USB/iPod SUPPORT.................................................................296
AUX SUPPORT.........................................................................296
PHONE MODE ........................................................................297
PHONE MODE ACTIVATION..........................................297
MAIN FUNCTIONS .............................................................297
DISPLAYED INFORMATION.............................................298
PAIRING A MOBILE PHONE.............................................298
STORING NAMES/NUMBERS IN THE MOBILE
PHONE PHONEBOOK ......................................................300
CONNECTION/DISCONNECTION OF A MOBILE
PHONE OR A
DELETION OF A MOBILE PHONE OR A
Bluetooth® AUDIO DEVICE .................295
Bluetooth® AUDIO DEVICE ...........300
Bluetooth® AUDIO DEVICE ........................................301
SETTING A MOBILE PHONE OR A
Bluetooth® AUDIO DEVICE AS FAVOURITE .........302
DELETION OF PHONE DATA
(PHONEBOOK AND RECENT CALLS) ........................302
273
Page 2

TRANSMISSION OF PHONE DATA
(PHONEBOOK AND RECENT CALLS) ........................302
MAKING A PHONE CALL.................................................303
MANAGING AN INCOMING CALL ..............................304
MAKING A SECOND PHONE CALL .............................306
MANAGING TWO PHONE CALLS................................306
ENDING A CALL..................................................................307
REDIALLING ..........................................................................307
CONTINUING A PHONE CALL .....................................307
ACTIVATION/DEACTIVATION OF THE
MICROPHONE......................................................................307
TRANSFERRING A CALL...................................................308
SMS MESSAGE READER......................................................308
"MORE" MODE........................................................................308
TRIP COMPUTER .................................................................309
CLOCK ....................................................................................309
eco:Drive .................................................................................309
SETTINGS ...............................................................................311
VOICE COMMANDS ............................................................315
USE OF THE VOICE COMMANDS .................................315
USE OF STEERING WHEEL CONTROLS
TO ACTIVATE VOICE COMMANDS..............................315
VOICE SESSION STATUS....................................................316
MULTIPLE CHOICE..............................................................316
GLOBAL VOICE COMMANDS.........................................317
PHONE VOICE COMMANDS ..........................................318
RADIO AM/FM/DAB VOICE COMMANDS ..................32
MEDIA VOICE COMMANDS ............................................32
CUSTOMER SERVICE NUMBER LIST ................................3
27
2
4
274
Page 3
INTRODUCTION
The car is equipped with an infotelematic system designed according to the specific characteristics of the
passenger compartment, with a customised design that matches the style of dashboard.
The system is installed in an ergonomic position for the driver and passenger, and controls can be quickly
located from the graphical display on the front, making the device easy to use.
To increase protection against theft, the system has a protection system that only allows it to be used on the
vehicle in which it was originally fitted.
The instructions for use are given below and we recommend you read them carefully and always keep them
to hand (for example, in the glove compartment).
Enjoy reading. Happy motoring!
The information in this publication is provided by way of example. Fiat Group
Automobiles S.p.A.can modify the specifications of the vehicle model described in this
publication at any time, for technical or marketing purposes. For further information,
contact a Fiat Dealership.
275
Page 4
TIPS, CONTROLS AND GENERAL
INFORMATION
TIPS
Road safety
Learn how to use the various system functions
before setting off.
Read the instructions for the system carefully before
setting off.
Care and maintenance
Observe the following precautions to ensure the
system is fully operational:
❒ the display is sensitive to scratching, liquids and
detergents. The display should not come into
contact with pointed or rigid objects which could
damage its surface. Do not press on the display
when cleaning it.
❒ prevent any liquid from entering the system: this
could be damaged beyond repair.
276
WARNING
If the volume is too loud this can be
dangerous.Adjust the volume so that you
can still hear background noises (e.g. horns,
ambulances, police vehicles, etc.).
Reception conditions
Reception conditions change constantly while driving.
Reception may be interfered with by the presence of
mountains, buildings or bridges, or when you are far
away from the broadcaster.
IMPORTANT The volume may be increased when
receiving traffic alerts and news.
Only clean the front panel and the display
with a soft, clean, dry, ant i-static cloth.
Cleaning and polishing products may
damage the surface. Do not use alcohol or similar
products to clean the panel or the display.
Page 5
Important
In the event of a failure, the system should only be
checked and repaired at a Fiat Dealership.
If the temperature is particularly low, the display may
take a while to reach optimum brightness.
If the car is stopped for a while and the outside
temperature is very high, the system may go into
“thermal protection” mode, suspending operation
until the temperature in the passenger compartment
returns to acceptable levels.
CD
Dirt, scratches or any distortions on CDs may cause
skipping during playback and poor sound quality.
Follow these tips for optimum playback conditions:
❒ only use CDs with the following mark:
❒ never use chemical products (e.g. antistatic,
thinner or spray cans) for cleaning as they could
damage the surface of the CDs;
❒ after listening to them place CDs back in their
cases to avoid them being damaged;
❒ do not expose CDs to direct sunlight, high
temperatures or moisture for long periods;
❒ do not stick labels on the surface of the CD and
do not write on the recorded surface using pens
or pencils;
❒ never use CDs that are very scratched, cracked,
deformed, etc. Their use could cause damage the
player or make it malfunction.
To achieve the best quality audio reproduction we
recommend the use of original CD supports. Correct
operation is not guaranteed when CD-R/RW media
are used that were not correctly burnt and/or with a
maximum capacity above 650 Mb.
❒ clean every CD thoroughly removing any
fingerprints or dust using a soft cloth. Hold CDs by
the circumference and clean them from the centre
towards the edge;
277
Page 6

IMPORTANT Do not use commercially available
protective sheets for CDs or discs with stabilisers as
they could get stuck in the internal mechanism and
damage the disc.
IMPORTANT If a copy-protected CD is used, it may
take a few seconds before the system starts to play
it. The CD player cannot be guaranteed to play all
protected discs. The presence of copy protection is
often in small letters or may be difficult to read on
the cover of the actual CD and it may say something
like, for example, "COPY CONTROL", "COPY
PROTECTED", "THIS CD CANNOT BE PLAYED
ON A PC/MAC" or identified through the use of
symbols, such as, for example:
IMPORTANT If a multisession disc is loaded, only the
first session will be played.
MULTIMEDIA DEVICES: SUPPORTED
AUDIO FILES AND FORMATS
For CD, USB and iPod sources the system can play
files with the following extensions and formats:
❒ .MP3 (32 – 320Kbps);
❒ .WAV;
❒ .WMA (5 – 320Kbps) mono and stereo;
❒ .AAC (8 – 96KHz) mono and stereo;
❒ .M4A (8 – 96KHz) mono and stereo;
❒ .M4B (8 – 96KHz) mono and stereo;
❒ .MP4 (8 – 96KHz) mono and stereo.
For all sources (CD, AUX, iPod and Bluetooth ®),
the system can also play the following Playlist
formats:
❒ .M3U
❒ .PLS
❒ .WPL
NOTE It makes no difference whether the suffixes
are written in capital or small letters.
278
Page 7
NOTES ON TRADEMARKS
iPod, iTunes and iPhone are registered trademarks of
Apple Inc.
All other trademarks are the property of their
respective owners.
Apple is not responsible for the operation of this
device and of its conformity with the safety rules and
standards.
The DAB/DAB+/DMB Digital Radio function has
been certified according to the specifications of
"ARD" white sticker, for Class A - Audio services.
ARD is a trademark of the Associazione per la
Radiofonia Digitale in Italia.
EXTERNAL AUDIO SOURCES
Other electronic devices (e.g. iPod, PDA, etc...) can
be used on the car.
Some of them can however cause electromagnetic
interference. Disconnect these devices if the system
performance worsens.
NOTE The system supports only FAT32-formatted
USB devices. The system does not support devices
with a capacity higher than 64 Gb.
279
Page 8

TECHNICAL SPECIFICATIONS
Speakers for basic specification
Front speakers
38 mm tweeters on the door handle;
❒ 2
❒ 2
165 mm mid-woofer speakers in the door
panel.
Rear speakers
❒ 2
165 mm full-range speakers in the door panel.
Hi-Fi specification speakers
(for versions/markets, where provided)
Front speakers
38 mm tweeters on the door handle;
❒ 2
❒ 2
165 mm mid-woofer speakers in the door
panel.
Rear speakers
❒ 2
165 mm full-range speakers in the door panel;
❒ 1 8-channel amplifier in the luggage compartment;
❒ 1 subwoofer box in the luggage compartment
(position varies according to the versions).
280
Page 9
QUICK GUIDE
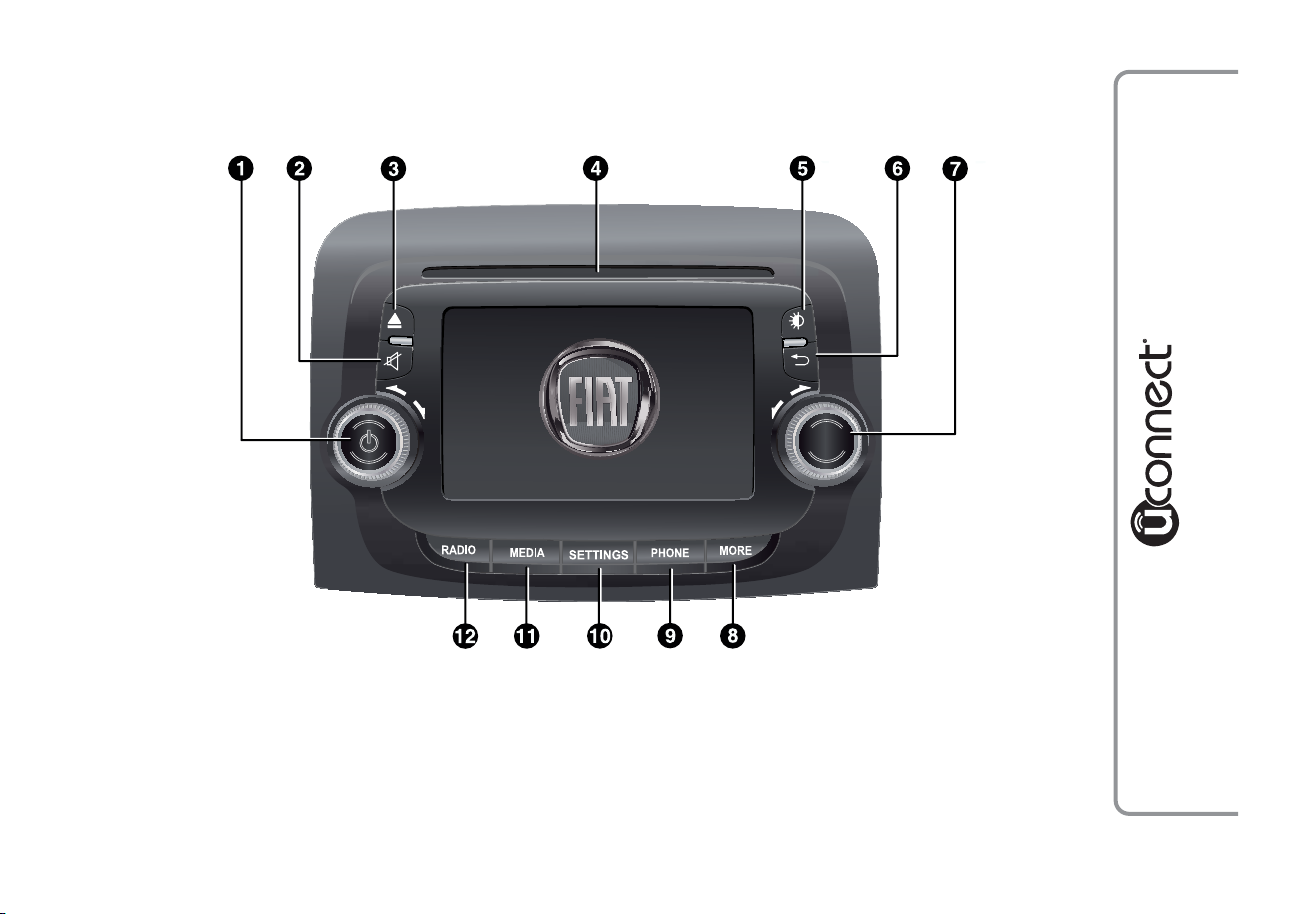
CONTROLS ON FRONT PANEL
fig. 1
VOL
BROWSE
ENTER
TUNE
SCROLL
BROWSE
BROWSE
ENTER
ENTER
F0Y0001
281
Page 10
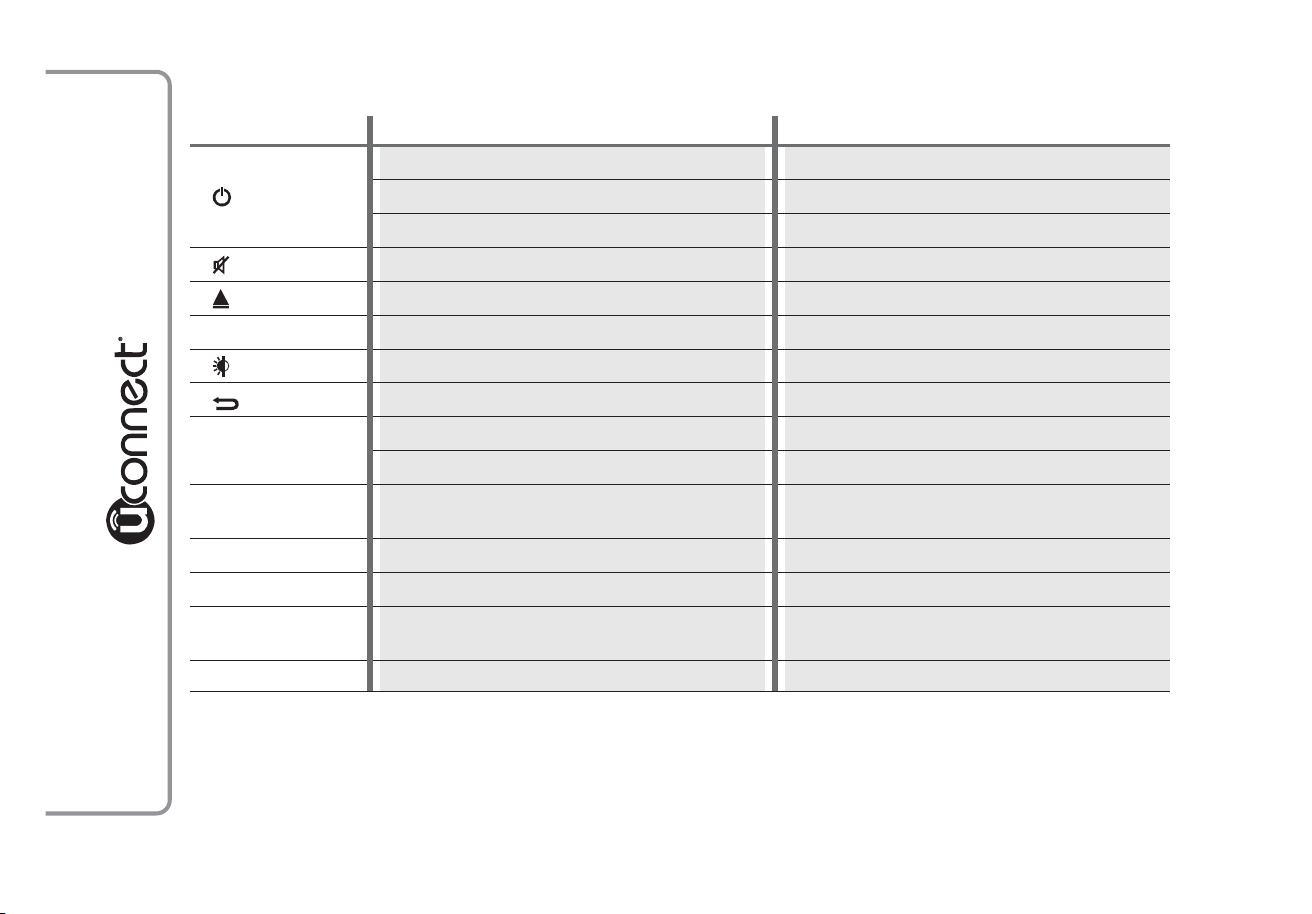
FRONT PANEL CONTROL SUMMARYTABLE
Button Functions Mode
Ignition Brief button press
1-
2-
3-
4 CD housing –
5-
6-
7-BROWSE
ENTER
8 - MORE
9 - PHONE Phone data displaying Brief button press
10 - SETTINGS Accessing the Vehicle Settings menu Brief button press
11 - MEDIA
12 - RADIO Accessing the Radio mode Brief button press
Off Brief button press
Volume adjustment Left/right rotation of knob
Volume activation/deactivation (Mute/Pause) Brief button press
CD ejection Brief button press
Display on/off Brief button press
Exit the selection/return to previous screen Brief button press
Scrolling the list or tuning to a radio station Left/right rotation of knob
Confirmation of the option displayed Brief button press
Accessing the addition functions (displaying of
Time, Trip Computer, eco:Drive function data)
Source selection: CD, USB/iPod, AUX or
Bluetooth ®
Brief button press
Brief button press
282
Page 11
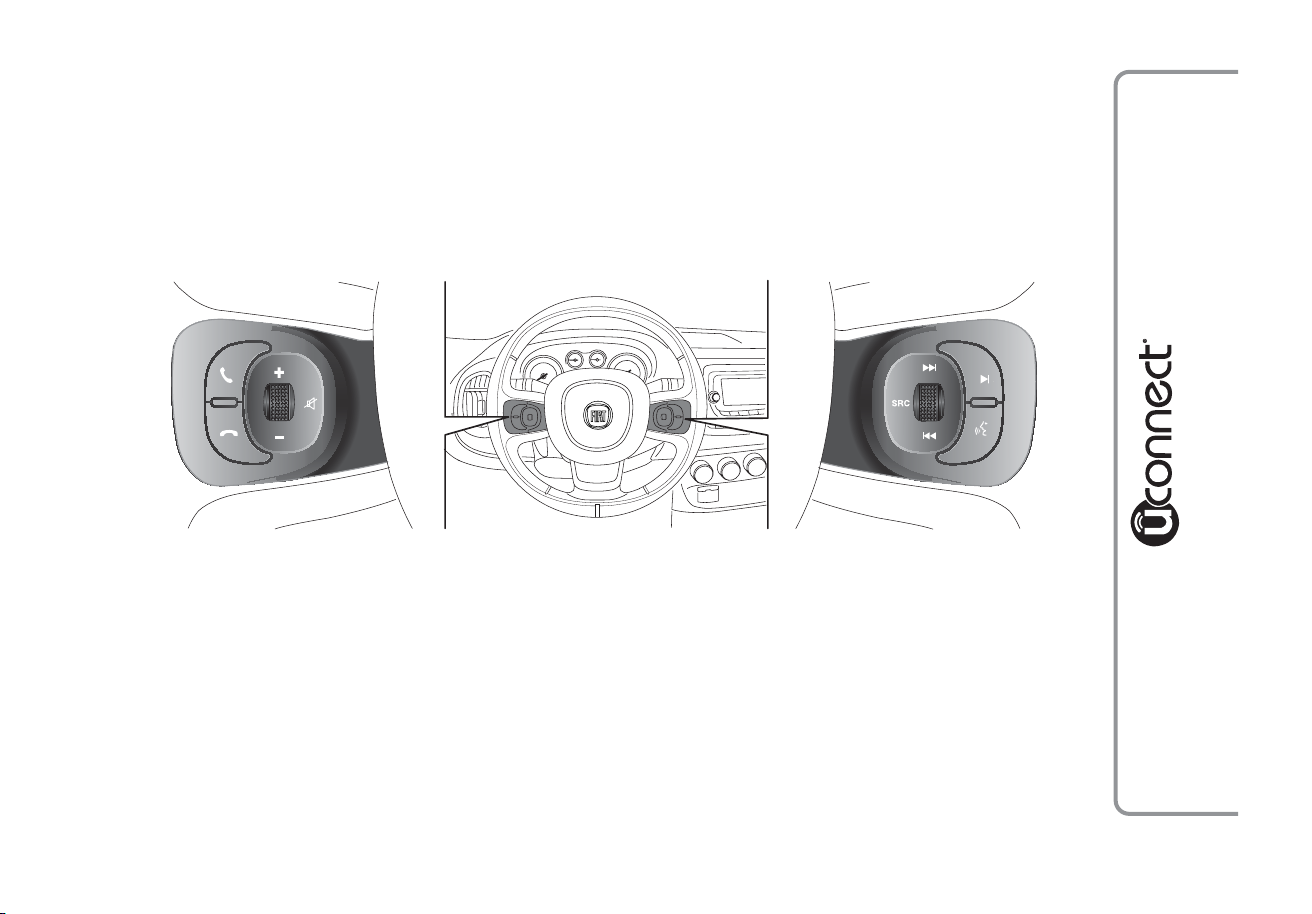
STEERING WHEEL CONTROLS
(for versions/markets, where provided)
DESCRIPTION
The controls for the main system functions are present on the steering wheel to make things easier.
The activation of the function selected is controlled, in some cases, by how long the button is pressed (short
or long press) as described in the table below.
fig. 2
F0Y0002
283
Page 12
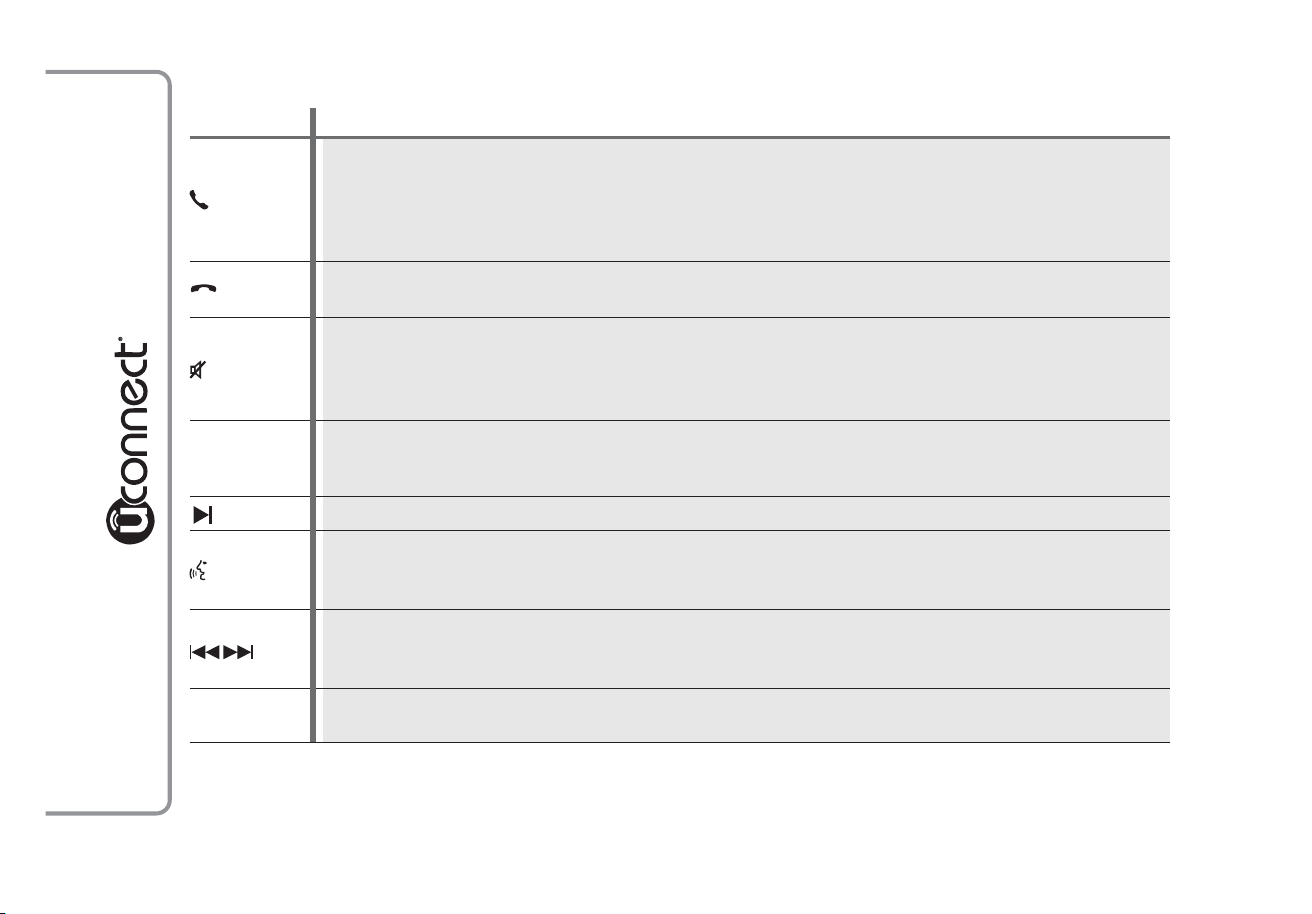
STEERING WHEEL CONTROL SUMMARYTABLE
Button Interaction (pressure/rotation)
- Acceptance of incoming call
- Acceptance of the second incoming phone call and putting the active phone call on hold
- Activation of voice recognition for Phone function
- Interruption of the voice message in order to give a new voice command
- Interruption of voice recognition
- Rejection of incoming call
- Ending of call in progress
Pressing the centre of the left wheel:
- deactivation/reactivation of the microphone during a phone conversation
Bluetooth ® source Pause
+/–
SRC
- activation/deactivation of the CD, USB/iPod,
- activation/deactivation of radio Mute function
Turning left wheel upwards or downwards:
- adjustment of the audio volume: hands-free, SMS message reader, voice announcements and music
sources
- Scrolling the stored radio stations (preset)
- Activation of voice recognition
- Interruption of the voice message in order to give a new voice command
- Interruption of voice recognition
Turning right wheel upwards or downwards:
- Radio Mode: selection of previous/next radio station
- CD, USB/iPod,
Pressing the centre of the right wheel:
- selection of audio sources available: radio, CD, USB/iPod, AUX and
Bluetooth ® mode: selection of previous/next track
Bluetooth ®
284
Page 13
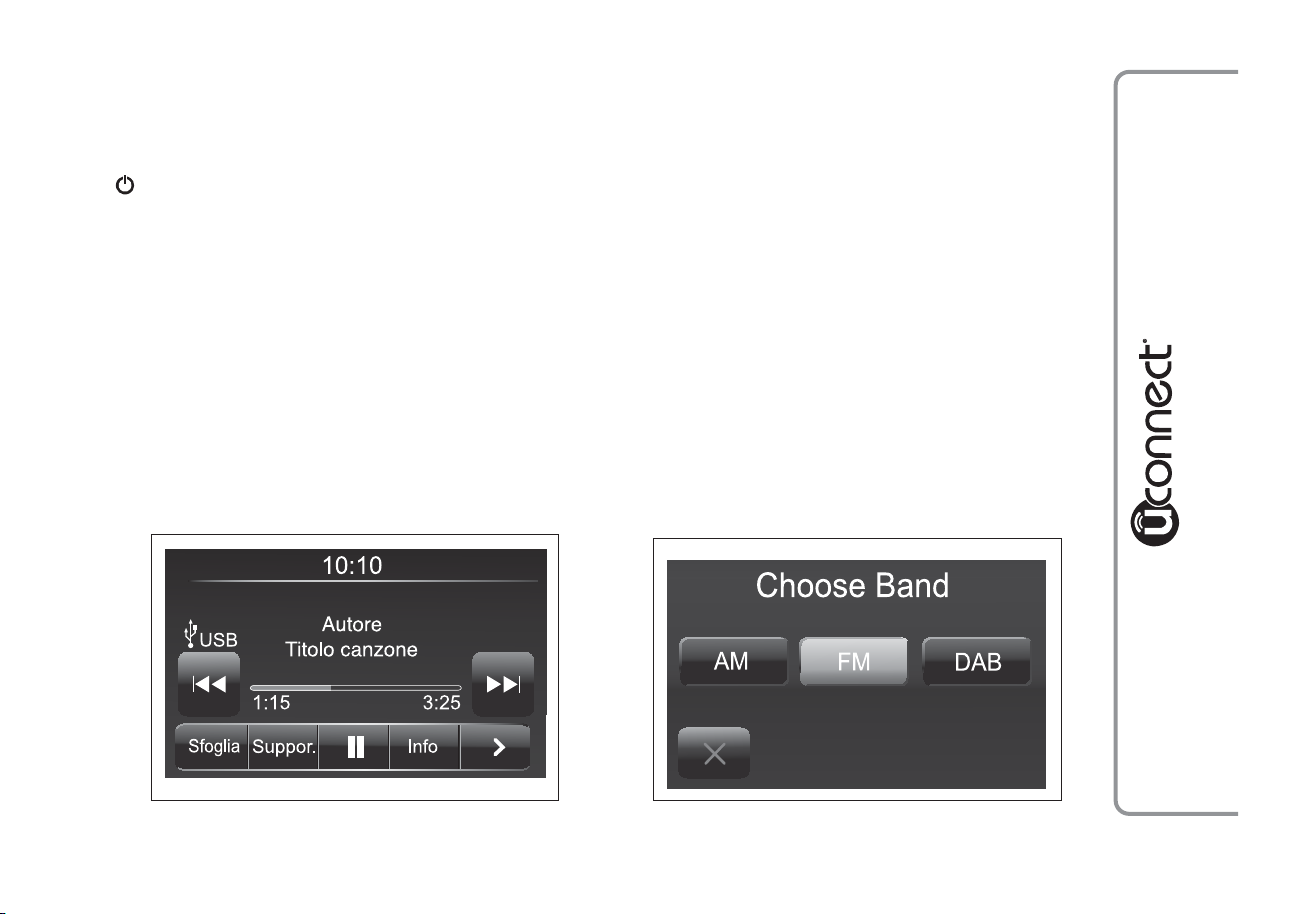
SWITCHING THE SYSTEM ON/OFF
RADIO (TUNER) MODE
The system switches on/off when the button/knob
(ON/OFF) is pressed (1-fig. 1).
The electronic volume adjustment control rotates
continuously (360°) in both directions without stop
positions.
Turn the button/knob clockwise to increase the radio
volume or counterclockwise to decrease it.
The system has the following tuners: AM, FM and
DAB (for versions/markets, where provided).
RADIO MODE SELECTION
Press the RADIO button (12-fig. 1) on the front
panel to activate the radio mode.
The different tuning modes can be selected with the
corresponding button on the display (see fig. 4).
Each tuning mode can have a specific preselection set.
FREQUENCY BAND SELECTION
Briefly press the "AM/FM" button to switch from AM
to FM and vice versa.
If the DAB tuner is available, briefly press the
"AM/FM", "AM/DAB", "FM/DAB" buttons to select
the desired band.
fig. 3
F0Y1030
fig. 4
F0Y1001
285
Page 14
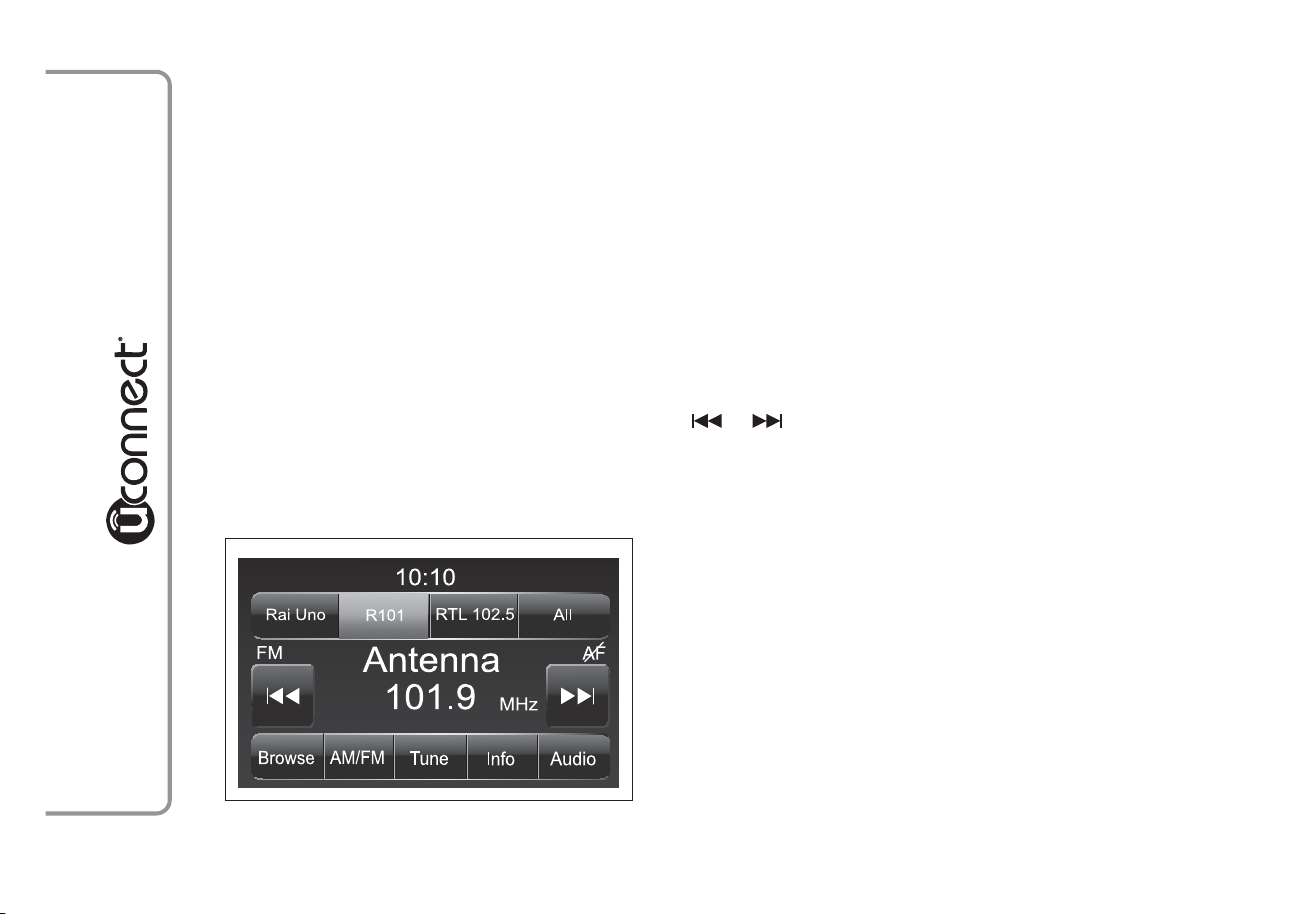
DISPLAYED INFORMATION
After the desired radio station is selected on the
display (see fig. 5), the following information is
shown:
At the top: the list of radio stations stored (preset)
is displayed; the station being listened to is
highlighted.
In the middle: the name of the radio station being
listened to and the buttons to select the previous or
the next radio station are displayed.
At the bottom: the following buttons are displayed:
❒ "Browse": list of the radio stations available;
❒ "AM/FM", "AM/DAB", "FM/DAB": selection of the
desired frequency band (button reconfigurable
according to the band selected: AM,FM or DAB);
❒ "Tune" : manual radio station tuning (not available
for DAB radios);
❒ "Info": additional information on the source being
listened to;
❒ "Audio": access to the "Audio setting" screen.
RADIO STATION SELECTION
To search for the desired radio station press buttons
or on the display or use the steering wheel
controls.
286
fig. 5
F0Y1000
Page 15
PREVIOUS/NEXT RADIO STATION SEARCH
Briefly press buttons
or on the display: when
the button is released the previous or the next radio
station is displayed.
When searching forwards, if the system reaches the
end of the band, it will automatically stop on the
station where the search has started from.
PREVIOUS/NEXT RADIO STATION FAST
SEARCH
Hold down buttons or on the display to start
the fast search: when the button is released, the first
tunable radio station can be heard.
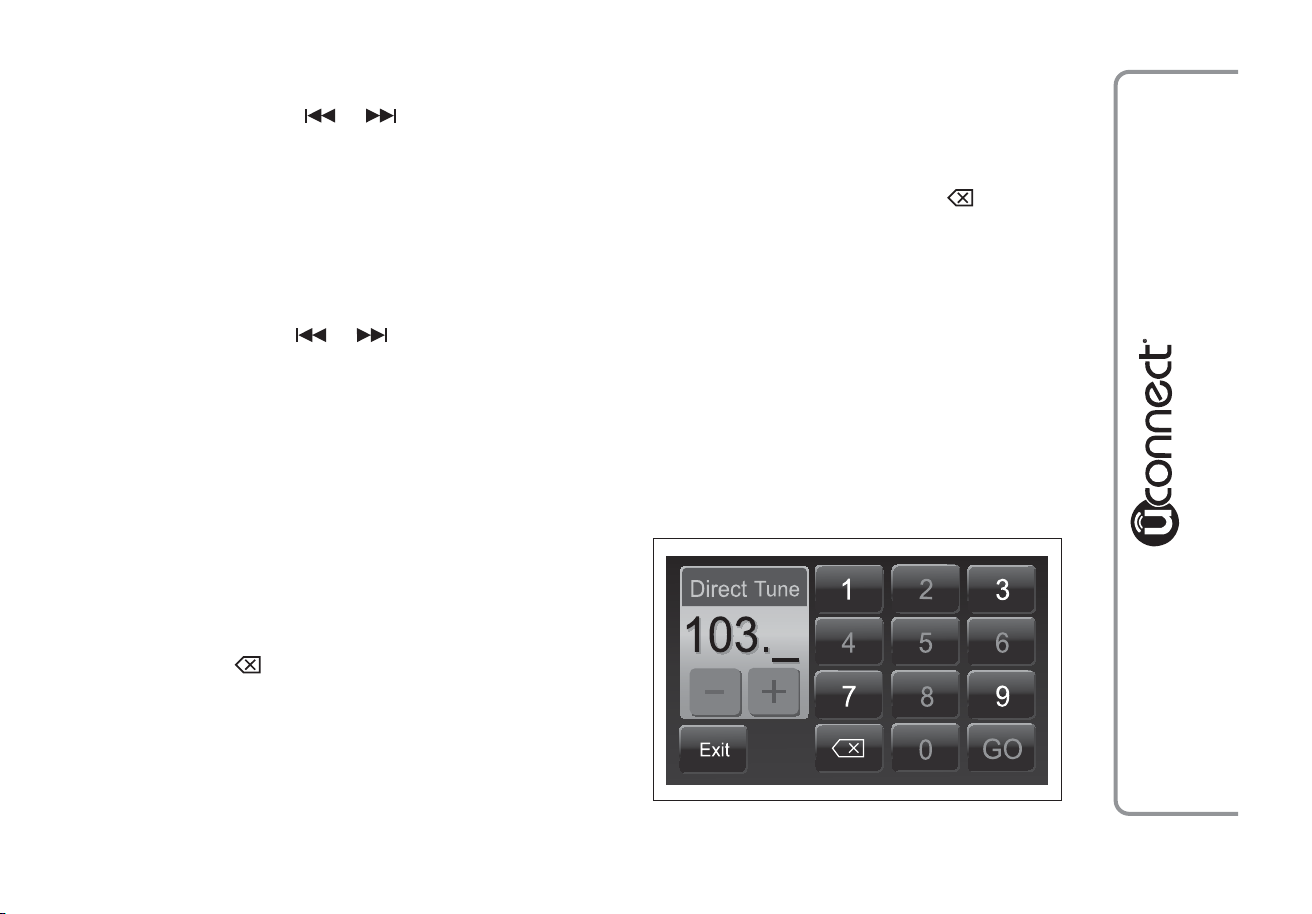
AM/FM RADIO STATION TUNING
Use the "Tune" button to select a radio station.
Press the "Tune" button on the display then select
the first number of the desired radio station (see fig.
6).
The graphic keyboard on the display is used to enter
the number of the station.
In this mode, use buttons + and – to fine-tune the
frequency.
Press button
(Delete) to delete a wrong number
(and enter the correct station number).
After entering the last digit of the station, the "Tune"
screen is deactivated and the system tunes
automatically to the station selected (the number of
the radio station is displayed in the "Tune" text box).
The screen disappears automatically after 5 seconds
or manually by pressing the "OK" or
(Delete)
buttons.
Incomplete radio station selection ("OK")
Press the "OK" button on the display to tune to the
radio station selected and close the "Direct Tune"
screen (manual tuning).
Exit the "Direct Tune" screen
Press the "Exit" or the "Radio" button on the display
to return to the system main screen.
fig. 6
F0Y1007
287
Page 16
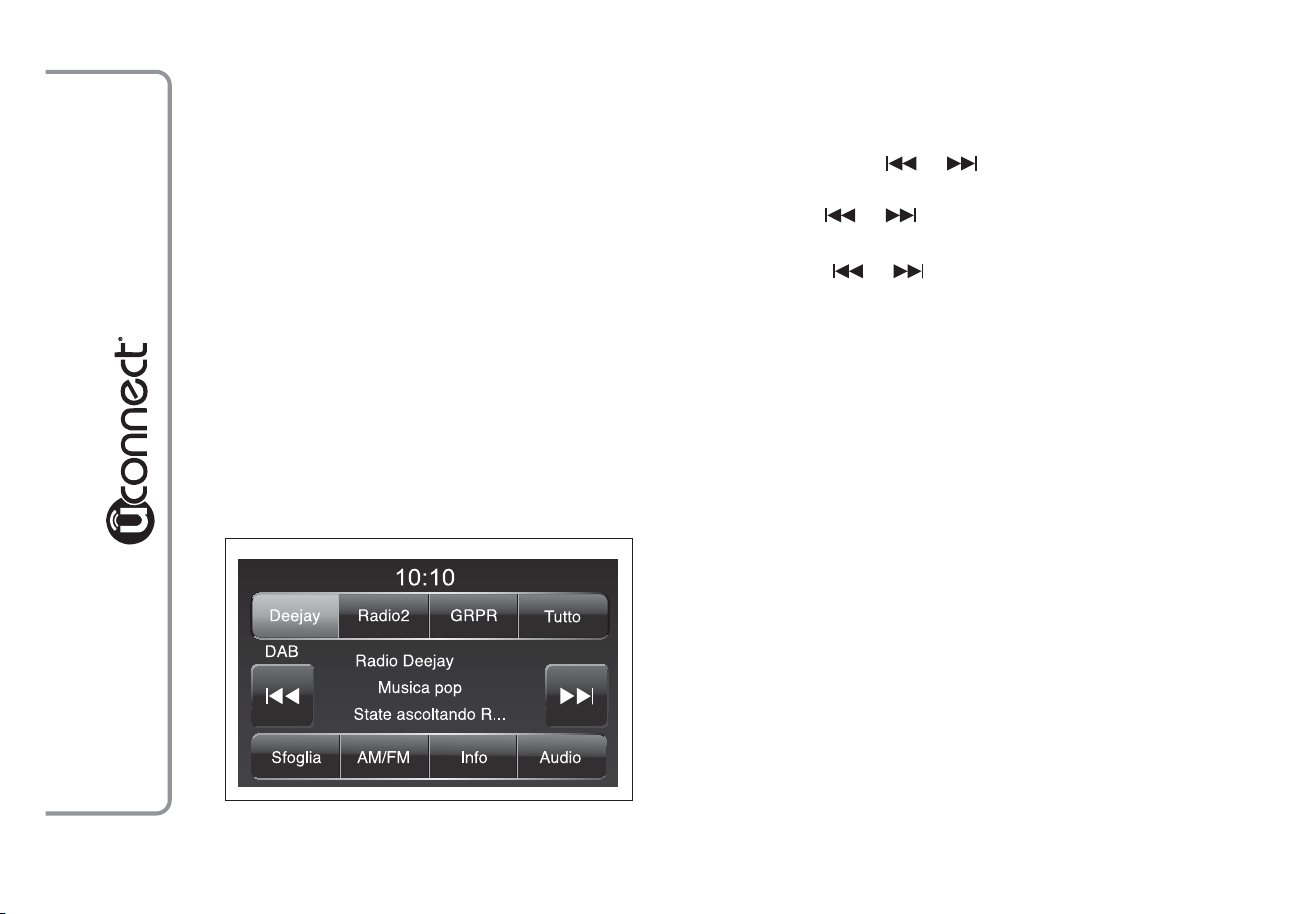
DAB RADIO
(for versions/markets, where provided)
Once the DAB radio mode on the display is selected,
the information on the station being listened to is
displayed (see fig. 7) and the following modes will be
available:
Selection of the previous/next radio station by:
❒ rotating the BROWSE ENTER button/knob (7-fig.
1);
❒ briefly pressing the
or buttons on the
display;
❒ pressing the
or controls on the steering
wheel.
Hold down the
or buttons to fast scroll the
station list.
The "Browse" button is used to display:
❒ the list of all DAB stations;
❒ the list of stations filtered by "Genres";
❒ the list of stations filtered by "Ensembles"
(broadcast group).
Use the "ABC" button inside each list to skip to the
desired letter.
The "Refresh" button requires the DAB radio station
list to be updated: the update can take a few seconds
up to about two minutes.
288
fig. 7
F0Y1020
Page 17

SETTING THE PRESELECTIONS
Preselections are available in all system modes and
are activated by touching one of the preselection
buttons located at the top of the display.
To store the radio station being listened to, press and
hold down the button corresponding to the desired
preset until a confirmation acoustic signal is heard.
The system can store up to 12 radio station in each
mode: 4 radio stations are displayed at the top.
Press the "All" button on the display to show all the
radio stations stored in the frequency band selected.
AUDIO
To enter the "Audio" menu, press the SETTINGS
button (10-fig. 1) on the front panel, scroll the menu
then select and press the "Audio" item on the display.
The following adjustments can be carried out using
the "Audio" menu:
❒ "Equalizer" (for versions/markets, where provided);
❒ "Balance/Fade" (left/right and front/rear balance
adjustment);
❒ "Volume/Speed" (excluding versions with Hi-Fi
system) speed-dependent automatic volume
adjustment;
❒ "Loudness" (for versions/markets, where provided);
❒ "Auto-On Radio";
❒ "Radio Off Delay".
To exit the "Audio" menu, press the
NOTE When a setting is changed, the
replaced with the word "Done".
/Done button.
button is
289
Page 18

Equalizer
(for versions/markets, where provided)
Select "Equalizer" on the display to adjust the bass,
medium and treble tones.
Use the "+" or "–" buttons to carry out the settings
desired (see fig. 8).
Then press
/Done button to return to the "Audio"
menu.
Balance/Fade
Press the "Balance/Fade" button to balance the sound
from the front and rear seat speakers.
Press the
or buttons to balance the front and
rear speakers (see fig. 9).
Press the
or buttons to balance the speakers on
the left and the right side.
The adjustment is also possible by moving the
symbol on the right side of the display
upwards/downwards/to the left/to the right.
Press the central "C" button to balance the
adjustments.
Then press
/Done button to return to the "Audio"
menu.
290
fig. 8
F0Y1002
fig. 9
F0Y1003
Page 19

Volume/Speed
Press the "Volume/Speed" button to choose between
"Off" and "1, 2 or 3".
The option selected is displayed (see fig. 10).
Choose "1, 2 or 3" to increase the volume
proportionally to the selection made.
Then press
/Done button to return to the "Audio"
menu.
Loudness
(for versions/markets, where provided)
To activate/deactivate the "Loudness" function to
improve the sound quality at low volumes.
Auto-On Radio
To set the radio behaviour when the ignition key is
turned to MAR.
The options are radio on, radio off or reset of the
condition active when the ignition key was last
turned to STOP.
Radio Off Delay
To keep the radio on for a preset time after the
ignition key is turned to STOP.
fig. 10
F0Y1004
291
Page 20

MEDIA MODE
This chapter describes the interaction modes
concerning the operation of CD, Bluetooth ®,
AUX, USB/iPod.
TRACK CHANGE (previous/next)
Briefly press the
ENTER button/knob (7-fig. 1) clockwise to play the
next track or briefly press the
BROWSE ENTER button/knob counterclockwise to
return to the beginning of the selected track or at
the beginning of the previous track if this has been
played for less than 8 seconds.
TRACK FAST FORWARD/REWIND
Press and hold down the
the selected track or keep the
fast rewind the track.
The fast forward/rewind will stop once the button is
released or when the previous/next track is reached.
button or turn the BROWSE
button or turn the
button to fast forward
button pressed to
TRACK SELECTION (Browse)
Use this function to scroll through or select the
tracks on the active device.
The selection options depend on the device
connected or the CD type inserted.
For example, on an audio CD you can select the
track to be played, whilst on a CD-ROM, a USB/iPod
or Bluetooth ® device you can scroll through the
list of artists, genres and albums available depending
on the information present on the tracks.
Use the "ABC" button inside each list to skip to the
desired letter within the list.
NOTE This button may be disabled for some
Apple® devices.
NOTE The "Browse" button does not allow any
operation on an AUX device.
NOTE To consult the list of Bluetooth ® audio
devices and supported functions, visit the website
www.fiat.com or call Customer Services on
00800.3428.0000 (the number may vary depending
on the country: please refer to the reference table in
the "Customer Service number list" section herein).
292
Page 21

Press the "Browse" button to activate this function
on the source being played.
Turn the BROWSE ENTER (7-fig. 1) button/knob to
select the desired category and then press the
button/knob to confirm the selection.
Press the "X" button to cancel the function.
NOTE The indexing time of a USB device can vary
according to the media inserted (in some cases it can
take a few minutes).
AUDIO SOURCE SELECTION
Press the "Source" button to select the desired audio
source among those available: CD, AUX, USB/iPod or
Bluetooth®.
If no source is selected, the screen disappears after a
few seconds and the display shows the main screen
again.
TRACK INFORMATION DISPLAY
Press the "Info" button to show on the display the
information on the track being listened to for devices
that support the function.
Press the "X" button to exit the screen.
RANDOM TRACK REPRODUCTION
Press the ">" button then the "Shuffle" button to play
the tracks on CD, USB/iPod or Bluetooth®in
random mode.
Press the "Shuffle" button again to deactivate the
function.
TRACK REPETITION
Press the ">" button then the "Repeat" button to
activate the function.
Press the "Repeat" button again to deactivate the
function.
293
Page 22

CD PLAYER
To activate the CD mode, enter an audio CD or an
MP3 in the relevant slot 4 (fig. 1) or press the MEDIA
button (11 - fig. 1) on the front panel.
If there is a CD inside, press the graphic button
"Source" then select "CD".
If the CD loaded cannot be read (e.g. a CD-ROM has
been inserted or the CD is inserted the wrong way
round or there is a reading error) the display will
show an error message.
LOADING/EJECTING A CD
To load the CD, insert it gently into the slot to
activate the motorised loading system, which will
position it correctly (the "CD" symbol on the display
comes on).
Enter a CD when the system is on, the CD mode is
automatically selected and the system starts playing
the tracks.
The display shows the number of the track and the
time (minutes and seconds).
Press the
panel, with the system on, to activate the motorised
ejection of the CD.
After the ejection, the audio source will be
automatically selected.
If the CD is not removed from the slot, the system
will re-enter it automatically after about 10 seconds
without playing it.
button (EJECT) (3 - fig. 1) on the front
294
Page 23

Bluetooth ® SOURCE
This mode is activated by pairing a Bluetooth ®
device containing music tracks.with the system.
PAIRING A Bluetooth® AUDIO DEVICE
To pair a Bluetooth® audio device, proceed as
follows:
❒ activate the Bluetooth® function on the device;
❒ press the MEDIA button (11-fig. 1) on the front
panel;
❒ if the "Media" source is active, press the "Source"
button;
❒ select the Bluetooth® media source;
❒ press the "Add Device" button;
❒ search for uconnect®ontheBluetooth® audio
device (during the pairing stage a screen is
displayed showing the progress of the operation);
❒ when requested by the audio device, enter the PIN
code shown on the system display or confirm on
the device the PIN displayed;
❒ if the pairing procedure is completed successfully, a
screen is displayed. Answer "Yes" to the question
to pair the Bluetooth® audio device as favourite
(the device will have priority on all other devices
that will be paired later on). If "No" is selected, the
priority is determined according to the order of
connection. The last device connected will have
the highest priority;
❒ an audio device can also be paired by pressing the
SETTINGS button (10-fig. 1) on the front panel
and by selecting "Phone / Bluetooth®".
IMPORTANT If the Bluetooth ® connection
between mobile phone and system is lost, consult
the mobile phone owner's handbook.
295
Page 24

USB/iPod SUPPORT
AUX SUPPORT
To activate the USB/iPod mode insert the
corresponding device (USB or iPod) in the USB port
fig. 11 present on the car.
If a USB/iPod device is inserted with the system on,
this starts playing the tracks present on the device.
To activate the AUX mode engage a suitable device
in the AUX port fig. 12 on the car.
Entering a device when the system is on, it starts
playing the tracks on the device (playing starts from
the first track).
Adjust the volume by the button/knob
(1 - fig. 1)
on the front or by the volume adjustment control on
the connected device.
As for the "Audio source selection" function, see the
chapter "Media Mode".
296
fig. 11
F0Y0097
fig. 12
F0Y0097
Page 25

IMPORTANT
The functions of the device connected with the AUX
port are directly managed by the device itself: it is
not possible to change track/folder/playlist with the
controls on the front or on the steering wheel.
Do not leave the cable of your portable player
connected with the AUX socket after disconnection,
to avoid possible hiss from the speakers.
PHONE MODE
PHONE MODE ACTIVATION
Press the PHONE button (9-fig. 1) on the front panel
to activate the Phone mode.
The following screen appears on the display (see fig.
13).
MAIN FUNCTIONS
Use the buttons on the display to:
❒ dial the phone number (using the graphic keypad
on the display);
❒ display and call the contacts on the mobile phone
phonebook;
❒ display and call contacts from the registers of
previous calls;
fig. 13
F0Y1012
297
Page 26

❒ pair up to 10 phones/audio device to make access
and connection easier and quicker;
❒ transfer calls from the system to the mobile phone
and vice versa and deactivate the microphone
audio for private conversations.
Your mobile phone’s audio is transmitted through
your vehicle audio system; the system will
automatically mute your radio when using the Phone
function.
DISPLAYED INFORMATION
When a phone is connected to the system, the
display shows various information (if available):
❒ status of roaming;
❒ network signal intensity;
❒ mobile phone battery charge;
❒ mobile phone name.
NOTE To consult the list of mobile phones and
supported functions, visit the website www.fiat.com
or call Customer Services on 00800.3428.0000 (the
number may vary depending on the country: please
refer to the reference table in the "Customer Service
number list" section herein).
298
Page 27

PAIRING A MOBILE PHONE
IMPORTANT Carry out this operation only with car
stationary and in safety conditions; this function is
deactivated when the car is moving.
Even though the mobile phone pairing procedure is
described below we always recommend to consult
the mobile phone owner's handbook.
To pair the mobile phone, proceed as follows:
❒ activate the Bluetooth ® function on the mobile
phone;
❒ press the PHONE button (9-fig. 1) on the front
panel;
❒ if no phone is paired with the system yet, the
display shows a dedicated screen;
❒ select "Yes" to start the pairing procedure then
search for the uconnect® device on the mobile
phone (if "No" is selected, the Phone main screen
is displayed);
❒ when prompted by the mobile phone, use its
keyboard to enter the PIN code shown on the
system display or confirm on the mobile phone the
PIN displayed;
❒ from the "Phone" screen you can always pair a
mobile phone pressing the "Settings" button: press
the "Add Device" button and proceed as described
above;
❒ during the pairing stage a screen is displayed
showing the progress of the operation;
❒ if the pairing procedure is completed successfully, a
screen is displayed: answer "Yes" to the question to
pair the mobile phone as favourite (the mobile
phone will have priority on all other mobile phones
that will be paired later on). If no other devices are
paired, the system will consider the first associated
device as favourite.
Note
The priority is determined according to the order of
connection for mobile phones which are not set as
favourite. The last phone connected will have the
highest priority.
299
Page 28

STORING NAMES/NUMBERS INTHE
MOBILE PHONE PHONEBOOK
Before pairing your mobile phone, you must make
sure you have stored the names you want to contact
in the phonebook on your mobile phone so that you
can call them using the car's hands-free system.
If your phonebook does not contain any names,
enter new names for the most frequently used
numbers.
For further details, consult your mobile phone
owner's handbook.
IMPORTANT The names in the phonebook not
containing phone numbers or name and surname will
not be displayed.
CONNECTION/DISCONNECTION OF A
MOBILE PHONE OR A Bluetooth®
AUDIO DEVICE
Connection
The system connects automatically to the mobile
phone paired with the highest priority.
To choose a specific mobile phone or Bluetooth®
audio device, proceed as follows:
❒ press the SETTINGS button (10-fig. 1) on the front
panel;
❒ select "Phone / Bluetooth" on the display;
❒ select the "Paired Phones" or "Paired Audio" list
using the corresponding button on the display;
❒ select the specific device (mobile phone or
Bluetooth® device);
❒ press the "Connect" button;
❒ during the connection stage a screen is displayed
showing the progress of the operation;
❒ the device connected is highlighted in the list.
300
Page 29

Disconnection
To disconnect a specific mobile phone or
Bluetooth® audio device, proceed as follows:
❒ press the SETTINGS button (10-fig. 1) on the front
panel;
❒ select "Phone / Bluetooth" on the display;
❒ select the "Paired Phones" or "Paired Audio" list
using the corresponding button on the display;
❒ select the specific device (mobile phone or
Bluetooth® device);
❒ press the "Disconnect" button.
DELETION OF A MOBILE PHONE OR A
Bluetooth® AUDIO DEVICE
To delete a mobile phone or Bluetooth® audio
device from a list, proceed as follows:
❒ press the SETTINGS button (10-fig. 1) on the front
panel;
❒ select "Phone / Bluetooth" on the display;
❒ select the "Paired Phones" or "Paired Audio" list
using the corresponding button on the display;
❒ select the device (mobile phone or Bluetooth®
device);
❒ press the "Delete Device" button;
❒ a confirmation screen will appear on the display:
press "Yes" to delete the device or "No" to cancel
the operation.
301
Page 30

SETTING A MOBILE PHONE OR A
Bluetooth® AUDIO DEVICE AS FAVOURITE
To set a mobile phone or Bluetooth® audio device
as favourite, proceed as follows:
❒ press the SETTINGS button (10-fig. 1) on the front
panel;
❒ select "Phone / Bluetooth" on the display;
❒ select the "Paired Phones" or "Paired Audio" list
using the corresponding button on the display;
❒ select the specific device (mobile phone or
Bluetooth® device);
❒ press the "Make Favourite" button;
❒ the device selected is moved to the top of the list.
DELETION OF PHONE DATA
(PHONEBOOK AND RECENT CALLS)
Select "Phone Data Delete" on the display to delete
the list of recent calls and the phonebook copy.
TRANSMISSION OF PHONE DATA
(PHONEBOOK AND RECENT CALLS)
If your mobile phone has a function for sending the
phonebook via Bluetooth® technology.
During the pairing procedure a screen will appear
with the request "Do you want to download you
phone data and recent calls?".
Answer "Yes" to copy the whole phonebook and the
list of recent calls to the system.
Answer "No" to carry out the operation later on.
After the first phone data transmission, the
procedure for transmitting and updating the
phonebook (if supported) starts as soon as a
Bluetooth® connection is established between
mobile phone and system.
Whenever a mobile phone is connected to the
system, a maximum of 1000 contacts can be
downloaded and updated for each phone.
Depending on the amount of items downloaded from
the phonebook, a slight delay can occur before the
last names downloaded can be used. Up to then the
phonebook downloaded previously (if present) will
be available.
302
Page 31

Only the phonebook of the mobile phone currently
connected to the system can be accessed.
The phonebook downloaded from the mobile phone
can neither be modified nor be deleted through the
uconnect® system: changes will be transmitted and
updated in the system when the mobile phone is
next connected.
MAKING A PHONE CALL
The operations described below can only be accessed
if supported by the mobile phone in use.
For all functions available, refer to the mobile phone
owner's handbook.
A call can be made by:
❒ selecting the
❒ selecting "Recent Calls";
❒ selecting the
❒ Pressing the "Redial" button.
icon (mobile phone phonebook);
icon;
Dialling the phone number using the
"keyboard" icon on the display
Enter the phone number using the graphic keyboard
displayed.
Proceed as follows:
❒ press the PHONE button (9-fig. 1) on the front
panel;
❒ press the
numbered buttons to enter the number;
❒ press the "Call" button to make a call.
Dialling the phone number using the mobile
phone
It is possible to dial a phone number with the mobile
phone and continue using the system (never allow
yourself to be distracted while driving).
When a phone number is dialled with the keyboard
of the mobile phone, the audio of the call is played
over your car's sound system.
button on the display and use the
303
Page 32

Recent calls
The list of the last calls made for each of the
following call types can be displayed:
❒ Calls received;
❒ Calls made;
❒ Calls without a reply;
❒ All calls.
To access these types of calls, press the "Recent
Calls" button on the Phone menu main screen.
MANAGING AN INCOMING CALL
Call controls
The buttons on the display allow the following phone
call functions to be managed:
❒ Answer;
❒ End;
❒ Ignore;
❒ Put on hold/resume;
❒ Deactivate/activate the microphone;
❒ Transfer the call;
❒ Switch from one call to the other;
❒ Conference/merge two active calls.
304
Page 33

Answering a phone call
When a phone call is received on the mobile phone,
the system deactivates the audio system (if active)
and displays a screen.
Press the "Answer" button or the
steering wheel controls to answer.
Rejecting a phone call
Press the "Ignore" button or the
steering wheel controls to reject.
button on the
button on the
Answering an incoming call during an active
conversation
To answer an incoming call whilst another phone
conversation is in progress, press the "Answer"
button to put the ongoing call on hold and answer
the new incoming call.
IMPORTANT Not all mobile phones may support the
management of an incoming call when another phone
conversation is active.
305
Page 34

MAKING A SECOND PHONE CALL
When a phone conversation is active, a second
phone call can be made as follows:
❒ select the number/contact of the list of recent
calls;
❒ select the contact from the phonebook;
❒ press the "Hold" button and dial the number using
the graphic keyboard of the display.
MANAGINGTWO PHONE CALLS
If two calls are in progress (one active and one on
hold), it is possible to switch between them pressing
the "Call On Hold" button or to merge the two calls
in a conference pressing the "Merge calls" buttons.
Note
Check whether the telephone in use supports the
management of a second call and the "Conference"
mode.
306
Page 35

ENDING A CALL
Press the "End" button or the
steering wheel controls to end a call in progress.
Only the ongoing call is ended and any call on hold
becomes the new active call.
Depending on the type of mobile phone, if the
ongoing call is ended by the caller, the call on hold
may not be activated automatically.
REDIALLING
To call the number/contact of last call made, press
the "Redial" button.
CONTINUING A PHONE CALL
After the engine is switched off, it is still possible to
continue a phone call.
The call continues until it is ended manually or for a
maximum period of about 20 minutes.
When the system is switched off the call is
transferred to the mobile phone.
button on the
ACTIVATION/DEACTIVATION OF THE
MICROPHONE
During a call the microphone can be deactivated
pressing the
steering wheel controls) or the "Mute" button on the
display.
When the microphone is deactivated it is still
possible to listen to the call in progress.
To reactivate the microphone, press the
corresponding button again.
button on the front panel (or on the
307
Page 36

TRANSFERRING A CALL
The ongoing calls can be transferred from the mobile
phone to the system and vice versa without ending
the calls.
To transfer the call, press the "Transfer" button.
SMS MESSAGE READER
The system can read the messages received by the
mobile phone.
To use this function the mobile phone must support
the SMS exchange function via Bluetooth ®.
If this function is not supported by the phone, the
corresponding
button is deactivated (greyed out).
When a text message is received, the display will
show a screen where the options "Listen", "Call" or
"Ignore" can be selected.
Press the
button to access the list of SMS
messages received by the mobile phone (the list
displays a maximum of 60 messages received).
"MORE" MODE
Press the MORE button (8-fig. 1) on the front panel
to display (see fig. 14) the following operation
settings:
❒ Trip Computer;
❒ Clock;
❒ eco:Drive.
308
fig. 14
F0Y1013
Page 37

TRIP COMPUTER
Press the "Trip" button (see fig. 14) to display the trip
information of the car.
This function allows you to display the consumption
levels and define two separate trips called “Trip A”
and “Trip B” for monitoring the car's "complete
journey" in a reciprocally independent manner.
Both functions can be reset (reset - start of a new
journey): to reset the desired "Trip" hold down the
"Trip A" or "Trip B" buttons.
CLOCK
Press the "Clock" button (see fig. 14) to display the
clock.
eco:Drive
eco:Drive (see fig. 15) monitors your driving style
on-board and in real time using the "Acceleration",
"Deceleration", "Gearbox" (excluding versions with
automatic transmission used in "Auto" mode) and
"Speed" indexes which are calculated and stored
directly in the system;
Connect to the eco:Drive site
(www.fiat.com/ecodrive) to configure the USB stick
to be used to estimate the trip and the driving style
data.
Do not remove the USB stick until the system has
downloaded the data since they might be lost
completely or partially.
fig. 15
F0Y1014
309
Page 38

Activation
Press the "eco:Drive" button (see fig. 14) to interact
with the function.
To activate the function press the "eco:Drive ON"
button.
A screen will be displayed (see fig. 16) showing 4
indexes:
❒ "Acceleration";
❒ "Deceleration";
❒ "Gearbox" (only 3 indexes for versions with
automatic transmission without the "Gearbox"
index);
❒ "Speed".
These indexes are grey until the system has sufficient
data to evaluate the driving style or in the event of
long stops.
Once sufficient data are available, the indexes will
have 4 colours depending on the evaluation: green
(very good), yellow, orange and red (very bad).
The average of these indexes will be displayed above
them, in real time, indicating the eco-sustainability of
the driving style, from 0 (low) to 100 (high).
To check the data average of previous trip (the "trip"
starts when the ignition key is turned to MAR and
stops when it is turned to STOP), select the
"Previous Trip" button (see fig. 17).
310
fig. 16
F0Y1015
fig. 17
F0Y1016
Page 39

The data are automatically transferred to the USB
stick when the engine is switched off. The data
transferred are deleted from the system memory.
When the data are transferred to the USB stick, the
display could show instructions on the correct
operation steps: follow these instruction.
These messages are only displayed with ignition key
in STOP position and radio off delay longer than 0
minutes.
Note
Warning messages will be displayed, when the USB
memory is full.
Deactivation
Press the "eco:Drive Off" button to deactivate the
function.
SETTINGS
Press the SETTINGS button (10-fig. 1) on the front
panel to display the "Settings" main menu (see fig.
18).
NOTE The menu items displayed vary according to
the versions.
The menu comprises the following options:
❒ Display;
❒ Time & Date;
❒ Safety/Assistance (for versions/markets, where
provided);
❒ Lights (for versions/markets where provided);
❒ Doors & Locks;
❒ Audio;
❒ Phone / Bluetooth;
❒ Radio;
❒ Restore Default Settings.
fig. 18
F0Y1005
311
Page 40

Display
The "Display" menu contains the following options:
❒ "Brightness" (this setting is not available when the
display mode is set to "Automatic"): select
"Brightness" and press the "+" or "–" buttons to
adjust the display brightness with the headlights on
or off (the setting not corresponding to the active
headlight condition is greyed out).
❒ "Display Mode": press the "Display Mode" button to
set the display brightness according to "Day",
"Night" or "Auto" condition. In "Auto" mode the
display brightness is aligned to that of the
instrument panel.
❒ "Language": press the "Language" button to select
one of the languages available.
❒ "Units": press the "Units" button to select the
correct unit for "Temperature" ("°C" or "°F"),
"Distance" ("km" or "mi") and "Fuel Consumption".
If the distance is in "km", "km/l" or "l/100km" can
be selected. If the distance is in "mi" (miles), "miles
per gallon" ("mpg") are set automatically.
❒ "Voice Resp. Length": press the relevant button to
set the detail level of the voice messages supplied
by the system and the suggestions displayed.
❒ "Touchscreen Beep": press the relevant button to
activate/deactivate the acoustic signal when the
buttons on the displayed are pressed.
❒ "Display Trip B": press the relevant button to
activate/deactivate the displaying of the Trip B on
the instrument panel display.
Clock & Date
Use this function to set the clock.
312
Page 41

Time setting
Press the SETTINGS button (10-fig. 1) on the front
panel then select "Clock & date" (see fig. 18).
Select "Set Time" and press the
or buttons (see
fig. 19) to adjust hours and minutes.
Press the "12h" or "24h" buttons to select the time
format.
The "am" and "pm" are available in "12h" mode.
In the Clock menu, "Show Time Status" can be
selected to activate/deactivate the displaying of the
clock at the top of the display (for versions/markets
where provided).
Date setting
To set the date proceed as for the time setting:
select "Set Date" to adjust day, month and year.
Safety/Assistance
(for versions/markets, where provided)
Select this function to adjust the rain sensor
sensitivity (for versions/markets, where provided).
Lights
(for versions/markets, where provided)
Use this function to carry out the following
adjustments:
❒ "Twilight sensor" (for versions/markets, where
provided): adjustment of headlight switching on
sensitivity;
❒ "Daytime Lights" (DRL) (for versions/markets
where provided): activation/deactivation of daytime
lights;
❒ "Cornering Lights" (for versions/markets where
provided): activation/deactivation of cornering
lights.
fig. 19
F0Y1006
313
Page 42

Doors & Locks
Use this function to activate/deactivate the automatic
door locking when the car is moving ("Autoclose"
function).
Audio
See paragraph "Audio" in chapter "Switching the
system on/off".
Phone / Bluetooth
See the description in the "Connecting/disconnecting
a mobile phone or a Bluetooth ® audio device"
paragraph in the "Phone Mode" chapter.
Radio
Use this function to configure the following options:
❒ "Traffic Announc.": activation/deactivation of the
automatic tuning of the traffic announcements
("TA" function);
❒ "Altern. Frequency": activation/deactivation of the
automatic tuning of the strongest signal for the
station selected ("AF" function);
❒ "Regional": activation/deactivation of the automatic
tuning to a station which broadcasts regional news
("REG" function);
❒ "Playing DAB Announcements":
activation/deactivation of the automatic tuning to
DAB announcements and selection of
announcement categories of interest among those
available.
Restore Default Settings
Use this function to restore the settings for display,
time, date, audio and radio to the default values set
by the manufacturer.
314
Page 43

VOICE COMMANDS
USE OF THEVOICE COMMANDS
Please follow the suggestions below to be sure that
the voice commands are always recognised by the
system:
❒ speak at a normal volume;
❒ always wait for the "beep" before speaking;
❒ the system is capable of recognising the voice
commands given, irrespective of gender, by the
tone of voice and intonation of the person giving
the instructions;
❒ if possible, try and keep the noise in the passenger
compartment to a minimum;
❒ before giving voice commands, ask other
passengers not to talk. This is to prevent
misunderstanding since the system may recognise
other words (in addition to or different from your
voice command) if several people are speaking;
❒ for optimum operation it is advisable to close the
windows and the sun roof (for versions/markets,
where provided) to avoid external interference.
IMPORTANT Voice commands must always be given
in safe driving conditions, in compliance with the laws
in force in the country where you are driving and
using the mobile phone correctly.
USE OF STEERING WHEEL CONTROLSTO
ACTIVATE VOICE COMMANDS
"Phone" button
The button on the steering wheel controls
activates the "Phone" voice recognition system to
make calls, display recent incoming and outgoing calls
and phonebook, etc.
Every time the button
and the display shows a suggestion screen inviting the
user to say a command.
"Voice" button
The button on the steering wheel controls
activates the "Radio/Media" voice recognition system
to:
❒ tune to a specific radio station;
❒ tune to a specific AF/FM radio frequency;
❒ play a track on a USB memory stick/iPod/CD MP3;
❒ play an album track on a USB memory
stick/iPod/CD MP3.
Every time the button
and the display shows a suggestion screen inviting the
user to say a command.
is pressed, there is a "beep"
is pressed, there is a "beep"
315
Page 44

Fast use of the voice interaction
The buttons
or , when pressed during a system
voice message, enable to say a voice command
directly.
For example, if the system is saying a help voice
message and you know the command to give to the
system, pressing the buttons
or , the voice
message is interrupted and you can say the wished
voice command directly (without having to listen to
the whole help voice message).
The buttons
or , if pressed when the system is
waiting for a voice command by the user, close the
voice session.
VOICE SESSION STATUS
The system displays the voice session status with
specific icons:
❒
(green icon): displayed when the system is
listening. In this case you can say a voice command;
❒
(green icon): displayed when the system has
interpreted the said voice command and its
function is performed. In this case you cannot say a
voice command;
❒
(green icon): displayed when the system is
processing the given voice command. In this case
you cannot say a voice command;
❒
(yellow icon): displayed when the system is
saying a help, information or multiple choice voice
message. In this case you cannot say a voice
command;
❒
(red icon): displayed when the voice
interaction is ended by the user. In this case you
cannot say a voice command.
MULTIPLE CHOICE
In a few specific cases the system cannot define
univocally the said voice command and asks for
choosing among max. four alternatives.
For example, if you ask to call a name in the
phonebook and there are similar names, the system
will suggest a numerical list of the available
alternatives (see fig. 20), asking to say the associated
number.
316
fig. 20
F0Y1046
Page 45

GLOBALVOICE COMMANDS
fig. 21
F0Y1040
317
Page 46

PHONE VOICE COMMANDS
318
fig. 22
F0Y1041
Page 47

fig. 23
F0Y1042
319
Page 48

320
fig. 24
F0Y1043
Page 49

fig. 25
F0Y1044
321
Page 50

RADIO AM/FM/DABVOICE COMMANDS
322
fig. 26
F0Y1045
Page 51

fig. 27
F0Y1050
323
Page 52

MEDIA VOICE COMMANDS
324
fig. 28
F0Y1047
Page 53

fig. 29
F0Y1048
325
Page 54

326
fig. 30
F0Y1049
Page 55

CUSTOMER SERVICE NUMBER LIST
The following table shows the specific Customer Service numbers for each country.
Country
Austria 00800.3428.0000 – +39.02.44412.041
Belgium 00800.3428.0000 0800.55111 +39.02.44412.041
Denmark – – –
France 00800.3428.0000 0800.3428.00 +39.02.44412.041
Germany 00800.3428.0000
Greece – 800.11500.800 +39.02.44412.041
Ireland – 1800.3428.00 +39.02.44412.041
Italy 00800.3428.0000 800.3428.00 +39.02.44412.041
Luxembourg 00800.3428.0000 800.28111 +39.02.44412.041
Holland 00800.3428.0000 – +39.02.44412.041
Poland 00800.3428.0000 – +39.02.44412.041
Portugal 00800.3428.0000 – +39.02.44412.041
United Kingdom 00800.3428.0000 – +39.02.44412.041
International freephone
number
Company freephone
number
+49.69.669.888.70
(upon payment)
International number
+39.02.44412.041
327
Page 56

Country
Czech Republic – – –
Slovakia – – –
Spain 00800.3428.0000 900.3428.00 +39.02.44412.041
Sweden – – –
Switzerland 00800.3428.0000 – +39.02.44412.041
Hungary –
International freephone
number
Company freephone
number
06.40.245.245
(upon payment)
International number
+36.1.465.3688
328
 Loading...