

Page 1

CP43609
MODELO:
MANUAL DE INSTRUCCIONES
Coee Station
3-in-1
3 en 1
Estación de Café
INSTRUCTION MANUAL
MODEL:
CP43609
Page 2

49 50
0
29 28 27
303132
262524
10 916 15 14 13 12 11
232221
20
19 18 17
1 5432 876
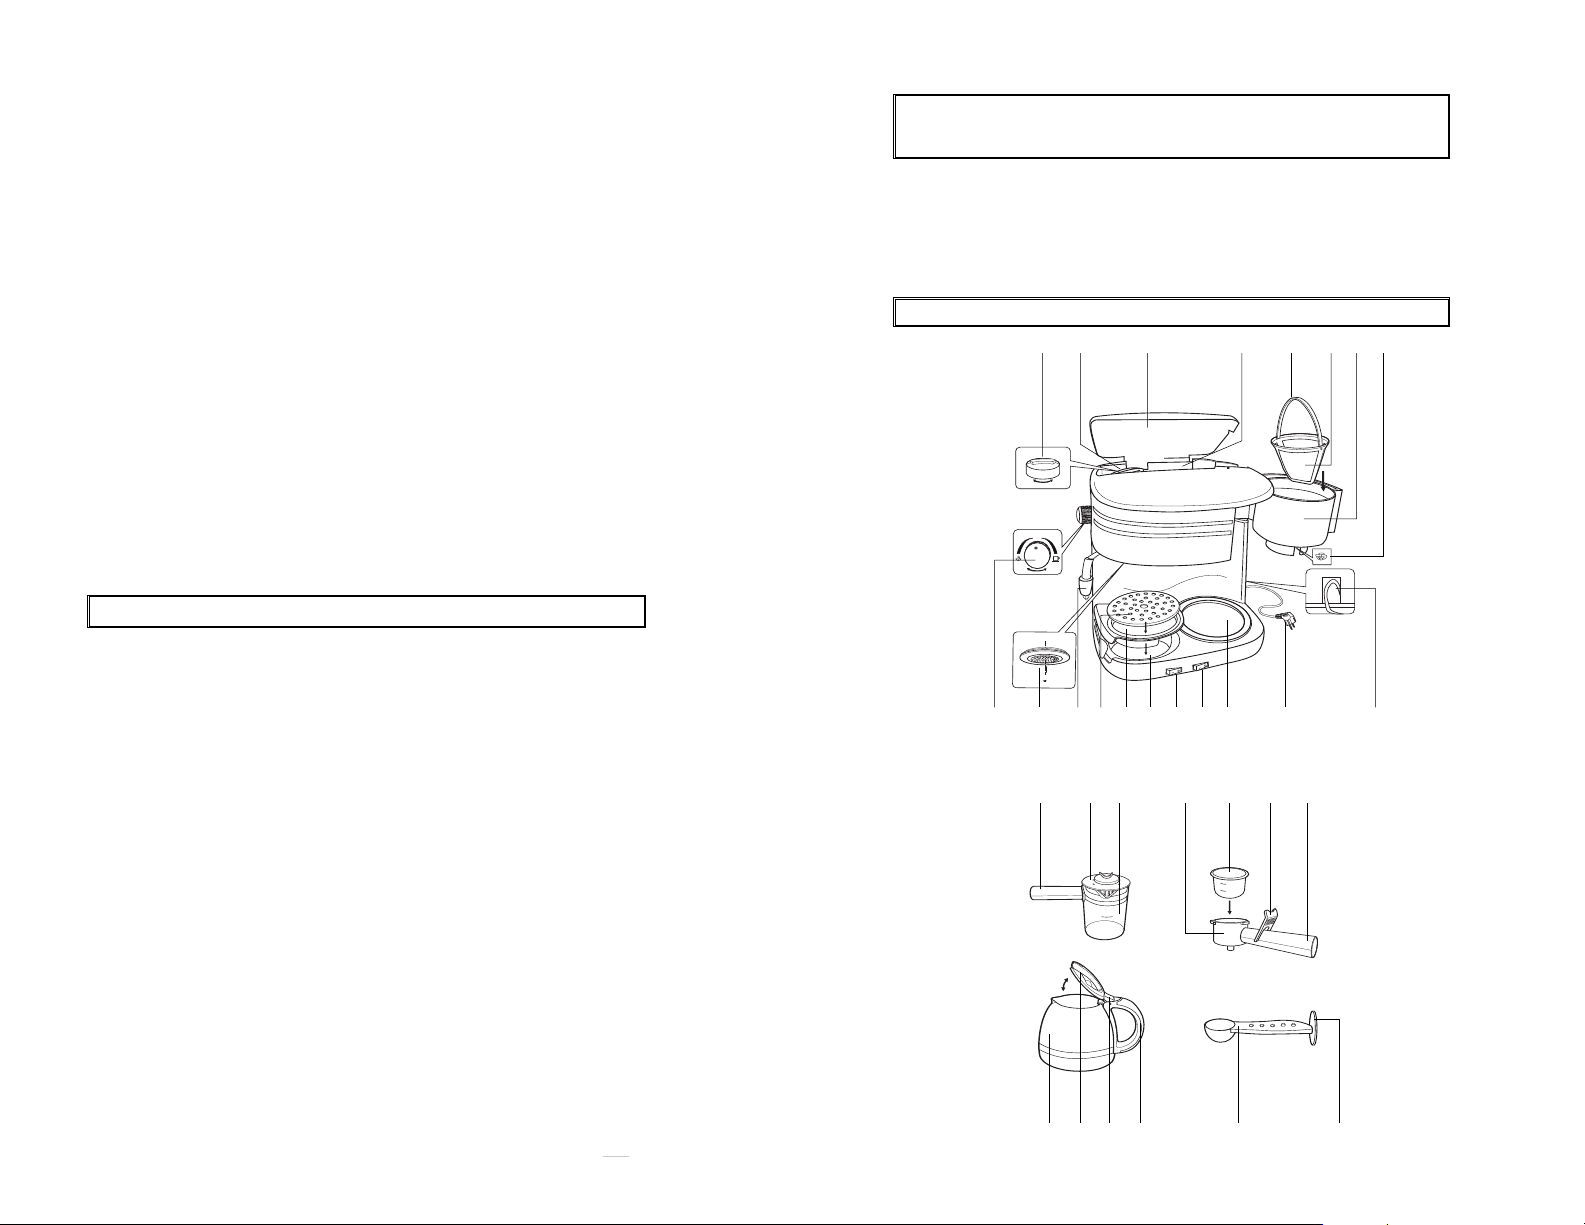
MONTAJE
instrucciones de uso con él.
Si cede este aparato a terceras personas, deberá entregar las
pudiese provocar. Observe especialmente las indicaciones de seguridad.
aparato a la red eléctrica, para evitar daños que un uso no adecuado
Por favor lea las instrucciones de uso con atención antes de conectar su
Estimado cliente,
CAFETERA PARA ESPRESSO / CAPPUCCINO
EM123
MANUAL DE INSTRUCCIONES
Page 3
GB
GB
SAFETY INFORMATION
• Incorrect operation and improper use can damage the appliance and
cause injury to the user.
• The appliance may be used only for it’s intended purpose. No
responsibility can be taken for any possible damage caused through
incorrect use or improper handling.
• Before connecting the appliance to the power source, check that the
current and power match those given on the rating plate.
• Do not put the appliance or the plug in water or any other liquid.
However should the appliance accidentally fall into water, unplug the
appliance immediately and have it checked by a qualified person before
using it again. Non-observance could cause a fatal electric shock!
• Never attempt to open the housing yourself.
• Do not place any kind of object into the inside of the housing.
• Do not use the appliance with wet hands, on a damp floor or when the
appliance itself is wet.
• Do not touch the plug with wet or damp hands.
• Check the cord and the plug regularly for any possible damage. If the
cord or plug is damaged, it must be replaced by the manufacturer or a
qualified person in order to avoid a hazard.
• Do not use the appliance if it is dropped or otherwise damaged or if the
cord or plug are damaged. In the case of damage, take the appliance to
an electrical repair shop for examination and repair if necessary.
• Never attempt to repair the appliance yourself. This could cause an
electric shock!
• Do not allow the cord to hang over sharp edges and keep it well away
from hot objects and naked flames. Remove the plug from the socket
only by holding the plug.
• For extra protection it is possible to fit the electric household installation
with a fault current breaker with a rated breaking current of not more
1 Espresso machine lock
2. Espresso machine water tank
3. Cover
4. Coffee machine water tank
5. Coffee filter handle
6. Coffee filter
7. Filter holder
8. Drip stop
9. Power cord storage (back side)
10. Power cord with power plug
11. Warming plate
12. Switch I O (Coffee machine)
13. Switch I O (Espresso machine)
14. Drip tray holder
15. Drip tray
16. Grid
17. Steam nozzle
0
18. Strainer and position of
espresso filter holder
19. Steam and espresso
controller
20. Espresso pot handle
21. Espresso pot cover
22. Espresso pot
23. Espresso filter holder
24. Espresso filter
25. Filter lock
26. Handle for espresso filter holder
27. Head of measuring spoon
28. Measuring spoon
29. Coffee pot handle
30. Rocker lever
31. Coffee pot cover
32. Coffee pot
GB
GB
49 50
MANUAL DE INSTRUCCIONES
EM123
CAFETERA PARA ESPRESSO / CAPPUCCINO
Estimado cliente,
Por favor lea las instrucciones de uso con atención antes de conectar su
aparato a la red eléctrica, para evitar daños que un uso no adecuado
pudiese provocar. Observe especialmente las indicaciones de seguridad.
Si cede este aparato a terceras personas, deberá entregar las
instrucciones de uso con él.
MONTAJE
0
1 5432 876
10 916 15 14 13 12 11
20
19 18 17
232221
29 28 27
262524
303132
27. Extremo de la cuchara de medir
32. Cafetera
31. Tapa de la cafetera
30. Palanca
29. Asa de la cafetera
28. Cuchara de medir
exprés (espresso)
26. Asa para el soporte del filtro
25. Fijación del filtro
24. Filtro exprés (espresso)
(espresso)
23. Soporte del filtro exprés
22. Cafetera exprés (espresso)
exprés (espresso)
21. Cubierta de la cafetera
(espresso)
20. Asa de la cafetera exprés
exprés (espresso)
19. Control de vapor y del
del filtro exprés (espresso)
18. Colador y punto de soporte
17. Boquilla de vapor
• No utilice el aparato si se ha caído o se ha dañado de alguna otra
riesgos.
substituido por el fabricante o por persona cualificada para evitar
daños. En caso de que uno de estos dos estè dañado, tendrà que ser
• Verificar el cable y el enchufe con regularidad para excluir eventuales
• No toque el enchufe con las manos húmedas o mojadas.
o cuando el aparato mismo esté mojado.
• No utilice el aparato con las manos húmedas, sobre un suelo húmedo
• No coloque ninguna clase de objetos dentro de la carcasa.
• No ententar abrir el alojamiento sin la ayuda de un experto.
fatal!
observancia de esta regla podria causar una descarga electrica
una persona cualificada antes de utilizarlo nuevamente. La no
desconectar el enchufe imediatamente y hacer verificar el aparato por
En caso de que el dispositivo caiga en agua accidentalmente,
• No colocar el dispositivo o el enchufe en agua o cualquier otro liquido.
corriente y el voltaje correspondan a aquellos indicados sobre la chapa
• Antes de conectar el dispositivo a la toma de corriente, verificar que la
causado por utilización o manejo incorrectos.
No se puede asumir responsabilidad por cualquier posible daño
• Este aparato sólo puede ser destinado al uso para el que fue fabricado.
ocasionar heridas al usuario.
• Una utilización incorrecta y mal uso pueden dañar el aparato y
INFORMACIONES DE SEGURIDAD
16. Rejilla
15. Bandeja de goteo
14. Soporte para la bandeja de goteo
exprés)
13. Interruptor I O (Máquina de café
12. Interruptor I O (Máquina de café)
temperatura
11. Plato para conservar la
enchufe
10. Cable de alimentación con
trasera)
9. Lugar para guardar el cable(parte
8. Freno de goteo
7. Soporte del filtro
6. Filtro de café
5. Asa del filtro de café
4. Depósito de agua de la cafetera
3. Tapa
exprés (espresso)
2. Depósito de agua de la cafetera
(espresso)
1. Cierre de la cafetera exprés
INSTRUCTION MANUAL
ESPRESSO/CAPPUCCINO/COFFEE MACHINE
Dear customer,
Please read these Operating Instructions through carefully before
connecting your device to the mains, in order to avoid damage due to
incorrect use. Please pay particular attention to the safety information. If
you pass the device on to a third party, these Operating Instructions must
also be handed over.
ASSEMBLY
1 5432 876
19 18 17
20
303132
232221
29 28 27
10 916 15 14 13 12 11
262524
EM123
Page 4

1 Espresso machine lock
Handle for espresso filter holder
GB
GB
51 52
2. Espresso machine water tank
3. Cover
4. Coffee machine water tank
5. Coffee filter handle
6. Coffee filter
7. Filter holder
8. Drip stop
9. Power cord storage (back side)
10. Power cord with power plug
11. Warming plate
12. Switch I O (Coffee machine)
13. Switch I O (Espresso machine)
14. Drip tray holder
15. Drip tray
16. Grid
17. Steam nozzle
18. Strainer and position of
espresso filter holder
19. Steam and espresso
controller
20. Espresso pot handle
21. Espresso pot cover
22. Espresso pot
23. Espresso filter holder
24. Espresso filter
25. Filter lock
26.
27. Head of measuring spoon
28. Measuring spoon
29. Coffee pot handle
30. Rocker lever
31. Coffee pot cover
32. Coffee pot
SAFETY INFORMATION
• Incorrect operation and improper use can damage the appliance and
cause injury to the user.
• The appliance may be used only for it’s intended purpose. No
responsibility can be taken for any possible damage caused through
incorrect use or improper handling.
• Before connecting the appliance to the power source, check that the
current and power match those given on the rating plate.
• Do not put the appliance or the plug in water or any other liquid.
However should the appliance accidentally fall into water, unplug the
appliance immediately and have it checked by a qualified person before
using it again. Non-observance could cause a fatal electric shock!
• Never attempt to open the housing yourself.
• Do not place any kind of object into the inside of the housing.
• Do not use the appliance with wet hands, on a damp floor or when the
appliance itself is wet.
• Do not touch the plug with wet or damp hands.
• Check the cord and the plug regularly for any possible damage. If the
cord or plug is damaged, it must be replaced by the manufacturer or a
qualified person in order to avoid a hazard.
• Do not use the appliance if it is dropped or otherwise damaged or if the
cord or plug are damaged. In the case of damage, take the appliance to
an electrical repair shop for examination and repair if necessary.
• Never attempt to repair the appliance yourself. This could cause an
electric shock!
• Do not allow the cord to hang over sharp edges and keep it well away
from hot objects and naked flames. Remove the plug from the socket
only by holding the plug.
• For extra protection it is possible to fit the electric household installation
with a fault current breaker with a rated breaking current of not more
Debe ser enrollado en su parte trasera y mantenido siempre alejado de
• El cable de alimentación no debe ir enrollado alrededor del aparato.
que no provengan del fabricante.
• No use accesorios que no hayan sido suministrados en el embalaje o
calientes o fríos no deben ser vertidos en las cafeteras.
combinación con este electrodoméstico. Líquidos extremadamente
• La cafetera y la cafetera exprés (espresso) solo deben ser usadas en
Use las marcas adecuadas para medir la cantidad exacta de agua.
• El depósito de agua deberá estar siempre relleno con suficiente agua.
boquilla de vapor.
quitar el soporte del filtro, deje que el vapor termine de salir por la
• Durante el proceso la máquina de espresso está presurizada. Antes de
ambos interruptores están en la posición 0.
• Conecte el aparato a la red eléctrica siempre que haya comprobado que
• Nunca mueva el aparato cuándo contenga en su interior agua caliente.
mucho durante el proceso.
• Peligro de quemaduras: El asa y las partes metálicas se calentarán
• Use únicamente agua decalcificada y fría en el depósito de agua.
CONSEJOS ESPECIALES DE SEGURIDAD
• No sostenga el aparato por el cable.
• Apague el aparato antes de desenchufarlo.
conectado a la toma de corriente.
• Atenciòn! El voltaje indicado persiste en cuanto el aparato estè
cuando se disponga a limpiarlo.
• Desenchufe siempre el aparato cuando no esté en uso y también
los niños utilicen aparatos domésticos sin supervisión.
incorrecta de los aparatos eléctricos, por lo tanto, no permita nunca que
• Los niños no pueden reconocer los peligros que implican la utilización
• Nunca deje la unidad desatendida cuando se está utilizando.
utilizarse al aire libre.
• Este aparato no es apropiado para su utilización comercial ni para
calentamiento del mismo cable prolongador o del enchufe.
consumo eléctrico del aparato, porque lo contrario puede dar lugar a un
• Si se utiliza un cable prolongador debe ser el adecuado para el
tropezar con ellos miestras están en uso.
de prolongación sean accidentalmente arrancados o que se pueda
• Verifique que no exista peligro de que el cable de la unidad o un cable
hogar. Consulte con su electricista para mayor información.
diferencial, para una intensidad no mayor a 30mA, en la instalación del
• Para una protección adicional se puede colocar un interruptor
del tomacorriente de pared solamente cogiéndolo por el enchufe.
bien apartado de objetos calientes y llamas vivas. Desconecte la unidad
• No permita que el cable cuelgue sobre bordes afilados y manténgalo
descarga eléctrica!
• Nunca intente reparar Ud. mismo el aparato. Puede dar lugar a una
examinado y reparado si fuese necesario.
lleve el aparato a una tienda de reparaciones eléctricas para que sea
manera o si el cable o el enchufe presentan daños. En caso de daño,
Page 5

GB
GB
GB
GB
• Do not fill in water if the appliance is hot. Always turn off the appliance
and cool down before filling in water.
• Use fresh and cold water only.
• The coffee/espresso pot may only be used with a closed cover and in
combination with this appliance.
• Never switch on the appliance without any water in the water
tank.
INTENTED USE
• This appliance is for household use only and has to be used to brew
coffee and espresso. The appliance is not meant for the commercial or
industrial use.
BEFORE INITIAL USE
• Remove all packaging material.
• Clean the unit as described under
Cleaning and Care
.
• Important! Before initial use, perform two to three run-throughs with
both, the coffee and espresso machine, without coffee, as described in
the following. Open the steam valve when preparing espresso for
approx. 5-10 seconds to clean the pipe of the steam nozzle. Small
quantities of smoke and smell may emit at the first run, this is normal.
After the run-throughs rinse all detachable parts with hot water.
OPERATION
Espresso preparing
• Pull out the power cord (10) of the power cord storage (9) at the back
side of the device. Do NOT connect the power plug with the power
supply.
• Open the cover (3).
• The espresso pot has markings for the amount of water filling for 2
and 4 cups of espresso. Mind these markings to prepare the
corresponding number of espresso cups. Open the espresso machine
lock (1) and fill in the corresponding water quantity into the water tank
(2) with support of the espresso pot (22).
• Turn the lock tightly.
• Insert the espresso filter (24) into the espresso filter holder (23) and
fold the filter lock (25) over the edge of the filter.
• Put the corresponding amount of espresso coffee into the filter with the
measuring spoon (28). Mind the markings inside the espresso filter.
• Press the coffee softly with the head of measuring spoon (27).
However, do not press too tightly as this can cause congestion and
overflowing. Remove surplus coffee powder from the edge of the
espresso filter to ensure a good fit at the filter holder photo. The
topmost marking in the filter may not be exceeded.
• Pull back the filter lock (25) with the thumb and insert the espresso
filter holder from below in the filter holder (18). The handle (26) of the
espresso filter holder must show on the arrow Turn the handle of
the espresso filter holder to the right on position LOCK until stop.
• Put the collection tray (15) with an inserted grid (16) in the tray holder (14).
51 52
manera o si el cable o el enchufe presentan daños. En caso de daño,
lleve el aparato a una tienda de reparaciones eléctricas para que sea
examinado y reparado si fuese necesario.
• Nunca intente reparar Ud. mismo el aparato. Puede dar lugar a una
descarga eléctrica!
• No permita que el cable cuelgue sobre bordes afilados y manténgalo
bien apartado de objetos calientes y llamas vivas. Desconecte la unidad
del tomacorriente de pared solamente cogiéndolo por el enchufe.
• Para una protección adicional se puede colocar un interruptor
diferencial, para una intensidad no mayor a 30mA, en la instalación del
hogar. Consulte con su electricista para mayor información.
• Verifique que no exista peligro de que el cable de la unidad o un cable
de prolongación sean accidentalmente arrancados o que se pueda
tropezar con ellos miestras están en uso.
• Si se utiliza un cable prolongador debe ser el adecuado para el
consumo eléctrico del aparato, porque lo contrario puede dar lugar a un
calentamiento del mismo cable prolongador o del enchufe.
• Este aparato no es apropiado para su utilización comercial ni para
utilizarse al aire libre.
• Nunca deje la unidad desatendida cuando se está utilizando.
• Los niños no pueden reconocer los peligros que implican la utilización
incorrecta de los aparatos eléctricos, por lo tanto, no permita nunca que
los niños utilicen aparatos domésticos sin supervisión.
• Desenchufe siempre el aparato cuando no esté en uso y también
cuando se disponga a limpiarlo.
• Atenciòn! El voltaje indicado persiste en cuanto el aparato estè
conectado a la toma de corriente.
• Apague el aparato antes de desenchufarlo.
• No sostenga el aparato por el cable.
CONSEJOS ESPECIALES DE SEGURIDAD
• Use únicamente agua decalcificada y fría en el depósito de agua.
• Peligro de quemaduras: El asa y las partes metálicas se calentarán
mucho durante el proceso.
• Nunca mueva el aparato cuándo contenga en su interior agua caliente.
• Conecte el aparato a la red eléctrica siempre que haya comprobado que
ambos interruptores están en la posición 0.
• Durante el proceso la máquina de espresso está presurizada. Antes de
quitar el soporte del filtro, deje que el vapor termine de salir por la
boquilla de vapor.
• El depósito de agua deberá estar siempre relleno con suficiente agua.
Use las marcas adecuadas para medir la cantidad exacta de agua.
• La cafetera y la cafetera exprés (espresso) solo deben ser usadas en
combinación con este electrodoméstico. Líquidos extremadamente
calientes o fríos no deben ser vertidos en las cafeteras.
• No use accesorios que no hayan sido suministrados en el embalaje o
que no provengan del fabricante.
• El cable de alimentación no debe ir enrollado alrededor del aparato.
Debe ser enrollado en su parte trasera y mantenido siempre alejado de
del filtro (25) sobre el filo del filtro.
• Inserte el filtro de espresso (24) en su soporte (23) y pliegue el cierre
• Gire el cierre ajustándolo.
cafetera de espresso (22).
correspondiente de agua en el depósito de agua (2) con soporte de la
cierre de la máquina de café (1) y rellénelo con la cantidad
preparar el correspondiente número de tazas de café exprés. Abra el
necesaria para 2 y 4 tazas de espresso. Considere estas marcas para
• La cafetera de café exprés tiene unas marcas con la cantidad de agua
• Abra la tapa (3).
la parte trasera del aparato. NO conecte el aparato a la corriente.
• Saque el cable de corriente (10) del lugar para guardar el cable (9) en
Preparando un café exprés (espresso)
FUNCIONAMIENTO
caliente.
las realizaciones enjuague todas las partes desmontables con agua
serán emitidas en la primera realización, esto es normal. Tras todas
tubo de la boquilla de vapor. Ciertas cantidades de humo y de olor
espresso durante aproximadamente 5-10 segundos para limpiar el
se describe a continuación. Abra la válvula de vapor mientras prepara
realizaciones con la cafetera de café y la de exprés, sin café, tal como
• ¡Importante! Antes del primer uso, lleve a cabo dos o tres
.
Cuidados y
Limpieza
• Limpie la unidad tal y como se describe en la sección de
• Retire todo el embalaje.
ANTES DEL PRIMER USO
uso comercial o industrial.
preparar café y espresso. El electrodoméstico no está diseñado para
• Este electrodoméstico es para uso doméstico y solo debe usarse para
USO RECOMENDADO
• Nunca encienda el electrodoméstico sin agua en el tanque.
con una tapa cerrada y con este aparato.
• La cafetera de café normal/exprés solo debe ser usada en combinación
• Use únicamente agua fría y fresca.
y déjelo enfriar antes de rellenarlo de agua.
• No añada agua si el recipiente está caliente. Siempre apague el aparato
• No use los recipientes, cuándo estén dañados o tengan asas aflojadas.
expulsado por el filtro caliente puede causarle quemaduras.
que se pondrá caliente durante el proceso. Asimismo, el vapor
funcionamiento. Tome la cafetera de café normal/exprés por su asa, ya
• ¡Peligro de quemaduras! El asa se pondrá caliente durante el
lugar.
• Nunca encienda el aparato sin haber antes puesto los recipientes en su
y antideslizante. Sino el aparato podría sufrir daños.
• El aparato debe siempre ser colocado sobre una superficie estable, lisa
las partes calientes del aparato.
than 30mA. Ask your electrician for advice.
• Make sure that there is no danger that the cord or extension cord may
inadvertently be pulled or cause anyone to trip when in use.
• If an extension cord is used it must be suited to the power consumption
of the appliance, otherwise overheating of the extension cord and/or
plug may occur.
• This appliance is not suitable for commercial use nor for use in the open
air.
• Never leave the appliance unattended while it is in use.
• Children cannot recognise the dangers involved in the incorrect use of
electrical appliances. Therefore never allow children to use household
appliances without supervision.
• Always remove the plug from the socket when the appliance is not in
use and each time before it is cleaned.
• Danger! Nominal voltage is still present in the appliance as long as the
appliance is connected to the mains socket.
• Switch the appliance off before disconnecting from the mains.
• Never use the cord to carry the appliance.
SPECIAL SAFETY ADVICE
• Only fill cold and decalcified water into the water tank.
• Danger of burns: The cabinet and metal parts will get hot during
operation.
• Do not move the appliance while hot water is filled in.
• Only connect the appliance with the power supply system when both
switches are in 0 position.
• During operation the espresso machine is pressurized. Before you
take off the filter holder, let the steam come out of the steam nozzle.
• The water tank must be always filled with enough water. Use the
appropriate markings to measure the exact amount of water.
• The coffee and espresso pot must only be used in combination with
this appliance. Extremely hot or extremely cold liquids must not be
filled into the pots.
• Do not use accessories which are not supplied with the packaging or
which are not provided by the manufacturer.
• The power cord must not wind round the appliance. It has to wind
round the its bottom side and keep the cord always away from the
appliance’ hot surfaces.
• The appliance must always be placed at a stable, flat and anti-skidding
surface. Otherwise it might cause injuries or damages on the
appliance.
• Never switch on the appliance, without placing the pots under their
outlets.
• Danger of burns! The cabinet will get hot during operation. Only hold
the coffee/espresso pot on its handle, because it will get warm during
operation. Likewise, upcoming damp of the hot filter might cause
burns.
• Do not use the pots, when they are damaged or have loosened
handles.
Page 6

GB
GB
• Do not fill in water if the appliance is hot. Always turn off the appliance
53 54
and cool down before filling in water.
• Use fresh and cold water only.
• The coffee/espresso pot may only be used with a closed cover and in
combination with this appliance.
• Never switch on the appliance without any water in the water
tank.
INTENTED USE
• This appliance is for household use only and has to be used to brew
coffee and espresso. The appliance is not meant for the commercial or
industrial use.
BEFORE INITIAL USE
• Remove all packaging material.
• Clean the unit as described under
• Important! Before initial use, perform two to three run-throughs with
both, the coffee and espresso machine, without coffee, as described in
the following. Open the steam valve when preparing espresso for
approx. 5-10 seconds to clean the pipe of the steam nozzle. Small
quantities of smoke and smell may emit at the first run, this is normal.
After the run-throughs rinse all detachable parts with hot water.
Cleaning and Care
.
OPERATION
Espresso preparing
• Pull out the power cord (10) of the power cord storage (9) at the back
side of the device. Do NOT connect the power plug with the power
supply.
• Open the cover (3).
• The espresso pot has markings for the amount of water filling for 2
and 4 cups of espresso. Mind these markings to prepare the
corresponding number of espresso cups. Open the espresso machine
lock (1) and fill in the corresponding water quantity into the water tank
(2) with support of the espresso pot (22).
• Turn the lock tightly.
• Insert the espresso filter (24) into the espresso filter holder (23) and
fold the filter lock (25) over the edge of the filter.
• Put the corresponding amount of espresso coffee into the filter with the
measuring spoon (28). Mind the markings inside the espresso filter.
• Press the coffee softly with the head of measuring spoon (27).
However, do not press too tightly as this can cause congestion and
overflowing. Remove surplus coffee powder from the edge of the
espresso filter to ensure a good fit at the filter holder photo. The
topmost marking in the filter may not be exceeded.
• Pull back the filter lock (25) with the thumb and insert the espresso
filter holder from below in the filter holder (18). The handle (26) of the
espresso filter holder must show on the arrow Turn the handle of
the espresso filter holder to the right on position LOCK until stop.
• Put the collection tray (15) with an inserted grid (16) in the tray holder (14).
vapor suficiente para hace espuma de la leche para el capuchino).
cafetera de espresso se corresponde con 4 tazas de espresso más
preparación de espresso. (La zona menor del anillo de metal en la
suficiente de agua para hacer espuma de la leche después de la
el depósito de agua de la máquina de espresso (2) con la cantidad
• Prepare espresso como se describe arriba. Asegúrese de que rellena
Leche espumosa (para el capuchino)
espresso (19) en la dirección de despacio.
abrir el cierre del depósito de agua. Gire el control de vapor y de
boquilla de vapor (17) antes de retirar el soporte del filtro o de
• ¡Precaución! Deje un tiempo al vapor que aún queda en la
por su asa (26). ¡Peligro de quemaduras!
• El café exprés ya puede ser servido. Sostenga la cafetera únicamente
del asa metálica.
cafetera de espresso. Vierta agua para 4 tazas, hasta el final inferior
rellene de agua hasta quedar entre la marca de 2 y de 4 en la
preparar el capuchino es mayor. Para hacer 2 tazas de capuchino,
• Nota para la preparación del capuchino: La cantidad de agua para
en ese botón se apagará.
posición O para apagar el aparato. El indicador luminoso de potencia
vapor y de espresso (19) en la posición de O y el control I O (13) en la
• Cuándo todo el agua agregada haya pasado, coloque el control de
exprés empezará a verter sobre la cafetera de espresso.
• Tras aproximadamente 2 o 3 minutos, el agua se calentará y el café
comenzará el proceso de preparación.
El indicador de potencia de los indicadores de I O se encenderá y
posición de espresso.
posición I. Coloque el control de vapor y de espresso (19) en la
• Presione el interruptor I O (13) de la máquina de espresso a la
• Conecte el cable de corriente (10) a una toma adecuada de corriente.
(23).
muesca de la tapa bajo la apertura del soporte del filtro de espresso
cafetera de espresso en la rejilla de la bandeja de goteo y lleve la
• Ponga la cubierta (21) en la cafetera de espresso (22). Ponga la
soporte (14).
• Ponga la bandeja de goteo (15) con una rejilla insertada (16) en su
hasta detenerse.
soporte del filtro de espresso hacia la derecha a la posición LOCK
del filtro de espresso debe mostrar la flecha Gire el asa del
de espresso desde abajo en su soporte (18). El asa (26) del soporte
• Retire el cierre del filtro (25) con el pulgar e inserte el soporte del filtro
La marca de tope no debe ser excedida.
filtro de espresso para asegurar una buena fijación al soporte del filtro.
congestión y desbordamiento. Retire el excedente de café del filo del
(27). No obstante, no presione demasiado porque podría causar
• Presione suavemente el café con el extremo de la cuchara de medir
de medir (28). Considere las marcas en el filtro de espresso.
• Ponga la cantidad adecuada de café exprés en el filtro con la cuchara
Page 7

GB
GB
GB
GB
espresso machine to position O.
• CAUTION! Turn back the steam and espresso controller to position O
before you take the vessel with the milk of the dipped steam nozzle.
Danger of burns!
• CAUTION! Do not open the cover of the steam pressure vessel (1)
after the steam production until the rest steam was let off by the steam
nozzle completely, the rest steam can lead into injuries by the
espresso machine.
Coffee preparing
• Open up the cover of the coffee machine (3). Fill the desired cup
number of water into the water tank of the coffee machine (4). The cup
number is marked at the glass pot. Never fill the water tank beyond
the marking 10 (10 cups of coffee).
• Turning the filter holder (7) aside and insert the permanent filter (6)
into the filter holder. The permanent filter has a handle (5) and for easy
inserting and taking out. Put the handle down after inserting.
• Put in the required amount of coffee powder into the coffee filter with the
measuring spoon (28) and swivel back the filter holder until it clicks in.
• Put the coffee pot (32) with a closed pot cover (31) on the warming
plate (8). Push it with an easy pressure under the drip stop (8). Make
sure that the drip stop (8) is pushed up completely, i.e. the coffee pot
is even and complete on the warming plate (11).
• Connect the power plugs (10) with a fitting electrical outlet.
• Turn the switch I O (12) to position I. The power indicator in the switch
lights on and the brewing process starts.
• While the coffee is made in the coffee pot, it can be taken from the
device for a short time since the coffee machine is equipped with a
drip stop system. Put the coffee pot back on the warming plate within
30 seconds to avoid overrunning the coffee.
• While the switch I O (12) in the position I is, the warming plate is
heated up to keep the coffee warm. After the device is switched off,
the warming plate keeps warm for a certain time. Danger of burns!
• When the complete water passed, turn the switch I O (12) to position
O. The power indicator in the switch I O goes out and the device is
turned off.
• Unplug the power plug from the electrical outlet after the brewing
process.
• The pot can be taken out from the device and coffee can be poured.
Hold the coffee pot only at the handle (29) tightly since the glass heats up.
• Press the rocker lever (30) to open the coffee pot cover.
• The coffee pot can be pushed back onto the warming plate for keeping
the coffee warm in the coffee pot.
Caution! The device may not remain unattended and switched on for
some time to heat up the warming plate. This can lead to damages to
the device and at the coffee pot.
53 54
• Ponga la cantidad adecuada de café exprés en el filtro con la cuchara
de medir (28). Considere las marcas en el filtro de espresso.
• Presione suavemente el café con el extremo de la cuchara de medir
(27). No obstante, no presione demasiado porque podría causar
congestión y desbordamiento. Retire el excedente de café del filo del
filtro de espresso para asegurar una buena fijación al soporte del filtro.
La marca de tope no debe ser excedida.
• Retire el cierre del filtro (25) con el pulgar e inserte el soporte del filtro
de espresso desde abajo en su soporte (18). El asa (26) del soporte
del filtro de espresso debe mostrar la flecha Gire el asa del
soporte del filtro de espresso hacia la derecha a la posición LOCK
hasta detenerse.
• Ponga la bandeja de goteo (15) con una rejilla insertada (16) en su
soporte (14).
• Ponga la cubierta (21) en la cafetera de espresso (22). Ponga la
cafetera de espresso en la rejilla de la bandeja de goteo y lleve la
muesca de la tapa bajo la apertura del soporte del filtro de espresso
(23).
• Conecte el cable de corriente (10) a una toma adecuada de corriente.
• Presione el interruptor I O (13) de la máquina de espresso a la
posición I. Coloque el control de vapor y de espresso (19) en la
posición de espresso.
El indicador de potencia de los indicadores de I O se encenderá y
comenzará el proceso de preparación.
• Tras aproximadamente 2 o 3 minutos, el agua se calentará y el café
exprés empezará a verter sobre la cafetera de espresso.
• Cuándo todo el agua agregada haya pasado, coloque el control de
vapor y de espresso (19) en la posición de O y el control I O (13) en la
posición O para apagar el aparato. El indicador luminoso de potencia
en ese botón se apagará.
• Nota para la preparación del capuchino: La cantidad de agua para
preparar el capuchino es mayor. Para hacer 2 tazas de capuchino,
rellene de agua hasta quedar entre la marca de 2 y de 4 en la
cafetera de espresso. Vierta agua para 4 tazas, hasta el final inferior
del asa metálica.
• El café exprés ya puede ser servido. Sostenga la cafetera únicamente
por su asa (26). ¡Peligro de quemaduras!
• ¡Precaución! Deje un tiempo al vapor que aún queda en la
boquilla de vapor (17) antes de retirar el soporte del filtro o de
abrir el cierre del depósito de agua. Gire el control de vapor y de
espresso (19) en la dirección de despacio.
Leche espumosa (para el capuchino)
• Prepare espresso como se describe arriba. Asegúrese de que rellena
el depósito de agua de la máquina de espresso (2) con la cantidad
suficiente de agua para hacer espuma de la leche después de la
preparación de espresso. (La zona menor del anillo de metal en la
cafetera de espresso se corresponde con 4 tazas de espresso más
vapor suficiente para hace espuma de la leche para el capuchino).
hasta que se detenga. El vapor es bombeado hacia la boquilla de
• Mientras el café se está haciendo en la cafetera, se puede retirar
interruptor se encenderá y comenzará el proceso.
• Presione el interruptor I O (12) a la posición I. La luz indicadora en el
• Conecte el enchufe (10) a una toma de corriente.
nivelada y colocada sobre el plato de mantener la temperatura (11).
presionado por completo hacia arriba, es decir la cafetera esta
sobre el freno de goteo (8). Asegúrese de que el freno de goteo (8) es
conservar la temperatura (11). Presiónelo con una presión sencilla
• Coloque la cafetera (32) con la tapa cerrada (31) en el plato para
cuchara de medida (28) y gire el soporte del filtro hasta que haga clic.
• Coloque la cantidad requerida de café en el filtro de café con la
insertado y la retirada. Baje el asa antes de insertar.
en el soporte. El filtro permanente tiene un asa (5) para facilitar el
• Gire el soporte del filtro (7) a un lado e inserte el filtro permanente (6)
tazas de café).
Nunca rellene el depósito de agua por encima del nivel de 10 (10
café (4). El número de la taza está marcado en el recipiente de cristal.
número deseado de tazas en el depósito de agua de la máquina de
• Abra la tapa de la máquina de café (3). Rellene de agua con el
Preparando café
podrían causarle heridas o daños.
desaparecido completamente de la boquilla de vapor. Dichos restos
después la producción de vapor hasta que los restos de vapor hayan
• ¡PRECAUCIÓN! No abra la tapa del recipiente de presión de vapor (1)
¡Peligro de quemaduras!
O antes de retirar el recipiente con la leche de la boquilla de vapor.
• ¡PRECAUCIÓN! Retorne el control de vapor y espresso a la posición
interruptor I O (13) de la máquina exprés a la posición O.
retorne el control de vapor y espresso a la posición O y pulse el
• Tan pronto como haya convertido en espumosa la suficiente leche,
vapor y la leche puede ser hecha espuma.
cantidad de vapor cuándo dicho control esté girado en la dirección de
vapor con el control de vapor y de espresso (19). Saldrá la máxima
desde la posición 0 hasta la posición de vapor Controle el nivel de
• Gire despacio hacia la izquierda el control de vapor y de espresso (19)
crece repentinamente con grandes burbujas.
Nota: No hierva la leche. Sabrá cuándo sucede eso si el volumen
la boquilla más profundamente para calentarla entre 65º C y 75º C.
superficie de la leche. Cuándo el volumen se haya doblado, sumerja
fuera del recipiente. Sumerja la boquilla de vapor levemente bajo la
superficie de la leche ya que de otra manera la leche podría salpicar
espumosa. La boquilla de vapor siempre debe estar sumergida bajo la
aproximadamente se duplica el volumen de leche cuándo se hace
de leche y sosténgalo bajo la boquilla de vapor (17). Considere que
• Rellene un recipiente resistente al calor con aproximadamente 100ml
espresso.
• La leche se puede hacer espumosa después de haber preparado el
• Put on the cover (21) on the espresso pot (22). Put the espresso pot
on the grid in the collection tray and bring the notch in the cover under
the opening of the espresso filter holder (23).
• Connect the power plug (10) with a corresponding electrical outlet.
• Press the switch I O (13) of the espresso machine to position I. Turn
the steam and espresso controller (19) on the espresso position. The
power indicator in the switch I O indicators on and the brewing process
starts.
• After approx. 2 -3 minutes the water is heated up and espresso coffee
pours into the espresso pot.
• If the filled water quantity is passed, turn the steam and espresso
controller (19) on position O and turn the switch I O (13) to position O
to turn the device off. The power indicator in the switch goes out.
• Note for the preparation of cappuccino: The water quantity for the
preparation of cappuccino is larger. Fill in water for 2 cups of
cappuccino between the marking 2 and 4 at the espresso pot. Pour
water for 4 cups until lower end of the metal strap.
• Espresso coffee can be poured now. Hold the pot only at the handle (26).
Danger of burns!
• Caution! Let off the remaining steam by the steam nozzle (17)
before the filter holder is removed or the lock of the water tank is
opened. Turn the steam and espresso controller (19) in the
direction of slowly.
Milk foaming (for cappuccino)
• Prepare espresso as described above. Ensure that sufficient amount
of water is filled in for foaming up the milk after the preparation of
espresso in the water tank of the espresso machine (2) (The lower
area of the metal ring at the espresso pot corresponds to 4 cups of
espresso plus steam to foam up milk for cappuccino).
• The milk can be foamed up after the espresso is prepared.
• Fill into a heat-resistant vessel approx. 100 ml of milk and hold it under
the steam nozzle (17). Consider that approximately the double volume
of the cold milk is produced if the milk is foamed up. The steam nozzle
should always be dipped under the surface of the milk since otherwise
milk could splash out of the vessel. Dive the steam nozzle briefly
under the surface of the milk but not too deep. When the volume has
been doubled, dive the steam nozzle more deeply into the milk to heat
up approx. 65 - 75 C.
Note: Do not boil the milk. You recognize this if the volume suddenly
rises and great bubbles form.
• Turn slowly to the left the steam and espresso controller (19) from the
position 0 to position steam Control the steam strength by the
steam and espresso controller. The maximum amount of steam leaves
if the steam and espresso controller is turned in the direction of
until stop. The steam is pumped out into the steam nozzle and the milk
can be foamed up.
• As soon as enough milk is foamed up turn back the steam and
espresso controller to position O and turn the switch I O (13) of the
Page 8

GB
GB
espresso machine to position O.
55 56
cuchara de medir (28). Si la tubería de vapor está muy sucia por los
• CAUTION! Turn back the steam and espresso controller to position O
before you take the vessel with the milk of the dipped steam nozzle.
Danger of burns!
• CAUTION! Do not open the cover of the steam pressure vessel (1)
after the steam production until the rest steam was let off by the steam
nozzle completely, the rest steam can lead into injuries by the
espresso machine.
Coffee preparing
• Open up the cover of the coffee machine (3). Fill the desired cup
number of water into the water tank of the coffee machine (4). The cup
number is marked at the glass pot. Never fill the water tank beyond
the marking 10 (10 cups of coffee).
• Turning the filter holder (7) aside and insert the permanent filter (6)
into the filter holder. The permanent filter has a handle (5) and for easy
inserting and taking out. Put the handle down after inserting.
• Put in the required amount of coffee powder into the coffee filter with the
measuring spoon (28) and swivel back the filter holder until it clicks in.
• Put the coffee pot (32) with a closed pot cover (31) on the warming
plate (8). Push it with an easy pressure under the drip stop (8). Make
sure that the drip stop (8) is pushed up completely, i.e. the coffee pot
is even and complete on the warming plate (11).
• Connect the power plugs (10) with a fitting electrical outlet.
• Turn the switch I O (12) to position I. The power indicator in the switch
lights on and the brewing process starts.
• While the coffee is made in the coffee pot, it can be taken from the
device for a short time since the coffee machine is equipped with a
drip stop system. Put the coffee pot back on the warming plate within
30 seconds to avoid overrunning the coffee.
• While the switch I O (12) in the position I is, the warming plate is
heated up to keep the coffee warm. After the device is switched off,
the warming plate keeps warm for a certain time. Danger of burns!
• When the complete water passed, turn the switch I O (12) to position
O. The power indicator in the switch I O goes out and the device is
turned off.
• Unplug the power plug from the electrical outlet after the brewing
process.
• The pot can be taken out from the device and coffee can be poured.
Hold the coffee pot only at the handle (29) tightly since the glass heats up.
• Press the rocker lever (30) to open the coffee pot cover.
• The coffee pot can be pushed back onto the warming plate for keeping
the coffee warm in the coffee pot.
Caution! The device may not remain unattended and switched on for
some time to heat up the warming plate. This can lead to damages to
the device and at the coffee pot.
vapor de la tubería. Utilize la herramienta hexagonal integrada en la
• Ahora deje que el aparato se enfríe y desenrosque la boquilla de
.
Consejos de Seguridad
hasta que esté limpia.
Mantenga la boquilla de vapor completamente sumergida en agua
sostenga un recipiente lleno de agua bajo la boquilla de vapor.
misma forma que antes lo hizo con la leche. En lugar de leche,
vapor como se indica a continuación. Ahora debe crear vapor, de la
• Si ha hecho espuma de leche, limpie la boquilla de vapor y el tubo de
húmedo y si lo desea un poco de detergente.
• Limpie la máquina de café normal/exprés regularmente con un trapo
para los restos, pueden ser limpiadas con agua y algo de detergente.
tapas de las cafeteras, la cuchara de medida, la rejilla y la bandeja
• El filtro, el soporte del filtro, las cafeteras de café normal/exprés, las
agua dentro del aparato.
haya vaciado de ambos depósitos. Debe asegurarse que no entra
de café y déle la vuelta al aparato hasta que toda el agua restante se
operación. Para ello, retire el cierre para abrir la tapa de la máquina
• Ambos depósitos de agua deberán ser vaciados después de cada
agua y café.
• Si queda café o agua en la bandeja de restos, retírelos y vacíela de
café. Limpie el filtro bajo un flujo de agua.
• Retire el filtro de café de la máquina de café y retire los restos de
• Retire el soporte del filtro espresso girándolo a la izquierda.
desechándolos de acuerdo con las normas de reciclado.
• Tire los restos del filtro de café de la máquina de café normal/exprés
• Antes de limpiar, desconecte el aparato y déjelo enfriarse.
• Revise también la sección de
CUIDADOS Y MANTENIMIENTO
al aparato y a la cafetera.
encendido para mantener la temperatura. Esto podría causarle daños
¡Precaución! El aparato no debe quedar desatendido mientras está
mantenga su temperatura.
• La cafetera puede ser colocada de nuevo sobre el plato para que se
• Presione la palanca (30) para abrir la tapa de la cafetera.
únicamente por su asa (29) ya que el cristal se calienta.
• La cafetera puede ser retirada y el café servido. Sujete la cafetera
• Desconecte el enchufe de la toma de corriente tras el proceso.
y el dispositivo también.
la posición O. El indicador de potencia en el interruptor I O se apagará
• Cuándo todo el agua haya pasado, coloque el interruptor I O (12) en
por un tiempo. ¡Peligro de quemaduras!
Cuándo el dispositivo sea apagado, el plato mantendrá la temperatura
mantener la temperatura se calentará para mantener el café caliente.
• Mientras el interruptor I O (12) esté en la posición I, el plato para
café.
mantener la temperatura en 30 segundos para evitar el exceso de
sistema anti-goteo. Coloque la cafetera de vuelta en el plato de
durante un corto período de tiempo ya que la cafetera cuenta con
Page 9

GB
GB
GB
GB
this appliance. Prepare the decalcifier according to its description and
let it run through the appliance. Repeat this process depending on the
water hardness. Never fill in hot water into the water tank and never
use it twice!
• Do not pour decalcifier into enamelled sinks.
Espresso machine
• Fill in 200 ml decalcifying solution (4 cups marking at the espresso
pot) into the steam pressure vessel.
• Follow the instructions for preparing espresso but without coffee
powder.
• Put the espresso pot under the espresso filter holder (23) and let pass
the solution up to the 2 cups marking.
• Put a vessel with cold water under the steam nozzle. Dive the steam
nozzle under the water surface and turn on the steam pressure
controller for approx. 10-15 seconds.
• Close the steam pressure controller and let the remaining solution run
into the espresso can.
• Repeat the process 2-3 times with fresh cold water, to wash out the
decalcifying solution. Also let steam stream by the steam nozzle to
remove remains of the decalcifier. Pour out the passed water into the
sink.
• To achieve best results when decalcifying the espresso filter and the
strainer (6), let them in a water decalcifying solution overnight (mind
the manufacturer’s regulations). Then clean them with a soft brush and
rinse.
Coffee machine
• Fill in 500 ml decalcifying solution (4 cups marking at the coffee pot)
into the water tank.
• Follow the instructions for preparing coffee but without coffee powder
and filters. Put the coffee pot on the warming plate and let pass the
solution up to the 2 cups' marking.
• Turn off the device and let the decalcifying solution have an effect for
approx. 10 minutes.
• Switch on the device again and let pass the remaining solution.
• Repeat the process with fresh cold water 2-3 times to wash out the
decalcifying solution.
Pour out the passed water into the sink.
55 56
durante un corto período de tiempo ya que la cafetera cuenta con
sistema anti-goteo. Coloque la cafetera de vuelta en el plato de
mantener la temperatura en 30 segundos para evitar el exceso de
café.
• Mientras el interruptor I O (12) esté en la posición I, el plato para
mantener la temperatura se calentará para mantener el café caliente.
Cuándo el dispositivo sea apagado, el plato mantendrá la temperatura
por un tiempo. ¡Peligro de quemaduras!
• Cuándo todo el agua haya pasado, coloque el interruptor I O (12) en
la posición O. El indicador de potencia en el interruptor I O se apagará
y el dispositivo también.
• Desconecte el enchufe de la toma de corriente tras el proceso.
• La cafetera puede ser retirada y el café servido. Sujete la cafetera
únicamente por su asa (29) ya que el cristal se calienta.
• Presione la palanca (30) para abrir la tapa de la cafetera.
• La cafetera puede ser colocada de nuevo sobre el plato para que se
mantenga su temperatura.
¡Precaución! El aparato no debe quedar desatendido mientras está
encendido para mantener la temperatura. Esto podría causarle daños
al aparato y a la cafetera.
CUIDADOS Y MANTENIMIENTO
• Revise también la sección de
Consejos de Seguridad
.
• Antes de limpiar, desconecte el aparato y déjelo enfriarse.
• Tire los restos del filtro de café de la máquina de café normal/exprés
desechándolos de acuerdo con las normas de reciclado.
• Retire el soporte del filtro espresso girándolo a la izquierda.
• Retire el filtro de café de la máquina de café y retire los restos de
café. Limpie el filtro bajo un flujo de agua.
• Si queda café o agua en la bandeja de restos, retírelos y vacíela de
agua y café.
• Ambos depósitos de agua deberán ser vaciados después de cada
operación. Para ello, retire el cierre para abrir la tapa de la máquina
de café y déle la vuelta al aparato hasta que toda el agua restante se
haya vaciado de ambos depósitos. Debe asegurarse que no entra
agua dentro del aparato.
• El filtro, el soporte del filtro, las cafeteras de café normal/exprés, las
tapas de las cafeteras, la cuchara de medida, la rejilla y la bandeja
para los restos, pueden ser limpiadas con agua y algo de detergente.
• Limpie la máquina de café normal/exprés regularmente con un trapo
húmedo y si lo desea un poco de detergente.
• Si ha hecho espuma de leche, limpie la boquilla de vapor y el tubo de
vapor como se indica a continuación. Ahora debe crear vapor, de la
misma forma que antes lo hizo con la leche. En lugar de leche,
sostenga un recipiente lleno de agua bajo la boquilla de vapor.
Mantenga la boquilla de vapor completamente sumergida en agua
hasta que esté limpia.
• Ahora deje que el aparato se enfríe y desenrosque la boquilla de
vapor de la tubería. Utilize la herramienta hexagonal integrada en la
cuchara de medir (28). Si la tubería de vapor está muy sucia por los
. Después
espresso y el colador (18), déjelos en solución decalcificadora durante
• Para obtener mejores resultados cuándo decalcifica el filtro de
desagüe.
quedado de decalcificador. Vierta el agua que ha circulado al
circule por la boquilla de vapor para eliminar los restos que hayan
solución decalcificadora. Adicionalmente permita que el flujo de vapor
• Repita el proceso 2 o 3 veces con agua fría y fresca, para limpiar la
vaya al bote de espresso.
• Cierre el control de presión de vapor y deje que la solución que queda
presión de vapor durante unos 10 o 15 segundos.
la boquilla de vapor bajo la superficie del agua y gire el control de
• Coloque un recipiente con agua fría bajo la boquilla de vapor. Sumerja
(23) y deje que la solución pase hasta la marca de las 2 tazas.
• Coloque la cafetera de espresso bajo el soporte del filtro de espresso
café.
• Siga las instrucciones para preparar espreso pero sin echar polvos de
cafetera) en el recipiente de presión de vapor.
• Rellene 200ml de solución decalcificadota (la marca de 4 tazas de la
Máquina de espresso
• No vierta decalcificador en fregaderos esmaltados.
con agua caliente el depósito de agua ni lo use dos veces!
Repita este proceso en función de la dureza del agua. ¡Nunca rellene
instrucciones y déjelo circular por el aparato.
para este aparato.Prepare el decalcificador conforme a sus
• Para ello, use un agente decalcificador habitual que sea apropiado `
• Decalcifique la máquina de café normal y espresso.
• Agua extremadamente dura : Cada 4 semanas
• Aqua dura : De 3 meses
• Agua normal : De 6 a 12 meses.
continuación.
normal/exprés. Tiene que ser decalcificada como se describe a
• Depende de con qué frecuencia se use la máquina de café
Decalcificado
• Nunca use gasolina ni disolventes para limpiar.
• No use ningún agente limpiador o utensilios de limpieza.
repóngalo en orden inverso.
(mire la figura)
estrella y quite el filtro con el cierre hermético
Para retirarlo gire el tornillo de cabeza roja con un destornillador de
• Limpie con regularidad el colador (18) y la zona del soporte del filtro.
después de cada proceso para prevenir la aparición de bacterias!
• ¡La boquilla de vapor y la tubería de vapor deben ser limpiadas
templada y un poco de detergente.
• Finalmente, limpie la tubería de vapor y la boquilla de vapor con agua
vapor.
restos de leche, repita el proceso descrito, pero sin la boquilla de
CARE AND MAINTENANCE
• Also pay close attention to the
• Before any cleaning, pull the power plug out of the socket and allow
the appliance to cool down.
• Take out the coffee grounds from the coffee/espresso machines’ filter
and dispose it environmentally compatible.
• Remove the espresso filter holder by turning it to the left.
• Take the coffee filter of the coffee machine and remove the coffee
grounds. Clean the filter under running warm water.
• If there is coffee or water in the collection tray, remove it and pour out
the water or coffee.
• Both water tanks should be completely emptied after each operation.
For this, remove the closure to open the coffee machine's cover and
turn the appliance upside down until all the remaining water has
flowed out of both tanks. It must be made sure that no water reaches
the inside of the appliance.
• The filter, filter holder, coffee/espresso pots, pot covers, measuring
spoon, grid and collection tray can be washed with water and some
detergent.
• Wipe the espresso/coffee machine regularly with a moist cloth and
possibly some detergent.
• If milk has been frothed, clean the steam nozzle and steam pipe as
follows. Steam should be created steam, like milk was steamed
before. Instead of milk, hold a water filled pot beneath the steam
nozzle. The steam nozzle should be completely submersed in the
water until it is clean.
• Then allow the appliance to cool down and unscrew the steam nozzle
from the pipe. Use the hexagon tool integrated in the measuring spoon
(28) for it. If the steam pipe is very dirty from the remaining milk,
repeat the process described above, but without the steam nozzle.
• Finally, wash the steam pipe and steam nozzle with warm water and
some detergent.
• The steam nozzle and steam pipe must be cleaned after each
frothing process to prevent bacteria build-up!
• Regularly clean the strainer (18) in the area of the filter holder. You
remove it by turning the cross head screw with a cross-tip screwdriver
and take off the sifter with seal
in inverse order.
• Do not use any scouring cleaning agents or hard cleaning tools.
• Never use petrol or solvents for cleaning.
Decalcification
• It depends on, how often the coffee/espresso machine is used. It has
to be decalcified as followed described.
• General water : All 6 to12 months
• Hard water : All 3 months
• Extremely hard water : All 4 weeks
• Decalcify the coffee and espresso machine.
• For this, use a customary decalcifying agent which is appropriate to
Safety Advice
(see illustration)
.
. Afterwards replace it
Page 10

GB
GB
this appliance. Prepare the decalcifier according to its description and
57 58
57 58
la noche (siguiendo las especificaciones del fabricante). Luego
límpielos con una brocha suave y enjuáguelos.
Máquina de café
• Rellene 500ml de solución decalcificadora (marca de 4 tazas en la
cafetera) en el depósito de agua.
• Siga las instrucciones para preparar café pero sin usar polvo de café
ni filtros. Ponga la cafetera en el plato de mantener la temperatura y
deje pasar la solución hasta la marca de 2 tazas.
• Apague el aparato y deje que haga efecto la solución decalcificante
por aproximadamente 10 minutos.
• Encienda de nuevo el aparato y deje que circulen los restos de
solución.
• Repita el proceso con agua fresca y fría 2 o 3 veces para retirar toda
la solución decalcificadora. Vierta el agua que queda por el desagüe.
elta GmbH
Carl-Zeiss-Str. 8
63322 Rödermark
0706/EM123
No deseche este producto en la basura doméstica una vez que
símbolo que se encuentra en el producto, el manual de usuario
GARANTÍA Y SERVICIO AL CLIENTE
Antes de la entrega, nuestros aparatos se someten a un estricto control
de calidad.
En el caso de que, a pesar de una cuidada producción, se detecten
daños, también como consecuencia del transporte, le agradeceremos
que devuelva el aparato a nuestro representante. Además de los
derechos de garantía que contempla la legislación, el comprador puede
ejercer los siguientes derechos de garantía:
Para el aparato comprado ofrecemos una garantía de 2 años, a contar a
partir de la fecha de compra. Durante este período, le subsanaremos
sin cargo alguno por cualquier defecto que se detecte con posterioridad
en el material O cualquier error de fabricación, mediante su reparación
O sustitución.
Los defectos ocasionados por una manipulación incorrecta del aparato y
los que se originen tras la intervención de otros reparadores O la
incorporación de piezas que no corresponden al aparato no se incluyen
en esta garantía.
let it run through the appliance. Repeat this process depending on the
water hardness. Never fill in hot water into the water tank and never
use it twice!
• Do not pour decalcifier into enamelled sinks.
Espresso machine
• Fill in 200 ml decalcifying solution (4 cups marking at the espresso
pot) into the steam pressure vessel.
• Follow the instructions for preparing espresso but without coffee
powder.
• Put the espresso pot under the espresso filter holder (23) and let pass
the solution up to the 2 cups marking.
• Put a vessel with cold water under the steam nozzle. Dive the steam
nozzle under the water surface and turn on the steam pressure
controller for approx. 10-15 seconds.
• Close the steam pressure controller and let the remaining solution run
into the espresso can.
• Repeat the process 2-3 times with fresh cold water, to wash out the
decalcifying solution. Also let steam stream by the steam nozzle to
remove remains of the decalcifier. Pour out the passed water into the
sink.
• To achieve best results when decalcifying the espresso filter and the
strainer (6), let them in a water decalcifying solution overnight (mind
the manufacturer’s regulations). Then clean them with a soft brush and
rinse.
Coffee machine
• Fill in 500 ml decalcifying solution (4 cups marking at the coffee pot)
into the water tank.
• Follow the instructions for preparing coffee but without coffee powder
and filters. Put the coffee pot on the warming plate and let pass the
solution up to the 2 cups' marking.
• Turn off the device and let the decalcifying solution have an effect for
approx. 10 minutes.
• Switch on the device again and let pass the remaining solution.
• Repeat the process with fresh cold water 2-3 times to wash out the
decalcifying solution.
Pour out the passed water into the sink.
1. This appliance is not intended for use by persons (including children) with reduced physical, sensory
or mental capabilities, or lack of experience and knowledge, unless they have been given supervision
or instruction concerning use of the appliance by a person responsible for their safety.
2. Children should be supervised to ensure that they do not play with the appliance.
3. If the supply cord is damaged, it must be replaced by the manufacturer, its service agent or similarly
qualied persons in order to avoid a hazard.
4. This appliance is intended to be used in household and similar applications such as:
-staff kitchen areas in shops, ofces and other working environments
-farm houses
-by clients in hotels, motels and other residential type environments
-bed and breakfast type environments.
1. When opening the appliance to rell with water, open the boiler lid slowly.
2. Only open the boiler lid when all the steam has been released from the appliance.
(CAUTION: if the boiler lid is opened with steam inside it way cause one to be burned)
ueva la tapa del hervidor para llenar con agua, solamente si no existe vapor.
2. Si al abrir la tapa del hervidor encuentra vapor de agua, espere un momento para abrirlo. Rem-
dor y realice esta operación lentamente.
1. Si necesita llenar la estación con agua nuevamente, tenga precaución al abrir la tapa del hervi-
- Ambientes tipo desayuno y cama
- Por huespedes de hotel, motel y otros tipos residenciales similares
- Granjas
- Cocinas para personal de ocina, tiendas y otros ambientes de trabajo.
4. Este electrodoméstico está diseñado para uso doméstico y aplicaciones similares como:
sonal calicado, para evitar cualquier peligro.
3. Si el cable de energia se daña, debe ser remplazado por el fabricante, su agente de servicio o per-
2. Todos los niños deben ser supervisados para asegurar que no jueguen con el electrodoméstico.
doméstico por parte de una persona responsable de su seguridad.
a menos que se les preste la supervisión o instrucciones respectivas con respecto al uso del electrocapacidades físicas, sensoriales o mentales disminuidas, o con falta de experiencia y conocimientos,
1. Este electrodoméstico no ha sido diseñado para ser utilizado por personas (incluyendo niños) con
residuos competente.
Infórmese en su administración local sobre la entidad de eliminación de
medio ambiente.
viejos, está contribuyendo de forma importante a la conservación del
productos de plástico reciclado u otra clase de reciclaje de aparatos
El plástico es reutilizable según esté indicado. Con la reutilización de
O el embalaje, hacen referencia a este punto.
punto de recogida de aparatos eléctricos y electrónicos. El
se haya cumplido su vida de funcionamiento, deposítelo en un
INDICACIONES SOBRE EL MEDIO AMBIENTE
Peso : Aprox. 4 kg
Dimensiones : 285 x 350 x 355 mm (Ax A x L)
120 V 60 Hz
1500 W
Consumo de potencia : 1300 W
Potencia de operación : 220 - 240 V~ 50 Hz
DATOS TÉCNICOS
la solución decalcificadora. Vierta el agua que queda por el desagüe.
• Repita el proceso con agua fresca y fría 2 o 3 veces para retirar toda
solución.
• Encienda de nuevo el aparato y deje que circulen los restos de
por aproximadamente 10 minutos.
• Apague el aparato y deje que haga efecto la solución decalcificante
deje pasar la solución hasta la marca de 2 tazas.
ni filtros. Ponga la cafetera en el plato de mantener la temperatura y
• Siga las instrucciones para preparar café pero sin usar polvo de café
cafetera) en el depósito de agua.
• Rellene 500ml de solución decalcificadora (marca de 4 tazas en la
Máquina de café
límpielos con una brocha suave y enjuáguelos.
la noche (siguiendo las especificaciones del fabricante). Luego
 Loading...