

Page 1
CP43021
MODELO:
MANUAL DE INSTRUCCIONES
Steam and
DryIron
Vapor
Plancha de
INSTRUCTION MANUAL
MODEL:
CP43021
Page 2

When using this or any other electrical appliance, always follow these basic safety
precautions:
Signal Word Definitions
NOTE: These are definitions only and may not pertain to the specific product
purchased.
DANGER – Indicates an imminently hazardous situation, which, if not avoided, will
result in death or serious injury. Usage of this signal word is limited to the most
extreme situations.
WARNING – Indicates a potentially hazardous situation, which, if not avoided, could
result in death or serious injury.
CAUTION – Indicates a potentially hazardous situation, which, if not avoided, may
result in minor/moderate injury or product/property damage. It also alerts against
unsafe practices.
WARNING: To avoid the risk of electrical shock, always make sure the product is
unplugged from the electrical outlet before assembling, disassembling, relocating,
servicing, or cleaning it.
WARNING: Handling the coated electrical wires of this product exposes you to lead, a
chemical known to the State of California to cause cancer, birth defects, and other
reproductive harm. WASH HANDS AFTER USE.
!!
WARNING--To reduce the risk of fire, electric shock, or serious personal
injury:
• Keep the product out of the reach of children and pets. This product is not
intended for use by children. Extra caution is necessary when using this appliance
near children.
• Always ensure the product is unplugged from the electrical outlet and allowed to
cool before handling, adding/removing water, relocating, or cleaning it.
• Do not leave the product unattended while it is in use. Always unplug the product
from the electrical outlet when not in use or if left on an ironing board.
IMPORTANT SAFEGUARDS
READ ALL INSTRUCTIONS
BEFORE USING.
!!
WARNING--To reduce the risk of fire, electric shock, or serious personal
injury:
• Keep the product out of the reach of children and pets. This product is not
intended for use by children. Extra caution is necessary when using this appliance
near children.
• Always ensure the product is unplugged from the electrical outlet and allowed to
cool before handling, adding/removing water, relocating, or cleaning it.
• Do not leave the product unattended while it is in use. Always unplug the product
from the electrical outlet when not in use or if left on an ironing board.
READ ALL INSTRUCTIONS
BEFORE USING.
•No toque las superficies calientes del aparato y tenga sumo cuidado al momento
•Coloque el electrodoméstico de manera vertical si no se está planchando.
• Mantenga el cordón y el electrodoméstico lejos de superficies calientes.
No toque ni sumerja su mano en el agua.
líquidos. Si la plancha se cayera al agua, inmediatamente proceda a desenchufarla.
• No coloque este electrodoméstico, el cordón ni el enchufe en agua u otro tipo de
si lo deja sobre una tabla de planchar.
• No deje el electrodoméstico funcionando solo. Desenchúfelo si no lo va a utilizar o
enfriar antes de manipularlo, añadir o retirar agua, trasladarlo o limpiarlo.
• Asegúrese siempre de que el producto se encuentre desenchufado y de dejarlo
utiliza este electrodoméstico en la presencia de niños.
no ha sido diseñado para ser utilizado por niños. Debe tenerse sumo cuidado si se
• Mantenga el producto fuera del alcance de los niños y mascotas. Este producto
fuego, una descarga eléctrica o lesiones personales graves:
ADVERTENCIA - Con el fin de reducir el riesgo de que se produzca
ANTES DE USAR
LEA TODAS LAS INSTRUCCIONES
nacimiento. LÁVESE LAS MANOS DESPUÉS DE CADA USO.
estado de California como causante de cáncer, defectos congénitos y otros daños de
producto, usted queda expuesto al plomo, un químico que se ha comprobado en el
ADVERTENCIA: Al momento de manipular el cable eléctrico recubierto de este
desarmarlo, trasladarlo, efectuar cualquier tipo de mantenimiento o limpiarlo.
trica, asegúrese de que el producto se encuentre desenchufado antes de armarlo,
ADVERTENCIA: Con el fin de evitar el riesgo de que se produzca una descarga eléc-
dad. También sirve de alerta para no llevar a cabo prácticas inseguras.
podría ocasionar lesiones menores o moderadas o daños al producto o a la propiePRECAUCIÓN – Indica una situación potencialmente peligrosa, que si no se evita,
podría causar la muerte o lesiones graves.
ADVERTENCIA – Indica una situación potencialmente peligrosa, que si no se evita,
limitada a situaciones extremas.
sionará la muerte o lesiones graves. El uso de esta palabra de alerta se encuentra
PELIGRO – Indica una situación inminentemente peligrosa, que si no se evita, oca-
lar que se haya adquirido.
NOTA: Estas son sólo definiciones y podrían no corresponder al producto en particu-
Definiciones de las palabras de alerta
tes precauciones de seguridad básicas:
Al momento utilizar este o cualquier otro electrodoméstico, siempre siga las siguien-
PRECAUCIONES IMPORTANTES
Page 3

• Do not place the product, Power Cord, or Plug in or expose them to water or other
liquids. Immediately unplug the product from the electrical outlet if it falls into
water; do not touch or reach into the water.
• Keep the Power Cord and product away from hot surfaces.
• Always rest the product upright when not actively ironing.
• Do not touch the hot surfaces of the product and use caution when turning the
product upside down, as there may be hot water in the reservoir; burns can occur
from touching hot metal parts, hot water, or steam.
• Allow the product to cool completely and be sure to loop the Power Cord loosely
around it before storing.
• Do not plug/unplug the product into/from the electrical outlet with a wet hand.
• Do not drop or insert objects into any opening of the product.
• Always turn product to the “O” (Off) position before plugging or unplugging the
product from the electrical outlet. To disconnect from the electrical outlet, pull
directly on the Plug; do not pull on the Power Cord.
• Do not put any stress on the Power Cord where it connects to the product, as the
Power Cord could fray and break.
• Do not use attachments not recommended or sold by the product manufacturer.
• Do not operate the product if it has a damaged or cut Power Cord or plug, if wires
are exposed, if it malfunctions, if it is dropped or damaged, or if it is dropped in
or exposed to water. This product has no user-serviceable parts. Do not attempt
to examine or repair this product yourself. Only qualified service personnel should
perform any servicing; take the product to the appliance repair shop of your
choice for inspection and repair.
!!
CAUTION-- To reduce the risk of personal injury or product/property
damage:
• This product is intended for indoor, non-commercial, non-industrial use in pressing
clothing; do not use the product outdoors or for any other purpose.
• Do not allow the Power Cord to hang (e.g., over the edge of a table or counter)
where it may be tripped over or pulled.
SPECIAL INSTRUCTIONS:
• To avoid a circuit overload when using this product, do not operate another high-
wattage product on the same electrical circuit.
Avoid the use of an extension cord because the extension cord may overheat and
cause a risk of fire. However, if you have to use an extension cord, the cord shall
be No. 14 AWG minimum size and rated not less than 1875W.Care should be taken
to arrange the cord so that it cannot be pulled or tripped over,
WARNING: This product is equipped with a polarized plug (one
blade is wider than the other blade) to reduce the risk of
electrical shock. This is a safety feature. The plug will fit into a polarized outlet only
one way. If you are unable to insert the plug into the electrical outlet, try reversing
the plug. If the plug still does not fit, contact a qualified electrician. Never use the
plug with an extension cord unless you can fully insert the plug into the extension
cord. Do not alter the plug. Do not attempt to defeat the safety purpose of the
polarized plug.
SAVE THESE INSTRUCTIONS
FOR FUTURE REFERENCE
!!
WARNING--To reduce the risk of fire, electric shock, or serious personal
injury:
• Keep the product out of the reach of children and pets. This product is not
intended for use by children. Extra caution is necessary when using this appliance
near children.
• Always ensure the product is unplugged from the electrical outlet and allowed to
cool before handling, adding/removing water, relocating, or cleaning it.
• Do not leave the product unattended while it is in use. Always unplug the product
from the electrical outlet when not in use or if left on an ironing board.
3
WARNING: This product is equipped with a polarized plug (one
blade is wider than the other blade) to reduce the risk of
EL FUTURO
PARA CUALQUIER REFERENCIA EN
GUARDE ESTAS INSTRUCCIONES
de seguridad del enchufe polarizado.
dentro de la toma del cable. No altere el enchufe. No intente eliminar esta medida
tipo enchufe con un cable de extensión a menos que el enchufe encaje totalmente
no encajara, póngase en contacto con un electricista calificado. No utilice este
insertar el enchufe dentro del tomacorriente, intente dándole la vuelta. Si aún así
encajar en un tomacorriente polarizado sólo de una manera. Si no se puede
Esta es una medida de seguridad. Este tipo de enchufe deberá
reducir el riesgo de que se produzca una descarga eléctrica.
izado (una extremidad es más ancha que la otra) con el fin de
ADVERTENCIA: Este producto cuenta con un enchufe polar-
momento de acomodar el cable para que alguien no pueda tirar de él ni tropezarse.
de 14 AWG y una resistencia eléctrica no menor de 1875W. Debe tenerse cuidado al
necesario utilizar un cable de extensión, dicho cable debe tener un tamaño mínimo
lentarse y causar el riesgo de que se produzca un incendio. Sin embargo, si fuera
Evite el uso de un cable de extensión ya que este tipo de cables puede sobrecano conecte otros productos de alto voltaje al mismo circuito eléctrico.
• Con el fin de evitar la sobrecarga del circuito al momento de utilizar este producto,
INSTRUCCIONES ESPECIALES
repostero) en donde alguien pueda tropezarse o tirar de él.
• No permita que el cordón cuelgue (por ejemplo del borde la mesa o de un
industrial. No utilice este producto al aire libre ni para otros propósitos.
• Este producto ha sido diseñado para uso doméstico, no comercial y no
personales o daños al producto o a la propiedad:
PRECAUCIÓN – Con el fin de reducir el riesgo de que se produzcan lesiones
más cercano para que se lo examine y repare.
a cabo el servicio de mantenimiento. Lleve el producto al centro de servicio técnico
ni reparar el producto usted mismo. Sólo el personal técnico calificado debe llevar
agua. Este producto no contiene piezas útiles para el usuario. No intente examinar
sufrido una caída o algún tipo de daño, o si se ha caído o ha quedado expuesto al
bles se encuentran expuestos, si el electrodoméstico presenta un desperfecto, ha
• No utilice el producto si el cordón o el enchufe se encuentran dañados, si los caproducto.
• No utilice accesorios no recomendados o vendidos por parte del fabricante del
que podría deteriorarse o romperse.
• No fuerce el cordón especialmente en la parte en donde se conecta al producto y
enchufe y no del cordón.
far o desenchufar el electrodoméstico. Para desconectar del tomacorriente, tire del
• Siempre coloque el producto en la posición “0” (OFF – apagado) antes de enchu-
• No deje caer ni inserte objetos dentro de las aberturas del electrodoméstico.
• No enchufe ni desenchufe el electrodoméstico con las manos mojadas.
cordón de manera no muy ajustada alrededor de la plancha antes de guardarla.
• Deje que el electrodoméstico se enfríe completamente y asegúrese de enrollar el
quemaduras.
tanque. Las partes metálicas calientes, el agua caliente o el vapor podrían causar
de voltear el producto de cabeza, ya que podría haber agua caliente dentro del
Page 4

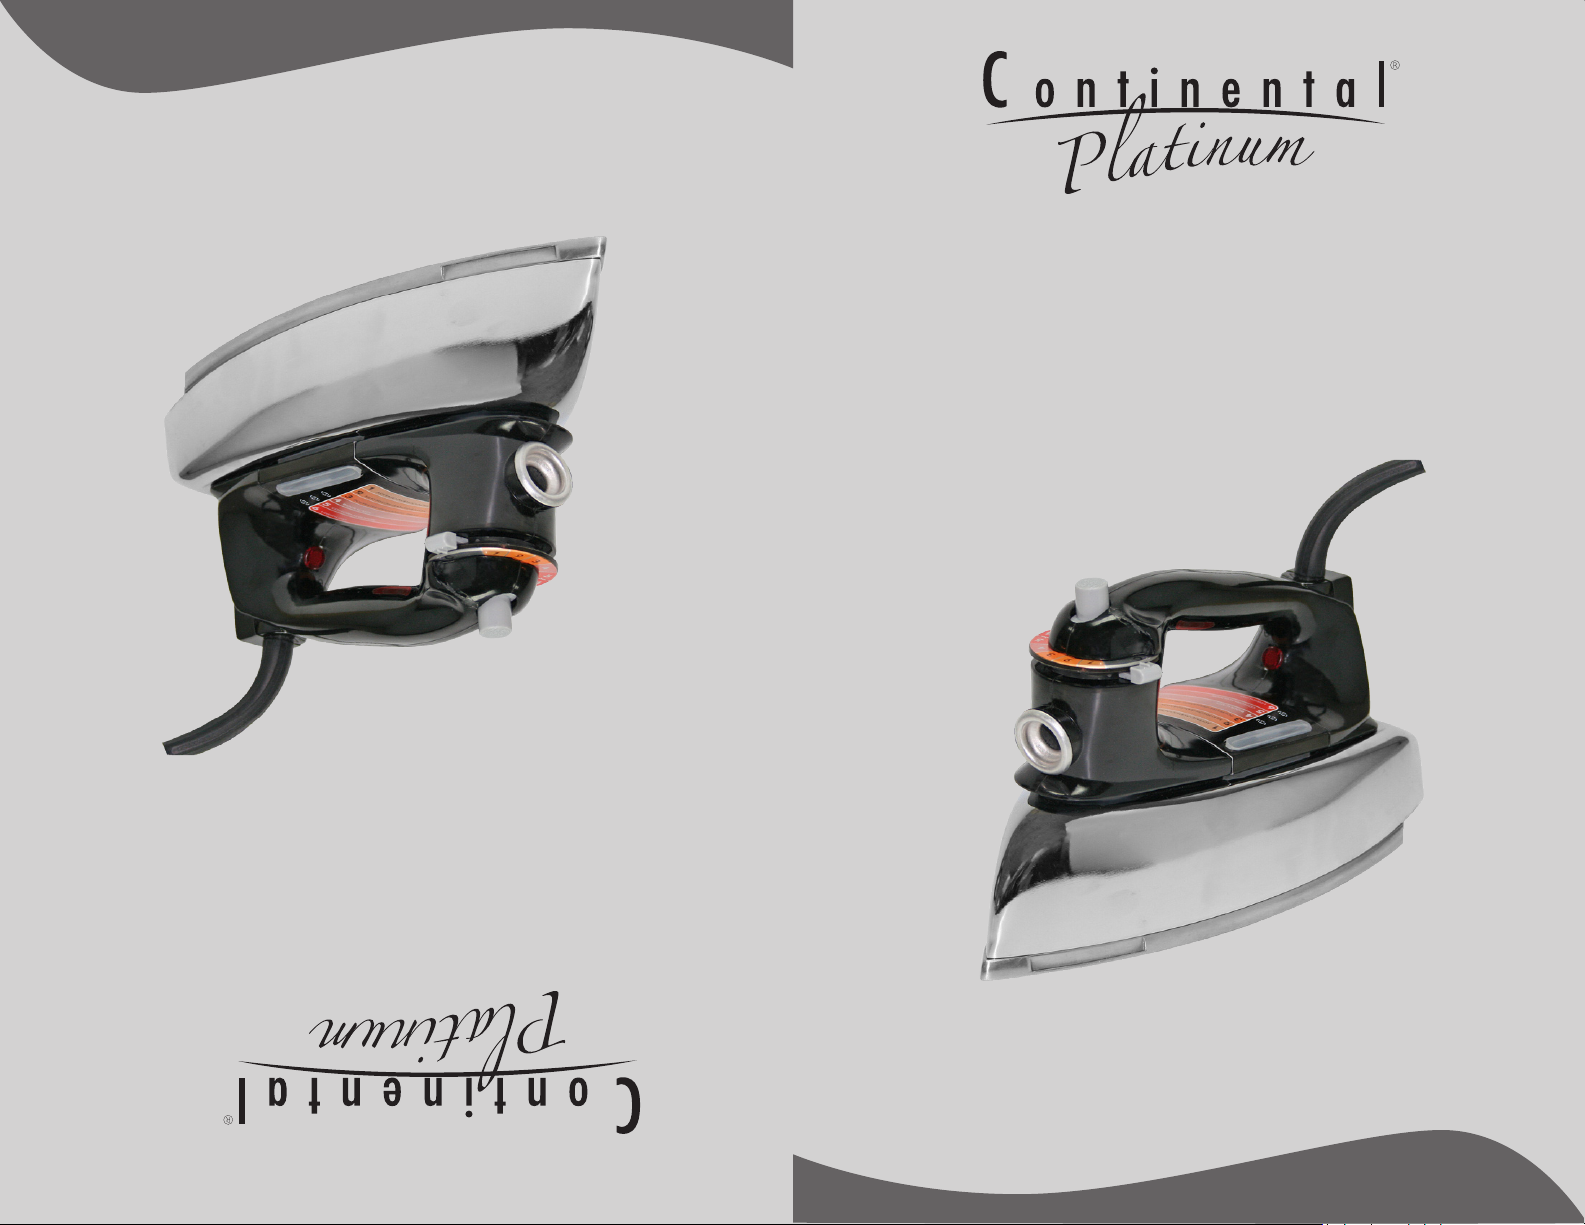
Parts
Before First Use
Remove any stickers/adhesives attached to the Soleplate. (Rub gently with a soft,
damp cloth if needed).
CAUTION: To avoid damage to the product, do not clean using abrasive
chemicals/pads.
To Use
CAUTION: To prevent scratching of the Soleplate, do not allow the product to come
into contact with abrasive objects (e.g., zippers, buttons) while ironing. Cover these
items with a press cloth before ironing.
NOTES:
• Due to the initial heating of the materials used in the manufacturing of the
product, some light smoke/vapors may be release when used for the first few
times. This is normal.
• Moisture may initially be present in the water reservoir.
1. Ensure the product is unplugged from the electrical outlet and the Temperature
Dial is set to the “0” (Off) position.
2. Place the product upright on a flat, stable, heat-resistant surface, and then plug
the product into a standard 120V AC electrical outlet.
3. Select Steam or Dry Pressing by pressing the Steam/Dry Button to the desired
position (“Dry” is the down position). Refer to the “Dry Pressing” or “Steam
Pressing” sections for detailed instructions.
5
Before First Use
Remove any stickers/adhesives attached to the Soleplate. (Rub gently with a soft,
damp cloth if needed).
CAUTION: To avoid damage to the product, do not clean using abrasive
chemicals/pads.
To Use
CAUTION: To prevent scratching of the Soleplate, do not allow the product to come
into contact with abrasive objects (e.g., zippers, buttons) while ironing. Cover these
items with a press cloth before ironing.
NOTES:
• Due to the initial heating of the materials used in the manufacturing of the
product, some light smoke/vapors may be release when used for the first few
times. This is normal.
• Moisture may initially be present in the water reservoir.
1. Ensure the product is unplugged from the electrical outlet and the Temperature
Dial is set to the “0” (Off) position.
2. Place the product upright on a flat, stable, heat-resistant surface, and then plug
the product into a standard 120V AC electrical outlet.
3. Select Steam or Dry Pressing by pressing the Steam/Dry Button to the desired
position (“Dry” is the down position). Refer to the “Dry Pressing” or “Steam
Pressing” sections for detailed instructions.
seco” y “Planchado a vapor” para mayores instrucciones.
– es la opción con el botón presionado). Véase las secciones de “Planchado al
respondiente (“Steam/Dry”) y colocándolo en la posición deseada (“DRY” – al seco
3. Seleccione la opción de planchado a vapor o al seco presionando el botón cor-
120V AC.
resistente al calor y luego proceda a enchufarlo a un tomacorriente estándar de
2. Coloque el producto de manera vertical sobre una superficie plana, estable y
de agua
Ventana del tanque
Soporte
Base
perilla de temperatura se encuentre en la posición “0” (OFF – apagado)
1. Asegúrese de que el electrodoméstico se encuentre desenchufado y que la
• Podría haber humedad dentro del tanque de agua en un inicio.
primeras veces. Esto es normal.
este producto, se podía producir cierto humo o vapor al momento de utilizarlo las
• Debido al calentamiento inicial de los materiales utilizados en la fabricación de
NOTAS:
planchar.
al momento de planchar. Cubra estos artículos con un paño o una tela antes de
producto entre en contacto con objetos abrasivos (por ejemplo cierres, botones)
PRECAUCIÓN: Con el fin de prevenir que la base se arañe, no permita que el
Cómo utilizar la plancha
químicos abrasivos o esponjas para fregar.
PRECAUCIÓN: Con el fin de evitar daños al producto, no lo limpie utilizando
(Frote con cuidado utilizando un paño húmedo si fuera necesario).
Retire todas las etiquetas o pegatinas que se encuentren adheridas a la base
Antes del primer uso
llenar agua
Abertura para
Perilla de temperatura
vapor / al seco
Botón de planchado a
Indicador de energía
Partes
Page 5

4. Slide the Temperature Setting Lever to the desired setting (reference the
Temperature Setting Guide on the product) for the fabric to be ironed and verify
the red Power Indicator is illuminated.
CAUTION: Check the garment/fabric label for the fiber content. If the
garment/fabric is made of blended fibers, turn the Temperature Dial to the fabric
with the lowest temperature setting before ironing.
5. Allow the product to heat (1-2 minutes) to the selected temperature setting
before ironing.
6. When finished, turn the Temperature Dial to the “0” (Off) position, and then
unplug the product from the electrical outlet.
WARNING: Always unplug the product from the electrical outlet when it is not in
use or will be left unattended.
7. Allow the product to cool completely before storing.
Dry Pressing:
To dry press, push the Steam/Dry Button down until it locks in the “Dry” (down)
position.
NOTE: It is not necessary to have water in the water reservoir when dry pressing.
Steam Pressing:
WARNING: Ensure the product is unplugged before adding water to the reservoir, and
if the product was in use, also allow it to cool before adding water.
CAUTION: Check the garment label of the item to be ironed for care instructions.
Some fabrics may be damaged when exposed to steam or water.
1. With the product unplugged from the electrical outlet and cooled (if it was in use),
slightly tip the product.
2. Push the Steam/Dry Button down until it locks in the “Dry” (down) position.
3. Pour water into the Water Fill Opening until the water level reaches the top of the
Water Reservoir Level Window.
CAUTION: Fill the Water Reservoir with water only; distilled water may be used if
the water in your area is hard, but do not use water from a home water softening
system and do not fill with other liquids.
CAUTION: Do not fill above the top of the Water Reservoir Level Window.
4. Push Steam/Dry Button down again to release the lock to the “Steam” (up)
position.
5. Set the product upright and wait 1-2 minutes until the product heats to the
selected temperature setting.
6. When finished ironing, slide the Temperature Dial to the “0” (Off) position and
unplug the product from the electrical outlet. Allow the product to cool
completely before moving or storing it.
Important: If no steam appears when the Variable Steam / Dry Dial is set for steam
and the product is hot and in the horizontal ironing position, gently tap the Soleplate
on the ironing board once or twice. If water drips from the steam vents, ensure the
Temperature Dial is set within the steam range (Wool – Linen) and the product has
“0” (OFF – apagado) y proceda a desenchufarlo. Deje que el electrodoméstico se
6. Una vez terminado el planchado, coloque la perilla de temperatura en la posición
que se caliente según la temperatura seleccionada.
5.Coloque el electrodoméstico de manera vertical y espere de 1 a 2 minutos hasta
quedando la posición “Steam” (a vapor).
4. Presione el botón “Steam/Dry” hacia debajo de nuevo para soltarlo y que suba
tanque.
PRECAUCIÓN: No llene el tanque por encima del nivel superior de la ventana del
líquidos.
un sistema de ablandamiento de agua casero ni tampoco llene el tanque con otros
si el agua en su localidad fuera muy dura, pero no utilice agua que provenga de
PRECAUCIÓN: Llene el tanque solamente con agua. Se puede utilizar agua destilada
parte superior de la ventana de nivel del tanque.
3. Vierta agua dentro del tanque a través de la abertura hasta que el nivel alcance la
posición “Dry”.
2. Presione el botón “Steam/Dry” hacia abajo hasta que quede asegurado en la
inclinarlo ligeramente.
1. Con el electrodoméstico desenchufado y frío (si hubiera estado en uso), proceda a
Algunas telas podrían dañarse si se las expone al vapor o al agua.
instrucciones de lavado y planchado.
PRECAUCIÓN: Verifique la etiqueta de la prenda que se desea planchar para ver las
bién déjelo enfriar antes de añadir más agua.
antes de llenar el tanque de agua, y si el electrodoméstico se encuentra en uso, tamADVERTENCIA: Asegúrese de que el electrodoméstico se encuentre desenchufado
Planchado a vapor:
NOTA: No es necesario llenar el tanque de agua para planchar al seco.
hacia abajo en la posición “Dry” (al seco)
Para planchar al seco, presione el botón “Steam/Dry” hasta que quede asegurado
Planchado al seco:
7. Deje que el electrodoméstico se enfríe completamente antes de guardarlo.
lo tiene que dejar funcionando sólo.
ADVERTENCIA: Siempre desenchufe el electrodoméstico si no lo va a utilizar o si se
– apagado) y luego proceda a desenchufar el producto.
6. Una vez que se termine, gire la perilla de temperatura a la posición “0” (OFF
antes de comenzar a planchar.
5. Deje calentar la plancha (de 1 a 2 minutos) según la temperatura seleccionada
comenzar a planchar.
la perilla de temperatura en el nivel de la tela con la temperatura más baja antes de
de las fibras. Se la prenda o la tela está fabricada de una mezcla de fibras, coloque
PRECAUCIÓN: Verifique la etiqueta de la prenda o de la tela para ver los contenidos
nada.
planchar y verifique que la luz indicadora de energía de color rojo se encuentre ilumide temperatura ubicada en el producto mismo) de acuerdo a la tela que se vaya
4. Deslice el botón de temperatura a la opción deseada (utilice la guía de referencia
Page 6

preheated at least 1-2 minutes. If water still drips, turn the Temperature Dial to a
slightly higher temperature setting.
Tips:
• To avoid damage to fabrics, refer to the garment label for the fiber content and
set the Temperature Dial to the lowest temperature setting recommended for the
fabric. Always test a small, inconspicuous area on the garment before continuing
to iron. If unsure of the temperature setting for a fabric, begin at the lowest
temperature setting and gradually increase the setting until the desired ironing
effect is achieved. When possible, use a press cloth or turn fabrics inside out to
help prevent damage.
CAUTION: Fabrics requiring a temperature setting below the “WOOL” setting
cannot be steam pressed.
• Begin ironing with those garments/fabrics that require a low temperature setting
(e.g., silk) followed by those requiring a high temperature setting (e.g., wool,
cotton, linen).
• Use care when ironing around plastic buttons or zippers, as these items may melt
from the heat of the product. A press cloth is recommended to prevent damage to
the items and to the Soleplate of the product.
Care and Maintenance
WARNING: Turn the Temperature Dial to the “0” (Off) position, unplug the product
from the electrical outlet, and allow the product to cool completely before cleaning
it.
CAUTION: Do not use abrasive cleaners/pads, steam iron cleaners, or vinegar to clean
the product any part of the product.
• Wipe the outside and the Soleplate of the product with a damp cloth.
• Drain the product by turning the Soleplate away from you and carefully turning the
product upside down over a sink; allow any remaining moisture inside of the
product to evaporate before storing.
WARNING: Even if the Soleplate is cool, use caution when draining the water from
the reservoir, as it may still be hot.
Electrical Specifications
Voltage Frequency Wattage Amperage
120 VAC 60 Hz 1000W 8.3 A
120V AC 60 Hz 100W 8.3 A
Voltaje Frecuencia Vatios Amperaje
Especificaciones eléctricas
mento de drenar el agua del tanque y que podría aún estar algo caliente.
ADVERTENCIA: Aún cuando la base se encontrara ya fría, tenga cuidado al mo-
humedad dentro del electrodoméstico se evapore antes de guardarlo.
con cuidado voltee la plancha de cabeza sobre un lavadero. Deje que el resto de la
• Drene el electrodoméstico colocando la base hacia el lado contrario de usted y
• Limpie el exterior y la base del producto con un paño húmedo.
chas a vapor o vinagre para limpiar el electrodoméstico ni ninguna de sus piezas.
PRECAUCIÓN: No utilice limpiadores abrasivos o esponjas, limpiadores para plan-
antes de proceder con la limpieza.
do) y proceda a desenchufar electrodoméstico dejándolo enfriar completamente
ADVERTENCIA: Coloque la perilla de temperatura en la posición “0” (OFF – apaga-
Cuidado y mantenimiento
a la vez proteger la base de la plancha.
co. Se recomienda utilizar un paño para planchar para evitar dañar estos artículos y
cierres ya que éstos pueden derretirse debido al calor emitido por el electrodomésti-
• Tenga cuidado al planchar alrededor de las zonas de botones plásticos o de
temperatura más alto (por ejemplo, lana, algodón, lino).
menor (por ejemplo, seda) y luego continúe con aquellas que requieran un nivel de
• Comience planchando las prendas o telas que requieran un nivel de temperatura
“LANA”, no pueden plancharse a vapor.
PRECAUCIÓN: Las telas que requieran un nivel de temperatura menor al de
planchar o voltee las prendas al revés para evitar daños.
el nivel hasta alcanzar el efecto deseado. Dentro de lo posible, utilice un paño para
un tipo de tela, comience planchando al nivel más bajo y gradualmente incremente
antes de continuar planchando. Si no se está seguro del nivel de temperatura para
dicha tela. Siempre pruebe con una zona de la tela o prenda pequeña y no visible
las fibras y coloque la perilla de temperatura al nivel más bajo recomendado para
• Con el fin de no dañar las telas, verifique las etiquetas para ver los contenidos de
Consejos prácticos:
un nivel de temperatura ligeramente más alto.
por lo menos de 1 a 2 minutos. Si aún goteara agua, gire la perilla de temperatura a
de planchado a vapor (Lana - Lino) y que el electrodoméstico se haya precalentado
vapor, asegúrese de que la perilla de temperatura se encuentre dentro del rango
tabla de planchar una o dos veces. Si goteara agua a través de las aberturas de
posición horizontal de planchado, con cuidado golpee un poco la base sobre la
la opción de planchado a vapor y el electrodoméstico se encuentra caliente y en
Importante: Si no se produjera vapor colocando el botón correspondiente en
enfríe completamente antes de trasladarlo o guardarlo.
 Loading...