

Page 1
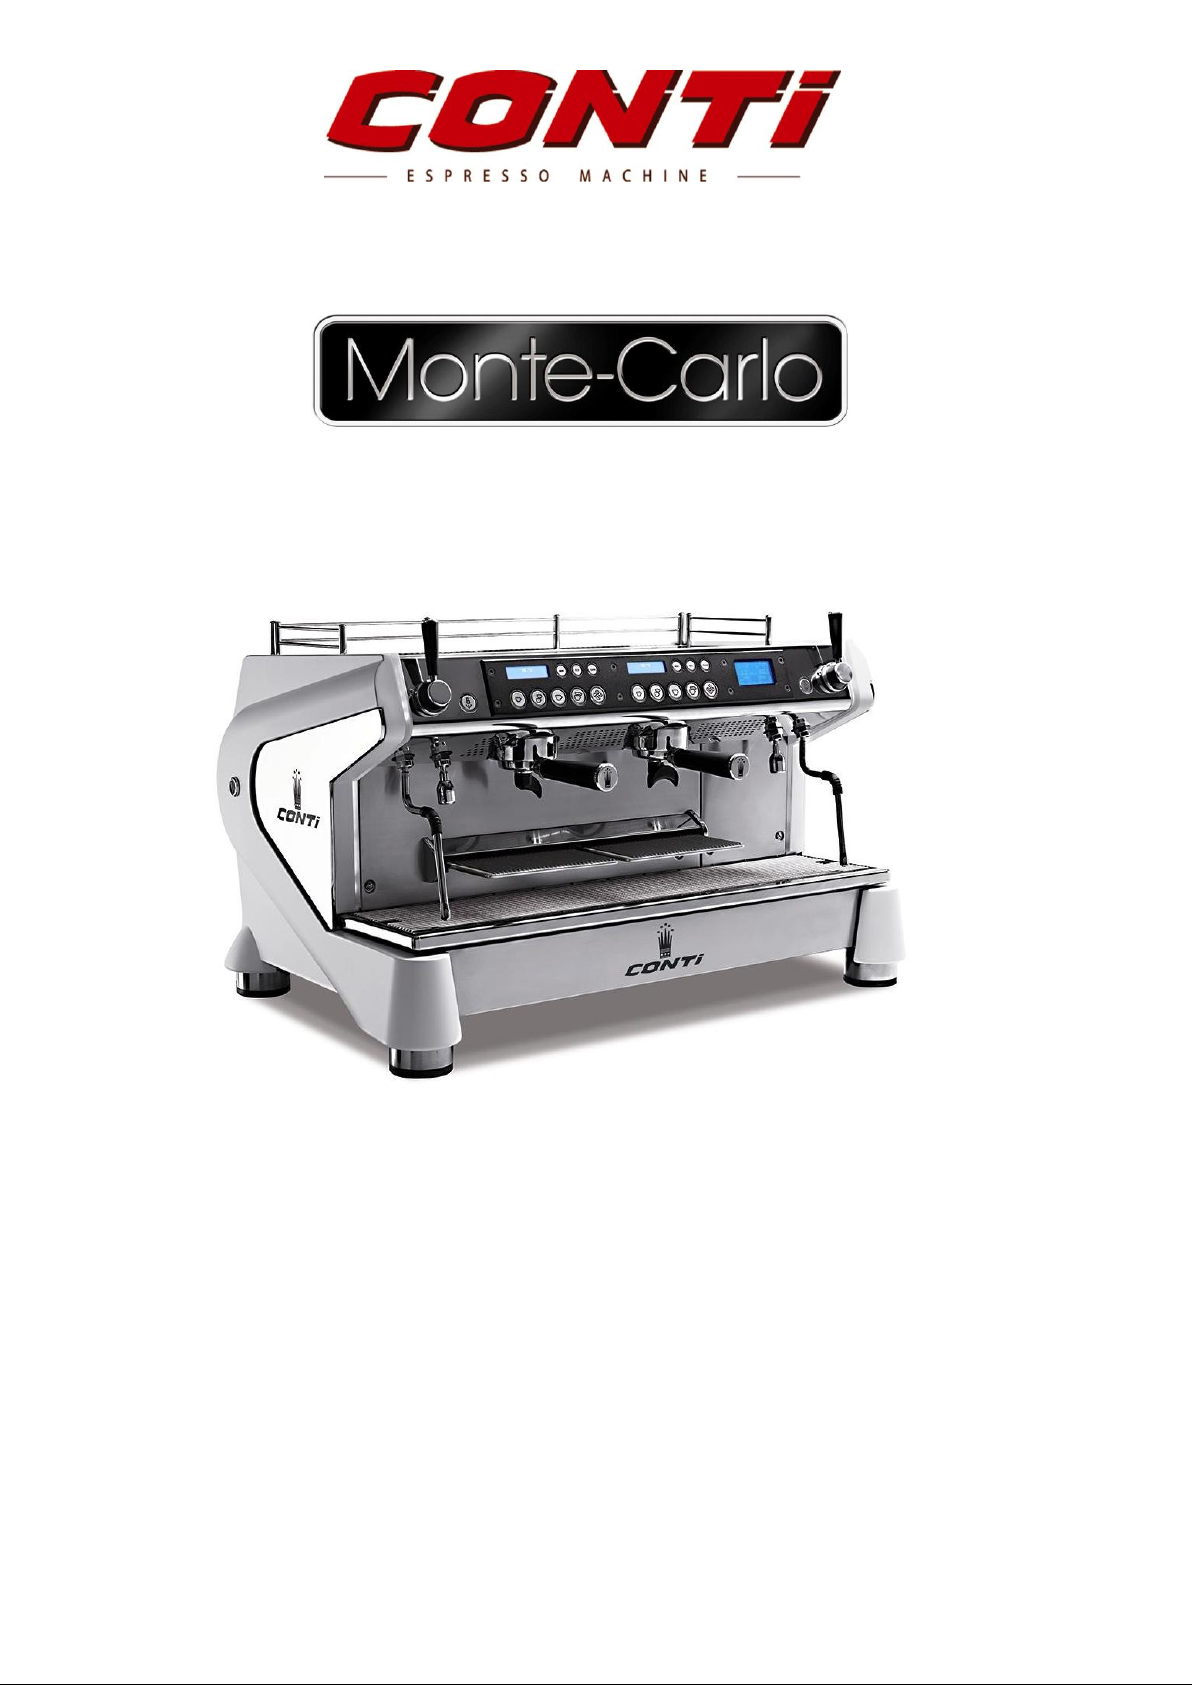
TECHNICAL DOCUMENTATION
MONTE-CARLO - 11/2015 - SOFT V 2.11 1
Page 2

1 TECHNICAL DOCUMENTS 3
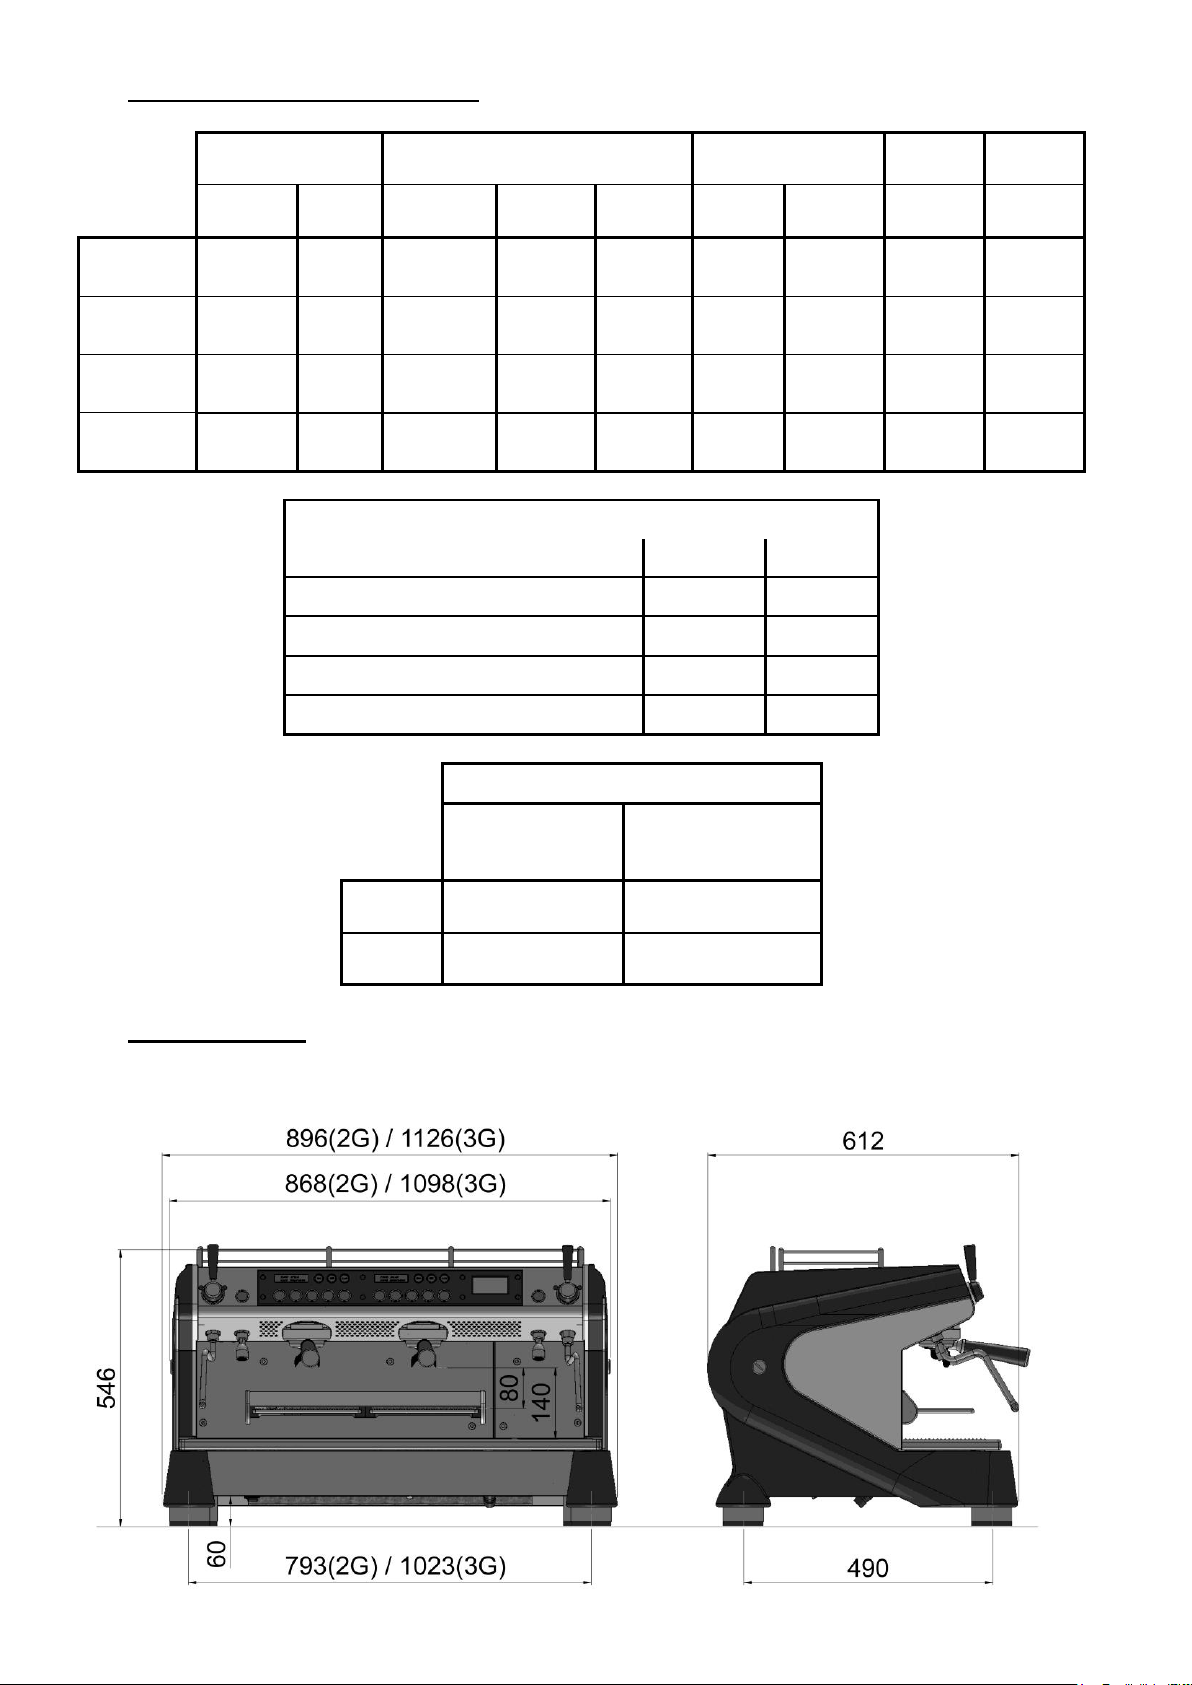
2 DIMENSIONS 3
3 CAUTION DURING THE USE 4
3.1 Ambient conditions 4
3.2 During installation 4
3.3 During the use 4
3.4 Rules relating to the environment 4
4 INSTALLATION 5
4.1 Standby In case of a standby of the machine (standby = 2 months): 5
4.2 Protections 5
4.3 Water supply 5
4.4 Drain 5
4.5 Supplying voltage 5
4.6 Water softeners 6
5 FIRST INSTALLATION: 7
6 STARTING & WARM UP: 9
7 HOW TO USE THE MACHINE 11
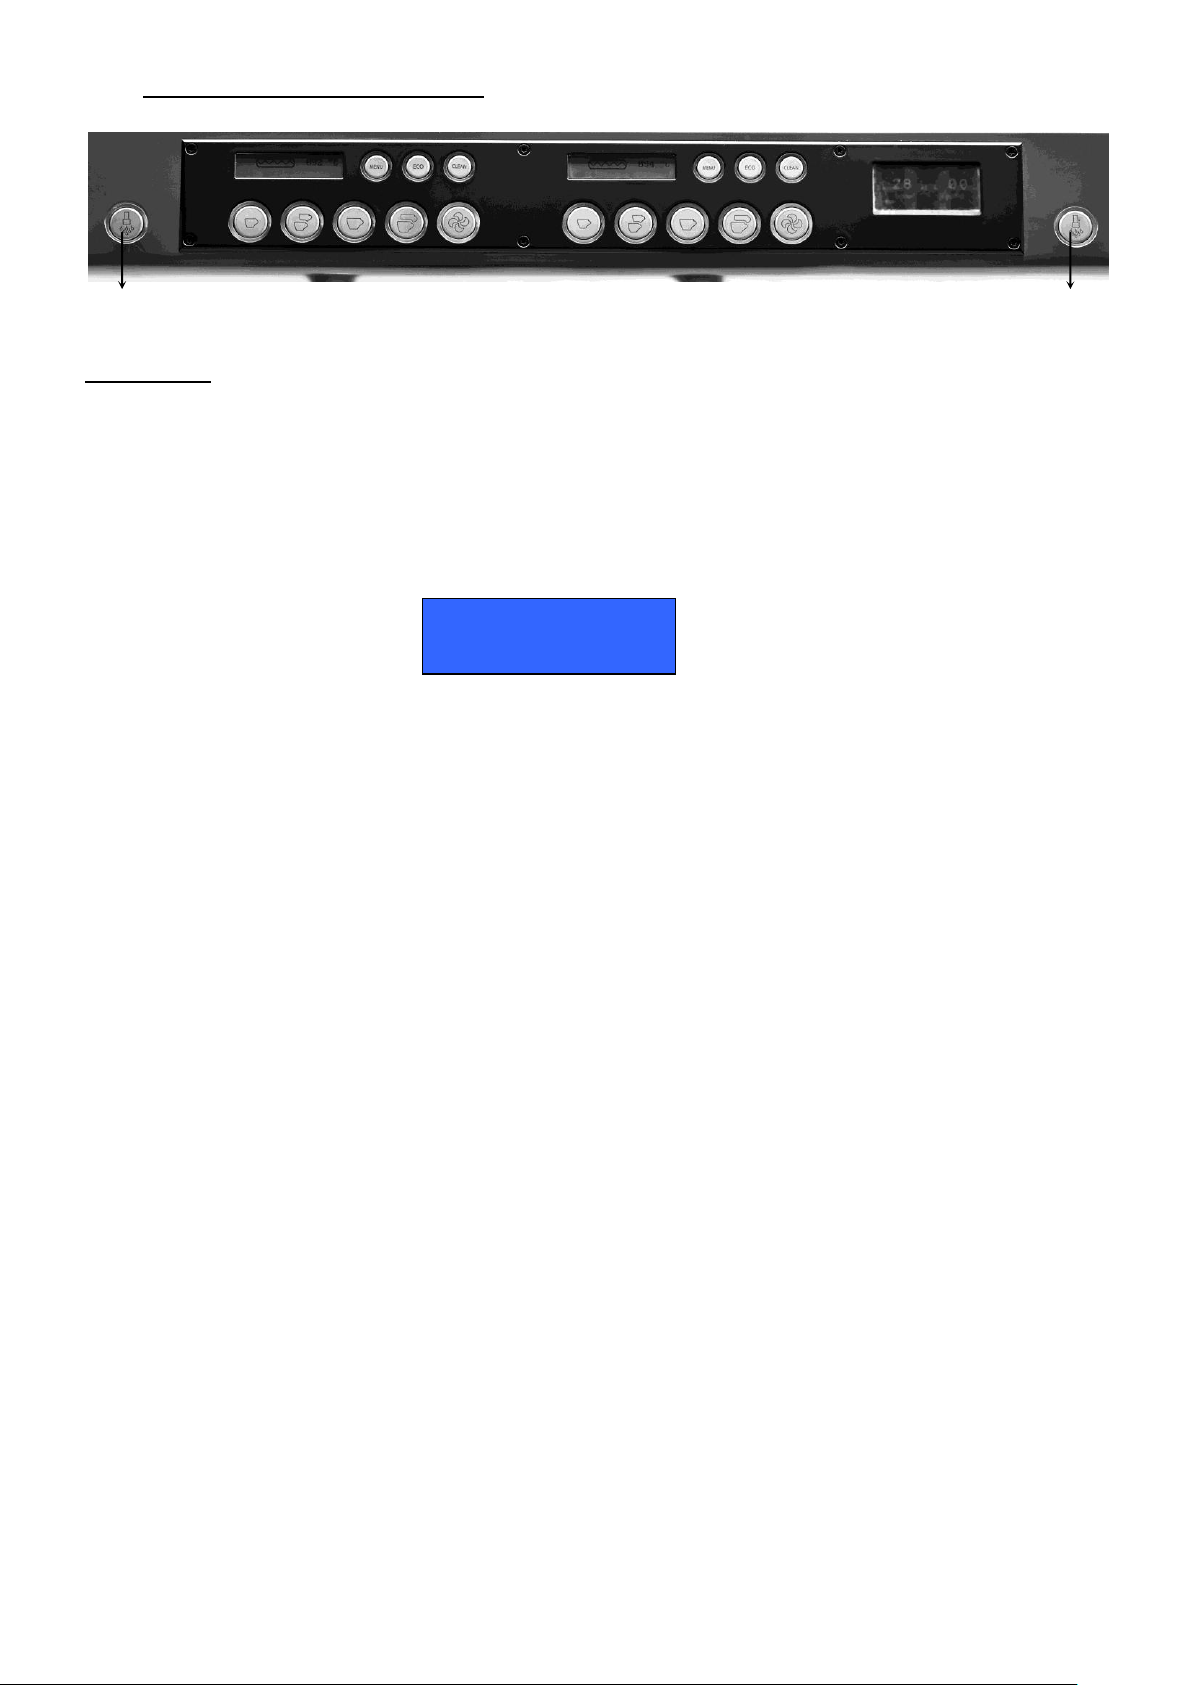
7.1 Operating elements 11
7.2 How to use the programmed doses 12
8 COFFEE GROUPS: 13
8.1 Mode menu 13
8.2 Group eco mode 15
8.3 Clean button 15
9 PROGRAMMING DOSES METHODOLOGY 16
9.1 Coffee doses programming: 16
9.2 Hot water dose programming: 17
10 GENERAL DISPLAY: 18
10.1 ECO MODE (general) 18
10.2 Programming on general display 18
11 COFFEE TEMPERATURE ADJUSTMENTS 37
12 QUALITY CRITERIA 38
13 STEAM CONTROL PRODUCTS ADJUSTMENTS 39
14 SOFTWARE VERSION UPDATE 40
15 MAINTENANCE OF MACHINES 42
16 ELECTRIC DESIGNATIONS 45
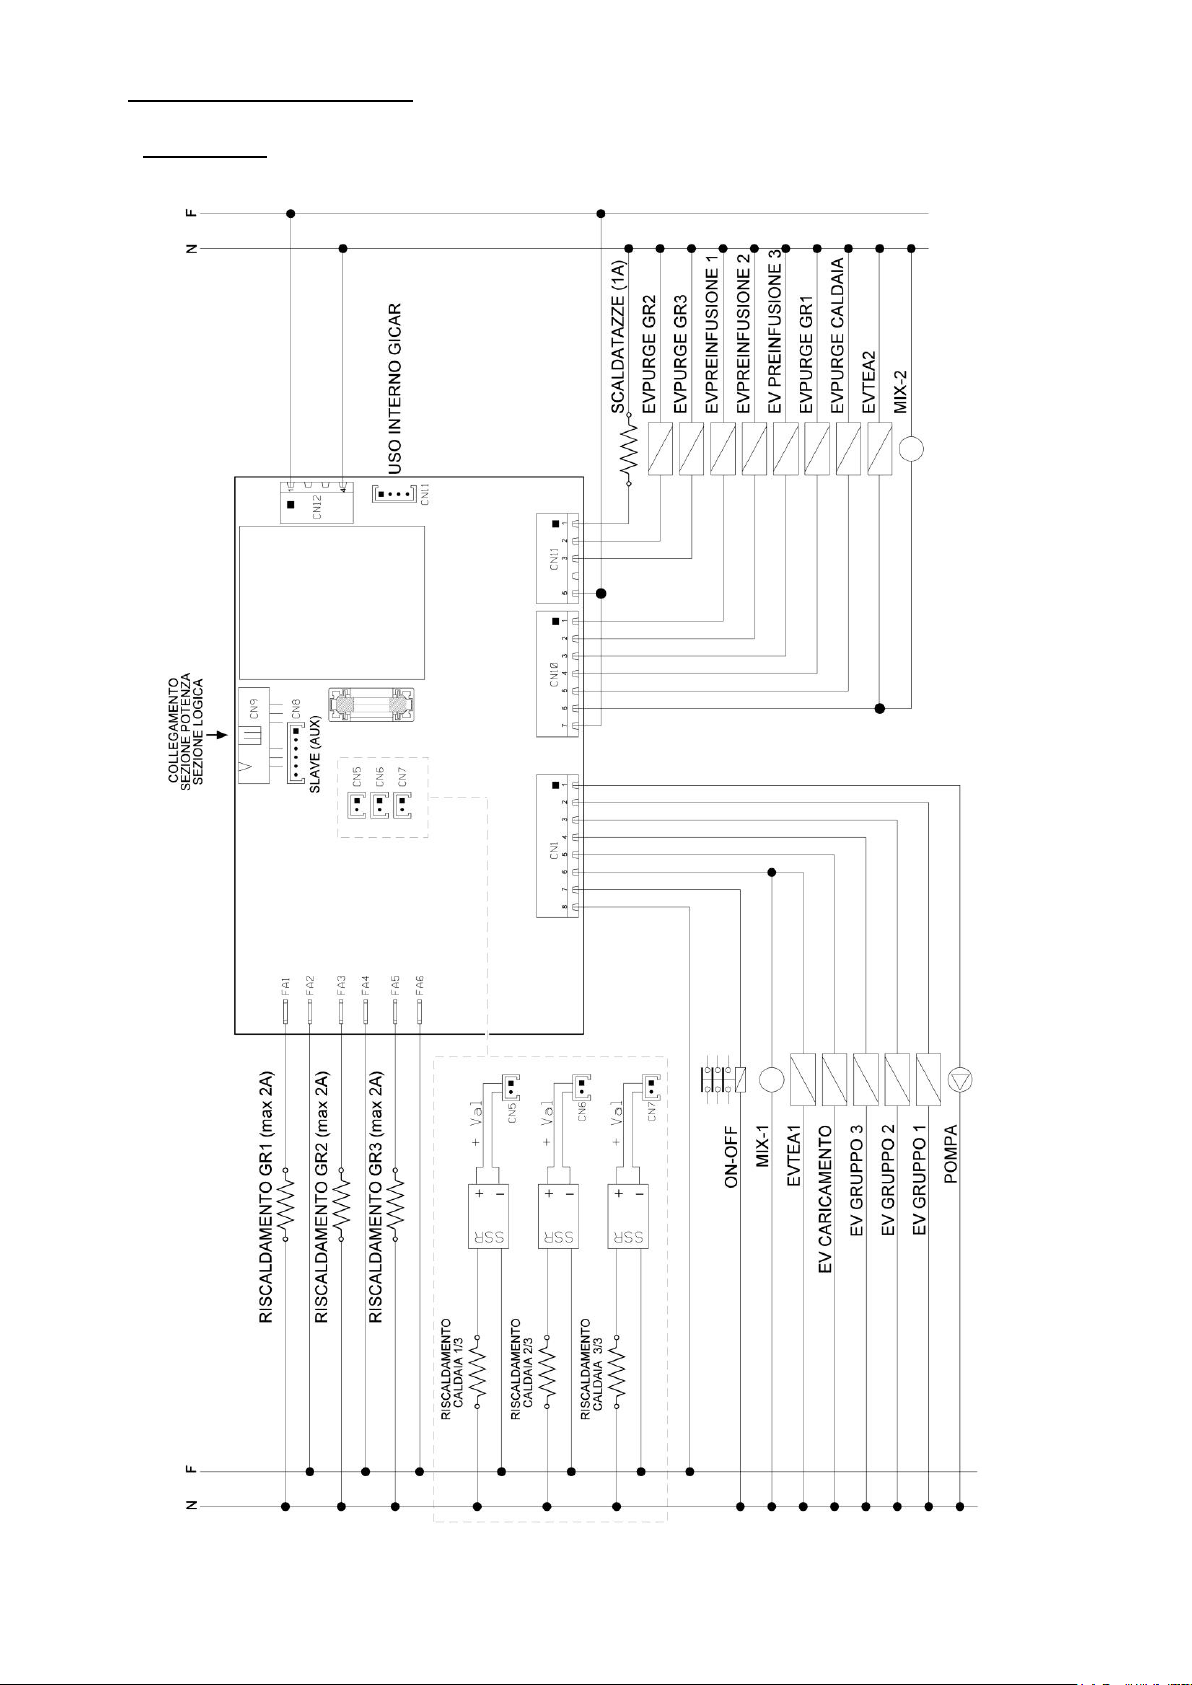
17 ELECTRIC DRAWING 46
17.1 CPU board 46
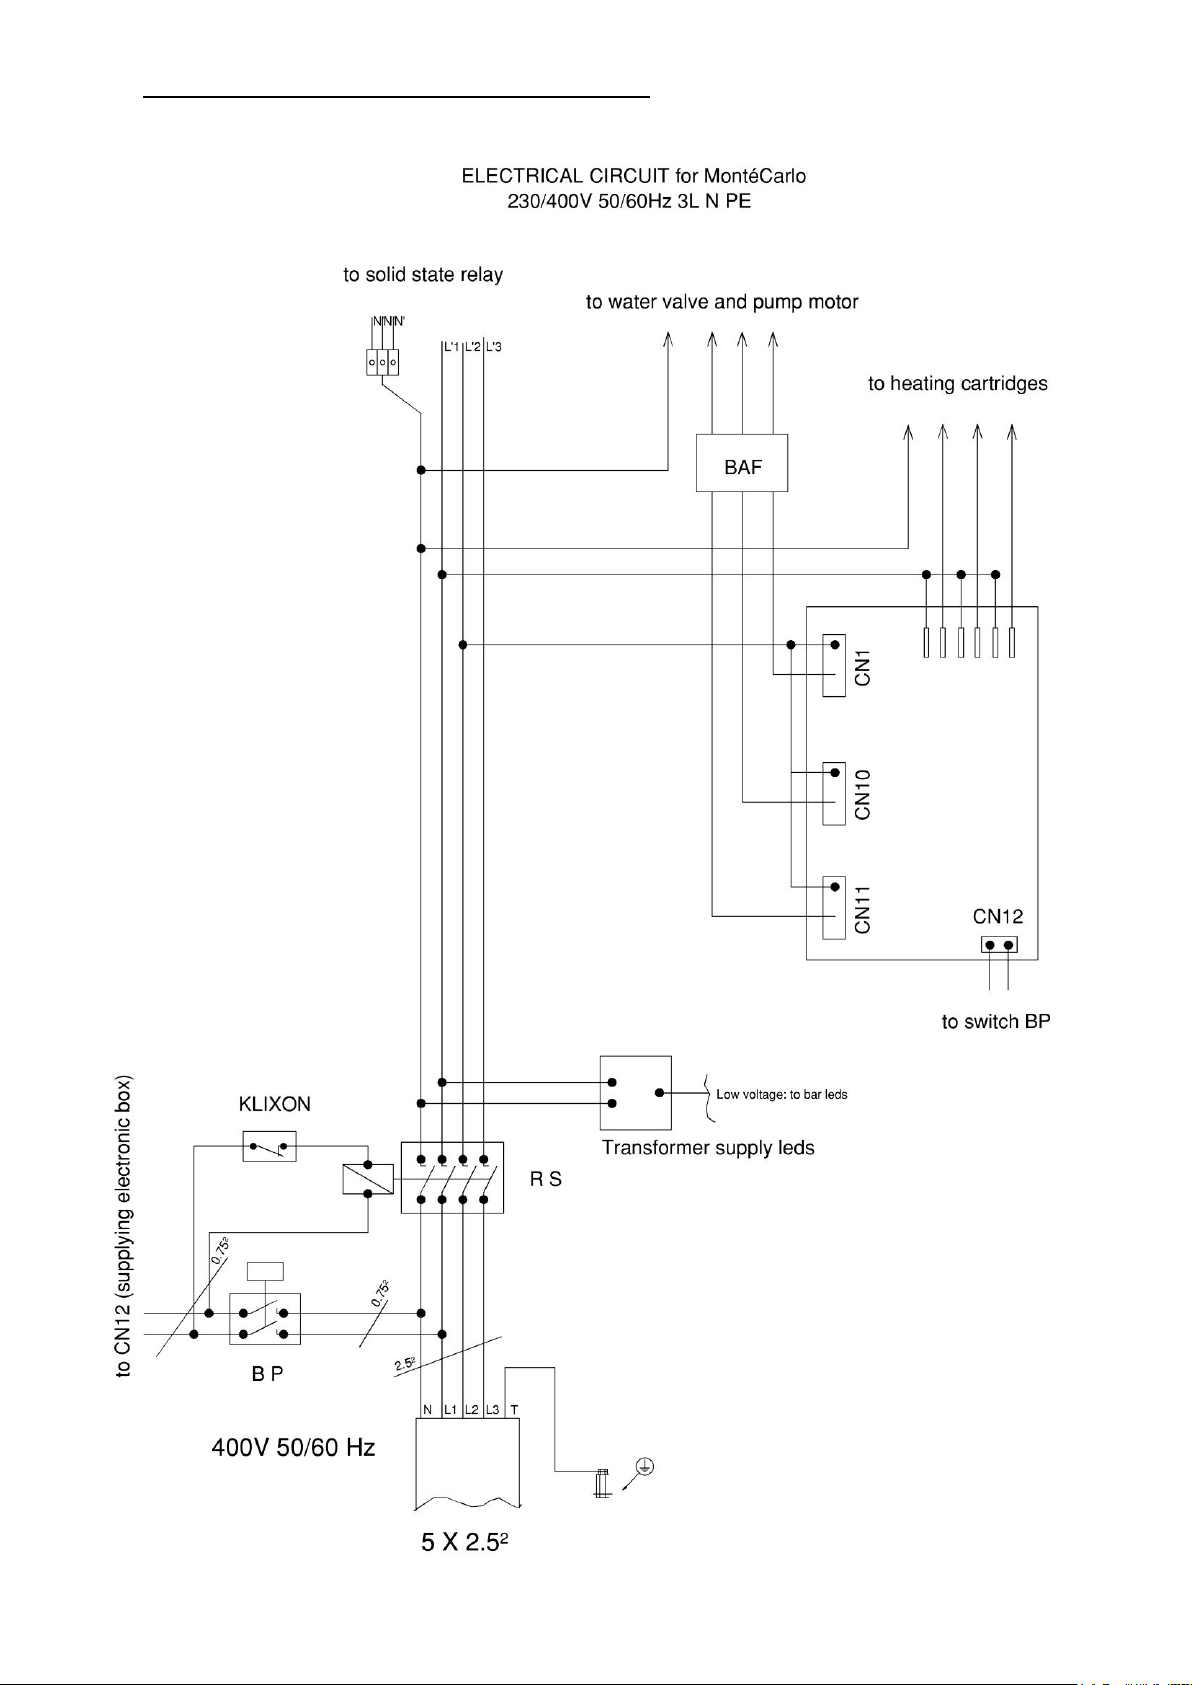
17.2 Electrical power diagram for “400V 3L N PE” 47
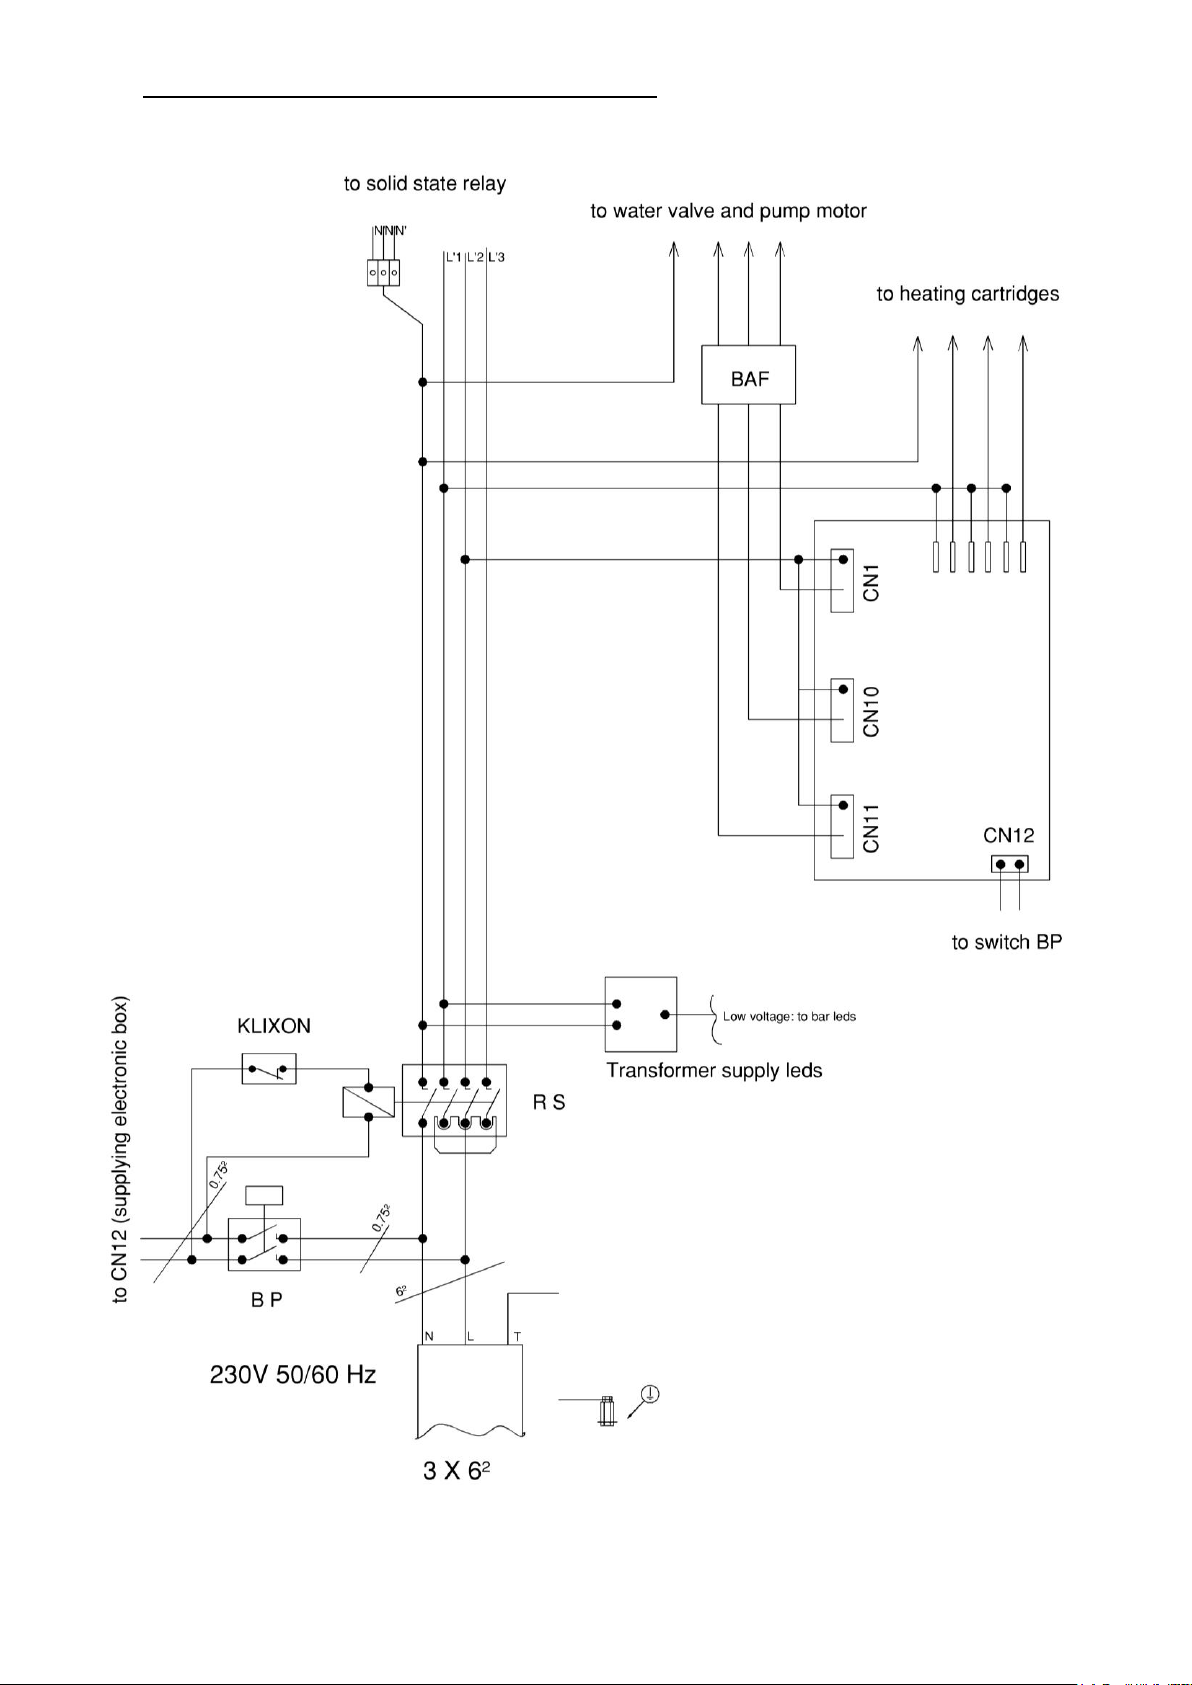
17.3 Electrical power diagram for “230 V 1L N PE” 48
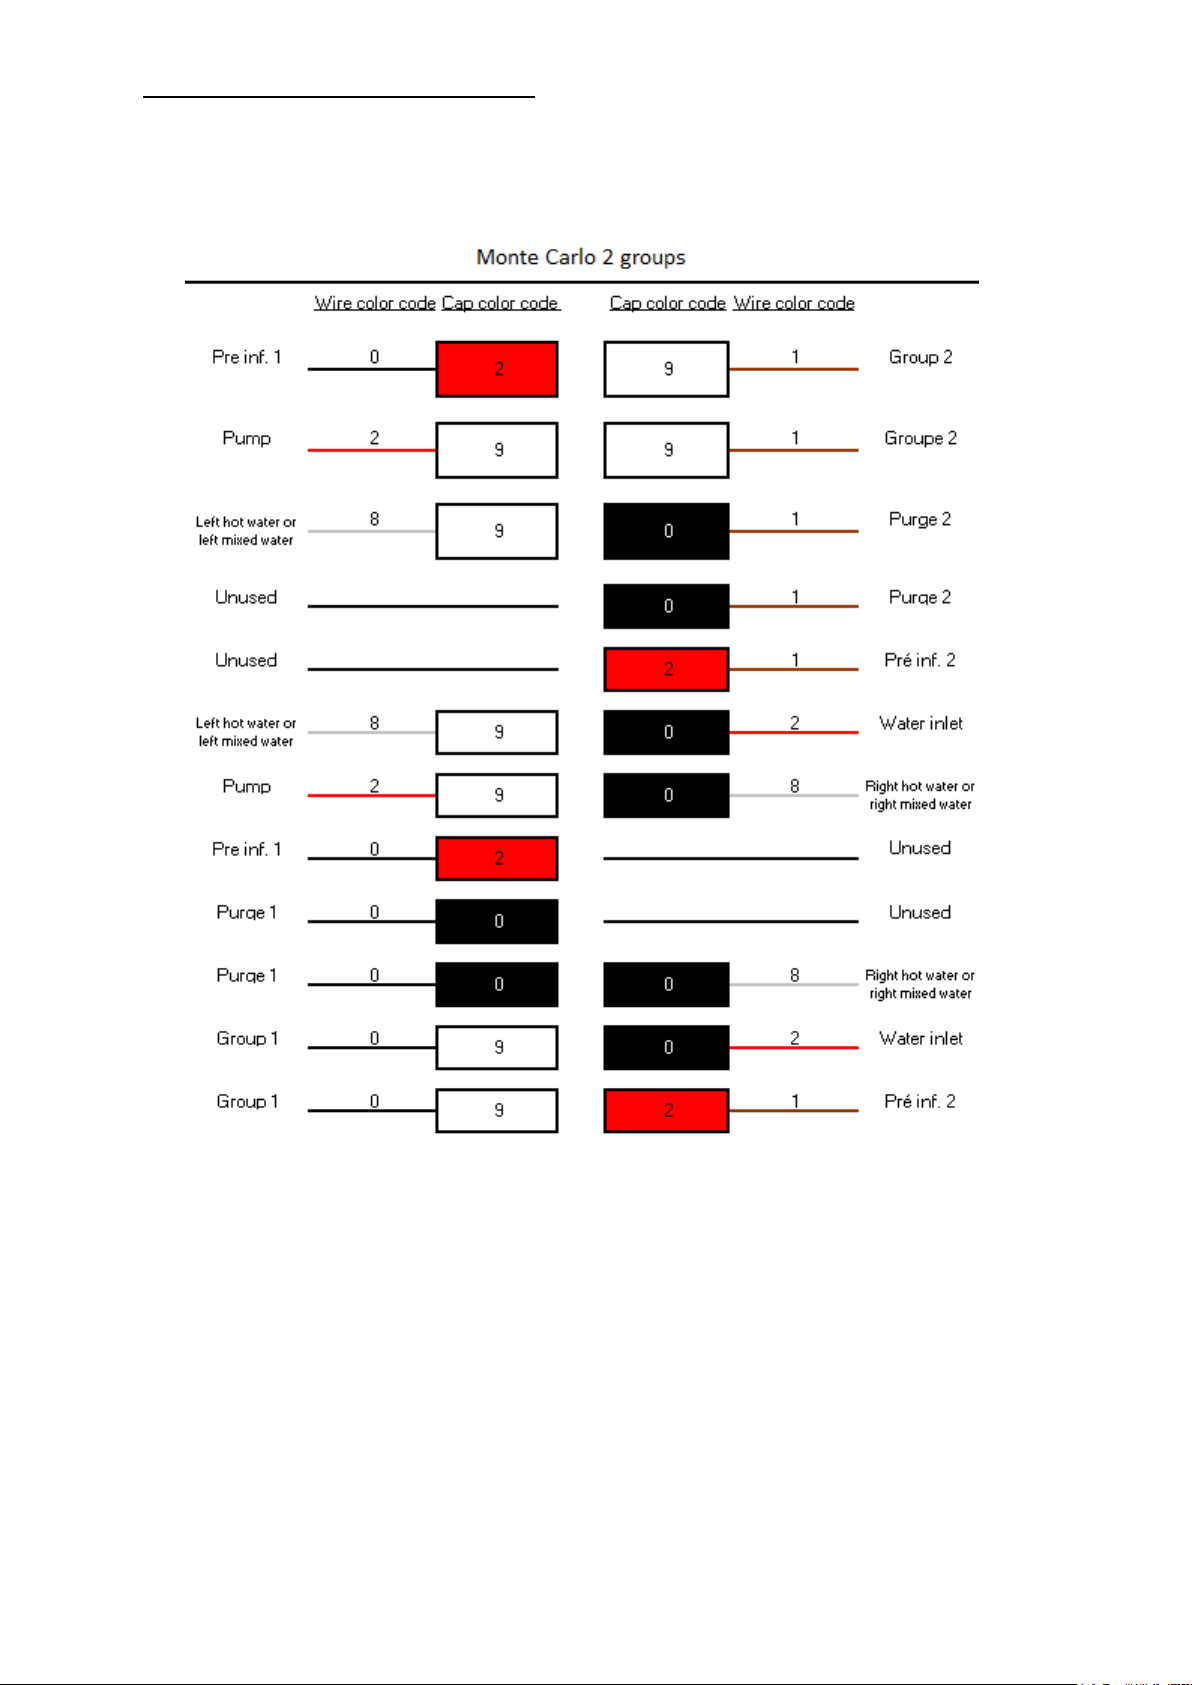
17.4 Connecting diagram: 12 fuses box 49
17.5 Solid state relay interface for “400 V 3NAC” 53
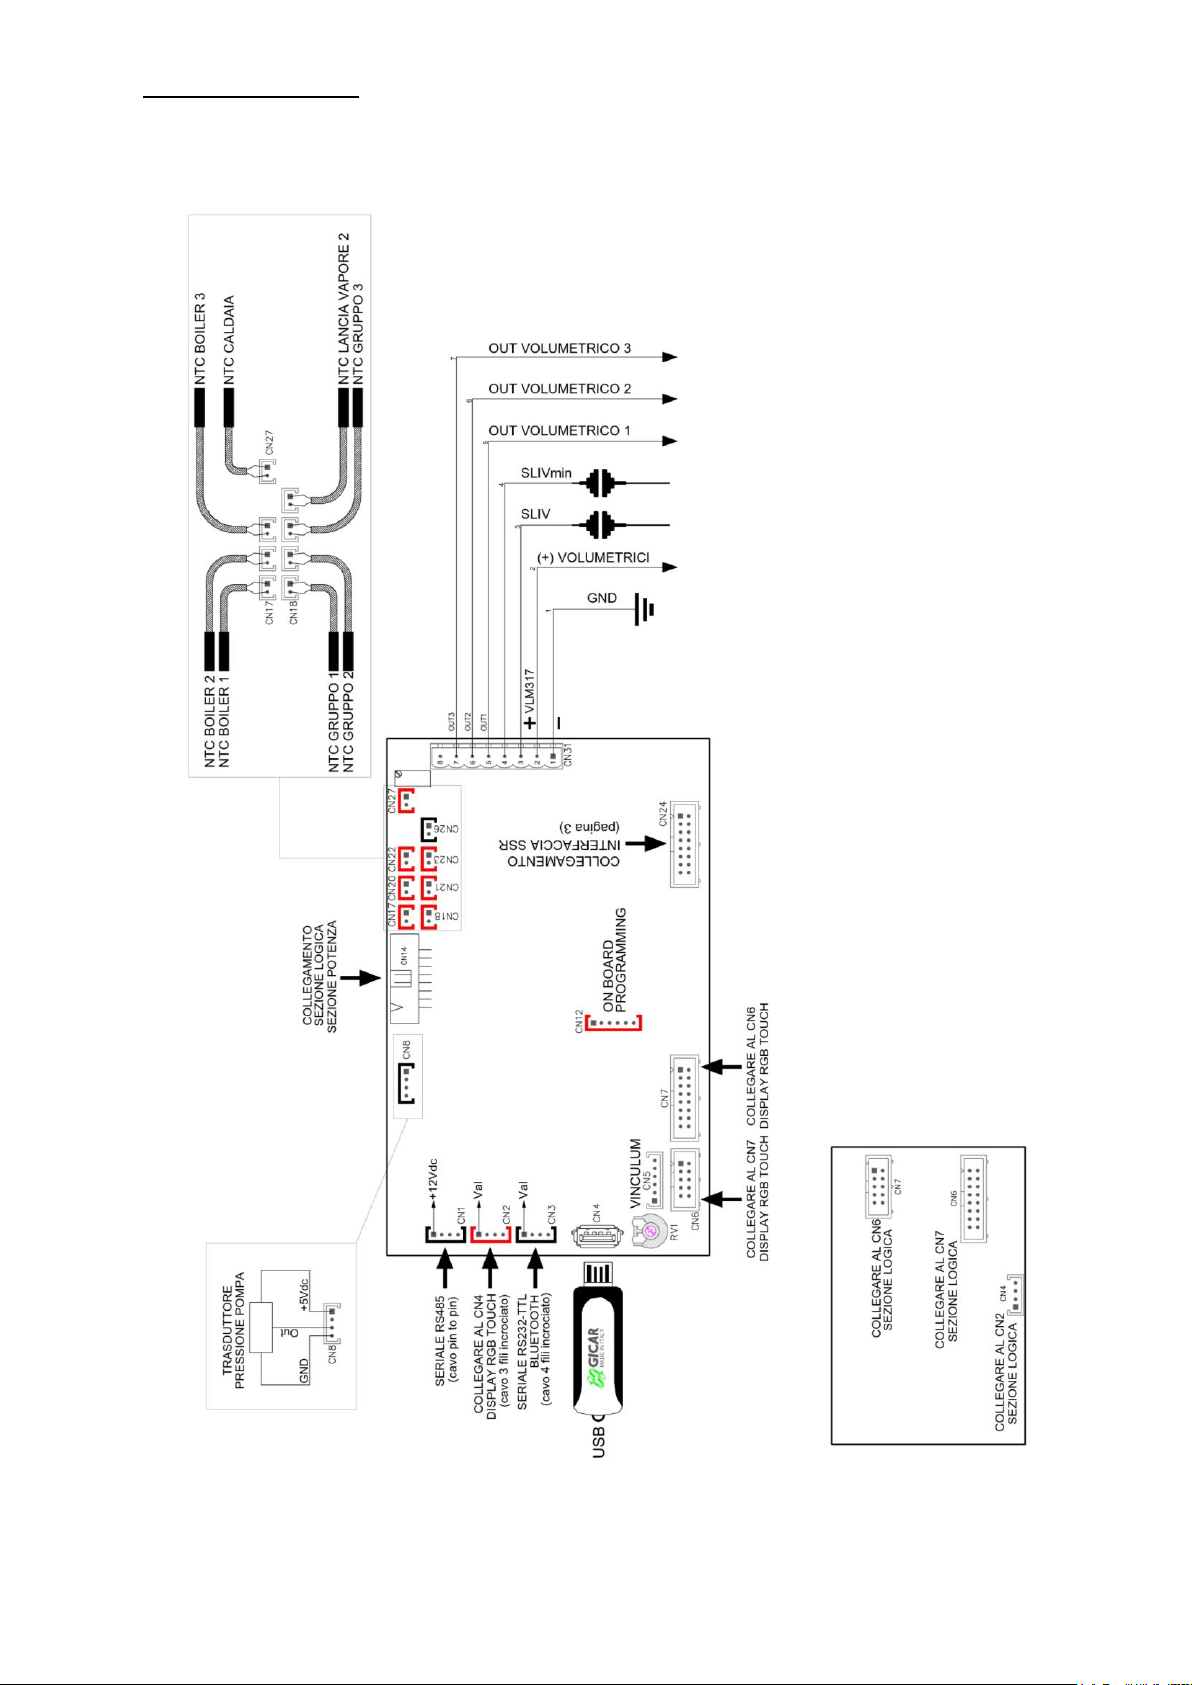
17.6 Low voltage wiring 54
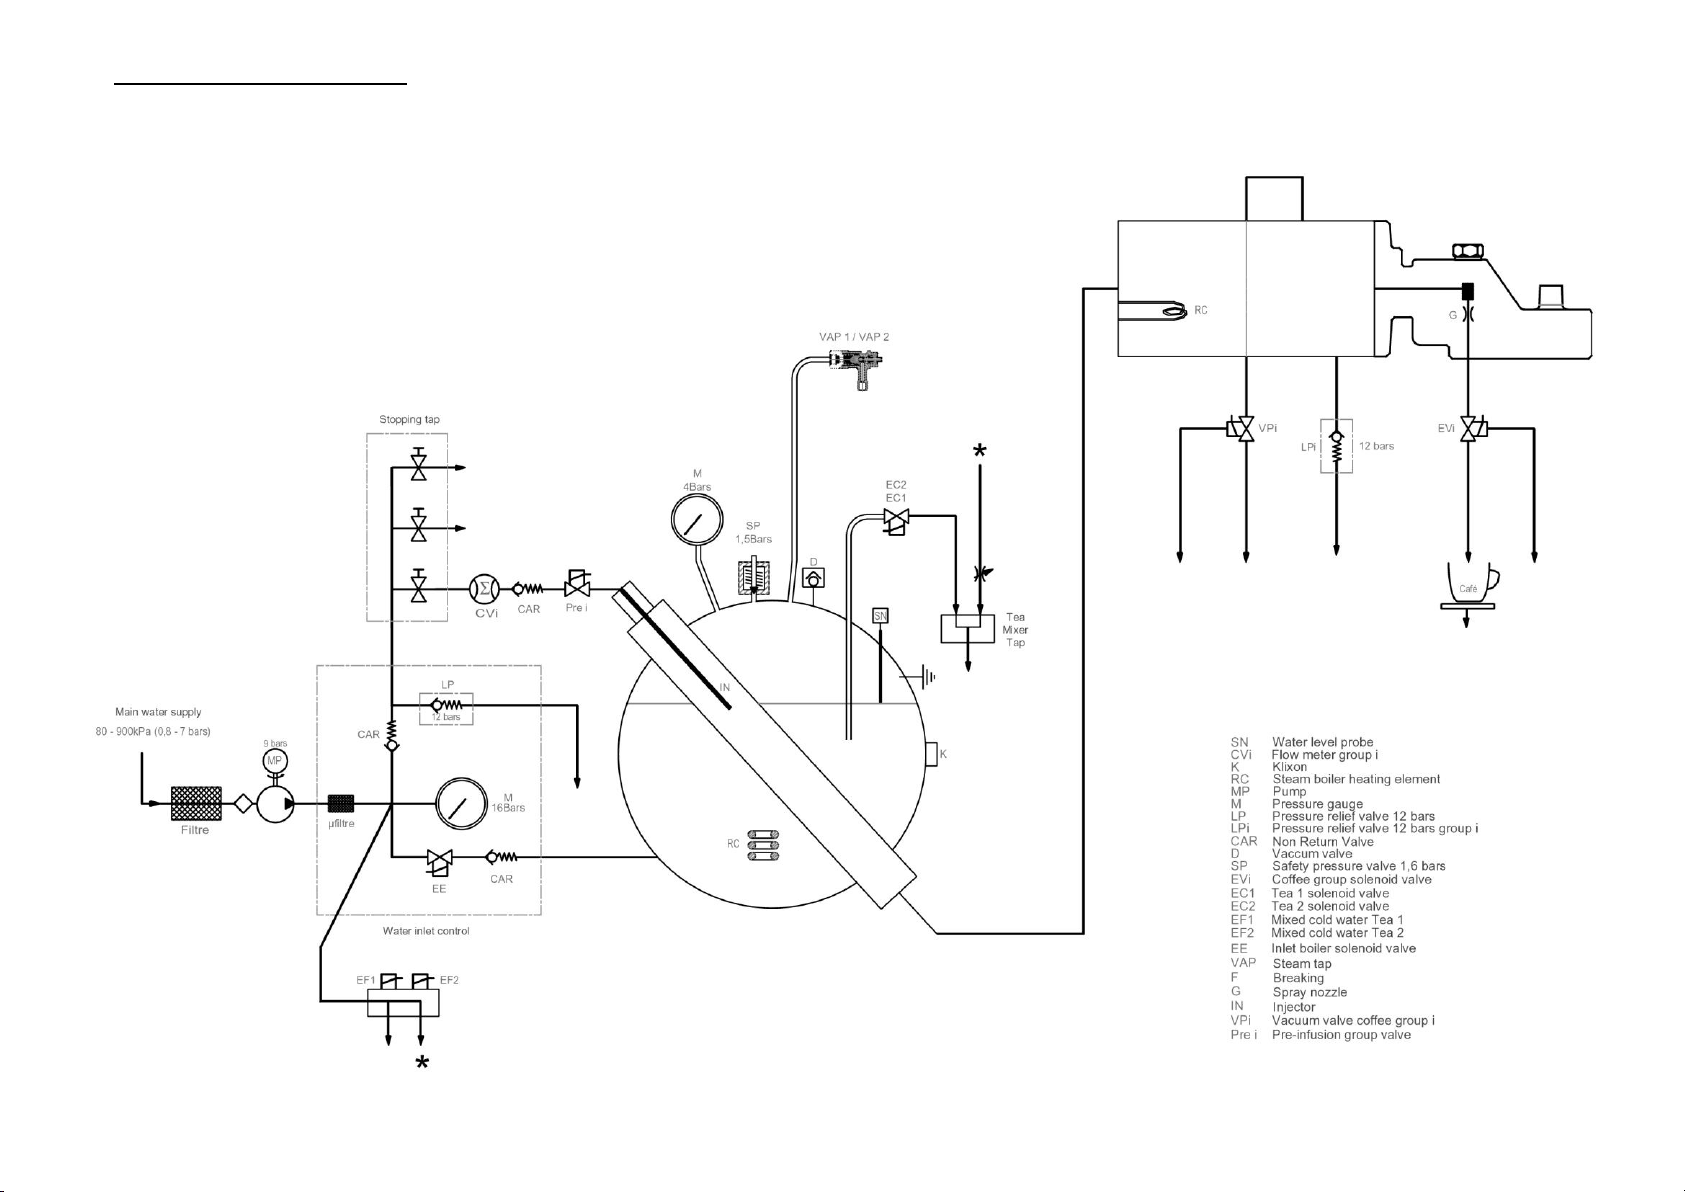
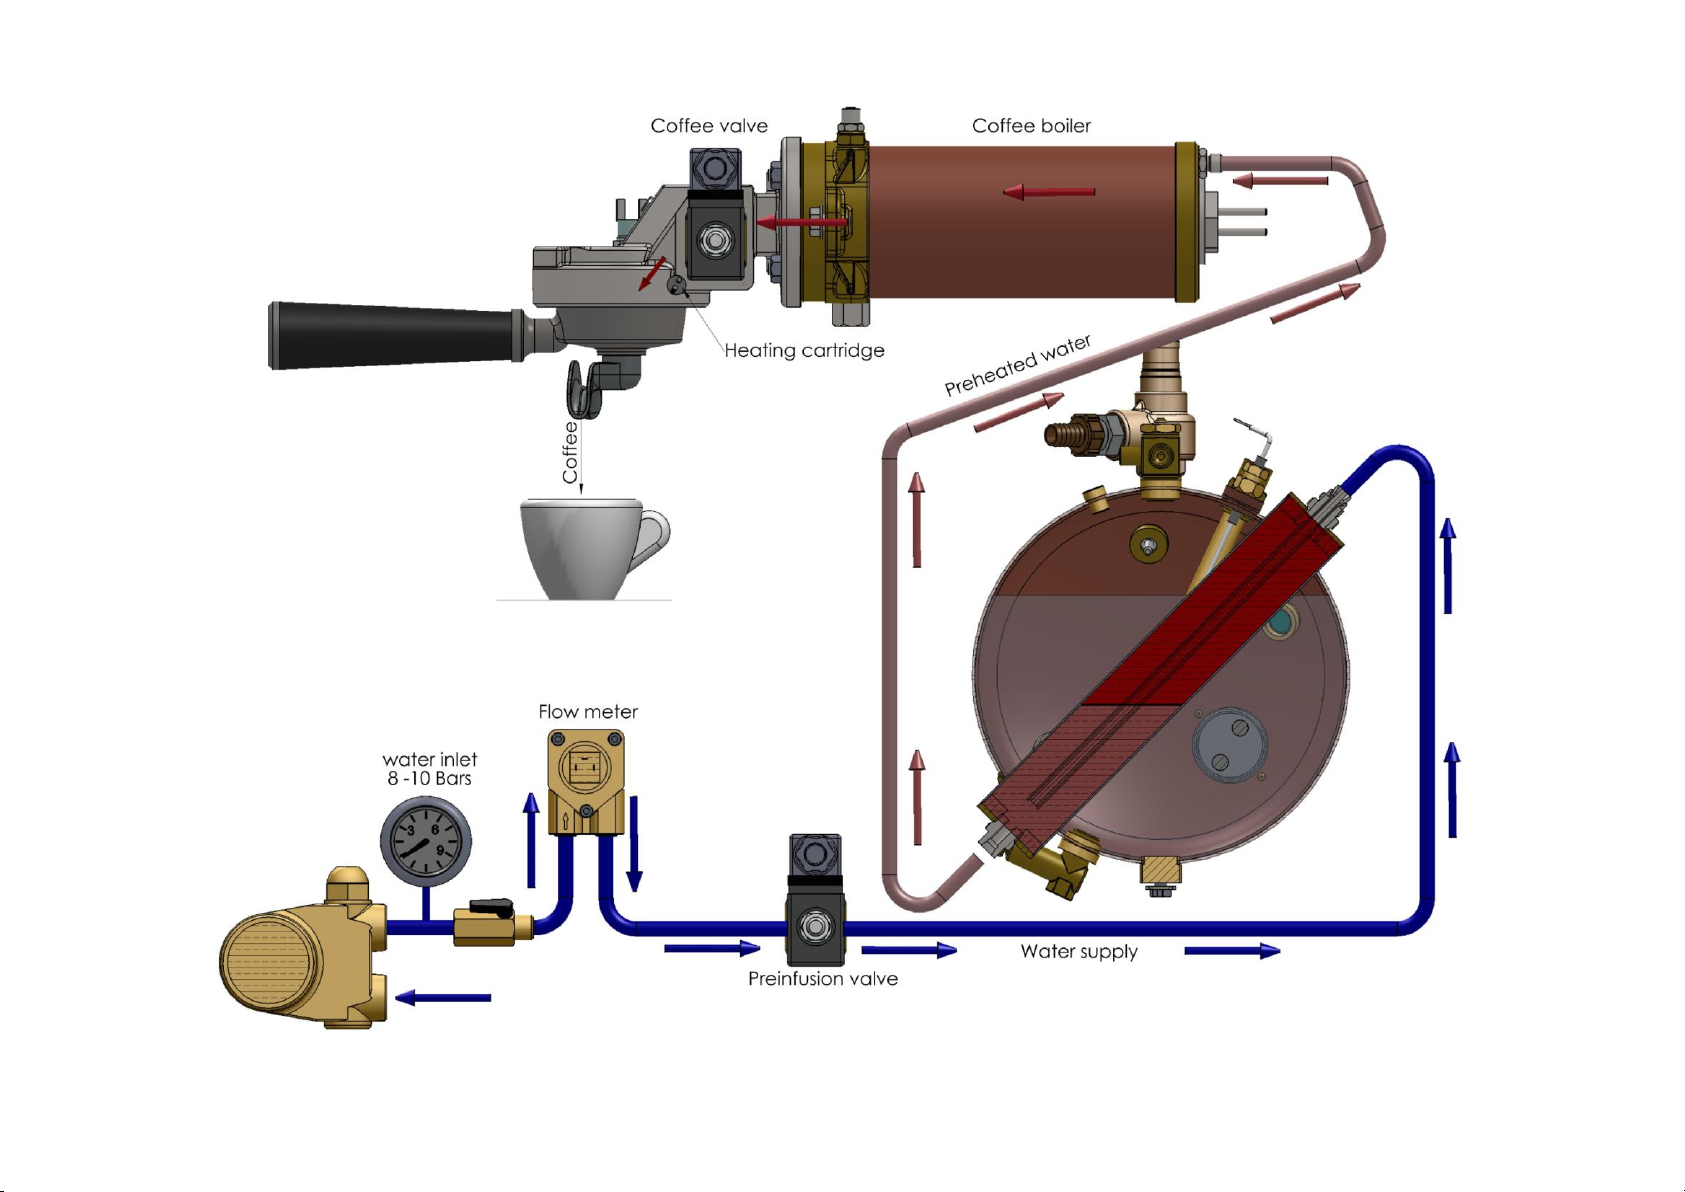
18 HYDRAULIC SCHEME 55
19 ALARM 57
20 POWER MANAGEMENT 59
MONTE-CARLO - 11/2015 - SOFT V 2.11 2
Page 3
1 TECHNICAL DOCUMENTS
Steam boiler
Coffee boiler
Group
Outlet
Total
power
Capacity
(liter)
Power
(W)
Capacity
(liter)
Number
Power
(W)
Number
Power
(W)
Power
(W)
(W)
MC 2G
10
4200
0,9
2
1000
2
100
300
6700
MC 3G
14
6000
0,9
3
1000
3
100
300
9600
MC 2G K
10
6000
0,9
2
2500
2
100
300
11500
MC 3G K
14
6000
0,9
3
2500
3
100
300
14100
BOILER CAPACITY ( IN LITERS )
2 Groups
3 Groups
TOTAL
10
14
Hot water volume
6,5
10
Steam volume
3,5
4
Coffee boiler volume
2 x 0.9
3 x 0.9
WEIGHT (kg)
EMPTY
(Kg)
Weight
in operation (Kg)
2G
89
97
3G
99
112
2 DIMENSIONS
Cup warmer capacity: (88 espressos cups) or (56 espressos cups + 18 cappucino cups)
MONTE-CARLO - 11/2015 - SOFT V 2.11 3
Page 4
3 CAUTION DURING THE USE
3.1 Ambient conditions
The ambient temperature around the machine had to be between 5°C and 32°C.
The ambient humidity must not exceed 70 %
The machine must be placed such as the cup warmer is located more than 1.5 meters
from the ground.
3.2 During installation
The installation (electrical connections, water supply and drainage) must be carried out by
a qualified technician approved by CONTI.
The machine must be connected to a device conforming to the standards of the country
where the machine is installed. Potential costs of equipment compliance are the only
responsibility of the customer.
For any technical intervention, the machines must always have the power disconnected
from the mains.
An effective earth connected to the terminal provided for this purpose on the device is
mandatory
A screw located under the bottom base machine, allow if necessary, to connect several
machine on an equipotential way.
Devices for disconnection from the main supply, having a contact separation of at least
3mm in all poles, must be provided in the fixed wiring in accordance with the installation
rules.
3.3 During the use
When the machine is not operating, the water cut-off valve has to be closed and the
electrical power supply cut.
When the machine is not supervised it must be disconnected from the power and water
supply.
Never disconnect the earthing when the machine is connected to the power supply.
Machines must always be disconnected from the main power, in case of technical
interventions.
3.4 Rules relating to the environment
This device has been designed according to the European Directive No. 2002/95/EC. This
refers to the restriction of certain hazardous substances in electrical and electronic
equipment (ROHS)
This device has been designed in compliance with the European Directive No.
2002/96/EC concerning waste electrical equipment (WEEE).
This picture informs you that this device should not be discarded with household waste.
At end of life, this product must be returned to a collection point or returned to an
authorized dealer. By doing so, you will help to protect the environment and human
health.
MONTE-CARLO - 11/2015 - SOFT V 2.11 4
Page 5

4 INSTALLATION
4.1 Standby In case of a standby of the machine (standby = 2 months):
The first thing to do is to test your machine in a lab.
If the machine stops running for a long time, you could have sediment in some places.
More precisely in small area like the spray nozzle.
4.2 Protections
It is necessary to place before the machine:
o A water shut off valve.
o An electrical protection standard, suitable for voltage and power consumption.
4.3 Water supply
Recommended operating pressure from 1.5 MPa to 6 MPa
Water connection pin 3/8"
The water supply pipes must resist to 145 Psi / 10 MPa
4.4 Drain
Without pressure.
A tip on the outlet of the machine and a pipe is supplied with the machine
Ensure a connection that causes no risk of fluid return, and ensure good drainage:
The drain pipe must be located lower than the machine.
Do not create a bend in the exhaust tube.
4.5 Supplying voltage
To be specify when ordering : 230V – 50/60Hz Monofase
Or : 400V – 50/60Hz Trifase
MONTE-CARLO - 11/2015 - SOFT V 2.11 5
Page 6

4.6 Water softeners
When the mains water has a high hardness (>10°TH ou >4 °KH), it is recommanded:
o To use a water treatment
o To regenarate regularly the filters.
What is the total Hardness of the water ?
o This is the amount of calcium and magnesium ions in the water.
o These ions are partly responsible for limestone formation.
o It is measured with the test strip provided with the machine.
o The unit of measurement is the ° French (° TH) or the ° German (° dH).
What is the Karbonat Hardness of the water?
o This is the amount of Carbonate Calcium ions and Carbonate Magnesium ions in the
water.
o These ions are completely responsible for limestone formation.
o It is measured with chemical dropper testers.
o The unit of measurment is ° Carbonate (°KH)
There are 2 types of water treatments:
Salt water softeners
o They treat the total water hardness (°TH)
o By an exchange of sodium ions with calcium and magnesium ions.
o They require periodic regeneration of the resins by the user.
o To use when the water hardness is > à 10°TH or > 5 °GH
Resins filters :
o They treat the Carbonat hardness water (°KH)
o By fixing carbonate ions on the resins.
o Often fitted with microfiltration and carbon filtration.
o To use when the Carbonat Hardness is > à 6°KH
o Highly recommended by the manufacturer :
The machines are equipped with suitable protection in accordance with flowrate
and the water encountered.
The changing cartridges is carried out by the technical service, at intervals to
be determined
MONTE-CARLO - 11/2015 - SOFT V 2.11 6
Page 7
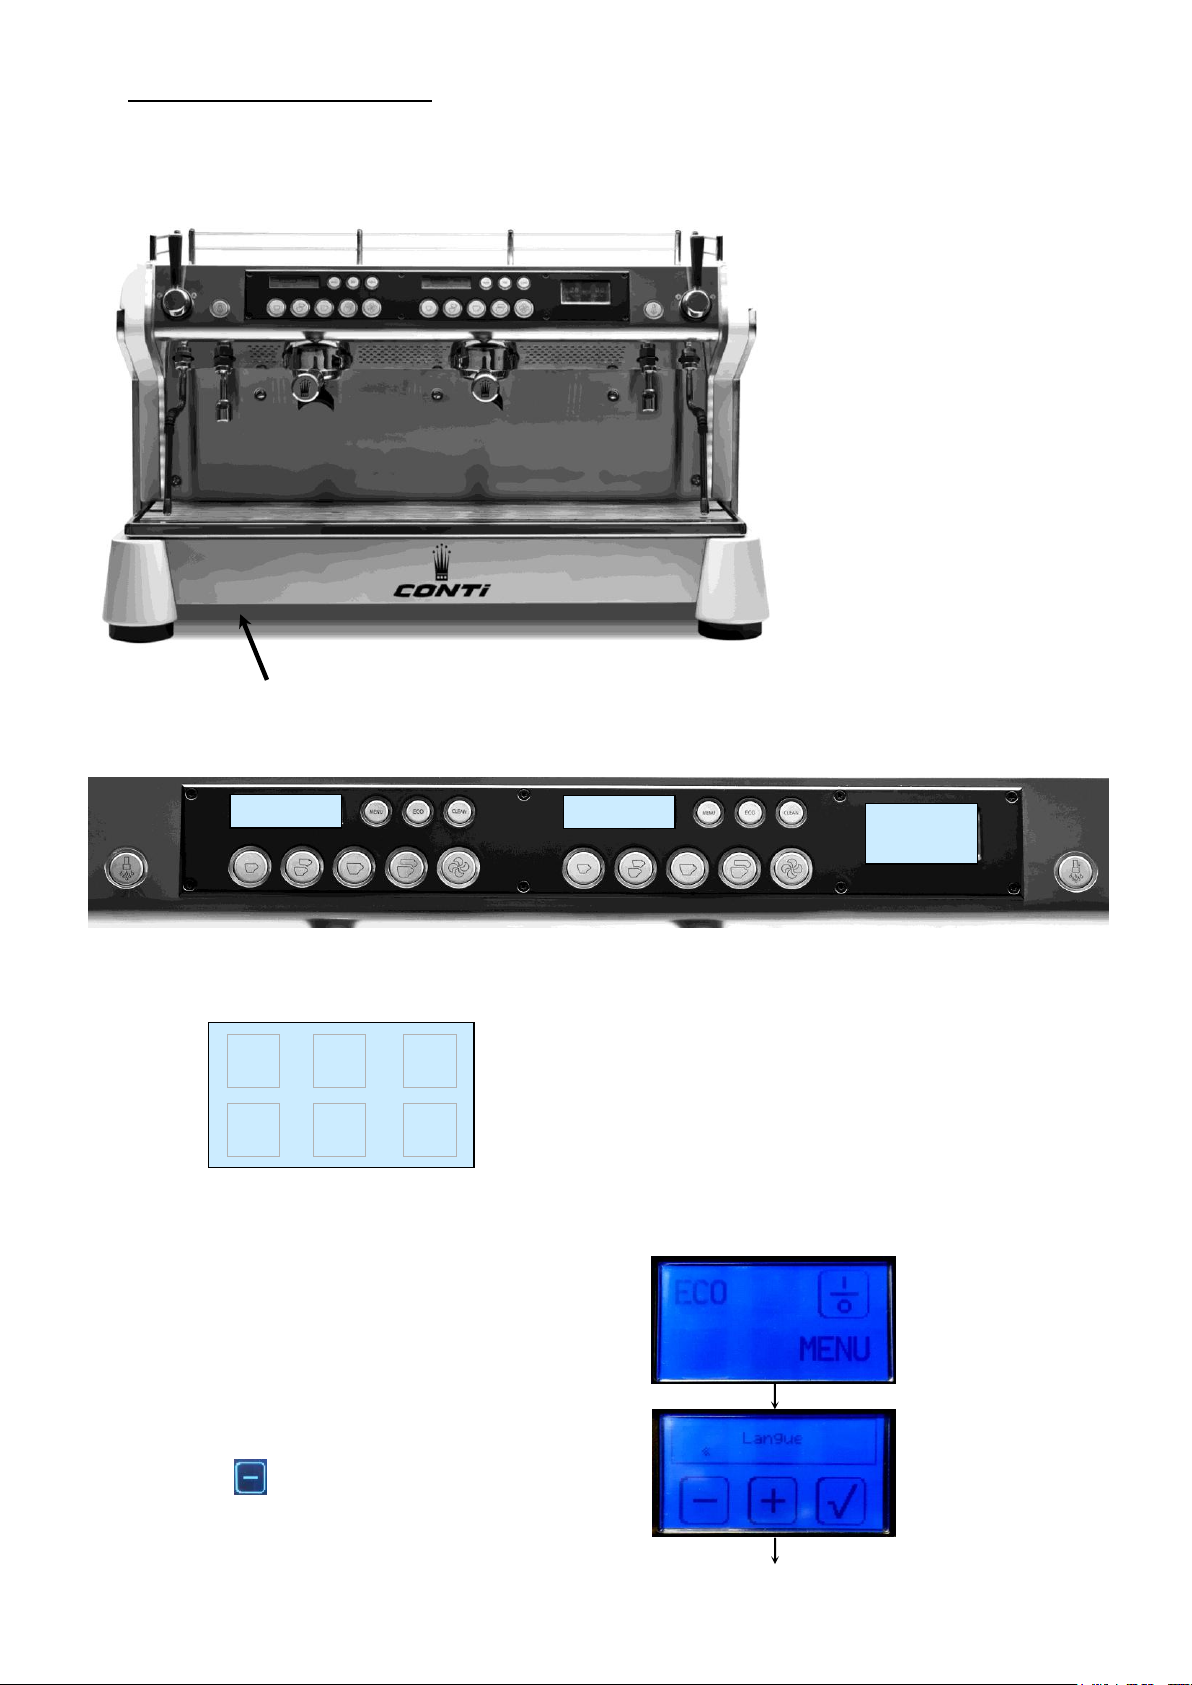
5 FIRST INSTALLATION:
1° step:
Press MENU for 6 seconds
2° step:
Press:
ON/OFF Switch
OFF
OFF
MC 2.11
Please
wait!
Push "where you want" on the display during
3 sec until:
A. Open the water supply tap
B. Switch on the machine using the ON/OFF switch under the drip tray.
C. During 1 second
The general display shows the software version “Monte Carlo 2.11”.
D. According the situation the display shows:
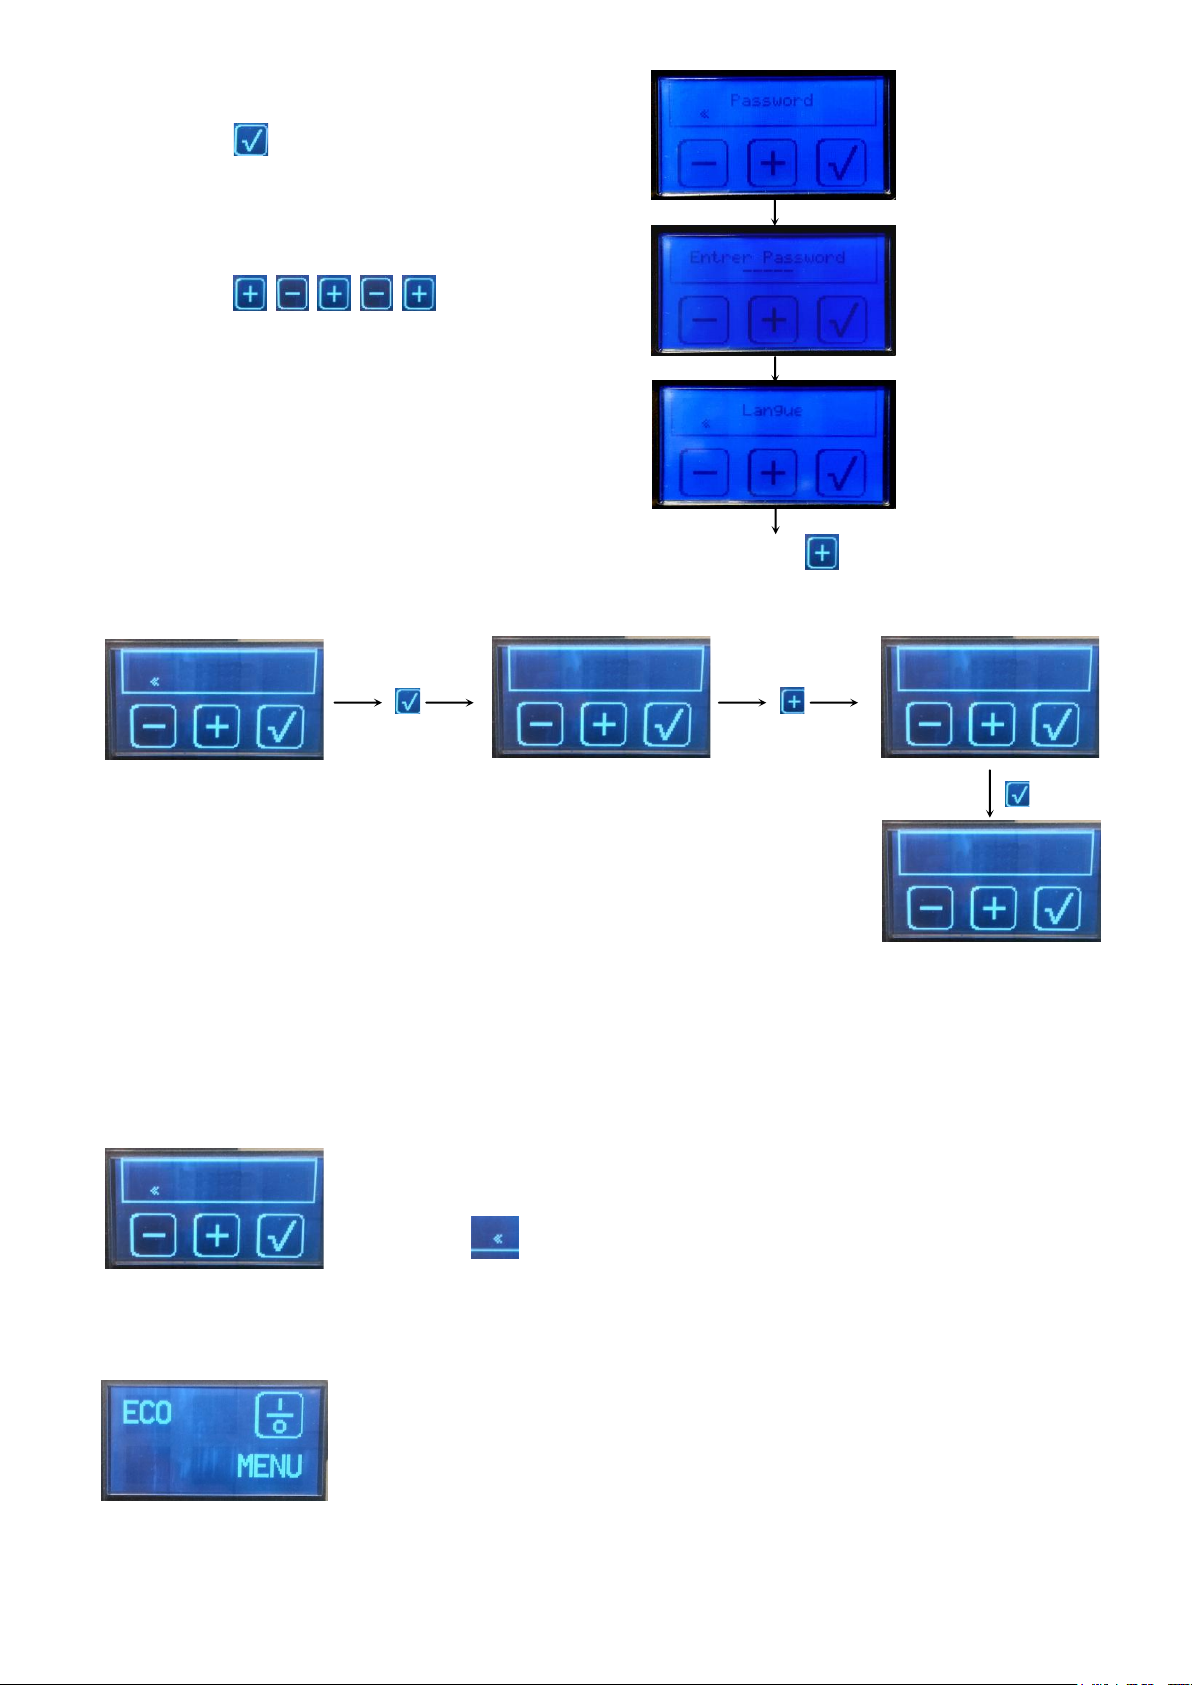
E. Enter the password to access the first installation, as follows:
MONTE-CARLO - 11/2015 - SOFT V 2.11 7
Page 8
3° step:
Press:
4° step:
Press:
5° step:
The display shows:
First Install
First Install
No
First Install
Yes
First Install
In progress
First Install
Press twice
F. The display shows:
Let the machine doing the 1° installation.
During this time, the air inside coffee groups are automatically vaccum by an opening cycle of vaccum
valves, pump and groups valves.
G. The process is finished when the display shows:
Press
H. The display shows:
MONTE-CARLO - 11/2015 - SOFT V 2.11 8
Page 9
6 STARTING & WARM UP:
Please
wait!
95°C
95°C
95°C
95°C
Please
wait!
Please
wait!
95°C
95°C
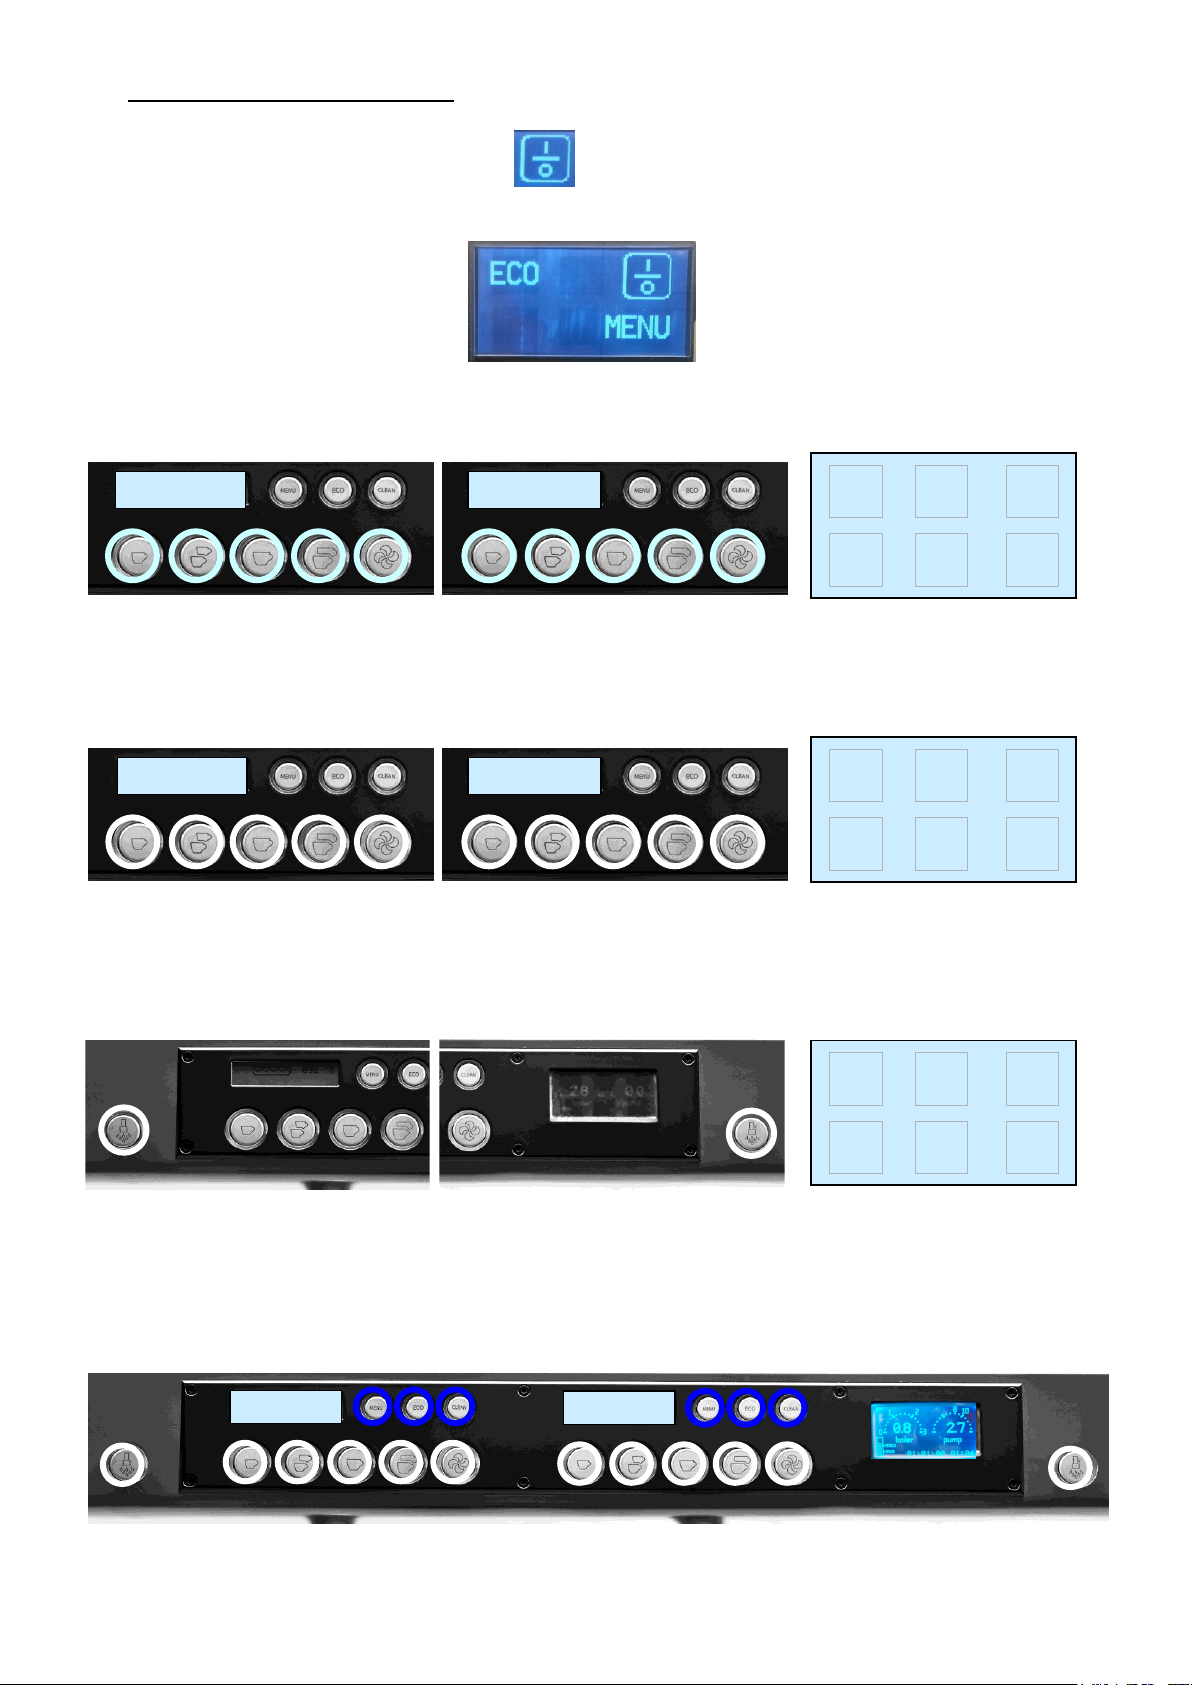
A. Switch ON the machine by pressing on the main display.
B. The key boards are lighting, and shows the coffee boilers temperature settings
Coffee buttons are blinking. General display blinking
C. When the temperature setting of coffee boilers is reached (2 or 3 minutes): automatic purge goes on.
The leds stay On General display blinking
D. When the steam boiler temperature reaches 105°C: hot water button lights up.
The leds stay On General display blinking
E. When the steam boiler temperature setting is reached (ex.125°C).
The machine is ready. All the lights stay On.
General display shows manometers
MONTE-CARLO - 11/2015 - SOFT V 2.11 9
Page 10
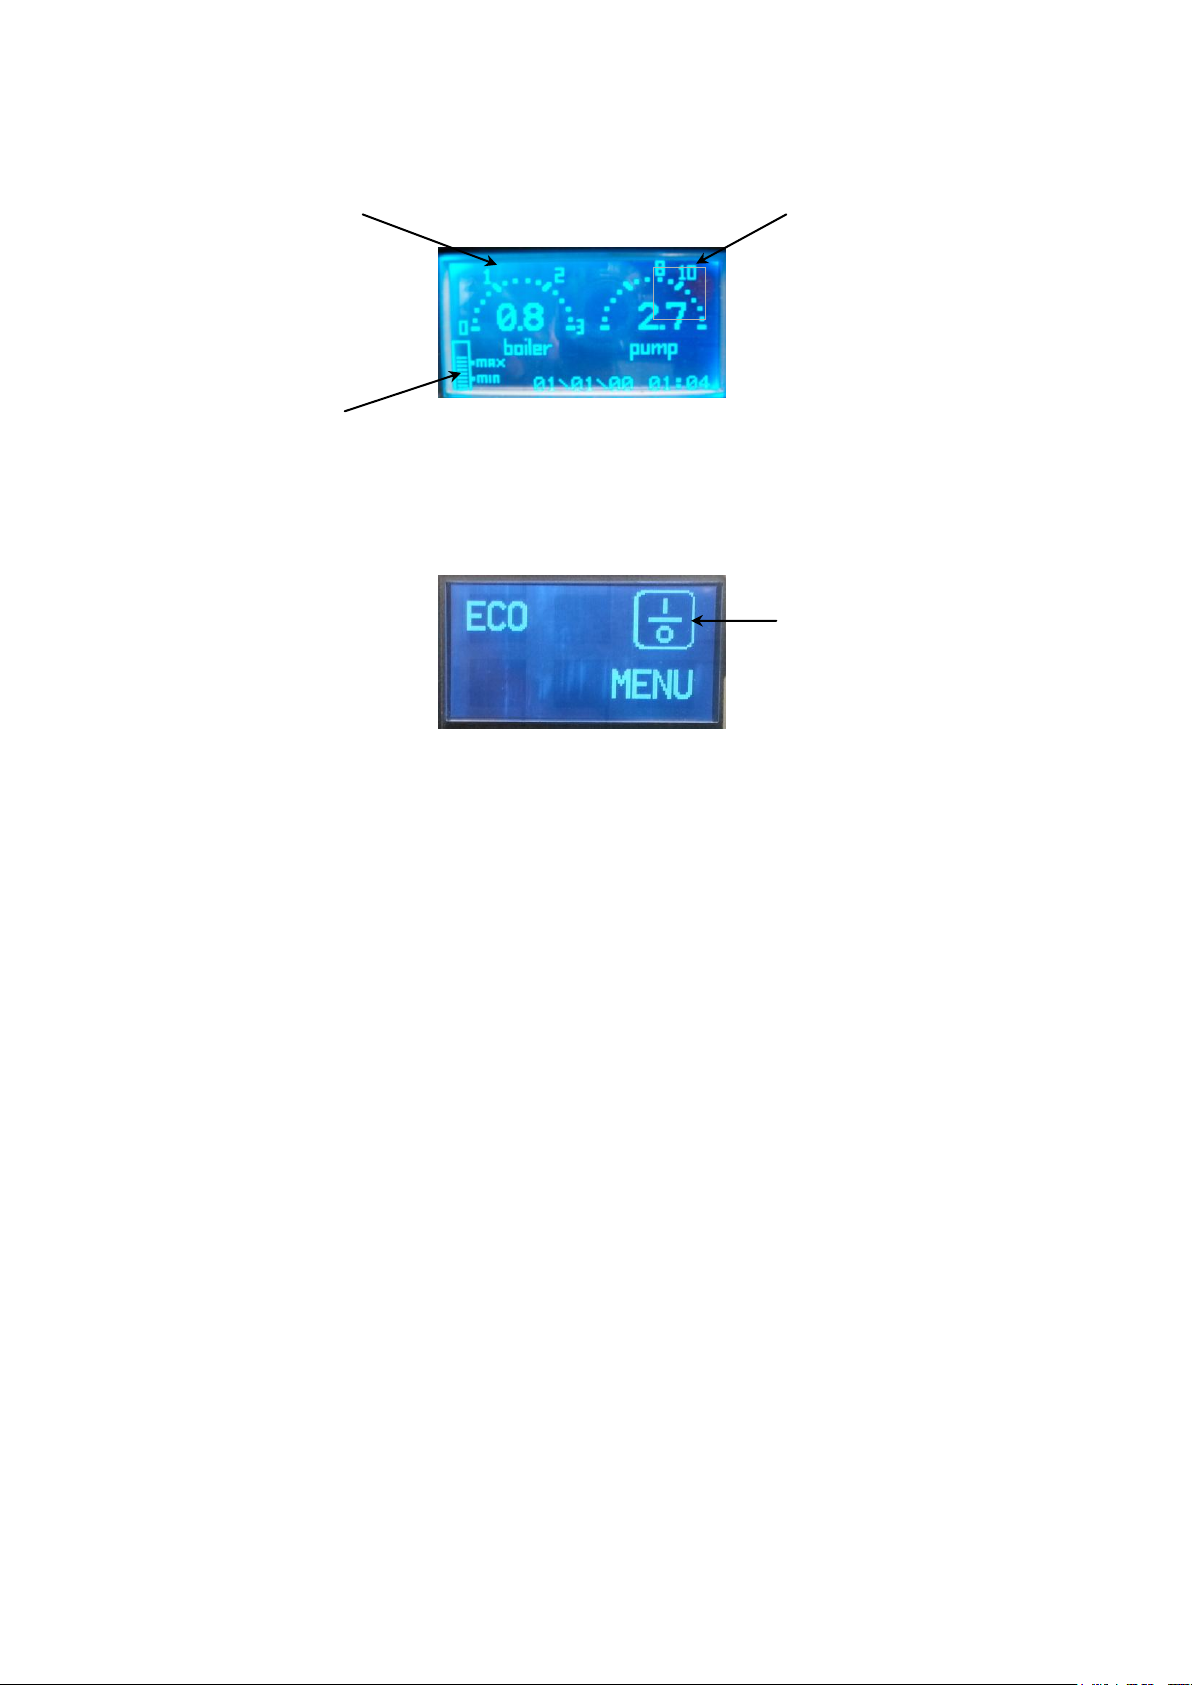
F. Main display
ON/OFF
When the machine is ready, the general display shows:
Boiler pressure (bar) Pressure
Level information
(In progress)
Press “where you want” on the display, during 3 sec to switch OFF the machine
The display shows:
(network/pump pressure)
MONTE-CARLO - 11/2015 - SOFT V 2.11 10
Page 11
7 HOW TO USE THE MACHINE
7.1 Operating elements
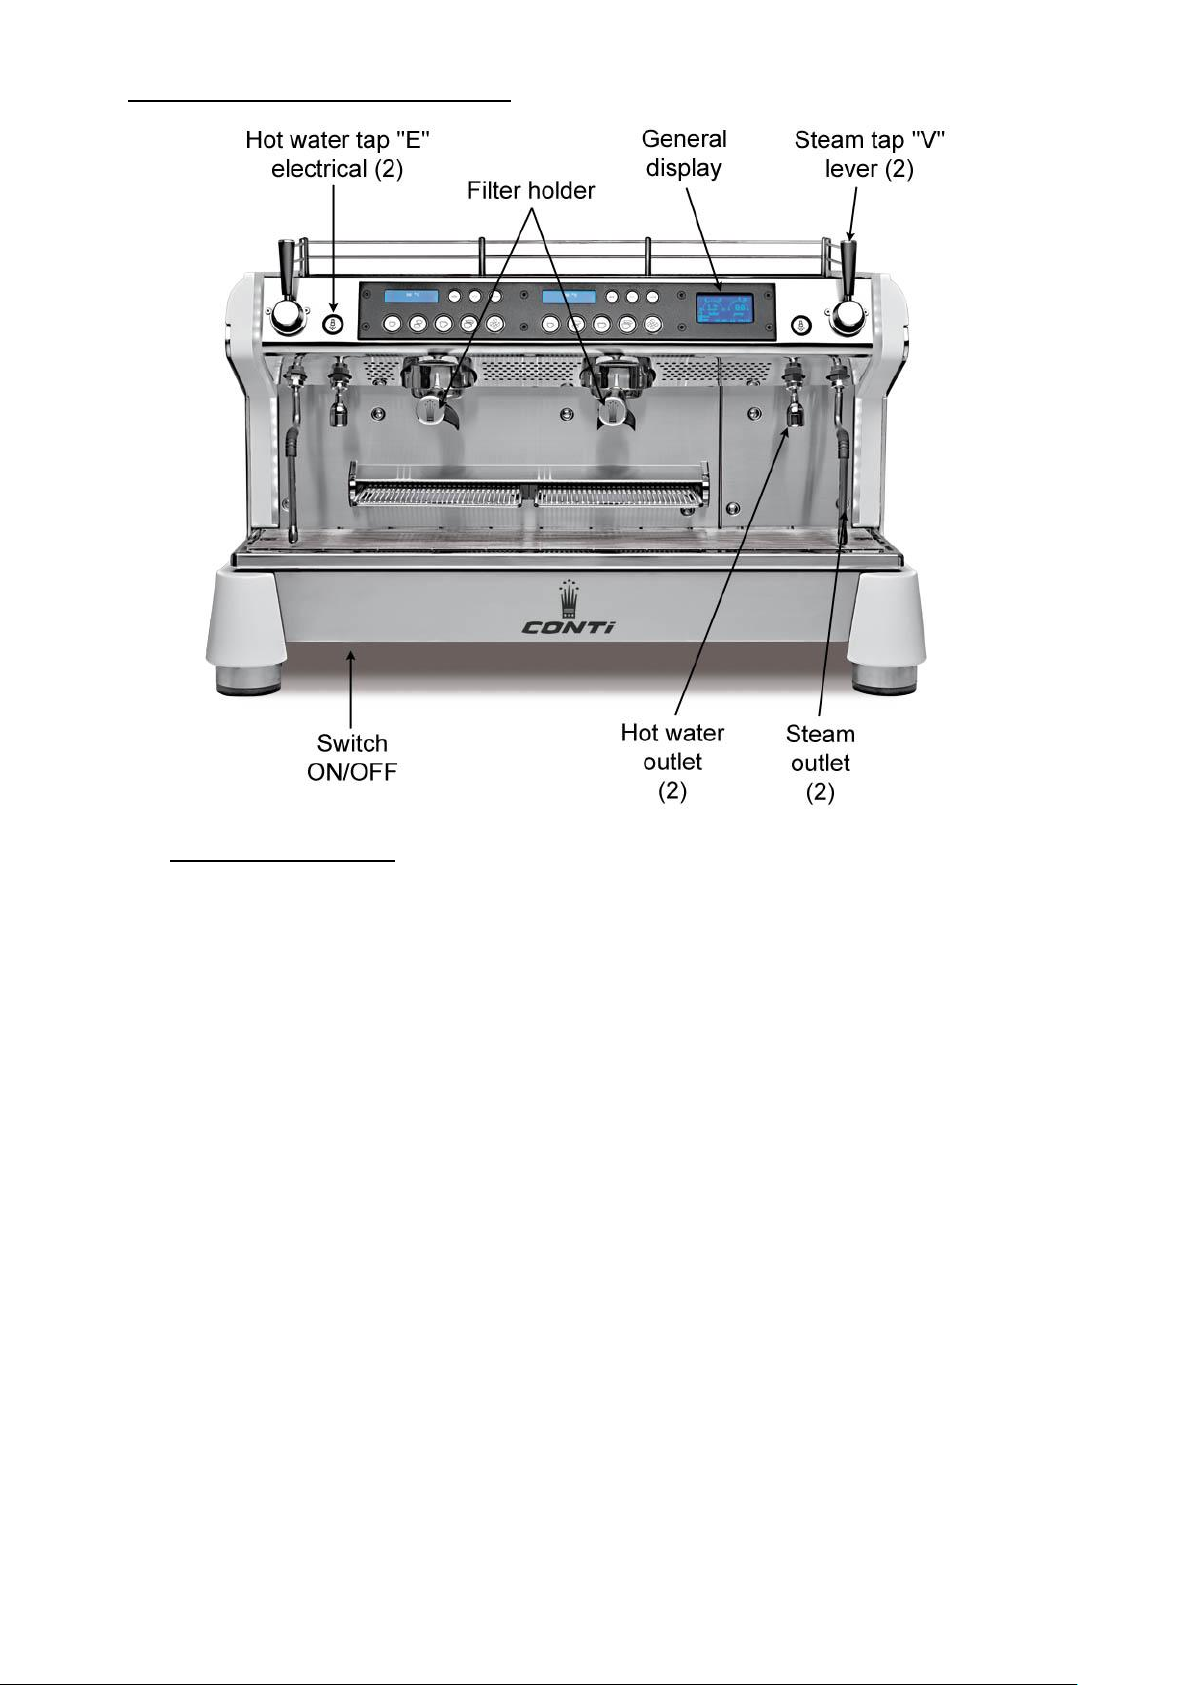
STEAM FUNCTION
Two steams taps levers « V » are provided to allow:
The heating of liquids by spraying steam.
The milk foam production to create Cappuccino or Macchiatto.
The liquid to be heated should preferably be placed in a deep container.
The tip of the steam wand outlet must be immersed in the liquid, without touching the bottom of the
container.
The steam may also be used to sterilise and warm glasses.
After each use and absolutely after heating milk, always clean the stainless steel steam nozzle and
the outlet nozzles with a damp cloth, removing all traces present.
A rinsing of the steam lance inner holes is to be done by a short pulse on the lever downwards to
release a jet of steam.
HOT WATER FUNCTION
Two electric taps “E” are provided for preparing tea, grog, etc.
Be careful, not to be burnt by the pressure water spray.
For that, the valve is coupled to cold water mixing for adjusting the water T° for tea and avoids spitting
hot water.
Each electric tape is controlled with 2 buttons for 2 different times
MONTE-CARLO - 11/2015 - SOFT V 2.11 11
Page 12

FILTERS
The machine is equipped with two types of filters: 1 cup (10 G) and 2 cups (18 G)
Each filter is operating with its own holder-filter to produce respectively 1 cup or 2 cups of coffee.
Filters need to be unclogged and clean, so they need to be cleaned almost once a day with hot water,
by being removed from the holder filters.
Take care to remove all residual traces of coffee and ensure proper cleanliness of perforations in the
bottom of the filter.
FILTER-HOLDER
Never remove the filter-holder during operation of the group. The shutdown is controllable with coffee
spouts: they no longer have to eject liquid.
Be careful to always keep the filter-holder engaged in the group, emptied of coffee cake, to keep them
warm.
In case of an extended stopping period, remove the filter-holder from the group, taking care to eject
the used grounds remain in the filter-holder.
Tighten the filter-holder until to be in contact with the seal, exceeding a little bit. The sealing is
guaranteed.
Do not unnecessarily try to crush the seal by tightening the filter at the maximum of your possibilities.
It may damage the seal prematurely.
To empty the coffee filters used, turn the filter holder upside-down and lightly tap it on the edge of a
wooden box. Never strike it against metal or other hard objects.
DIGITAL MANOMETER M1 : BOILER PRESSURE
The boiler pressure is adjusted in factory between 0,8 MPa (12 PSI) and 1 MPa (15 PSI). This value
varies slightly around its nominal temperature, due to the PID system which controls the heating and
limits the current consumption to its minimum.
Factory settings: 1.2 MPa with setting range from 0.8 MPa to 1.4 MPa .
NOTE: An over-heating thermostat cut the power on the general relay, in case of an abnormal high
temperature. The machine is not anymore supplied.
DIGITAL MANOMETER M2 : PUMP PRESSURE
The pump pressure is adjusted at 9 MPa in the factory. Value which allows the best extraction of
coffee flavors. A bypass system evacuates over-pressure.
NOTE: Simultaneous operation of all the groups can impact a little bit the pressure level.
Visualization of the presence of water network is done by consulting the gauge
7.2 How to use the programmed doses
Simply select one of the buttons available on each keypad to obtain the doses or the
programmed drinks.
The selected dose is shown by a blinking led on the keypad.
The flow can be stopped by repressing:
o The same button or
o The STOP button (which is also the programming and continuous flow button).
MONTE-CARLO - 11/2015 - SOFT V 2.11 12
Page 13
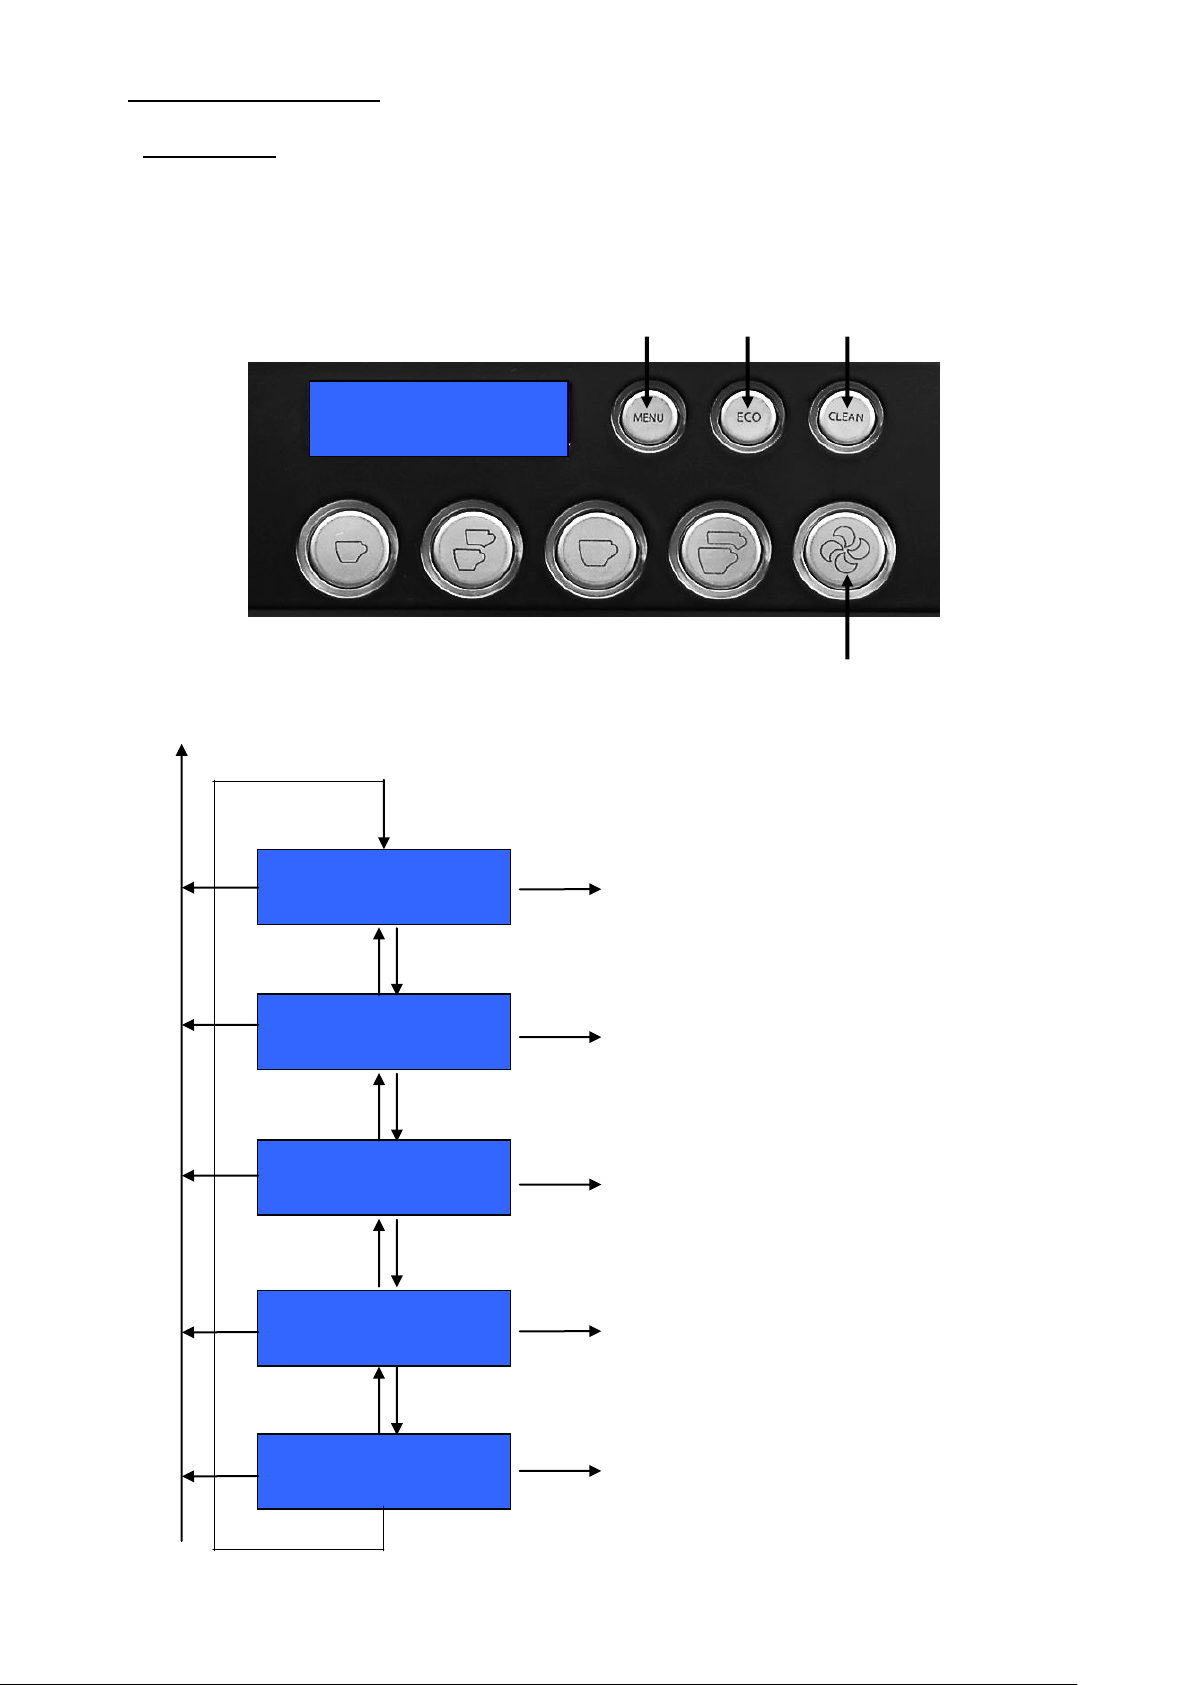
8 COFFEE GROUPS:
95°C
Coffee boiler T°
Group temperature
MENU A
Pre brewing
Dose setting
MENU C
Counters
MENU E
NORMAL MODE
ESC
ESC
ESC
ESC
ESC
- +
MENU D
"MENU"
- +
- +
- +
MENU B
8.1 Mode menu
Press the "Menu/Enter" button to enter in the programming mode.
The "Esc" button is used to escape from the programming mode.
MENU/ENTER - +
Esc
MONTE-CARLO - 11/2015 - SOFT V 2.11 13
Page 14
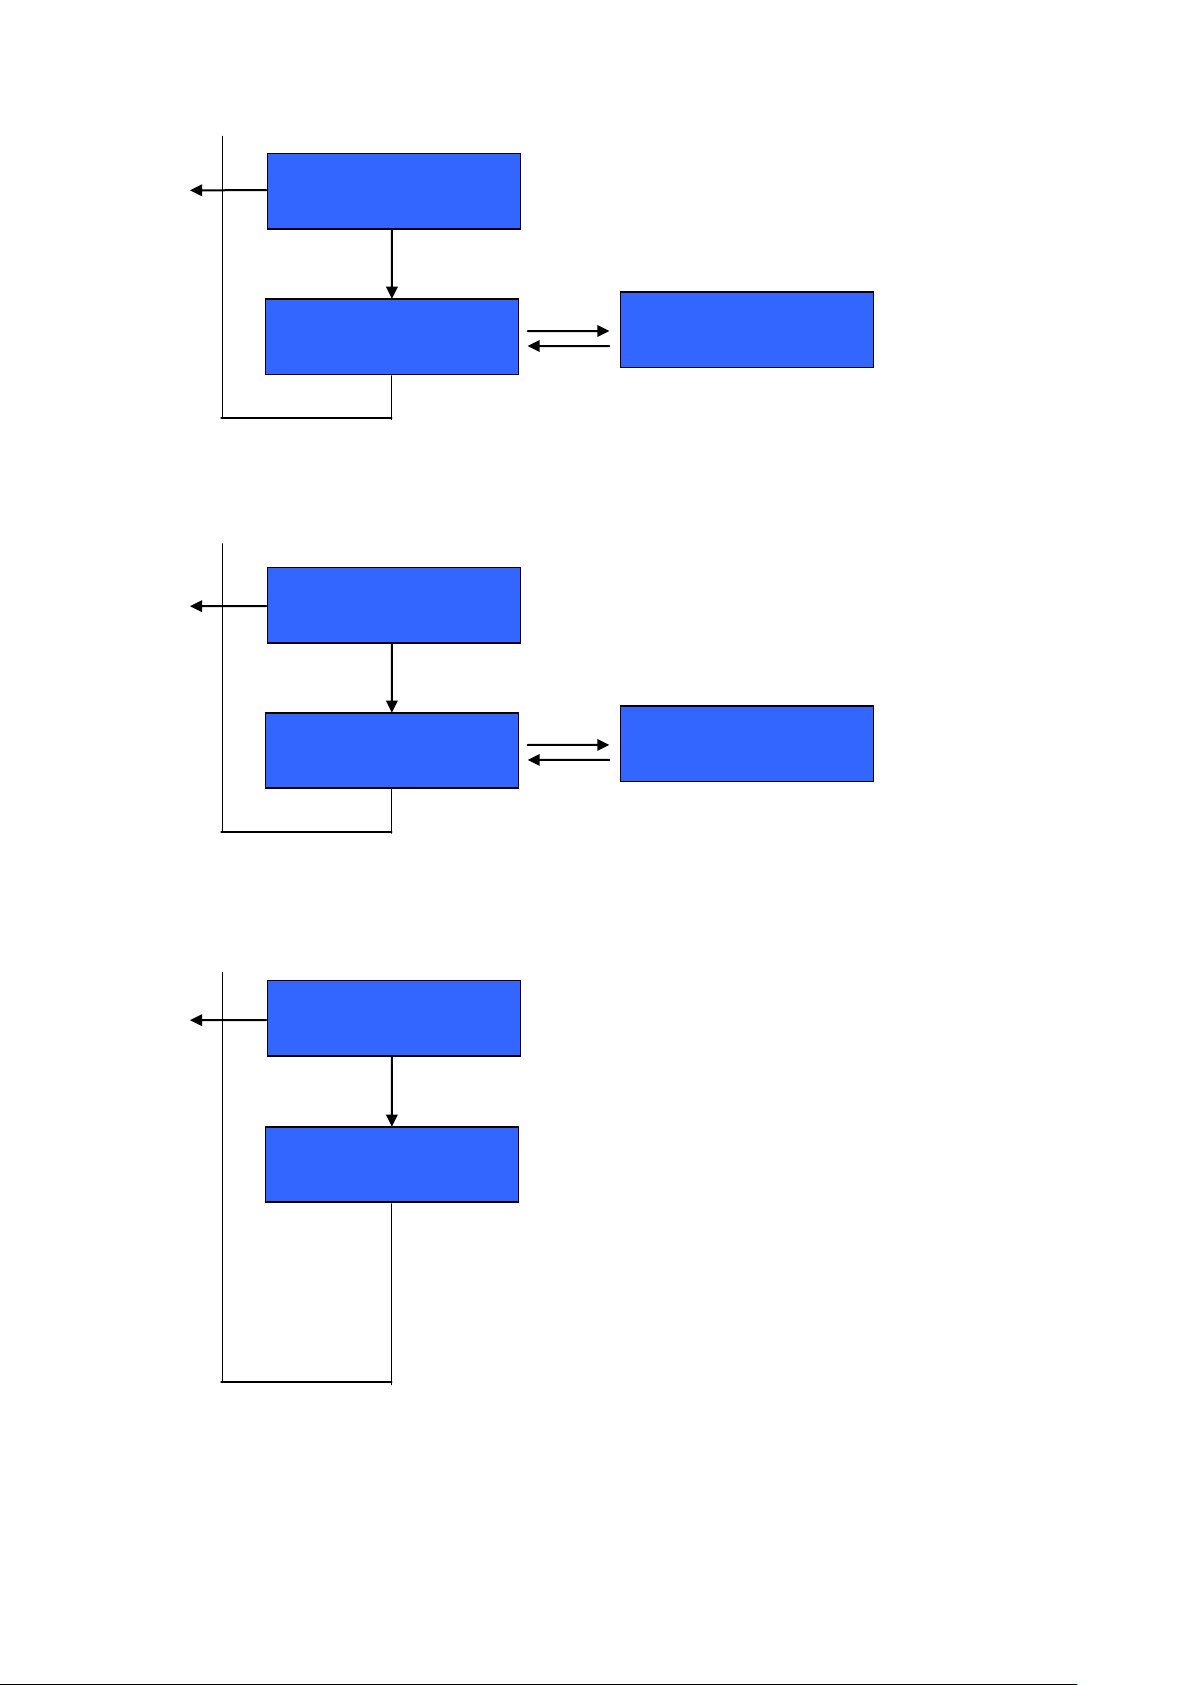
A) COFFEE BOILER TEMPERATURE
Coffee boiler T°
95°C
ENTER
+
Coffee boiler T°
Coffee boiler T°
94°C
ESC
Press "menu" to validate and "ESC" to escape
Group temperature
88°C
ENTER
+
Group temperature
Group temperature
89°C
Dose setting
ENTER
Dose setting
ESC
All the leds are OFF
It is enough to program the left group so that both
groups are configured in the same way.
Do the dose and stop at the desired volume.
When the dose is programmed the led button
remain lighting
Do the same for the others buttons
The continuous is not programmable.
The hot water button (close to the keyboard)
is programmable like the coffee dose.
Press "menu" to validate and "ESC" to escape
PRESS "MENU" to validate and "ESC" to escape
ESC
B) GROUP TEMPERATURE
C) DOSE SETTING
MONTE-CARLO - 11/2015 - SOFT V 2.11 14
Page 15
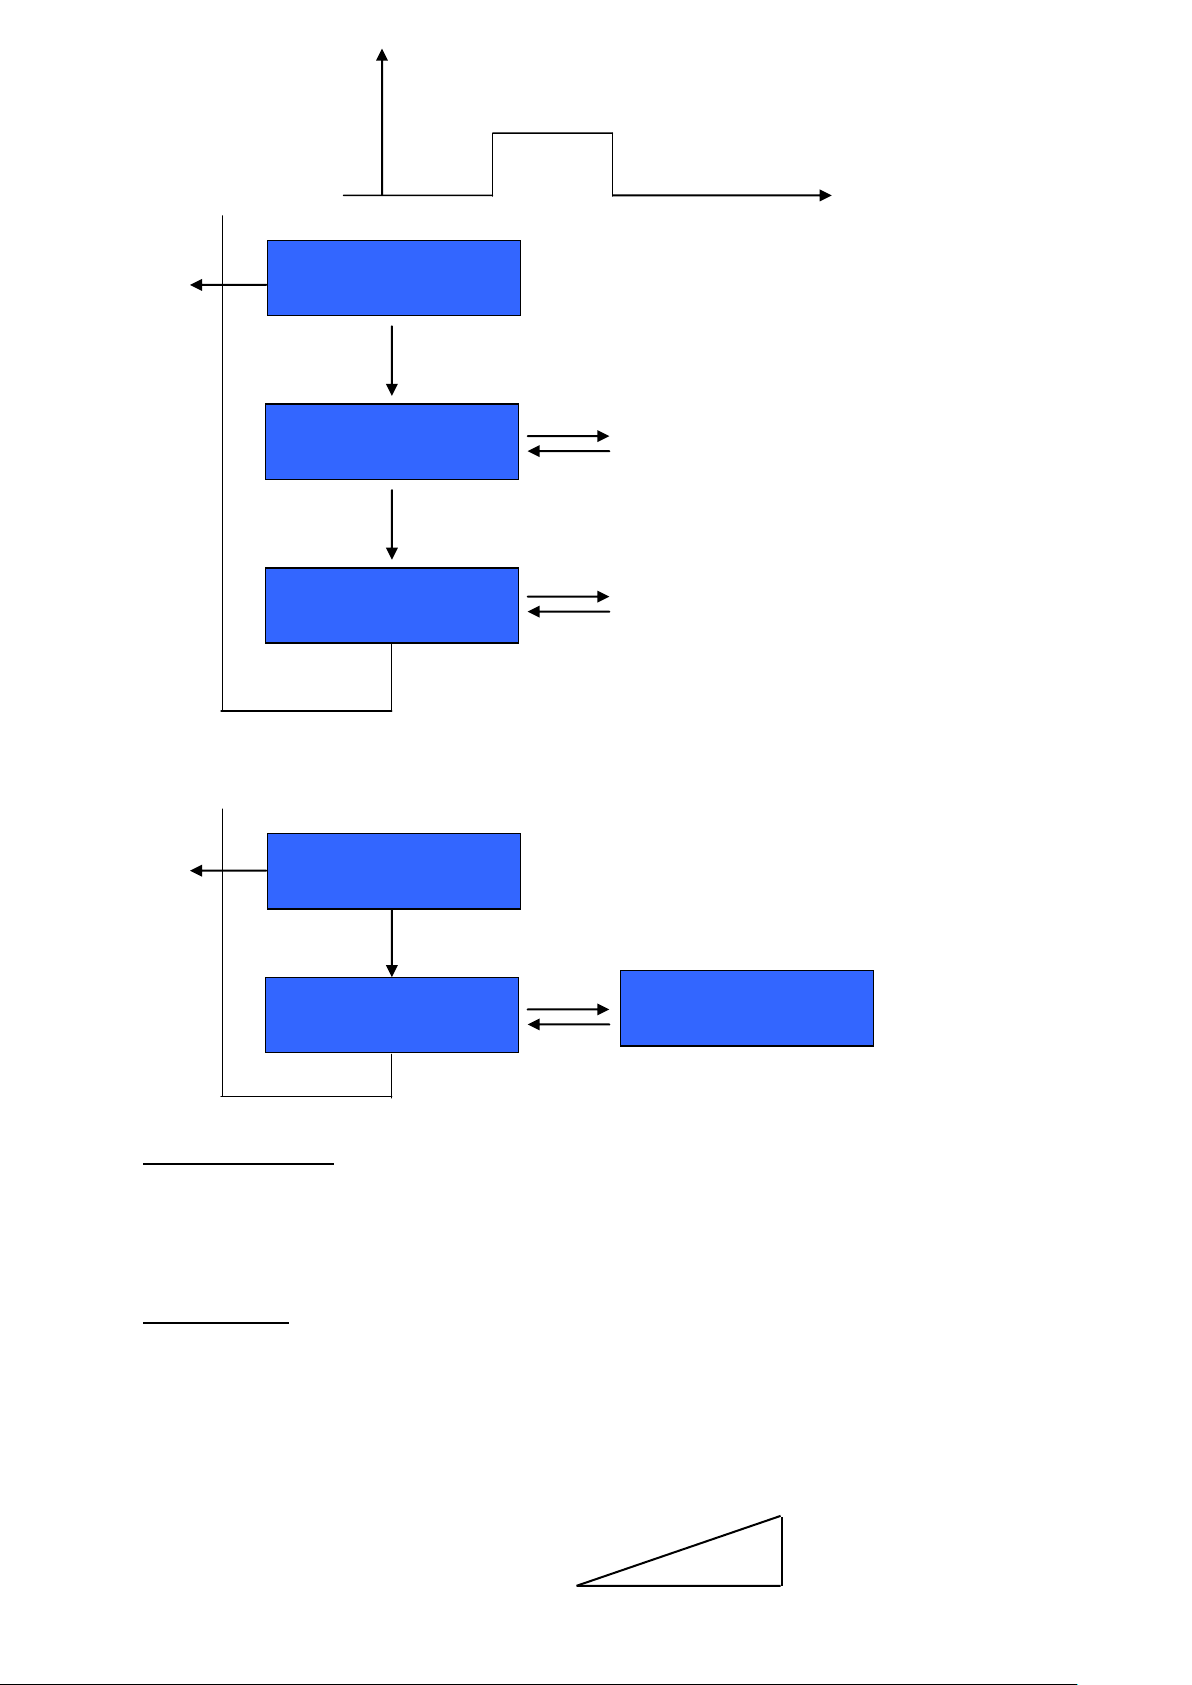
D) PRE BREWING
Prebrew. EV open sec
Espresso 20
ENTER
+
Pre brewing
Espresso
10
ENTER
+
Counters
Other button
xx
Press "menu" to reset the counters
PRESS "MENU" to validate and "ESC" to escape
to adjust the closed time
Prebrew. EV closed sec
Espresso 20
MENU to adjust the other button
+
to adjust the delay time
Closed
Delay
Time
ESC
ESC
E) COUNTERS
8.2 Group eco mode
If you press on the "ECO" button, you enter in the "ECO" mode: the coffee boiler switches off. The
group is desabled but the group head is maintained at temperature. The other groups remain
functionning. Press again on the "ECO" button to enable the group.
8.3 Clean button
If you press on the "CLEAN" button, the cleaning cycle starts.
Prepare the blind filter holder and cleaning tablet
Put it on the group head
Press the "CLEAN" button
The machine starts the cleaning cycle without any special indication.
A bar graph indicates the cleaning progress.
MONTE-CARLO - 11/2015 - SOFT V 2.11 15
Page 16
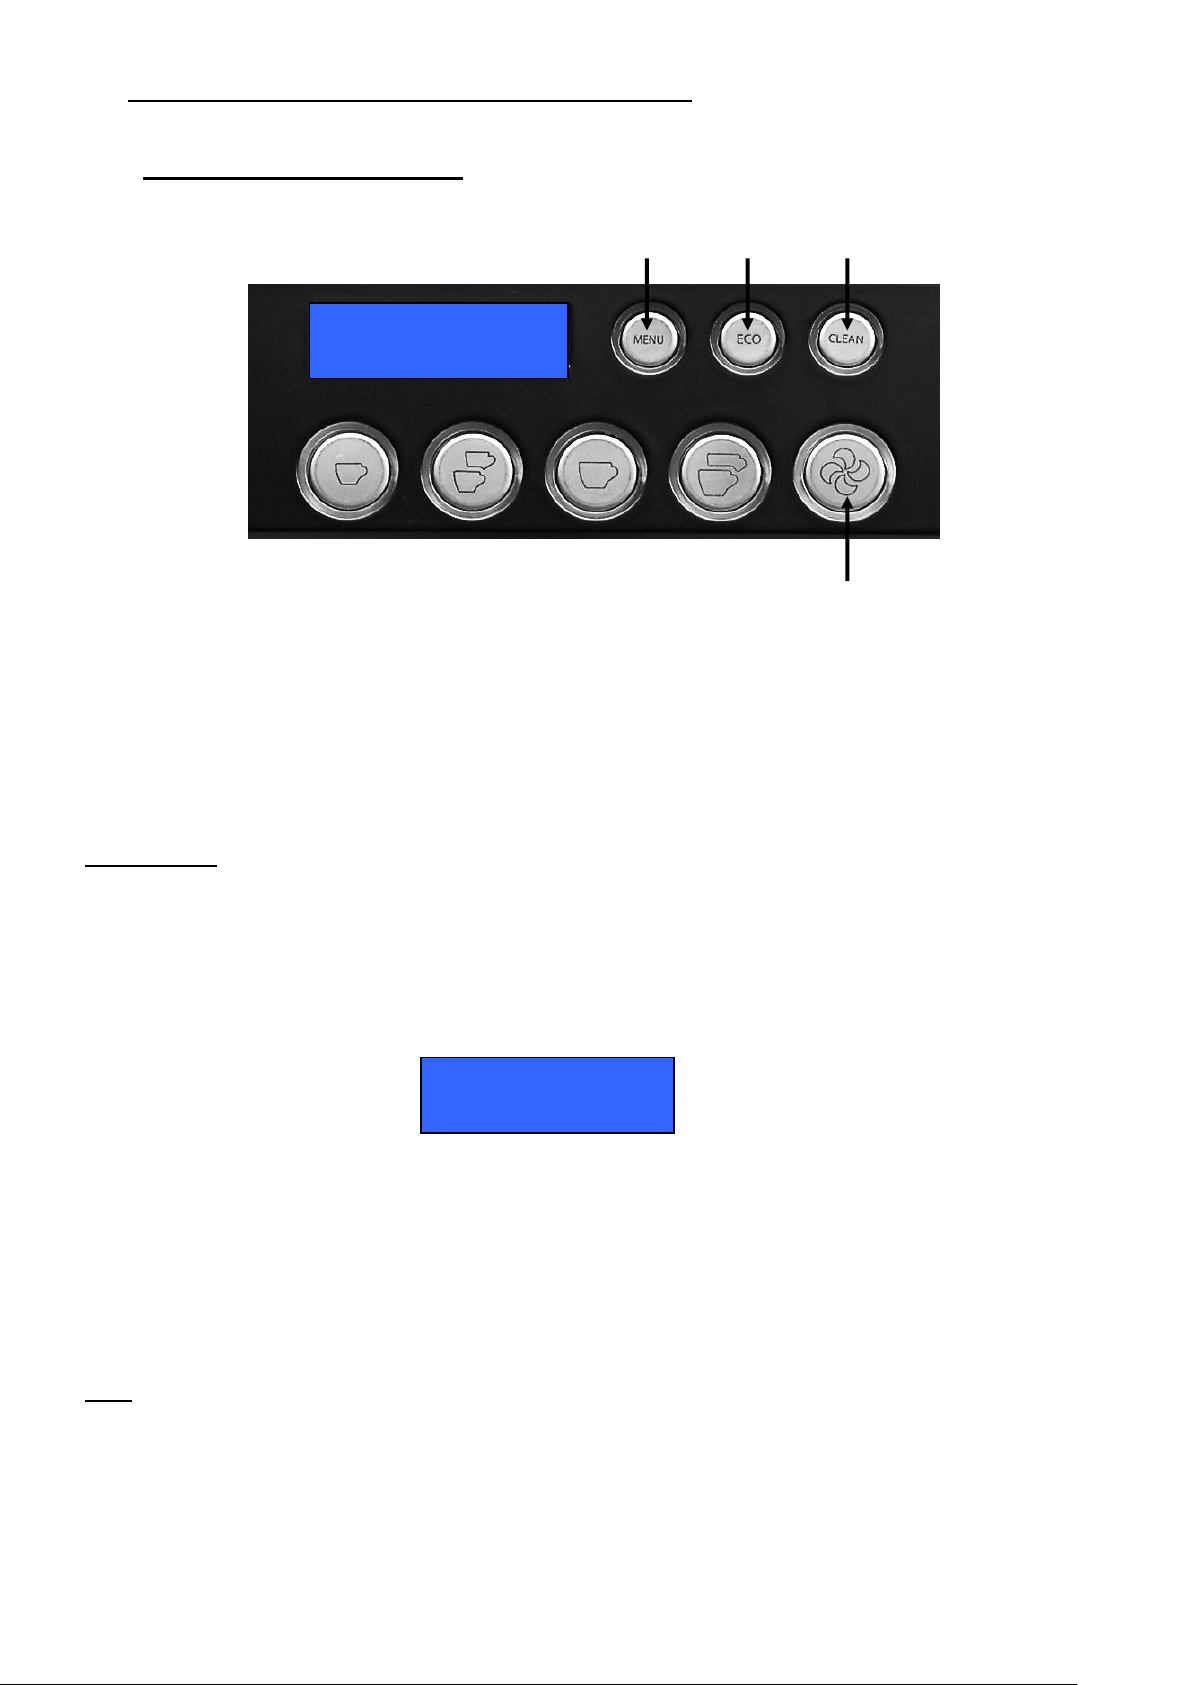
9 PROGRAMMING DOSES METHODOLOGY
Doses setting
XX s YY ml
95°C
9.1 Coffee doses programming:
MENU/ENTER - +
Esc
2 ways of programming are possible to set the coffee dose.
Choose 1st group (on the left when the user is in front of the machine)
o To program all groups at the same time with the same value.
o The programmed key will have its equivalent key programmed identically on the others
groups
Choose each group separately, if they the groups need to have different value.
Methodology:
Put the ground coffee (1 dose or 2 doses according to the programmed key), in the suitable filter
holder.
Press the “MENU” key: the display show “Coffee boiler T”
Press 2 times the “+” key: the display shows “Doses setting”
Press the “MENU” key: the display shows:
The button to be programmed are not lighting.
Press the key to be programmed to start the flow, and press again when water quantity is correct.
The value is directly registered
The programmed key remains On
Then, keep programming the next key, and so on for the others keys.
Note : On the factory, each machine undergoes a test protocol on which a program has already been
completed, according to the following settings:
1 espresso = 2,5 cl / 2 espressos = 5 cl / 1 coffee = 4,5 cl / 2 coffee = 9 cl
MONTE-CARLO - 11/2015 - SOFT V 2.11 16
Page 17
9.2 Hot water dose programming:
Doses setting
XX s YY ml
«Hot water» key «Hot water» key
Methodology:
One programming dose is available for each outlet:
Press key the coffee “MENU” from the group nearest the outlet to be programmed.
the display show “Coffee boiler T”
Press 2 times the “+” key: the display shows “Doses setting”
Press the “MENU” key: the display shows:
Push hot water key to start the flow, and push again when the water volume is correct.
The timing key is registered.
MONTE-CARLO - 11/2015 - SOFT V 2.11 17
Page 18
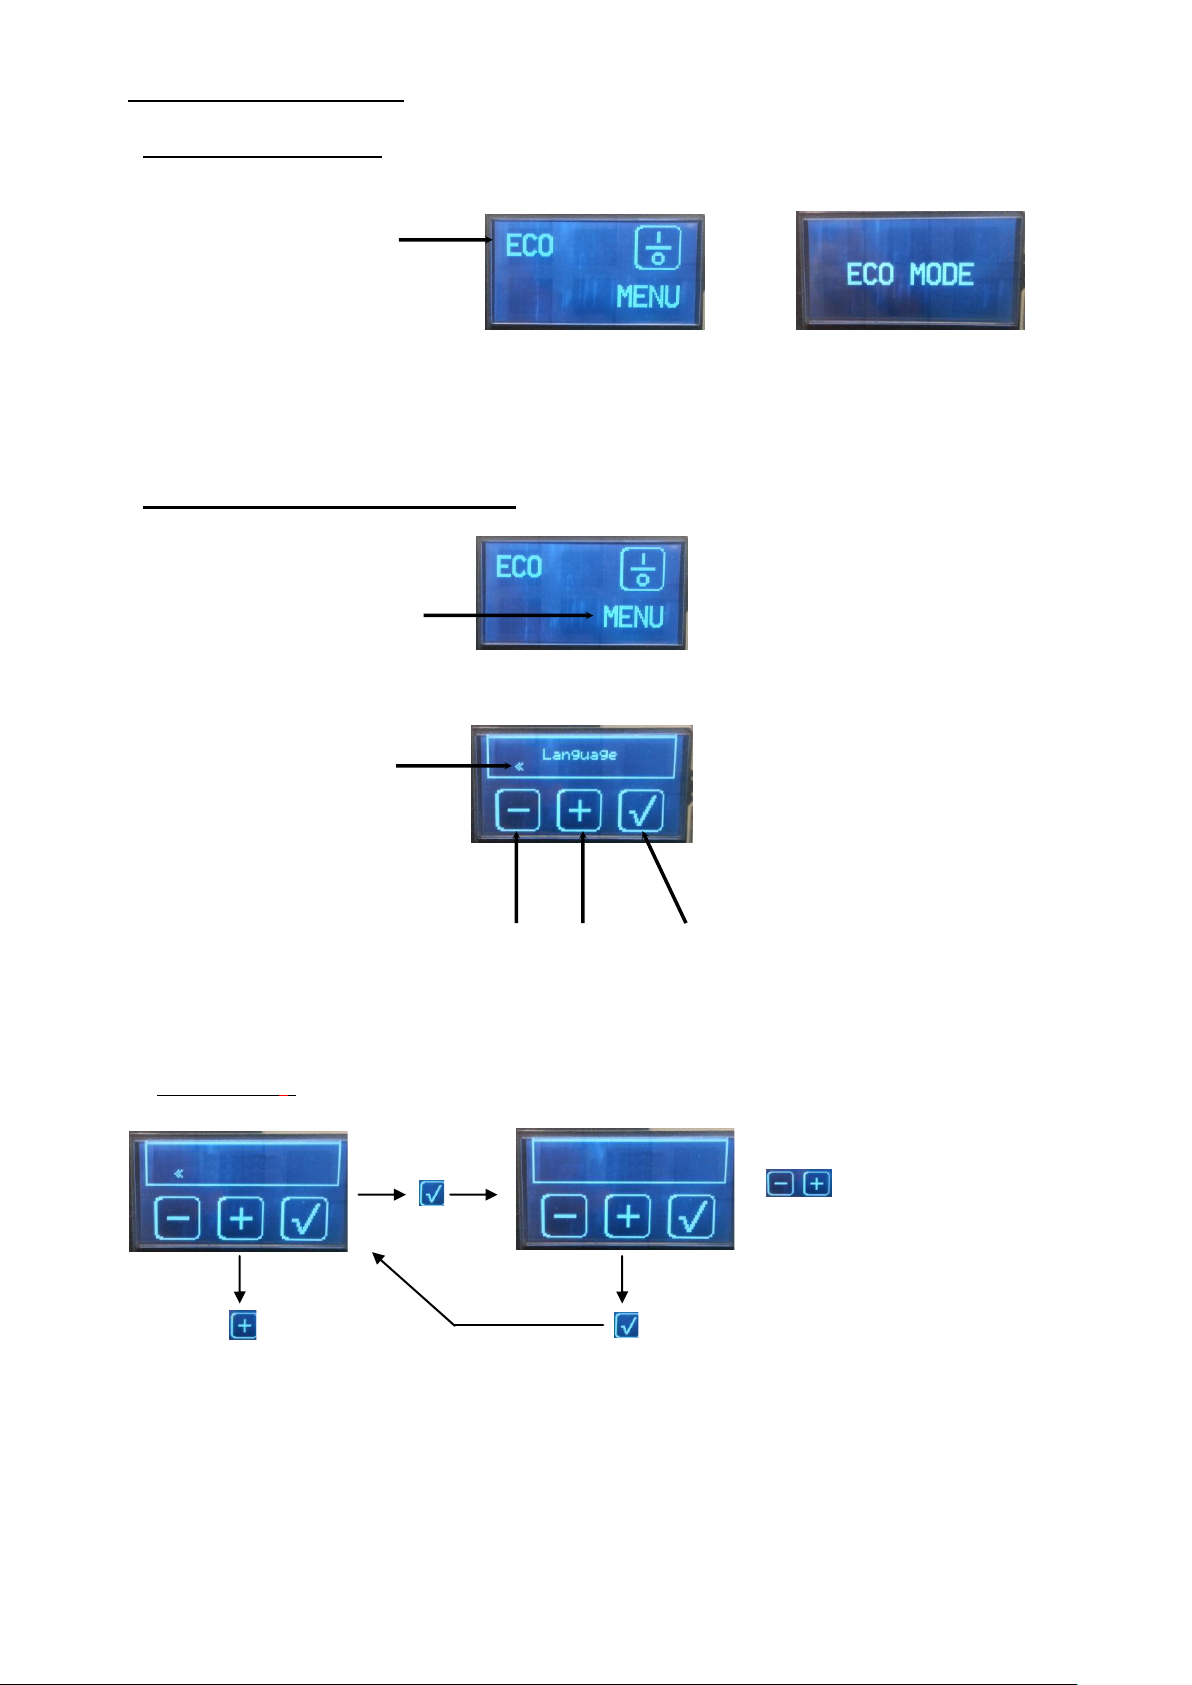
10 GENERAL DISPLAY:
Press the menu button
for 5 seconds
- + ENTER
Esc.
To change the language
Press the eco button
for eco mode
Language
Language
English
To validate
Next step
First step
10.1 ECO MODE (general)
The entire machine goes in eco mode. The steam boiler is maintened at 60°C.
Products can’t be extracted.
To come back on the main menu, press "where you want" on the display during 3 seconds.
10.2 Programming on general display
If a password is not entered, the steps available are only those marked with: (*)
To access to the complete menu, go to the last step “Password” and enter the good password
10.2.1 Language (*)
Available languages : French / English / Italian / Spanish / German / Portuguese
MONTE-CARLO - 11/2015 - SOFT V 2.11 18
Page 19
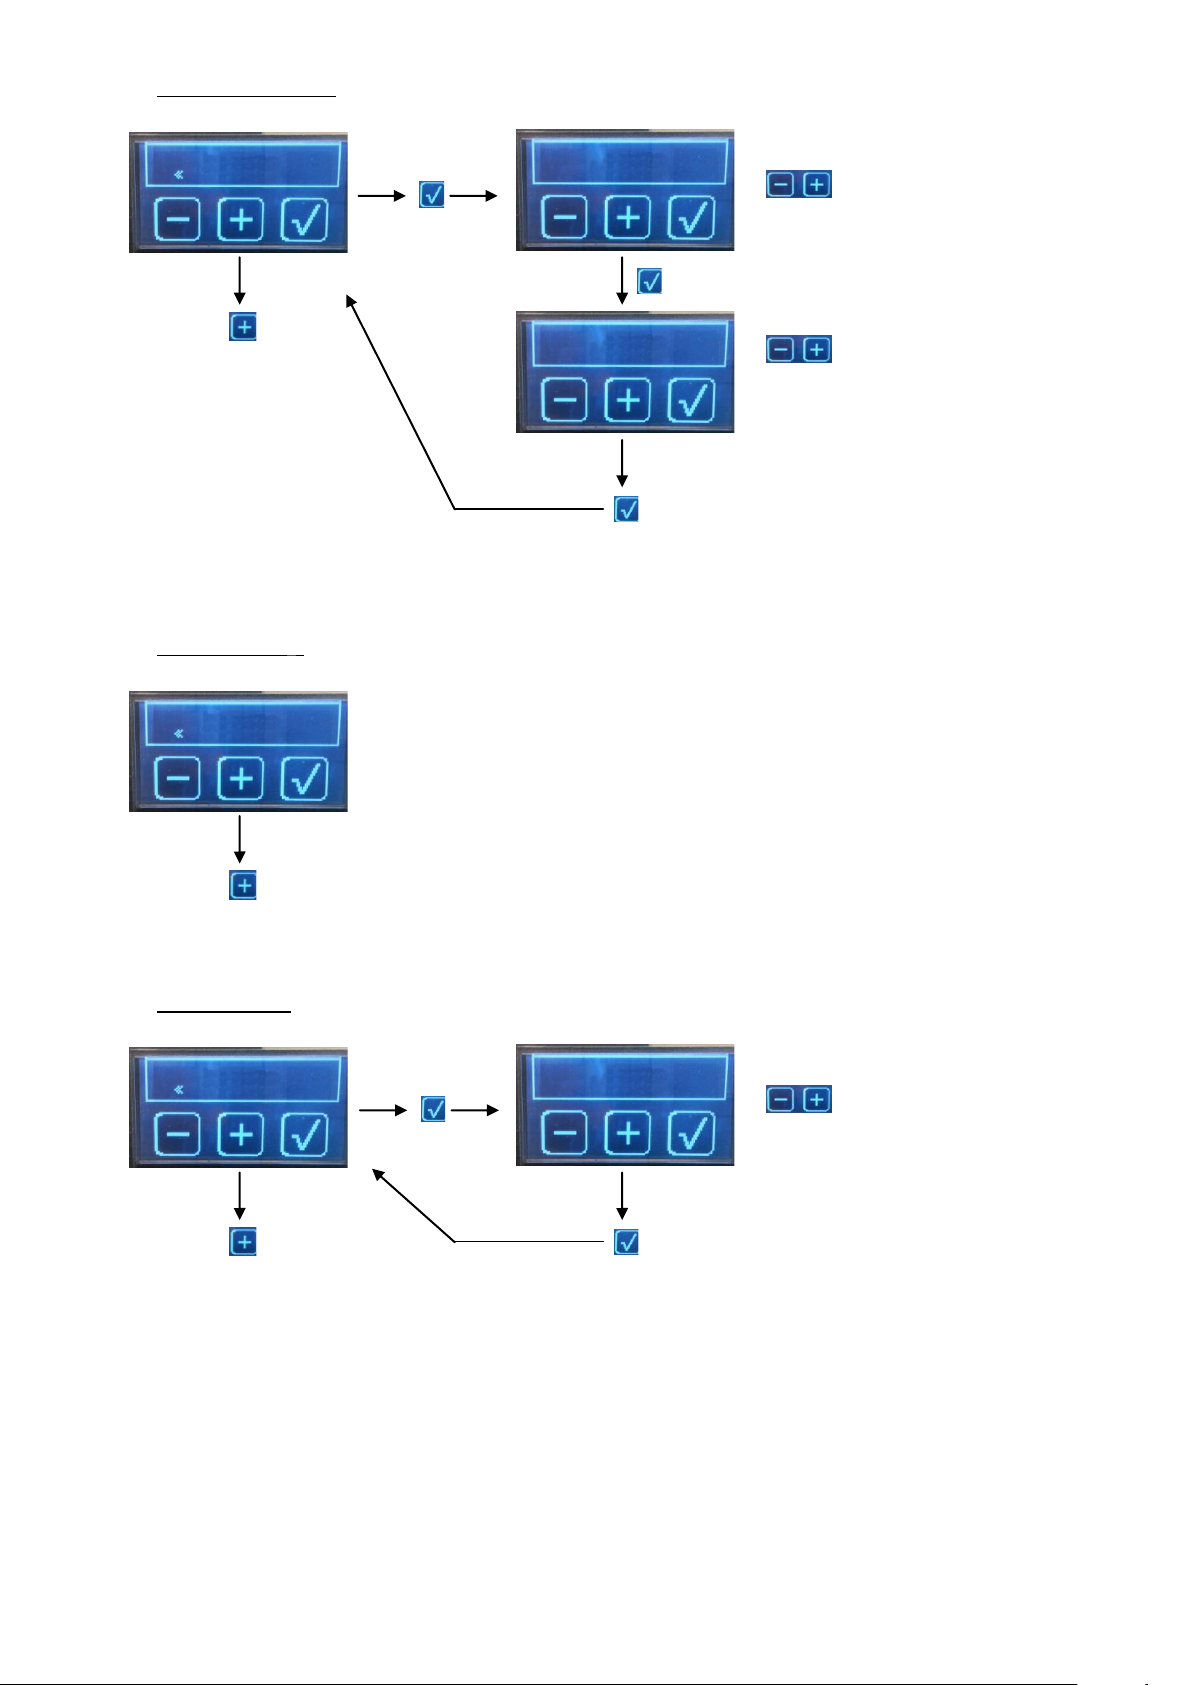
10.2.2 Machine Version
To select the group
2 or 3 group
Machine version
N. group
2
To validate
Next step
Machine version
Coffee
To validate
To select
Coffee / steam control
First install
Next step
See chapter : First installation
To select the value
Range: 1 to 6
Boiler Power
Boiler Power
2
To validate
Next step
This is to configure the machine in 2 or 3 groups and in coffee or steam control model.
10.2.3 First install (*)
10.2.4 Power boiler
This step is to define the maximum power supply available for the machine.
Exemple: 2 Max 22 Amp.(see chapter power management)
MONTE-CARLO - 11/2015 - SOFT V 2.11 19
Page 20
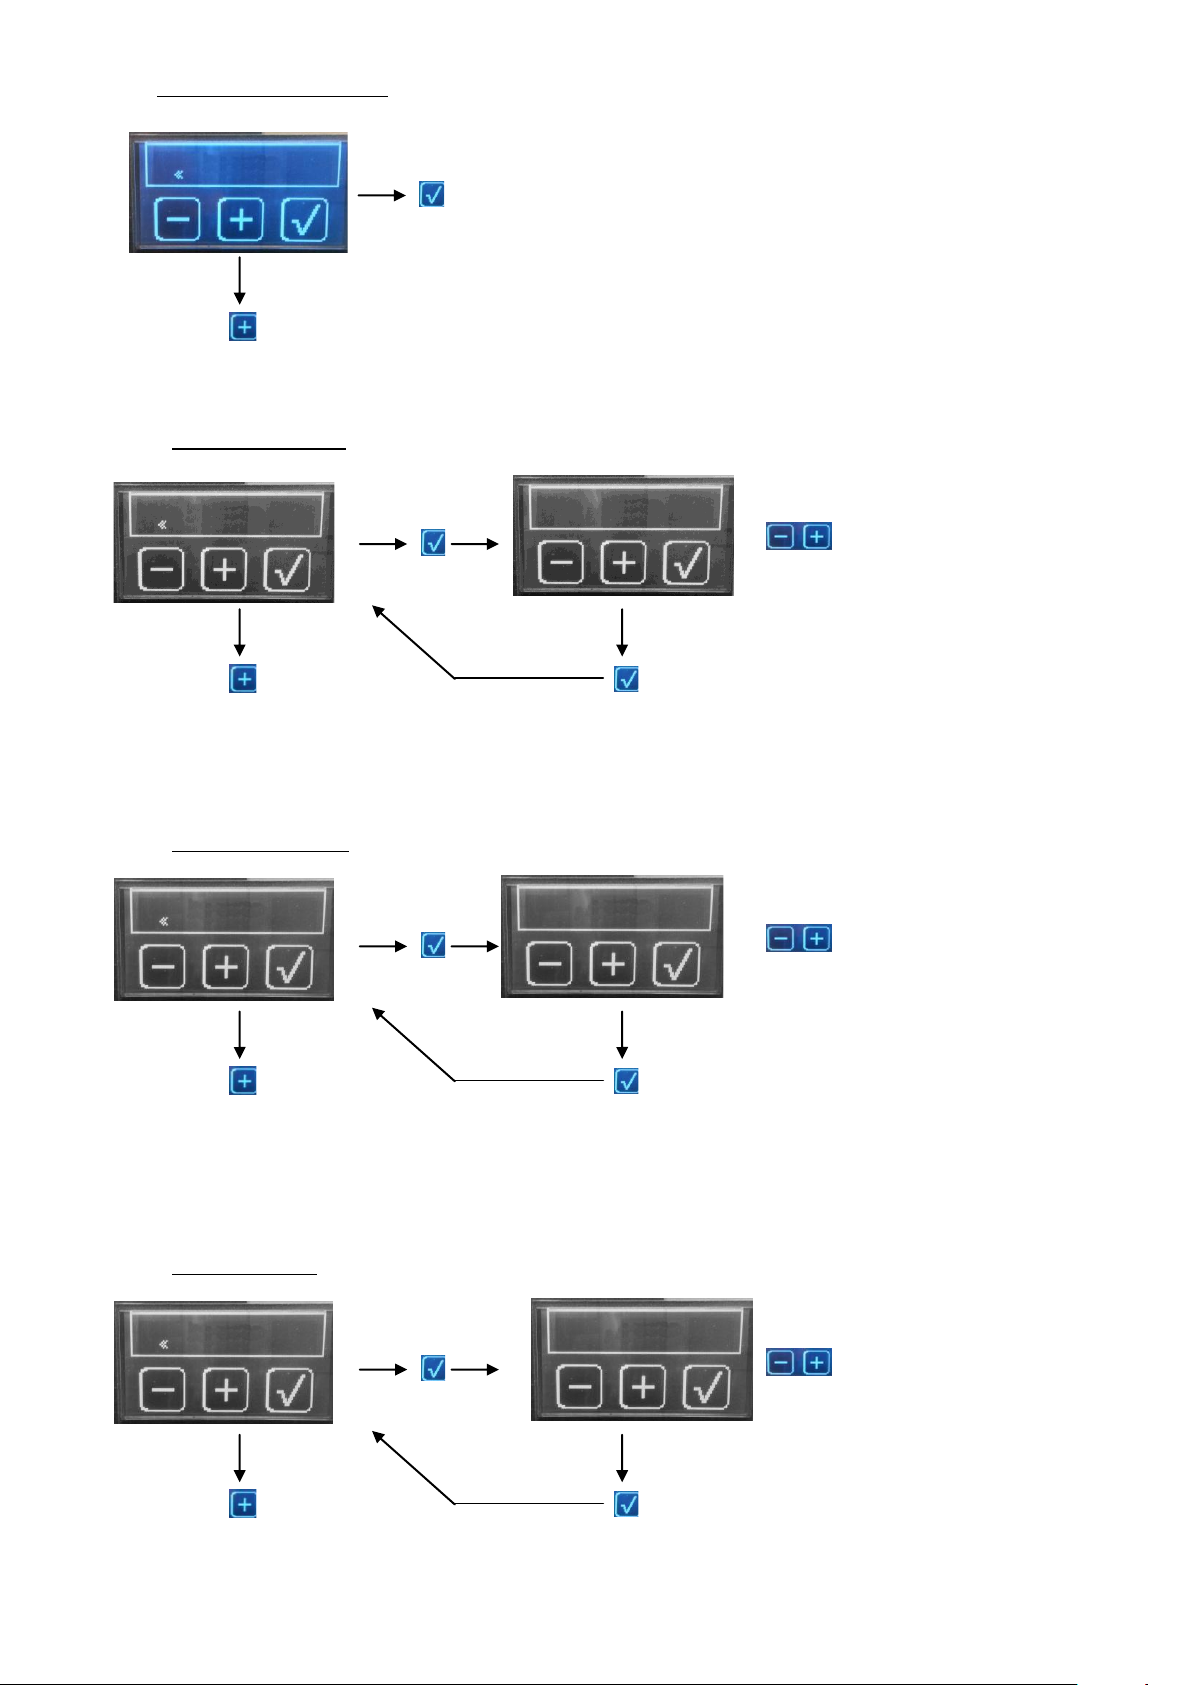
10.2.5 Technical parameters
Technical Par
Next step
To access to the following sub menu
The display backlighting change on the reverse mode
To select
Range: °C / °F
Unit of measure
Temperature
°C
To validate
Next step
To select
With pump / without pump
Boiler filling up
Boiler filling up
With pump
To validate
Next step
To select
Range: MIN / MID / MAX
Probe Sensitivity
Probe Sensitivity
Mid
To validate
Next step
10.2.5.1 Unit of measurment
This step allows choosing the unit of temperature °C / °F for the machine.
10.2.5.2 Filling up with pump
This step allows the machine to fill the tanker with or without the pump.
In case of “kit solo” system the machine need to be adjusted with a filling up with pump.
10.2.5.3 Probe sensitivity
MONTE-CARLO - 11/2015 - SOFT V 2.11 20
Page 21
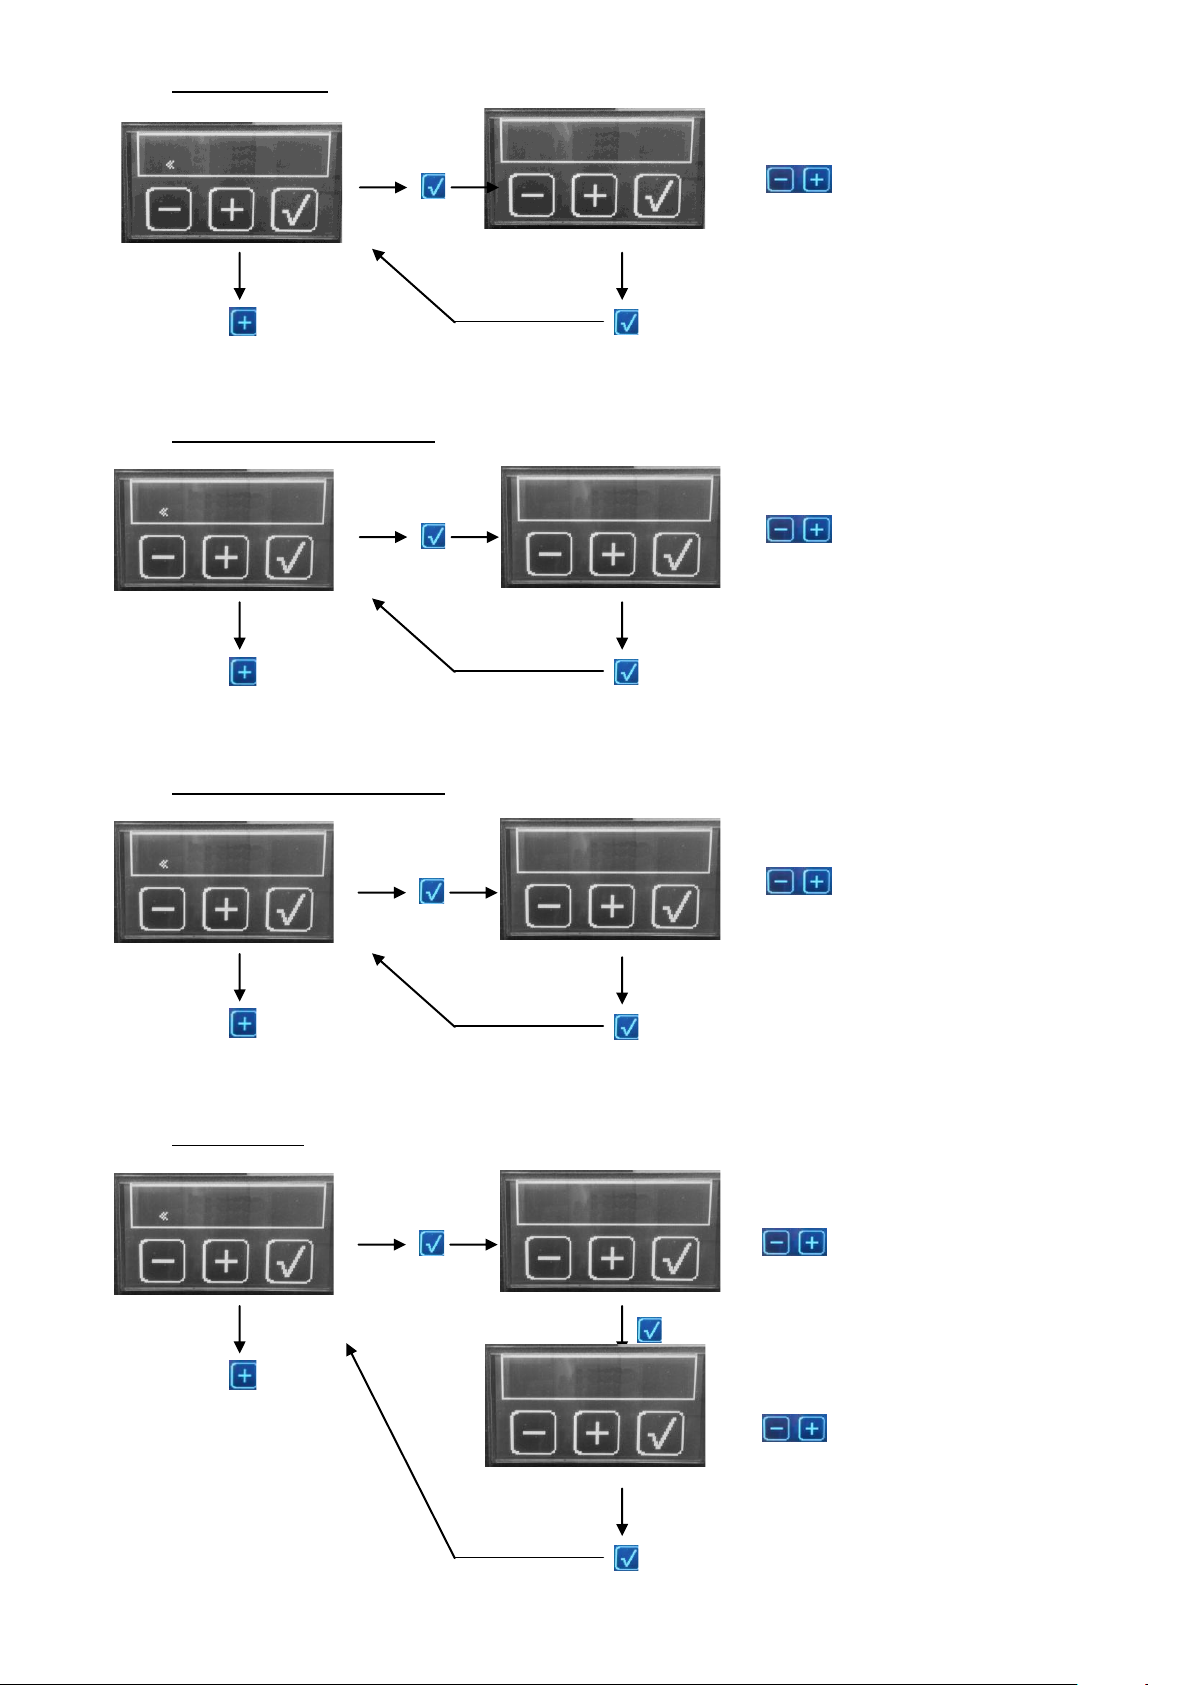
10.2.5.4 Filling up time out
To adjust the value
Range: till 360s
Filling up time out
Filling up time out
360s
To validate
Next step
To adjust the value
Range: 5 to 80 min
T. Ri C. Steam
T. Ri C. Steam
80min
To validate
Next step
To adjust the value
Range: 2 to 15 min
T. Ri C. Coffee
T. Ri C. Coffee
15min
Next step
To adjust the value for espresso
Adjustable value from 0,5 to 4,5
Quality Criteria
ESP Criteria (ml/s)
min 1,5 max 2,2
To validate
Next step
KF Criteria (ml/s)
min 2,5 max 4,5
To validate
To validate
To adjust the value for coffee
Adjustable value from 0,5 to 6
10.2.5.5 Time out steam boiler heating
10.2.5.6 Time out Coffee Boiler Heating
10.2.5.7 Quality Criteria
MONTE-CARLO - 11/2015 - SOFT V 2.11 21
Page 22
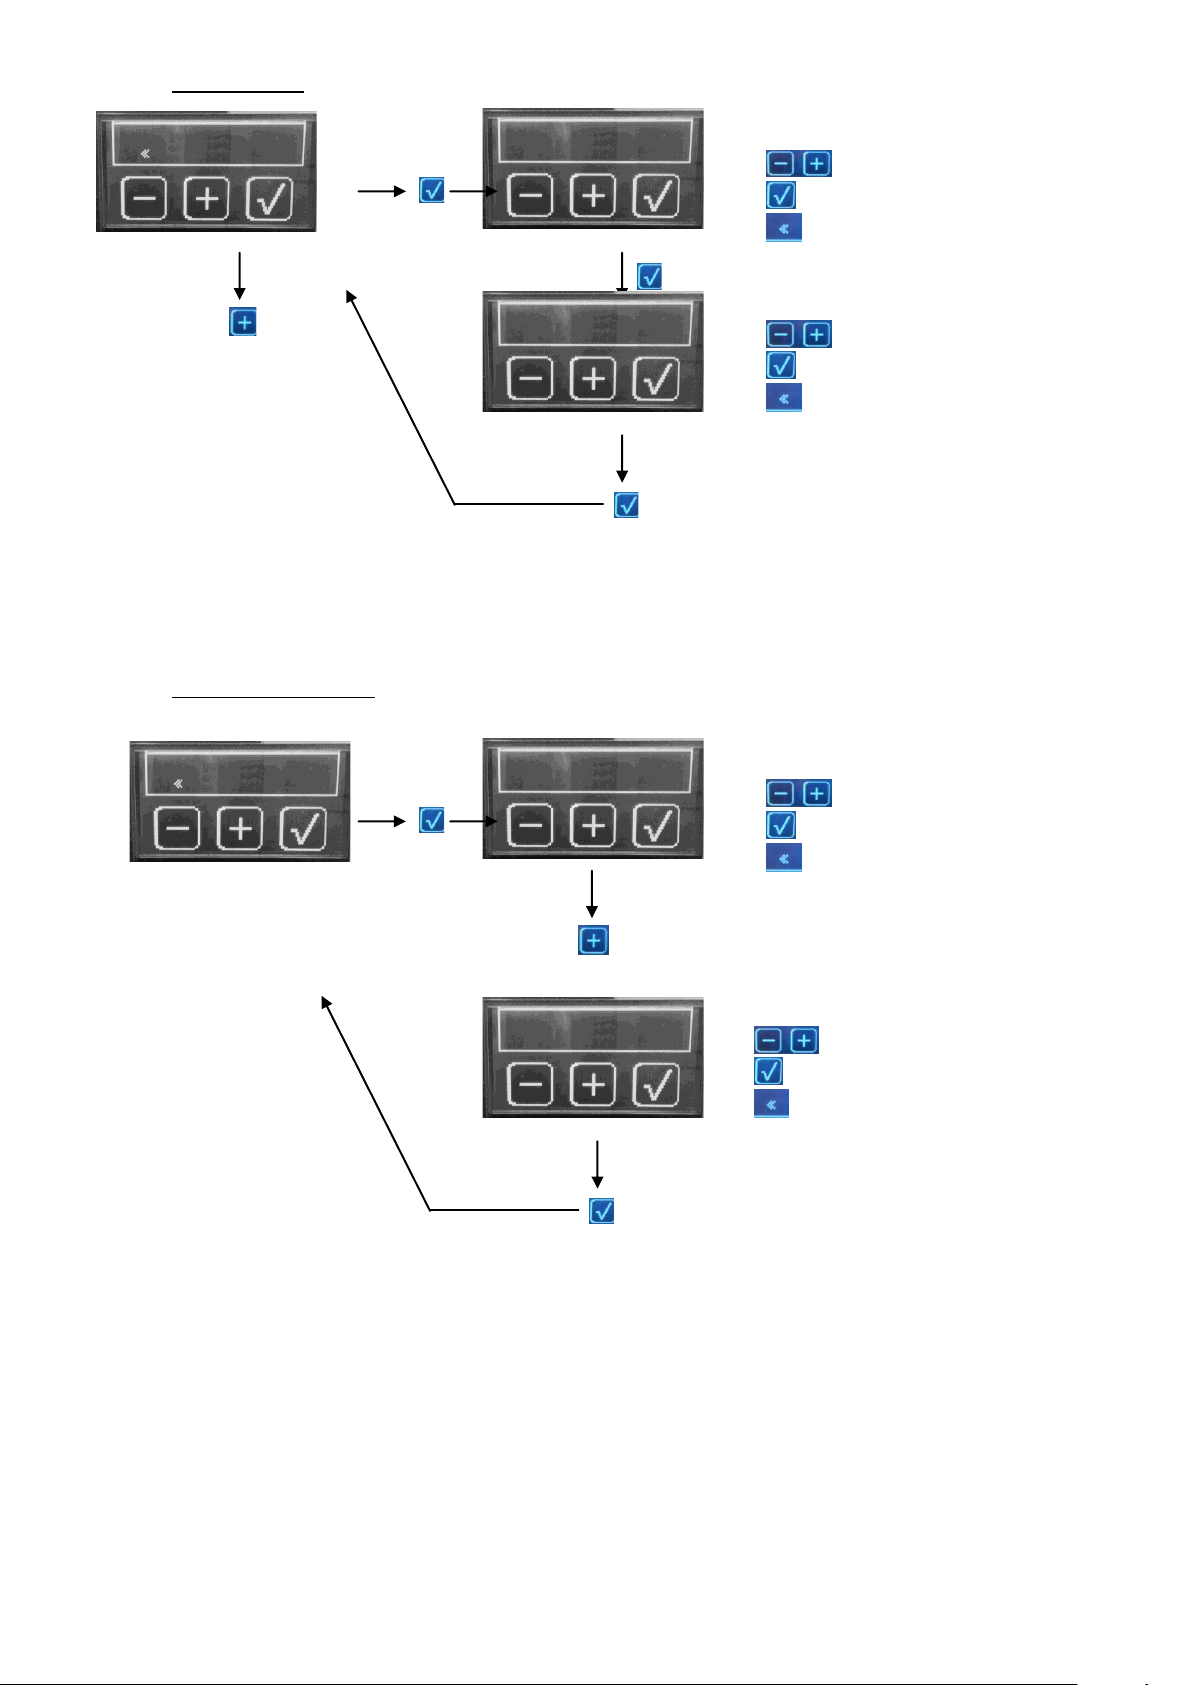
10.2.5.8 Contact details
To change the character
To move to the next character
To escape
Service
Service Name
Monte Carlo
To validate
Next step
Service Phone
To validate
To change the character
To move to the next character
To escape
To select
To validate
To escape
Prog. groups
Prog. groupes
Activated
Prog. groupes
Disactivated
To validate
To select
To validate
To escape
To change
10.2.5.9 Programmation groups
MONTE-CARLO - 11/2015 - SOFT V 2.11 22
Page 23
To select
To validate
To escape
Filters Alarm Reset
Filters Alarm Reset
NO
Filtres Reset Alarme
Yes
To validate
To select
To validate
To escape
To change
To select
To validate
To escape
Service Alarm Reset
Service Alarm Reset
NO
Service Alarm Reset
YES
To validate
To select
To validate
To escape
To change
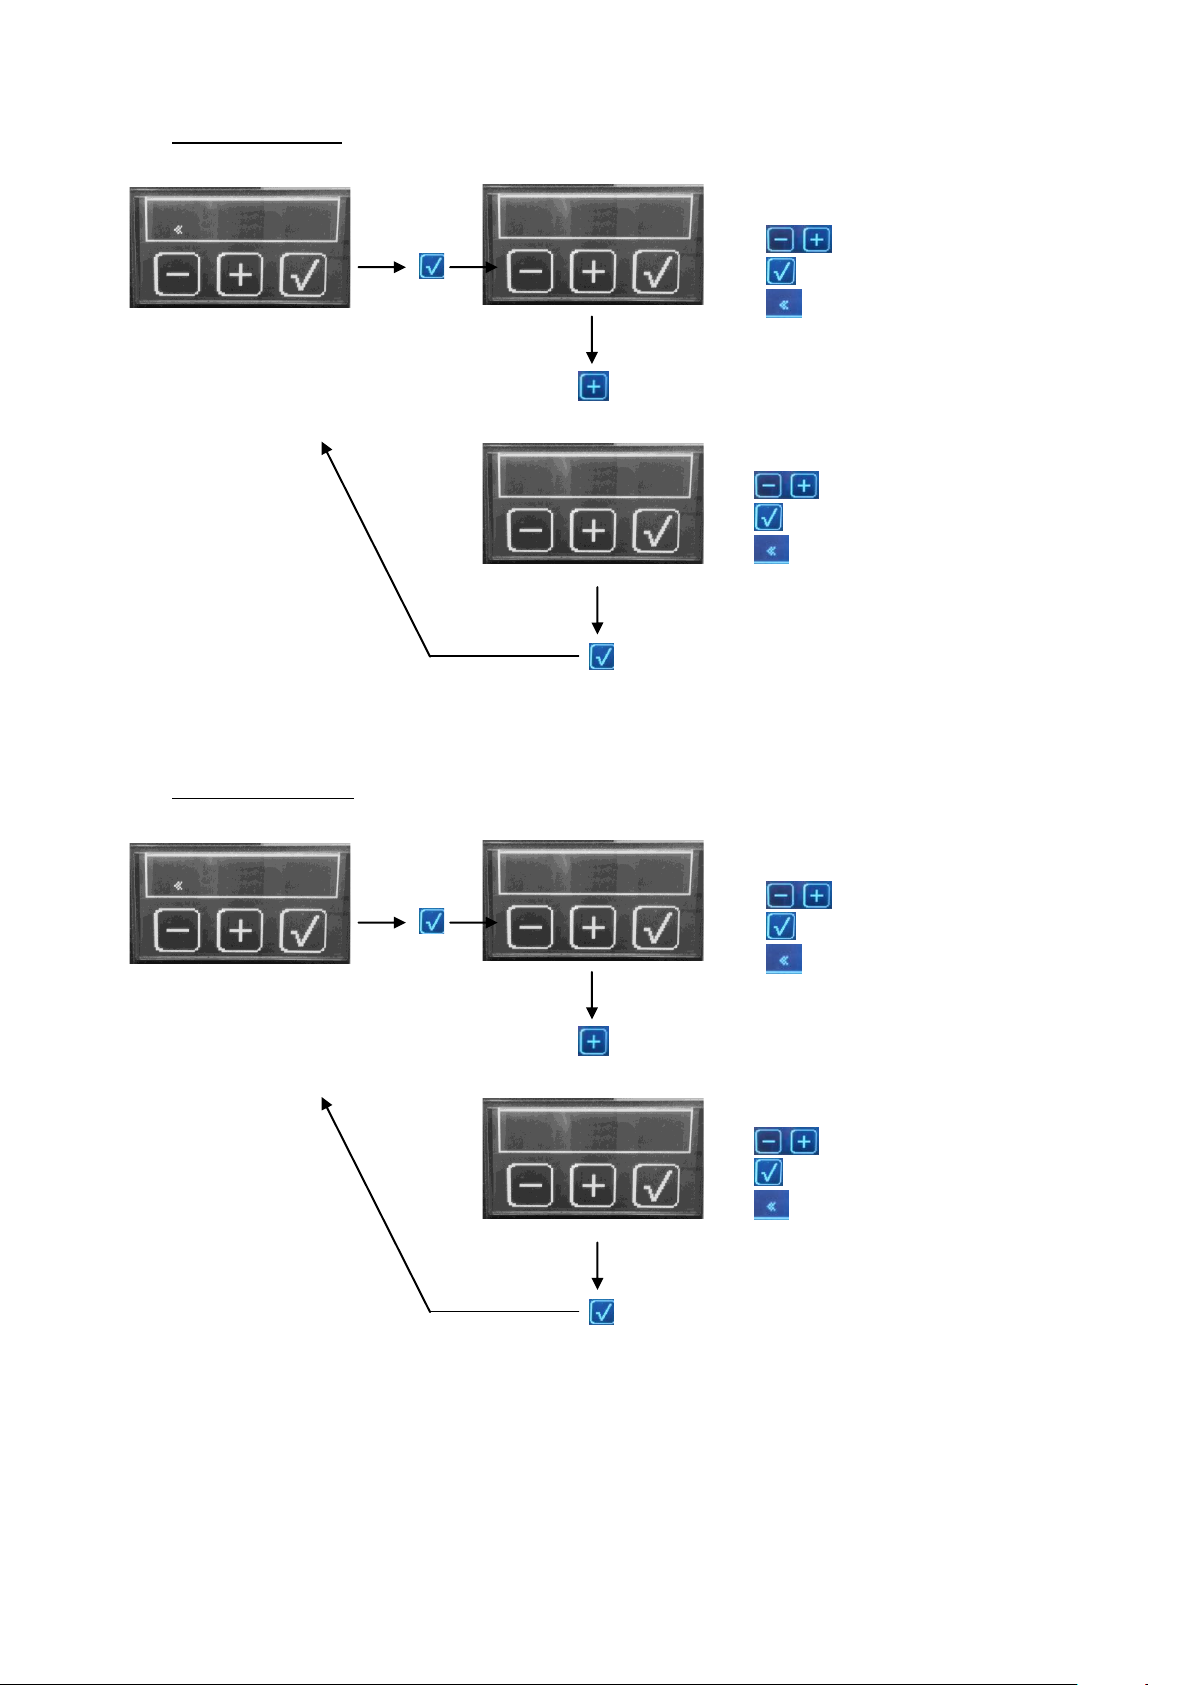
10.2.5.10 Filters Alarm Reset
10.2.5.11 Service Alarm Reset
MONTE-CARLO - 11/2015 - SOFT V 2.11 23
Page 24
Unit of measure
Next step
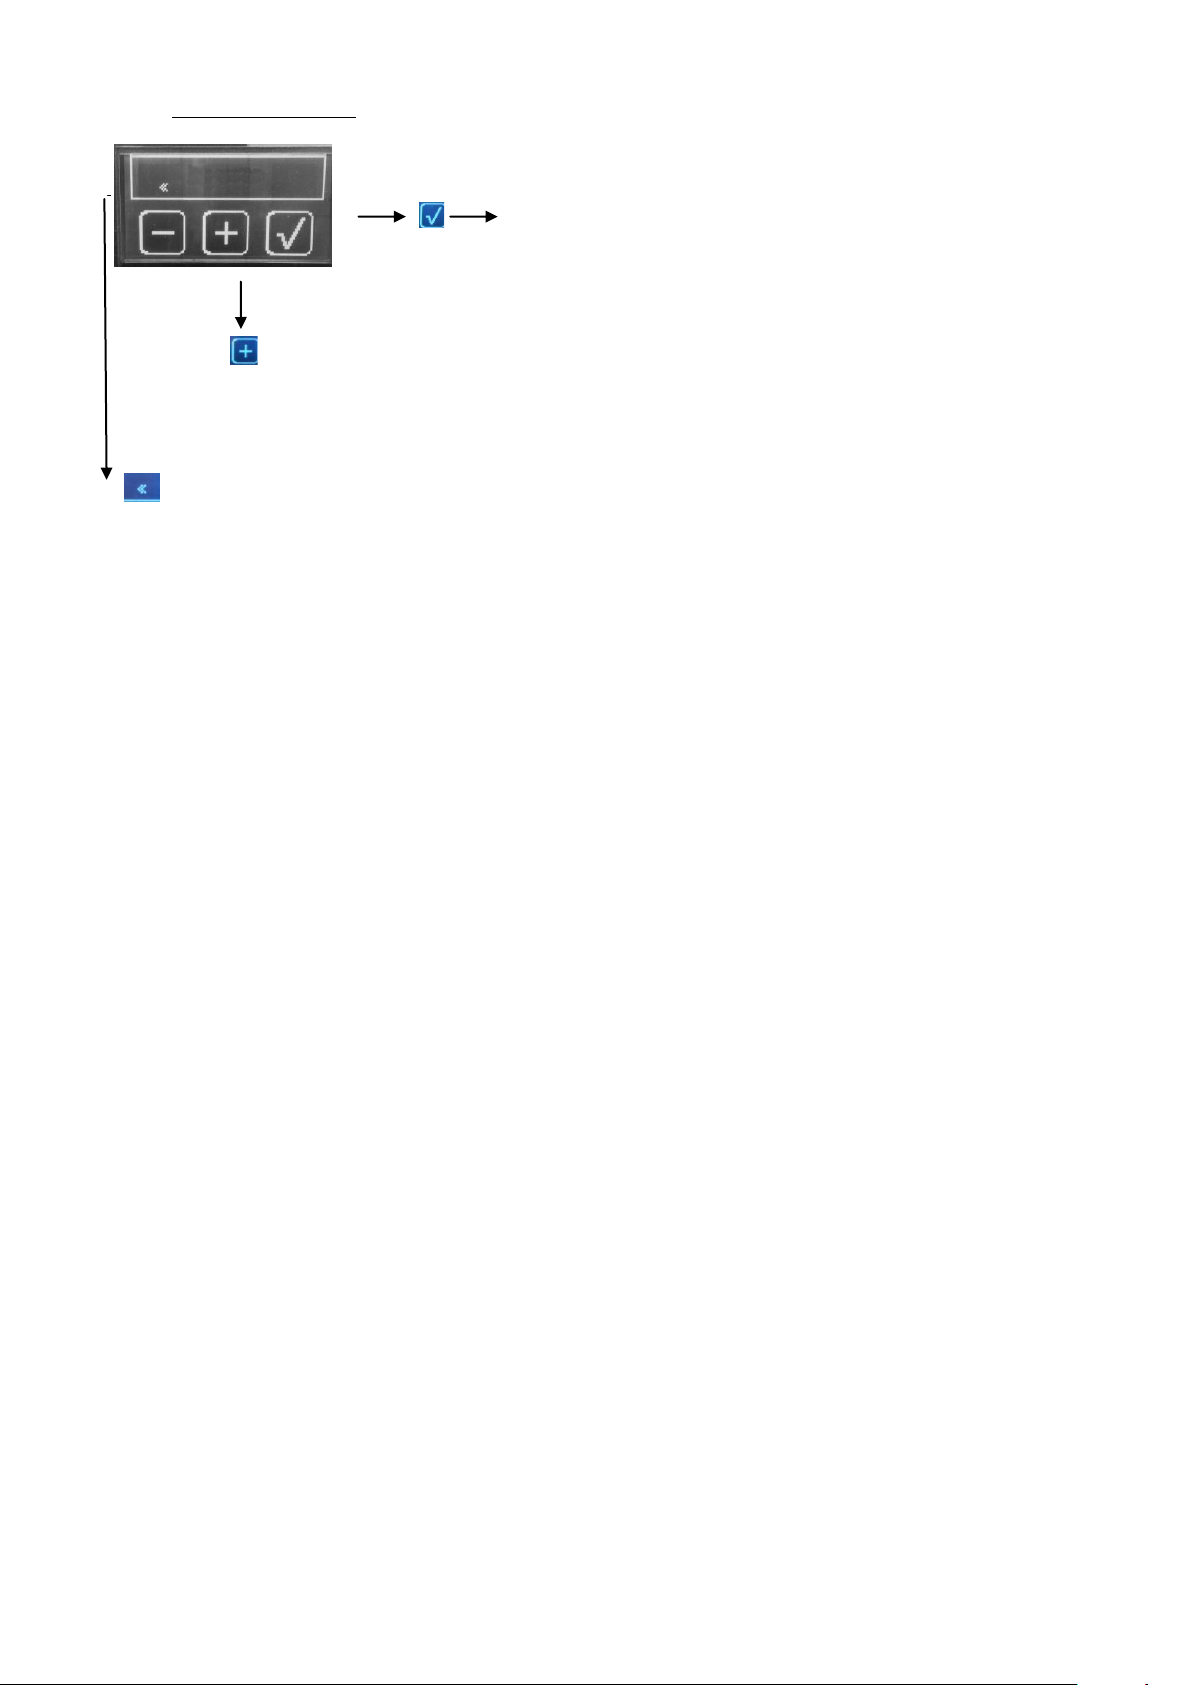
10.2.5.12 Unit of measurments
To escape
MONTE-CARLO - 11/2015 - SOFT V 2.11 24
Page 25
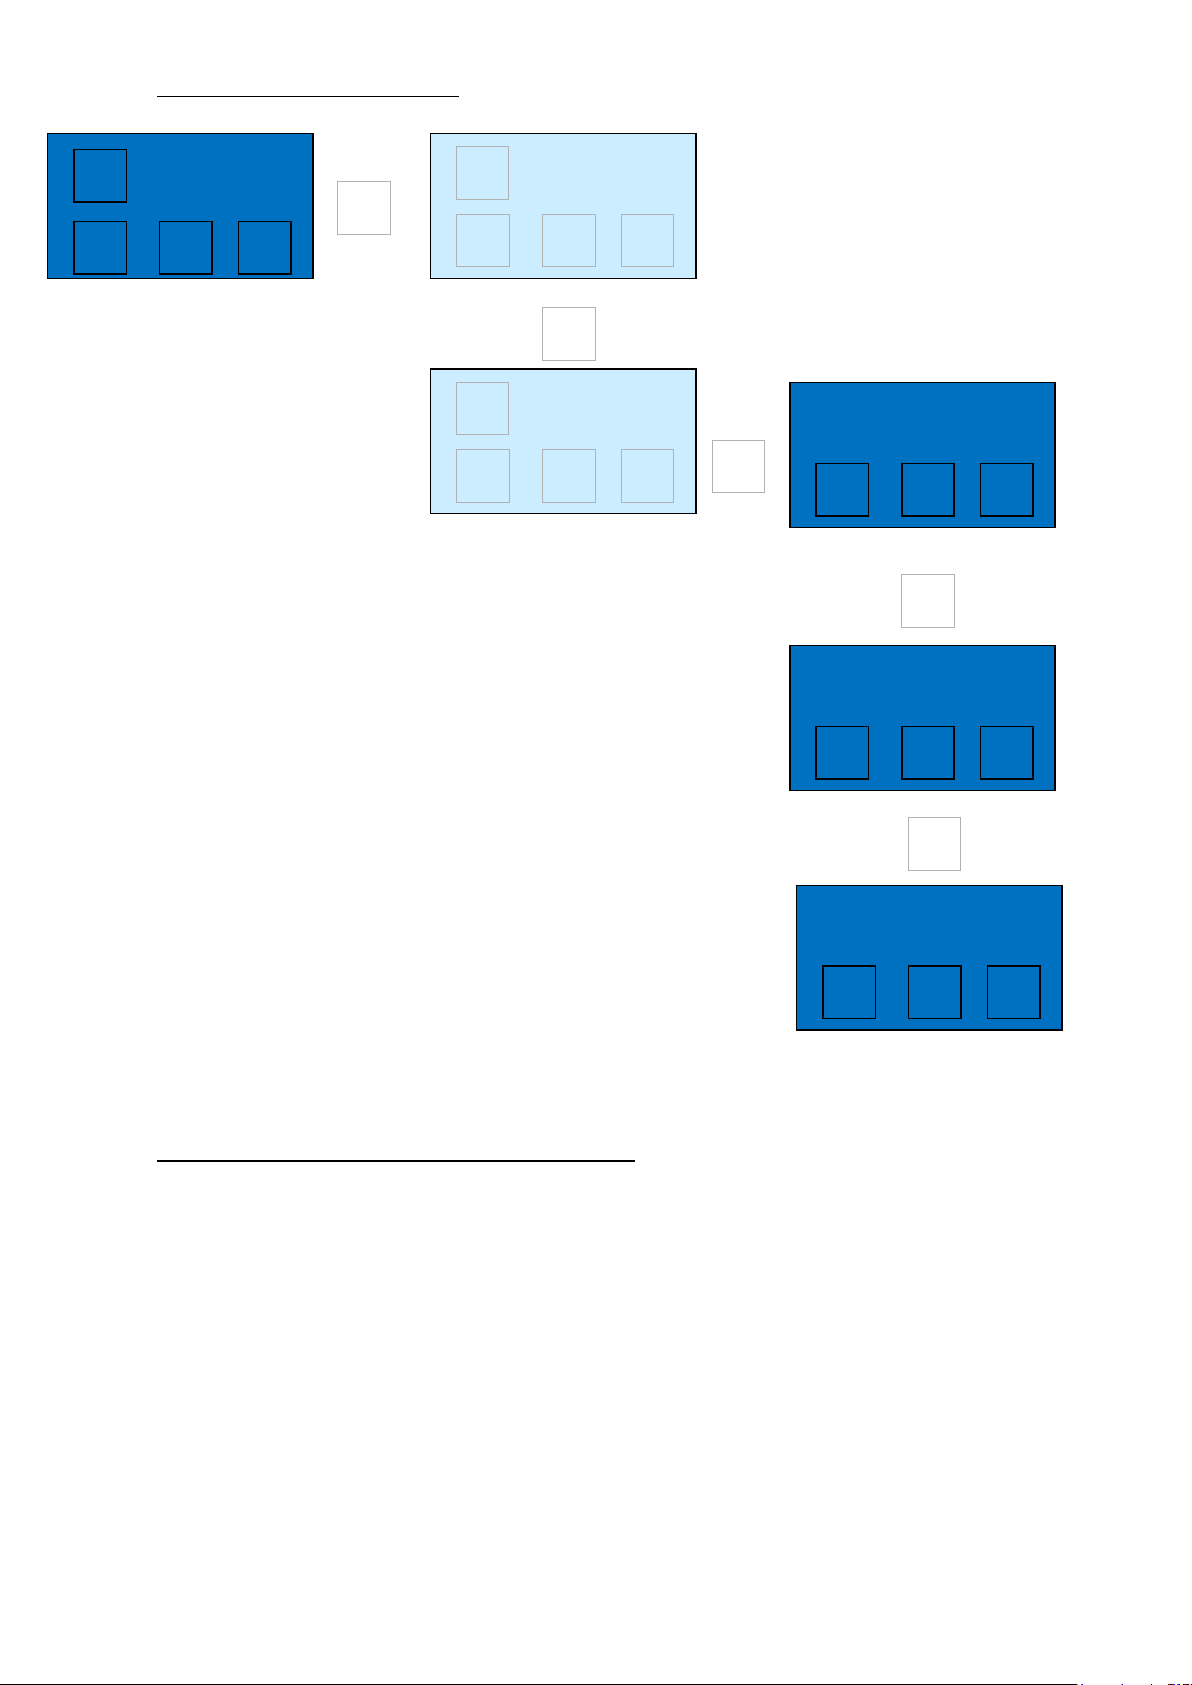
Extraction
display
«
- + √
10.2.6 Viewing (Ex : Temp.Display)
Viewing
Time / Volume
- + √
Viewing
Time/Vol/Flow
- + √
+
+
Viewing
Quality criteria
- + √
√
√
+ ou – to change the value
Setting / Actual / Average
√ to validate
+
Temp Café
Setting
« - +
√
Viewing
Extraction
«
- + √
o (allow to change viewing type during the extraction)
Explanation of the temperature coffee displayed :
o If the value is « setting »
The temperature shown on each coffee group displays will be the Setting T° value
o If the value is « Actual»
The temperature shown on each coffee group displays will be the real temperature
inside the coffee boilers.
o If the value is « Average»
The temperature shown on each coffee group displays will be an average of the
real temperature inside the coffee boilers.
MONTE-CARLO - 11/2015 - SOFT V 2.11 25
Page 26

Explanation of the viewing type during the extraction :
2Cafés @ @
2Cafés @ @
XX s_ YYYml_ZZml/s
- - - - - -
o If the user chooses “Time / Volume” (default value) :
The viewing during the extraction is this one (@ represents cups logos)
o If the user chooses “Time / Volume / Flow”
The viewing during the extraction is this one :
ZZ ml/s is the flow in ml/s. It’s YYY on XX (on 2 digits)
If the user chooses “Quality criteria”
The viewing during the extraction is this one:
(See more explanations in chapter : coffee quality criteria displayed)
MONTE-CARLO - 11/2015 - SOFT V 2.11 26
Page 27
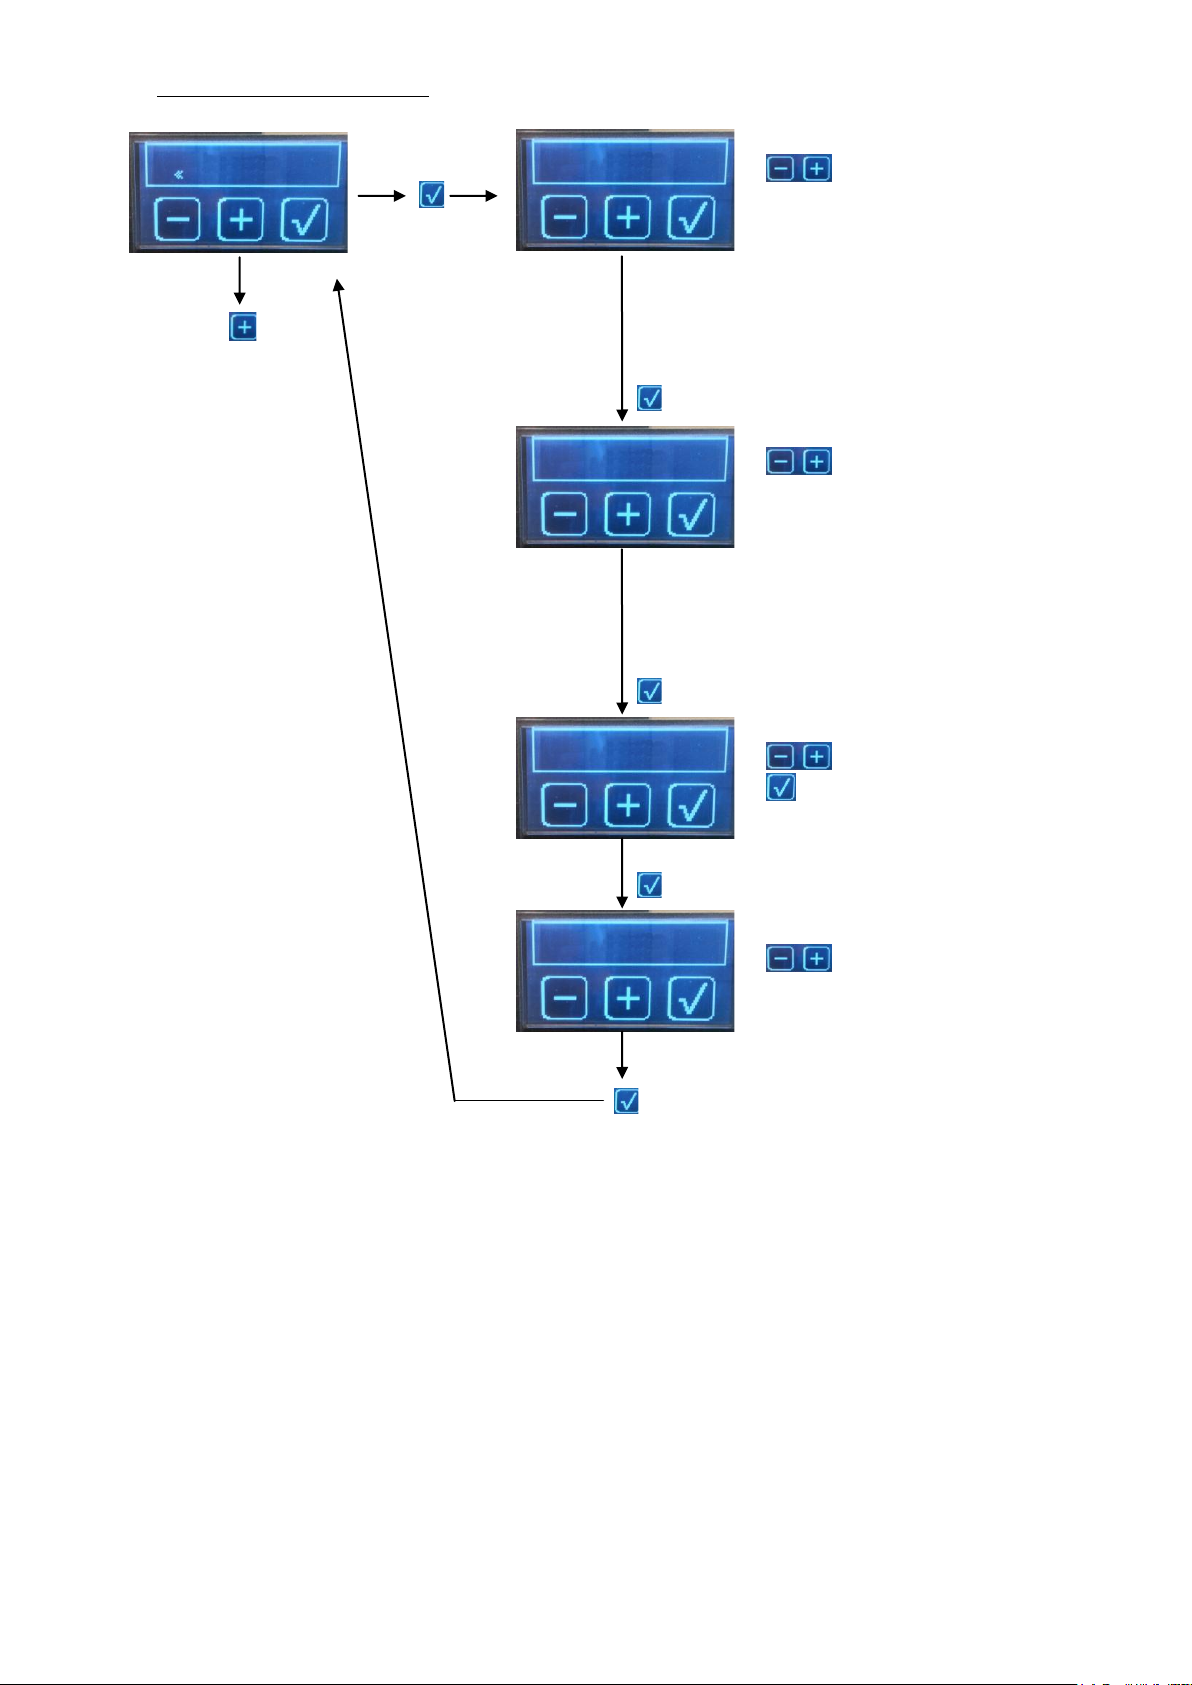
10.2.7 Coffee boiler temperature
Coffee Boiler T.
Coffee Boiler T.
95°C
To validate
Next step
PID setting
8°C
To validate
To adjust the value
Range: 2 to 15°C
To adjust the value
Range: 80 to 95 °C
(the temperature shown is the
setting T° of the left group)
(the choosen setting temperature is
validated for all the groups)
Temperature Gr
95°C
Kp Ks Kd
1 0,0 6,0
To adjust the value
To validate and proceed
For next step
To validate
To adjust the value
Range: 80 to 95 °C
(the temperature shown is the
setting T° of the left group)
(the choosen setting temperature is
validated for all the groups)
MONTE-CARLO - 11/2015 - SOFT V 2.11 27
Page 28
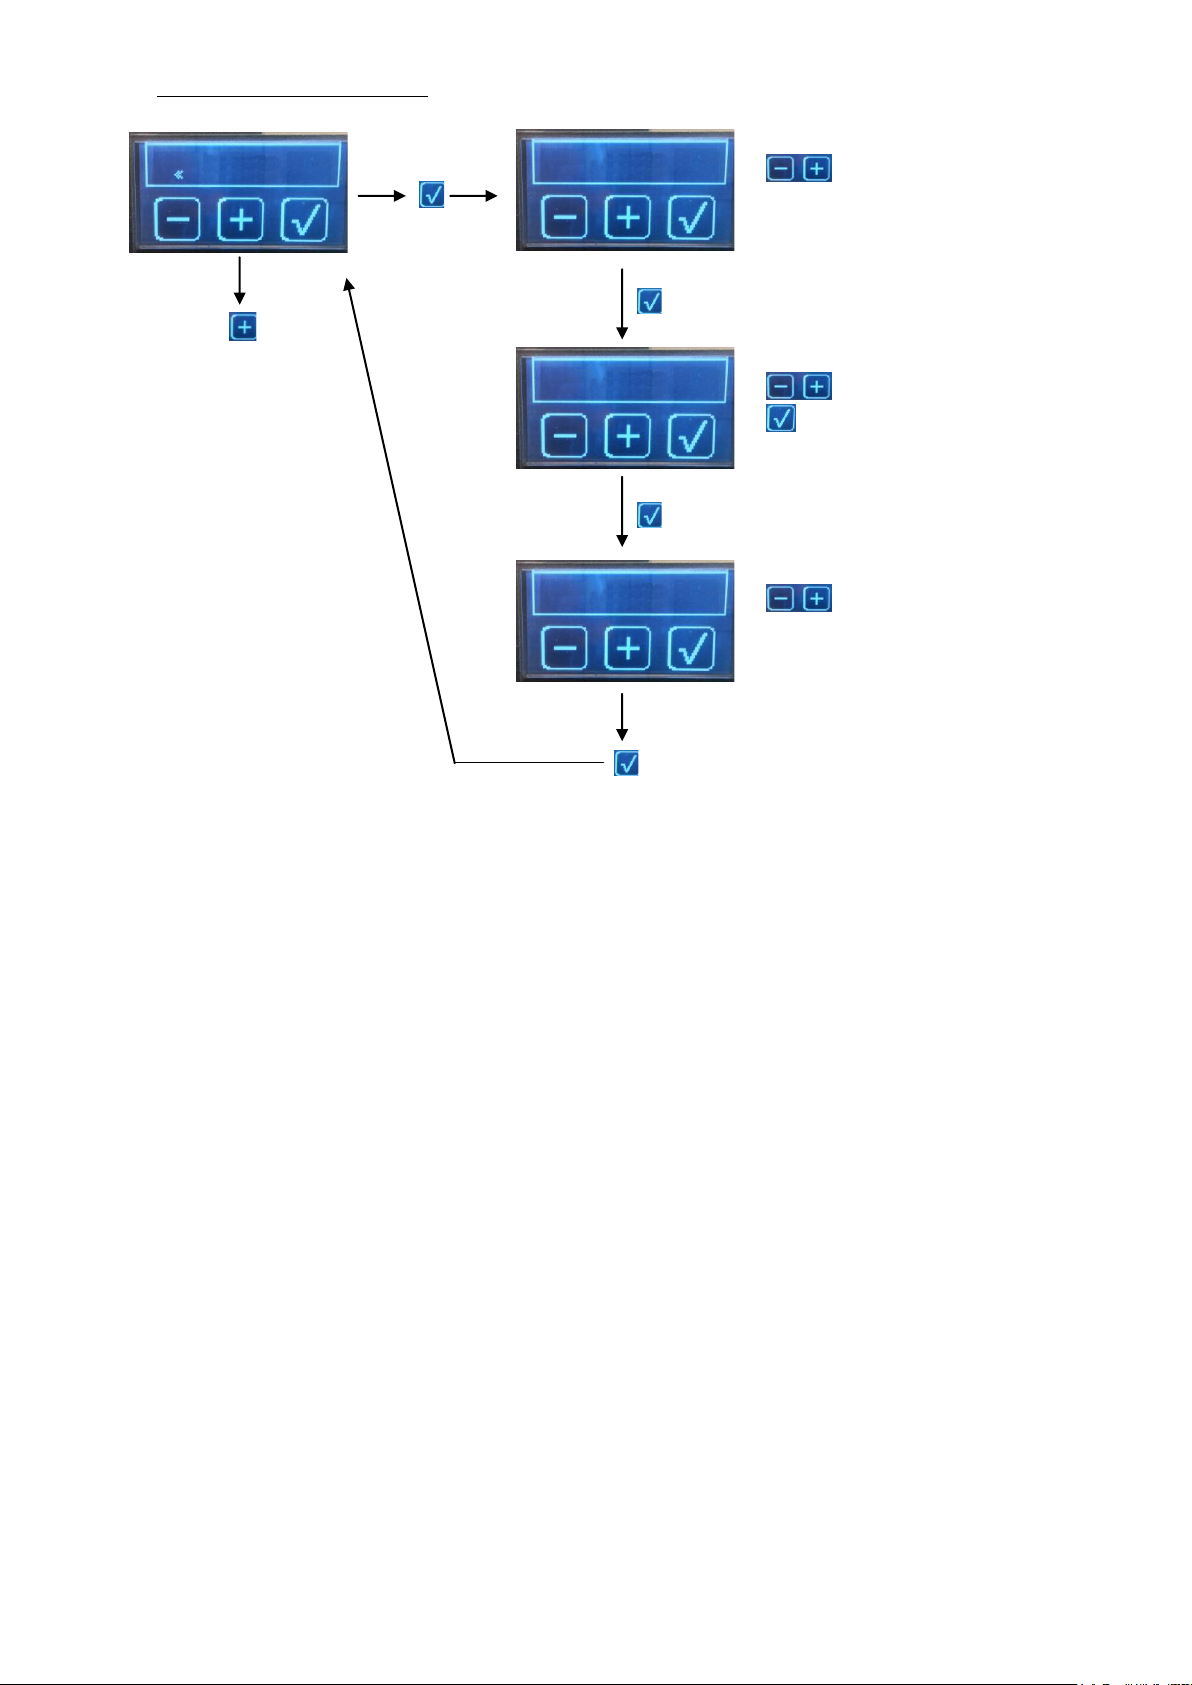
10.2.8 Steam boiler temperature
Temp. Boiler
Temp. Boiler
123°C
Next step
PID setting
5°C
To adjust the value
Range: 2 to 5°C
To adjust the value
Range: 80 to 125 °C
Kp Ks Kd
3,8 0.04 10,0
To adjust the value
To validate and proceed
For next step
To validate
To validate
MONTE-CARLO - 11/2015 - SOFT V 2.11 28
Page 29
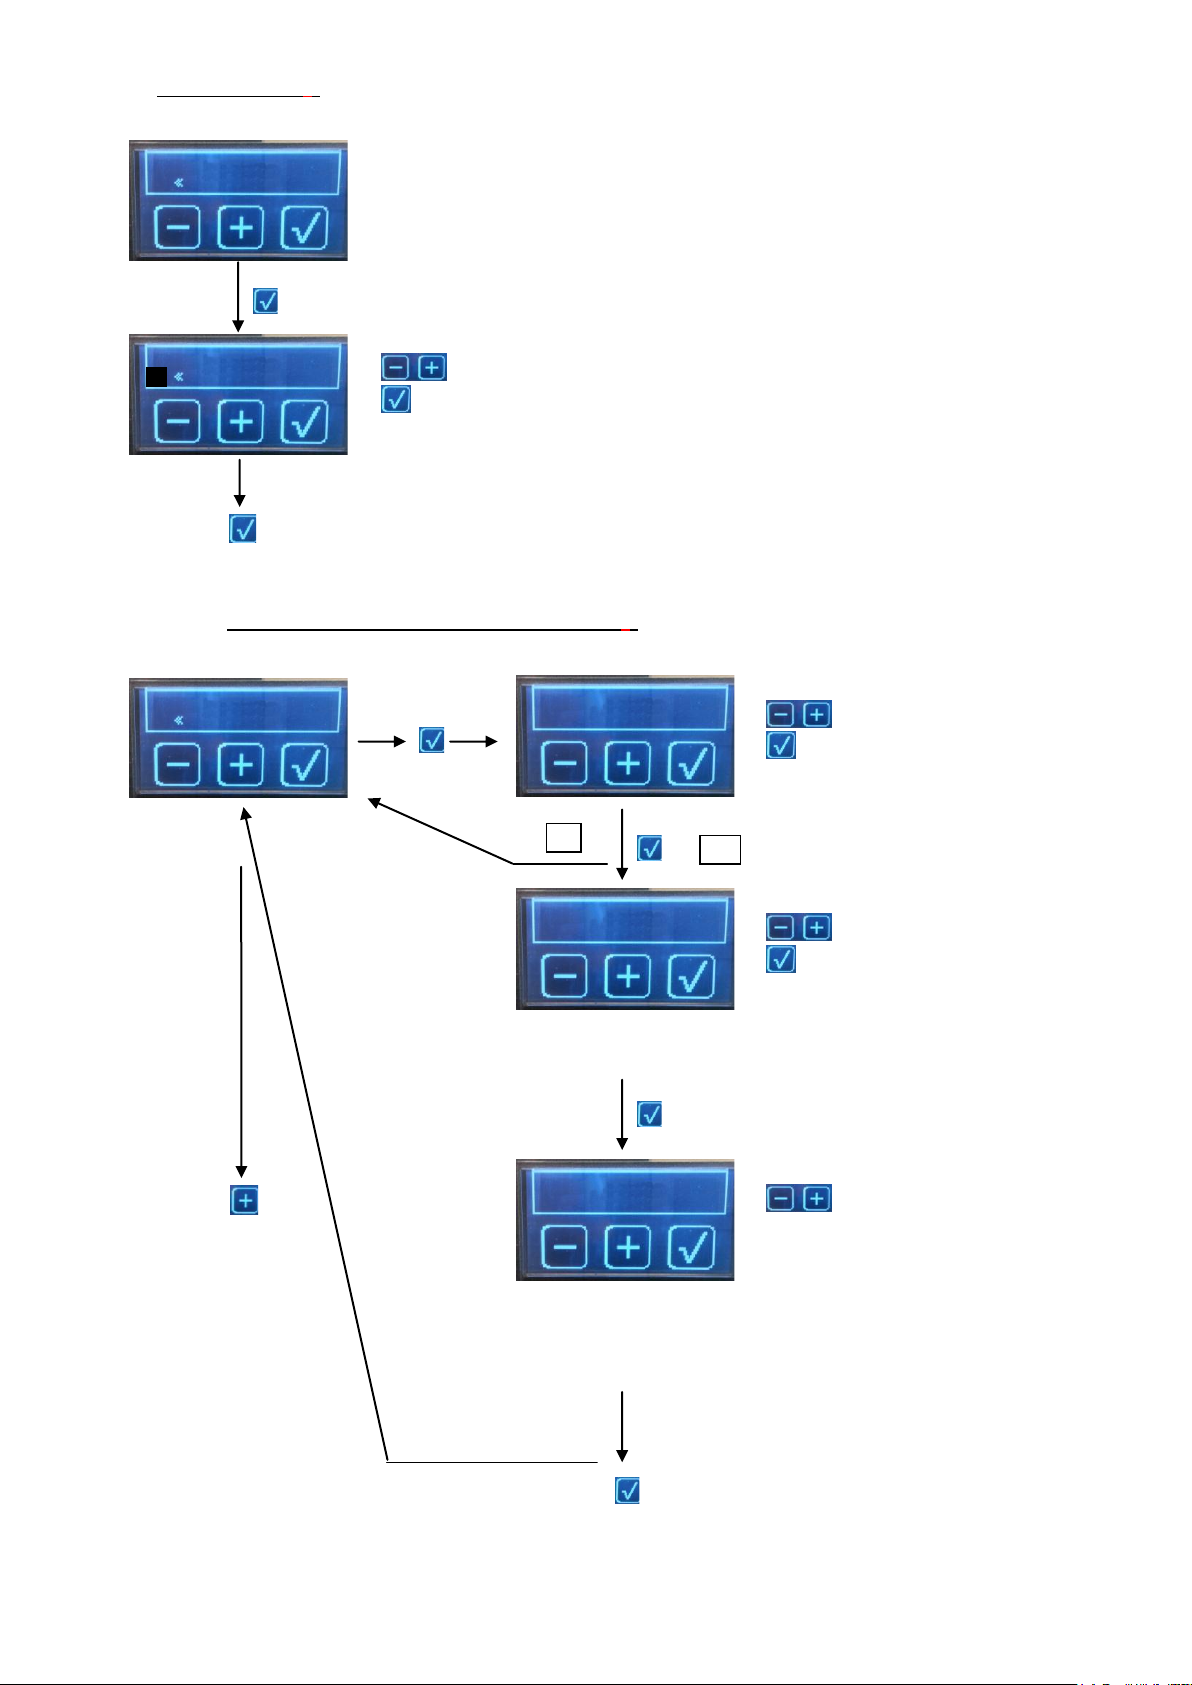
10.2.9 Clock adjust (*)
Set clock Fri
05/01/15 16:49
Next step
To adjust the value
To validate and proceed
Auto ON/OFF
Auto ON/OFF
NO
To select Yes or No
To validate
If Yes
If No
ON OFF
08:00 12H
To adjust the value
To validate and proceed
Next step
Closed ON
Sat Sun
To select the day of closure
Range: Mon to Sun
OFF
To validate
Nets step
Set clock Fri
14/02/14 16:49
10.2.10 Automatic switch ON or switch OFF (*)
ON: Time from which the machine switches ON automatically
OFF: Time during which the machine stays On
This is the day on which the machine remain switched OFF
2 days are programmable
If the value is “OFF”: there is no closed day.
MONTE-CARLO - 11/2015 - SOFT V 2.11 29
Page 30
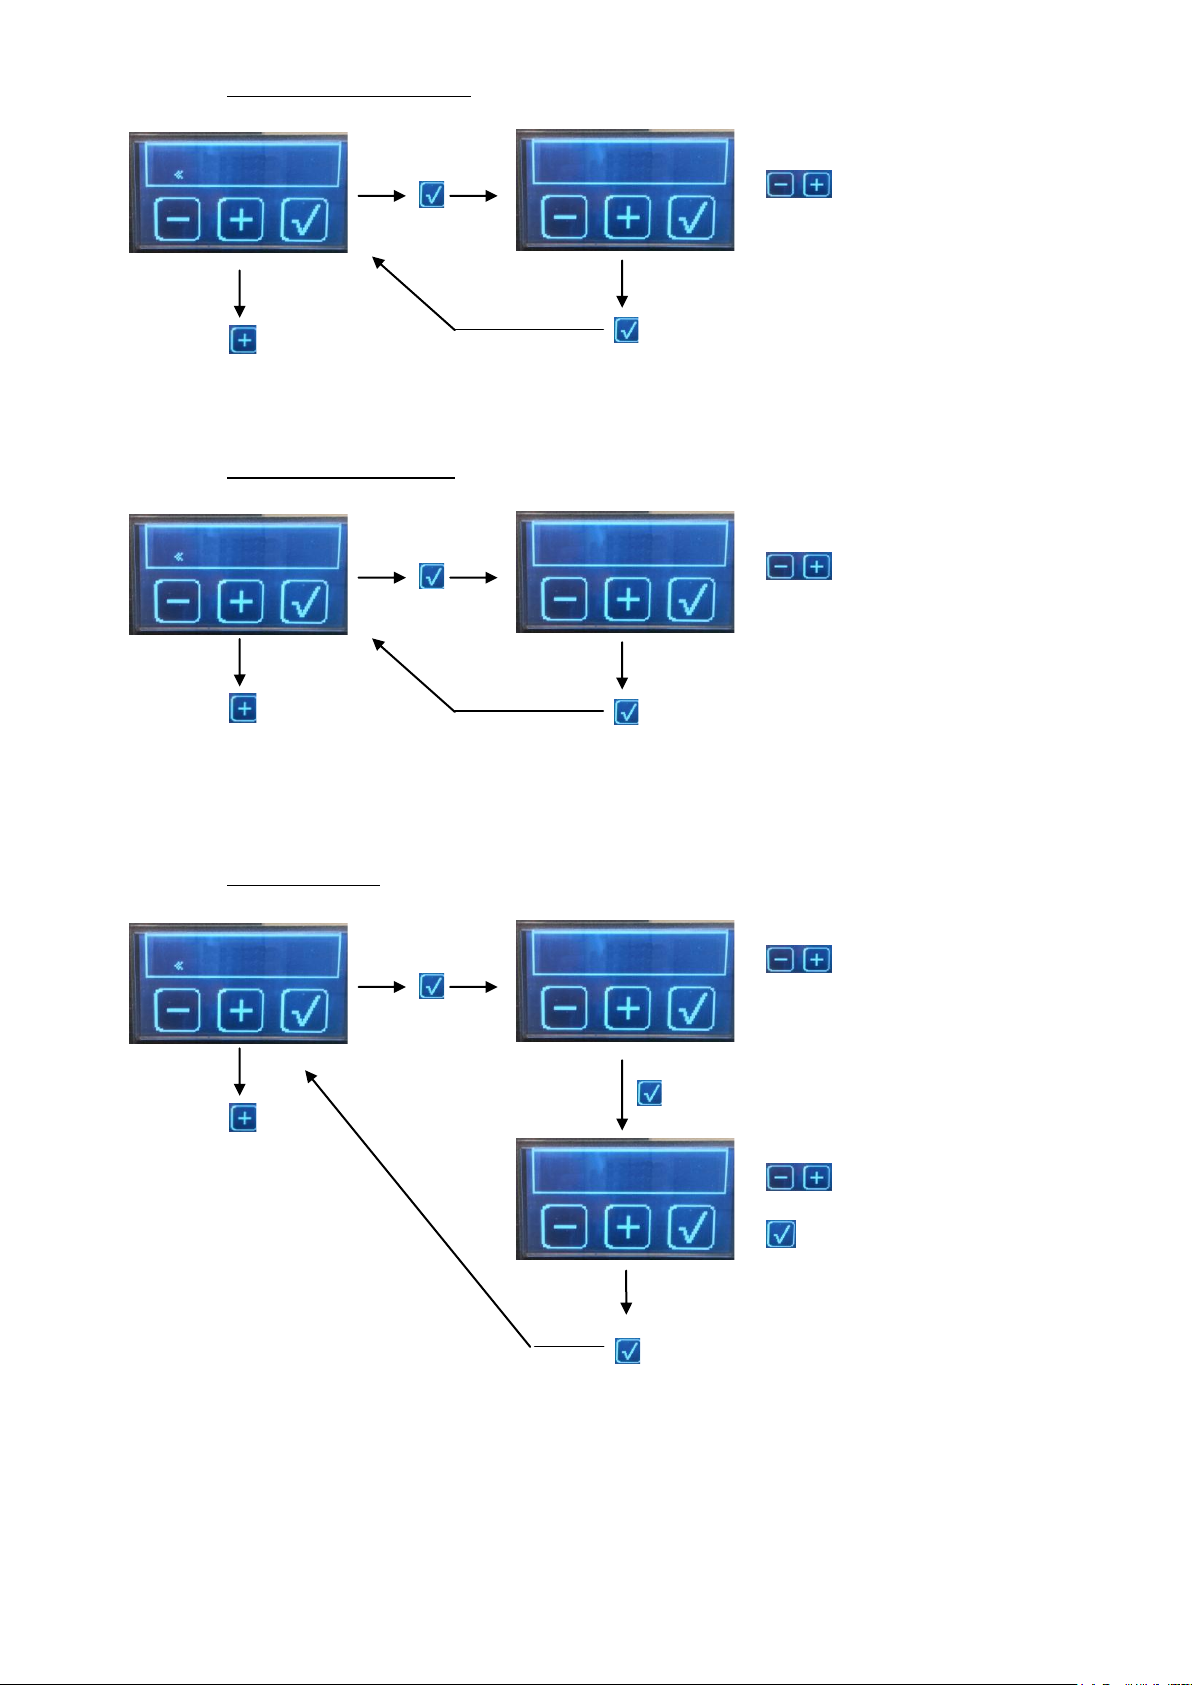
10.2.11 Doses setting disability
To select
Range: Enable/Disable
Doses Setting
Doses Setting
Enable
To validate
To select
Range: Enable/Disable
Prebrewing
Prebrewing
Enable
Next step
To validate
Next step
Steam Control
Rinse time
0,5 sec
Next step
To adjust the value
Range: 0 to 3 sec
Delta T. Vap
5
To adjust the value
Range: 0°K / 5°K / 10°K
To validate of proceed
To validate
To validate
If Disable: there is no possibility for the user to adjust the doses
10.2.12 Pre-brewing disability
If Disable: there is no possibility for the user to adjust the pre-brewing
10.2.13 Steam Control
See chapter: Steam control adjustments
MONTE-CARLO - 11/2015 - SOFT V 2.11 30
Page 31
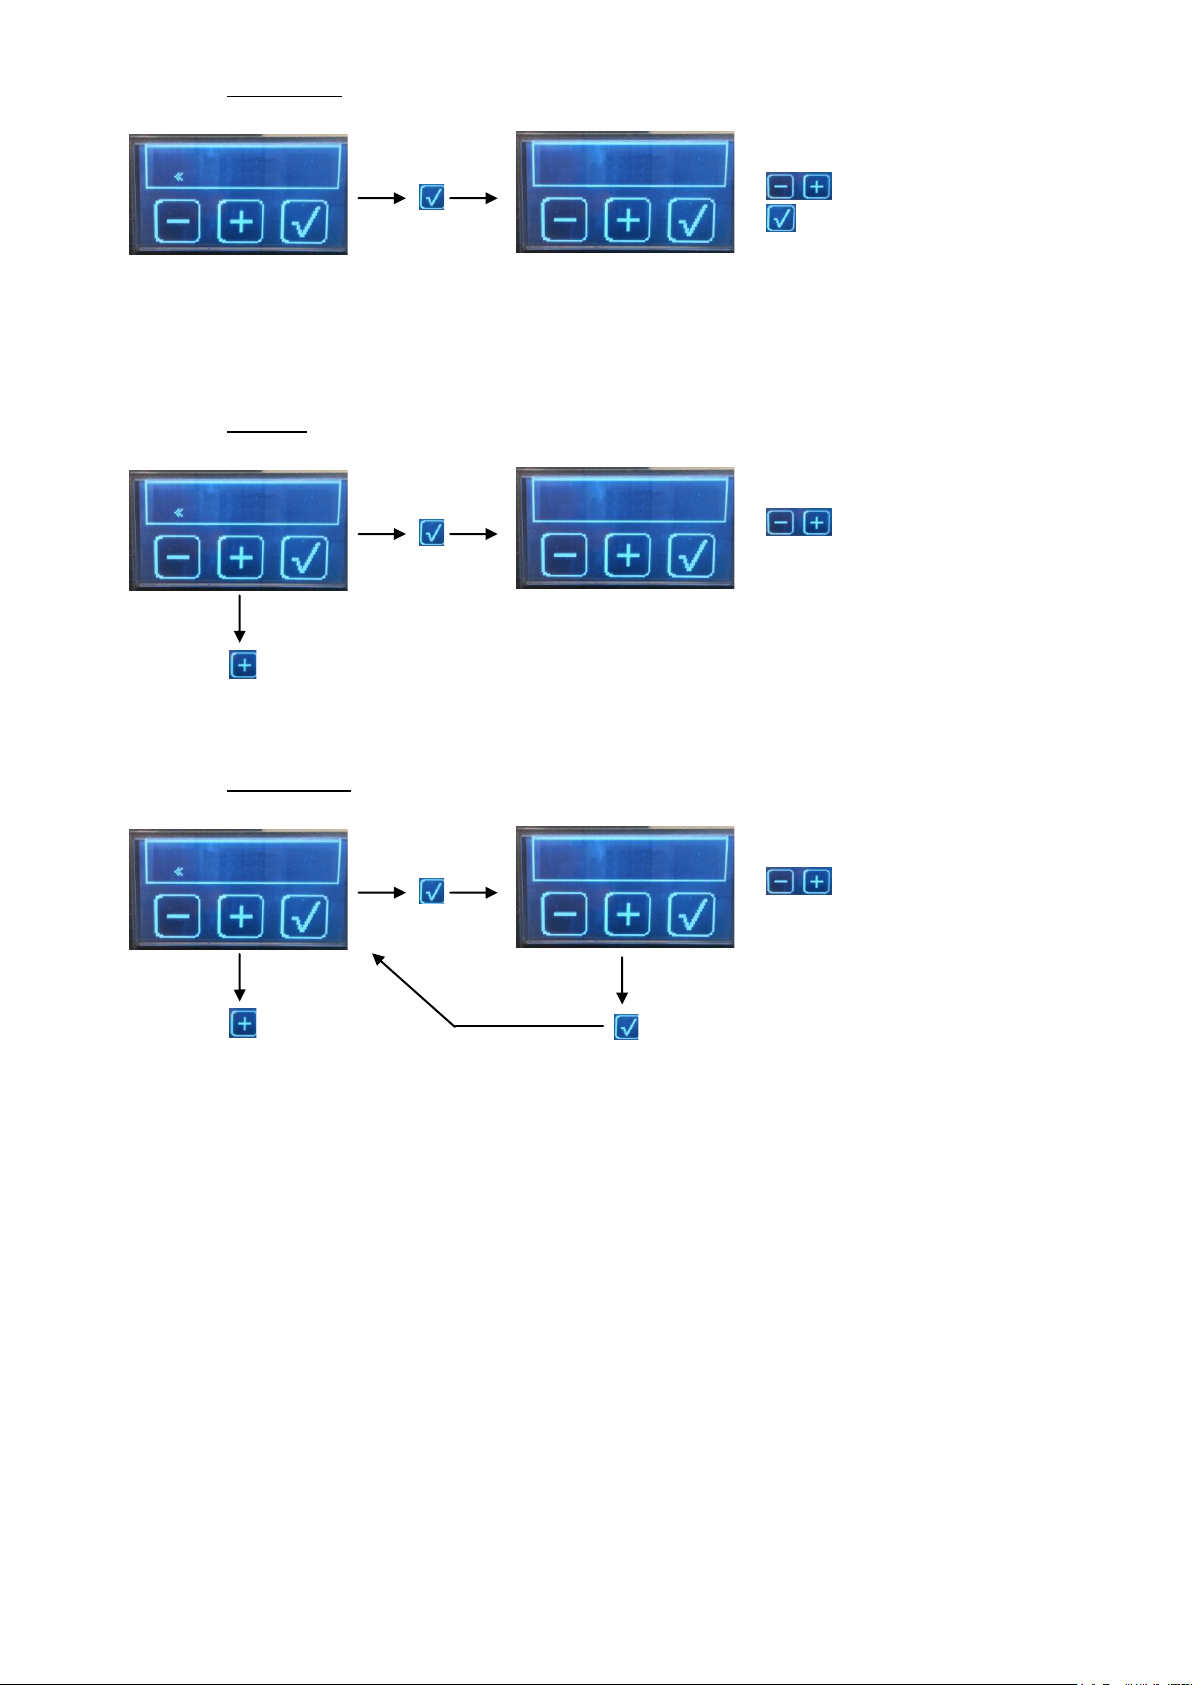
10.2.14 Calibration
To adjust the value
Range: 0 to 99900
Service
Service cycles
0
Next step
To adjust the value
Range: 0 to 10000
Water Filter
Water Filter
5500
Next step
To validate
To adjust the value
To validate
Pressure calibre.
V. Th. 9.0 bar
V. Cor. 9.0 bar
The goal: The value displayed by the manometer is the same that the value of the pump pressure
10.2.15 Service
10.2.16 Water Filter
MONTE-CARLO - 11/2015 - SOFT V 2.11 31
Page 32
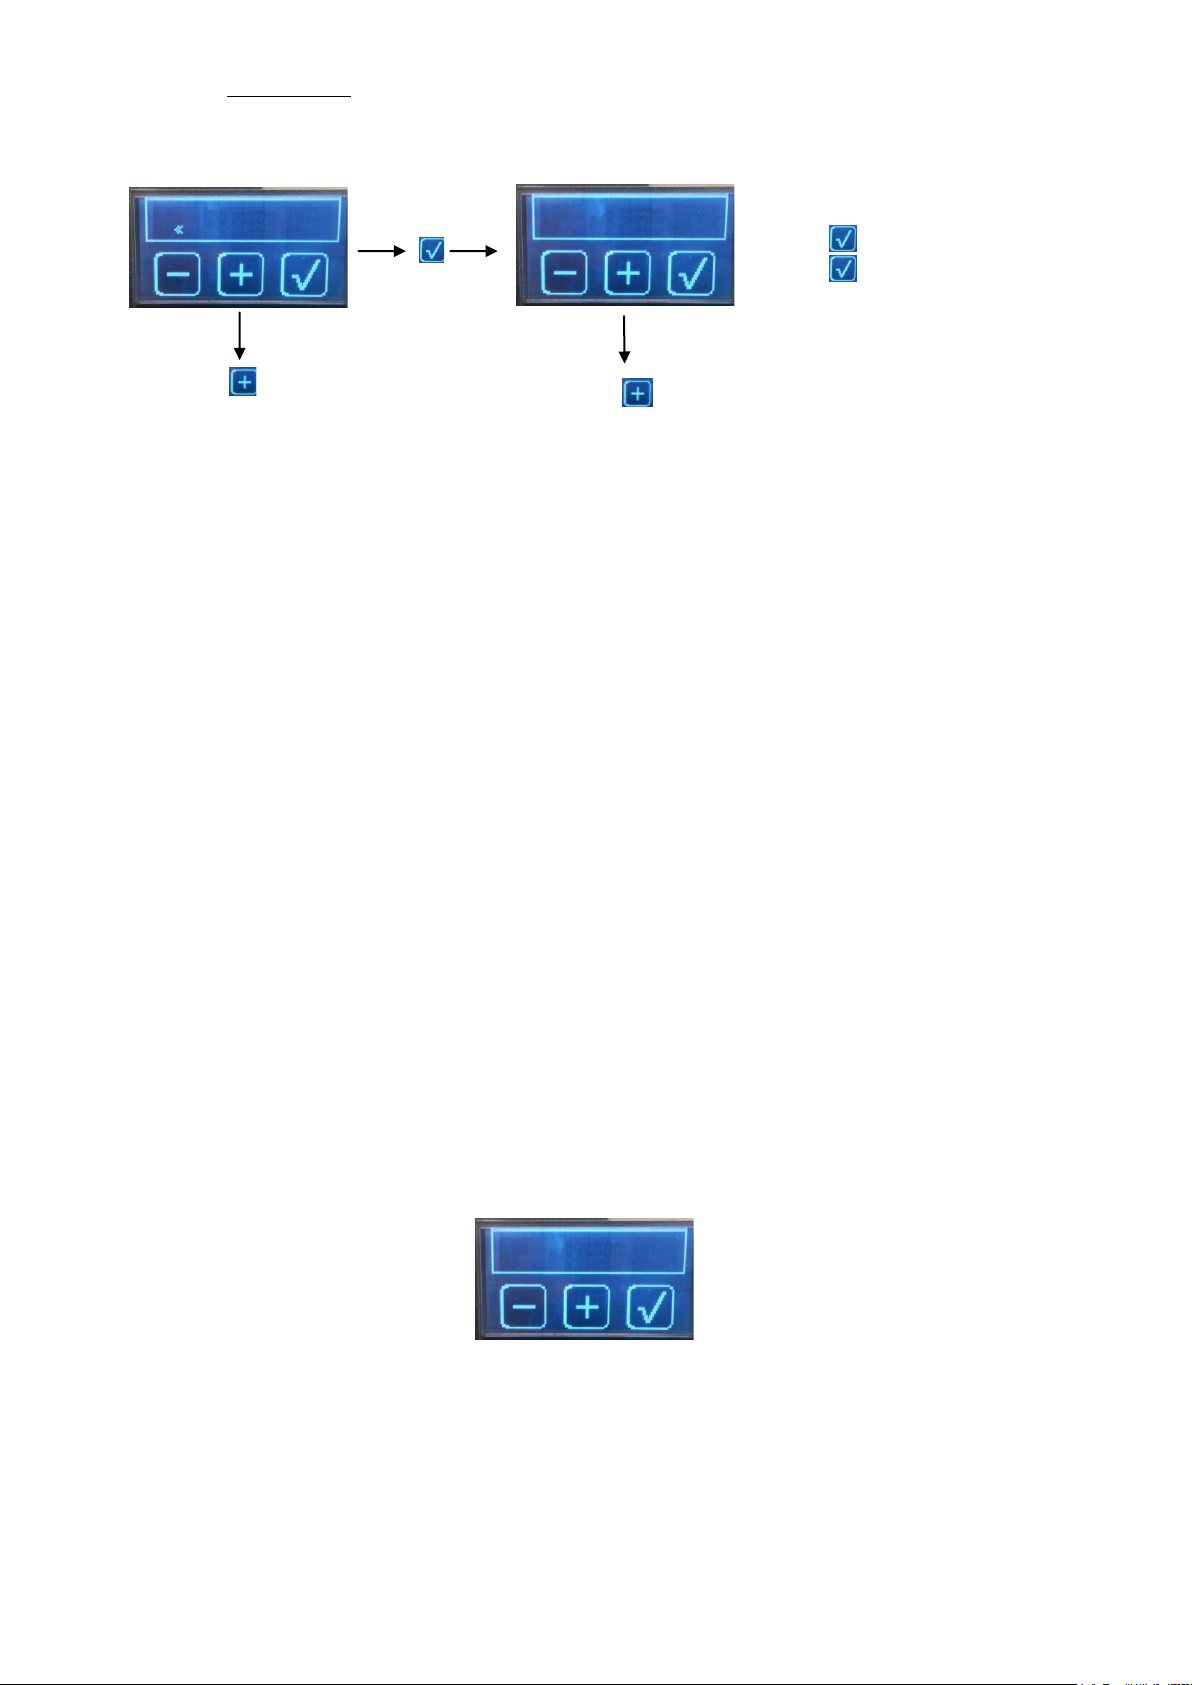
10.2.17 Diagnostics
Press to activate the outlet
Press to disable the outlet
Diagnostic
Output
On / Off
Next step
Steam 1: XXX °C (Real temperature read in the steam boiler)
Steam 2: XXX °C (Real temperature read in the steam boiler)
Steam 3: XXX °C (Real temperature read in the steam boiler)
Coffee 1: YY °C (Real temperature read in the 1° coffee boiler)
Coffee 2: YY °C (Real temperature read in the 2° coffee boiler)
Coffee 3: YY °C (Real temperature read in the 3° coffee boiler)
R grp 1:ZZ °C (Real temperature read in the 1° head group)
R grp 2:ZZ °C (Real temperature read in the 2° head group)
R grp 3:ZZ °C (Real temperature read in the 3° head group)
Pump: Pump motor
Filling up valve: Filling up valve for steam boiler
Coffee 1 valve: Coffee valve for group n° 1
Coffee 2 valve: Coffee valve for group n° 2
Coffee 3 valve: Coffee valve for group n° 3
Pre-Inf valve Grp 1: Pre-Brewing valve for group n° 1
Pre-Inf valve Grp 2: Pre-Brewing valve for group n° 2
Pre-Inf valve Grp 3: Pre-Brewing valve for group n° 3
Hot water 1 valve: left hot water valve
Hot water 2 valve: Right hot water valve
Steam C. Valve: Steam valve for steam control
Vaccum valve grp 1:
Vaccum valve grp 2:
Vaccum valve grp 3:
Air valve: Air valve for steam control
On / Off: Relay dedicated to supply the light transformer
Output
On / Off
The menu allows supplying and testing separatly all the outlets:
MONTE-CARLO - 11/2015 - SOFT V 2.11 32
Page 33
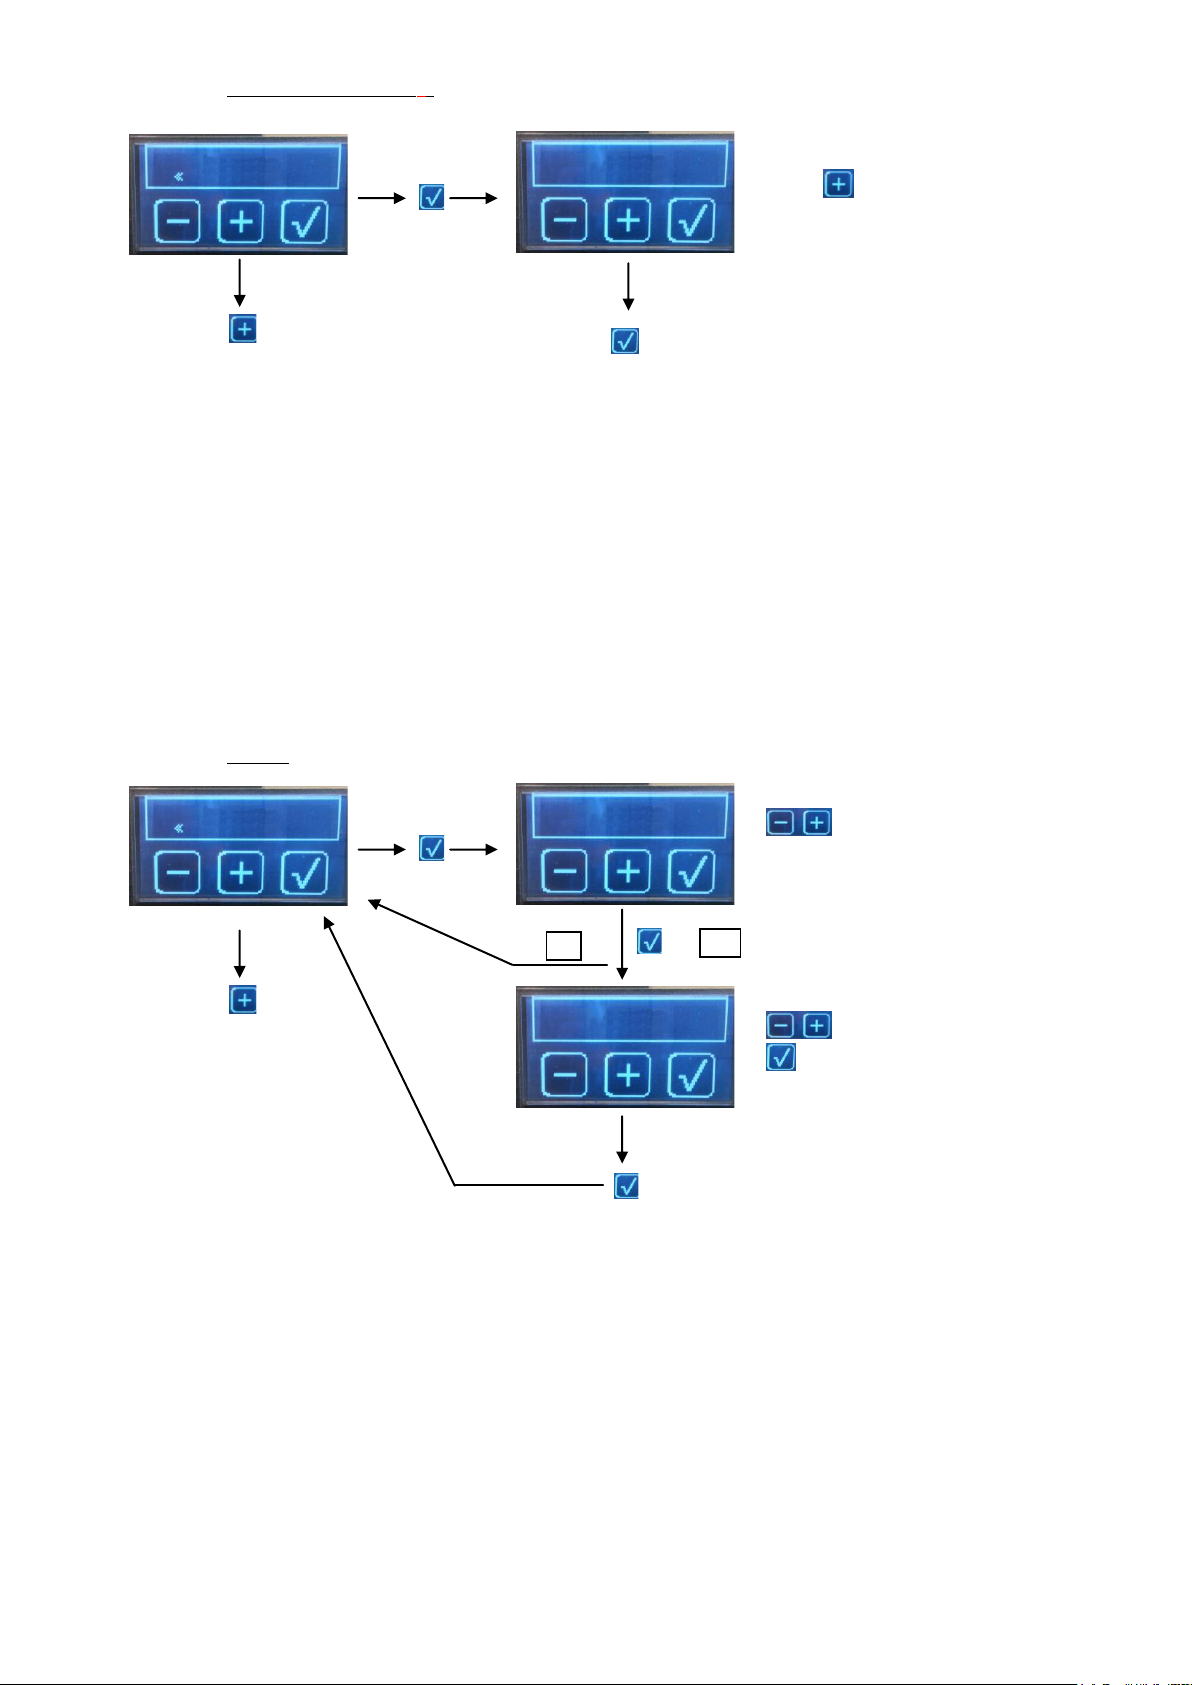
10.2.18 Coffee Counters (*)
To validate
Reset
Reset
NO
To select
Range: Yes / No
If Yes
If No
Data Reset
Completed
To select Yes or No
To validate
Next step
Press to know the amount of
each product
Coffee counters
Espresso
1589
Next step
To see the others counters :
For example :
Espresso : 23
2 espressos : 391
Coffee: 31
2 Coffee: 19
Continuous: 633
Tea: 570
Milk: 0
Steam: 0
Total coffee: 874 (not resetable)
10.2.19 Reset
Switch OFF and switch ON the machine. The machine is reseted.
MONTE-CARLO - 11/2015 - SOFT V 2.11 33
Page 34
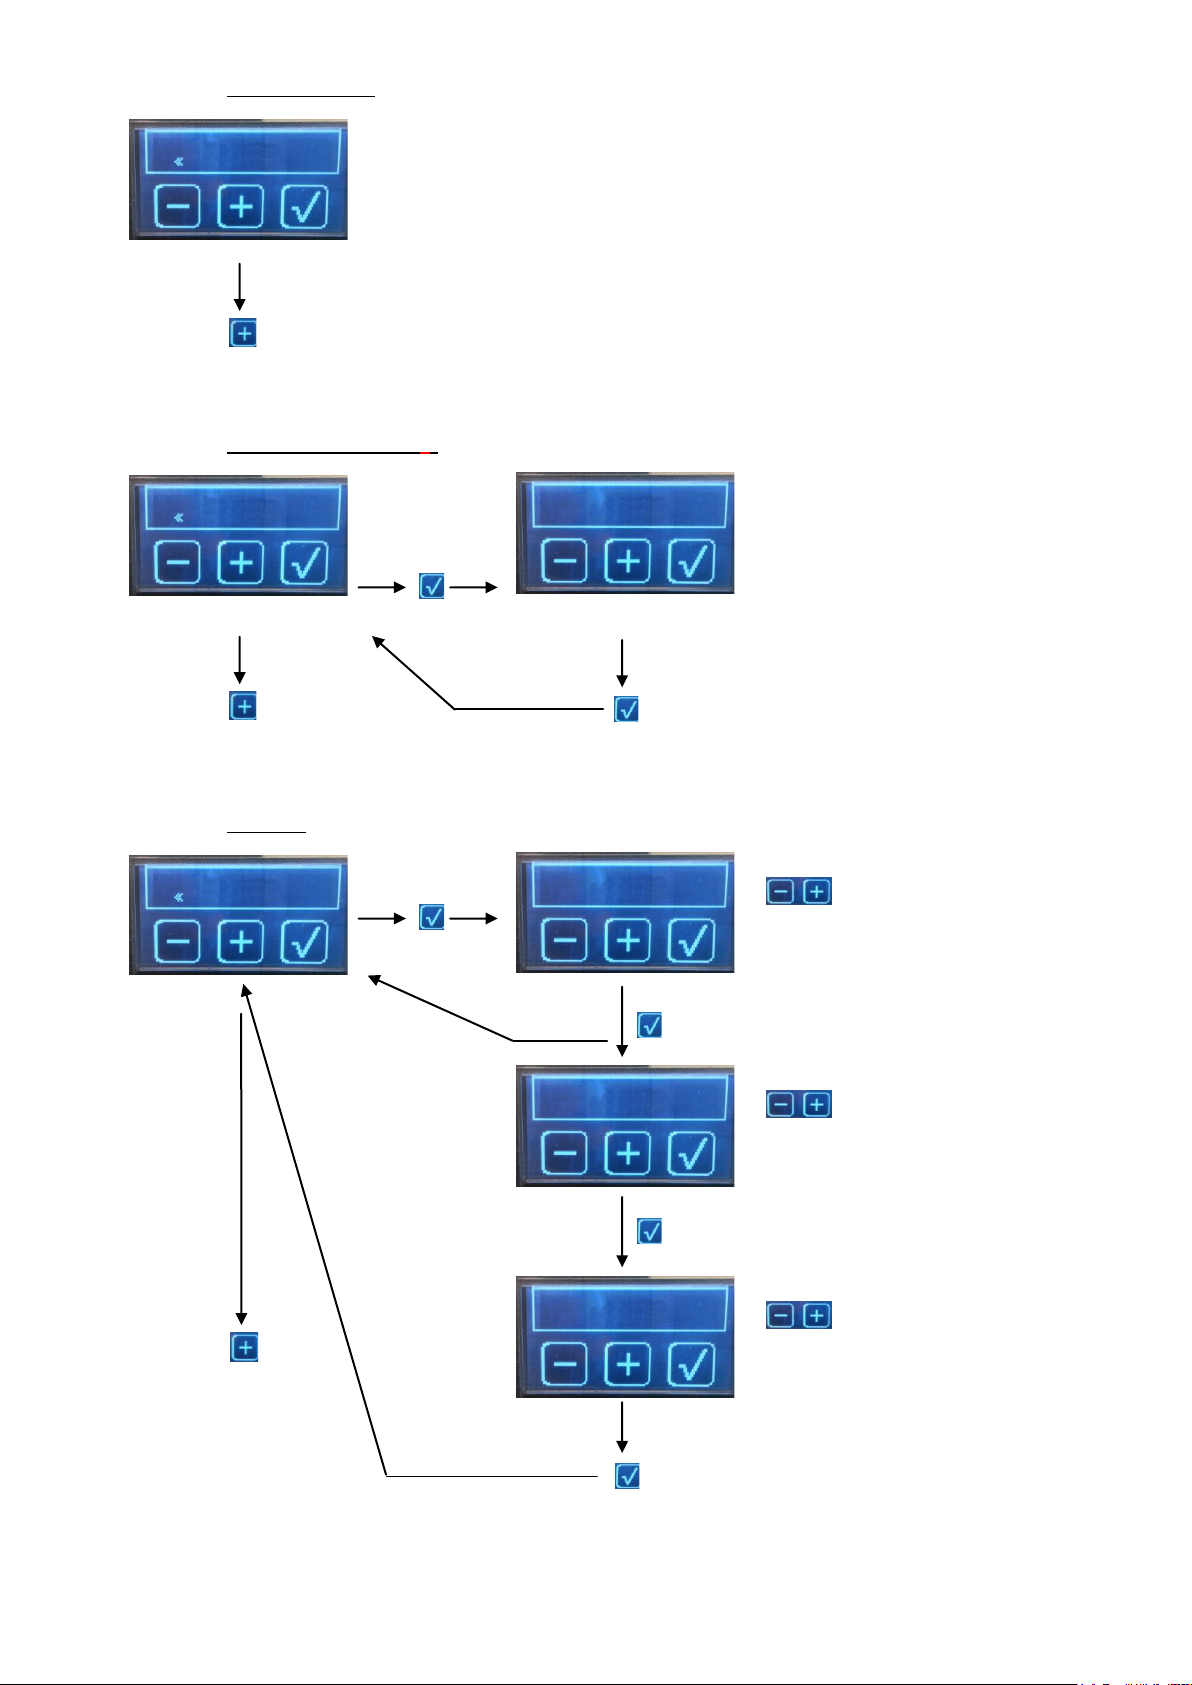
10.2.20 USB interface
Version/Date SW
MONTE CARLO
2.11 20/05/15
Next step
To come back
USB Interface
Next step
See chapter: How to update the software version
Display
Mode Display
Normal
To select
Range: Normal/Reverse
Contraste
47
To select
Range: 0 to 64
To validate
Color
To choose the color
To validate
On progress
Nets step
(come back to the
1°step :language)
10.2.21 Software version (*)
10.2.22 Display
MONTE-CARLO - 11/2015 - SOFT V 2.11 34
Page 35
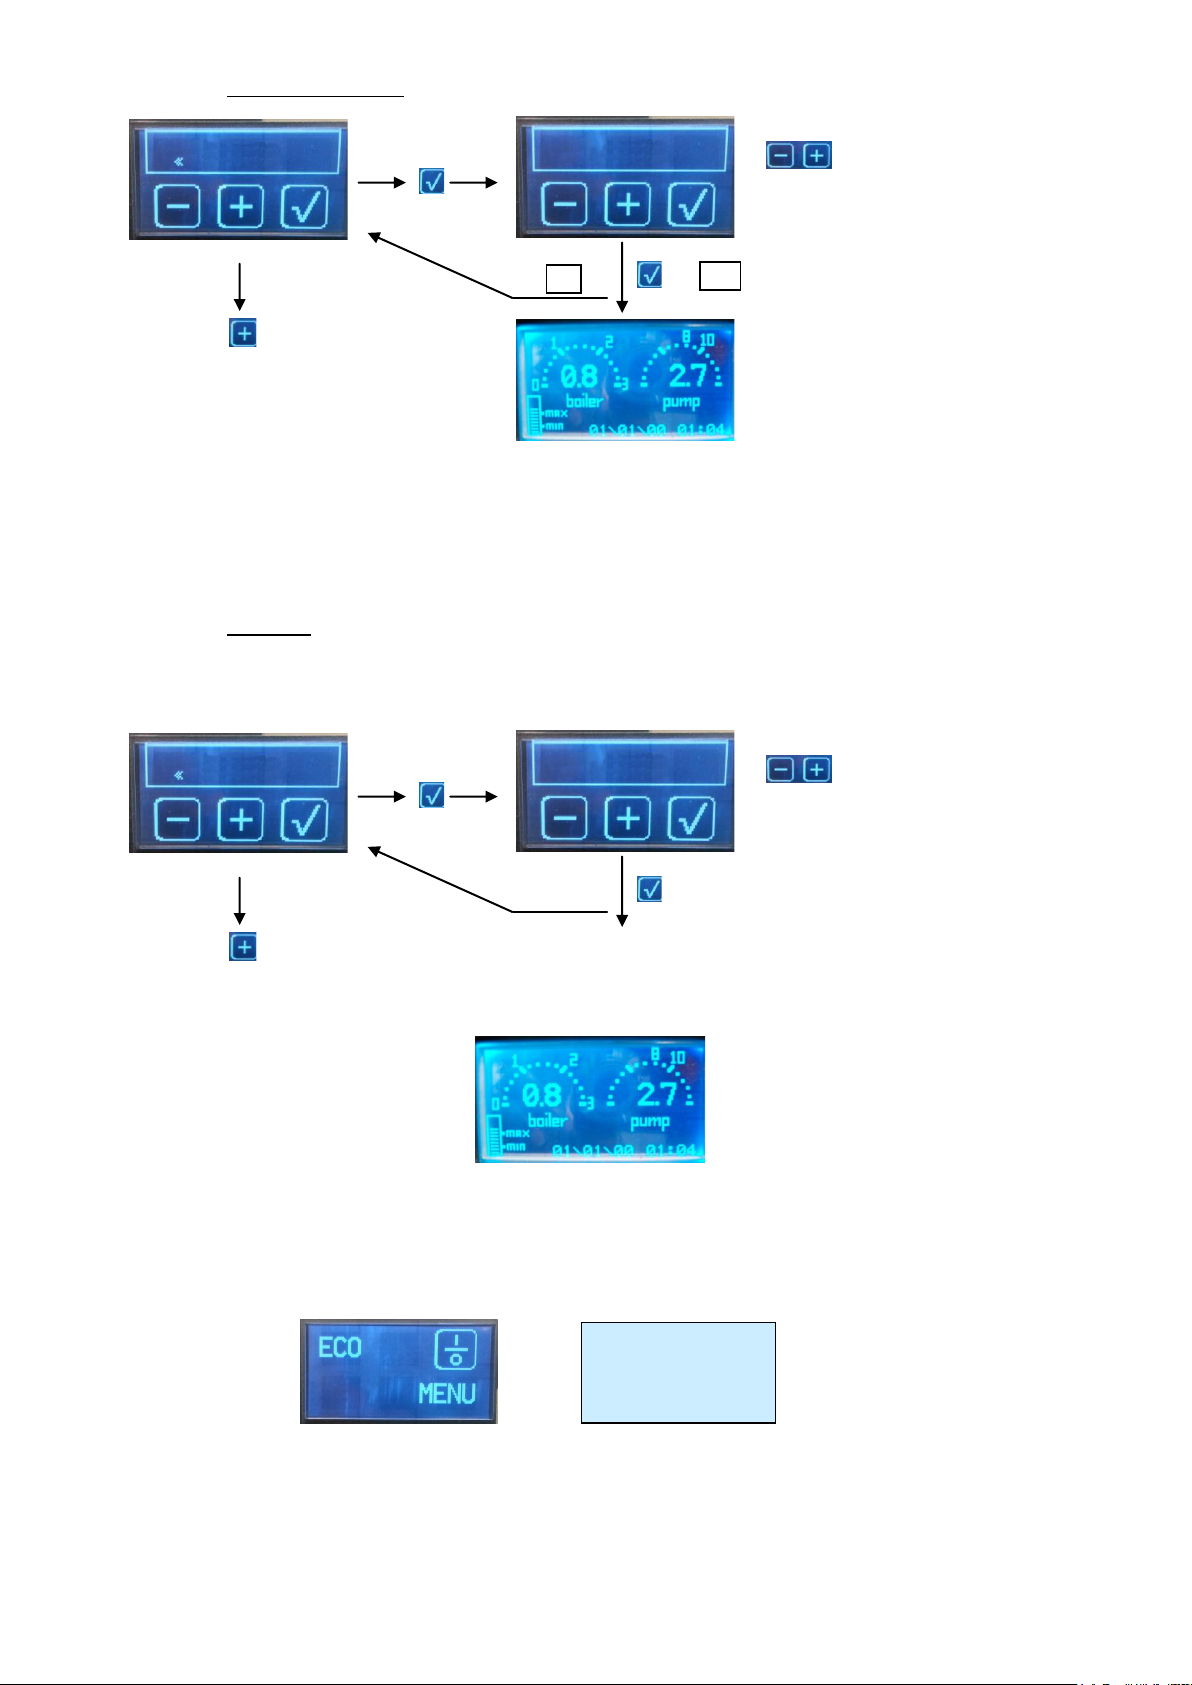
ECO
10.2.23 Exposition mode
Mode exposition
Mode exposition
NO
To select
Range: Yes / No
If Yes
If No
EXPO
The machine remain in exposition mode: No filling up tanker
No heating up boiler
No doses available
Next step
Lighting
Lighting
Yes
To select
Range: Yes / No
Next step
To come back on normal menu: Go into the menu and select “No” in the exposition mode step
10.2.24 Lighting
This step allows choosing if during the functioning the “side white leds” are “switch off” or “switch on”.
When the machine ON:
YES : The lights are ON
NO: The lights are OFF
The lights are always “OFF” when the machine is OFF:
MONTE-CARLO - 11/2015 - SOFT V 2.11 35
Page 36
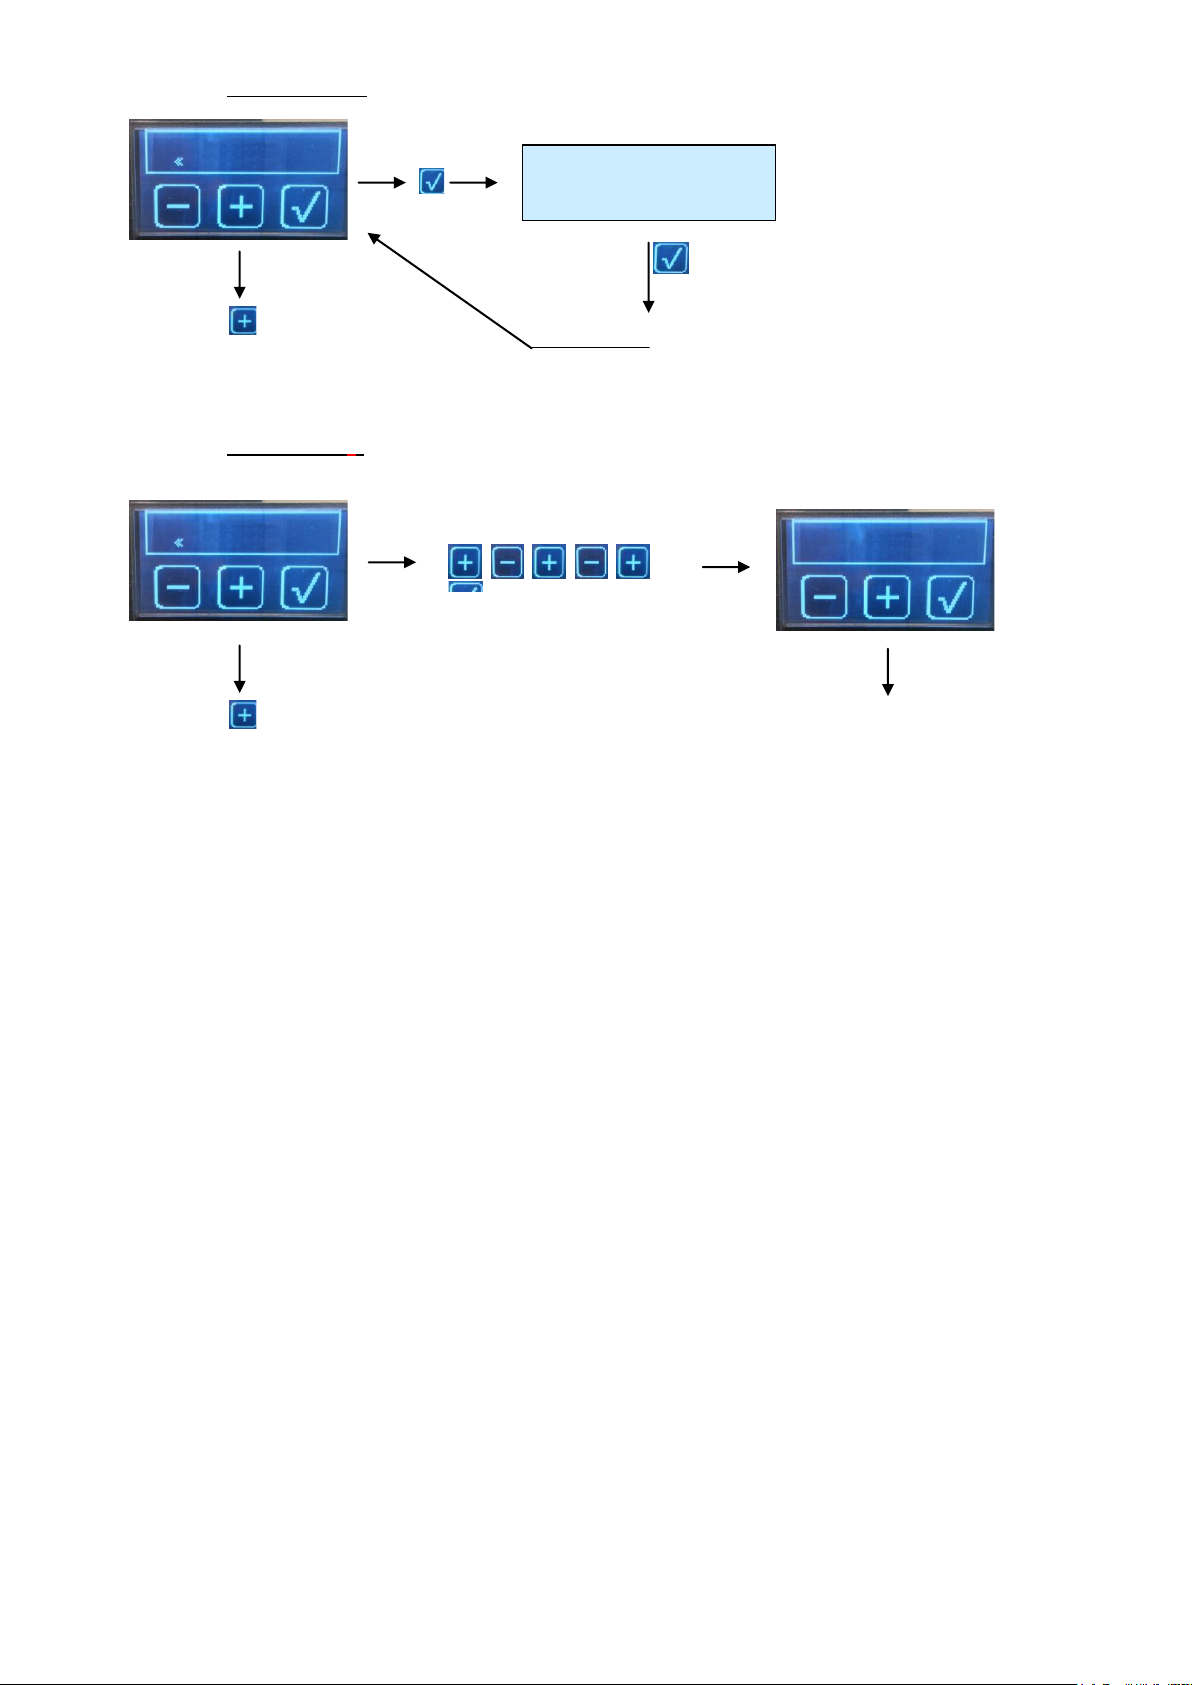
10.2.25 Alarm history
Access to the all complete menu
Password
Language
Next step
(Acces only to steps marked *)
Alarm history
Next step
To see the 10 next defaults in memory
Alarm history
Default n°1 1
10.2.26 Password (*)
MONTE-CARLO - 11/2015 - SOFT V 2.11 36
Page 37
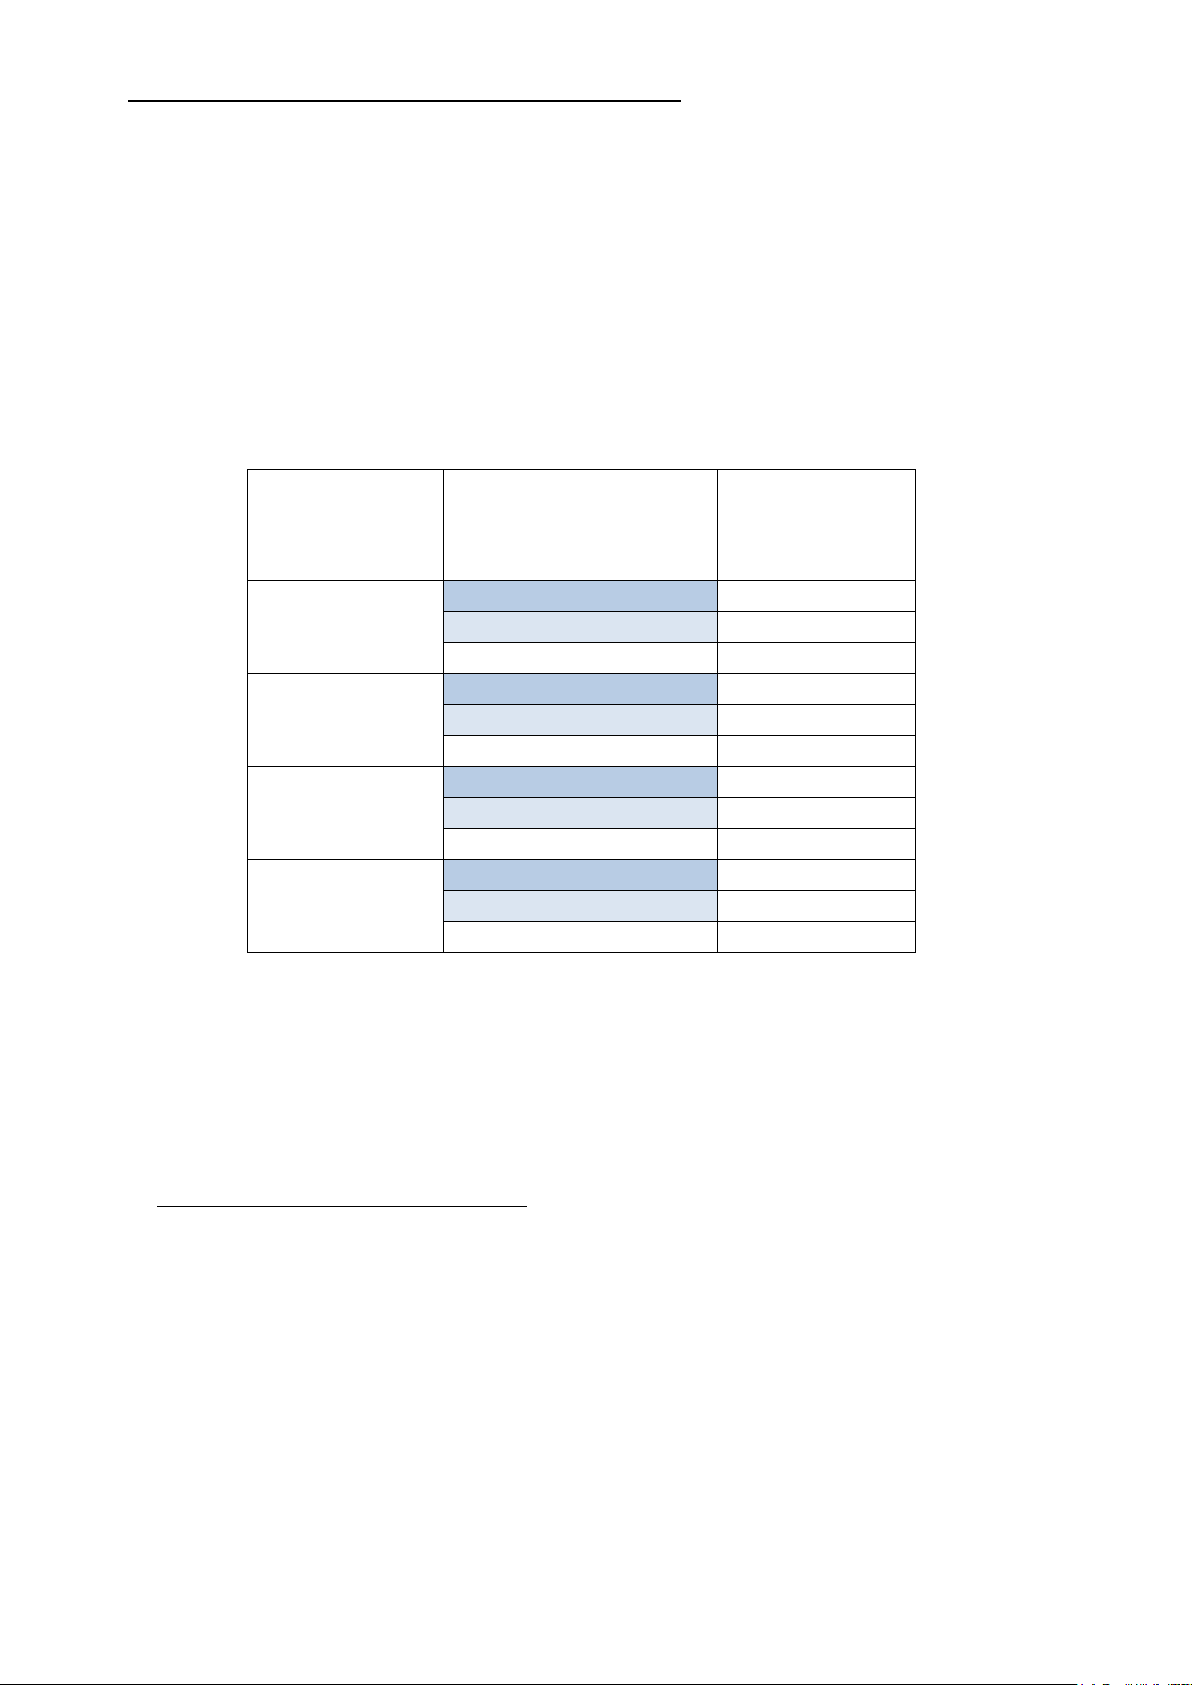
11 COFFEE TEMPERATURE ADJUSTMENTS
Steam boiler
Coffee boiler and
Group
Coffee
Temperature
(°C)
Temperature (°C)
Temperature
(°C)
117
87
78
90
81
93
85
120
87
78
90
81
93
85
123
87
79
90
82
93
85
125
87
79
90
82
93
85
Factory adjustment:
Steam boiler temperature: 123°C
Coffee boiler temperature: 90°C
Group temperature: 90°C
Coffee temperature: 89°C
On the one hand, you can choose the steam boiler temperature between 117°C (0.8b) and
125°C (1.4b).
On the other hand, you can choose the coffee boiler temperature and the group temperature
to have the desire temperature.
To adjust the coffee temperature, you can change the coffee boiler and group temperature.
1°C on coffee boiler and group temperature -> 1°C on coffee temperature
Concerning the abacus above, these values are given in an indicative way, following the
regulation and the especial protocol of the CONTI company. These can change according to
the type of coffee used, as well as the environment of the machine.
11.1.1 Hot water temperature adjustment
The factory setting is a hot water temperature at 92°C.
You can change this temperature by adjusting the screw above the tap.
MONTE-CARLO - 11/2015 - SOFT V 2.11 37
Page 38
12 QUALITY CRITERIA
- - - - - -
XXs YYYml
Quality Criteria
«
- + √
√
ESP Value (ml/s)
Min:1.5 Max:2.2
- + √
KF VALUE (ml/s)
Min:2.5 Max:4.5
- + √
+ or – to change the value
√ to validate and proceed
Adjustable value : 0,5 to 4,5
The mini can’t be > to the maxi
+ or – to change the value
√ to validate and proceed
Adjustable value : 0,5 to 6
The mini can’t be > to the maxi
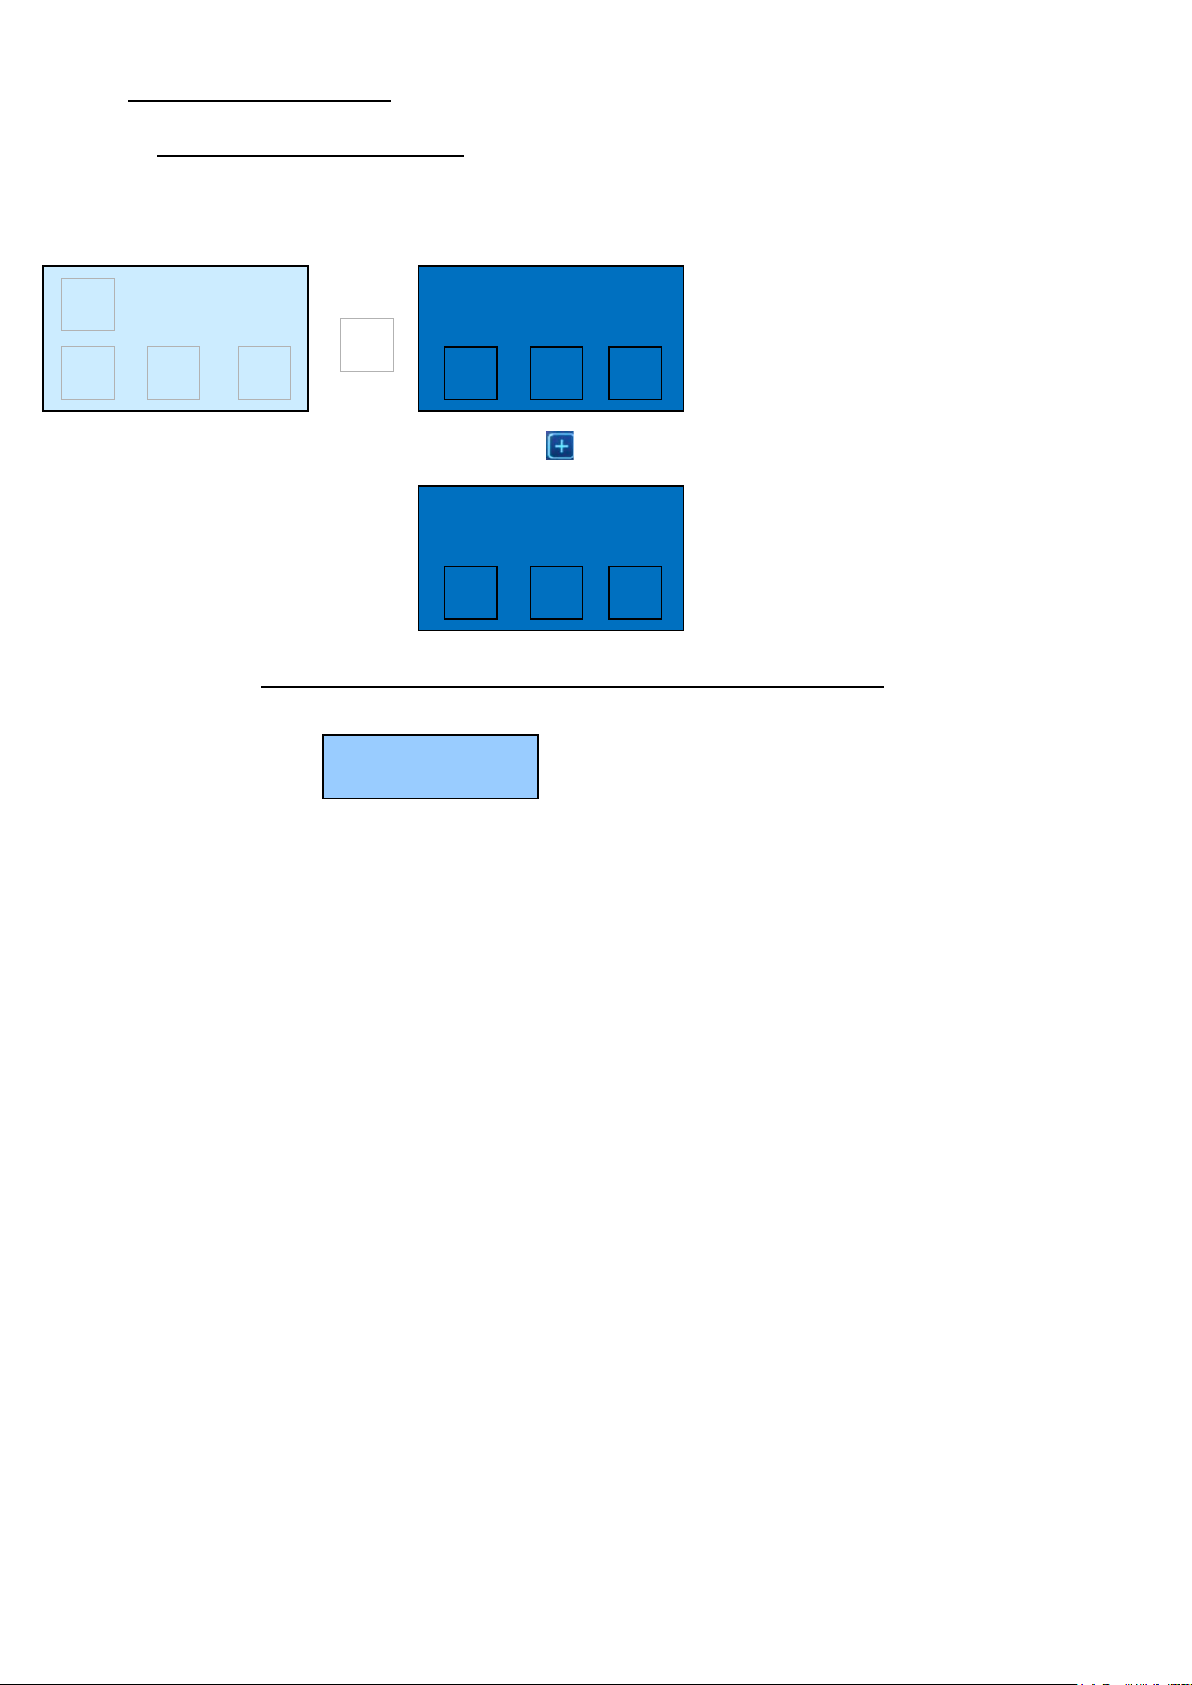
Quality criteria programmation :
First, the user has to choose his own quality criteria.
These are the acceptable minimum and maximum flow rates for the estimated product.
The user need to choose the type of display « Quality criteria » :
The display during the extraction becomes :
The cursor moves (7 positions) depending of the measured flow (ml/s).
There are minimum and maximum values for espresso.
There are minimum and maximum values for coffee.
The cursor shows 7 positions matching to 7 values included between the
programmed mini and max.
For example : programmed value : Min = 0.80 ml/s / Max = 1,20 ml/s
Position 1 = flow between 0.80 ml/s and 0.86 ml/s
Position 2 = flow between 0.86 ml/s and 0.91 ml/s
Position 3 = flow between 0.91 ml/s and 0.97 ml/s
Position 4 = flow between 0,97 ml/s and 1,02 ml/s (median position)
Position 5 = flow between 1,02 ml/s and 1,08 ml/s
Position 6 = flow between 1,08 ml/s and 1,14 ml/s
Position 7 = flow between 1,14 ml/s and 1,20 ml/s
MONTE-CARLO - 11/2015 - SOFT V 2.11 38
Page 39
13 STEAM CONTROL PRODUCTS ADJUSTMENTS
95°C
HOT MILK
XX °C
«
- + √
MILK FOAM
YY °C
«
- + √
Dose setting
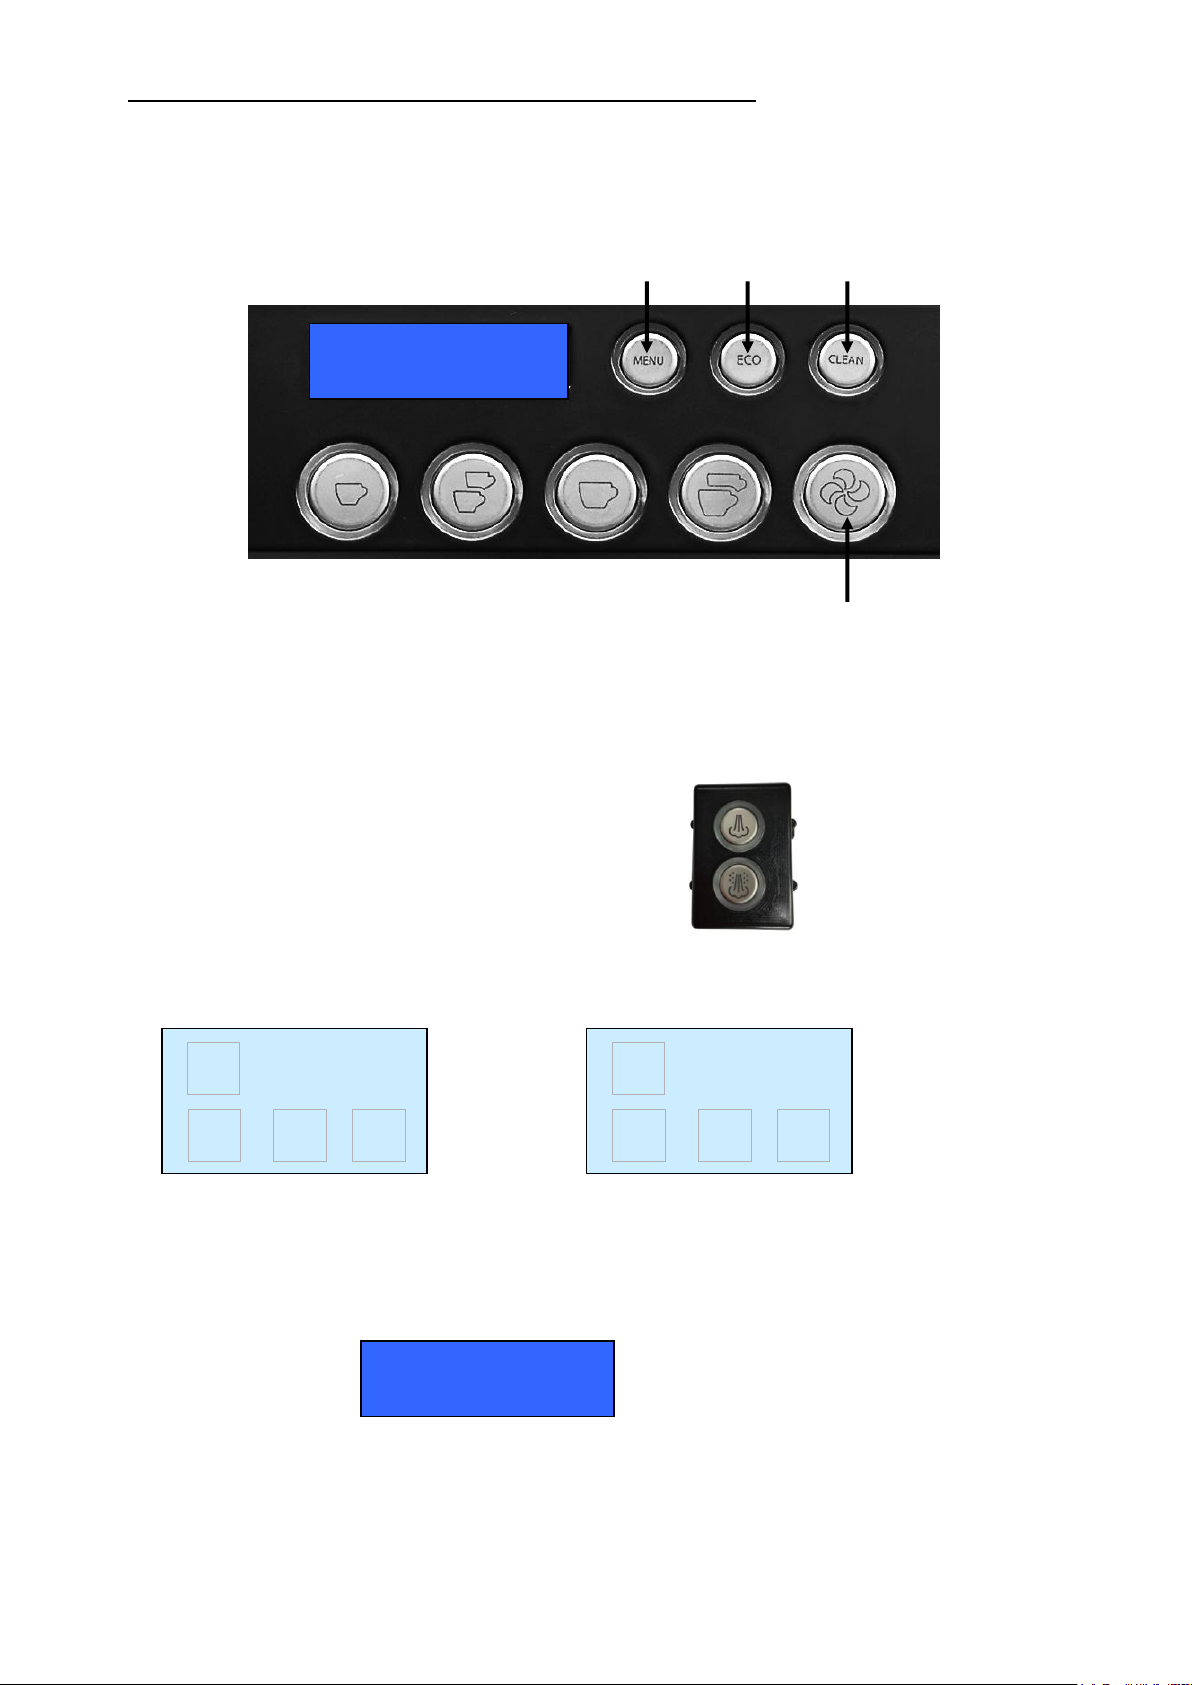
How to adjust “hot milk” or “milk foam” product: By “auto learning”
Using the nearest coffee key pad menu from the steam control:
Use keypad n° 2 on a 2 groups machine
Use keypad n° 3 on a 3 groups machine
MENU/ENTER - +
Esc
The users prepare the product to be heated, and put the pot above the steam control outlet.
Press the coffee “MENU” button
Press “+” until the display shows “dose setting”
Press “MENU” again (for ENTER)
Press the product button “hot milk” or “milk foam” :
The machine starts to heat the product. At the same time the display shows the T° value read inside
the milk.
or
XX or YY is the temperature read by the probe
When the temperature displayed or the made product is OK. Then, push again on the button.
The making of the product is stopped. The temperature is stored in the memory. Push on the
“MENU” button to escape from the programming.
Press the coffee « ESC » button.
That’s the same procedure for the « hot milk » and the “milk foam »
MONTE-CARLO - 11/2015 - SOFT V 2.11 39
Page 40
14 SOFTWARE VERSION UPDATE
USB Interface
USB Interface
No
USB Interface
Yes
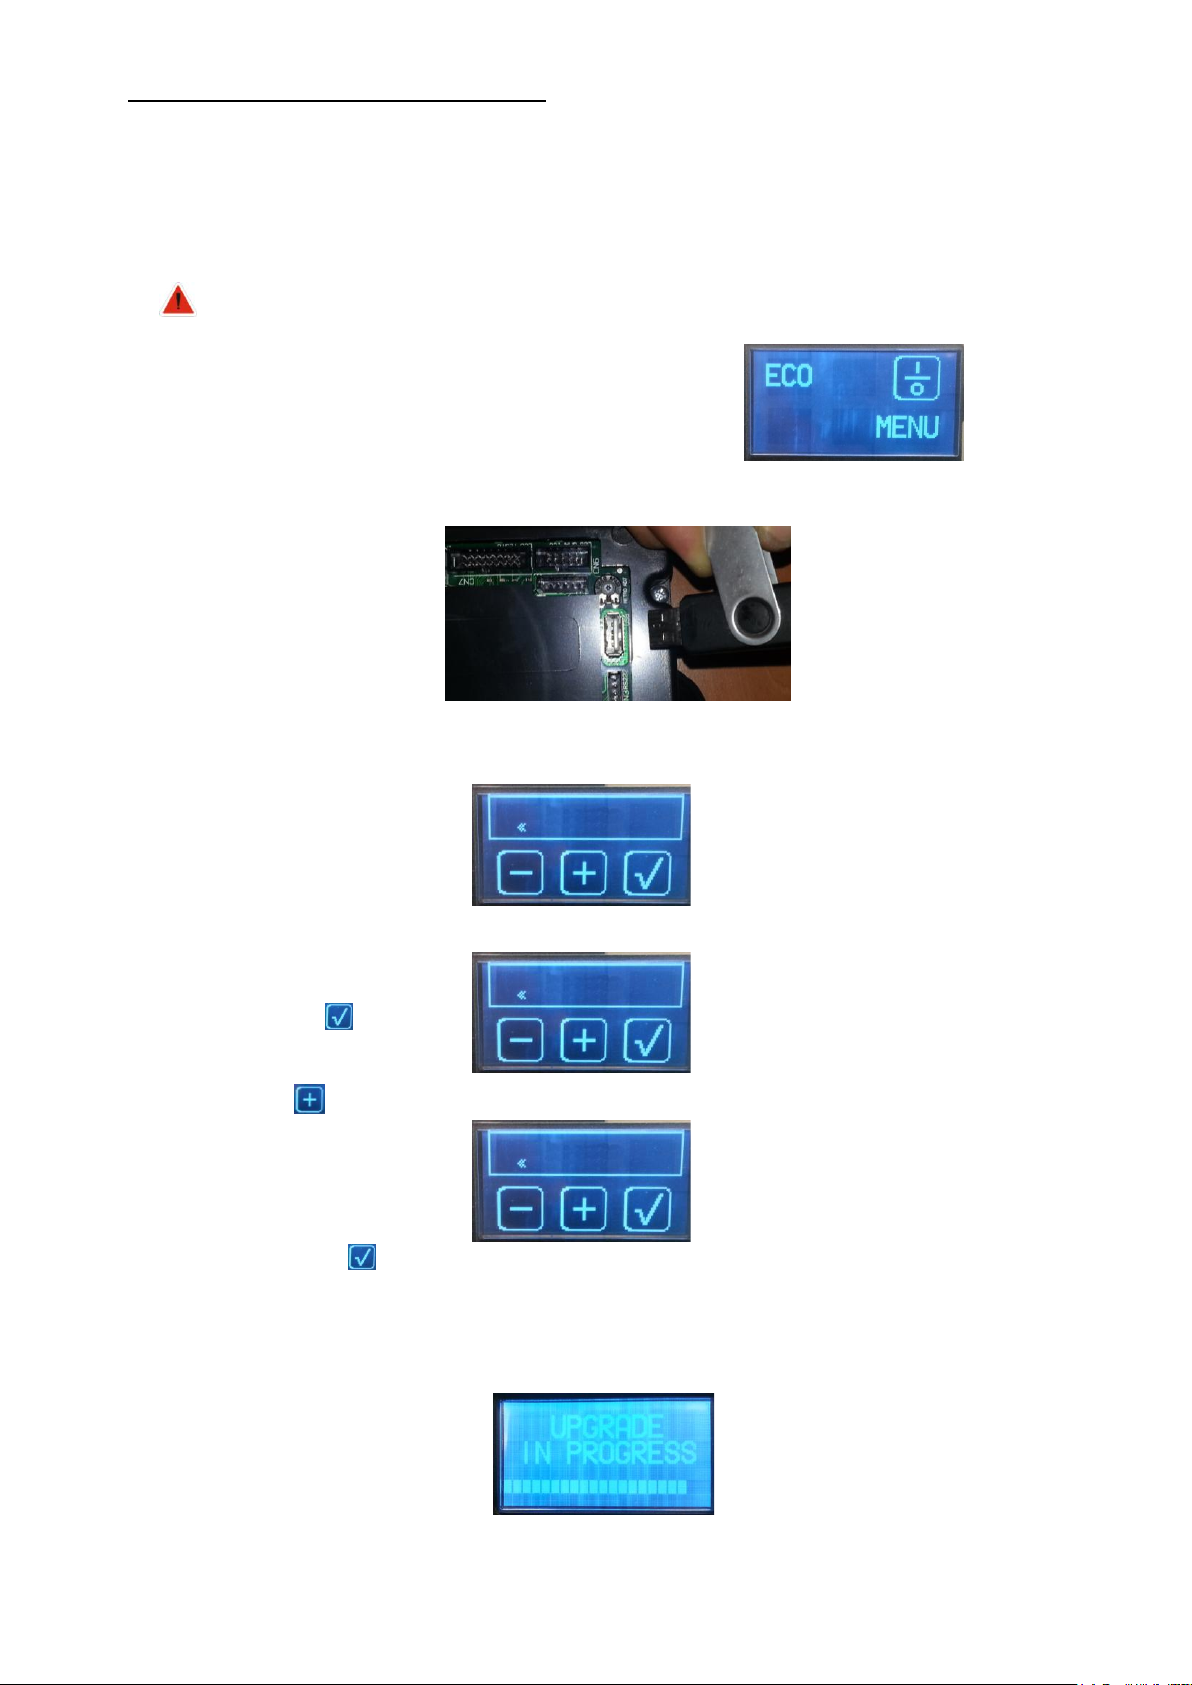
The step “USB interface” allows the updating of the machine’s software.
Prepare the USB key with a file named "update.bin" (this file is the new software
version)
Please make sure the USB stick does not contain any other file. It must be empty.
Put the machine on stand by; the display shows:
Insert the USB key in the mainboard
Press the Menu button for 5 seconds and go to step:
Press on
Press
The machine shows:
Then press
The machine start upgrating software
The display show a decreasing scrollbar:
The operation takes about 70 min.
MONTE-CARLO - 11/2015 - SOFT V 2.11 40
Page 41
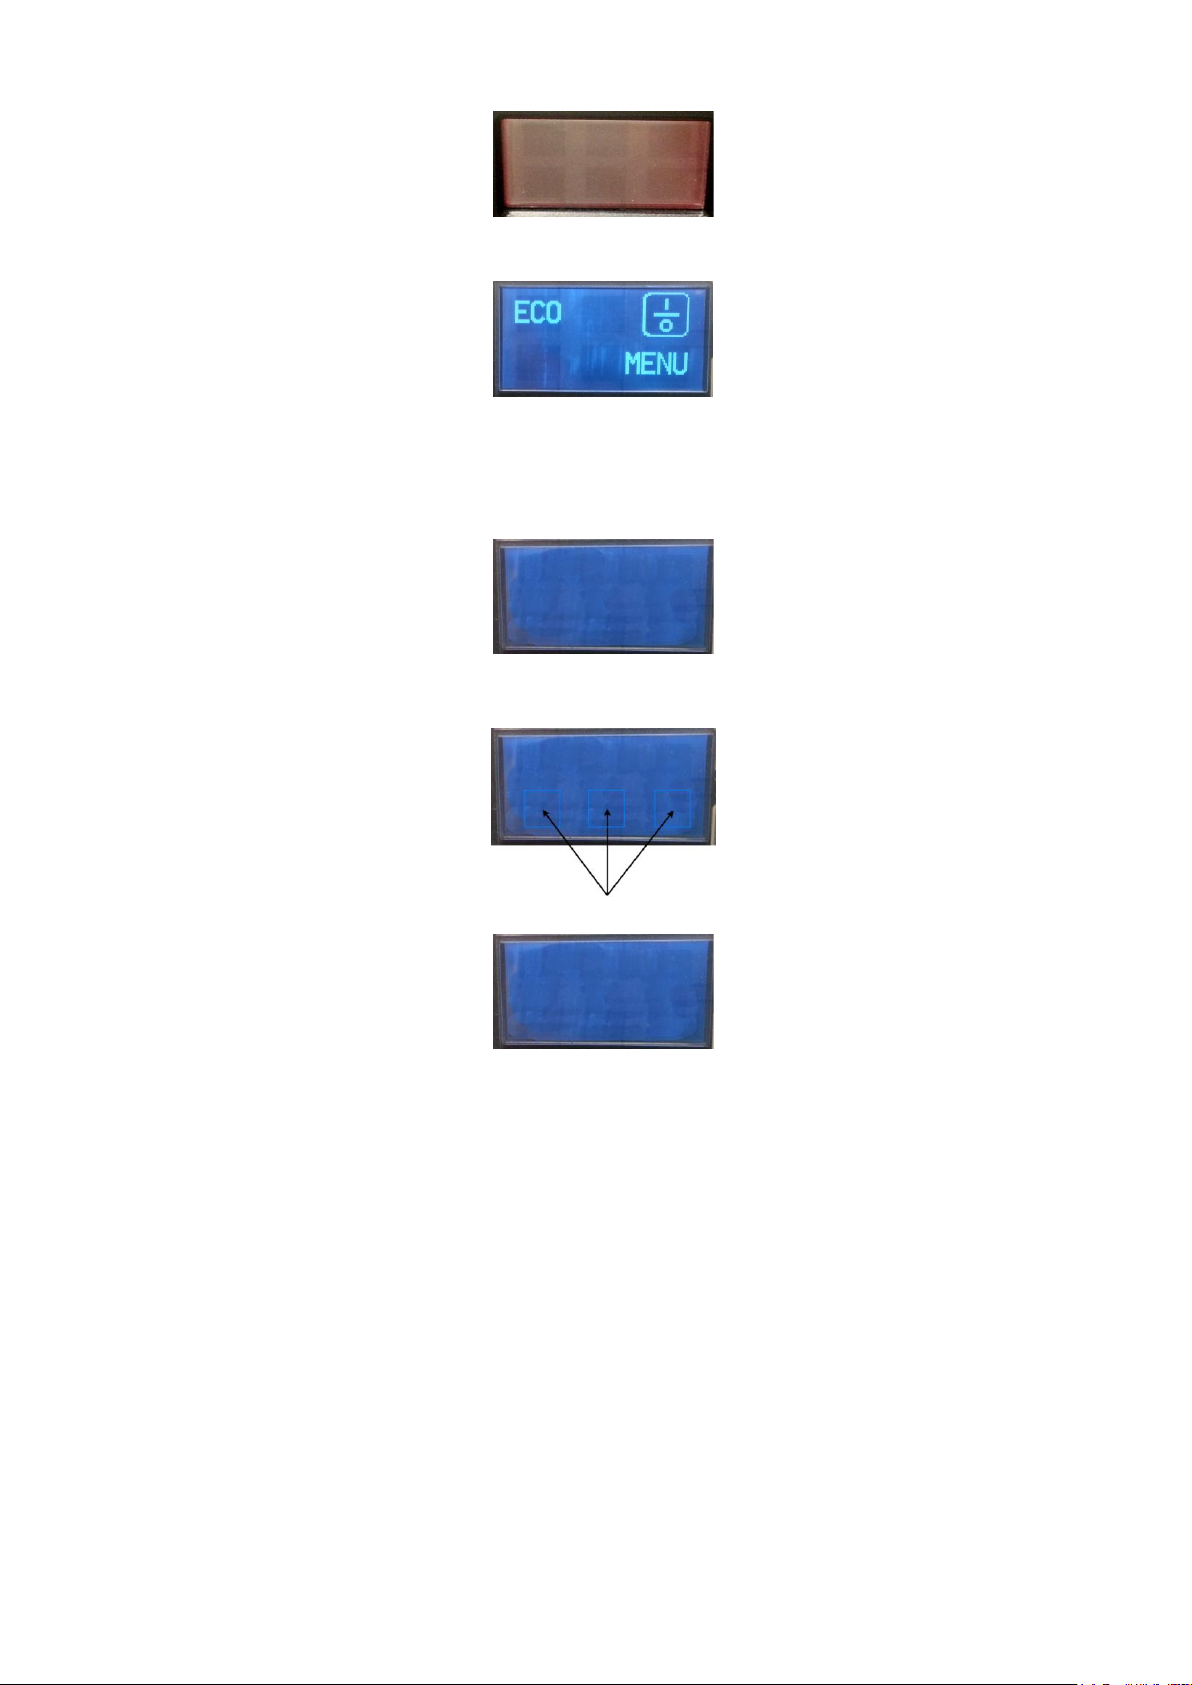
After this time the display shows a blinking red screen during 5 min.
MONTE CARLO
Reset completed
When the upgrade is finished the display shows:
Switch OFF the machine
Remove the USB key
Switch ON the machine, as soon as the graphic display shows:
Press the 3 following keys for 3 seconds
When the display shows:
Switch OFF and switch ON the machine
The machine is ready.
MONTE-CARLO - 11/2015 - SOFT V 2.11 41
Page 42

15 MAINTENANCE OF MACHINES
DAILY MAINTENANCE
- Clean the hot water outlet and the steam outlets with a scouring pad:
o Use a needle to keep the diffuser outlets unclogged.
o Then purge by opening the tap a few seconds.
- Clean the drip tray and the basin, removing them from the machine.
- Remove the filter-holder and clean the seal injection filter-holder with the brush.
- Use the automatic process cleaning:
o Push on the « clean » button
o The automatic cleaning process of the group is started in 3 steps:
o The process is shown on the display.
o The machine asks for blind hold filter and the CONTI cleaning pill code n°466662
o Follow the instructions on the display.
o Repeat this procedure on each group.
- Brush the filters in water containing detergent:
o In order to unclog the holes
o Never use a needle or a flame.
HALF YEAR MAINTENANCE:
- A kit n° 450200, for the following operation is available for sale.
- For each group:
o Remove the sprinkler, diffuser, and seal gasket.
o Scrub the gasket groove and the supplying hole on the group head.
o Clean the two parts of the diffuser. Clear all the holes with a needle.
o Reassemble the 2 parts of the diffuser on the group head
o Place NEW Filter gasket (No. 002711), and NEW sprinkler (No. 415684)
- Remove and clean the level sensor and the safety sensor (limestone deposit).
MONTE-CARLO - 11/2015 - SOFT V 2.11 42
Page 43

ANNUAL MAINTENANCE:
- A kit n° 450201, for the following operation is available for sale.
- Change the pump inlet filter (No. 411861)
- On the steam boiler:
o Change vaccum valve (No. 408898)
o Change the safety valve (No. 411827)
- On the coffee boiler:
o Remove and clean the gasket limiter 12 Bars
o Clean the draining valve core
- On the inlet bloc valves:
o Change the filter (No. 470199)
o Replace the gasket (No. 219000) of 2 non-return valves
o Remove and clean the gasket limiter 12 Bars
o Clean the nucleus of the solenoid inlet water boiler
- On the cold water valve block :
o Clean the both cold water valves cores
- On the pre-brewing valve:
o Clean the pre-brewing valve core
- On the coffee groups
o Change the O-ring nozzle (No. 403457) and the filter nozzle (No. 403458)
o Clean the 3rd way and the nucleus of the solenoid coffee valve
- On the 2 electrical taps
o Clean the nucleus of the solenoid "hot water" valve
- On the 2 steam taps:
o Change the 2 O-rings (No. 403457)
o Change the 1 gasket (No. 407502)
- On the 2 "steam" output and on the 2 "hot water" output
o Change the O-ring (No. 061200)
o Change the O-ring (No. 055300)
- For water quality issues, it is recommended to fully drain the boiler.
MONTE-CARLO - 11/2015 - SOFT V 2.11 43
Page 44

BIENNAL MAINTENANCE:
- A kit n° 450201, for the following operation is available for sale.
- Change the pump inlet filter (No. 411861)
- On the steam boiler:
o Change vaccum valve (No. 408898)
o Change the safety valve (No. 411827)
o Dismantle and clean the injectors
- On the coffee boiler:
o Change the limiter 12 Bars (No. 409774)
o Change the draining valve (No. 430046)
- On the inlet bloc valves:
o Change the filter (No. 470199)
o Replace the gasket (No. 219000) of 2 non-return valves
o Change the limiter 12 Bars (No. 409774)
o Change the inlet boiler valve (No. 470161) + 2 PTFE gasket (No. 407500)
- On the cold water valve block :
o Change cold water valve (No. 466273)
- On the pre-brewing valve :
o Change the pre-brewing valve (No. 450033)
- On the coffee groups
o Remove all the parts and uncork all the holes in the group head.
o Change the O-ring nozzle (No. 403457)
o Change the filter nozzle (No. 403458)
o Change the solenoid coffee (No. 4072391) + 2 PTFE gasket (No. 407500)
- On the 2 electrical taps
o Change the solenoid "hot water" (No. 470161)
o Change the 2 PTFE gasket (No. 407500)
o Change the O-ring of the adjusting screw (No. 400 039)
- On the 2 steam taps:
o Change the 2 O-rings (No. 403457)
o Change the 1 gasket (No. 407502)
o Change the O-ring (No. 356500)
- On the 2 "steam" output and on the 2 "hot water" output
o Change the O-ring (No. 061200)
o Change the O-ring (No. 055300)
o Change the washer (No. 401320)
o Change the O-ring of steam nozzles (No. 055400)
- On the flowmeter :
o Change the non-return valve (No. 415167)
- Change the silicone tubes evacuation 3-way valves cafes (No. 405621)
- For water quality issues, it is recommended to fully drain the boiler.
MONTE-CARLO - 11/2015 - SOFT V 2.11 44
Page 45

16 ELECTRIC DESIGNATIONS
REFERENCES
DESIGNATIONS
BAF
Fuse box
CN i
Connector n° i
CP i
Coffee buttons GROUPE n° i
CV i
Flow meter GROUPE n° i
D
Circuit breaker 25 A
EC
Tea solenoid valve.
EE
Inlet valve
EV i
Coffee solenoid valve n°i
F1
Fuse 3.15A
F2
Fuse 1A
K TE
Tea key 1
K VAP
Steam key
LCDi
Connector DISPLAY GROUPE i
LV
Steam Control system probe
MP
Pump
ON / OFF
On / Off button
SV
Temperature sensor for steam boiler
RCCi
Heating element group n° i
RCi
Heating element n° i for steam boiler
RS
Security relay.
RV i
Adjustment of the display contrast groups n° i
SN
Level probe
SS
Security probe
ST i
Temperature sensor group n° i
STR
Auxiliary contact of relay RS
TSi
Coffee boiler n° i security thermostat
TSV
Steam boiler security thermostat
VAP
Steam solenoid valve for steam control (option)
Pi
Bleeding solenoid valves Gr i
CODE COULEURS FILS
CABLE COLOUR CODE
1
marron
brown
2
rouge
red
3
orange
orange
4
jaune
yellow
5
vert
green
6
bleu
blue
7
violet
violet
8
gris
grey
9
blanc
white
0
noir
black
MONTE-CARLO - 11/2015 - SOFT V 2.11 45
Page 46
17 ELECTRIC DRAWING
17.1 CPU board
MONTE-CARLO - 11/2015 - SOFT V 2.11 46
Page 47
17.2 Electrical power diagram for “400V 3L N PE”
MONTE-CARLO - 11/2015 - SOFT V 2.11 47
Page 48
17.3 Electrical power diagram for “230 V 1L N PE”
MONTE-CARLO - 11/2015 - SOFT V 2.11 48
Page 49
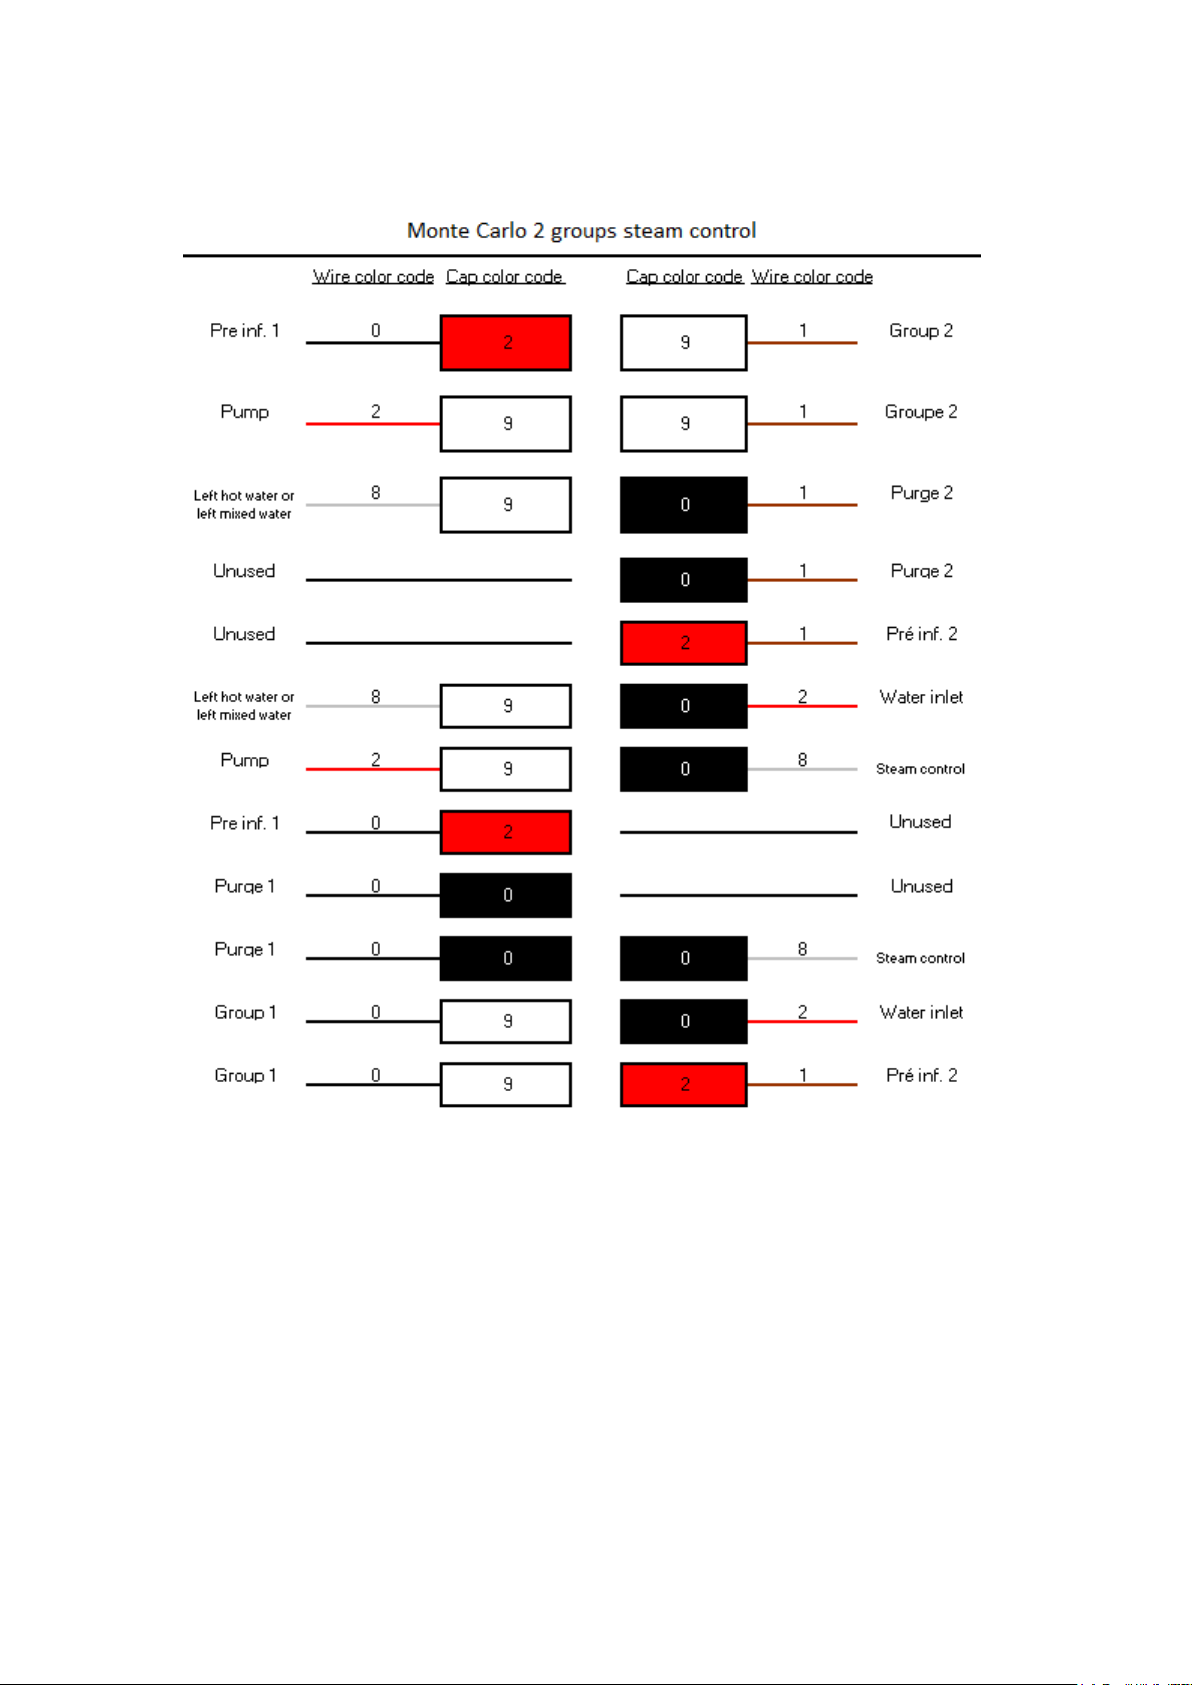
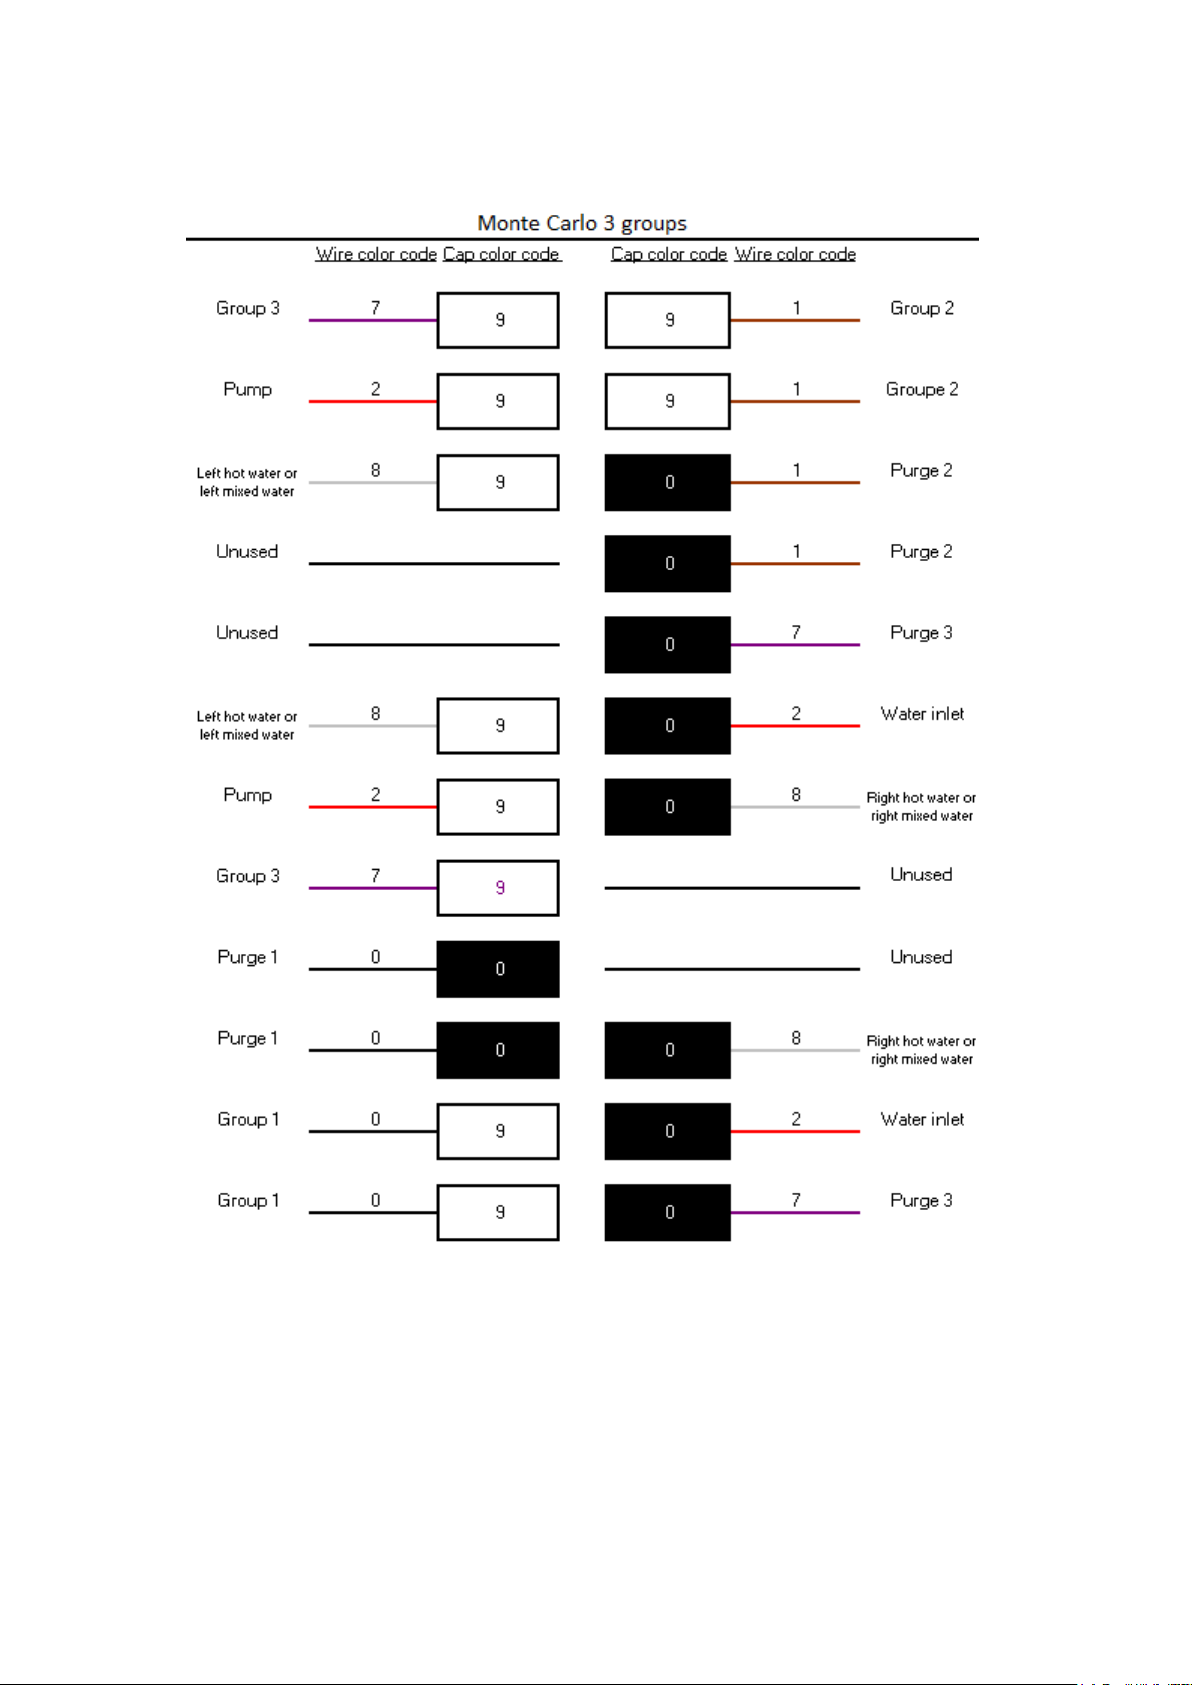
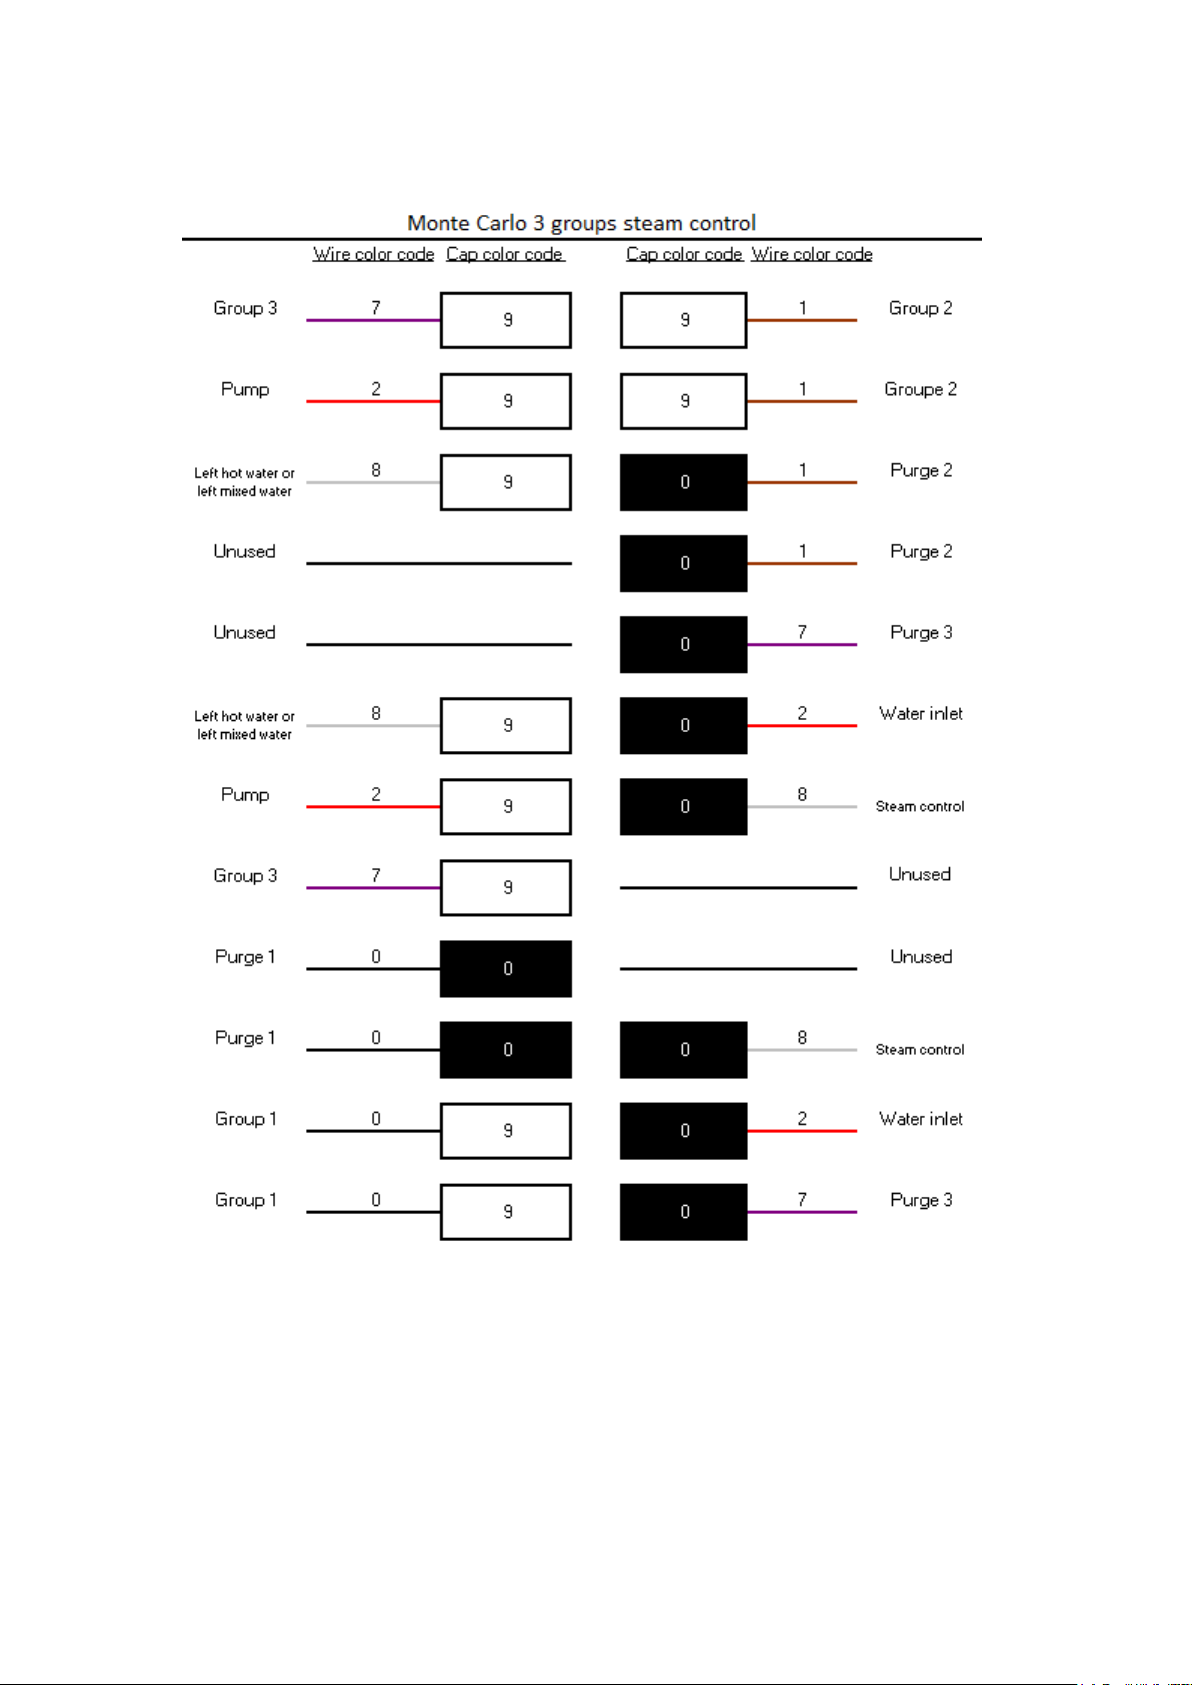
17.4 Connecting diagram: 12 fuses box
MONTE-CARLO - 11/2015 - SOFT V 2.11 49
Page 50
MONTE-CARLO - 11/2015 - SOFT V 2.11 50
Page 51
MONTE-CARLO - 11/2015 - SOFT V 2.11 51
Page 52
MONTE-CARLO - 11/2015 - SOFT V 2.11 52
Page 53
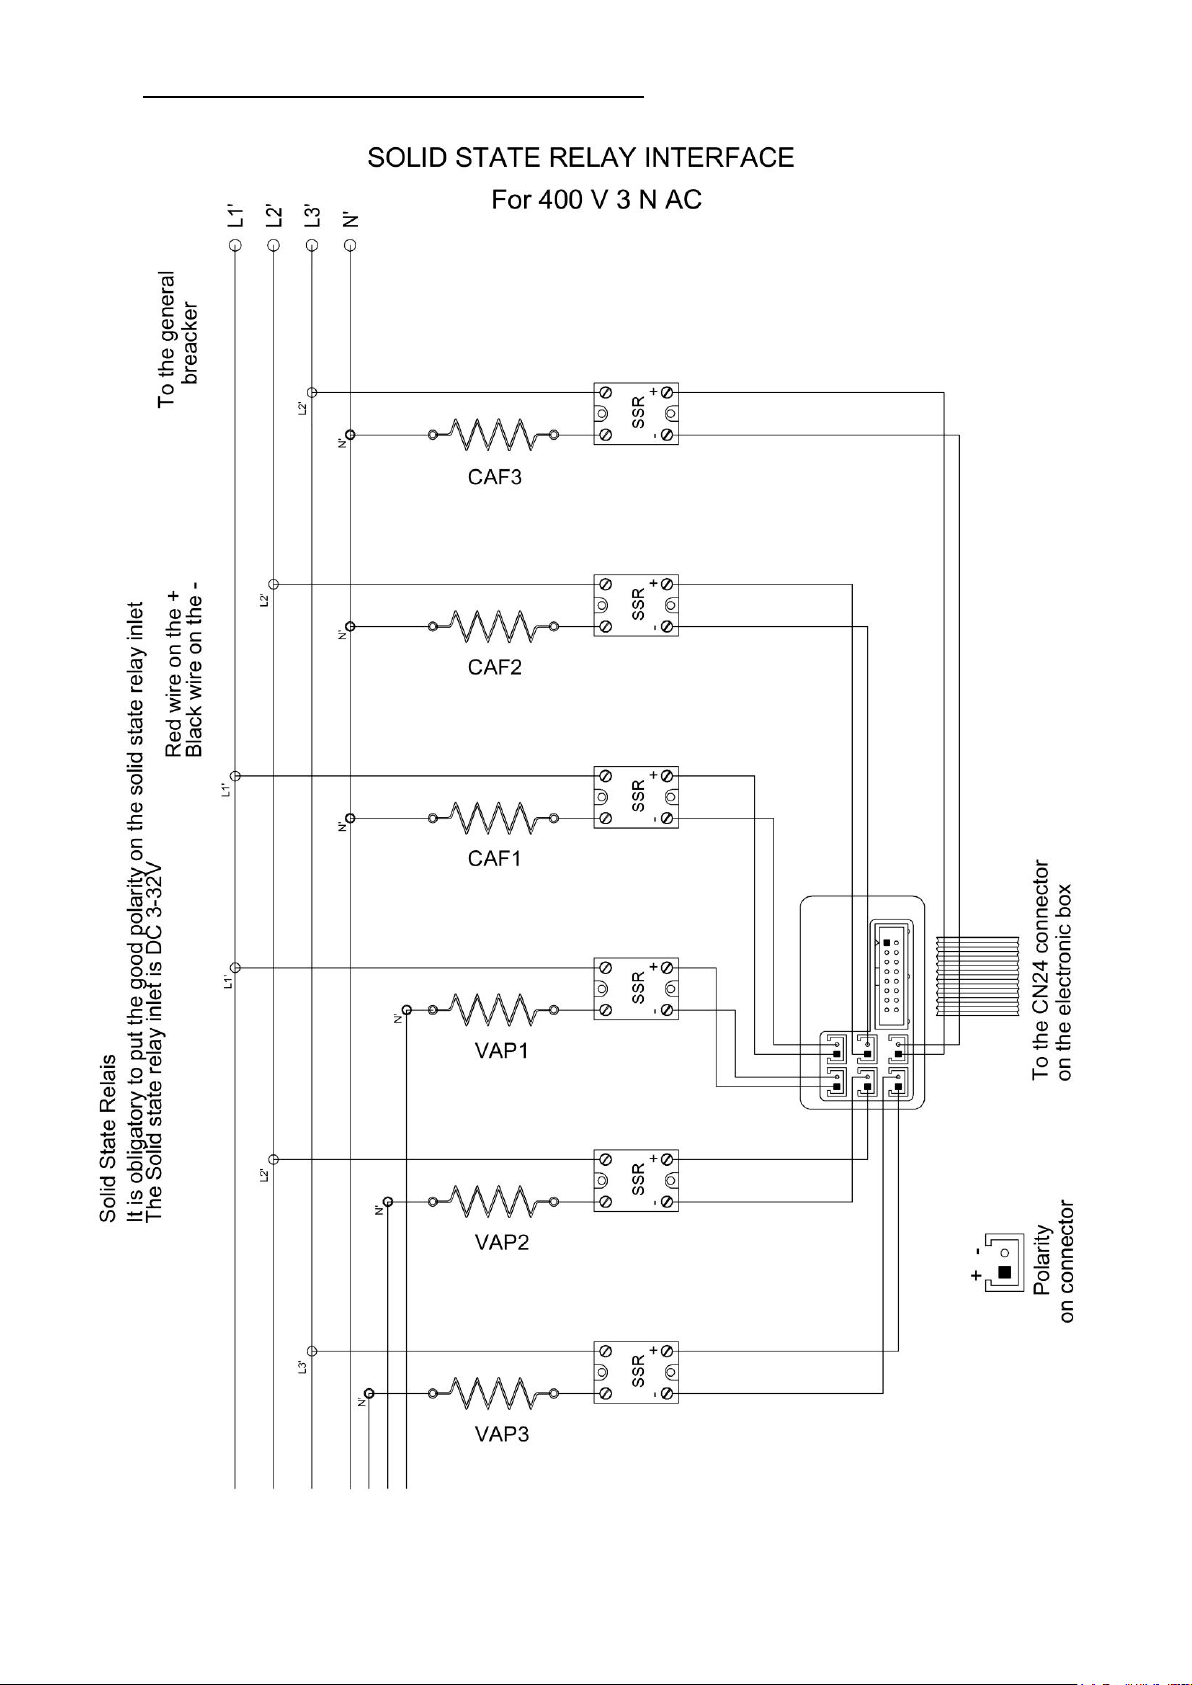
17.5 Solid state relay interface for “400 V 3NAC”
MONTE-CARLO - 11/2015 - SOFT V 2.11 53
Page 54
17.6 Low voltage wiring
MONTE-CARLO - 11/2015 - SOFT V 2.11 54
Page 55
18 HYDRAULIC SCHEME
MONTE-CARLO - 11/2015 - SOFT V 2.11 55
Page 56
MONTE-CARLO - 11/2015 - SOFT V 2.11 56
Page 57

CODE
Description
Faults
Recommandations
A01
Coffee boiler 1 probe alarm
- Coffee boiler 1 t° probe in
short-circuit or
disconnected.
- Check the probe
- Check the probe connection
- Check the electronic board
A03
Coffee boiler 2 probe alarm
- Coffee boiler 2 t° probe in
short-circuit or
disconnected.
- Check the probe
- Check the probe connection
- Check the electronic board
A05
Coffee boiler 3 probe alarm
- Coffee boiler 3 t° probe in
short-circuit or
disconnected.
- Check the probe
- Check the probe connection
- Check the electronic board
A09
Group 1 probe alarm
- Group 1 t° probe in shortcircuit or disconnected.
- Check the probe
- Check the probe connection
- Check the electronic board
A11
Group 2 probe alarm
- Group 2 t° probe in shortcircuit or disconnected.
- Check the probe
- Check the probe connection
- Check the electronic board
A13
Group 3 probe alarm
- Group 3 t° probe in shortcircuit or disconnected.
- Check the probe
- Check the probe connection
- Check the electronic board
A15
A17
Boiler probe alarm
- Boiler t° probe in shortcircuit or disconnected.
- Check the probe
- Check the probe connection
- Check the electronic board
A19
Steam control probe alarm
- Steam control t° probe in
short-circuit or
disconnected.
- Check the probe
- Check the probe connection
- Check the electronic board
A22
Safety probe alarm (low level)
- Low level safety probe
didn’t detect water for more
than 2 seconds => boiler
heating stopped
- Check the probe (limestone)
- Check the probe connection
- Check the electronic board
- Check that the boiler fills
- Check the water inlet
A23
Boiler time out alarm
- Time allocated to the
boiler heating exceeded.
- Check the boiler t° probe
- Check the probe connection
- Check the electronic board
- Check the heaters and the relays
- Check the programmed heating time
- Check the relay control box
A24
Coffee boiler 1 time out alarm
- Time allocated to the
coffee boiler 1 heating
exceeded.
- Check the t° probe
- Check the probe connection
- Check the electronic board
- Check the heater and the relay
- Check the programmed heating time
- Check the relay control box
A25
Coffee boiler 2 time out alarm
- Time allocated to the
coffee boiler 2 heating
exceeded.
- Check the t° probe
- Check the probe connection
- Check the electronic board
- Check the heater and the relay
- Check the programmed heating time
- Check the relay control box
A26
Coffee boiler 3 time out alarm
- Time allocated to the
coffee boiler 3 heating
exceeded.
- Check the t° probe
- Check the probe connection
- Check the electronic board
- Check the heater and the relay
- Check the programmed heating time
- Check the relay control box
A27
Flow meter 1 time out alarm
- No flowmeter 1 pulse after
5 seconds
- Check the flowmeter (flashings)
- Check the flowmeter connection
- Check the electronic board
- Check for clogged coffee group
19 ALARM
MONTE-CARLO - 11/2015 - SOFT V 2.11 57
Page 58

A28
Flow meter 2 time out alarm
- No flowmeter 2 pulse after
5 seconds
- Check the flowmeter (flashings)
- Check the flowmeter connection
- Check the electronic board
- Check for clogged coffee group
A29
Flow meter 3 time out alarm
- No flowmeter 3 pulse after
5 seconds
- Check the flowmeter (flashings)
- Check the flowmeter connection
- Check the electronic board
- Check for clogged coffee group
MONTE-CARLO - 11/2015 - SOFT V 2.11 58
Page 59
Power 1
Power 2
Power 3
Power 4
Power 5
Power 6
Max power
(W)
Max current
(A)
Max power
(W)
Max current
(A)
Max power
(W)
Max current
(A)
Max power
(W)
Max
current
(A)
Max power
(W)
Max current
(A)
Max power
(W)
Max
current
(A)
MC 2G
1900
8
3300
14
4700
20
5700
25
6700
29
6700
29
MC 3G
2600
11
4600
20
6600
29
7600
33
8600
37
9600
42
MC 2G K
3000
13
5500
24
7500
33
9500
41
11500
50
11500
50
MC 3G K
3100
13
5600
24
8100
35
10100
44
12100
53
14100
61
20 POWER MANAGEMENT
The Monte Carlo machines are three phase machines
When the machine is connected to a three phase network, the absorbed power consumption does not need to be flanged.
In this case the Power Management is at its maximum position: 6.
The machine can be connected to a single phase 230V.
In this case:
1: Change the power cable with a cable 3x6 ² (Conti reference: 103600)
2: Depending on the available amperage on the grid (16A / 20A / 32A):
It is necessary to adjust the power consumption of the machine.
Through the Power management (see table below)
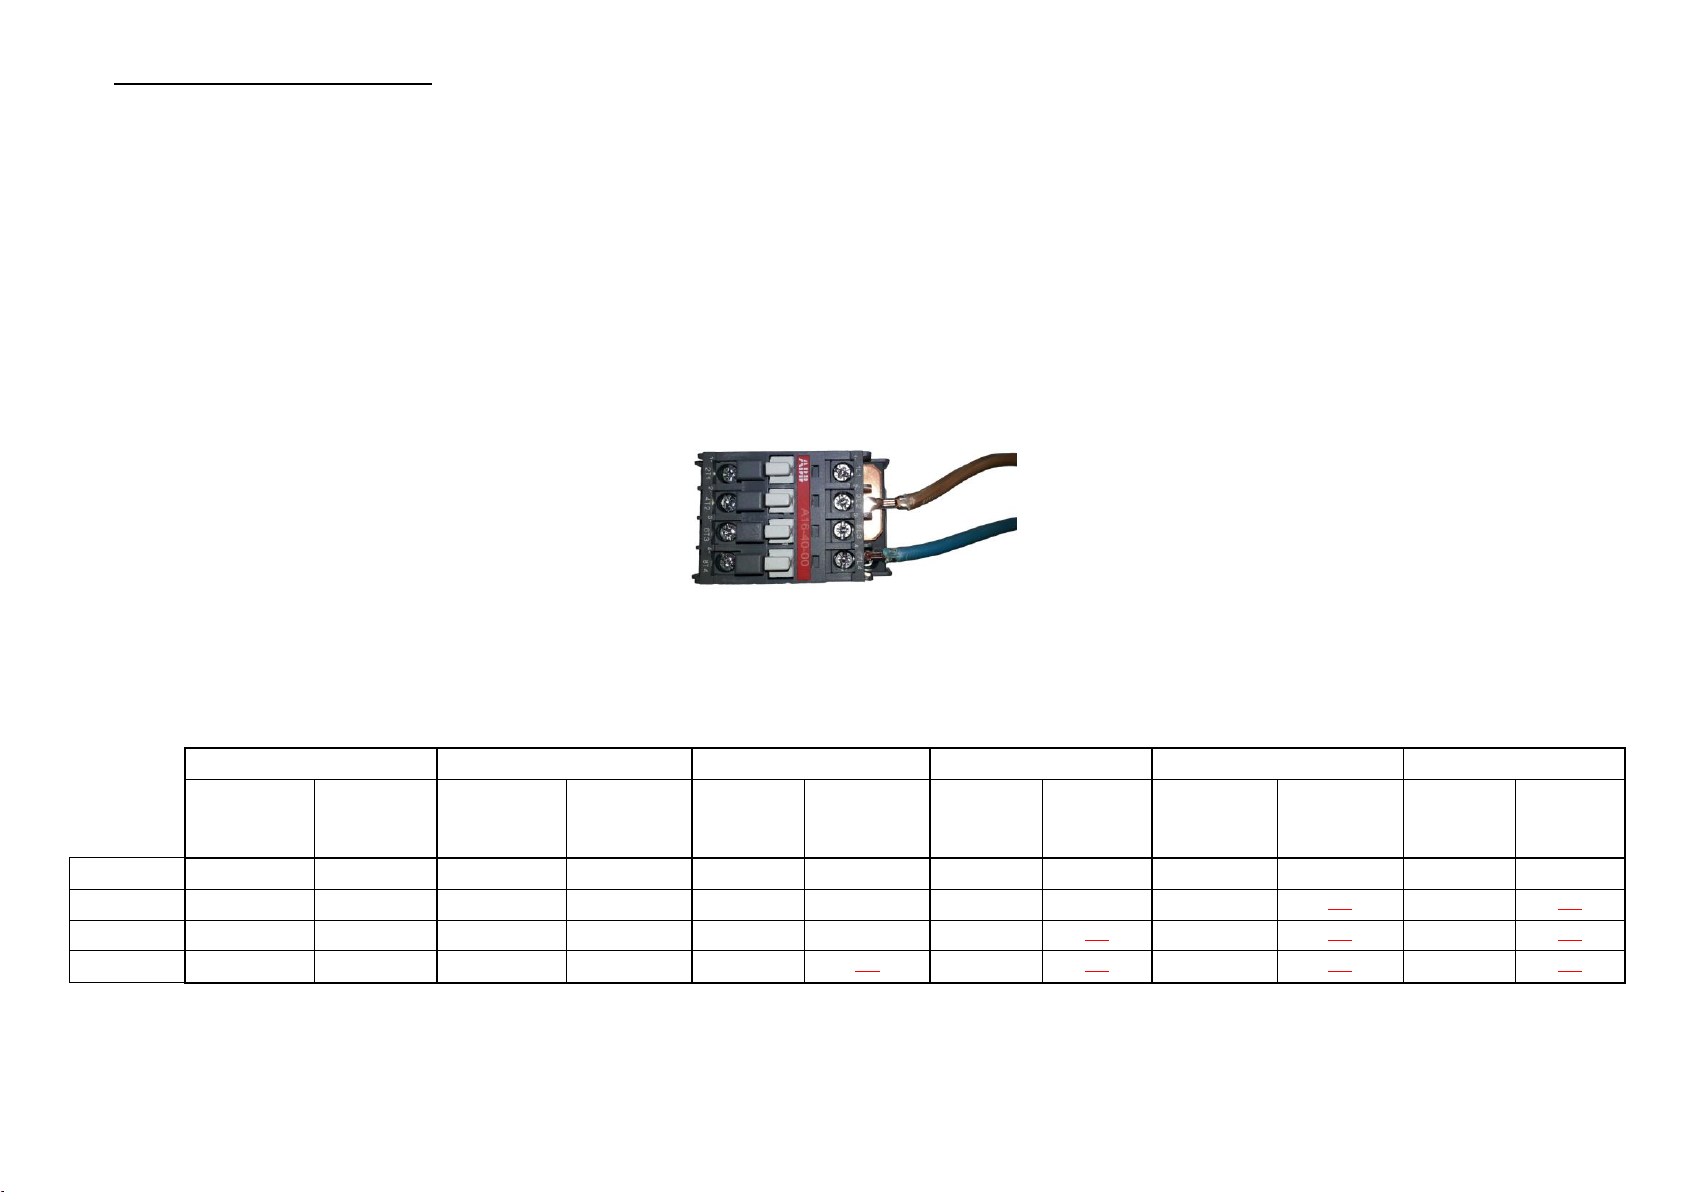
3: Here's how to connect the 3x6 ² cable on the general relay machine
Nota Bene:
It is possible to retain the original cable (5x2,5 ²), but in this case:
It is imperative to curb the power management 1 (or 2 maximum if the machine is not used too much)
Power parameters and Current comsumption (for 230 volts monophase)
Power 1/2/3/4/5/6:
MONTE-CARLO - 11/2015 - SOFT V 2.11 59
That’s the number of heating element can be supplyied at the same time in the machine
The priority is always given to the coffee Boiler
Page 60

La Ruche - 1 , Av e nue Albert II - B. P . 1 19 - MC 98007 MON ACO Ced ex
Tél.: (377) 9 3 1 0 43 43 Fax : (377) 9 3 1 0 43 44
http ://www . c o n t i-espresso. co m h t tp : //www.conti - sp areparts.com
E-mail:tech@ c o n t i-espresso. co m
 Loading...