

Page 1

Operator’s Guide
Wide Format Color & Monochrome
Scanners
Page 2

Table of Contents
1. About This Guide 1-1
2. Scanner System Requirements 2-1
3. Installation 3-1
3.1 Set up the scan station 3-1
3.2 Smart Card 3-1
3.3 Install Drivers and Maintenance software 3-1
3.4 Select the Scanner Interface 3-2
3.4.1 Interface Types 3-2
3.4.2 Cable Connector Panel on the Scanner 3-3
3.5 Connection through the FireWire interface 3-6
3.5.1 Check your computer for FireWire 3-6
3.5.2 Connect the scanner with the Firewire cable 3-6
3.5.3 “Unknown device is found” message 3-7
3.6 Connection through the USB interface 3-7
3.6.1 Check your USB Port 3-7
3.6.2 Connect the scanner with the USB cable 3-8
3.6.3 “Unknown device is found” message 3-8
3.7 Connection through the SCSI interface 3-9
3.7.1 Step 1: Install the SCSI host adapter board 3-9
3.7.2 Step 2: Install the SCSI driver software 3-10
3.7.3 Step 3: Connect the scanner to the PC 3-10
3.7.4 Step 4: Set the scanner DIL-switches 3-10
3.8 Installation Verification 3-15
3.9 Preliminary Maintenance 3-15
4. Operator Panel and Indicators 4-1
4.1 Scanner Control area 4-3
4.2 Application Control Area 4-5
4.3 Paper Control area 4-6
5. Original’s Insertion Slot 5-1
5.1 Rulers 5-1
5.2 Scanning Thick Media 5-2
5.2.1 Manual Adjustment for thick media 5-2
5.2.2 Automatic Thickness Adjustment Control 5-3
5.2.3 When Scanning in Extended Media Positions 5-4
5.3 Accessing the scan area 5-5
5.3.1 Detach the pressure platen – non ATAC models 5-5
5.3.2 Flip Open the Pressure Platen – ATAC models 5-6
5.4 Changing the glass plate 5-6
6. Maintenance 6-1
Page 3

7.
Appendix A: Important Safety Instructions 7-1
8. Appendix B: Regulations 8-1
Page 4

About This Guide 1-1
1. About This Guide
This guide explains how to operate and maintain your wide format
scanner.
The operator’s guide is general and covers several scanner models,
although there are specific individual features between the different
models. Therefore, you should view the scanner specifications for
your particular model if you are unsure whether a feature described in
this guide is relevant for your specific scanner. For example,
descriptions in this guide on color calibration and color scanning
speeds do not apply for monochrome-only scanners.
This guide assumes basic knowledge of your computer and operating
system and does not repeat material from their documentation.
Be sure to refer to the WIDEsystem TOOLS User’s Guide found on
the WIDEsystem TOOLS CD-ROM for additional information
regarding installation and maintenance of your scanner.
Page 5

System Requirements 2-1
2. Scanner System Requirements
• PC or supported workstation.
• Compatible Windows operating system - see the WIDEsystem
TOOLS documentation for details."
• USB port, enabled FireWire Port, or an SCSI interface-kit matching
your workstation. (Note: USB and FireWire are not supported on
Windows NT)
• The WIDEsystem TOOLS CD supplied with your scanner.
• Scanning software and compatible third party software.
Page 6

Installation 3-1
3. Installation
3.1 Set up the scan station
Your wide format scanner should be placed either on a sturdy table or
the specially designed stand-alone floor stand. The 25” models are
small enough to place on your desk.
Make sure there is enough space behind the scanner to allow the
media to run out. Thick stiff media requires space that is at least as
large as the media length.
Slots or openings in the cabinet at the back or bottom are provided for
ventilation. This ensures reliable operation of the product and protects
it from overheating. These openings must never be blocked or
covered by placing the unit on a bed, sofa, rug, or other similar soft
surface. Your scanner should never be placed near or over a radiator
or heat register. You should not place the scanner in a built-in
installation unless proper ventilation is provided.
See also the Safety Instructions at the end of this operator’s guide.
3.2 Smart Card
Check that the scanner Smart Card is correctly installed (contact side
downwards) and corresponds to your scanner model. You will find the
Smart Card in the small drawer labeled “PUSH” behind the scanner
front streamer (remove the streamer to access the drawer).
The scanner will only function correctly when a Smart Card is
inserted. Notice that the SCSI DIL switch controls are in the Smart
Card drawer. Setting the DIL switch controls is described under the
sections for SCSI installation.
3.3 Install Drivers and Maintenance software
You are now ready to install the setup controls, panel commands,
basic drivers and maintenance utilities for your scanner. Insert the
WIDEsystem TOOLS CD-ROM and click the relevant installation
option(s). Installing the WIDEsystem software will also install your
drivers. Follow the installation instructions described in the
WIDEsystem TOOLS User’s Guide that is included on the CD.
Page 7

Installation 3-2
3.4 Select the Scanner Interface
Different scanner models support specific types of interface
connections. On some scanners, two different types of interfaces can
be used and you need to select the one that is best for your scanning
purposes and is compatible with your PC system. The Interface types
and their advantages are described in the following section.
3.4.1 Interface Types
FireWire
FireWire is currently the fastest connection type for both color and
monochrome scanning. FireWire can accommodate 400 megabits
(around 50 megabytes) per second, which is more than adequate for
high volume scanning of large formats. FireWire is a plug-and-play
(PnP) specification. You do however need a FireWire card installed on
your computer and many computers are delivered with a FireWire
card preinstalled. Check your computer specifications and operating
system to see if your system is equipped for FireWire connectivity.
Note: FireWire is not supported on Windows NT.
USB
USB is a connectivity specification that allows computer peripherals to
be attached to a computer and eliminates the need to open the
computer and install cards into dedicated slots. USB is a plug-n-play
(PnP) specification that does not require configuration of switches or
jumpers as with SCSI.
The USB 1.1 bus provided with USB connection scanners supports a
data transfer speed of 12Mbps. USB is supported on Windows 98 or
above. USB is not supported on Windows NT. Most newer PC’s and
laptops come equipped with a USB port.
USB 1.1 is relatively slow with color scanning compared to FireWire
and SCSI.
SCSI
Setting up the SCSI connection requires installation of an SCSI board
in your PC, installing the SCSI driver and setting the scanners SCSI
connection ports. SCSI is recommended if you cannot use the
FireWire connection option yet you require high speed color scanning.
SCSI interface scanners support the Ultra SCSI (8-bit Narrow) SCSI
type interface.
SCSI is supported on Windows and Windows NT host platforms.
Page 8

Installation 3-3
3.4.2 Cable Connector Panel on the Scanner
The interface cable connectors are grouped in a Cable-ConnectorPanel found on the underside of the scanner and accessed from the
scanner’s back.
As illustrated in the interface table above, the different scanner
models support different options for interfacing. You will find one of
the following types of cable connector panels on your scanner.
1. USB
2. USB + SCSI
3. FireWire + SCSI
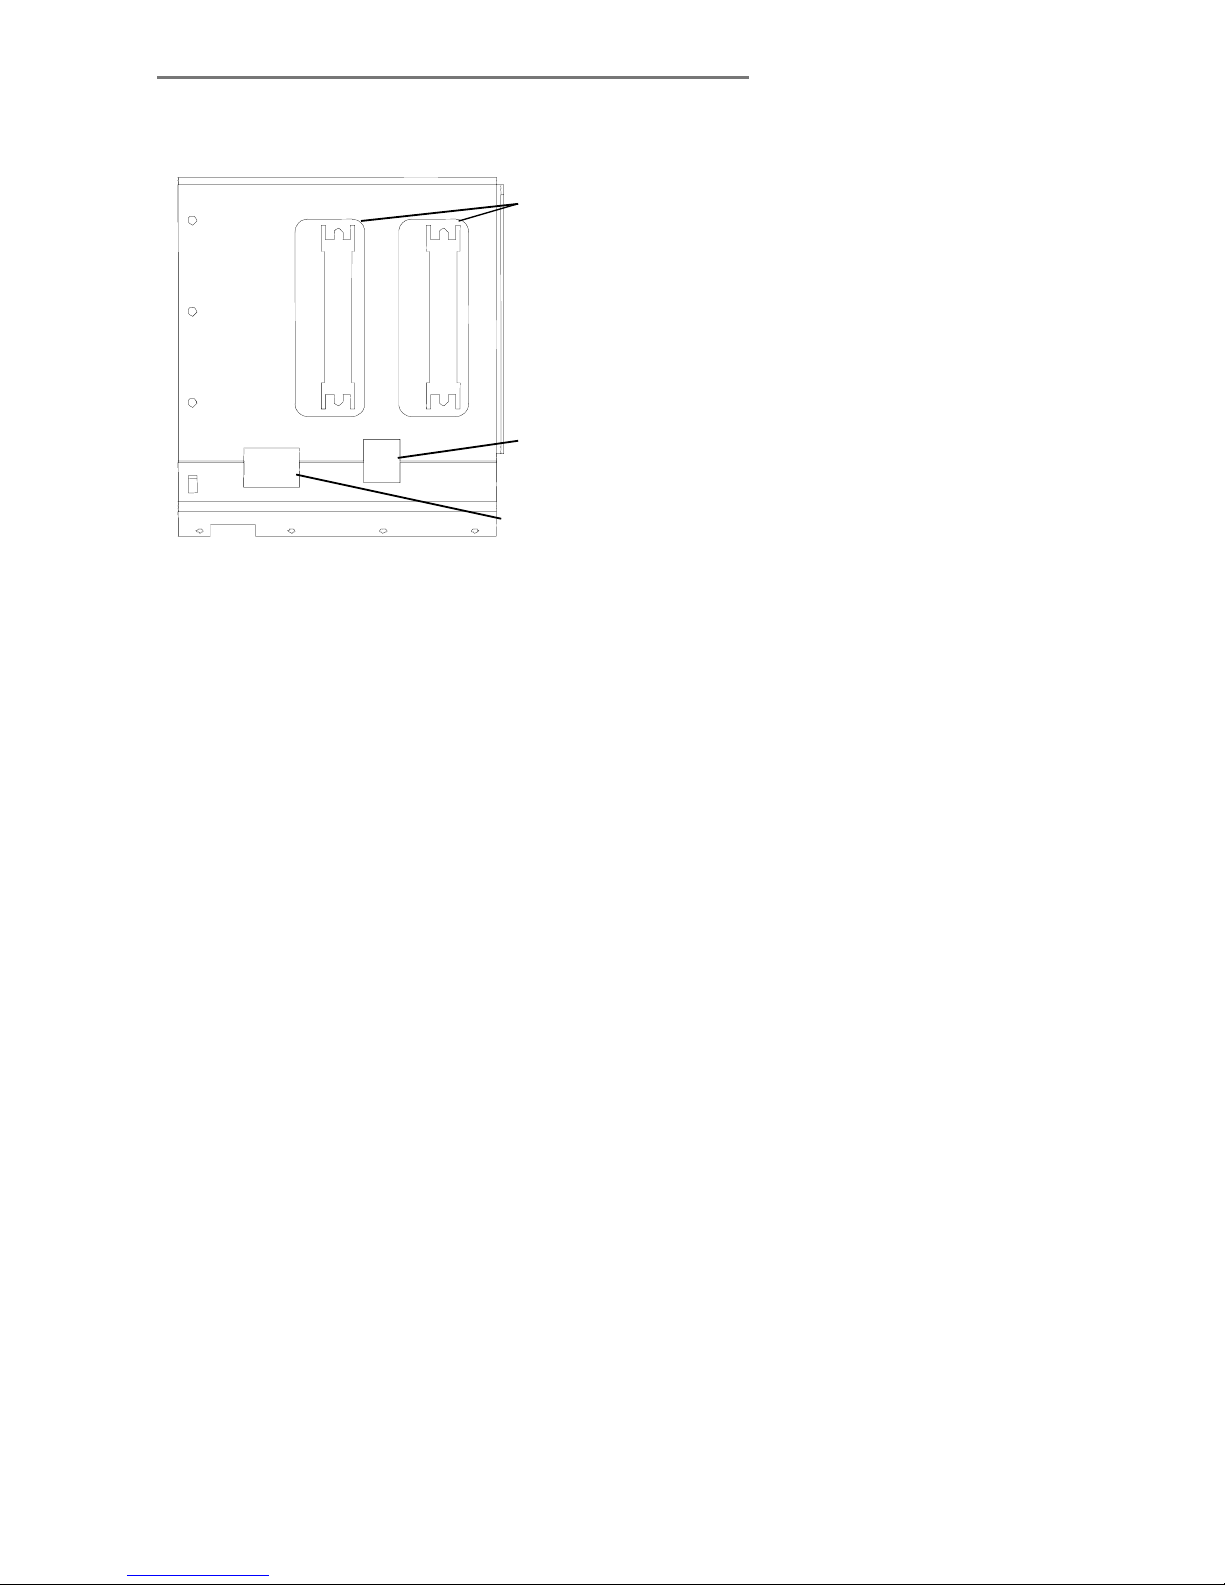
USB (only) Cable Connector
AUX
USB
USB connector
AUX
(Future purpose connec
t
Figure 3-1 Scanner USB Connector
Page 9
Installation 3-4
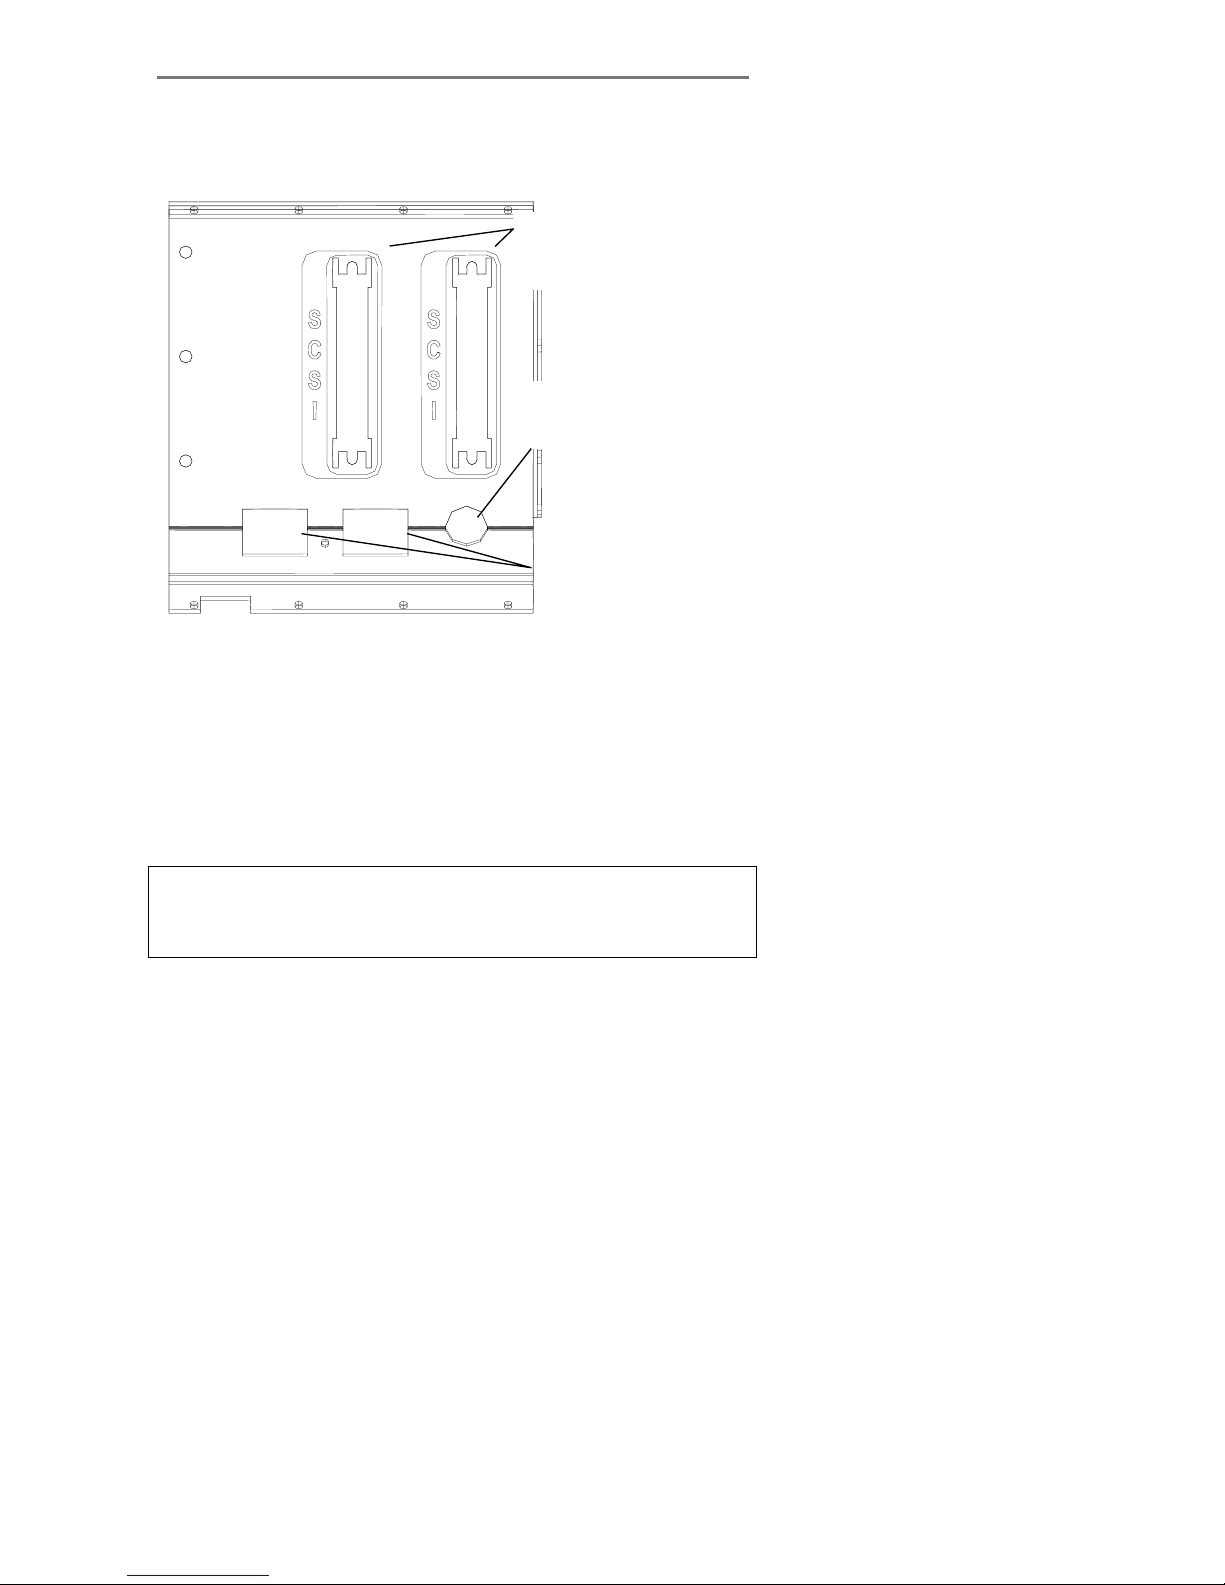
USB + SCSI Cable - Connectors
AUX
USB
S
C
S
I
S
C
S
I
SCSI connectors
(One for connection to PC
and one for daisy-chaining
another device)
USB connector
AUX
(Future purpose connector)
Figure 3-2 Scanner USB and SCSI Connectors on Cougar Scanners
Note: The extra SCSI connector is only used if you wish to daisychain another device to your system and not for interfacing with
another PC.
Page 10
Installation 3-5
FireWire + SCSI Cable - Connectors
AUX
FIREWIRE
FIREWIRE
AUX
(Future purpose connector)
SCSI connectors
(One for connection to PC
and one for daisy-chaining
another device)
FireWire connectors
Figure 3-3 FireWire + SCSI Connector
Note: The extra SCSI connector and extra FireWire connector are for
daisy-chaining another device to your system and not for interfacing
with another PC.
Regulatory Notice: Your scanner product has been tested to comply
with the EMC Standards EN55022 and FCC, Part 15. To maintain
compliance, only use shielded SCSI/USB/FireWire (FW) interface
cables.
Page 11

Installation 3-6
3.5 Connection through the FireWire interface
To connect through FireWire, you will need the FireWire cable that
came with your scanner and your computer must be enabled for
FireWire through a FireWire card and port. FireWire is not supported
on Windows NT.
3.5.1 Check your computer for FireWire
Some computers come with built in FireWire inputs. You can check if
FireWire is enabled by following these steps:
1. In Windows, Click Start, Settings, and then Control Panel.
2. Double-click the System icon.
3. Click the Device Manager tab.
If a FireWire host controller (IEEE) is listed, then FireWire is enabled
on your computer. If you do not see this device listed, you will need to
install a FireWire card.
To install a FireWire card, shutdown your computer and install the
card into an empty PCI slot. See your computer’s user’s manual for
installation of new hardware and the driver installation information that
came with your FireWire card to setup the device under your specific
Windows operative system.
3.5.2 Connect the scanner with the Firewire cable
1. Locate the FireWire cable that came with your scanner.
2. Connect the PC end to the FireWire port on your computer
3. Connect the peripheral end to a FireWire connection socket
on your scanner.
4. If you have not yet installed the driver through the
WIDEsystem TOOLS CD, Windows will display the “New
Hardware Found Wizard dialog box after you connect the
cable.
5. If an ”Unknown device is found” message appears after you
plug in the cable, follow the steps described below under
Unknown device is found message.
Page 12

Installation 3-7
6. Follow the installation instructions in the WIDEsystem TOOLS
User’s Guide that came on the WIDEsystem TOOLS CD. The
scanner drivers are installed through an installation wizard.
3.5.3 “Unknown device is found” message
If your system has problems detecting the scanner, make sure your
FireWire port is enabled (see above). If your system still does not
detect the device, disconnect the FireWire cable, unplug the power to
your scanner and turn off the computer. Then reconnect the scanner
and restart the PC and restart the driver installation.
3.6 Connection through the USB interface
USB is supported on Windows 98 or above. USB is not supported on
Windows NT. Your computer must have an enabled USB port.
3.6.1 Check your USB Port
Even if the computer has a USB port, it will not function unless it is set
up, or enabled. Follow the instructions below to determine whether
your USB port is enabled.
4. In Windows, Click Start, Settings, and then Control Panel.
5. Double-click the System icon.
6. Click the Device Manager tab.
7. Click the plus (+) icon to the left of the Universal Serial Bus
Controller item.
If a USB host controller and a USB root hub are listed, then USB is
probably enabled on your computer. If you do not see these devices
listed, refer to your computer's documentation or contact the
manufacturer for more information on enabling and setting up USB.
Page 13

Installation 3-8
3.6.2 Connect the scanner with the USB cable
1. Locate the USB cable that came with your scanner.
2. Connect the PC end to a USB port on your computer
3. Connect the peripheral end to the USB connection socket on your
scanner.
4. If you have not yet installed the driver through the WIDEsystem
TOOLS CD-ROM, Windows will display the “New Hardware
Found Wizard dialog box after you connect the cable.
5. If an ”Unknown device is found” message appears after you plug
in the USB cable, follow the steps described below under
Unknown device is found message.
6. The driver is located on the WIDEsystem TOOLS CD-ROM that
came with your scanner. Insert the CD into your CD drive.
7. Follow the installation instructions in the WIDEsystem TOOLS
User’s Guide that came with the CD. The scanner drivers are
installed through an installation wizard.
3.6.3 “Unknown device is found” message
If your system has problems detecting the scanner, make sure your
USB port is enabled (see above). If your system still does not detect
the device, disconnect the USB cable, unplug the power to your
scanner and turn off the computer. Then reconnect the scanner and
restart the PC and restart the driver installation.
Page 14

Installation 3-9
3.7 Connection through the SCSI interface
SCSI stands for Small Computer System Interface and is pronounced
"skuzzy". It's a standard for connecting peripherals to your computer
via a standard hardware interface, which uses standard SCSI
commands. Your SCSI interface supports the Ultra SCSI (8-bit
Narrow) SCSI type interface.
In order to put together a PC with a SCSI interface for your scanner
you'll need:
• A SCSI host adapter board (also called a SCSI controller)
• SCSI driver software
• A SCSI cable
How to set up the SCSI interface
Setting up the SCSI Interface requires the following steps. Each step
is described in detail in the following sections:
1. Install the SCSI host adapter board into an empty slot in PC.
2. Install the SCSI driver software that came with the scanner.
3. Connect the scanner to PC.
4. Set scanner DIL switches if the default settings require changing.
5. Set scanner DIL switch 4 termination properties.
3.7.1 Step 1: Install the SCSI host adapter board
1. Set the PC-system unit power-switch to OFF.
2. Set any external device power switches to OFF (such as printers,
displays etc.).
3. Unplug the PC-system unit and all other devices from the wall
outlet.
4. Remove the cover of your computer to expose the expansion
slots.
5. Align and insert the SCSI host adapter board into an empty slot.
6. Use the expansion slot panel screw to secure the host adapter to
the computer frame.
Page 15

Installation 3-10
3.7.2 Step 2: Install the SCSI driver software
SCSI driver installation will be dependent on your Windows operating
system. Follow the instructions for your operating system described in
the SCSI driver documentation.
3.7.3 Step 3: Connect the scanner to the PC
1. Be sure to disconnect the power cable from the scanner. If power
runs through the scanner at this point it may damage your SCSI
host adapter.
2. The SCSI connectors are accessed from the back of the scanner
and found underneath the left side (when facing the back).
3. Connect the SCSI cable that came with your scanner to one of the
two SCSI connectors. The extra connector is for daisy-chaining
another device to the system.
4. After the SCSI cable has been inserted in the connector the
power cable can be inserted into the scanner and plugged in.
3.7.4 Step 4: Set the scanner DIL-switches
The DIL-switches are used for setting up of the scanner’s SCSI
connection ports, and for selection of the scanner test mode and the
scanner forced boot start up mode.
The DIL-switches are set from the factory to default settings that apply
to most common configurations so usually you will not have to change
them. Best scanning performance is obtained with only one device on
the SCSI bus. However, if your configuration requires more than one
device on the bus, you may need to change the DIL-switch settings.
The factory default DIL-switch settings and the DIL-switch Value table
are shown on the following page. Use the table and the following
instructions for each switch to determine your DIL-switch settings if
you need to change them.
Before proceeding with setting the switches you must turn the
scanner power off. Removing and inserting the Smart Card (see
below) while power is on can damage the scanner.
Page 16
Installation 3-11
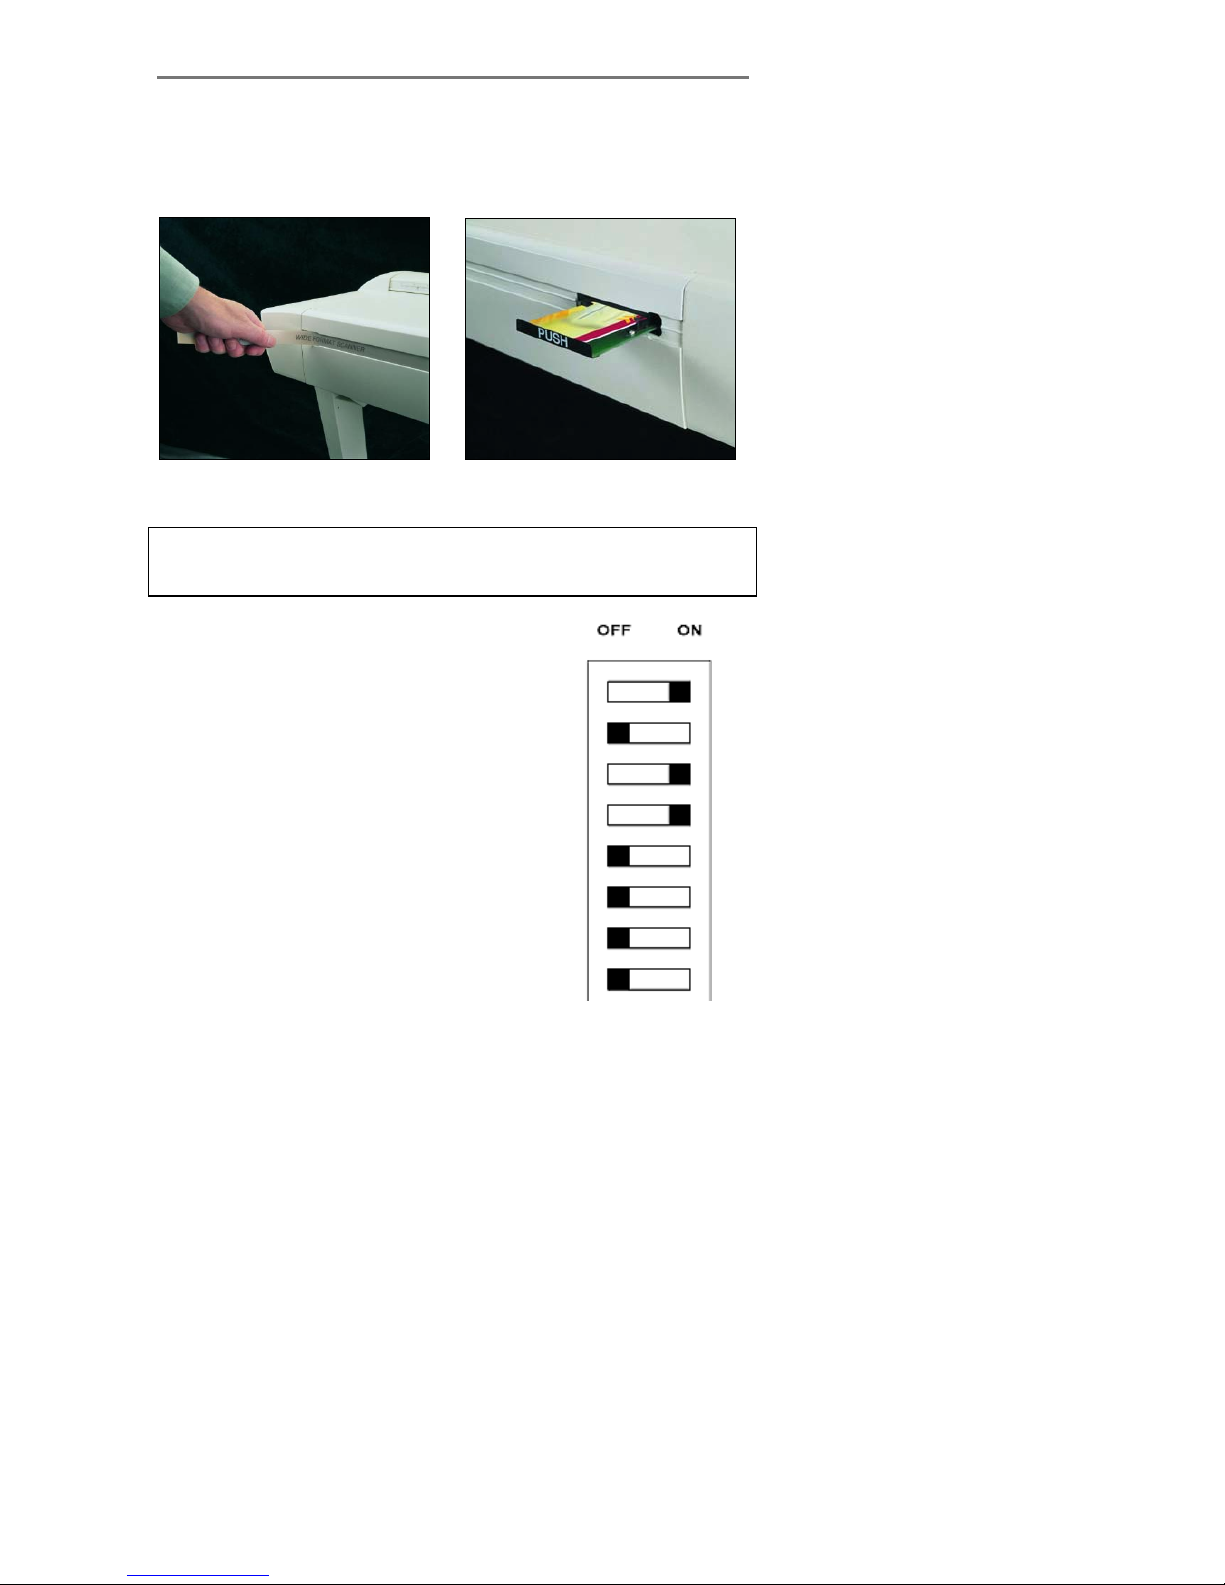
You will find the DIL-switches in the small Smart Card drawer labeled
“PUSH” behind the scanner front streamer. To access the switches
remove the streamer, push the drawer inwards and release so it pops
open and remove the Smart Card.
Figure 3-4 Access the DIL-switches
Important: Remember to reinsert the Smart Card when finished
setting the DIL-switches and before turning power on.
SCSI DIL-Switches – Factory Default Settings
SCSI Device Address 1
SCSI Device Address 2
SCSI Device Address 3
SCSI Built –in Termination 4
No Synchronous Transfer 5
Not in use 6
Force Boot Start up 7
Continuous Test Mode 8
Page 17

Installation 3-12
Device number setup – switch 1,2,3
Make sure the power to the computer and the scanner are OFF when
setting the SCSI device number, as the switch settings are only read
from the scanner DIL-switch during the scanner’s power up.
You can set up the SCSI device no. for the scanner to any unused
SCSI device no. The combination of the three SCSI Device Address
switches determines the scanners device no. To set the SCSI device
no. to the one required, you simply set the switches 1, 2 and 3 to the
combination of ON/OFF values specified in the table below. The
scanner is set as SCSI Device no. 2 from the factory.
SCSI device no / Switch combination:
1 2 3
SCSI device no. 0 ON ON ON
SCSI device no. 1 OFF ON ON
*SCSI device no. 2 ON OFF ON
SCSI device no. 3 OFF OFF ON
SCSI device no. 4 ON ON OFF
SCSI device no. 5 OFF ON OFF
SCSI device no. 6 ON OFF OFF
SCSI device no. 7 OFF OFF OFF
* Factory Default
SCSI built-in active termination – switch 4
Scanners with SCSI interface connectors have a built-in active SCSI
termination that works better than a passive terminator at high transfer
rates.
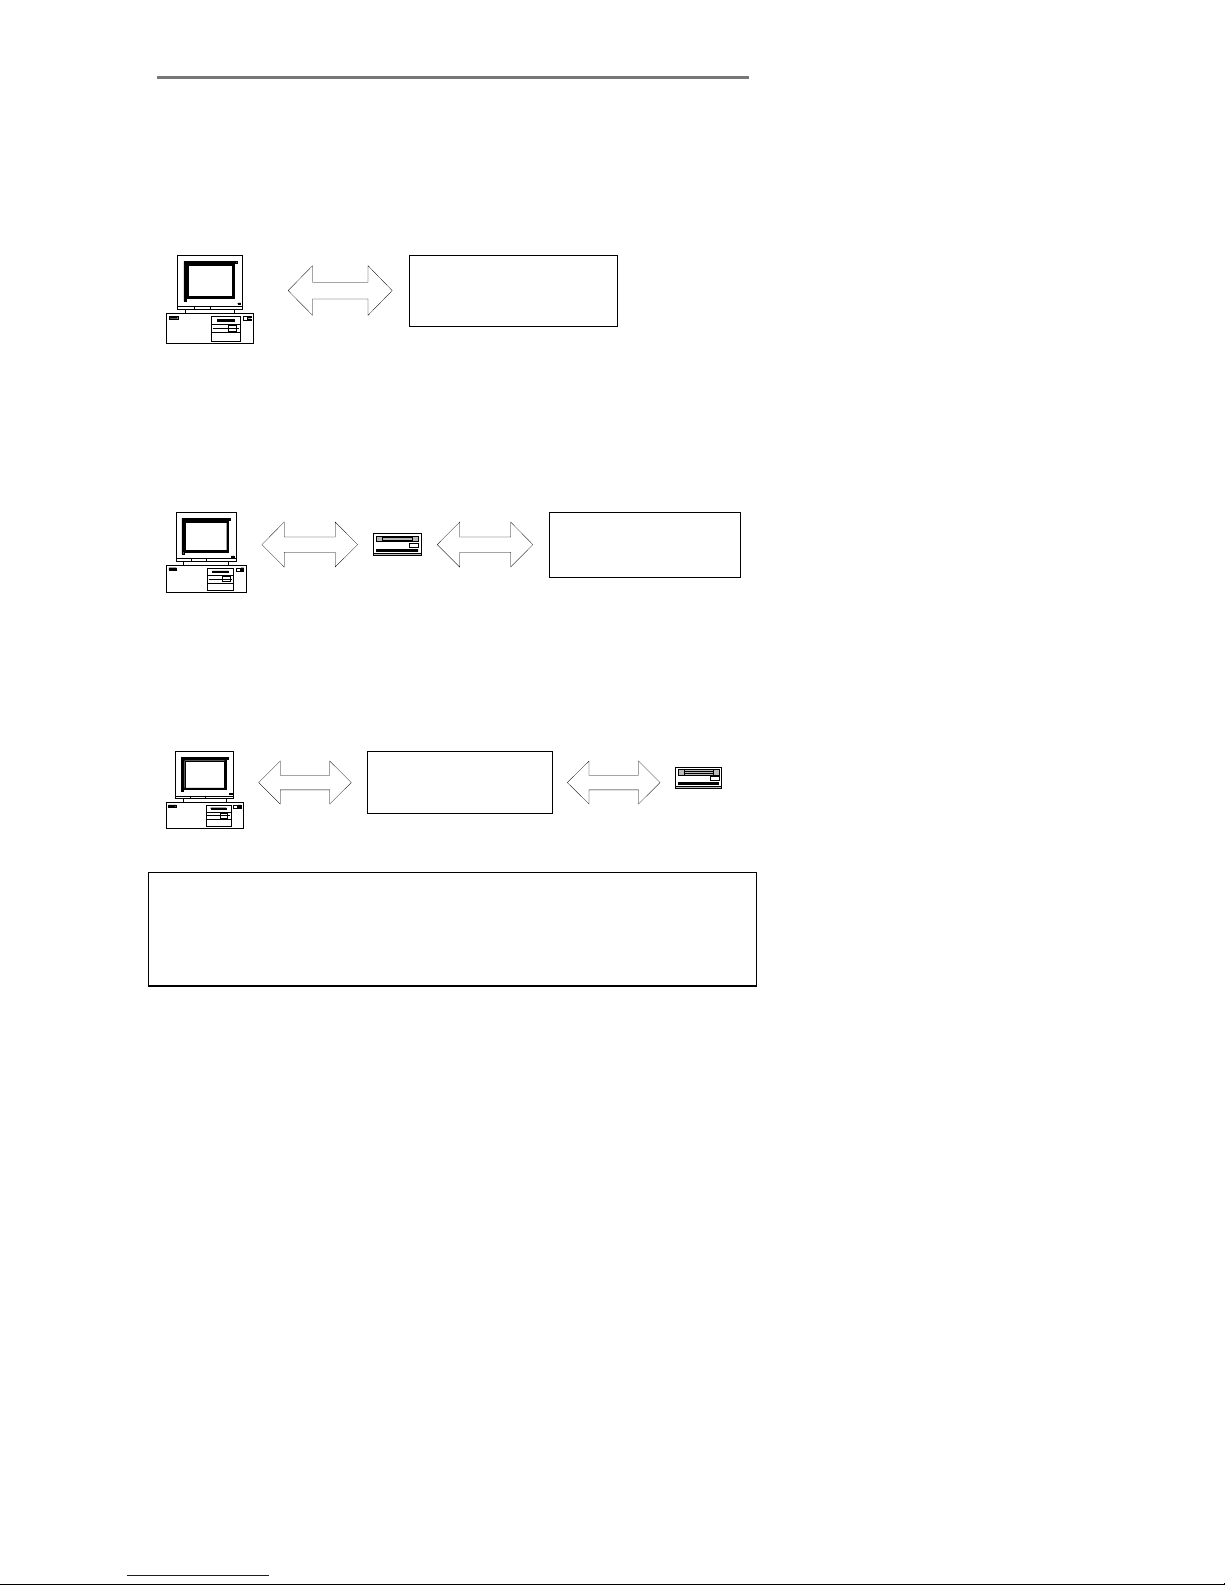
The built-in active termination for the SCSI bus is enabled by setting
switch 4 on the SCSI switch to ON and disabled by setting it to OFF.
If the scanner is the last device on the SCSI bus, make sure the builtin active SCSI termination is turned on. If the scanner is not the last
device make sure switch 4 is turned off. (see following illustrations).
Important: Never set switch 4 to ON and use a terminator block at the
same time.
Page 18
Installation 3-13
The following 3 scenarios show how to terminate the SCSI bus
correctly:
A. The Scanner is the only external device on the SCSI bus
Host Computer
SCSI
SCANNER
Switch 4 must be ON
B. The Scanner is the last device on the SCSI bus
SCANNER
Switch 4 must be ON
Host Computer
SCSI
CD-ROM
SCSI
C. The Scanner is not the last device on the SCSI bus
SCANNER
Switch 4 must be OFF
Host Computer
SCSI
CD-ROM
SCSI
Must be
terminated
Note: If the scanner is connected to an existing SCSI controller in the
PC that is used together with an internal SCSI device (f.ex. a hard
disk), make sure that the on-board SCSI termination is removed
before attaching the scanner. Please refer to the documentation for
the internal device for instruction.
Page 19

Installation 3-14
Troubleshooting and Test Controls – switches 5, 6, 7 and 8
Switch 5. No synchronous transfer: Disables SCSI synchronous
transfer mode (reverts to asynchronous transfer). Only use this mode
for testing as it slows the scanner down.
Switch 6. Not in use – no effect.
Switch 7. Force boot start up: If a malfunction occurred during an
update of the scanner firmware, this switch forces the scanner into
firmware boot mode, enabling you to download the firmware again.
Switch 8. Continuous test mode: The continuous test mode is only
used for special technical maintenance and renders the scanner
inaccessible.
Important: For normal scanning, make sure that none of the
troubleshooting and test control switches are on.
Page 20

Installation 3-15
3.8 Installation Verification
Turn on the power to the computer and the scanner.
If you have not yet done so, install the Scanner Maintenance Software
and your scanning applications on your PC. Follow the installation
instructions supplied with each item. The Scanner Maintenance
Software is on your WIDEsystem TOOLS CD.
Start up the maintenance software (Start – Programs – Scanner
Maintenance). The program will detect your scanner if it is installed
correctly and display an introduction to the maintenance wizard.
Otherwise, a message will inform you that your scanner could not be
detected. If this is the case turn off power to all connected devices
and reboot the system.
3.9 Preliminary Maintenance
Once you have setup your scanner and verified your installation, it is
important that you run your first maintenance session before working
with the scanner.
Shipping and transportation of your scanner from the factory may
have affected the camera positions and it may be necessary to align
the cameras and then calibrate.
Follow the instructions described under the chapter on Maintenance in
this Operators Guide and in the Scanner Maintenance instructions
found on the WIDEsystem TOOLS CD-ROM that came with your
scanner.
Page 21
Operator Panel and Indicators 4-1
4. Operator Panel and Indicators
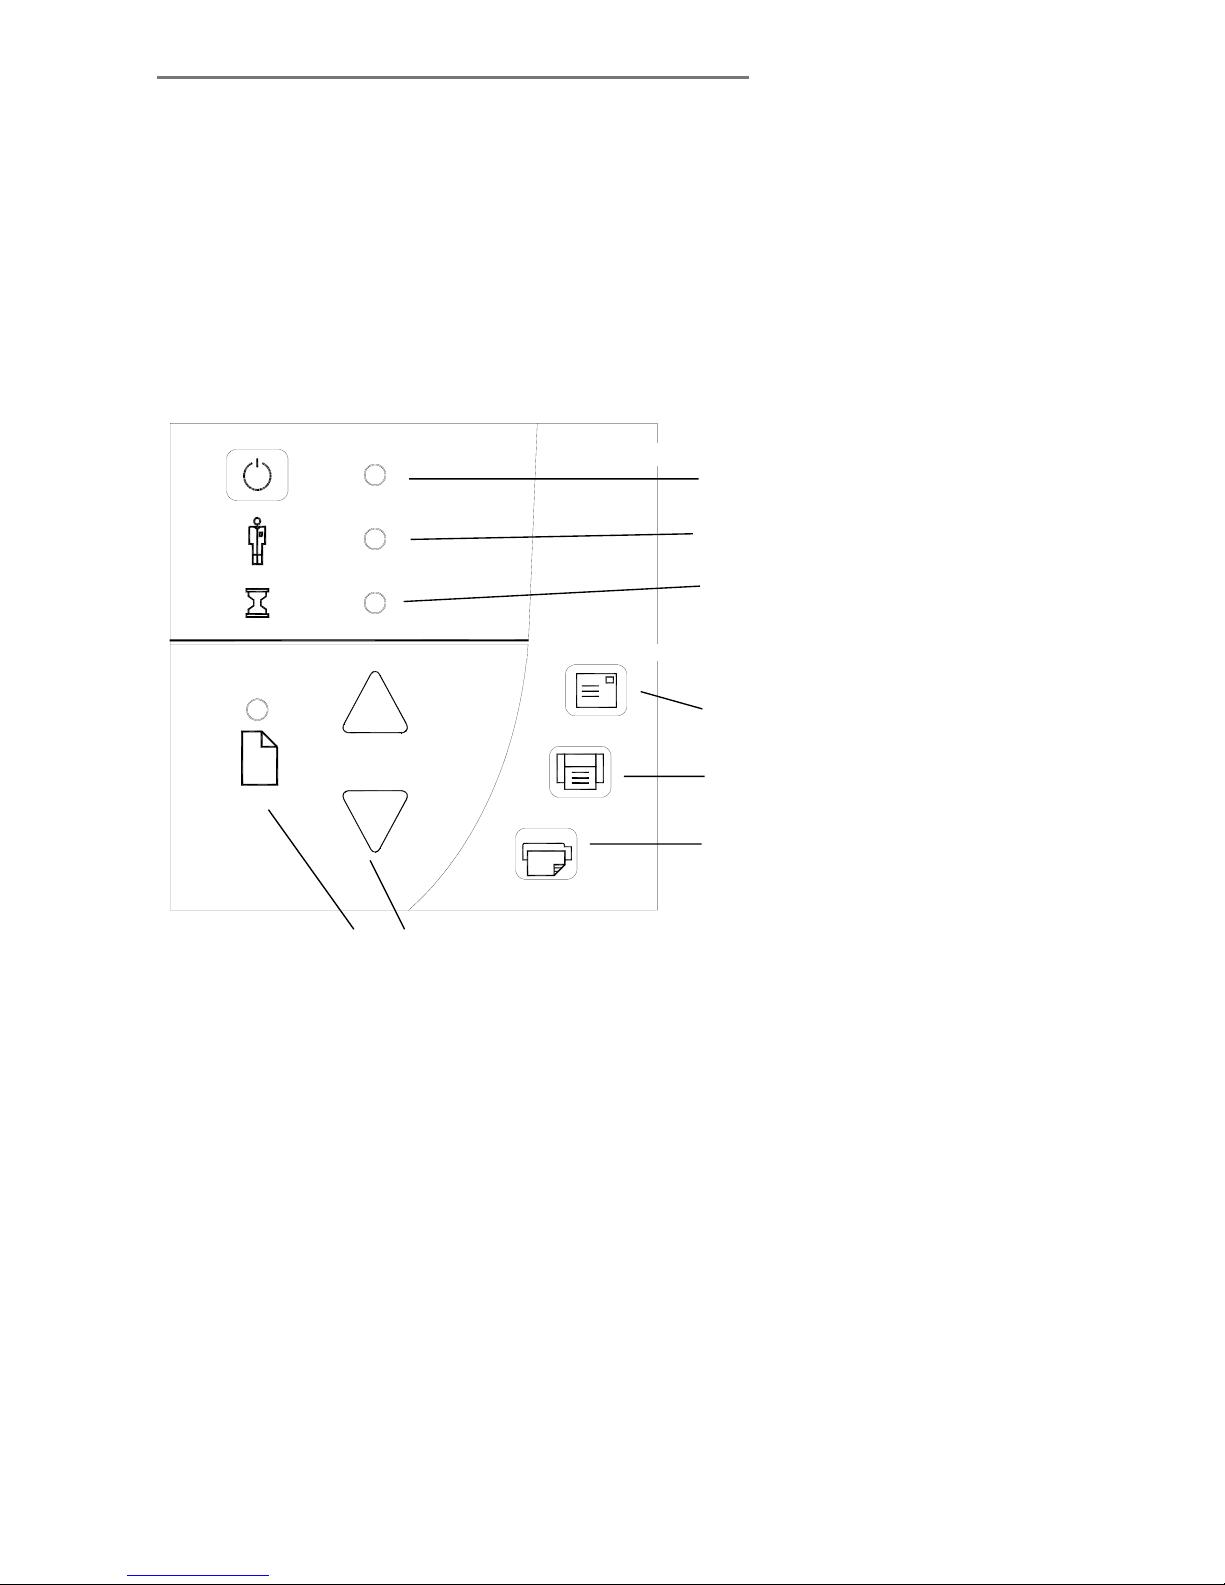
The Scanner Operator Panel is divided into 3 areas:
A Scanner control area with 1 key and 3 LED indicators.
An Application control area with 3 keys.
A Paper control area with 2 keys and 1 LED indicator.
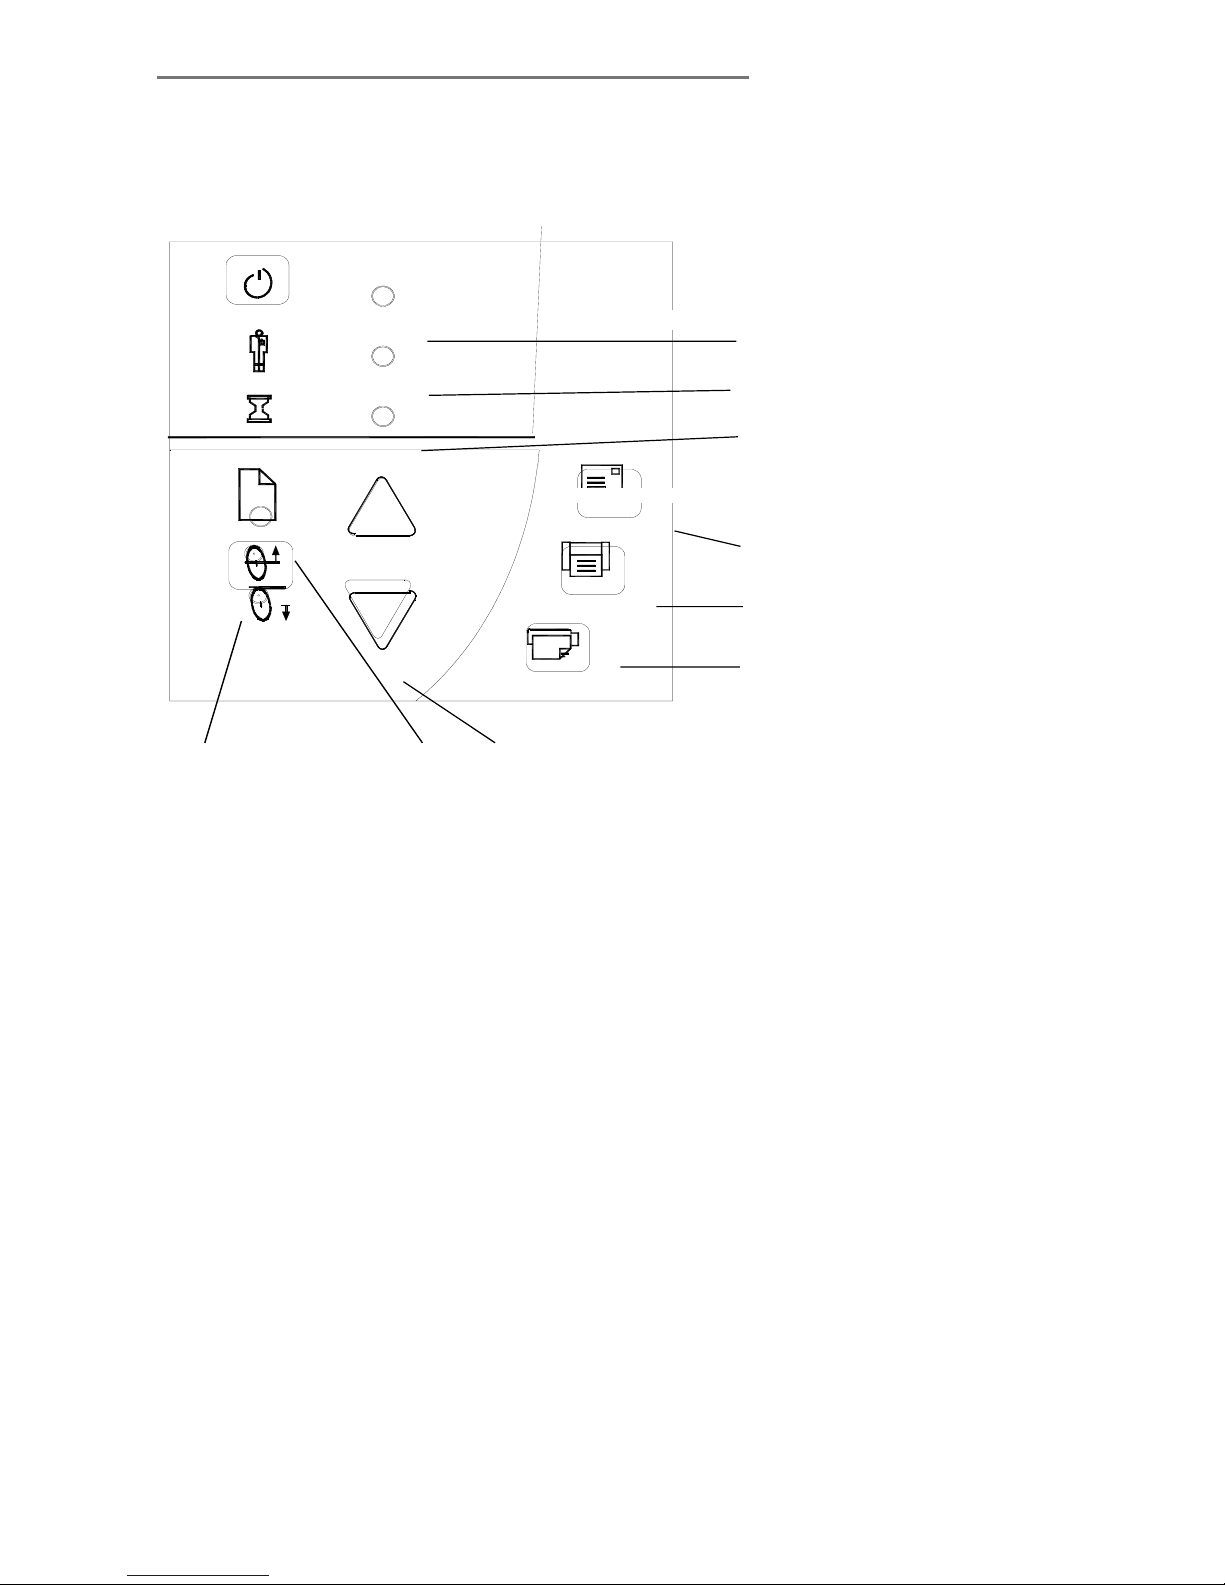
On some scanner models, an Automatic Thickness Adjustment
Control (ATAC) key is also available in the Paper control area.
The next two illustrations show the two types of operator panels.
Standard Operator’s Panel:
1
2
3
4
5
6
8
7
Scanner Control area:
Application Control area:
Paper Control area:
Page 22
4-2 Operator Panel and Indicators
Operator’s Panel with ATAC (Automatic Thickness Adjustment
Control) functionality - Detailed descriptions of each numbered item
follow in the next sections.
1
2
3
4
5
6
8
7
Scanner Control area:
Application Control area:
Paper Control area:
9
Page 23

Operator Panel and Indicators 4-3
4.1 Scanner Control area
1. Power switch and power LED
When you connect the scanner to the power outlet and turn on the
outlet switch at the back of the scanner, it starts up in ON mode
meaning it boots and the LED lights green. With the scanner
connected to the power outlet, you control scanner power through the
power switch:
• To turn the scanner from ON to OFF, press down 1 second until
the LED lights red.
• To turn the scanner from OFF to ON, press down until the LED
lights green.
• Shortly after, the Power LED turns yellow as the scanner goes
straight into self-test mode. All the LEDs will light up - the
Diagnostics LED red and the other LEDs, including the Power
LED, are yellow.
• After self-test, the Power LED turns green again and the scanner
goes into Warm-up (see 3. Wait LED).
2. Diagnostics LED
Flashes if an error is detected by the built-in diagnostic. Simultaneous
flashing by both the "Diagnostic" and the "Wait (Warm-up)" indicators
may mean that the scanning area needs cleaning. See the
"Maintenance" chapter for instructions on cleaning the scanning area.
If the Diagnostic and the Wait indicators continue to flash after
scanner maintenance, then there may be camera position errors that
require professional service.
Page 24

4-4 Operator Panel and Indicators
3. Wait LED
The Wait LED lights when the scanner power is turned on, and stays
on during the internal diagnostic and stabilization phase. Keyboard
input is prevented during this time.
The Wait indicator reveals the status of the scanner’s self-adjustment
procedure, which consists of both stitching and light profile
adjustment. If the scanner does not self adjust the stitching and light
profiles may change over time due to thermal changes in the scanner.
The Wait indicator works in the following way:
• When the Wait Indicator is off, the self-adjustment is up-to-
date, and the scanner is ready to scan.
• When the Wait Indicator is on, the scanner is warming-up or
re-adjusting; a scan may be issued, but quality may be
compromised (when adjusting is completed, the Wait Indicator
turns off). To allow the scanner to self adjust do not (re)move
original or change Original Pressure Platen position while the
Wait Indicator is on.
• When the Wait Indicator is flashing (and the Diagnostics
Indicator is off) re-adjusting is needed, but not possible; any
original in the scanner should be removed, and Original
Pressure Platen should be returned to the normal position
(also in this situation a scan may be issued, but the quality will
be compromised). When adjusting is again possible, the Wait
Indicator stops flashing, but continues to be on until the selfadjust is complete.
• The Wait Indicator is on during basic calibration to indicate
that the original should not be (re)moved during this
procedure (for the same reason the scanner keyboard is
disabled during basic calibration).
Page 25
Operator Panel and Indicators 4-5
4.2 Application Control Area
The following buttons require correct installation of the WIDEsystem
TOOLS CD, software application components and setup definitions
before they can become active. Your scanner must be running
through STI (Still Image Interface) on Windows and your PC must be
turned on and running.
Below are descriptions of the buttons intentional functionality.
However, you can assign applications with other functions to any of
the buttons. For instructions on configuring the buttons to other
applications, see the WIDEsystem TOOLS User’s Guide, found on
your WIDEsystem TOOLS CD-ROM.
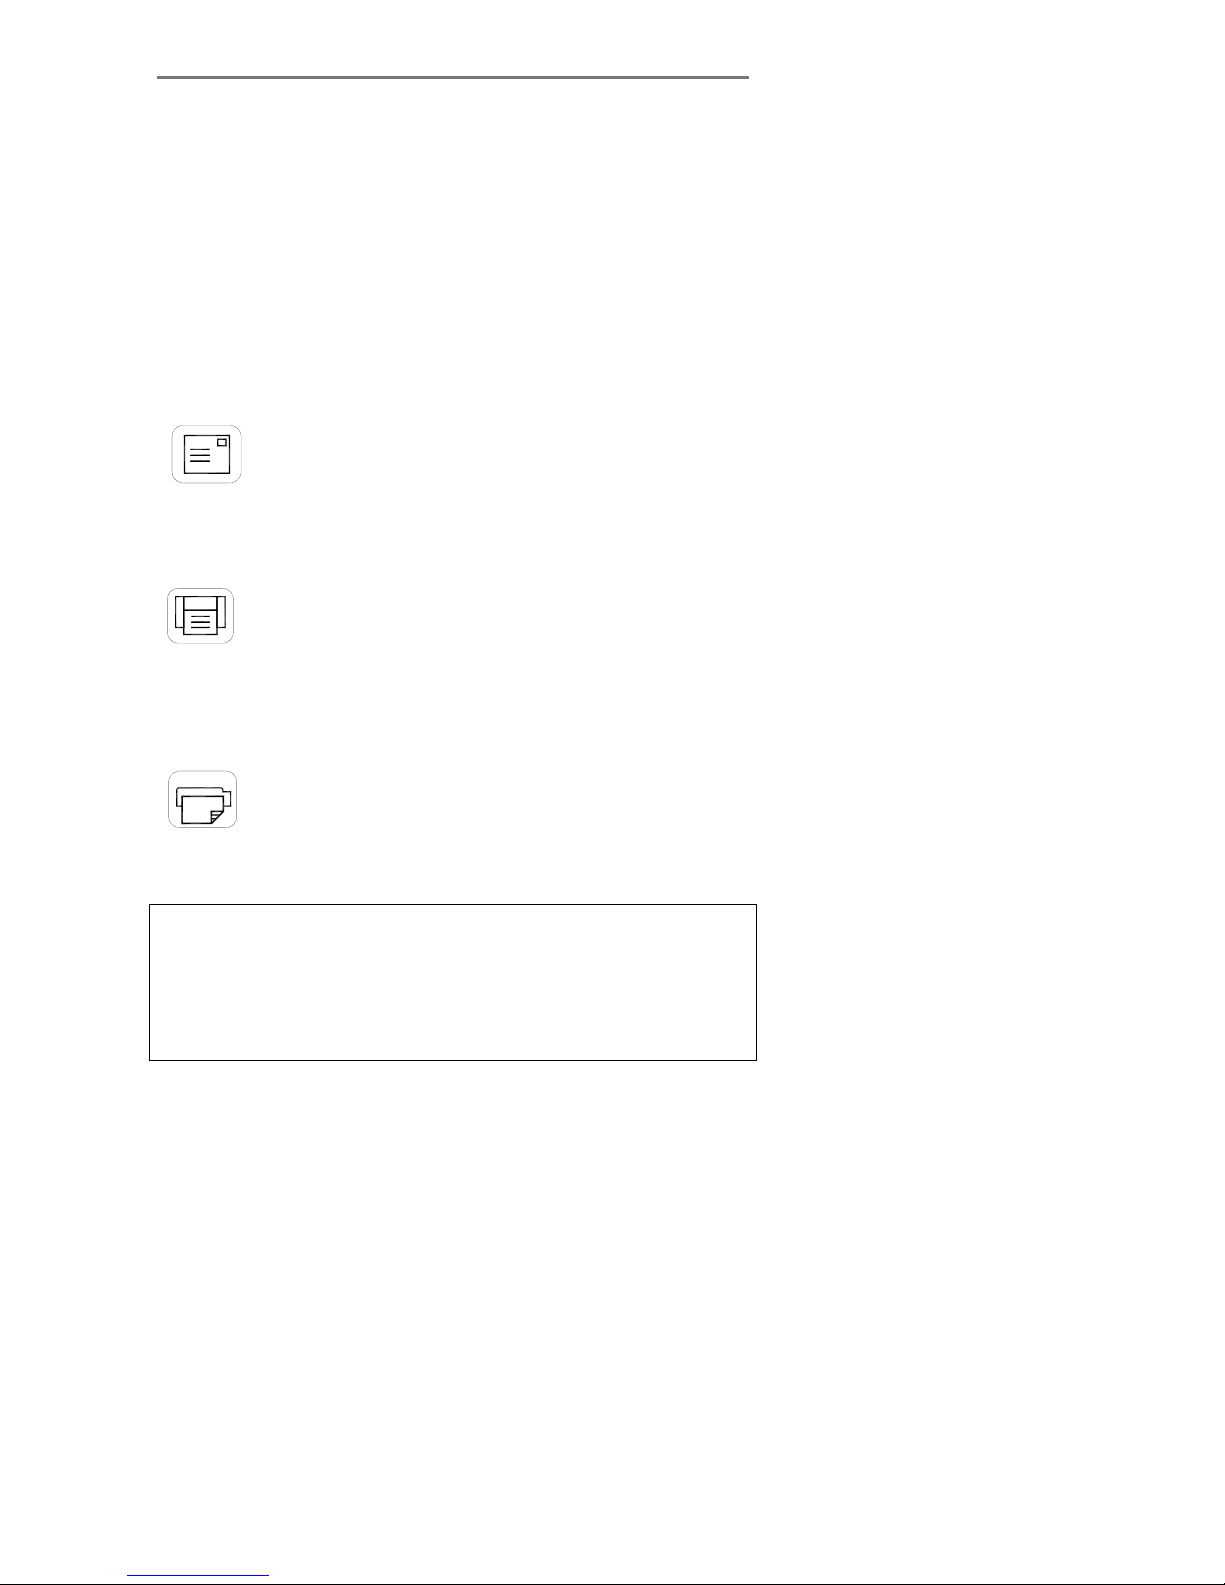
4. Email Application
This button is for activating an application for sending scanned
images via E-mail.
5. Scan Application
This button is for activating your scanning application if it is installed
on your PC so that when you press the Scan Application button, you
can trigger a scan of the document currently loaded in the scanner.
6. Copy Application
This button is for activating a scan-to- copy application if it is installed
on your PC.
NOTE: The applications you wish to use with the buttons must be
designed to recognize your scanner device and the signals sent from
its buttons so that when a button is pressed, a scan is initiated and the
result is loaded into the application triggered. Any application you
assign to a button must be specially programmed in order to work in
this manner. Check your application’s documentation to verify it
functionality with your scanner’s one-touch-scan buttons.
Page 26

4-6 Operator Panel and Indicators
4.3 Paper Control area
Use the Paper Control area when you insert your document.
7. Paper Forward and Paper Reverse Key
The Paper Forward Key moves the drawing into the start-of-scan
position.
• If the Auto-Load option is selected in your scan application,
loading will take place automatically as soon as the original enters
the insertion slot. A delay factor for automatic paper loading can
be set in the application giving you time to position the original
correctly.
• Pressing the Paper Forward Key during scanning will stop the
scanning process and the original will be fed through the scanner
while the key is held down.
• The Reverse Key stops the current scanning process and
reverses the original. The original will be fed backwards through
the scanner while the key is held down.
• On scanners with ATAC – When the scanner is in Automatic
Thickness Adjustment Control (ATAC) mode (see the description
of the ATAC key below), the paper forward and paper reverse
keys become “Guide plate up” and “Guide plate Down” keys.
8. Paper Ready Indicator
On standard panels On panels with ATAC support
The Paper Ready Indicator lights up as soon as the drawing is
inserted into the original’s insertion slot and correctly positioned. Then
the original can be moved into the start-of-scan position either by
pressing the Paper Forward Key or through automatic loading.
• The Paper Ready Indicator lights green when ready to scan
normal thin media and yellow when ready for thick media.
• The Paper Ready Indicator blinks yellow when the scanner is in
ATAC mode but not yet ready, i.e., the guide plate is not yet
positioned.
Page 27

Operator Panel and Indicators 4-7
• The Paper Ready indicator stays ON, signifying that the scanner
is ready to be controlled from the computer.
• During scanning the Ready indicator will blink.
• At end of scanning the Ready indicator will stop blinking signifying
that scanning can be repeated from the computer, or else
terminated by ejecting the original from the scanner.
• The paper ready indicator will light red if the guide-plate is in
thick media setting (a raised guide plate) but no media is detected
in the scanner. This applies for a guide-plate raised either
manually or through Automatic Thickness Adjustment Control
(ATAC).
9. Automatic Thickness Adjustment Control (ATAC) key
Some scanner models support Automatic Thickness Adjustment
Control for easy adjustment of the guide plate level for scanning thick
media. The next section of this manual describes thick media
scanning in detail.
Pressing the ATAC key toggles scanner operation between ATAC
mode and the normal Paper Forward/Reverse mode.
When the scanner is in ATAC mode:
• The Paper Ready indicator blinks yellow.
• The Paper Forward and Paper Reverse keys become “Guide
plate up” and “Guide plate Down” keys.
• When the guide plate has been lowered and is adjusted for
the thick media, the Paper Ready indicator turns yellow
(stops blinking) indicating that the scanner is ready to scan
thick media.
• When the guide plate has been lowered and is adjusted for
the thick media, the scanner automatically goes out of ATAC
mode, which means that the Paper Forward and Paper
Reverse keys return to their normal functionality.
The steps for scanning thick media on scanners with and without
Automatic Thickness Adjustment Control (ATAC) are described in the
next section.
Page 28
Insertion Slot 5-1
5. Original’s Insertion Slot
5.1 Rulers
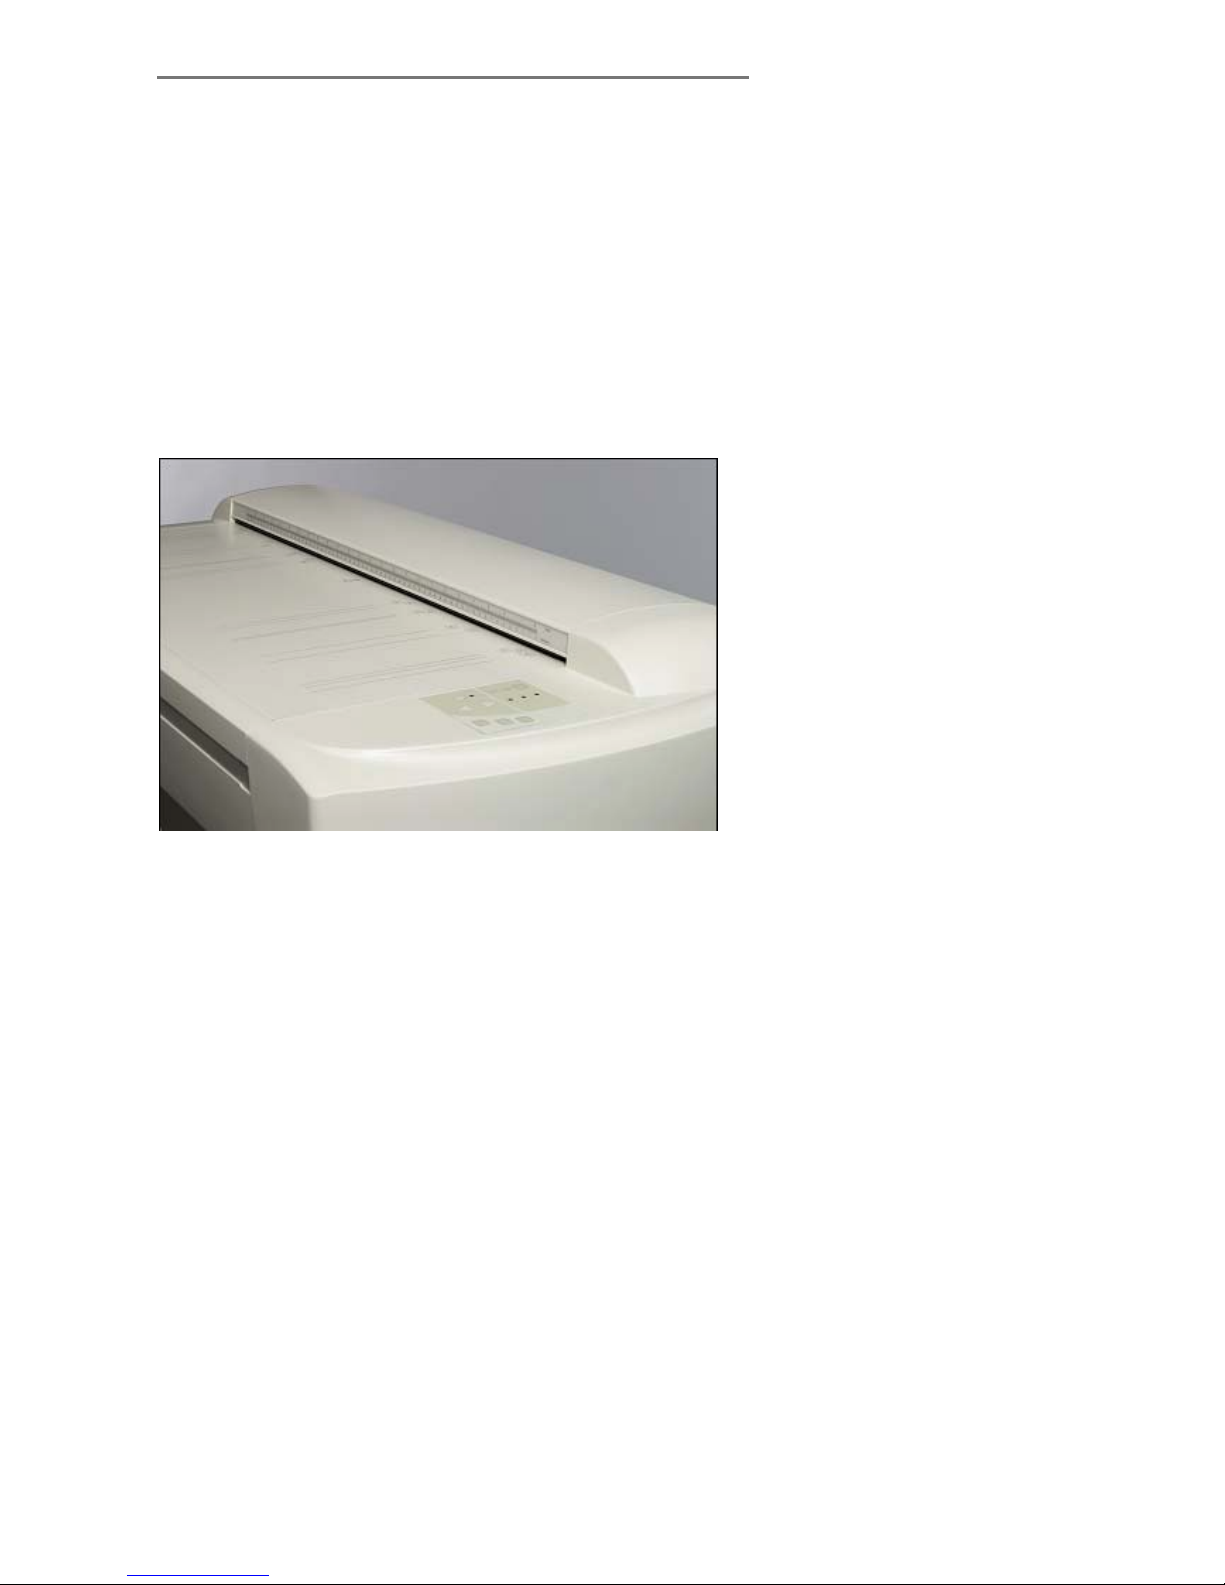
The Original’s Insertion slot (picture below) is marked with a
measurement ruler for inches and millimeters. The ruler corresponds
to right side aligned original loading. Just below the ruler are marked
common standard sizes that help guide you with optional centered
loading.
The default loading method is center-load. On some scanners, the
loading method can be selected from the scanning application. Center
feeding is always preferable as the original is positioned symmetrically
on the feed rollers during scanning. The scan area width measured in
standard sizes, inches or millimeters is likewise set from the
application.
Figure 5-1 Original Insertion Slot
The required setting for an original drawing can be measured, with the
original inserted into the scanner, using the ruler printed on top of the
Original Insertion Slot on the scanner. Then, you just enter your
measurement in the width setting box in your application’s media size
setup dialogs.
Page 29
5-2 Insertion Slot
5.2 Scanning Thick Media
Scanning needs are not always limited to convenient paper-thin
media. Many industries, such as reprographics and GIS, will find the
need to digitize or copy images printed or pasted on thicker media
such as cardboard, foamboards, gatorboards etc. To support such
needs you can change the vertical size of the insertion slot (guide
plate height) on your scanner so you can fit the slot to the thickness of
your original. This feature adds an extra dimension to scanning
possibilities. Depending on your scanner model, changing the
insertion slot height is
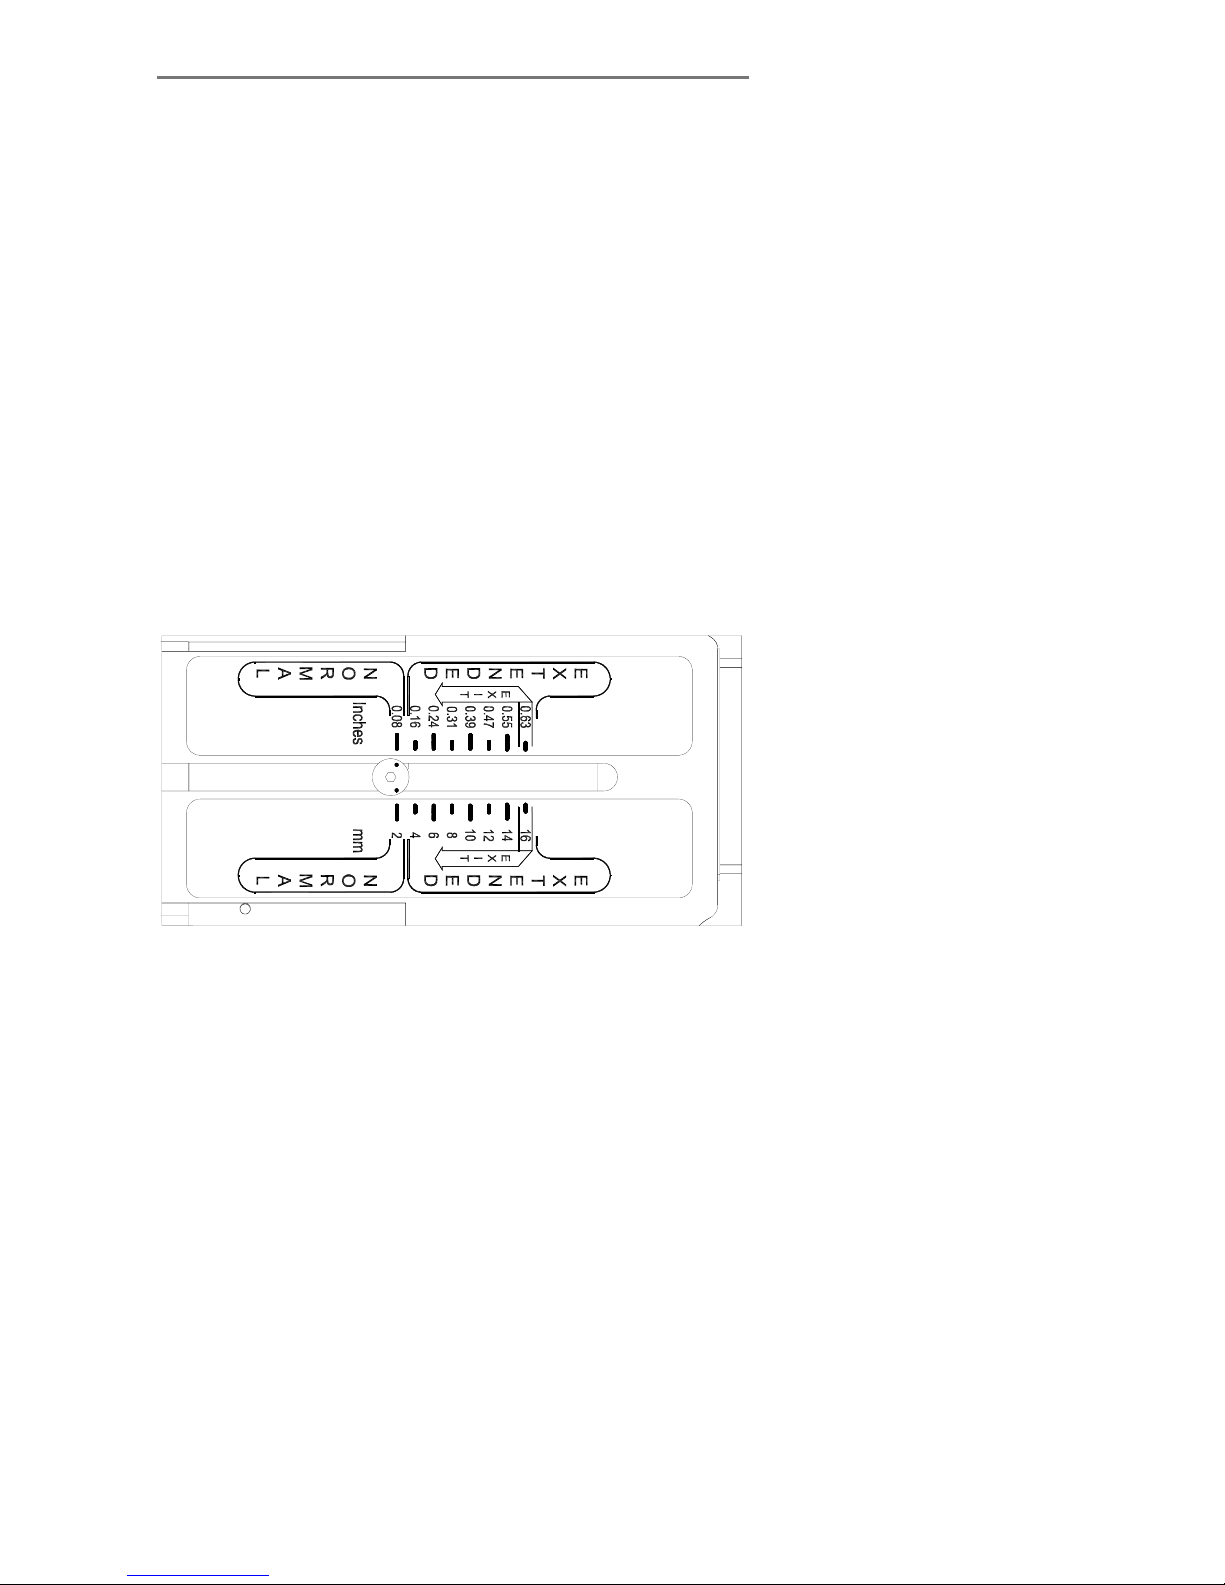
5.2.1 Manual Adjustment for thick media
You can change the insertion slot size (guide plate height) on your
scanner from 0 to 15 mm (0 to .6”) in small steps so you can fit the
slot to the thickness of your original.
To change the insertion slot space, open the Original’s Insertion Slot
cover and set the media thickness adjustment sliders found at each
side to the same setting.
Figure 5-2 Media Thickness Settings
Page 30

Insertion Slot 5-3
The media thickness can be set in the following steps (corresponding
to the indications on the right and left adjustment sliders):
Step MaximumThickness
0 (Normal Position)
2mm (0.08”)
1
4mm (0.16”)
2
6mm (0.24”)
3
8mm (0.32”)
4
10mm (039”)
5
12mm (0.47”)
6
14mm (0.55”)
7
15mm (0.60”)
Measure the thickness of your original to find the right setting. The
Paper Ready key will turn yellow (stop blinking) when the guide plate
is positioned correctly and is ready for thick media scanning.
5.2.2 Automatic Thickness Adjustment Control
Some scanner models support Automatic Thickness Adjustment
Control (ATAC). Scanners supporting ATAC have an ATAC key on
the operator’s panel. You can change the insertion slot size (guide
plate height) on your scanner from 0 to 15 mm (0 to .6”)
The ATAC key is on the operator panel.
Adjusting the insertion slot for thick media with ATAC:
1. Press the ATAC key on your operator’s panel to set the scanner
in ATAC mode.
2. The Paper Ready Indicator blinks yellow indicating the scanner is
in ATAC mode but not yet ready, i.e., the guide plate is not yet
positioned on the thick original.
Page 31

5-4 Insertion Slot
3. Press and hold the Paper Forward key (arrow up) key to raise the
guide plate until there is room to insert the thick original.
4. Insert the thick original evenly for a straight scan path.
5. Press and hold the Paper Reverse (arrow down) key to lower the
guide plate until the guide plate stops on its own.
6. The Paper Ready indicator will turn yellow (stop blinking) when
the guide plate is positioned correctly and is ready for thick media
scanning.
7. The scanner will automatically leave the ATAC mode, which
means that the Paper Forward and Paper Reverse keys will return
to their normal functionality for moving the original forwards and
backwards.
5.2.3 When Scanning in Extended Media Positions
The Normal position (Step 0: 2mm/0.08”) is detected by a sensor in
the scanner. Auto-adjustment of the scanner’s light profile, stitching
etc. only takes place in the Normal position. With extended media
thickness positions, the last performed auto-adjustment is stored and
utilized. This means that you should from time to time return to the
normal position, and especially when turning the scanner on, to allow
it to auto-adjust.
The Normal position also gives the highest scanning speed. In the
extended media thickness positions, scanning speed is automatically
reduced.
Modifying Stitching Parameters
Thick stiff originals will rest on top of the scanner rollers and thus raise
a small distance over the glass plate, which will lead to changes in the
stitching of images at points between the cameras (overlapping
pixels). The stitching parameters will need to be modified in order to
correct for this. You can modify stitching parameters through your
scanning application.
To modify the stitching insert your thick original in the scanner, scan
the image in your application and check the result in the viewer for
overlapping or missing pixels in the camera transition areas. Then
adjust the value in the application’s dialogs. Repeat scanning and
adjustment until the effect is minimized.
The modified stitching parameters will automatically be selected when
in one of the extended media positions.
Page 32

Insertion Slot 5-5
Treating Edge Distortion
Scanning thick originals can give distortions when the front edge
meets the exit rollers or the trailing edge leaves the entry rollers. To
omit this, the leading and trailing edges are by default skipped when
in one of the extended media thickness positions.
Leading/trailing edge skipping can be turned off through the
application’s Scanner Setup dialog.
Supporting Thick Originals
To facilitate scanning of thick originals in the extended media
thickness positions it is important to insert the original center aligned
and to help support the original during scanning. This should be done
both at the entrance side and the exit side of the scanner. Specially
designed support tables can be attached behind the scanner for those
who perform a lot of thick media scanning. Ask your local dealer for
purchase information.
5.3 Accessing the scan area
In order to access the scan area for cleaning or other maintenance
purposes, you have to free the pressure platen. On some scanner
models, the pressure platen can be completely detached from the
scanner. On scanners with Automatic Thickness Adjustment Control
(ATAC), the elevation mechanism resides in the backside of the
pressure platen. Therefore the pressure platen is flipped open with the
scanner cover for accessing the scan area. Instructions for each
scanner type follow below:
5.3.1 Detach the pressure platen – non ATAC models
The following applies for scanner models without Automatic
Thickness Adjustment Control (ATAC) functionality.
To remove the original’s pressure platen for cleaning the scan area:
1. Place your fingers in the insertion slot and flip open the
scanner’s top cover.
2. Press down on the pressure platen.
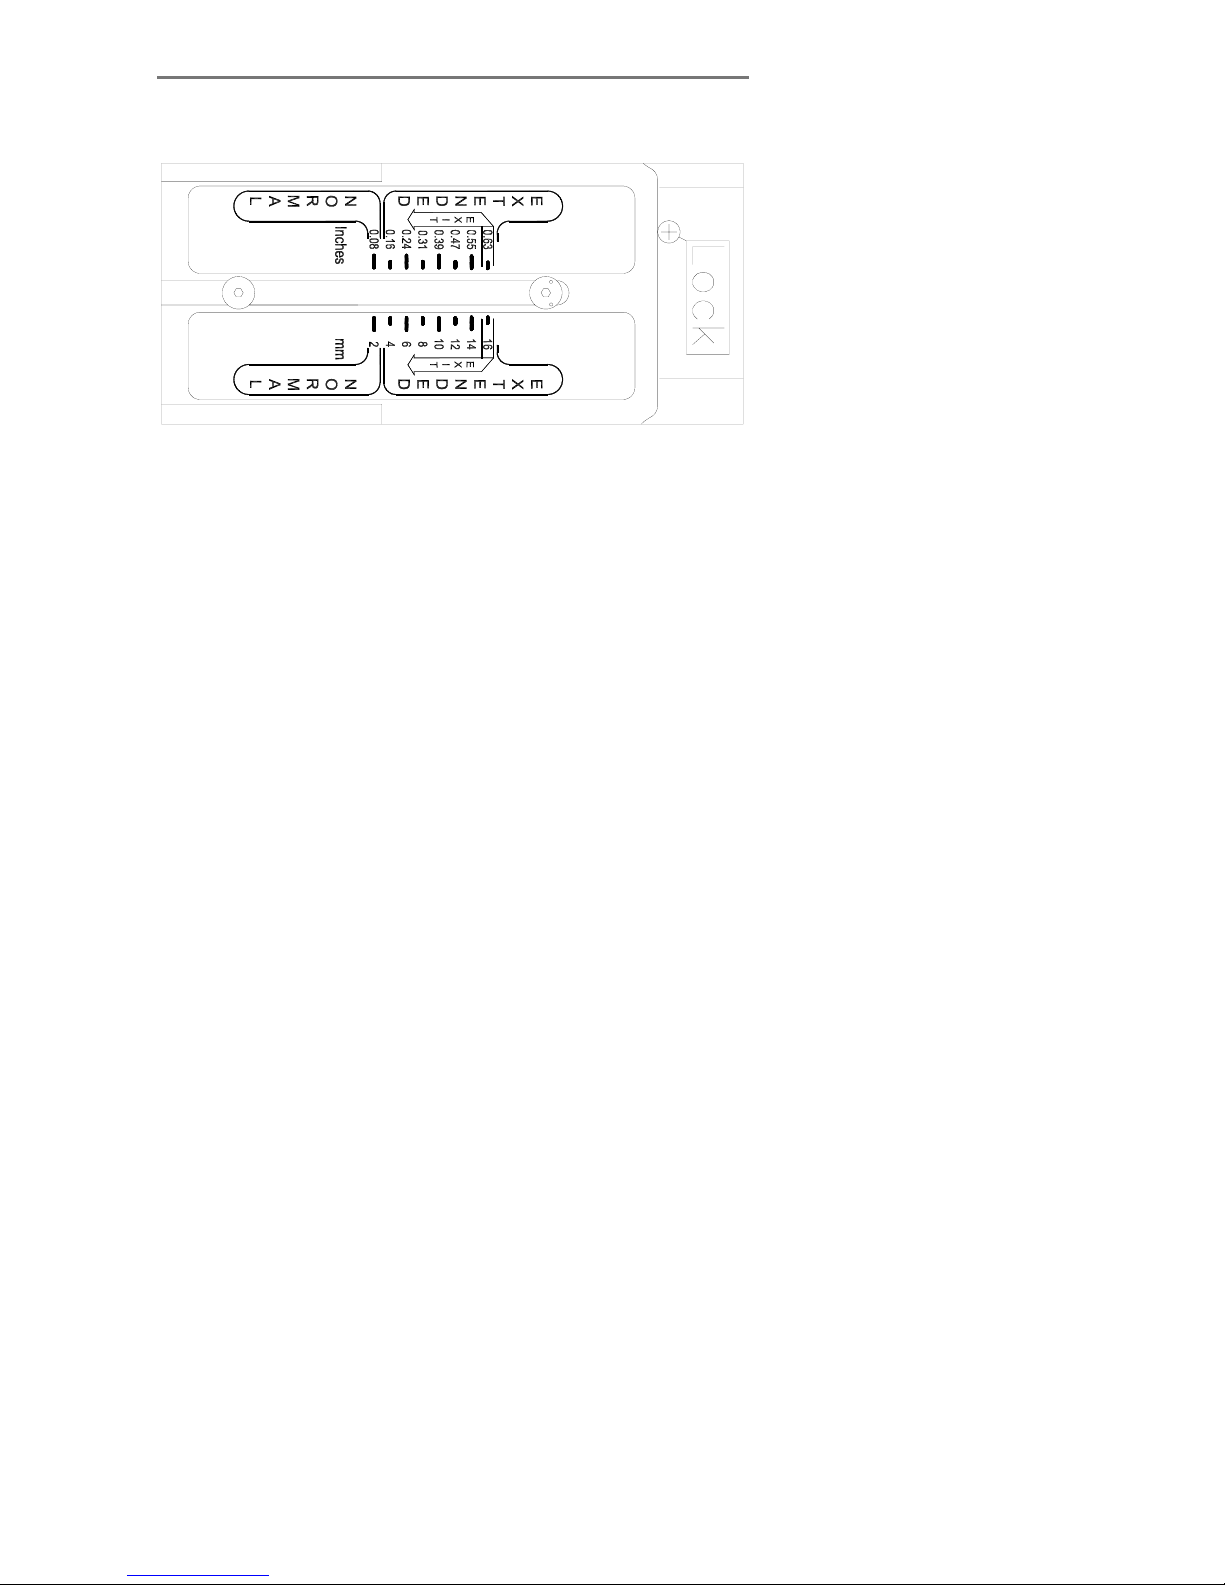
3. While maintaining pressure, slide the left and right extended
media thickness adjustment sliders fully towards the middle of
the platen until the metal safety buttons on each side of the
scanner pop up.
4. Use the two handles to lift out the pressure platen as soon as
you feel the sliders disengage.
.
To reinsert the original pressure platen, reverse the above procedure.
Page 33
5-6 Insertion Slot
Figure 5-3 Slider in the exit position
5.3.2 Flip Open the Pressure Platen – ATAC models
The following applies only for scanner models with Automatic
Thickness Adjustment Control (ATAC) functionality.
1. Push down on the two lever buttons found near the insertion slot
on each side of the scanner’s top cover.
2. The cover locking mechanism should now be disengaged.
3. As you hold both lever buttons down, place your free fingers in the
insertion slot and flip the cover open.
4. The pressure platen with the white metal areas is under the
scanner cover. Hold the cover open as you clean.
5.4 Changing the glass plate
Some scanner models allow users to detach the glass plate from the
scanner in order to replaced scratched glass plates with new ones.
On other scanner models, a service technician must preform this
process. See your scanner’s model specifications to see the glass
plate is detachable on your scanner.
To replace detachable glass plates:
1. Remove the pressure platen as described in the section above.
2. The glass plate will be exposed and accessible.
Page 34

Insertion Slot 5-7
3. On each side of the glass plate there is a small lever and round
finger-handle. With both arms, pull the left and right levers
backwards to flip the glass plate upwards towards your body.
4. The levers are attached to the scanner chassis with a small hook.
Lift the levers out of the hook to free the glass plate from the
scanner.
5. Reverse the process to reinsert a new glass plate.
Page 35

Maintenance 6-1
6. Maintenance
Regular scanner maintenance is a sure way to minimize costly
downtime. The Automatic Scanner Maintenance system supported on
your scanner hinders your scanner from degrading over time. The
three routine maintenance procedures cleaning, camera alignment
and calibration will improve image quality and reduce your service
costs.
The three maintenance functions are closely entwined and they
should all be performed in a single maintenance session, starting with
cleaning the scan area and ending with calibration. The reason for this
is simple. If you clean the glass or adjust the cameras then you will
have changed conditions in the scanning area and will need to
calibrate in order to readjust black, white and color interpretation. This
works the other way as well – scanner calibration must always be
preceded by cleaning and camera alignment to get reliable calibration
results.
Scanner Maintenance is very easy to perform and most of it is
completely automatic. After manually cleaning the scan area, you just
insert a Maintenance Sheet, start the Maintenance program and let
the wizard take over as it performs camera alignment and calibration.
The tools for scanner maintenance were supplied with your scanner including the program that will check your scanner and guide you
through the maintenance steps. For best results, install the Scanner
Maintenance program from the WIDEsystem TOOLS CD-ROM and
run the maintenance procedures after setting up your scanner for the
first time.
Full instructions for perfect scanner maintenance through
cleaning, alignment and calibration are included on the
WIDEsystem TOOLS CD-ROM that came with your scanner.
Page 36

A: Safety Instructions 7-1
7. Appendix A: Important Safety Instructions
Read all of these instructions and save instructions for later use.
Follow all warnings and instructions marked on the scanner.
A. Do not place the scanner on an unstable surface, stand, cart or
table. Serious damage can be caused if the unit falls.
B. Turn off all power to the unit before cleaning. Do not use liquid
cleaners or aerosol cleaners.
Use a damp cloth for cleaning.
C. The scanner should be operated from the type of power source
indicated on the marking label. If you are not sure of the type of power
available, consult your dealer or local power company.
D. The scanner is equipped with a three-wire grounding type plug.
This plug will fit only into a grounding-type power outlet. This is a
safety feature. If you are unable to insert the plug into the outlet.
contact your electrician to replace your obsolete outlet. Do not defeat
or ignore the purpose of the grounding-type plug.
E. Do not allow anything to rest on the power cord. Do not locate the
scanner where persons will walk on the cord.
F. If an extension cord is used with the scanner, make sure that the
total of the ampere ratings of the products plugged into the extension
cord does not exceed the extension card ampere rating. Also, make
sure that the total of all products plugged into the wall outlet does not
exceed 15 amperes.
G. Slots or openings in the cabinet at the back or bottom are provided
for ventilation. This ensures reliable operation of the product and
protects it from overheating. These openings must never be blocked
or covered. The openings should never be blocked by placing the unit
on a bed, sofa, rug, or other similar soft surface. This product should
never be placed near or over a radiator or heat register. This product
should not be placed in a built-in installation unless proper ventilation
is provided.
H. Never push objects of any kind into the scanner through cabinet
slots since they may touch dangerous voltage points or short out parts
Page 37

7-2 A: Safety Instructions
that could result in a risk of fire or electrical shock. Avoid any
possibility of spilling liquid of any kind on the scanner.
I. Do not attempt to service the scanner yourself. Opening or removing
those covers requiring tools may expose you to dangerous voltage
points or other risks. Refer all servicing in those compartments to
authorized service personnel.
J. Unplug the scanner from the wall outlet and refer servicing to
authorized service personnel under the following conditions:
• When the power cord or plug is damaged or frayed.
• If liquid has been spilled into the scanner.
• If the scanner has been exposed to rain or water.
• If the scanner does not operate normally when operating
instructions are followed then adjust only those controls that are
covered by the operating instructions in this manual. Improper
adjustment of controls other than those mentioned in this manual
may result in permanent damage and will at best require extensive
work by a qualified technician to restore this product to its normal
operation.
• If the scanner has been dropped or the cabinet has been
damaged.
• If the scanner exhibits a distinct change in performance, indicating
a need for service.
Page 38

B: Regulations 8-1
8. Appendix B: Regulations
FCC Regulations
This equipment has been tested and found to comply with the limits
for a class A digital device, pursuant to Part 15 of the FCC Rules.
These limits are designed to provide reasonable protection against
harmful interference when the equipment is operated in a commercial
environment. This equipment generates, uses, and can radiate radio
frequency energy and, if not installed and used in accordance with the
instruction manual, may cause harmful interference to radio
communications. Operation of this equipment in a residential area is
likely to cause harmful interference in which case the user will be
required to correct the interference at his own expense.
Warning
This is a class A product. In a domestic environment this product may
cause radio interference in which case the user may be required to
take adequate measures.
 Loading...