

Page 1
User’s Guide
Wide Format
iJET
Scanners
MODELS:
FLEX50i
HD4230i
Augus t
20 08 Edi tion
Page 2

Table of Contents
1. About This Guide 1-1
1.1 Scope 1-1
1.2 Identify your scanner model 1-1
1.3 Additional Guide Icons 1-2
1.4 Web Access Interface or iJET Panel? 1-2
2. Using the iJET Panel 2-1
2.1 To make a simple copy 2-2
2.2 To perform a simple Scan-to-File 2-2
2.3 Operations on the iJET Panel 2-2
2.4 Power ON/OFF 2-3
2.5 The iJET Panel Buttons – Overview 2-4
2.6 How do I Navigate the iJET Panel Menus? 2-6
3. Scanner Configuration and Setup Instructions 3-1
3.1 Connect the scanner directly to printer(s) - Stand Alone Copier 3-2
3.2 Connect the Scanner to LAN – Network Scan/Copy Device 3-5
3.3 Connect the Scanner to a PC - Scan/Copy workstation 3-9
3.4 Combining Configuration Types for Multiple Functionality 3-12
3.5 Physical Placement of the Scanner 3-13
3.6 Locating the Interface Cable Connector-Panel 3-15
3.7 Personalizing and Localizing Your System 3-17
3.7.1 Setting the iJET Panel’s Display Language 3-17
3.7.2 Setting the Paper Series Preference 3-18
3.7.3 Setting the Media Handling (load) Preferences 3-18
3.7.4 Setting the local Time and Date 3-20
3.8 Printer Setup on the Scanner 3-21
3.9 Creating Media Profiles – For Color Printer Setup 3-24
3.10 Scanner on Network Setup 3-25
3.11 Setup to Share the Scanner (Use from PCs on the LAN) 3-27
3.12 Usability Settings and User Preferences 3-28
3.12.1 Setting the Timer for Automatic Sleep and Wake-up 3-28
3.12.2 Setting the Sleep Mode Preferences 3-30
3.12.3 Setting the Lamp Power Preferences 3-31
3.12.4 Setting Accuracy Lens Enhancement (ALE) 3-32
3.12.5 Viewing Scanner Device Information 3-33
3.12.6 Accessing the Scanner’s Internal Hard Disk 3-34
4. Loading Originals for Copying and Scanning 4-1
4.1 How do I Load Originals into the Scanner? 4-1
4.2 Loading and Scanning Thick Media 4-3
5. How do I Make a Copy? 5-1
5.1 Copy Using the iJET Panel – The Basic Steps 5-1
5.2 Main Copy Options - Quick buttons 5-2
5.2.1 How do I… Set Copy Lightness? 5-3
5.2.2 How do I… Set a Scale factor? – Output size 5-4
5.2.3 How do I…Set Copy Quality? 5-5
5.2.4 How do I… Set number of Copies? 5-6
5.3 Other Copy Options – Menu Button 5-7
5.3.1 How do I… Set Original Type Color? 5-7
5.3.2 How do I… Set Original Type B&W? 5-8
5.3.3 How do I… apply the Sharpen filter? 5-9
5.3.4 How do I… apply the Background (Backg.) Clean filter?5-10
5.3.5 How do I… Set the Media Profile (MediaType)? 5-11
5.3.6 To Create a New Media Profile 5-12
5.3.7 How do I… Mirror the Image? 5-13
5.3.8 How do I… Reset Copy defaults? 5-14
Page 3

5.3.9 The Advanced option 5-15
5.4 Using Copy Software with the scanner (local or network PC) 5-16
6. How do I Scan to File? 6-1
6.1 Scan to Local or Network PC with the iJET Panel 6-2
6.2 Scan-to-File Menu Options – iJET Panel 6-4
6.2.1 Enter the iJET Panel Scan-to-File Menu 6-4
6.2.2 Set the Scan Mode 6-4
6.2.3 Set the Scan Mode Parameters – Level or Gamma 6-6
6.2.4 Set the Scan-to-File Resolution 6-7
6.2.5 Set the Scan-to-File Size (input size) 6-8
6.2.6 Set the File Format ( TIFF, JPEG, PDF ) 6-9
6.2.7 Set the File Format Quality 6-10
6.2.8 Using Scan Software – From Local PC or Network PC 6-11
7. Using the Web Access Interface – Setup, Monitor, Scan 7-1
8. Maintenance 8-1
8.1 Preliminary Maintenance – during scanner installation 8-1
8.2 Regular Scanner Maintenance 8-1
8.3 Cleaning the Scan Area 8-2
8.4 Running the Scanner Maintenance Program 8-6
8.4.1 Starting Scanner Maintenance from a PC on the LAN 8-6
8.4.2 Starting Scanner Maintenance from a Local PC 8-6
8.4.3 Running Scanner Maintenance - Steps 8-7
8.5 Replacing Scanner Parts 8-8
8.5.1 Replacing the Glass-plate 8-8
8.5.2 Replacing the White-Background 8-12
8.5.3 Replacing the Scanner Lamp-Unit 8-18
8.5.4 Replacing the Dust-Filters 8-25
8.6 Locate / Insert the Smart Card 8-28
8.7 Downloading New Firmware 8-30
8.7.1 Setting the Scanner in Firmware BOOT Mode 8-32
9. Appendix A: Important Safety Instructions 9-1
10. Appendix B: Regulations 10-1
11. Appendix C: iJET Panel Quick Reference Guide 11-2
11.1 iJET Panel Buttons Overview 11-4
11.2 Option Description Tables 11-6
11.2.1 Menu Button - Copy Settings 11-6
11.2.2 Menu Button – Advanced Settings – System Setup 11-9
11.2.3 Scan-to Button – Scan-to-file Settings 11-15
11.3 The complete iJET Panel Menu diagram 11-17
Page 4

About This Guide 1-1
1. About This Guide
This guide explains how to maintain and operate your wide format copy (iJET) scanner and its iJET Panel.
The guide assumes basic knowledge of other optional configuration components such as printer,
computer and operating system and does not repeat material from their documentation.
Be sure to refer to:
The Installation Guide – accessed from the menu on the WIDEsystem TOOLS CD-ROM –
describes installation of your driver if interfacing your scanner with a PC.
The readme.htm file in the ws folder on the WIDEsystem TOOLS CD-ROM – contains the most
current installation and OS compatibility issues.
WIDEsystem TOOLS Help – Press F1 after installing and opening WIDEsystem. – Contains
information on using the WIDEsystem application, Scan2Net functionality and Scanner
Maintenance software if interfacing your scanner with a PC.
1.1 Scope
This guide covers installation, operation and maintenance of your scanner. The guide covers only copying
and scanning operation through the iJET Panel.
The scanner can also be operated and controlled though compatible scan and copy software installed on
a PC that is either directly connected with the scanner or on the same network. While this guide will
provide instructions on setting up the scanner with a PC, it will not describe in detail how to operate the
scanner from that PC. Operation of scan and copy software is not within the scope of this guide. Please
refer to the software’s documentation and on-line help for instructions on using the specific software
application with the scanner.
1.2 Identify your scanner model
This User’s Guide covers 2 scanner models, although there are individual differences between the
models.
The 2 model labels: FLEX50i, HD4230i will head topics and functionality descriptions.
Topics/descriptions can be specific for only one of the models. These will be headed by one of the labels.
Other topics/descriptions are general for both models. These will be headed by both labels.
Identify your scanner model and then look for its label in this guide.
Models not listed in the table below are not within the scope of this guide.
Label in Guide Scanners Type Scanner’s Main Characteristics
Model IDs
Printed on the back of the
scanner
FLEX50i
18” (A2)
wide format copy
scanners
Top fed - Flatbed
iJET Panel
AC51A
HD4230i
42”
wide format copy
scanners
Sheet fed - Insertion slot
iJET Panel
ATAC (Automatic Thickness
Adjustment Control)
KM67E
Page 5
About This Guide 1-2
1.3 Additional Guide Icons
Reference additional Details within this guide – Look for the “Manual” icon
The Manual Icon: marks a reference to another section in this guide where you can find more
instructions on a certain function just named.
Operation from the panel – Look for the “On the iJET Panel” icon
The On the iJET Panel Icon: marks instructions to actions you perform by pressing the buttons
on the scanner’s copy operator’s panel.
Actual iJET Panel Button – Look for the “Button” icon
The Button Icon will often appear in this guide together with the iJET Panel Icon. The Button Icon
marks which button to look for and press on the iJET Panel to initiate an action. The icon will contain
the button name as seen on the iJET Panel. For example, instructions describing an action reached
through the menu button will be marked with the button icon:
1.4 Web Access Interface or iJET Panel?
The scanner also supports an embedded web server and a file storage area. The embedded web server
provides a Web Access Interface that enables users to communicate and control the scanner from a PC
on the LAN through the PC’s web browser, thus bypassing special software and OS compatibility issues.
To access the scanner, users just start their browser and enter the scanner’s IP address.
A number of the iJET panel’s scanner setup and configuration options can be applied from the Web
Access Interface and some users may prefer this to using the iJET panel menus and buttons. The Web
Access Interface also allows simple scans to the scanners internal storage with the option to retrieve the
file
This manual will focus on setup, configuration, copy and scan through the iJET panel. If you wish
instead to use a PC and the Web Access Interface for some of these options, please refer to this
manual’s section on the “Web Access Interface” for more details.
NOTE: The scanner manufacturer will continuously add new features to the Web Access Interface
through firmware upgrades and therefore, the best way to view currently available options is by opening
the Web Access Interface currently loaded in the scanner.
Menu
Page 6
The iJET Panel 2-1
2. Using the iJET Panel
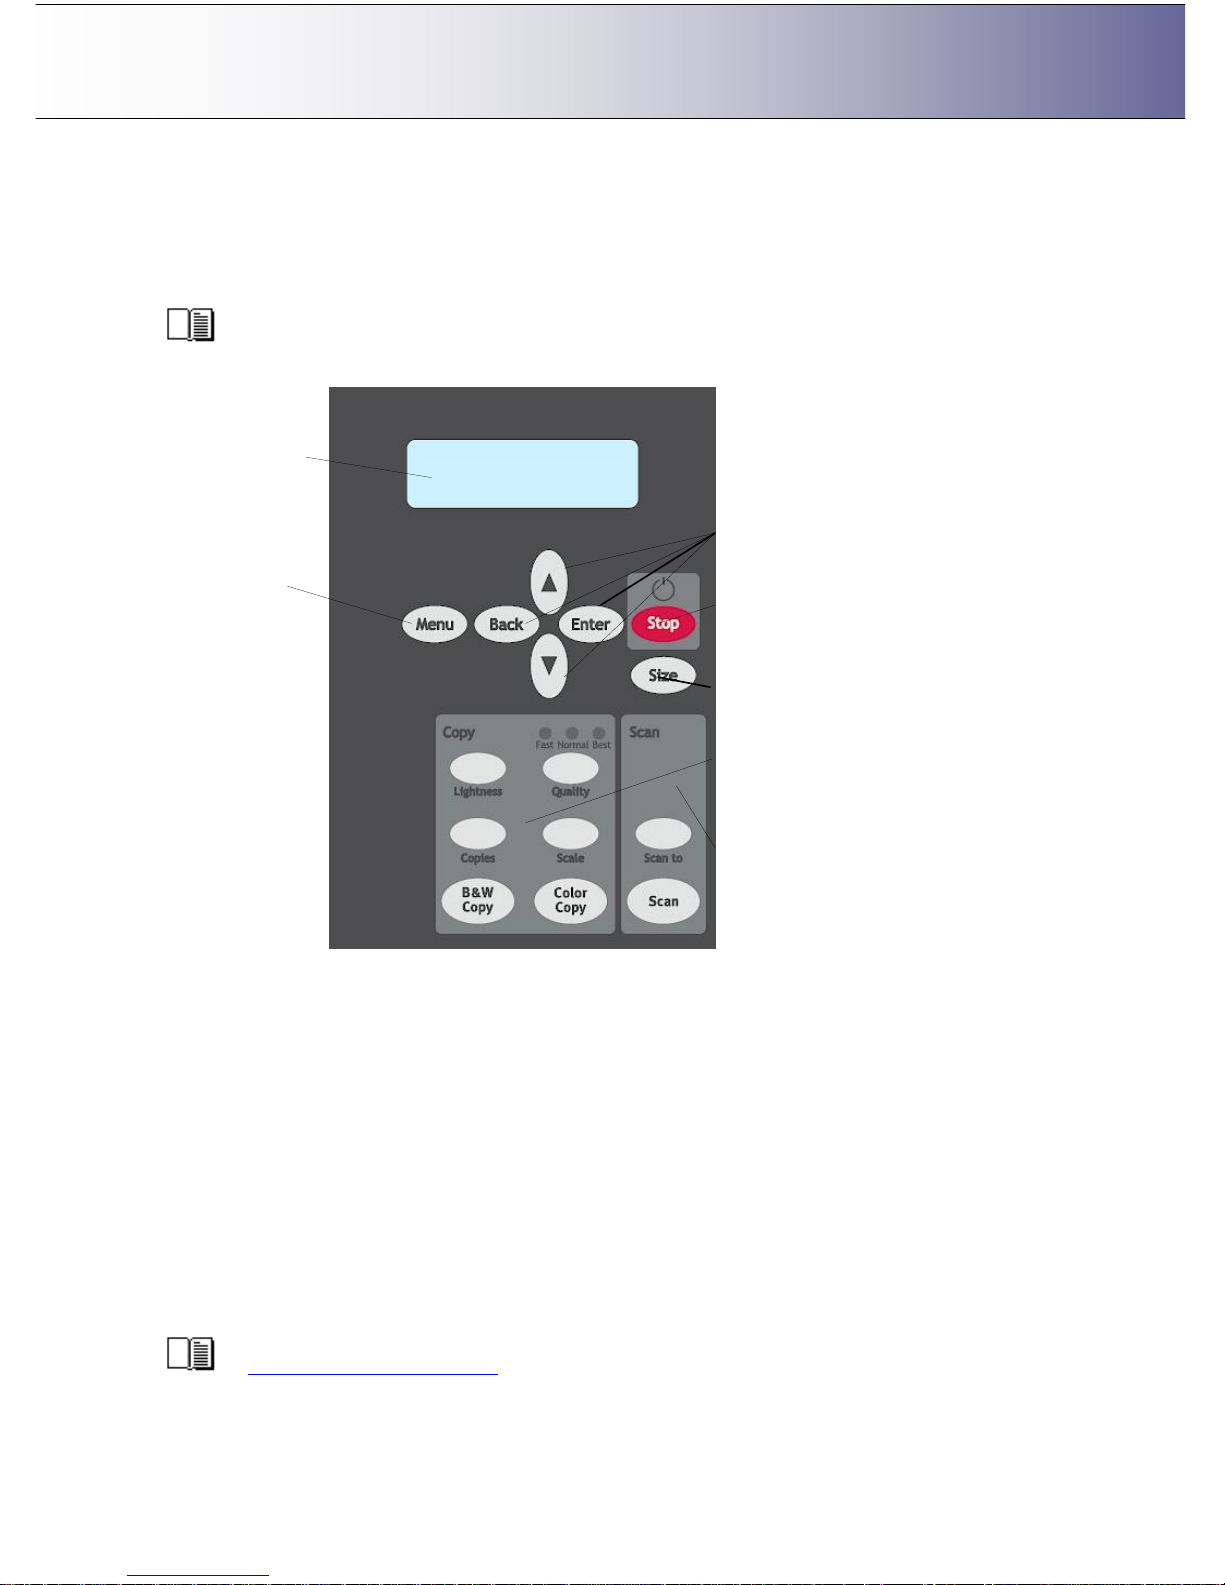
Before setting up your copy/scan configuration, you will need to familiarize yourself with the iJET Panel. A
number of setup tasks are performed through the iJET Panel and will require that you know how to
navigate the iJET Panel’s menus.
Instructions on making specific settings will be described under each configuration type in the
chapter “Copy Scanner Configuration and Setup”.
Scan Option Area
Copy Option Area
Control Buttons
Size Button
Menu Button
Display Window
Stop Button
The iJET Panel enables you to perform advanced copy and scan-to-file jobs straight from the scanner
(and not from a PC and scanning software interface). The panel contains a display window, control
buttons and option buttons.
The Display Window contains the current selections as you make them and useful messages
from the scanner regarding maintenance and operation.
The Menu button leads to a options for copy settings and an Advanced submenu for
configuration settings.
The control buttons arrow up, arrow down, Back, Enter, are for navigating the menus and for
selecting menu options.
The Stop button is for interrupting a copy or scan process.
The Size button is for setting the original’s size (input size) for both copy and scan jobs.
Below the control and menu buttons, are a Copy Option Area and a Scan Option Area, each
with its own set of quick option buttons. These buttons are described below.
An overview of the panel’s buttons follows at the end of this section.
Page 7

The iJET Panel 2-2
2.1 To make a simple copy
The following procedure for making a copy presumes the following:
The scanner and printer(s) are setup correctly as described in this User’s Guide.
The Size button option is set to Auto.
Options such as Lightness, Scale, Original Type, Quality and so on are all set to your standard
settings and the job does not require special adjustments.
1. Load the original.
2. Press the Color Copy button for color jobs or B&W copy button for B&W jobs.
or
For jobs that require adjusting the copy parameters, see the section “How do I make a Copy?” See also
relevant sections for setting up the system and setting options.
2.2 To perform a simple Scan-to-File
The following procedure for making a copy presumes the following:
The scanner is setup correctly with a local or network PC as described in this User’s Guide.
The Size button option is set to Auto.
Scan-to button options such as Scan Mode, File Format, Resolution and so on are all set to your
standard settings and the job does not require special adjustments.
1. Load the original
2. Press the Scan to button and select a scan target. A (USB) target is a local PC.
3. Press the Scan button to start the job.
For jobs that require adjusting the Scan to parameters, see the section “How do I Scan to File?”
See also relevant sections for setting up the system and setting options.
2.3 Operations on the iJET Panel
Turn the scanner power ON/OFF (Wake-up and Sleep modes))
Make quick settings for Copying – Lightness, Quality, Copies (no. of..) and Scale.
Make additional high level copy settings through the Menu button.
Apply scanner and printer setup options through the Menu button - Advanced.
Apply personal and local preferences through the Menu button - Advanced.
Select a scan-to-file target through the Scan to button.
Make advanced scan-to-file settings through the Scan to button
Start a Copy (BW or Color) job.
Start a Scan-to-file job.
Scan to
Scan
B&W
Copy
Color
Copy
Page 8
The iJET Panel 2-3
2.4 Power ON/OFF
These power on/off instructions apply only after you have setup and configured your system as
described in the relevant sections under “Scanner Configuration and setup”.
First time during setup (hard power ON)
1. Connect the scanner to the power outlet and turn on the outlet switch (scanner’s back).
2. The scanner runs a self-test and init procedure and after warming up it is ready to scan.
3. The text in the display window will tell you what the scanner is doing and when the scanner is ready to
scan. Prior to the “Ready” message the scanner will need to self adjust.
Normally, after powering up for the first time as described above, you will leave the outlet switch
permanently in the ON position, and turn scanner power on and off in the “soft” manner from the iJET
Panel as described below. This is the method recommended for daily use as it is faster than hard power
on.
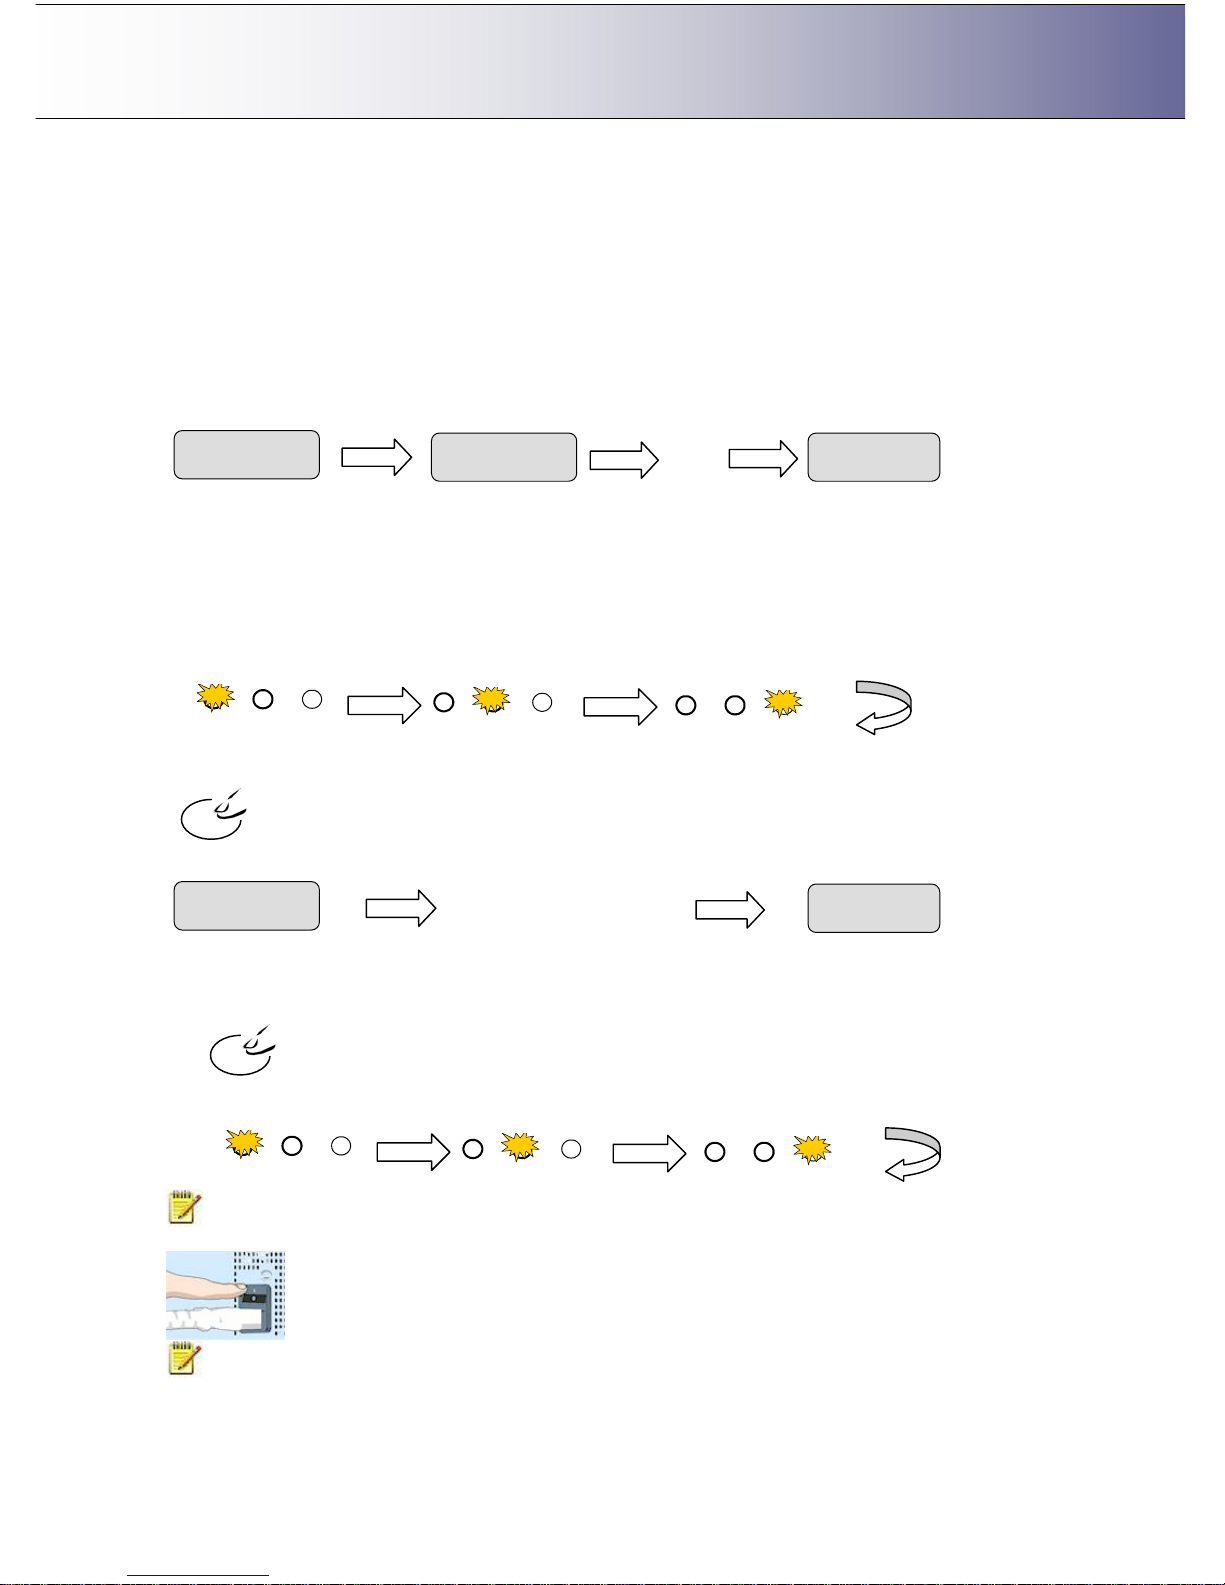
To turn power ON from the iJET Panel (wake-up mode)
1. The scanner must be OFF in Sleep mode. When the scanner is in Sleep mode, you will see the 3 Print
Quality LEDS flashing alternately as shown below.
Press and hold down the STOP button for a few seconds until the iJET Panel’s display window becomes
active (lights up).
2. The text in the display window will tell you what the scanner is doing and when the scanner is ready to
scan. Prior to the “ready” message the scanner may need to initialize itself and warm up.
To turn power OFF (Sleep) from the iJET Panel
1. Press and hold down the Stop button for a few seconds until the iJET Panel’s display window light
goes off.
When the scanner goes in OFF in Sleep mode, the 3 Print Quality LEDS light alternately as shown
below.
NOTE: The outlet switch at the back of the scanner must be in the ON position in order to control
power with Wake-up and Sleep modes.
NOTE: Power management through Wake-up Sleep modes can be controlled automatically with
WIDEsystem. See the WIDEsystem help for details.
Stop
FW:xxxx
…….
Ready
Fast Normal Best
Fast Normal Best
Fast Normal Best
Stop
Fast Normal Best
Fast Normal Best
Fast Normal Best
FW:xxxx
Adjusting
Ready
…….
Page 9
The iJET Panel 2-4
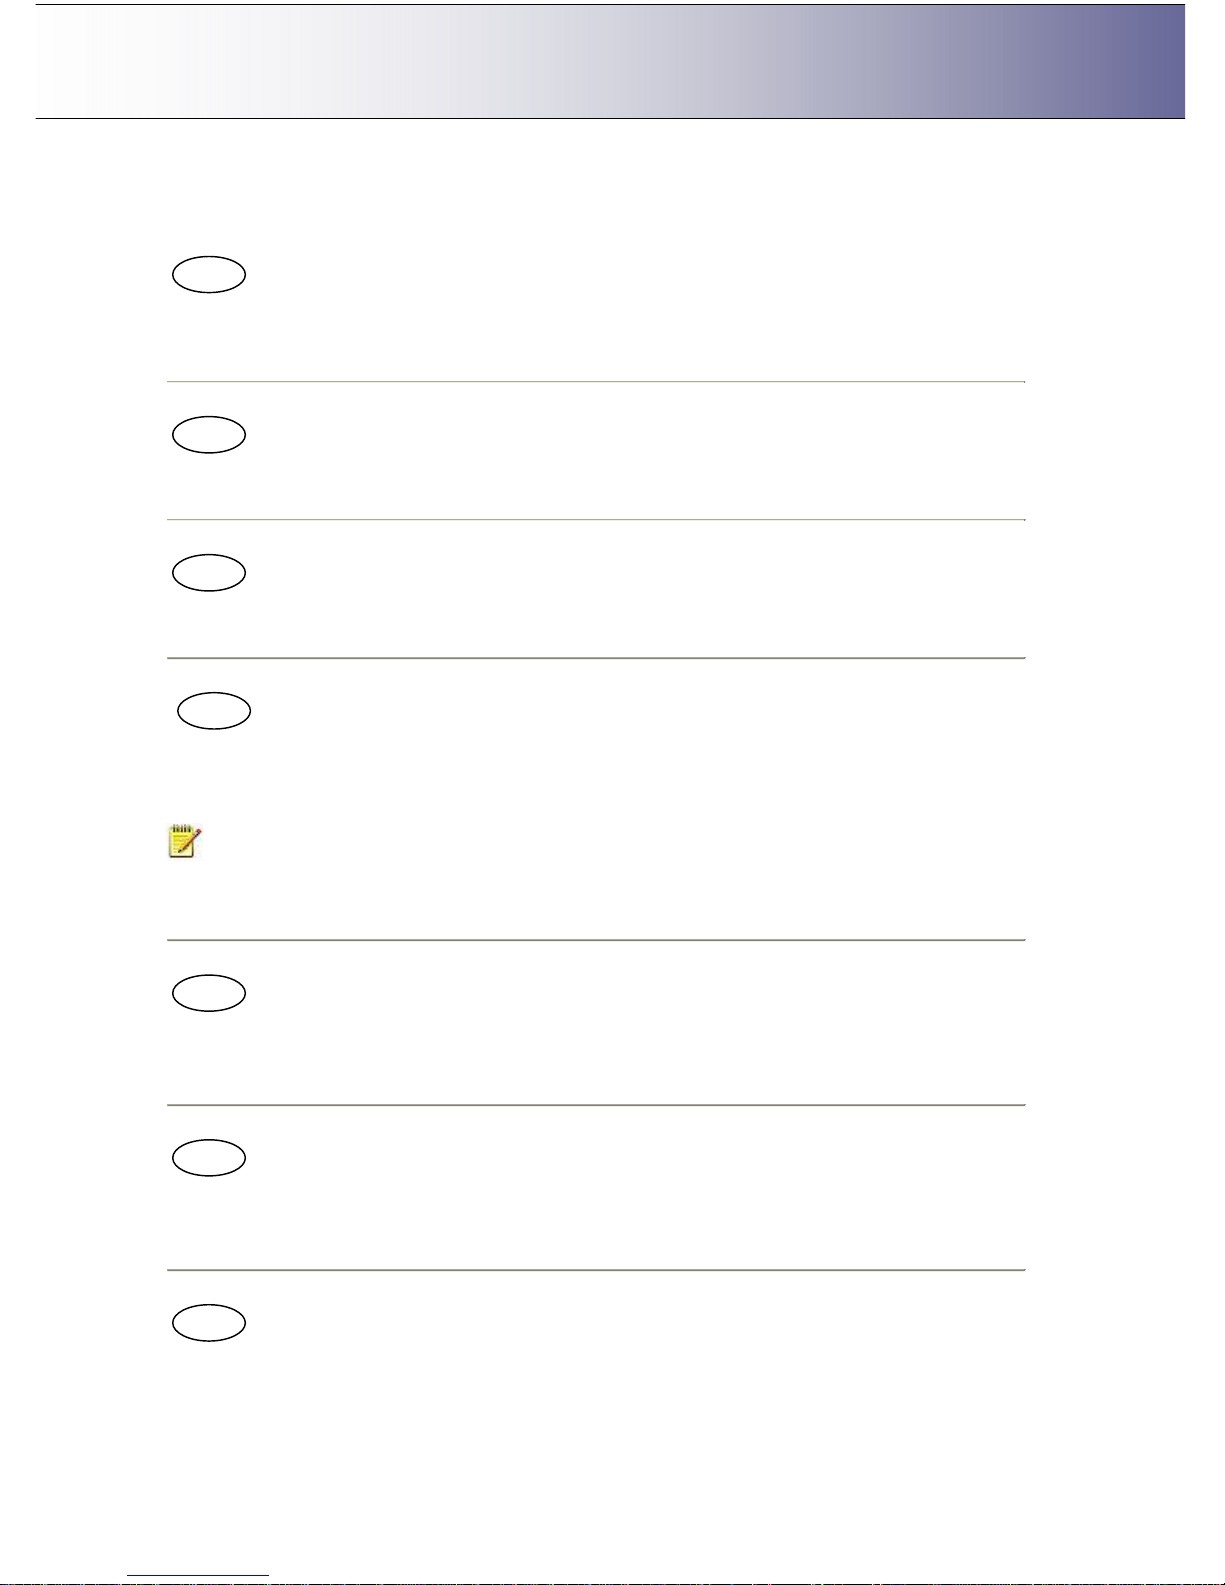
2.5 The iJET Panel Buttons – Overview
The Menu button
Menu button - The Menu button leads to the total range of options for copying and also the Advanced
menu with all the system setup and configuration functions.
A complete description on how to navigate the menu and select options follows below.
The Back button
Control Button – for moving one level up when in a menu or for returning to an option’s current (active)
setting while in the process of editing the option’s value.
The Enter button
Control Button – for entering the menu functionality for changing an option’s value and for setting
(accepting) the value once it is selected.
The Size button
Settings button - For setting the size of the original. The Size button is used for both copy and scan-to-file
operation. Press the button to activate option setting. You then change the value each time you again
press the button or with the arrow up/down buttons. You can select Auto detection or a standard size
setting.
NOTE that Size is a global system variable that can be changed in 3 different ways: 1. With the Size
button 2. With the Menu button > Size option and 3. With the Scan-to button > Size option. This means
that when you change the size for a copy job, it will also apply for a scan-to-file job and vise versa unless
you change it again.
The Lightness button
Settings (quick) button - For increasing or decreasing lightness in the copy. Press the button to activate
option setting. You then change the value each time you again press the button or with the arrow up/down
buttons.
The Quality button
Settings (quick) button - For setting copy quality to Fast, Normal or Best. Press the button to activate
option setting. You then change the value each time you again press the button or with the arrow up/down
buttons.
The Copies button
(…Copies button) Settings (quick) button - For setting the number of (how many) copies you want output.
Press the button to activate option setting. You then change the value each time you again press the
Lightness
Copies
Quality
Menu
Back Enter Size
Page 10
The iJET Panel 2-5
button or with the arrow up/down buttons.
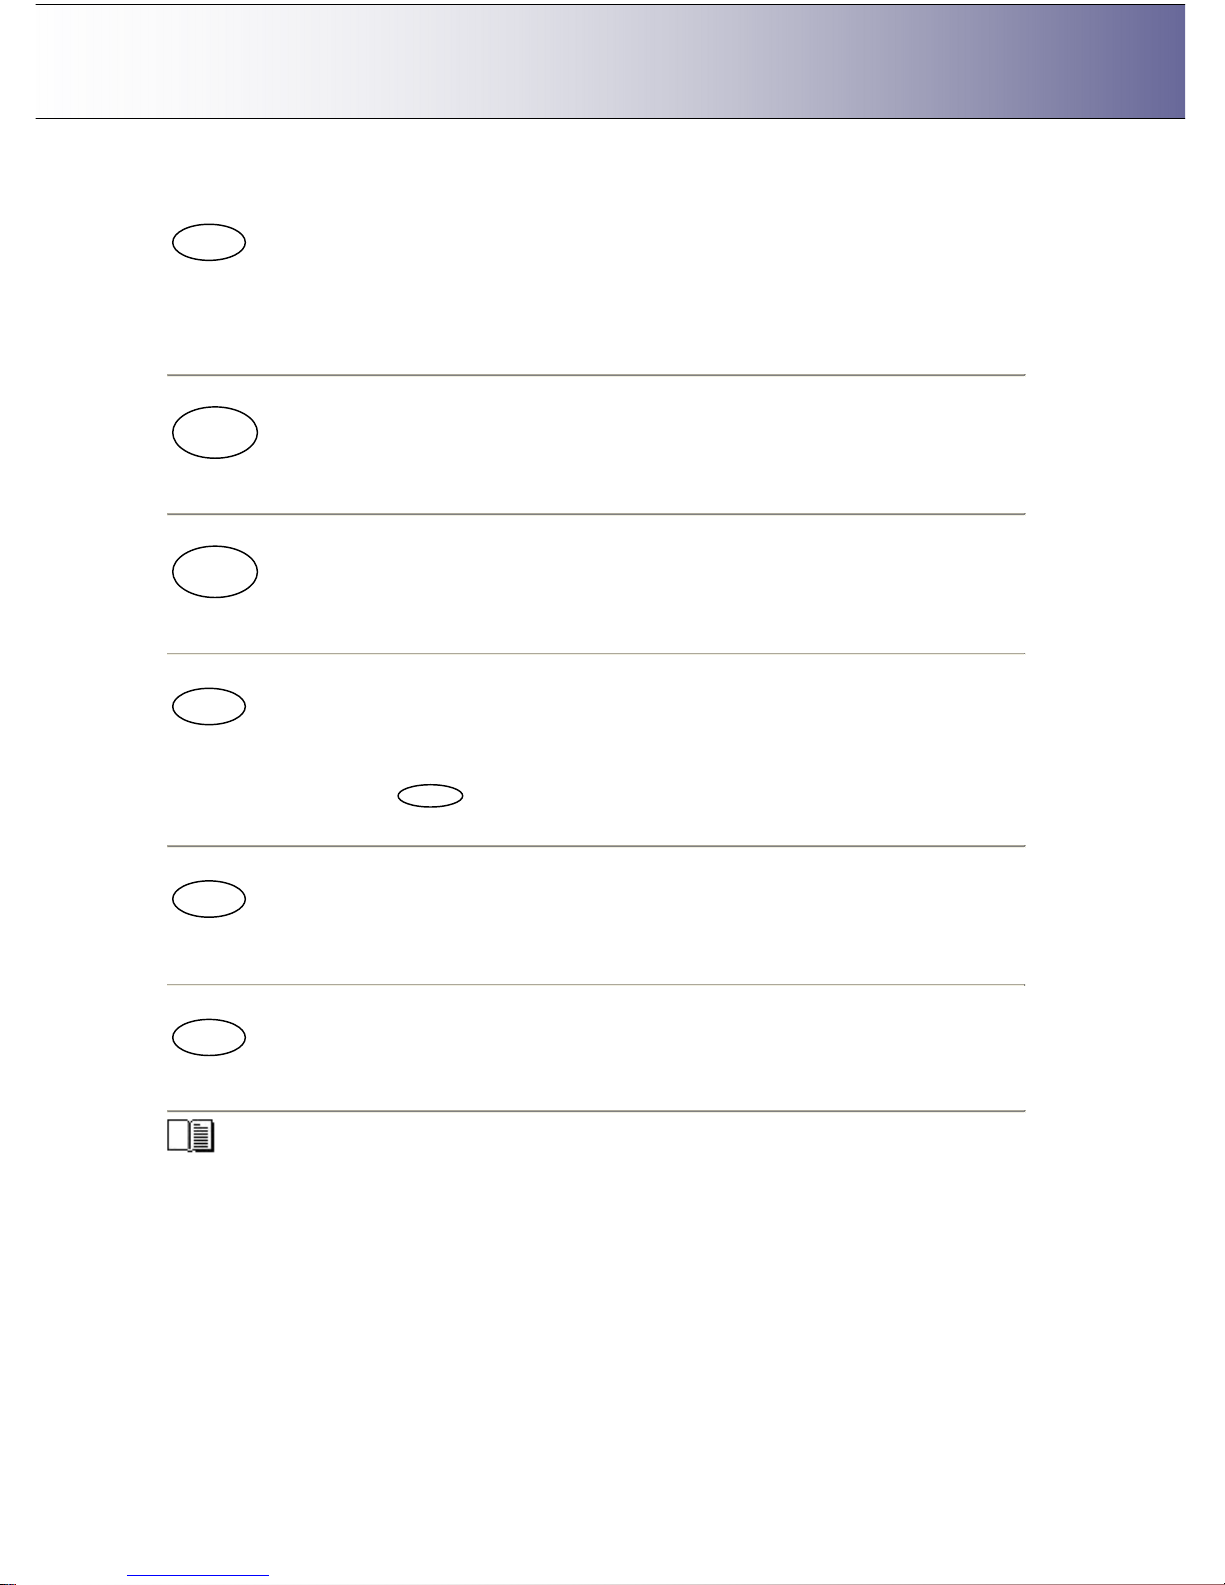
The Scale button
Option button - For setting a value that defines the output size in relation to the input size. For making
copies larger or smaller than the original. Press the button to activate option setting. You then change the
value to predefined scale ratios each time you again press the button. Use the arrow up/down buttons for
fine tuning - 1 step increments of the currently displayed value. Press the Enter button to save.
The B&W Copy button
Action Button: The B&W Copy button will start the copy job using the settings made for B&W copying
through the Menu button and the Size, Quality, Copies, Lightness and Scale buttons.
The Color Copy button
Action Button: The Color Copy button will start the copy job using the settings made for Color copying
through the Menu button and the Size, Quality, Copies, Lightness and Scale buttons..
The Scan to button.
Menu Button - For selecting a scan-to-file target (PC on the network) and for setting scan-to-file options.
You change the scan target each time you press the button. Keep pressing until you see the right target in
the window. Then, pressing will lead to the Scan Menu with its wide range of scan-to-file options
you can select for the job. Scan-to-file options include modes, formats, and resolution.
The Scan button
Action button - The Scan button will start a scan job using the settings made for scanning through the
Scan To button.
The Stop button
Action Button – This button has 2 functions: 1. For interrupting and terminating a scan or copy job before it
is finished. 2. For turning the scanner ON, OFF into Wake-up and Sleep modes.
More details on using the iJET Panel buttons with copy and scan-to-file tasks are described in the
relevant sections in the chapters “How do I Make a Copy” and “How do I Scan to File?”.
Color
Copy
B&W
Copy
Scan
Stop
Scan to
Scale
Enter
Page 11
The iJET Panel 2-6
2.6 How do I Navigate the iJET Panel Menus?
This section explains how you find and set the many options behind the Menu button and the Scan to
button. You will learn here how menu options and values are shown in the display window and how you
use the control buttons Back, Enter and arrows up/down to reach them for setting and changing their
values.
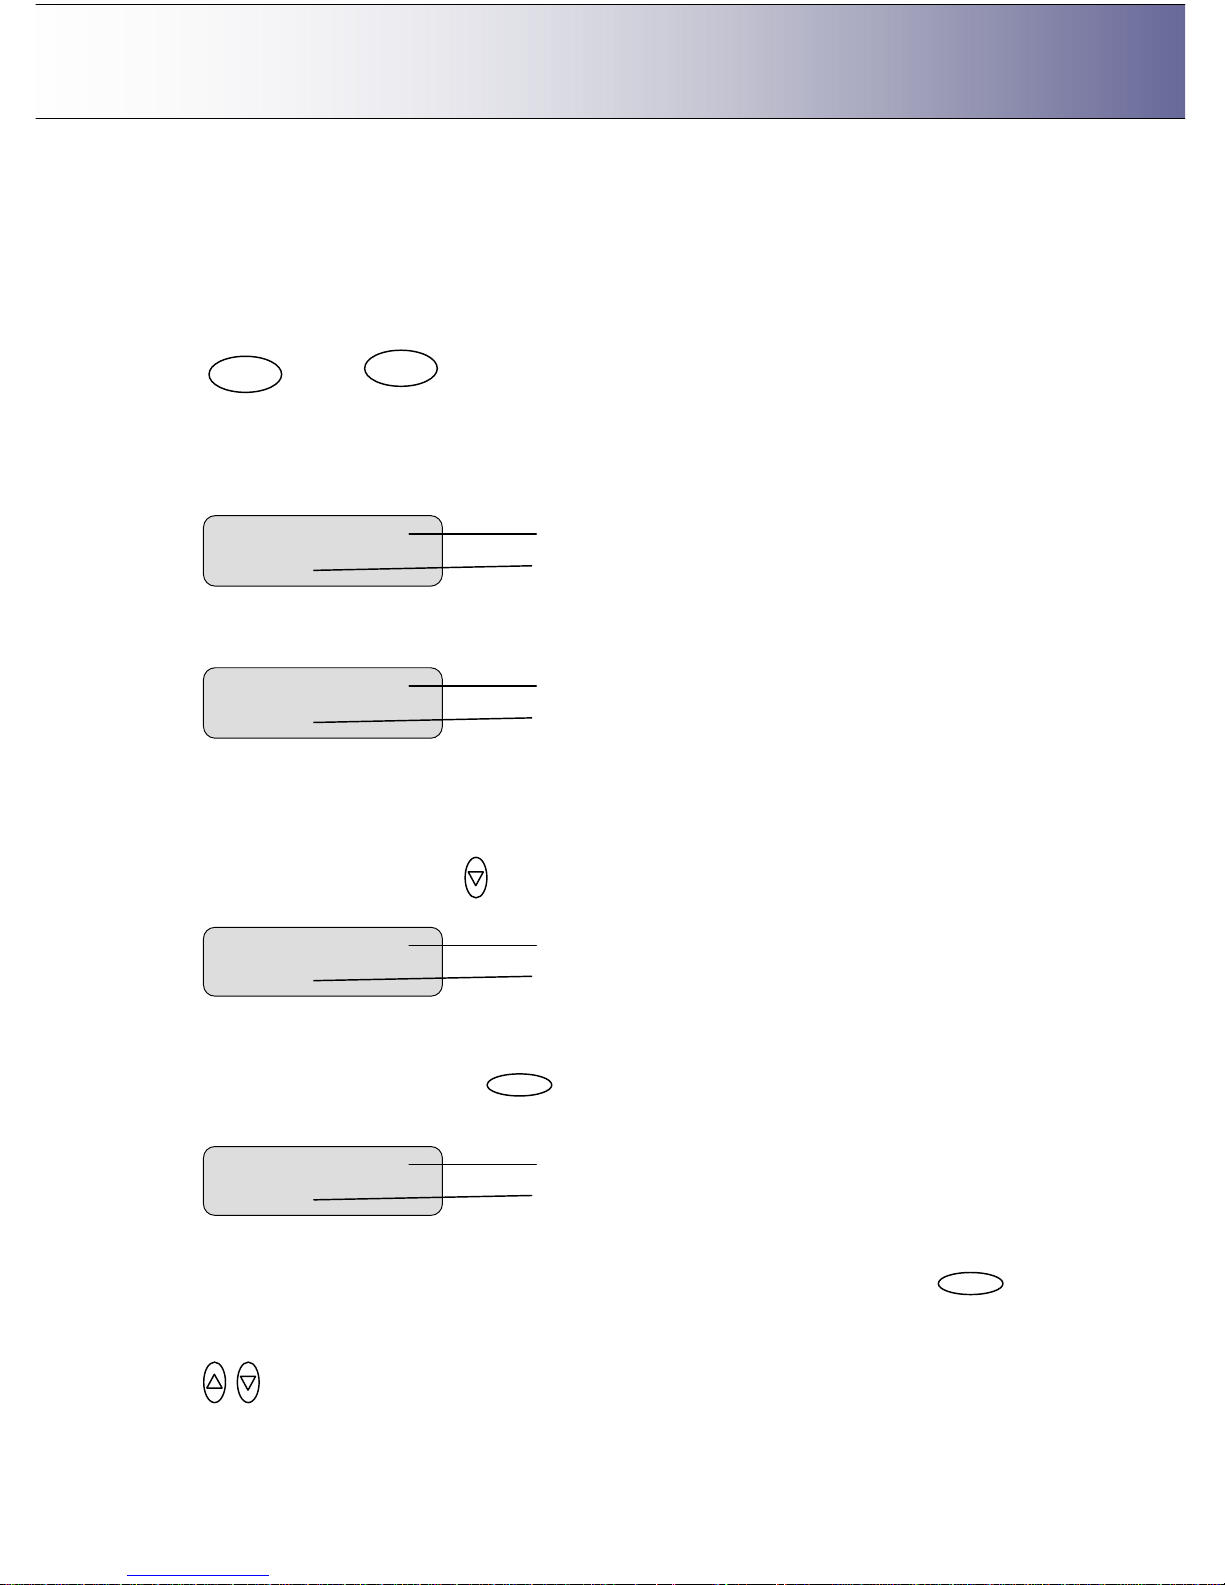
1. When you press the one of these buttons you start its underlying menu.
or…
2. A menu contains an ordered list of menu option items and each of these menu option items can be
set to different values. Only one menu option item can be shown at a time in the display window.
When you start a menu, its first menu option item and its current value is shown in the display window
as shown below for the Menu button.
3. A menu option that is followed by three dots (…) means that there is a sub menu that follows when
you press Enter.
4. The first line in the display is the menu option item and the second line is its current value. In the
example above, the current menu option item is “Org. Type Color” and its value is “Photo”. The “>”
marks which one of the two lines is currently active for changing with the arrow up/down buttons. In
the example above, the first line, i.e the menu option item line is active.
Pressing the down arrow button in this case will move the menu forward to the next menu option
item and that option’s own current setting as shown below:
5. The “>” marker in the example above shows that the menu option item “Org, Type B&W” is now
active and “Sepia” is its current setting. To enter the menu option in order to make changes to its
setting, you press the Enter button.
In the display panel the “>” mark will move down to the next line as shown below.
6. The “>” marker now indicates that the setting for “Org. Type B&W” option can be changed. Pressing
the up/down arrow buttons will move through the available settings. Press the Enter button
when the right setting is displayed to the right of the “>” marker. The selected setting will then become
the option’s active setting and the “>” marker will hop back to the menu level (top line) so you can
resume leafing through the menu option items with the arrow up/down buttons.
>Printer Setup
…
Menu option item
Three dots (…) indicate there is a submenu
Org. Type B&W
>
Sepia
Menu option item
Current setting for the
o
ption item
> Org. Type B&W
Sepia
Menu option item
Current setting for the
o
ption item
Menu
Scan to
Enter Enter
> Org. Type Color
Photo
Menu option item
Current setting for the
o
ption item
Page 12
The iJET Panel 2-7
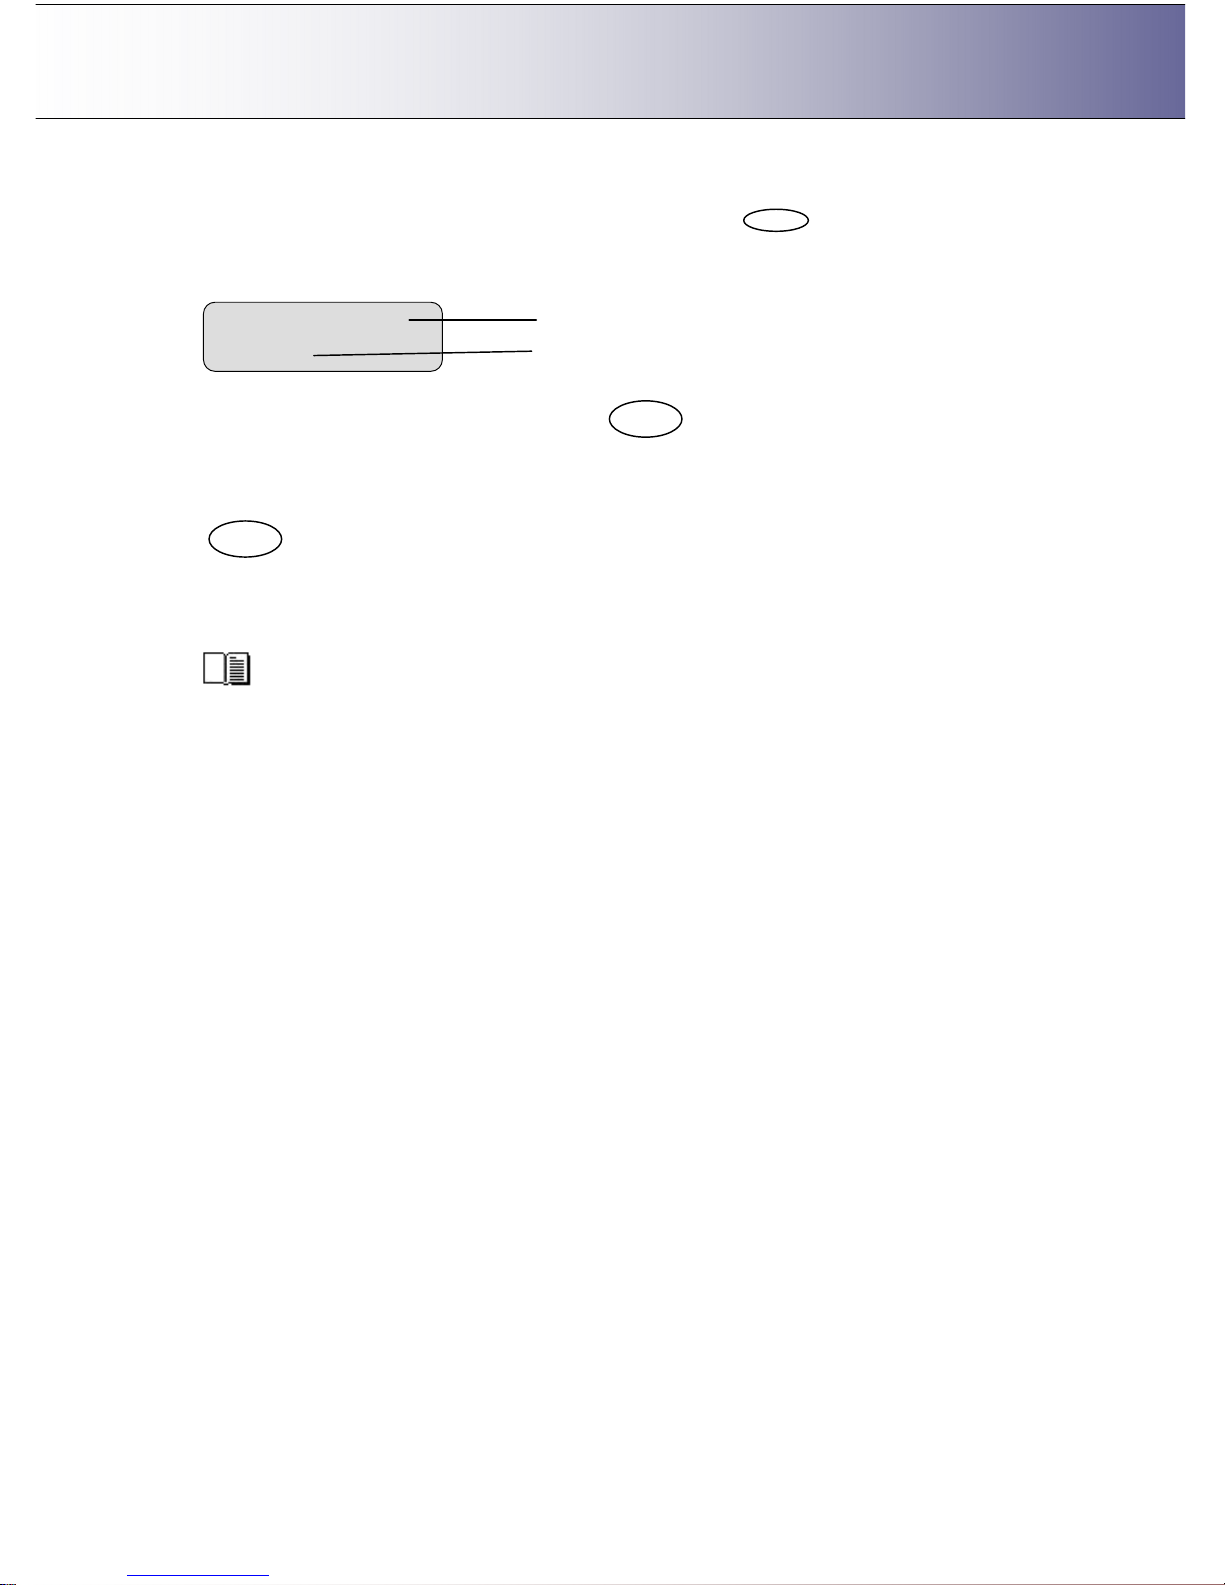
7. From the display window shown above to the display window below: The user pressed the arrow
down button until the value “Line” was displayed and then pressed to accept that value as
the new setting for the “Org. type B&W” option. The “>” marker moved back to the menu option item
level enabling the user to continue navigating the menu with the arrow up/down buttons.
8. When in a menu, you can press the Back button to return to a previous menu level or to
reset the active option item to its last saved value.
9. Press the Stop button if you need to cancel a started scan-to-file or copy job.
10. The copy area quick buttons Lightness, Quality, Copies and Scale are shortcuts to option items
behind the Menu button. Their values can be changed through repeated pressing of the quick button
or else in the traditional manner with the arrow up/down buttons as with other menu option items.
The quick buttons Lightness, Quality, Copies and Scale are described in detail in the relevant
sections of the chapter “How do I Make a Copy”.
> Org. Type B&W
Line
Menu option item
Current setting for the
o
ption item
Stop Back
Enter
Page 13
Configuration and Setup 3-1
3. Scanner Configuration and Setup Instructions
Your Copy scanner supports iJET technology for copy and scan-to-file functionality. The iJET panel
enables you to set options on the scanner so you can copy straight from the device without a controllerPC and software. Furthermore, your scanner can be connected directly to the LAN enabling it to function
with other devices such as printers and PCs that are on the same network. Finally, your scanner supports
both USB device (input) and USB host (output) interfaces for direct connection to a printer and to a PC
that can control the scanner through scan/copy software.
This wide range of connection and operation capabilities means that your scanner can be set up in many
different ways or “configurations” to match the needs of your business. For clarity, we have termed the
main configuration possibilities and their components as follows:
Configuration Type Components - Description
1 Stand Alone Copier Configuration
Scanner connected directly (no PC) to one or two
printers.
2 Network Scan/Copy Device
Scanner connected directly (no PC) to the network.
The scanner is set up to be recognized on the
network by network PCs and also setup to
recognize/use network PCs as scan targets. The
scanner is setup to use network printers.
3 Scan/Copy Station on Local PC
Scanner connected to a PC through USB interface.
Scan/copy software is installed on the PC.
4
Combinations of the above for Multiple
Functionality
The scanner is connected to a local PC and a local
printer. The scanner is also connected directly to
the network in order to be shared by network PCs
and to use network PCs as scan targets. The
scanner can also use network printers.
This User’s Guide section describes each of these configurations, including its components, requirements
and step-by-step installation instructions.
NOTE: The combinations of the first three configurations (present in above list as configuration
nr. 4) are not only possible, but in many cases also recommended in order to get the full range of scan-to-
file and copy functions out of your device and maximum flexibility for your business .
More on combining configurations in the section “Combining Configuration Types for Multiple
Functionality.”
NOTE: About interface connection cables: Your scanner came with a number of interface cables. Refer
to the supplied document: “NOTE ON INTEFACE CABLES” for instructions on which cables to use with
your specific configuration.
All the configurations described in the following sections can be set up with both models:
FLEX50i, HD4230i
Page 14
Configuration and Setup 3-2
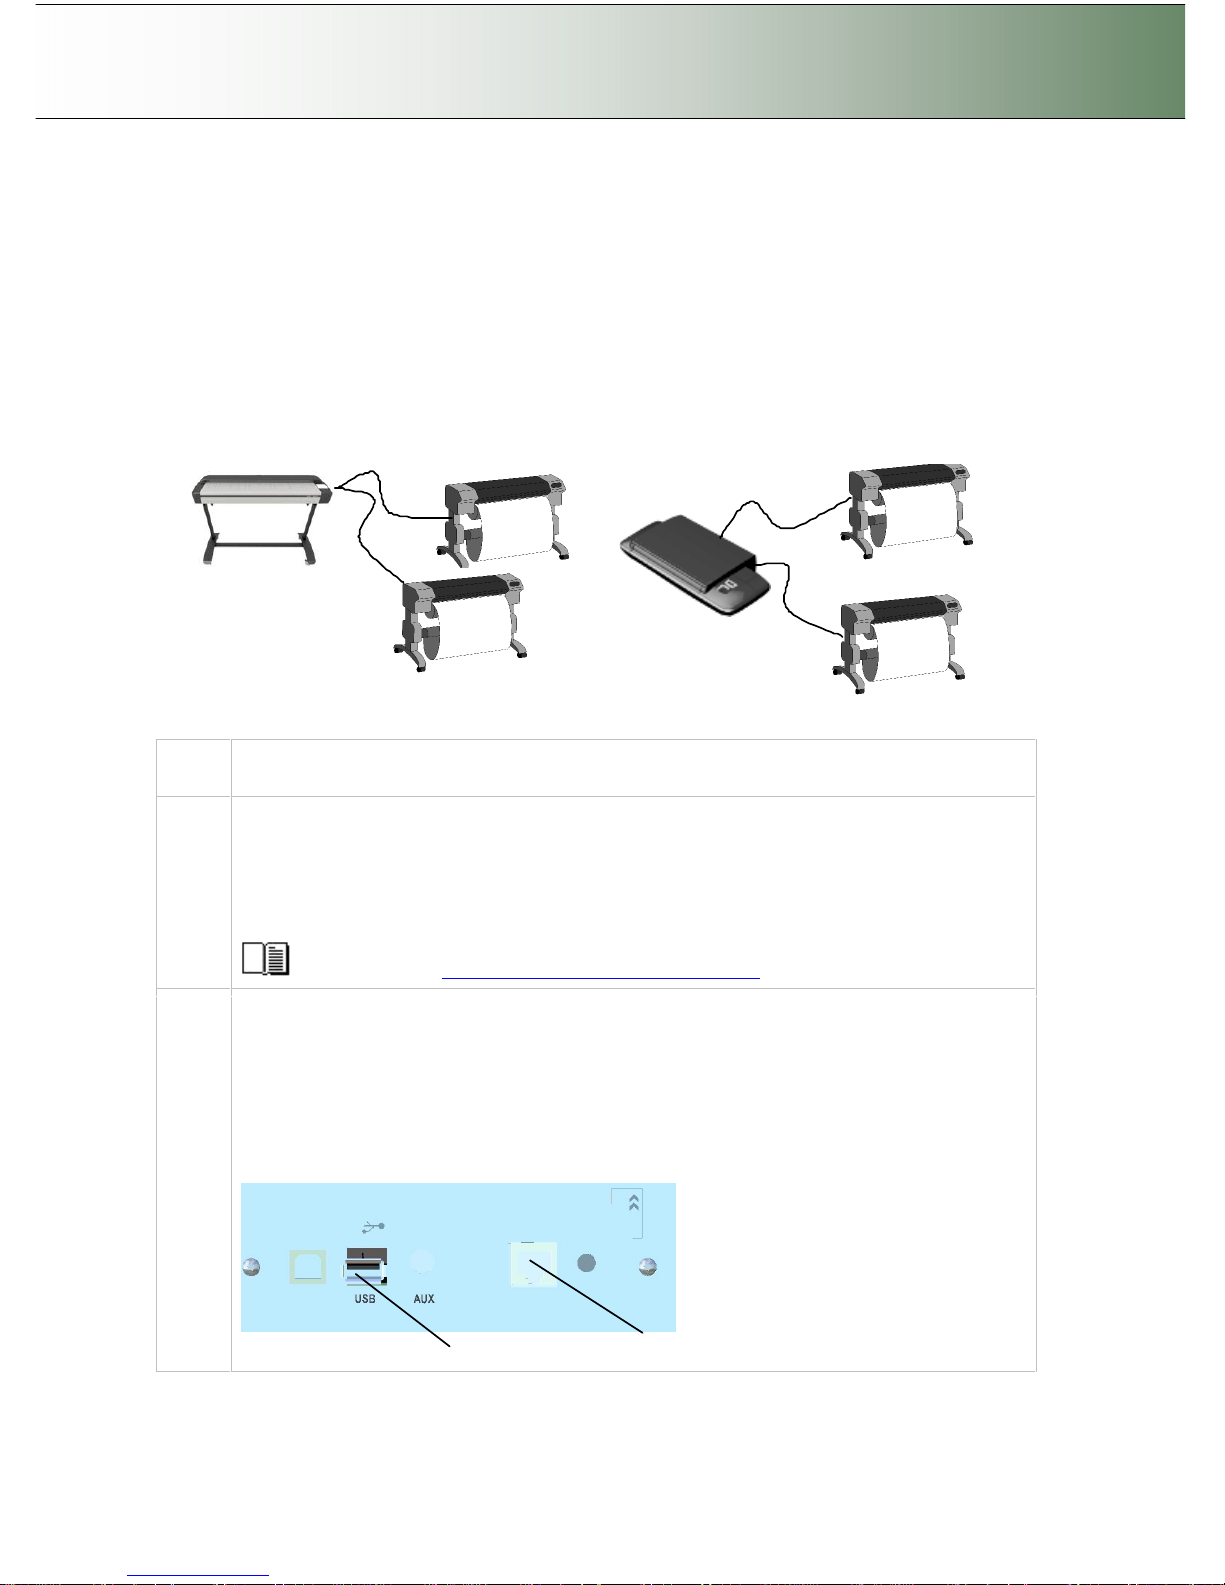
3.1 Connect the scanner directly to printer(s) - Stand Alone Copier
Components: Wide format copy scanner and one or two large format printers. The Scanner is connected
directly (no PC or network) to one or two printers.
Usage: For copying large format documents. This configuration can create printed output only. All
operation takes place from the iJET Panel (scanner).
System Requirements:
Wide Format Copy scanner
Compatible large format printer(s)
USB cable or twisted LAN cable or both. - for connecting the scanner to the printer(s)
Printers are connected through
USB or LAN interface
Step Description – Stand Alone Copier Configuration
1
Set up your scan station
Your wide format copy scanner should be placed either on the specially designed stand-alone
floor stand or on a sturdy table. For sheet-feed models, make sure there is enough space behind
the scanner to allow the media to run out.
HD4230i: If you own a smart card, make sure that the smart card is in place. See the
instructions that came with the smart card.
See the sections “Physical Placement of the Scan Station”
2
Connection to printer– scanner end
Connect the USB cable or LAN cable to the scanner. Check your printer’s interface options to
select which of these to use. For USB use the USB host (output) port which is the flat rectangle
shaped socket. See the document: “NOTE ON INTERFACE CABLES” for instructions on the
specific interface cable types to use with this configuration.
You can attach two printers at a time – a B&W printer and a Color printer. Note that the scanner
has only one USB out connection so a second printer will have to be able to use the LAN
connection.
USB host port - (output to printer)
LAN port
Page 15
Configuration and Setup 3-3
See the section “Locating the Interface Cable Connector Panel” for further nstructions.
3
Connection tp printer - printer end
Connect the other end of the USB interface cable or LAN cable to the large format printer.
See the section “Locating the Interface Cable Connector Panel” for detailed instructions
for your specific scanner model.
4
Quick clean for dust
Clean your scanner’s surface so dirt and dust are not dragged into the scan area with the
original. Wipe the glass with a dry cloth to remove any dust in the scan area.
5
Connect scanner power cable
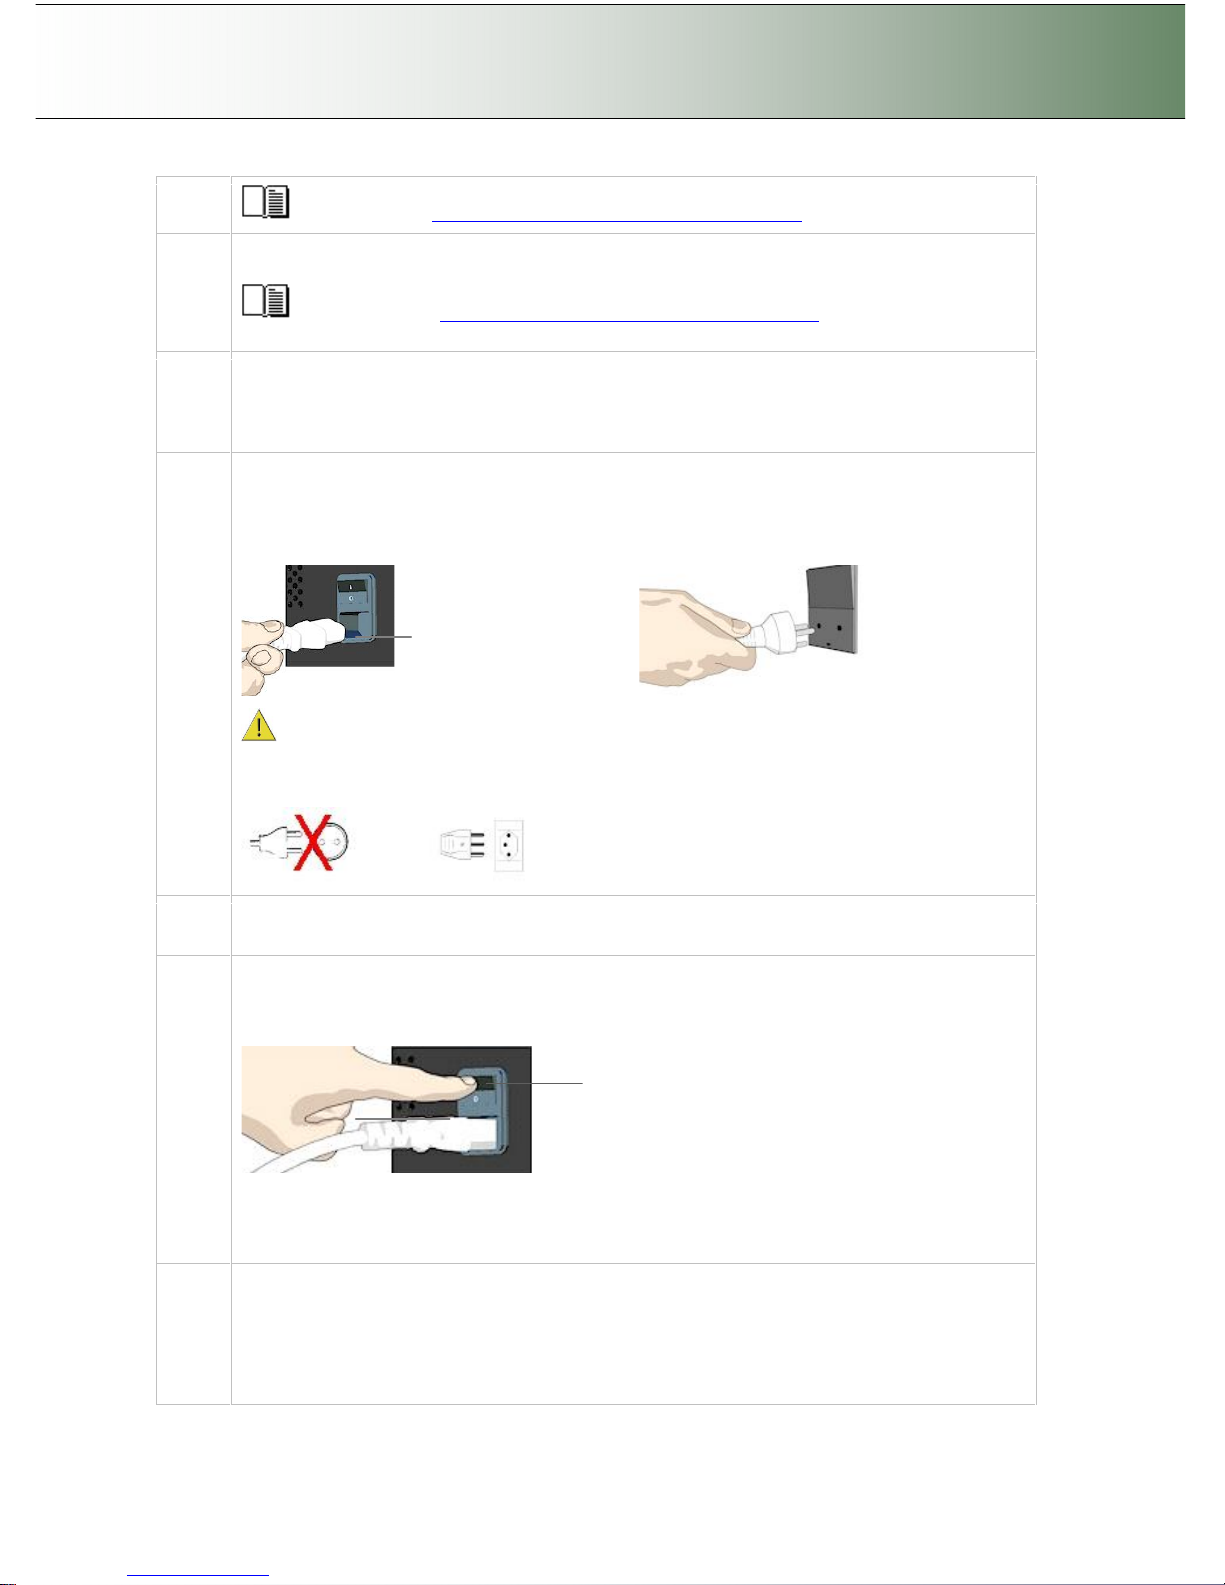
At back of the scanner, you will find the scanner-end power cable socket, just below the Main
Poer Switch. Connect the cable to the scanner plug socket and then the other end to your
grounded power source. Do not yet turn on the Outlet switch on the scanner.
Scanner-end power socket
Plug-in in power source
Caution: The scanner is equipped with a three-wire (pin) grounding type plug. If you cannot
insert the plug into your outlet, contact your electrician to replace the outlet and ensure a
grounded power connection. Do not try to defeat or ignore the purpose of the grounding-type
plug.
6
Connect the printer’s power cable.
See your printer’s documentation for instructions.
7
Turn (power) on the scanner and the printer
To turn on the scanner - at back of the scanner, above the scanner-end power cable plug you
will find the main power switch. Flip the main power switch to ON (marked “I”). The scanner
starts the init and self test sequence and you must wait until these are finished.
Main Power switch
Press the “I” to turn on.
The Main Power switch is found at the back of the scanner
See your printer’s documentation for instructions on connecting the printer’s power cables and
turning the printer to ON. .
8
Perform Preliminary Maintenance - Calibration
You will need to use a PC with WIDEsystemNET and Scanner Maintenance software installed.
To run scanner maintenance:
Use a local or LAN connected PC with WIDEsystem and Scanner Maintenance installed. Left
click on the WIDEsystem scanner Icon and select Launch Scanner Maintenance from the menu.
Page 16
Configuration and Setup 3-4
Follow the instructions on your screen.
See the section “Running the Scanner Maintenance Program” for detailed instructions.
9
Set localization Preferences
On the iJET Panel - Select Menu > Advanced > Options >… to set preferences for language,
paper series and media handling (loading).
See the section about options for ”Personalizing and localizing the system” for details.
10
Make Printer Setup settings on the scanner
You can setup for two printer types – a B&W printer and a color printer. After you setup your
printers, pressing the Color Copy button will send the output to your color printer and pressing
the B&W Copy button will send the output to your B&W printer.
On the iJET Panel
Printer set up is described for Color Printer below. The same rules and method applies for B&W
Printer setup.
Select Menu > Advanced > Printer Setup > Color Printer to make settings.
Select Menu > Advanced > Printer Setup > Color Printer > Interface > USB if you used a USB
connection between the scanner and the printer and LAN if you used a LAN connection. If you
selected LAN, use the arrow up/down buttons to enter the printer’s IP address.
Select the Printer Model setup method – Auto Configure, Printer List or Custom Setup and apply
the additional setting(s) attached to the Printer Model setup method you selected.
See the section “Printer Setup on the Scanner” for more details.
11
Prepare the Printer
Perform actions and settings on the printer device such as check that the right paper is loaded
and the printer is ON. See your printer’s documentation for help.
12
Create a system media type for your printers media (Closed Loop Calibration)
For the color printer only - You must create a system media type profile in order to color match
paper media, printer and scanner before using the system. Identify the media type (Coated,
Glossy, Semi-Glossy) you use with the printer and then perform closed loop calibration (3 steps).
On the iJET Panel
Select Menu > Advanced > Options > Closed Loop Cal.
Press Enter and then use the arrows up/down buttons to reach the right media type and Enter to
select. With some printers you will also need to perform the Calibrate Rip step.
On “Print Sheet” select Enter. The system will print a color patch sheet.
Feed the sheet into the scanner
On “Scan Sheet” select Enter. The system will scan the color patch sheet and calculate color
matching values for future jobs with the current media type.
See the section on “how do I… Create a New Media” for more details.
13
Test your system
Make a simple copy to test your system.
See the section on “how do I… Make a Copy” for details.
Menu
Menu
…..
Page 17
Configuration and Setup 3-5
3.2 Connect the Scanner to LAN – Network Scan/Copy Device
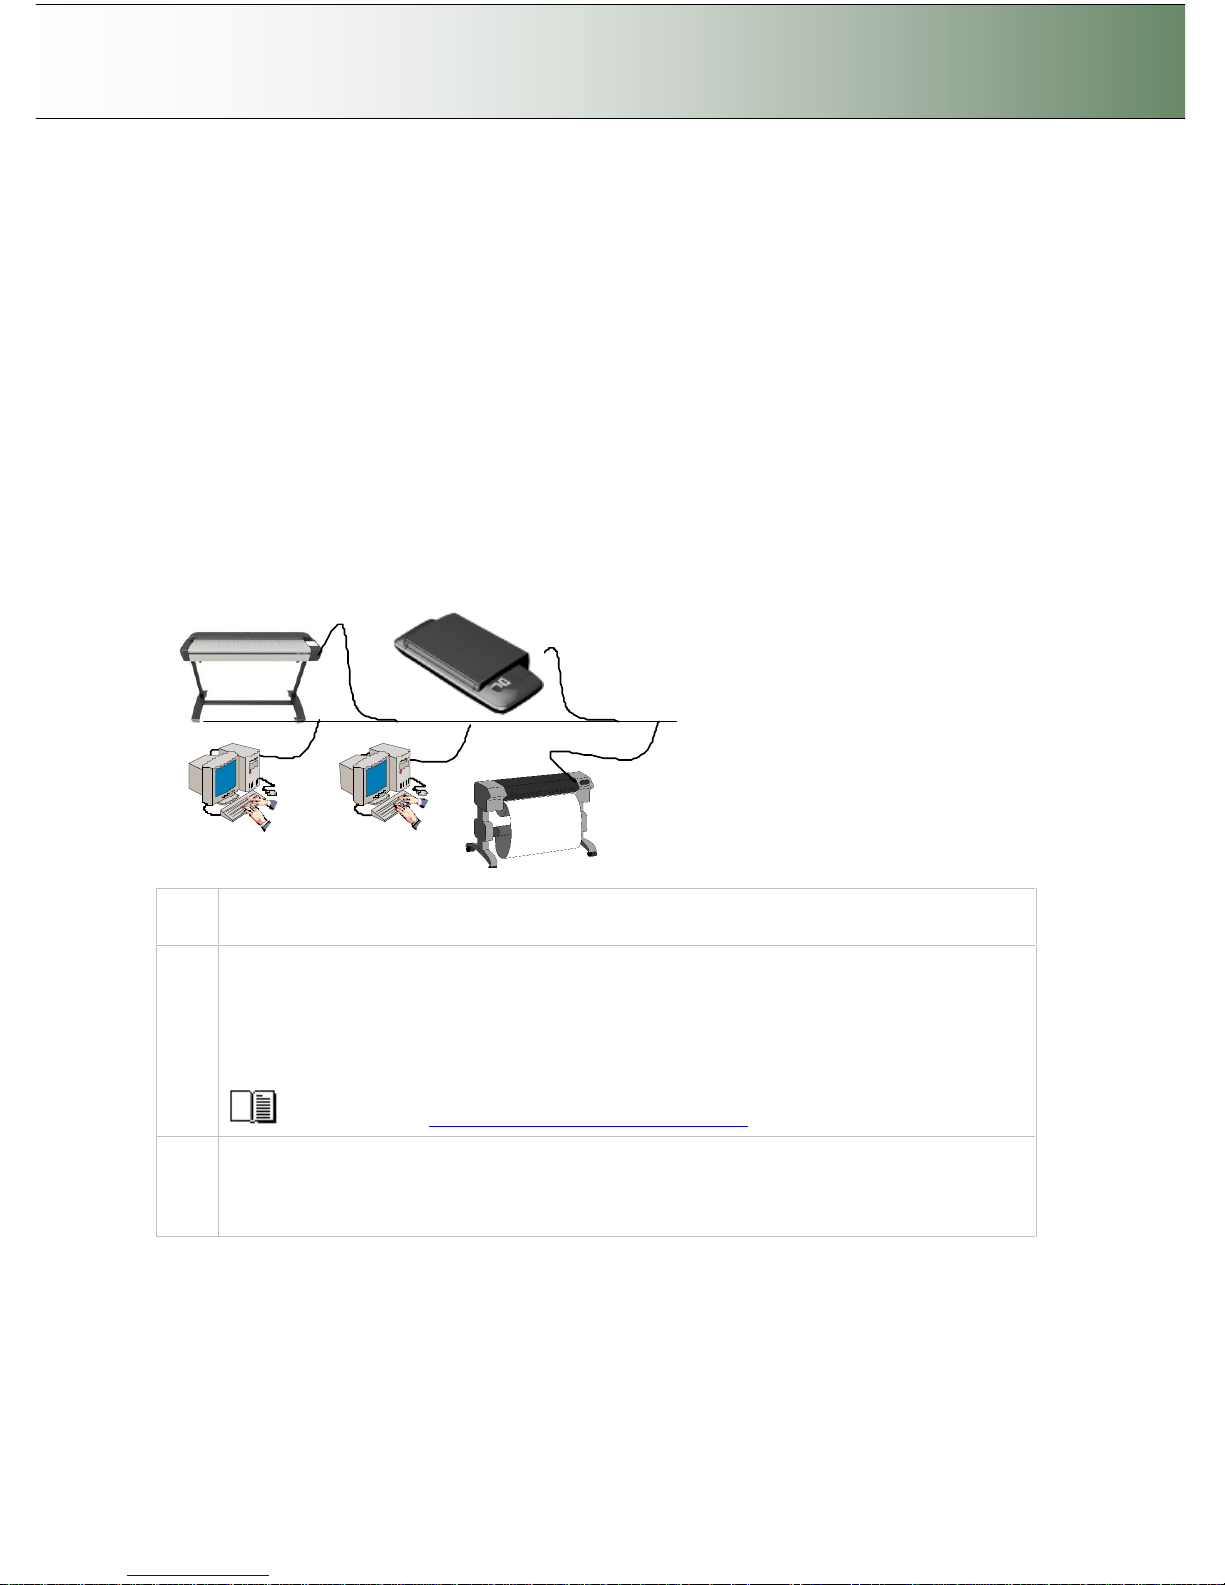
Components: Wide format copy scanner and Local network. Peripheral devices such as PCs and printers
are setup and active on the network. The scanner will be setup to recognize PCs on the network as scanto-file targets. The scanner will also be setup to be recognized and accessed by PCs on the network
(sharing). The scanner will be setup to recognize and use network printers.
Usage: For copying and digitizing large format documents. For creating both printed and file (digitized)
output. Operation is from the iJET Panel (scanner) or from network PCs. Users operating from the panel
can copy to printers on the network and scan-to-file to PCs on the network. Network PCs with compatible
scan or copy software installed can “share” the scanner and use it with network printers or for scan-to-file
tasks.
System Requirements:
Wide Format Copy scanner
Compatible large format printer on the network (for copy functionality).
LAN cable connecting the scanner to the network.
One or more PCs on the network (for scan to file and shared scanner functionality).
The PCs need: compatible operating system (see ws/readme.htm on WIDEsystem TOOLS CD).
Scanner’s LAN interface
Step Description
1
Set up your scan station
Your wide format copy scanner should be placed either on the specially designed stand-alone
floor stand or on a sturdy table. For sheet feed models, make sure there is enough space behind
the scanner to allow the media to run out.
HD4230i: If you own a smart card, make sure that the smart card is in place. See the
instructions that came with the smart card.
See the sections “Physical Placement of the Scan Station”
2
Connection – scanner end
Connect the LAN cable to the scanner’s LAN port. See the document: “NOTE ON INTERFACE
CABLES” for instructions on the specific interface cable type to use with this configuration.
Page 18
Configuration and Setup 3-6
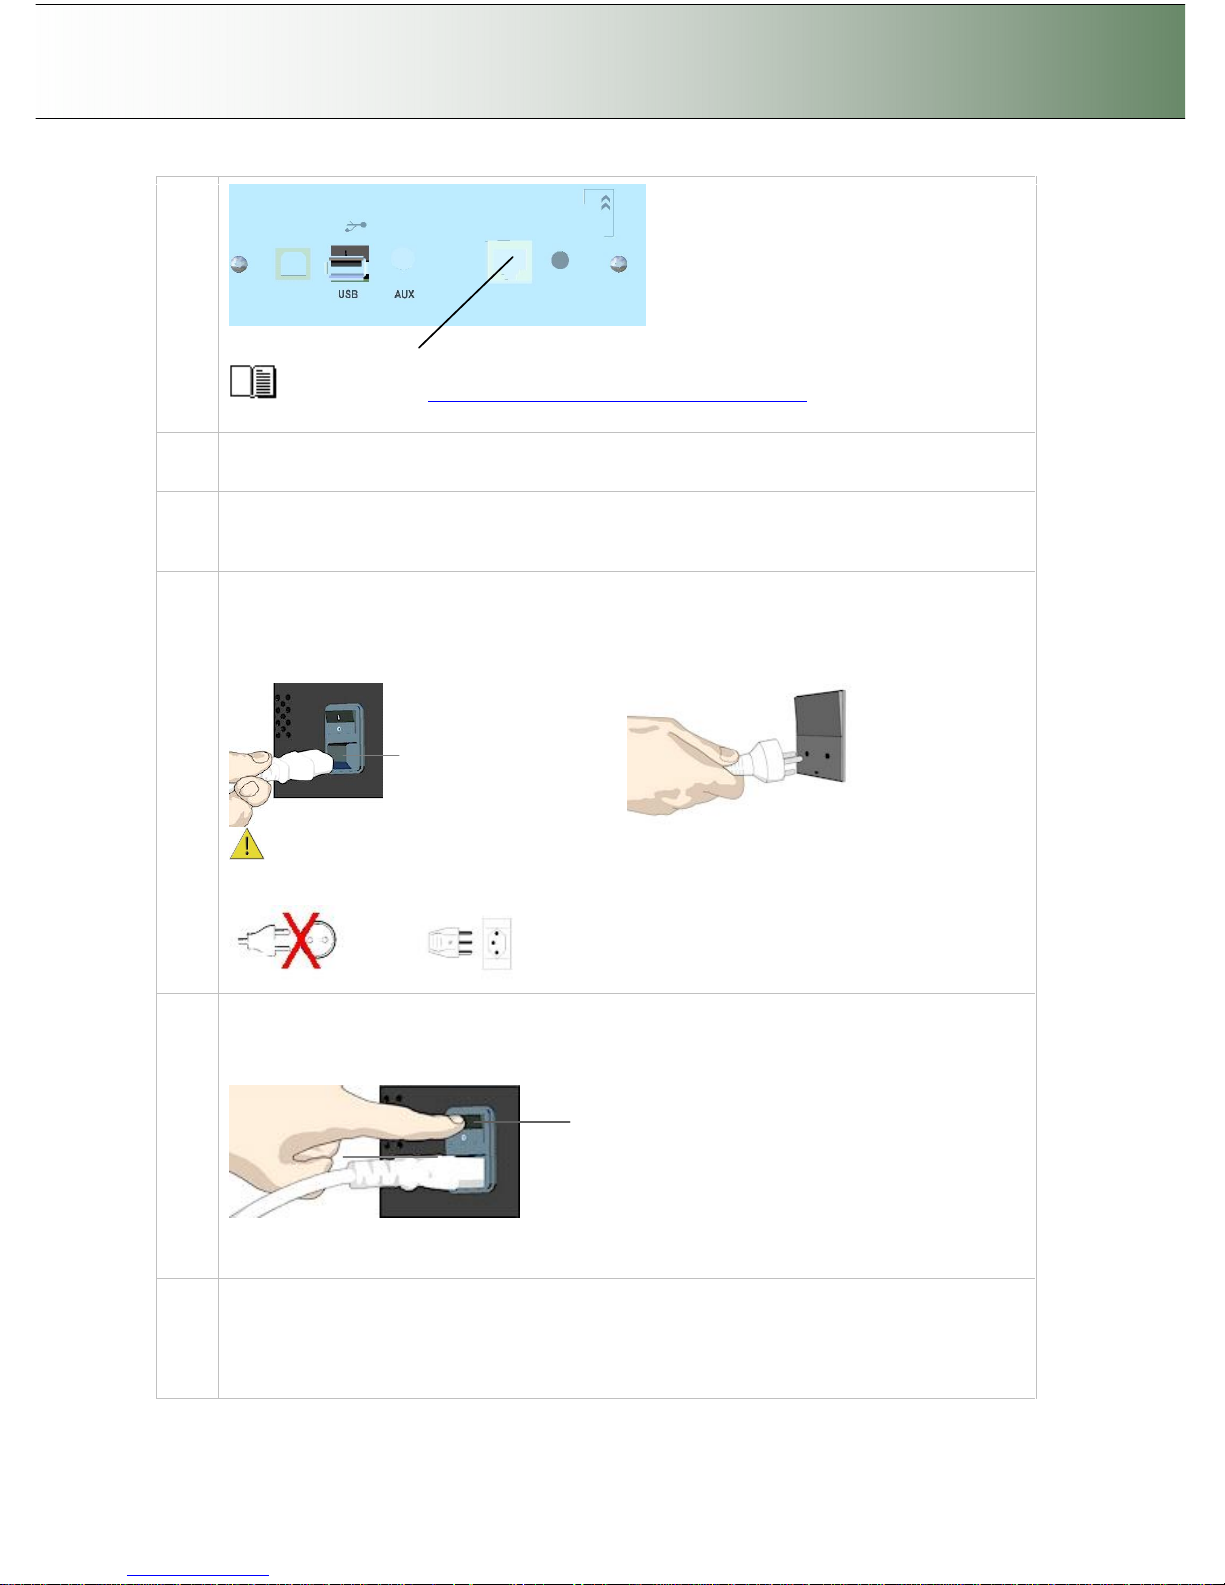
LAN port
See the section “Locating the Interface Cable Connector Panel” for instructions regarding
your specific scanner model.
3
Connection – network end.
Connect the other end of the LAN cable to the network or switch.
4
Quick clean for dust
Clean your scanner’s surface so dirt and dust are not dragged into the scan area with the original.
Wipe the glass with a dry cloth to remove any dust in the scan area.
5
Connect scanner power cable
At back of the scanner, you will find the scanner-end power cable socket, just below the Main Poer
Switch. Connect the cable to the scanner plug socket and then the other end to your grounded
power source.
Scanner-end power socket
Plug-
in in power source
Caution: The scanner is equipped with a three-wire (pin) grounding type plug. If you cannot
insert the plug into your outlet, contact your electrician to replace the outlet and ensure a
grounded power connection. Do not try to defeat or ignore the purpose of the grounding-type plug.
6
Turn (power) on the scanner and the printer
To turn on the scanner - at back of the scanner, above the scanner-end power cable plug you will
find the main power switch. Flip the main power switch to ON (marked “I”). The scanner starts the
init and self test sequence and you must wait until these are finished.
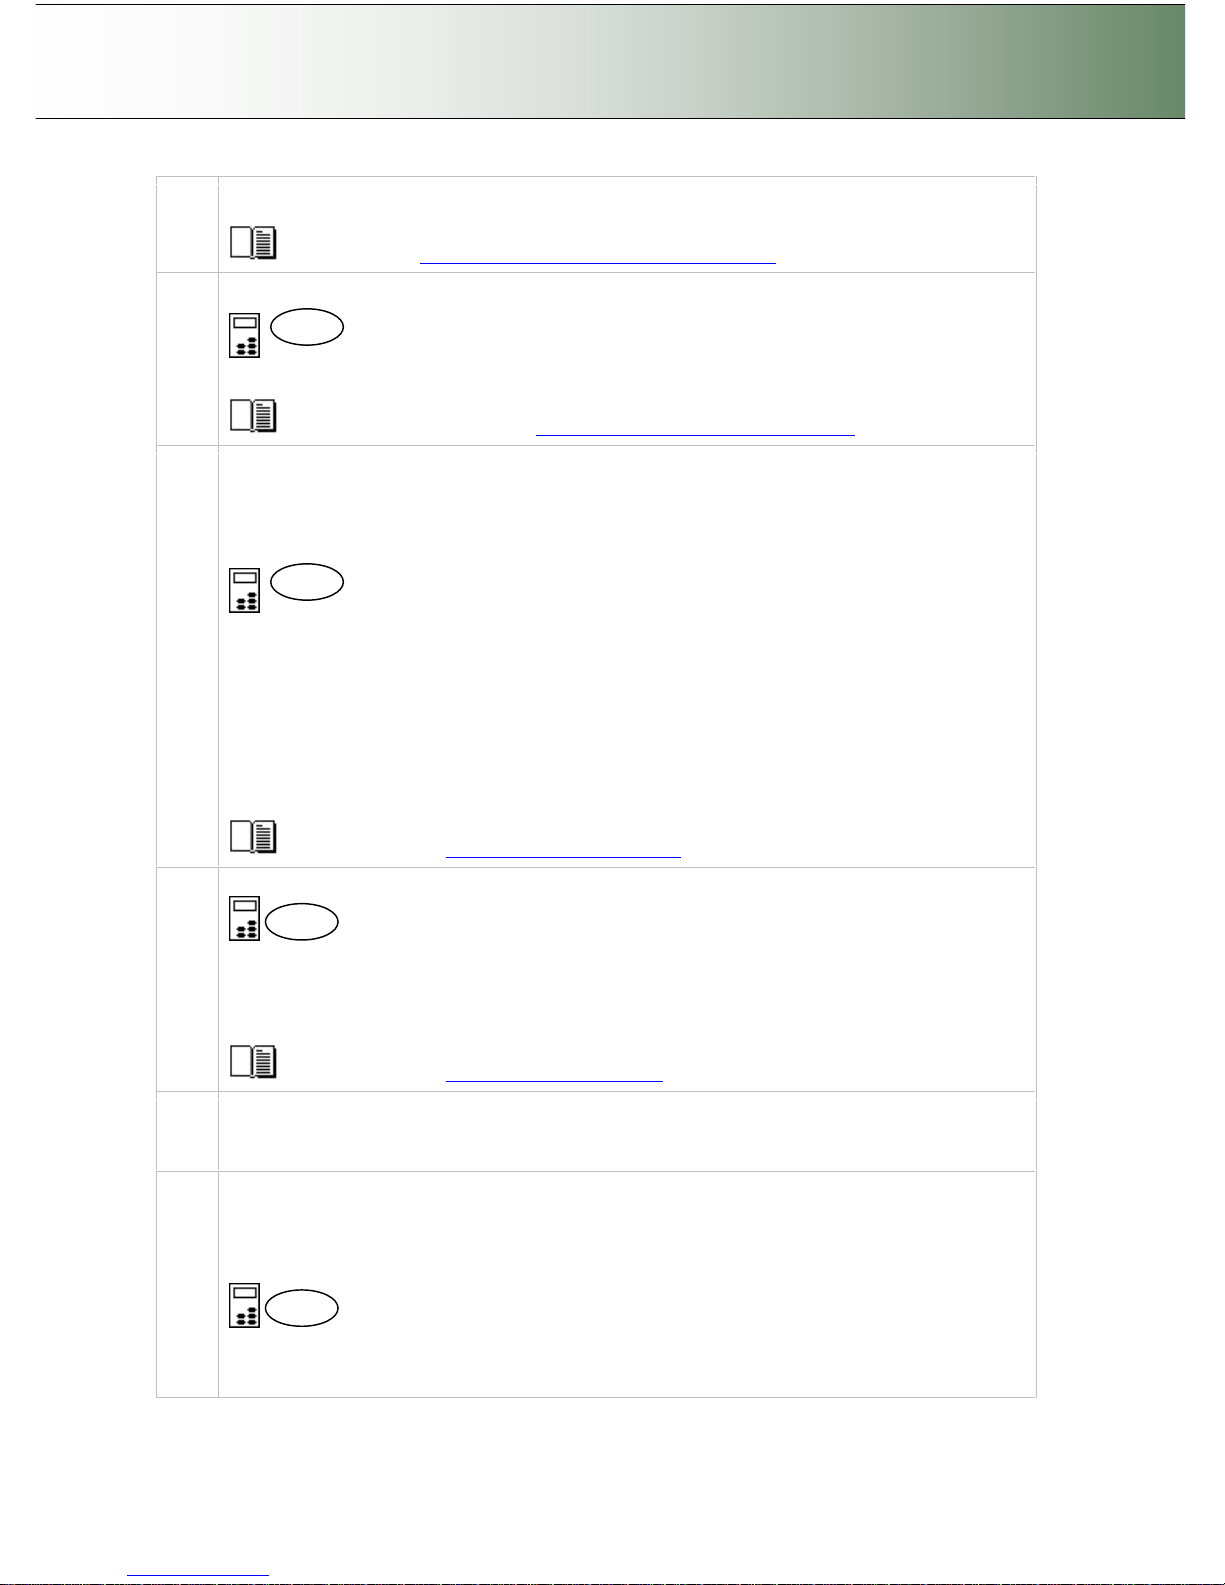
Main Power switch
Press the
“I” to turn on.
See your printer’s documentation for instructions on connecting power cables to the printer and
switching the printer ON.
Perform Preliminary Maintenance – Calibration
You will have to use a PC with WIDEsystem and Scanner Maintenance software installed. To run
scanner maintenance.
Use a local USB connected PC or a LAN connected PC with WIDEsystem and Scanner
Page 19
Configuration and Setup 3-7
Maintenance installed. Left click on the WIDEsystem scanner Icon and select Launch Scanner
Maintenance from the menu. Follow the instructions on your screen.
See the section ”Running the Scanner Maintenance Program” for detailed instructions.
7
Set localization Preferences
On the iJET Panel - Select Menu > Advanced > Options >… to set preferences for language,
paper series and media handling (loading).
See the section on options for ”Personalizing and localizing the system” for details.
8
Make Printer Setup settings on the scanner
You can setup for two printer types – a B&W printer and a color printer. After you setup your
printers, pressing the Color Copy button will send the output to your color printer and pressing the
B&W Copy button will send the output to your B&W printer. In this configuration, both printers are
on the network.
On the iJET Panel
Printer set up is described for Color Printer below. The same rules and method applies for B&W
printer setup.
Get the network id information for the printer(s) you want to use from your network administrator.
Select Menu > Advanced > Printer Setup > Color Printer to make settings.
Select Menu > Advanced > Printer Setup > Color Printer > Interface > LAN. Use the arrow
up/down buttons to enter the printer’s IP address.
Select the Printer Model setup method – Auto Configure, Printer List or Custom Setup and apply
the additional setting(s) attached to the Printer Model setup method you selected.
See the section on “Printer Setup on the Scanner” for more details.
9
Make Scanner Network Setup settings on the scanner
On the iJET Panel
Select the Menu > Advanced > Network Setup. You can use DHCP network setup if your network
supports it. Otherwise you need to enter the network address information manually. Contact your
network administrator for the correct address values. Select Menu > Advanced > Network Setup >
Share Scanner > Yes if you want to enable PCs on the network to use the scanner.
See the section on “Scanner on Network Setup” for details.
10
Prepare the Printer
Perform actions and settings on the printer device such as check that the right paper is loaded
and the printer is ON. See your printer’s documentation for help.
11
Create a system media type for your printers media (Closed Loop Calibration)
You must create a system media type profile in order to color match paper media, printer and
scanner before using the system. Identify the media type (Coated, Glossy, Semi-Glossy) you use
with the printer then perform closed loop calibration (3 steps).
On the iJET Panel
Select Menu > Advanced > Options > Closed Loop Cal.
Press Enter and then use the arrows up/down buttons to reach the right media type and Enter to
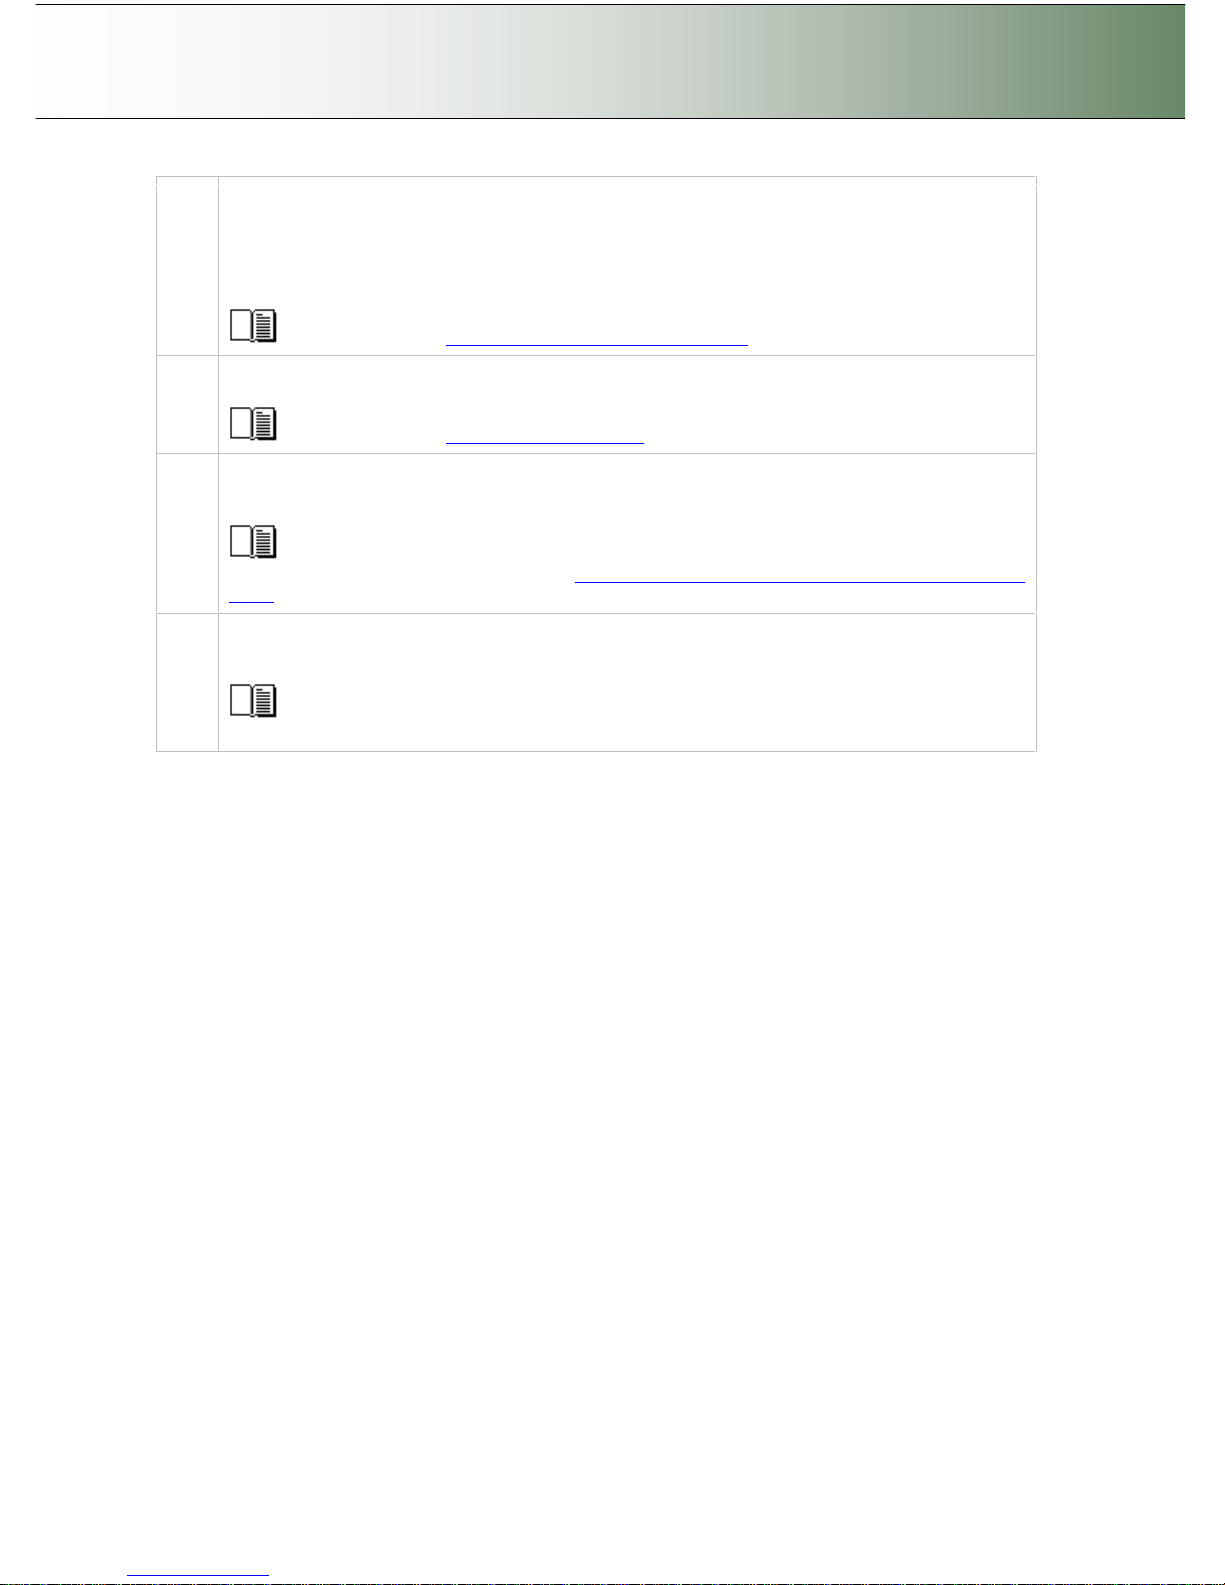
Menu
Menu
Menu
Menu
Page 20
Configuration and Setup 3-8
select.
On “Print Sheet” select Enter. The system will print a color patch sheet.
Feed the sheet into the scanner
On “Scan Sheet” select Enter. The system will scan the color patch sheet and calculate color
matching values for future jobs with the current media type.
See the section on “how do I… Create a New Media Type” for more details.
12
Test your system
Make a simple copy to test your system.
See the section on “how do I… Make a Copy” for details.
13
Verify Scan to File functionality
Scan to a network PC to test Scan to file functionality. The PC must have WIDEsystemNET
installed and must be setup for network scanning.
See instructions on setting up a PC for scan2net in WIDEsystemNET on-line help. See
more on scanning to a PC in the section “How do I… Scan to local or network PC from the iJET
panel”
14
Verify Shared Scanner functionality
The netwok PC must have WIDEsystemNET and compatible scan/copy software installed. Check
that you can identify the scanner from the PC and perform a test scan.
See instructions about setting up a PC for scan2net in the WIDEsystemNET on-line help.
See information on using a shared scanner in the scan or copy application’s on-line help.
Page 21
Configuration and Setup 3-9
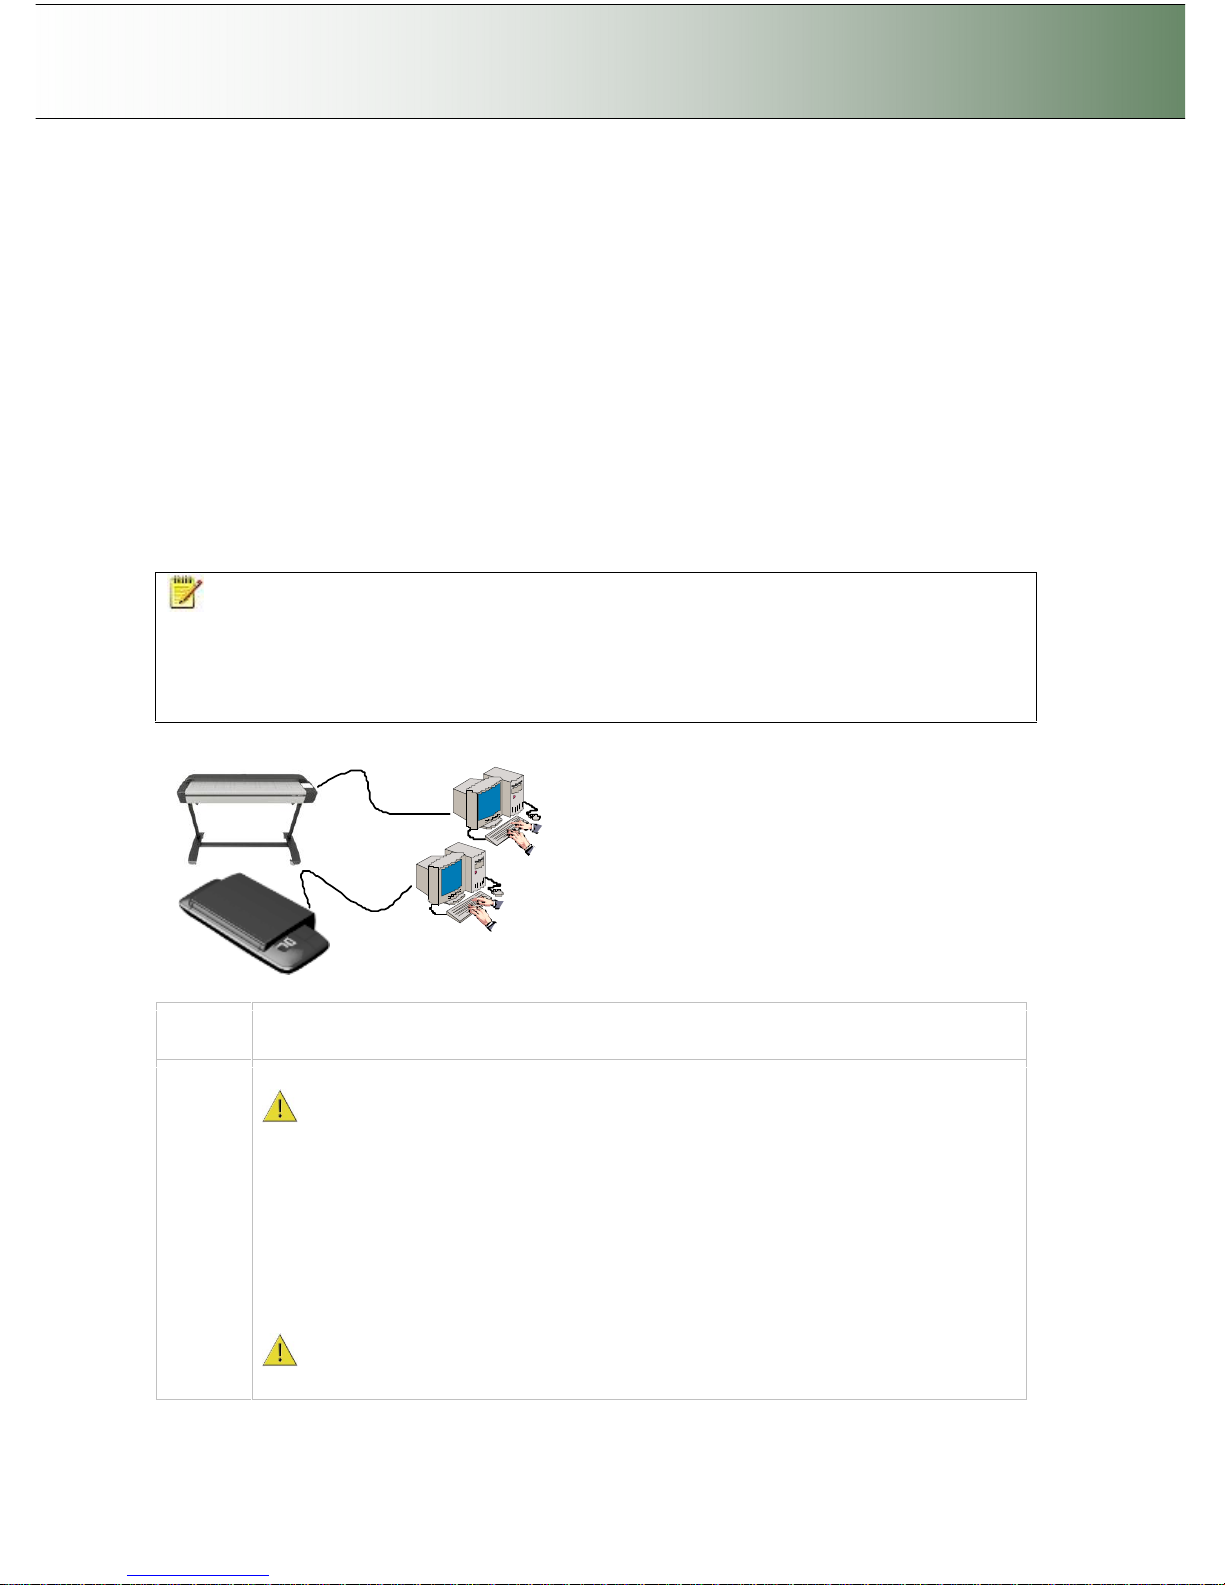
3.3 Connect the Scanner to a PC - Scan/Copy workstation
Components: Wide format copy scanner and PC. This configuration is for scanning to file and saving on
a local PC. If this configuration is to be used for copying purposes, it must include a printer that is either
connected directly to the PC (local printer) or the PC can be connected to the network and have access to
network printers.
Usage: For digitizing large format documents. Used for scan-to-file (digitized) output only unless a printer
is attached to the PC or PC to network printers. Operation is possible both from the iJET Panel and from
the PC.
System Requirements:
Wide Format Copy scanner
PC with Compatible operating system (see ws/readme.htm on WIDEsystem TOOLS CD)
USB port on the PC
The WIDEsystem TOOLS CD supplied with your scanner.
Scanning software or compatible third party software.
NOTE: Scanning and Copying in this configuration would often be performed through scan and
copy software installed on the PC rather than through the scanner’s iJET Panel. Usage of scan and
copy software is not within the scope of this User’s Guide. Please refer to the software’s documentation
and on-line help for instructions on using the software with the scanner.
Users can scan-to-file to the PC from the iJET Panel in this configuration. See the section “How do I Scan
to File?” in this guide.
Scanner’s USB device (input) interface
Step Description
1
Insert the WIDEsystem TOOLS CD-ROM into your PC.
IMPORTANT : DO NOT YET CONNECT THE SCANNER TO POWER OR PC. install
WIDEsystem before you connect the scanner or install any scanner software applications.
Your scanner drivers are automatically installed with WIDEsystem and your PC will then be
fully prepared to detect and setup the newly connected scanner device.
Start up the WIDEsystem TOOLS CD-ROM by inserting the CD-ROM into your PC. Normally
the setup program interface will start automatically. If it does not, perform the following steps
to activate it.
1. Click the Start button on the Taskbar and choose Run from the menu.
2. Type D:\setup in the Command Line Box (where D: represents the name of your CDROM drive).
3. Choose the OK button.
Important: Be sure to use the WIDEsystem TOOLS CD-ROM that came with your
scanner or a newer version. Out-of-date versions of WIDEsystem software may not detect
Page 22
Configuration and Setup 3-10
your scanner model.
2
Install WIDEsystem Software
Click on the option Install WIDEsystem Software from CD main menu or run the setup.exe
program directly from the WIDEsystem (ws) folder on the CD-ROM. Follow the installation
instructions that appear on your screen.
3
Install Scanner Maintenance Software
Click on the option Install Scanner Maintenance Software from CD’s menu. Follow the
instructions that appear on your screen.
4
Shut down (power off) the PC
Your PC is now prepared and must be powered off before connection with the scanner.
5
Quick clean for dust
Clean your scanner’s surface so dirt and dust are not dragged into the scan area with the
original. Wipe the glass with a dry cloth to remove any dust in the scan area.
6
Set up your scan station
Your wide format copy scanner should be placed either on the specially designed standalone floor stand or on a sturdy table. For sheet feed models, make sure there is enough
space behind the scanner to allow the media to run out.
and “Maintenance-Locate the Smart Card” for instructions for your specific scanner
model. See the sections “Physical Placement of the Scan Station” .
7
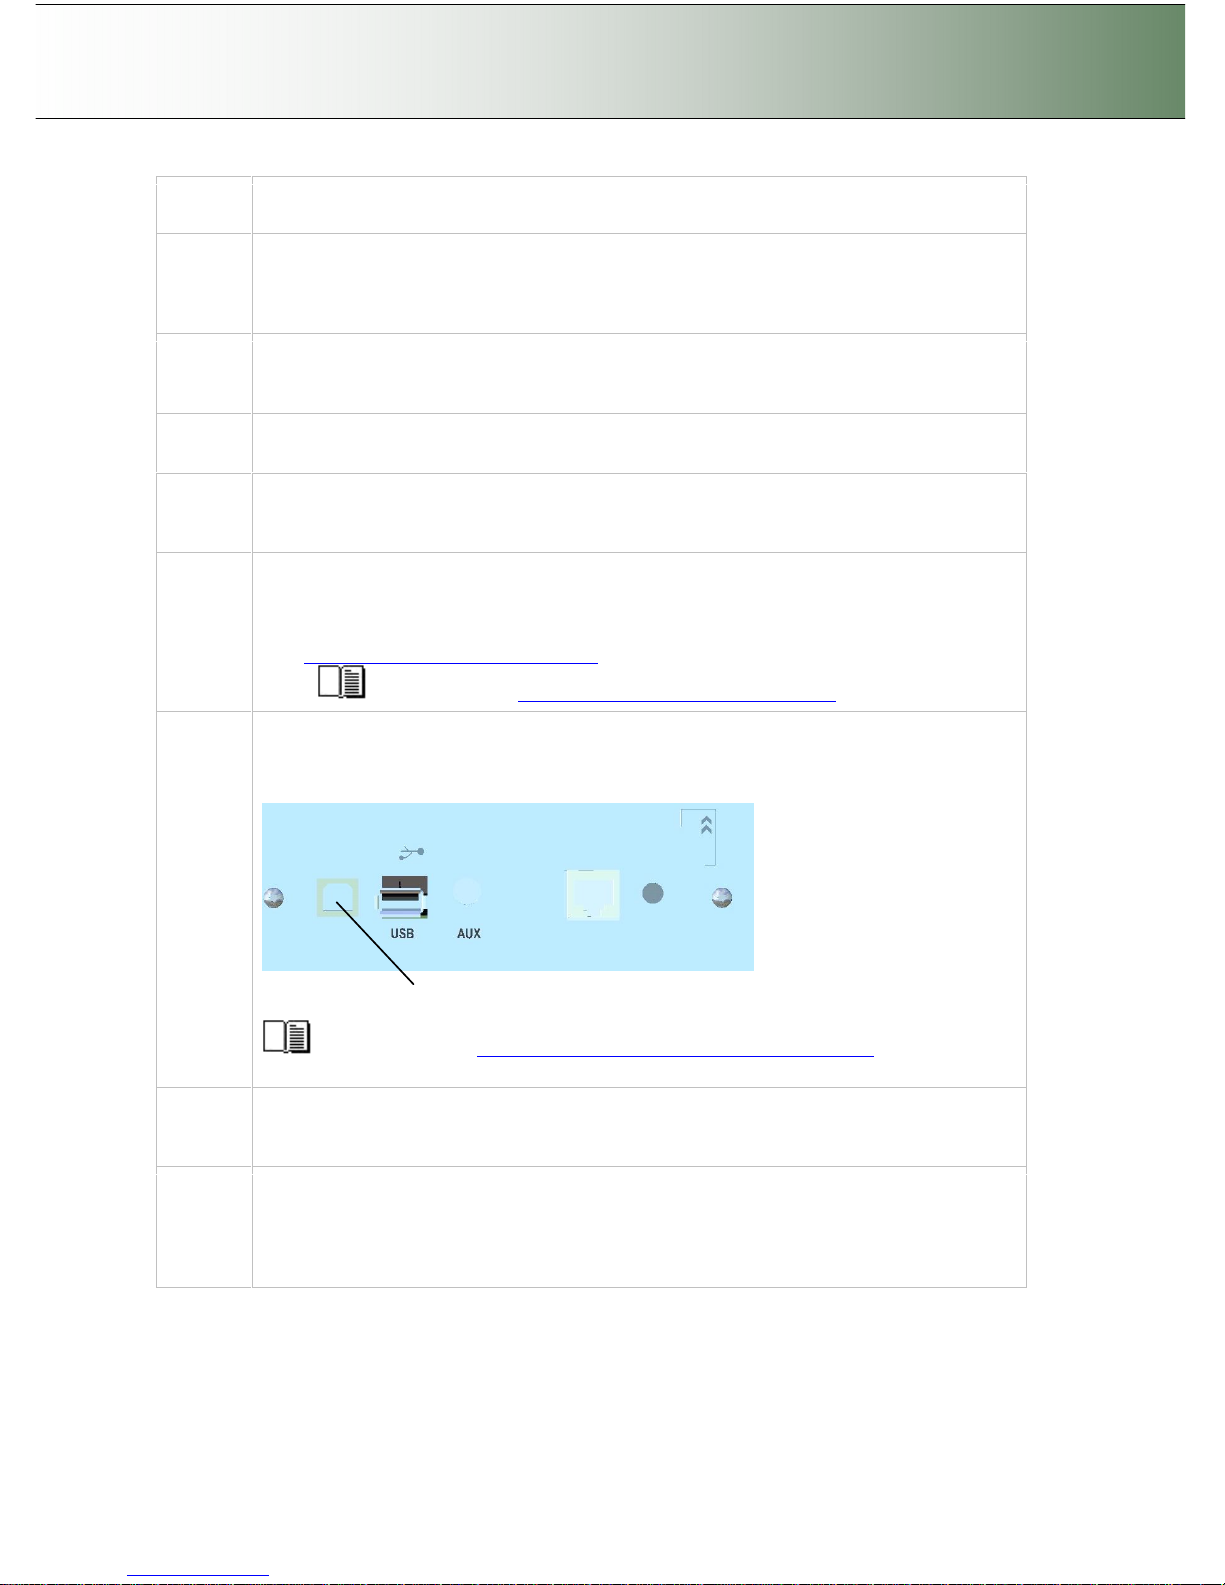
Connect the interface cable – scanner end
Connect the USB interface cable to the scanner’s USB device (input) port (squared formed
socket). See the document: “NOTE ON INTERFACE CABLES” for instructions on the
specific interface cable type to use with this configuration.
USB device (input) port
See the section “Locating the Interface Cable Connector Panel” for instructions
relating to your specific scanner model.
Connect the interface cable – PC end
Connect the other end of the USB cable to the PC’s USB connection port (flat rectangle
socket).
8
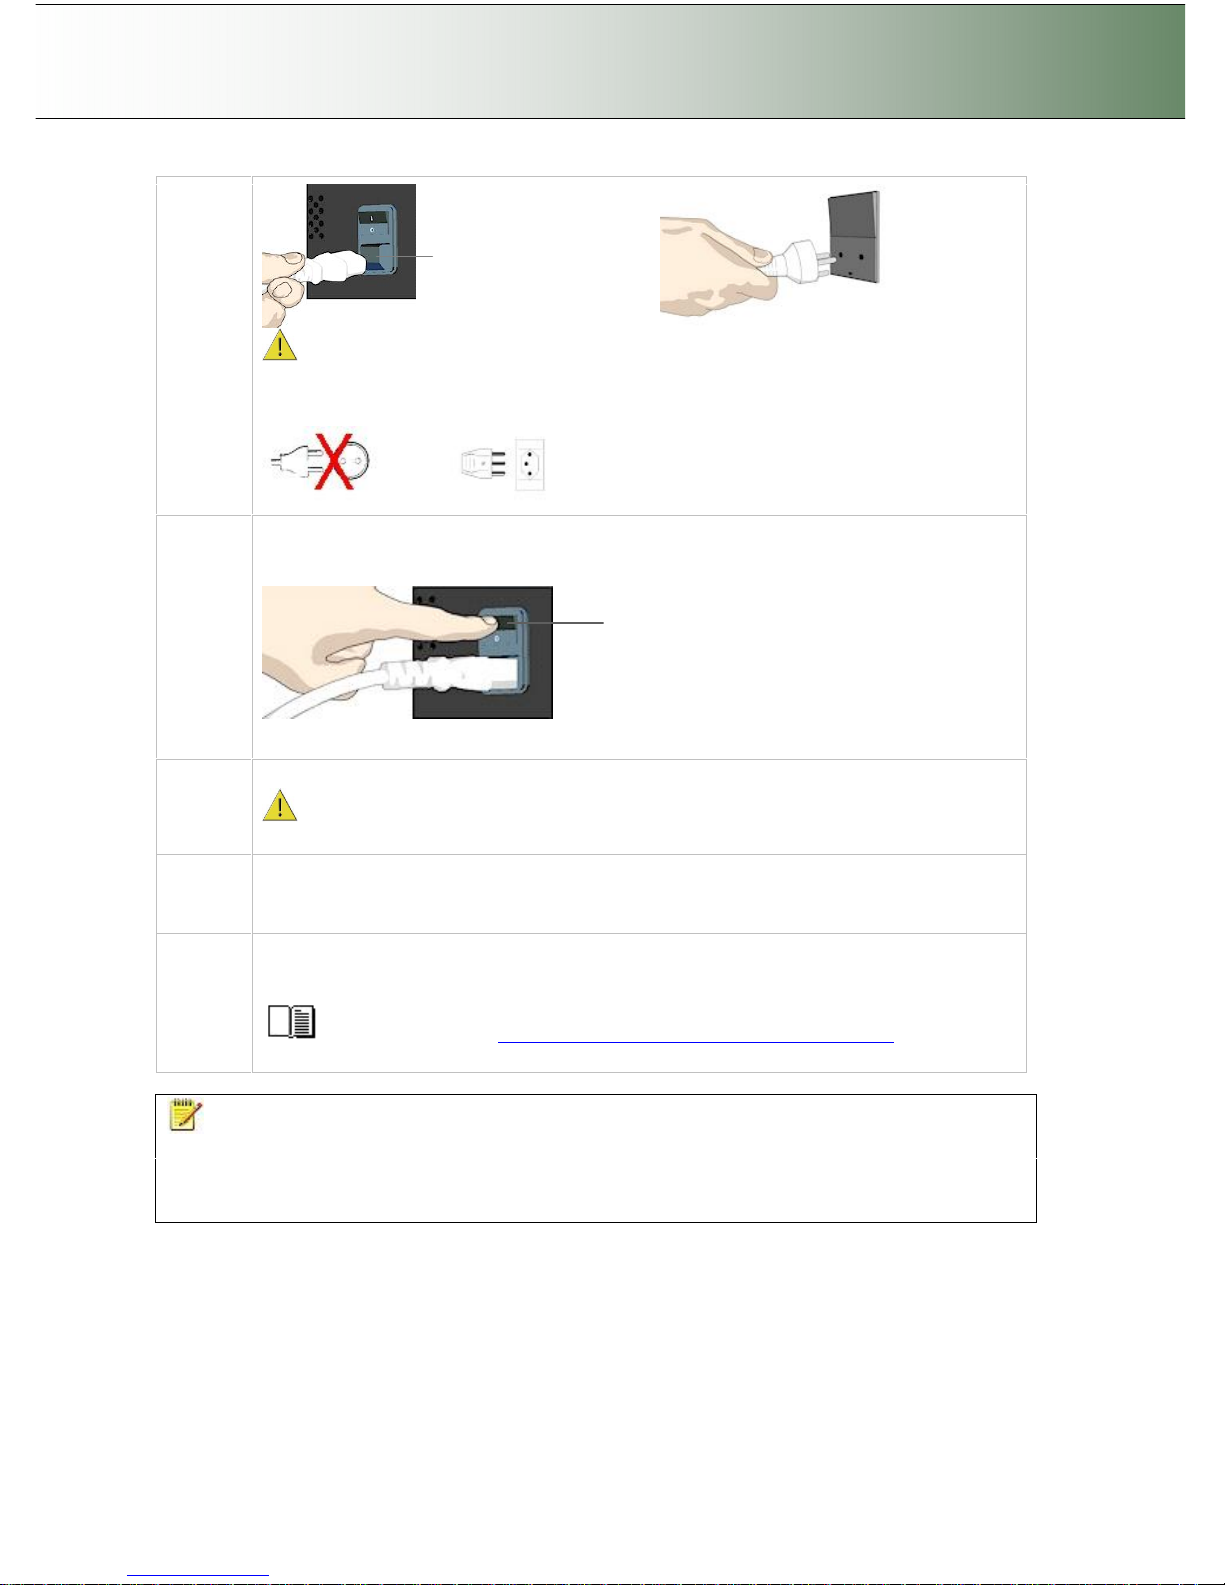
Connect scanner power cable
At back of the scanner, you will find the scanner-end power cable socket, just below the Main
Poer Switch. Connect the cable to the scanner plug socket and then the other end to your
grounded power source. Do not yet turn on the Outlet switch on the scanner.
Page 23
Configuration and Setup 3-11
Scanner-end power socket
Plug-
in in power source
Caution: The scanner is equipped with a three-wire (pin) grounding type plug. If you
cannot insert the plug into your outlet, contact your electrician to replace the outlet and
ensure a grounded power connection. Do not try to defeat or ignore the purpose of the
grounding-type plug.
9
Turn on the Scanner
To turn on the scanner - at back of the scanner, plug in the power cable and flip the Outlet
Switch to ON. The scanner starts the init and self test sequence.
Main Power switch
Press the
“I” to turn on.
Power outlet and switch is found at the back of the scanner
10
Turn on the PC
Make sure the PC connected to the scanner is likewise power-connected to a
grounding-type power outlet with a three-wire (pin) grounding type plug.
11
Verify installation of new hardware
Double click on the WIDEsystem scanner icon on the Windows system tray. The program
should detect a Selected Scanner in the dialog.
12
Run preliminary Scanner Maintenance - Maintenance program
Left click on the WIDEsystem scanner Icon and select Launch Scanner Maintenance from
the menu. Follow the instructions on your screen.
See the section ”Running the Scanner Maintenance Program” for detailed
instructions.
NOTE: On Windows Compatibility - Your scanner and drivers are tested and developed to support
the most current active Microsoft Windows version OS systems. Drivers and interface support in regard to
specific Windows versions will follow the Microsoft Support Lifecycle Policy. The compatibility
specifications can therefore change accordingly. The most current OS compatibility specifications and
drivers will be available on your manufacturer’s website.
Page 24
Configuration and Setup 3-12
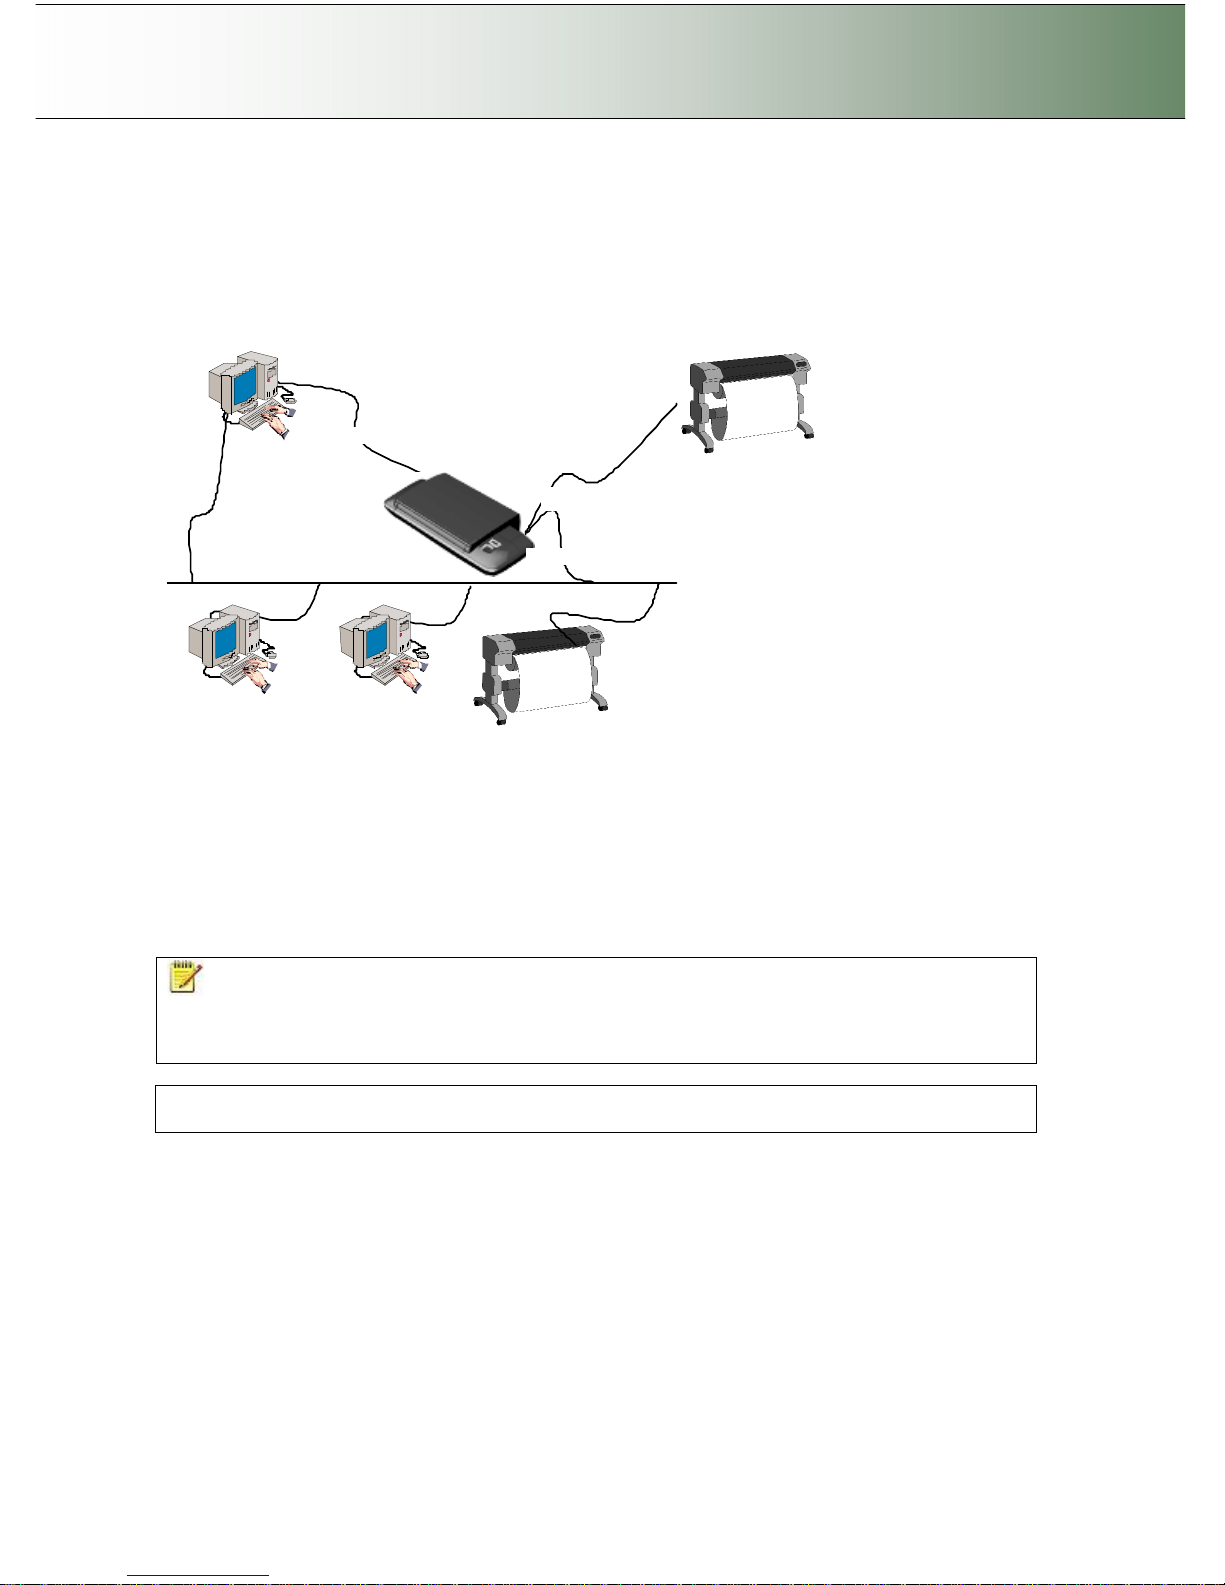
3.4 Combining Configuration Types for Multiple Functionality
Although they were described separately, the three configurations: Stand alone copier, Scan/ Copy device
on a network, Scan/ Copy station on local PC can be combined to provide multiple functionality. For most
companies, a combined solution would be recommended to get the most out of the scanner and provide a
flexible, multi-purpose device.
Scanner’s USB
device (input)
interface
Scanner’s USB
host (output)
interface
Scanner’s LAN interface
In the example illustrated above, we have connected both a printer and a PC directly to the scanner and
both the scanner and the PC are each attached directly to the network. This means that the configuration
can be used as a stand alone copier, a stand alone scan-to-file station, a device for saving scans to
network PCs and a shared device that can be controlled and used by network PCs. The scanner can use
both the local printer and printers on the network. Both scan-to-file and copying can be performed either
through the iJET Panel or through scan/copy software.
Use the instructions for each configuration in the previous sections for setting up a combined solution.
You will find that many of the steps are general and apply for all configurations so you only need to
perform them once.
NOTE: Your Copy Scanner supports a single LAN connection port. This means that if you connect a
printer directly through this port, you will not be able to set up a combined solution with network
accessibility. You can use LAN switch boxes to work around this problem. It is advisable to use the USB
host (output) port for direct printer connection if USB connectivity is supported on the printer.
Regulatory Notice: Your scanner product has been tested to comply with the EMC Standards EN55022
and FCC, Part 15. To maintain compliance, only use the interface cables supplied with the scanner.
Page 25
Configuration and Setup 3-13
3.5 Physical Placement of the Scanner
Please follow the guidelines below for optimal safety, scanner functionality, and scanning results.
Physical placement of the scanner:
With Scanner: FLEX50i
Your wide format flatbed scanner should be placed on a stabile, level and completely flat (plane) surface
such as a sturdy table. If convenient, you can place the backend of the scanner against a wall. The lid will
not open all the way back and stops at an approximate 650 angle.
It is very important to follow the instructions below to ensure the scanner is setup with optimal stability and
without tension on the scanner’s frame. Failure to do so can produce poor scanning results and cause
damage to the scanner device over time.
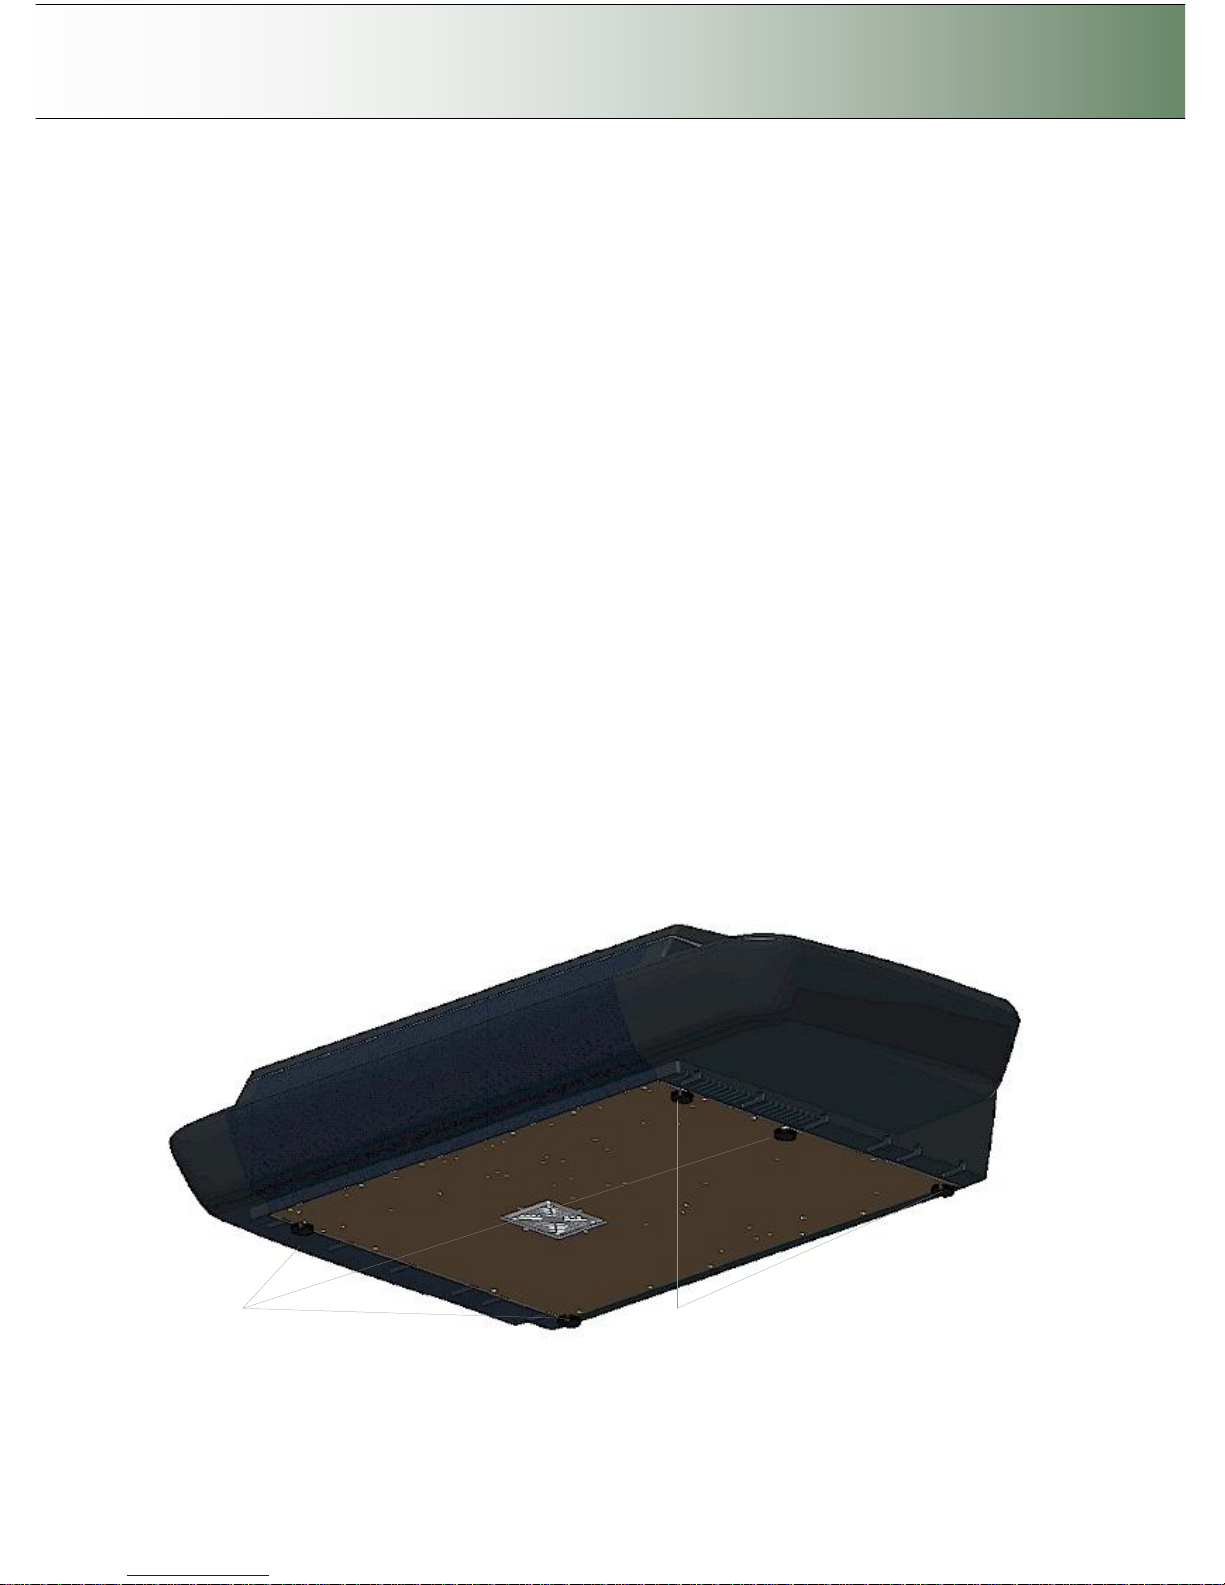
The scanner rests on feet placed at the bottom of the scanner. There are 3 fixed feet and 2 adjustable feet
(total of 5 feet). See the instructions below for feet adjustment.
Adjustment of the scanner’s feet for sturdy placement
1. The two outer feet closest to the operator’s panel side are adjustable. The middle foot on the
same side and the two feet on the other side are fixed. See the illustration below.
2. The 2 adjustable feet should be positioned (tightened) all the way up when setting up the
scanner on its new surface. They are delivered in that position from the manufacturer.
3. The 2 adjustable feet (in their original position as described in step 2) are slightly shorter than the
3 fixed feet. Therefore the scanner will at first rest only on the 3 fixed feet (1 on the operator
panel side and 2 on the opposite side).
4. Use a screwdriver or an alternative long slim object to access and rotate the 2 adjustable feet
until they touch the surface so all 5 feet are in contact with it.
5. If the scanner is moved, the 2 adjustable feet must be retightened to their original (shortest)
position and the steps above must be repeated.
2 adjustable feet
Original position must be all the way up (shortest feet)
3 fixed feet
Page 26
Configuration and Setup 3-14
Physical placement of the scanner:
With Scanner: HD4230i
Your wide format scanner should be placed either on the specially designed stand-alone floor stand or on
a sturdy table. Make sure there is enough space behind the scanner to allow the media to run out. Thick
stiff media naturally requires space that is at least as large as the media length.
Physical placement of the scanner:
Guidelines that apply for both scanners: FLEX50i, HD4230i
Slots and openings in the cabinet at the back and bottom are provided for ventilation. This ensures
reliable operation of the product and protects it from overheating. These openings must never be blocked
or covered by placing the unit on a bed, sofa, rug, or other similar soft surface.
Your scanner should never be placed near or over a radiator or heat register.
You should not place the scanner in a built-in installation unless proper ventilation is provided.
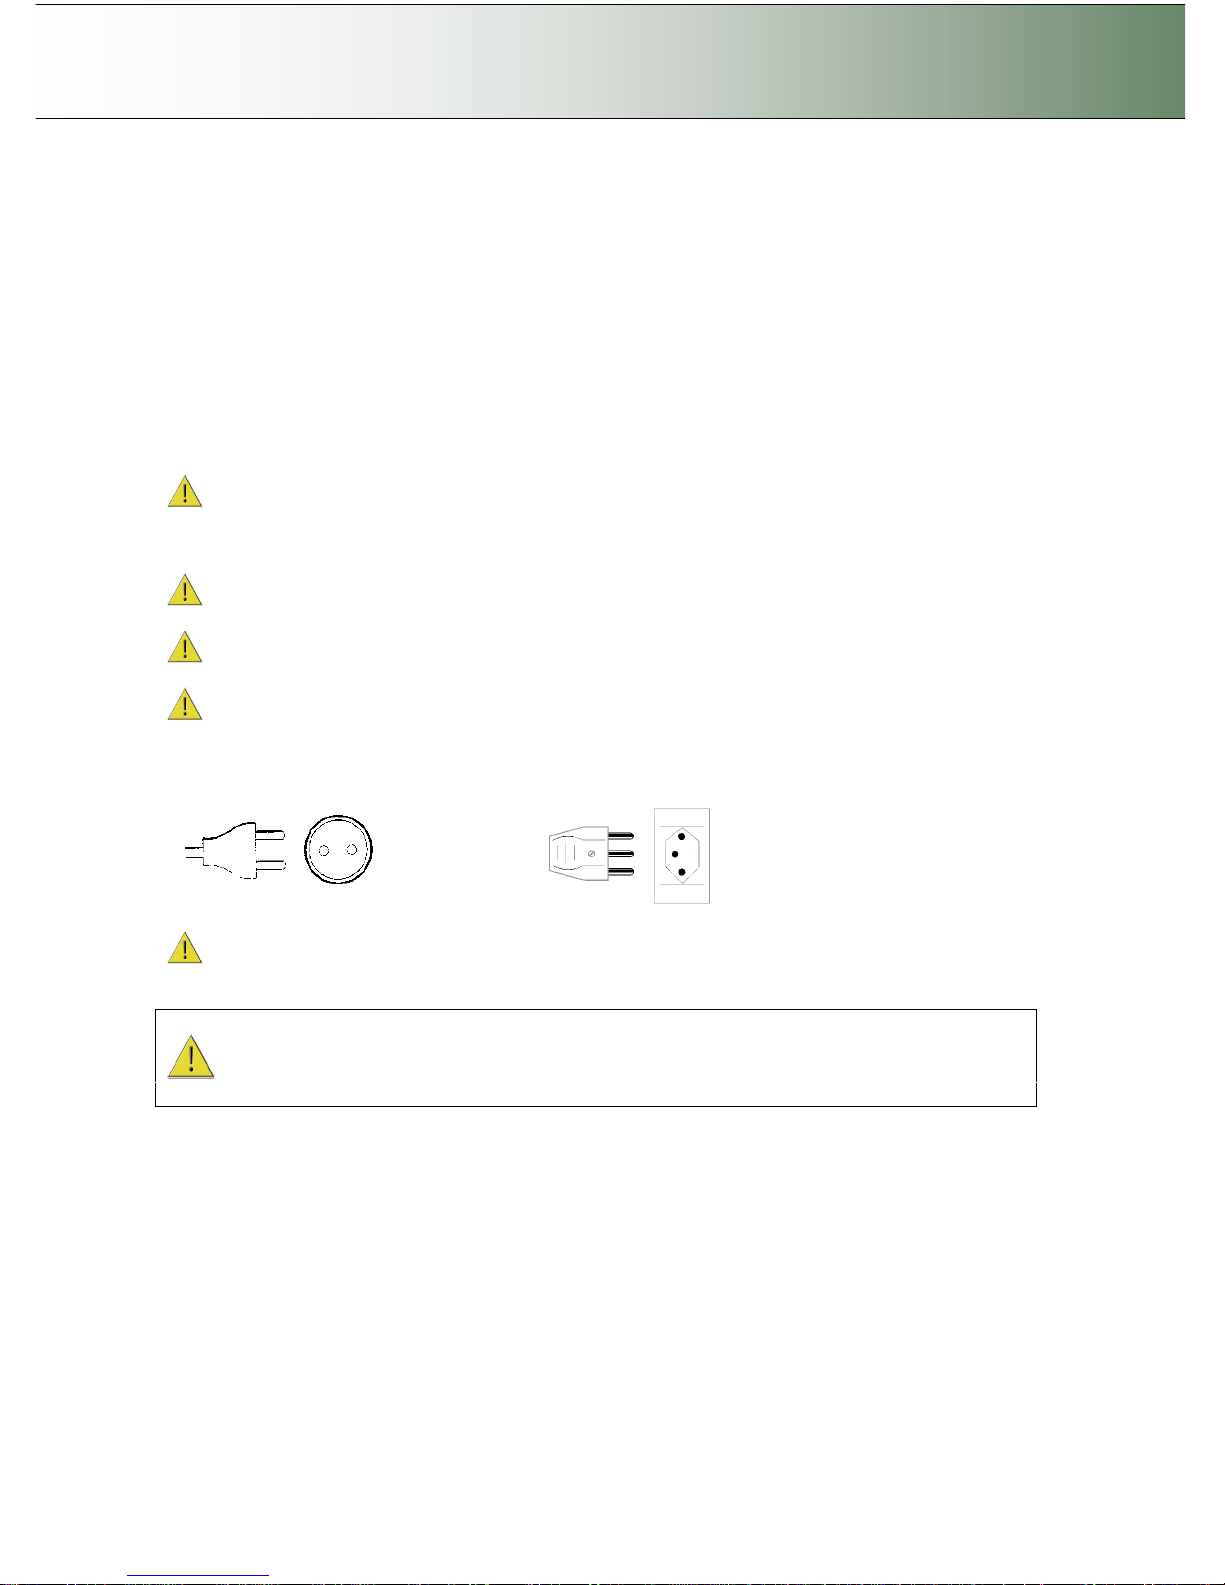
The scanner is equipped with a three-wire (pin) grounding type plug. This plug will fit only into a
grounding-type power outlet. This is a safety feature. If you cannot insert the plug into your outlet, contact
your electrician to replace the outlet and ensure a grounded power connection. Do not try to defeat or
ignore the purpose of the grounding-type plug.
X
Make sure the PC connected to the scanner is likewise power-connected to a grounding-type power
outlet with a three-wire (pin) grounding type plug.
See also the Safety Instructions at the end of this User’s Guide.
Page 27
Configuration and Setup 3-15
3.6 Locating the Interface Cable Connector-Panel
Your scanner’s interface cable connectors are grouped in a cable connector panel. You will need to locate
the cable connector panel in order to insert interface cables when setting up the system. You can find
your scanner’s cable-connector-panel as follows:
Locate the cable-connector-panel
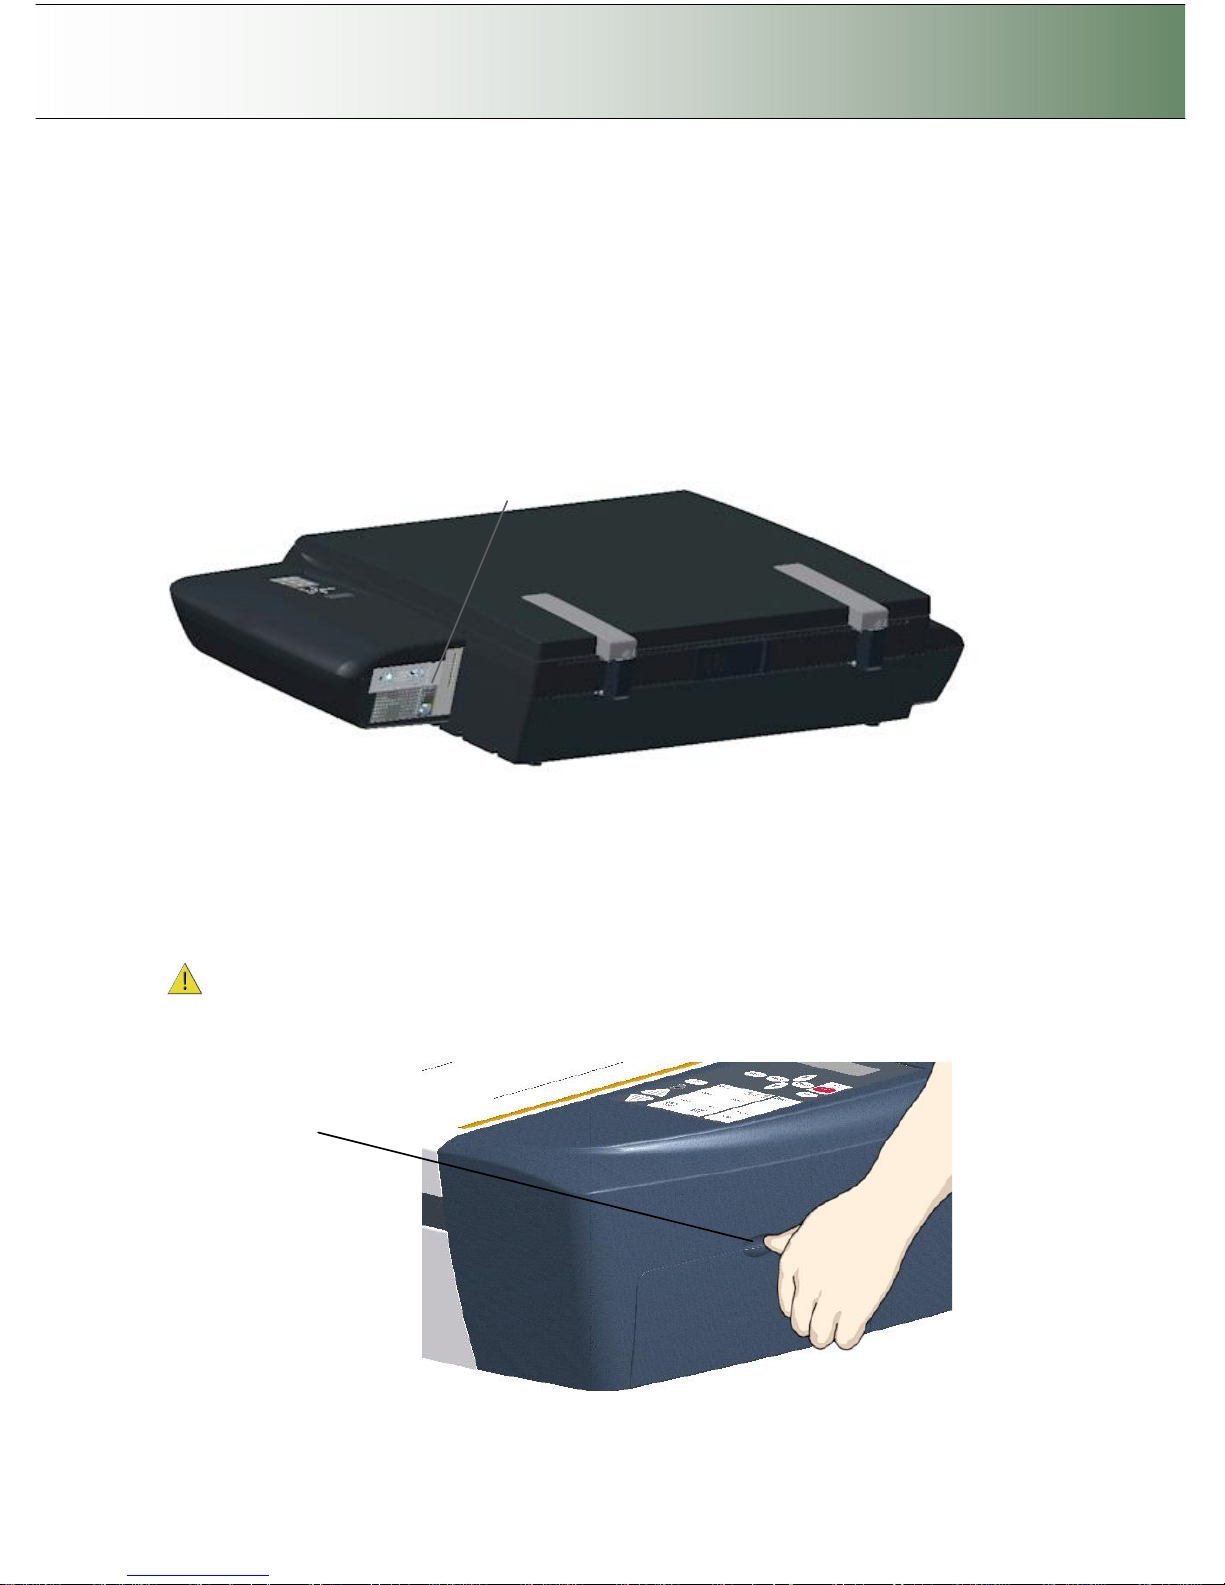
On Scanners: FLEX50i
The scanner has LAN, USB device (input) and USB host (output) interface connectors grouped in a cableconnector-panel. The cable-connector-panel is found at the back of the scanner.
The cable-connector-panel is found on the scanner’s back.
Locate the cable-connector-panel
On Scanners: HD4230i
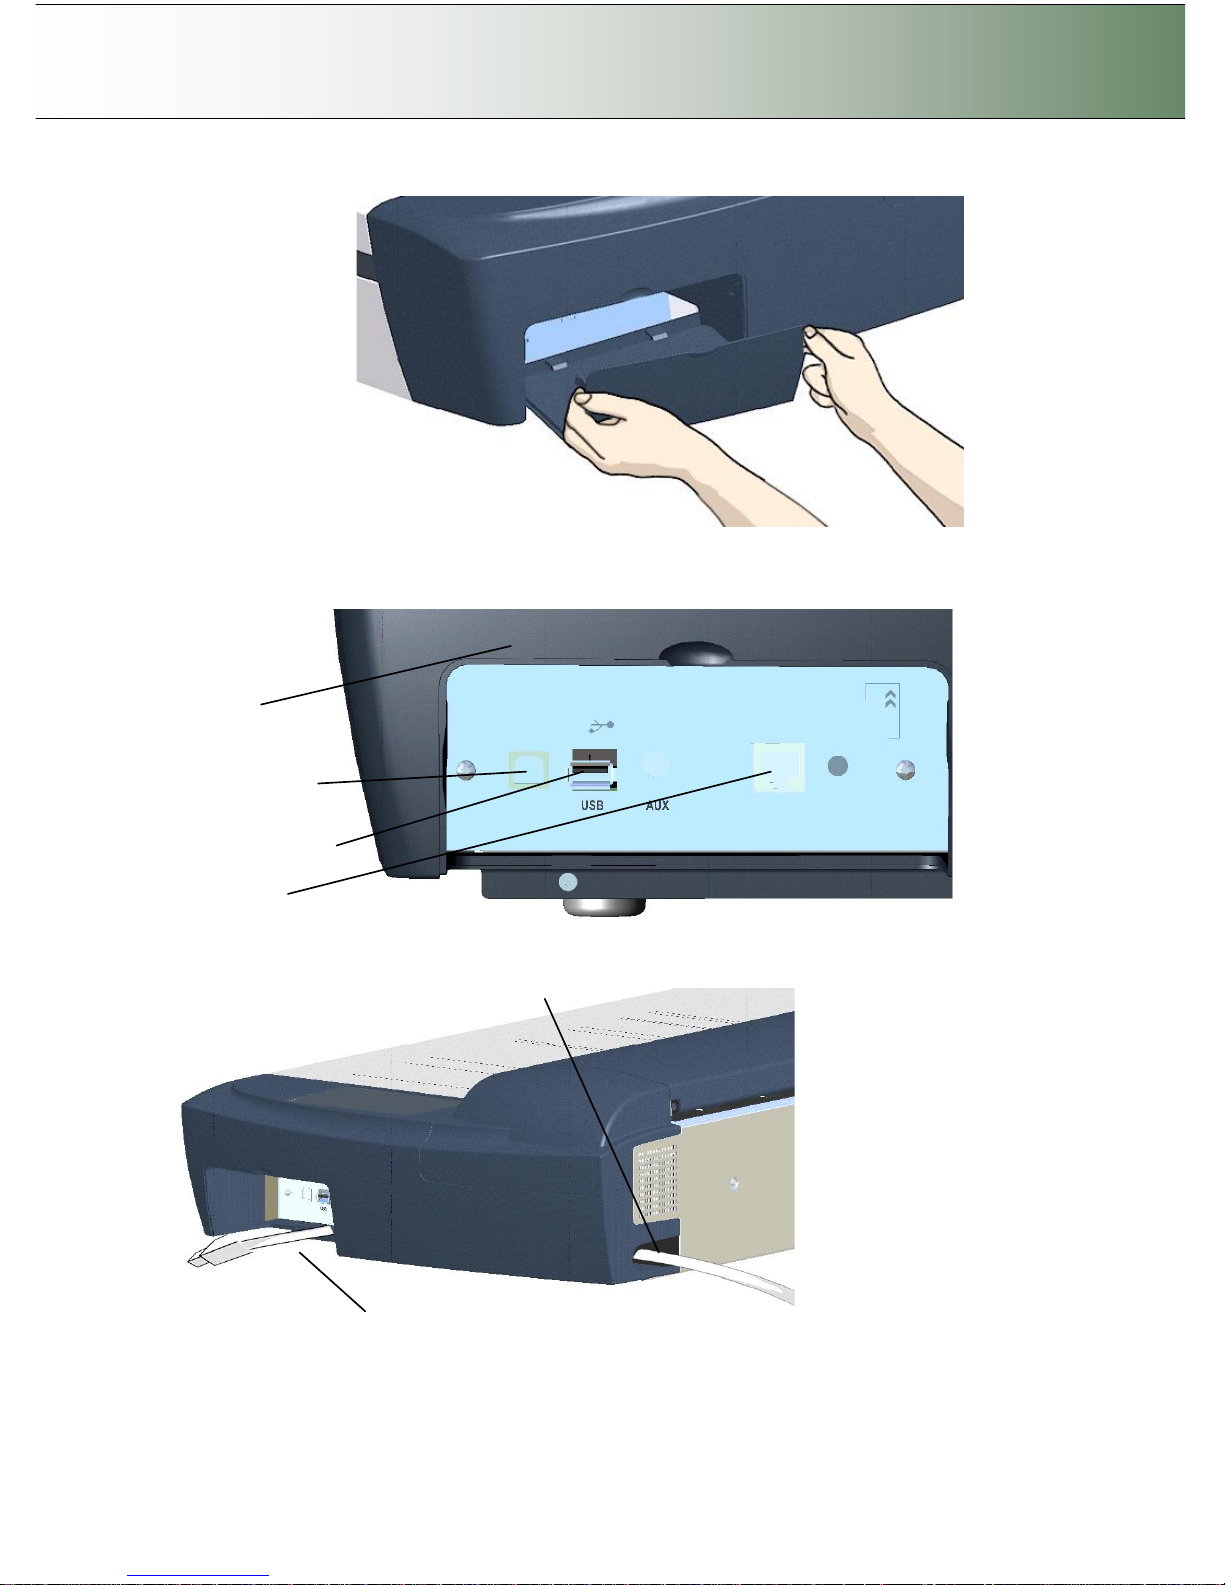
The scanner has LAN, USB device (input) and USB host (output) interface connectors grouped in a cableconnector-panel. You will find the cable-connector-panel by removing the scanner’s right side cover. After
connecting the interface cable, you feed it through the opening in the back of the scanner until it emerges
in front of the cable-connector-panel. See the illustrations below.
Be sure to reattach the cover after you connect the interface. The cover must always be closed
before you turn the scanner ON.
Insert your thumb in the slot at the top
of the interface cover. Push down to
snap the lid open.
Page 28
Configuration and Setup 3-16
Remove the interface cover with both hands.
The Interface panel:
Smart Card
USB connection PC
USB connection Printer
LAN connection
Feed the interface cable through the hole in the back…
… until it emerges in interface area.
Page 29
Configuration and Setup 3-17
3.7 Personalizing and Localizing Your System
The iJET Panel options can be configured to match your local standards regarding the language
displayed in the menus, paper size series (preferred standard size systems such as “ARCH” and ISO A)
and media handling (original’s loading method).
NOTE: The number of languages available for the panel is limited.
NOTE: A number of the iJET panel’s scanner setup and configuration options can instead be applied
from the Web Access Interface through a PC’s browser and some users may prefer this to using the iJET
panel menus and buttons. See the section on the “Web Access Interface” for details.
3.7.1 Setting the iJET Panel’s Display Language
On scanners: FLEX50i, HD4230i
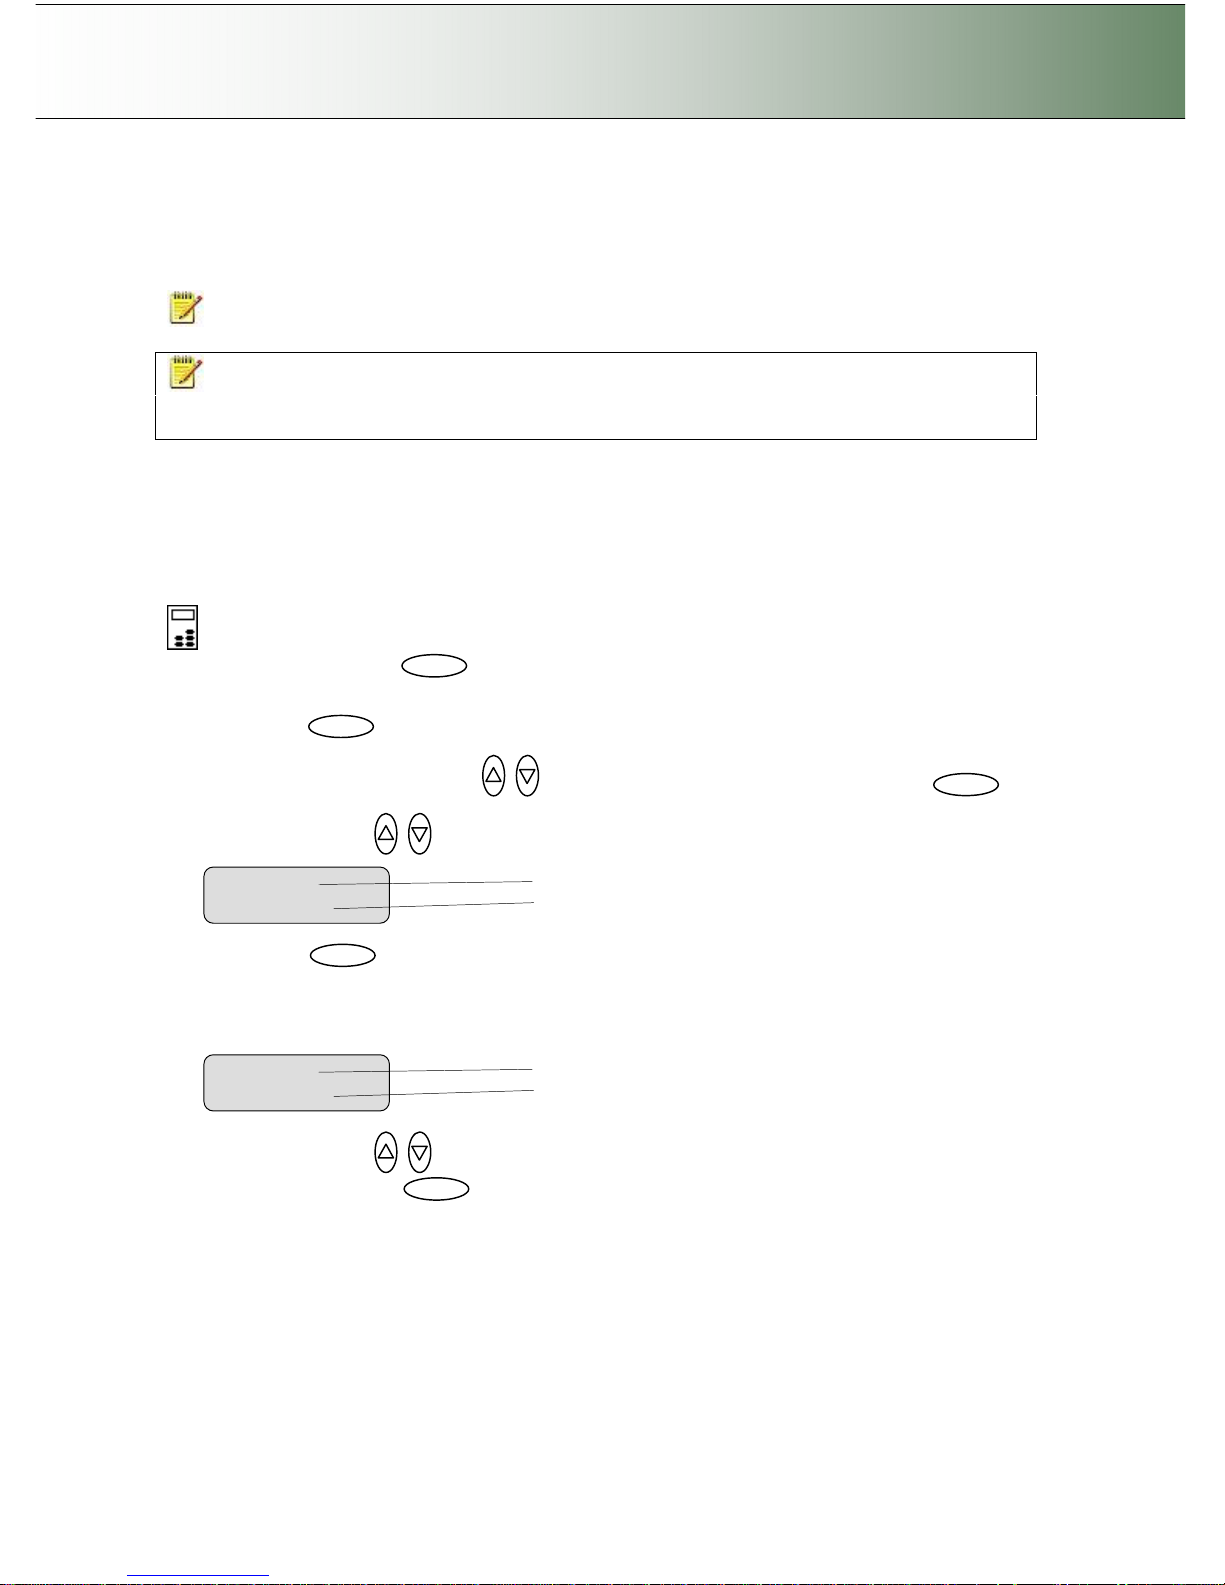
On the iJET Panel
1. Select the Menu button.
2. Use the arrow button up or down until the display windows shows Advanced and confirm with the
Enter button .
3. Use the arrow buttons up or down until the display shows Options and confirm with .
4. Use arrows down/up until the display shows Language. .
5. Confirm with . The “>” marker will move down to the option setting line so you can change it.
6. Your display should look like this (the actual text to the right of the “>” will show the current setting
for the option and may be different than the one shown below).
7. Use arrows down/up to select the language you want to use for the texts in the iJET panel’s
display and confirm with .
Enter
Menu option item
Current setting for option item
> Language
English
Menu option item
Current setting for option item
Language
>
English
Enter Enter Menu Enter
Page 30
Configuration and Setup 3-18
3.7.2 Setting the Paper Series Preference
Depending on your location and business, you may usually work with a specific standard paper series.
This option lets you tell the system which paper series you want displayed when you set the Size (input
size) option. You can also tell the system to always display all the paper series’ in the system.
On scanners: FLEX50i, HD4230i
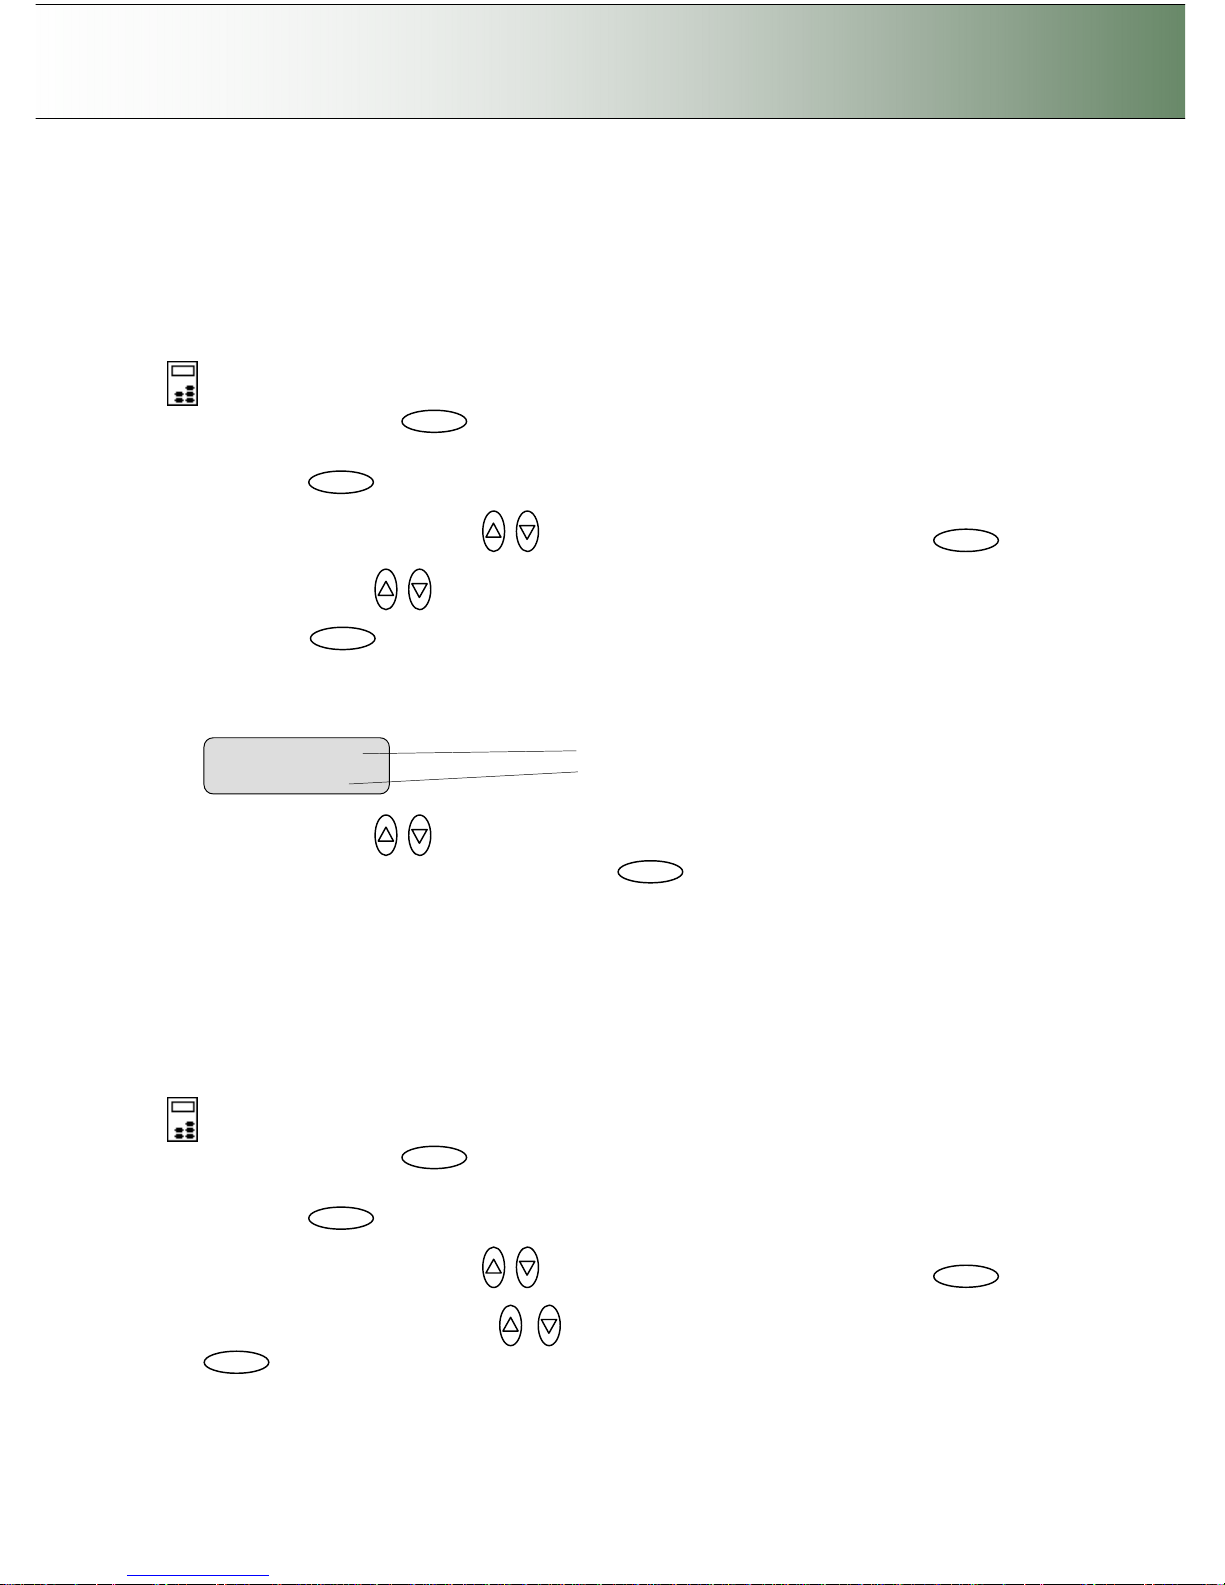
On the iJET Panel
1. Select the Menu button.
2. Use the arrow button up or down until the display windows shows Advanced and confirm with the
Enter button .
3. Use the arrow buttons up or down until the display shows Options and confirm with .
4. Use arrows down/up until the display shows Paper Series.
5. Confirm with . The “>” marker will move down to the option setting line so you can change it.
6. Your display should look like this (the actual text to the right of the “>” will show the current setting
for the option and may be different than the one shown below).
7. Use arrows down/up to select the paper series (...ARCH, ANSI, ISO A...) you want to use
when setting the paper size and confirm with Enter . You can also select ALL if you need to
use more than one paper series.
3.7.3 Setting the Media Handling (load) Preferences
This option lets you tell the system how you want to load originals into the scanner.
On scanners: HD4230i (not relevant on flatbed models)
On the iJET Panel
1. Select the Menu button.
2. Use the arrow button up or down until the display windows shows Advanced and confirm with the
Enter button .
3. Use the arrow buttons up or down until the display shows Options and confirm with .
4. Use the arrow buttons up or down until the display shows Scanner Setup and confirm with
.
Enter
Enter
Menu option item
Current setting for option item
Paper Series
>
ALL
Enter Menu Enter Enter
Enter
Menu
Enter
Page 31
Configuration and Setup 3-19
5. Use arrows down/up until the display shows Media Handling and confirm with .
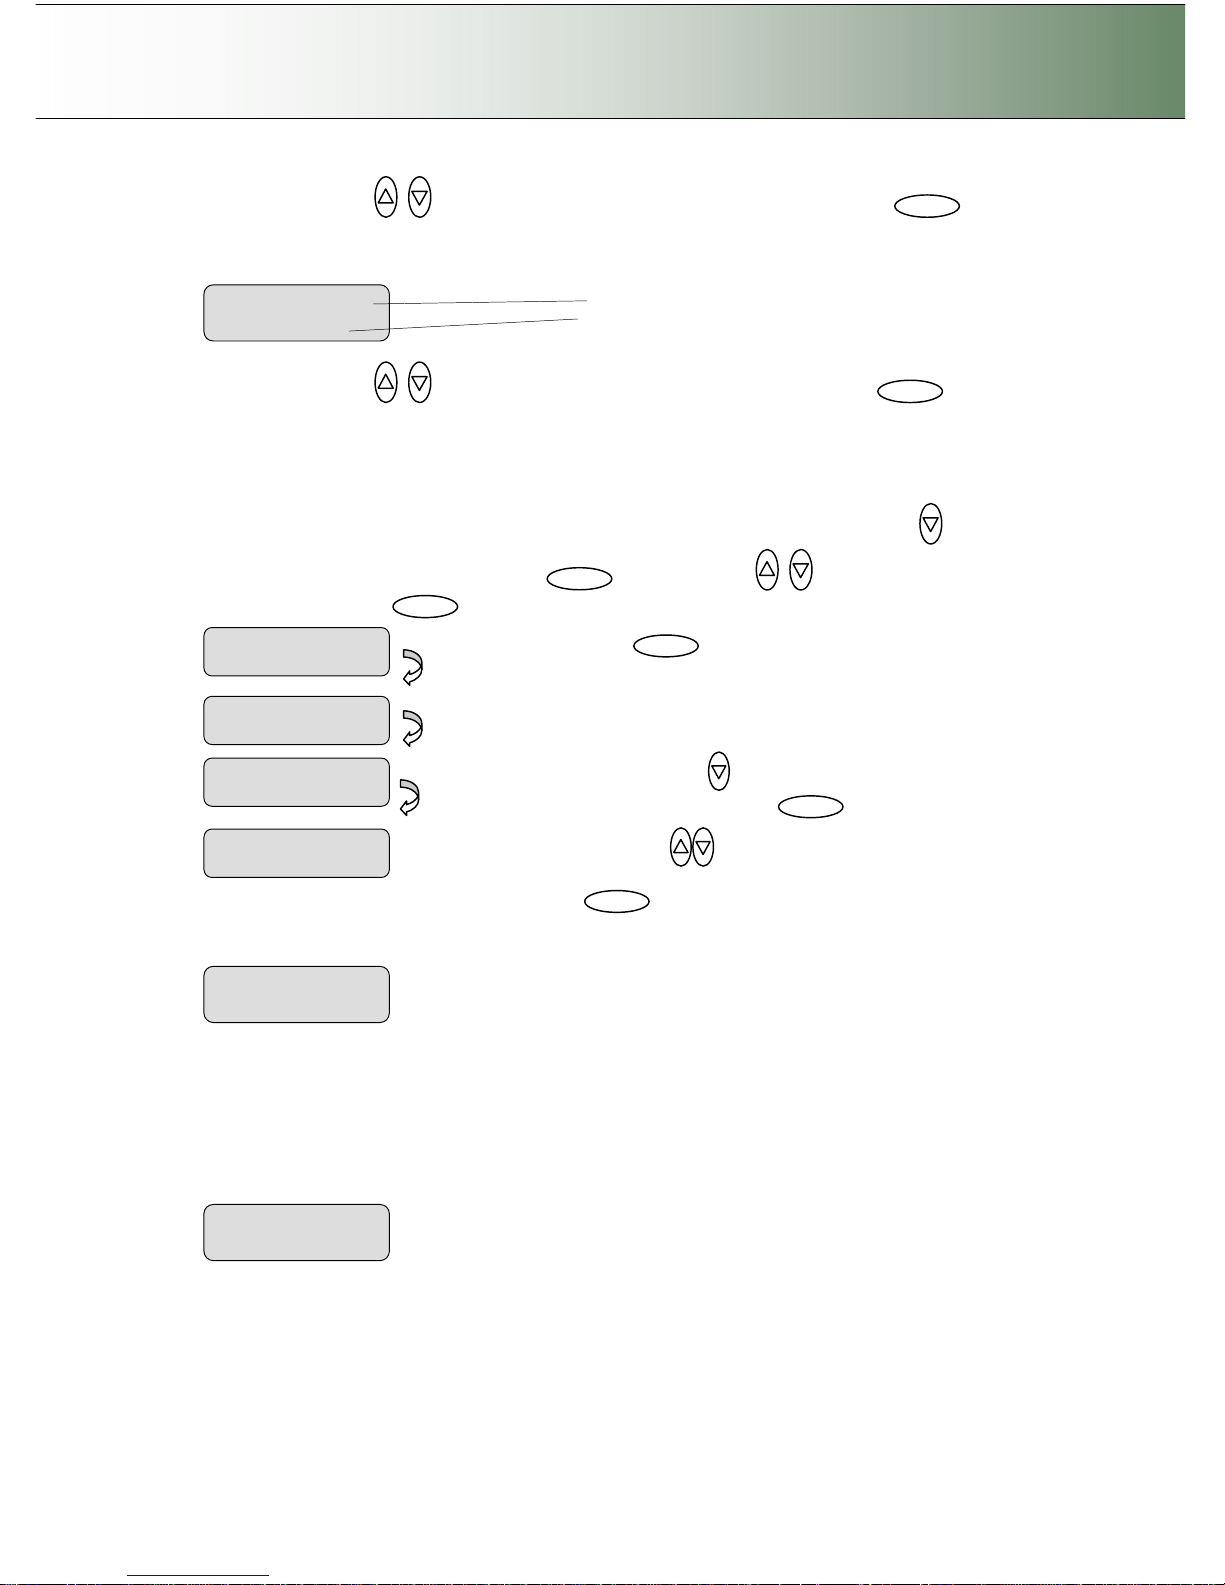
6. Your display should look like this (the actual text to the right of the “>” will show the current setting
for the option and may be different than the one shown below).
7. Use arrows down/up to select the method you want to use and confirm with . Auto
Load means the scanner will pull the original into the scan area as soon as you insert it into the slot.
You can set a Load Delay factor with Auto Load (see next step). Manual Load means you insert the
original and press on the panel’s feed forward button.
8. Delay Factor: If you selected Auto Load and want to change the delay factor – Make sure the Media
Handling option is marked with the “>”. If not press enter to move it up. Use arrow down to reach
the Load Delay option. Confirm with Enter . Use the arrows to set a Load Delay
factor and confirm with . These steps are illustrated below.
9. Soft Handling: Back-step and use the arrow down to reach the Soft Handling option. Press Enter.
Your device is designed to scan at very high speeds for maximum efficiency. However, some old,
curled or creased originals can trigger a paper jam when fed and scanned at high speeds. You may
also have a fragile original that you want passed delicately through the drive system. With the Soft-
handling option selected, both feeding and scanning are slowed down to enable smooth scanning of
curled, creased, frayed or fragile originals. Use the arrows to select Yes or No to Soft Handling and
press Enter to confirm.
10. Media Offset: Back-step and use the arrow down to reach the Soft Handling option. Press Enter.
The scanner media offset determines the left, top and bottom points of the scanning range. The
media offset is set during production, but you can correct slight offset irregularities if they occur.
Press Enter to reach each setting Side Offset, Top Offset, Bottom Offset and use the arrows to set
values (Defaults = 0). An offset value over 0 in the Side Offset field means that the scanning field’s
side reference point is moved towards the middle. An offset value over 0 in the Top Offset or Bottom
Offset fields mean that the scanning field’s top or bottom point is moved down.
Media Offset
>
Side Offset
Soft Handling
>
YES
Press
Enter
to confirm
Auto
Load
Media Handling
>
Auto Load
Load Delay
>
3
Use arrows
to change the
Load Delay value and confirm with
Enter
.
The the ‘>’ mark will have moved
up to the menu option line -
Media
Handling
.
> Media Handling
Auto Load
> Load Delay
0
Use arrow down to reach the
Load Delay
option. Press
Enter
Menu option item
Current setting for option item
Media Handling
>
Auto Load
Enter Enter
Enter Enter
Page 32
Configuration and Setup 3-20
3.7.4 Setting the local Time and Date
Your scanner needs to be set up with the local time and date. The setting is important for many system
functions such as file creation and using the scanner Timer for automatic wake-up and sleep (see specific
section in this User’s Guide).
On scanners: FLEX50i, HD4230i
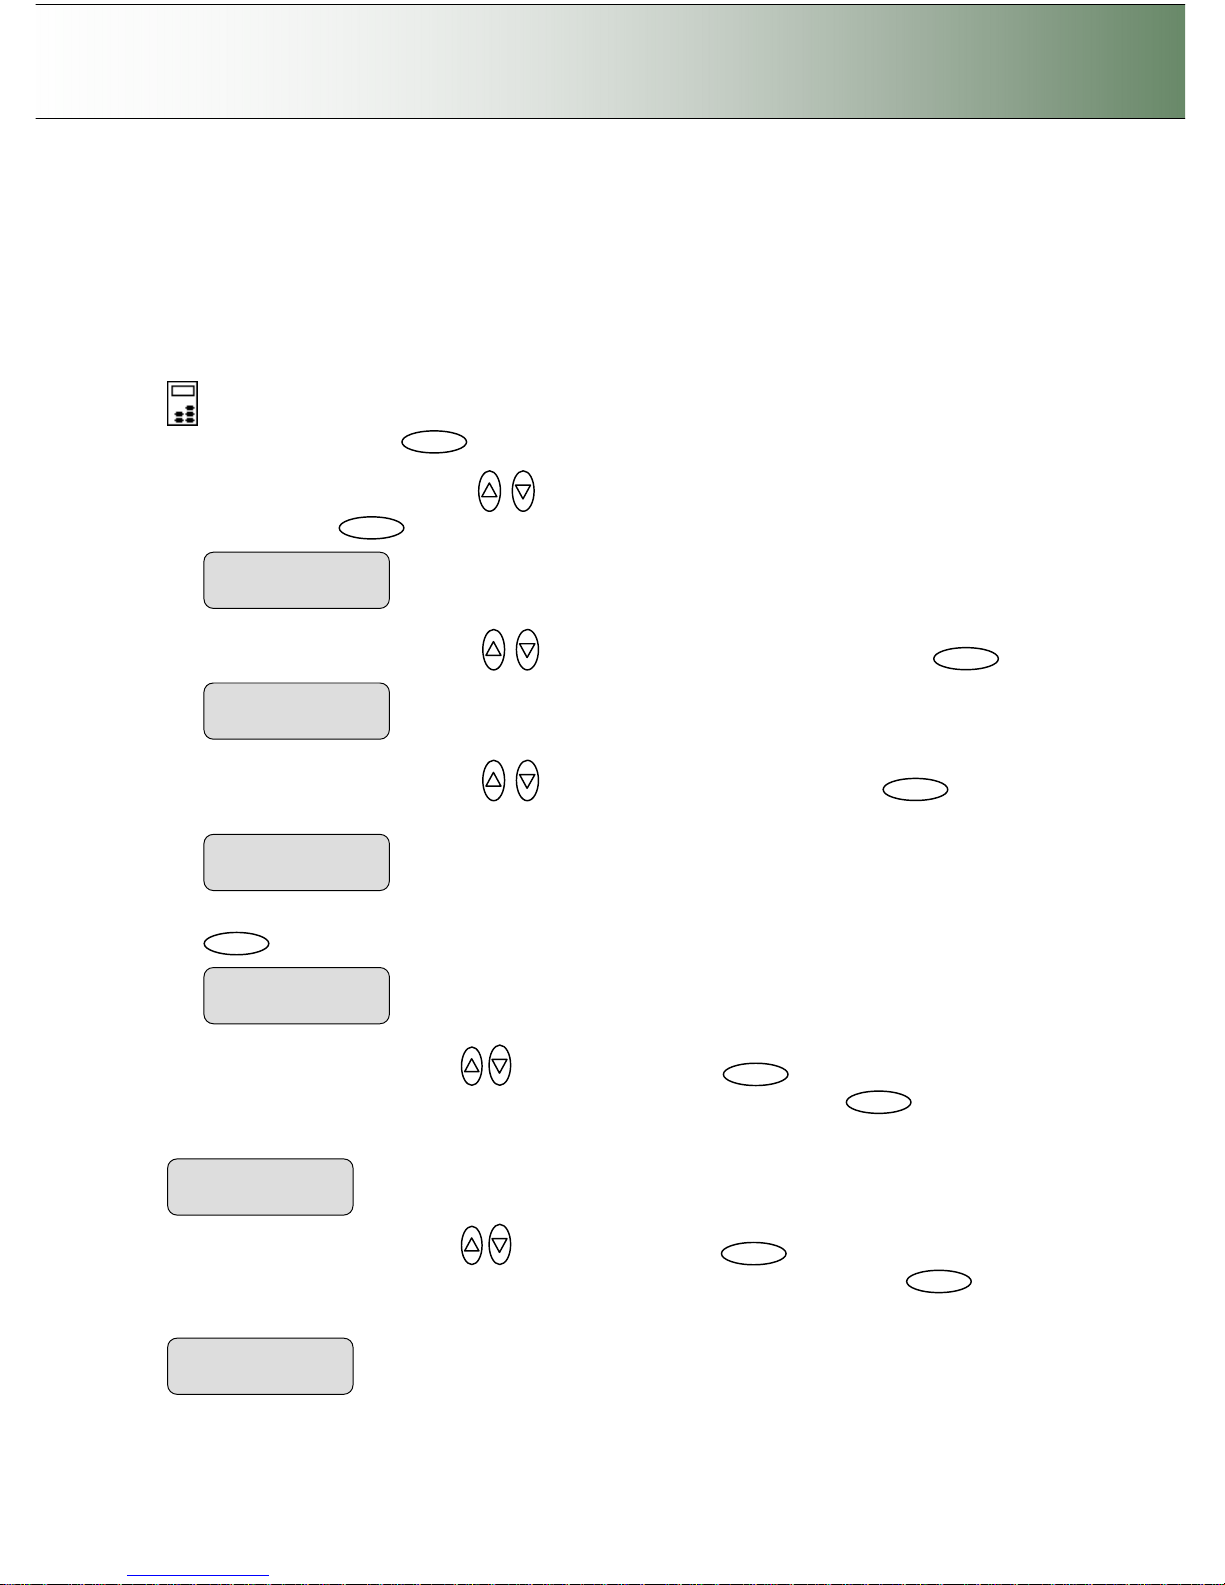
On the iJET Panel
1. Select the Menu button.
2. Use the arrow button up or down until the display window shows Advanced and confirm with
the Enter button .
3. Use the arrow buttons up or down until the display shows Options and confirm with .
4. Use the arrow buttons up or down to reach the option Time and Date. Press to
confirm.
5. Set the Time Format to 24- hour format (example: 17.30) or AM/PM format (example 05.30). Press
to confirm.
6. Use the arrow buttons up/down to reach Set Time. Press to enable editing and enter
your local time in format hh:mm. Use the arrows to change the digits and press to confirm
the value.
7. Use the arrow buttons up/down to reach Set Date. Press to enable editingand enter
the duccent date in format yyyy-mm-dd. Use the arrows to change the digits and press to
confirm the value..
Enter Enter
Time Format
> 2006-09-27
Enter
Set Time
> hh:mm
Enter
> Advanced
> Options
> Time and Date
Enter Menu Enter
Time Format
> 24-hour
Enter
Enter
Page 33
Configuration and Setup 3-21
3.8 Printer Setup on the Scanner
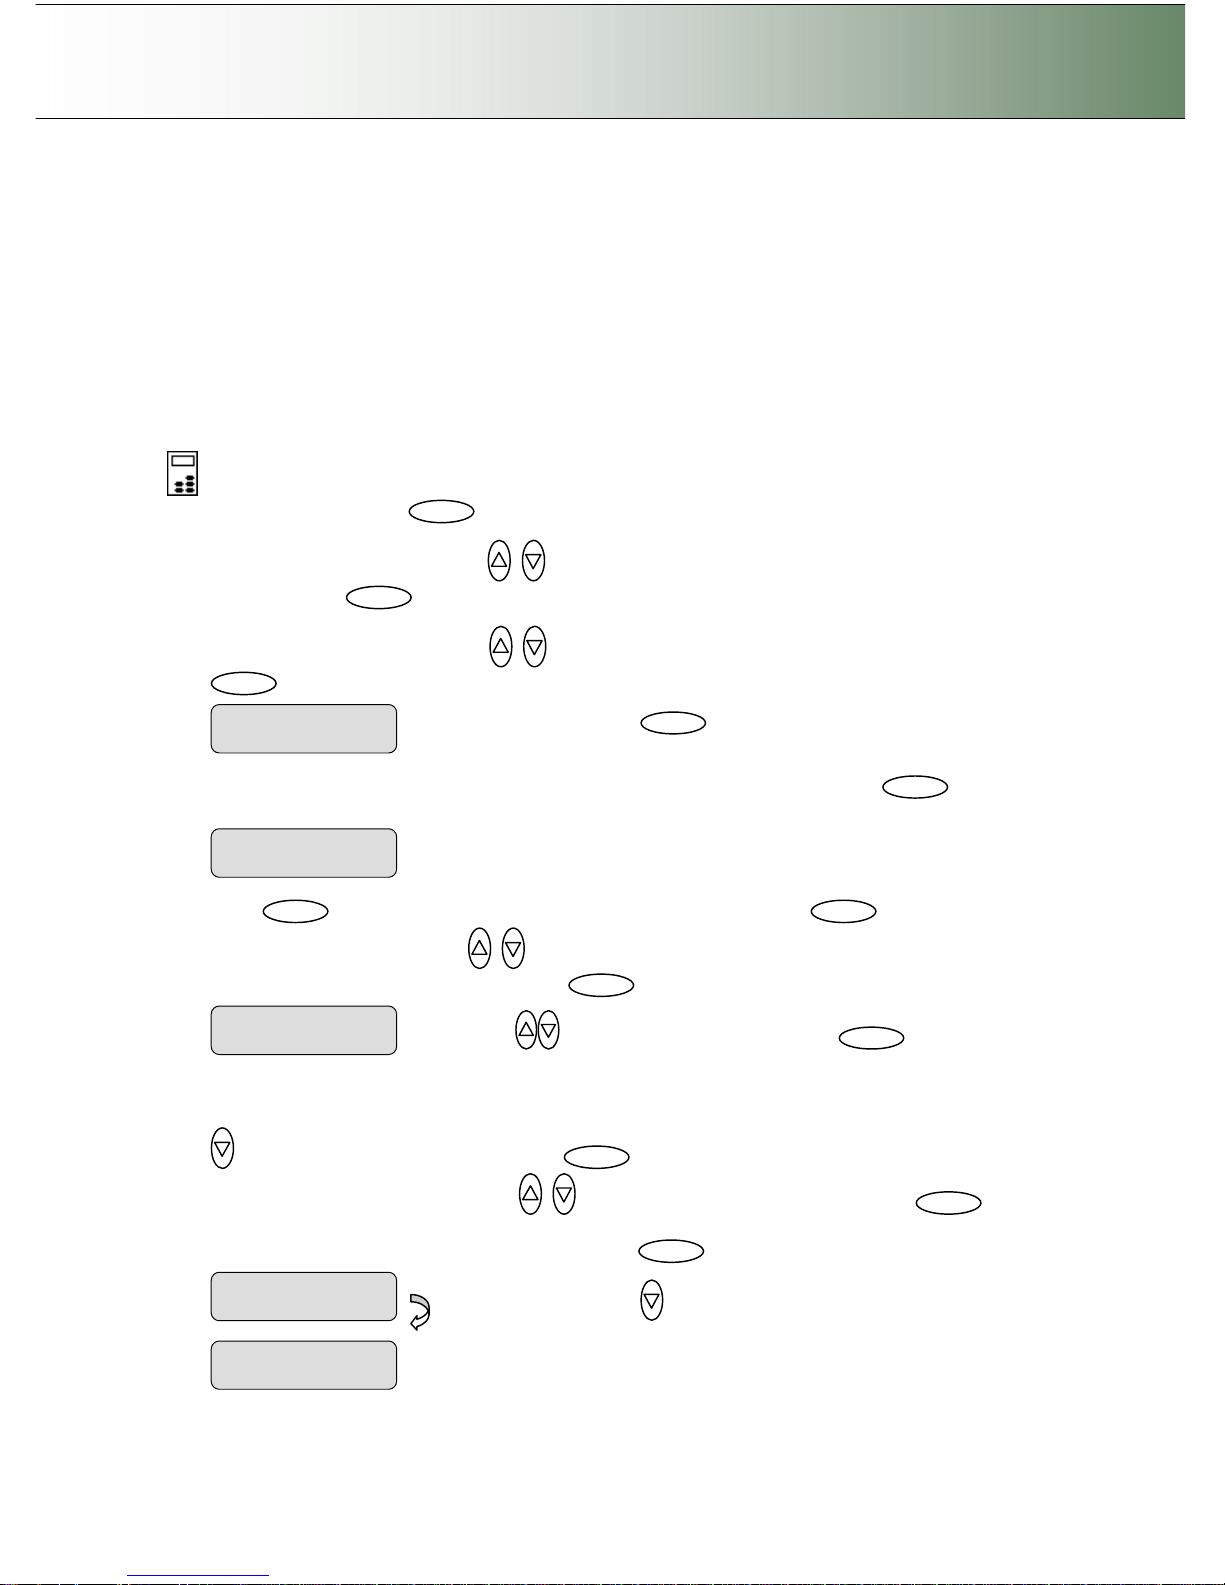
In order to be operated from the iJET Panel, your copy scanner needs to recognize a printer. The setup
procedure depends on whether you connect a printer through the USB host (output) port or through a LAN
port (either directly or indirectly). Direct connection through the LAN port will require that you enter the
local printer’s IP address. If you connect to the network through the LAN port and want to use a printer on
that network, you will have to enter the network printer’s IP address.
On scanners: FLEX50i, HD4230i
To apply printer setup settings:
On the iJET Panel
1. Select the Menu button.
2. Use the arrow button up or down until the display window shows Advanced and confirm with
the Enter button .
3. Use the arrow buttons up or down until the display shows Printer Setup and confirm with
.
4. You can set up a Color Printer and a B&W Printer (max 2 printers at a time). Press to reach
the Color Printer option.
5. Press to confirm Color Printer and reach the Interface option and again to confirm
Interface. Use arrows down/up to select USB or LAN, depending how you connected your
color printer and confirm your selection with .
6. If you are using LAN interfacing, either with a printer directly connected to the scanner’s LAN port or
to a remote printer on the network, you will need to set the printer’s IP address. Press arrow down
to display the IP setting dialog and then . The default IP shows 4 groups with 3 zeros in
each group. Use the arrows up/down to change the first group (3 digits). Press to
move to the next 3 digit group and again the arrows to change them. Repeat this with each group
until you have the right IP displayed and press Enter to confirm.
Press to reach the IP setting dialog.
Interface
>
LAN
Use the arrows to change the IP
values as described above.
IP Address
> xxx.xxx.xxx.xxx
Interface
> USB
Use arrows
to change the Interface setting. Press
Enter
to confirm.
> Color Printer
…
Press
Enter
to confirm
Printer setup
> Printer Setup
…
Enter
Enter
Enter
Enter Enter Enter Enter
Enter Menu Enter
Page 34
Configuration and Setup 3-22
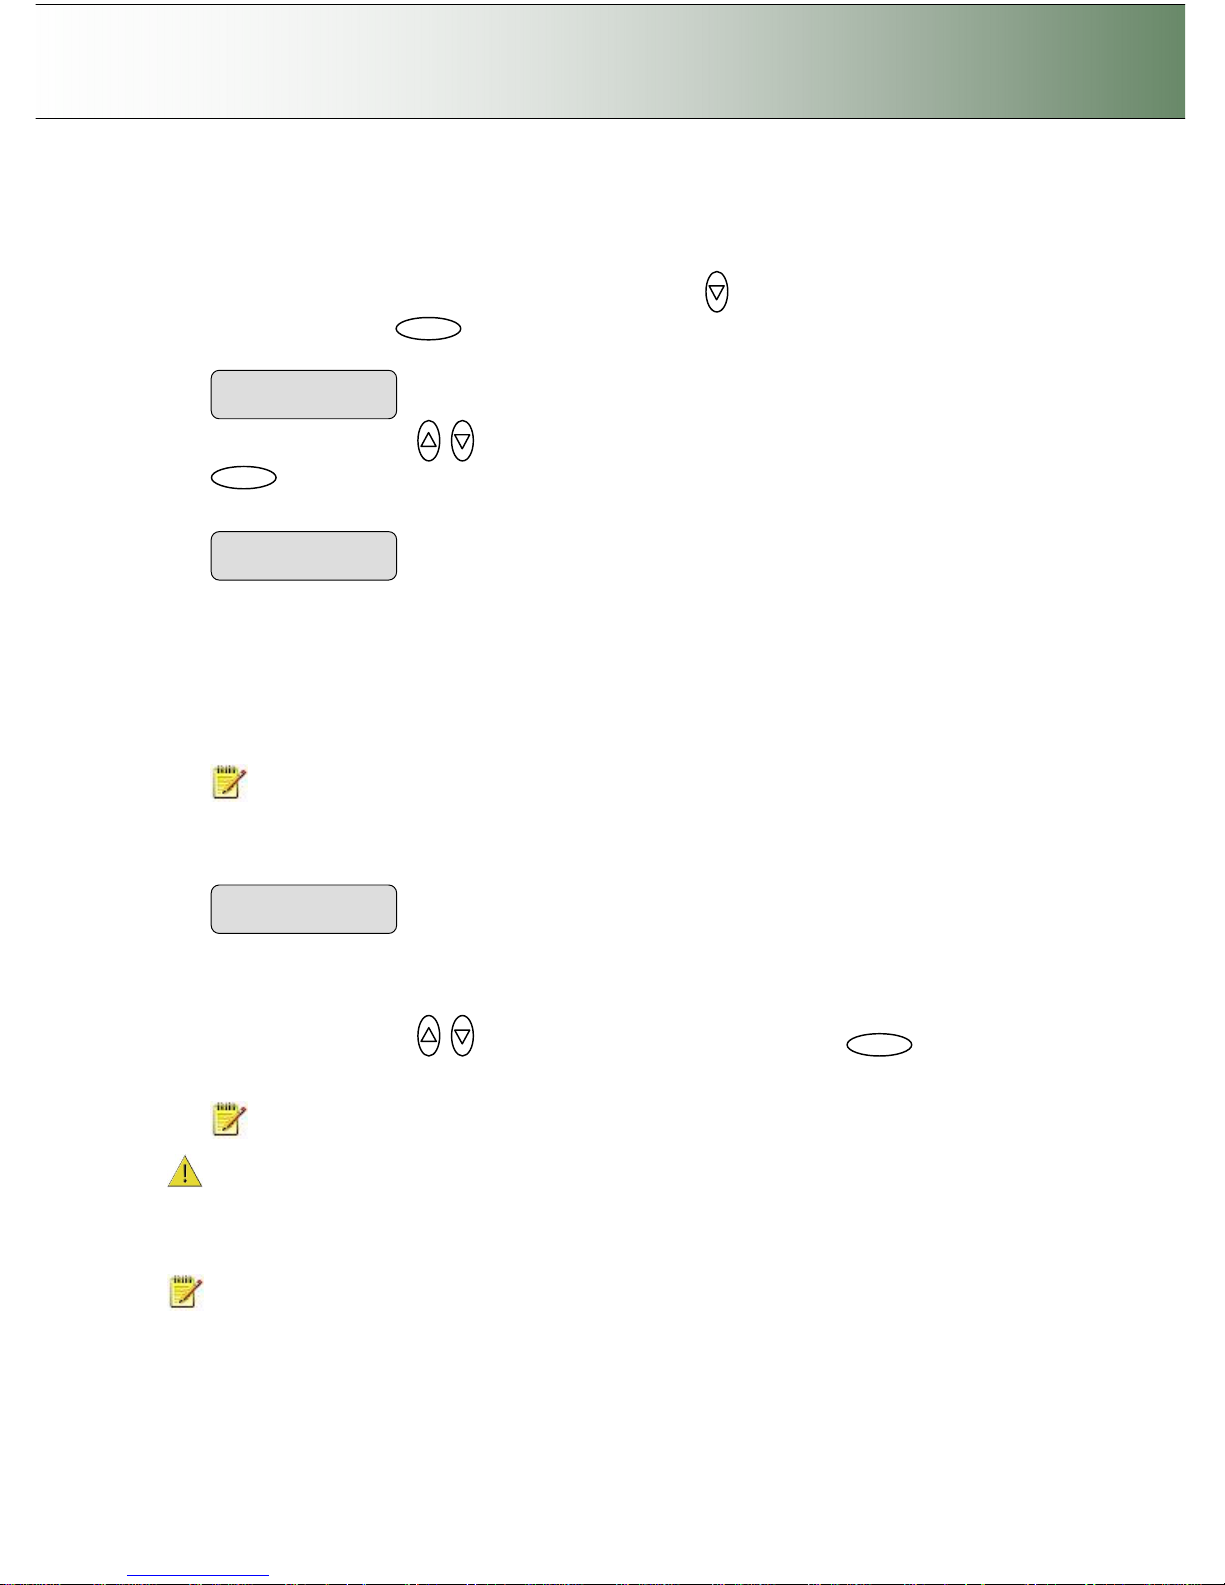
7. You must now set definitions and parameters for the actual Printer Model. Printer Model settings can
be set in 3 ways (methods): automatically, by selecting a printer model from a list of predefined
printers or through making custom settings manually.
To select the Printer Model setup method: Press arrow down to reach and display the Printer
Model dialog and then to move the “>” mark down and thus enter the Printer Model options.
Use the arrows up/down to display one of the following Printer Model options and press
to confirm your selection:
7.1 Auto Configure
Auto Configure tells the system to retrieve the printer’s parameters automatically from the printer
itself. The system searches for the printer on the port as indicated by your Interface setting (USB or
LAN-IP address) and then when it finds it, the printer’s setup parameters are saved in the scanner
device.
Not all printer models support automatic setup and you will need to use the Printer List or the
Custom Setup options instead. The printer must support SNMP in order for its settings to be
detected automatically.
NOTE: the actual search and settings upload process takes place the first time you try to print
and not during setup. It is therefore recommended to make a dispensable test copy just after
completing the steps for setting up your scanner.
7.2 Printer List
If you select Printer List and confirm with enter, you will be able to select an actual printer model by
its name. The model names that appear in the Printer List indicate printers that have been fully
tested for compatibility with your copy scanner and their setup parameters are ready in the system.
Use the arrows up/down to move through the list of printers and press to confirm
your printer model selection.
NOTE: New printer models may become available in the list with new firmware upgrades.
Compatible Printer’s lists on the web: Your scanner manufacturer’s support pages on the web will
provide lists containing specific printer models that are compatible with the scanner. Look for your printer
model on the list. The website lists will be updated as new printers enter the market.
If your printer is not named on the website list, you can try to use the printer’s documentation to determine
the right settings and enter these through the Custom Setup option.
NOTE: Unlisted printers may not be compatible with the scanner.
7.3 Custom Setup
Enter
Printer Model
> Auto Configure
Printer Model
> Printer List
Enter
Printer Model
> Auto Configure
Enter
Page 35
Configuration and Setup 3-23
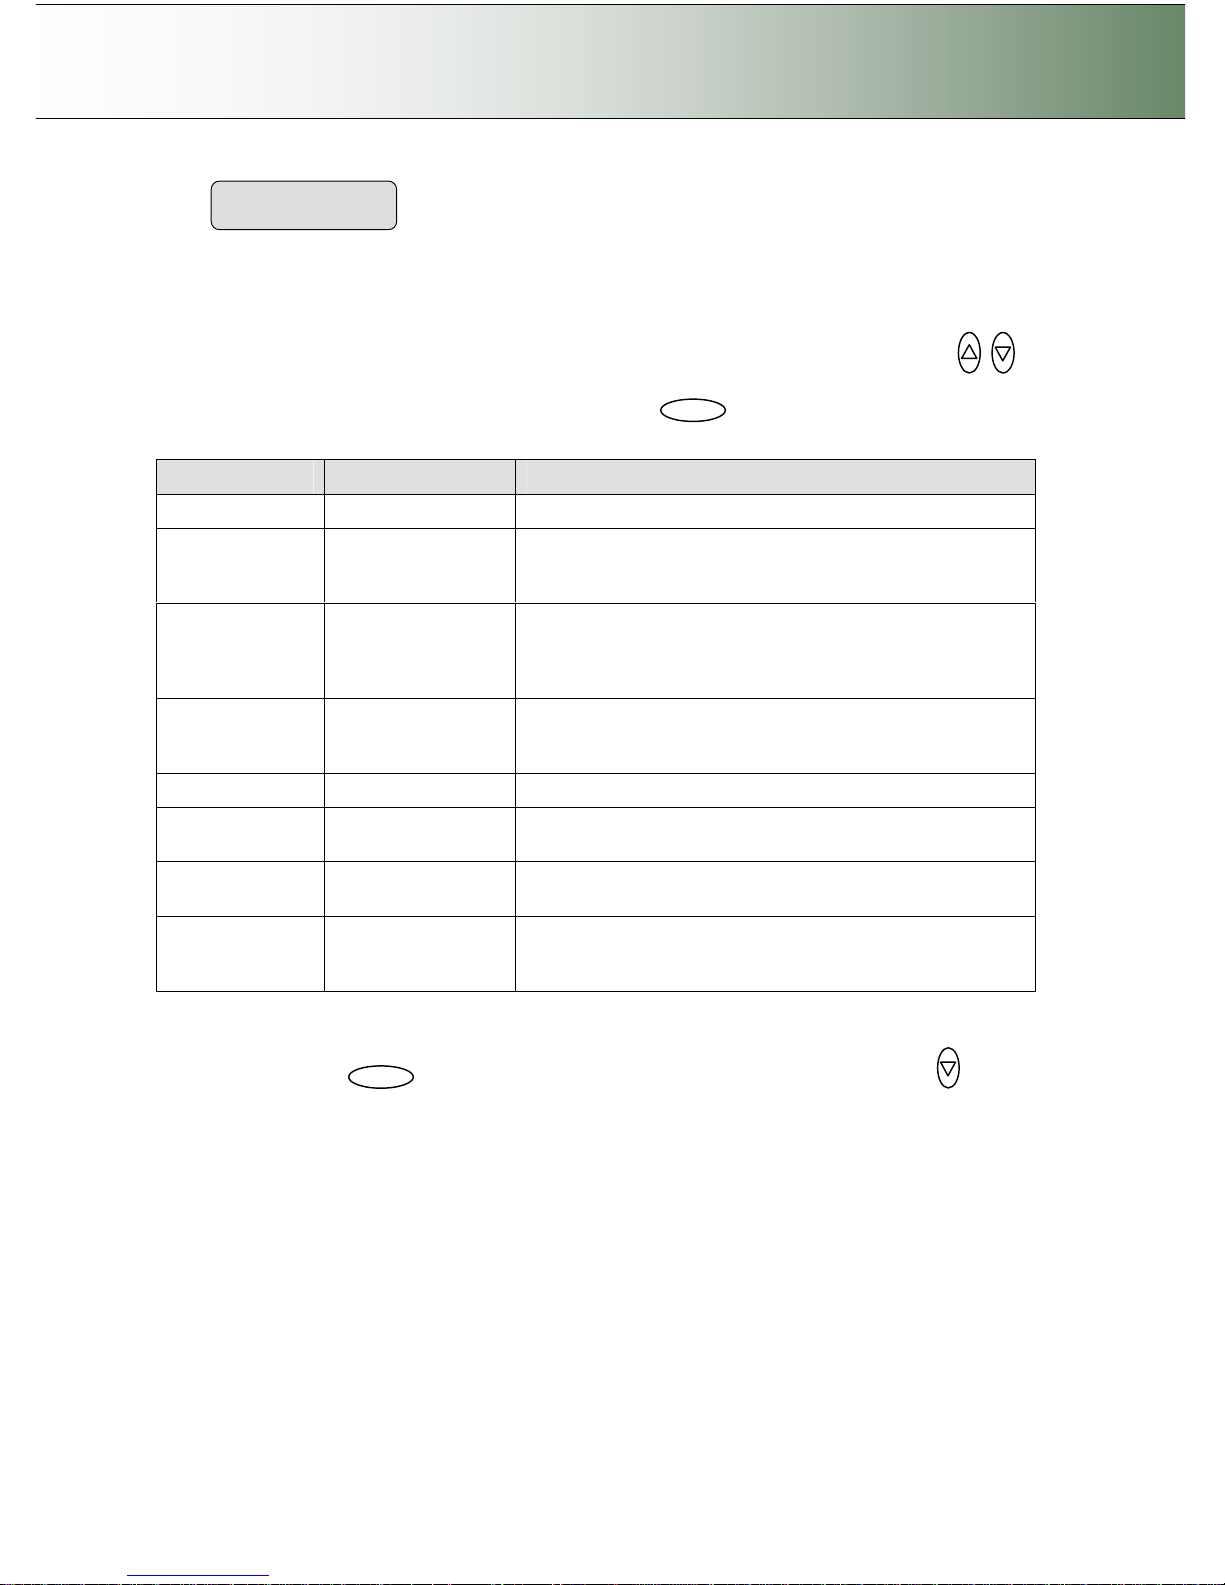
The Printer Model - Custom Setup option lets you configure a printer manually. This option gives you
the freedom to use other printers than those compatible with the Auto Configure method and those
that have been tested and are available through the Printer List method.
Here follows a short description of the parameter settings. Use the arrow button up or down
to move through the options. Use Enter to activate the option’s value selection. Use again the arrows
to change the option values and again the Enter button to confirm your setting.
Option Values Description
Command Set RTL or PCL3GUI This is the printer’s format language
Ctrl. Language None or HP PJL
The control language is used internally by the system to
apply some of the others settings, such as resolution, size,
etcetera.
Orientation Landscape/Portrait
Feeding orientation for printer. On most large format printers
this will be landscape while on some of the narrower models
it will be Portrait.
Scalable No/Yes
‘No’ means that the scanner will take care of scaling before
sending data to the printer.
‘Yes” means that the printer will take care of scaling.
Resolution 300,360,600,720 This is the printer’s fixed resolution
Printer Size
A0,A1,A2….paper
size list
The printer is defined to be of a certain max standard size A0, A2 etcetera.
Render Type
Default/No Simple/
Ctx format
Scan to print data protocol. See the lists fro right selection.
Use Inked Area No/Yes
Yes – The printer will cut the output by looking at the area
that was actually printed.
No – use the whole paper size to determine the place to cut.
8. Repeat steps 4 – 6 with B&W Printer. To reach the B&W Printer option from the previous step: Use
the Back button to move back to Color Printer in the menu and then arrow down to
reach the B&W Printer option.
Printer Model
> Custom Setup
Enter Back
Page 36
Configuration and Setup 3-24
3.9 Creating Media Profiles – For Color Printer Setup
You must create a Media Profile for each media type you use with the specific color printer. Otherwise,
your color copy output colors will not necessarily match the original’s colors. Optimal quality color results
are only obtained if the capture device (scanner) and output device (printer) "see" colors in the same way
on a given output media. A Media Profile is a unit that stores data that matches scanner and printer colors
on a given media.
Before you start a copy job, you select a Media Type (Menu button) that corresponds with the media in
your printer and the Media Profile you prepared. By this action you are harmonizing scanner, printer and
media color factors for achieving optimal color precision in your copies.
A Media Profile is connected solely to a specific printer and media type so you will need to create new
media profiles if any of these (printer or print-media) are changed.
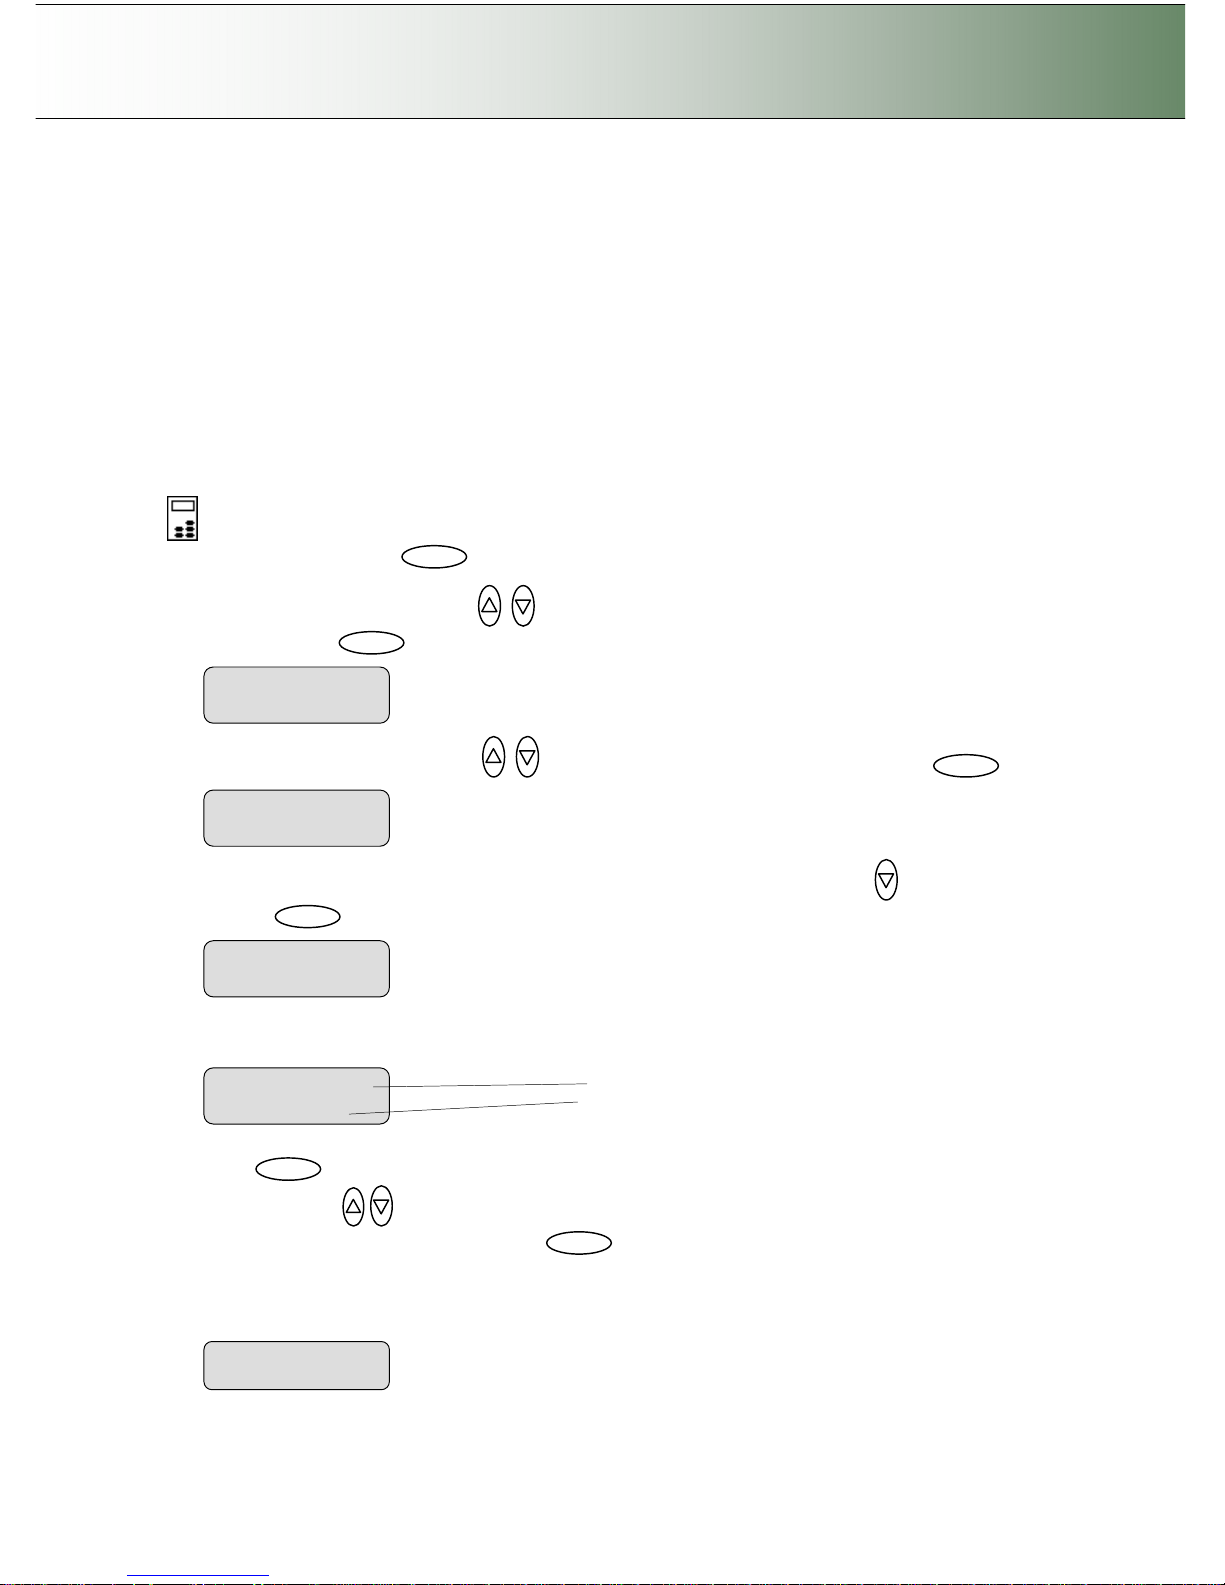
On the iJET Panel
8. Select the Menu button.
9. Use the arrow button up or down until the display window shows Advanced and confirm with
the Enter button .
10. Use the arrow buttons up or down until the display shows Options and confirm with .
11. Closed Loop Cal should be displayed as the first option. If not use the arrow down button to reach
it. Press to confirm.
12. Your display should now look like this (the actual text on the 2. line will show the current setting for
the option and may be different than the one shown below).
13. Press to move the “>” mark to the current setting so you can change it. Use the arrow
buttons up/down until you reach the media type (Coated, Semi Glossy, Glossy…) that
describes the media in your printer. Press to confirm.
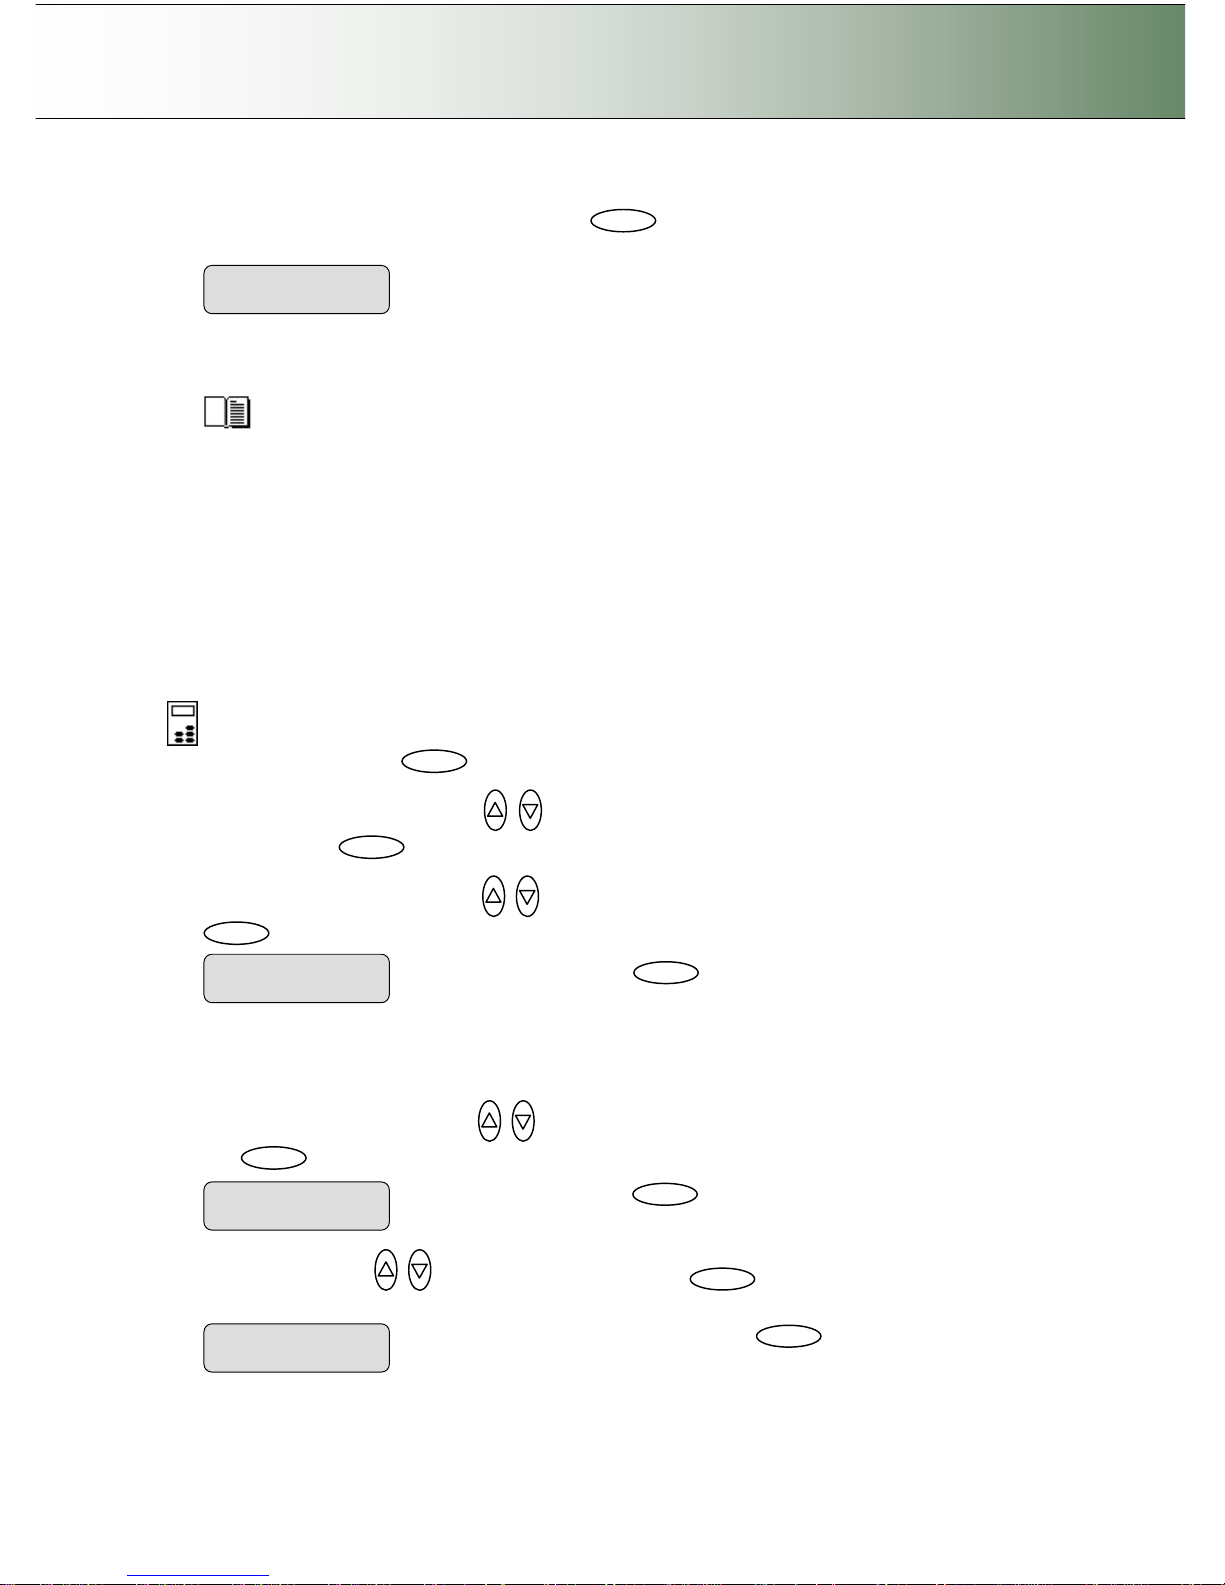
14. Print the Media Profile sheet - You are now ready to print the main Media Profile sheet. Step back
and use the arrows to step down to the “Print Sheet” option and select Enter to accept it and then
Enter again. The system will print a color patch sheet.
> Advanced
…
> Options
…
> Closed Loop Cal
…
Enter Menu Enter
> Print Sheet
‘Enter’ to go…
Enter
Menu option item Media Profile
Current setting for option item
> Media Profile
Coated
Enter Enter
Page 37
Configuration and Setup 3-25
15. Feed the sheet into the scanner
16. The display will now show “Scan Sheet”. Select to start. The system will scan the color patch
sheet and calculate color matching values for future jobs with the current media type.
17. When you use the system for copying, you will select the option for the Media Profile that matches
the media loaded on your printer. This is done through the Menu button –> Media Profile. The system
will then load the corresponding Media Profile and use it to create optimal color output for the job.
Read more on Media Profile selection under the section How do I make a Copy – Other Copy
Options - How do I Set the Media Type (media Profile).
3.10 Scanner on Network Setup
In order to be recognized on the network, your copy scanner needs to identify itself. Some networks
support DHCP which will enable the scanner to extract its network setup information automatically from
the network. On other networks, you will have to enter the network ID information manually.
On scanners: FLEX50i, HD4230i
To apply the scanners network setup settings:
On the iJET Panel
1. Select the Menu button.
2. Use the arrow button up or down until the display window shows Advanced and confirm with
the Enter button .
3. Use the arrow buttons up or down until the display shows Network Setup and confirm with
.
4. The rest depends on if your network supports DHCP or not. Follow one of the scenarios below:
If your network supports DHCP:
1. Use the arrow button up or down until the display window shows DHCP Setup and confirm
with to move the “>” marker down change the setting.
2. Use arrows down/up to select YES and confirm with
Enter
. The scanner will then get its
network setup information directly from the networks DHCP server.
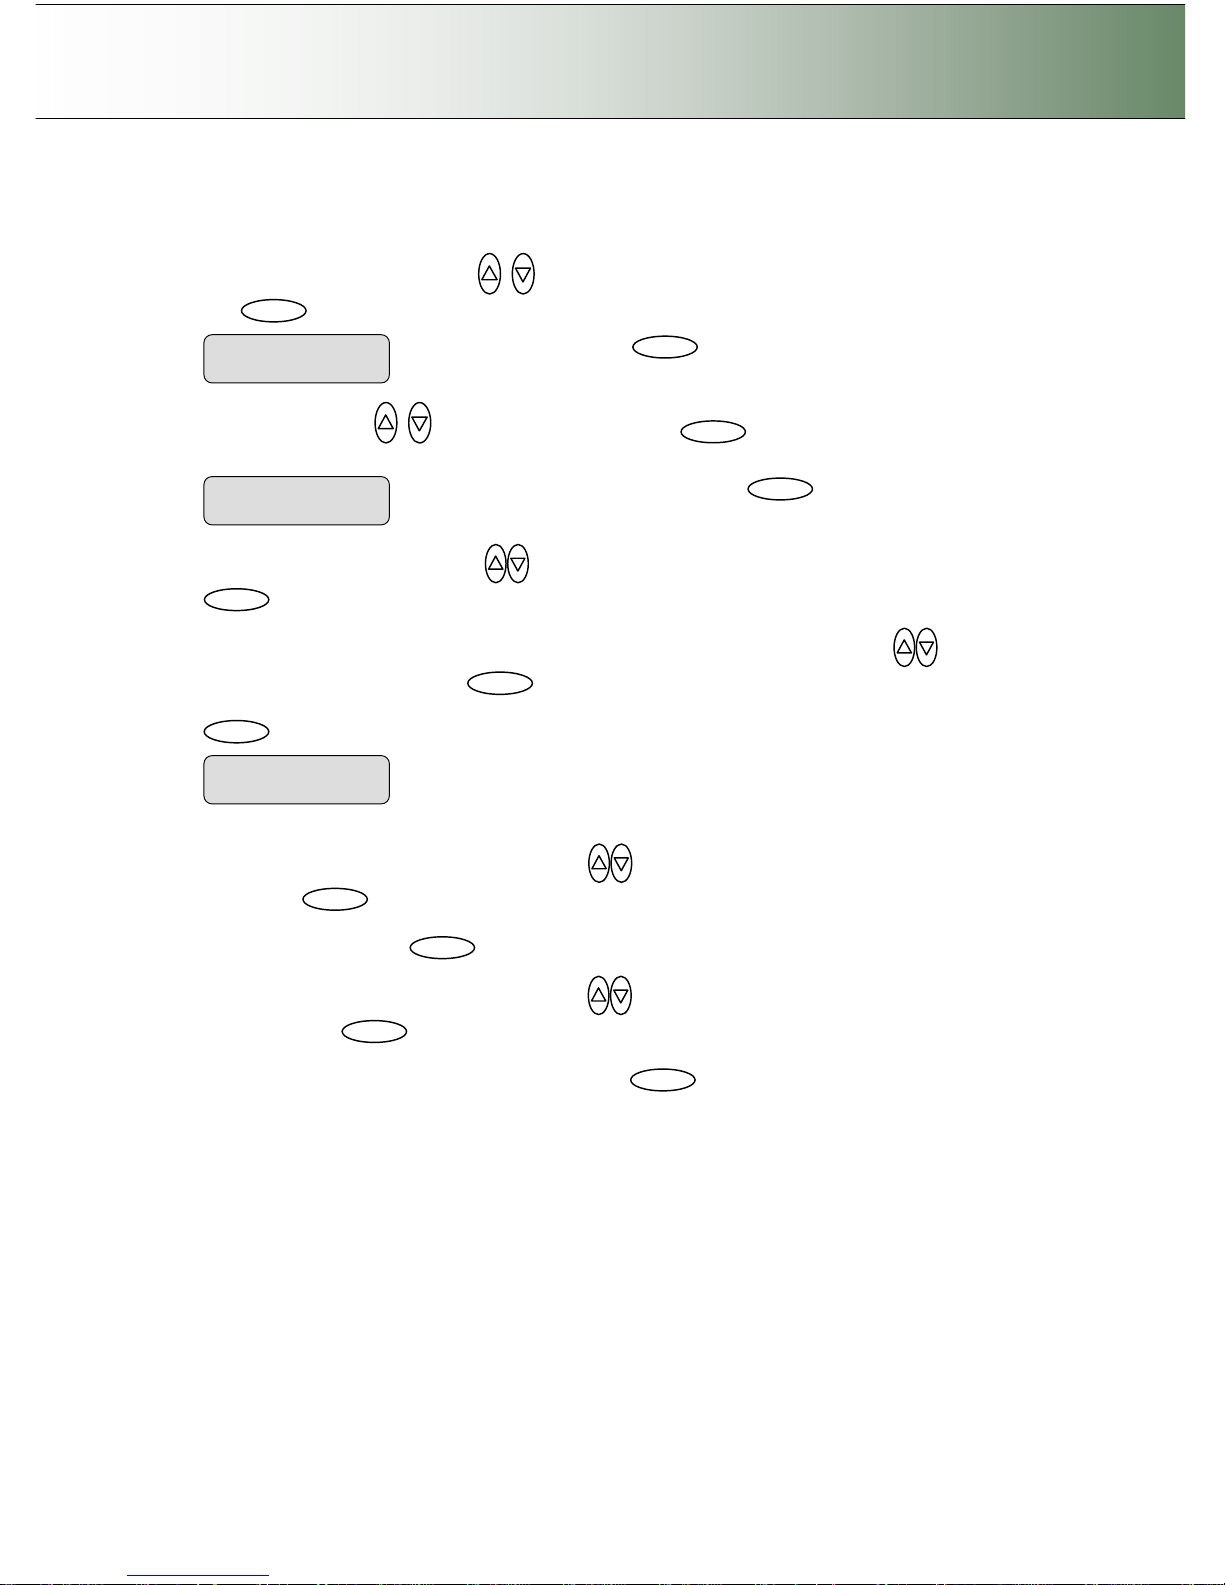
> Scan Sheet
‘Enter’ to go…
Enter
Change value to “YES” and confirm with
Enter
DHCP Setup
> YES
Press
Enter
to confirm DHCP
setup
> DHCP Setup
NO
Enter
Press
Enter
to confirm
Network setup
> Network Setup
…
Enter Menu Enter
Page 38
Configuration and Setup 3-26
If your network does not support DHCP:
1. Get the values IP Address, Subnet Mask and Gateway Address from your network administrator.
2. Use the arrow button up or down until the display window shows DHCP Setup and confirm
with to move the “>” marker down change the setting.
3. Use arrows down/up to select NO and confirm with
Enter
. The scanner will then be
identified on the network with the values you enter manually in the next steps. .
4. Use the arrow buttons up/down
until the iJET Panel displays IP Address and confirm with
Enter
.
5. The default IP shows 4 groups with 3 digits in each group. Use the arrows up/down
to change
the first group (3 digits). Press to move to the next 3 digit group and again the arrows to
change them. Continue with each group until you have the right IP displayed and press Enter
to confirm.
6. Use the arrow buttons arrow buttons up/down
until the iJET Panel displays Subnet Mask and
confirm with
Enter
. Subnet Mask is a mask used to determine what subnet an IP address belongs
to. Use the up/down arrow to change a digit’s value in the same manner as described above for the
IP Address. Confirm with
Enter
7. Use the arrow buttons arrow buttons up/down
until the iJET Panel displays Gateway Address
and confirm with
Enter
. A Gateway address is the IP address of a network point that acts as an
entrance to another network. Use the up/down arrow to change a digit’s value in the same manner
as described above for the IP Address. Confirm with
Enter
Use the arrows to change the IP
values as described above.
IP Address
> xxx.xxx.xxx.xxx
Enter Enter
Change value to “NO” and confirm with
Enter
DHCP Setup
> NO
Press
Enter
to confirm DHCP
setup
> DHCP Setup
YES
Enter
Page 39
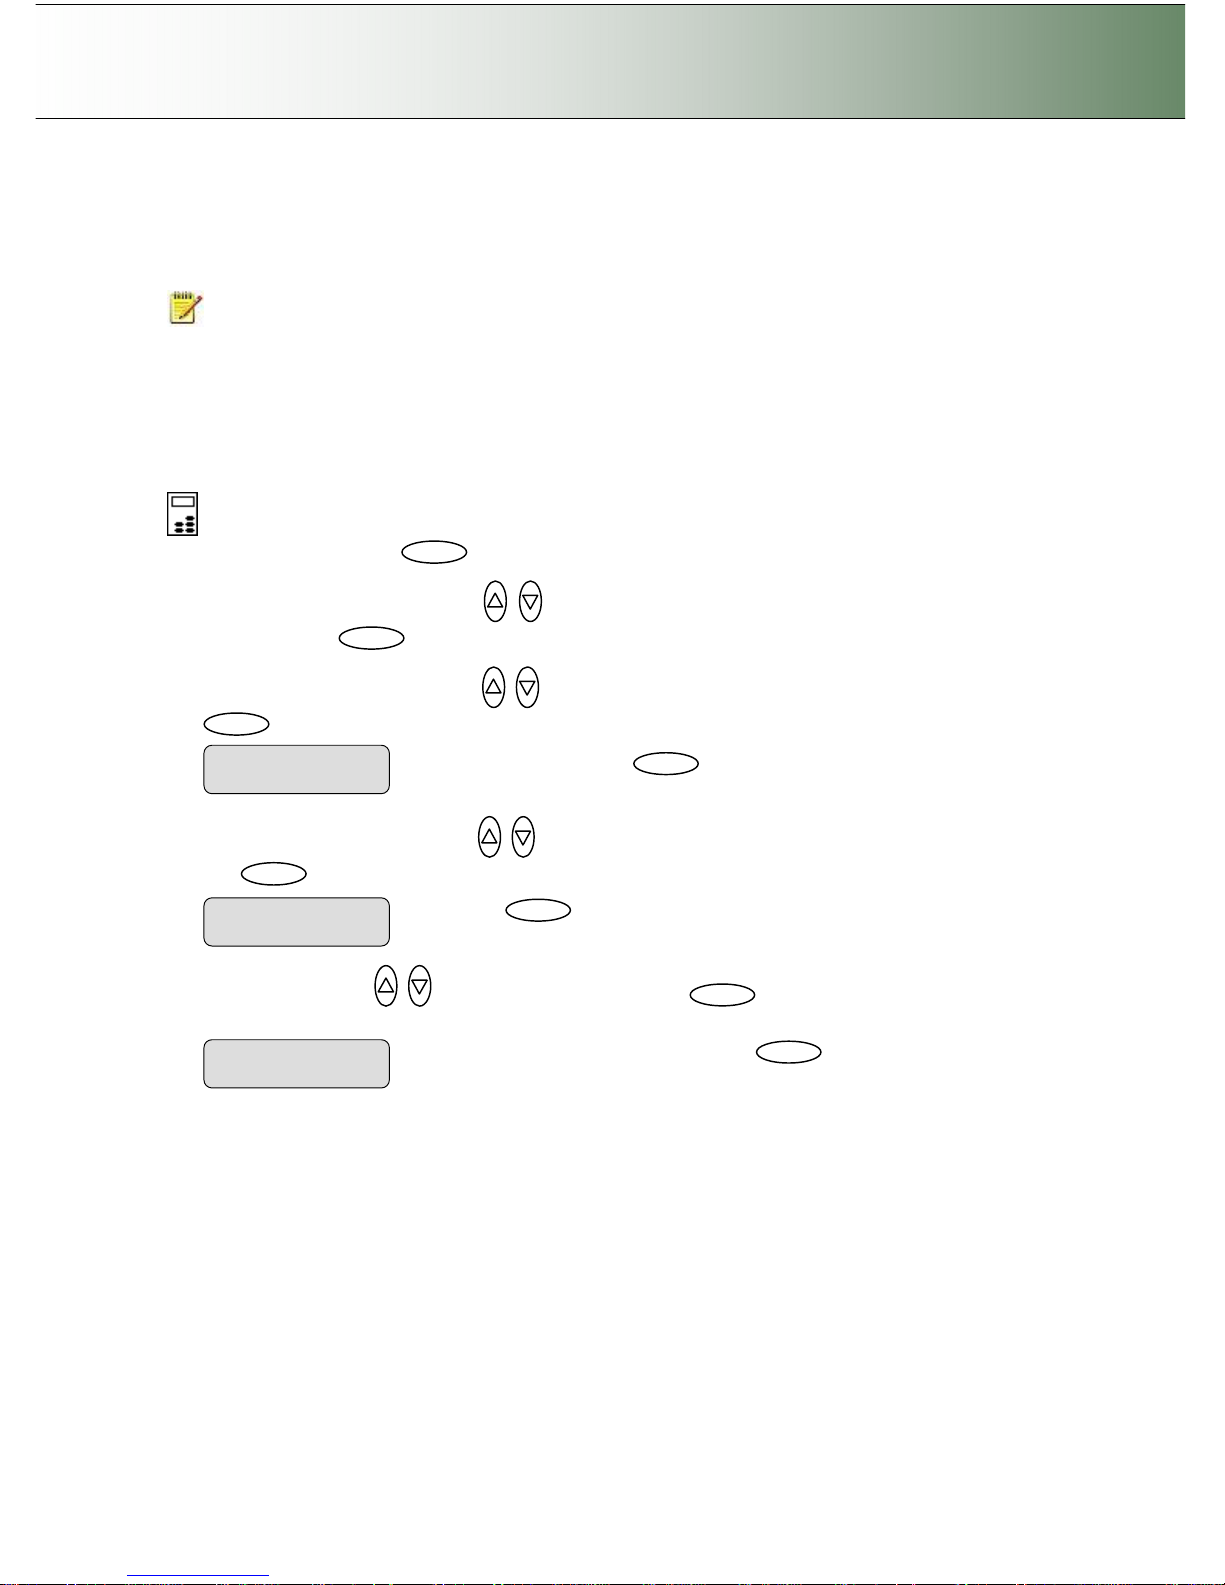
Configuration and Setup 3-27
3.11 Setup to Share the Scanner (Use from PCs on the LAN)
Your scanner can be setup to be used for scanning from PC stations on the network. This requires that
you first have setup the scanner to be recognized on the network as described in the previous section
“Scanner on Network Setup”. The following will describe how to enable your scanner to be shared.
NOTE: Using a shared scanner from a PC on the network will require scan and copy software plus
drivers installed on that PC. The scan/copy software must be compatible with the scanner and shared
scanner functionality. See your scan/copy software documentation for details and instructions.
On scanners: FLEX50i, HD4230i
To enable a scanner for sharing:
On the iJET Panel
1. Select the Menu button.
2. Use the arrow button up or down until the display window shows Advanced and confirm with
the Enter button .
3. Use the arrow buttons up or down until the display shows Network Setup and confirm with
.
4. Use the arrow button up or down until the display window shows Share Scanner and confirm
with to move the “>” marker down in order to change the setting.
5. Use arrows down/up to select YES and confirm with
Enter
. The scanner will then be
enabled for shared scanning from PCs on the network.
6. Reboot the scanner to ensure that the setting is applied on the network.
Change value to “YES” and confirm with
Enter
Share Scanner
> YES
Press
Enter
to confirm Share Scanner setup and
move the ‘>’ marker down to change the setting.
Share Scanner
> NO
Enter
Press
Enter
to confirm
Network setup
> Network Setup
…
Enter Menu Enter
Page 40
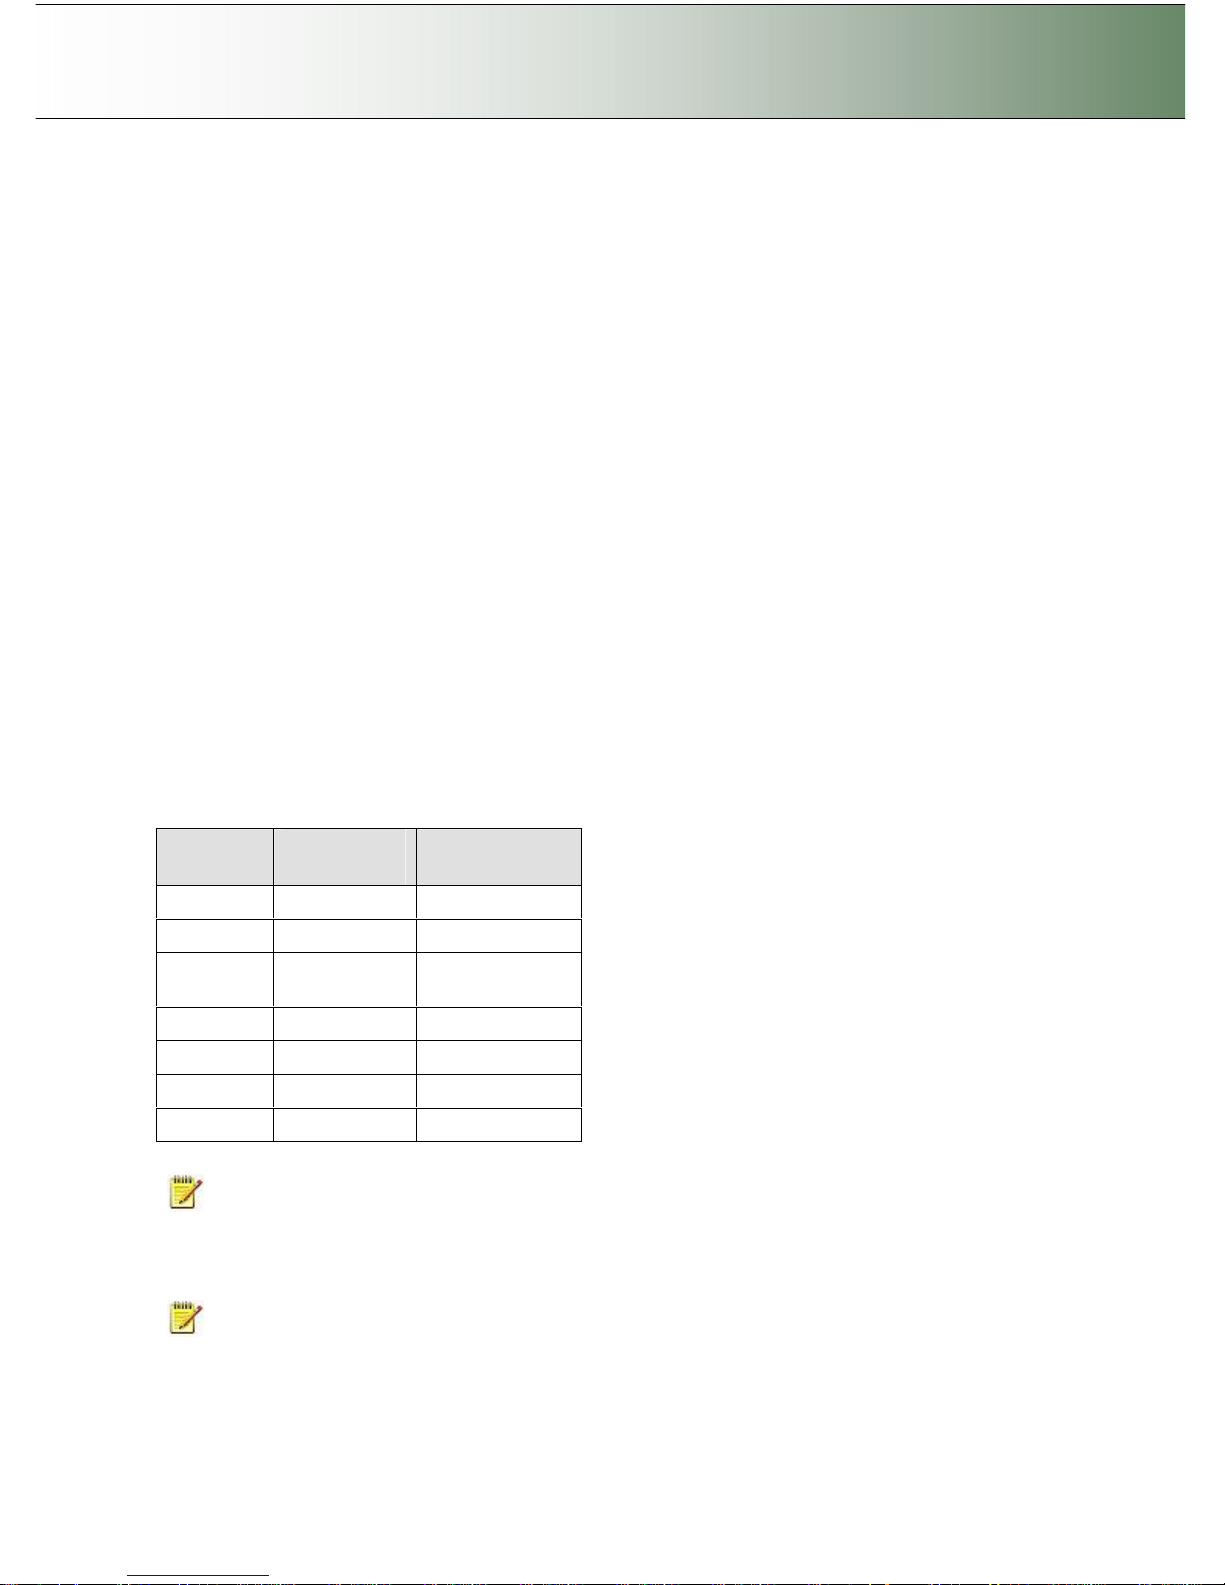
Configuration and Setup 3-28
3.12 Usability Settings and User Preferences
The following options are designed for setting up the scanner optimally to comply with the main types of
your scanning tasks, your business workday and your daily routines.
3.12.1 Setting the Timer for Automatic Sleep and Wake-up
On scanners: FLEX50i, HD4230i
The Timer is for programming your scanner’s internal clock that controls your scanner’s sleep and wakeup schedule.
Running with the right internal temperature is of utmost importance when doing high quality scanning and
your scanner should be allowed a warm up time to reach it.
The Timer lets you program the scanner to automatically power on and warm up at times most convenient
for you and your schedule. In this way, it can be set to turn on before you arrive and is thus ready when
you need it. You do not have to waste valuable time waiting for your system to reach optimal conditions.
As an example, your business opens a bit later on Mondays then on other days, so the scanner can be
programmed to start up at 07:30. By the time you reach work at 08:00, the scanner will be warmed up and
ready to work at an optimal internal temperature. Still as an example - on Tuesday you need to process a
heavy copy order and anticipate a long day. You therefore set the scanner to shut down much later than
usual. On Wednesdays, You are always attending meetings and won’t need the scanner until after lunch.
Thursday and Friday are normal workdays and the shop is closed during the weekend.
The example above gives the following settings to be entered in the Timer Menu:
Weekday
Wake-up
Time
Sleep Time
Monday 07:30 17:00
Tuesday 07:00 23.59
Wednesda
y
12.00 17.00
Thursday 07:00 17:00
Friday 07:00 17:00
Saturday 00:00 00:00
Sunday 00:00 00:00
NOTE: When the Timer puts the scanner in Sleep mode, the scanner device goes into a lower power
level.
To set the Timer:
NOTE: Make sure the scanner power (main switch at the back) is on in “hard power on”. It must
remain in hard power On in order for the timer to work. Control also that the scanner's clock settings are
correct before setting the timer.
Page 41
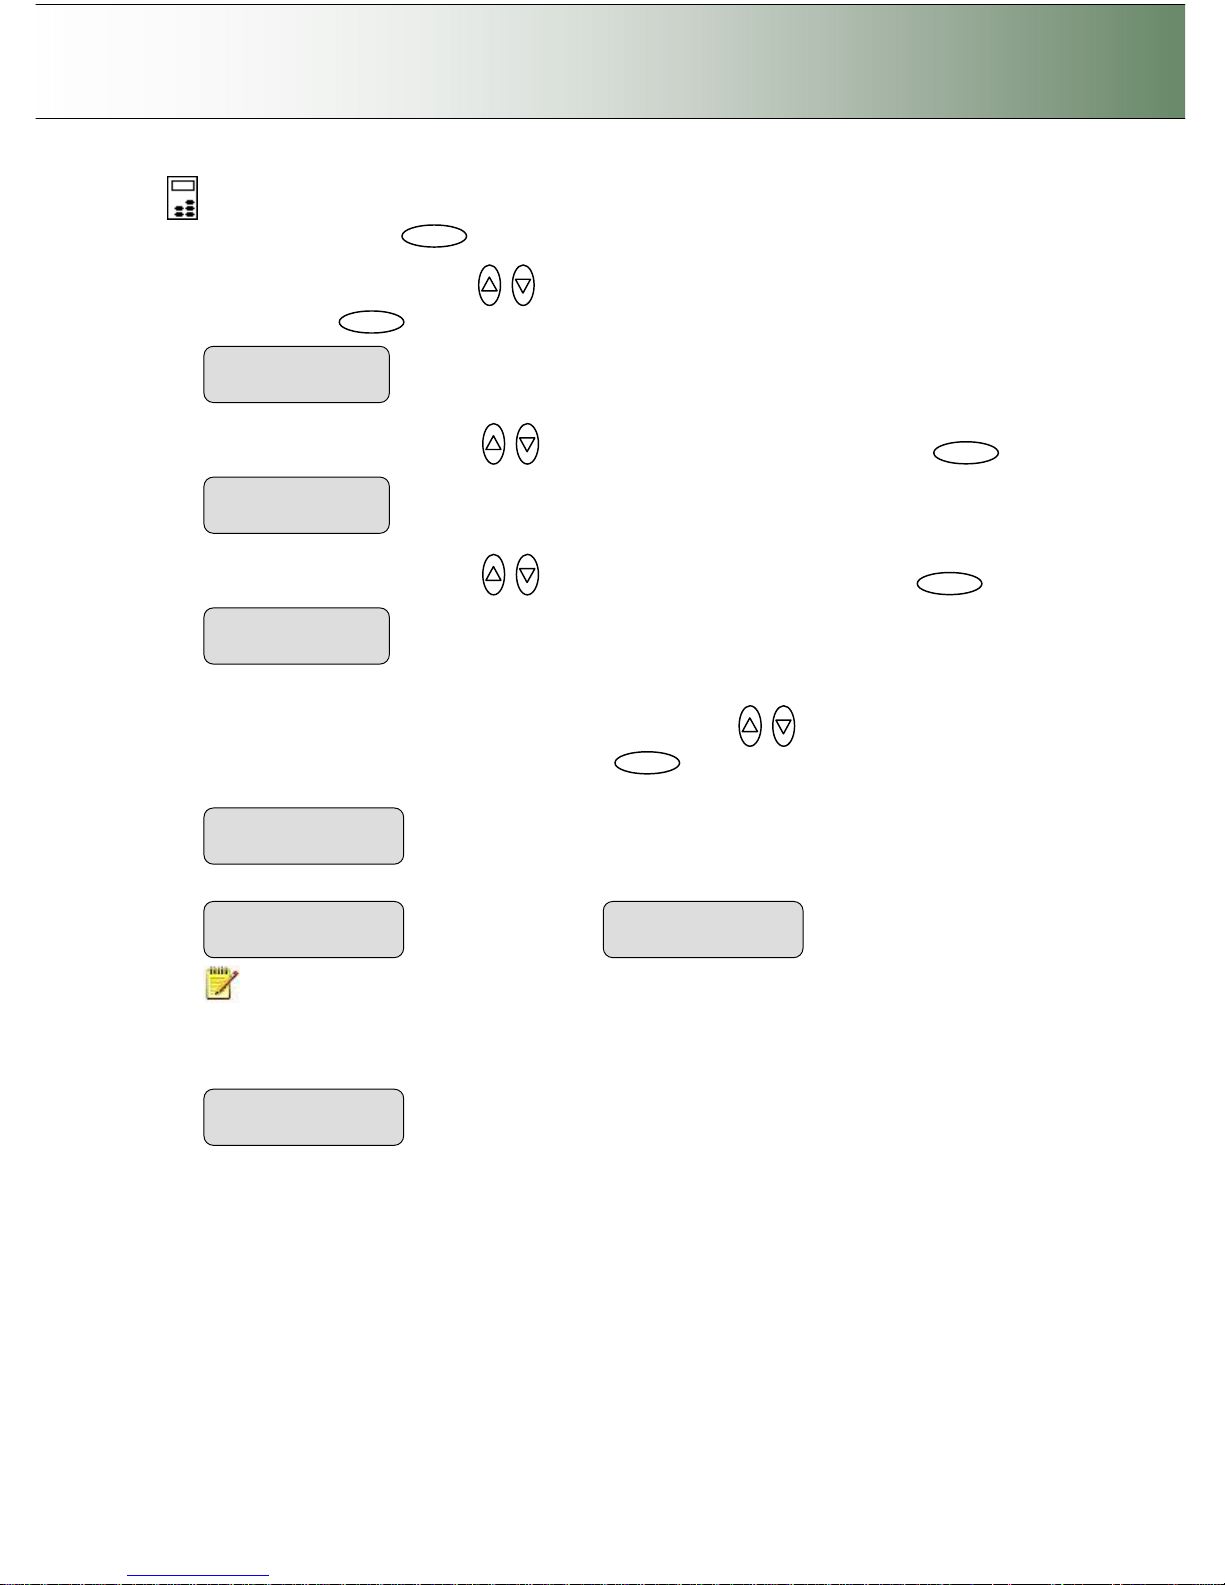
Configuration and Setup 3-29
On the iJET Panel
1. Select the Menu button.
2. Use the arrow button up or down until the display window shows Advanced and confirm with
the Enter button .
3. Use the arrow buttons up or down until the display shows Options and confirm with .
4. Use the arrow buttons up or down until the display shows Timer and confirm with .
5. You can set the wake up and sleep times for each day. Each day contains a submenu where Wake-
up and Sleep times can be set. Use the arrow buttons up or down and Enter to move through
the days and to set the times. Confirm always with .
NOTE: AM or PM must be selected if the AM/PM option was selected under Advanced ->
Options -> Time and Date -> Time Format.
6. If you enable the Link Monday to Friday option, setting only for Monday will automatically set all the
other weekdays (not the weekend) to the same wake-up and sleep times. The default is “No”.
>Monday
…
> Link Mon. To Fri.
>Yes
Wake-up Time
> 08:00
Sleep Time
> 17.00
Enter
> Timer
Enter
> Advanced
> Options
Enter Menu Enter
Page 42
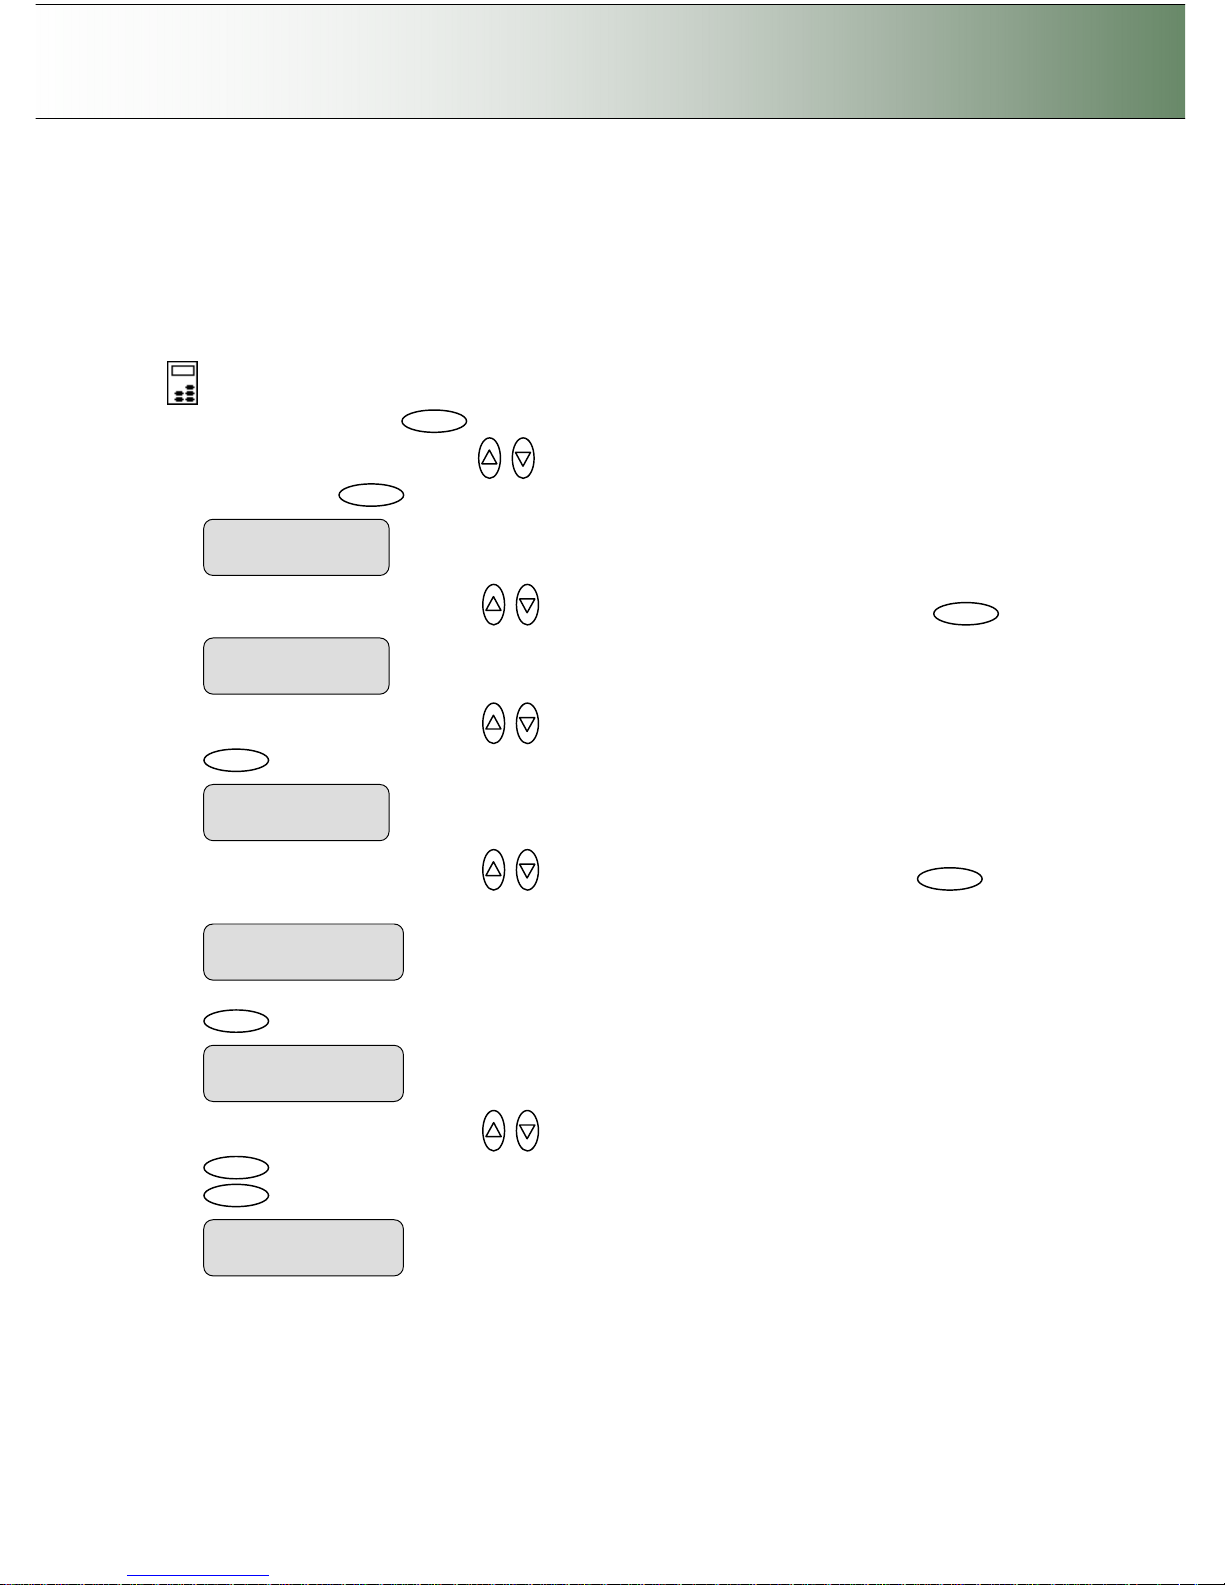
Configuration and Setup 3-30
3.12.2 Setting the Sleep Mode Preferences
On scanners: FLEX50i, HD4230i
The Sleep Mode option is for setting the scanner to enter Sleep Mode automatically after a user-defined
idle time. This is an Energy Saver feature. This automatic sleep functionality is additional to the Timer
clock function described above.
On the iJET Panel
1. Select the Menu button.
2. Use the arrow button up or down until the display window shows Advanced and confirm with
the Enter button .
3. Use the arrow buttons up or down until the display shows Options and confirm with .
4. Use the arrow buttons up or down until the display shows Sleep Mode and confirm with
.
5. Use the arrow buttons up or down until the display shows Sleep and confirm with .
.
6. Set to Yes with the arrow buttons if you want the scanner to use the Sleep Mode option. Confirm with
.
7. Use the arrow buttons up or down until the display shows Sleep Delay and confirm with
. Use the arrow buttons again to change the delay value (default = 15 minutes). Confirm with
.
Enter
Sleep
> No
Enter Enter
Sleep Delay
>15
Sleep
> Yes
Enter
> Sleep Mode
…
Enter
> Advanced
…
> Options
…
Enter Menu Enter
Page 43
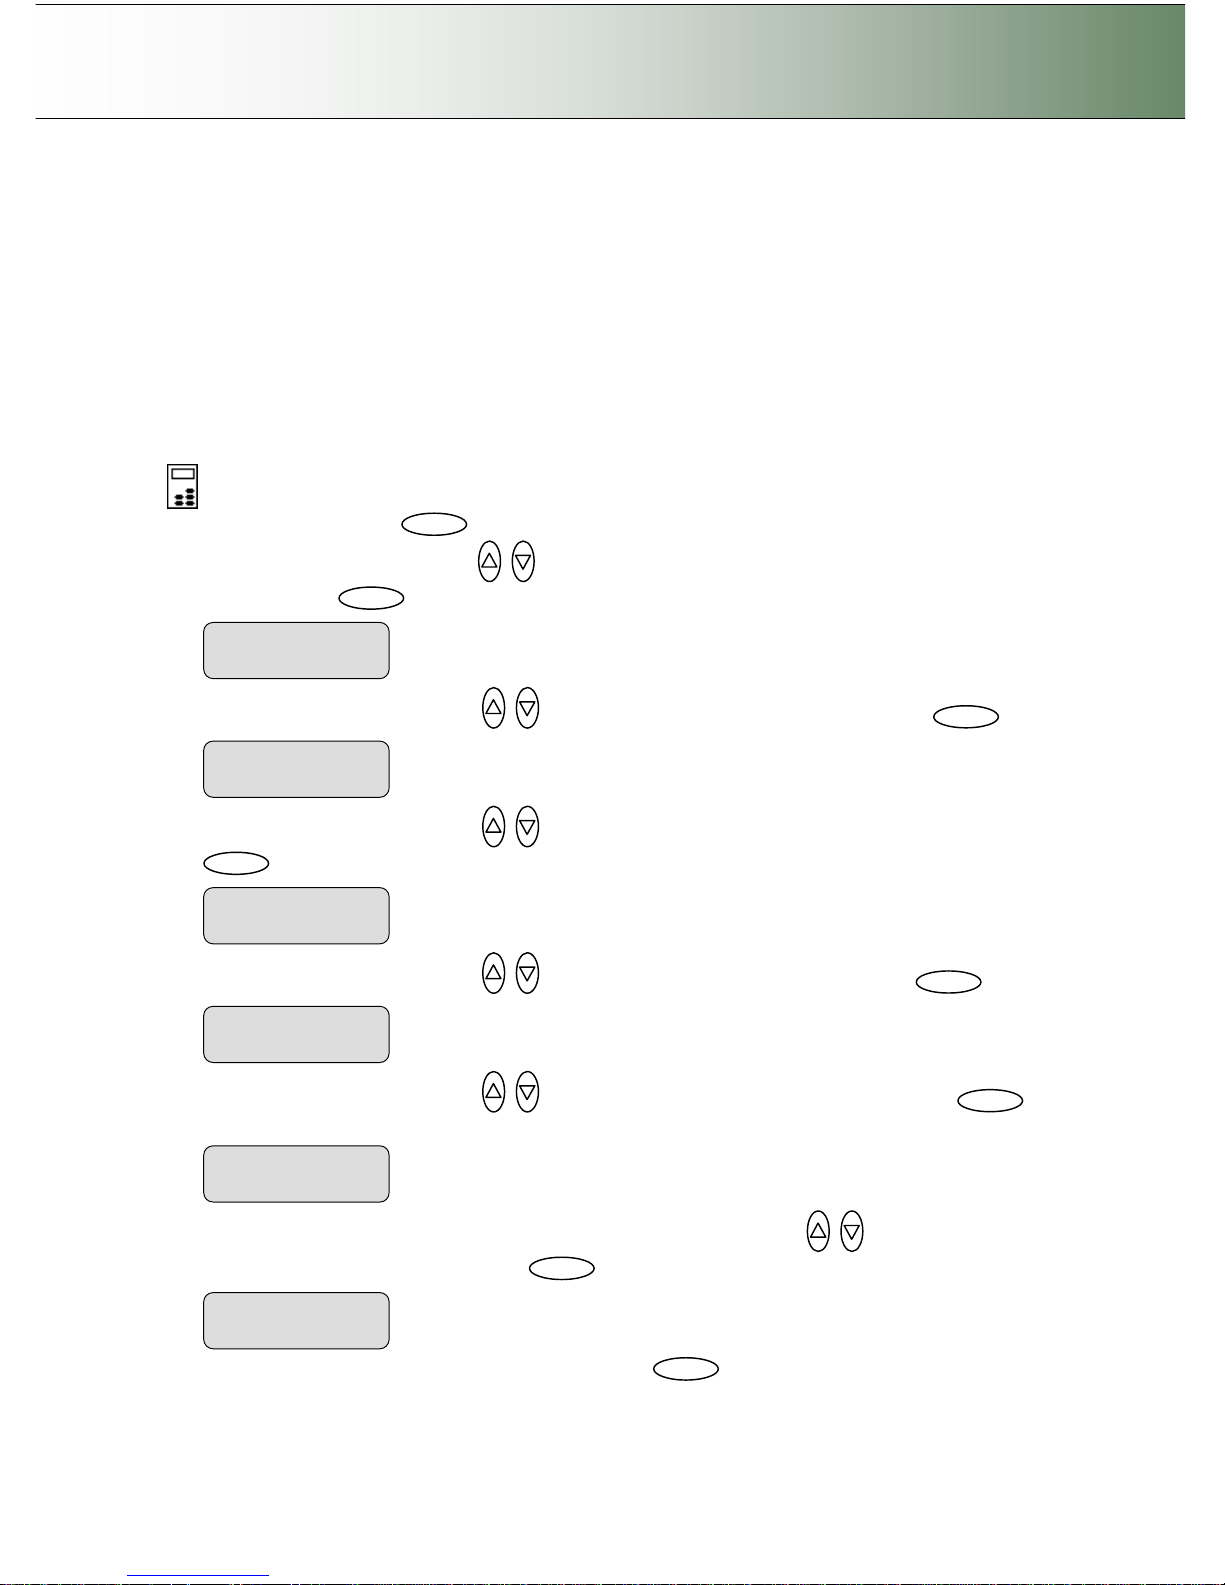
Configuration and Setup 3-31
3.12.3 Setting the Lamp Power Preferences
On scanners: FLEX50i
This option is for the flatbed scanners and lets you determine if you want the lamp to automatically go on
only when it is needed for scanning or to stay on permanently (while the scanner is on), also when the
scanner is idle. With some color printing jobs, you may want to have the lamp always on to ensure color
stability. It is recommended to use the “Always On” setting only if you notice problems (slight color shade
stripes) in the printout and otherwise use the “Automatic” lamp on/off functionality. You can also use an
on/off delay factor.
To set the lamp to remain always on:
On the iJET Panel
1. Select the Menu button.
2. Use the arrow button up or down until the display window shows Advanced and confirm with
the Enter button .
3. Use the arrow buttons up or down until the display shows Options and confirm with .
4. Use the arrow buttons up or down until the display shows Scanner Setup and confirm with
.
5. Use the arrow buttons up or down until the display shows Lamp and confirm with .
6. Use the arrow buttons up or down until the display shows Always On and confirm with
.
7. To control on/off with a delay factor - Use the arrow buttons up or down until the display
shows Use lamp delay and confirm with .
8. Set a Lamp Delay factor (0-256) and confirm with enter
Enter
Lamp
> use lamp delay
Enter
Lamp
> Always On
Enter
> Scanner Setup
Enter
Lamp
> Automatic
Enter
> Advanced
> Options
Enter Menu Enter
Page 44
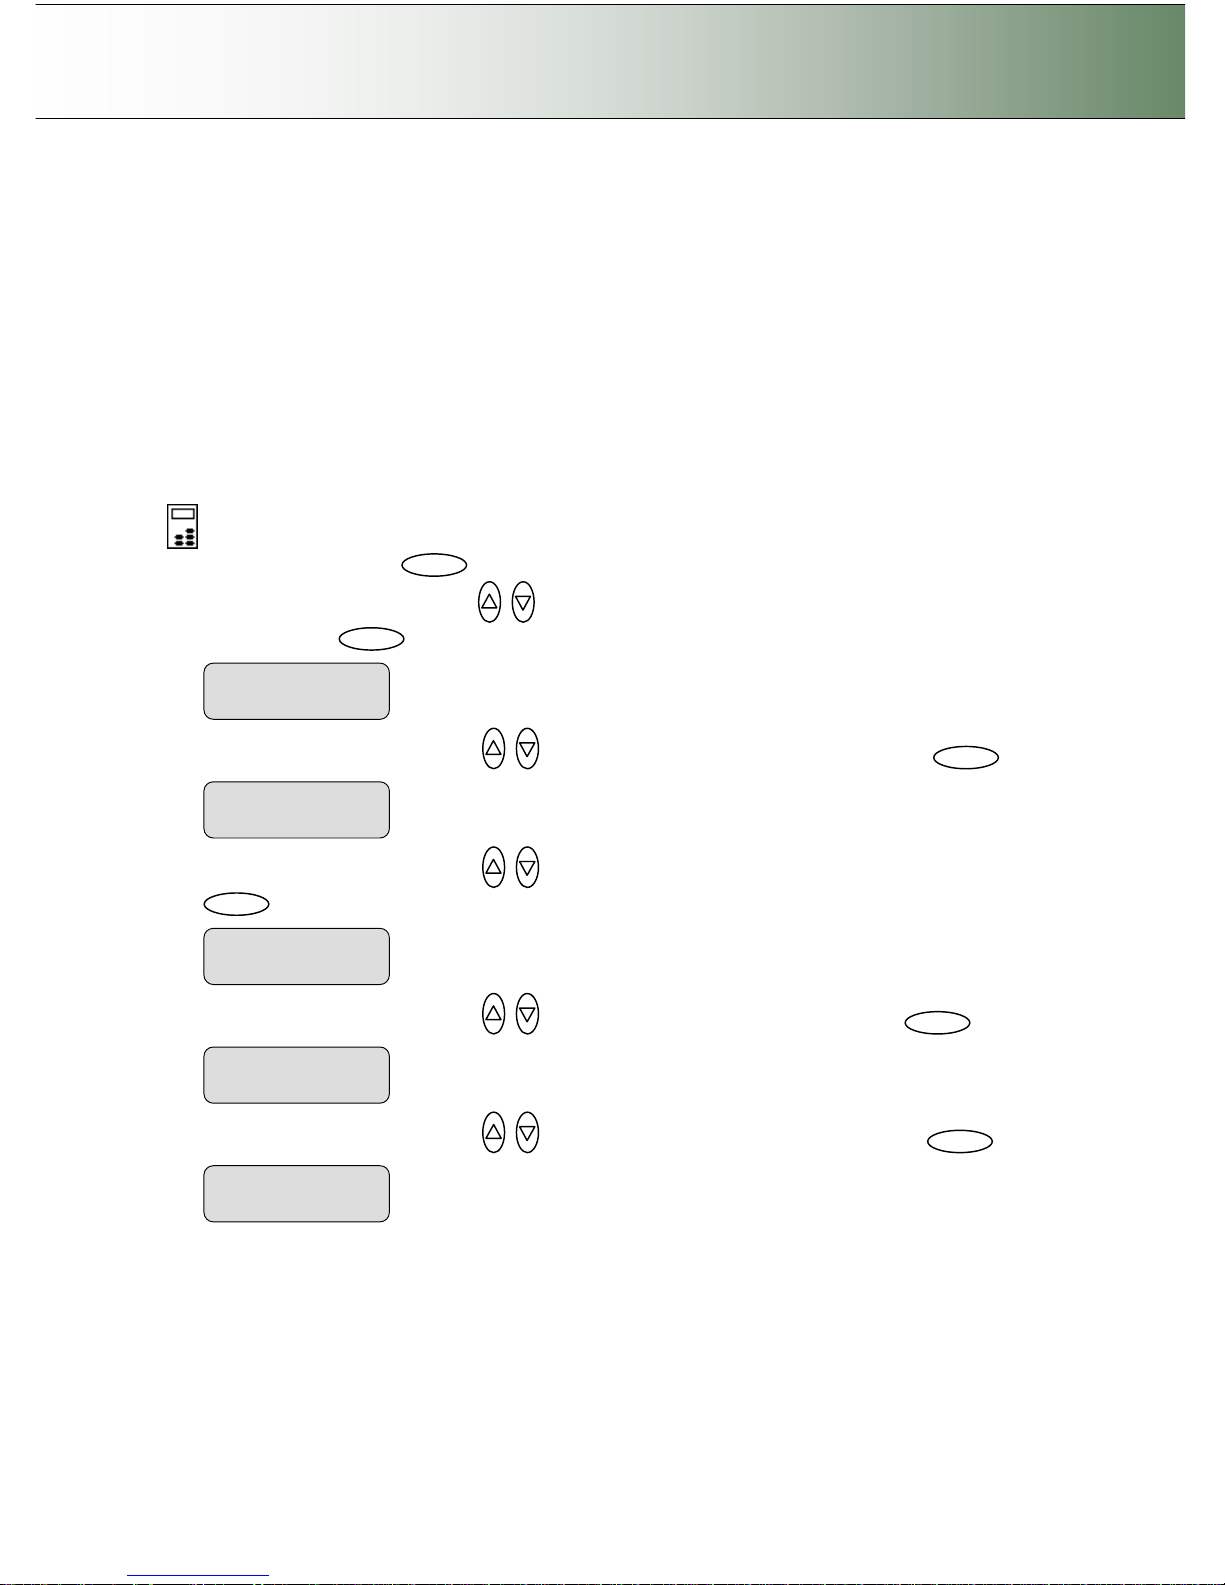
Configuration and Setup 3-32
3.12.4 Setting Accuracy Lens Enhancement (ALE)
On scanners: FLEX50i, HD4230i
Accuracy Lens Enhancement Technology (ALE) is a feature in the scanner that electronically maintains
precision across any two points of the scan line for meeting strict accuracy requirements. The option
should be enabled for scanning tasks that require a high level of precision such as the precise capture of
scaled maps and CAD drawings.
In rare cases, when scanning originals printed with raster, the ALE function can create interference that
will appear as bands in the output. This effect will be amplified if the sharpen filter is also applied with the
scan. In these cases it is recommended to disable sharpening, ALE or both.
To set the ALE mode:
On the iJET Panel
1. Select the Menu button.
2. Use the arrow button up or down until the display window shows Advanced and confirm with
the Enter button .
3. Use the arrow buttons up or down until the display shows Options and confirm with .
4. Use the arrow buttons up or down until the display shows Scanner Setup and confirm with
.
5. Use the arrow buttons up or down until the display shows ALE and confirm with .
6. Use the arrow buttons up or down until the display shows Enable and confirm with .
ALE
> Enable
Enter
> Scanner Setup
Enter
ALE
> Disable
Enter
> Advanced
> Options
Enter Menu Enter
Page 45
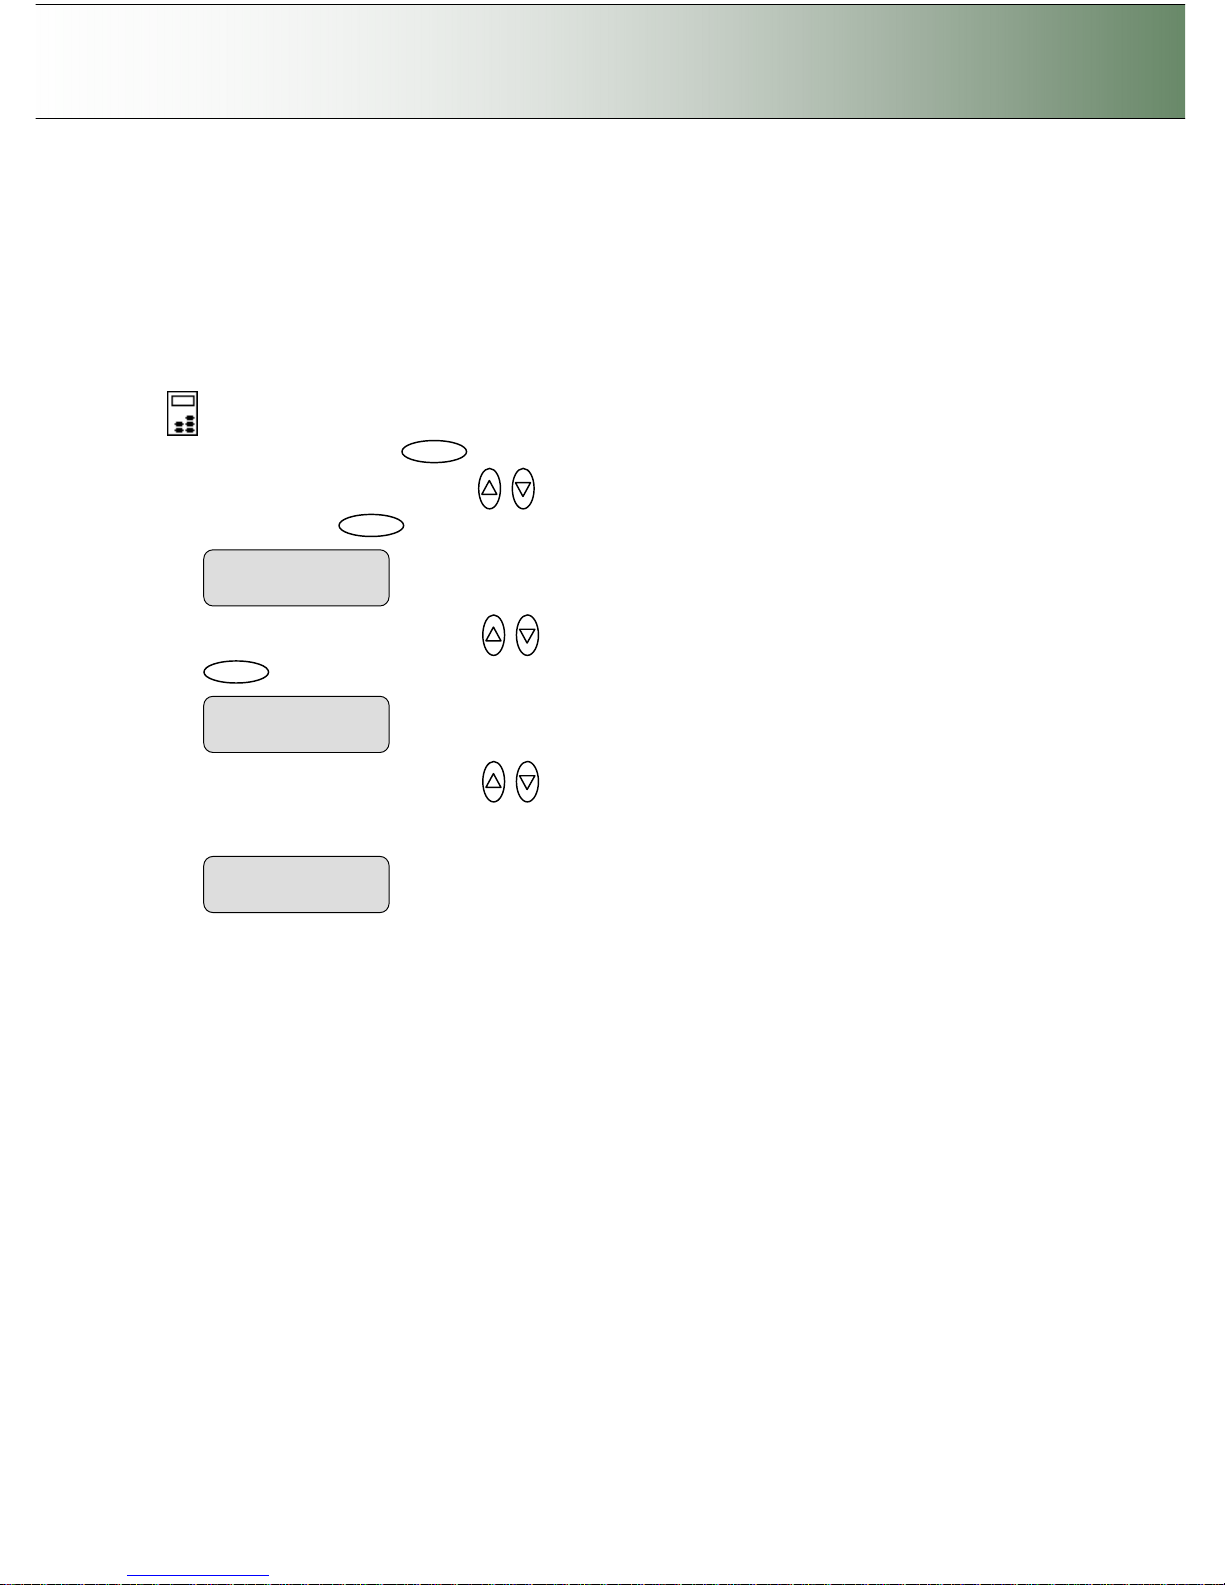
Configuration and Setup 3-33
3.12.5 Viewing Scanner Device Information
On scanners: FLEX50i, HD4230i
This option lets you view information about the scanner device and important configuration values in
relation to the network. A number of the options are useful when seeking service. The Scanner
Information option is only for viewing values and not for changing them.
To view scanner information:
On the iJET Panel
1. Select the Menu button.
2. Use the arrow button up or down until the display window shows Advanced and confirm with
the Enter button .
3. Use the arrow buttons up or down until the display shows Scanner Info and confirm with
.
4. Use the arrow buttons up or down to display the different information values such as Scanner
Name (on network), the scanner’s IP Address, firmware release, scanner Serial Number, Service ID
and more. You can only view the Scanner Information values – you can not change them.
> IP Address
10.10.4.
111
> Advanced
> Scanner Info
Enter Menu Enter
Page 46
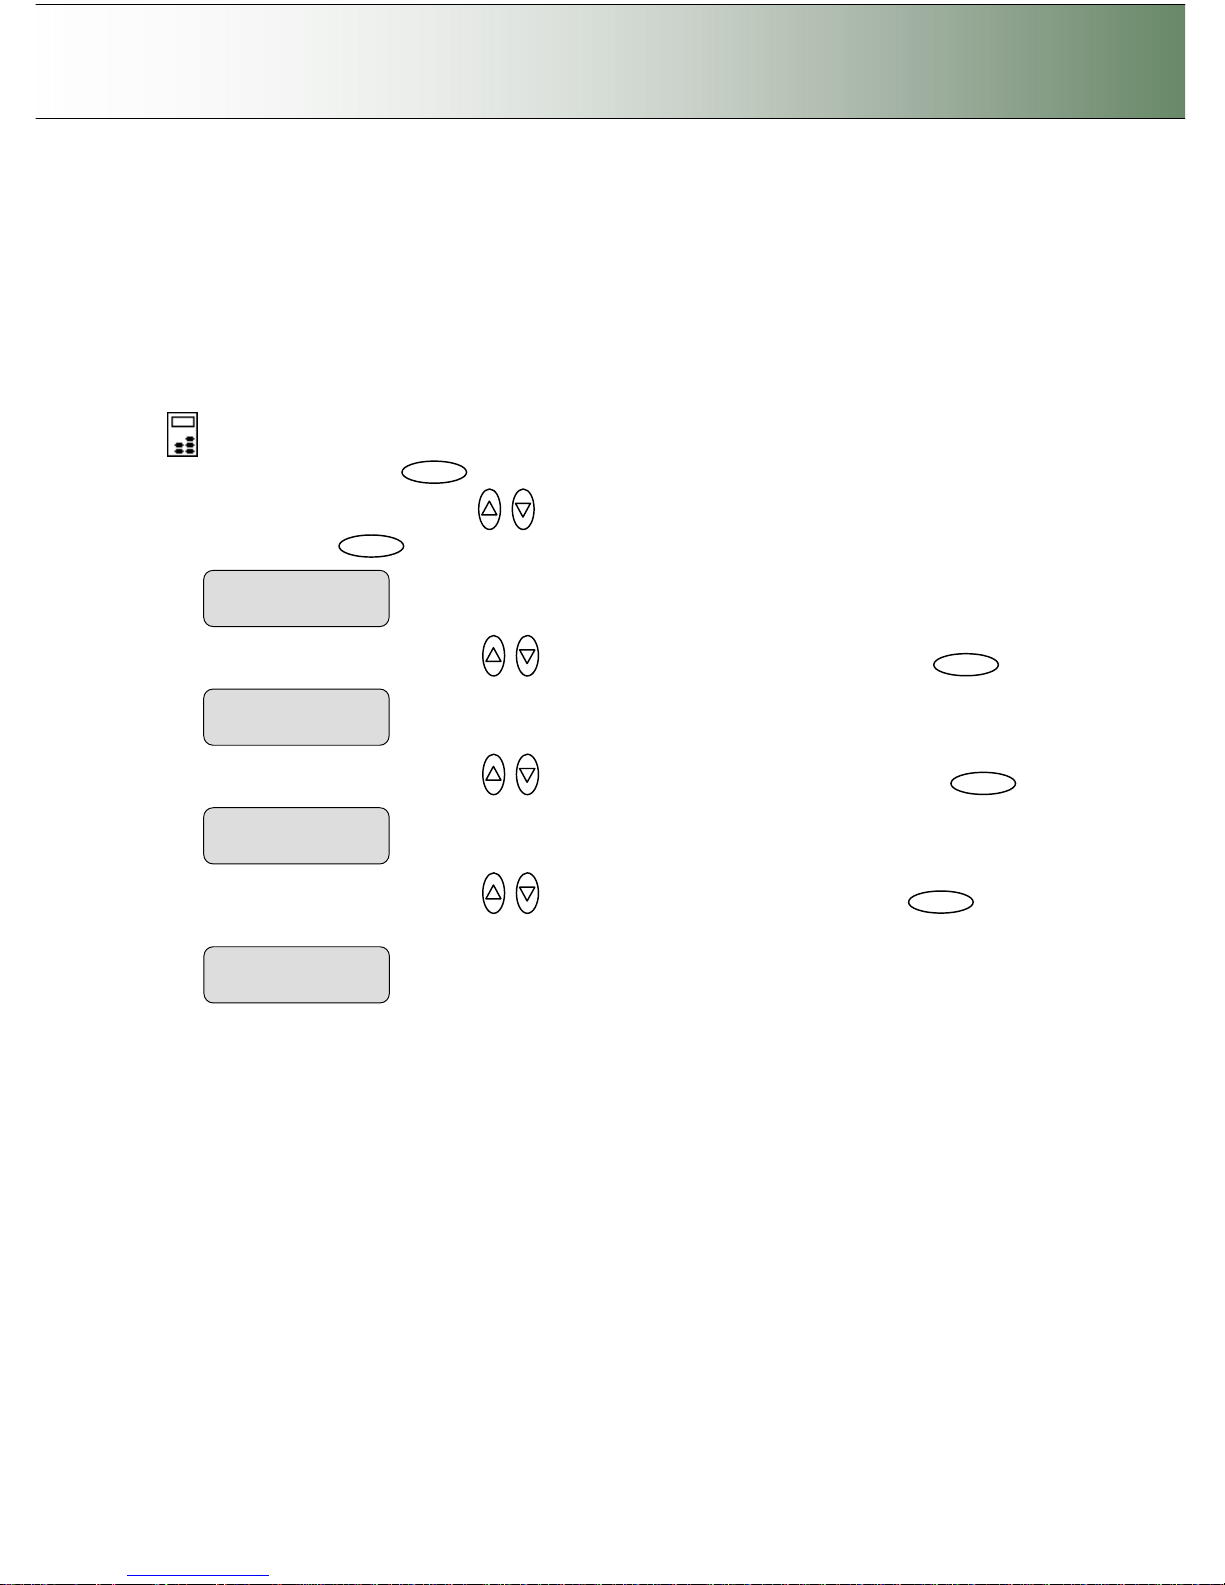
Configuration and Setup 3-34
3.12.6 Accessing the Scanner’s Internal Hard Disk
On scanners: FLEX50i, HD4230i
Your scanner is equipped with an internal hard disk (storage space) that is used by the scanner for rapid
processing. The Web Access Interface (see section in this User’s Guide) enables you to scan to this hard
disk and then retrieve the scanned file for further processing on a PC. The option Hard Disk is for
performing simple tasks and gaining information related to the scanner’s internal hard disk.
To access the scanner’s internal hard disk:
On the iJET Panel
1. Select the Menu button.
2. Use the arrow button up or down until the display window shows Advanced and confirm with
the Enter button .
3. Use the arrow buttons up or down until the display shows Options and confirm with .
4. Use the arrow buttons up or down until the display shows Hard Disk and confirm with .
5. Use the arrow buttons up or down to browse through the options available and to
activate them. You can view the hard disk size, and manipulate files on the disk.
Enter
> Disk Size
Xxx/xxx
> Hard Disk
Enter
> Advanced
> Options
Enter Menu Enter
Page 47
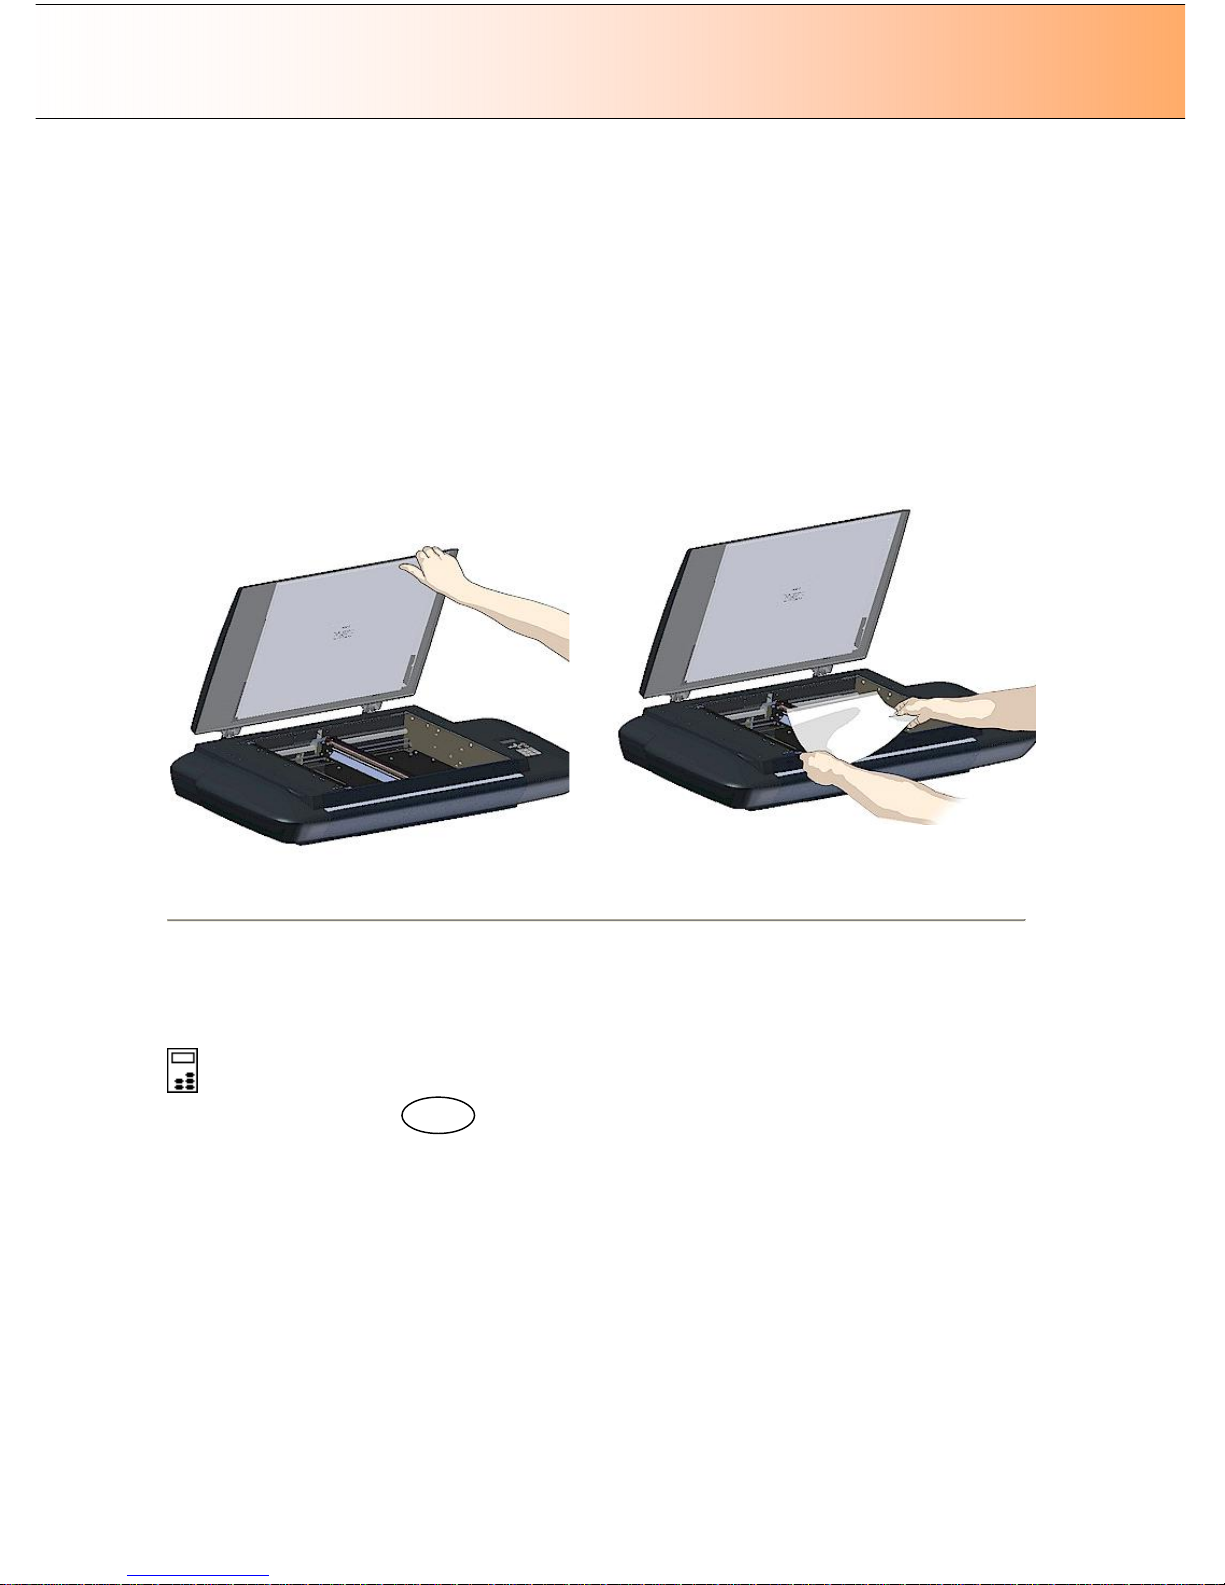
Using the scanner, how do I … Load? 4-1
4. Loading Originals for Copying and Scanning
4.1 How do I Load Originals into the Scanner?
On Scanners: FLEX50i
To load an original into the scanner:
1. Open the lid backwards.
2. Place your document, face down, on the glass plate.
3. Align the document edges against the alignment guide bar at the scanner’s left side for a straight
scan. Align the document middle with the center arrow marking on the alignment bar. You can use
the standard size markings to position the original and measure its standard size.
4. Close the lid over the document.
Open the scanner lid
Place the original face down on the glass plate.
Loading Originals
On Scanners: HD4230i
You can use manual loading or automatic loading. To select your loading method:
On the iJET Panel
1. Select the Menu button.
2. Use the arrow buttons right/left until the iJET Panel displays Paper Setup and confirm with the OK
button.
3. Use the arrow buttons right/left until you reach Media Handling and confirm with OK
4. Use arrows down/up to select the load method – Auto Load or Manual Load. Confirm with OK.
5. With Auto Load you can select a delay factor if the document is grabbed too fast. Press arrow right to
reach Load Delay and arrow down/up to set a delay factor between 0-1000.
How do I load the scanner with …
Manual loading - you determine when the scanner pulls in the original:
1. Align the original’s center with the scanner’s center arrow guide marker.
2. Push the original into the insertion slot until you feel it contact the rollers.
Menu
Page 48
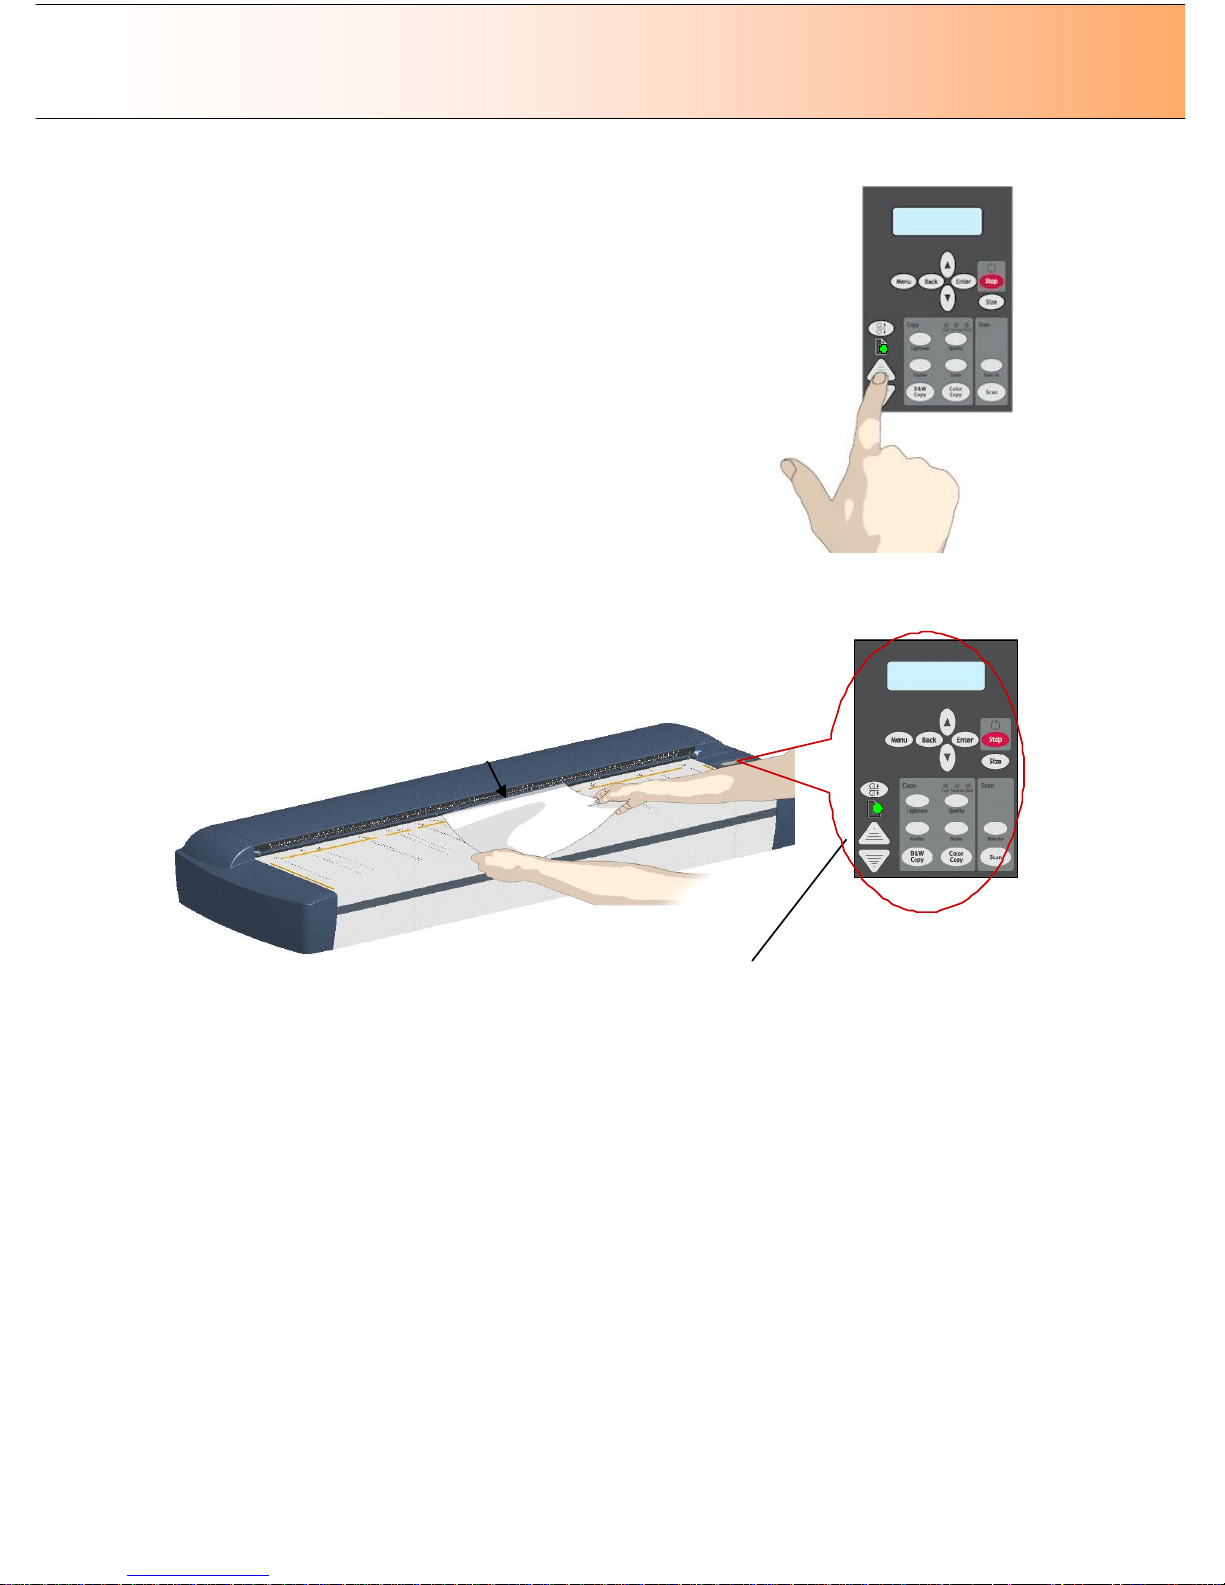
Using the scanner, how do I … Load? 4-2
3. The Paper Ready LED lights green (yellow for thick media) when the
original is positioned correctly for a straight scan path.
4. While holding the original in place with one hand, use the other hand
to press and hold down the Paper Forward button on the scanner.
5. The original moves into the start-scan position.
Automatic loading - the scanner takes the original as soon as you
insert it in the paper slot. Automatic loading is reliable for most jobs and
especially useful for batch scanning jobs.
1. Align the original’s center with the scanner’s center arrow guide
marker.
2. Push the original into the insertion slot until you feel it contact the
rollers.
3. The Paper Ready LED lights green (yellow for thick media) when the
original is positioned correctly for a straight scan path.
4. The scanner will grab the original automatically and move it into
start-scan position.
Feed the original at the scanner’s
center
Paper ready
LED
lights green when paper is engaged.
Press the paper forward button
Page 49
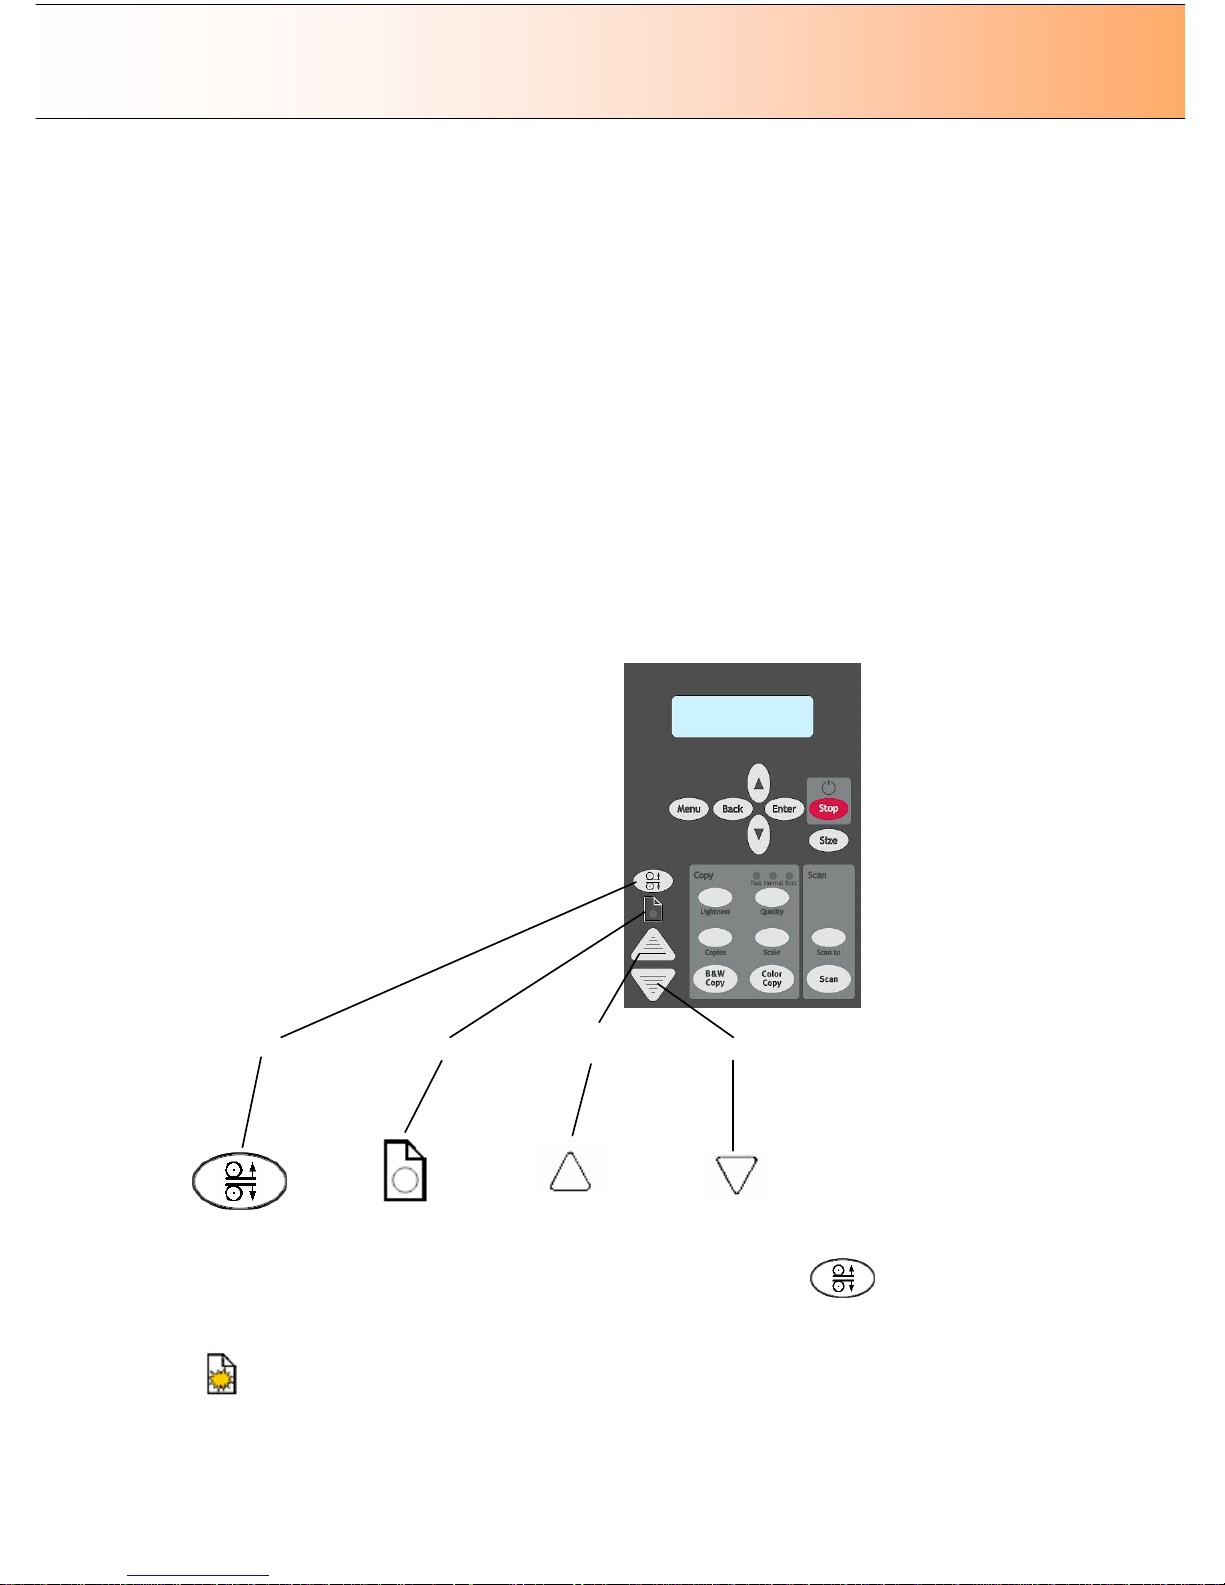
Using the scanner, how do I … Load? 4-3
4.2 Loading and Scanning Thick Media
You may need to digitize or copy images printed or pasted on thick media such as cardboard,
foamboards, gatorboards etc.
On Scanners: FLEX50i
Your flatbed scanner can accommodate originals up to 1,5” ( 38 mm,) thick while still allowing you to close
the cover. You can also scan very thick originals by placing the original on the scanner bed and leaving
the cover open.
On Scanners: HD4230i
These scanners support Automatic Thickness Adjustment Control (ATAC). There is an ATAC key on the
iJET Panel. You use the key to raise and lower the pressure-platen. You can change the insertion slot
size (pressure-platen height) on your scanner from 2mm to 15 mm (up to 0.6”). Originals up to 2mm thick
should be scanned with the pressure platen all the way down (normal position). Thicker originals will
require you use the ATAC key to adjust for thick media.
ATAC Key
Paper Ready Indicator
Paper Forward
Paper Reverse
Panel on Models
HD4230i
–
ATAC and paper feed buttons
Adjusting the insertion slot for thick media with ATAC:
1. Press the ATAC key on your iJET Panel to set the scanner in ATAC mode.
2. The Paper Ready Indicator blinks yellow indicating the scanner is in ATAC mode but not yet ready,
i.e., the pressure-platen is not yet positioned on the thick original.
Page 50
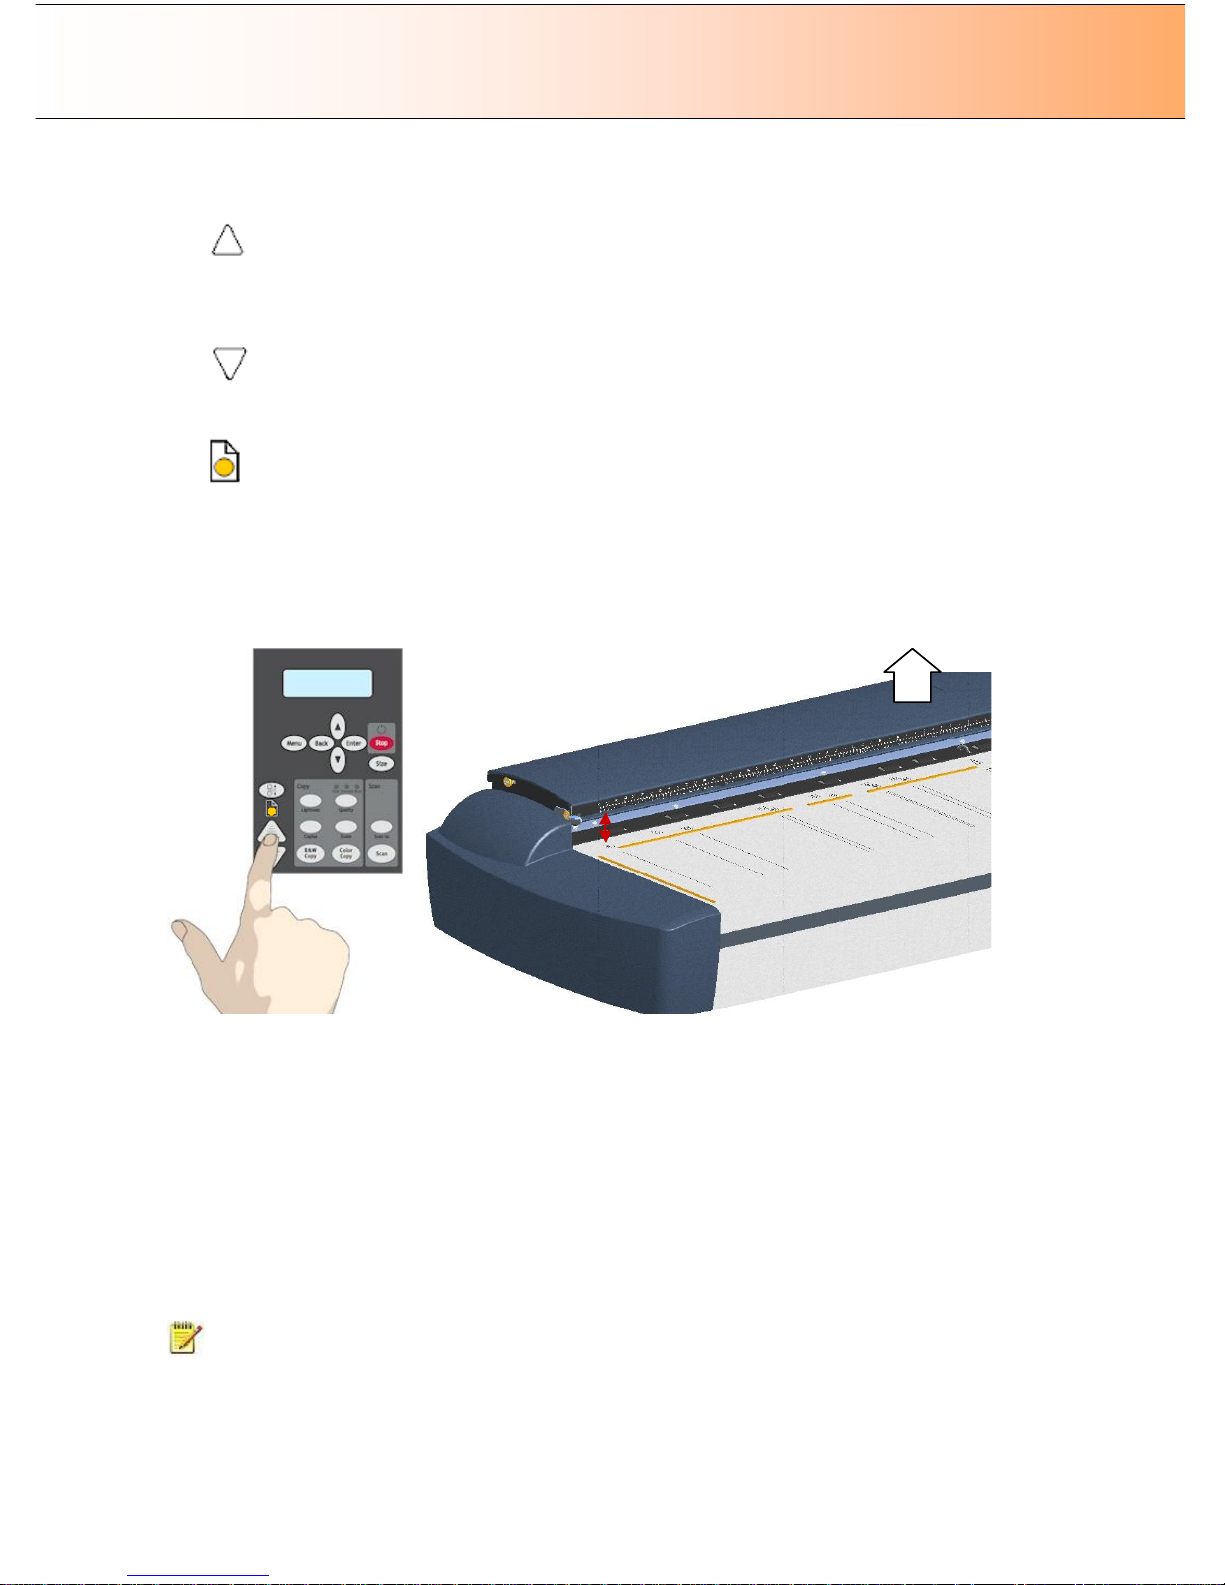
Using the scanner, how do I … Load? 4-4
3. Press and hold the Paper Forward key (arrow up) key to raise the pressure-platen until there is room
to insert the thick original.
4. Insert the thick original evenly for a straight scan path.
5. Press and hold the Paper Reverse (arrow down) key to lower the pressure-platen until the pressureplaten stops on its own.
6. The Paper Ready indicator will turn yellow (stop blinking) when the pressure-platen is positioned
correctly and is ready for thick media scanning.
7. Once the thick original is loaded, the scanner will automatically leave the ATAC mode, which means
that the Paper Forward and Paper Reverse keys will return to their normal functionality for moving the
original forwards and backwards.
8. It is important to help support the thick original during scanning - both at the entrance side and the
exit side of the scanner.
Raise t he
Pressure Platen
- Press and hold
the Paper Forward
key (arrow up) key to raise
the pressure-platen
and create a larger
insertion space..
About Thick Media Settings and Auto Adjustment
On scanners: HD4230i (not relevant on flatbed models)
Scanner’s Auto-adjustment – only in the Normal position.
The scanner employs an automatic self-adjustment procedure (light profile, stitching etc.) that can only
auto-activate when the scanner is in the Normal position. With prolonged scanning in extended thickness
settings, you should from time to time return the scanner to its Normal position to allow it to self-adjust.
This will ensure refreshed self-adjustment and optimal performance of your scanner. Make a habit of
always setting the scanner in the Normal position when shutting down, so it can auto-adjust the next time
you turn it ON.
NOTE: The scanner runs at its optimal speed in the Normal position. To allow stable drive handling,
scanning speed is automatically reduced when the scanner is in the extended thickness positions.
Stitching Offsets – stitching correction when scanning thick media:
Page 51
Using the scanner, how do I … Load? 4-5
On scanners: HD4230i (not relevant on flatbed models)
About Camera Stitching
During scanning, stiff media will often not be pressed completely flat against the scanner’s glass-plate and
this can affect the scanner's automatic control of border lines between the cameras – also called
“Stitching”.
Normally, only stiff media will affect stitching. A flexible media will usually be stitched correctly regardless
of its thickness and will not require you to make these adjustments. However, any stiff media, thick or thin
will usually require setting these options to ensure correct stitching between each scanner camera.
To Adjust Camera Stitching:
1. Adjust the insertion slot to accommodate your thick or normal thin yet stiff media as described in
the section Adjusting the insertion slot for thick media with ATAC.:
2. Load the original you wish to scan.
3. Select either the "Use offsets for thick media" option or the "Use offsets for thin media" option.
Thick media is defined as media thicker than 2mm (0.08") and requires you to raise the scanner
insertion area top for scanning. See below under To set the Stitching Offset value options
through the iJET panel for instructions on reaching the options in the panel.
4. Make a test scanning. Bulky stiff media needs to be supported with both hands on
its way in and out of the scanner.
5. Stitching errors will be easiest to see on an image with one or more clear diagonal
lines. If the lines seem uneven, you will need to make adjustments.
6. Change the Offset value in the edit fields for each of the scanner's pair of cameras Camera A-B,
Camera B-C and Camera C-D). Normally, only positive values should be used. See below under
To set the Stitching Offset value options through the iJET panel for instructions on reaching the
options in the panel.
7. Make test scans or previews and readjust the values until you
are satisfied that the lines are stitched correctly.
To set the Stitching Offset value options through the iJET panel
On the iJET Panel
1. Select the Menu button.
2. Use the arrow button up or down until the display windows shows Advanced and confirm with the
Enter button .
3. Use the arrow buttons up or down until the display shows Options and confirm with .
4. Use the arrow buttons up or down until the display shows Scanner Setup and confirm with
.
5. Use arrows down/up until the display shows Stitch. Offsets and confirm with .
6. Your display should look like this (the actual text to the right of the “>” will show the current setting
for the option and may be different than the one shown below).
Enter Enter Enter
Menu
Enter
Page 52

Using the scanner, how do I … Load? 4-6
7. Use arrows down/up to reach and set the Use thin originals option or the Use Thick Originals
option as described above under To Adjust Camera Stitching - step 3. Confirm with enter.
8. Use arrows down/up to reach and set each Camera-pair stitching offset value as described
above under To Adjust Camera Stitching -step 6. Confirm with enter.
Enter
Enter
Menu option item
Current setting for option item
Stitch Offsets
>
Camera A
-
B
Page 53
Using the scanner, how do I … Copy? 5-1
5. How do I Make a Copy?
5.1 Copy Using the iJET Panel – The Basic Steps
Once the scanner is set up and configured to the needs and standards of your business, it becomes as
simple to use as a conventional office copy machine. By “setup and configured” we mean that iJET Panel
menu options such as original types and paper types are determined and set.
On scanners: FLEX50i, HD4230i
To make a copy:
1. Load the original into the scanner.
See the section “How do I load originals?” for information regarding your specific scanner
model.
2. Set the Size of your original
The value your set here determines the scan area. Usually this would be the size of the original
unless you wish only to input a portion. Press the Size button to activate size setting.
You then change the value each time you again press the Size button or with
the arrow up/down buttons .
NOTE: About the Size value: Size is a global system variable that can be changed in 3 different
ways: 1. With the Size button 2. With the Menu button > Size option and 3. With the Scan-to button >
Size option. This means that when you change the size for a copy job, it will also apply for a scan-tofile job and vise versa until you change it again.
3. You can select Auto detection or a standard size setting. Auto will detect the edges of the original and
set the scan area to the full original size. Press
Enter
to confirm your setting.
4. Apply Copy Output Settings
The iJET Panel offers quick buttons for common copy output settings. Apply one or more of these if
needed. Otherwise, go to the last step where you start copying with the current settings.
Detailed Instructions on using each of these buttons plus other copy options accessed through
the Menu button follow in this “how do I…Make a Copy?” section.
5. Press the appropriate copy button.
Press the B&W Copy button for B&W copy jobs.
Press the Color Copy button for color jobs.
Size
Change the value (Auto or a standard size) and
press
Enter
to confirm.
Size
> Auto
Color
Copy
B&W
Copy
Size
Scale
Copies
Quality
Lightness
Page 54
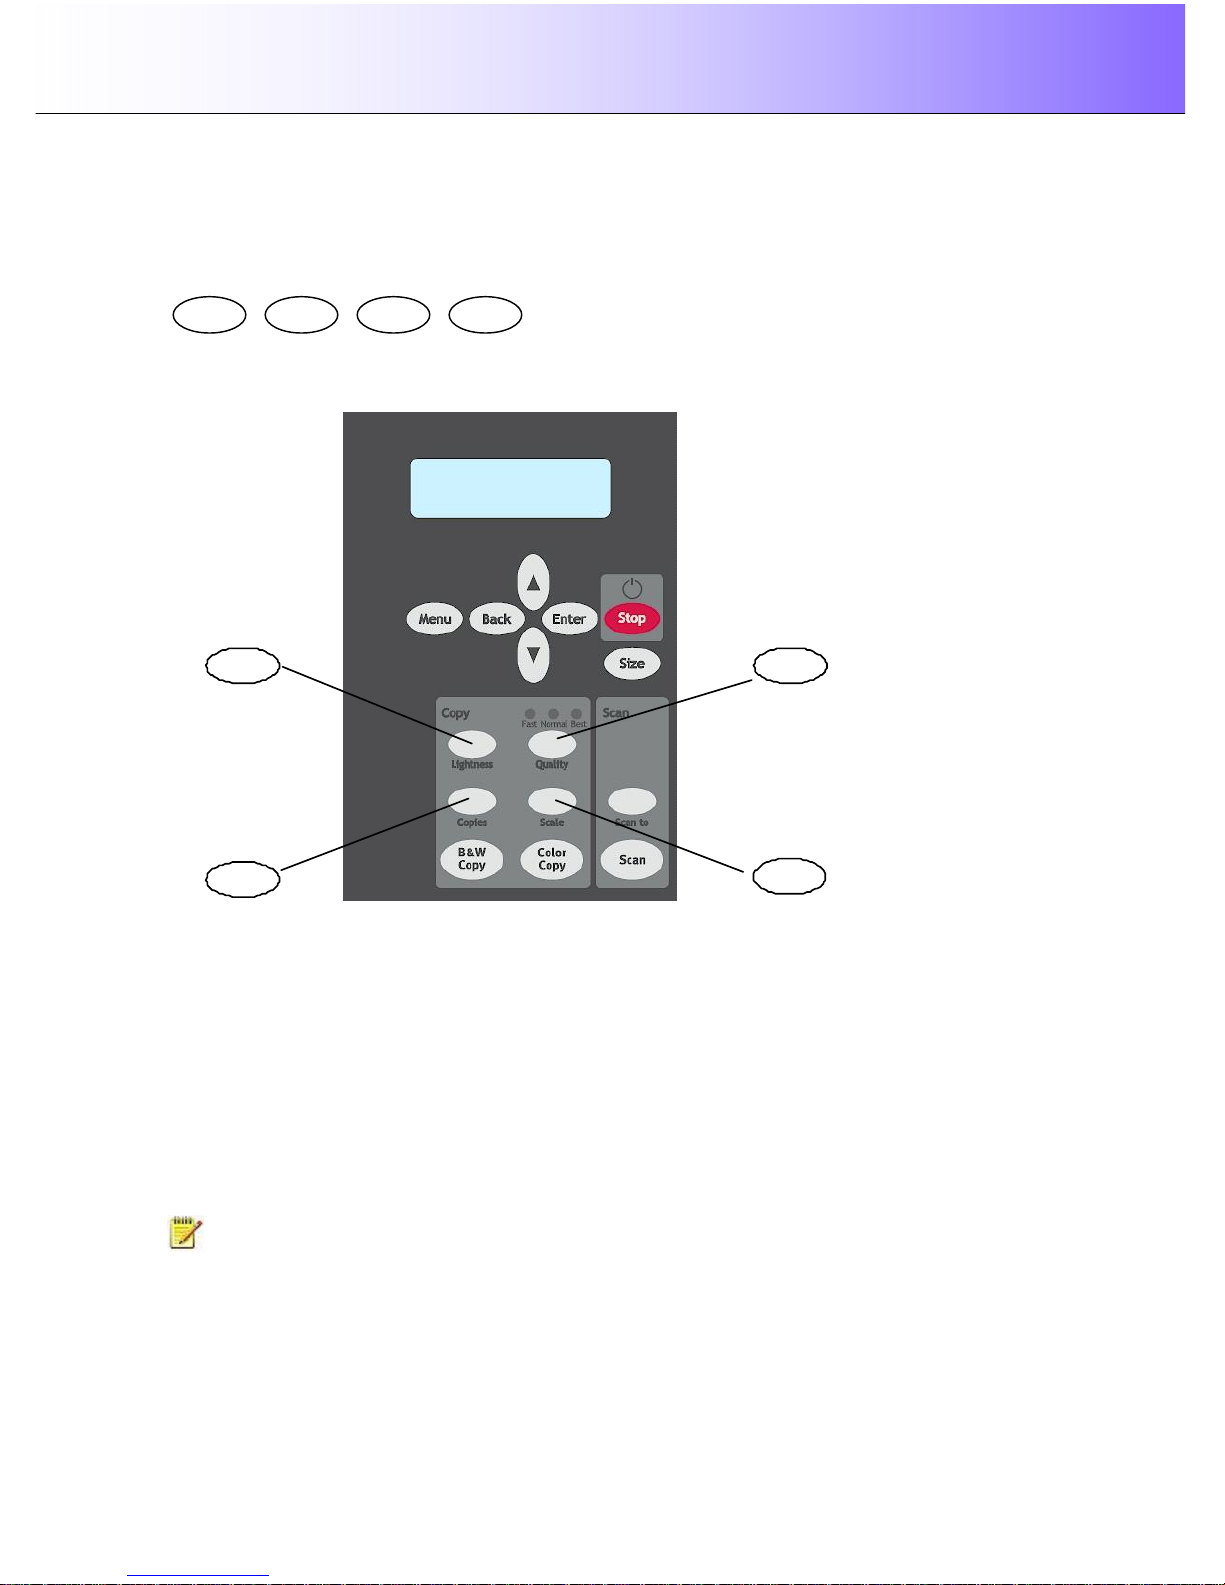
Using the scanner, how do I … Copy? 5-2
5.2 Main Copy Options - Quick buttons
This section describes the main copy options you can set with the iJET Panel’s quick buttons. The buttons
are:
Lightness
Copies
Quality
Scale
The buttons Lightness, Copies, Quality and Scale are shortcuts into the iJET Panel Menu system to
options you can reach through the Menu button. This means that each of the copy functions described in
this section (copy image Lightness, copy Quality, number of Copies and Scale – output size in relation to
the original ) can be set both by pressing the corresponding Quick button and by entering the Menu and
navigating to the function.
There are additional copy options in the Menu that are not accessible through quick buttons and can only
be reached and set by way of the Menu button. These are Org. Types, Sharpen, Background Clean,
Media Type, Mirror, reset and Advanced. These copy options will be described in the next section “Other
Copy Options – Menu Button.
NOTE: The panel shown above is one the FLEX50i models. The panel on the HD4230i models
contains all the same copy and scan functionality buttons and additionally also contains ATAC and paperfeed buttons on its left side.
Scale
Copies
Quality
Lightness
Page 55
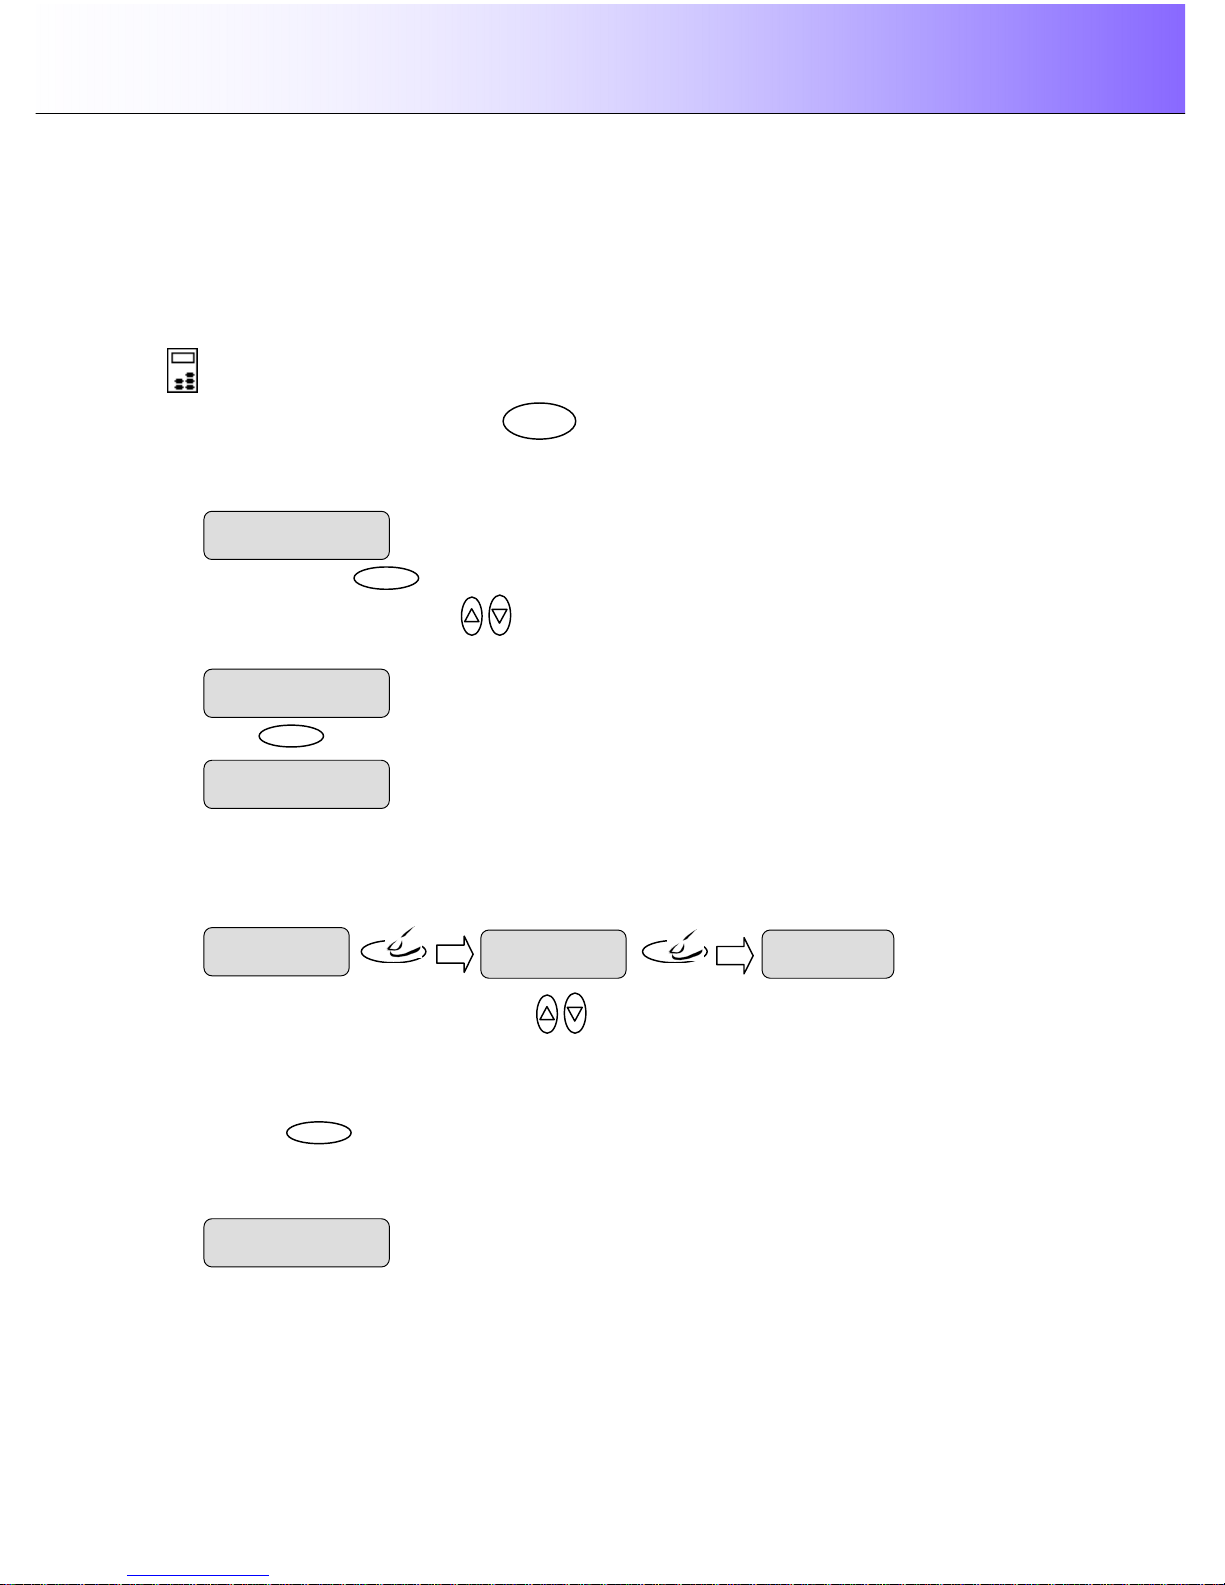
Using the scanner, how do I … Copy? 5-3
5.2.1 How do I… Set Copy Lightness?
You can change the Lightness value to make the copy lighter or darker and compensate for dull or faded
originals. The default Lightness value is set to zero which works well with most documents. Values +1 to
+6 will make the copy lighter in relation to the original and values -1 to -3 will make the copy darker in
relation to the original.
To set the copy Lightness value:
On the iJET Panel –
1. Quick - Press the Lightness button. The iJET Panel display will open the Lightness option
with the “>” marker on the value level indicating you can immediately change the Lightness option’s
value. From here you can skip steps 2 and 3 and go to step 4 to change the value.
2. Menu – Press the button to enter the main Menu.
Use the arrow up/down buttons to move through the Menu options until the display shows
Lightness.
3. Press
Enter
to move the “>” marker down to indicate you want to change the Lightness value.
4. There are two ways to change the value:
5. Repeated presses to the Lightness button will change the Lightness value forward in single steps
from -3 to +6. The value list wraps around meaning that you step from +6 to -3 when you continue to
press the button.
6. Or…press the arrow up/down buttons to change the Lightness value. With these you can
step both forward and backward in the value list.
7. Select a positive (+) value from the list to make the copy lighter. Select a negative (-) value from the
list to make the copy darker.
8. Press the
Enter
button to accept the selected value. The “>” marker will move up to the Menu level
indicating that the value is set and you can step on through the menu options if needed. The new
Lightness value will be applied every time you press the B&W Copy or Color Copy button until you
repeat the steps above to change it.
The ”>” marker is on the Menu level
. You can continue
navi
gating the menu options with the arrow up/down
buttons.
> Lightness
+2
Lightness
> 0
lightness
Lightness
>+ 1
lightness
Lightness
> +2
Menu
Lightness
> 0
Lightness
The “>” marker is down to the value level
so you can
change the value.
Lightness
> 0
> Lightness
0
Page 56
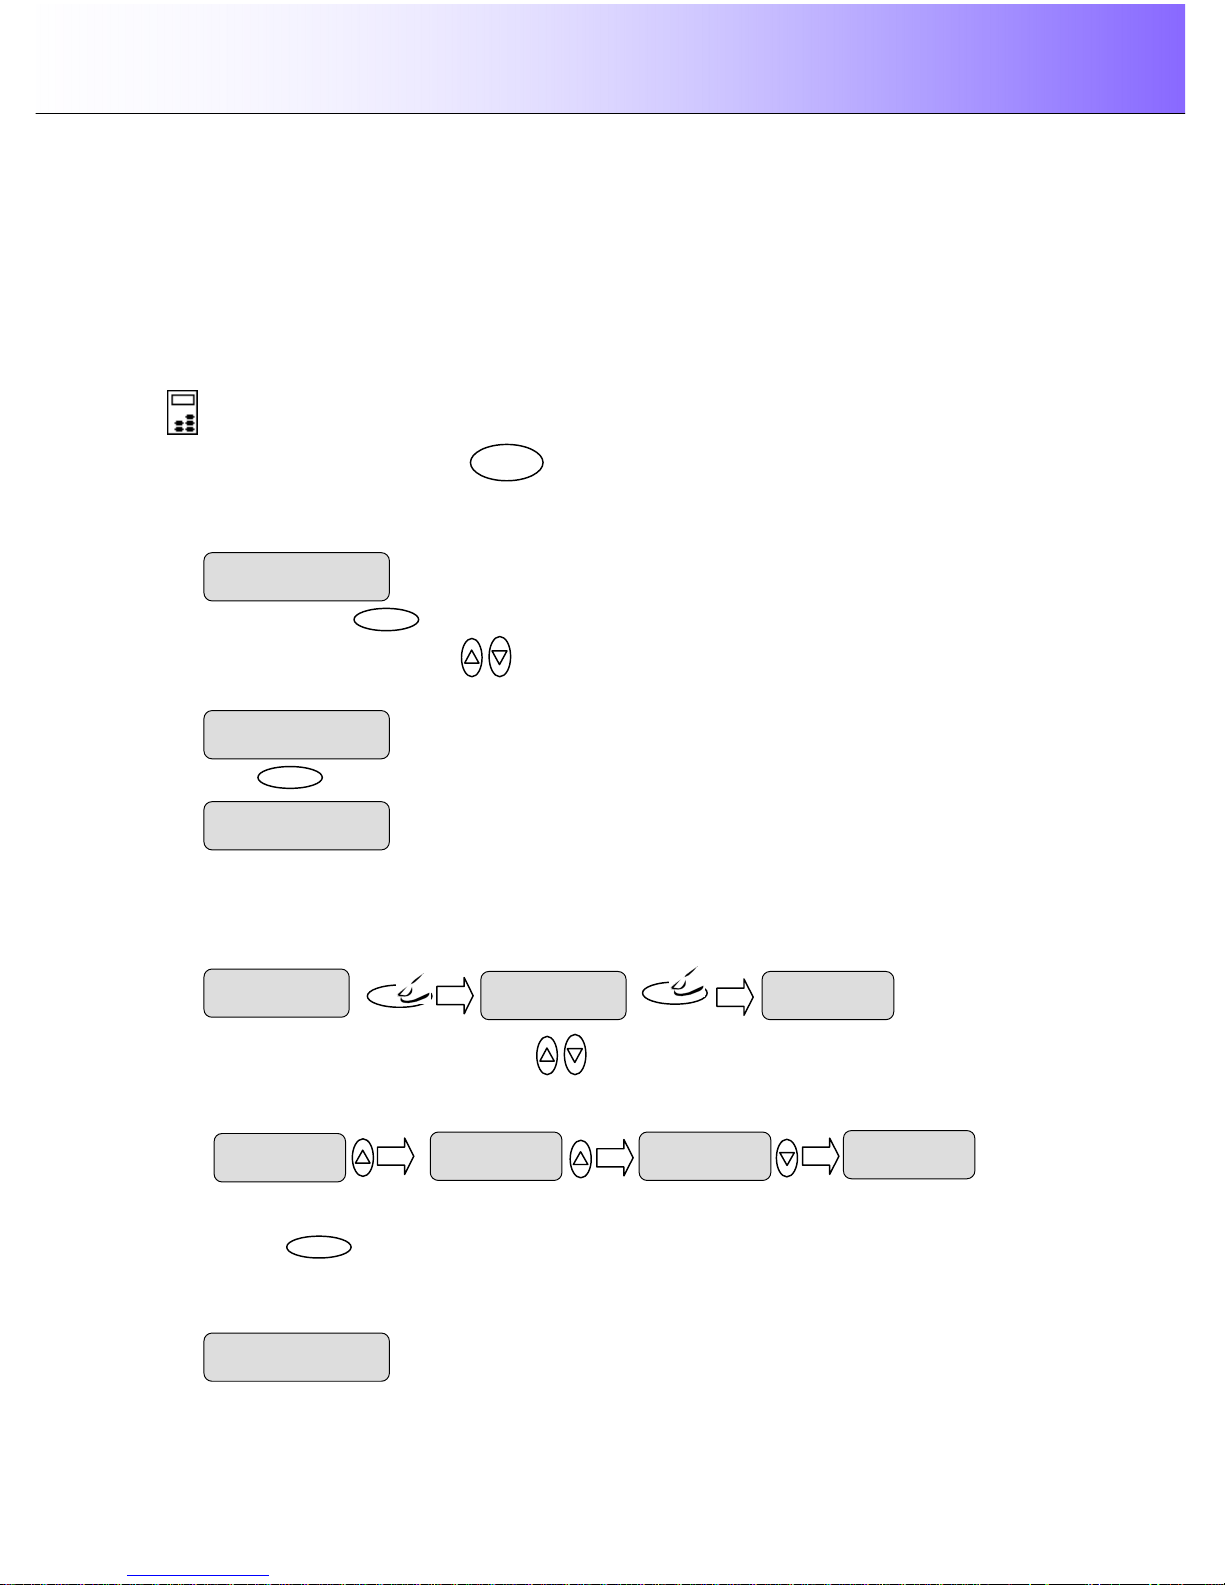
Using the scanner, how do I … Copy? 5-4
5.2.2 How do I… Set a Scale factor? – Output size
In the beginning of this section (How to… make a copy) we described how to set the input size with the
Size button. You can enlarge or reduce this size in your output copy through the Scale option. The Scale
value is defined as a percent (factor) of the original. A scaling factor of 100% means that the copy inherits
the original’s size, under 100% means it is reduced and over 100% means it is enlarged. The scaling
factor can be selected from a list of predefined factors and if needed, these can be fine tuned to create
your own factors.
To set a Scale factor:
On the iJET Panel –
1. Quick - Press the Scale button. The iJET Panel display will open the Scale option with the
“>” marker on the value level indicating you can immediately change the Scale option’s value. From
here you can skip steps 2 and 3 and go to step 4 to change the value.
2. Menu – Press the button to enter the main Menu.
Use the arrow up/down buttons to move through the Menu options until the display shows
Scale %.
3. Press
Enter
to move the “>” marker down to indicate you want to change the Scale factor value.
4. There are two ways to change the value:
5. Repeated presses to the Scale button will change the Scale factor value forward though a list of
predefined Scale factor values. The value list wraps around meaning that you step from 800 to 25
when you continue to press the button.
6. Or…press the arrow up/down buttons to change the Scale factor value in single value
steps. You can use this to fine tune one of the predefined values you reached by pressing the Scale
button as described above.
7. Select a value larger than 100 to enlarge the image and smaller than 100 % to reduce the image.
8. Press the
Enter
button to accept the selected value. The “>” marker will move up to the Menu level
indicating that the value is set and you can step on through the menu options if needed. The new
Scale value will be applied every time you press the B&W Copy or Color Copy button until you repeat
the steps above to change it.
>
200
Scale %
> 201
Scale %
> 202
Scale %
> 201
Scale %
> 200
Scale %
> 200
Scale %
> 201
Scale
Scale %
> 202
Scale
The ”>” marker is on the Menu level
. You can continue
navigating the menu options with the arrow up/down
buttons.
> Scale %
201
Menu
Scale %
> 100
Scale
The “>” marker is down to the value level so you can
change the value.
Scale %
> 100
> Scale %
100
Page 57
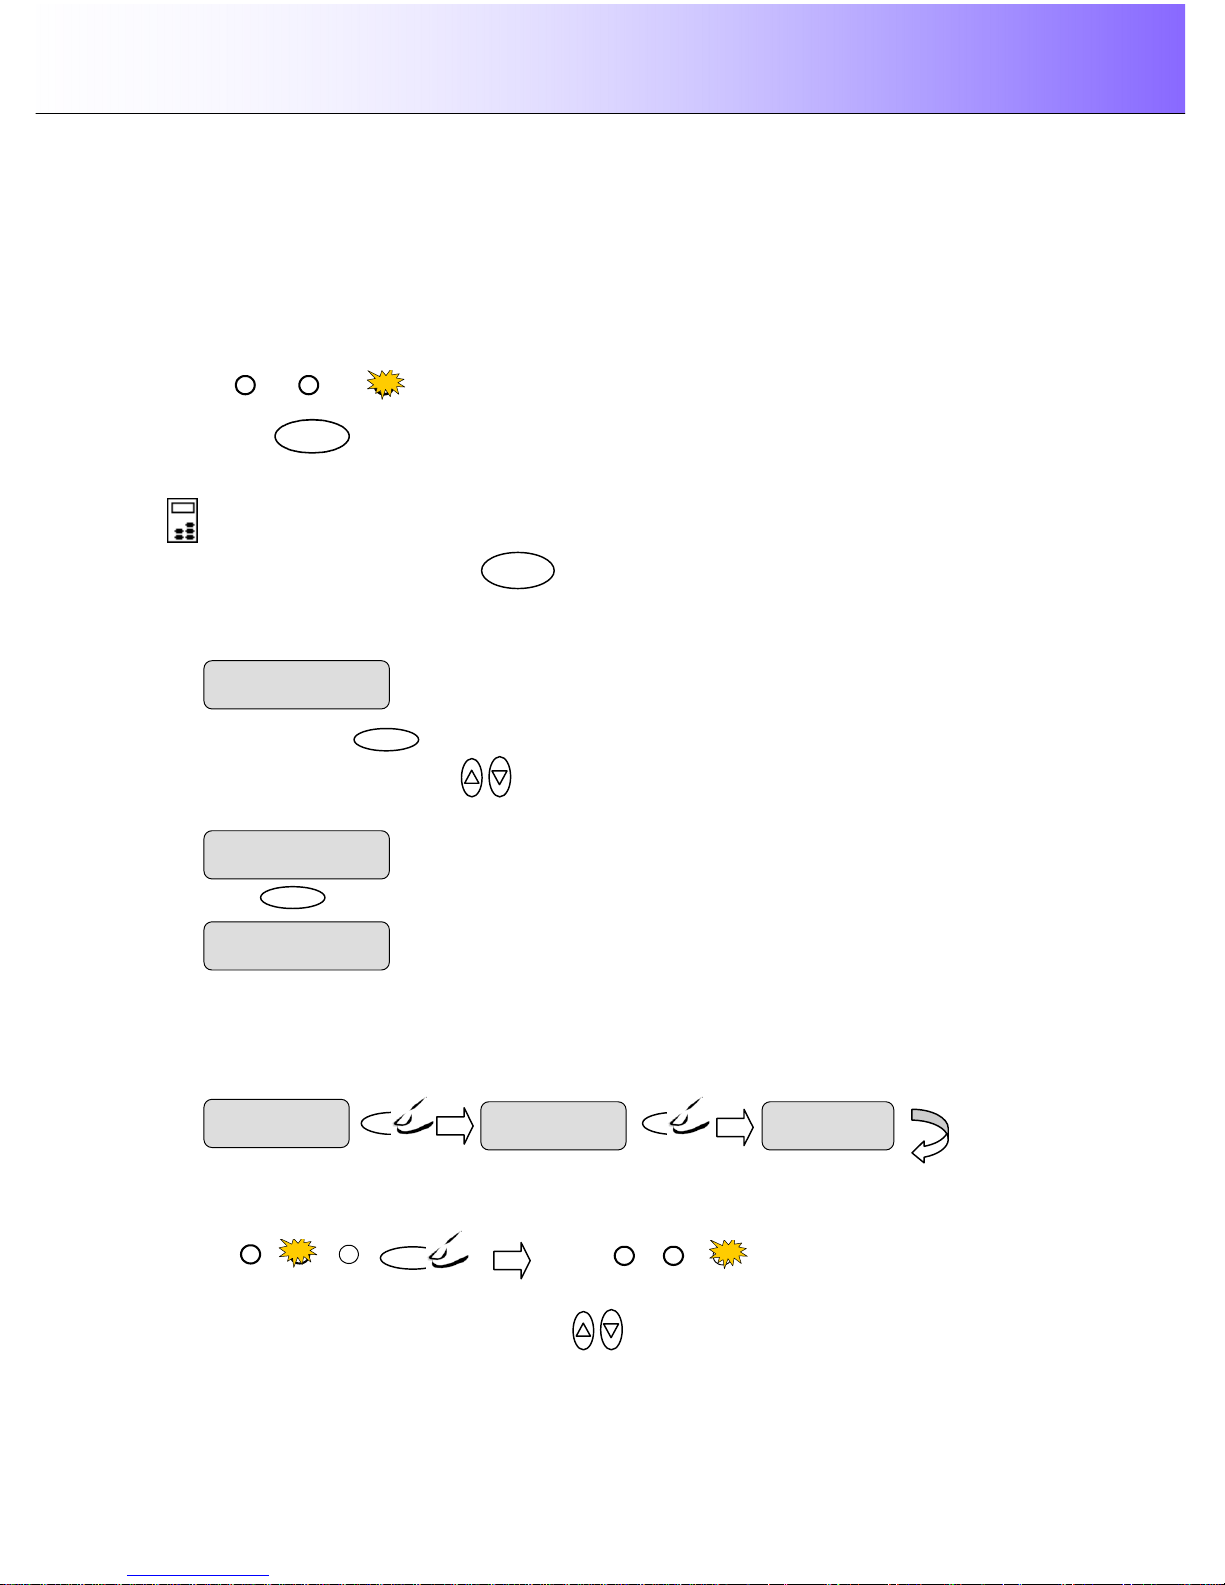
Using the scanner, how do I … Copy? 5-5
5.2.3 How do I…Set Copy Quality?
You can determine the output quality. The best quality will take the longest to output and use the highest
amount of ink on inkjets. You may want to use the Fast quality setting for test copies. Yo can set Quality
to one of its three options: Fast, Normal, Best.
You can see which of the quality settings is active by the LEDs above the Quality button. The active
setting will be the only one that is lighted. In the example below the Best setting is active.
You can press the Quality button until the LED for the Quality setting you want to use lights up.
Fast Normal Best
Quality
To set the copy Quality value:
On the iJET Panel –
1. Quick - Press the Quality button. The iJET Panel display will open the Quality option with
the “>” marker on the value level indicating you can immediately change the Quality option’s value.
From here you can skip steps 2 and 3 and go to step 4 to change the value.
2. Menu – Press the button to enter the main Menu.
Use the arrow up/down buttons to move through the Menu options until the display shows
Quality.
3. Press
Enter
to move the “>” marker down to indicate you want to change the Quality value.
4. There are two ways to change the value:
5. Repeated presses to the Quality button will change the Quality value forward through Fast,
Normal, Best. The list wraps around meaning that you step from Best to Fast when you continue to
press the button.
The LEDs above the Quality button will show the active setting.
6. Or…press the arrow up/down buttons to change the Lightness value. With these you
can step both forward and backward in the Fast, Normal, Best quality list.
Menu
Fast Normal Best
Fast Normal Best
Quality
Quality
> Fast
Quality
Quality
>Normal
Quality
Quality
> Best
Quality
> Normal
Quality
The “>” marker is down to the value level so you can
change the value.
Quality
> Normal
> Quality
Normal
Page 58
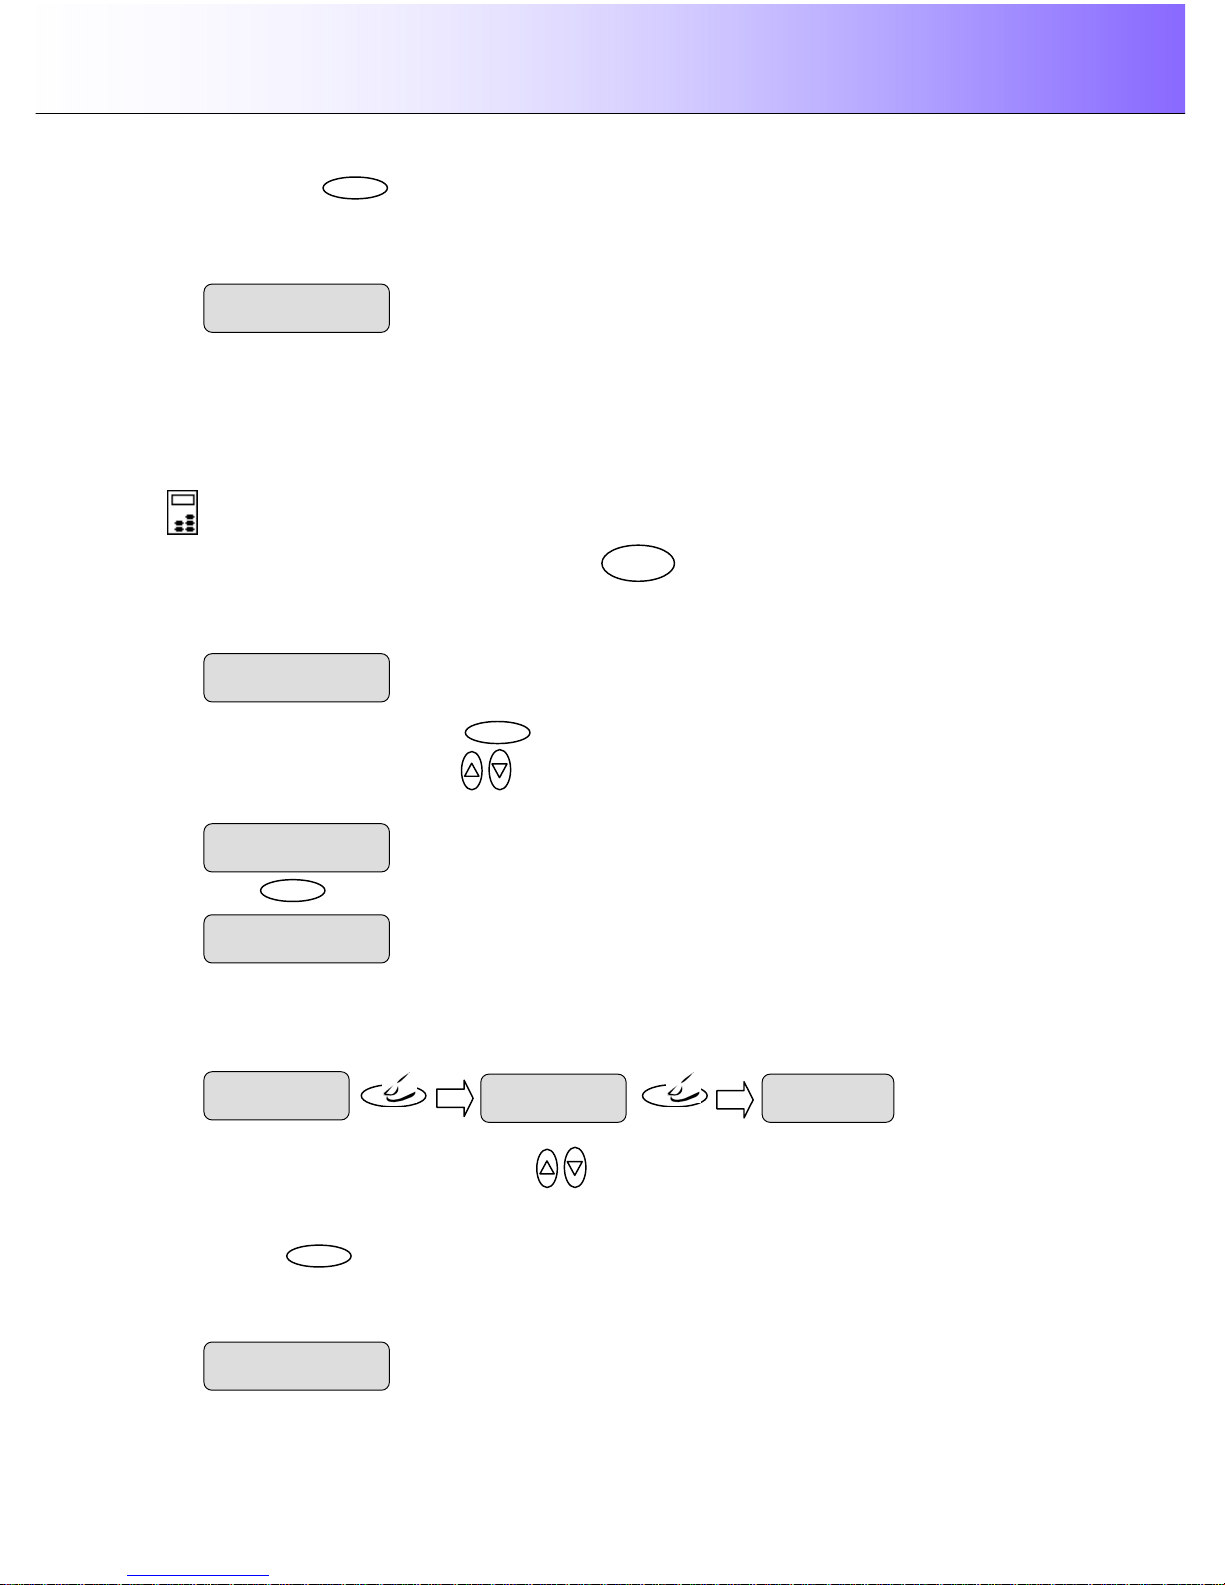
Using the scanner, how do I … Copy? 5-6
7. Press the
Enter
button to accept the selected value. The “>” marker will move up to the Menu
level indicating that the value is set and you can step on through the menu options if needed. The
new Quality value will be applied every time you press the B&W Copy or Color Copy button until you
repeat the steps above to change it.
5.2.4 How do I… Set number of Copies?
You can tell the system to make multiple copies of the original in the scanner. You can set the system to
output between 1 and 50 copies. The default value is 1.
To set the copy Copies value:
On the iJET Panel –
1. Quick Button Setting - Press the Copies button The iJET Panel display will open the
Copies option with the “>” marker on the value level indicating you can immediately change the
Copies option’s value. From here you can skip steps 2 and 3 and go to step 4 to change the value.
2. Through the Menu – Press the button to enter the main Menu.
Use the arrow up/down buttons to move through the Menu options until the display shows
Copies.
3. Press
Enter
to move the “>” marker down to indicate you want to change the Copies value.
4. There are two ways to change the value:
5. Repeated presses to the Copies button will change the Copies value forward in single steps from 1
to 50..
6. Or…press the arrow up/down buttons to change the Copies value. With these you can
increase and decrease the value.
7. Press the
Enter
button to accept the selected value. The “>” marker will move up to the Menu level
indicating that the value is set and you can step on through the menu options if needed. The new
Copies value will be applied every time you press the B&W Copy or Color Copy button until you
repeat the steps above to change it.
The ”>” marker is on the Menu level
. You can continue
navigating the menu options with the arrow up/down
buttons.
> Copies
3
Copies
> 1
Copies
Copies
>2
Copies
Copies
>3
Menu
Copies
> 1
Copies
The “>” marker is down to the value level so you can
change the value.
Copies
> 1
> Copies
1
The ”>” marker is on the Menu level
. You can continue
navigating the menu options with the arrow up/down
buttons.
> Quality
Best
Page 59
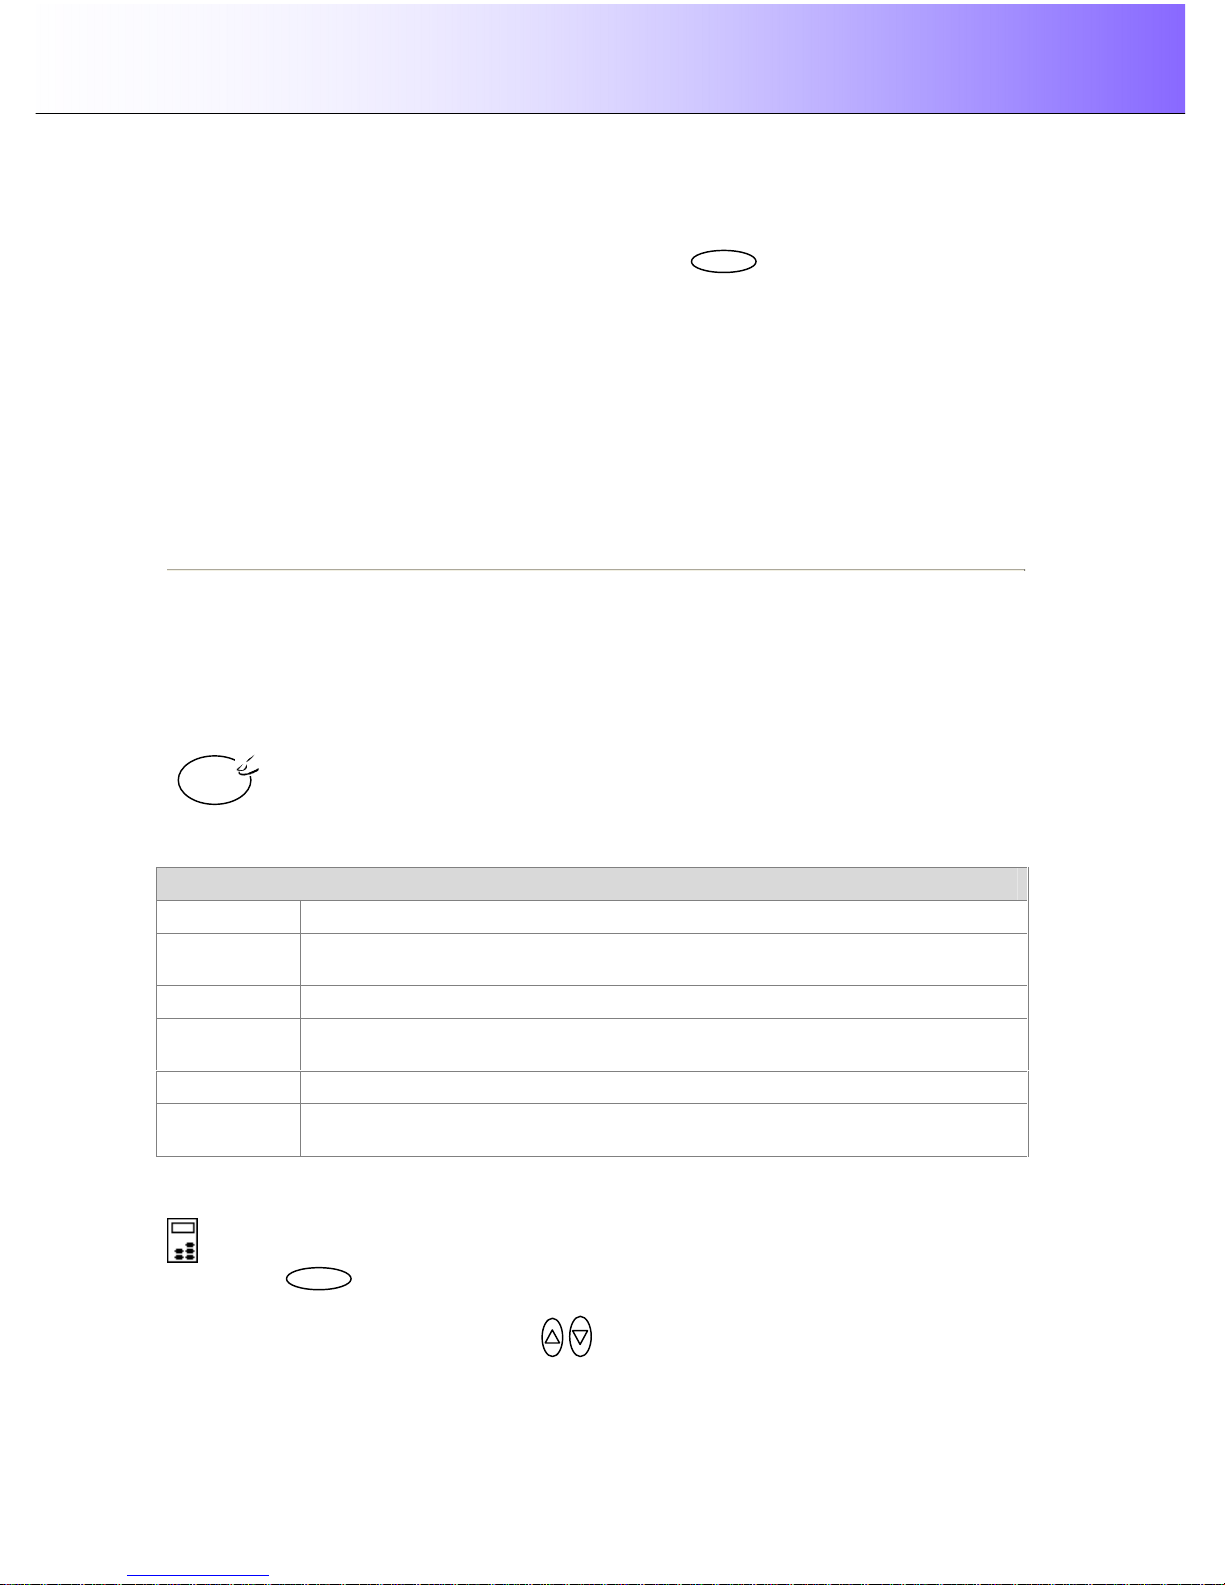
Using the scanner, how do I … Copy? 5-7
5.3 Other Copy Options – Menu Button
As described in the previous sections, the copy quick buttons Lightness, Scale, Quality and Copies are
shortcuts into the options accessible through the Menu button . In this section we will describe
other options in the same Menu. These options are not accessible through quick buttons and can only be
reached through the Menu button. The option features described here are more general than those
behind the four quick buttons and they will therefore not be needed as often.
The Menu button options described in the following subsections are:
Original Type Color and Original Type B&W
Sharpen
Background Cleanup
Media Type
Mirror
Reset
Advanced…
5.3.1 How do I… Set Original Type Color?
The original type setting – Org. Type-Color is your central input parameter for color copying and relates to
controlling image capture with color originals. The Org. Type-Color setting tells the system to use specific
internal image enhancement processes that are optimal for the color original in question. For example,
selecting the “CAD/Map” option will tell the scanner to optimize for high detail. The option you choose will
be applied by the system when you press the Color Copy button.
The available options for Org. Type-Color are described below. Note that for each original type there is an
“Ink” version that contains special parameters for originals that were created on inkjet printers.
Org. Type Color
Photo
For reproducing photographs and posters
Photo Ink
For reproducing photographs and posters and the original to be copied has been
created (printed) with an inkjet printer.
Brochure
For documents containing both photos and text.
Brochure Ink
For documents containing both photos and text and the original to be copied has been
created (printed) with an inkjet printer.
CAD/Map
Suitable for color CAD drawings, maps and graphics with a high level of detail.
CAD/Map Ink
Suitable for color CAD drawings, maps and graphics with a high level of detail and the
original to be copied has been created (printed) with an inkjet printer.
To set the copy Original Type for Color::
On the iJET Panel –
1. Press the button to enter the main Menu.
2. The Org. Type-Color option should be the first option to appear.
If it is not, use the arrow up/down buttons to move through the Menu options until the display
shows Org. Type-Color as shown below.
Color
Copy
Menu Menu
Page 60
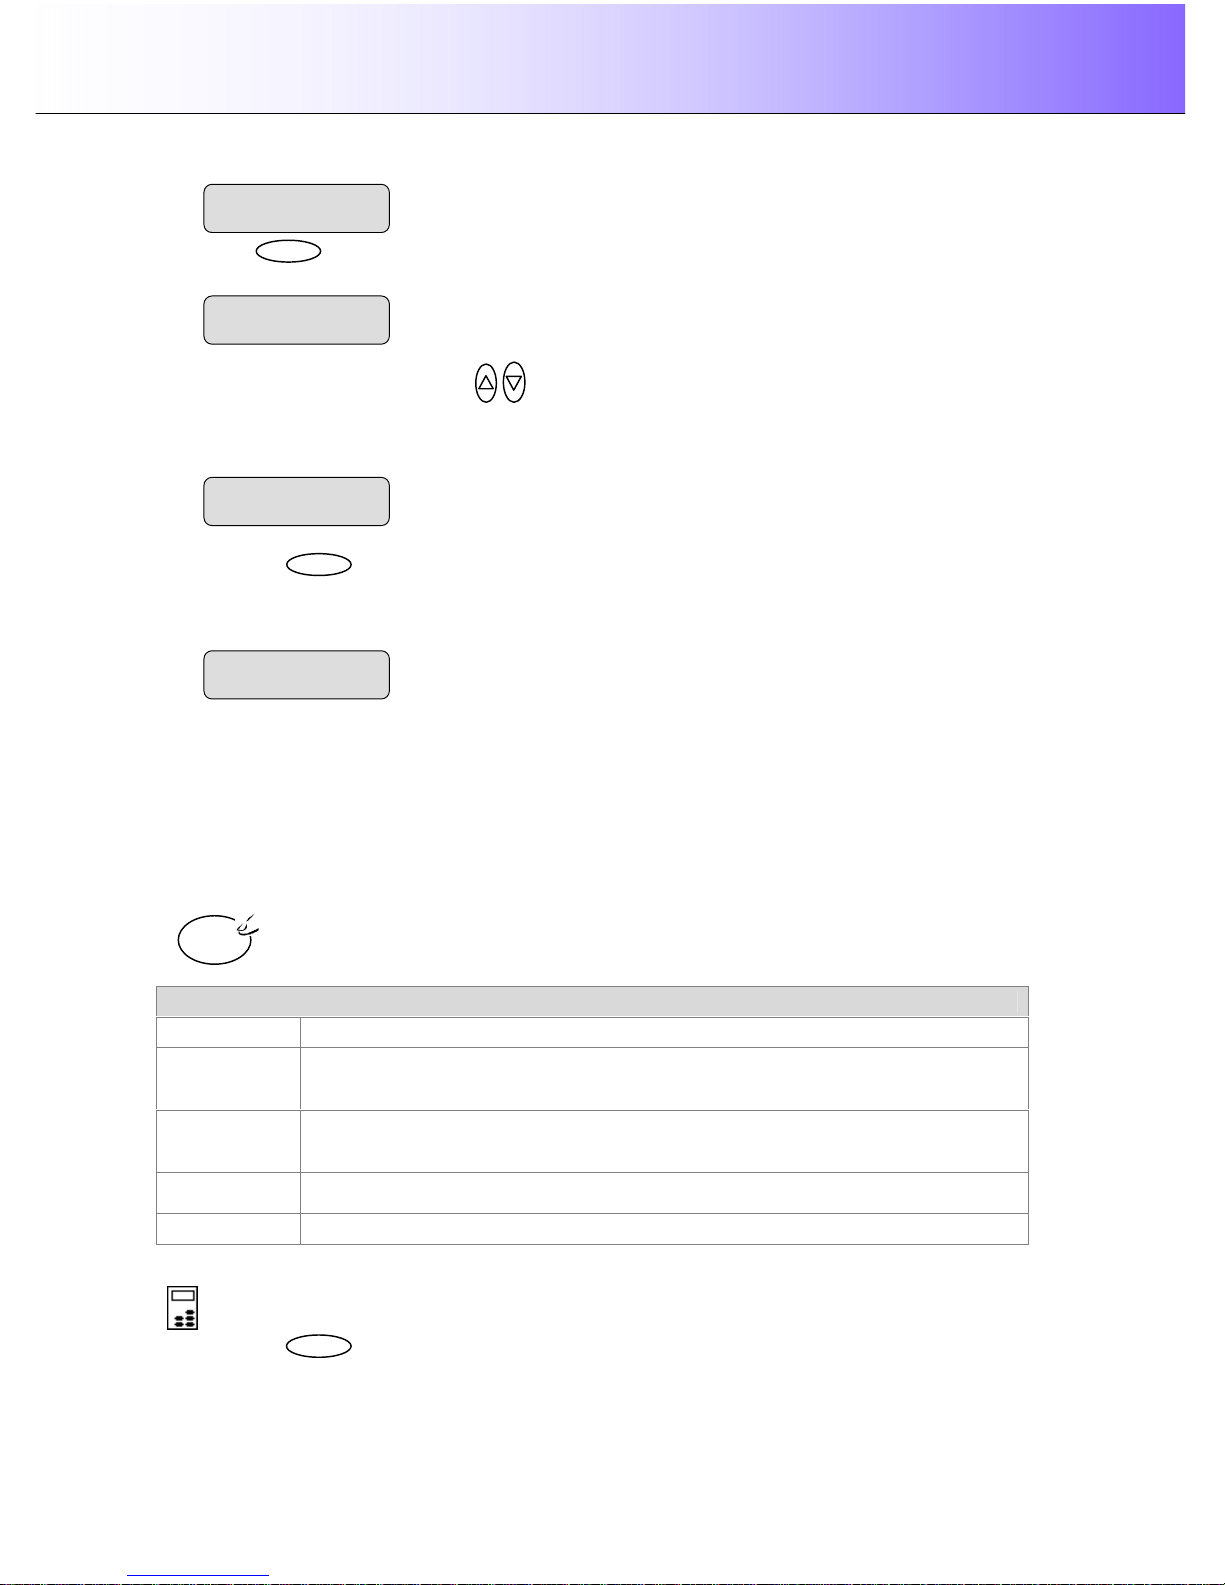
Using the scanner, how do I … Copy? 5-8
3. Press
Enter
to move the “>” marker down to indicate you want to change the Org. Type-Color
value.
4. Press the arrow up/down buttons to change the Org. Type-Color value that matches the
original and copy job. Choose one of the “(Ink)” original types if your original was created on an ink jet
printer. The display shown below is set for a brochure (document with photos and text) that was
printed on an ink-jet printer.
5. Press the
Enter
button to accept the selected value. The “>” marker will move up to the Menu level
indicating that the value is set and you can step on through the menu options if needed. The new
Org. Type-Color value will be applied every time you press the Color Copy button until you repeat the
steps above to change it.
5.3.2 How do I… Set Original Type B&W?
The original type setting – Org. Type-BW is your central input parameter for B&W or graytone copying and
relates to controlling image capture. The Org. Type-B&W setting tells the system to use specific internal
image enhancement processes that are optimal for the original in question. For example, selecting the
“Blueprint” option will tell the scanner to optimize for cleaning up background noise and enhancing image
quality. The option you choose will be applied by the system when you press the B&W Copy button.
The available options for Org. Type-B&W are described below.
Org. Type -BW
Photo Photo is suitable for photographic images that contain many shades of gray.
Blueprint
Suitable for Blueprint and other originals with heavily distorted foregrounds and
backgrounds. The shades that create image noise are close to the shades that
represent the image's data and the two are hard to differentiate.
Sepia
Suitable for Sepia and other originals with heavily distorted foregrounds and
backgrounds where the shades that create image noise are close to the shades that
represent the image's data and the two are hard to differentiate.
Line
For copying clean and clear line drawings and text. Takes advantage of B&W
thresholding
CAD Suitable for black and white CAD drawings and graphics with a high level of detail.
To set the Original Type for B&W copying::
On the iJET Panel –
1. Press the button to enter the main Menu.
B&W
Copy
Menu
Org. Type-Color
> Brochure (Ink)
The ”>” marker is on the Menu level
. You can continue
navigating the menu options with the arrow up/down
buttons.
> Org. Type-Color
Brochure (Ink)
The “>” marker is down to the value level so you can
change the value.
Org. Type-Color
> Photo
> Org. Type-Color
Photo
Page 61
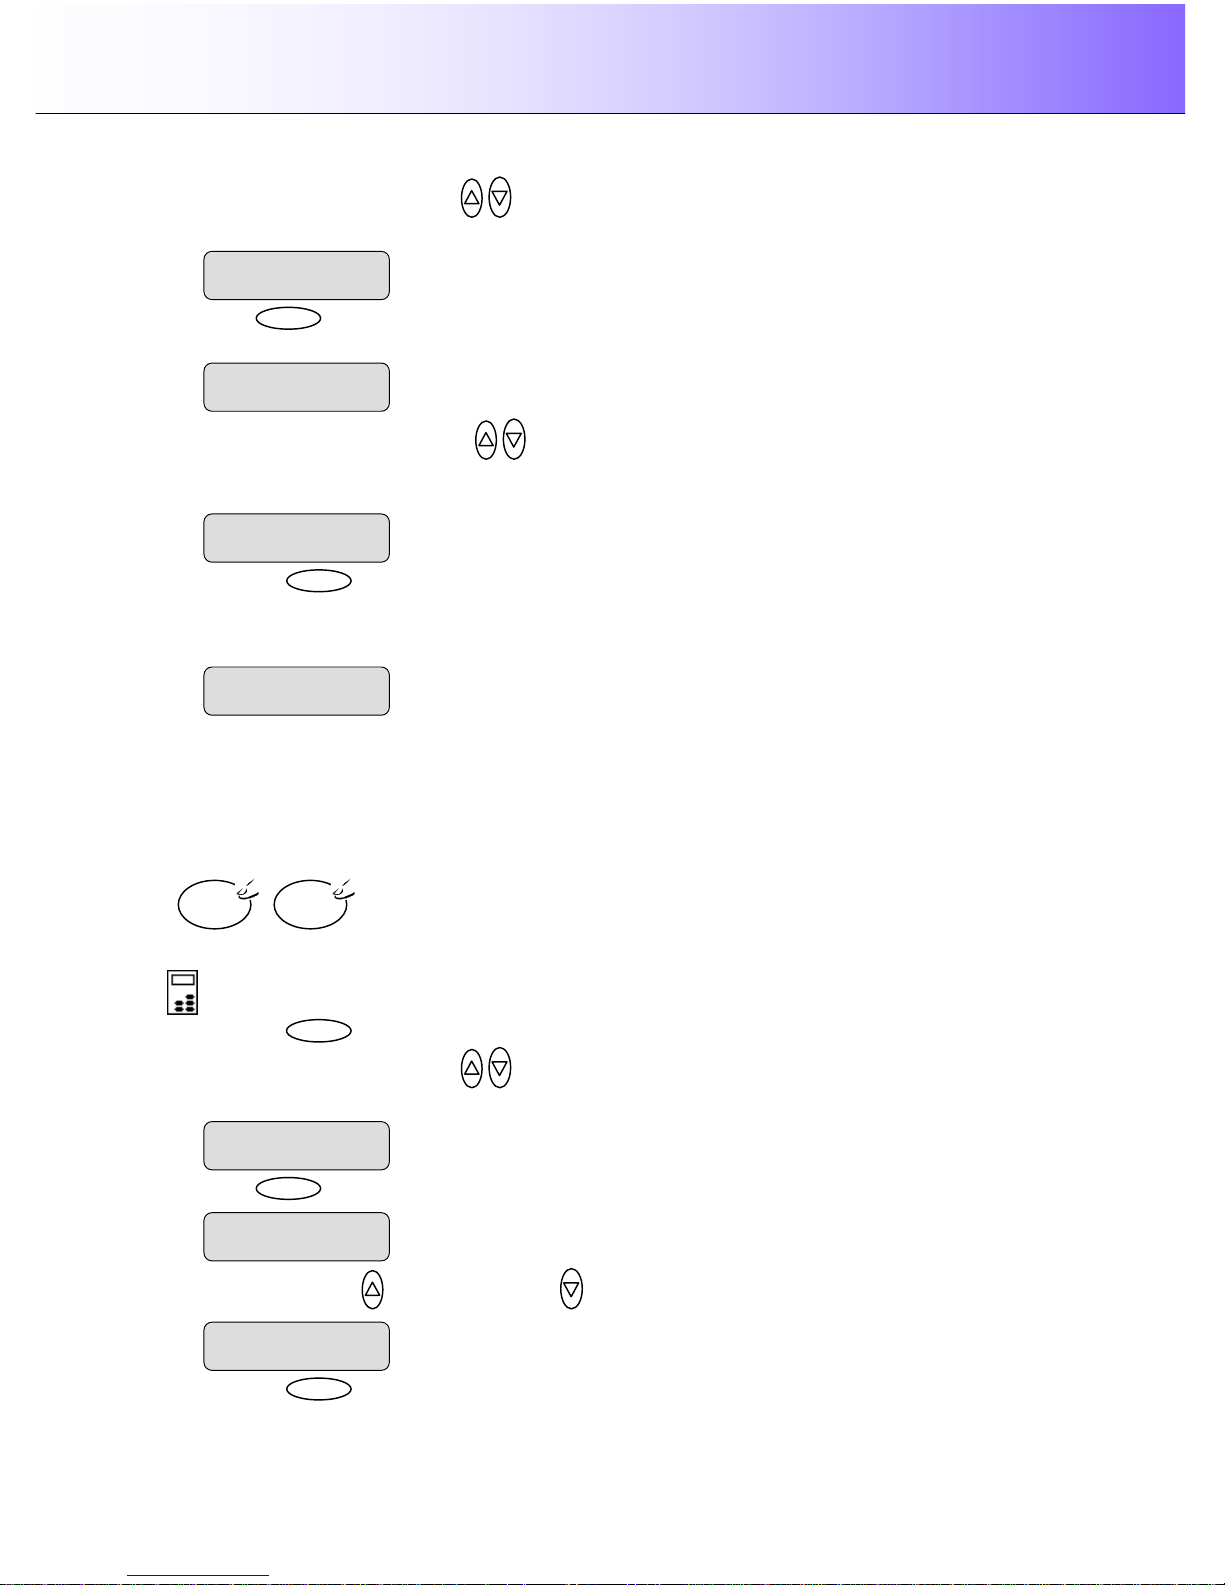
Using the scanner, how do I … Copy? 5-9
2. Use the arrow up/down buttons to move through the Menu options until the display shows Org.
Type-B&W as shown below.
3. Press
Enter
to move the “>” marker down to indicate you want to change the Org. Type-B&W
value.
4. Press the arrow up/down buttons to change the Org. Type-B&W value that matches the
original and copy job. The display shown below is set for Line originals (documents with line drawings
and text).
5. Press the
Enter
button to accept the selected value. The “>” marker will move up to the Menu level
indicating that the value is set and you can step on through the menu options if needed. The new
Org. Type-B&W value will be applied every time you press the B&W Copy button until you repeat the
steps above to change it.
5.3.3 How do I… apply the Sharpen filter?
You can give your copy sharper lines with the Sharpen option. The Sharpen filter identifies edges in the
image and intensifies them. You can use the Sharpen option with both Color Copying and B&W Copying
and with all original types. When set to ON, the option will apply the Sharpen filter when you press either
the Color Copy or B&W Copy button.
To apply the Sharpen filter
On the iJET Panel –
1. Press the button to enter the main Menu.
2. Use the arrow up/down buttons to move through the Menu options until the display shows
Sharpen as shown below.
3. Press
Enter
to move the “>” marker down to indicate you want to change the Sharpen setting.
4. Press the arrow up or arrow down button to change the Sharpen setting
5. Press the
Enter
button to accept the selected setting. The “>” marker will move up to the Menu
B&W
Copy
Color
Copy
Sharpen
> ON
Menu
The “>” marker is down to the value level so you can
change the setting.
Sharpen
> OFF
> Sharpen
OFF
Org. Type-B&W
> Line
The ”>” marker is on the Menu level
. You can continue
navigating the menu options with the arrow up/down
buttons.
> Org. Type-B&W
Line
The “>” marker is down to the value level s
o you can
change the value.
Org. Type-B&W
> Photo
> Org. Type-B&W
Photo
Page 62
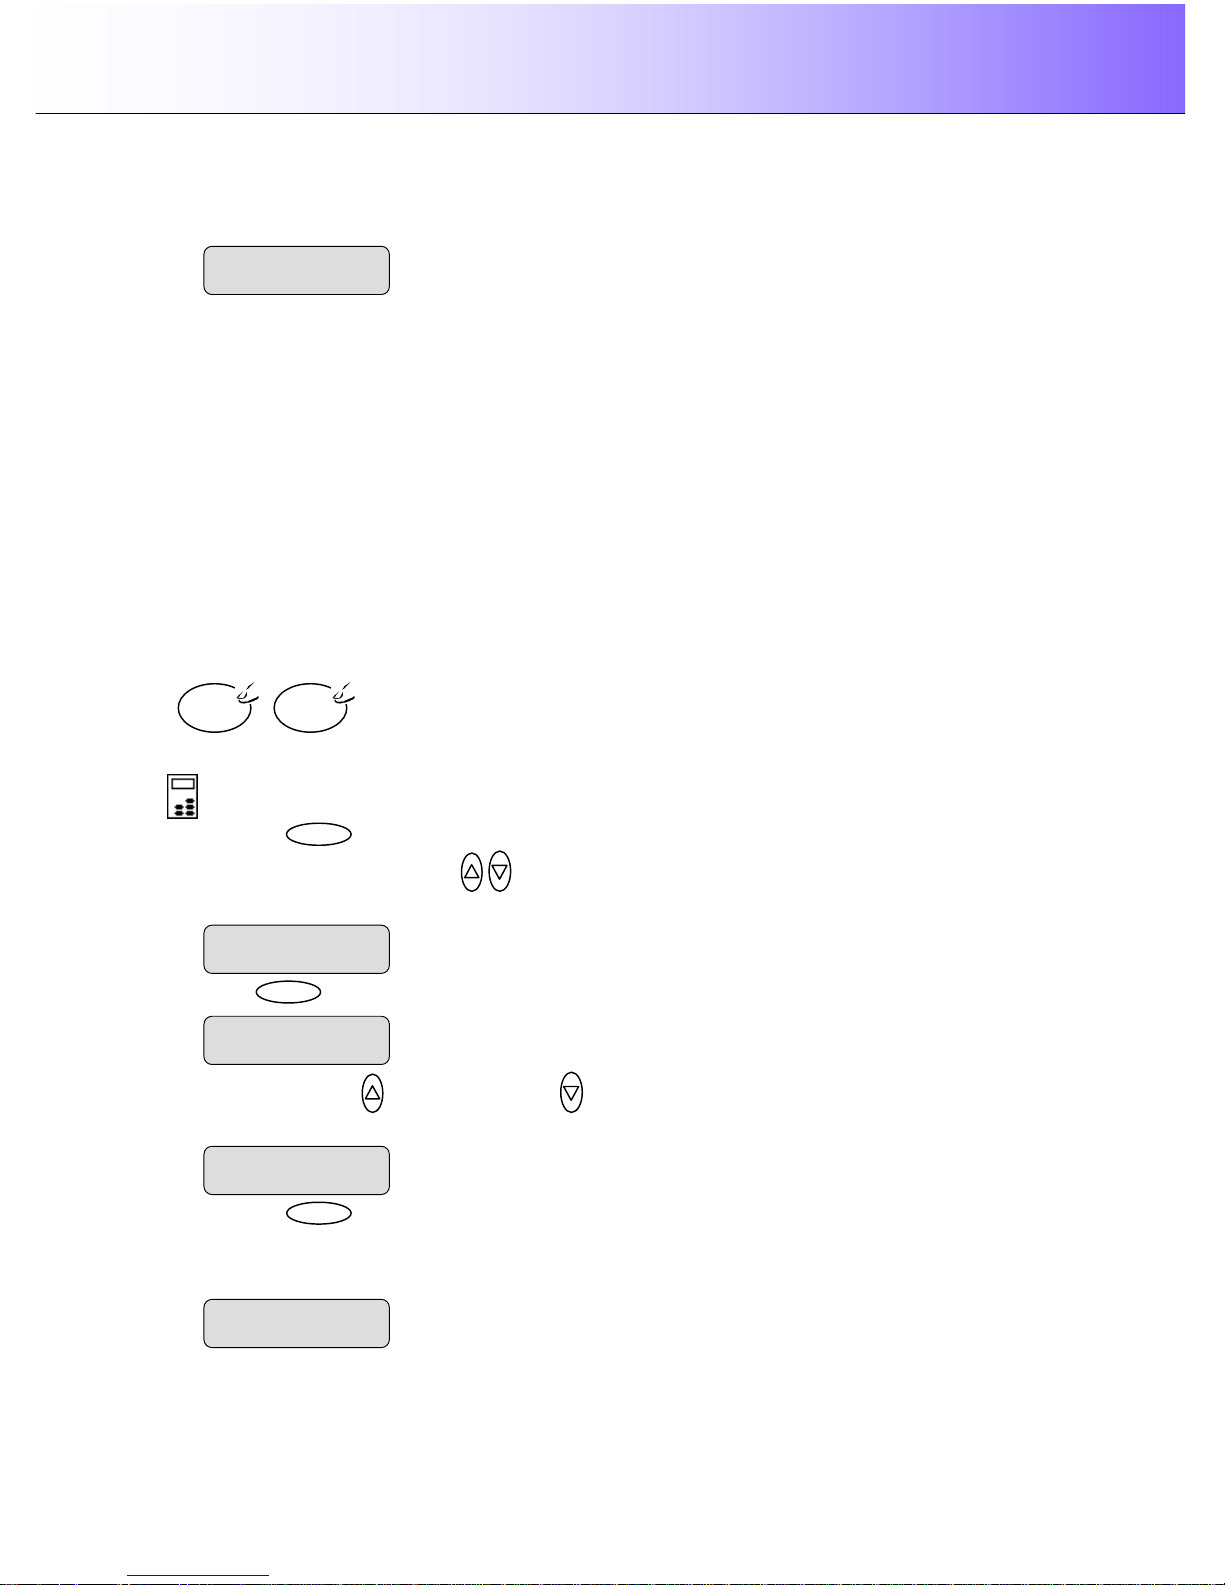
Using the scanner, how do I … Copy? 5-10
level indicating that the value is set and you can step on through the menu options if needed. The
new Sharpen setting will be applied every time you press the Color Copy or the B&W Copy button
until you repeat the steps above to change it.
5.3.4 How do I… apply the Background (Backg.) Clean filter?
Background clean is used if you have an original with a background that is not as completely white as
you would like it. If you want the background to appear pure white in the copy, then you can increase the
background clean value. Background clean should be used with caution, as it can also affect light colors
that you will not consider as part of the background.
The Background clean setting is a "cutoff" point. Pixels with a lightness under the setting’s value are
affected. The higher the Backg. Clean value, the larger the range of pixels that will be turned to white.
You can define cutting points from 0 to 12. The default value is zero (no effect).
Example:
You have copied an original and want to improve it through bringing out the text by making the
background whiter. You can adjust the background clean value upwards from its default of zero (to 12,
for example) and thus make the pixels at high lightness levels go to white.
The option’s setting will be applied when you press either the Color Copy or B&W Copy button.
To apply the Backg. Clean filter
On the iJET Panel –
1. Press the button to enter the main Menu.
2. Use the arrow up/down buttons to move through the Menu options until the display shows
Backg. Clean as shown below.
3. Press
Enter
to move the “>” marker down to indicate you want to change the Backg. Clean setting.
4. Press the arrow up or arrow down button to change the Backg. Clean value. The higher the
value, the larger the umber of shades that will be converted to white in the copy.
5. Press the
Enter
button to accept the selected setting. The “>” marker will move up to the Menu
level indicating that the value is set and you can step on through the menu options if needed. The
new Backg. Clean setting will be applied every time you press the Color Copy or the B&W Copy
button until you repeat the steps above to change it.
B&W
Copy
Color
Copy
Backg. Clean
> 10
The ”>” marker is on the Menu level
. You can continue
navigating the menu options with the arrow up/down
buttons.
> Backg. Clean
10
Menu
The “>” marker is down to the value
level so you can
change the setting.
Backg. Clean
> 0
> Backg. Clean
0
The ”>” marker is on the Menu level
. You can continue
navigating the menu options with the arrow up/down
buttons.
> Sharpen
ON
Page 63
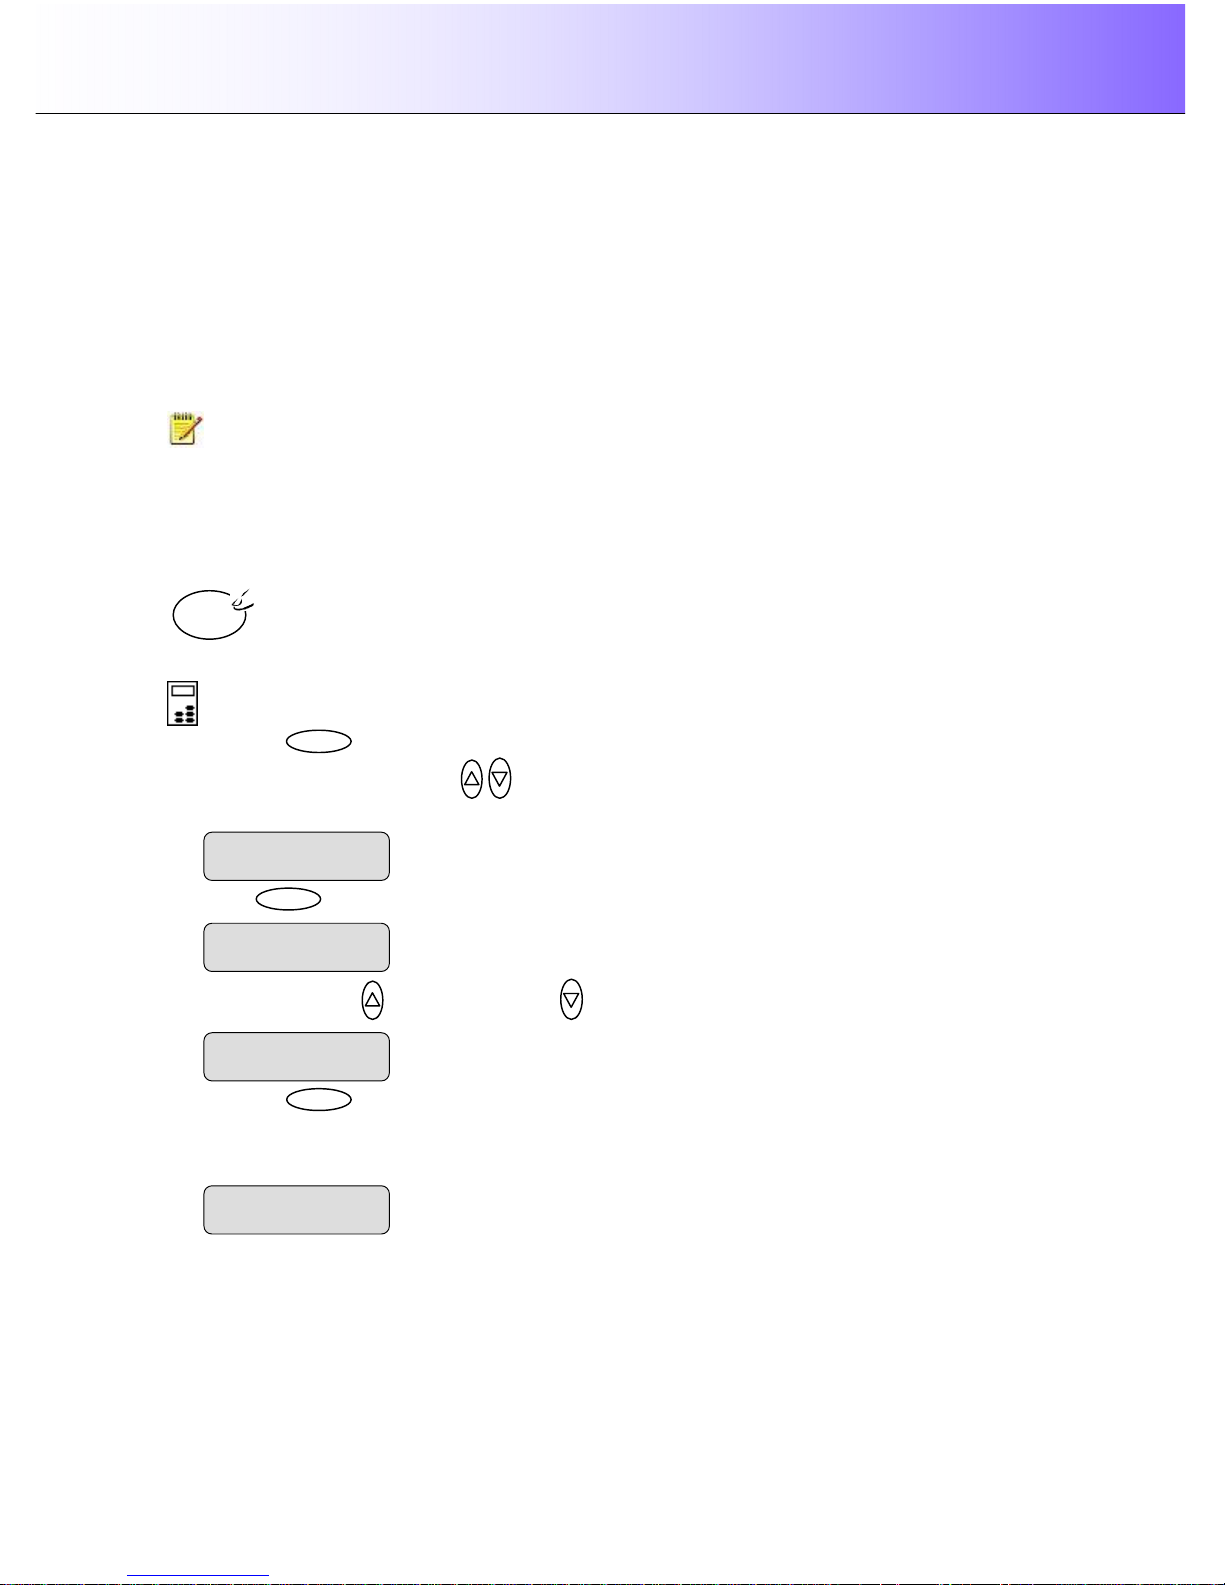
Using the scanner, how do I … Copy? 5-11
5.3.5 How do I… Set the Media Profile (MediaType)?
When making color copies, it is important to tell the system what kind of paper you have in the printer.
Already during scanning, your system will optimize processing for optimal color matching in relation to the
media type the image will be printed on. Processing for glossy paper is different than processing for
coated paper. Your Media Profile setting is not used with B&W Copying.
We described how to create Media Profiles in the sections on Configuration and Setup - Media Profiles -
Color Printer Setup. A Media Profile you created during setup will be applied when you set the
corresponding Menu -> Media Profile.
NOTE: If your system does not already have a Media Profile for the media in your printer, then you
must create a new Media Profile.
Instructions on creating new Media Profiles are described in the section on Media Profiles - Color Printer
Setup. For convenience, we have repeated these instructions below at end of this section - How do I…
Set the Media Profile?
Your Media Profile setting is applied when you press the Color Copy button.
To set a Media Type:
On the iJET Panel –
1. Press the button to enter the main Menu.
2. Use the arrow up/down buttons to move through the Menu options until the display shows
Media Profile as shown below.
3. Press
Enter
to move the “>” marker down to indicate you want to change the Media Profile setting.
4. Press the arrow up or arrow down button to change the Media Type setting.
5. Press the
Enter
button to accept the selected setting. The “>” marker will move up to the Menu
level indicating that the value is set and you can step on through the menu options if needed. The
new Media Profile setting will be applied every time you press the Color Copy button until you repeat
the steps above to change it.
Color
Copy
Media Profile
> Semi Glossy
The ”>” marker is on the Menu level
. You can continue
n
avigating the menu options with the arrow up/down
buttons.
> Media Profile
Semi Glossy
Menu
The “>” marker is down to the value level so you can
change the setting.
Media Profile
> Coated
> Media Profile
Coated
Page 64
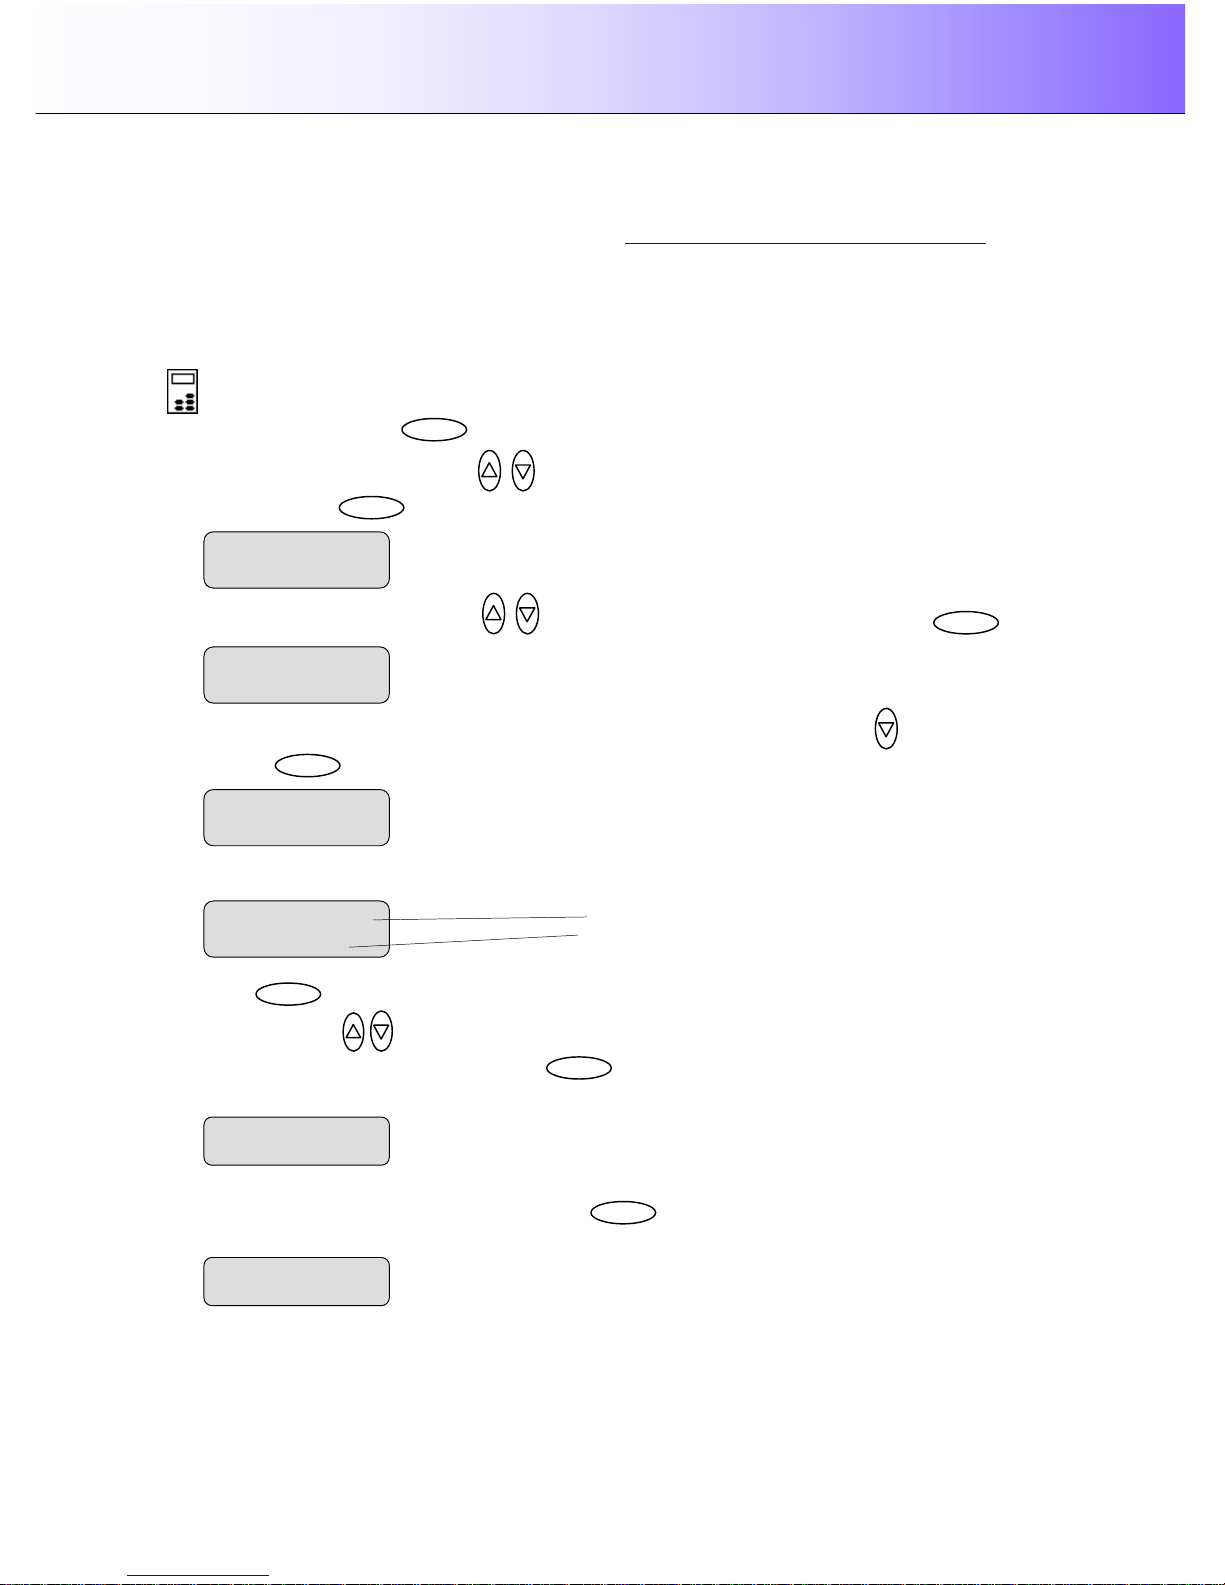
Using the scanner, how do I … Copy? 5-12
5.3.6 To Create a New Media Profile
(The instructions below are repeated from the section – “Creating Media Profiles - Color Printer Setup”):
If your system does not already have a Media Profile for the media that matches the media in your printer,
then you must create a new Media Profile.
A Media Profile is connected solely to a specific printer and media type so you will need to create new
media profiles if all of these (printer or media) are changed.
On the iJET Panel
1. Select the Menu button.
2. Use the arrow button up or down until the display window shows Advanced and confirm with
the Enter button .
3. Use the arrow buttons up or down until the display shows Options and confirm with .
4. Closed Loop Cal should be displayed as the first option. If not use the arrow down button to reach
it. Press to confirm.
5. Your display should now look like this (the actual text on the 2. line will show the current setting for
the option and may be different than the one shown below).
6. Press to move the “>” mark to the current setting so you can change it. Use the arrow
buttons up/down until you reach the media type (Coated, Semi Glossy, Glossy…) that
describes the media in your printer. Press to confirm.
7. On “Print Sheet” select Enter. The system will print a color patch sheet.
8. Feed the sheet into the scanner
9. The display will now show “Scan Sheet”. Select to start. The system will scan the color patch
sheet and calculate color matching values for future jobs with the current media type.
10. When you use the system for copying, you will select the option for the Media Type that matches the
media loaded on your printer. This is done through the Menu button. The system will then load the
corresponding Media Profile and use it to create optimal color output for the job.
> Advanced
…
> Options
…
> Closed Loop Cal
Enter
Menu
Enter
> Scan Sheet
‘Enter’ to go…
Enter
> Print Sheet
‘Enter’ to go…
Enter
Menu option item Media Profile
Current setting for option item
> Media Profile
Enter
Enter
Page 65
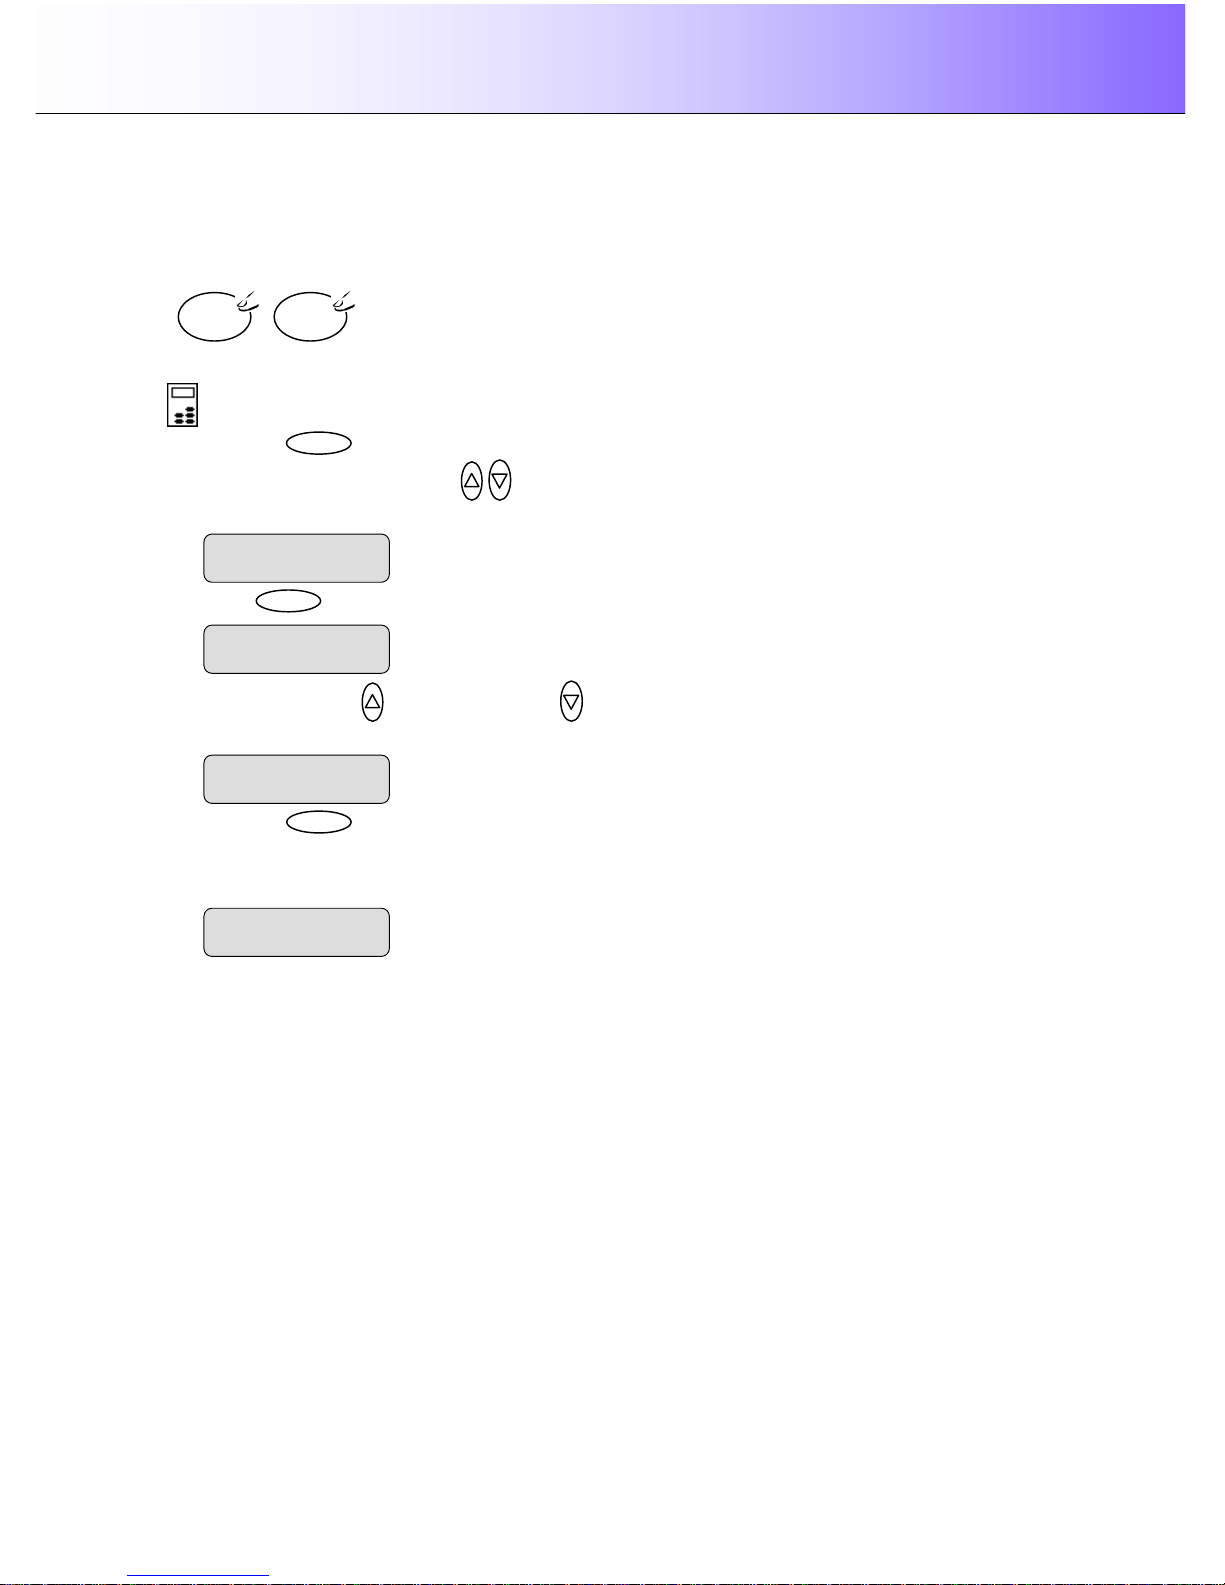
Using the scanner, how do I … Copy? 5-13
5.3.7 How do I… Mirror the Image?
You can mirror the image during capture.
The option’s setting will be applied when you press either the Color Copy or B&W Copy button.
To Mirror the image:
On the iJET Panel –
1. Press the button to enter the main Menu.
2. Use the arrow up/down buttons to move through the Menu options until the display shows
Mirror as shown below.
3. Press
Enter
to move the “>” marker down to indicate you want to change the Mirror option setting.
4. Press the arrow up or arrow down button to change the Mirror option value to YES or to NO.
YES will mirror the original image in your copy and NO will leave it as it is.
5. Press the
Enter
button to accept the selected setting. The “>” marker will move up to the Menu
level indicating that the value is set and you can step on through the menu options if needed. The
new Mirror setting will be applied every time you press the Color Copy or the B&W Copy button until
you repeat the steps above to change it.
B&W
Copy
Color
Copy
Mirror
> YES
The ”>” marker is on the Menu level
. You can continue
navigating the menu options with the arrow up/down
buttons.
> Mirror
YES
Menu
The “>” marker is down to
the value level so you can
change the setting.
Mirror
> NO
> Mirror
NO
Page 66
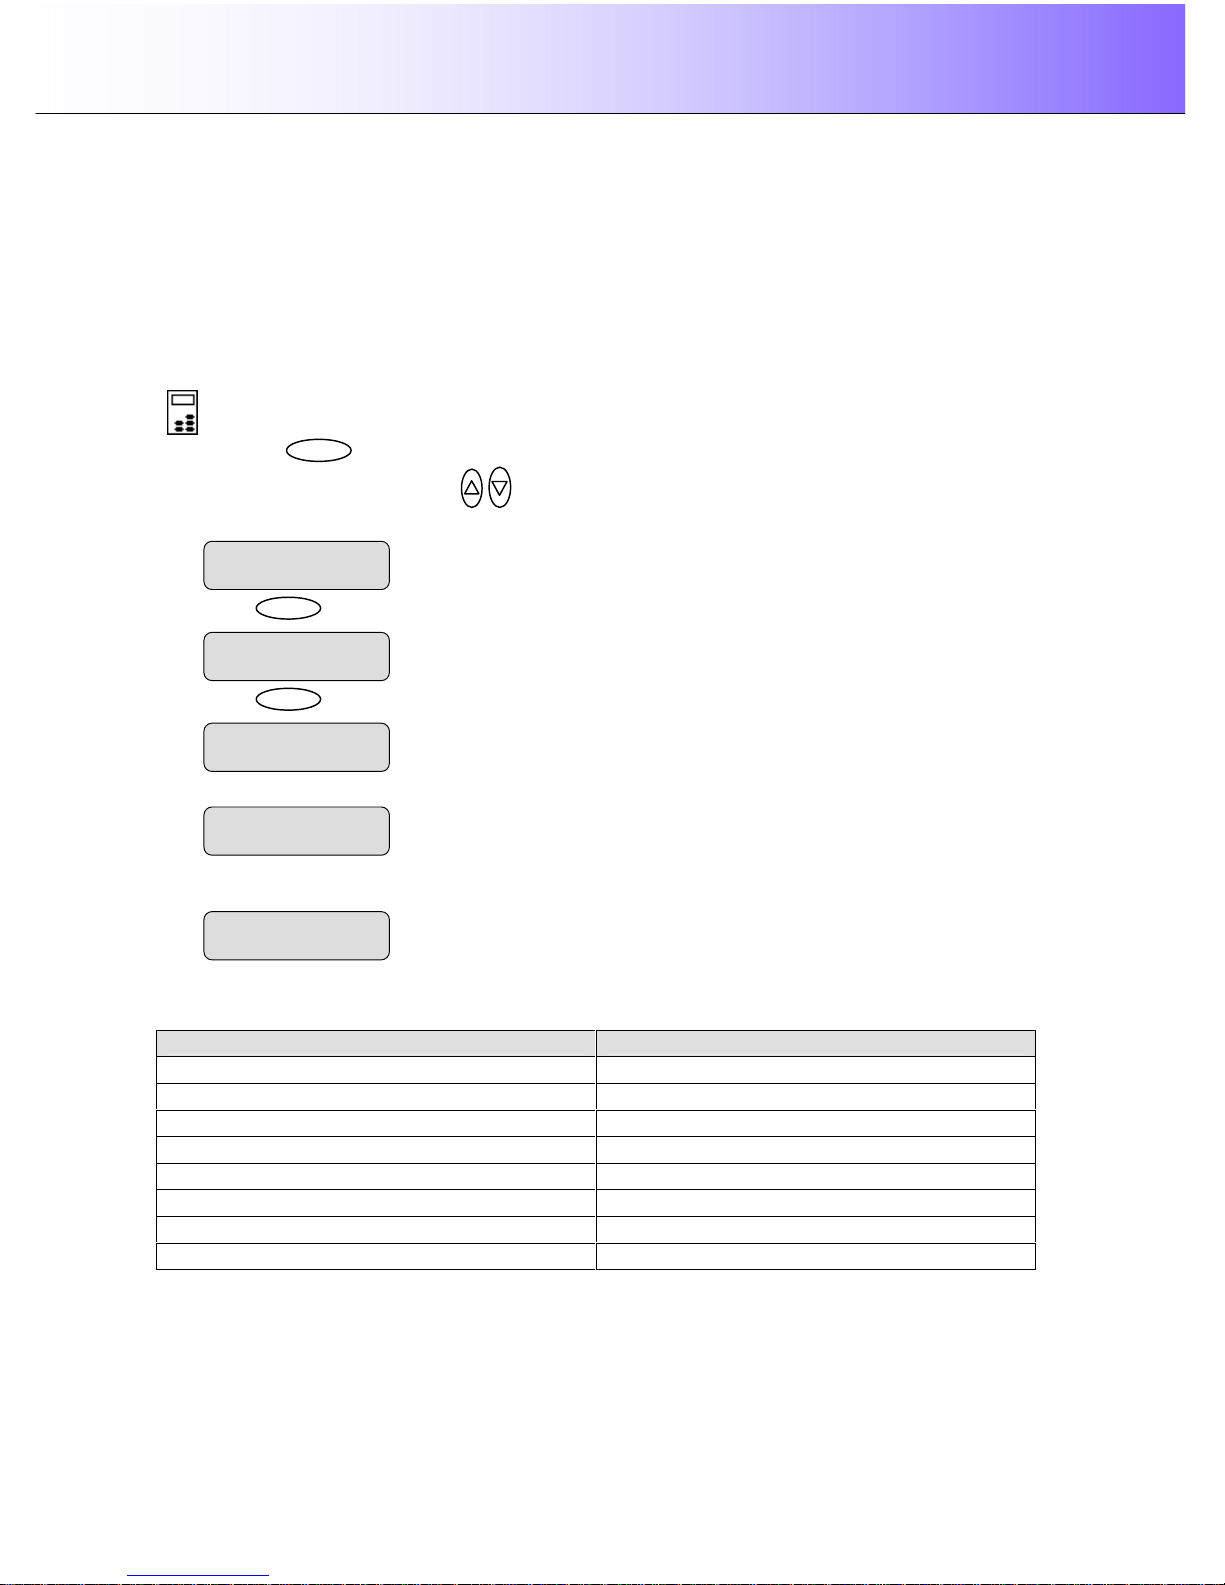
Using the scanner, how do I … Copy? 5-14
5.3.8 How do I… Reset Copy defaults?
The Copy default values that came with your system are those that will work well with the most common
copy jobs. The Copy default values are those accessed from the Menu button’s top level - Lightness,
Sharpen, Scale and etcetera. The lower level options accessed though the Menu - Advanced options,
such as network setup and printer setup are not changed by the Reset option. The Reset option is useful
if you have made a number of special settings for a copy job and want to restore all copy settings at once
and thus reset the system for yourself or for other users.
To Reset the system copy defaults:
On the iJET Panel –
1. Press the button to enter the main Menu.
2. Use the arrow up/down buttons to move through the Menu options until the display shows
Reset as shown below.
3. Press
Enter
to move the “>” marker down to indicate you want to activate the Reset option.
4. Press
Enter
to activate the option. The system will start restoring the copy defaults.
5. When finished, the system will display ‘Done’.
6. The iJET Panel display will automatically return the “>” marker back up to the Menu level so you can
step on through the menu options if needed.
The table below shows which copy settings are affected when you select the Restore option:
Copy settings that return to their default value Copy settings that remain at the last used value
Lightness Org. Type Color
Copies Org. Type BW
Scale Media Type
Quality
Size
Mirror
Sharpen
Backg. clean.
Reset
> Done
Reset
> Please Wait..
The ”>” marker is on the Menu level
. You can continue
navigating the
menu options with the arrow up/down
buttons.
> Reset
‘Enter to go’
Menu
The “>” marker is down to the value level so you can
change the setting.
Reset
> Enter to go
> Reset
‘Enter’ to go
Page 67
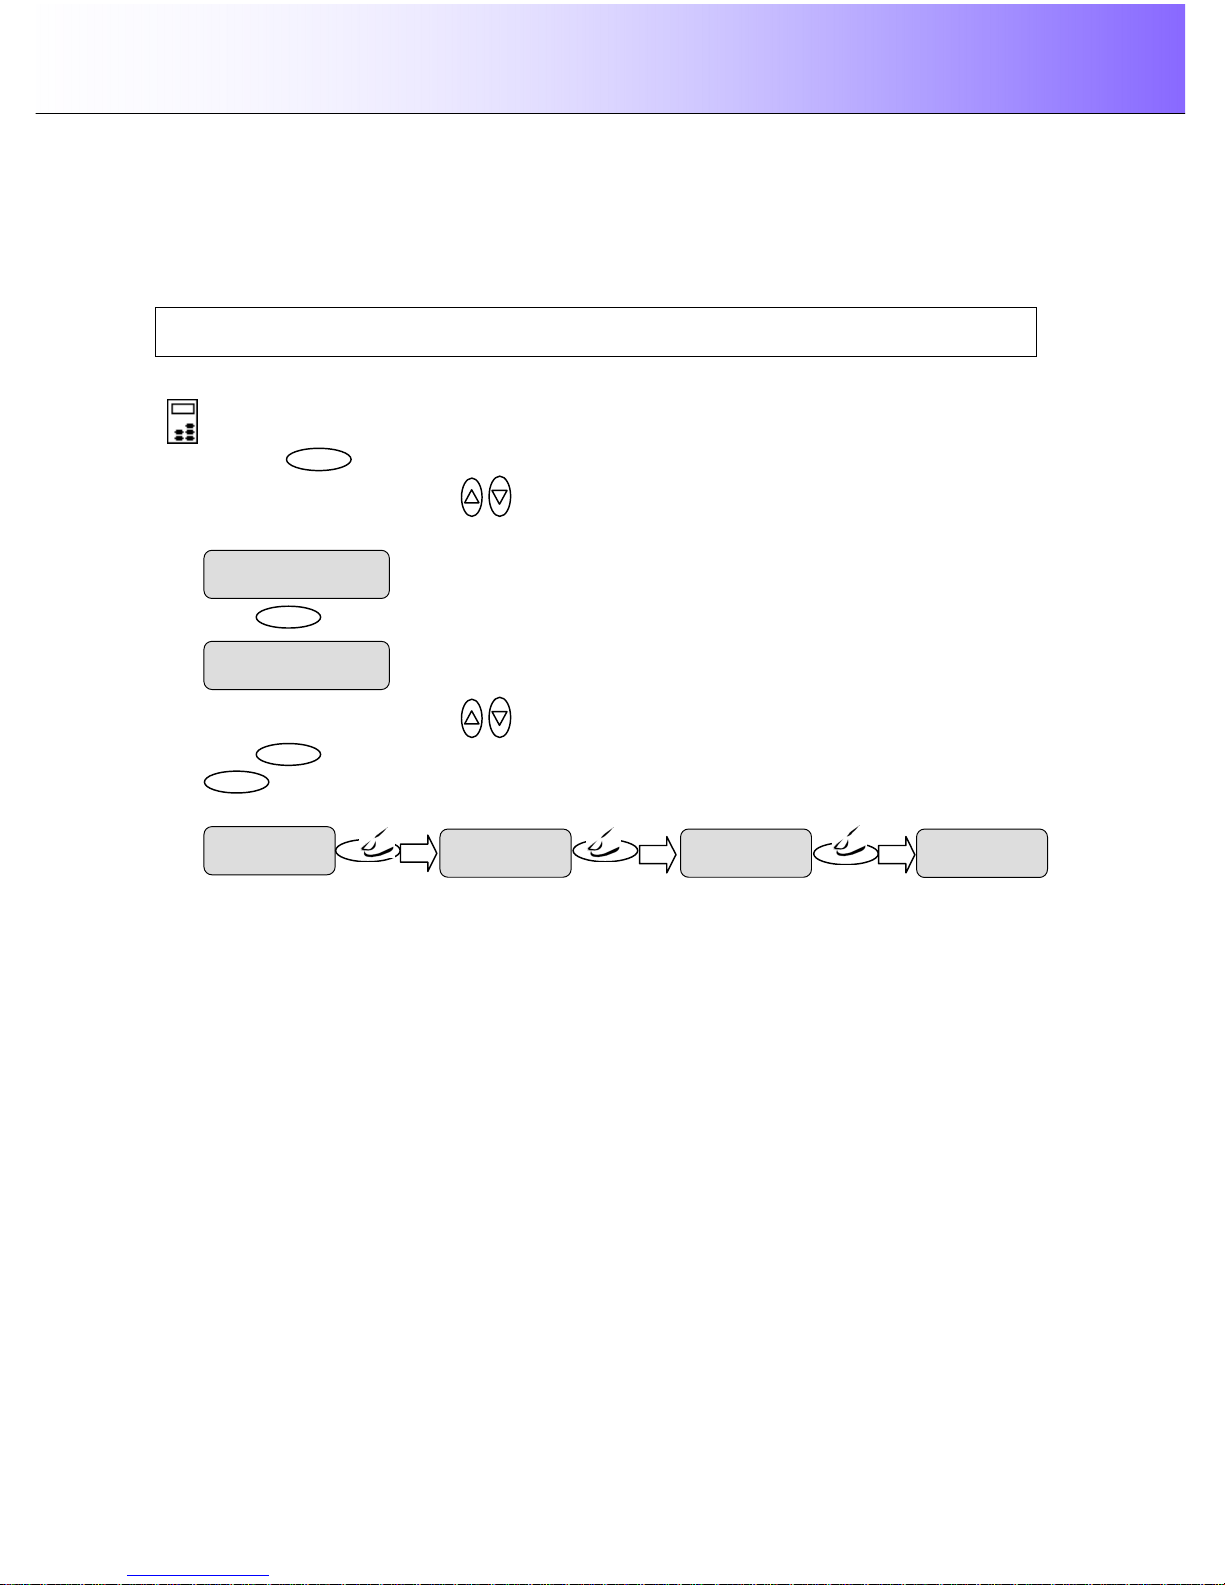
Using the scanner, how do I … Copy? 5-15
5.3.9 The Advanced option
The Advanced option The Advanced option leads to submenus containing options related to the scanner
device and not to actual copy or scan settings. Most of the Advnaced options are for system
administrators who are configuring the system to match the company’s business.
The options in the Advanced submenus are described in the sections on Scanner Configuration
and Setup and the sections on Scanner Maintenance.
To reach the Advanced options:
On the iJET Panel –
1. Press the button to enter the main Menu.
2. Use the arrow up/down buttons to move through the Menu options until the display shows
Advanced as shown below.
3. Press
Enter
to reach the first Advanced menu option Printer Setup.
4. Use the arrow up/down buttons to move through the Advanced submenu options.
5. Press
Enter
to enter an option. Some options will require one or more additional presses to the
Enter
button to reach underlying options and settings as shown in the example below in which the
system administrator wants to change the color printer’s interface type.
Printer Setup
…
Enter
Color Printer
…
Entert
> Interface
LAN
Enter
Interface
> LAN
Menu
> Printer Setup
…
> Advanced
…
Page 68

Using the scanner, how do I … Copy? 5-16
5.4 Using Copy Software with the scanner (local or network PC)
Your scanner can also be used with compatible copy software from a locally connected or network PC. If
the scanner is connected to the LAN, network PCs will be able to “share” the scanner and control it with
compatible copy software and use it with network printers. Naturally, compatible copy software can also
be applied in a stand alone local PC/printer configuration.
The “Scan/Copy station on Local PC” configuration was described in the section on “Setup and
Configuration”. Copying or scanning to file with this configuration can take place through software
installed on the PC. The software would control the scanner and all settings and operation would take
place from the PC.
If the scanner is connected and setup with network identification on the LAN, PCs on the LAN can
recognize and use the scanner (share) if compatible scan or copy software is installed on the PC. The
PCs must also have WIDEsystemNET installed.
Please refer to the scan/copy software documentation and on-line help for the most up-to-date
instructions on using the specific software application with the scanner.
Be sure to view the on-line help for WIDEsystemNET for information on scanner sharing and scanning to
a designated folder (to a network PC) on the LAN.
Please refer to this User’s Guide section on Scanner On Network Setup Settings for details on
enabling your scanner to be recognized on the LAN and shared by network PCs.
Page 69
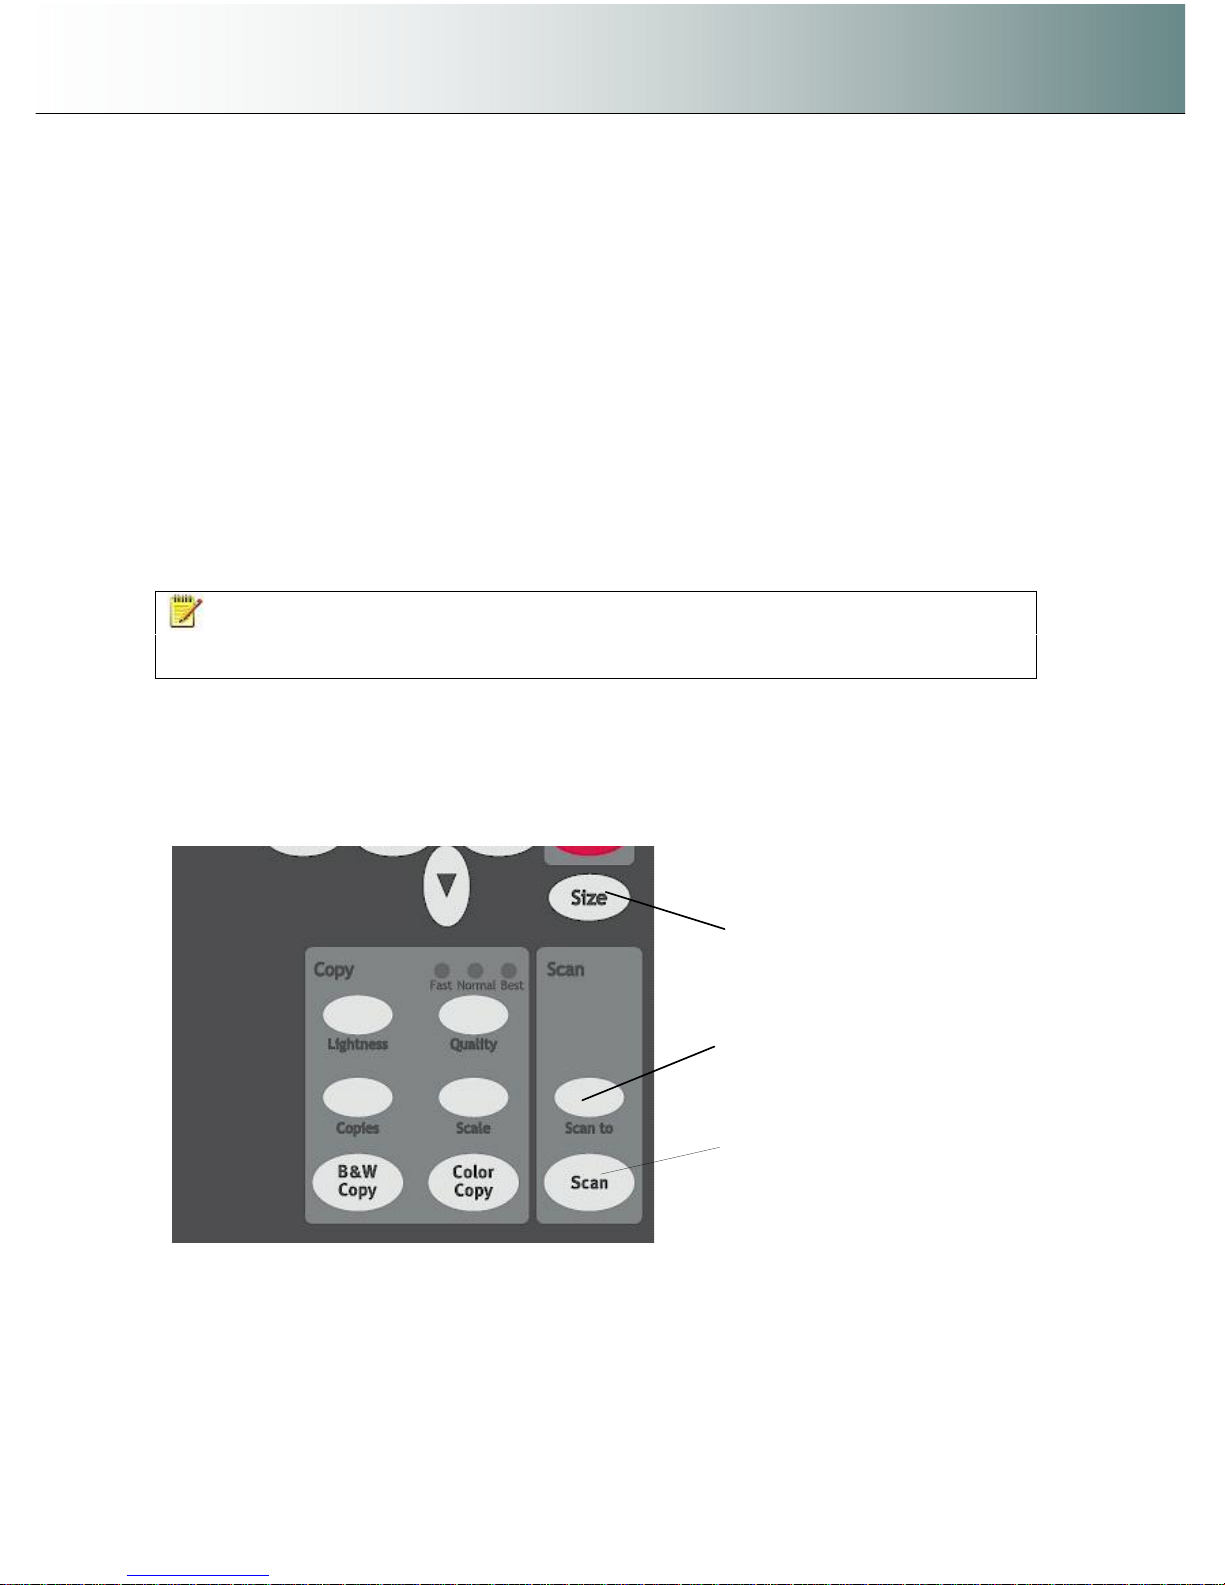
Using the scanner, how do I … Scan to File? 6-1
6. How do I Scan to File?
Scan-to-file means that you save the image in a file format on a PC’s hard disk rather than outputting
directly to a printer (copy). Scans cannot be saved in the scanner itself. In order to scan and save the
image in a file, your system must recognize a PC. Therefore, the configuration must include a PC, either
directly through USB or else through the network. The PC must have WIDEsystemNET installed. Your
system can scan to file if:
1. Your scanner is connected to the network through the LAN interface and Scan2Net Designated
Folder functionality has been configured in WIDEsystemNET on each PC so that a special scan input
folder is defined on the PC and the PC will be recognized by the scanner.
2. Your scanner is connected to a local PC through USB and Scan2Net Designated Folder functionality
has been configured in WIDEsystemNET on that PC so that a special scan input folder is defined on
the PC and the PC will be recognized by the scanner.
3. Your scanner is connected to the network through the LAN interface. The scanner has been enabled
for access from the PC’s on the LAN by setting the scanner’s Share option to YES (see section:
Setup to Share the Scanner). The PC’s on the LAN are setup to recognize the shared scanner with
WIDEsystemNET software and compatible scan/copy software.
NOTE: WIDEsystemNET software is on the WIDEsystem TOOLS CD that came with your scanner.
See the CD’s included documentation and your WIDEsystemNET software on-line help for instructions on
installing and configuring a PC for Designated Folder functionality.
This section will focus on the first and second scan-to-file scenario in which you use the iJET
Panel to select a scan target and scan to a designated folder.
You will use the iJET Panel’s Scan to button to make all your settings for a scan to file job and the Scan
button to start it. You will use the Size button to enter the original’s size before pressing the Scan button
(unless scanning the whole original with Auto size). Details follow in the next section.
Scan button – start
the scan job.
Size Button – set
the original
’s size.
(Skip if set to Auto)
Scan to Button -
set scan to file
target and options
Page 70
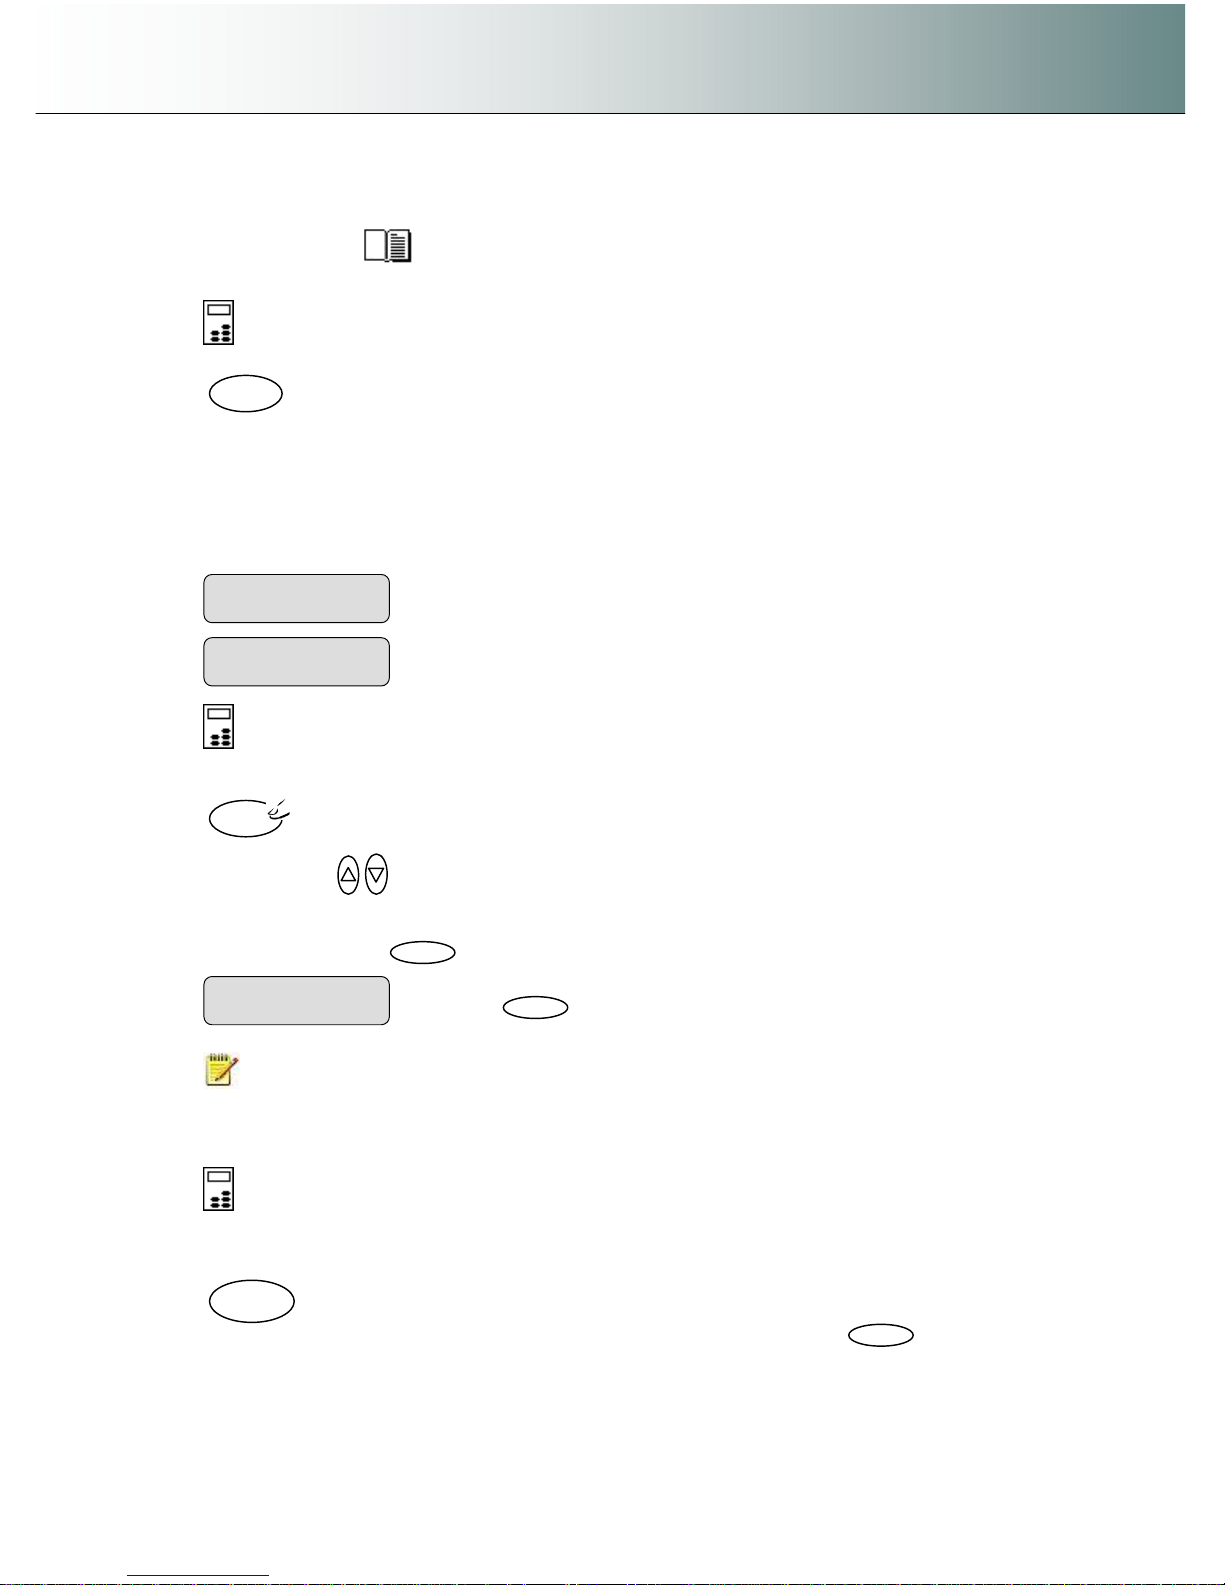
Using the scanner, how do I … Scan to File? 6-2
6.1 Scan to Local or Network PC with the iJET Panel
1. Load your original. See the section “How do I load originals?” for information regarding your
specific scanner model.
2. On the iJET Panel –Select the Scan to button. The first of the recognized scan targets (PCs) will
be displayed.
3. Repeated pressing on the Scan to button will step through the list of recognized scan targets (PCs).
Stop when the right scan target is displayed. A target name that includes “(USB)” will be a PC
connected directly to the scanner. “No Clients” will be displayed if no PCs with Designated Folder
functionality were detected locally or on the network. See your WIDEsystemNET help for instructions
on setting a PC for Designated Folder functionality with a scanner connected directly to the LAN.
4. Set the Size of your original
The value your set here determines the scan area. Usually this would be the size of the original
unless you wish only to input a portion. Press the Size button to activate size setting.
You then change the value each time you again press the Size button or with the arrow
up/down buttons . You can select Auto detection or a standard size setting. Auto will detect the
edges of the original and always set the scan area to the full original size every time. You will
probably use Auto for most jobs. You can always crop the image in an image editor on the PC after
scanning-to-file. Press
Enter
to confirm your setting.
NOTE: About the Size value: Size is a global system variable that can be changed in 3 different
ways: 1. With the Size button 2. With the Menu button > Size option and 3. With the Scan to button >
Size option. This means that when you change the size for a copy job, it will also apply for a scan-tofile job and vise versa until you change it again.
5. Make your scan-to-file settings. The latest (or “default” if none were made) scan to file settings
are always attached to the scan target, so each available scan target will have stored its own settings.
If you know your target’s settings to be correct for your current job, press the Scan button to send the
scan. Otherwise, continue to the next step.
6. If you want to change the scan-to-file settings - Confirm the scan target with
Enter
to move into
the Scan-to-File Menu. The first Scan-to-File Menu option Scan Mode will be shown in the display.
Size
Change the value (Auto or a standard size) and
press
Enter
to confirm.
Size
> Auto
Local PC set as scan target
Scan to
PC_nr8 (USB)
Network PC named “PC_nr3” set as scan target
Scan to
PC_nr3
Scan
Scan to
Page 71
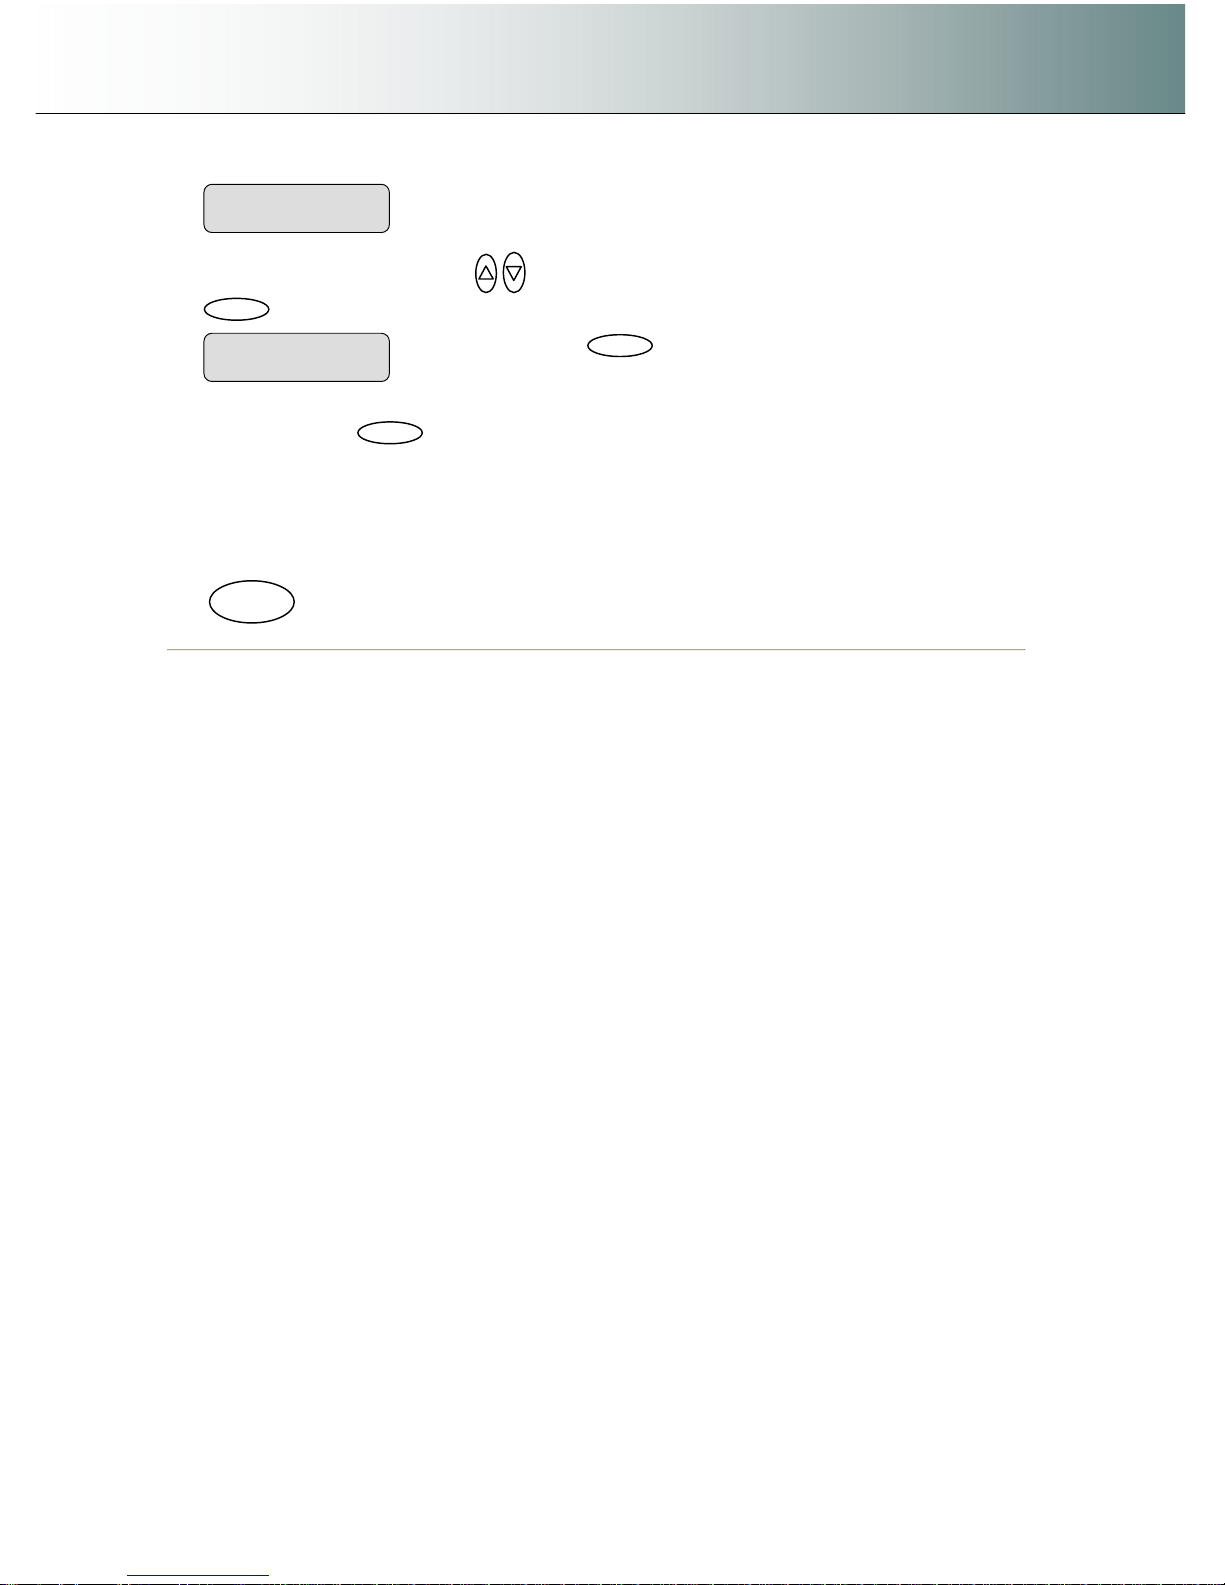
Using the scanner, how do I … Scan to File? 6-3
7. Press the arrow up/down buttons to move through the options in the Scan-to-File Menu. Press
Enter
to move the “>” marker down so you can change the current option’s value.
8. The Scan-to-File Menu will take you through different options. Each option must be confirmed by
pressing the Enter
Enter
button. The Scan-to-File Menu and its options are described in the
next section.
9. Your new scan-to-file settings will be tied to and stored with the target PC name you selected in step
3 and they will be recalled next time you select the same target PC from the iJET Panel.
10. When you have finished making your settings, press the Scan button to send your scan to the target
PC.
Scan
When you press
Enter
, the “> “marker moves
down indicating you can change the option value.
Scan Mode
> 24-bit Color
Entry into the Scan-to-File Menu
> Scan Mode
24-bit Color
Page 72
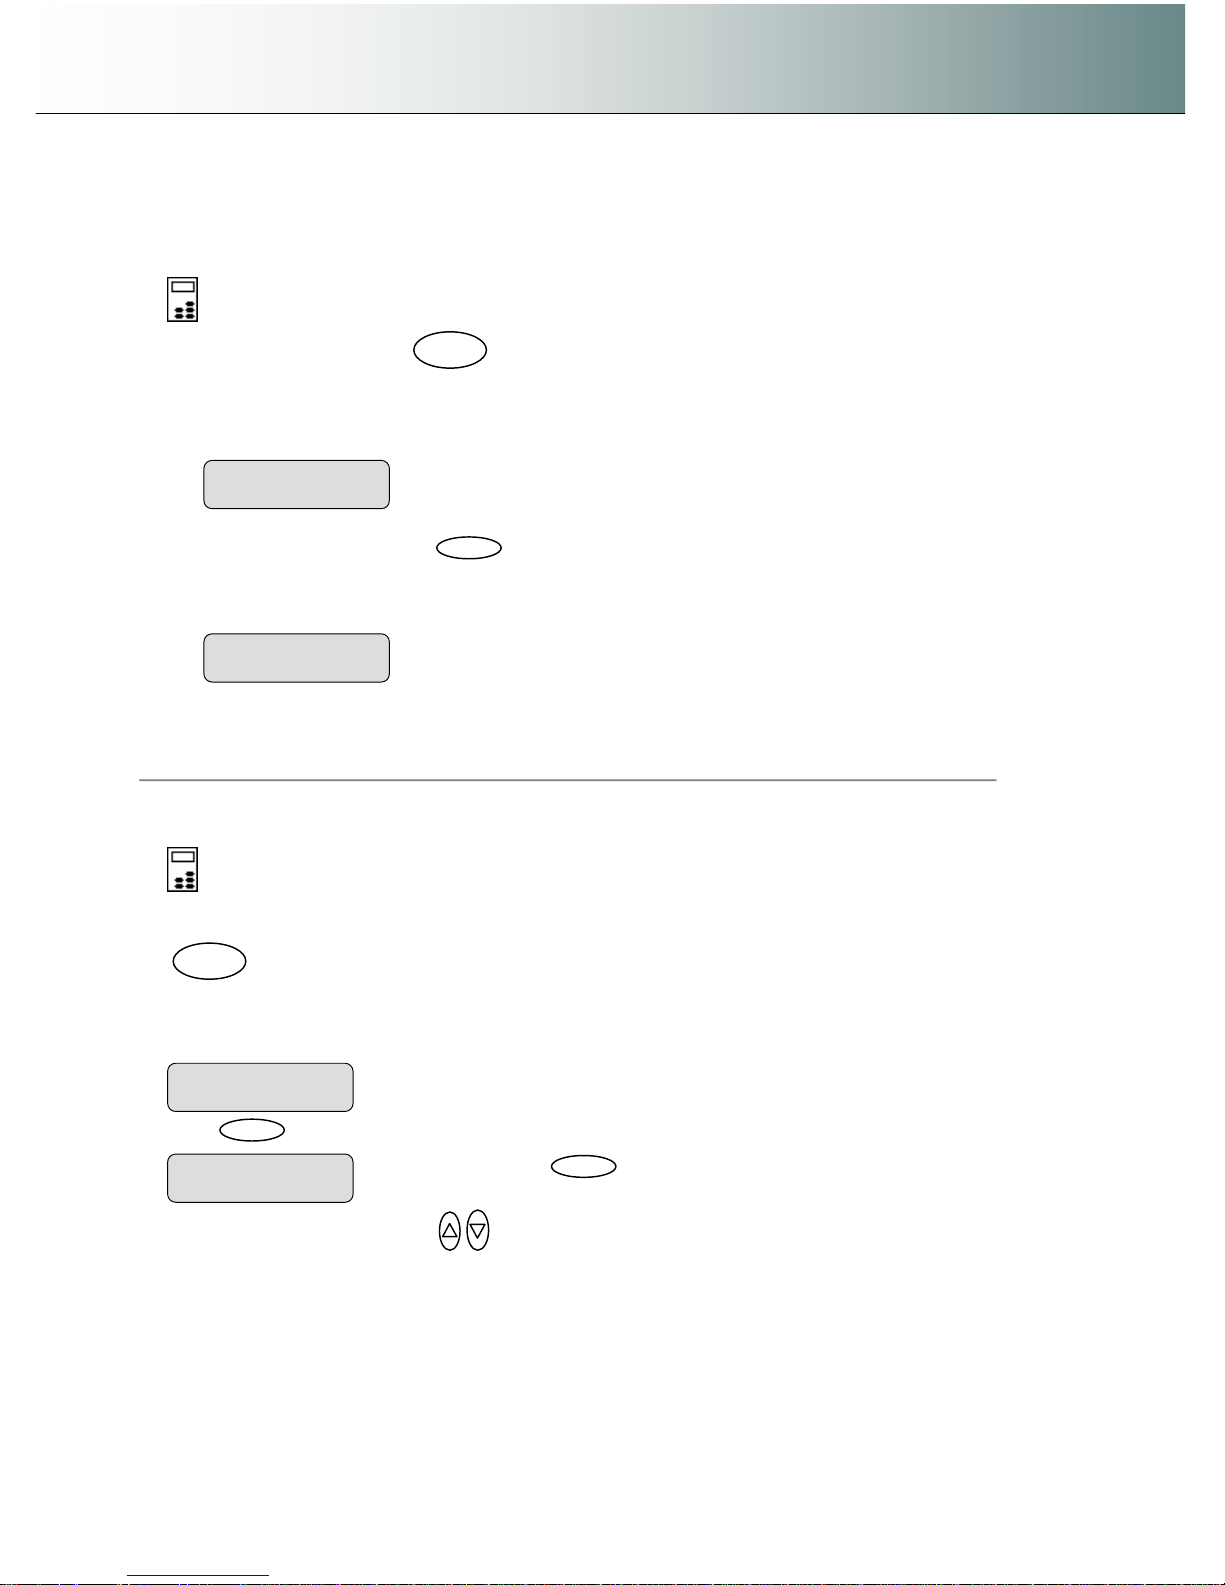
Using the scanner, how do I … Scan to File? 6-4
6.2 Scan-to-File Menu Options – iJET Panel
6.2.1 Enter the iJET Panel Scan-to-File Menu
On the iJET Panel –
1. Select the Scan to button
2. Select the scan target.
3. Confirm the scan target with
Enter
to start the Scan-to-File menu.
4. The first Scan-to-File Menu option Scan Mode will be shown in the display.
6.2.2 Set the Scan Mode
On the iJET Panel –
1. If you are not already in the Scan-to-File menu, start/enter the menu with the Scan to button as described
in the beginning of this section.
.
2. The first Scan-to-File Menu option is the Scan Mode. Your display should look as follows: will be shown in
the display.
3. Press
Enter
to move the “>” marker down so you can change the current option’s value if needed.
4. Press the arrow up/down buttons to move through the values for the Scan Mode option. The
following Scan Modes are available:
Network PC named “PC_nrX” set as scan target
Scan to
PC_nrX
Scan to
When you press
Enter
, the “> “marker moves
down indicating you can change the option value.
Scan Mode
> 24-bit Color
Entry into the Scan-to-File Menu
> Scan Mode
24-bit Color
Scan to
Entry into the Scan-to-File Menu
> Scan Mode
24-bit Color
Page 73
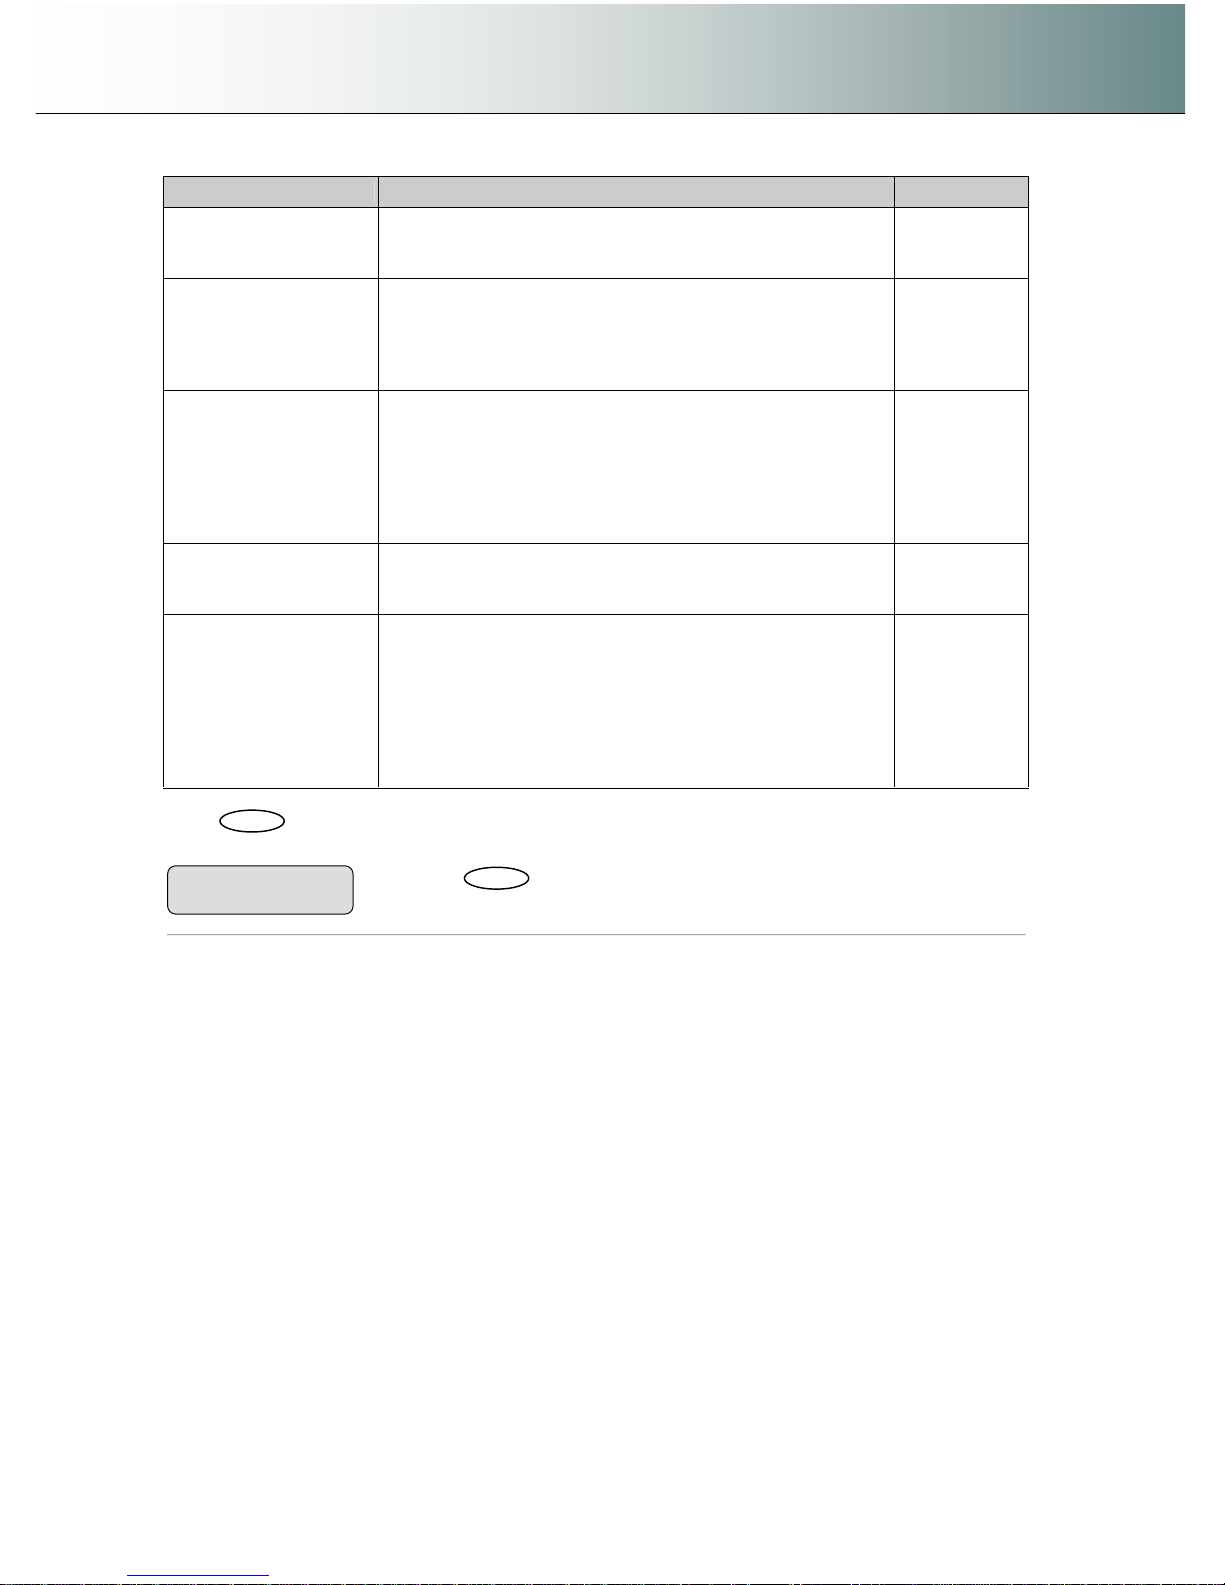
Using the scanner, how do I … Scan to File? 6-5
Scan Mode What it Does / Usage Adjustments
B&W Threshold This mode uses thresholds to determine whether a pixel is
black or white. Use this mode for drawings and line art. You
can set the threshold value (Level). Default value is 151.
Level
B&W Adaptive
Adaptive enhancement for line images. Suitable for scanning
all kinds of drawings including difficult blueprints, brown
transparencies (sepias), etc. You set Adaptive level. Provides
minimum file sizes and is thereby, well suited for digitizing.
Level
B&W Copy Adaptive
Adaptive enhancement on foreground and background. This
mode is suitable for copying (scan and print) of Sepia,
Blueprint and other originals with heavily distorted foregrounds
and backgrounds where the shades that create unwanted
"noise" are close to the shades that make up the image's data
and the two are hard to differentiate.
Level
soften/sharpen
Graytone In this mode 256 gray levels are recognized for each pixel.
Graytone mode creates good reproductions of complicated
B/W images like B/W photos.
Gamma
Sharpen
24-bit Color
This is the 24 bit true color mode for capturing all of the
image's colors with the closest reproduction. This mode
produces large files since all colors, even shades with only
slight differences, are captured and produced. You use this
mode when you want accurate reproduction of complicated
color images like color photos and posters. You can make
tonal adjustments through a Gamma value.
Gamma
Sharpen
5. Press
Enter
to accept the Scan Mode and move the “>” marker back up. From here you can set the
Scan Mode parameter (Level or Gamma). See details below.
Press
Enter
to accept the Scan Mode. The “>
“marker moves back up.
> Scan Mode
Graytone
Page 74
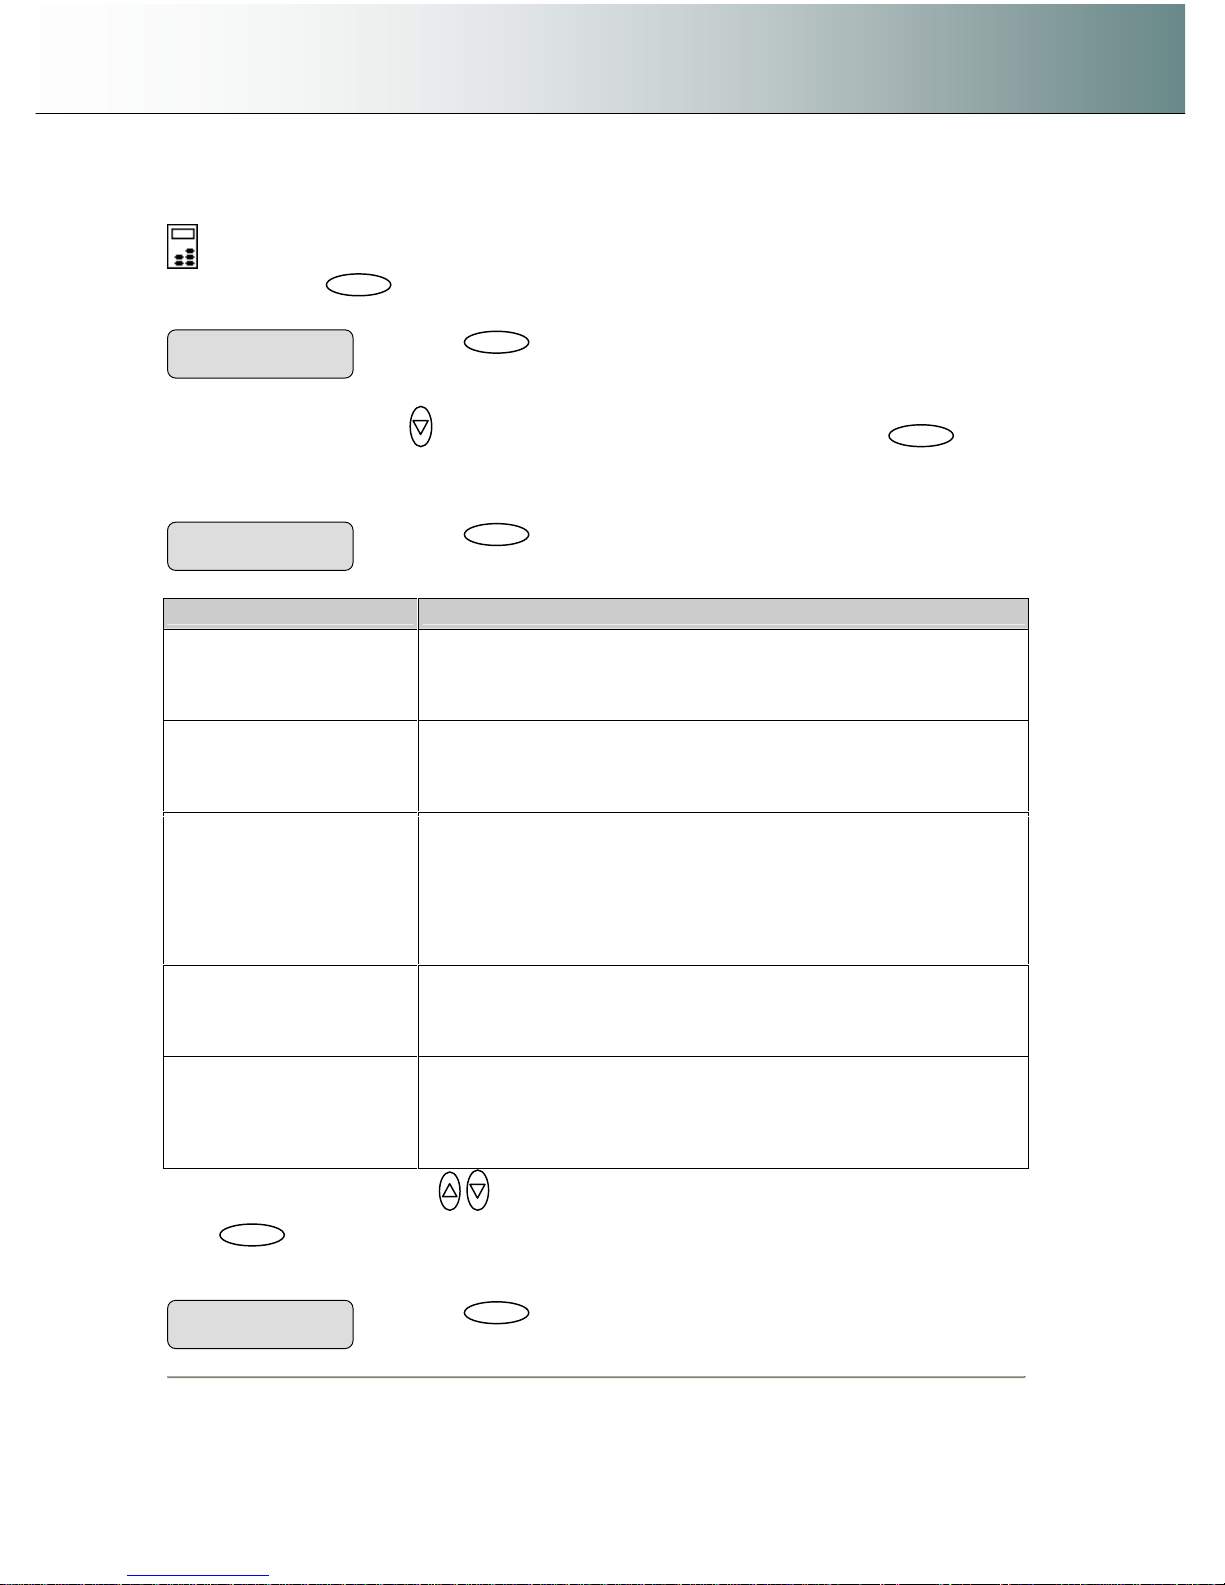
Using the scanner, how do I … Scan to File? 6-6
6.2.3 Set the Scan Mode Parameters – Level or Gamma
On the iJET Panel –
1. When you pressed
Enter
to accept the Scan Mode, the “>” marker moved back up to the option text
“Scan Mode”.. From here you can set the current Scan Mode parameter.
2. Press the arrow down button to move to the Scan Mode’s parameter option and then
Enter
to
indicate you want to change it. If you selected B&W Threshold, B&W Adaptive or B&W Copy Adaptive, the
parameter option will be Level. If you selected Graytone or Color, the parameter option will be Gamma.
Use the guidelines in the table below to make your setting.
Scan Mode Adjustment – what it does
B&W Threshold Level in this scan mode is the threshold value. Values between 0-255.
The
default is 151. When scanning at a specific threshold value, all gray tones
below the threshold will be represented as black pixels, and all gray tones
above will be represented as white pixels.
B&W Adaptive
B&W Adaptive Level works like a threshold - the lower the value, the more
of the background is picked up during scanning. Values between 0-255.
Default is 0.
B&W Copy Adaptive
B&W Copy Adaptive Level works like a threshold - the lower the value, the
more of the background is picked up during scanning. Adaptive
enhancement features are automatically applied in this copy mode, with
simultaneous processing on different image aspects. You only have to
adjust the adaptive "Level" to determine the best degree of enhancement
processing for your specific image. Values between 0-255. Default is 0.
Graytone Gamma – Values between 0.1 and 3.0. Default is 1.0. Pixels are
intensified according to a gamma c
urve they are mapped to. A low gamma
value smaller than 1.0 darkens the output while a high gamma value
larger than 1.0 typically lightens the shadow areas and brings out detail.
24-bit Color
Gamma– Values between 0.1 and 3.0. Default is 1.0. Pixels are intensified
according to a gamma curve they are mapped to. A low gamma value
smaller than 1.0 darkens the output while a high gamma value larger than
1.0 typically lightens the shadow areas and brings out detail.
3. Press the arrow up/down buttons to change the value displayed.
4. Press
Enter
to accept the new parameter value for the current Scan Mode The “>” marker moves back
up back up to the Scan-to-File Menu level. From here you can move on and make more Scan-to-file menu
settings.
Press
Enter
to indicate you want to change the
value. The > marker will move down..
Gamma
> 1.00
Press
Enter
to accept the parameter value.
> Gamma
0.70
Press
Enter
to accept the Scan Mode. The “>
“marker moves back up.
> Scan Mode
Graytone
Page 75
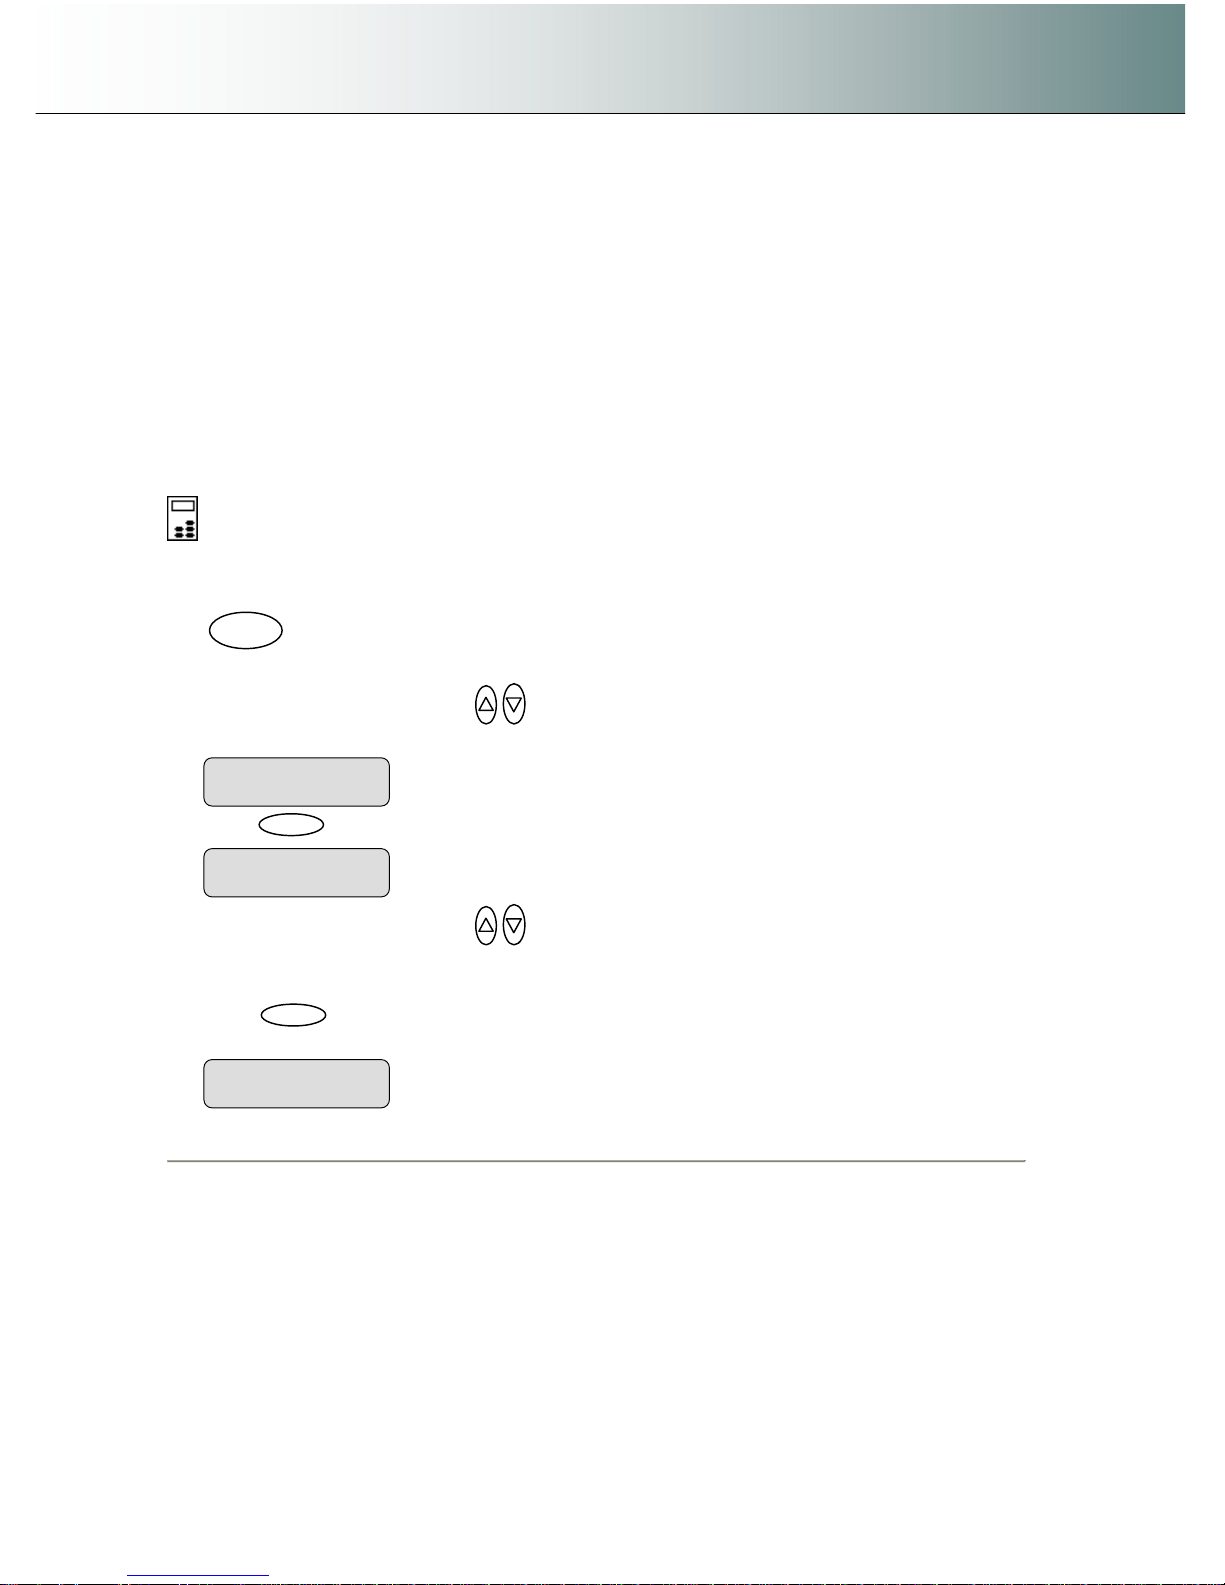
Using the scanner, how do I … Scan to File? 6-7
6.2.4 Set the Scan-to-File Resolution
This is where you determine image quality. Note that high resolutions create large files. 300 dpi or more is
adequate for printing. Certain maps and CAD drawings with high levels of detail require high resolutions.
CAD processing of the image may also require that you select a high resolution. The Dpi (dot per inch)
range selectable is from 50 to 9600. Dpi value settings below or equal to the scanners optical dpi will give
pure optical resolutions without interpolation.
Interpolation involves resampling through adding pixels between original pixels to increase resolution
beyond the actual number of CCD cells (optical resolution). The new pixel’s colors and intensities are
calculated on the basis of their surrounding pixels. See your scanner model specifications to view the
scanner’s optical resolution.
To set the Scan-to-File Resolution:
On the iJET Panel –
1. If you are not already in the Scan-to-File menu, start/enter the menu with the Scan to button as
described in the beginning of this section.
.
2. Press the arrow up/down buttons to move through the Scan-to-File Menu options until the
display shows Resolution.
3. Press
Enter
to move the “>” marker down to indicate you want to change the resolution value.
4. Press the arrow up/down buttons to change the Resolution value. You can select from a list of
pre-defined resolution (dpi) values (50, 100, 200, 300 …9600). Resolution values above the
scanner’s optical resolution will use interpolation.
5. Press
Enter
to accept the selected value and move the “>” marker back up to the Scan-to-File
Menu level so you are ready to move on to the next Scan-to-File setting.
The “>” marker is back up to the Scan-to-
File Menu
level.
> Resolution
353
The “>” marker is down to the value leve
l so you can
change the value.
Resolution
> 200
> Resolution
200
Scan to
Page 76
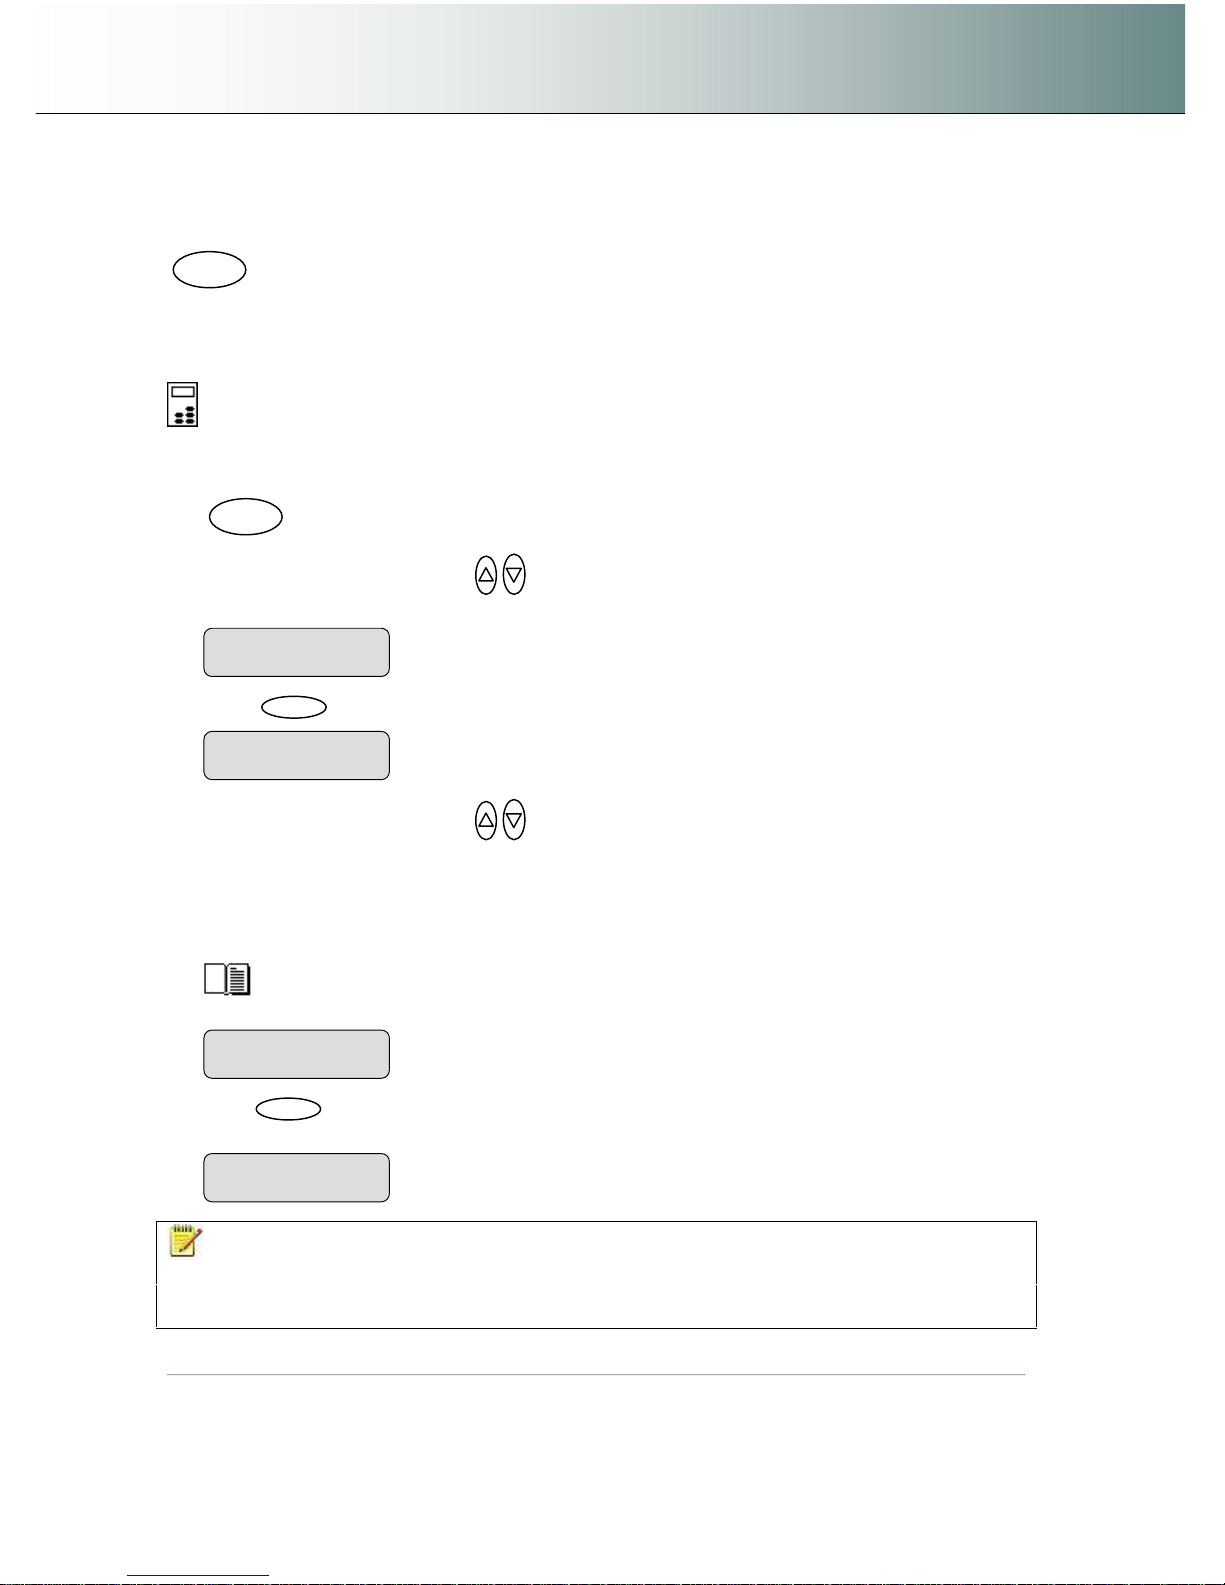
Using the scanner, how do I … Scan to File? 6-8
6.2.5 Set the Scan-to-File Size (input size)
This same Scan-to-File Menu option can also be reached by pressing the function Size button.
The value you set here determines the scan area. Usually this would be the size of the original unless you
wish only to input a portion.
To set the Scan-to-File Size:
On the iJET Panel –
1. If you are not already in the Scan-to-File menu, start/enter the menu with the Scan to button as
described in the beginning of this section.
2. Press the arrow up/down buttons to move through the Scan-to-File Menu options until the
display shows Size.
3. Press
Enter
to move the “>” marker down to indicate you want to change the Size value.
4. Press the arrow up/down buttons to change the Size value.
5. The Auto option will detect the edges of the original and set the scan area to the full original size.
This is the recommended setting. If necessary, you can later crop the image in an image editor
after it has been saved to the target PC.
The standard sizes shown are those that belong to the Paper Series you selected through Menu >
Advanced > Options > Paper Series.
See this guide’s section on “Personalizing and Localizing the System” for details on selecting a
Paper Series preference.
6. Press
Enter
to accept the selected value and move the “>” marker back up to the Scan-to-File
Menu level so you are ready to move on to the next Scan-to-File setting.
NOTE: About the Size value: Size is a global system variable that can be changed in 3 different
ways: 1. With the Size button 2. With the Menu button > Size option and 3. With the Scan-to button > Size
option. This means that when you change the size for a copy job, it will also apply for a scan-to-file job
and vise versa until you change it again.
.
Size
> Auto
The “>” marker is back up to the Scan-to-
File Menu
level.
> Size
Auto
The “>” marker is down to the value level so you can
change the value.
Size
> A3
> Size
A3
Scan to
Size
Page 77
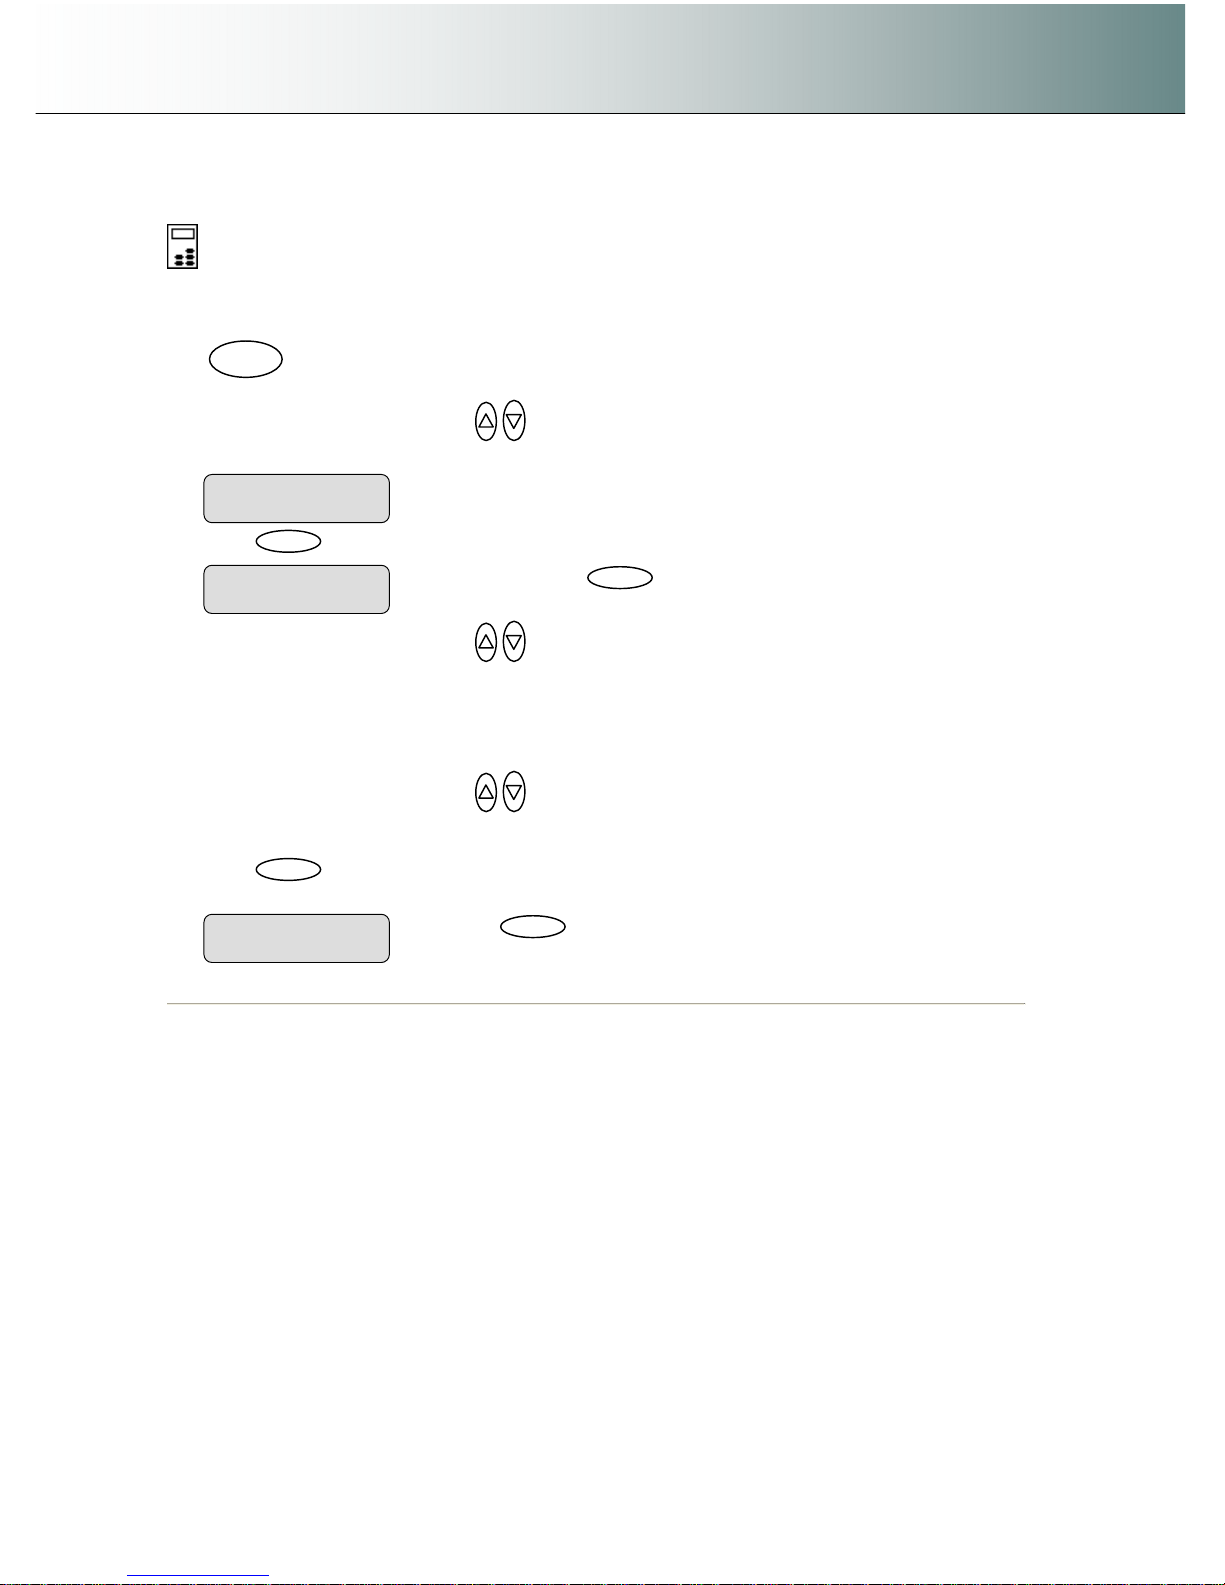
Using the scanner, how do I … Scan to File? 6-9
6.2.6 Set the File Format ( TIFF, JPEG, PDF )
On the iJET Panel –
1. If you are not already in the Scan-to-File menu, start/enter the menu with the Scan to button as
described in the beginning of this section.
.
2. Press the arrow up/down buttons to move through the Scan-to-File Menu options until the
display shows File Format.
3. Press
Enter
to move the “>” marker down so you can change the current option’s value if needed.
4. Press the arrow up/down buttons to move through the values for the File Format option. The
following File Formats are available.
5. PDF – If selected you can set a quality factor from 1 to 100. 70 is default.
6. JPG – If selected you can set a quality factor from 1 to 100. 70 is default.
7. TIFF – If selected you can set quality to Uncompressed or PackBits.
8. Press the arrow up/down buttons to change the value displayed.
9. Press
Enter
to accept the File Format and move the “>” marker back up. From here you can set
the File Format quality. See details below.
Press
Enter
to accept the File Format. The “>
“marker moves back up.
> File Format
JPEG
> File Format
PDF
Scan to
When you press
Enter
, the “> “marker moves
down indicating you can change the option value.
File Format
> PDF
Page 78
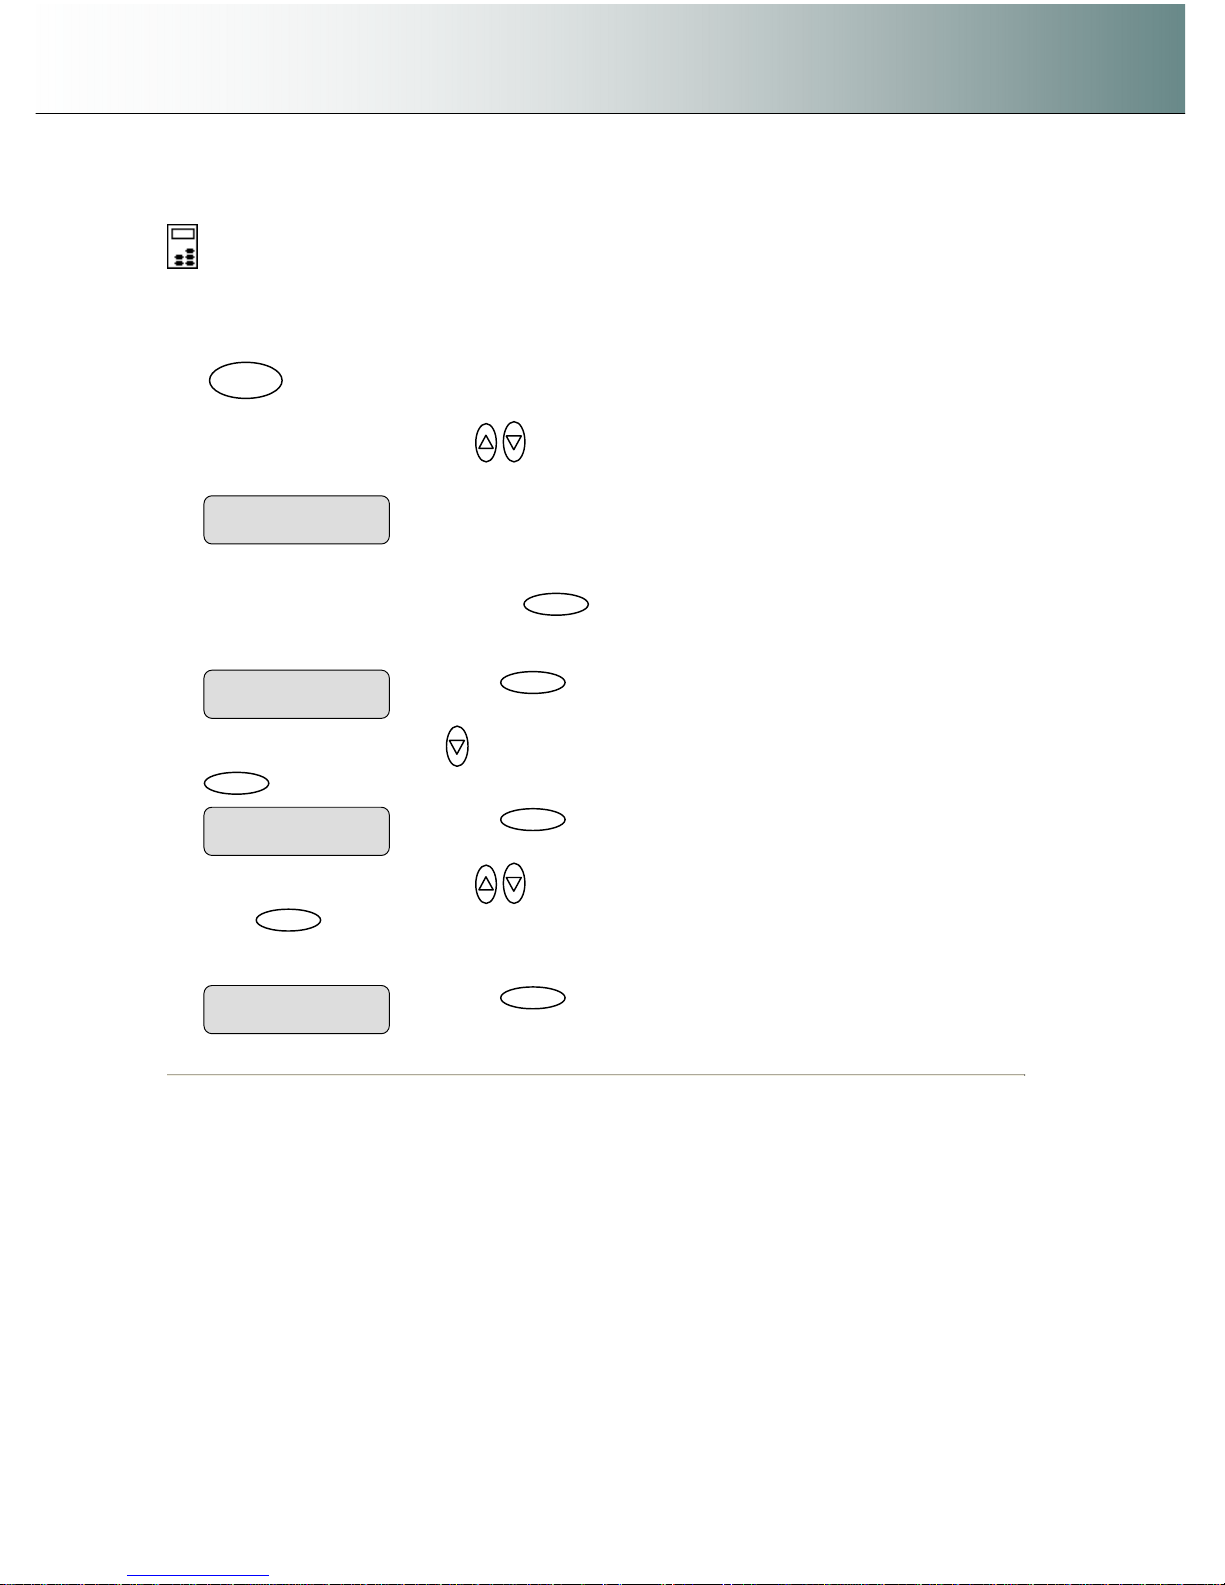
Using the scanner, how do I … Scan to File? 6-10
6.2.7 Set the File Format Quality
On the iJET Panel –
1. If you are not already in the Scan-to-File menu, and want to change the Quality value for the
current file format setting - start/enter the menu with the Scan to button as described in the
beginning of this section.
.
2. Press the arrow up/down buttons to move through the Scan-to-File Menu options until the
display shows File Format. Then move on to step 4.
3. If you are in the Scan-to-File menu and have just selected a File Format as described in the
previous section - When you pressed
Enter
to accept the File Format, the “>” marker moved
back up to the option text “File Format”. From here you can move forward in the Scan-to-File Menu to
set the File Format quality parameter.
4. Press the arrow down button to move to the File Format’s Quality parameter option and then
Enter
to indicate you want to change it.
5. Press the arrow up/down buttons to change the value displayed.
6. Press
Enter
to accept the new quality value for the current File Format The “>” marker moves back
up back up to the Scan-to-File Menu level. From here you can move on and make more Scan-to-file
menu settings.
> File Format
JPEG
Scan to
Press
Enter
to indicate you want to change the
value. The > marker will move down..
JPEG Quality
> 70
Press
Enter
to accept the parameter value.
> JPEG Quality
100
Press
Enter
to accept the File Format. The “>
“marker moves back up.
> File Format
JPEG
Page 79

Using the scanner, how do I … Scan to File? 6-11
6.2.8 Using Scan Software – From Local PC or Network PC
The “Scan/Copy station on Local PC” configuration was described in the section on “Setup and
Configuration”. Scanning to file with this configuration can take place through scan software installed
on the PC. The software would control the scanner and all settings and operation would take place from
the PC.
If the scanner is connected and setup with network identification on the LAN and is enabled for sharing,
PCs on the LAN can recognize and use the scanner if compatible scan or copy software is installed on the
PC. The PCs must also have WIDEsystemNET installed.
For both of these cases, please refer to the scan/copy software documentation and on-line help for the
most up-to-date instructions on using the specific software application with the scanner.
Be sure to view the on-line help for WIDEsystemNET for information on setting up the parameters
necessary for scanner sharing and scanning to a designated folder (to a network PC) on the LAN.
Please refer to this User’s Guide section on Scanner On Network Setup and Setup to Share the
Scanner for details on enabling your scanner to be recognized on the LAN and shared by network PCs.
Page 80
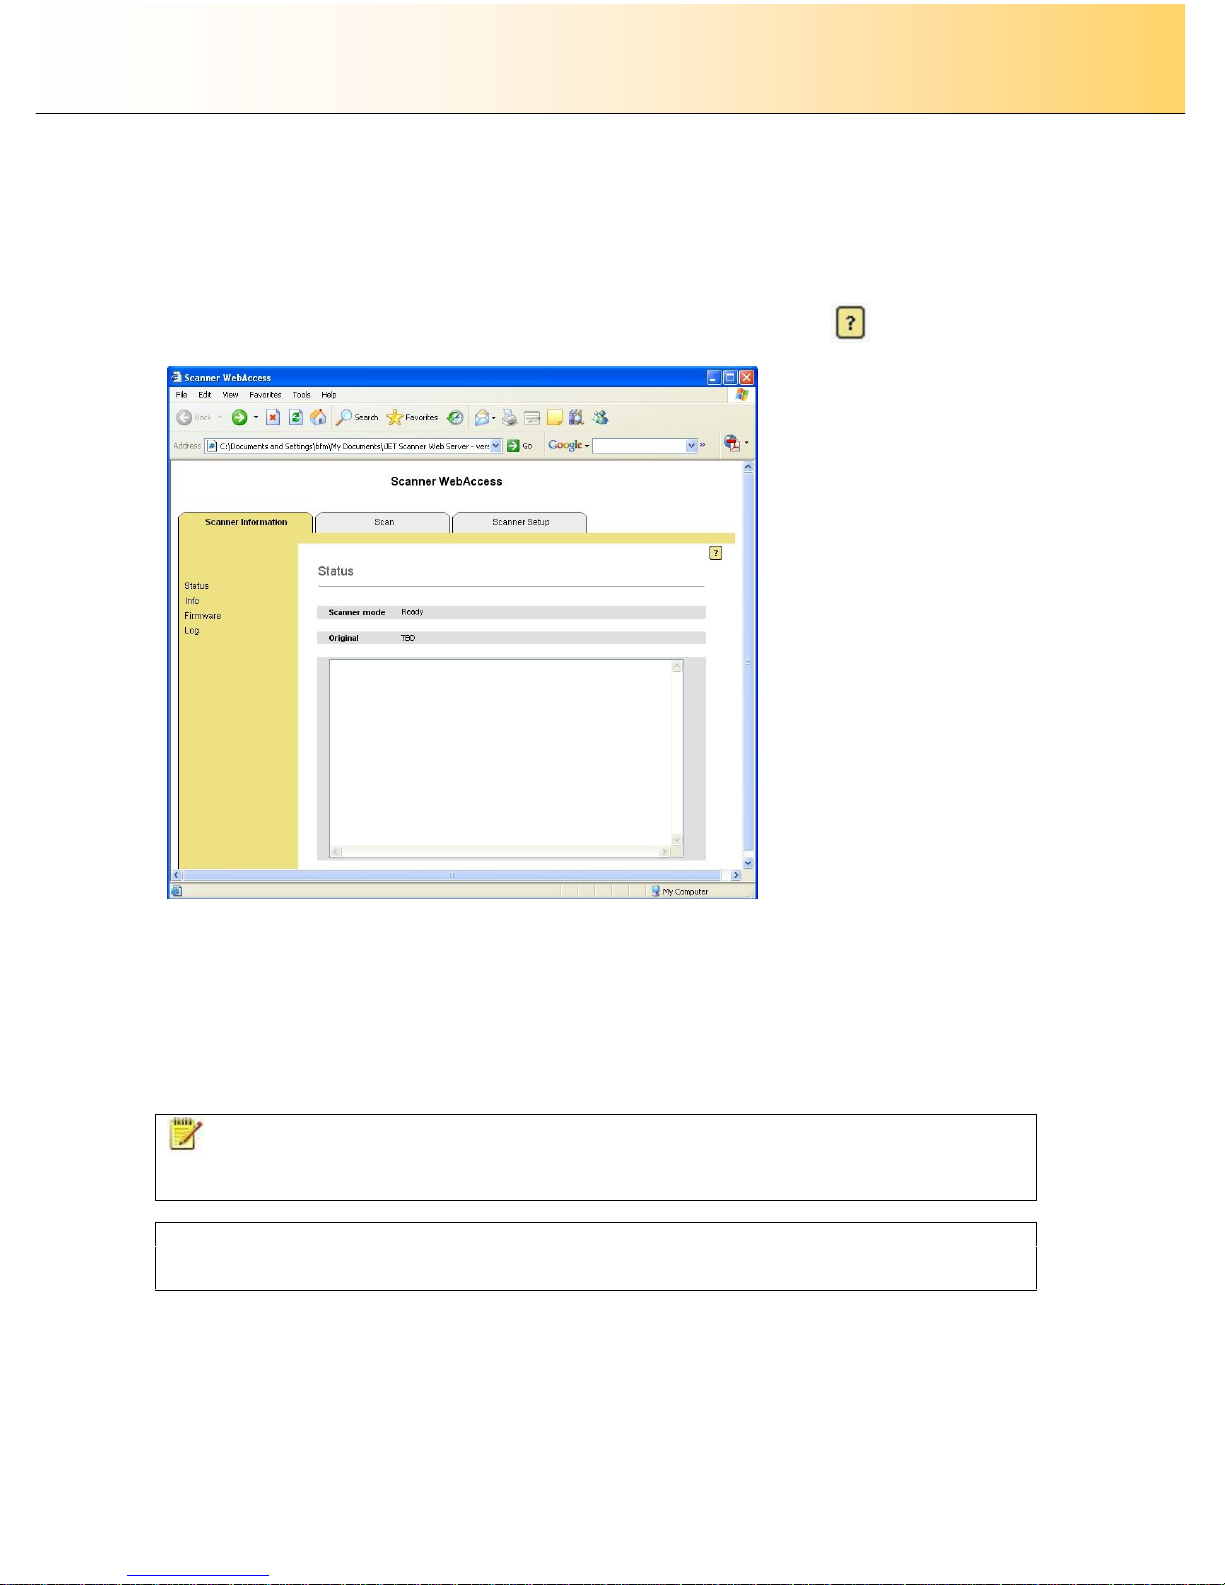
Web Access Interface 7-1
7. Using the Web Access Interface – Setup, Monitor, Scan
The iJET scanner supports an embedded web server and a file storage area. The embedded web server
provides a Web Access Interface that enables users to communicate and control the scanner from a PC
on the LAN through the PC’s web browser, thus bypassing special software and OS compatibility issues.
To access the scanner, users just start their browser and enter the scanner’s IP address. Detailed
instructions for using the interface can be viewed when you press the help button:
Here are some of the things you can do through the Web Access Interface:
Monitor scanner information – view device status, firmware versions and the scanner’s log.
Configure your scanner – setup options for language, network, date/time, media feeding. Make
scanner-printer communication settings and network setting. Set a timer for automatic sleep and
wake-up and set security on the Web Access Interface.
Scan – Send a scan to the internal file storage in the scanner and then download the file from
the scanner to your PC. The interface offers a range of scan options.
NOTE: A number of the iJET panel’s scanner setup and configuration options can instead be applied
from the Web Access Interface through a PC’s browser and some users may prefer this to using the iJET
panel menus and buttons.
On-line Help
The Web Access Interface includes on-line help. Please refer to the Web Access Interface online help for
detailed instructions on all the available Web Access Interface options.
Page 81
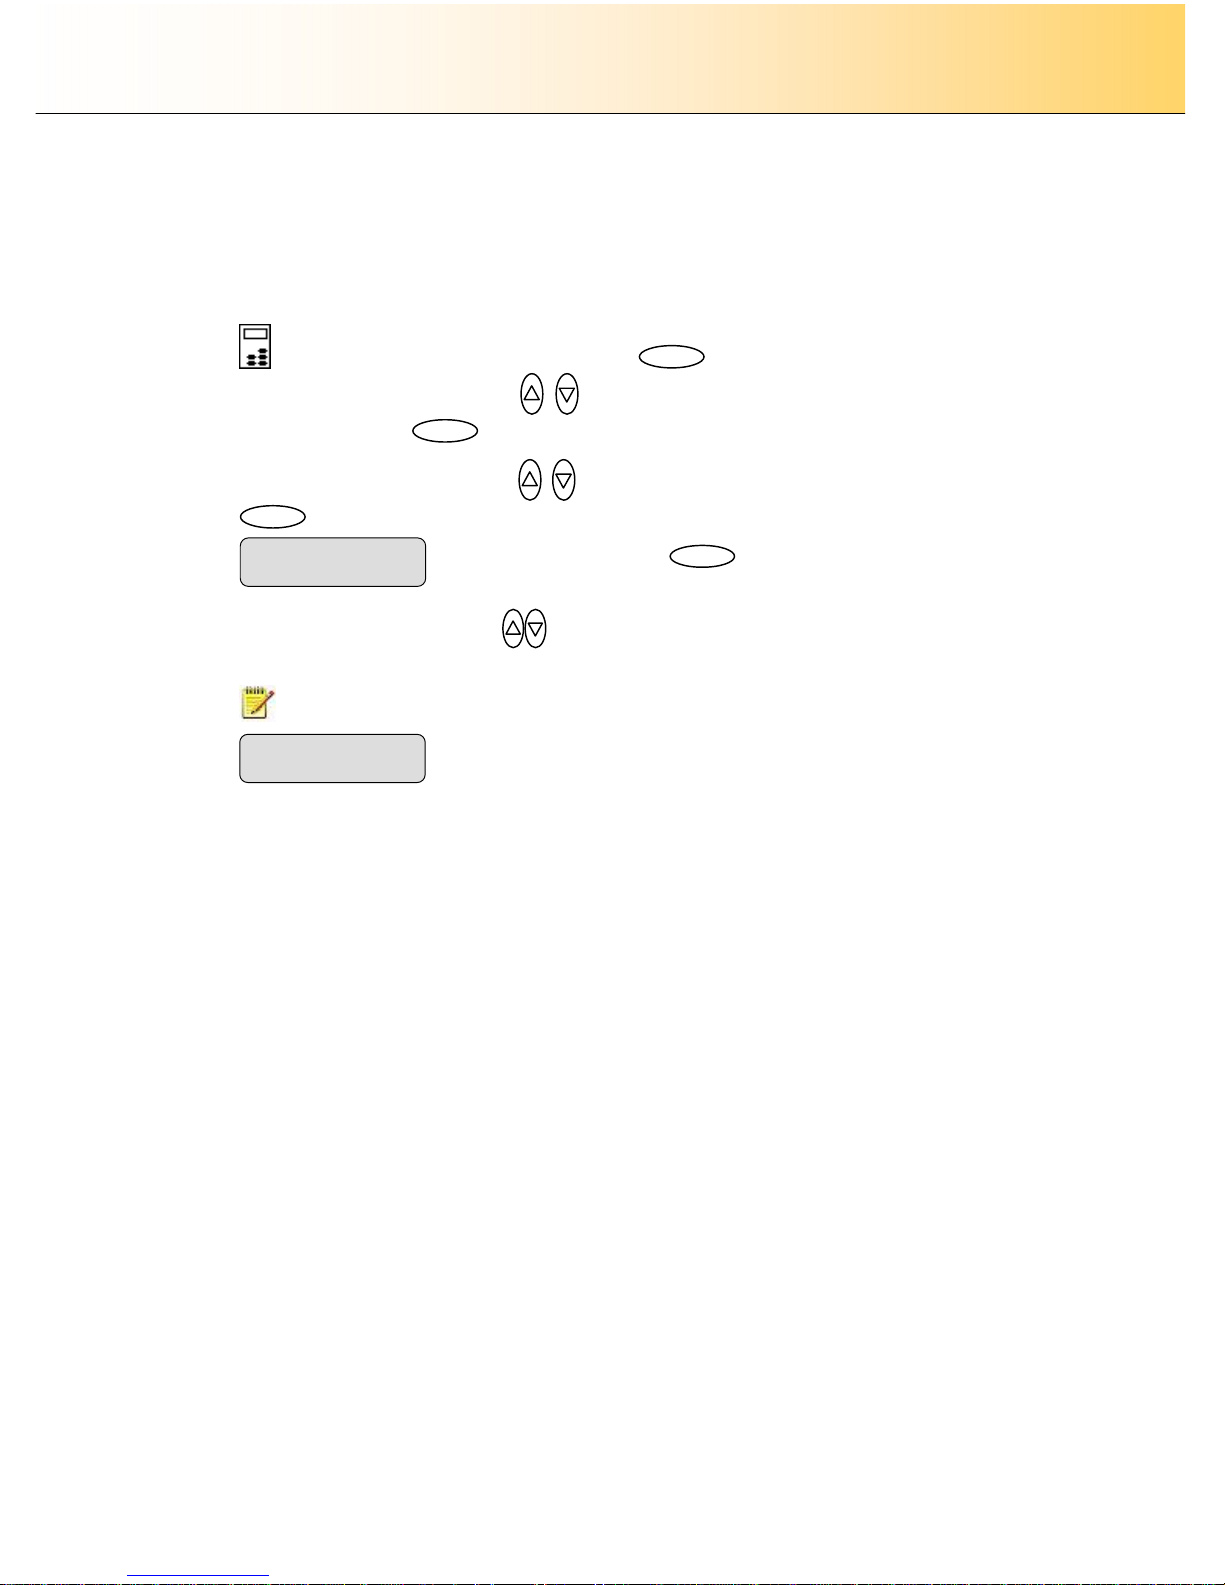
Web Access Interface 7-2
To start the web access interface:
1. Make sure that the scanner is connected to the LAN and setup on the network as described in
the section “Scanner on Network Setup”.
2. You need to find the scanners IP address in the Scanner Info menu option:
3. On the iJET Panel: Select the Menu button.
4. Use the arrow button up or down until the display window shows Advanced and confirm
with the Enter button .
5. Use the arrow buttons up or down until the display shows Scanner Info and confirm with
.
6. Use the arrow buttons up/down
until the iJET Panel displays IP Address.
7. The IP address will be displayed.
NOTE: The address displayed below is only an example.
8. Enable the Web Access Interface (Web server) – Select in the panel Menu -> Advanced as
described above in steps 3-4. Select Network setup and navigate with the arrow buttons to Web
Server. Select Yes to activate the Web Access Interface.
9. Open a browser on a PC connected to the same LAN as the scanner.
10. Enter the IP Address you found through step “Find the scanner’s IP Address”
11. The Web Access Interface for the scanner will appear on your screen which means you have
made contact with the scanner through its web server.
12. Carry out the action you wish to perform – monitor, make setup options or scan to the internal
storage. Use the Web Access Interface on-line help for detailed instructions.
IP Address
> 10.10.4.111
Press
Enter
to confirm
Scanner Info
> Scanner Info
…
Enter
Menu
Enter
Page 82

Maintenance 8-1
8. Maintenance
8.1 Preliminary Maintenance – during scanner installation
On scanners: FLEX50i, HD4230i
After setting up your new scanner and verifying your installation, it is recommended to clean your scanner
before working with it.
Packaging, shipping and transportation may have left dust particles on the scanner and in the scan area.
Wipe the glass plate and scanner feeding bed with a dry cloth to ensure a dust-free scan area.
On HD4230i models, shipping and transportation could have affected the cameras and it is therefore
highly recommended to run calibration and thus automatically test and align the cameras.
8.2 Regular Scanner Maintenance
On scanners: FLEX50i, HD4230i
Regular scanner maintenance is a sure way to minimize costly downtime. Follow the general
recommendations:
1. Keep your scanner clean – the section below describes how to thoroughly clean the internal scan area
after periods of use. How often you need to clean the scanner will depend on how often and the types
of media you scan. If your work involves scanning newspapers and old blueprints you will likely need
to clean more often than users who only scan brochures and new drawings.
2. Be sure to clean the scanner when results are not optimal. Particles of dust in the scan area can be
the cause of streaks in the end result.
3. Scanner Calibration is very easy to perform and most of it is completely automatic. After manually
cleaning the scan area, you just insert a Calibration Sheet, and start the Scanner Maintenance
program. You should calibrate the scanner if your output and color precision is not optimal.
4. You must run the Scanner Maintenance program from a PC that recognizes the scanner and has
WIDEsystemNET and Scanner Maintenance software installed. See the following section on Running
the Scanner Maintenance Program for details.
Page 83
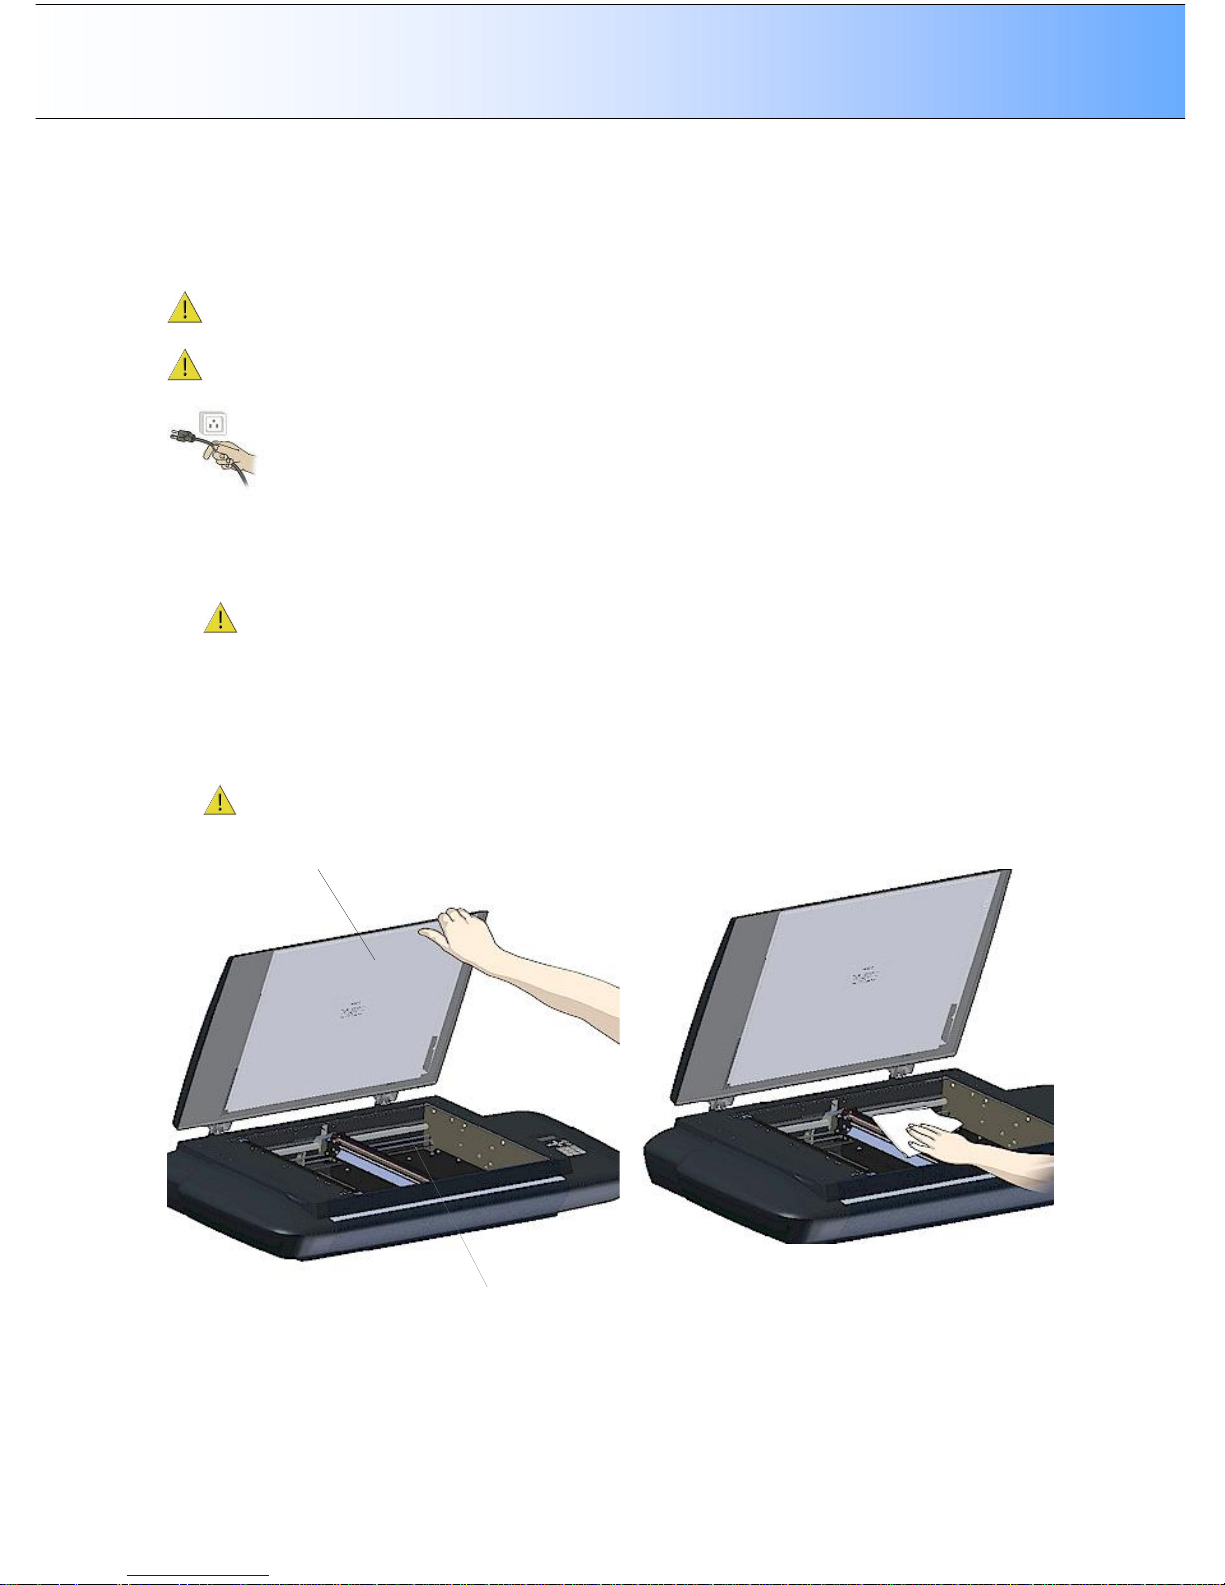
Maintenance 8-2
8.3 Cleaning the Scan Area
Follow the steps below for thoroughly cleaning the scanner and scan area. Be sure to clean the scan area
when results are not optimal. These could be streaks in your scan image due to dust particles in the scan
area. Cleaning instructions for each scanner type follow below:
Caution: Do not use abrasives, acetone, benzene or fluids that contain these chemicals. Do not
spray liquids directly onto the scanner glass-plate or anywhere else in the scanner.
Caution: Before cleaning the scan area, be sure to turn the scanner power off and disconnect the
power plug.
Cleaning the Scan Area
On scanners: FLEX50i
1. Turn the scanner power off and disconnect the power plug.
2. Open the scan area lid.
3. The glass-plate is now exposed for cleaning.
4. Clean the glass with a lint-free cloth and a mild, streak-free, glass cleaner. Dry the glass completely
using a separate clean, dry lint-free cloth like the one provided with the maintenance kit.
5. Close the scanning area lid when finished. Cover your scanner with the plastic dust cover when not in
use.
CAUTION: Make sure the scanner power is OFF when using the scanner dust cover.
Open the scanner lid
The glass plate is exposed for cleaning.
Wipe the glass plate with lint-free cloth & mild
glass cleaner. Wipe dry with separate cloth.
Page 84
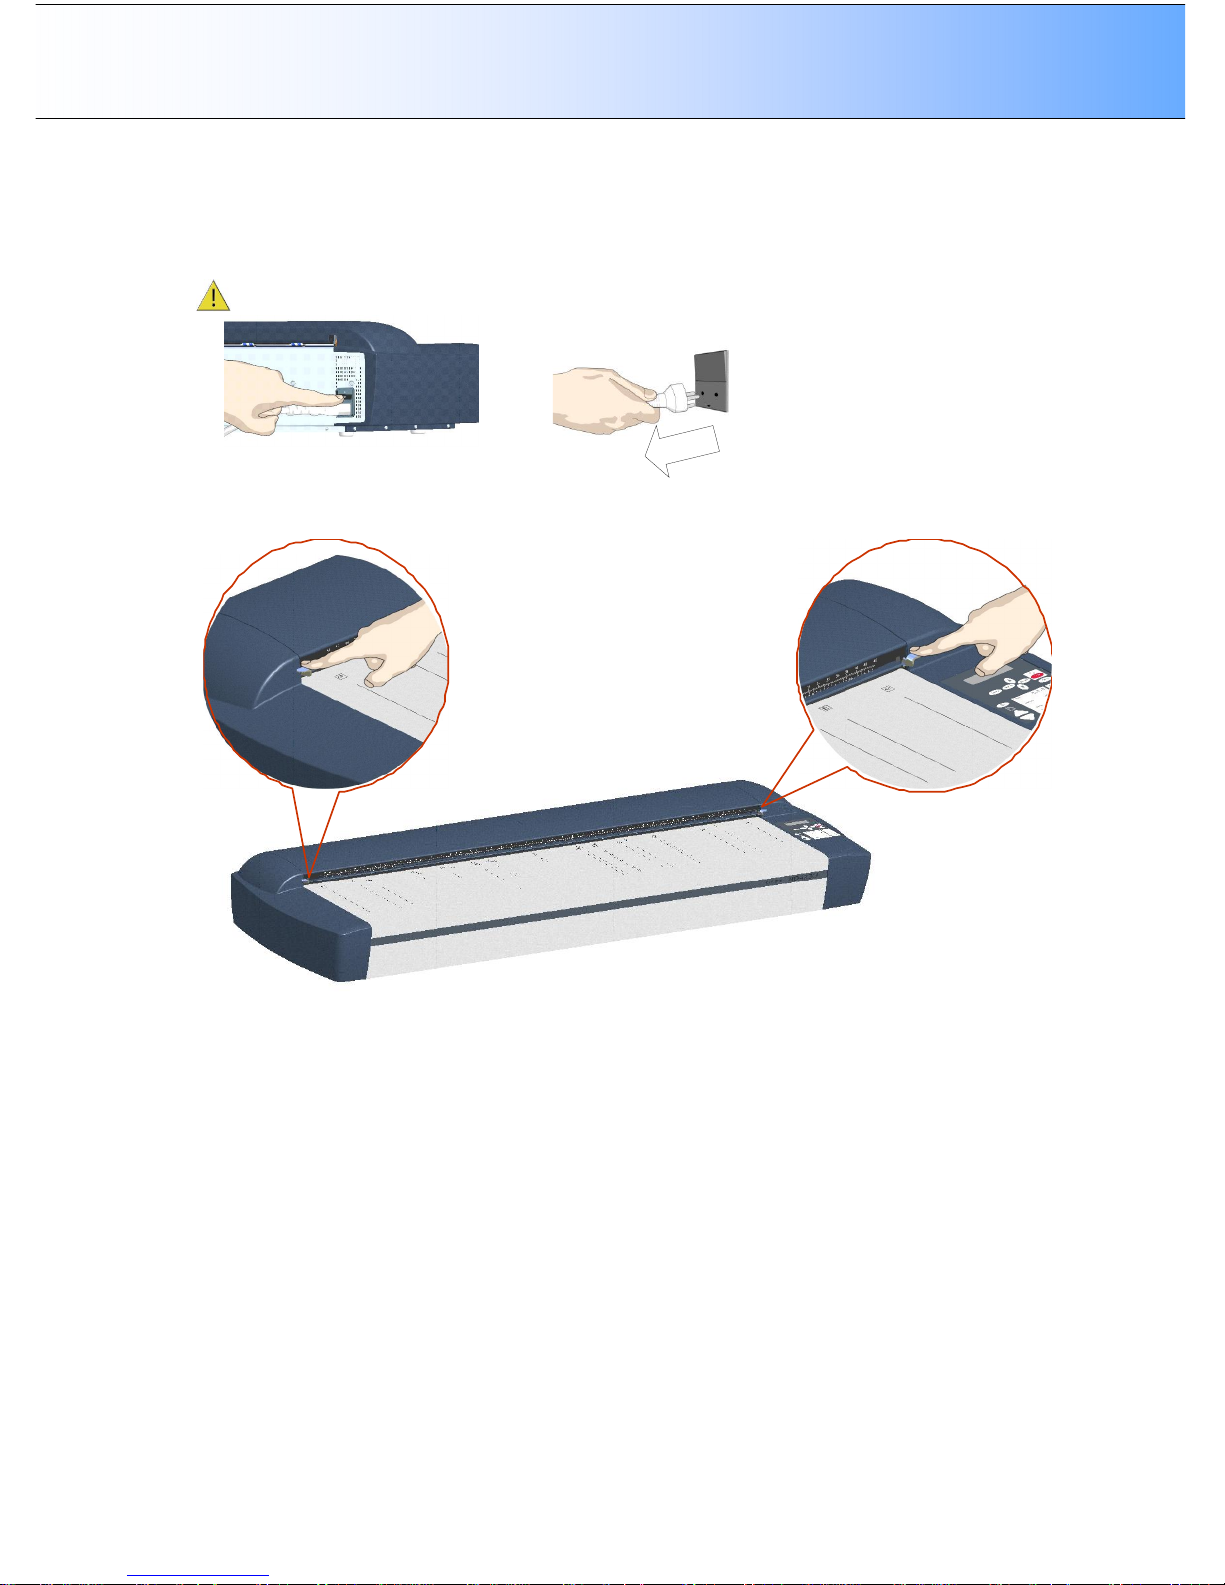
Maintenance 8-3
Cleaning the Scan Area
On scanners: HD4230i
1. Turn the scanner power OFF and disconnect the power plug.
3. Open the scan area lid - Push down on the two lever buttons found near the insertion slot on each
side of the lid.
4. The scanning area lid locking mechanism should now be disengaged.
5. Place your thumbs in the insertion slot and flip the scanning area lid back to its open position.
Page 85
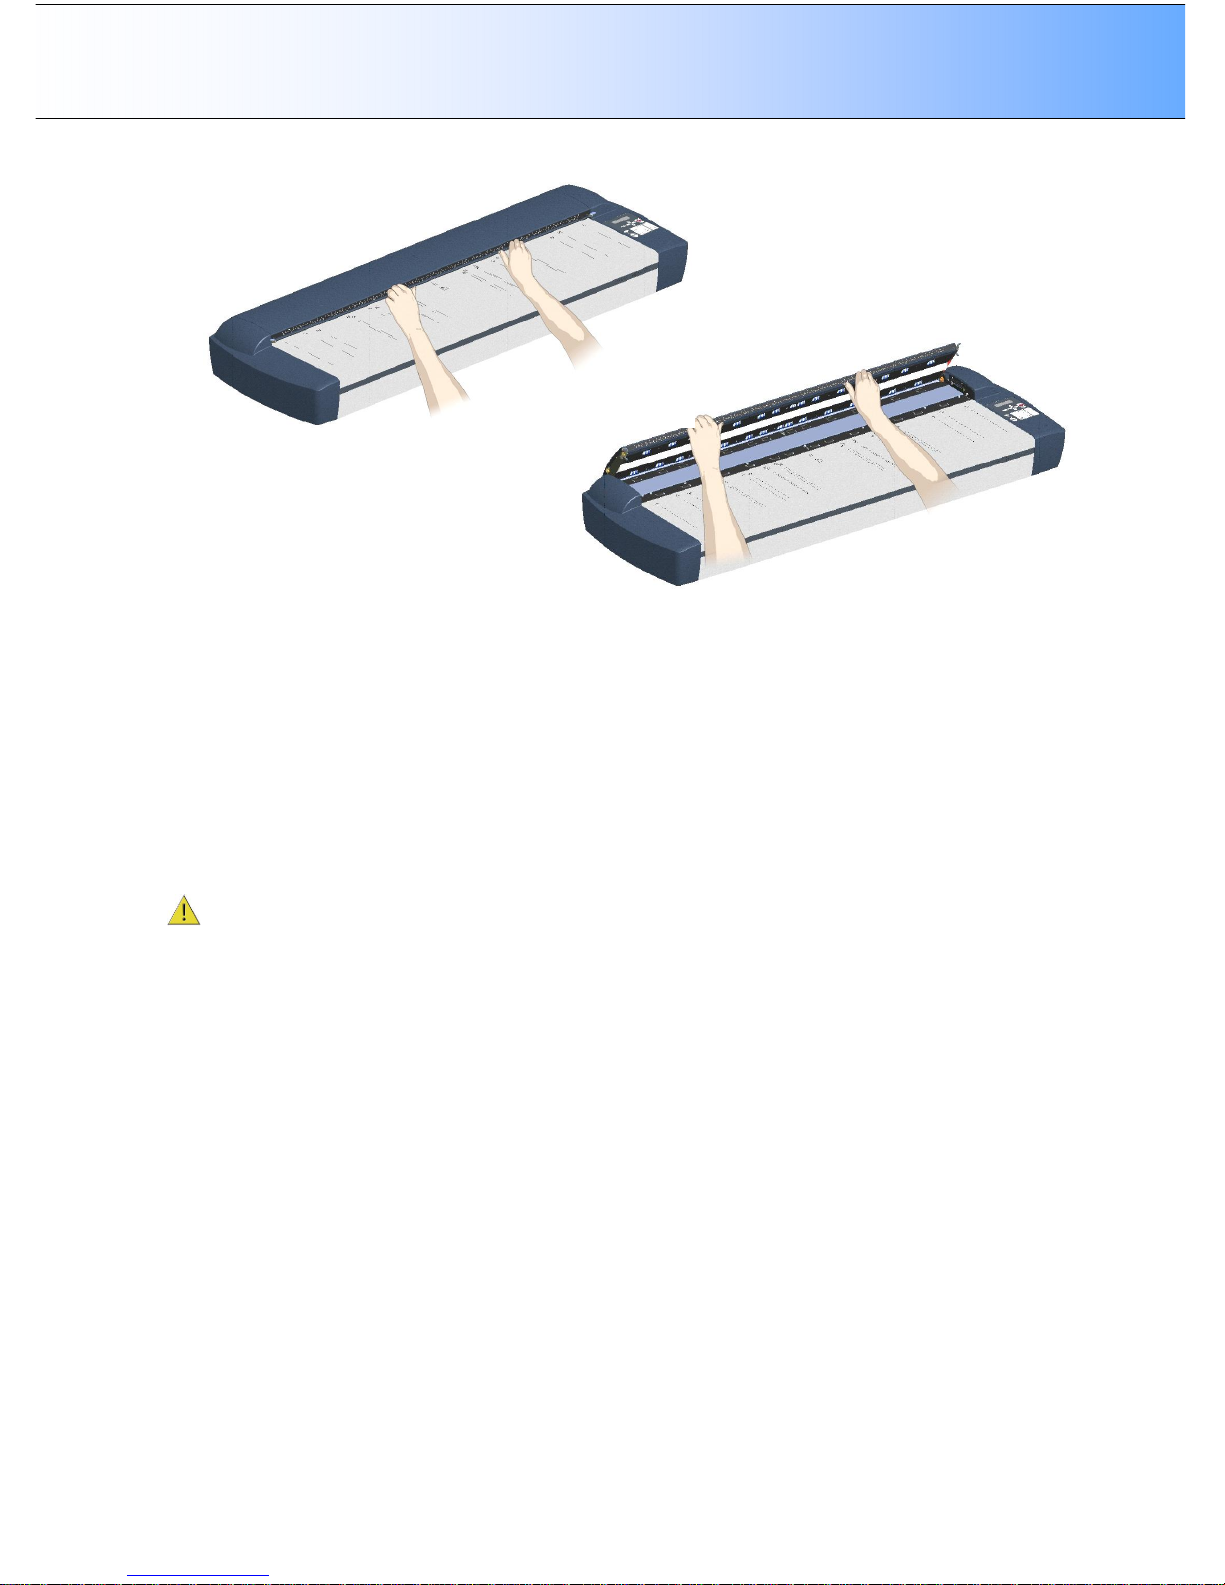
Maintenance 8-4
6. The scanning area is now exposed for cleaning.
7. Clean the glass with a lint-free cloth and a mild, streak-free, glass cleaner. Apply the cleaner to the
cloth and then wipe in the scanner. Dry the glass completely using a separate clean, dry lint-free cloth
like the one provided with the maintenance kit.
8. The white-background-platen (white metal area) is fixed in the scanning area lid. Wipe the white
background paten and the upper (transport) rollers with a lint-free cloth and a mild, streak-free, glass
cleaner. Apply the cleaner to the cloth and first wipe the platen’s white area and then the upper
roller’s surface.
9. The lower rollers are aliened in two rows on each side of the glass plate. Wipe the lower rollers with a
lint-free cloth and a mild, streak-free, glass cleaner.
10. Dry the platen and rollers completely using separate clean, dry lint-free cloths.
CAUTION: Do not spray cleaning liquids directly in the scanning area. Always apply the liquids to the
cloth and then wipe the specific scanner parts without touching other parts.
Page 86
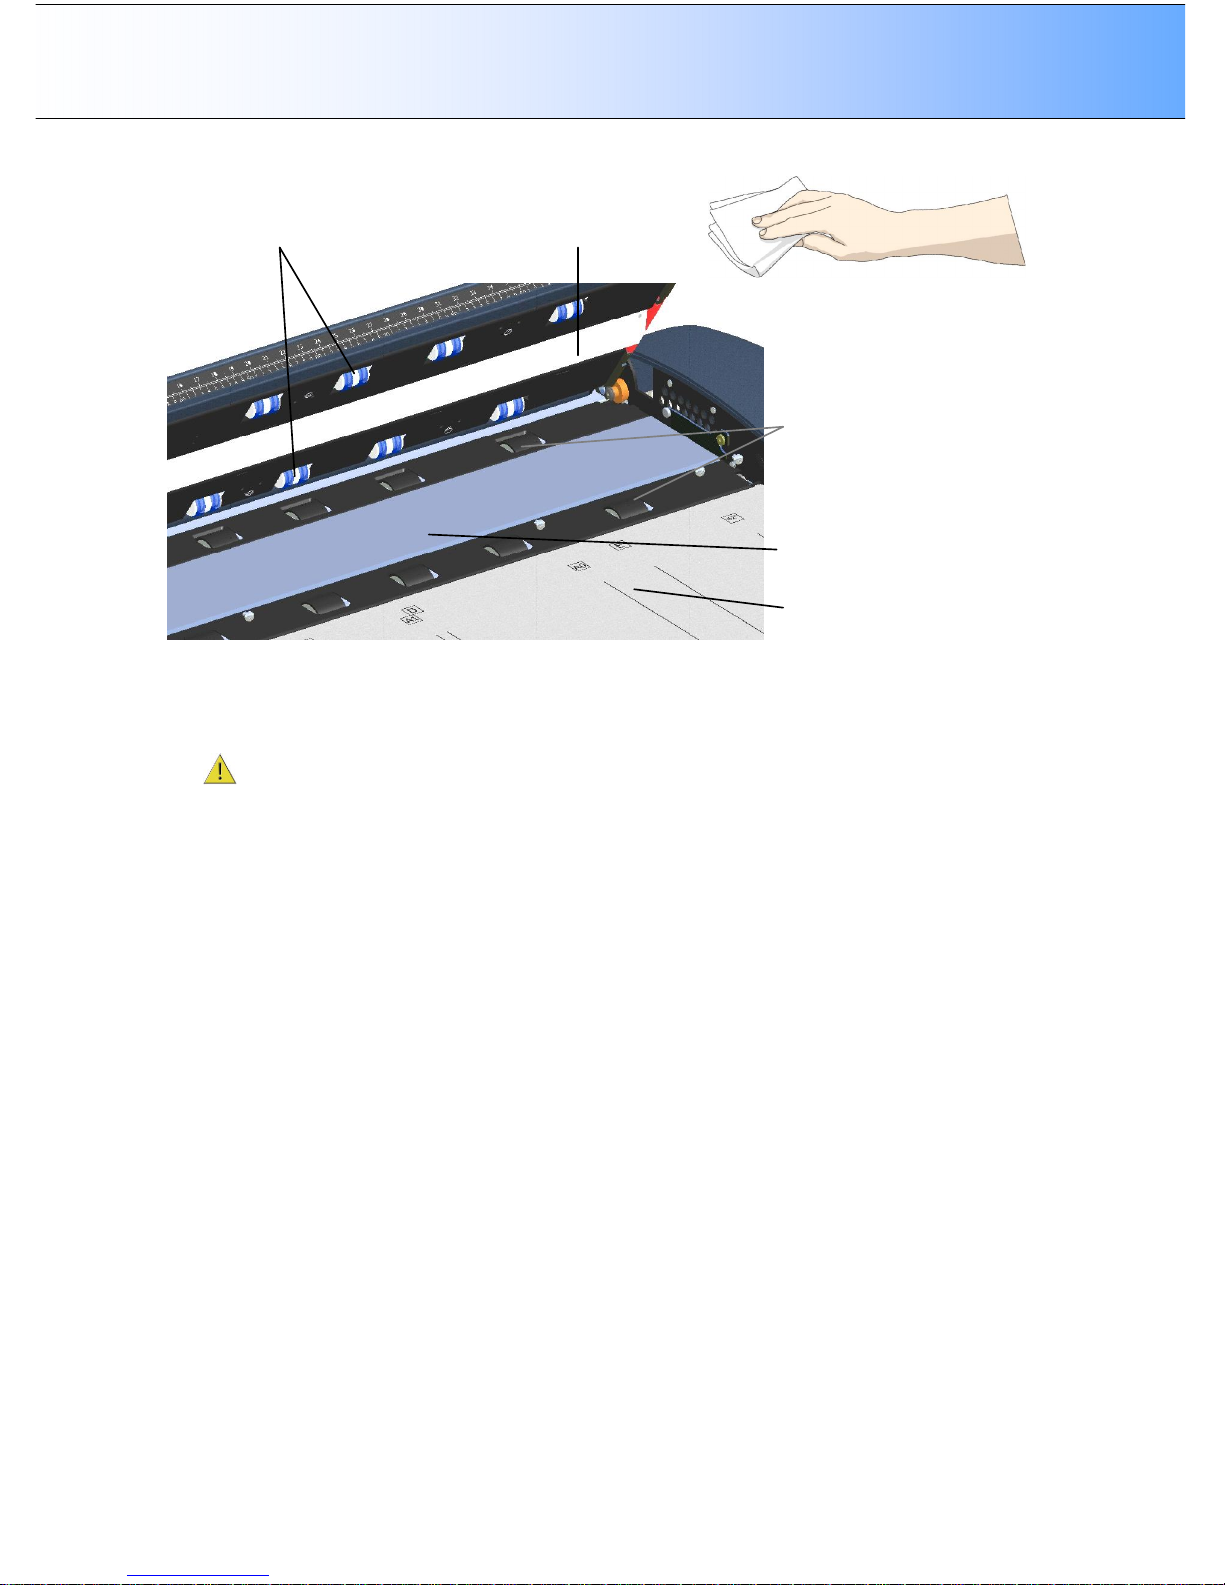
Maintenance 8-5
Upper rollers
Scan Area
–
You need to clean:
White Background Platen
Glass Plate.
Lower rollers.
Scan
ner
bed
surface
.
11. Close the scanning area lid when finished. The locks will reengage.
12. Clean also the scanner bed surface so dirt and dust are not dragged into the scan area with the
original.
13. Cover your scanner with the plastic dust cover when not in use.
CAUTION: Make sure the scanner power is OFF when using the scanner dust cover.
Page 87
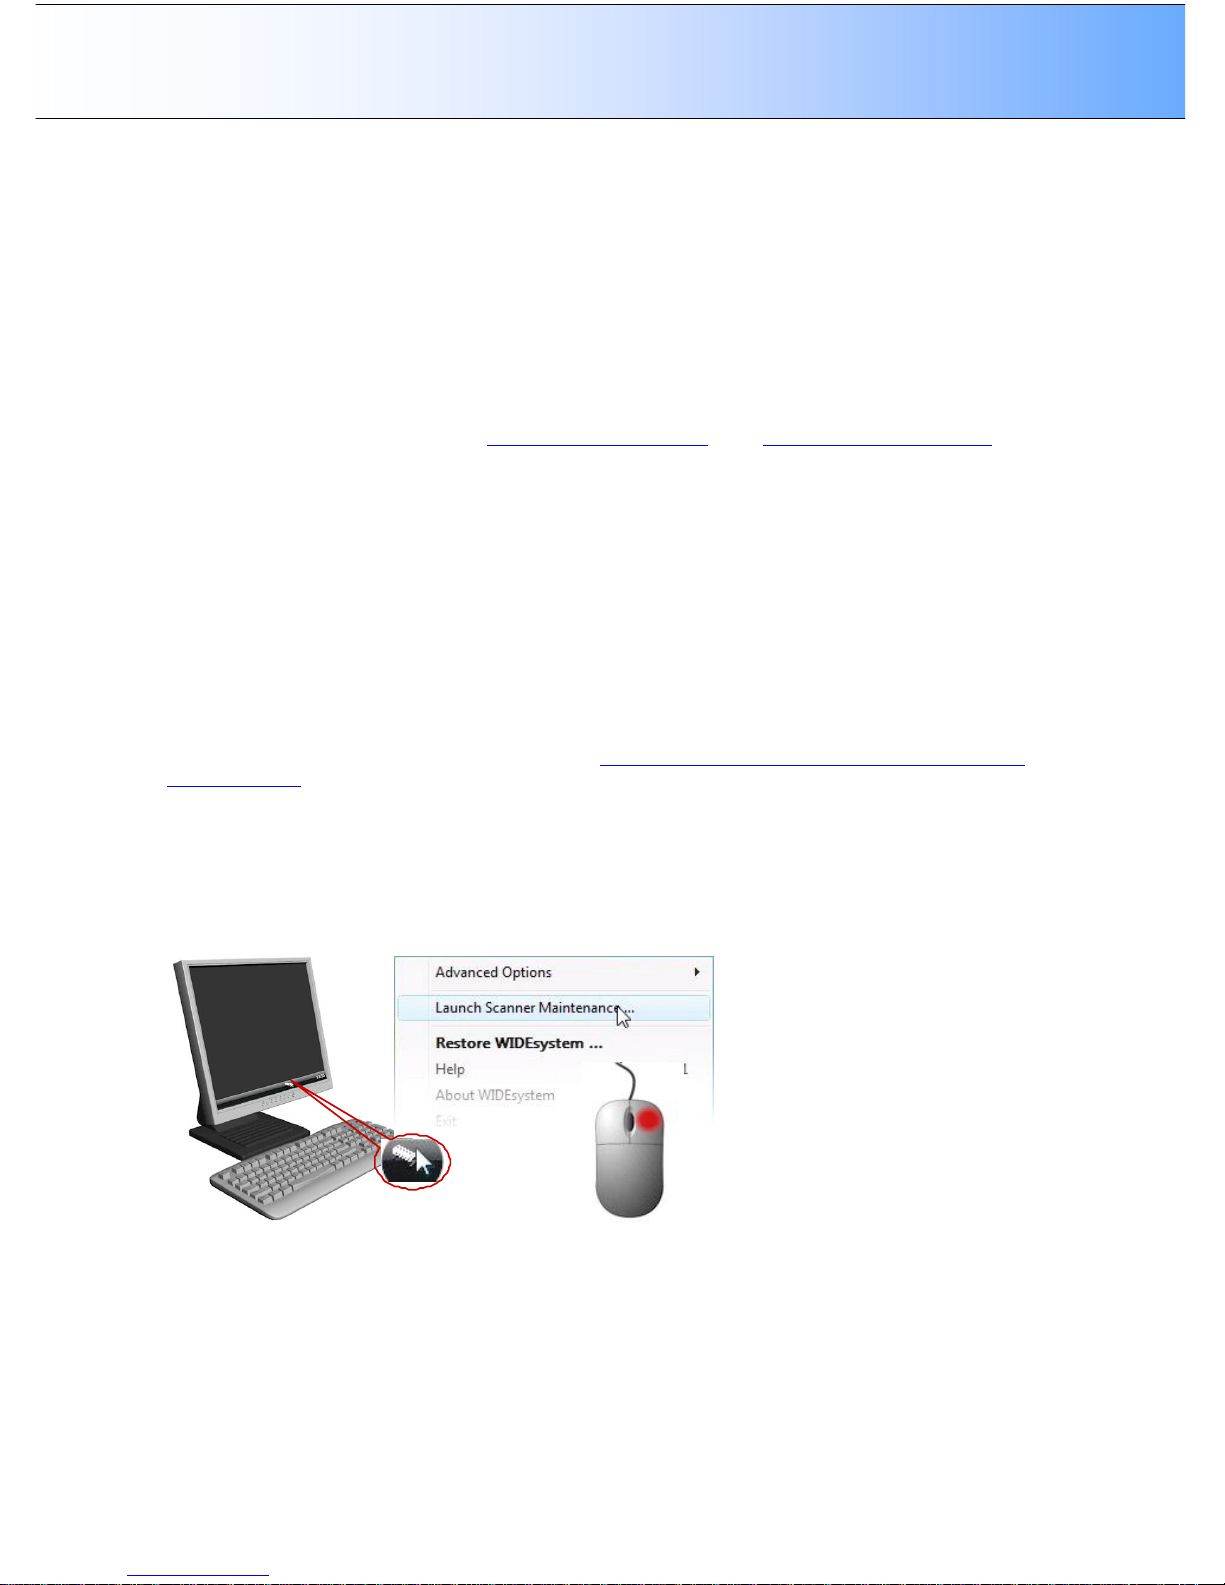
Maintenance 8-6
8.4 Running the Scanner Maintenance Program
The way you start and run the Scanner Maintenance Program depends on your scanner model and
configuration.
8.4.1 Starting Scanner Maintenance from a PC on the LAN
If the scanner is connected to the LAN, you must run the Scanner Maintenance program from a PC that
recognizes the scanner. This can be done from a PC on the LAN that has WIDEsystemNET setup to
recognize the scanner and the Scanner Maintenance program installed. The scanner must also be
enabled for sharing. See the sections “Scanner on Network Setup” and “Setup to Share the Scanner” for
instructions. See your WIDEsystemNET on-line help for details on adding a scanner to the list of
recognized scanners on a PC.
To start scanner maintenance from a PC on the LAN:
1. Start WIDEsystemNET and select the scanner from your list of scanners.
2. Right-click on the WIDEsystemNET icon and select Scanner Maintenance.
3. Follow the Scanner Maintenance instructions described below.
8.4.2 Starting Scanner Maintenance from a Local PC
If the scanner is not enabled for network/shared scanning, you must run the Scanner Maintenance
program from a PC connected locally through the USB port. The PC must have WIDEsystemNET and
Scanner Maintenance installed. See the section: Scanner Configuration and Setup – Connect the
Scanner to a PC for information on setting up this type of configuration.
To start Scanner Maintenance from a local PC:
1. Right-click on the WIDEsystemNET icon and select Launch Scanner Maintenance.
2. Follow the Scanner Maintenance instructions described below.
Page 88

Maintenance 8-7
8.4.3 Running Scanner Maintenance - Steps
The steps for running Scanner Maintenance described below are the same regardless of which of the
configuration solutions you use.
To run Scanner maintenance Program:
On Scanners: FLEX50i
1. Power on the scanner if not already ON.
2. Insert the Calibration Sheet that came with your scanner. The sheet’s printed side must be
inserted face down.
3. Start the Scanner Maintenance program in one of the ways described at the start of this section.
4. The program will run calibration.
5. After calibration, remove the Calibration Sheet from the scanner.
6. Return the Scanner Calibration Sheet to its protective cover and then place it in the storage folder.
Store the folder in a dry place and out of direct light.
On Scanners: HD4230i
1. Power on the scanner if not already ON.
2. Insert the Calibration Sheet that came with your scanner. Align the midpoint arrow with the middle
mark on the scanner. The sheet’s printed side must be inserted face down.
3. Start the Scanner Maintenance program in one of the ways described at the start of this section.
4. The program will run Camera Alignment, Stitching and Calibration.
5. The program analyses alignment and stitching status of the cameras. If the cameras are unaligned,
the program and scanner will automatically make the necessary corrections.
6. After Camera Alignment, the Scanner Maintenance program automatically moves on to Calibration.
7. Calibration completes the maintenance process. Remove the Scanner Calibration Sheet from the
scanner.
8. Return the Scanner Calibration Sheet to its protective cover and then place it in the storage folder.
Store the folder in a dry place and out of direct light.
Page 89
Maintenance 8-8
8.5 Replacing Scanner Parts
This section describes how to replace those scanner parts that are liable to wear down over long-term
use. Changing parts will renew your scanner and ensure optimal results. Your scanner monitors usage of
parts and will warn you when it is time for a replacement through a message in the iJET Panel display
window.
Some scanner models are designed so users can replace parts on their own (user-replaceable parts)
while other scanner models will require a service technician. The instructions in this section apply only for
scanners with user-replaceable parts. You can see which parts are user-replaceable on your scanner in
the table below.
Scanner Model Parts that are User-Replaceable
HD4230i
Glass-plate, White-background-platen, Lamp, Dust filters
FLEX50i
White-background-platen, Lamp, Dust filters
Important Safety Instruction: Before replacing any user-replaceable parts, be sure to turn the
scanner power off and disconnect the power plug.
NOTE: Regarding RECALIBRATION - glass plate, White background platen, lamp unit
replacement: Replacing these parts will change conditions in the scan area. Therefore, it is
recommended to recalibrate right after changing and cleaning these parts.
8.5.1 Replacing the Glass-plate
The HD4230i scanner models are designed so users can detach the glass-plate from the scanner in order
to replace a scratched glass-plate with a new ones. Your scanner monitors usage of the glass plate and
will warn you when it is time for a replacement by displaying a message in the iJET Panel display window.
On Scanners: HD4230i
1. Turn the scanner power off and disconnect the power plug.
2. Open the scan area lid - Push down on the two lever buttons found near the insertion slot on each
side of the lid.
Page 90
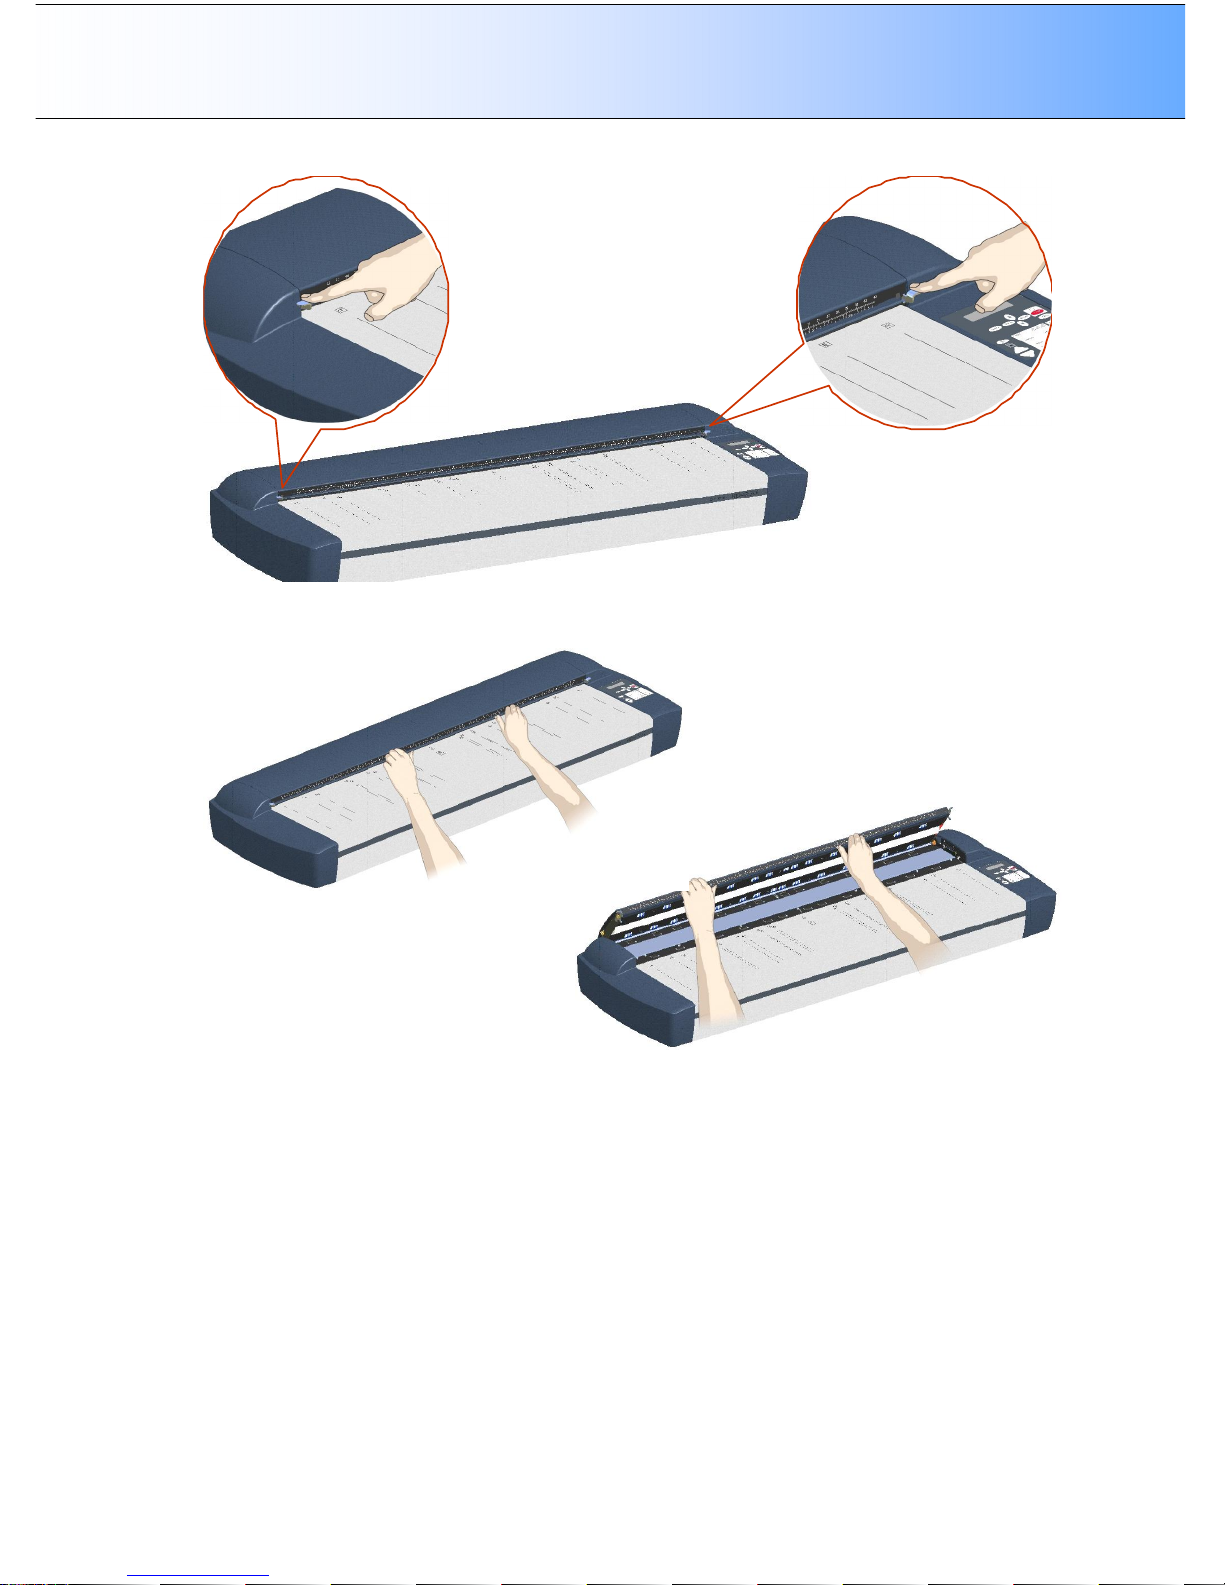
Maintenance 8-9
3. The scanning area lid locking mechanism should now be disengaged.
4. Place your thumbs in the insertion slot and flip the scanning area lid back to its open position.
5. The glass-plate will be exposed and accessible.
6. On each side of the glass-plate there is a small lever with a round lever-handle on its end. Place a
finger under both round lever handles on each side of the scanner (see illustration below).
Page 91
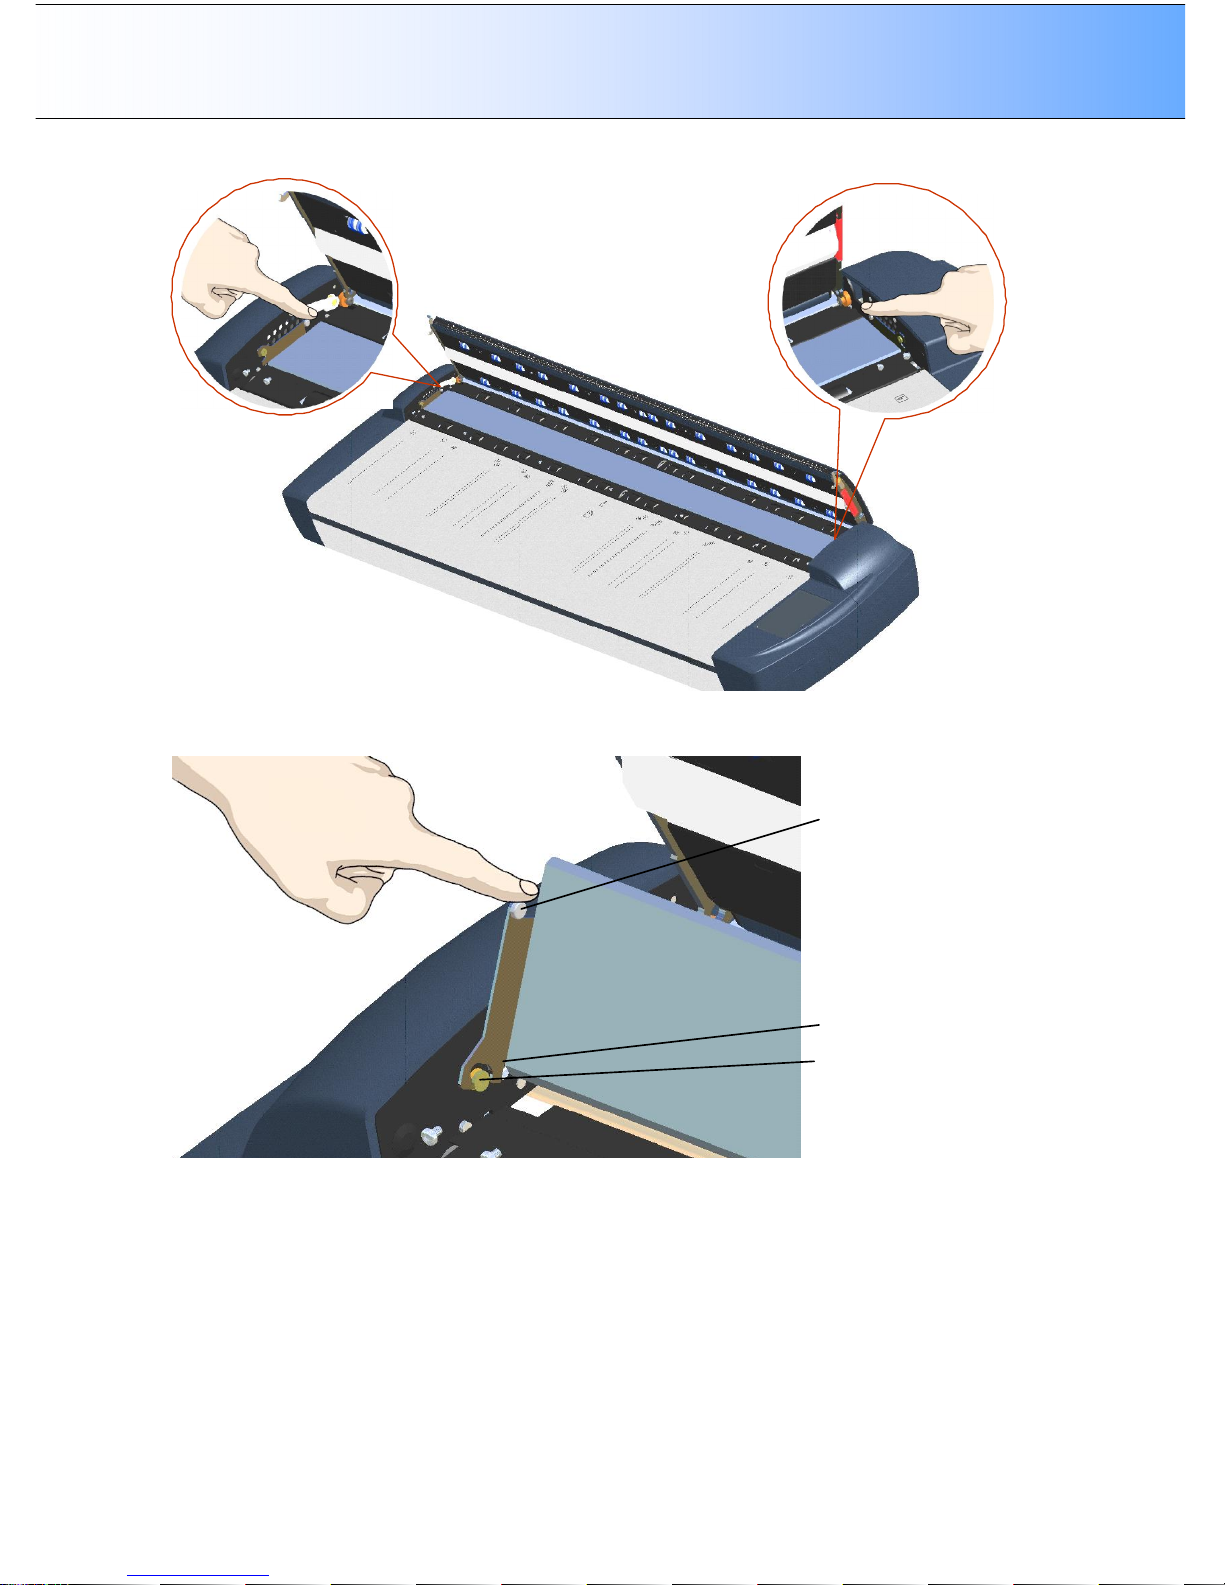
Maintenance 8-10
7. With both arms, pull simultaneously on the left and right levers to flip the glass-plate towards your
body so it tilts upwards and is fee from the scan area bed.
Lever handle
Hook
Pin
Page 92
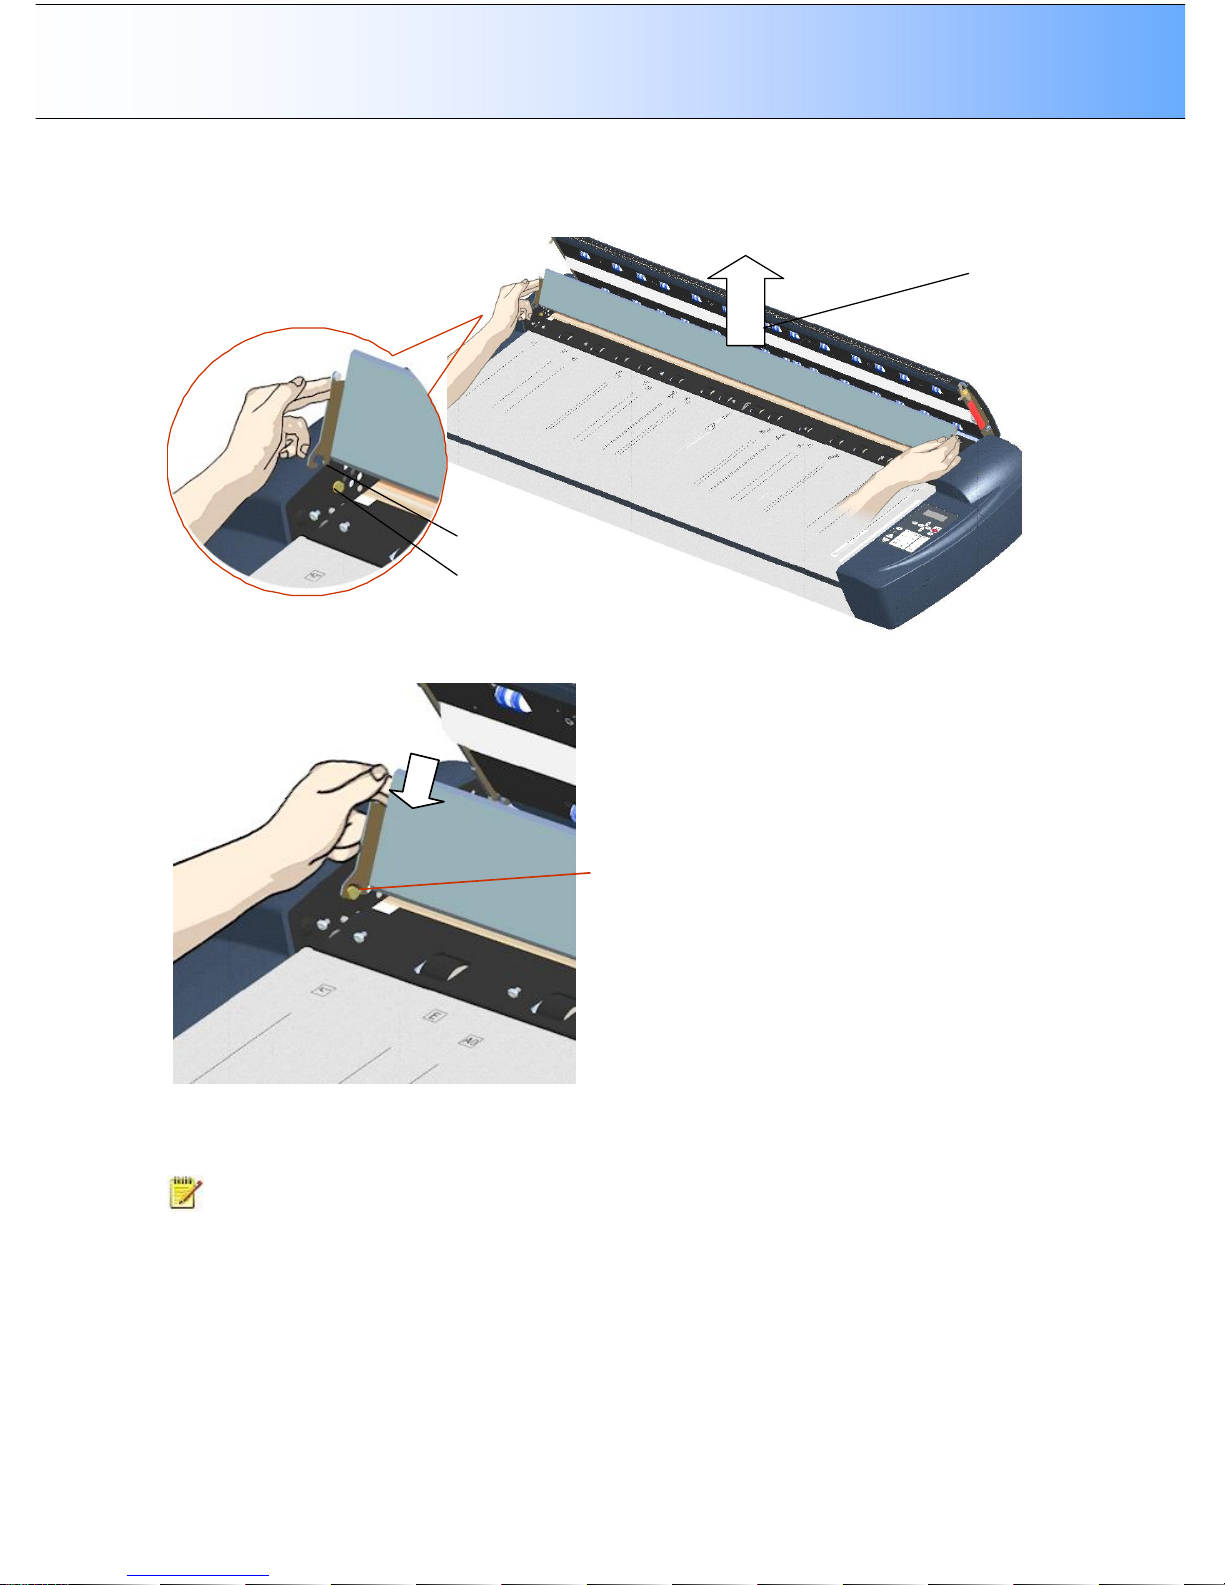
Maintenance 8-11
8. Each lever is attached to the scanner chassis with a small hook that rests on a round pin. As you hold
the glass-plate on both its edges, lift it upwards to detach both lever’s hooks from the pins and thus
free the glass-plate from the scanner.
Hook
Pin
Lift the glass
-
plate up to free it.
9. Reverse the above operations to reinsert a new glass-plate – Fit the new glass-plate’s lever hooks on
to the pins on each side of the scanner.
Place the
hook on the
round pin
10. While supporting the glass-plate with fingers on the lever handles, carefully let the glass-plate down
backwards (away from your body) and ease it into place.
11. Close the scan area lid.
NOTE: Make sure you clean a new glass-plate before using it with the scanner. Recalibrate the
scanner after replacing the glass.
Page 93
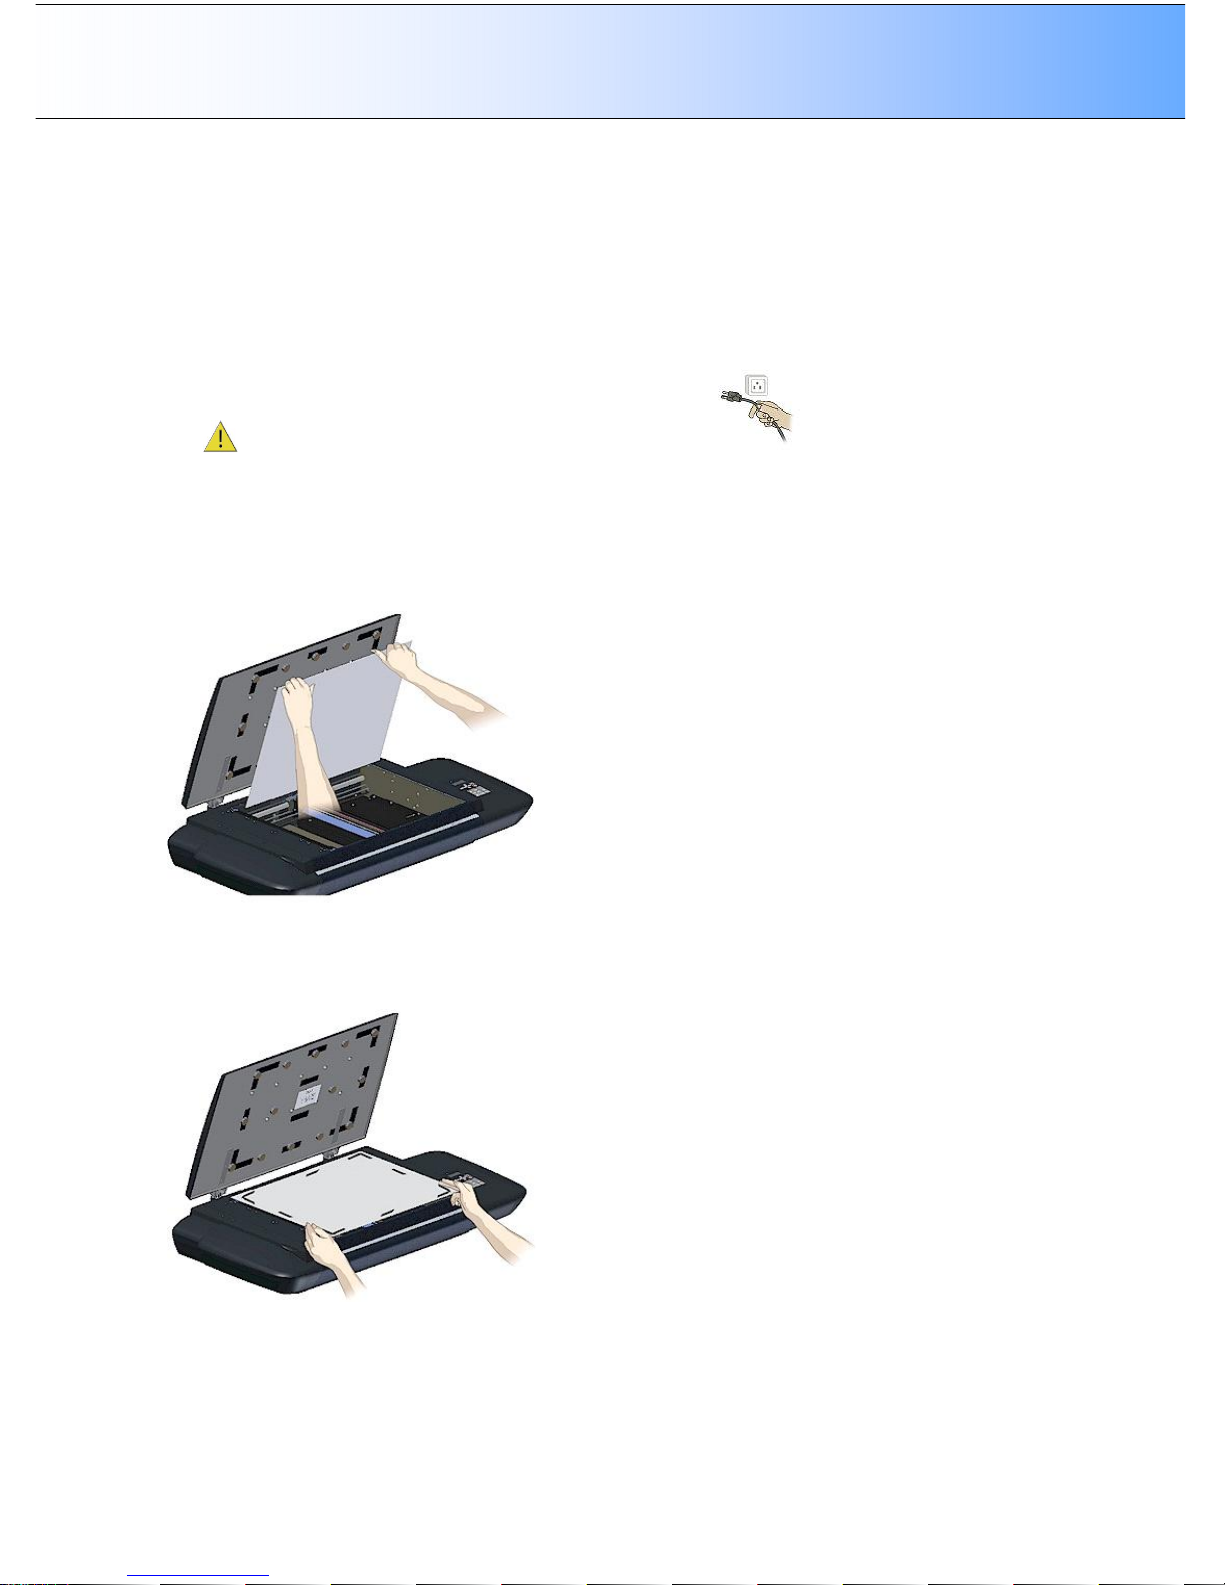
Maintenance 8-12
8.5.2 Replacing the White-Background
A white-background platen can become damaged, worn or discolored after long periods of use and
replacement with a fresh white-background-platen is recommended. Your scanner monitors usage of
parts and will warn you when it is time for a replacement through a message in the iJET Panel display
window.
On Scanners: FLEX50i
1. Turn the scanner power off and disconnect the power plug.
2. Open the scanner’s lid all the way.
3. The white background platen is attached to the lid’s underside. It is constructed as two layers - upper
layer and lower layer. The lower layer faces the glass. The upper layer is attached to the bottom side
of the lid with Velcro at its corners and edges.
4. Use both hands to place your fingers between the bottom side of the lid and the top edge of the upper
layer. Pull the platen free.
5. Place the new white background platen on the glass plate with its Velcro corners facing up. Align the
new white background platen on the glass by making sure there is an equal amount of space around
all four edges of the lower layer (the layer resting on the glass).
Page 94
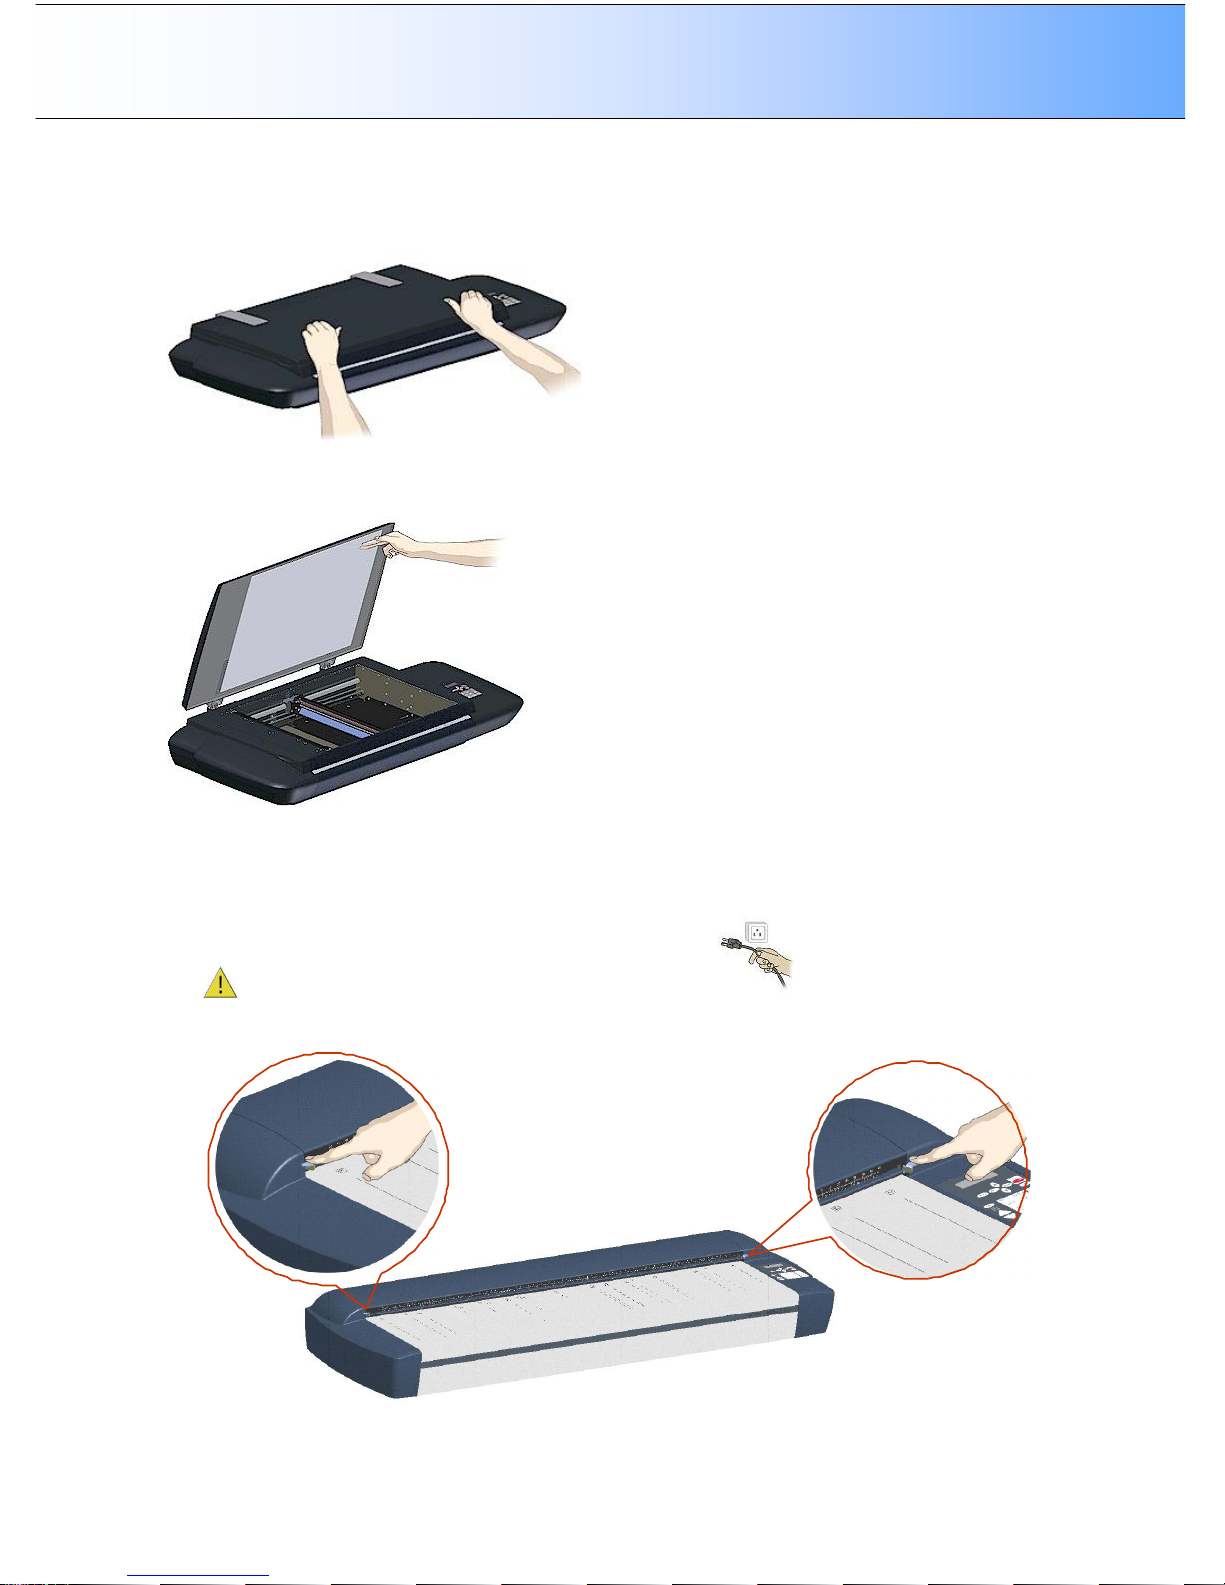
Maintenance 8-13
6. Gently close the lid. Press the lid firmly at all its corners and edges to ensure contact between the
lid’s and the white background platen’s Velcro.
7. Make sure your hands are clean. Open the lid and press firmly on the new white background platen
corners and edges to make sure the Velcro is properly in contact in all places. Recalibrate the
scanner.
Replacing the White-background:
On Scanners: HD4230i
1. Turn the scanner power off and disconnect the power plug.
2. Open the scan area lid - Push down on the two lever buttons found near the insertion slot on each
side of the lid.
Page 95
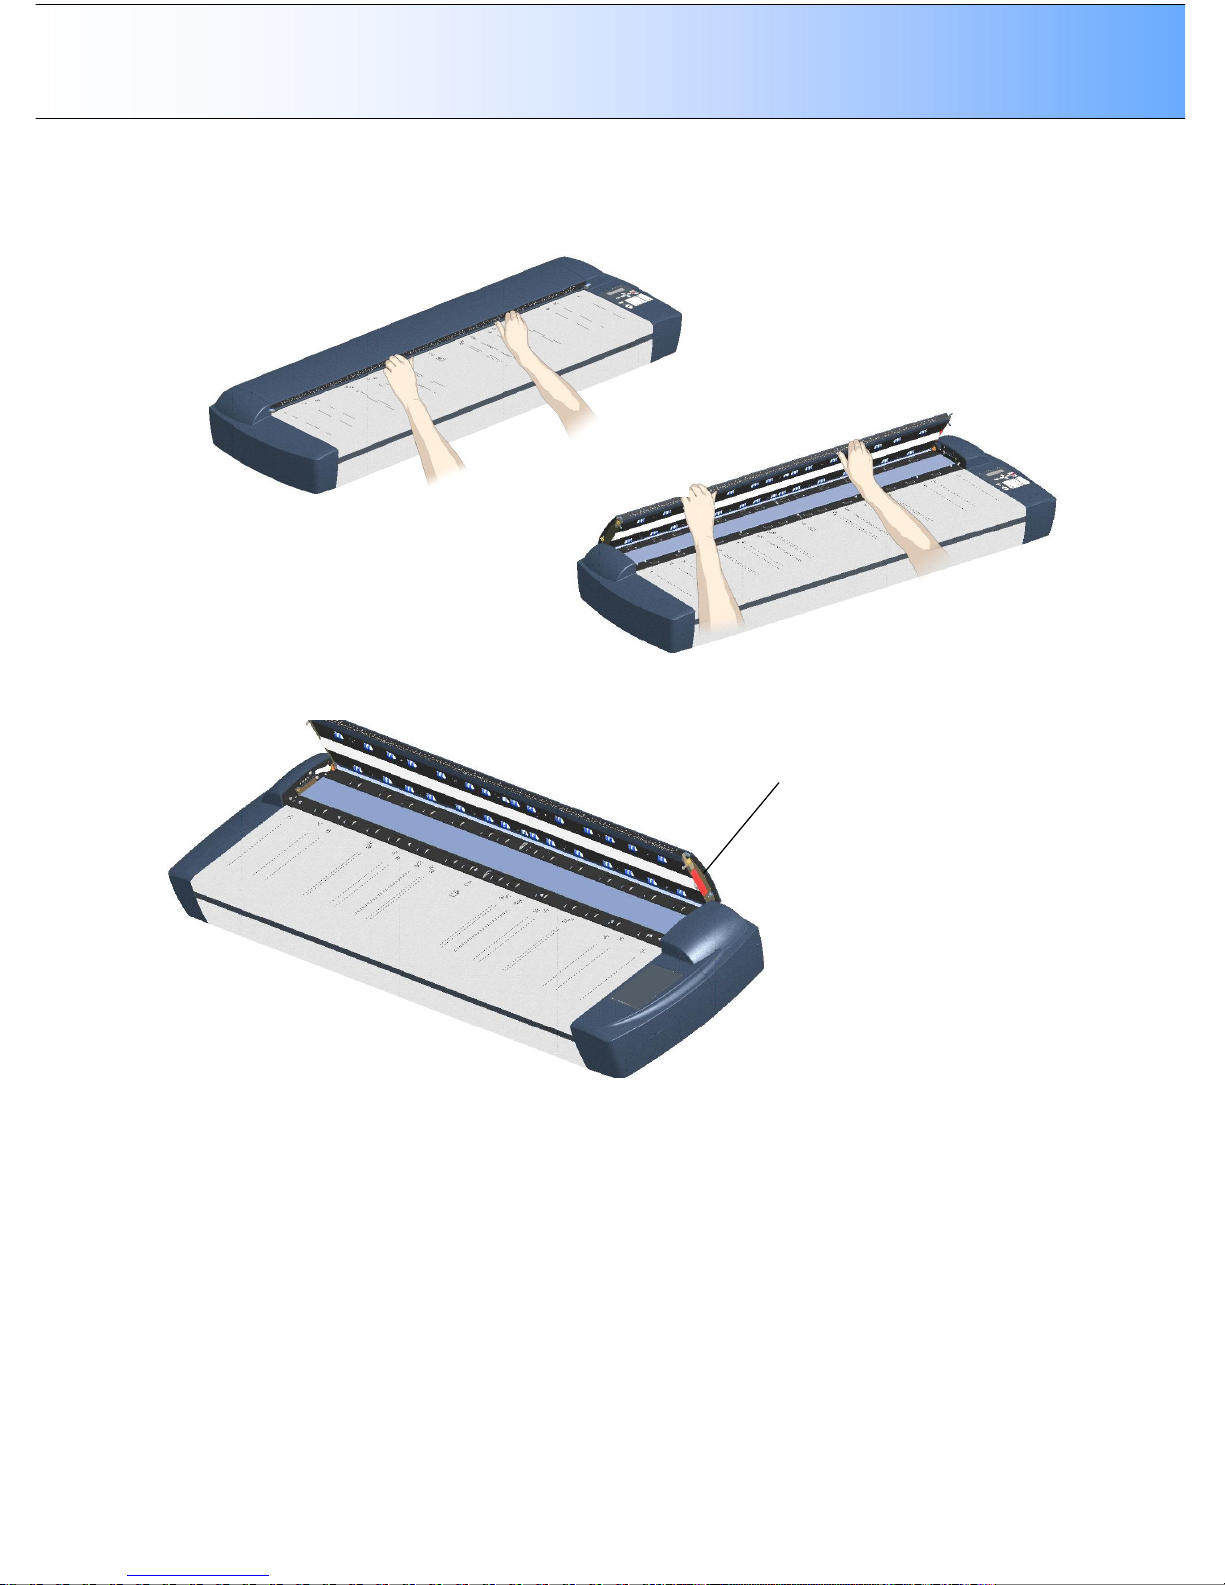
Maintenance 8-14
3. The scanning area lid locking mechanism should now be disengaged.
4. Place your thumbs in the insertion slot and flip the scanning area lid back to its open position.
5. On the lid’s left edge, you will find a red strip. This is the white platen cover.
Red strip
–
white
background platen cover
Page 96
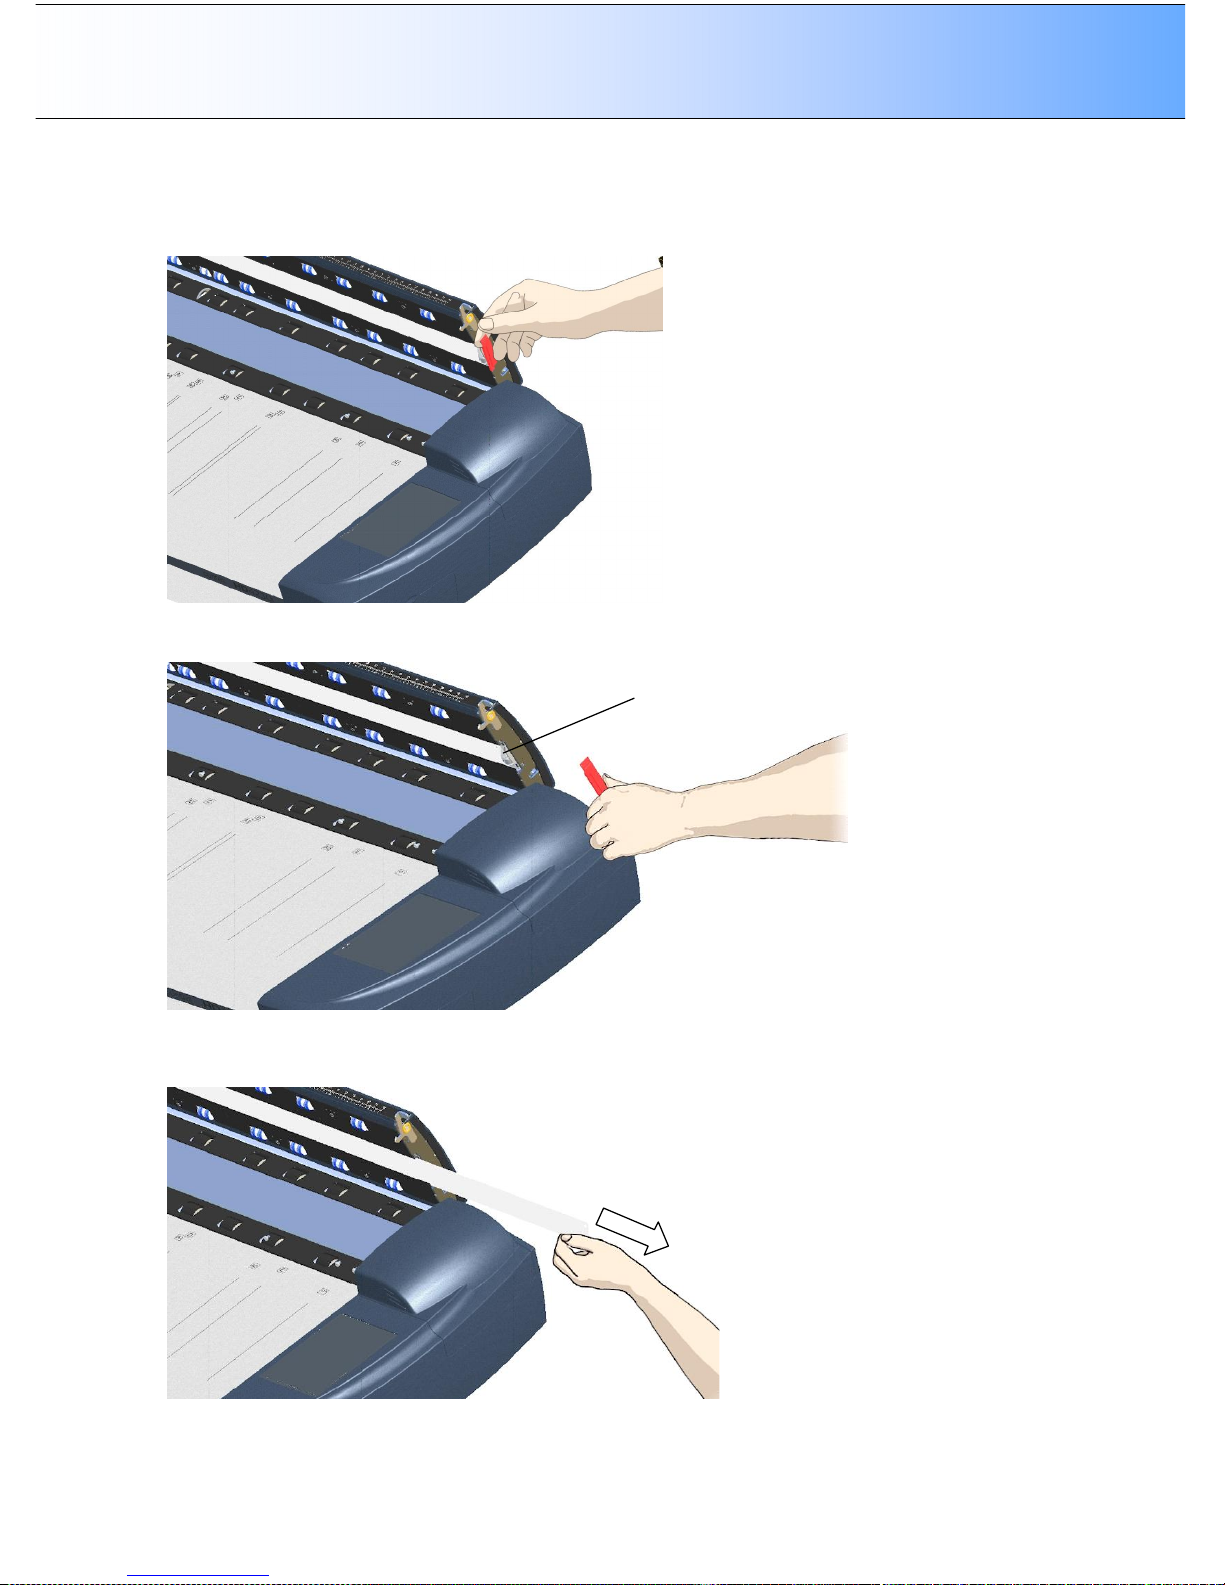
Maintenance 8-15
6. Grip the top (flexible) edge of the red strip with your fingers.
7. Remove the red strip to expose the edge of the white-background-platen.
Edge of the white-background-platen
8. Grip the edge of the white-background-platen with your fingers and pull to slide it out of the scanner.
Page 97
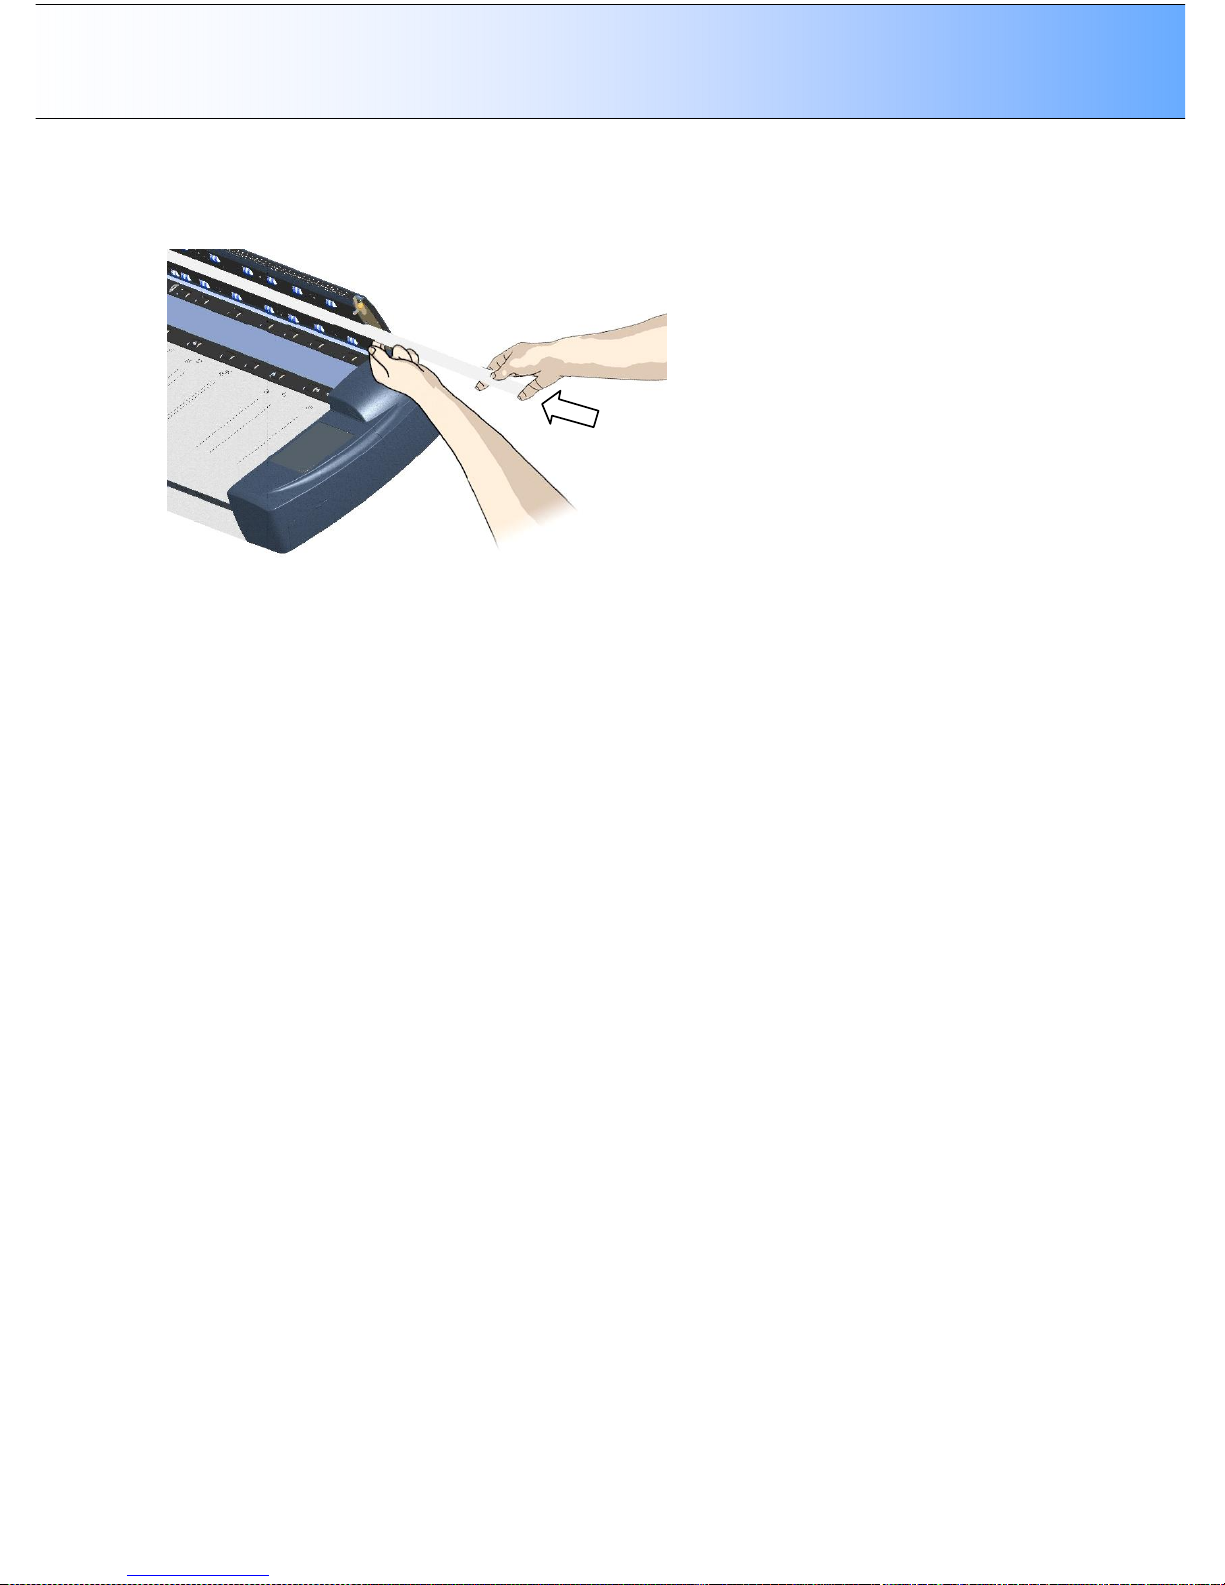
Maintenance 8-16
9. Reverse the steps to insert your new white-background-platen. Carefully slide in a new white-
background-platen while taking care not to bend it.
10. Reattach the red strip.
11. Close the scanning area lid so the locking mechanism reengages.
12. Calibrate the scanner.
Page 98

Maintenance 8-17
Page 99
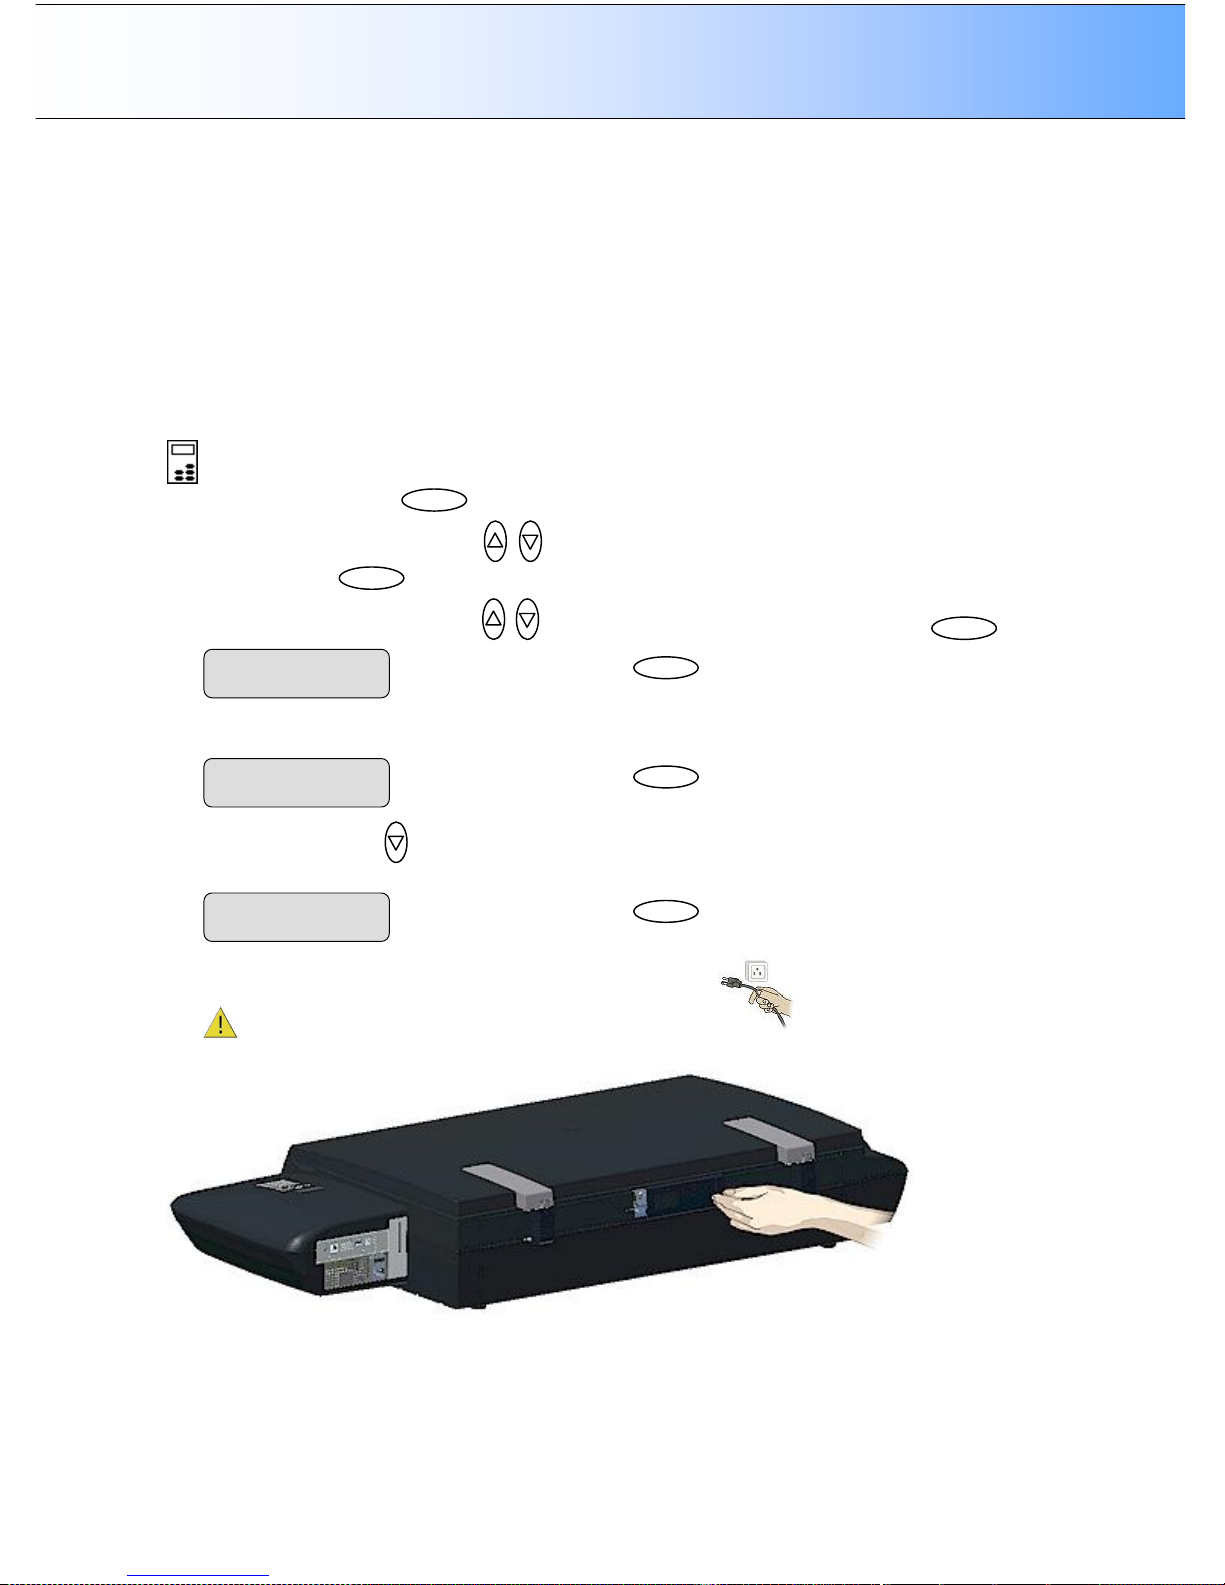
Maintenance 8-18
8.5.3 Replacing the Scanner Lamp-Unit
Your scanner comes with a high quality and durable lamp. Even so, its effectiveness will gradually weaken
over time. A new lamp-unit can be obtained through your dealer. Your scanner monitors usage of the
lamp and will warn you when it is time for a replacement through a message in the iJET Panel display
window. To change the lamp, you have to command the scanner to move the scan-head to the right
position so you can pull out the lamp unit and reinsert a new one.
Replacing the Scanner Lamp-unit:
On Scanners: FLEX50i
On the iJET Panel
1. Select the Menu button.
2. Use the arrow button up or down until the display window shows Advanced and confirm with
the Enter button .
3. Use the arrow buttons up or down until the display shows Service and confirm with .
4. The option Replace Lamp appears. Press Enter to move the “>” marker down to its value so you can
change it.
5. Press the arrow down to change the option to YES and press Enter to accept. The scan head will
move into position so you can pull it put of the scanner.
6. Turn the scanner power off and disconnect the power plug.
7. The lamp cover is on the backside of the scanner. Slide the lamp cover to the right to open it.
8. You must replace the whole lamp-unit. A lamp-unit consists of a lamp with fixed power connectors.
Press
Enter
to start
Replace Lamp
> YES
Press
Enter
to move the “>!
Marker down so you can change
Replace Lamp
> NO
Press
Enter
to confirm
Service
> Service
…
Enter Menu
Enter
Page 100
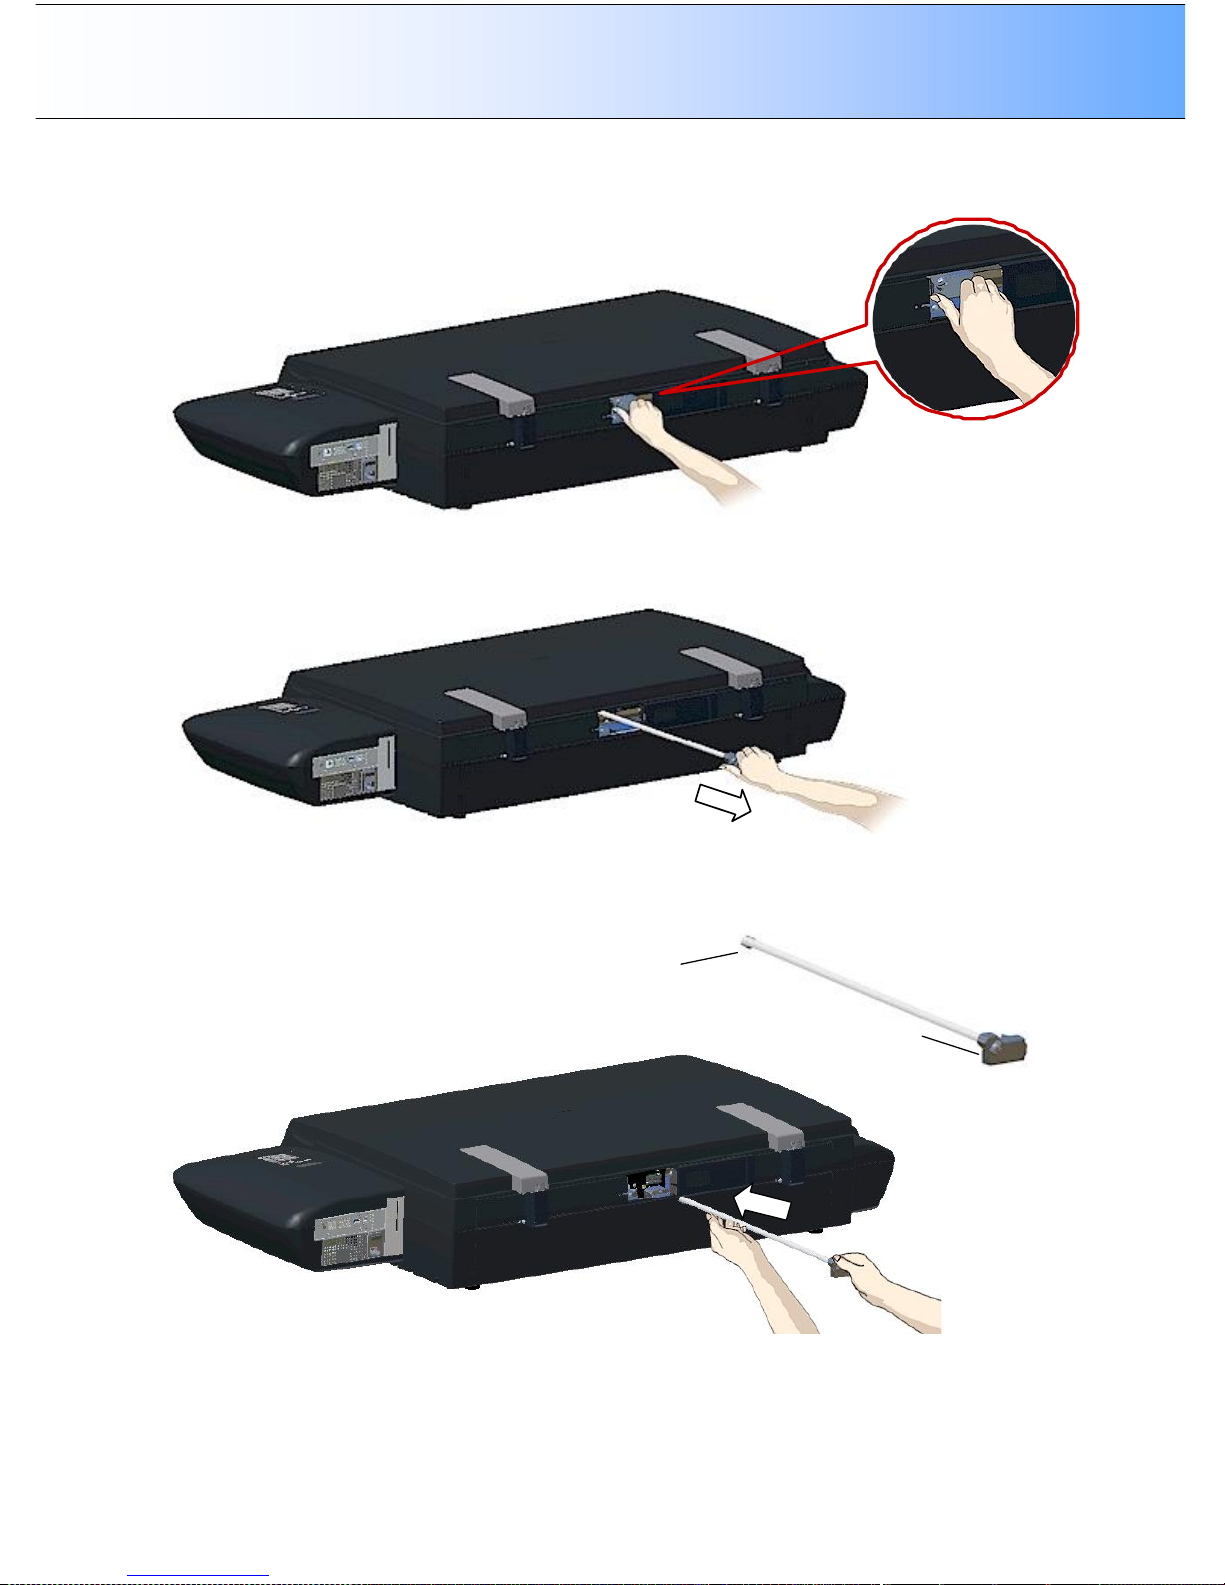
Maintenance 8-19
9. Grasp the visible end of the lamp-unit (its power connector casing)
10. Carefully pull the lamp-unit out of the scanner.
11. Reinsert the new lamp-unit. Support the unit with both hands. Take care to insert at the right angle.
The round end goes in first and the power connector end last. The power connector casing must be
aligned horizontally with the connections visible through the lamp cover opening. To guide you, match
the shape of the lamp-unit end with the shape of the insertion hole.
Lamp unit, round end
L
amp unit, power
connector
end
12. Insert the lamp-unit all the way so the power connections engage with the connections on the lamp-
unit.
 Loading...