

Page 1
Power and control units for dedicated projectors
USER GUIDE
9780 - 9781 - July 2010 Version 1.0
Page 2

PILOT60 and 120 - Power and control units for dedicated projectors
Page 2
English
Page 3
PILOT60 and 120 - Power and control units for dedicated projectors
English
Page 3
1 - Safety information
This symbol signals an important safety
precaution.
The CAUTION symbol signals a risk of product deterioration.
The WARNING symbol signals a risk to the user’s physical integrity.
The product may also be damaged.
Important safety information
Symbols used
Any maintenance procedure must be performed by a CONTEST
authorised technical service. Basic cleaning operations must thoroughly follow our safety instructions.
This product contains non-isolated electrical components. Do not
undertake any maintenance operation when it is switched on as
it may result in electric shock.
This unit is intended for indoor use only. Do not use it in a wet,
or extremely cold/hot locations. Failure to follow these safety instructions could result in fire, electric shock, injury, or damage to
this product or other property.
WARNING : This unit contains no user-serviceable parts. Do not open the
housing or attempt any maintenance by yourself. In the unlikely even your unit
may require service, please contact your nearest dealer.
In order to avoid any electrical malfunction, please do not use any multi-socket,
power cord extension or connecting system without making sure they are
perfectly isolated and present no defect.
Risk of electrocution
To prevent the hazard of electric shocks, do not use
extension cords, multi-socket or any other connection
system without making sure metal parts completely are
out of reach.
Recycling your device
• As HITMUSIC is really involved in the environmental cause, we only commercialise clean, ROHS compliant products.
• When this product reaches its end of life, take it to a collection point designated by local authorities. The separate collection and recycling of your
product at the time of disposal will help conserve natural resources and ensure that it is recycled in a manner that protects human health and the
environment.
Page 4
PILOT60 and 120 - Power and control units for dedicated projectors
Page 4
English
1 - Please read carefully :
We strongly recommend to read carefully and understand
the safety instructions before attempting to operate this unit.
2 - Please keep this manual :
We strongly recommend to keep this manual with the unit for
future reference.
3 - Operate carefully this product :
We strongly recommend to take into consideration every
safety instruction.
4 - Follow the instructions:
Please carefully follow each safety instruction to avoid any
physical harm or property damage.
5 - Avoid water and wet locations :
Do not use this product in rain, or near washbasins or other
wet locations.
6 - Installation :
We strongly encourage you to only use a
fixation system or support recommended by
the manufacturer or supplied with this product.
Carefully follow the installation instructions and
use the adequate tools.
Always ensure this unit is firmly fixed to avoid
vibration and slipping while operating as it may result in
physical injury.
7 - Ceiling or wall installation :
Please contact your local dealer before attempting any ceiling
or wall installation.
8 - Ventilation :
The cooling vents ensure a safe use of this product, and avoid
any overheating risk.
Do not obstruct or cover these vents as it may result in
overheating and potential physical injury or product damage.
This product should never been operated in a closed nonventilated area such as a flight case or a rack, unless cooling
vents are provided for the purpose .
9 - Heat exposure :
Sustained contact or proximity with warm surfaces may cause
overheating and product damages. Please keep this product
away from any heat source such as a heaters, amplifiers, hot
plates, etc...
10 - Electric power supply :
This product can only be operated according to
a very specific voltage. These information are
specified on the label located at the rear of the
product.
11 - Power cords protection:
Power-supply cords should be routed so that they
are not likely to be walked on or pinched by items
placed upon or against them, paying particular
attention to cords at lugs, convenience receptacles
and the point where they exit from the fixture.
Instructions and recommendations
12 - Cleaning precautions :
Unplug the product before attempting any cleaning
operation. This product should be cleaned only with
accessories recommended by the manufacturer.
Use a damp cloth to clean the surface. Do not
wash this product.
13 - Long periods of non use :
Disconnect the unit’s main power during long
periods of non use.
14 - Liquids or objects penetration :
Do not let any object penetrate this product as it
may result in electric shock or fire.
Never spill any liquid on this product as it may
infiltrate the electronic components and result in
electric shock or fire.
15 - This product should be serviced when :
Please contact the qualified service personnel if :
- The power cord or the plug has been damaged.
- Objects have fallen or liquid has been spilled into
the appliance.
- The appliance has been exposed to rain or water.
- The product does not appear to operate normally.
- The product has been damaged.
16 - Inspection/maintenance :
Please do not attempt any inspection or maintenance by
yourself. Refer all servicing to qualified personnel.
17 - Operating environment :
Ambient temperature and humidity: +5 - +35°C,
relative humidity must be less than 85% (when
cooling vents are not obstructed).
Do not operate this product in a non-ventilated,
very humid or warm place..
Page 5
PILOT60 and 120 - Power and control units for dedicated projectors
English
2 - Introduction
3 - Technical specifications
4 - Description
Thanks for choosing the PILOT series. You are now in possession of a high-quality, powerful product able to
create incredile animations for your concerts, parties, clubs etc.
The PILOT series features 3 products: PILOT60, PILOT210, and PILOT240.
This manual describes the PILOT60 and PILOT120.
Common features:
• Functions:
- Master/Slave mode
- Automatic
- 15-16 built-in programs
- 3 user programs
- Compatible with white and colour projectors
• DMX compatibility:
- RGBW Projectors, from 3 - 19 channels
- White projectors, from 1 - 8 channels
• Display with drop-down menu
• 48V outputs via RJ45 sockets for compatible projectors
• RJ45/XLR for DMX connections supplied
• Power supply: 240V 50-60 Hz
• Dimensions: 234 x 279 x 62 mm
• Weight: 2.4 kg
Specific characteristics:
• PILOT60
- 1x60 W output (Max) for compatible projectors
• PILOT120
- 2x60 W outputs (Max) for compatible projectors (Total 120W)
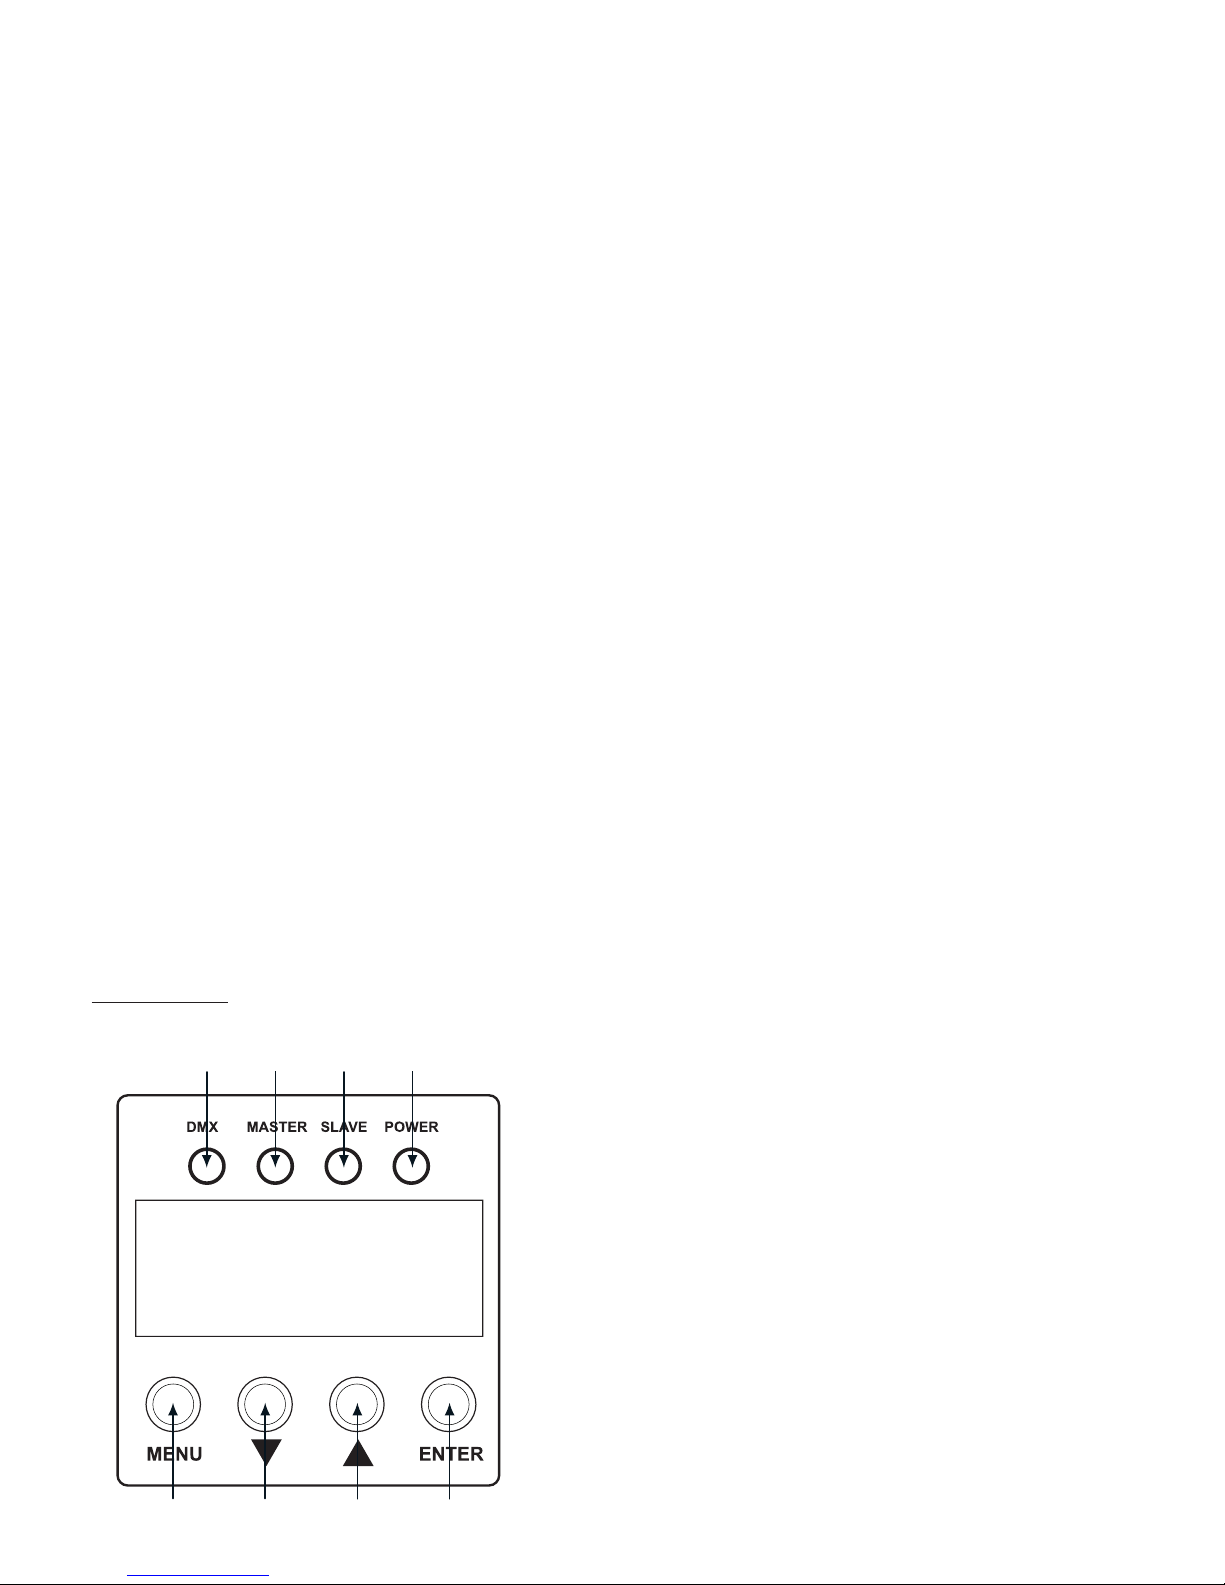
1 - DMX LED - This LED lights on when an incoming DMX
signal is detected.
2 - MASTER LED - This LED lights on when the controler is
in MASTER mode.
3 - SLAVE LED - This LED lights on when the controler is in
SLAVE mode.
4 - POWER LED - This LED lights on when the unit is
switched on.
5 - MENU button - Allows you to enter/leave menus.
6 - DOWN button - Allows you to browse through menus
and modify values.
7 - UP button - Allows you to browse through menus and
modify values.
8 - ENTER button - Allows you to save changes.
Front panel:
1 432
5 8
76
Page 6
PILOT60 and 120 - Power and control units for dedicated projectors
Page 6
English
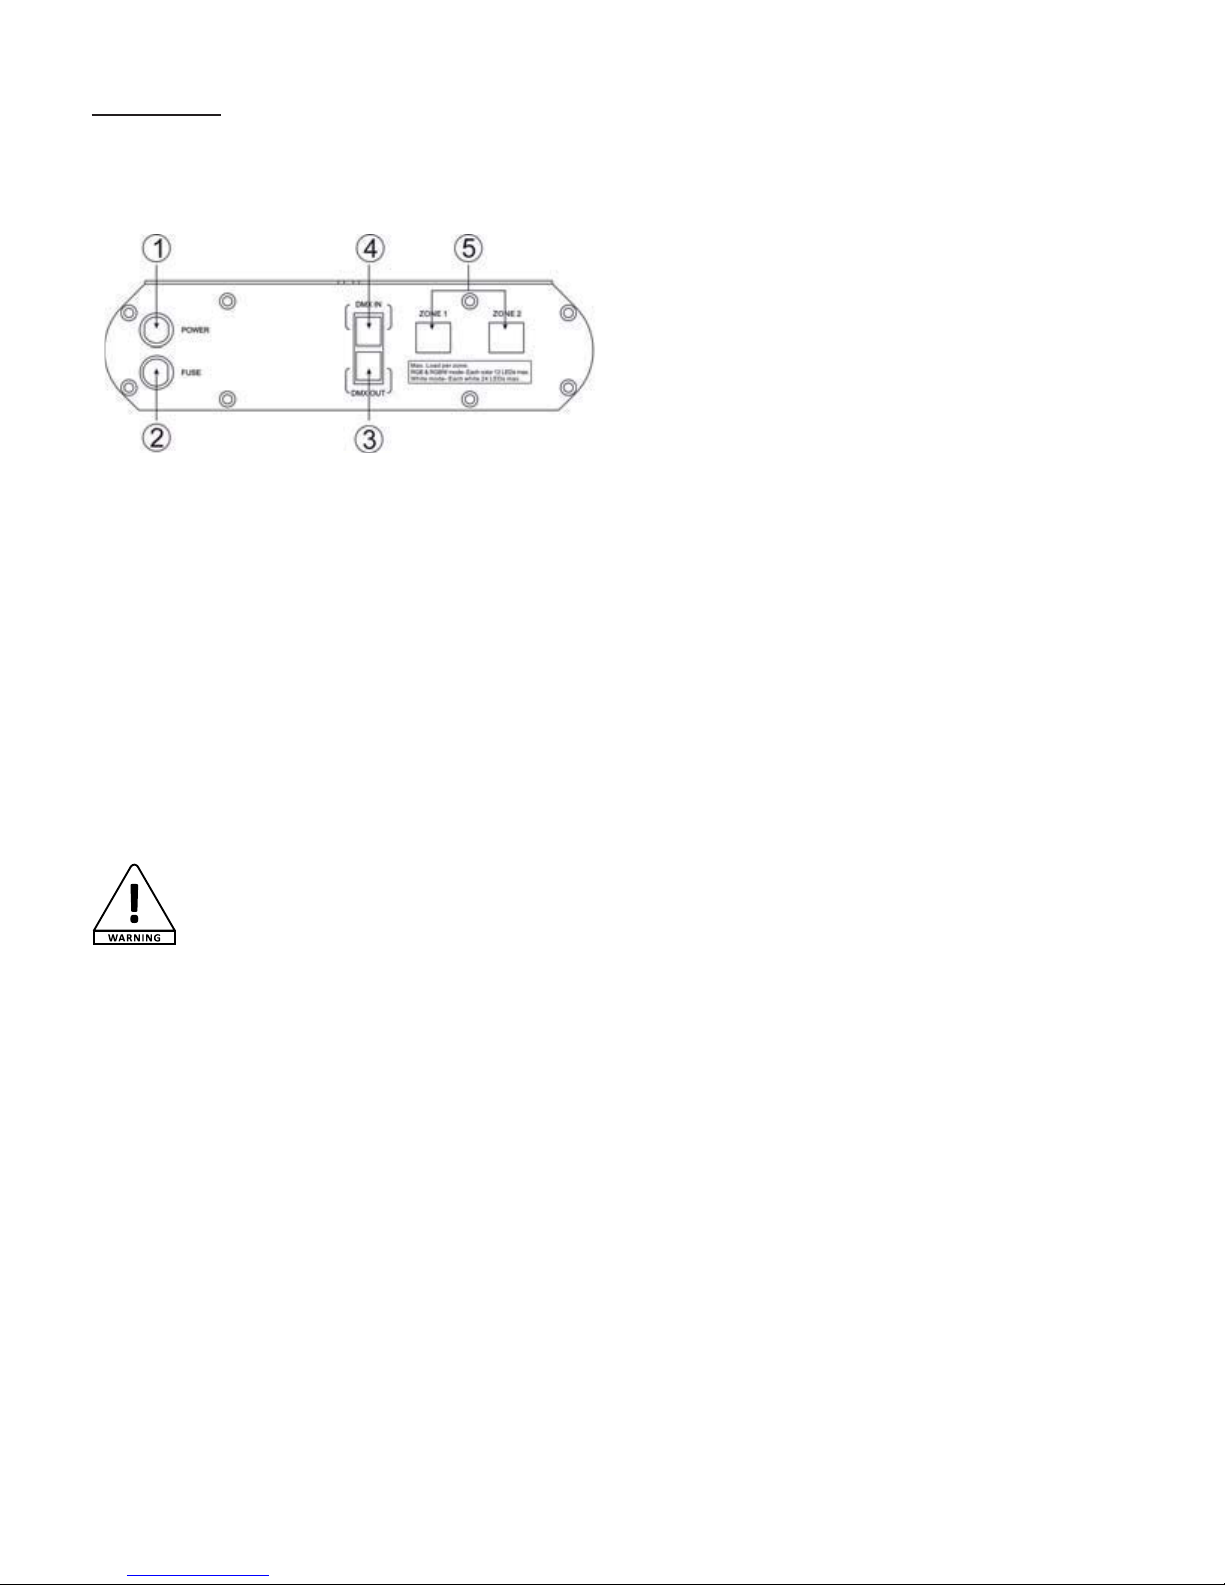
1 - Power input
To connect the PILOT120 to an electrical outlet.
2- Fuse
If need to replace the fuse, please make sure the
new fuse has exactly the same characteristics as
the original one.
3 - DMX OUT
Allows you to plug the PILOT120 to other devices
(with the supplied RJ45/XLR adapter). In MASTER
mode, connect the SLAVE controller here.
4 - DMX IN
Allows you to plug the PILOT120 to other devices
(with the supplied RJ45/XLR adapter). In SLAVE
mode, connect the MASTER controller here.
5 - ZONE 1 and 2 outputs
Connect here the compatible projectors.
60 W maximum per zone.
Rear panel:
5 - Installation
The PILOT series was designed to control and power up LEDs projectors such as the FLAT1TC, FLOOR4TC,
CEIL6TC...
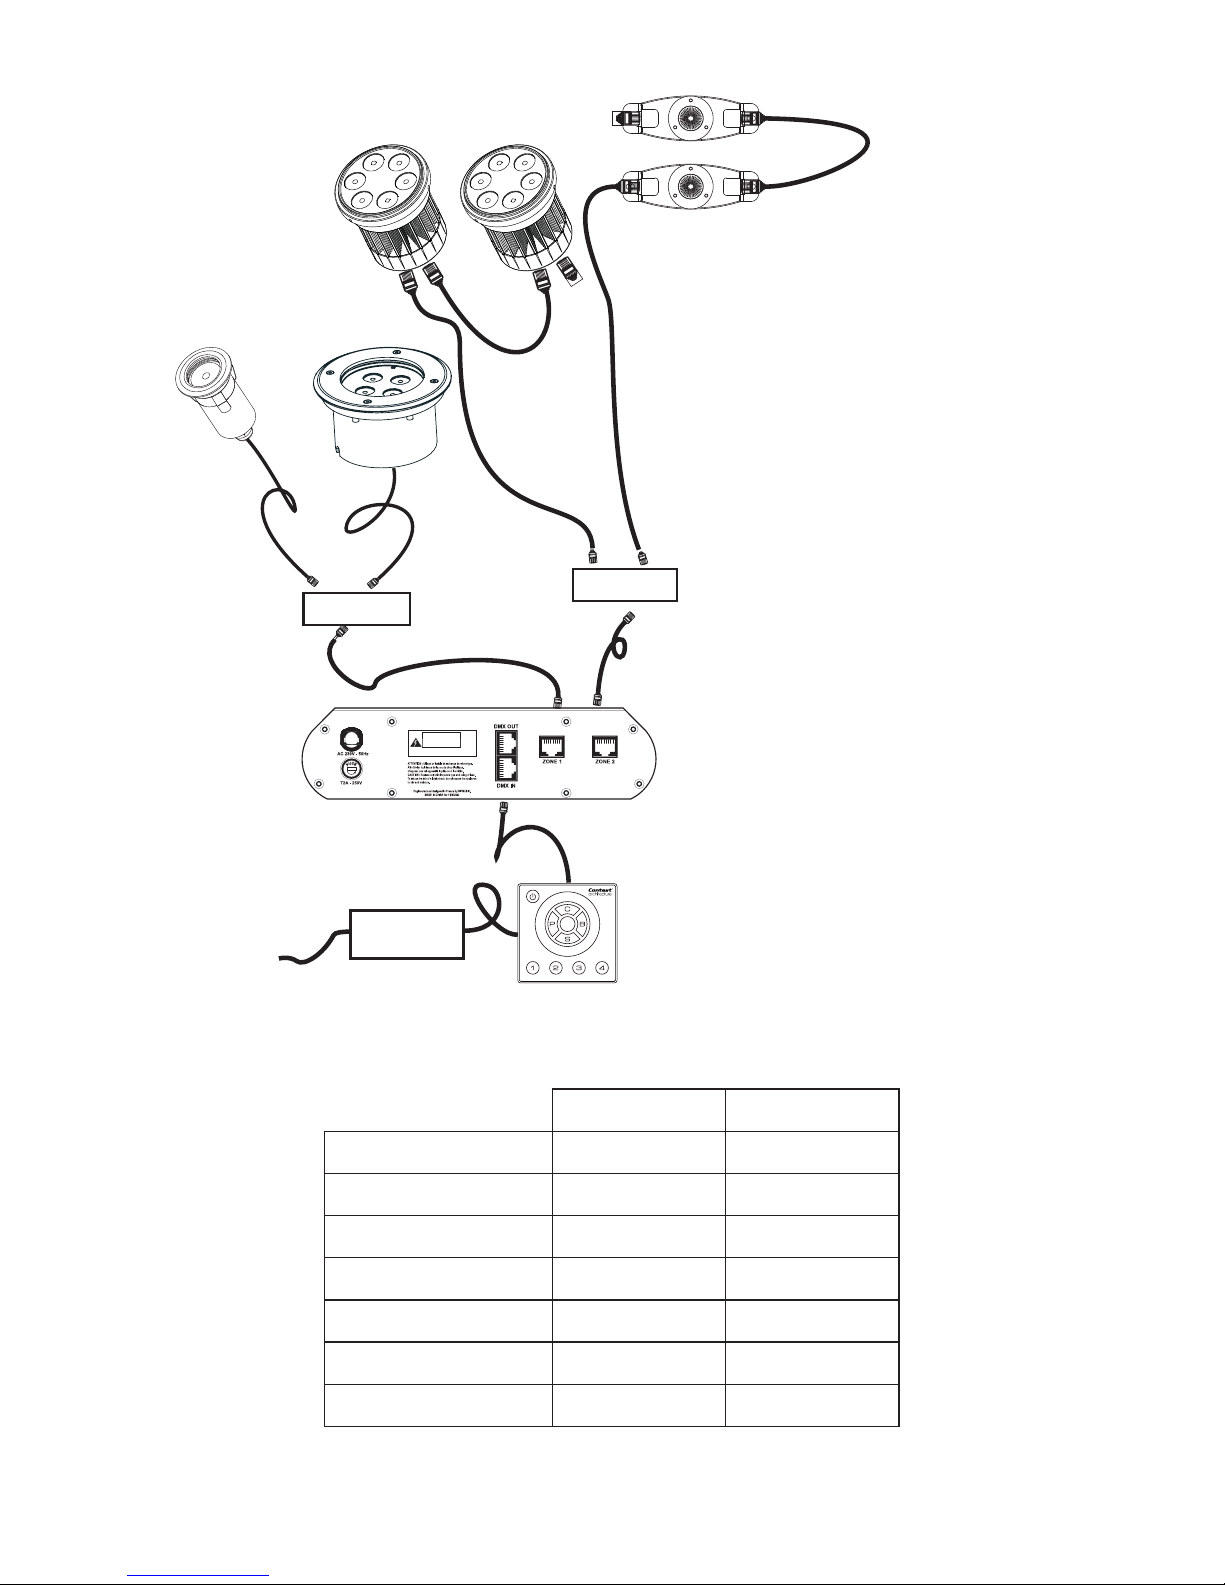
Le PILOT60 features 1x60W output while the PILOT120 features 2x60W outputs.
It is imperative to respect the maximum power per output. Refer to the next page for more information about
the maximum number of projectors per power supply unit.
The projectors MUST be divided per output in order to avoid going over 60W per zone.
The PILOT60 and PILOT120 must be placed on a flat, non-flammable surface. You can secure their fixations
with 2 screws. Please make sure the cooling vents are not obstructed.
Caution: Please make sure the device is switched off when you are connecting LEDs projectors.
Page 7
PILOT60 and 120 - Power and control units for dedicated projectors
English
LINK-SPLIT
Projectors
Splitters
Pilot120
Power unit
Controller
DC 12V
0,5A
230V-50 Hz
LINK-SPLIT
RJ45 line terminators
Max number of projectors for each PILOT series unit
PILOT60 PILOT120
CEIL1TC 12 24
CEIL3TC 4 8
CEIL4TC 3 6
CEIL6TC 2 4
FLOOR1TC 12 24
FLOOR4TC 3 6
FLAT1TC 12 24
Page 8

PILOT60 and 120 - Power and control units for dedicated projectors
Page 8
English
6 - Configuring your device
To access the PILOT60 or PILOT120 settings, press the MENU button. Use the UP and DOWN buttons to
browse through functions and confirm with ENTER.
The accessible functions are described below:
Address: DMX addressing
This menu allows you to choose the address of your controller. Once the address has been validated, the
projector automatically switches to DMX mode.
Channel Mode : Channels selection
This menu allows you to determine the number of channels used by the controller in DMX mode. The several
modes available are listed below:
PILOT60 :
- Mod1. (7-channel mode - Red Green Blue White colours, dimmer and strobe)
- Mod2. (4-channel mode - Red Green Blue White colours)
- Mod3. (3-channel mode - Red Green Blue colours)
- Mod4. (4-channel mode - Red Green Blue coloursand strobe)
- Mod5. (2-channel mode - cool white, warm white)
- Mod6. (2-channel mode - colours, dimmer)
- Mod7. (1-channel mode - dimmer)
PILOT120 :
- Mod1. (11-channel mode - Red Green Blue White per zone, dimmer and strobe)
- Mod2. (8-channel mode - Red Green Blue White per zone)
- Mod3. (6-channel mode - Red Green Blue per zone)
- Mod4. (4-channel mode - Red Green Blue zone1 per zone, and strobe)
- Mod5. (4-channel mode - Cool white, warm white per zone)
- Mod6. (3-channel mode - Colours per zone)
- Mod7. (1-channel mode - dimmer)
ShMd : Show Mode
This menu allows you to select a show from Sh1 to Sh19. Use the UP and DOWN buttons once you have
selected a show to increase/decrease the sequencing and speed values, then confirm with ENTER. Press
MENU to cancel.
BlMd : Blackout Mode
Allows you to activate/deactivate the Blackout mode. Choose Yes to activate it, No to deactivate it.
Page 9

PILOT60 and 120 - Power and control units for dedicated projectors
English
ProG : Program Mode
This menu allows you to create programs you will then be able to play from the Show Mode menu.
Select a program to modify from Sh1 to Sh19. Press ENTER to display the customisable values.
- SteP - This option allows you to access the customisable values of each step:
- Color (Colours of the two zones)
- c-1 (Zone 1 colours)
- c-2 (Zone 2 colours)
- Dimm (Dimmer of the two zones)
- d-1 (Zone 1 dimmer)
- d-2 (Zone 2 dimmer)
- Uhit (White for the two zones)
- u-1 (Zone 1 white)
- u-2 (Zone 2 white)
Note: the available options depend on the number of channels previously determined. If the colours per zone
are not available in the DMX configuration they will not appear in this menu.
Manu : Manual mode
This menu allows you to manually control the unit and decide on which scene you want it to play.
To do so, modify the value of the targeted channel with the UP and DOWN buttons, then confirm with ENTER.
All the channels available in DMX mode are also available in Manual mode. Press the MENU button to cancel
and go back to the main menu.
baLa : White balance settings
Allows you to adjust the white ebalance. You are able to modify the red, green and blue levels per zone
(PILOT120 only), or globally.
teSt : Test mode
Allows you to test every function of the controller. Once the test program has been launched, press the
MENU button to interrupt it.
LEd : Display settings
This function activates or deactivates the digital display while the device is being used.
FhrS : Fixture uptime
Allows you to check on the device uptime.
ver : Software version
Displays the current version of the operating software.
Page 10
PILOT60 and 120 - Power and control units for dedicated projectors
Page 10
English
7 - Using a DMX controller
You can control your PILOT via a standard DMX controller. This controller must have at least the same number of channels as your DMX configuration, in order to be able to access all the functions of the PILOT.
If you are using several PILOT controllers, you must skip between each address a number equal to the number of channels used by the controller.
For instance, if your PILOT is in Mod3. (3-channel mode - RGB colours)
the DMX addressing will be as follows:
First controller: DMX address 1
Second controller: DMX address 4
Third controller: DMX address 7
...
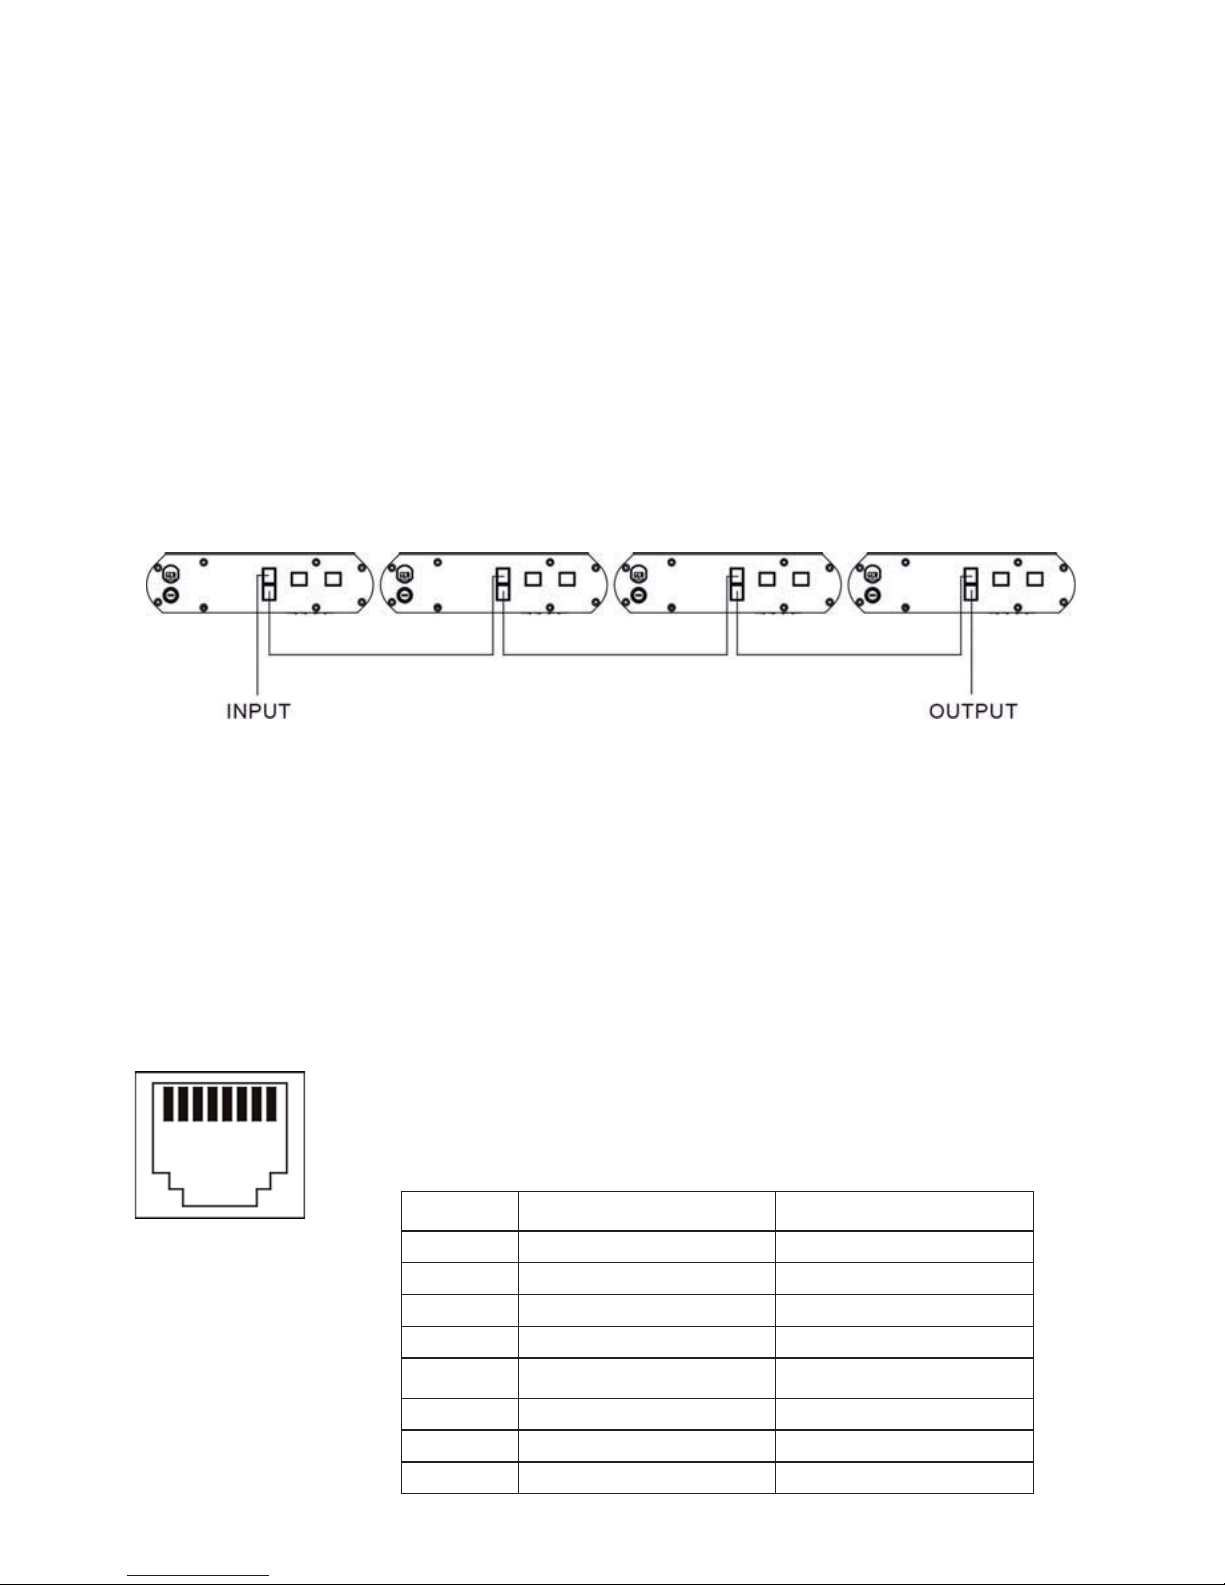
8 - DMX and Master/Slave connections
Your PILOT controller features two RJ45 sockets to carry the DMX signal. You can daisy chain several PILOT
to use them with the Master/Slave or DMX modes. The outgoing signal uses the DMX OUT socket while the
incoming signal uses the DMX IN.
Our LINK-RJ cables are fully compatible with the PILOT series and available in several lengths: from 15 cm to
10 m.
You will require the supplied RJ45/XLR adapters if you want to connect your PILOT controller in DMX to other
types of devices.
18
9 - Pinout of the DMX RJ45 socket
Front view of the RJ45 socket
Pins Thread colour DMX match
1 orange/white Not connected
2 orange Not connected
3 white/green Not connected
4 green Not connected
5 white/blue Not connected
6 blue DMX +
7 white/brown DMX -
8 brown Ground
Page 11
PILOT60 and 120 - Power and control units for dedicated projectors
English
18
Front view of the RJ45 socket
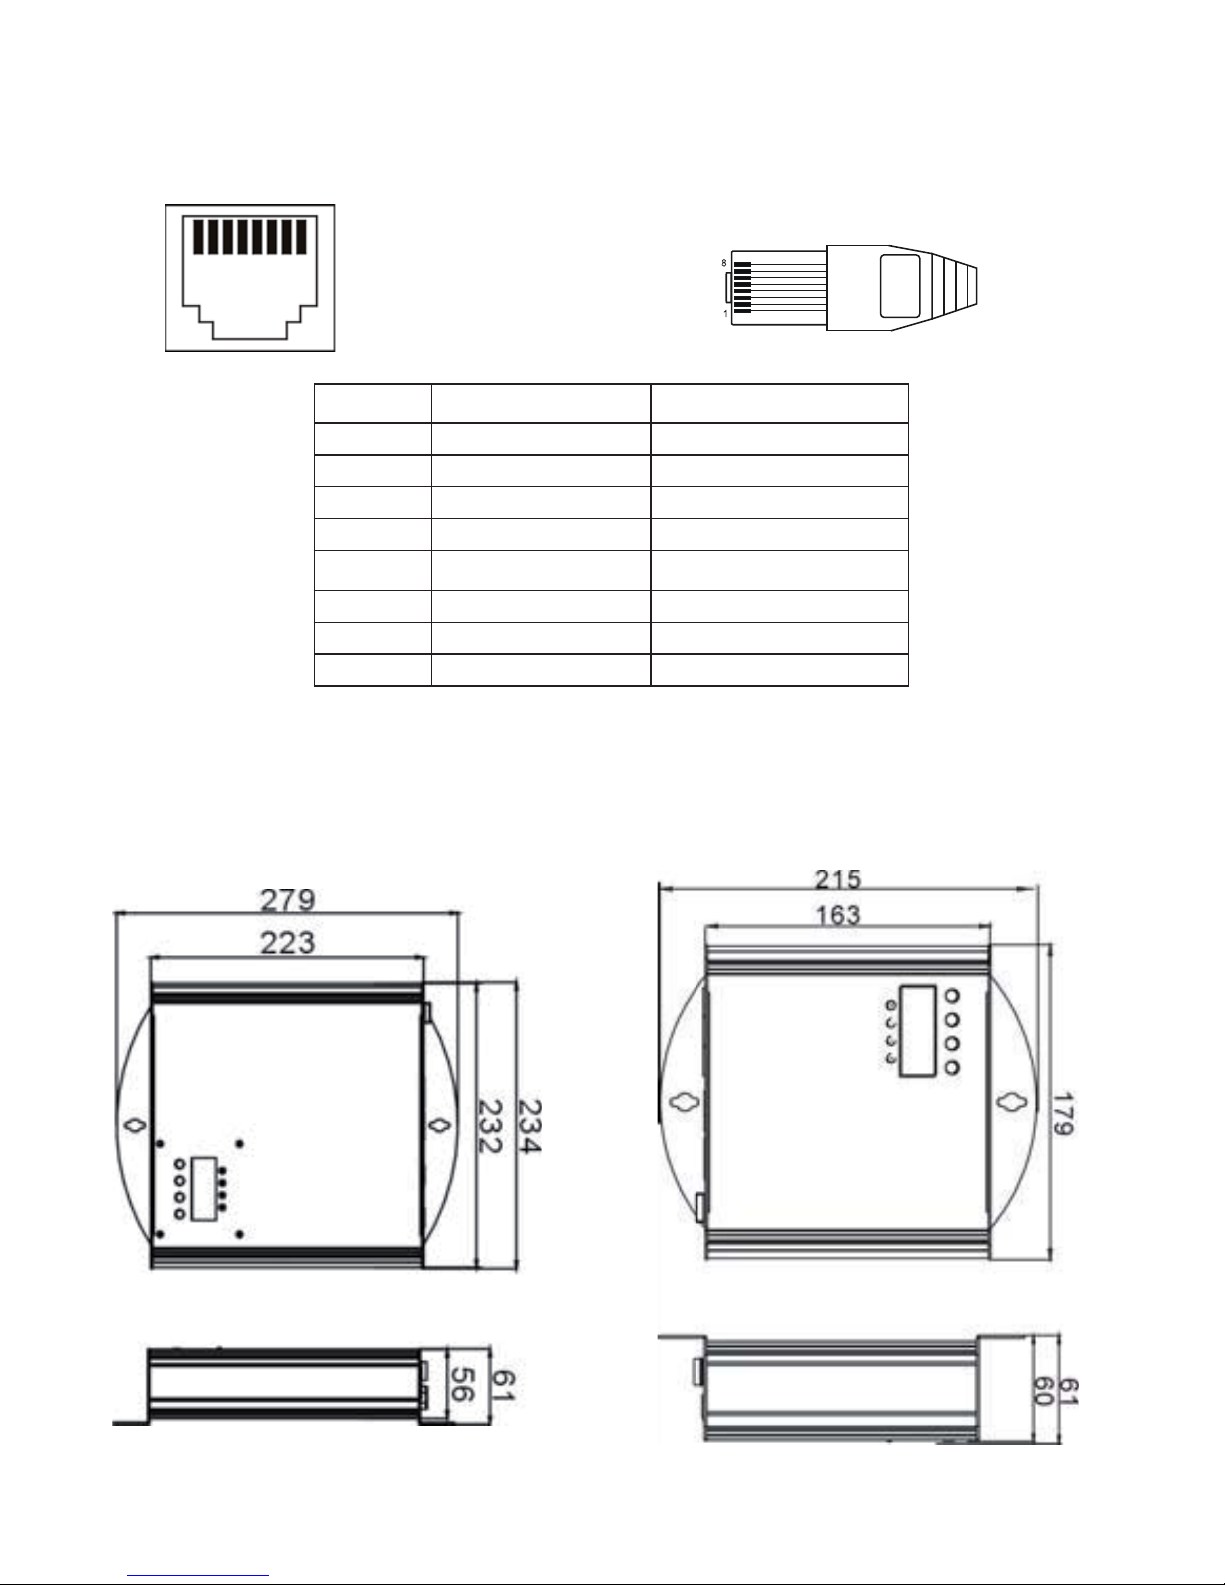
10 - Pinout of the RJ45 socket for the LED output
11- Dimensions
PILOT 120 PILOT 60
8-pin RJ45 plug
Pins side view
Pins Thread colour RGBW LEDs match
1 orange/white red +
2 orange green +
3 white/green blue +
4 green white +
5 white/blue red -
6 blue green -
7 white/brown blue -
8 brown white -
Page 12

Because CONTEST® takes the utmost care in its products to make sure you only get the best possible quality, our products are
subjects to modifications without prior notice. That is why technical specifications and the products physical configuration might differ
from the illustrations.
Make sure you get the latest news and updates about the CONTEST® products on www.contest-lighting.com
CONTEST® is a trademark of HITMUSIC S.A. - Zone Cahors sud - 46230 FONTANES - FRANCE
 Loading...