


24-CHANNEL DMX CONSOLE FOR POWER BLOCKS
USER GUIDE
9067 - April 2015 Version 2.0

English
1 - Safety instructions ------------------------------------------------------------------------- 3
2 - Instructions and recommendations ------------------------------------------------------- 4
3 - Command panel ---------------------------------------------------------------------------- 5
4 - Rear connectors ---------------------------------------------------------------------------- 7
5 - PROGRAMMATION ------------------------------------------------------------------------ 7
5.1 - Activating the Record mode
5.2 - Changing the record code
5.3 - Programming a scene
5.4 - Creating a sequence
6 - Modifying programs (Edit) ----------------------------------------------------------------- 8
6.1 - Activating the Edit mode
6.2 - Modifying one or several steps
6.3 - Inserting a scene into a program
6.4 - Deleting one or several scenes
6.5 - Deleting a program
6.6 - Deleting all programs
7 - Launching programs ----------------------------------------------------------------------- 9
7.1 - Launching a program
7.2 - Launching a program in music-sensitive mode (Audio)
7.3 - Launching a program with the SPEED fader
7.4 - Launching a program with the Standard Beat
7.5 - Changing the SPEED mode between 5 and 10 min
8 - MIDI ----------------------------------------------------------------------------------------- 10
8.1 - Configuring MIDI IN
8.2 - Configuring MIDI OUT
8.3 - Leaving the MIDI parameters
8.4 - Receiving MIDI datas
8.5 - Sending MIDI datas
8.6 - Execution
9 - DMX ----------------------------------------------------------------------------------------- 11
9.1 - Configuring DMX channels
9.2 - Deleting configured DMX channels
9.3 - Using the 12 built-in programs
10 - MAIN FUNCTIONS ----------------------------------------------------------------------- 12
11 - TECHNICAL SPECIFICATIONS ---------------------------------------------------------- 14
12 - BASIC CHART: PROGRAMMING A SEQUENCE -------------------------------------- 15
MEMORY-24 - 24-channel DMX console for power blocks
TABLE OF CONTENTS
Page 2

MEMORY-24 - 24-channel DMX console for power blocks
1 - Safety instructions
Important safety information
English
This unit is intended for indoor use only. Do not use it in a wet,
or extremely cold/hot locations. Failure to follow these safety instructions could result in fire, electric shock, injury, or damage to
this product or other property.
Any maintenance procedure must be performed by a CONTEST
authorised technical service. Basic cleaning operations must thoroughly follow our safety instructions.
This product contains non-isolated electrical components. Do not
undertake any maintenance operation when it is switched on as
it may result in electric shock.
WARNING : This unit contains no user-serviceable parts. Do not open the
housing or attempt any maintenance by yourself. In the unlikely even your unit
may require service, please contact your nearest dealer.
In order to avoid any electrical malfunction, please do not use any multi-socket,
power cord extension or connecting system without making sure they are
perfectly isolated and present no defect.
Risk of electrocution
To prevent the hazard of electric shocks, do not use
extension cords, multi-socket or any other connection
system without making sure metal parts completely
are out of reach.
Recycling your device
• As HITMUSIC is really involved in the environmental cause, we only commercialise clean, ROHS compliant products.
• When this product reaches its end of life, take it to a collection point designated by local authorities. The separate collection and recycling of your
product at the time of disposal will help conserve natural resources and ensure that it is recycled in a manner that protects human health and the
environment.
Symbols used
This symbol signals an important safety
precaution.
The CAUTION symbol signals a risk of product deterioration.
The WARNING symbol signals a risk to the user’s physical integrity.
The product may also be damaged.
Page 3

English
Instructions and recommendations
1 - Please read carefully :
We strongly recommend to read carefully and understand
the safety instructions before attempting to operate this unit.
2 - Please keep this manual :
We strongly recommend to keep this manual with the unit for
future reference.
3 - Operate carefully this product :
We strongly recommend to take into consideration every
safety instruction.
4 - Follow the instructions:
Please carefully follow each safety instruction to avoid any
physical harm or property damage.
5 - Avoid water and wet locations :
Do not use this product in rain, or near washbasins or other
wet locations.
6 - Installation :
vibration and slipping while operating as it may result in
physical injury.
7 - Ceiling or wall installation :
Please contact your local dealer before attempting any ceiling
or wall installation.
8 - Ventilation :
The cooling vents ensure a safe use of this product, and avoid
any overheating risk.
Do not obstruct or cover these vents as it may result in
overheating and potential physical injury or product damage.
This product should never been operated in a closed nonventilated area such as a flight case or a rack, unless cooling
vents are provided for the purpose .
9 - Heat exposure :
Sustained contact or proximity with warm surfaces may cause
overheating and product damages. Please keep this product
away from any heat source such as a heaters, amplifiers, hot
plates, etc...
10 - Electric power supply :
11 - Power cords protection:
Power-supply cords should be routed so that they are not likely
to be walked on or pinched by items placed upon or against
them, paying particular attention to cords at lugs, convenience
receptacles and the point where they exit from the fixture.
We strongly encourage you to only use a
fixation system or support recommended by
the manufacturer or supplied with this product.
Carefully follow the installation instructions and
use the adequate tools.
Always ensure this unit is firmly fixed to avoid
This product can only be operated according to
a very specific voltage. These information are
specified on the label located at the rear of the
product.
MEMORY-24 - 24-channel DMX console for power blocks
12 - Cleaning precautions :
13 - Long periods of non use :
14 - Liquids or objects penetration :
electric shock or fire.
15 - This product should be serviced when :
16 - Inspection/maintenance :
Please do not attempt any inspection or maintenance by
yourself. Refer all servicing to qualified personnel.
17 - Operating environment :
Unplug the product before attempting any cleaning
operation. This product should be cleaned only with
accessories recommended by the manufacturer.
Use a damp cloth to clean the surface. Do not
wash this product.
Disconnect the unit’s main power during long
periods of non use.
Do not let any object penetrate this product as it
may result in electric shock or fire.
Never spill any liquid on this product as it may
infiltrate the electronic components and result in
Please contact the qualified service personnel if :
- The power cord or the plug has been damaged.
- Objects have fallen or liquid has been spilled into
the appliance.
- The appliance has been exposed to rain or water.
- The product does not appear to operate normally.
- The product has been damaged.
Ambient temperature and humidity: +5 - +35°C,
relative humidity must be less than 85% (when
cooling vents are not obstructed).
Do not operate this product in a non-ventilated,
very humid or warm place.
Page 4

MEMORY-24 - 24-channel DMX console for power blocks
3 - Command panel
1
2
3
4
5
9
8
10 11 12 13
English
34
14
15
16
17
18
19
20
21
22
23
32
6
7
27
24
26
28
25
30
29
1 - Preset A LEDs
Allow you to visualize the light intensity and value of the 1-12 DMX channels.
2 - Faders (1 - 12)
Allow you to control the intensity of the 12 first channels.
3 - FLASH buttons (1 - 12)
Allow you to instantly use the maximum value of a channel.
4 - Preset B LEDs
Allow you to visualize the light intensity and value of the 13-24 DMX channels.
5 - Scenes LEDs
Allow you to visualise which scenes are currently active.
6 - Faders (13 - 24)
Allow you to control the intensity of the 12 last channels.
7 - FLASH buttons (13 - 24)
Allow you to instantly use the maximum value of a channel. Can also be used for programming.
8- DARK button
Activates the black-out mode (all DMX outputs are deactivated).
9 - DOWN/BEAT REV button
The DOWN function allows you to modify a scene in Program mode.
The BEAT REV function allows you to reverse a program sequence (except for music-sensitive programs).
10 - MODE SELECT/REC SPEED button
Mode Select : Allows you to choose one of the following modes: CHNS (chase)/SPEED, Double Preset,
and Single Preset.
Rec Speed : Configures the speed (speed of any program in Mix mode).
11 - UP/CHASE REV button
UP allows you to modify a scene in Program mode.
CHASE REV allows you to reverse a sequence controlled via a fader.
33
31
Page 5

English
12 - PAGE button
Allows you to select a page of scenes: 1, 2, 3 or 4.
13 - DELETE/REV ONE button
Delete allows you to delete any step from a scene while Rev One allows you to reverse the any program sequencing.
14 - Screen
Allows you to visualise the current status of the console.
15 - INSERT/% or 0-255 button
Insert allows you to insert one or several steps into a scene. % or 0-255 allows you to change the unit of value
displayed on the screen.
16 - EDIT/ALL REV button
Edit activates the Program mode. All Rev allows you to reverse the sequencing of any program.
17 - ADD or KILL/REC EXIT button
ADD allows you to activate several SCENES and FLASH buttons at the same time. KILL only allows you to
activate one FLASH button at a time. When activating a FLASH button, all programs and scenes will become
inactive. REC EXIT allows you to leave the program (edit) or recording (record) modes.
18 - RECORD/ SHIFT button
The RECORD button allows you to activate the recording mode. Shift does not have a function by itself but can
be combined with other buttons.
19 - A 1-24 button
Allows you to switch between two modes: 2 x 12 or 1 x 24 channels.
20 - PARK button
Allows you to activate the Single/Mix Chase mode, use channels 13 to 24 with the current settings, or program a
scene with the master B fader, depending on the mode used.
21 - HOLD button
Pauses the current scene.
22 - STEP button
Allows you to jump to the next step when the speed fader is at its maximum, or in program mode.
23 - AUDIO button
Allows you to activate the music-sensitive (Audio) mode via the internal microphone.
24 - MASTER A fader
Allows you to control the preset A outputs.
25 - MASTER B fader
Allows you to control the preset B outputs.
26 - BLIND button
Allows you to hide some channels during the execution of programs.
27 - HOME button
Deactivates the Blind mode.
28 - TAP SYNC button
Repeatedly tap on this button to create a tempo on which the sequences will be based.
29 - FULL ON button
Activates all the outputs at their maximum value.
30 - BLACK OUT button
Deactivates all the outputs except for the Flash and Full on.
31 - Fade Time fader
Allows you to set a crossfade time.
32 - Speed fader
Allows you to configure the speed.
33 - Audio fader
Allows you to configure the sensitivity of the audio input.
34 - FOG MACHINE button
Allows you to activate or deactivate a fog/smoke machine.
MEMORY-24 - 24-channel DMX console for power blocks
Page 6
MEMORY-24 - 24-channel DMX console for power blocks
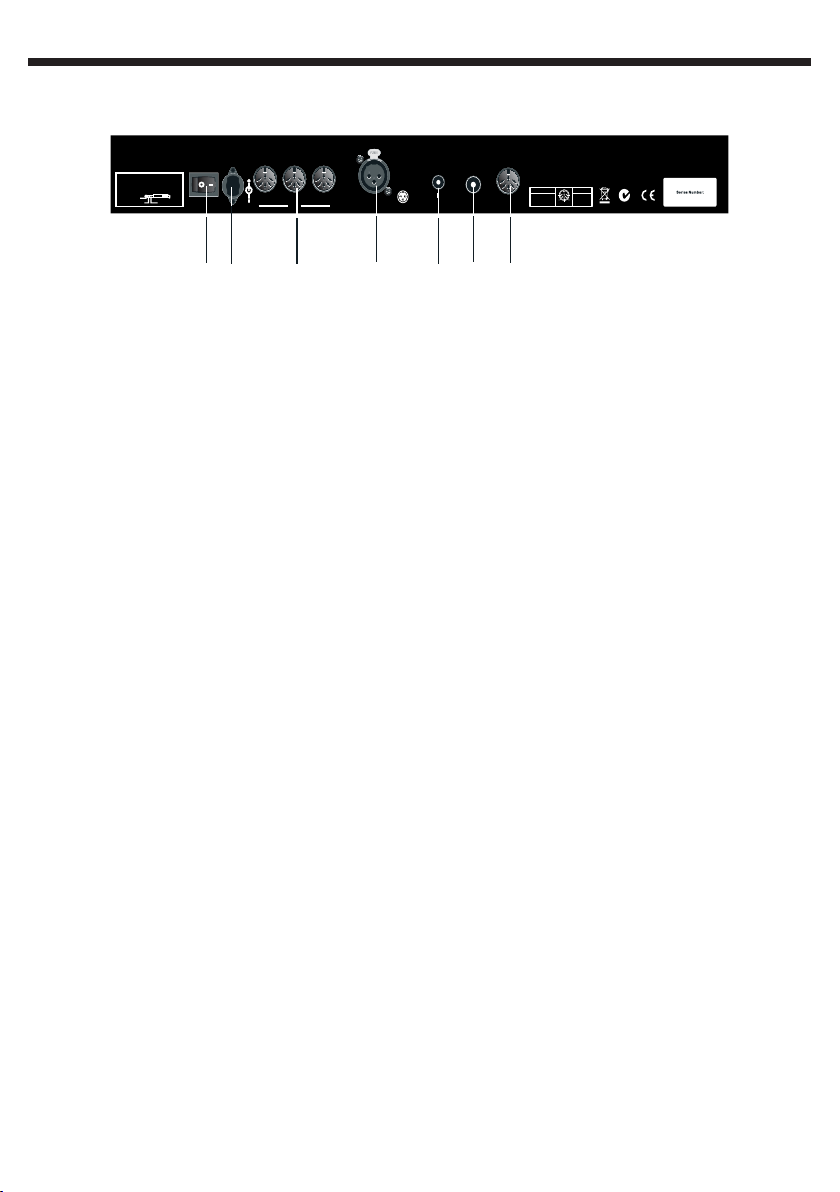
4 - Rear connectors
DC Input: 12-20VDC, 500mA Min
Audio: Line IN 0.1V-1Vp-p
Remote: 1/4"stereo jack
Full on
Black out
OUTTHRU
GND
POWER
DC IN
IN
MIDI
DMX OUT
1=Ground
2=Data3=Data+
AUDIO
REMOTE
35 36 37 38 39 40 41
35 - POWER switch
Allows you to turn the console on or off.
36 - DC INPUT
DC 12-20V, 500mA Min. We strongly advise you to only use the power cord supplied with the MEMORY-24.
37 -MIDI Thru/Out/In
MIDI sockets allowing you to connect a sequencer or any MIDI device.
38 - DMX OUT
3-pin XLR socket: DMX signal output.
39 - AUDIO input
RCA socket allowing you to receive a line-level sound signal for music-sensitive programs.
40 - REMOTE input
Allows you to plug a remote control to control the black-out and full on modes.
41 - FOG CONTROL OUT
Allows you to remotely control a smoke machine.
FOG MACHINE
MIDI THRU/OUT
1=NC; 2=GND
3=NC; 4=V+
5=Signal
MIDI IN
1
3
1=NC; 2=NC
3=NC; 4=V+
5
4
5=Signal
2
Made in PRC
English
5 - PROGRAMMATION
5.1 - Activating the Record mode
a - Press (without releasing) the RECORD button.
b - Without releasing RECORD, consecutively press the FLASH 1, 6, 6 and 8 buttons.
c - Release the RECORD button, the RECORD LED will light on to confirm the activation of the Record mode.
The LED will not light on if the code is incorrect.
NB : Even though this code can be modified, the default Record code is FLASH 1, 6, 6 and 8 buttons.
5.2 - Changing the Record code
a - Enter the current Record code: 1, 6, 6 and 8.
b - Simultaneously press the EDIT and RECORD buttons.
c - Enter the new code while pressing down these two buttons. The CODE must use 4 FLASH buttons (either the
same e.g. 1, 1, 1 and 1 or different FLASH buttons)
d - Enter the code again, the LEDs of all the channels and of all the SCENES buttons will flash 3 times.
The LEDs will not flash if the code is incorrect.
e - Press REC EXIT and RECORD at the same time, then release them together to exit the Record mode.
NB : To change the Record code again, press the RECORD and REC EXIT buttons simultaneously.
Page 7

English
5.3 - Programming a sequence
a - Activate the Record mode.
b - Select the Single mode 1-24 by pressing the MODE SELECT button. This selection will allow you to control the
24 channels of your programmation.
Make sure the MASTER A and B faders are at there maximum. (The MASTER A fader is at its maximum when it is
upward, The MASTER B fader is at its maximum when it is downward)
c - Create your scene by using the channels 1 to 24 faders. When at 0% or DMX 0,the faders will be in position 0, at
100% or DMX 255 will be in position 10.
d - Once your scene is complete, press the RECORD button to save your scene in the temporary memory.
e -Deleting a sequence: Simultaneously press the REC CLEAR and RECORD buttons, all the LEDs will flash to
confirm your choice.
5.4 - Creating a sequence
a - Repeat the aforementioned steps c and d. You can program up to 1000 steps.
b - To save a step, select a bank of sequences (or a step). Press the PAGE button (page 1 to 4) to save your steps.
c - Simultaneously press one of the FLASH buttons (between 13 and 24) and the RECORD button. All the LEDs to
confirm your choice.
d - You can either keep programming sequences, or leave the programmation mode. To leave the programmation
mode, simultaneously press the EXIT and RECORD buttons, the RECORD LED will light on.
Please refer to the end of this guide for a brief summary of this process.
MEMORY-24 - 24-channel DMX console for power blocks
6 - Modifying programs (Edit)
6.1 - Activating the Edit mode
a - Activate the Record mode.
b - Press the PAGE button to select the page containing the program you want to modify.
c - Press the MODE button to select CHNS< >SCENES;
d - Without releasing it, press the EDIT button.
e - Keep the EDIT button down and press the FLASH button representing the program you want to modify.
f - Release the EDIT button, the LED of the desired program will light on.
6.2 - Modifying one or several steps
a - Activate the Record mode.
b - Press the STEP button to browse through steps and select the one you want to modify.
c - Press the UP button to increase the intensity. Press the DOWN button to decrease the intensity..
d - While pressing the UP and DOWN buttons, press the FLASH button representing the DMX channel of the scene
you want to modify until the requested value is displayed on the screen.
Press the FLASH button to confirm your choice.
e - Repeat steps b, c, and d to modify more steps.
f - Simultaneously press the REC EXIT and RECORD buttons to leave the Edit mode. The LED of the modified scene
will light off.
Page 8

MEMORY-24 - 24-channel DMX console for power blocks
6.3 - Inserting a scene into a program
Ex : Insert a scene with channels 1 to 12 between sequences 4 et 5 of the program 35 :
a - Activate the Record mode
b - Put the channels 1 to 12 faders at their maximum.
c - Press the RECORD button.
d - Make sure you are in CHNS<>SCENE mode and activate the Edit mode.
e - Press the PAGE button to select page 3.
f - Simultaneously press the FLASH 23 and the EDIT buttons.
g -Press the SCENE button to browse through scenes and select scene 4 of your program.
h - Press the INSERT button to insert a new scene into your program, all the LEDs will flash to confirm your choice.
i - Leave the Edit mode.
6.4 - Deleting one or several scenes
Ex : Erasing scene 3 of the FLASH 15 program of page 2:
a - Activate the Record mode.
b - Press the MODE button to select CHSN<>SCENE.
c - Press the PAGE button and select page 2.
d - Simultaneously press the FLASH 15 and the EDIT buttons , the SCENE LED will light on.
e - Press the STEP button and select scene 3.
f - Press the DELETE button, pour effacer la scène, toutes les LEDs s’allumeront pour confirmer la suppression de la
scène.
g - Simultaneously press the REC EXIT and RECORD buttons to leave the programmation mode (Edit).
6.5 - Deleting a program
a - Activate the Record mode.
b - Press the PAGE the page of the program you want to erase.
c - Simultaneously press twice the EDIT and FLASH (representing the program you want to erase).
d - Release tese buttons, all the LEDs will flash to confirm the suppression.
English
6.6 - Deleting all programs
a - Press and hold down the RECORD button.
b - Consecutively press the FLASH 1, 4, 2 and 3 buttons (while pressing the RECORD button). All the LEDs will flash
to confirm the suppression.
7 - Launching programs
7.1 - Launching a program
a - Press the MODE button to select CHSN<>SCENE.
b - Press the PAGE button to select the page containing your program.
c - Push the MASTER B fader to its maximum (downward).
d - Push the channel fader (13 to 24) at its maximum to launch the program.
c - Set the Fade Time.
d - Press the FLASH button corresponding to the program you want to play to launch the program.
e - Use the fader of the channel corresponding to the program to modify the program currently playing.
Page 9

English
7.2 - Launching a program in music-sensitive mode (Audio)
a - Use the built-in microphone or the audio input.
b - Sélectionnez le programme désiré comme décrit ci-dessus.
c - Press the AUDIO button untils the LED lights on to confirm the activation of the Audio mode.
d - Use the AUDIO LEVEL fader to configure the microphone sensitivity.
e - Press the AUDIO button ton leave the Audio mode, the LED will light off.
7.3 - Launching a program with the SPEED fader
a - Make sure the Audio mode is deactivated.
b - Select a program.
c - Position the SPEED fader onto SHOW Mode (downward), and simultaneously press the FLASH button of the
program and the REC SPEED button. The program will no longer be set at the programmed speed.
d - Configure the program speed with the SPEED fader.
NB: Step c is not necessary if the program is not programmed at the default speed.
7.4 - Launching a program with the Standard Beat
a - Make sure the Audio mode is deactivated. Press the MODE button to select CHNS<>SCENE.
b - Press the PARK to select the Mix Chase mode.
c - Select your program.
d - Configure the speed with the SPEED fader (until the display indicates the required speeed) or with the TAP SYNC
button (press it at least twice to define a tempo).
e - Simultaneously press the REC SPEED and FLASH buttons of your program.
f - Press the FLASH button of your program to launch it.
7.5 - Changing the SPEED mode between 5 and 10 min
MEMORY-24 - 24-channel DMX console for power blocks
a - Press and hold the RECORD button.
b - While pressing the RECORD button, simultaneously press the FLASH 5 or FLASH 10 buttons three times.
c - The speed 5min LED or speed 10min LED will light on to confirm you activated the Speed mode ( 5 or 10 min).
8 - MIDI
8.1 - Configuring MIDI IN
a - Simultaneously press the RECORD button and press 3 times the FLASH 1 button. The display will indicate ‘‘CHI’’.
b - Press one of the FLASH buttons (1 to 16) to assign the MIDI IN channel, the LED of the corresponding channel
will light on.
8.2 - Configuring MIDI OUT
a - Simultaneously press the RECORD button and press 3 times the FLASH 2 button. The display will indicate
‘‘CHO’’.
b - Press one of the FLASH buttons (1 to 16) to assign the MIDI OUT channel, the LED of the corresponding channel
will light on.
8.3 - Leaving the MIDI parameters
a - Simultaneously press the RECORD and REC EXIT buttons to leave the MIDI parameters.
8.4 - Receiving MIDI datas
a - Simultaneously press the RECORD button and press 3 times the FLASH 3 button. The display will indicate ‘‘IN’’,
the console is now ready to receive MIDI datas.
Page 10

MEMORY-24 - 24-channel DMX console for power blocks
8.5 - Sending MIDI datas
a - Simultaneously press the RECORD button and press 3 times the FLASH 4 button. The display will indicate
‘‘OUT’’, the console is now ready to send MIDI datas.
NB : - All functions are disabled during data transfer.
- The transfer will be interrupted in case of error or power failure.
8.6 - Execution
a - If no MIDI information have been received for more than 10 minutes,the channel and activated program via MIDI
signal will be deleted.
b - During MIDI data transfers, the identity of the console is 55H and the name of the folder is DC1224 with the
extension ‘‘BIN (space)’’.
c - The dump files allow the console to send its MIDI data to another console or MIDI device.
d - There are 2 types of file modes for dump files, as described below.
e - The console will receive and send Note On and Note Off data via the FLASH buttons. The table below indicates
the notes and their functions:
English
Note n° Speed Functions
22 - 69 Master program Activates or deactivates programs 1 to 48
70 - 93 Channels intensity Activates channels 1 to 24
94 FULL POWER
95 BLACK
96 HOLD
97 Activates or deactives the music-sensitive mode
98 CHNS<>SCENE
99 DOUBLE PRESET Mode
100 SINGLE PRESET Mode
101 Scene
102 BLACK-OUT
9 - DMX
9.1 - Configuring DMX channels
a - Make sure the Record mode is acivated. Press and hold the RECORD button.
b - Press 3 times the FLASH8 button while pressing the RECORD button. The screen will display the DMX channels
c - You can select a DMX channel (between 1 and 512) using the UP and DOWN buttons.
d - Once you chose a DMX channel, press one of the FLASH buttons (1 to 24), this channel can now be assigned.
e - If you press on the FULL ON button, the DMX value of the channel will be set to 255, all the LEDs from the
FLASH (1-24) buttons will light on. By pressing the BLACK OUT button the DMX value of the channel will be set to
0, all the LEDs of the FLASH (1-24) buttons will light off.
f - Press the EXIT button, and press the RECORD to exit the DMX configuration mode.
Page 11

English
9.2 - Deleting configured DMX channels
a - Make sure the RECORD mode is activated. Press and holf the RECORD button.
b - While pressing the RECORD button, press 3 times the FLASH7 button. The DMX channels already configured will
be deleted and the console will use the default DMX parameters (channels 1 - 24).
9.3 - Using the 12 built-in programs
a - Make sure the RECORD mode is activated. Press and holf the RECORD button.
b - While pressing the RECORD button, consecutively press the FLASH 6, 6, 8 and 8 buttons. You will then ben able
to use the 12 built-in programs of page 1, although the other programs will be deleted.
MEMORY-24 - 24-channel DMX console for power blocks
10 - MAIN FUNCTIONS
10.1 - Reversing the scenes sequencing
a - Reversing all scenes sequencing:
Press the ALL REV button, and every scene will be reversed.
b - Reversing all programs with the speed control:
Press the CHASE REV button.
c - Reversing all programs with the standard beat:
Press the BEAT REV button.
d - Reversing the sequencing of a specific program:
Simultaneously press the REC ONE button and the FLASH button corresponding to the program, and release these
two buttons at the same time.
10.2 - Fade Time
a - The amount of time the fader will use to go from 0 to the maximum, and vice versa.
b - The Fade Time is set via the Fade Time fader, from instantly to 10 minutes.
10.3 - TAP SYNC button
a - The TAP SYNC button allows you to program and synchronise sequences with the tempo. Set a tempo by
pressing this button several times. The tempo will be determined by the last two pressures on this button. The STEP
button LED will flash at the rythm of the new tempo. The tempo can be modified at any time, even when the program
is already launched.
b - TAP SYNC will erase the parameters of the SPEED fader until you move the latter again.
c - Use the TAP SYNC button or the SPEED fader to configure the speed of a program.
The MASTER faders control the main levels of channels and scenes (except for the FLASH buttons).
For instance: If the MASTER faders are at their minimum, all the outputs will be at 0 (except for the FLASH or FULL
ON).
If the MASTER faders are set at 50%, all the outputs will be at 50% of their capacity.
If the MASTER faders are set at their maxmimum, all the outputs will be at 100% of their capacity.
The MASTER A fader controls the channels 1 to 12 outputs.
The MASTER B fader controls the channels 13 to 24 outputs.
10.4 - MASTER faders
Page 12

MEMORY-24 - 24-channel DMX console for power blocks
10.5 - Single mode
a - All programs will be launched one after another in the order determined by their number (P1, P2, P3...).
b - The display wil indicate which program is currently being played.
c - All programs are controlled via the SPEED fader.
d - Press the MODE SELECT button and select CHNS<>SCENE.
e - Press the PARK button to select SINGLE CHASE MODE. A red LED will indicate your selection.
10.6 - Mix Mode
a - Launches all the programs at the same time.
b - All programs are controlled via the SPEED fader, or every program speed will be controlled individually (refer to
Programming the speed).
c - Press the MODE SELECT button and select CHNS<>SCENE.
d - Press the PARK button to select MIX CHASE. A yellow LED will indicate your selection.
10.7 - Dimmer display
a - The display is used to indicate the percentage of intensity or DMX value.
b - To switch from the DMX value to percentages, simultaneously press the SHIFH and % or 0-255 buttons.
c - The screen indicates ‘‘076’’ for a percentage of 76%. The screen indicates ‘’ 76.’’ for a DMX value of 76.
10.8 - BLIND and HOME functions
a - The BLIND function temporarily hides some channels from your sequence, while the sequence is being played,
and allows you to manually control these channels.
b - Simultaneously press the BLIND and FLASH buttons (representing the channel you want to control).
c - To go back to normal, simultaneously press the HOME and FLASH buttons of the corresponding channel.
10.9 - PARK button
English
a - In CHNS<>SCENES mode, press the PARK button to switch from Single Mode to Mix Mode.
b - In Double Preset mode, pressing the BANK buttons has the same effect as putting the MASTER B fader at its
minimum.
c - In Single Mode, this button can temporarily record the current output by adjusting the MASTER B fader.
10.10 - ADD KILL button
The ADD KILL button changes the FLASH buttons mode. Usually, the FLASH touches are in Add mode, that is why
pressing one of the FLASH buttons does not interrupt other scenes but allows you to play several scenes at the
same time.
The Kill mode can be activated by pressing the ADD KILL button and the corresponding LED will light on. By
pressing any of the FLASH buttons, you will hide the other scenes or programs currently being played.
In Kill mode, the hidden programs are hidden but not interrupted.
Page 13

English
10.11 - Double Preset Mode
a - Press the SELECT MODE button to activate the Double Preset Mode.
b - In this mode, the channels 1 to 12 faders and the channels 13 to 24 faders both control 12 channels.
c - The MASTER A fader controls channels 1 to 12 whereas the MASTER B fader controls channels 13 to 24.
d - The Double Preset Mode does not allow you to save any scene.
10.12 - Using the Double Preset Mode
a - Activate the Double Preset mode.
b - Set the channels 1 to 6 faders at their maximum, do the same for channels 13 to 24 faders.
c- Set the MASTER A and MASTER B faders at the same level, push them in the same direction to obtain a scene.
Preset B is used to prepare the next scene.
MEMORY-24 - 24-channel DMX console for power blocks
11 - TECHNICAL SPECIFICATIONS
- Power supply : 12-20V, DC 500mA min.
- DMX output : Châssis XLR 3 broches.
- MIDI : Châssis DIN 5 broches.
- AUDIO input : 100Mv-1Vpp.
- Fuse : F0,5A 250V 5x20mm
- Dimensions : 482 x 264 x 85mm
- Weight : 4.6 Kg
CAUTION !
- To prevent any program losses, your console must be turned on at least two hours a month.
- The display indicates «LOP» when the voltage is too low.
Page 14

MEMORY-24 - 24-channel DMX console for power blocks
12 - BASIC CHART : PROGRAMMING A SEQUENCE
ACTION DISPLAY / RESULT
English
Activate the RECORD mode:
1
2
3
4
5
6
Simultaneously RECORD + FLASH
1, 6, 6 and 8
MASTER A and
B faders at their MAX
Select the Mode:
SINGLE 1-24 with the
MODE SELECT button
Préparing a scene: with the
1-24 faders
Press RECORD: The scene is
temporarily saved
Repeat steps 4 and 5 for the
next scenes
The RECORD LED lights on:
you are in programmation mode
The 1-24 SINGLE LED lights on
The LEDs of each band
lights on, according to the
configuration
All the LEDs flash
7
8
9
Switch to CHNS mode with the
MODE SELECT button
Select the page to store your
sequence with the PAGE button
Simultaneously press RECORD
and one of the FLASH buttons
you want of preset B
The CHNS < > SCENES LED
lights on
The LED of the selected page
lights on
All the LEDs will flash: your
sequence has been saved!
Page 15

Because CONTEST® takes the utmost care in its products to make sure you only get the best possible quality, our products are
subjects to modifications without prior notice. That is why technical specifications and the products physical configuration might differ
from the illustrations.
Make sure you get the latest news and updates about the CONTEST® products on www.contest-lighting.com
CONTEST® is a trademark of HITMUSIC S.A. - Zone Cahors sud - 46230 FONTANES - FRANCE
 Loading...