

Page 1
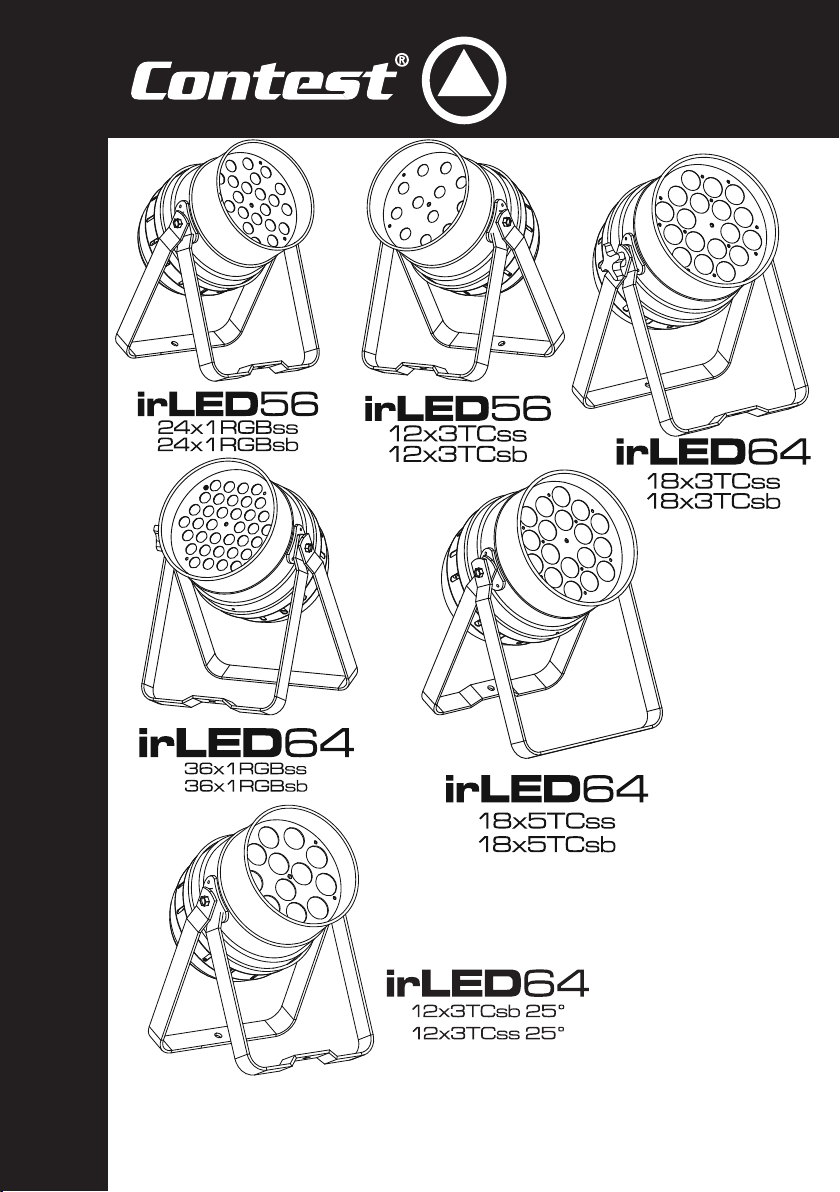
IRLEDS SERIES - LED PAR PROJECTORS WITH INFRARED REMOTE CONTROL
9869/9870/9871/9872/9873/9874/9875/9876/9877/9878/9974/9975 - November 2012 Version 2.0
USER GUIDE
Page 2
English
1 - Safety information
Important safety information
irLEDs series - LED PAR projectors with infrared remote control
This unit is intended for indoor use only. Do not use it in a wet,
or extremely cold/hot locations. Failure to follow these safety instructions could result in fire, electric shock, injury, or damage to
this product or other property.
Any maintenance procedure must be performed by a CONTEST
authorised technical service. Basic cleaning operations must thoroughly follow our safety instructions.
This product contains non-isolated electrical components. Do not
undertake any maintenance operation when it is switched on as
it may result in electric shock.
WARNING : This unit contains no user-serviceable parts. Do not open the
housing or attempt any maintenance by yourself. In the unlikely even your unit
may require service, please contact your nearest dealer.
In order to avoid any electrical malfunction, please do not use any multi-socket,
power cord extension or connecting system without making sure they are
perfectly isolated and present no defect.
Warning
This product is equipped with Class 2 LEDs.
Please avoid looking directly at the beam as it may
cause severe eye injuries.
Recycling your device
• As HITMUSIC is really involved in the environmental cause, we only commercialise clean, ROHS compliant products.
• When this product reaches its end of life, take it to a collection point designated by local authorities. The separate collection and recycling of your
product at the time of disposal will help conserve natural resources and ensure that it is recycled in a manner that protects human health and the
environment.
Risk of electrocution
To prevent the hazard of electric shocks, do not use
extension cords, multi-socket or any other connection
system without making sure metal parts completely are
out of reach.
Symbols used
Page 2
This symbol signals an important safety
precaution.
The WARNING symbol signals a risk to the user’s physical integrity.
The product may also be damaged.
Note : The legislation requires that every device set up in a public space features a double
fixation bracket. This security system must hold 10 times the weight of the device.
The CAUTION symbol signals a risk of product deterioration.
Page 3
irLEDs series - LED PAR projectors with infrared remote control
Instructions and recommendations
English
1 - Please read carefully :
We strongly recommend to read carefully and understand
the safety instructions before attempting to operate this unit.
2 - Please keep this manual :
We strongly recommend to keep this manual with the unit for
future reference.
3 - Operate carefully this product :
We strongly recommend to take into consideration every
safety instruction.
4 - Follow the instructions:
Please carefully follow each safety instruction to avoid any
physical harm or property damage.
5 - Avoid water and wet locations :
Do not use this product in rain, or near washbasins or other
wet locations.
6 - Installation :
vibration and slipping while operating as it may result in
physical injury.
7 - Ceiling or wall installation :
Please contact your local dealer before attempting any ceiling
or wall installation.
8 - Ventilation :
The cooling vents ensure a safe use of this product, and avoid
any overheating risk.
Do not obstruct or cover these vents as it may result in
overheating and potential physical injury or product damage.
This product should never been operated in a closed nonventilated area such as a flight case or a rack, unless cooling
vents are provided for the purpose .
9 - Heat exposure :
Sustained contact or proximity with warm surfaces may cause
overheating and product damages. Please keep this product
away from any heat source such as a heaters, amplifiers, hot
plates, etc...
10 - Electric power supply :
11 - Power cords protection:
and the point where they exit from the fixture.
We strongly encourage you to only use a
fixation system or support recommended by
the manufacturer or supplied with this product.
Carefully follow the installation instructions and
use the adequate tools.
Always ensure this unit is firmly fixed to avoid
This product can only be operated according to
a very specific voltage. These information are
specified on the label located at the rear of the
product.
Power-supply cords should be routed so that they
are not likely to be walked on or pinched by items
placed upon or against them, paying particular
attention to cords at lugs, convenience receptacles
12 - Cleaning precautions :
13 - Long periods of non use :
14 - Liquids or objects penetration :
15 - This product should be serviced when :
16 - Inspection/maintenance :
Please do not attempt any inspection or maintenance by
yourself. Refer all servicing to qualified personnel.
17 - Operating environment :
Unplug the product before attempting any cleaning
operation. This product should be cleaned only with
accessories recommended by the manufacturer.
Use a damp cloth to clean the surface. Do not
wash this product.
Disconnect the unit’s main power during long
periods of non use.
Do not let any object penetrate this product as it
may result in electric shock or fire.
Never spill any liquid on this product as it may
infiltrate the electronic components and result in
electric shock or fire.
Please contact the qualified service personnel if :
- The power cord or the plug has been damaged.
- Objects have fallen or liquid has been spilled into
the appliance.
- The appliance has been exposed to rain or water.
- The product does not appear to operate normally.
- The product has been damaged.
Ambient temperature and humidity: +5 - +35°C,
relative humidity must be less than 85% (when
cooling vents are not obstructed).
Do not operate this product in a non-ventilated,
very humid or warm place..
Page 3
Page 4

English
irLEDs series - LED PAR projectors with infrared remote control
2 - Main Features
irLED56-24x1RGBss : 24x1W RGB LEDs PAR56 projector, aluminium finish.
irLED56-24x1RGBsb : 24x1W RGB LEDs PAR56 projector, black finish.
irLED56-12x3TCss : 12x3W RGB LEDs PAR56 projector, aluminium finish.
irLED56-12x3TCsb : 12x3W RGB LEDs PAR56 projector, black finish.
irLED64-36x1RGBss : 36x1W RGB LEDs PAR64 projector, aluminium finish.
irLED64-36x1RGBsb : 36x1W RGB LEDs PAR64 projector, black finish.
irLED64-18x3TCss : 18x3W RGB LEDs PAR64 projector, aluminium finish.
irLED64-18x3TCsb : 18x3W RGB LEDs PAR64 projector, black finish.
irLED64-18x5TCss : 18x5W RGB LEDs PAR64 projector, aluminium finish.
irLED64-18x5TCsb : 18x5W RGB LEDs PAR64 projector, black finish.
irLED64-12x3TCss 25° : 12x3W RGB LEDs PAR64 projector, aluminium finish, beamwidth: 25°.
irLED64-12x3TCsb 25° : 12x3W RGB LEDs PAR64 projector, black finish, beamwidth: 25°.
These products use the DMX, automatic and music-sensitives mode and are compatible with infrared remote
controls.
• Features:
- Aluminium housing
- Double mounting brackets for suspension or ground
handling
- Rear display
- Frost filters for perfect beam diffusions
- Internal thermal protection
• Functions:
Built-in command panel with digital drop-down
display for :
- DMX addressing
- Choosing the number of channels: 2, 3, 4, 5 or 6
- Choosing the built-in programs
- Choosing the preset colours
- Master/Slave mode
- Music-sensitive mode and choosing the mic
sensitivity
• Package contents:
The package must contain:
- The projector
- The user guide
- A double mounting bracket
- An infrared remote control
- A 2-pole + earth power cord
- Infrared remote control giving you access to every
remote function
3 - Technical specifications
3.1 - irLED56-24x1RGBss 3.5 - irLED64-36x1RGBss
• Optical:
- 24x1W LEDs 8 red, 8 green, 8 blue
- Beamwidth: 30°
• Connectors:
- DMX IN and OUT via 3-pin XLR,
- POWER IN/OUT via IEC sockets
• Power supply: 110/240 V 50/60 Hz
• Power consumption: 30 W
• Finish: Aluminium
•
Dimensions
• Weight : 2.7 kg
: 320 x 250 x 170 mm (PAR56 format)
Page 4
• Optical:
- 36x1W LEDs 12 red, 12 green, 12 blue
- Beamwidth: 30°
• Connectors:
- DMX IN and OUT via 3-pin XLR,
- POWER IN via 2P+E power cord
• Power supply: 110/240 V 50/60 Hz
• Power consumption: 40 W
•
Dimensions
• Weight: 3.2 kg
: 340 x 270 x 220 mm (PAR64 format)
Page 5

irLEDs series - LED PAR projectors with infrared remote control
3.2 - irLED56-24x1RGBsb 3.6 - irLED64-36x1RGBsb
• IrLED56-24x1RGBss with black finish • IrLED64-36x1RGBss with black finish
3.3 - irLED56-12x3TCss 3.7 - irLED64-18x3TCss
• Optical:
- 18x3W RGB LEDs
- Beamwidth: 40°
• Connectors :
- DMX IN and OUT via 3-pin XLR,
- POWER IN/OUT via IEC sockets
• Power supply: 110/240 V 50/60 Hz
• Power consumption: 40 W
Dimensions
•
• Weight : 2.8 kg
: 320 x 250 x 170 mm (PAR56 format)
3.4 - irLED56-12x3TCsb 3.8 - irLED64-18x3TCsb
• irLED56-18x3TCss with black finish • IrLED64-18x3TCss with black finish
3.9 - iLED64-18x5TCss 3.10 - iLED64-18x5TCsb
• Optical:
- 18x5W RGB LEDs
- Beamwidth: 40°
• Connectors :
- DMX IN and OUT via 3-pin XLR,
- POWER IN/OUT via IEC sockets
• Power supply : 110/240 V 50/60 Hz
• Power consumption: 100 W
•
Dimensions
• Weight : 5 kg
: 340 x 270 x 220 mm (PAR64 format))
• Optique :
- 18x3W RGB LEDs
- Beamwidth: 40°
• Connectors :
- DMX IN and OUT via 3-pin XLR,
- POWER IN/OUT via IEC sockets
• Alimentation : 110/240 V 50/60 Hz
• Consommation : 60 W
•
Dimensions
• Poids : 4.3 kg
• irLED64-18x5TCss 25°
: 340 x 270 x 220 mm (PAR64 format))
with black finish
English
3.11 - iLED64-18x5TCsb 25°
• Optical:
- 12x3W RGB LEDs
- Beamwidth: 25°
• Connectors :
- DMX IN and OUT via 3-pin XLR,
- POWER IN/OUT via IEC sockets
• Power supply: 110/240 V 50/60 Hz
• Power consumption: 40 W
Dimensions
•
• Weight : 4 kg
: 340 x 270 x 220 mm (PAR64 format)
3.12 - irLED64-12x5TCss 25°
• IrLED64-12x3TCsb 25° with black finish
Page 5
Page 6
English
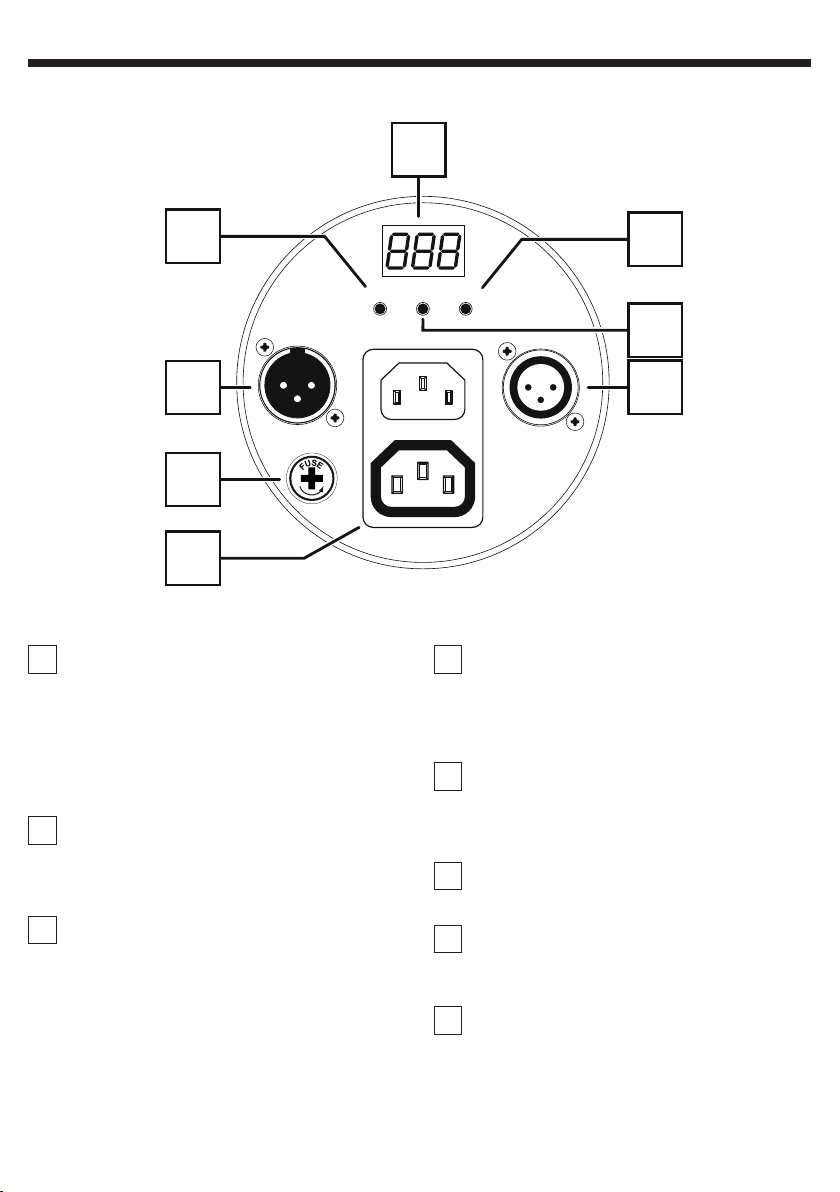
4 - Description
irLEDs series - LED PAR projectors with infrared remote control
5
6
DMX OUT
3
2
1
1
Power input/output socket
Allows you to connect the projector to an electrical
outlet and to link several projectors together via a
Male/Female IEC cord.
Please make sure the voltage is in adequation with
the product indications.
Attention : Do NOT go over 700W on the same
power source.
2
Fuse
If need to replace the fuse, please make sure the
new fuse has exactly the same characteristics as the
original one.
MODE UP
POWER IN 240V/50Hz
POWER OUT 240V/50Hz
8
DOWN
DMX IN
7
4
4
DMX input
3-pin female XLR plug hardwired as follows :
- Mass: 1
- Negative signal: 2
- Positive signal: 3.
5
Display
This intuitive display allows you to configure your
projectors. Please refer to the next paragraphs for
more details about the projectors cojnfigurations.
6
MODE button
Allows you to access menus and select a function.
3
DMX output
3-pin male XLR plug hardwired as follows :
- Mass: 1
- Negative signal: 2
- Positive signal: 3
Page 6
7
UP button
Press UP to increase the adjustable values or browse
the sub-menus.
8
DOWN button
Press DOWN to decrease the adjustable values or
browse the sub-menus.
Page 7
irLEDs series - LED PAR projectors with infrared remote control
English
5 - The internal menu
Press the MODE button to acces the internal menu.
To switch from a submenu to another, press the MODE button again.
Simultaneously press MODE and DOWN if you want the display to shut off when the menu remains inactive.
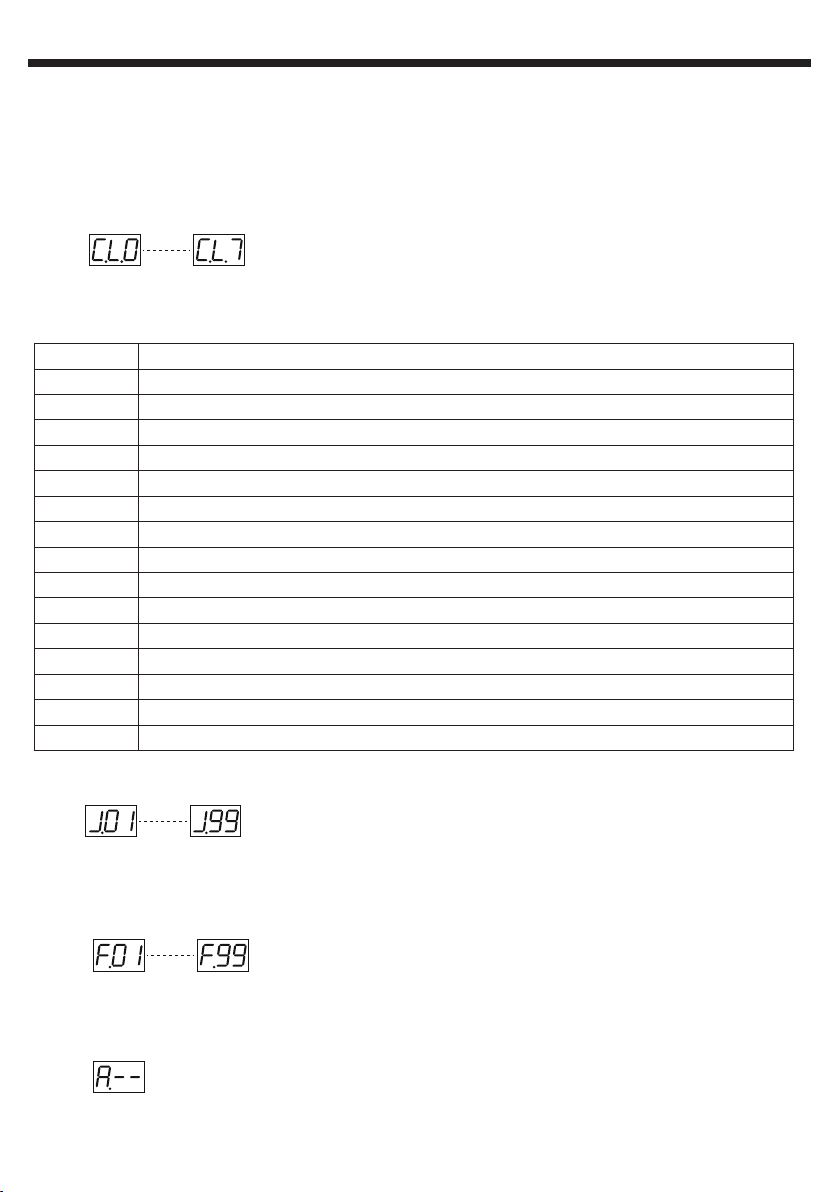
5.1 - C.XX Menu: Choosing a fixed colour or sequence
Press MODE until reaching C.XX. Press UP or DOWN to pick a colour. C.00 means the projector is in Black-out
mode. Fixed colours and sequences are described below:
C.00
C.01
C.02
C.03
C.04
C.05
C.06
C.07
C.08
C.09
C.10
C.11
C.12
C.13
C.14
C.15
Black-out
Red
Orange
Yellow
Green
Cyan
Blue
Pink
Magenta
Cool white
Warm white
Colours sequencing (without crossfade)
Blue to Green crossfade sequence
Red to Orange crossfade sequence
Crossfade sequence with every colour
Warm white to cool white crossfade sequence
5.2 - J.XX Menu: Adjust the colour sequence speed (without crossfade):
Press MODE until reaching J.XX. Press UP or DOWN to pick a value between 1 and 99. 1 is the slowest speed, 99
the fastest.
5.3 - F.XX Menu: Adjust the colour sequence speed (with crossfade)
Press MODE until reaching F.XX. Press UP or DOWN to pick a value between 1 and 99. 1 is the slowest speed, 99
the fastest..
5.4 - A.-- Menu: Switching to Auto mode
Press MODE until reaching A.--. The projector will alternate between crossfade and step sequences.
The sequencing speed described above will automatically be used.
Page 7
Page 8
English
irLEDs series - LED PAR projectors with infrared remote control
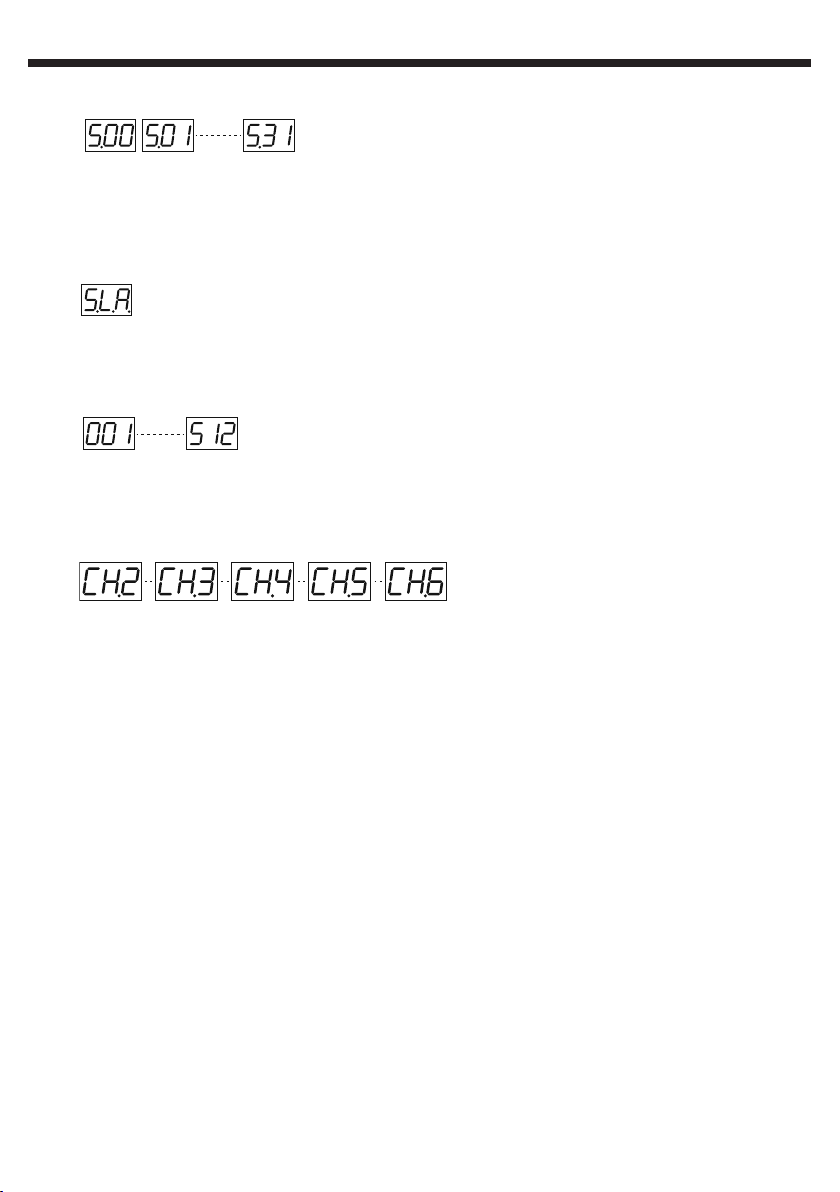
5.5 - S.XX Menu: Activating the music-sensitive mode and configuring the mic sensitivity
Press MODE until reaching S.00 and select a value with UP or DOWN. S.00 deactivates the music-sensitive mode.
S.01 is a very low sensitivty, whereas S.31 is the max sensitivity. The colours are sequenced without crossfade
when using the music-sensitive mode.
5.6 - S.L.A. Menu: Switching to slave mode
Press MODE until reaching S.L.A. The projector will react to DMX signals coming from a similar projector.
The Master unit can use the automatic, DMX or music-sensitive modes.
5.7 - XXX Menu: Switching to DMX mode
Press MODE until reaching the value of the DMX address. Configure the DMX address with UP and DOWN. In the
absence of any DMX signal, the display will flash.
5.8 - CH.X Menu: Choosing a DMX mode
The irLED PAR projectors feature several DMX modes to be fully compatible with different remote controls and
projectors.Use the UP or DOWN buttons to choose a mode. The 5 following modes are available:
- 2-channel mode: Channel 1 = 10 preset colours, 5 macros and music-sensitive mode ; Channel 2 = Main dimmer.
- 3-channel mode: Channel 1 = Red ; Channel 2 = Green ; Channel 3 = Blue
- 4-channel mode: Channel 1 = Red ; Channel 2 = Green ; Channel 3 = Blue ; Channel 4 = Dimmer and Strobe
- 5-channel mode: Channel 1 = Red ; Channel 2 = Green ; Channel 3 = Blue ; Channel 4 = Dimmer ;
Channel 5 = Strobe
- 6-channel mode: Channel 1 = Red ; Channel 2 = Green ; Channel 3 = Blue ; Channel 4 = Dimmer ;
Channel 5 = Strobe or speed; Channel 6 = Fixed colours, colours sequencing and music-sensitive mode.
Page 8
Page 9
irLEDs series - LED PAR projectors with infrared remote control
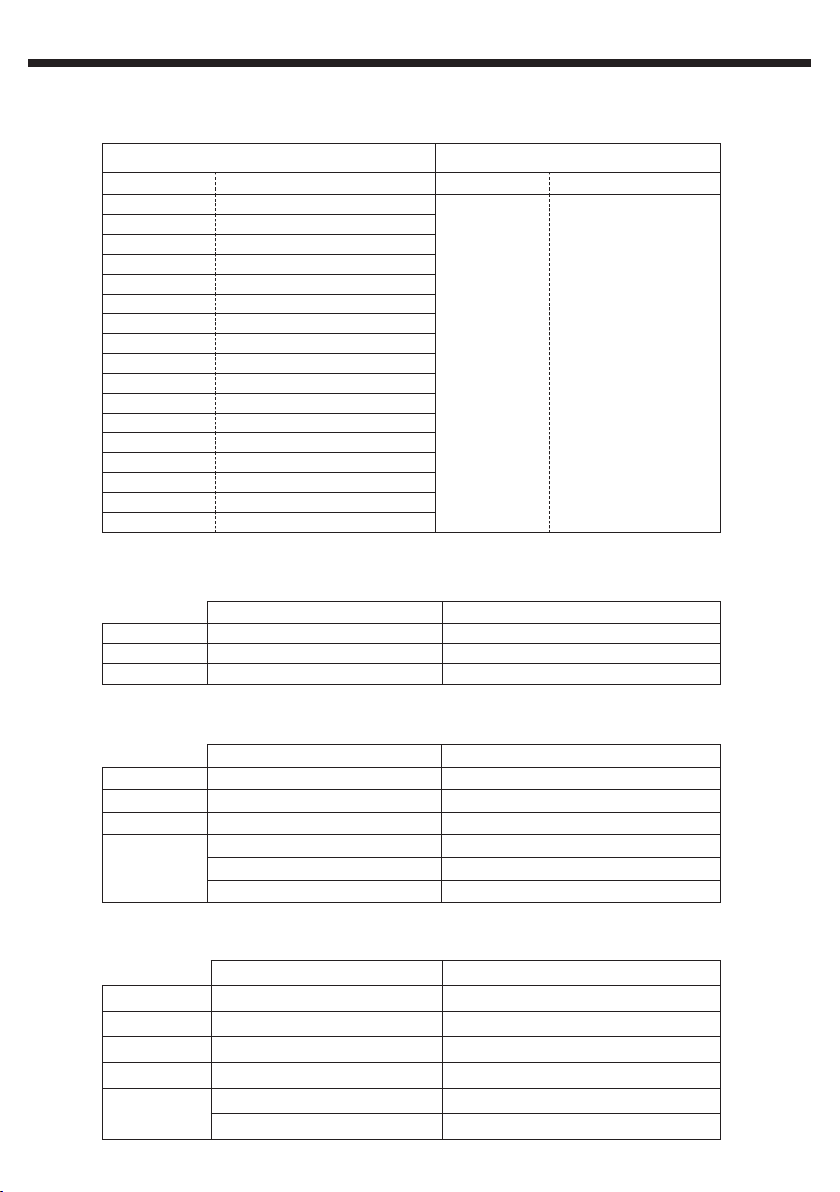
5 - The various DMX modes
6.1 - 2-channel mode
CHANNEL 1 CHANNEL 2
DMX values Effect DMX values Effect
000 - 015
016 - 030
031 - 045
046 - 060
061 - 075
076 - 090
091 - 105
106 - 120
121 - 135
136 - 150
151 - 165
166 - 180
181 - 195
196 - 210
211 - 225
226 - 240
241 - 255
6.2 - 3-channel mode
CHANNEL 1 000 - 255
CHANNEL 2 000 - 255
CHANNEL 3 000 - 255
Off
Red
Orange
Yellow
Green
Cyan
Blue
Pink
Magenta
Cool white (6000°K)
Warm white (3200°K)
Colour macro 1
Colour macro 2
Colour macro 3
Colour macro 4
Colour macro 5
Music-sensitive colour macro
DMX values Effect
000 - 255
Red from 0 - 100%
Green from 0 - 100%
Blue from 0 - 100%
Dimmer from 0 - 100%
English
6.3 - 4-channel mode
CHANNEL 1 000 - 255
CHANNEL 2 000 - 255
CHANNEL 3 000 - 255
CHANNEL 4
6.4 - 5-channel mode
CHANNEL 1 000 - 255
CHANNEL 2 000 - 255
CHANNEL 3 000 - 255
CHANNEL 4 000 - 255
CHANNEL 5
DMX values Effect
Red from 0 - 100%
Green from 0 - 100%
Blue from 0 - 100%
000 - 189
190 - 250
251 - 255
Main dimmer from 0 - 100%
Slow to fast strobe
Full power
Valeur DMX Effet
Red from 0 - 100%
Green from 0 - 100%
Blue from 0 - 100%
Main dimmer from 0 - 100%
000
001 - 255
No function
Slow to fast strobe
Page 9
Page 10
English
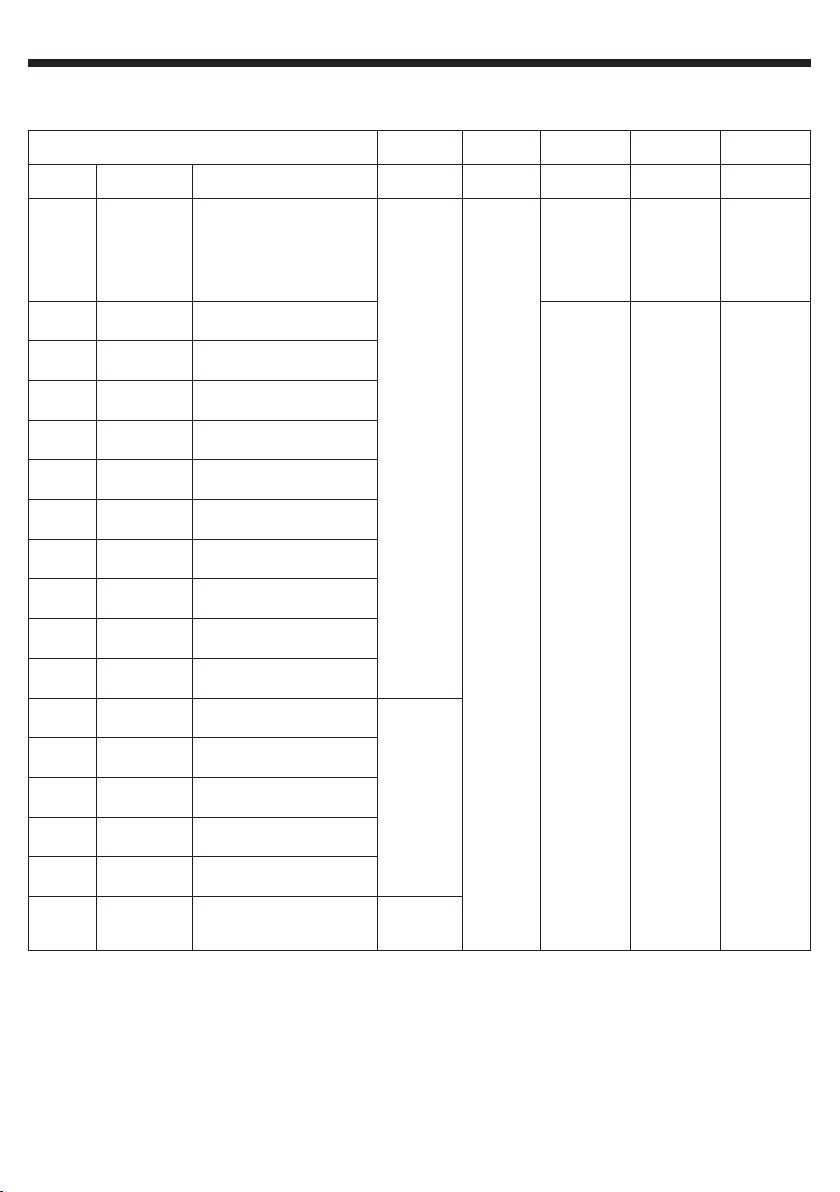
6.5 - 6-channel mode
CHANNEL 6 CHAN.5 CHAN. 4 CHAN. 3 CHAN. 2 CHAN. 1
MODE DMX values Function
irLEDs series - LED PAR projectors with infrared remote control
1
000 - 015 Black-out
2
016 - 030 Red
3
031 - 045 Orange
4
046 - 050 Yellow
5
061 - 075 Green
6
076 - 090 Cyan
7
091 - 105 Blue
8
106 - 120 Pink
9
121 - 135 Magenta
10
136 - 150 Cool white (6000°K)
11
151 - 165 Warm white (3000°K)
12
166 - 180 Macro 1
13
181 - 195 Macro 2
14
196- 210 Macro 3
Blue
(000 - 255)
0-100%
Strobe (016 - 255)
From slow to fast - 0,1Hz to 20Hz
from 0 - 100%
Main dimmer (000 - 255)
No function
Green
(000 - 255)
0-100%
No function
Red
(000 - 255)
0-100%
No function
15
16
17
Page 10
211 - 225 Macro 4
226 - 240 Macro 5
241 - 255
Music-sensitive
sequencing
From slow to fast
Speed (000 - 255)
Mic
sensitivity
Page 11
irLEDs series - LED PAR projectors with infrared remote control
English
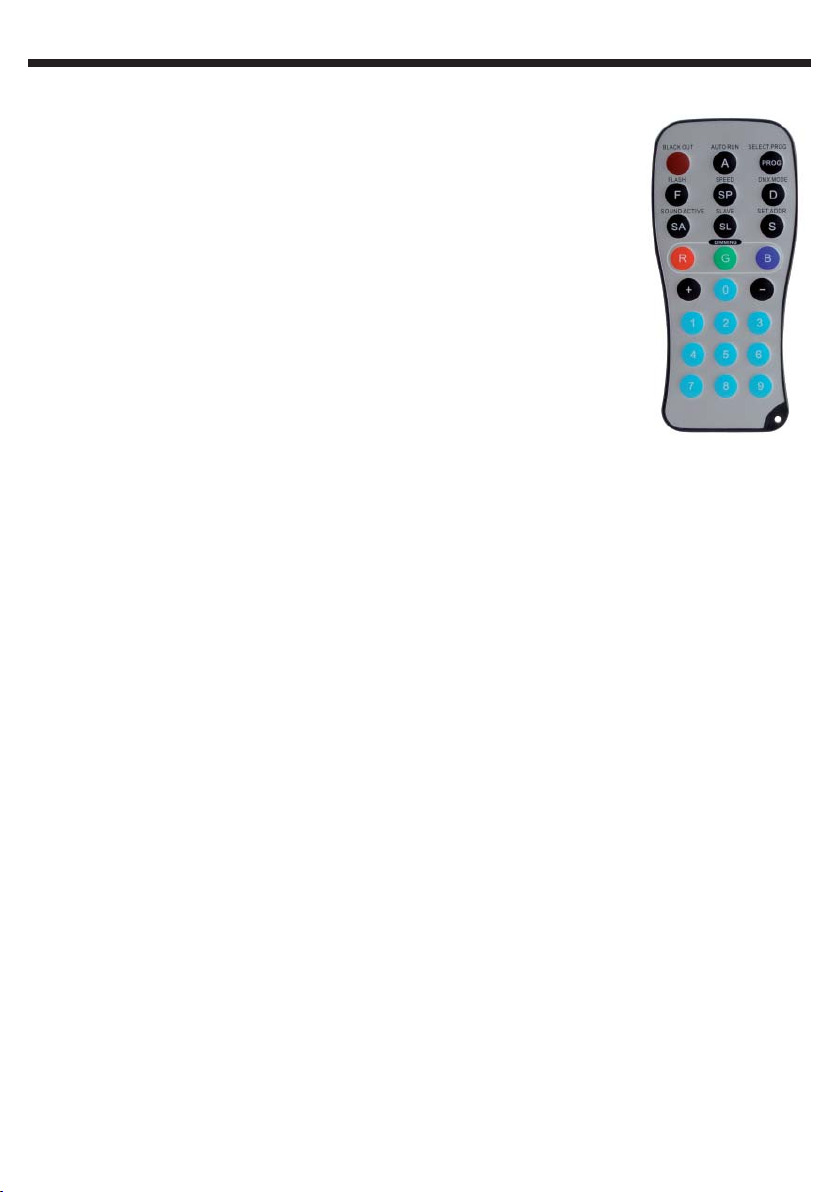
7 - Infrared remote control
The infrared remote control supplied with the projectors allows you to remotely access
all the functions of the projectors. The infrared sensor is located on the front of the
projector.
Note : The remote control can also be used when the projector is in DMX mode.
1 - Black out button: Turns the projectors ON or OFF.
2 - A (AUTO RUN) button: Activates the automatic mode. Automatic colour changes.
3 - PROG (SELECT PROG) button: Launches built-in programs.
Select a program among the 10 fixed colours selections (red, green, cyan...), Color
Jumping (fast colour sequencing) and Color Dream (slower colour sequencing) by
pressing the + and - buttons.
Note : Fixed colours can also be chosen with the 0 to 9 buttons.
The sequencing is as follows: 0 = black-out ; 1 = Red ; 2 = Green ; 3 = Blue ; 4 =
Orange ; 5 = Yellow; 6 = Magenta, 7 = Cyan, 8 = Cool white and 9 = Warm white.
4 - F button (FLASH): Activates or deactivates the Flash mode. Increase or decrease
the flash speed with the + and - buttons of the remote control.
5 - SP button: Allows you to configure the Color Jumping and Color Dream programs speed. Increase or
decrease the speed with the + and - buttons of the remote control.
6 - D button (DMX MODE): Activates the DMX mode of the projectors.
7 - DMX mode selection
There are 5 different DMX modes.
You will need to select a DMX mode before controlling your projector in DMX mode ;
Press the D button (DMX MODE) and use the + and - buttons to switch from one mode to another :
- When the LEDs are red, the projector is currently using the 2-channel mode.
- When the LEDs are green, the projector is currently using the 3-channel mode.
- When the LEDs are blue, the projector is currently using the 4-channel mode.
- When the LEDs are red and green, the projector is currently using the 5-channel mode.
- When the LEDs are red and blue, the projector is currently using the 6-channel mode.
8 - SA button: Activates the music-sensitive mode.
9 - SL button (SLAVE): Activates the slave mode.
10 - SET ADDR buttons and 0, 1, 2, 3, 4, 5, 6, 7, 8 and 9: Allows you to configure your projectors DMX address.
For instance, if you want to configure the address 245 :
- Press S, all the LEDs are flashing to indicate the beginning of the process.
- Press 2, the green LEDs of your projectors lit up to indicate the hundreds digit has been saved.
- Press 4, the blue LEDs of your projector lit up to indicate the tenths digit has been saved.
- Then press 5. All the LEDs will flash to confirm you the address has been saved properly.
To configure the address 002:
-
Press S, all the LEDs are flashing to indicate the process beginning.
-
Press 0, the green LEDs of your projectors lit up to indicate the hundreds digit has been saved
-
Press 0, the blue LEDs of your projector lit up to indicate the tenths digit has been saved
-
Then press 2. All the LEDs will flash to confirm you the address has been saved properly
11 - R, G and B buttons : Adjusts colours brightness, R for red, G for green and B for blue. Increase or
decrease their brightness with the + and - buttons.
.
.
.
Page 11
Page 12

Because CONTEST® takes the utmost care in its products to make sure you only get the best possible quality, our
products are subjects to modifications without prior notice. That is why technical specifications and the products
physical configuration might differ from the illustrations.
Make sure you get the latest news and updates about the CONTEST® products on www.contest-lighting.com
CONTEST® is a trademark of HITMUSIC S.A. - Zone Cahors sud - 46230 FONTANES - FRANCE
 Loading...