

Models IRC 550* / URC 550*
Universal Remote Control
Programming and Operating
Instructions
To have a clearer idea of the features and capabilities of
your remote control, take a moment to read these
instructions. Save for future reference.
© 2006 Contec Holdings, LLC, Rev. 05/06
1. Introduction
Your IRC550 and URC550 universal remote controls
are simple to program, easy to use, and can operate
up to five (5) devices, which include:
SAT Satellite receivers
TV Televisions
DVD DVD
AUDIO Audio receivers, amplifiers, CD players
AUX VCRs, 2
* Model IRC550 transmits to each of the above
electronic devices using an infrared (IR)
signal. Model URC550 transmits both infrared (IR)
and radio-frequency (RF) signals to your DSR
receiver, but IR-only signals to all your other
devices. The RF capability of the URC550 permits it
to remotely operate a DSR receiver that’s enclosed in
a home-entertainment unit or located where an
unobstructed line-of-site between the remote and
DSR is not possible. Model URC550 is supplied is
with the premium-featured HD / DVR DSR500 series
receivers.
The remote is ready to use with your Star Choice
satellite receiver, but before you can use your remote
control to operate the other devices listed above, it
must first be programmed (set-up).
2. Before Getting Started
Some of the special features and buttons on your
remote control are as follows:
Point and Press
Lets you program your TV, VCR, DVD, AUDIO
devices without codes. For more information, see
Sections 5 and 14.
Memory Guard
Eliminates reprogramming after battery changes.
Time Out
If the same button is pressed and held for 30-
nd
TV, 2nd DVD, 2nd Audio device
®
Programming
®
seconds, your remote control will turn itself off
automatically. This extends the battery life should
the remote become lodged under or between heavy
objects, for example sofa cushions.
3. Installing. Replacing Batteries
Install two (2) new “AA” batteries as indicated by the
diagram in the battery compartment.
When the batteries become low and need to be
replaced, the [SAT] button will blink several
times and the remote control will not transmit the
function for the button that was pressed.
When this happens, simply replace the existing
batteries with two (2) new “AA” batteries to
restore normal operation to the remote control.
4. If You Have More Than One Satellite Receiver
Your remote control is set at the factory to control all
of the functions on your Motorola satellite receiver.
However, if you have more than one satellite receiver,
you may want to prevent the remote control in one
room from affecting the satellite receiver in another
room. To prevent this kind of interference, you must
"pair" each remote control with each receiver by
assigning a new "address" to each combination. This
“address” assignment is made using your remote
control as follows:
1. Press the [SAT] button to select the remote
control’s SAT mode.
2. Press the [Options] button to display the Options
screen on your TV.
3. On the Options screen, use the [▲], [▼], [◄], [►]
buttons to highlight the Change System Settings /
System Setup option, then press [Enter].
4. On the Systems Setting / Setup screen, use the
[▲], [▼], [◄], [►] buttons to highlight the Change
Installation Settings / System Settings (applies to
DSR 5xx, 207, 317 receivers) option, then press
[ENTER].

5. On the System Settings (applies to DSR 5xx, 207,
317 receivers) screen, use the [▲], [▼], [◄], [►]
buttons to highlight the Installation Settings option,
then press [ENTER]
6. On the Installation Settings screen, use the [▲],
[▼], [◄], [►] buttons to highlight the Remote
Control Address option, then press [ENTER]
7. Once you are on the Remote Control Address
screen, disregard the instructions on the
screen and follow these steps using the
remote control keypad….
a. In this order, press and hold the [MUTE] button,
then the [ENTER] button. Hold both
down together
until the mode buttons
illuminate in rotation (i.e. SAT Æ TV Æ DVD Æ
AUDIO Æ AUX Æ SAT…). Release both
buttons as soon as the mode buttons
illuminate.
b. Enter any one of the following addresses:
[000], [001], [002], [003], [004], [005], [006],
[007]. Entry of the 3-digit of each address
stores the address automatically and causes
the mode buttons to blink and go out.
c. Press the [ENTER] button to set the same
address in your Satellite Receiver. The new
address will be displayed in the upper right
corner of your TV screen.
d. Exit from the Remote Control Address screen.
5. Programming Your TV, DVD, AUDIO Devices
Code-Entry Programming
1. Turn on all the electronic devices (TV, DVD,
AUDIO) you want to program the remote to
operate.
Using the remote control keypad….
2. In this order, press and hold the [ENTER] button,
then the [MUTE] button. Hold both
together
until the mode buttons illuminate in
buttons
buttons down
rotation (i.e. SAT Æ TV Æ DVD Æ AUDIO Æ AUX
Æ SAT…). Release both buttons as soon as the
mode buttons illuminate.
3. a. To program your TV, locate the 3-digit code for
your brand in the TV Setup Code
list and enter
it on the keypad of the remote control. Entry
of the correct code will cause your TV to turn
off. If multiple codes are listed for your brand,
you may have to enter several different codes
until your TV turns off.
b. As soon as you have entered a 3-digit code
that turns your TV off, press [MUTE].
1. If the TV turns back on, press [ENTER] to
lock in the code. The mode buttons will
blink 3-times and go out.
Or
2. If the TV does not turn back on, enter a
different 3-digit setup code until your TV
turns back on. Then press [ENTER] to
lock in the code. The mode buttons will
blink 3-times and go out.
4. To program your DVD, refer to the DVD Setup
Code lists
and repeat steps 2 and 3 above.
5. To program your AUDIO devices, refer to the
AUDIO Setup Code list
and repeat steps 2 and 3
above.
Point and Press
®
Programming
This method allows you to program
control without
codes using the [S] or [T] buttons
your remote
("Power" function during programming). For more
information on this method as well as other buttons
you can program your remote with, see Section 14.
1. Turn on all the electronic devices (TV, DVD,
AUDIO) you want to program the remote to
operate.
Using the remote control keypad….
2. In this order, press and hold the [ENTER] button,
then the [MUTE] button. Hold both buttons down
together
until the mode buttons illuminate in
rotation (i.e. SAT Æ TV Æ DVD Æ AUDIO Æ AUX
Æ SAT…). Release both buttons as soon as the
mode buttons illuminate.
3. Press [S] one step at a time until one of your
electronic devices turns off. Each time you press
[S] button, the mode buttons will illuminate in
rotation. As soon as one device turns off, stop
pressing the [S] button.
4. Press [MUTE]. If the device that turned off...
a. Turns back on, press [ENTER] to lock in this
code. The mode buttons will blink 3-times and
go out.
Or
b. Does not turn back on, press [T] one step
at a time until that device turns back on. Each
time you press the [T] button, the mode
buttons will illuminate once
in reverse rotation
(AUX Æ AUDIO Æ DVD Æ TV Æ SAT Æ
AUX).
Once you have found a code that turns the
device on / off, press [ENTER] to lock in this
code. The mode buttons will blink 3-times and
go out.
5. Repeat steps 2 to 4 above for each of the
remaining electronic devices you wish to program
the remote to operate.
Note: Given the size of the code libraries in your
remote control, it will take several minutes to cycle
through all the codes when using the Point and Press
Programming method.
6. Programming Your Auxiliary Device – VCR, 2nd
TV, 2nd DVD, 2nd Audio Device
1. Turn on the electronic device (VCR, 2
DVD, 2
nd
AUDIO) you want to program as an
nd
TV, 2nd
AUXILIARY device.
Using the remote control keypad….

2. In this order, press and hold the [ENTER] button,
then the [MUTE] button. Hold both
together
until the mode buttons illuminate in
rotation (i.e. SAT Æ TV Æ DVD Æ AUDIO Æ AUX
Æ SAT…). Release both buttons as soon as the
mode buttons illuminate.
3. Press [ENTER] again.
4. Follow the Code Entry Programming (paragraph
3) or Point and Press Programming® (paragraphs
3 & 4) areas of Section 5 to program your AUX
device.
7. Programming Your TV / VCR Combination
1. Turn on your TV / VCR combination device and
set it to its TV mode.
2. Program your remote to operate the TV
Using the Code Entry Programming method
described in Section 5, find a TV Setup Code that
operates the TV functions (Power, Vol S/T, Mute,
Ch S/T, 0-9) of your TV / VCR unit.
3. Set your combination device to its VCR mode and
install a VHS tape.
4. Program your remote to operate the VCR
functions. Using the Code Entry Programming
method described in Section 5, enter, lock and
test each 3-digit VCR Setup Code
until a code is found that operates the transport
functions (PLAY, STOP, REW, FWD, PAUSE,
REC) of your TV / VCR unit.
Before you can test for the correct VCR setup
code, you must first press the [VCR] button first to
put the remote in its VCR mode.
8. Programming Your TV / DVD or TV / VCR / DVD
Combination
1. Turn on your TV / DVD combination device and
set it to its TV mode.
2. Program your remote to operate the TV
Using the Code Entry Programming method
buttons down
functions.
for your brand
functions.
described in Section 5, find a TV Setup Code
that
operates the TV functions (Power, Vol S/T, Mute,
Ch S/T, 0-9) of your TV / DVD unit.
3. Set your combination device to its DVD mode and
install a DVD.
4. Program your remote to operate the DVD
functions. Using the Code Entry Programming
method described in Section 5, enter, lock and
test each 3-digit DVD Setup Code
for your brand
until a code is found that operates the transport
functions (PLAY, STOP, REW, FWD, PAUSE,
REC) of your TV / DVD unit.
Before you can test for the correct DVD setup
code, you must first press the [DVD] button to put
the remote in its DVD mode.
5. Last, if you have a TV / VCR / DVD combination
unit, you need to program your remote to operate
the VCR functions.
6. Set your combination device to its VCR mode and
install a VHS tape.
7. Using the Code Entry Programming method
described in Section 5, enter, lock and test each
3-digit VCR Setup Code
code is found that operates the VCR transport
for your brand until a
functions (PLAY, STOP, REW, FWD, PAUSE,
REC) of your TV / DVD / VCR unit.
Before you can test for the correct VCR setup
code, you must first press the [VCR] button first to
put the remote in its VCR mode.
9. Code Number Readback
To identify the 3-digit TV setup codes stored under
the Point and Press
®
programming method, follow
these steps using the remote control keypad…
1. In this order, press and hold the [ENTER] button,
then the [TV] button. Hold both
together
until the [TV] button illuminates. Release
buttons down
both buttons as soon as the [TV] button
2. Press [INFO]. The mode buttons will “blink back”
the code numbers, with a 1-second interval
between each digit of the code. Please note that
for the numeric “0”, the mode buttons will
illuminate blink in fast-sequence.
Example: For code “130”, the remote will blink 1
time, then 3 times, then in a fast-sequence for the
0.
To identify the 3-digit SAT code, press [ENTER], then
[SAT] as defined in step 1 above, then press [INFO].
To identify the 3-digit DVD code, press [ENTER], then
[DVD] as defined in step 1 above, then press [INFO].
To identify the 3-digit AUDIO code, press [ENTER],
then [AUDIO] as defined in step 1 above, then press
[INFO].
To identify the 3-digit AUX code, press [ENTER], then
[AUX] as defined in step 1 above, then press [INFO].
10. Master Power
Your remote has a Master Power feature that can be
programmed so that a single press of the [POWER]
button (in remote’s SAT mode) can turn all of your
electronic devices on / off together.
To program
the Master Power feature, follow these
steps using the remote control keypad:
1. In this order, press and hold the [ENTER] button,
then the [POWER] button. Hold both buttons
down together
until the [SAT] button illuminates.
Release both buttons as soon as the [SAT] button
illuminates.
2. Press [1]. The [SAT] button will blink 3-times and
go out.
the Master Power feature, follow these steps:
To use
1. Press [SAT] to select the remote’s SAT mode.
illuminates.

2. Press [POWER] – the remote will turn on / off your
SAT, TV, DVD, AUDIO an AUX devices with one
button press.
To reset
the Master Power feature to its default
setting, follow these steps using the remote control
keypad:
1. In this order, press and hold the [ENTER] button,
then the [POWER] button. Hold both
down together
until the [SAT] button illuminates.
buttons
Release both buttons as soon as the [SAT] button
illuminates.
2. Press [0]. The [SAT] button will blink 3-times and
go out.
11. Programming Volume Control
When you first program your remote, volume / mute
are controlled through your TV (except AUDIO which
defaults to the AUDIO device). The volume control
options in each mode of the remote are:
Mode
SAT TV (#1)
TV TV (# 1)
DVD TV (# 1)
AUDIO - Rec / Amp
AUDIO - CD
AUX – VCR
AUX - TV # 2 TV (# 2) SAT
Volume
Control Default
Rec /Amp
TV (# 1)
TV (# 1)
Volume
Control
Options
SAT
AUDIO
nd
AUX (2
AUX (2
AUX (2
AUX (2
AUX (2
AUDIO (Rec /
TV /
Rec / Amp)
SAT
AUDIO
nd
TV /
Rec / Amp)
SAT
AUDIO
nd
TV /
Rec / Amp)
SAT
TV
nd
Rec /
Amp)
SAT
TV
nd
Rec /
Amp)
SAT
Amp)
Mode
AUX - DVD # 2
AUX - Rec # 2 Rec / Amp # 2 SAT, TV
AUX - CD #2 CD # 2 SAT , TV
Volume
Control Default
TV (# 1) SAT, AUDIO
Volume
Control
Options
AUDIO (Rec /
Amp)
(Rec / Amp)
To control volume / mute through your Satellite
receiver in the remote’s Satellite
mode…
1. In this order, press and hold the [ENTER] button,
then the [SAT] button. Hold both
together
until the [SAT] button illuminates.
buttons down
Release both buttons as soon as the [SAT] button
illuminates.
2. Press [VOL S], then [SAT] for Satellite volume.
The [SAT] button will blink 3-times and go out.
To return volume control to your TV, repeat step 1,
then press [VOL S], then [TV] in step 2.
To return volume control to your TV, repeat step 1,
then press [VOL S], then [TV] in step 2.
12. Operating Your Satellite Receiver
To operate your Satellite receiver, press [SAT] to
select the Satellite mode. Then refer to Section 15
for the operation of your Satellite receiver.
13. Operating Your Electronic Devices
To operate your other electronic devices, press
the mode button for the device you wish to
operate, then refer to the table below for the
available buttons / functions in each mode:
Button
Label
Power Power Power Power Power
Vol ▼/▲ Vol ▼/▲
TV Mode
DVD
Mode
Vol
▼/▲
(TV)
AUDIO
Mode
Vol
▼/▲
AUX
Mode
(VCR)
Vol
▼/▲
(TV)
Button
Label
Mute Mute
Ch ▼/▲ Ch ▼/▲ -
0 – 9 0 - 9 - 0 - 9
Last Last Ch - -
Enter / OK
Video
Source
Options Menu - ▲,▼,◄,► ▲,▼,◄,► - -
Guide
[]
[]
[]
[]
[]
[ ]
TV Mode
Enter (in
Menu)
TV Input -
Enter (after
Ch entry)
- Play
- Stop
- FF FF – CD FF
- Rew
- Pause
- Rec
DVD
Mode
Mute
(TV)
- -
- -
AUDIO
Mode
Mute
Play –
CD
Stop CD
Rew –
CD
Pause-
CD
Rec CD
14. Additional Programming Information
1. The mode buttons will illuminate in rotation (i.e.
SAT Æ TV Æ DVD Æ AUDIO Æ AUX Æ SAT...)
while the remote is in a programming mode. In
the absence of a keypress entry, the mode
buttons will stop illuminating after 30 seconds and
the remote will exit the programming mode.
2. The Point and Press® (Auto-Scan) Programming
method allows you to program your remote control
using codes. Instead, the remote control
without
automatically finds the correct setup code using
certain buttons / commands that you select. Once
you have found a setup codes that that operates
your device, you then lock it in.
3. When using the Point and Press® Programming
Method, there are several important points to
remember:
• The order in which you program your
electronic devices is not important.
AUX
Mode
(VCR)
Mute
(TV)
Ch
▼/▲
TV /
VCR
Play
Stop
Rew
Pause
Rec

• There may be several codes that turn your
electronic devices on / off (or perform other
functions).
• While the remote is searching for the correct
setup code(s) for your electronic devices, it is
possible that other (previously programmed)
devices may turn on / off (or perform other
functions). If this occurs, continue pressing
the [S] or [T] buttons (or the buttons
described in this section until you find the
correct code for the device you are
programming.
• It may take several minutes for the remote to
find the correct code that turns your device on
/ off (or performs another selected function).
During this time, the mode buttons will
illuminate in rotation (i.e. SAT Æ TV Æ DVD
Æ AUDIO Æ AUX Æ SAT...).
• Once you lock-in a code, be sure to check the
available functions for that device (i.e. TV
Vol S/T, Mute, TV Input (TV / VCR button),
Ch S/T, 0-9; VCR - Play, Stop, Rew...;
DVD
- Play, Stop, Rew...; AUDIO - Vol S/T,
Mute) to see if they are operating.
4. When programming the remote control using the
[S] or [T] buttons (Power function) under the
Point and Press
®
Programming method, you may
find a code that turns a device off but not back on.
If this happens…
• The correct code has not been found as you
may you may have a code that operates
some but not all of the functions of your
device. Continue pressing [S] until your
device turns back on.
OR
• You may have gone past the correct matching
code. Try pressing [T] one
press at a time
until you find a code that turns your device
back on.
5. When using the Point and Press® Programming
method, you can also program your remote using
the following buttons:
-
[VOL S] – to “go forward” through the codes
using the “VOL S” function on your devices.
• [VOL T] – to “go back” through the codes
using the “VOL T“ function on your devices.
Note: When you find the correct code, the
volume of the device being programmed will
increase or decrease.
• [CH S] - to “go forward” through the codes
using the “CH S” function on your devices.
• [CH T] - to “go back” through the codes using
the “CH T“ function on your devices.
Note: When you find the correct code, the
channel of the device being programmed will
increase or decrease.
• [XX] - to “go forward” through the codes
using the “Fast Forward” function on your
devices.
• [WW] - to “go back” through the codes using
the “Rewind” function on your devices.
Note: When you find the correct code, the
fast-forward or rewind function of the device
being programmed will be performed. To
simplify programming using these buttons,
insert a VHS tape or DVD in the device being
programmed.
Warning: Changes or modifications to this remote
control not expressly approved for by Contec
Holdings could void the user's authority to operate this
equipment.
Rev. 05/06
© 2006, Contec Holdings, LLC
Point and Press
®
and Memory Guard
®
are registered
trademarks of Contec Holdings, LLC
MOTOROLA and the stylized M logo are registered in
the U.S. Patent and Trademark office
TV Setup Codes
Admiral
Advent
Adventura
Aiwa
Akai
Amark
Amstrad
Anam
AOC
APEX
Astar
Audiovox
Belcor
Bell & Howell
Broksonic
Brokwood
Candle
Centurion
026 054 211 213
072 094 425 447 463
047
214 471
053 462 473
023 215
157
217 218 219 220 221
222 223
053 073 095 108
030 038 427
462
220 191 168 051 451
465
073
211 213
165 167
073
068 091
095 107 108
Citizen 068 091 211 213 233
Concerto 073 095
Contec 147
Coronado 023
Craig 223
Crown 023
Curtis Mathes 016 054 107 108 211
213
Daewoo 051 068 073 095 158
159 189 191 194 196
197 198 200 202 204
205 206 207 209
Daytron 073 095 107 108
Dell 448 094 072 463
Dumont 073
Electro Home 073 095
Elektra 353
Emerson 016 023 053 064 103
139 158 159 164 165
166 167 168 169 392
400 401 402 408 415
Envision 073 095
ESA 454 456
Fisher 355 356
Funai 047 048 157 168 211
Fujitsu 460 469
Gateway 426

GE 015 018 042 044 049
054 055 068 073 090
095 101 102 103 389
390 396 403 406 407
092
Gibralta 023 048 053 068 073
090 095 107 108 233
360
Goldstar (LG) 023 053 068 073 090
107 108 233 360 361
Gradiente 104
Grundig 233
Go Video 443
Hall Mark 073 095
Hitachi 023 068 095 096 097
098 099 100
Hyundai 453
Inkel 364
Insignia 450 461 456
JC Penney 039 053 068 073 092
095 102 355
Jensen 062
JVC 104 105 106 396 397
410
Kawasho 073 095
KMC 023
KTV 023 053 233 366
Konka 445 168
Kosch 462
Kurazai 211 213
LG (Goldstar) 023 053 068 073 090
107 108 233 360 361
Lodgenet 211 213
Logik 211 213
Luxman 068 073 095
LXI 024 026 157 345 355
388
Mag 459
Magnavox (Philips) 023 068 071 072 073
089 090 091 092 093
094 134 385 387 397
404 419 463 472
Majestic 211 213
Marantz 053 107 108 109
Megatron 215
Memorex 090 211 213 355 388
405 423
Mintek 470
MGA / Mitsubishi 053 068 073 090 095
107 109 110 216 384
394 395 398 399 417
108
Montgomery Ward 022 023 026 053 071
072 108 211 213
NEC 028 068 090 108 200
464
Net TV 426
Norcent 455 472
Orion 019 159 160 161 162
163 382
Panasonic 042 043 044 045 046
429
Philco 023 053 068 071 072
091 463
Magnavox (Philips) 023 068 071 072 073
089 090 091 092 093
094 134 385 387 397
404 419 463 472
Pilot 073 094 233
Pioneer 111 144 383
Planar 474
Polaroid 384 394
Portland 023 068
ProScan 055 070
Prima 072
Proton 090 371 372
Protron 457 467
Proview 459
Pulsar 073
Quasar 044
Radio Shack 073
Realistic 022 166 168
RCA 042 052 053 054 055
069 070 416 068
Sampo 090 108
Samsung 015 016 017 023 031
090 107 108 134 147
151 153 386 411
Sansui 423 424
Sanyo 353 355 356 376 377
Scott 090 108 168
Sceptre 468
Sears 023 031 038 039 068
353 355 356 030
Sharp 016 022 023 024 025
026 027 028 029 393
395 409
Signature 2000 023 026 108 211 213
Sony 014 020 021 178
Soundesign 091
Squareview 157
Superscan 419
Supre-Macy 380
Sylvania 068 071 072 090 091
093 107 108 157 158
419 092 456 466
Symphonic 047 157
Tatung 044 446
Techwood 068
Teknika 023 068 072 091 168
213 463
Telerent 023 213
Tera 381
Tevion 065 414
TMK 068 090
Toshiba 030 031 038 039 423
Totevision 233
Universal 068 102
Vidtech 068
ViewSonic 428
Vizio 095 454
Wards 068 090
White Westinghouse 211 408 449 458
X30SVNAGAIII 468
XR-1000 213
Yamaha 068
York 090 108
Zenith 047 048 049 050 051
391 405 406 434
VCR Setup Codes
Admiral 066 075
Aiwa 132
Akai 269 275 336 351 352
354
Audio Dynamics 243 291
Bell & Howell 238 357
Broksonic 333 337 358 359
Canon 086 362
Citizen 033 172 247 331
Colortyme 291
Craig 172 363
Curtis Mathes 086 112 247 291
Daewoo 033 343 344 345 346
347 342

Daytron 345 365
DBX 243 291
Dynatech 132
Emerson 033 086 132 326 327
331 332 333 334 335
336 337 338 339 340
341 342
Fisher 035 081 357 363 238
Funai 132
GE 086 172 174 170
Go Video 348 349 350 331
Goldstar (LG) 247 331
Harman Kardon 291
Hitachi 078 132
Instant Replay 086
JC Penney 078 086 172 238 291
JCL 086
JVC 120 128 243 247 250
253 238
Kenwood 120 132 238 243 247
LG (Goldstar) 247 331
Lloyd 132
Logik 367
LXI 132 331
Magnavox (Philips) 086 132 183
Marantz 086 172 183 238 247
291
Marta 331
Matsui 368
Memorex 132 238 331 363 369
370
Mitsubishi 255 258
MTC 132 172
Montgomery Ward 066 170 173 373
Multi Tech 132 172 367
NEC 120 238 243 291 374
375
Orion 322 326 327 328 329
330
Panasonic 112 117 430 086
Pentax 078
Philco 086 132 183
Philips (Magnavox) 086 132 183
Pioneer 078 120 263
Portland 345
ProScan 170 174
Quartz 238 378
Quasar 112
RCA 078 132 141 170 172
173 174 086
Realistic 066 132 238 363
Samsung 269 271 275 276 278
Sansui 120 367 379
Sanyo 238 346 357 363
Scott 033 332 367
Sears 035 078 238 331 363
Sharp 066 075
Shintom 367
Signature 2000 066 170 173 373
Sony 056 058 060
Soundesign 132
Sylvania 086 132 141 183 184
322 324 420
Symphonic 132
Tandy 132 238
Tashiko 331
Tatung 243
Teac 132 243
Technics 086
Teknika 132 331 359
Thomas 132
TMK 338
Toshiba 033 035 078 081
Totevision 172 331
Unitech 172
Vector Research 291
Video Concepts 132 291
Wards 066 132 172 247 331
XR-1000 367
Yamaha 132 243 291 238
Zenith 058 120 122 128 132
435
DVD Setup Codes
Aiwa 495
Apex Digital 193 227 489
Axion 491
B144 146
Cyberhome 490 496 498
Daewoo 494
Denon 201 203
DVD-Video 199 484
ECA 156
GE 150 152 156 175
Goldstar (LG) 129 133 135 179 260
Go-Video 129 486
Gradiente 212 234
Harmon Kardon 256 259
Hitachi 149
JVC 177 179
JVC-RMSDR013J
Kenwood 228
KLH 248 252
LG (Goldstar) 129 133 135 179 260
Liteon 499 500
Magnavox /
Philips
Marantz 270
Mintek 432
Mitsubishi 181 185
Multimedia
Gateway
NAD 246
Onkyo 085 244
Panasonic 115 118 121 124 431
Philips /
Magnavox
Pioneer 125 187 188
Polaroid 497
Proceed 236
Protron DVDVideo
Replay TV 422
Samsung 192 224 225 487 493
Sharp 034 076 077 079
Sony 040 059 061 436 479
480 481
Sylvania 421 484
Thomson 156 237
TiVo 418
Toshiba 082 085 087 113
Yamaha 121 124 210
Yamakawa 485
Zenith 129 133 135 483
Audio Setup Codes
CD Players
ADC 318
Akai 249 261
475 476 477 478
138 143 146 484
482
138 143 146 484
488

Aiwa 176
Carver 176 155
Crown 154
Denon 273
Fisher 230 274
Goldstar (LG) 308
Harman Kardon 315
JVC 297
Kenwood 131 176 274 289 299
Krol 176
LG (Goldstar) 308
Magnavox (Philips) 037 084 119 296
Mission 176
Mitsubishi 245 249
NAD 182 231 290
Nakamichi 264 319
NEC 235
NSM 176
Onkyo 300
Panasonic 184 266 437
Philips (Magnavox) 037 084 119 296 433
Pioneer 116 127
Quasar 184
Radio Shack 186 190 266 279 289
RCA 295 037 119
Sanyo 230 309
SAE 176
Scott 186
Sharp 288 289
Sony 067 292 293
Soundesign 148 242 311 320
STS 318
Sylvania 084
Teac 186
Technics 184 208 317
Toshiba 290
Yamaha 280
Receivers / Amplifiers
Adcom 325
Aiwa 301
Akai 142
Bose 302 440
Carver 155 180
Denon 262 307
Everquest 136
Fisher 063 180
Fosgate Audionics 305
Goldstar (LG) 036
Harman Kardon 130 257 305 306
Hitachi 240
Jensen 140
JVC 114 241
Kenwood 063 277 444
LG (Goldstar) 036
Luxman 281
Magnavox 080 463
Marantz 282 283 284 285
NAD 286
Onkyo 126 171 304
Optimus 142 229 321
Panasonic 032 074 438 441
Parasound 323
Philips (Magnavox) 080
Pioneer 123 137 251 298
Quasar 032
Radio Shack 229 267
RCA 439
Realistic 226 268
Rotel 310
Samsung DVD /
Reciever
Sansui 283
Sanyo 195
Scientific Atlanta 312
Scott 272
Sharp 294
Sherwood 229 267
Sony 041 057 232 287 442
Soundesign 083 088 239 265
SSI 313
Taekwang 142
Teac 314 316
Technics 032
Wards 063
Victor 114 241
Yamaha 145 254 303
Zenith 036 083 088 239 265
492

l
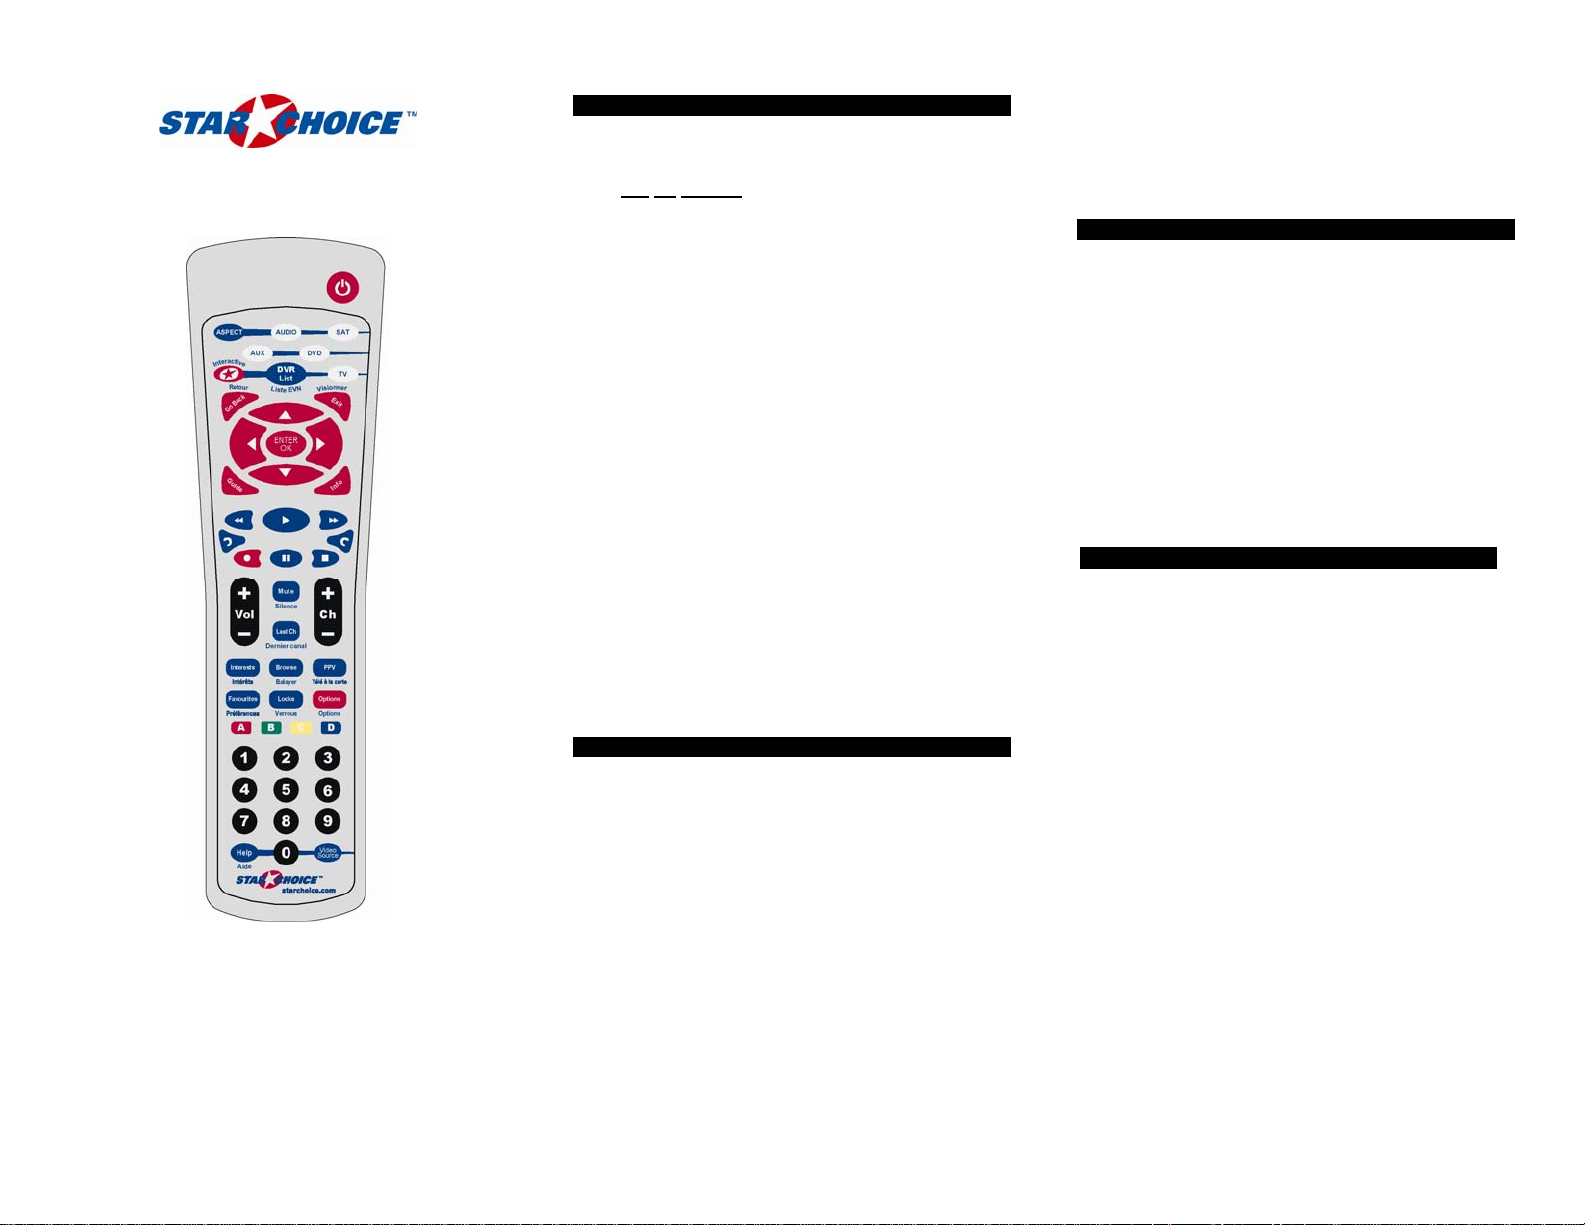
Select Mode of remote. Press …
[SAT] - for Satellite mode
[AUDIO] - for Audio mode
[AUX] - for Auxiliary mode
Changes viewing aspect on TV screen
Interactive TV applications
Return to previous screen
[TV] - for TV mode
[DVD] - for DVD mode
(model URC550 only)
Highlight (S,T,W,X)menu screen items,
Navigate listings in Browse banner
Display Interactive Programming
Guide, Press again to remove
Skips recording back in 10-second (default)
intervals (model URC 550 only)
Satellite, VCR, DVD, Audio transport
Increase or decrease volume
Display Interests menu, exit any menu
In guide mode, cycles through favorite
channel listings, with All Channels as
default. While watching TV, steps Up
through pre-set favorite channels listing as
functions
Mutes volume
selected in guide mode
Enter channel # - 3 digits
Display help screens, press again to
remove
15. Using Your IRC 550 / URC 550 Remote Contro
Power for selected device
Displays list of recorded programs
(model URC550 only)
Exit any menu, display program
information
Select highlighted item
Display detailed program information
In guide mode, advances forward in 6hour increments.
Skips recording forward in 30-second
(default) intervals. In guide mode,
advances guide forward in 24-hour
intervals (model URC550 only)
Increase or decrease channel
Returns to last channel viewed
Display pay-per-view programming
Display current program title at
bottom of screen
Display Options menu, exit any menu
Displays parental control menu
Interactive TV applications
Input source to SAT receiver or TV
 Loading...